 — Mode d'emploi PDF")
TERASTATION LIVE - Network Attached Storage (NAS) BUFFALO - Free user manual and instructions
Find the device manual for free TERASTATION LIVE BUFFALO in PDF.
| Product Type | Network Attached Storage (NAS) |
| Brand | Buffalo |
| Model | TeraStation Live |
| Dimensions | 170 x 235 x 310 mm |
| Weight | ~7 kg |
| Power Supply | 220-240 V AC, ~17 W |
| LAN Standards | IEEE 802.3u 100BASE-TX, IEEE 802.3 10BASE-T |
| Network Interface | RJ-45 |
| USB Ports | 2 x USB 2.0 (type A) |
| USB Speed | Up to 480 Mbit/s (HS) |
| Operating Temperature | 5 to 35 °C |
| Operating Humidity | 20 to 80% (non-condensing) |
| Package Contents | TeraStation Live, Ethernet cable, power cable, TeraNavigator CD, quick installation guide, warranty card |
| Main Functions | File sharing on the network, access via T drive (Windows) or shared folder (Mac), web configuration interface, NAS Navigator utility |
| Security | Identification by username and password (default: admin/password) |
| Maintenance and Cleaning | Keep the device in a dry and well-ventilated environment; do not use abrasive products |
| Spare Parts and Repairability | Contact Buffalo technical support for any assistance |
| General Information | Certified FCC Class B; compliance with environmental standards |
Frequently Asked Questions - TERASTATION LIVE BUFFALO
User questions about TERASTATION LIVE BUFFALO
0 question about this device. Answer the ones you know or ask your own.
Ask a new question about this device
Download the instructions for your Network Attached Storage (NAS) in PDF format for free! Find your manual TERASTATION LIVE - BUFFALO and take your electronic device back in hand. On this page are published all the documents necessary for the use of your device. TERASTATION LIVE by BUFFALO.
USER MANUAL TERASTATION LIVE BUFFALO
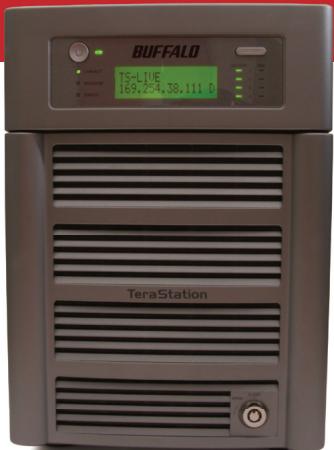
Step I: Connect your Cables
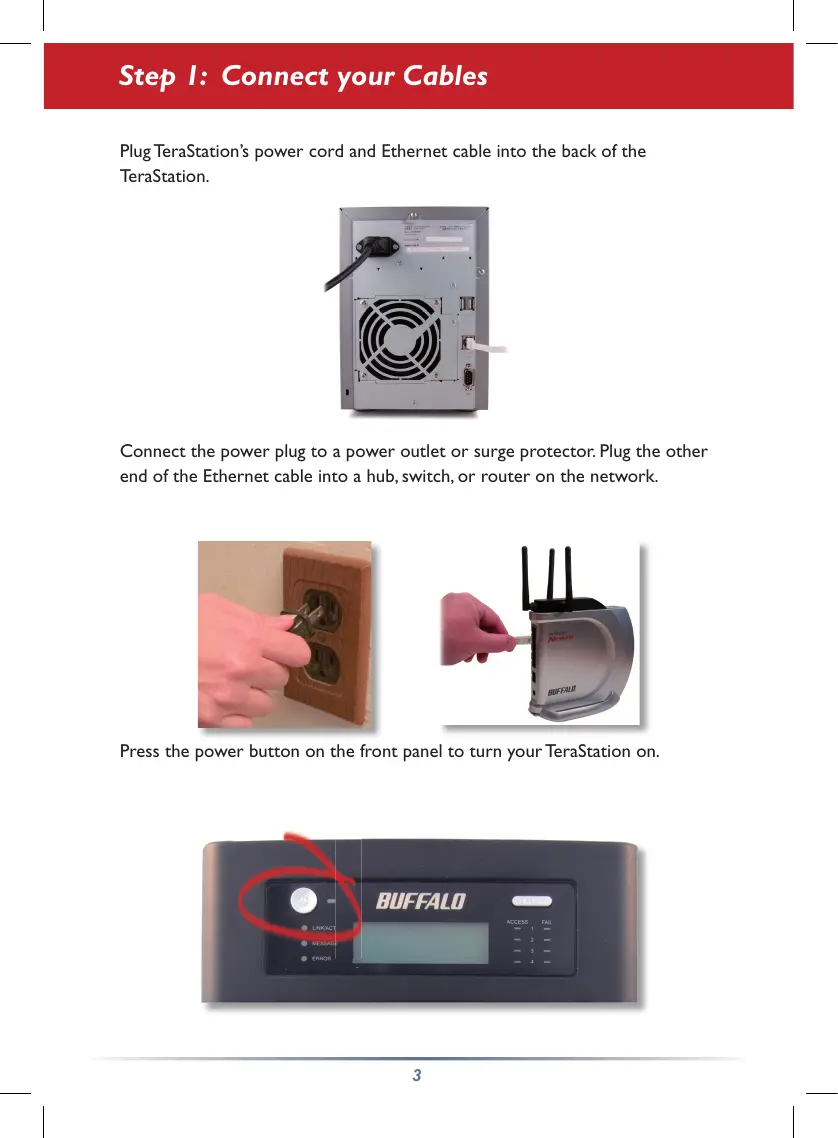
Plug TeraStation's power cord and Ethernet cable into the back of the TeraStation.
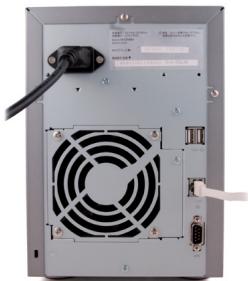
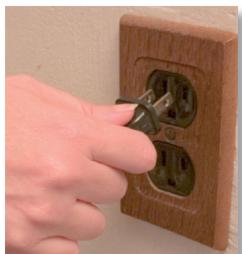
Connect the power plug to a power outlet or surge protector. Plug the other end of the Ethernet cable into a hub, switch, or router on the network.
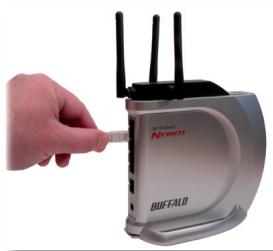
Press the power button on the front panel to turn your TeraStation on.
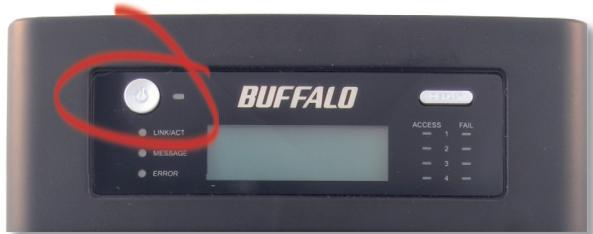
Step 2: Check your Connection
Check the LINK/ACT LED on the front of the TeraStation. If it's lit, then your TeraStation is connected to your network. Please turn to page 5 to continue setup.
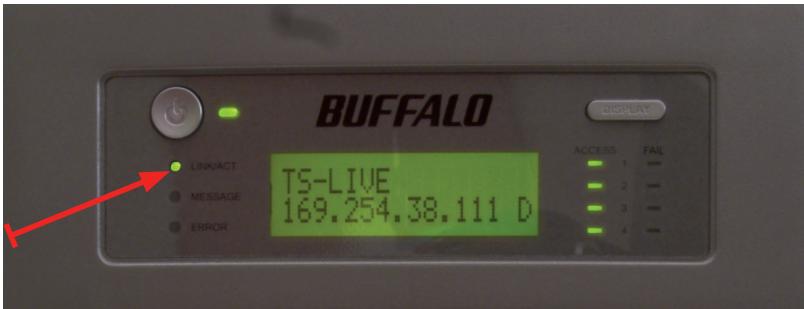
If the LINK/ACT LED on the front of TeraStation is not lit, your TeraStation is not properly connected to your network. Make sure that:
- both TeraStation and the hub, switch, or PC are powered on.
- the Ethernet cable is securely fastened to both devices.
- the Ethernet cable is not damaged. To verify, try using another Ethernet cable.
If problems persist, contact our technical support.
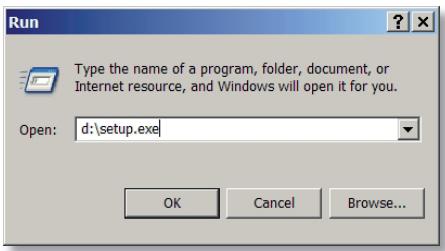
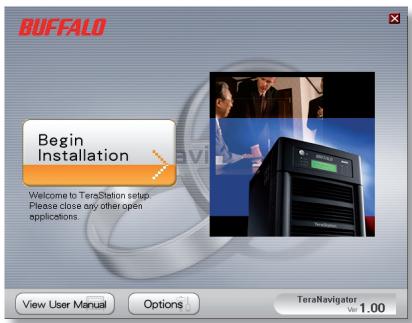
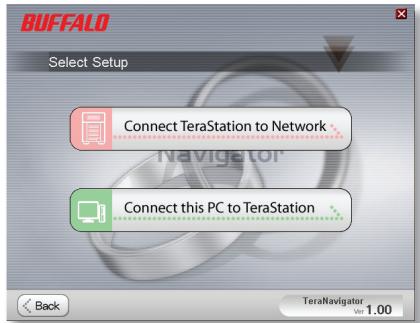
Step 3: Installing Software
Insert the TeraNavigator CD into your computer's CD-ROM drive. If Setup doesn't launch automatically, you can launch it manually by clicking Start, then Run.... When the Run dialog opens, type d:\setup.exe (where "d" is the drive letter of your CD-ROM). Press OK to
continue. If you are installing the software on a Mac, open the CD and click on the TeraNavigator icon to begin installation.
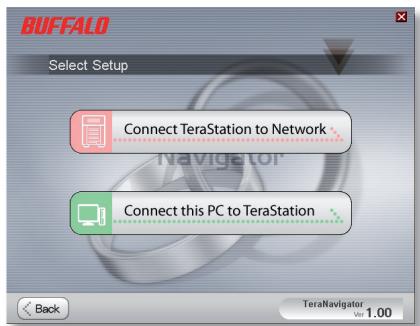
If you're installing on a Mac, skip to the next page.
If you're installing on a PC, click on Connect this PC to TeraStation (the green, lower button).
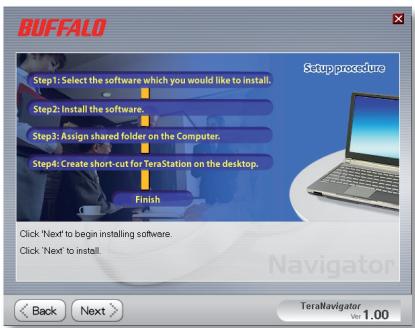
Click Next to step through the installation.
Click on Begin Installation.
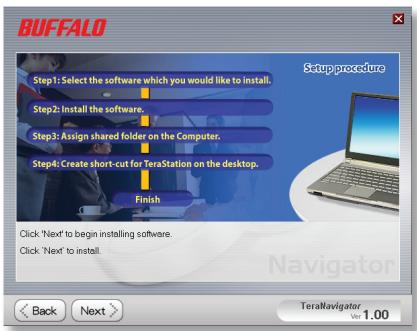
Step 3: Installing Software (cont'd)
Continue pressing Next to step through the installation.
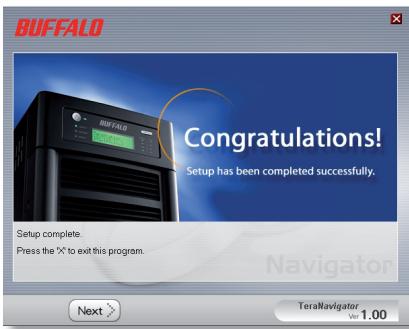
When installation is complete, you may close the installation window.
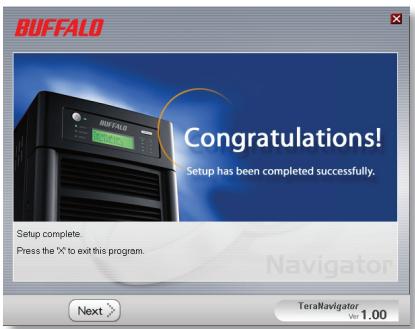
Congratulations! Your TeraStation is ready to use.
Please see the TeraStation User Manual on your TeraStation CD for more help and configuration options.
Using your TeraStation with a Windows PC
If you're using a Windows PC, two new icons will be on your desktop: Shortcut for your TS-Live and Buffalo NAS Navigator.
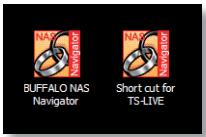
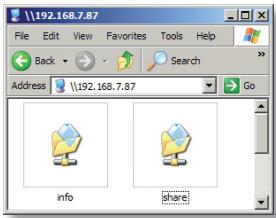
The TS-Live shortcut will open the folders on your TeraStation.
Share is the main folder that you can put files and folders in. Info contains a copy of your user manual.
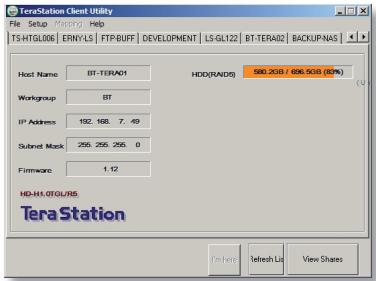
The Buffalo NAS Navigator icon opens the TeraStation's client utility. This lets you easily view system information for your TeraStation(s). If you click Setup and choose Configuration Settings, it will take you to the settings configuration GUI, where you may change your TeraStation's settings. Until you change it, the default username is "admin" and the password is "password". Consult your user manual for more information on the Buffalo NAS Navigator and the Settings Configuration GUI.
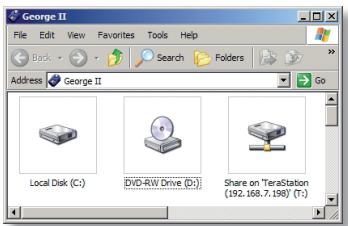
Another way to access folders and data on your TeraStation is through the mapped driveletter 'T'. When the installation program ran, it added your TeraStation's main "share" folder to your "My Computer" folder as drive 'T'. Use this virtual hard drive like any other hard drive on your computer. You may add additional shares and
mapped drive letters to your TeraStation and PC; consult your user manual for more information.
Using your TeraStation with a Mac
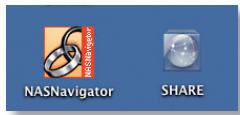
After installing the TeraNavigator software, your Mac will have two new icons on the desktop.
The Share folder is the main folder that you can put files and folders in. NAS Navigator is the TeraStation's client utility.
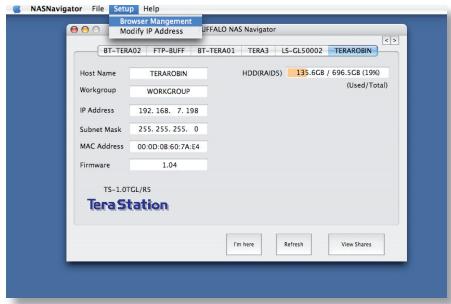
Clicking NAS Navigator opens the TeraStation's client utility. This lets you easily view system information for your TeraStation(s). If you click Setup and choose Browser Management, it will take you to the settings configuration GUI, where you may change your TeraStation's settings. Until
you change it, the GUI's username is "admin" and the password is "password". Consult your user manual for more information on the Buffalo NAS Navigator and the Settings Configuration GUI.
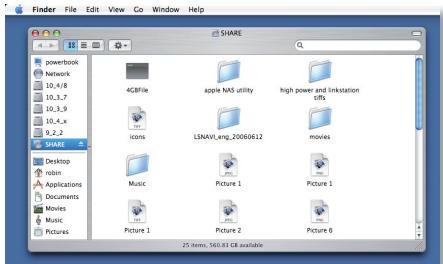
Clicking Share opens the main folder on the TeraStation. You may add additional shares to your TeraStation; consult your user manual for more information.
Firmware Language - The default language for the web interface is English. This can be changed on both PC & Mac by selecting the Basic screen, and then choosing your desired language from the Display Language drop down. You will also need to select the corresponding Windows Client Language. Click on Apply to implement your changes. You must log out and log in again to view your changes.
Technical Specifications
| LAN Standards: | IEEE 802.3u 100BASE-TX; IEEE 802.3 10BASE-T |
| Transmission: | 1000/100Mbps/10 Mbps, 1000BASE-T: 8B1Q4, PAM5, X 4B/5B, MLT-3; 10BASE-T Manchester Code |
| Access Media: | CSMA/CD |
| Media Interface: | RJ-45 |
| USB Standard: | USB 2.0Hi-Speed (HS)Full-Speed (FS)Low-Speed (LS) |
| USB Connector: | USB A Connector (2) |
| Data Transmission Speed: | Max: 480 Mbps (HS Mode)Max: 12 Mbps (FS Mode) |
| Electric Current: | 220-240V A/C |
| Power Consumption: | ~17W (Varies based on size) |
| Dimensions: | 170 x 235 x 310 mm |
| Weight: | ~7Kg. (Weight varies based on size) |
| Operating Temperature: | 5-35°C; 20-80% non-condensing |
Technical Support
Buffalo Technology offers free technical support. See the back page of this quick start guide for contact information. Please also visit the web site at: http://www.buffalo-technology.com.
FCC Warning
This device complies with part 15 of the FCC Rules. Operation is subject to the following two conditions: (1) This device may not cause harmful interference, and (2) this device must accept any interference received, including interference that may cause undesired operation.
CE Mark Warning
This is a Class B product. In a domestic environment, this product may cause radio interference, in which case the user may be required to take adequate measures.
Environmental Information
- The equipment that you have purchased has required the extraction and use of natural resources for its production.
- The equipment may contain hazardous substances that could impact health and the environment.
- In order to avoid the dissemination of those substances in our environment and to diminish the pressure on the natural resources, we encourage you to use the appropriate take-back systems.
- The take-back systems will reuse or recycle most of the materials of your end life equipment in a sound way.
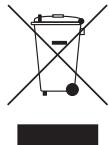
- The crossed-out wheeled bin symbol invites you to use those systems.
- If you need more information on the collection, reuse and recycling systems please contact your local or regional waste administration.
BUFFALO ™
http://www.buffalo-technology.com
Address:
Buffalo Technology UK LTD
176, Buckingham Avenue,
Slough, Berkshire, SL1 4RD
United Kingdom
General Inquiries:
sales@buffalo-technology.com
Technical Support:
Helpdesk Hours
Monday-Thursday
9:00 AM - 6:00 PM
Phone
Friday
9:00 AM - 4:30 PM
Phone (UK only)
+353 61 70 80 50
08712501260
Web
helpdesk@buffalo-technology.ie
www.buffalo-technology.com
TeraStation Live

BUFFALO ™
Packungsinhalt:
Buffalo Technology UK LTD
176, Buckingham Avenue, Slough, Berkshire, SL1 4RD
United Kingdom
Monday-Thursday 9:00AM-6:00PM
Friday 9:00 AM - 4:30 PM
Telefon
+353 61 70 80 50
Assistance technique
Buffalo Technology UK LTD
176, Buckingham Avenue,
Slough, Berkshire, SL1 4RD
Royaume-Uni
Assistance technique :
Heures de bureau
Fare cli scu Begin Installation (Avvia installment).
Fase 3: installment del software (continua)
Buffalo Technology UK LTD
176, Buckingham Avenue, Slough, Berkshire, SL1 4RD
Regno Unito
Buffalo Technology UK LTD
176, Buckingham Avenue, Slough, Berkshire, SL1 4RD
Reino Unido
Buffalo Technology UK LTD
176, Buckingham Avenue, Slough, Berkshire, SL1 4RD
Reino Unido
Consultas Gerais:
Correio electrónico
sales@buffalo-technology.com
Suporte Técnico:
Helpdesk
Segunda-Quinta 9H00-18H00
Sexta
9H00-16H30
Telephone
+35361708050
Telephone (Só RU)
08712501260
Correio electrónico
helpdesk@buffalo-technology.ie

Inhoud verpakking:
- TeraStation Live
- Ethernet-kabel
- Voedingskabel
Installatie-cd TeraNavigator - Beknopte installmentgids
- Garantiekaart
Buffalo Technology UK LTD
176, Buckingham Avenue,
Slough, Berkshire, SL1 4RD
Groot-Brittanniè
Algemene vragen:
sales@buffalo-technology.com
Technische ondersteuning:
Steg 3: Installera programmet (forts.)
Buffalo Technology UK LTD
176, Buckingham Avenue,
Slough, Berkshire, SL1 4RD
United Kingdom
Allmanna fragor:
E-post
sales@buffalo-technology.com
Teknisk support:
Helpdeskens oppettider
mandag - torsdag 9:00 - 18:00
fredag 9:00-16:30
Telefon
+35361708050
Telefon (endast Storbritannien)
08712501260
E-post
helpdesk@buffalo-technology.ie
Buffalo NAS Navigator-ikonet Åpner
Buffalo Technology UK LTD
176, Buckingham Avenue,
Slough, Berkshire, SL1 4RD
Storbritannia
Trin 3: Installation of software
Trin 3: Installation of software (fortsat)
Fortsaet med at klikke pa Next (Næste) for at gå gennem installationen trin for trin.
Buffalo Technology UK LTD
176, Buckingham Avenue,
Slough, Berkshire, SL1 4RD
United Kingdom
Generelle sporgsmål:
sales@buffalo-technology.com
Teknisk support:
Abningstider i helpdesk
Buffalo Technology UK LTD
176, Buckingham Avenue, Slough, Berkshire, SL1 4RD
United Kingdom
Yleiset kyselyt:
Sahköpostiosoite
sales@buffalo-technology.com
Tekninen tuki:
- Step I: Connect your Cables
- Step 2: Check your Connection
- Step 3: Installing Software
- Step 3: Installing Software (cont'd)
- Using your TeraStation with a Windows PC
- Using your TeraStation with a Mac
- Technical Specifications
- Technical Support
- FCC Warning
- CE Mark Warning
- Environmental Information
- BUFFALO ™
- Address:
- General Inquiries:
- Technical Support:
- Packungsinhalt:
- Assistance technique
- Assistance technique :
- Fase 3: installment del software (continua)
- Consultas Gerais:
- Suporte Técnico:
- Inhoud verpakking:
- Algemene vragen:
- Technische ondersteuning:
- Steg 3: Installera programmet (forts.)
- Allmanna fragor:
- Teknisk support:
- Buffalo NAS Navigator-ikonet Åpner
- Trin 3: Installation of software
- Trin 3: Installation of software (fortsat)
- Generelle sporgsmål:
- Yleiset kyselyt:
- Tekninen tuki:
Brand : BUFFALO
Model : TERASTATION LIVE
Category : Network Attached Storage (NAS)