
PHOTOSMART E317 - Digital Camera COMPAQ - Free user manual and instructions
Find the device manual for free PHOTOSMART E317 COMPAQ in PDF.
| Product type | Digital camera |
| Brand | COMPAQ (HP) |
| Model | PHOTOSMART E317 |
| Power supply | 2 AA batteries (alkaline, lithium, NiMH) |
| Battery life (alkaline batteries) | 80 to 130 shots |
| Battery life (lithium batteries) | 260 to 490 shots |
| Battery life (rechargeable NiMH batteries) | 110 to 280 shots |
| Internal memory | Yes (unspecified) |
| Memory card support | SD card (optional) |
| Display | Yes (unspecified) |
| Lens | Integrated with sliding cover |
| Video recording | Yes (video clips) |
| Connection | USB (cable included) |
| Included software | HP Image Zone |
| Compatible operating system | Windows 2000/XP/98/98 SE/Me, Mac OS X v10.2+ |
| Available languages | Multilingual (including French) |
| Special functions | 5 shooting modes, direct printing, built-in help |
| Included accessories | CD-ROM, USB cable, strap, starter batteries |
| Recycling | WEEE compliant (do not throw in household waste) |
Frequently Asked Questions - PHOTOSMART E317 COMPAQ
User questions about PHOTOSMART E317 COMPAQ
0 question about this device. Answer the ones you know or ask your own.
Ask a new question about this device
Download the instructions for your Digital Camera in PDF format for free! Find your manual PHOTOSMART E317 - COMPAQ and take your electronic device back in hand. On this page are published all the documents necessary for the use of your device. PHOTOSMART E317 by COMPAQ.
USER MANUAL PHOTOSMART E317 COMPAQ
< Jackie_QSG_e.ok.fm Page 2 Tuesday, March 29, 2005 1:22 PM


Legal Notices
© Copyright 2005 Hewlett-Packard Development Company, L.P.
The information contained herein is subject to change without notice. The only warranties for HP products and services are set forth in the express warranty statements accompanying such products and services. Nothing herein should be construed as constituting an additional warranty. HP shall not be liable for technical or editorial errors or omissions contained herein.
Windows® is a U.S. registered trademark of Microsoft Corporation.

SD logo is a trademark of its proprietor.
Important recycling information for our customers in the European Union: To preserve the environment, this product must be recycled after its useful life as required by law. The symbol below indicates that this product may not be disposed in the general trash. Please return the product for proper recovery/ disposal to the authorized collection location nearest to you. For more information regarding return and recycling of HP products generally, please visit:
www.hp.com/hpinfo/globalcitizenship/environment/recycle/index.html

For future reference, please enter the following information:
Model Number (on the front of the camera)
Serial Number (10-digit number on the bottom of the camera)
Date the camera was purchased
Printed in China
2
HP Photosmart E217/E317 Quick Start Guide


Lee_Jackie_QSG_e.ok.fm Page 3 Tuesday, March 29, 2005 1:22 PM


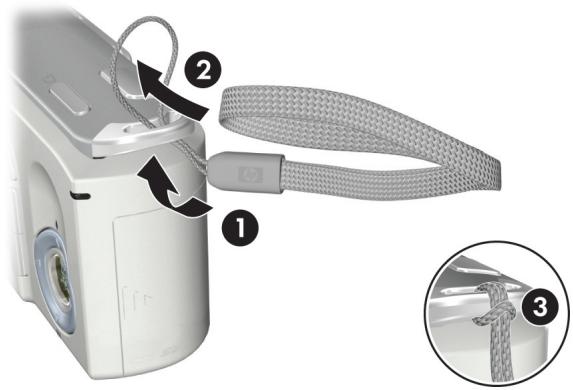
1. Attach the Wrist Strap

ennnn
Attach the wrist strap to the wrist strap mount on the side of the camera as shown.


3


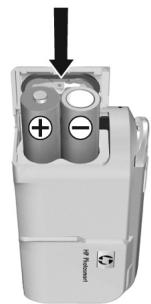
2. Install the Batteries

- Open the Battery/Memory card door on the side of the camera by sliding the door toward the front of the camera.
- Insert the batteries as indicated inside the door.
- Close the Battery/Memory card door by pushing the door down and sliding the door toward the back of the camera until the door latches.
You can expect performance similar to the following from the different types of AA batteries that work in your camera:
Alkaline (Starter Batteries) 80 to 130 shots
Lithium 260 to 490 shots NiMH (1800) 110 to 280 shots
If you use NiMH (rechargeable) batteries, be sure that you fully charge them before using them in the camera.


Lee_Jackie_QSG_e.ok.fm Page 5 Tuesday, March 29, 2005 1:22 PM


3. Turn On the Camera

ennnn
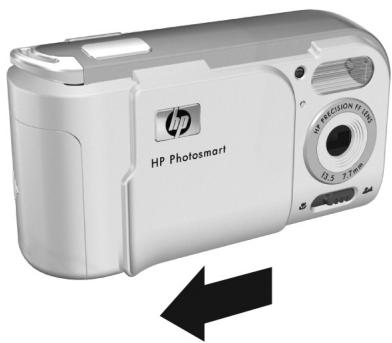
To turn the camera on, slide the lens cover open until it clicks, uncovering the lens. The Power/Memory light on the back of the camera turns on solid green. The HP logo also displays on the Image Display as the camera powers up.
CAUTION: When sliding the lens cover, keep your fingers clear of the lens. Fingerprints on the lens can impair the quality of the picture.

5

4. Choose the Language
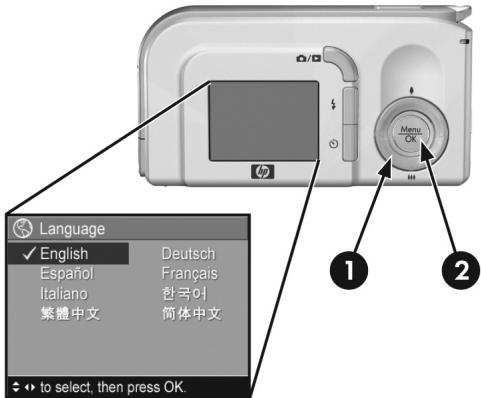
The first time you turn the camera on, you are prompted to choose a language.
- Scroll to the language that you want by using the
buttons on the Controller - Press the Menu OK button to select the highlighted language.


Lee_Jackie_QSG_e.ok.fm Page 7 Tuesday, March 29, 2005 1:22 PM


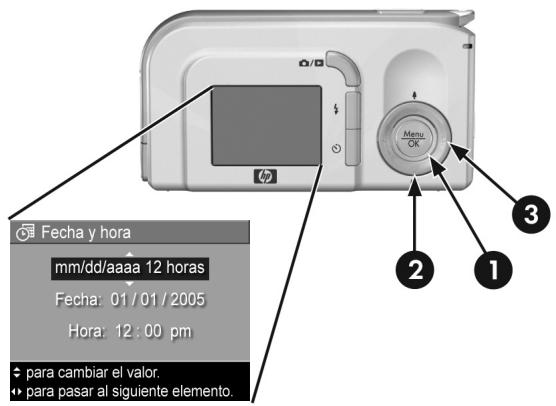
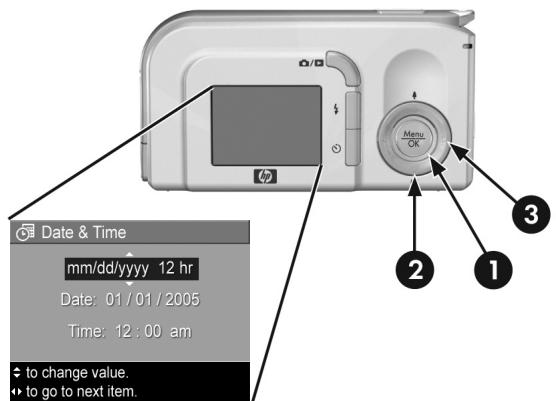
5. Set the Date and Time

ennnn
You are now prompted to set the date and time.
- The first item highlighted is the date and time format. If you want to change the date and time format, use the buttons. If the date and time format is correct, press the button to move to the Date.
- Adjust the value of the highlighted selection by using the buttons.
- Press the buttons to move to the other selections.
- Repeat Steps 2 and 3 until the date and time are set correctly.
- Press the Menu button when you have entered the proper values for the date and time. A confirmation screen appears, asking if the correct date and time have been set. If the date and time are correct, press the Menu button to select Yes.
7


6. Install and Format a Memory Card (Optional)
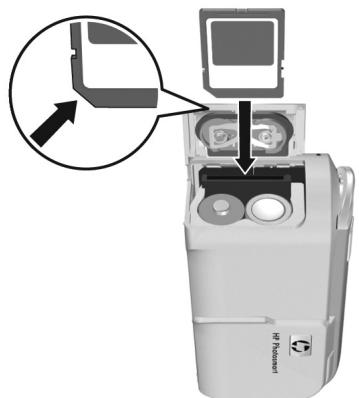
Your camera contains internal memory that allows you to store images and video clips. However, you can use a memory card (purchased separately) instead to store images and video clips.
- Turn off the camera and open the Battery/Memory card door on the side of the camera.
- Insert the memory card in the small slot behind the batteries, with the notched side of the card going in first, as shown. Make sure the memory card snaps into place.
- Close the Battery/Memory card door and turn on the camera.


Lee_Jackie_QSG_e.ok.fm Page 9 Tuesday, March 29, 2005 1:22 PM


To help prevent corrupted cards and images, you should format memory cards before you use them for the first time. To format the memory card:
- Press the Menu OK button, then use the button to move to the Playback Menu
- Press the button to highlight Delete, and then press the Menu OK button to display the Delete sub-menu.
- Use the button to highlight Format Card, and then press the Menu button to display the Format Card confirmation screen.
- Press the button to highlight Yes, and then press the Menu OK button to format the card.
Formating Card... appears in the Image Display while the camera is formatting the memory card. When the camera has completed the formatting, the Total Images Summary screen is displayed.
To remove the memory card from the camera, first turn the camera off. Then open the Battery/Memory card door, press down on the top edge of the memory card, and it will spring outward from the slot.

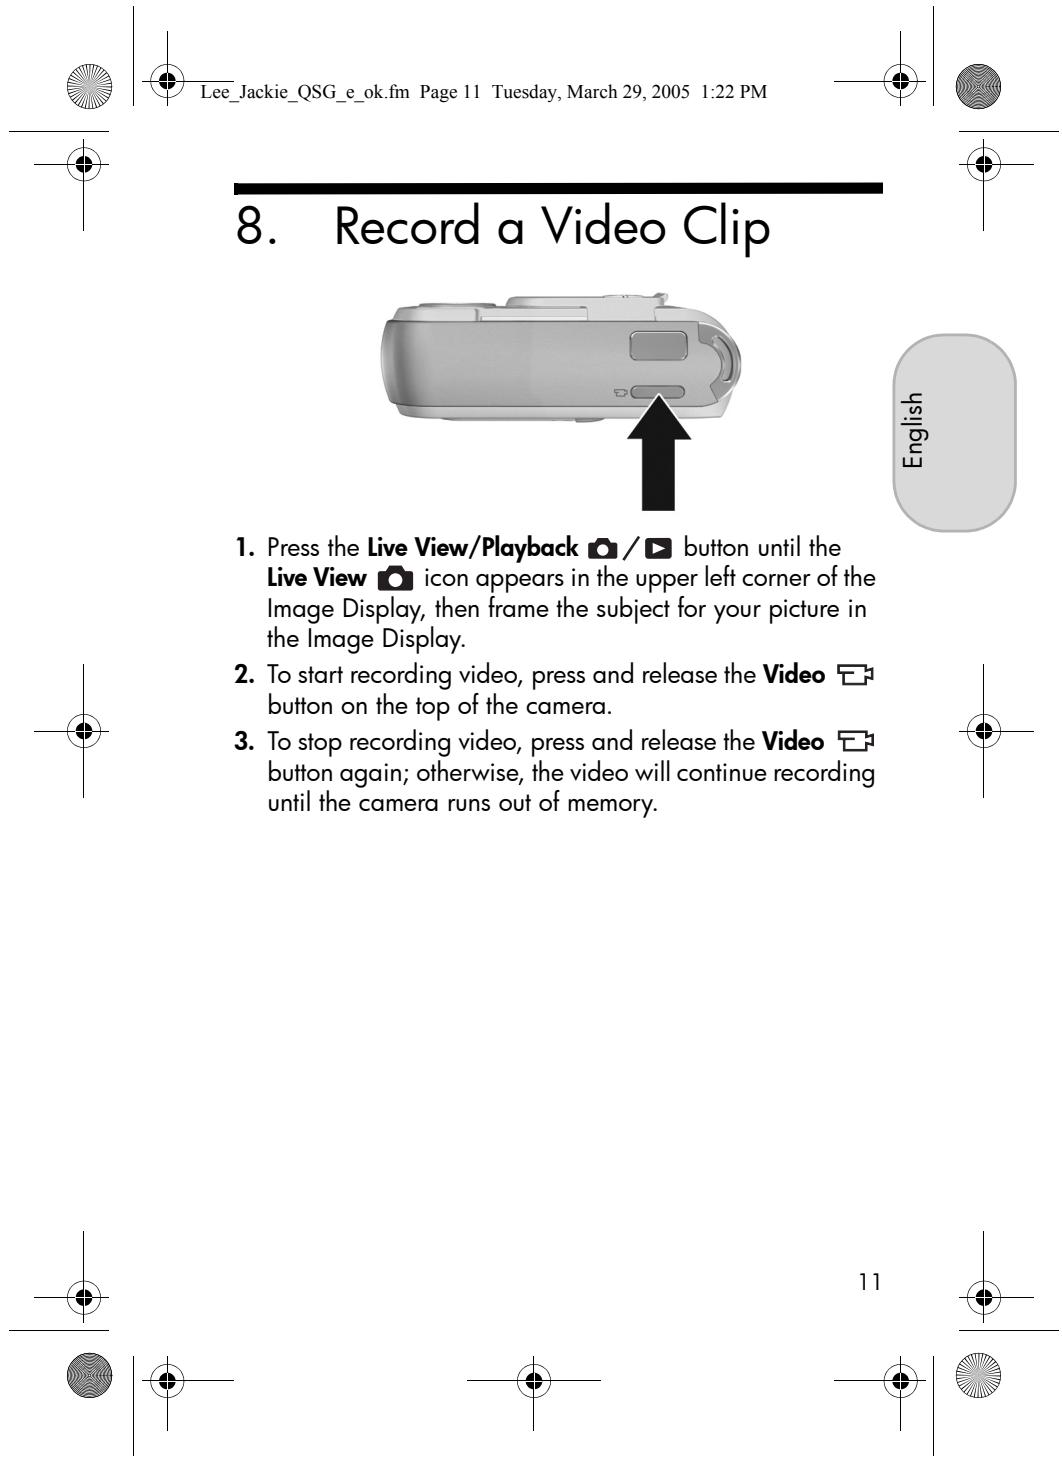
7. Take a Still Picture

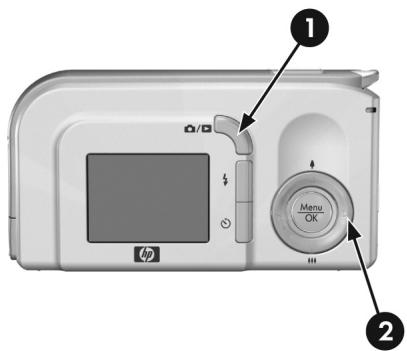
- Press the Live View/Playback button until the Live View icon appears in the upper left corner of the Image Display, then frame the subject for your picture in the Image Display.
- Press the Shutter button all the way down to take the picture. The camera beeps after taking the picture. The image appears for several seconds on the Image Display.
TIP: Hold the camera with both hands when pressing the Shutter button to reduce camera shake and prevent blurry pictures.


9. Review Images and Video Clips
You will use Playback to review images and video clips.
- Press the Live View/Playback button until the Playback icon appears in the upper left corner of the Image Display.
- Use the buttons to scroll through your images and video clips.
Video clips play automatically after the first frame of the video clip displays for 2 seconds.

Lee_Jackie_QSG_e.ok.fm Page 13 Tuesday, March 29, 2005 1:22 PM


10. Install the Software

ennnn
The HP Image Zone software allows you to transfer images from the camera, and then view, edit, print, or e-mail them.
If you have trouble installing or using the HP Image Zone software, see the HP Customer Support website for more information: www.hp.com/support.
Windows
To install the HP Image Zone software, your computer must have a minimum of 64MB of RAM, Windows 2000, XP, 98, 98 SE, or Me, and Internet Explorer 5.5 Service Pack 2 or higher. If your computer meets these requirements, the installation process installs the full version of HP Image Zone; if not, the process installs the HP Image Zone Express, which lacks some features contained in the full version.
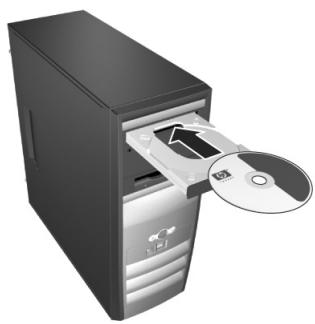
- Close all programs and temporarily disable any virus protection software running on your computer.
- Insert the HP Image Zone software CD into the CD Drive of your computer and follow the on-screen instructions. If


Lee_Jackie_QSG_e.ok.fm Page 14 Tuesday, March 29, 2005 1:22 PM


the installation window does not appear, click Start, click Run, type D:\Setup.exe, where D is the letter of your CD drive, then click OK.
3. When the HP Image Zone software has finished installing, re-enable any virus protection software that you disabled in Step 1.
Macintosh
To install the HP Image Zone software successfully, your Macintosh computer must have built-in USB, 128 MB of physical RAM, Mac OSX v10.2 or later, and 250 MB of disk space.
- Close all programs and temporarily disable any virus protection software running on your computer.
- Insert the HP Image Zone software CD into the CD drive of your computer.
- Double-click the CD icon on the computer desktop.
- Double-click the installer icon, and then follow the on-screen instructions.
- When the HP Image Zone software has finished installing, re-enable the virus protection software that you disabled in Step 1.
HP Photosmart E217/E317 Quick Start Guide


Lee_Jackie_QSG_e.ok.fm Page 15 Tuesday, March 29, 2005 1:22 PM


11. Transfer Images to a Computer

ennnnne
- Turn off the camera, then connect the camera to the computer through the USB cable provided.
- Turn on the camera.
- Follow the on-screen instructions to have the software transfer the images from the camera to the computer.
- Disconnect the camera from the computer.


Getting Assistance
View the User's Manual on CD
Your camera has many more valuable features that are covered in detail in the User's Manual. These features include 5 shooting modes, direct printing capability, on-camera Help, camera accessories, and much more. To view the User's Manual:
- Insert the HP Image Zone software CD into the CD drive of your computer.
- On Windows: Click View User's Manual on the Main page of the CD installation screen.
On Macintosh: Look in the README file in the docs folder of the HP Image Zone software CD.
Additional Assistance
- For tips and tools to help you use your camera more effectively, visit www.hp.com/photosmart.
HP online service and support is your one stop source for all product assistance, diagnostics, and driver downloads. Get award winning assistance 24x7 at www.hp.com/support. - For help with the HP Image Zone software, see the HP Image Zone online manual.
- For an interactive learning experience (in English) that will guide you through the most-used features of your camera and provide basic digital photography tips, please install and run the Interactive User's Guide program from your software CD.


Lee_Jackie_QSG_fra.fm Page 2 Tuesday, March 29, 2005 11:09 AM


Informations legales
Copyright 2005 Hewlett-Packard Development Company, L.P.
www.hp.com/hpinfo/globalcitizenship/environment/recycle/index.html

Lee_Jackie_QSG_fra.fm Page 3 Tuesday, March 29, 2005 11:09 AM


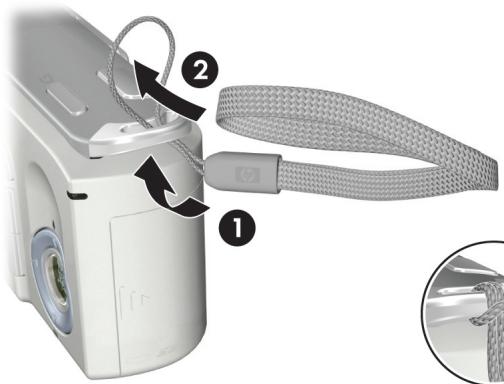
1. Fixation de la sangle
Jackie_QSG_fra.fm Page 4 Tuesday, March 29, 2005 11:09 AM


Lee_Jackie_QSG_fra.fm Page 8 Tuesday, March 29, 2005 11:09 AM


Lee_Jackie_QSG_fra.fm Page 9 Tuesday, March 29, 2005 11:09 AM


Lee_Jackie_QSG_fra.fm Page 14 Tuesday, March 29, 2005 11:09 AM


Lee_Jackie_QSG_fra.fm Page 15 Tuesday, March 29, 2005 11:09 AM


< -Jackie_QSG.fm Page 1 Tuesday, March 29, 2005 11:29 AM
HP Photosmart
E217/E317
Fotocamera digitale
Guida introductiva
Italiano

i n v e n t
1


Lee_Jackie_QSG.fm Page 2 Tuesday, March 29, 2005 11:29 AM


Note legali
Lee_Jackie_QSG.fm Page 3 Tuesday, March 29, 2005 11:29 AM

Lee_Jackie_QSG.fm Page 6 Tuesday, March 29, 2005 11:29 AM
Lee_Jackie_QSG.fm Page 7 Tuesday, March 29, 2005 11:29 AM


Lee_Jackie_QSG.fm Page 9 Tuesday, March 29, 2005 11:29 AM


Lee_Jackie_QSG.fm Page 11 Tuesday, March 29, 2005 11:29 AM


Lee_Jackie_QSG.fm Page 13 Tuesday, March 29, 2005 11:29 AM


Lee_Jackie_QSG.fm Page 14 Tuesday, March 29, 2005 11:29 AM


Lee_Jackie_QSG.fm Page 15 Tuesday, March 29, 2005 11:29 AM

Jackie_QSG.fm Page 16 Tuesday, March 29, 2005 11:29 AM


< _* Jackie_QSG.fm Page 1 Tuesday, March 29, 2005 11:13 AM
HP Photosmart
E217/E317
Digitalkamera
Kurzanleitung


i n v e n t
1


Lee_Jackie_QSG.fm Page 2 Tuesday, March 29, 2005 11:13 AM


Rechtliche Hinweise
Copyright 2005 Hewlett-Packard Development Company, L.P.
www.hp.com/hpinfo/globalcitizenship/environment/recycle/index.html

Lee_Jackie_QSG.fm Page 4 Tuesday, March 29, 2005 11:13 AM


Lee_Jackie_QSG.fm Page 5 Tuesday, March 29, 2005 11:13 AM


Lee_Jackie_QSG.fm Page 6 Tuesday, March 29, 2005 11:13 AM
Lee_Jackie_QSG.fm Page 7 Tuesday, March 29, 2005 11:13 AM


Lee_Jackie_QSG.fm Page 9 Tuesday, March 29, 2005 11:13 AM


Lee_Jackie_QSG.fm Page 10 Tuesday, March 29, 2005 11:13 AM


Lee_Jackie_QSG.fm Page 13 Tuesday, March 29, 2005 11:13 AM


Lee_Jackie_QSG.fm Page 15 Tuesday, March 29, 2005 11:13 AM


Lee_Jackie_QSG.fm Page 16 Tuesday, March 29, 2005 11:13 AM


Lee_Jackie_QSG.fm Page 17 Tuesday, March 29, 2005 11:13 AM


Unterstützung
Lee_Jackie_QSG.fm Page 2 Tuesday, March 29, 2005 10:57 AM


Avisos legales
Copyright 2005 Hewlett-Packard Development Company, L.P.
www.hp.com/hpinfo/globalcitizenship/environment/recycle/index.html

Lee_Jackie_QSG.fm Page 3 Tuesday, March 29, 2005 10:57 AM


Lee_Jackie_QSG.fm Page 5 Tuesday, March 29, 2005 10:57 AM


< -Jackie_QSG.fm Page 6 Tuesday, March 29, 2005 10:57 AM
Lee_Jackie_QSG.fm Page 7 Tuesday, March 29, 2005 10:57 AM


5. Ajuste de性和 hora
Jouds
Lee_Jackie_QSG.fm Page 9 Tuesday, March 29, 2005 10:57 AM


Lee_Jackie_QSG.fm Page 11 Tuesday, March 29, 2005 10:57 AM


Lee_Jackie_QSG.fm Page 13 Tuesday, March 29, 2005 10:57 AM


Lee_Jackie_QSG.fm Page 14 Tuesday, March 29, 2005 10:57 AM


Lee_Jackie_QSG.fm Page 15 Tuesday, March 29, 2005 10:57 AM


Lee_Jackie_QSG.fm Page 16 Tuesday, March 29, 2005 10:57 AM


Lee_Jackie_QSG.fm Page 1 Tuesday, March 29, 2005 11:44 AM
HP Photosmart
E217/E317
Câmera digital
<Lee_Jackie_QSG.fm Page 2 Tuesday, March 29, 2005 11:44 AM


Avisos legais
© Copyright 2005 Hewlett-Packard Development Company, L.P.
As informacoesquirycontidas estao sujeitas a alteracoessem aviso previo.
As unicas garantias a produits e services HP sao as descririas nas declaracoes de garantia expressa que accompanyingcada produit e serviceo. Nenhuma informacaoquirycontida podesserconsiderada comouma garantia adicularia.
AHPse isenta de responsabilitadepor erros tecnicos ou editorais ou omissoesquirycontidas.
www.hp.com/hpinfo/globalcitizenship/environment/recycle/index.html

Lee_Jackie_QSG.fm Page 3 Tuesday, March 29, 2005 11:44 AM


1. Prenda a alca
Prenda a alcaca no respectivo suporte na lateral daamera, como过剩o.


3

2. Instale as baterias
Lee_Jackie_QSG.fm Page 5 Tuesday, March 29, 2005 11:44 AM
3. Ligue a-camera
Lee_Jackie_QSG.fm Page 7 Tuesday, March 29, 2005 11:44 AM


5. Ajuste a Data e a Hora
Vocé sera Solicitar a definir a data e a hora.
Lee_Jackie_QSG.fm Page 9 Tuesday, March 29, 2005 11:44 AM


Lee_Jackie_QSG.fm Page 11 Tuesday, March 29, 2005 11:44 AM


Lee_Jackie_QSG.fm Page 13 Tuesday, March 29, 2005 11:44 AM


10. Instale o software
O software HP Image Zone permite transferir, depuis visualizar, editor, imprinter e enviar por e-mail as imagens da camera.
Lee_Jackie_QSG.fm Page 14 Tuesday, March 29, 2005 11:44 AM


Lee_Jackie_QSG.fm Page 15 Tuesday, March 29, 2005 11:44 AM


- Legal Notices
- Attach the Wrist Strap
- Install the Batteries
- Turn On the Camera
- Choose the Language
- Set the Date and Time
- Install and Format a Memory Card (Optional)
- Take a Still Picture
- Review Images and Video Clips
- Install the Software
- Windows
- Macintosh
- Transfer Images to a Computer
- Getting Assistance
- Additional Assistance
- Informations legales
- Fixation de la sangle
- HP Photosmart
- E217/E317
- Fotocamera digitale
- Guida introductiva
- Note legali
- Rechtliche Hinweise
- Unterstützung
- Avisos legales
- Ajuste de性和 hora
- Avisos legais
- Prenda a alca
- Instale as baterias
- Ligue a-camera
- Ajuste a Data e a Hora
- Instale o software
Brand : COMPAQ
Model : PHOTOSMART E317
Category : Digital Camera