
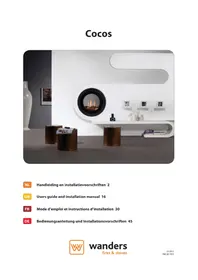
SOLEA GAS - Gas stove WANDERS - Free user manual and instructions
Find the device manual for free SOLEA GAS WANDERS in PDF.
| Product type | Gas stove |
| Brand | WANDERS |
| Model | SOLEA GAS |
| Fuel | Natural gas (G20/G25) or propane (I3P) depending on version |
| Nominal power | 7.3 kW (natural gas) / 5.0 kW (propane) |
| Gas consumption | 0.770 m³/h (natural gas) / 0.196 kg/h (propane) |
| Supply pressure | 20/25 mbar (natural gas) or 37 mbar (propane) depending on country |
| Combustion system | Closed system with concentric flue Ø80/150 mm |
| Ignition | Electronic via remote control; manual backup ignition |
| Control | Remote control with thermostat and 4-time-slot timer |
| Rotation | Swiveling possible (option) with locking |
| Finish material | Heat-resistant lacquer |
| Glass | Ceramic glass |
| Log set | 7 or 8 ceramic logs depending on gas type |
| Maintenance | External cleaning with damp cloth; annual maintenance by approved installer |
| Safety | Thermocouple, door lock, safety distances (10 cm rear, 20 cm sides, 80 cm front) |
| Warranty | 1 year |
| Remote control power supply | 9V battery (alkaline) |
| Receiver power supply | 4 LR6/AA 1.5 V batteries |
| Gas connection | G3/8" with shut-off valve |
| Minimum distance to walls | 10 cm rear, 20 cm sides, 80 cm front (glass face) |
Frequently Asked Questions - SOLEA GAS WANDERS
User questions about SOLEA GAS WANDERS
0 question about this device. Answer the ones you know or ask your own.
Ask a new question about this device
Download the instructions for your Gas stove in PDF format for free! Find your manual SOLEA GAS - WANDERS and take your electronic device back in hand. On this page are published all the documents necessary for the use of your device. SOLEA GAS by WANDERS.
USER MANUAL SOLEA GAS WANDERS
User's Guide and Installation Manual for the Solea Gas Hearth
Dear Client,
Congratulations on your new Solea gas fireplace. It will be a comfortable source of heat to enjoy for many years on end.
Your Solea fireplace is fitted with a so-called closed system double-walled flue. All flue gases are directly discharged through the inner flue. The outer pipe extracts fresh air which produces beautiful and evenly burning flames. In principle, the Solea can be installed in all kinds of spaces, even in rooms without any ventilation or with mechanical ventilation.
When designing this fireplace we took particular care of the ease of use and the operational safety. The Solea is developed and produced at our own factory in Netterden (the Netherlands) and is for the greater part handmade. Only the best materials are used for the construction and comply with current international standards. This will guarantee that your hearth has a long life.
The first part of this user's guide gives you tips and directions about how to use your gas fireplace correctly and safely. The second part of the manual contains the installation instructions and the technical specifications of the Solea. They are of particular importance to the installer.
We advise you to read this manual thoroughly before using your new gas fireplace and to keep the manual in a handy place. Your installer may need the manual for the yearly maintenance of your fireplace.
We wish you much warmth with your new fireplace!
The WANDERS team
Contents
Installation 20
Putting into operation 20
Ready for use 21
Igniting the fireplace for the first time 21
Batteries 22
Setting the remote control handset 22
Lighting the fire manually 23
Placing the ceramic lumber set 24
Maintenance 24
Safety 25
Possible error messages 25
Guarantee 26
Installation instructions 27
Technical drawings 65
Installation
It is common practice for the dealer where you purchased your Solea gas fireplace to take also care of installing it and connecting it to the mains. If this is not the case, please ensure that the installation is done by a certified installer. Connecting gas devices by unqualified persons is prohibited, in which case we cannot give any guarantee that your Solea gas hearth is functioning properly.
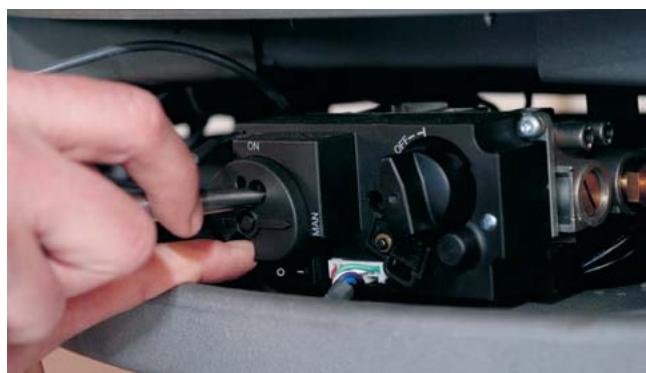
Turning and locking
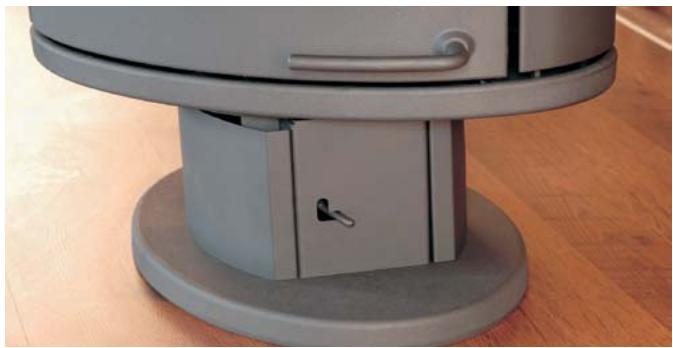
If you selected the turnable model of the Solea, you can turn the fireplace and lock it in place at 30 degrees to the left or to the right. This makes it possible to turn the flames towards you wherever you are in the room. The fireplace can only be turned if it is placed straight under the chimney shaft and stands on a solid floor. You can lock and unlock the Solea with the knob on the right hand side in the base of the fireplace (see photograph).
Putting into operation
When using the Solea for the first time you start as follows:
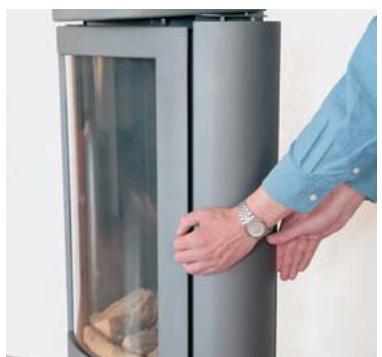
- Open the door of the fireplace (see illustrations on this page).
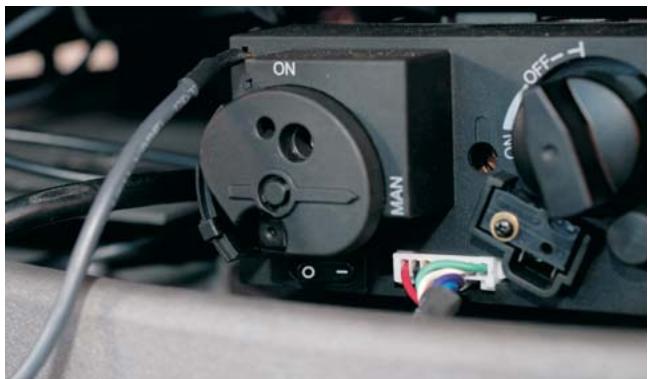
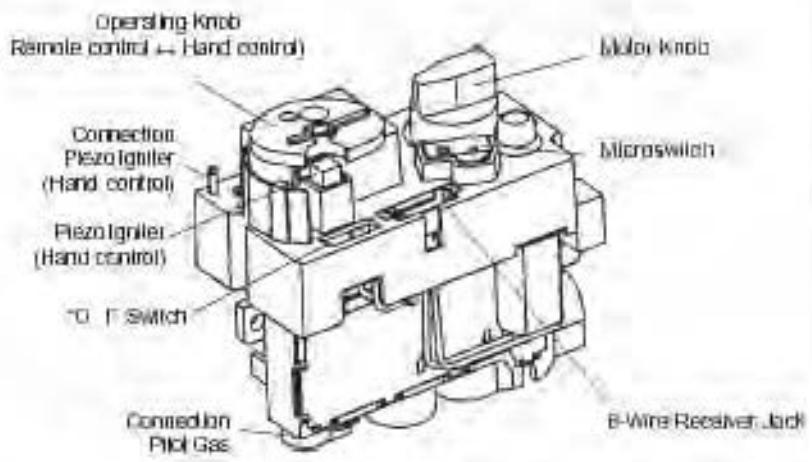
You will see the gas control switch in the middle (see photo).
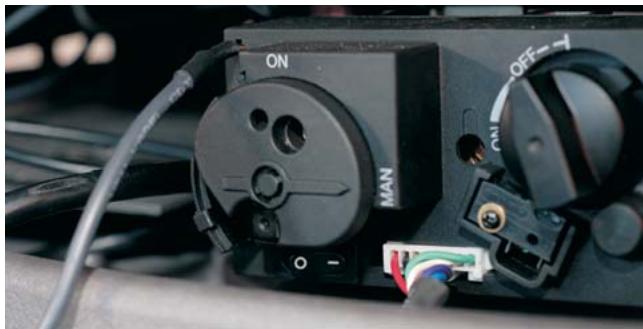
The gas control switch
- Preset the O I - switch on mark I.
- Turn the control switch to the ON position.
- Then close the door of the Solea and lock it.
Avoid finger marks
Please make sure not to leave any finger marks on the glass. Finger marks leave stains which burn in the glass and can not be removed later.
Opening the door
1. The whole Solea.

2. Removing the clip bindings from the stovepipe.
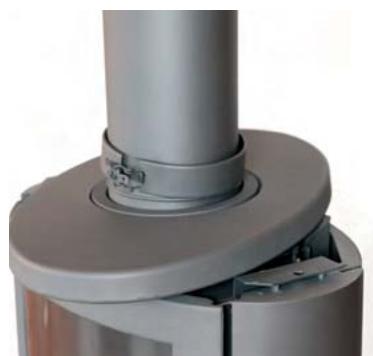
3. Lifting the top, and shifting it.
4. Removing the right side cover.
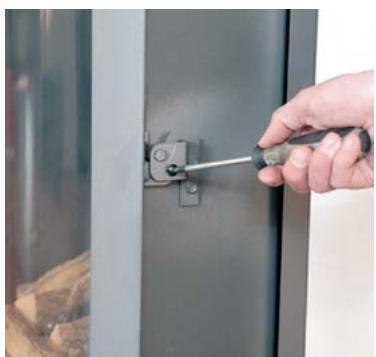
5. Removing the screw of the lock system.
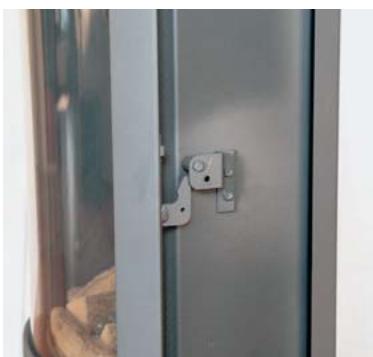
6. The door can now be opened.
Ready for use
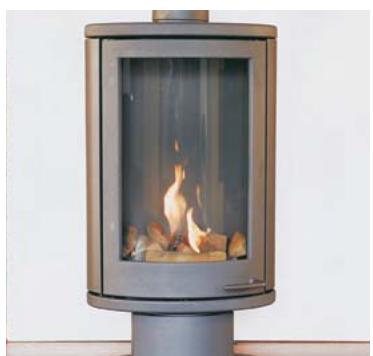
After connecting the Solea to the gas mains and making the necessary adjustments, the unit is ready for use. Take the remote control and point it towards the gas hearth. Press the buttons 'OFF' and the upper big button . When you hear a short beep it means that the signal has reached the receiver and you can stop pressing the buttons. Now you will hear a series of short beeps after which the pilot flame will ignite. After a few seconds, the fire will start to burn at its maximum. You can preset the height of the flames manually with the big buttons in the middle of the remote control.
When you press the button, the hearth will burn higher. When you press the button you will turn the hearth down. When you keep pressing the hearth will switch to standby position. The pilot flame will stay alight.
Igniting the fireplace for the first time
When you light the Solea for the first time, the fireplace must 'anneal'. The unit has a heat resistant lacquer which must still burn in. Though this may give an unpleasant smell, it is otherwise harmless. It is advisable to turn onto high for about three hours while airing the room well. It is advisable to keep the pilot flame burning in heating season to prevent condensation and possible calcification on the inside of the door.
Some deposit may form on the glass panes of the hearth after you light it for the first time to 'anneal' your hearth. You can easily remove this deposit with a damp cloth and if necessary with some cleansing agent for ceramic
rings when the hearth is cooled down. Page 20 shows you how to open and close the door of the stove. Please make sure you do not leave any finger marks on the inside of the glass pane. Finger marks leave stains which will burn in the glass as soon as you burn the fire.
Discolouration of walls, ceilings and grates
After lighting your hearth, the walls, ceilings and grates may show some discolouration. This is caused by the dust particles that burn in the convection cover. This is a natural process for which WANDERS cannot be held responsible. To minimize discolouring we refer to the advice given for atmospheric hearths. Your installer can give you more information about this.
When you light the hearth for the first time, the Solea calculates how much time is needed to reach the preset temperature. As the Solea selects the most efficient way to heat the room it may happen that the flames are not burning at their highest level when you light the stove.
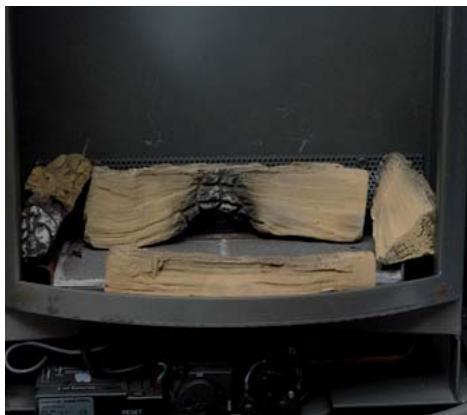
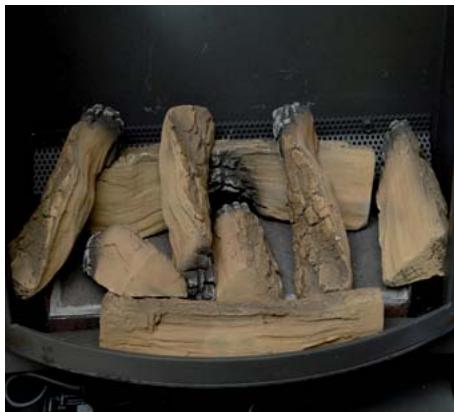
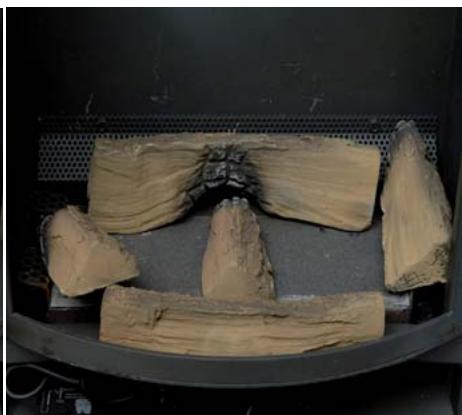
Ensure that the logs are not placed in front of the pilot flame. The gas must be able to stream freely to the main burner. The main burner is located underneath the log set. See page 24 for placing the ceramic log set properly.
Newly-built house or recently renovated?
It is advisable to wait six weeks before lighting the hearth in a newly-built house that has recently been delivered, or a space that has recently been drastically renovated. The walls and ceilings still contain gases, softeners and moist from plasterwork or paint. The warm air-streams may discolour the dust particles in the space which may stick to walls and ceilings. When the moist in the walls and ceilings warm up this may also cause yellowish stains.
Batteries
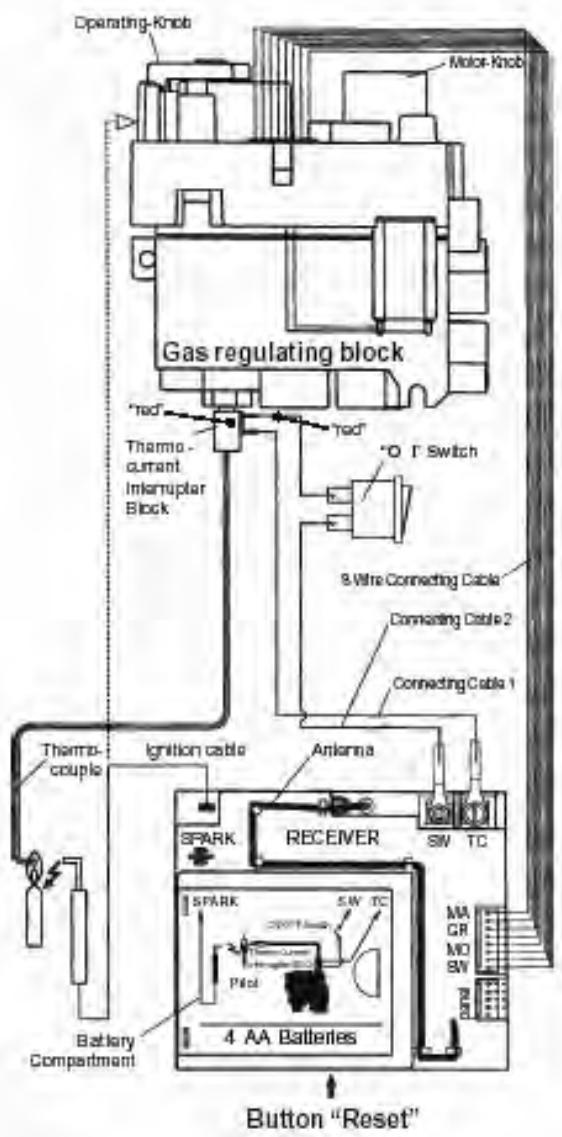
Your Solea gas unit is delivered with batteries in the receiver of the fireplace. If the electronic ignition system of the unit does not work properly, it could be due to empty batteries in the receiver. It is therefore advisable to place new batteries in the receiver and the remote control when installing your Solea. The receiver in the unit works on 4 batteries of 1.5V (type LR6 or AA) or 1× 9V alkaline. The remote handset is powered by a 9V alkaline block battery. The batteries will last for about one year.
When you ignite the fireplace and you hear a long acoustic tone with short breaks it means that the batteries in the receiver of the fireplace are due for replacement. The same tone is also an indication for renewing the batteries in the remote handset. Every time you use the remote control for setting the unit you can see the 'transmit' signal in the top right corner of the display. If you don't see this signal when pressing the buttons, the batteries are due for replacement.
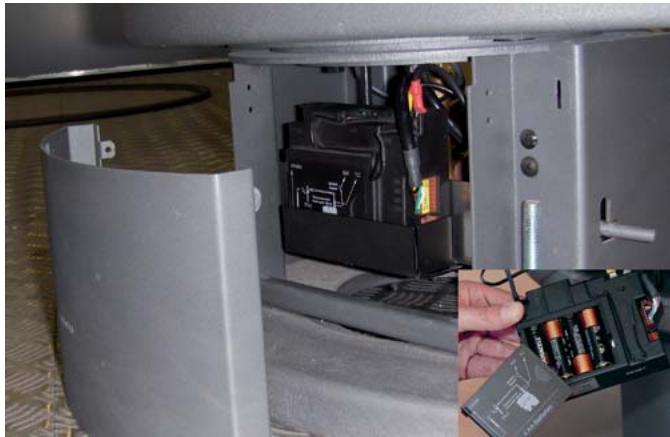
Replacing the batteries of the receiver.
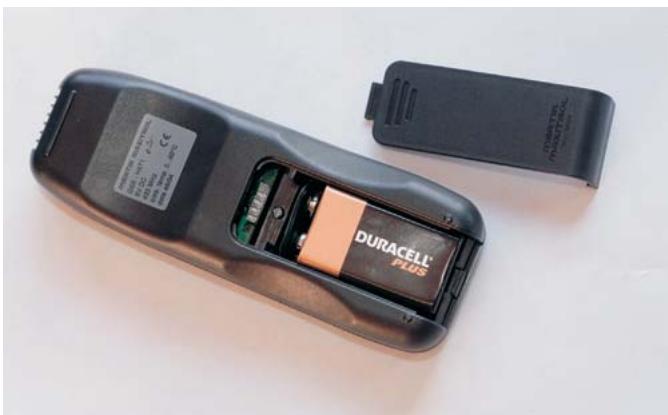
Replacing the batteries in the remote control.
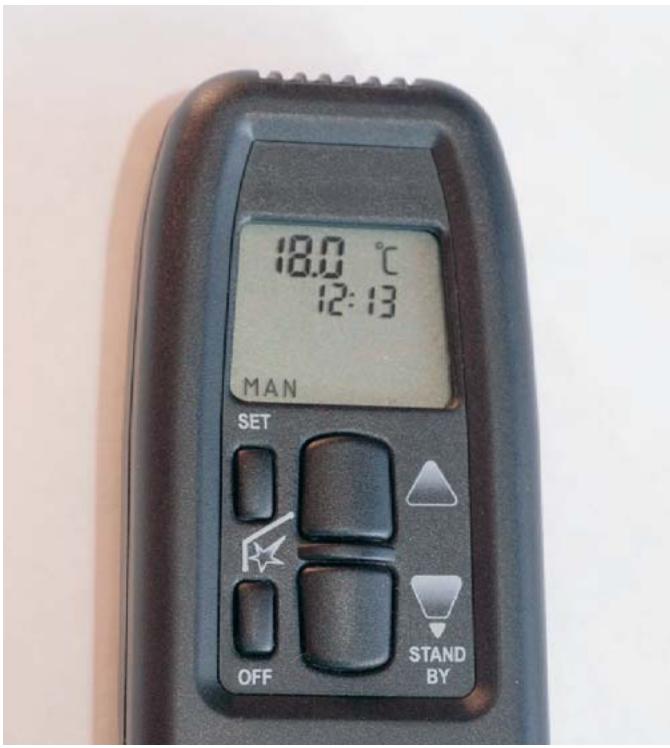
Setting the remote control handset
Setting your Solea remote is simple. Once you have done it you can operate your fireplace in less than no time. Your remote can even preset four time schedules for the desired temperatures.
It is advisable to switch off your hearth when you preset the remote to avoid accidentally changing the temperature of your stove.
If your hearth has not received a signal from the remote control for six hours, it switches automatically back to the pilot flame setting. The pilot flame will burn continuously.
If the pilot light has gone out you must wait at least five minutes before lighting the hearth again.
Setting the time and date
When you put the batteries in the remote control handset for the first time, the display will show 0:00 in short flashes. Then the display will show the temperature, the time (0:00) and in the low left corner it will show 'MAN'
Press the big buttons and simultaneously. The display will flash the time. The button is for setting the hour, and the button is for setting the minutes. Wait a few seconds, or press 'OFF' to save the time.
You can switch from a setting in Celsius / 24 hours indication to the American Fahrenheit / 12 hours indication. Press both 'OFF' and buttons simultaneously for two seconds, and the indication will automatically switch.
SET: changing the set user modus
The 'SET' button is used for setting how you want to use your Solea.
There are four operational modes: MAN, -temp, -temp and TIMER. By briefly pressing the set-button you can leaf through all four possibilities.
MAN
When the display shows 'MAN' you can manually turn the fire higher and lower . When you press and hold the button the fire will burn at the lowest position, which is the pilot flame position. Every time you press or when you are in another function (3-temp, 2-temp or TIMER), the remote will switch to the 'MAN' position.
- temp
Briefly press the 'SET' button and the -temp will appear on the display. When you press and hold the 'SET' button, the day-temperature indication will start flashing. You
can preset the desired temperature by the half degree with the big buttons and . The remote control will automatically switch back to day-temperature setting. The minimum day temperature is 5 degrees Celsius.
- - temp
Briefly press the 'SET' button twice and the D-temp will appear on the display. When you press and hold the 'SET' button, the night-temperature indication will start flashing. You can preset the desired temperature by the half degree with the big buttons and . The remote control will automatically switch back to night-temperature setting. The minimum night temperature is 0 degrees Celsius. The display will then show the '--' signal.
TIMER
You can preset a total of four time-settings. When you link up all four time-settings, comfortable room temperatures are ensured at all times.
Press 'SET' three times and the word 'TIMER' appears on the lower right hand side of the display. Keep the 'SET' button pressed until the signal P1 appears and the time indication is blinking. With the buttons and you can set respectively the hours and the minutes. By briefly pressing the 'SET' button you can browse through the timer programme P1 -temp, P1 -temp, P2 -temp, P2 -temp. Here is an example of a possible presetting.
P1 -temp: 07:30 - 08:30 19^
P1 2)-temp: 08:30 - 17:00 15^
P2 -temp: 17:00 - 23:00 19^
P2 23:00 - 07:30 15^
The TIMER function works only when the pilot flame is on. Press 'OFF' once to switch off the TIMER function. The remote control will automatically switch to the MAN position.
Thermostat
The remote control handset is also the thermostat of your gas fireplace. With the symbols -temp and -temp you can preset the day and night temperatures. For the optimum effect we advise you to use the handset remote within a five-metre range, with the display pointed directly at the fireplace.
Lighting the fire manually
-
Your Solea gas fireplace can also be ignited manually. Please follow the instructions given below.
-
Open the door of the fireplace as shown on page 20. Remove also the frontplate of the base.
- Disconnect the ignition cable from the receiver and connect it to the ignition block.
- Turn the '0 I' switch to the 'I' position. Turn the motor switch all the way to the right until you hear a ticking sound. Switch the operating switch to 'MAN' position.
- Push a pen through the big hole against the small metal bar and keep it pressed in. Press the small square cube in the orifice.
- You will now hear a ticking sound and the pilot flame will ignite. When the pilot flame is burning, keep pressing against the small metal bar for about 10 seconds.
If the pilot flame has died, you must wait at least five minutes before repeating the above-mentioned steps.
- Turn the operating knob to the 'ON' position.
- Turn the motor knob to the left to ignite the burner. Then you can set the height of the flames with the motor knob.
Turn the motor now all the way to the right to extinguish the fire. The pilot flame will stay lighted. If you turn the 'O I' switch to the 'O' position, the pilot flame will die as well.
Placing the ceramic lumber set
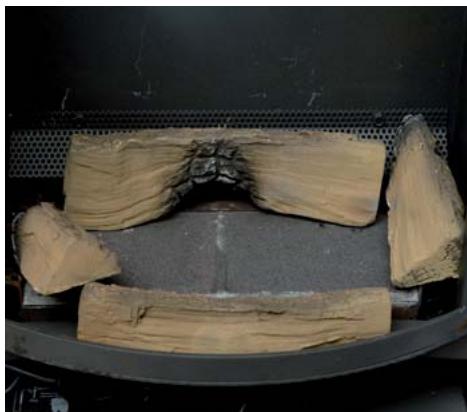
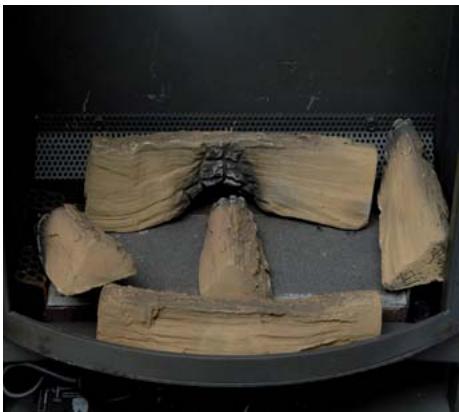
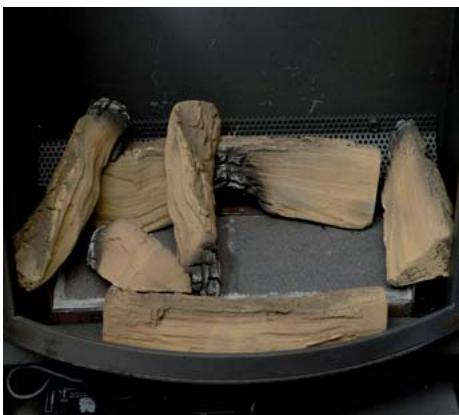
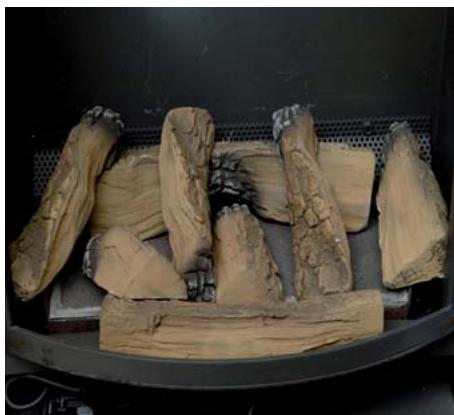
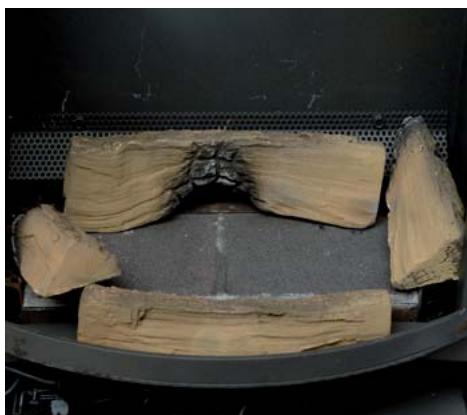
Your Solea gas fireplace is certified for use with natural and propane gases. The natural gas version has a lumber set of 8 logs; the propane version has a set of 7 logs. Please make sure that you place the logs exactly as shown in the illustrations. Do not put the logs on the pilot flame as this will prevent the head burner from igniting and may result in the accumulation of unburned gasses in the hearth. If this happens you must extinguish the pilot flame and wait for 5 minutes before lighting the stove again. Make sure the glass front is closed properly when burning the hearth.
Please make sure not to leave any finger marks on the glass. Finger marks leave stains which burn in the glass and can not be removed later.
It is prohibited to use extra ceramic (wooden) logs or other materials with the wooden logs. It will prevent the hearth from working properly and can damage the hearth beyond repair. It is strongly recommended that you replace the ceramic wooden logs only by the same kind of logs produced by WANDERS.
Maintenance
Small maintenance
You can clean the outside of the hearth with a damp cloth that doesn't give off fluff. Clean the outside only when the hearth is cold. If some coffee or something else is spilt on the hearth when it is burning, turn the unit off immediately. When the hearth has cooled off completely, you can remove any stains with a damp cloth. You can clean the (cold) glass pane with a special cleansing product for ceramic cooking rings.
Do not use any aggressive cleaning products or abrasives and do not use stove polish.
Annual maintenance
Your gas hearth needs to be checked and maintained by a certified installer at least once a year. He will check and if necessary clean the following components:
- The air-tightness of the exhaust pipes for gas and fumes and the supply pipes of combustion air.

Arranging the log set for natural gas.
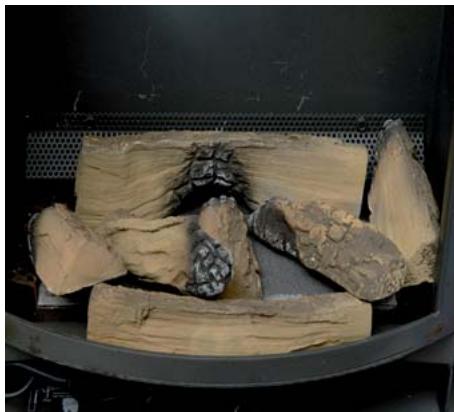
Arranging the log set for propane gas.
- The proper functioning of the gas governor, the thermocouple interrupter (a safety measure against unexpected outflow of gas) and the ignition of the main burner.
- The entire pipe system, including the exterior wall or roof duct and the external terminal.
- Inspection of possible wear and tear of the sealing of the doors and glass panes.
- The following components will be cleaned: the main burner, the pilot light, the flue tube and the supply of combustion air. Any dust collected in the hearth can be removed with a vacuum cleaner.
Safety
A WANDERS source of heat is more than just a stove in your room; the flue and the exterior wall or roof duct are also part of the heating system. Only when your Solea gas hearth is installed with the concentric flue designed by WANDERS, can we guarantee that your hearth is burning safely.
Every gas hearth by WANDERS is installed with a thermocouple interrupter. This will prevent unexpected gas flow if the pilot light has gone out.
Some recommendations for safely using your Solea:
- Only use your gas hearth if the door is properly closed. When the door is open, or the glass damaged, you must not use the fireplace.
- Prevent small children or the infirm from getting too close to a burning stove and do not leave them alone in the room when the fireplace is ignited. You could use a fire-screen.
- Do not pour or put combustible liquids and materials on the log set, as it may damage the fireplace beyond repair.
- Never allow children to play with the remote handset.
- The Solea must never be built in the wall. The distance from the Solea to the rear wall behind must be at least 10 centimetres, and to the sides at least 20 centimetres. If you have the turnable Solea model, the distance from the Solea to the wall must be 20 centimetres in any turned position. The distance from the glass side of the fireplace to the wall must never be less than 80 centimetres due to fire safety.
- Do not place any combustible materials, such as curtains, close to the fireplace. A minimum distance of 1.5 meters is required.
- The fireplace must be repaired with original parts only, and by a certified installer.
- If for any reason the pilot light goes out, you must wait 5 minutes before igniting the Solea again.
Possible error messages
It may happen that your Solea fireplace does not function as planned. Before contacting the Solea seller or a certified installer you may check the following possible error messages.
The pilot flame does not ignite.
- Check whether the gas supply is open; remove the front plate at the base of your hearth. Turn on the gas tap.
- Check whether the batteries in the receiver and your remote handset are functioning. (See page 22).
- The cause may be a minor electronic interruption. Open the door of the fireplace (see page 20) and reset the receiver with the reset button at the back of the receiver.
I can hear a long tone with short breaks while igniting the pilot flame.
- This signal is given when the batteries in the receiver are due for replacement (see page 22). When this signal is given you can ignite your hearth for another 10 times.
I can hear a continuous signal for 5 seconds.
- One of the cables in the fireplace is not properly connected, or the 'O I' switch is not on the 'I' position. Open the door of the fireplace (see page 20) and check all the cables and the 'O I' switch. If the unit still does not ignite you must contact a certified installer.
I can hear 5 short signals. The pilot flame and the main burner do not ignite.
- There may be some air in the pilot feed line. Wait for 5 minutes and try again. If the pilot flame still does not ignite you must contact a certified installer.
Guarantee
WANDERS Metaalwerken B.V. in Netterden, the Netherlands, gives a one-year guarantee for your Solea gas fireplace after the purchase date, provided that the fireplace is properly installed and used in accordance with the instructions in the manual.
The guarantee includes all defects which can be reduced to flaws in material and construction, in which case you will receive the new parts free of charge. Labour costs or other expenses are not covered by the guarantee. You can send defect parts (carriage paid) to WANDERS Metaalproducten B.V., Amtweg 4, 7077 AL in Netterden [The Netherlands].
The guarantee does not include: failure due to improper use; non-compliance with the installation and operating instructions; installation by a non-certified installer; negligence of the apparatus and converting the fireplace to be fired with another kind of gas.
WANDERS can not be held responsible for any cracks in stuccoed walls or discolouration of walls, ceilings and/ or grates after burning the fireplace. Discolouration is caused by the burning of dust particles in the convection cover. To reduce the chance of cracks in stucco and to minimize discolouration we refer to the advice given for decorative hearths. Your installer can give you more information.
Any complaints will be dealt with after the sales firm, the installer or the gas company filed a complaint and sent a copy of the purchase receipt with purchase date. Any repairs do not entitle you to extend the guarantee term. All consequential damages or loss are excluded.
Installation instructions Solea gas fireplace
Contents
| General instructions | 27 |
| Placing the concentric channel system | 28 |
| Placing possibilities of the pipe system | 28 |
| Installing the sealing | 30 |
| Completing the installation | 30 |
| Technical details | 31 |
General instructions
The Solea gas fireplace is a closed system and must only be installed by a certified installer in combination with WANDERS' concentric pipe system. Only then will the Solea be approved according to the European CE standard for gas appliances. We will not give any guarantees if the Solea is fitted and/or installed in an incomplete or improper manner. The pipe system consists of an inner pipe with a diameter of 80 millimetres and an outer pipe with a diameter of 150 millimetres.
The appliance may only be installed and connected by a certified installer in accordance with the installation instructions mentioned below. Furthermore, the national and local rules and regulations on placing and using closed gas appliances shall be applicable.
Before installing the appliance, the installer must check whether the information on the type tag of the fireplace corresponds with the gas type and gas pressure to which the appliance is connected. If it does not match, you are not allowed to connect the Solea.
Placing
The gas fireplace can be placed in a crack-free and/or mechanically ventilated home without difficulty. There is no need for extra ventilation for combustion or for a smoke and fire vent. Waste gases are discharged by natural draught via the inner pipe into the open. The oxygen needed for burning the fire is supplied from the space between the pipes. This is the reason that no insulation must be placed between the inner and outer pipe.
The Solea must not be built into the wall, and must be placed on a floor that is solid enough to hold the appliance. The distance from the Solea to the rear wall must be at least 10cm , and there must be a free space of at least 20 centimetres to the right and left side of the fireplace.
If you have the turnable Solea, the distance from the gas hearth to the walls must be at least 20~cm in any turned
position. For fire safety, the distance between the glass side of the hearth and the wall must never be less than 80 cm in any turned position. Be sure to place the Solea on a solid floor plumb under the flue pipe. If the fireplace is out of plumb with the concentric pipe system, the hearth cannot be turned.
Insulation
Due to the high temperatures of the exterior walls (up to approximately 150^ or 300^ ) it is prohibited to have or to place any combustible materials close to the channel system. The entire concentric pipe system should be encased from the place where it is out of sight up to the outlet in the exterior wall. Ventilate the encased concentric pipe system by placing a grid near the floor and the ceiling on every floor. Use universal wall clips with a diameter of 150mm for anchoring the concentric pipe system.
If an existing chimney is used, first make sure whether the chimney is sufficiently insulated and with sufficient diameter to accommodate the concentric pipe system. If the chimney was previously used as a wood-burning or coal-fired stove, the chimney must first be professionally cleaned. You must use special WANDERS connecting sets for connecting a gas hearth to an existing chimney.
Gas connection
- Use a feed pipe with an approved G3/8" stop cock with coupling. The gas connection of the appliance is located in the base. The gas pipe can be connected via the floor or via the rear side. If you connect the gas mains to the rear, the bursting disc at the rear of the base must be broken.
- You must use the 12-mm compression coupling, which is already mounted on the base.
- De-aerate the supply pipe before fitting and fastening the appliance.
- Avoid tension on the operating valve and pipes to avoid gas leakage.
- Check if the connection is gastight.
Placing the concentric channel system
The concentric channel system consists of three parts: the channels itself, the transit through the roof or the wall and the outflow.
Instructions for placing the outflow
The outflow of the pipe system can be placed on top of the roof or against the side wall of the house.
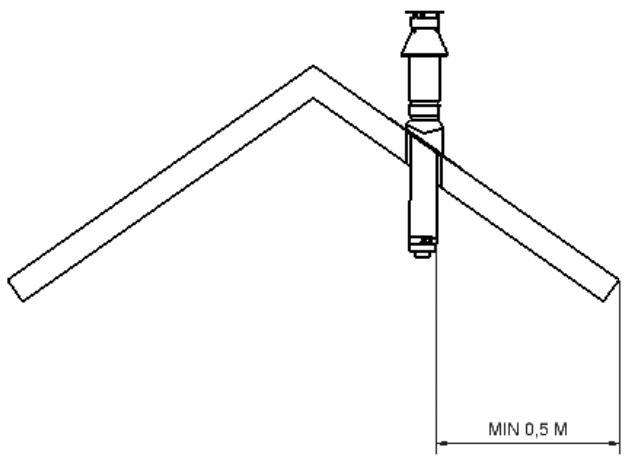
Outflow on top of the roof
When placing the outflow on top of the roof, make sure that there is a distance of at least 50~cm between the outflow and the edges of the roof, with the exception of a possible existing ridge. You must also take the place of the outflow into account in relation to the existing ventilation openings, movable windows and combustion air supply provisions. Please consult the national and local requirements.
Outflow into the wall
When placing the outflow into the side wall, make sure that there is distance of at least 50~cm between the outflow and the corners of the building, eaves, gutters, balconies and etceteras. You need not have this distance
when the outflow runs to at least the front side of the overhanging part.
You must also take into consideration the place of the outflow in relation to the existing ventilation openings, movable windows and combustion air supply provisions.
Please consult the national and local requirements.
Placing possibilities of the pipe system
To make the hearth turnable you always need the 4175 WANDERS turning pipe; the first vertical pipe A. The total length of the pipe system must never be more than 10 metres excluding the passage through the wall and outer wall. A 90^ square angle counts as a length of 2 metres. A 45^ turn counts as a length of 1 metre.
For the combined flue tube and combustion air supply you must apply one of the following possibilities of the WANDERS concentric pipe systems: with wall duct, with roof duct, or with roof duct with bend. When leading the pipe through the outer wall you must always make it 1 metre vertical before going through the outer wall.
Installation through the outer wall
Always allow 1 metre vertical before passing through the outer wall.
| Kind of gas | length of duct A | length of duct B | Sealing |
| (min. - max.) | (min. - max.) | ||
| Natural gas | 1,0 – 3,0 m | 0 – 3,0 m | No |
| Propane | 1,5 – 3,0 m | 0 – 3,0 m | No |
All measures are excluding the length of the transit through the wall.
Installation through the roof
Kind of gas length of duct A Sealing
(min. - max.)
Natural gas 1,0-10,0 m at least 3.0m 50mm
Propane 1,5 - 10,0m at least 3.0m 50mm
All measures are excluding the length of the transit through the roof.
Installation through the roof with a bend
| Kind of gas | length duct B(min. - max.) | length duct A1(min. - max.) | length ducts A1 + A2(min. - max.) | Sealing |
| Natural gas | 1,0 - 10,0 m | 1,0 - 10,0 m | 1,0 - 10,0 m | No |
| Propane | 1,0 - 10,0 m | 1,0 - 10,0 m | 1,0 - 10,0 m | No |
A1+A2:B≥2:1
The ratio between vertical length and horizontal length (or 45^ up) is always at least 2 to 1.
All measures are excluding the length of the transit through the roof.
Installing the sealing
The diagrams on pages 28 and 29 indicate when you need to place a sealing. If this is the case, the seal must be placed on the inside of the combustion chamber (see illustration). The diameter of the seal must be 50~mm .
Caution: wrong placement of the seal may cause malfunction of the appliance.
Completing the installation
The concentric system is now fitted and the fireplace is installed. To complete the installation, the following must be carried out:
Opening the door
The Solea gas fireplace must be lighted only when the door is closed. The door is locked for safety reasons. Page 20 gives a description how to open the door. When the door is opened you can place the ceramic lumber set in the hearth and put the batteries in the receiver. The Solea can be used with both natural gas and propane.
Placing the ceramic logs
Avoid finger marks
Avoid leaving finger marks on the glass after placing the ceramic logs and closing the door. Finger marks will burn in the glass and can not be removed later.
NATURAL GAS
Place the 8 ceramic logs as shown in the illustration below. The log set must be placed exactly as in the example. Make sure the door is closed before igniting the hearth.
Do not add or change anything to the ceramic logs.
Make sure the pilot light is uncovered at all times, and
that it can reach the main burner freely.
PROPANE GAS
Place the 7 ceramic logs as shown in the illustration. The log set must be placed exactly as in the example. Make sure the door is closed before igniting the hearth.
Do not add or change anything to the ceramic logs.
Make sure the pilot light is uncovered at all times, and
that it can reach the main burner freely.
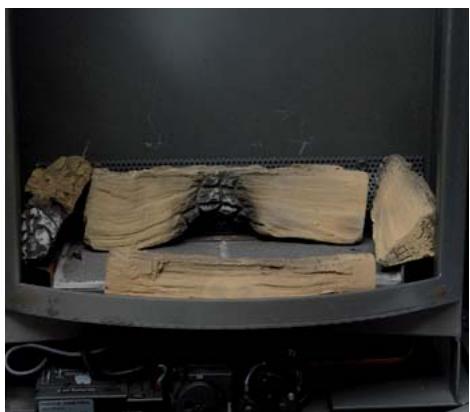
Arranging the log set for natural gas

Arranging the log set for propane gas.
Placing the batteries
The Solea remote handset operates on a 9 ~V block battery. The receiver in the fireplace operates on four
1,5V batteries (type LR6 or AA). The batteries will last for about one year.
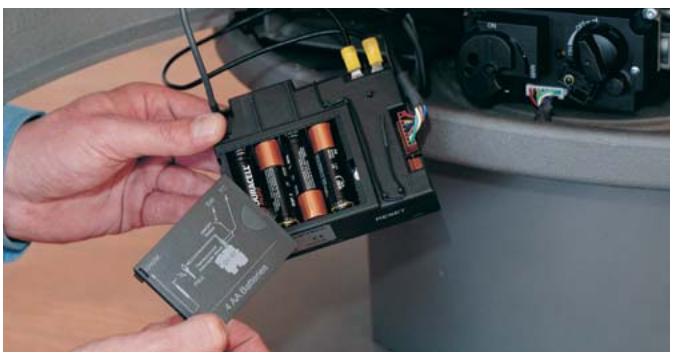
Replacing the batteries of the receiver.

Replacing the batteries in the remote control.
Technical details
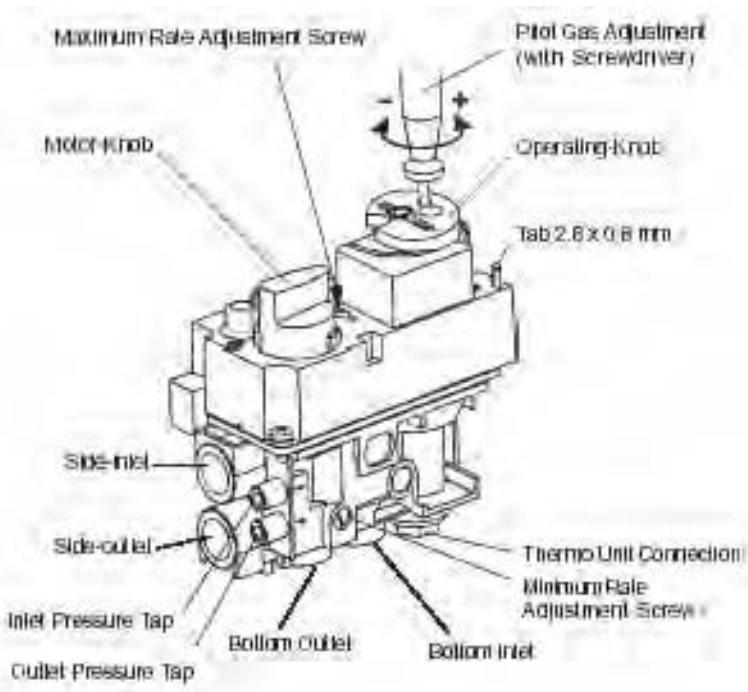
Diagram of the gas governor
Electrical circuit diagram for gas governor and receiver
Technical data for kind of gas and consumption
| A | B | C | D | E | F | G | H |
| NL | G25 I2L | 25mb | 6,8kw | 10mb | 2,5 | 1,4 | 0,804 |
| NL | I3P | 30 | 5,0 | 29 | 1,2 | 1,1 | 0,196 |
| BE | G20/G25 I2E+ | 20/25mb | 7,3kw | 7,6mb | 2,5 | 1,4 | 0,770 |
| BE | I3P | 37 | 5,0 | 29 | 1,2 | 1,1 | 0,196 |
| FR | G20/G25 I2E+ | 20/25mb | 7,3kw | 7,6mb | 2,5 | 1,4 | 0,770 |
| FR | I3P | 37 | 5,0 | 29 | 1,2 | 1,1 | 0,196 |
| IT | G20 I2H | 20mb | 7,3kw | 7,6mb | 2,5 | 1,4 | 0,770 |
| IT | I3P | 37 | 5,0 | 29 | 1,2 | 1,1 | 0,196 |
| DE | G20/G25 I2ELL | 20mb | 7,3kw | 7,6mb | 2,5 | 1,4 | 0,770 |
| DE | I3P | 50 | 5,0 | 29 | 1,2 | 1,1 | 0,196 |
| AT | G20 I2H | 20mb | 7,3kw | 7,6mb | 2,5 | 1,4 | 0,770 |
| AT | I3P | 50 | 5,0 | 29 | 1,2 | 1,1 | 0,196 |
| GB | G20 I2H | 20mb | 7,3kw | 7,6mb | 2,5 | 1,4 | 0,770 |
| GB | I3P | 37 | 5,0 | 29 | 1,2 | 1,1 | 0,196 |
| PT | G20 I2H | 20mb | 7,3kw | 7,6mb | 2,5 | 1,4 | 0,770 |
| PT | I3P | 37 | 5,0 | 29 | 1,2 | 1,1 | 0,196 |
| ES | G20 I2H | 20mb | 7,3kw | 7,6mb | 2,5 | 1,4 | 0,770 |
| ES | I3P | 37 | 5,0 | 29 | 1,2 | 1,1 | 0,196 |
| DK | G20 I2H | 20mb | 7,3kw | 7,6mb | 2,5 | 1,4 | 0,770 |
| DK | I3P | 30 | 5,0 | 29 | 1,2 | 1,1 | 0,196 |
| LU | G20/G25 I2ELL | 20mb | 7,3kw | 7,6mb | 2,5 | 1,4 | 0,770 |
| LU | I3P | 37 | 5,0 | 29 | 1,2 | 1,1 | 0,196 |
| IE | G20 I2H | 20mb | 7,3kw | 7,6mb | 2,5 | 1,4 | 0,770 |
| IE | I3P | 37 | 5,0 | 29 | 1,2 | 1,1 | 0,196 |
| SE | G20 I2H | 20mb | 7,3kw | 7,6mb | 2,5 | 1,4 | 0,770 |
| SE | I3P | 30 | 5,0 | 29 | 1,2 | 1,1 | 0,196 |
| NO | G20 I2H | 20mb | 7,3kw | 7,6mb | 2,5 | 1,4 | 0,770 |
| NO | I3P | 30 | 5,0 | 29 | 1,2 | 1,1 | 0,196 |
A: Land / Country / Pays / Land
B: Gastype / Gastype / Type de gas / Gasart
C: Voordruk / Prepressure / Pre pression / Vordruck
D: Belasting o.w. / Nom. Press. OW / Nom. Pression OW / Nom. Belastung
E: Branderdruk / Burner pressure / Pressi on brule on / Brennerdruck
F: Inspluter / Injector / Buse / Einspritzer
G: Kleinstand inspuiter / Low stand injector / Buse petit feu / Klein Stand Einspritzer
H: Verbruik / Consumption / Consommation / Verbrauch
FR
SET: changing the set user modus
- Contents
- Installation
- Turning and locking
- Putting into operation
- Avoid finger marks
- Opening the door
- Ready for use
- Igniting the fireplace for the first time
- Discolouration of walls, ceilings and grates
- Newly-built house or recently renovated?
- Batteries
- Setting the remote control handset
- Setting the time and date
- SET: changing the set user modus
- MAN
- - temp
- - - temp
- TIMER
- Thermostat
- Lighting the fire manually
- Placing the ceramic lumber set
- Maintenance
- Small maintenance
- Annual maintenance
- Safety
- Possible error messages
- The pilot flame does not ignite.
- I can hear a long tone with short breaks while igniting the pilot flame.
- I can hear a continuous signal for 5 seconds.
- I can hear 5 short signals. The pilot flame and the main burner do not ignite.
- Guarantee
- Installation instructions Solea gas fireplace
- General instructions
- Placing
- Insulation
- Gas connection
- Placing the concentric channel system
- Instructions for placing the outflow
- Placing possibilities of the pipe system
- Installation through the outer wall
- Installation through the roof
- Kind of gas length of duct A Sealing
- Installation through the roof with a bend
- Installing the sealing
- Completing the installation
- Placing the ceramic logs
- NATURAL GAS
- PROPANE GAS
- Placing the batteries
- Technical details
- Technical data for kind of gas and consumption
- FR
Brand : WANDERS
Model : SOLEA GAS
Category : Gas stove