TM 40 - Microphone AKG - Free user manual and instructions
Find the device manual for free TM 40 AKG in PDF.
Download the instructions for your Microphone in PDF format for free! Find your manual TM 40 - AKG and take your electronic device back in hand. On this page are published all the documents necessary for the use of your device. TM 40 by AKG.
USER MANUAL TM 40 AKG
11:19 Uhr FCC Statement This equipment has been tested and found to comply with the limits for a Class B digital device, pursuant to Parts 74, 15, and 90 of the FCC Rules. These limits are designed to provide reasonable protection against harmful interference in a residential installation. This equipment generates, uses, and can radiate radio frequency energy and, if not installed and used in accordance with the instructions, may cause harmful interference to radio communications. However, there is no guarantee that interference will not occur in a particular installation. If this equipment does cause harmful interference to radio or television reception, which can be determined by turning the equipment off and on, the user is encouraged to try to correct the interference by one or more of the following measures:
- Reorient or relocate the receiving antenna.
- Increase the separation between the equipment and the receiver.
- Connect the equipment into an outlet on a circuit different from that to which the receiver is connected.
- Consult the dealer or an experienced radio/TV technician for help. Shielded cables and I/O cords must be used for this equipment to comply with the relevant FCC regulations. Changes or modifications not expressly approved in writing by AKG Acoustics may void the user’s authority to operate this equipment. This device complies with Part 15 of the FCC Rules. Operation is subject to the following two conditions: (1) this device may not cause harmful interference, and (2) this device must accept any interference received, including interference that may cause undesired operation. 1 Safety and Environment
1. Do not expose the equipment to
direct sunlight, excessive dust, moisture, rain, mechanical vibrations, or shock.
1. Be sure to dispose of used batteries
as required by local waste disposal rules. Never throw batteries into a fire (risk of explosion) or garbage bin.
2. When scrapping the equipment,
remove the batteries, separate the case, circuit boards, and cables, and dispose of all components in accordance with local waste disposal rules. 2667_03_TM40-Hex
Dear Customer: Thank you for purchasing an AKG product. This Manual contains important instructions for setting up and operating your equipment. Please take a few minutes to read the instructions below carefully before operating the equipment. Please keep the Manual for future reference. Have fun and impress your audience!
Seite 9 Check that the package contains all the parts listed above. If anything is missing, please contact your AKG dealer. You can replace the color code battery cover with the supplied black replacement cover.
2.5 Controls (Refer to fig. 1)
1 ON/MUTE/OFF: This slide switch provides three positions: ON: Power to the transmitter module is on. M: The signal delivered by the microphone is muted while power and the RF carrier frequency remain on. This prevents the receiver from responding to interference from other transmitters. OFF: Power to the transmitter module is off. 2 Battery compartment for one 1.5-V AAA size battery (supplied). The color of the battery compartment cover indicates the carrier frequency of your transmitter module:
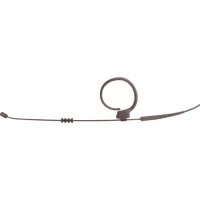
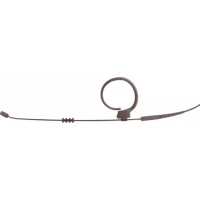
The TM 40 is a WMS 40 microtools Series miniature transmitter module specifically designed for direct connection to the D 880M, D 3700M, D 3800M, C 900M, and C 5900M microphones. The TM 40 operates on a single fixed, quartz stabilized carrier frequency in the 710 MHz to 865 MHz UHF band. 1 TM 40 1 CA 40 1 AAA transmitter charging size batmodule adapter tery 1 black battery cover The color of the battery cover indicates the carrier frequency of your transmitter.
2.5 Controls (Refer to fig. 1)
1 ON/MUTE/OFF: This slide switch provides three positions: ON: Power to the transmitter module is on. M: The signal delivered by the microphone is muted while power and the RF carrier frequency remain on. This prevents the receiver from responding to interference from other transmitters. OFF: Power to the transmitter module is off. 2 Battery compartment for one 1.5-V AAA size battery (supplied). The color of the battery compartment cover indicates the carrier frequency of your transmitter module: Seite 10
3 Status LED: Indicates battery status. LED flashes momentarily upon switching ON and extinguishes: battery is OK. LED lights constantly: battery will be dead in about 60 minutes. 4 Input Gain: This rotary pot sets the sensitivity of the transmitter module’s audio section. 5 Charging contacts for charging a rechargeable battery inside the battery compartment using the optional CU 40 charger. 6 Contacts: The contacts at the upper end of the transmitter module will automatically establish all electrical connections to the microphone. 2667_03_TM40-Hex
11:19 Uhr 3 Setting Up
3.1 Inserting/Replacing and
Testing the Battery Refer to fig. 2:
1. Depress the snap hook on the battery
compartment lid (1).
2. Pull the battery compartment lid (1)
down to remove it from the transmitter module. Important: The foam pad on the inside of the battery compartment lid (1) holds the battery in place. Do not remove the foam pad. If you do, the battery will not be held in place properly and may cause a rattling noise.
3. If there is a dead or defective battery
inside the battery compartment, remove the battery.
4. Insert the supplied or new battery (2)
into the battery compartment as shown in fig. 2. Seite 11
Fig. 2: Inserting the battery.
5. Set the ON/MUTE/OFF switch (3) to ON.
The status LED (4) will flash momentarily. If the battery is in good condition, the status LED (4) will extinguish. If the status LED (4) lights constantly the battery will be dead within about 60 minutes. Replace the battery with a new one as soon as possible. If the status LED (4) fails to flash momentarily the battery is dead. Insert a new battery.
6. Slide the battery compartment lid (1)
onto the transmitter module against the direction of the arrow to the point that the lid (1) will click shut.
3.2 Using Rechargeable Batteries
Refer to fig. 3: Instead of dry batteries, you can also use a 1.5-V rechargeable battery to power the transmitter module. We recommend SANYO HR-4U (650 mAh) or Panasonic Rechargeable PRO+
11:19 Uhr Seite 12 (550 mAh) NiMH rechargeable batteries. To charge the battery, insert the transmitter module (1) into the CA 40 adapter (2) and the adapter into the optional CU 40 charger (3) as shown in fig. 3. For details, refer to the CU 40 charger manual.
Microphones You can connect the transmitter to the following microphones: D 880M, D 3700M, D 3800M, C 900M, and C 5900M.
4.2 Connecting and Disconnecting
the Transmitter Refer to the instruction manual of your microphone.
4.3 Setting Levels (Refer to fig. 1)
1. Check that the receiver is marked
with the same color code as the transmitter module.
2. Use a small screwdriver to turn the
input gain control (4) on the transmitter module to a position halfway between the left and right stops.
3. Set the ON/MUTE/OFF switch (1) to
ON to switch power to the transmitter module on.
4. Switch power to your sound system
5. Speak or sing into the microphone.
6. If your voice sounds distorted on the
loudspeakers turn the input gain control (4) down CCW to the point that you will hear no more distortion. If your voice sounds too quiet on the loudspeakers, turn the input gain control (4) up CW. If the loudspeakers start howling due to acoustic feedback, immediately turn the input gain 2667_03_TM40-Hex
11:19 Uhr control (4) back down to the point that the howling will stop.
4.4 Microphone Technique
For detailed hints on how to use a vocal microphone, particularly with regard to working distance, proximity effect, and feedback, refer to the instruction manual of your AKG microphone. Seite 13 5 Cleaning To clean the transmitter module case, use a soft cloth moistened with water.
For troubleshooting hints, refer to your receiver manual.
11:19 Uhr Seite 14 6 Specifications Carrier frequency range Modulation Audio bandwidth Frequency stability (-10°C to +50°C) Rated deviation T.H.D. at 1 kHz Compander Signal/noise ratio RF output Current consumption Power requirement Battery life Audio input level for rated deviation Size (WxDxH) Net weight 710 to 865 MHz 40 to 20,000 Hz ±15 kHz 15 kHz (SP1, SP2: 13.5 kHz) typ. 0.8% integrated typ. 103 dB(A) typ. 5 mW typ. 75 mA single 1.5-V AAA size battery >11 hours (dry battery) >6 hours (rechargeable battery) 300 mV/1 kHz length: 125 mm (5 in.); dia.: 26 mm (1 in.) 30 g (1.1 oz.) This product complies with the following standards: EN 300422-2 V1.1.1; EN 301489-9 V1.3.1; EN 60065:2002; EN 50371:2002.