
HEARO 999 AUDIOSPHERE II - Headphones AKG - Free user manual and instructions
Find the device manual for free HEARO 999 AUDIOSPHERE II AKG in PDF.

| Product type | Digital wireless audio headphone with UHF transmitter |
| Brand | AKG |
| Model | HEARO 999 AUDIOSPHERE II |
| Carrier frequency | 864 MHz or 914 MHz |
| Modulation | GFSK |
| Audio inputs | Analog (RCA L/R), Digital (optical and coaxial switchable) |
| Audio outputs | Analog (RCA L/R), 6.35 mm stereo headphone jack |
| Digital processing | 20/24 bit resolution |
| Audio bandwidth | 18 Hz - 24 kHz |
| Maximum range | 50 m in open field |
| Power supply | 12 V DC, 800 mA (AC adapter included) |
| Transmitter weight | Approx. 590 g |
| Main functions | IVA, Dolby Surround Pro-Logic, Dolby Digital, VMax |
| Included accessories | AK1, AK2 cables, DK1 optical fiber cable, AC adapter, 3.5/6.35 mm stereo adapter |
| Cleaning | Soft cloth dampened with water |
| Safety | Use the supplied adapter, do not open the casing, avoid heat/humidity |
| Compliance | EN 301489-9, EN 301357-2, EN 60950, Directive 1999/5/EC |
| Compatible headphone types | AKG digital wireless headphones (same band) and wired stereo headphone |
Frequently Asked Questions - HEARO 999 AUDIOSPHERE II AKG
User questions about HEARO 999 AUDIOSPHERE II AKG
0 question about this device. Answer the ones you know or ask your own.
Ask a new question about this device
Download the instructions for your Headphones in PDF format for free! Find your manual HEARO 999 AUDIOSPHERE II - AKG and take your electronic device back in hand. On this page are published all the documents necessary for the use of your device. HEARO 999 AUDIOSPHERE II by AKG.
USER MANUAL HEARO 999 AUDIOSPHERE II AKG
User Instructions . 12
Please read the manual before using the equipment!
Page FCC Statement. 12
Getting Started Quickly 13
1 Safety and Environment 13
2 Description 13
2.1 Introduction. 13
2.2 Unpacking. 14
2.3 Optional Accessories 14
2.4 General Description 14
2.5 Four 3-D sound Processing Techniques 14
2.6 Controls 16
3 Audio and Power Connections 18
3.1 Connecting to Audio Sources 18
3.2 Audio Outputs. 18
3.3 Connecting to Power 18
4 Operating Notes 18
4.1 Important Notes 18
4.2 Setting Up the System 19
4.3 Using Headphones 19
4.4 Using Loudspeakers 20
5 Cleaning 20
6 Troubleshooting 20
7 Specifications 22
8 Warranty Conditions 22
FCC Statement
This equipment has been tested and found to comply with the limits for a Class B digital device, pursuant to Parts 74, 15, and 90 of the FCC Rules. These limits are designed to provide reasonable protection against harmful interference in a residential installation. This equipment generates, uses, and can radiate radio frequency energy and, if not installed and used in accordance with the instructions, may cause harmful interference to radio communications. However, there is no guarantee that interference will not occur in a particular installation. If this equipment does cause harmful interference to radio or television reception, which can be determined by turning the equipment off and on, the user is encouraged to try to correct the interference by one or more of the following measures:
Reorient or relocate the receiving antenna.
- Increase the separation between the equipment and the receiver.
- Connect the equipment into an outlet on a circuit different from that to which the receiver is connected.
- Consult the dealer or an experienced radio/TV technician for help.
Shielded cables and I/O cords must be used for this equipment to comply with the relevant FCC regulations.
Changes or modifications not expressly approved in writing by AKG Acoustics may void the user's authority to operate this equipment.
This device complies with Part 15 of the FCC Rules. Operation is subject to the following two conditions: (1) this device may not cause harmful interference, and (2) this device must accept any interference received, including interference that may cause undesired operation.
Getting Started Quickly
Using Wireless Headphones
- Analog: Connect LINE IN L and LINE IN R on the transmitter to the headphone output, LINE, or REC output on your audio source using the supplied AK 1 or AK 2 connecting cable. Digital: Connect the optical output on your audio source to the DIGITAL IN/OPTICAL jack on the transmitter using the supplied DK 1 connecting cable.
- Connect the supplied AC adapter to the POWER jack on the transmitter and to a convenient power outlet.
- Press the ON switch to switch power to the transmitter on. (See also section 4.2.)
- Point the antenna straight up.
- Use the DIGITAL switch to activate either the analog inputs (DIGITAL LED dark) or the digital inputs (DIGITAL LED lit).
- Charge the supplied batteries inside the headphones. (Refer to the headphones manual).
- Switch the headphones on.
- Set the frequency selector on the headphones and the FREQ. selector on the transmitter to the same channel.
Using Loudspeakers
- Connect the LINE OUT jacks on the transmitter to an available input on your amplifier (e.g., TAPE IN).
- Press the ON switch to switch power to the transmitter on. (See also section 4.2.)
- Switch power to the amplifier on.
1 Safety and Environment

- Operate the equipment with the supplied 12 VDC, 800mA AC adapter only. Check that the AC voltage stated on the AC adapter is the same as that available in your country. Using the transmitter with a different AC adapter voids the warranty.
- Never try to open the equipment's case. Refer servicing to qualified service personnel only.
- Never place the equipment near heat sources such as radiators or electric heaters or expose it to direct sunlight, excessive dust, humidity, rain, temperatures below freezing, or impacts.
- Never use petroleum-based cleaners or paint thinners to clean the equipment.
- If you do not use your equipment for an extended period of time (e.g., when traveling), disconnect the AC adapter from the AC outlet.
- Also refer to section 4.1 Important Notes.
- When scrapping the equipment, remove the batteries, separate the case, circuit boards, and cables, and dispose of all components in accordance with local waste disposal rules.
2 Description

Dear Customer:
Thank you for purchasing an AKG product.
In order to make optimum use of the benefits of your HEARO 999 AUDIOSPHERE II, please take a few minutes to read the instructions below carefully before operating the equipment.
Please keep the manual for future reference.
2.1 Introduction
2.2 Unpacking
| HEARO 999 AUDIOSPHERE DIGITAL TRANSMITTER | AK 1 RCA to RCA stereo connecting cable | AK 2 mini jack to 2 x RCA stereo connecting cable | DK 1 fiber optical cable | Mini to 1/4” stereo adapter | AC Adapter |
Check the packaging. If any of the above items is missing, contact your AKG dealer immediately.
2.3 Optional Accessories
RMU 60 rack mount kit for one or two HEARO 999 AUDIOSPHERE II units
2.4 General Description
The HEARO 999 AUDIOSPHERE II is a UHF transmitter designed specifically for use with digital wireless headphones from AKG. Outputs for hardwire stereo headphones and loudspeakers allow the unit to be used in professional recording studios as well. The heart of the HEARO 999 AUDIOSPHERE II is a high quality digital signal processor whose high resolution ensures optimum sonic results with both analog and digital program material.
Universal interfacing The HEARO 999 AUDIOSPHERE II provides analog and digital inputs for easy interfacing with analog outputs on audio, video, TV equipment or PCs as well as digital outputs on DVD and CD players or digital TV sets.
Digital signal processing
Analog signals are digitized immediately after the input stage. All signal processing that affects the sound takes place in the digital domain. This maintains the full dynamic range of the input signal and minimizes noise.
Digital signal transmission using ACS Audio Coding System
The signal is transmitted in its digital form to the receiver in the wireless headphones. Conventional digital audio signal transmission techniques delay the signal by about 60 to 100 milliseconds due to the required data compression. As a result, TV or video sound may seem slightly out of sync. The ACS Audio Coding System developed by AKG is he first technique that reduces the time delay to approximately 5 milliseconds so that there will be no noticeable delay between picture and sound.
Digital receiver
The receiver built into the headphones converts the received digital signal into an analog audio signal. The greatest advantage of digital over analog transmission is that it requires neither an automatic gain control (AGC) nor a compander system. This maintains the full original dynamic range of the audio signal. Other benefits of this process include minimum noise, better high-frequency reproduction, lower distortion, better interference rejection, and consistent transmission quality throughout the transmitter range of up to 165 feet (50m) under ideal transmission conditions (free field). Unlike infrared signals, RF signals will penetrate walls and ceilings.
Acoustic status indicator
If the transmitter and receiver are tuned to different frequencies or if you are too far from the transmitter, you will hear a beep tone in the headphones.
914 MHz or 864 MHz
The HEARO AUDIOSPHERE II is available for one of two frequency bands: 914 MHz (US and Canada) or 864 MHz (UK, Europe, etc.).
UHF headphones available separately
The HEARO 999 AUDIOSPHERE II system lets you share your listening enjoyment with other persons. You can operate your transmitter with several digital headphones simultaneously. Make sure to use digital wireless headphones operating in the same UHF frequency band as the HEARO 999 AUDIOSPHERE II.
Rack mount case
The HEARO 999 AUDIOSPHERE II features a 1 U half-rack case with removable feet. The optional RMU 60 rack mount kit allows you to install one or two units side by side in a 19" rack.
2.5 Four 3-D Sound Processing Techniques
The HEARO 999 AUDIOSPHERE II is the first device that provides four unique 3-D sound processing techniques in one unit:
-
IVA Individual Acoustics with 7 selectable ear matching functions for absolutely realistic, three-dimensional listening through headphones;
-
Dolby Surround Pro-Logic Decoder for perfect reproduction of hi-fi, TV, PC, or video sound in analog or digital Pro-Logic surround formats;
- Dolby Digital decoder for optimum reproduction of DVD multichannel sound (AC3);
VMAX for surround sound from a single pair of loudspeakers.
One drawback of headphone listening is the psychoacoustic phenomenon of "inside localization": the orchestra seems to play inside your head rather than in the room. AKG developed a binaural audio processing technique called IVA (Individual Virtual Acoustics) that uses so-called "ear matching functions" to model the way the head and pinnae change the arriving sound waves. Thus, the various sound sources will seem to be located outside your head even when you are using headphones.
2.5.1 IVA Individual Virtual Acoustics
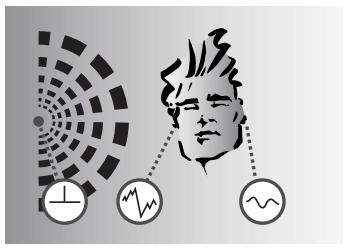
A: Natural hearing: Due to the effect of the head and pinnae, sound waves arriving at one ear differ from those arriving at the other. Amplitude and phase differences create a sense of spatial hearing.
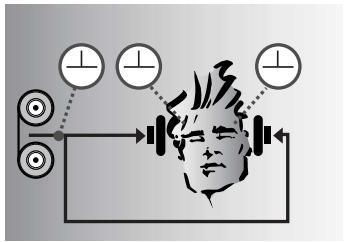
B: Listening through headphones: Amplitude and phase differences are eliminated. Sound sources are localized inside the head rather than in the room.
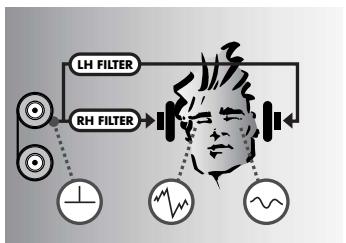
C: Listening through headphones with IVA processing: The ear matching function modifies the audio signals at the ears to resemble diagram A. This restores natural, spatial hearing.
The Dolby Surround Pro-Logic decoder integrated in the HEARO 999 AUDIOSPHERE II derives a center and a surround channel from a Pro-Logic encoded stereo signal. The IVA processor converts these signals to a binaural format equivalent to that reproduced by four high quality loudspeakers (3 front, 1 rear speaker). This lets you enjoy the 360^ listening experience of Dolby Surround even through headphones.
The HEARO 999 AUDIOSPHERE II uses an authentic Dolby Digital decoder licensed by Dolby Laboratories, Inc. The unique combination of a Dolby Digital decoder and IVA processing allows the simulation over headphones of five loudspeakers exactly at the positions specified by Dolby. All five loudspeaker channels provide full-bandwidth audio, and the high separation as specified by the Dolby standard prevents comb filter effects.
The HEARO 999 AUDIOSPHERE II derives the surround simulation from the unprocessed input signal with no added spatial effects, so you will perceive the same acoustics over headphones as you would in the theater. This will preserve the original atmosphere of every movie unchanged.
The VMAx processor enables a single pair of loudspeakers to provide surround sound. Similar to IVA, VMAx processing derives three-dimensional sound from analog or digital input signals. VMAx will simulate the appropriate loudspeakers for Dolby Surround Pro-Logic and Dolby Digital encoded input signals.
VMAx also allows you to increase the virtual distance between closely spaced stereo loudspeakers (e.g., speakers placed next to a computer monitor).
The processed signal is available at the analog audio output so you can use a standard stereo amplifier to reproduce the VMAX signal.
2.5.2 Dolby Surround Pro-Logic Decoder
2.5.3 Dolby Digital Decoder
2.5.4 VMAX Processor
2.6 Controls
2.6.1 Front Panel
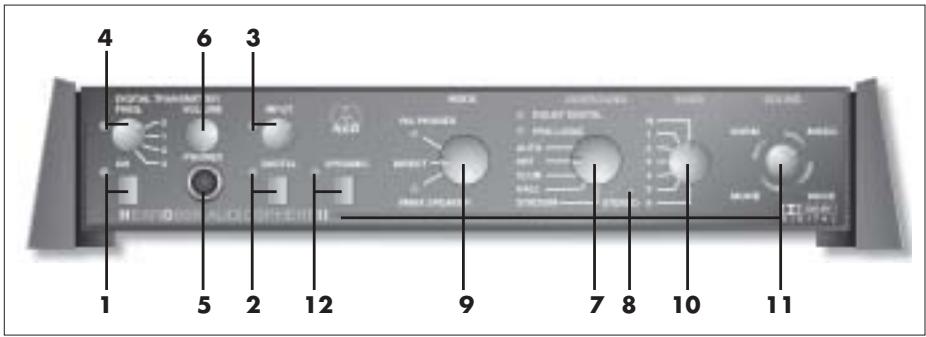
- ON: This pushbutton switches the unit on and off. The green LED next to the ON switch lights to indicate the unit is ON.
- DIGITAL: This pushbutton switch toggles between the analog and digital inputs. The green LED next to the DIGITAL switch lights to indicate the digital input has been selected.
- INPUT: This rotary control sets the level at the audio output. The bi-color LED next to the control indicates the signal level at the input to the audio circuitry: flickering/lighting green indicates optimum level range, red indicates overload. Selecting the digital input disables the INPUT control.
- FREQ.: This four-step rotary switch selects three different channels within the carrier frequency band of the integrated transmitter or switches the transmitter off ("0" position). The LED next to the FREQ. selector lights to indicate the transmitter is ON.
- PHONES: 1/4" stereo jack for connecting a pair of hardwire stereo headphones.
- VOLUME: This rotary control sets the volume of the headphones connected to the PHONES jack (5). The VOLUME setting does not affect the volume of the wireless headphones.
- SURROUND: This five-step rotary switch is located in the signal path between the input stage and the MODE switch. It switches the Dolby decoders on and off or adds one of three different reverb programs to normal stereo signals. The output signal of the SURROUND selector passes through the MODE switch and on to the IVA or VMAx processor or directly to the output.
AUTO: This mode automatically activates the Dolby Surround Pro-Logic or Dolby Digital decoder depending on whether a Pro-Logic or Dolby Digital signal is present at the input. One green LED each will light to indicate which decoder is currently active. If a normal stereo signal is present at the input, we recommend that you set the SURROUND selector to "OFF" in order to avoid undesired sonic results.
OFF: Both Dolby decoders are out of circuit and the input signal passes to the MODE selector (9) unchanged. The DOLBY DIGITAL and the PRO-LOGIC LEDs will extinguish.
CLUB, HALL, STADIUM: Acoustic simulations of three different venues of different sizes.
- STEREO: This green LED indicates the following modes:
| Stereo signal at the input and SUR-ROUND selector (7) in “OFF” position: | STEREO LED on |
| SURROUND selector (7) in “CLUB”, “HALL”, OR “STADIUM” position: | |
| SURROUND selector (7) in “AUTO” position: | STEREO LED off |
| MODE selector (9) in “DIRECT” position: | |
| MODE selector (9) in “IVA-PONES” or “VMAX” position and SURROUND selector (7) in “AUTO” position: |
- MODE: This three-step rotary switch selects the following modes:
IVA-PHONES: The IVA processor is active and affects the signal at the PHONES and LINE outputs as well as the signal transmitted to the wireless headphones. In this mode, the green LED below the IVA-PHONES label will be illuminated.
DIRECT: In this mode, all signal processors are out of circuit and all controls and indicators to the right of the MODE selector are disabled. You will hear the unchanged stereo input signal in the hardwire and wireless headphones and the loudspeakers
you may have connected to the HEARO 999 AUDIOSPHERE II. The IVA-PHONES and VMAx LEDs extinguish.
A Dolby Digital encoded signal present at the input will be automatically mixed down to a Pro-Logic encoded stereo signal.
VMAX: The VMAX processor derives a 3-D signal for loudspeaker reproduction. In VMAX mode, the green LED above the VMAX label will be illuminated.
In all modes, the same signal will be available at all outputs (PHONES, LINE OUT, built-in transmitter).
- EARS: The shape of the outer ear changes the waveform of impinging sound in a unique way that differs from person to person. Using headphones defeats these outer ear transfer functions because the sound sources are located immediately in front of the ears. The result is unnatural sound.
In order to provide the most realistic headache reproduction possible, AKG measured many outer ear transfer functions and electronically modeled seven representative "ear curves".
In IVA-PHONES mode, the EARS selector offers a choice of one standard ear curve ("N") and six other ear curves for you to select the one that sounds the most natural to you. In DIRECT and VMAx modes, the EARS selector is disabled.
- SOUND: In IVA-PHONES mode, this 12-step rotary switch lets you select four different sound programs, each with three speaker spreader settings (close, medium, or wide virtual stereo spread):
NORM: Basic sound program for all types of program material.
MUSIC: Linear response for a neutral sound rich in detail.
VOICE: This sound program has been optimized for intelligibility of speech and is therefore recommended for radio and TV programs with a high proportion of speech, or for monitoring during speech and vocal recording sessions in the studio.
MOVIE: Simulates the typical sound of theater speakers and is therefore recommended for videos and DVD movies in Dolby Surround or Dolby Digital formats.
In VMAx mode, only the speaker spreader function without the sound programs will be available.
- DYNAMIC: The dynamic range (the difference between the loudest and softest passages) of Dolby Digital encoded input signals may sometimes be so great that soft dialogs may become unintelligible.
With the DYNAMIC switch IN, the dynamic range is reduced. This means that very soft passages will automatically be raised in level while very loud passages are attenuated so the average perceived loudness of the signal rises. The green LED next to the switch is lit. With the DYNAMIC switch OUT, the full dynamic range of the input signal is preserved and the green LED next to the switch extinguishes. The difference between the loudest and softest passages is the same as in the original signal.
Important Note:
Note:
2.6.2 Rear Panel
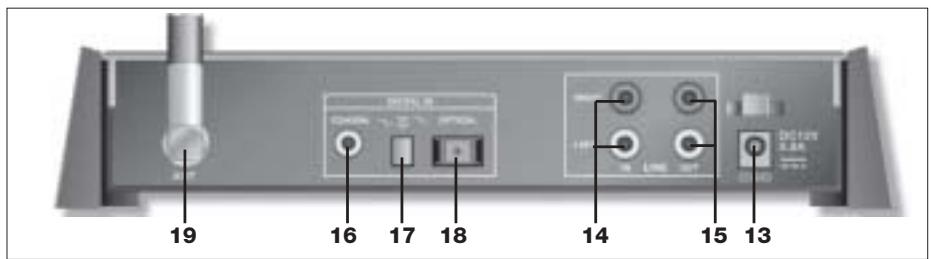
- POWER: Input jack for the AC adapter.
- LINE IN LEFT/RIGHT: RCA audio input jacks for analog stereo or Pro-Logic encoded signals.
- LINE OUT LEFT/RIGHT: Analog RCA audio output jacks. The output level depends on the setting of the INPUT control (3). The VOLUME control (6) does not affect the output level.
- COAXIAL: RCA input jack for an optional coaxial cable for interfacing with a digital audio source with a coaxial output.
- DIGITAL IN: Pushbutton switch that activates either the coaxial or the optical digital input.
- OPTICAL: Input connector for the supplied fiber optical cable for interfacing with a digital audio source with an optical output.
19.ANT: Flexible, swiveling UHF transmitting antenna.
3 Audio and Power Connections
Note:
You may use the transmitter either free-standing or install it in a 19" rack using the optional RMU 60 rack mount kit. (If you install the transmitter in a 19" rack, do not make your audio and power connections before installing the transmitter.)
3.1 Connecting to Audio Sources
Refer to connecting diagram (fig. 1) and Table 1.
- Before connecting the HEARO 999 AUDIOSPHERE II to your audio source, switch power to your audio source OFF.
- Make the desired audio connections. You can connect the HEARO 999 AUDIOSPHERE II to any analog headphones output (mini jack or 1/4 jack), to the LINE or REC output of your amplifier, or to an optical or coaxial digital output. To connect the transmitter to a coaxial output, use a commercial connecting cable with an RCA connector at each end (not supplied with the transmitter).
| Analog audio source | HEARO 999 AUDIOSPHERE II | ||
| Headphone output | LINE IN | supplied | Connecting cable |
| Mini jack | L/R (2 x RCA jacks) | AK 2 | |
| 1/4" jack | L/R (2 x RCA jacks) | AK 2 + stereo adapter | |
| LINE OUT/REC OUT | LINE IN | Connecting cable | |
| 2 x RCA jacks | L/R (2 x RCA jacks) | AK 1 | |
| Digital audio source | DIGITAL IN | Connecting cable | |
| Optical output | OPTICAL | DK 1 | |
| Coaxial output | COAXIAL | Coaxial cable | |
Table 1: Audio connections vs. required cables.
Note:
When using an analog audio source, check that the DIGITAL switch (2) is OUT. When using a digital audio source, check that the DIGITAL switch (2) is IN.
Note:
You can connect each digital input to a digital audio source and use the DIGITAL IN switch (17) to toggle between the two audio sources.
3.2 Audio Outputs
3.2.1 Connecting to a Stereo Amplifier
- Switch power to your audio source OFF.
- Use the supplied AK 1 RCA cables to connect the "TAPE IN", "AUX IN", or "PLAYBACK IN" jacks on the amplifier to the LINE OUT jacks (15) on the HEARO rear panel.
- Refer to the operating manual of your amplifier for instructions on how to listen to and mute the signal at the TAPE", "AUX", or "PLAYBACK" input. On most amplifiers, you can push the "TAPE MONITOR" switch IN to listen to the processed signal and OUT to cut the processed signal.
3.2.2 Connecting Stereo Headphones
- Connect the stereo jack plug on your hardwire stereo headphones to the PHONES jack (5). You can use the VOLUME control (6) to set the volume of the headphones.
3.3 Connecting to Power
Refer to fig. 2.
- Connect the DC cable on the supplied AC adapter to the POWER jack (13) on the HEARO rear panel.
- Check that the AC voltage stated on the AC adapter is the same as that available in your country. If it is, connect the AC adapter to a convenient AC outlet.

4 Operating Notes
4.1 Important Notes
Before setting up your system, please remember the following points:
- Operating switches on or connecting the HEARO 999 AUDIOSPHERE II to your audio source may cause clicks which at high volume settings may affect your hearing. Therefore, be sure to set the VOLUME control on the wireless headphones or the VOLUME control (6) on he HEARO to minimum before switching between different sources (tuner, turntable, CD player, etc.) or connecting the HEARO.
- Listening over headphones at high volume levels, particularly over extended periods of time, may damage your hearing.
- The transmitter incorporated in your HEARO 999 AUDIOSPHERE II is a radio frequency device that conforms to the strict European and FCC standards. For physical reasons that are not related to the quality of the product, extremely strong interference sources may affect reception. In order to maintain interference-free listening pleasure, do not operate your HEARO 999 AUDIOSPHERE II in the close vicinity of radio equipment, cel
lular telephones, or directly above TV or computer monitor picture tubes. The supplied connecting cables are long enough to allow the HEARO 999 AUDIOSPHERE II to be placed at a safe distance from interference sources.
Interference caused by other users of the same frequency band are beyond AKG's control.
If you use the HEARO 999 AUDIOSPHERE II with wireless headphones, you will first need to charge the batteries in the headphones, referring to the instruction manual that comes with your headphones.
- Switch ON the audio source to which the HEARO 999 AUDIOSPHERE II is connected.
- Push the ON switch (1) to switch the HEARO 999 AUDIOSPHERE II ON.
- Point the antenna (19) straight upward.
- Use the DIGITAL switch (2) to activate either the LINE IN analog input (the DIGITAL LED is dark) or the DIGITAL input (the DIGITAL LED is lit).
To activate the OPTICAL input push the DIGITAL IN switch (17) IN, to activate the COAXIAL input push the DIGITAL IN switch (17) OUT. (You can not, however, listen to both audio sources simultaneously.)
- Use the INPUT control (3) on the HEARO front panel to set the input level such that the INPUT LED next to the INPUT control (3) will flicker green in step with the input signal or light green steadily, occasionally flashing red on extremely loud sounds. Turn the INPUT control (3) CCW just enough to stop the INPUT LED flashing red.
There is no need to set the input level for digital input signals. Therefore, the INPUT control (3) is disabled as soon as you push the DIGITAL switch (8) IN.
You can use the HEARO 999 AUDIOSPHERE II with both digital wireless and hardwire stereo headphones.
- Switch the headphones ON. The green POWER LED on the headphones will illuminate Note that the transmitter incorporated in the HEARO 999 AUDIOSPHERE II will not come on until audio signal is present at the transmitter input.
As soon as audio signal is present at the transmitter input, the FREQ. LED (4) on the HEARO will illuminate green.
If no signal arrives at the transmitter input for approx. 3 minutes, the built-in transmitter will automatically switch off and the FREQ. LED (4) will extinguish. The PHONES and LINE outputs, though, remain active.
If the FREQ. selector (4) is in the "0" position, the transmitter is out of circuit. To switch the transmitter back on, set the FREQ. selector (4) to "1", "2", or "3".
- Set the frequency selector on the headphones to the same channel as the FREQ. selector (4) on the transmitter.
If you hear noise or beep sounds on the headphones, set both the FREQ. selector (4) on the HEARO and the frequency selector on the headphones to a different channel.
- Set the VOLUME control on the headphones to the desired volume level.
Beep sounds audible in the headphones mean that the received signal is too weak, the headphones receive no signal, or that the headphones are tuned to a different frequency than the transmitter. Move closer to the transmitter or repeat step 2 above.
- Set the FREQ. selector (4) to "0" to switch the built-in transmitter out of circuit.
- Connect the stereo jack plug on your hardwire stereo headphones to the PHONES jack (5).
- Use the VOLUME control (6) to set the volume of the headphones.
To adjust your HEARO 999 AUDIOSPHERE II to your hearing with extra precision, visit http://www.akg.com and go to "Downloads" to download two dedicated test signals in WAV or MP3 format. Use the first signal, "Applause", to make a shortlist of the best ear matching curves. The second signal, "Acoustic Guitar Solo", is a pure mono signal (identical signals in the left and right channels) for "choosing the winner".
Of course, you may as well use applause and a mono signal rich in transients (such as a solo piece for acoustic guitar) from an existing sound carrier.
- Set the MODE selector (9) to "DIRECT".
- Set the SOUND selector (11) to one of the three "MUSIC" positions.
- Start the "Applause" test signal.
- Set the MODE selector (9) to "IVA PHONES" and the EARS selector (10) to "N". Set the MODE selector (9) to "DIRECT" to compare the sound of the processed test signal with the unprocessed test signal.
- Make a list of the three or four ear matching curves where you perceived the smallest
4.2 Setting Up the System
Note:
4.3 Using Headphones
4.3.1 Wireless Headphones
Note:
4.3.2 Hardwire Headphones
4.3.3 Test Signals for Choosing Ear Matching Curves
Making a shortlist
4 Operating Notes
change in sound compared to the unprocessed test signal, and which you felt sounded the most natural.
Choosing the winner
- Set the MODE selector (9) to "IVA-PHONES" and start the "Acoustic Guitar Solo" test signal.
- Use the EARS selector (10) to compare the ear matching curves on your shortlist with one another.
- Make a list of those ear curves where the signal most closely approximated a "point source" (a sound source of zero width). For this test, it makes no difference whether you perceive the signal inside or outside your head.
- The ear matching curve that provides the closest approximation to a point source is the one most congruent with the transfer function of your ears. Your HEARO 999 AUDIOS-PHERE II is now optimally adjusted to your ears for natural spatial hearing over headphones.
4.4 Using Loudspeakers
To increase the virtual distance ("stereo spread") between two closely spaced loudspeakers (e.g., computer speakers, near-field monitors),
For connections refer to section 3.2.1 and fig. 1.
- Set the MODE selector (9) to "VMAX". The VMAX LED will illuminate.
- Set the SURROUND selector (7) to "OFF" for straight stereo mode or to "CLUB", "HALL", or "STADIUM" for stereo reproduction with room simulation. The STEREO LED will illuminate.
- Set the SOUND selector (11) to "close" (< 10^) , "medium" (approx. 20^ ), or "wide" (>30^) depending on the base angle between your loudspeakers. The VMAx processor will simulate for each of these settings a virtual loudspeaker pair with a base angle of 60^ . Remember that in VMAx mode the SOUND selector (11) will only change the virtual stereo spread without changing sound programs.

5 Cleaning
We recommend cleaning the surfaces of your HEARO 999 AUDIOSPHERE II using a soft cloth moistened with water.

6 Troubleshooting
| Symptom | Possible Cause | Remedy |
| No sound. | 1. AC adapter is not connected to HEARO and/or AC outlet.2. HEARO is OFF or not connected to audio source.3. Connected audio source is switch- ed off.4. Wrong input selected.5. INPUT control is at zero.6. Volume control on audio source is set too low.7. Batteries in wireless headphones are low.8. Wireless headphones are switched off.9. Volume control on headphones is at zero. | 1. Connect AC adapter to HEARO and/or AC outlet.2. Switch HEARO on or connect to audio source.3. Switch audio source on to feed signal to HEARO input.4. Activate the input that is actually used (see sections 4.3.1 and 4.3.2).5. Turn up INPUT control (refer to sec- tions 4.2.1 and 4.2.2)6. Increase audio source volume to the point that transmitter switches on.7. Charge batteries.8. Switch wireless headphones on.9. Set volume control to desired level. |
| Mono sound | 1. Connected audio source operates in mono mode. 2. Transmitter is not correctly connected to audio source. | 1. Switch audio source to stereo mode. 2. Check cable connection between HEARO and audio source. |
| Noise | 1. Audio level at transmitter input is too low. 2. Input signal is noisy. 3. Batteries in wireless headphones are low. | 1. Turn up audio source volume control and/or INPUT LEVEL control on HEARO. 2. Check audio source. 3. Charge batteries. |
| Distorted sound | 1. Audio level at transmitter input is too high. 2. Batteries in wireless headphones are low. | 1. Turn down audio source volume control and/or INPUT control on HEARO. 2. Charge batteries. |
| Intermodulation noise | 1. Electrical appliances with poor interference protection. 2. Audio source or sound carrier defective. | 1. Switch off any "suspicious" appliances (if possible). 2. Check audio source or sound carrier. |
| Headphones receive unwanted transmitters | 1. A neighbor uses similar UHF headphones. | 1. Set FREQ. selector on HEARO and frequency selector on headphones to same channel. |
| Overemphasized bass or treble range | 1. Bass or treble control settings on audio source. | 1. Readjust bass or treble controls. |
| Beep sounds heard on wireless head-phones | 1. Transmitter and headphone carrier frequencies do not match. 2. No or weak reception. | 1. Set FREQ. selector on HEARO and frequency selector on headphones to same channel. 2. Change listening position, move closer to transmitter. |
| Momentary reception dropouts (crackling) | 1. Interference from other equipment. 2. Signal too weak due to reception disturbances. | 1. Use FREQ. selector on HEARO and frequency selector on headphones to change carrier frequency. 2. Change listening position, move closer to transmitter. |
| INPUT LED flashing red. | 1. SURROUND selector at "CLUB", "HALL", or "STADIUM" although Dolby Digital signal is present at input. | 1. Set SURROUND selector to "AUTO". |
| Modulation: | GFSK |
| Carrier frequency band: | 914 or 864 MHz (LPD band) |
| Audio inputs: | analog: RCA connectors left/right, 20 bit converters |
| digital: 1 x coaxial, 1 x optical (selectable) | |
| Outputs: | analog audio output on left/right RCA jacks, with 20 bit converters |
| Digital signal processing: | 20/24 bit resolution |
| Audio bandwidth: | 18 Hz to 24 kHz |
| INPUT LED: | -18 dB to 0 dB: green; ≥0 dB: red |
| Power supply: | 12 VDC, 300 mA |
| Radiation angle: | 360° |
| Weight: | approx. 1.3 lbs. (590 g) |
| Max. range: | approx. 165 ft. (50 m) under ideal transmission conditions (free field) |
This equipment (864 MHz version only) conforms to the following standards: EN 301489-9 V1.3.1; EN 301357-2 V1.2.1; EN 61000-3-2:2000; EN 61000-3-3:1995+A1:2001; EN 60950:2000; EN50371:2002
Page
Cher client/chere clientele,
- STEREO: Anything LED, regardless of its color, is assigned a color code.
DECLARATION OF CONFORMITY
Document No.351/06-2003 replaces No.
Type of Product: Wireless Dolby Surround Headphone Set
Brand, Model No.: HEARO 999 AUDIOSPHERE II (Transmitter 864MHz) and HEARO DIGITAL (Receiver 864MHz) (Including power supply)
We declare that the above mentioned product is in conformity with the following European Directive:
No.99/5 EC; Radio Equipment and Telecommunications Terminal Equipment
The conformity is achieved by fulfilling the following European Standard(s):
EN301489-9V1.3.1;EN301357-2V1.2.1;EN61000-3-2:2000 EN61000-3-3:1995+A1:2001;EN60950:2000;EN50371:2002
Product examination was carried out by:
TÜV Österreich, Notified Body 0408
Deutschstrasse 10
1230 Wien, Austria
Manufacturer's Signature:
hucocb Managing Director Dr. Hugo Lenhard-Backhau
This declaration certifies the accordance with the above mentioned EC-Directive but does not assure certain attributes of the product.
AKG Acoustics GmbH hereby declares that the product HEARO 999 AUDIOSPHERE II complies with the essential requirements and other relevant provisions of Directive 1999/5/EC.
H A Harman International Company
AKG Acoustics GmbH
BodenseestraBe 228, D-81243 Munchen/GERMANY, Tel: (+49 89) 87 16-0, Fax: (+49 89) 87 16-200,
www.akg-acoustics.de, e-mail: info@akg-acoustics.de, Hotline: (+49 89) 87 16-22 50, hotlinede@akg.com
AKG ACOUSTICS, U.S.
914 Airpark Center Drive, Nashville, TN 37217, U.S.A., Tel: (+1 615) 620-3800, Fax: (+1 615) 620-3875, www.akgusa.com, e-mail: akgusa@harman.com
For other products and distributors worldwide see our website: www.akg.com

- FCC Statement
- Getting Started Quickly
- Using Wireless Headphones
- Using Loudspeakers
- Safety and Environment
- Description
- Introduction
- Unpacking
- Optional Accessories
- General Description
- Four 3-D Sound Processing Techniques
- IVA Individual Virtual Acoustics
- Dolby Surround Pro-Logic Decoder
- Dolby Digital Decoder
- VMAX Processor
- Audio and Power Connections
- Note:
- Connecting to Audio Sources
- Audio Outputs
- Connecting to a Stereo Amplifier
- Connecting Stereo Headphones
- Connecting to Power
- Operating Notes
- Important Notes
- Setting Up the System
- Using Headphones
- Wireless Headphones
- Hardwire Headphones
- Test Signals for Choosing Ear Matching Curves
- Making a shortlist
- Choosing the winner
- Using Loudspeakers
- Cleaning
- Troubleshooting
- DECLARATION OF CONFORMITY
Brand : AKG
Model : HEARO 999 AUDIOSPHERE II
Category : Headphones