
DIAGRAM 395 - Rotary tool DREMEL - Free user manual and instructions
Find the device manual for free DIAGRAM 395 DREMEL in PDF.
| Product type | Multifunction rotary tool |
| Brand | DREMEL |
| Model | DIAGRAM 395 (395) |
| No-load speed | 10 000 to 33 000 rpm (variable speed) |
| Power supply | Mains, 220-240 V, 50/60 Hz |
| Rated power | 125 W (estimated) |
| Dimensions (L x W x H) | Approx. 18 x 4 x 4 cm |
| Weight | Approx. 0.3 kg |
| Sound level | 75 dB(A) (according to EN 50144) |
| Vibration (hand-arm) | 7.6 m/s² (hand-arm method) |
| Chuck type | Collet with nut |
| Max. shank diameter | 3.2 mm (1/8 inch) |
| Shaft lock | Yes, for accessory change |
| Main functions | Grinding, sanding, cutting, polishing, engraving, cleaning, drilling |
| Accessories included | Grinding wheels, sanding bands, cutting discs, brushes, etc. (see manual) |
| Maintenance and cleaning | Clean with a dry cloth; replace worn brushes at an approved service center |
| Safety | Automatic shutdown in case of overload; use of goggles and gloves recommended |
| Spare parts and repairability | Repairs by qualified technician; genuine parts recommended |
| Warranty | 2 years (1 year for BASIC) from date of purchase |
| General information | Compliant with EN 50144, EN 55014, directives 73/23/EEC, 89/336/EEC, 98/37/EEC |
Frequently Asked Questions - DIAGRAM 395 DREMEL
User questions about DIAGRAM 395 DREMEL
0 question about this device. Answer the ones you know or ask your own.
Ask a new question about this device
Download the instructions for your Rotary tool in PDF format for free! Find your manual DIAGRAM 395 - DREMEL and take your electronic device back in hand. On this page are published all the documents necessary for the use of your device. DIAGRAM 395 by DREMEL.
USER MANUAL DIAGRAM 395 DREMEL
* diagram / Diagramm / schema / figur / kasto kaivio / figura / grafico / diagrama / oydpqma / diagramot / sekil / pnc. 395
| GB | INSTRUCTIONS | page | 2-9, 20-23, 72 |
| D | HINWEISE | Seite | 2-9, 20, 24-26, 72 |
| F | INSTRUCTIONS | page | 2-9, 20, 27-29, 72 |
| NL | INSTRUCTIES | bladz. | 2-7, 10-11, 20, 30-32, 72 |
| S | INSTRUktionER | sida | 2-7, 10-11, 20, 33-35, 72 |
| N | ANVISNINGEN | side | 2-7, 10-11, 20, 36-38, 72 |
| FIN | OHJEET | sivu | 2-7, 12-13, 20, 39-41, 72 |
| DK | INSTRUCTION | side | 2-7, 12-13, 20, 42-44, 72 |
| I | ISTRUZIONI | pag. | 2-7, 12-13, 20, 45-47, 73 |
| E | INSTRUCCIONES | pag. | 2-7, 14-15, 20, 48-50, 72 |
| P | INSTRUÇOES | pag. | 2-7, 14-15, 20, 51-53, 73 |
| GR | ΟΔΗΓΙΕΣ | σελδα | 2-7, 14-15, 20, 54-56, 73 |
| H | LEΙRΑS | oldal | 2-7, 16-17, 20, 57-59, 73 |
| CZ | POKΥNY | strana | 2-7, 16-17, 20, 60-62, 73 |
| PL | INSTRUKCJA | strona | 2-7, 16-17, 20, 63-65, 73 |
| TR | KILAVUZ | sayfa | 2-7, 18-20, 66-68, 73 |
| RU | ΗΝΥΚμή | стараца | 2-7, 18-20, 69-71, 73 |
Dremel European Sales Office - The Netherlands
02/01 2610913352
DREMEL
http://www.dremel.com

2
| J | 395 |
| K | 125 W |
| L | 10000 - 33000 |
| M | 0,8 - 3,2 mm |
| N | 0,55 Kg |
| J | 285 |
| K | 125 W |
| L | 15000 & 33000 |
| M | 0,8 - 3,2 mm |
| N | 0,54 Kg |
| J | K | L | M | N | |
| GB | Model | Input | No Load Speed R.P.M. | Collet Capacity | Weight |
| D | Modell | Leistungsaufnahme | Drehzahl unbelastet U/Min. | Spannkapazität | Gewicht |
| F | Type | Puisance absorbée | Vitesse à vide tr./min | Capacité pince | Poids |
| NL | Model | Opgenomen vermogen | Toerental onbelast o.p.min. | Kapaciteit spantang | Gewicht |
| S | Modell | Ingängseffekt | Hastigehet obelastad varv/min. | Kapacitet spannhylsa | Vikt |
| N | Modell | Watt | Tomgangshastigkeit o./.min. | Kapasitet chuck | Vekt |
| FIN | Malli | Teho | Kuormittamaton nopeus r/min | Hylsyn koko | Paino |
| DK | Model | Effekt | Hastighed ubels/min. | Kapacitet tang | Vægt |
| I | Modello | Potenza assorbita | Velocità a vuoto giri/min. | Capacità pinza | Peso |
| E | Modelo | Potencia | Velocidad en vacio r.p.min. | Capacidad de la boquilla de sujeción | Peso |
| P | Modelo | Potência | Velocidade RPM | Capacidade da pinça | Peso |
| GR | Movtêλo | Ioçúnç κινητήρα | Táxúŋtα χωρίς φροτίου/στρ. avá λεπτό | Yπòδoχή σφιγκτήρα | Báρος |
| H | Modell | Telijesítíményfelvétel | Terheletlen fordulatszám/perc | Feszítési méret | Súly |
| CZ | Typ | Příkon | Oráčky naprázdno ot./min. | Max. prüměr pro upnutí | Hmotnost |
| PL | Model | Pobór mocy | Prědkóstć obrotowa w biegu luzem | Średnica mocowania uchwytu | Cięzar |
| TR | Model | Girgisçuü | Boştaki devir sayisi, dev/dak | Gérme kapasitesi | Ağırkışi |
| RU | Modélb | ПOTrapebněmaюцость | Сkorocstь врацения бez hagrузки, об/mин | Диаметратрona | Maccà |

3
GB Mounting Accessories (text page 22)
D Montieren des Zubehors (Textseite 25)
Montage des accessoires (page texte 28)
NL Aanbrengen van accessoires (tekstpage 31)
S Montering av tillbehör (se sidan 34)
N Montering av utstyr (tekst side 37)
FIN Tarvikkeiden asennus (tekstisivu 40)
DK Pasaetning af tilbehør (tekst side 43)
1 Montaggio degli accessori (pagina di testo 46)
E Montaje de los accesos (texto en la page 49)
P Montagem de acessosios (pagina 52)
GπoV aToTOnTeMoeTe TaEaopmtmuata (eλiδa Kεμεvou 55)
A tartozekok felszerelése (szöve oldal 58)
CZ Upinaciprispusuensstvi (text na strane 61)
PLMocowanie narzędzi roboczych wuchwycie (tekst, strona 64)
TR Aksesuarin takilmasi (metin sayfasi 67)
RU YctaHOBka akceccyapOB (CM. TEKCT Ha cTp. 70)

4
GB Mandrel assembly
D Dorn
Ensemble mandrin
NL Montage opspandoorn
S Satta fast spindeln
Montering av spindel

FIN Karan kokoaminen
DK Tilbehortil spindle
① Gruppo perno
E Conjunto del mandril
P Conjunto de mandris
GR Suvaopmooyon Tou Biodtou stEixouc

Reinforced Cut-Off Wheels
Felt Polishing Wheel
Filz-Polierscheiben
CE DECLARATION OF CONFORMITY
We declare under our sole responsibility that this product is in conformity with the following standards or standardized documents:
EN 50 144, EN 55 014, in accordance with the regulations 73/23/EEC, 89/336/EEC, 98/37/EEC.


CE TODISTUS STANDARDIMUKAISUDESTA
Totadistame tāj va jastamme ykin sitiāt, ātī tāmā tute on alauteletiūn standardāj atStandardomisaiaskirov qautimestu mukenān EN 50144, EN 55104, seuravirus sajjtonjenu mukaisesti 73/23/EWG, 89/336/EWG, 98/37/EWG.

01 DREMEI Europe
J.P.Houben

INFORMATION ON NOISE/VIBRATION
The noise level when working can exceed 85 dB(A) Wear ear protection!
Measured in accordance with EN 50 144 the sound pressure level of this tool is 75dB(A) and the vibration 7.6~m / s (hand-arm method).
MELU-/TARINATIETO
CE STRVZUJICI PROHLASENI
Pohvzrujeme na opodovnost, Zo temyo vrobek opevodá nadésučijnímrom na腰部 nostramovn podskandin: EN 50 144, EN 55 014, pode ulastoveni směžnic 73/23/EWG, 89/336/EWG, 98/37/EWG.

01 DREMELE Europe
J.P.Houben

INFORMACE O HLUCNOSTI A VIBRAC
Mira hucnostji piri praci muze pfesahnout 85 dB(A) Brouviet chronie sluchul.
Méronie podie EN 50 144 cini tlak houkvé viny toto pistroje 75 dB(a), a vibraci 16.5 m/s² (metoda ruka-puzé).

CE DÉCLARATION DE CONFORMITE
CE KONFORMITETSFÖRKLARING
VI interg ar assurant for, att dndahti stvenstamme mad folande.
VII interg ar assurant for, att dndahti stvenstamme och aktrismetia 7/23/EEW,89/366/EEW,98/37/EEW.


LJUD/VIBRATIONSDATA
Ljudhivan Vid arabete kan overskrifa 85 dB(A). Anynd horsolskyddl.
Ljutskynrivn sum ovumppits enigl 50 EN 44 rpaenna masklin 75 dB(A), och vibration 7,6 m/s² (hand-arm method).

CE SAMSVARSEKLAERING
3AABJIIEHME COOTBETCTBNI
Mu NCHONOTBTCTBENHCTO 3AARJAMR, HTO 3T0 3AEDJIPE COOTBETCTBET CIEDYQUMIN CTANDAPTM INM TADAPTROKIOAHKM DOKYMHTAM EN 50 144 EN 55 014, B TOCOTBYSU M C HTPKYHM 73/23/EEC,89/336/EEC,98/37/EEC.

01 DREMELEurope
J.P.Houber

INΦOPMAUΩ OUIYMHOCTN BIBSPALM
Pn paocote ypoaeBwmyMoxetippeBaTe 80D3(A) Oeabe Ta H uyn 3aunntbHne pncncoc6bnHn
Pir i Kepemekere B o ccttctbntcno cr anatapdt EN 50 144 yoboeo.
B a Cn 76329800000000000000000000000000000000000000000000000000000000000000000000
RAÇÖES
exceder 85 dB(A).
··
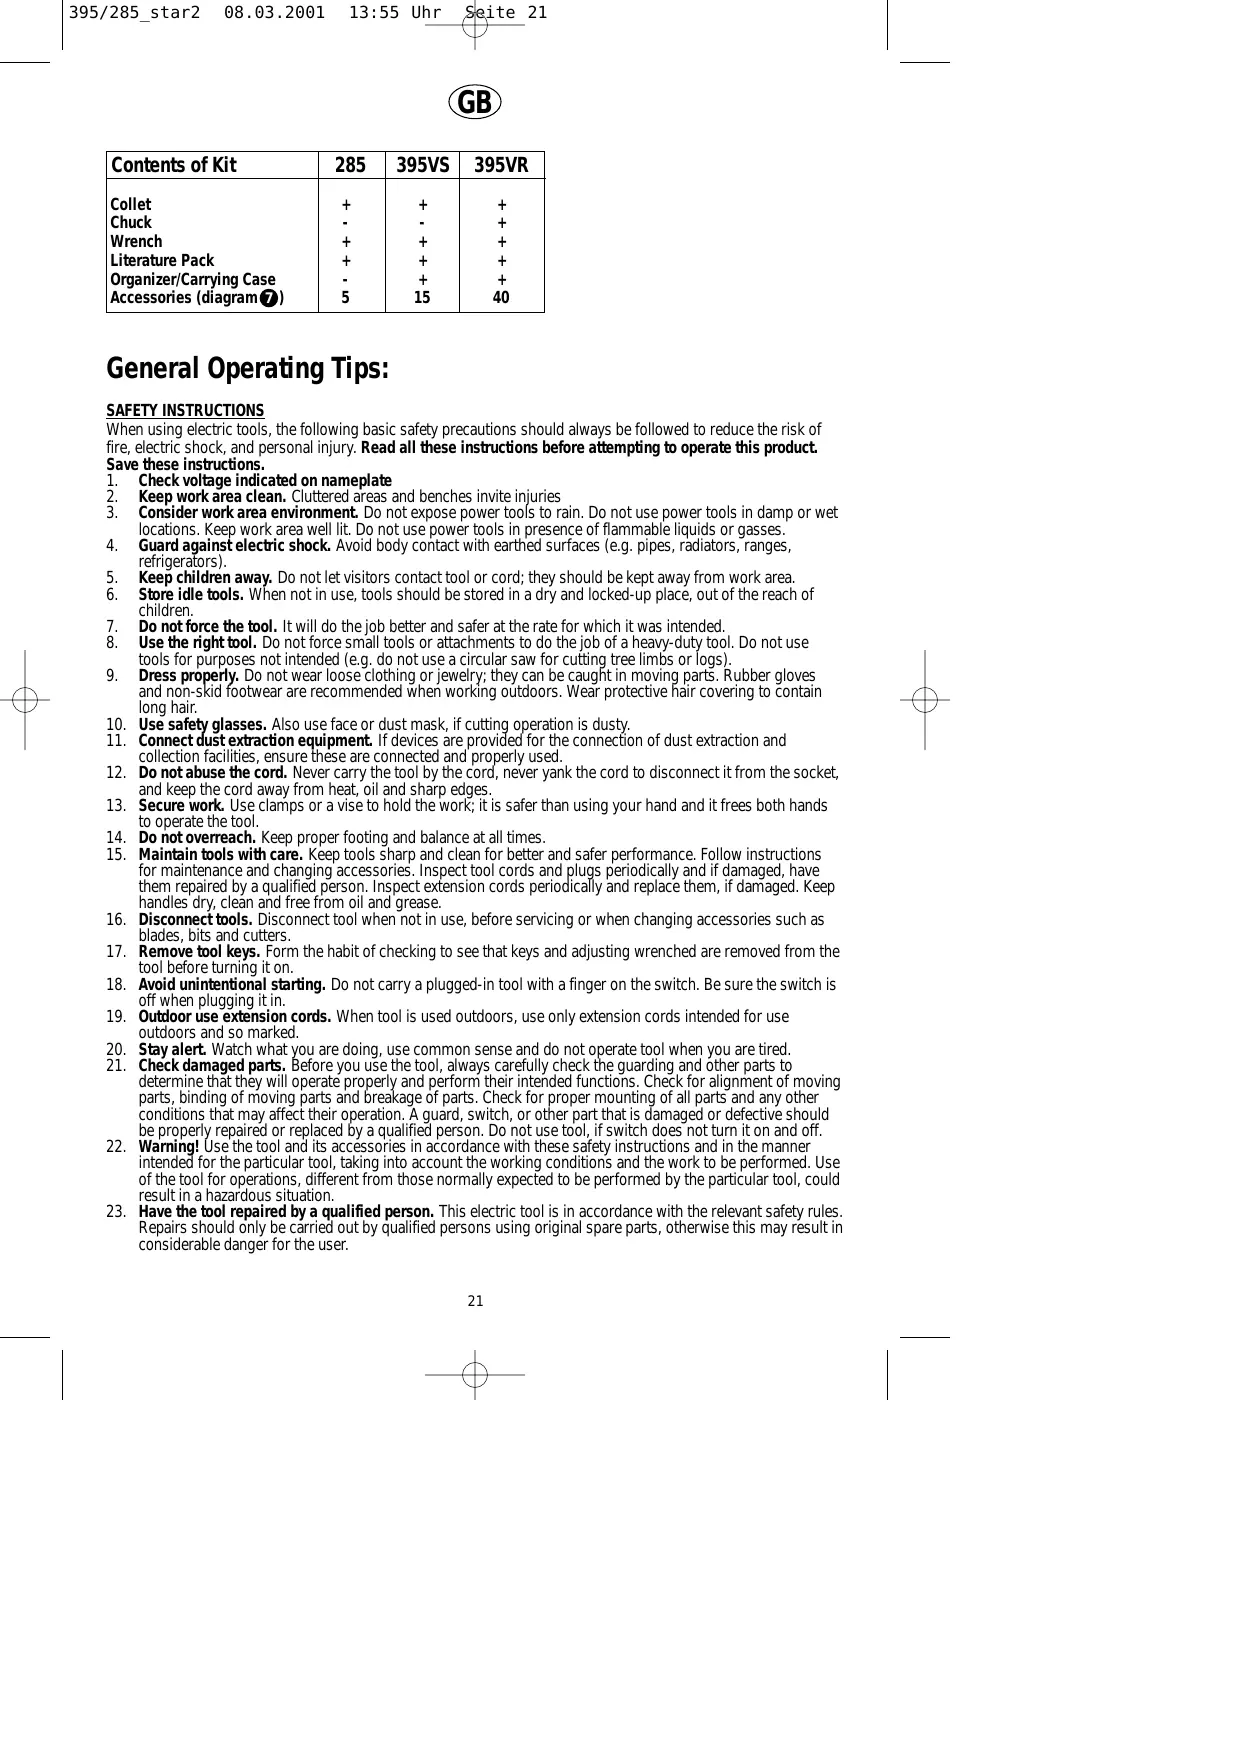
| Contents of Kit | 285 | 395VS | 395VR |
| Collet | + | + | + |
| Chuck | - | - | + |
| Wrench | + | + | + |
| Literature Pack | + | + | + |
| Organizer/Carrying Case | - | + | + |
| Accessories (diagram7) | 5 | 15 | 40 |
General Operating Tips:
SAFETY INSTRUCTIONS
When using electric tools, the following basic safety precautions should always be followed to reduce the risk of fire, electric shock, and personal injury. Read all these instructions before attempting to operate this product.
Save these instructions.
- Check voltage indicated on nameplate
- Keep work area clean. Cluttered areas and benches invite injuries
- Consider work area environment. Do not expose power tools to rain. Do not use power tools in damp or wet locations. Keep work area well lit. Do not use power tools in presence of flammable liquids or gasses.
- Guard against electric shock. Avoid body contact with earthed surfaces (e.g. pipes, radiators, ranges, refrigerators).
- Keep children away. Do not let visitors contact tool or cord; they should be kept away from work area.
- Store idle tools. When not in use, tools should be stored in a dry and locked-up place, out of the reach of children.
- Do not force the tool. It will do the job better and safer at the rate for which it was intended.
- Use the right tool. Do not force small tools or attachments to do the job of a heavy-duty tool. Do not use tools for purposes not intended (e.g. do not use a circular saw for cutting tree limbs or logs).
- Dress properly. Do not wear loose clothing or jewelry; they can be caught in moving parts. Rubber gloves and non-skid footwear are recommended when working outdoors. Wear protective hair covering to contain long hair.
- Use safety glasses. Also use face or dust mask, if cutting operation is dusty.
- Connect dust extraction equipment. If devices are provided for the connection of dust extraction and collection facilities, ensure these are connected and properly used.
- Do not abuse the cord. Never carry the tool by the cord, never yank the cord to disconnect it from the socket, and keep the cord away from heat, oil and sharp edges.
- Secure work. Use clamps or a vise to hold the work; it is safer than using your hand and it frees both hands to operate the tool.
- Do not overreach. Keep proper footing and balance at all times.
- Maintain tools with care. Keep tools sharp and clean for better and safer performance. Follow instructions for maintenance and changing accessories. Inspect tool cords and plugs periodically and if damaged, have them repaired by a qualified person. Inspect extension cords periodically and replace them, if damaged. Keep handles dry, clean and free from oil and grease.
- Disconnect tools. Disconnect tool when not in use, before servicing or when changing accessories such as blades, bits and cutters.
- Remove tool keys. Form the habit of checking to see that keys and adjusting wrenched are removed from the tool before turning it on.
- Avoid unintentional starting. Do not carry a plugged-in tool with a finger on the switch. Be sure the switch is off when plugging it in.
- Outdoor use extension cords. When tool is used outdoors, use only extension cords intended for use outdoors and so marked.
- Stay alert. Watch what you are doing, use common sense and do not operate tool when you are tired.
- Check damaged parts. Before you use the tool, always carefully check the guarding and other parts to determine that they will operate properly and perform their intended functions. Check for alignment of moving parts, binding of moving parts and breakage of parts. Check for proper mounting of all parts and any other conditions that may affect their operation. A guard, switch, or other part that is damaged or defective should be properly repaired or replaced by a qualified person. Do not use tool, if switch does not turn it on and off.
- Warning! Use the tool and its accessories in accordance with these safety instructions and in the manner intended for the particular tool, taking into account the working conditions and the work to be performed. Use of the tool for operations, different from those normally expected to be performed by the particular tool, could result in a hazardous situation.
- Have the tool repaired by a qualified person. This electric tool is in accordance with the relevant safety rules. Repairs should only be carried out by qualified persons using original spare parts, otherwise this may result in considerable danger for the user.
GB
DREMEL TOOL SAFETY

Read and save this instruction manual and the enclosed safety instructions
Always keep the cord away from moving parts of the tool
- When you put away the tool, switch off the motor and ensure that all moving parts have come to a complete standstill
In case of electrical or mechanical malfunction, immediately switch off the tool and disconnect the plug
Use completely unrolled and safe extension cords with a capacity of 16 Amps (U.K. 13 Amps)
Only use the original DREMEL accessories which can be obtained from your DREMEL dealer.
- Before using accessories always compare the maximum allowed r.p.m. of that specific accessory with the r.p.m. of the tool
This tool should not be used by people under the age of 16 years
- Never use grinding wheels over 114'' (32 mm) 0
- Never use drill bits over 1/8'' (3.2 mm)
- Never use shaft lock while tool is running
- Store tool in locations where temperature will not exceed 50^
- Ensure that the collet size corresponds with the shaft size of the accessory
- Keep the air vent openings clean and uncovered
- Handle and store grinding/cutting discs carefully to avoid chipping and cracking
- Do not use damaged, deformed or vibrating grinding/cutting discs
For mounting/using non-Dremel accessories observe the instructions of the manufacturer concerned
Before using the tool
- ensure that accessory is correctly mounted and firmly tightened
- check if accessory runs freely by turning it by hand
- test-run tool for at least 30 seconds at highest no-load speed in a safe position
- stop immediately in case of considerable vibration or other defects and check tool to determine the cause
! Never use a cutting disc for side grinding
- When grinding metal, sparks are generated; keep other persons and combustible material from work area
- Wear protective glasses and gloves, hearing protection, a dust mask, and sturdy shoes; when necessary also wear an apron
- ! The accessory continues to rotate for a short time after the tool has been switched off
When connecting new 3-pin plug (U.K. only):
- Do not connect blue (=neutral) or brown (=live) wire in the cable of this tool to the earth terminal of the plug
If for any reason the old plug is cut off the cable of this tool, it must de disposed of safely and not left unattended
USE
-
On/Off Button "C" (diagram 1)
-
Switch on the tool and select speed by pushing the lever to the desired speed range.
Speed from 10,000 - 33,000 R.P.M.'s -
Mounting Accessories (diagram 3)

- To Loosen, push Shaft Lock button "D" and hold it, while turning the Collet Nut "A" (or chuck) by hand until the shaft locks preventing further rotation. If necessary use the Wrench, "E" to loosen the Collet Nut "A"
- Change accessories by inserting an accessory into the Collet "B" (or chuck) as far possible to minimize run out and unbalance
- With Shaft Lock button "D" engaged, tighten the Collet Nut "A"(or chuck) by hand until the accessory shank is gripped by the Collet "B". If necessary use the Wrench "E" to tighten the Collet Nut "A".
-
Avoid excessive tightening of the Collet Nut "A".
-
Holding and guiding the tool (see diagram 5)
-
pencil grip for precision work (engraving)
- paring knife hand grip for rough work (grinding)
- 2 hand golf grip ideal for when you need to keep the tool parallel to the work surface, i.e. using a cut-off wheel
GB
APPLICATION ADVICE
- Always practice on a piece of scrap material first to choose the right accessory and determine the optimum working speed
- Do not apply to much pressure on the tool; let the speed do the work for you
- Use only accessories that are recommended by the manufacturer for your model.
SPEED
There are 2 basic types of Rotary Tools: two-speed and variable speed models. On the two-speed model, there is a LOW and HIGH switch. When the switch indicator is on the "LOW" low setting, the tool runs at 15,000 RPM. When the switch indicator is on the "HIGH" high setting, the tool runs at about 33,000 RPM. On the variable speed model, there is a switch indicator with a black line on it. Slide to the number on the housing to select the operating speed needed from 10,000 - 33,000 RPM. You can refer to the charts on page 4,5,6 and 7 to determine the proper speed, based on the material being worked and the type of cutter or other accessory being used. These charts enable you to select both the correct accessory and the optimum speed at a glance.
The Settings for Approximate Revolutions Per Minute Rotary Tool Variable Speed Model 395
| Switch Setting | Speed Range |
| 1-2 | 10,000 - 14,000 RPM |
| 3-4 | 15,000 - 19,000 RPM |
| 5-6 | 20,000 - 24,000 RPM |
| 7-8 | 25,000 - 29,000 RPM |
| 9-10 | 30,000 - 33,000 RPM |
The speed of the rotary tool is controlled by setting this indicator on the housing.

Some rules of thumb in regard to speed:
- Plastic and materials that melt at low temperatures should be cut at low speeds.
- Polishing, buffing, and cleaning with a wire brush must be done at speeds below 15,000 RPM to prevent damage to the brush.
- Wood should be cut at high speed.
- Iron or steel should be cut at top speed if using tungsten carbide accessory, but at lower speeds if using high speed steel cutters. If a high speed steel cutter starts to chatter this normally means it is running to slow.
- Aluminum, copper alloys, lead alloys, zinc alloys and tin may be cut at various speeds, depending on the type of cutting being done. Use paraffin or other suitable lubricant on the cutter to prevent the cut material from adhering to the cutter teeth.
To aid you in determining the optimum operational speed for different materials and different accessories, we have constructed a series of tables that appear on diagram 6. By referring to these tables, you can discover the recommended speeds for each type of accessory. Look these tables over and become familiar with them.
Ultimately, the best way to determine the correct speed for work on any material is to practice for a few minutes on a piece of scrap, even after referring to the chart. You can quickly learn that a slower or faster speed is more effective just by observing what happens as you make a pass or two at different speeds. When working with plastic, for example, start at a slow rate of speed and increase the speed until you observe that the plastic is melting at the point of contact. Then reduce the speed slightly to get the optimum working speed.
Increasing the pressure on the tool is not the answer when it is not cutting as you think it should. Perhaps you should be using a different cutter, and perhaps an adjustment in speed would solve the problem. But leaning on the tool seldom helps.
MAINTENANCE AND REPAIR
- Keep tool and cord clean (some household cleaning products and solvents can damage plastic parts; these products include among others benzine, trichloroethelene, chloride, ammonium
- Excessive sparking mostly indicates worn-out carbon brushes, therefor your tool should be brought to a service station.
- In case of an electrical or mechanical defect, hand in tool at one the DREMEL Service Stations for repair (addresses are listed on the service diagram supplied with the tool)
VEDLIKEHOLD/REPARASJON
- On/Off knap "C" (diagram 1)
MANUTENÇAO/REPARACAO
!Hikorda He nCnoB3yIte OTe3HO Kpyr dJa 6OKOBOrO wJinfoBaHnA

- ПишлфованьmetаллmaобразуOTсИСКры; He doIpyckaIte haxOxДeHЯВ pa6oey 3OHe pyrnx IIOdeN roIPOUHX MaTePnaIob
OeBaIte 3auiTbIe OChn peuAtKn, cpeCTBa3auiTbI BOLoc, npOTINBnIbeBOE pcENPAPTO npoHHyO 6byb; a pRNI Heo6xDiMOnTo - apyTK
!Pekyua Hacaika npoJonkaet BpaaTaBcHekOTOpoe BpemnOncE OTKJIoueHnIHCTpyMeHa
NCIOJIb3OBAHNE
- KhoNka BkN/BykN "C" (pnc.1 1
- BkIIOHTe INCTpymEnT. BbIePnte ckOpocTb, yCTaHOBnB pbuXoIMbI Ha Heo6xOJIMbI dnaIa3OH cKOpOcTei.
-
Ckopoctb ot 10.000 do 33.000 o6/MnH
-
YCTAHOBKa aKCECCyapOB (pnc. 3)
YtO6bI ocNlaBHT, hAnMTeK HONKy 6bnKOpBcN Bana "D" n UpeXKnBaiTe e HaaKatoi pni BpaueHnrai KaHn "A"(mni npaOna) BpyHyIO do Tex nop, noka Ban He 3a6NoKnpyeTcT o TaIbnHeuero npobopauBaHn. Pnp Heo6xOIMCTo IcnPb3yTe KJIOU "E" dnn OCA6neHn raink cIaHn "A".
-Дязамны akceccya pa, BCTaBtHe hacaIky "B"(nII NaTPOH) KaK moXHO rIy6xKe, YTO6bI
UMeHbWHTB BO3MOXHOCTb BbIaDEHnI JIN BO3HNKHOBeHne Dnc6aHaHca.
3aJeCTByK KHONky 6nOKupOBk Bana D" 3aTnHte raKy aHn "A"(Nn NaTPOH) BpyHyTO TaK, YTObI bXBOCTOB NK AECCEyapa IINoTHO 3axaJcH B aHre "B".Pn Heo6xOIMMocTn MCnObl3yTe KInOu "E" dIraTBAHNA RAHKaHn "A".
- Ⅲ63eRaTe CnIuKOM CnIbHo 3aTyrBaTb rai Ky ZaHr "A"!
3.YdepkBaHne HnapBHeHne HNCTpyMeHTa (cm.pnc. 5)
LahroBb3axBaT dna pa6oT, Tpe6yIoXx BbcOKoToHocn (rpaBnpOBka)
-PyuHOn 3axBaT cKo6eIaIpa60,THe Tpe6yUxNbICOKOToHocTN (JINIOBOAHne)
IycbTOPOHNCHcpeHNeCK3xABAT NdeAaBHO NOxOxDnIT,ecNl Heo6XDbMOIeDpEXKBaTbMHTCPTyEMHT npalapnEHNb PA6oHeNoNEpOBxHOCTn,HanrIpMEp, npi IcnNOsBOAHmOTpeSHOrO Da
COBETbI IO NcNoJIb3OBAHnIO
C zelbno nOjbopa cooTBeCTBvUoSeH hacaJkn iOnpeJeHnA ONTImaIbHO paOoh cKOpocTN npedBaPntbNo noppAKTuYTeCb Ha npo6Hom MaTePnaJe
B Vo BPmra pa60tby He npnlaarte M3nnHnx ycIny; ncytb 3a Bac pa60taeT baw BbICOKOCKOPoTHOH INCTpymENT
-ПользоватсгТольк TeMпprспосблелHM,КOTOPbI peKOMeHIOBaHbI npOIN3BOdnteJIem MOndeJIn.
CKOPOCTb
CyueCTbYIO T OCHOBHbIX TnIa pOToPbHbIX NHCtpyMeHTOB: DByXCKOpocTbIe MOJIIN MOnJIeN CpeYNIpyEmo CKOpocTbHO. Ha DByXCKOpocTbIX MoJIeIN YcTaHOBLeH peKJIIOuAtelb LOW - HIGH (HN3Kaar - BbcOKaer ckOpocTb). EcNI cTpeJka Ha peKJIIOUaTeNe yKa3bIaBaeT Na "LOW," To ckOpocTb BpaSeHIN CoCTabJIeR 15,000 06/MnH. EcNI cTpeJka Ha peKJIIOUaTeNe yKa3bIaBaeT Na "HIGH," To ckOpocTb BpaSeHIN CoCTabJIeR npi6JIInTeJIbHO 33,000 06/MnH. Ha MoJIeIN C peYNIpyEmo CKOpocTbO yCtaHOBIn PeKJIIOuAtelb C cepHO IINIe. IINABHO nepeCTaB JIeKJIIOUaTeN bIuΦpbl, paCNOLOKeHHe H KOpNyCe, MOxHO BbIbPaR paBOHyO BdINAnAzoHe 10,000 - 33,000 06/MnH. No TaBIMaD, pnpBeDEHbIM h CTpaHINax 4, 5, 6 n7, MOxHO ONPeDEHITb TOcHyIOCKOpocTb, IcXODaN I3 o6paBbAeMOrO MaTePNaNA I TnIa NcNoIb3eMyEo pe3ua IINI HNCtPyMeHTA. ITO tIm TaBNIaAM Bbl TaKke CMOKeTe NDo6paBk Kaq PpABINbHbN aKCECCyAp, TAK i ONTMaJIbHyO CKOpocTb npi UINIpOFBKe.
UctaHOBka pnp6n3ntelbHoro Yncla obopotob B MmHyTu dna potophoro IHCTpyMeHTa c peryInpyeMoNCKOPOCTbIO, moJeJIb 395.
| Установka nevеклочашия | Диапазон скорости |
| 1-2 | 10,000 - 14,000 RPM |
| 3-4 | 15,000 - 19,000 RPM |
| 5-6 | 20,000 - 24,000 RPM |
| 7-8 | 25,000 - 29,000 RPM |
| 9-10 | 30,000 - 33,000 RPM |
Ckopoctb potophoro nHCTpymeHTa ynpabIJIaTcYCTaHOBkoI daHHoro yka3aTeJIHa KOpnyce.

HekotopbIe npaKTUeCKne npabnla no6opa ckopoctn:
- ɪnʒeɪnɪŋɪsɪnɪŋtMaccbɪŋIJIeKoɪnɪaBkɪx MætpənəlɒH eO6xoɪmɒ o6pa6aTbɪBaTb ᴰ HɪN3Kɪx CκOPOCTAUX.
2.Плпроваимe,шлфоваимеичстку пп рамошипpoволочи сеткн HeobxOДМо BblonHЯть Ha CKOPoCTaH He BbIe 15.006/MnH,чTOБыпдотьратNT nobpeЖdHeMe sETKN. - Ⅰздении зз depreba Heобхоюmo obpa6aыBaTb Ha BicOKnx CKopoCTAx.
4.Издения ИЗ кениэ Stаин Heоьхолимо OобраытыВа на само ВсICOKОСКСКОCTN рпи NOMOUI pRINHДIeXHOCTeI ИЗ KAPБДАВOLБФРAMA,НО на HN3KIXS CKOPOCTN рпи NOMOUI BICOKOCKOPOCTHBIX CTaJIbHbIX pe3IOB.Еслвс БСКОСКОСТСН OТЯЛьноpe3EuaHnAeT BIVbPnPoBAt,3TO OБИЧУ O3HaHaeT,TOH OВВрачEDТССMИKOM MeDJIENHO. - AIIOMHIN, MedIbE CnIbA, CBNHcOBbIe & MuNHObBc IcNAbMbIa TAKKEx ONoBO MOxHO 6oBa6aTbIBaTb Ha pa3IMuHbIX cKOpOCTRx B3aBcMOnOCTN OT TiNa Onepaunu Pe3Kn. NcIpbIbTa bnpaФaHOBbIe NmDpyrno NOxdoJIaue MCA3KN Irape3ua, ChObI prEoDBATBnTuHaIinaHae ObaPabTaIBaEMOrMoTeMaepnHa Na 3y6bera3e3a.
Tb6b6ObIeHTb bIbOp OTMImaHbHO CKOpOCTn ObpA60TK Dnra pa3IIMhBIX MaTePmIAOB N pINHaJdHexHOCTe, Mbl Pa3a6oTaIbnHe TaBnCt, Cm. PNC. 6. POnIy3yRc3TNMI TaBnUAMMOKHO IOdo6pTa peKOMeH dyEmyo cKOpOCTn IaKaJDo TnIa MaTePmEA. O6Ba3ATEHo NPOCMOTnE IN3yUHe DaHNBie TaBnIi!
Ho BCE-takn, yTO6bI HauNlyuHIMM o6pa3OM ONpeDeHITb NIOxOJaUHcKOpCTb 60pOCTb 60pa6OTKn, HxJHO HeCKoBko MmHTy nonpaKTINHOBaTcRa Ha He6OJIbWOM KycOHeKc 60pa6aTbBAeMOro MaTePnAla, DaXe ECNI PpeBaPntEhHO 3aRJIHyTb T a6NtUc. 7TO6bI NoHATb, HAO JIyMeHbUHITb INIyBEInHITb 60pOCTb, HxJHO pOCTo NOCMTpeTb Ha pe3yNbTaT 60pa6OTKn HAByx pa3bIX bCKOpCTAH. Prn O6paOBtO HxJIN IINI NaCTMaCbI NyUe HaYAt, HapMpMer, C HN3KO KcOPoCTN i NOCTeHNO YBeHNHbATB CKOpCTB IO TEX NOP, NOKA O6pa3eU He HauHET pNaIBTuBc Pn iONKTAE C IHCTpyMeHToM. TOrDa HxJHO NOCTeHNO UMeHbAaT bCKOpCTb, 7TO6bI DOCTuB ONTMalJBHO CKOpCTN 60pa6OTKn.
Becnoe3Ho DaBnTb Ha HNCTpyment C 60JIbeCmIOJ, YTO6bI NOnyUHTb JKeJaEMbI Pe3YJbTaT pe3Kn. Bo3MOxHO, CJeDyET CMeHNTb pe3eU cIN NIm NImeHtB ckOpOCTb O6pa6OTKn. Ho haxIM Ha INCTpyment BpI d IIN NOMoXeT.
TEXHUNCHECKOE OBCJNYXNBAHNE IN PEMOH
CdeepxHte HnctpymENT n CTeBOn hUpy B NCTOTe (HeKoTOpbIe 6blTOBbIe YNCTaIue cpeCTBa I pactBOPHTEN MoryT NOBpeNTb NpA1tMacCOBBie DeTAN; TAKc NpeCTBa codepkat 6EH3IN, TpIXLOp3TaH, BEuCECTBa, COpePKAAUe XNoP, AMMnK An DpyrMe BeueCTBa)
CIMKOMBHOHCKPEHNO6bHNOO3HaAETN3HOCYrOBhIXIeTOK,B3TOMcUYaHEBMHe06XoIM06PbATMbCB-CEpHTC.
B cnlyae kaknx-ln6o 3neKtpruecknx nHmexaHuecknx HncnpBaHcTe8n obaaItecb nra pmoHa K odHO nO opuiaJIbHO zapreIcTprpoBaBHx CTaHcIy texHueckcko OBO cOpJyKBMaHnФpmby DREML (aDpeca npBBeHbY b YkazAAHIX NO ocLcyJKBaHIO, npInlaeraMbx K IHCTpyMeHTy)

GUARANTEE
This DREMEL product has been carefully inspected before leaving the factory and carries a guarantee of 2 years ("BASIC": 1 year) from the date of purchase during which period any defect caused by faulty material or manufacture will be corrected without charge. Damage due to normal wear and tear, overload or improper handling will be excluded from the guarantee. In case of a complaint, please, send the tool undismantled together with proof of purchase to the nearest DREMEL Service Station, postal charges prepaid. DREMEL reserves the right to decline responsibility in case of repairs made by persons other than DREMEL service staff. In no event compensation can be claimed in case of damage to the workpiece or injury to the tool user. This guarantee does not affect your statutory rights (UK only). Information on guarantee in instruction manual herewith expires.

GARANTIE

- CE DECLARATION OF CONFORMITY
- CE TODISTUS STANDARDIMUKAISUDESTA
- INFORMATION ON NOISE/VIBRATION
- MELU-/TARINATIETO
- CE STRVZUJICI PROHLASENI
- INFORMACE O HLUCNOSTI A VIBRAC
- CE DÉCLARATION DE CONFORMITE
- CE KONFORMITETSFÖRKLARING
- LJUD/VIBRATIONSDATA
- CE SAMSVARSEKLAERING
- 3AABJIIEHME COOTBETCTBNI
- INΦOPMAUΩ OUIYMHOCTN BIBSPALM
- RAÇÖES
- exceder 85 dB(A).
- General Operating Tips:
- SAFETY INSTRUCTIONS
- Save these instructions.
- GB
- DREMEL TOOL SAFETY
- USE
- APPLICATION ADVICE
- SPEED
- Some rules of thumb in regard to speed:
- MAINTENANCE AND REPAIR
- VEDLIKEHOLD/REPARASJON
- MANUTENÇAO/REPARACAO
- NCIOJIb3OBAHNE
- COBETbI IO NcNoJIb3OBAHnIO
- CKOPOCTb
- TEXHUNCHECKOE OBCJNYXNBAHNE IN PEMOH
- GUARANTEE
- GARANTIE
Brand : DREMEL
Model : DIAGRAM 395
Category : Rotary tool