HD-QLU3 DRIVESTATION QUAD USB 3.0 - Disque dur externe BUFFALO - Free user manual and instructions
Find the device manual for free HD-QLU3 DRIVESTATION QUAD USB 3.0 BUFFALO in PDF.
Download the instructions for your Disque dur externe in PDF format for free! Find your manual HD-QLU3 DRIVESTATION QUAD USB 3.0 - BUFFALO and take your electronic device back in hand. On this page are published all the documents necessary for the use of your device. HD-QLU3 DRIVESTATION QUAD USB 3.0 by BUFFALO.
USER MANUAL HD-QLU3 DRIVESTATION QUAD USB 3.0 BUFFALO
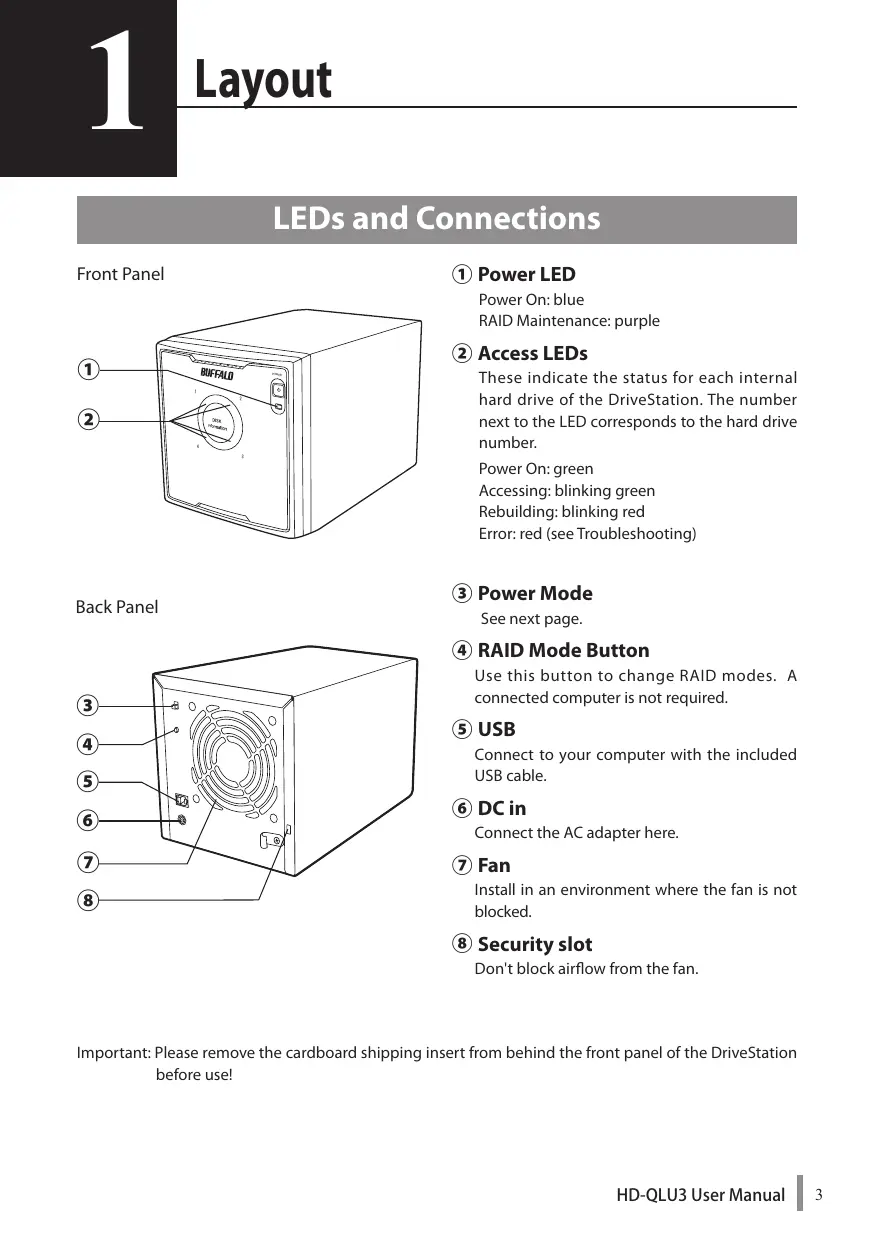
LEDs and Connections
① Power LED Front Panel
RAID Maintenance: purple
These indicate the status for each internal hard drive of the DriveStation. The number next to the LED corresponds to the hard drive number.
Power On: green Accessing: blinking green Rebuilding: blinking red Error: red (see Troubleshooting)
Use this button to change RAID modes. A connected computer is not required.
⑤ USB Connect to your computer with the included
Connect the AC adapter here.
Install in an environment where the fan is not blocked.
Don't block airflow from the fan.
Important: Please remove the cardboard shipping insert from behind the front panel of the DriveStation before use!
Auto power mode will turn the DriveStation on and off automatically with your computer, or you may turn the DriveStation off manually.
This switches the power on and off.
Auto: The DriveStation turns on and off with your computer. Off : This turns off the DriveStation’s power. This turns the DriveStation off. Even if the attached computer is turned on, the DriveStation will remain off until the switch is moved to the Auto position.
• In Auto mode, after the computer is turned off, there may be a short delay before the DriveStation shuts down. • If the DriveStation is connected to a USB hub with its own power supply, it may not shut down automatically when the computer is turned off. In this case, use the switch to turn it off manually.
To avoid damage to your data, follow these precautions:
Never configure this unit as a destination for virtual memory. Never perform any of the following operations while the access LED is flashing: • Unplug the cables • Turn off your computer • Put your computer into standby, hibernate, or sleep mode
• The maximum size of a file on the default FAT32 partition is 4 GB. To use the drive with files larger than 4 GB, reformat the drive with NTFS or Mac OS extended, which allow larger file sizes.
• Mac OS X may not recognize this device at boot. If this happens, unplug the cables, then plug it again after a few seconds. • This unit supports hot-plugging connections. You can plug or unplug the data cable while the DriveStation and your PC are on. However, never unplug the cables while the power/access LED is flashing, or your data may be lost or damaged. • Do not lean any object against this unit. It may cause the unit to malfunction. • If you use this unit with Windows 7, Vista, or XP on a computer with a USB 2.0 or 1.1 port, you may receive a message indicating that a high-speed USB hub is connected to a non high-speed USB device. To continue, click [X]. • You may hear some noise while this unit is working, especially while it is booting or being accessed. This is normal. • Always refer to the manuals for your computer and peripheral devices. • After a system crash, Mac OS may ask you to insert your OS X system disk to recover the OS. Disconnect the DriveStation from your Mac before initiating the recovery process. • For Macintosh users, reformat the DriveStation before using it. See the “Formatting Guide” manual for more information. • Connect the DriveStation to a USB 3.0 or USB 2.0 port. • Windows XP and Windows Server 2003 don’t support drive capacities larger than 2 TB without service packs or other additional software. To reformat DriveStations larger than 2 TB into multiple partitions of 2 TB or less, so that they may be easily used with Windows XP or Windows Server 2003, use the RAID Utility (RAID Management Utility) in “NTFS-Compatible Mode” or “FAT32-Compatible Mode”.
This device has been designed to release heat through its case. The surface of the case may become quite warm during normal use. • Do not stack multiple DriveStations. • Do not cover the DriveStation with anything that might block the transfer of heat.
• With Windows 7, Vista, Windows Server 2008 R2, Windows Server 2008, Windows Server 2003 R2, or
Windows Server 2003 SP1 or later, you may use arrays larger than 2 TB. • If your anti-virus or other security software includes a software firewall, register the RAID Utility (C:\Program Files\BUFFALO\HD-xLU3\RaidUtility.exe) as an exception for the firewall. This is not necessary with the software firewall built-in to Windows. For more information on how to add an exception to your software firewall, contact the manufacturer of your security software. • When the driver for this unit is installed, devices are added to [Device Manager]. To display Device Manager, follow the instructions below: Windows 7/Vista ������������������������������������ Click [Start], right-click [Computer], and click [Manage]. When “A program needs your permission to continue” is displayed, click [Continue] or [Yes] and then [Device Manager]. Windows XP ��������������������������������������������� Click [Start] and right-click [My Computer]. Click [Manage] and then [Device Manager].
Universal Serial Bus controllers
USB Mass Storage Device
Universal Serial Bus controllers
USB Mass Storage Device
Dismounting the DriveStation
For Windows Unplugging the DriveStation incorrectly can corrupt data. Please be careful! If your computer is turned off, then it is always safe to unplug the DriveStation. If your computer is turned on, please follow the procedure below to unplug your DriveStation. This example shows Vista, but other versions of Windows are similar.
Click the icon (Windows 7 / Vista / Server 2008 R2 / Server 2008) or
XP / Server 2003 R2 / Server 2003) in the system tray.
When the menu opens, click the device name.
OS Windows 7 Windows Server 2008 R2
Eject USB-SATA Bridge
Safely remove USB Mass Storage Device
If TurboPC is enabled, "TurboPC" may be part of the device name.
A message that indicates you can safely remove the unit will appear. Click [OK] and unplug the DriveStation.
Note: You do not have to click [OK] if your OS is Windows 7 or Windows XP. The message will automatically disappear. • It may take a short time for the message to be displayed. • When the RAID Utility is running, an error may be displayed, and it may not be possible to dismount the DriveStation. In this case, exit the RAID Utility before performing the above procedure. To exit the RAID Utility from the Start menu, select [All Programs][BUFFALO]-[HD-xLU3]-[RAID Utility[EXIT]].
Drag the DriveStation’s icon to the trash to dismount the drive.
Note: If you’ve created multiple partitions on the DriveStation, dismount each partition separately before unplugging the drive.
It’s now safe to unplug the DriveStation from your Mac.
NTFS is suitable for use with modern Windows computers.
To divide the DriveStation into multiple partitions, consult the “Format/Maintenance Guide” on your Navigator CD.
A Linux-compatible format will be required if the DriveStation will be connected to a TeraStation. Consult the TeraStation's user manual for more information.
• Never turn off or reset the computer or TeraStation during the formatting process.
This can damage the drive or result in other problems. This can also cause later operations to fail to be executed properly. • When the hard drive is formatted, all data contained on the drive is lost. Before formatting, be sure to carefully check the operating environment of the hard drive one more time. The customer assumes all responsibility for the hard drive formatting process. To ensure that you do not accidentally erase important data or programs, back up your data.
Importance of Backups
The process of copying data to external storage media for protecting important data stored in a hard drive is called a “backup”. Large-capacity hard drives store a large volume of data everyday. The loss of data due to an accident, human error, or unexpected event can result in significant losses for business operations. Making a backup saves the same data to multiple storage media (such as a hard drive). As a result, in the event that the data saved in one media is corrupted or lost, the corrupted or lost data can be restored from another storage media. Note: Create backups on a regular basis when using a hard drive.
Backup Storage Media
Many types of storage media below can be used for backup. • BD-R/RE
• Magneto-Optical (MO) disk • Expansion hard drive
• CD-R/RW For best results, dedicate a hard drive exclusively for backup.
Restoring Backup Data
Recovering data from a backup is called restoring. For more information, see the backup manual on your Navigator CD.
Error Check (ScanDisk)
Windows includes a tool for finding and fixing hard drive errors. To ensure reliable operation, regular drive checks are recommended. Notes: • For more information on ScanDisk, see Windows Help. • Mac OS doesn’t include a hard drive error checking utility. To perform a drive check from a Mac, use a third-party utility.
Optimization (Defrag)
When a hard drive is used over an extended period of time, repeated writing and deleting of files causes gradual separation and fragmentation of the file pieces stored on the hard drive. This is called fragmentation. It takes longer to read or write a fragmented file because numerous different locations on the drive must be accessed. The process of properly reorganizing a file that has become fragmented in this way is called defragmentation. Optimization of a hard drive results in faster drive access speeds. Windows includes a tool for optimizing fragmented hard drives. Periodic optimization is recommended to ensure maximum performance of your hard drives. Notes: • For the optimization procedure, see Windows Help or the manual. • Mac OS does not include a tool for optimizing the hard drive. To perform hard drive optimization, use a third-party utility.
When Specific Software Does Not Run
Software designed for standard internal hard drives may not work with the DriveStation. Check your software specifications to make sure that it is compatible with USB hard drives.
Building RAID Arrays
The four internal hard drives of the DriveStation can be configured into a RAID array for use as a single hard drive. The RAID array can also be reset and rebuilt using the procedures below.
Notes on Building a RAID Array
• When building a RAID array, connect the DriveStation with a USB cable and disconnect all other USB devices. The RAID array may not be built correctly if other USB devices are connected. • When building a RAID array, all data stored on the DriveStation is lost. Be sure to back up your data before building the RAID array.
RAID is a system of combining multiple hard drives for use as a single hard drive, increasing hard drive speed, and enabling easy recovery in the event of hard drive failure. The DriveStation uses four hard drives to build the RAID. The RAID level is determined based on how the hard drives are combined. The RAID levels supported by the DriveStation are shown below.
■ RAID 5 Mode (Default setting: Enables high-speed access and secure storage of data)
Parity (error-correcting code) is generated from the data, and this code is saved and distributed to multiple hard drives together with the data. If any one of the hard drives fails, the data can be recovered by replacing the hard drive and comparing with the parity of the surrounding data. The OS only recognizes the capacities of three hard drives. Because the data is distributed when it is saved, this enables faster hard drive access than using a single hard drive. • Example of Hard Drive Configuration Configuration using HD-QL4TU3R5: Recognized as a 3 TB (1 TB×3) hard drive
Total usable capacity is the sum of the capacity of three drives and data protection is provided
Parity (P) is generated and saved. Even if one hard drive fails, data can be recovered by comparing the parity.
■ RAID 10 Mode (Enables high-speed access and secure storage of data)
Four hard drives are combined into a large virtual drive. Usable space is the total of two hard drives' capacity. Because reads are distributed over two drives, access speeds are slightly faster than an individual drive's. All data is written simultaneously to two hard drives. As a result, if one hard drive from a pair (either 1-2 or 3-4) fails, all data can be recovered by replacing the drive. However, if two drives from different pairs fail, such as 1 & 3, or 2 & 4, then data will not be recoverable. • Example of Hard Drive Configuration Configuration using HD-QL4TU3R5: Recognized as a 2 TB (1 TB×2) hard drive
Enables highspeed data access and advanced data protection
Data is distributed and saved to two hard drives.
■ RAID 1 Mode (Enables secure storage of data)
Drives are combined into mirrored pairs. Total usable space is the capacity of two individual drives. All data is written to two drives simultaneously. If either drive in a pair fails, all data can be recovered by replacing the drive. However, if both drives in a pair fail, then data will not be recoverable.
• Example of Hard Drive Configuration Configuration using HD-QL4TU3R5: Recognized as 2 TB (1 TB×2) hard drive
Data is always copied to two different drives
Data is mirrored to two different hard drives.
■ RAID 0 Mode (Enables use as a high-speed, large-capacity hard drive)
This mode uses the four hard drives as a single large-capacity hard drive. Data is distributed and written to the four hard drives simultaneously for faster access. The OS recognizes this as a large single drive with a capacity equal to the sum of the four hard drives. RAID 0 does not provide a mechanism for protecting data. As a result, failure of any hard drive will result in the loss of all data on the array. • Example of Hard Drive Configuration Configuration using HD-QL4TU3R5: Recognized as 4 TB (1 TB×4) hard drive
Enables use as a highspeed, large-capacity hard drive
Data is distributed and saved to four hard drives.
The total capacity of all four drives is usable.
■ Spanning Mode (Enables use as a large-capacity hard drive)
In this mode, all four hard drives are combined into a large single drive with capacity equal to the sum of the four individual drives. Because data is saved without distributing to the drives, the data access speed is the same as that of an individual drive. Spanning mode has no mechanisms for protecting data. As a result, failure of a single drive means that all data on the drives is lost.
• Example of Hard Drive Configuration Configuration using HD-QL4TU3R5: Recognized as 4 TB (1 TB×4) hard drive
Enables use as a largecapacity hard drive
Data is saved in order starting from the first hard drive.
The total capacity of all four drives is usable.
■ Normal Mode (Enables use as four hard drives)
In this mode, the hard drives are used without building a RAID array. The DriveStation is recognized as four hard drives, and different data can be saved to each one.
• Example of Hard Drive Configuration Configuration using HD-QL4TU3R5: Recognized as four 1 TB hard drives
Enables separate access to four hard drives
Installing the RAID Utility
The Utility is used to build a RAID array. If the RAID Utility is not installed, install it by following the procedure below. Note: The procedure below is not necessary if the RAID Utility is already installed.
Load the Utility CD in the computer.
DriveNavigator will start. If it does not start automatically, double-click the CD-ROM drive icon in the Utility CD from [Computer (My Computer)].
Click [Begin Installation].
The license agreement screen is displayed. Click [I accept] to proceed.
Click [Additional Software installation].
Select [RAID Utility], then click [Install].
Follow the on-screen instructions to complete the installation process.
Double-click "RaidUtility.dmg" in the "Mac" folder in the Utility CD.
Double-click the RaidUtility disk that was extracted to the Desktop.
(RaidUtility) from the RaidUtility disk to the Desktop.
The installation process is now complete.
To start the RAID Setting Utility, double-click Caution
(RaidUtility) on the Desktop.
(RaidUtility) that was copied to the Desktop. If it is deleted, you
will no longer be able to run the RAID Setting Utility. If you accidentally delete it, recopy it from the Utility CD.
Building a RAID Array
Use the procedure below to build a RAID array. Caution
Be sure to read "Notes on Building a RAID Array" on page 12.
Note: The example below shows Windows 7. Your screens may look slightly different.
Start the RAID Utility.
In Windows, right-click the In the Macintosh, double-click
icon in the taskbar, and select [Open Utility].
(RaidUtility) that was copied to the Desktop.
Click [Config], and click [Disk Config].
Click [Config], and select [Disk Config].
What should I do when the screen below appears?
The screen below is displayed when there is a preset password. Enter the password, then click [OK]. Caution
If you have forgotten the password, the RAID array cannot be built. Please contact the Buffalo Support Center.
① Enter the password (20 alphanumeric characters or less).
Select the RAID array to be built, then click [Next].
① Select the RAID array to be built.
Select the format system (Windows 7/Vista/XP only).
① Select the format system.
Notes: ・If using Windows Server 2003 or Macintosh, the screen above is not displayed.
Skip to the next step. ・ For best results, use NTFS format. FAT 32 format doesn't support files larger than 4 GB. ・ Windows XP doesn't support drives larger than 2 TB. When formatting the DriveStation with a capacity larger than 2 TB, select "NTFS Compatible" or "FAT32-Compatible". This divides the drive area into partitions not exceeding 2 TB for formatting. ・When formatting a capacity larger than 2 TB in Windows Vista, selecting "NTFS (GPT)(Recommended)" enables the creation of drive areas larger than 2 TB. However, in this case, the drive area cannot be used in Windows XP.
When the message "If the disk configuration is changed, all data on the drive will be erased. Are you sure you want to proceed?" is displayed, click [Yes].
When "Check again that there is no important data on the target drive. Are you sure you want to proceed?" is displayed, click [Yes].
Building of the RAID array is started. When the message "RAID Management drive is registered. Please connect HD-xLU3 again." is displayed, disconnect the DriveStation from the computer, then reconnect it.
When the message "The setting was successfully changed." or "The operation mode was changed." is displayed, click [OK].
Building of the RAID array is now complete.
Notes: For users of Windows Server 2003
After building the RAID array, the DriveStation must be initialized using the NTFS format. Format the DriveStation while referring to the on-screen manual "Formatting Guide". For Macintosh users After building the RAID array, the DriveStation must be initialized using the MacOS Extended format. Initialize the DriveStation while referring to the on-screen manual "Formatting Guide". If the DriveStation is connected to a computer after building the RAID array, the access lamp may glow green and the DriveStation may not be recognized properly. In this case, turn off the power for the DriveStation, then turn it on again.
Rebuilding or Resetting a RAID Array
To rebuild a RAID array or change your RAID mode, use the procedure described in "Building a RAID Array".
Setting a RAID Building Password
You may protect the RAID array with a password. If a password is configured, it will be required to change the RAID array. Caution
Be careful with this setting! If you set a password and then lose or forget it, you will not be able to change your RAID settings.
Note: The example below shows Windows 7. Your screens may look slightly different.
Start the RAID Utility.
For Windows, right-click the For mac OS, double-click
icon in the notification area, and select [Open Utility].
(RaidUtility) which was copied to the Desktop.
Click [Config], and then click [Set Password].
Click [Config], then select [Set Password].
If a RAID Password is Configured
If a RAID password is already set, enter it and click [OK]. Note:
If you have forgotten the RAID password, then the RAID array cannot be changed.
① Enter the password.
① E n t e r t h e p a s s wo r d t h a t w i l l b e set twice (20 or less alphanumeric characters).
If Hint is set, the preset hint is displayed when prompted for the password. Because anyone can view the hint, it is recommended that you set a password that cannot be guessed by anyone else. The hint can be set up to a maximum of 64 characters.
When "The password was set" is displayed, click [OK].
Setting of the password is now complete.
E-mail Notification (Windows Only)
The RAID Utility can notify you by email when certain events occur. To configure this, follow the steps below. Note: The example below shows Windows 7. Your screens may look slightly different.
icon on the taskbar, then select [Option].
① Specify the monitoring interval for the device. ② Check "Receive email when error occurs". The subject of the e-mail can also be entered. Clicking [Restore default] sets "RAID Report" as the e-mail subject.
Click the [Email config]tab.
Enter the address, account, and password of the e-mail server that is used and specify the e-mail address of the sender and recipients. ① Enter the address, port number, and sender address of the SMTP server.
② To use POP before SMTP, select "Use
[POP before SMTP]", then enter the address, port number, user account, and password of the POP server.
③ Enter the e -mail addresses of the recipients (up to five).
④ Click [Config]. 24
An e-mail is sent to the specified address(es) if any of the following events occur.
・Hard drive error ・Fan malfunction ・Overheating of hard drive ・Hard drive replacement count was increased ・Error during RAID maintenance Email notification is now configured.
Note: In Advanced mode, you may select which events will cause an email notification to be sent.
Click [Email and Message display events].
Specify the events for sending an e-mail notification.
① Check the events that should trigger an email alert.
The events that trigger email notification have been specified.
Message Display (Windows Only)
The RAID Utility can display messages as shown below.
The message display function is set as shown below.
Note: The screens may vary depending on the OS you are using.
icon in the taskbar, and select [Option].
① Specify the monitoring interval for the device.
② Check the events that will trigger a message.
Messages are displayed when any of the following events occur.
・Device connection or disconnection ・Hard drive error ・Overheating of hard drive ・Rebuilding is in progress ・RAID maintenance was started ・Error during RAID maintenance
・Change in RAID array
・Fan malfunction ・Hard drive replacement count was increased ・Rebuilding is completed ・RAID maintenance was completed ・Available hard drive space is low (less than 10%)
Message display settings are now configured.
Note: In Advanced mode, you may select which events will cause a message to display.
Click [Advanced] in the Option Setting screen.
Click [Email and Message displayevents].
Specify the events when messages will be displayed.
① Click the event where you want to display a message so that a check mark appears.
Message display settings are now configured.
Log Recording (Windows Only)
The "RaidUtility.(*1).(*2).log" file is automatically created in the folder where the RAID Utility was installed (default installation directory is C:\Program Files\BUFFALO\HD-xLU3). *1: A number for the date is inserted. *2: The numbers 0 to 9 are inserted. The information below is contained in the log file. System log records [2010/xx/xx xx:xx:xx] Log recording date
[2010/xx/xx xx:xx:xx] Log recording date
[Log record content]
WARN=Warning ERR=Error [Information label]
[P/N=xxxxxxxxxx] [Log record content]
The log file storage period is 6 months.
RAID Maintenance (Windows Only)
In the RAID Utility, the RAID Maintenance function can be set for periodically checking for errors due to bad sectors and automatically rebuilding when an error is found. The RAID Maintenance function is set as shown below. Note: The screens may vary depending on the OS you are using.
in the taskbar, and select [Option].
Notes: ・ During RAID maintenance, the power LED glows purple and the access LEDs blink green. You may continue to use the DriveStation during RAID maintenance, but this increases the time required for RAID maintenance to complete.
・ To see the time remaining, hover the mouse cursor over the RAID maintenance icon. However, if the time remaining is more than 24 hours, it will not be displayed.
RAID maintenance is now configured.
Notes: RAID Maintenance will not run under the following conditions.
・If a previous error occurred during RAID Maintenance ・During rebuilding ・If RAID Maintenance is already running RAID maintenance execution schedule The available settings for the execution schedule of the RAID Maintenance are shown below. ・Every week (The day of the week can be specified from Sunday, Monday, Tuesday, Wednesday, Thursday, Friday, and Saturday.) ・ Week (1, 2, 3, 4) (The day of the week can be specified from Sunday, Monday, Tuesday, Wednesday, Thursday, Friday, and Saturday.) ・ Weeks 1 and 3 (The day of the week can be specified from Sunday, Monday, Tuesday, Wednesday, Thursday, Friday, and Saturday.) ・ Weeks 2 and 4 (The day of the week can be specified from Sunday, Monday, Tuesday, Wednesday, Thursday, Friday, and Saturday.) ・1st of every month The execution time can be specified in one-hour intervals from 00:00 to 23:00. When [config] is clicked in the Option Setting screen, the next execution date and time is calculated based on the current time. If the next execution is more than 30 minutes later, the next execution only is set. If the next execution is within 30 minutes, and second execution is also calculated and set. Example: If the "Every week Sun." and "0:00" are set at 23:30 or earlier on Saturday, RAID Maintenance is enabled 30 minutes later. If set at 23:31 or later, the function is set for the next week.
Checking Details of the DriveStation and Hard Drive
Detailed information about the DriveStation (such as the number of hard drives, hard drive status, fan status, and connection type) can be checked by clicking [File]-[Info] from the RAID Utility menu. Also, after [Advanced] is clicked in the Option Setting screen, clicking [File]-[Info] from the RAID Utility menu shows the [Device Info] button. Clicking [Device Info] enables checking of the detailed information for individual hard drives.
The RAID mode can be changed by the RAID mode button located on the back of the DriveStation.
Changing the RAID Mode
When the RAID mode is changed, all data stored in the DriveStation is erased. If you have important data saved, be sure to back up the data to a computer or other device before performing the procedure below.
Disconnect the DriveStation from the computer.
Move the power switch to the OFF position, then set it to AUTO.
Hold down the RAID mode button for five seconds.
Wait for the power and access LEDs to turn off.
The DriveStation will beep.
Press the RAID mode button to cycle through the different RAID modes.
The current RAID mode is indicated by the colors of the access LEDs as shown below. If the DriveStation is in Windows XP compatibility mode, the access LEDs will blink. Each time the RAID mode button is pressed, the RAID mode changes and the DriveStation beeps. RAID Mode
Green Green Green Orange
Green Green Green Orange
Green Green Orange Orange
Green Orange Orange Orange
This is your last chance to abort! After the next step, you will be committed to changing the RAID mode. To cancel changing the RAID mode, move the power switch to OFF now.
A table of LED colors for each RAID mode is also available on the back side of the front cover.
Hold down the RAID mode button for five seconds.
The DriveStation will beep once, the access LED turns off, and the power LED will blink purple as the DriveStation changes its RAID mode. Caution
While the power LED is blinking purple, do not turn off the power or unplug your
DriveStation. It could be damaged if power is lost during the RAID change.
When the change is complete, the DriveStation will beep three times and the power LED will stop blinking.
The access LEDs now show the new RAID mode.
Press the RAID mode button.
The DriveStation will beep and shut down.
The RAID mode is now changed. Your new RAID array is not formatted yet, so connect the drive to your computer and format it.
Disconnect the DriveStation from the computer.
Move the power switch to the OFF position, then set it to AUTO.
Press the RAID mode button on the back side.
Wait for the power and access LEDs to turn off.
The DriveStation will beep.
The power LED will turn purple and the current RAID mode is indicated by the access LEDs.
The current RAID mode is indicated by the colors of the access LEDs as shown below. If the DriveStation is in Windows XP compatibility mode, the access LEDs will blink. RAID Mode Normal Mode RAID 0 RAID 1 RAID 5 RAID 10 Spanning
Green Red Green Green Green Orange
Red Red Green Green Green Orange
Green Red Green Green Orange Orange
Red Red Green Orange Orange Orange
A table of LED colors for each RAID mode is also available on the back side of the front cover.
After confirmation is complete, press the RAID mode button. The DriveStation will beep and shut down. HD-QLU3 User Manual
The DriveStation indicates errors with beeps and LED flashes. These beeps and flashes can help you troubleshoot problems.
These indicate the status for each internal hard drive of the DriveStation. The number next to the LED corresponds to the hard drive number.
The fan on the back side is stopped. Turn off the
DriveStation and check if dust has accumulated on the fan. If removing dust does not solve the problem, the fan may be broken. Contact the Buffalo Technology Support Center.
One long, continuous beep
A hard drive has overheated. Check if the fan on the back side is running.
If the fan is not running, turn off the DriveStation and check if dust has accumulated on the fan. If the fan still does not run after removing dust, it may be broken. Contact the Buffalo Technology Support Center. If it is running, the hard drive may have failed. Check the access LED to confirm the hard drive status. A hard drive still may have overheated even if no access LED for either hard drive is lit red. Turn off the power, and wait at least one hour before using again.
One access LED is glowing red
Beeps for about three seconds and stops
An error occurred in the hard drive. Replace the hard drive whose access LED is lit. If replacing the hard drive does not solve the problem, check if the hard drive is connected correctly.
Power LED This is lit when the power is turned on and during RAID maintenance.
One or both of the access LEDs is blinking red
A rebuild is in progress. Normally this happens after a hard drive is replaced in a RAID 5, RAID 10, or RAID 1 array.
Do not turn off the power until rebuilding is complete. When rebuilding is complete, the unit will beep three times and the access LED will glow a steady green (not blinking). During the rebuild, turning off the power can damage the unit or corrupt data. Connection to a computer is still possible during rebuilding, but the data transfer speed will be slower. The rebuilding time takes about 21 minutes per 100 GB (for the HD-QL4TU3R5, about 210 minutes in RAID 5 mode and about 420 minutes in RAID 10 mode). (This is an estimated time with no computer connected.)
Both access LEDs are glowing red
Beep for about three seconds and stops
The DriveStation is not recognized. Check the USB cable connecting the DriveStation to your computer.
An access LED is completely off
The hard drive is not connected correctly. Make sure that the drives are firmly seated inside the DriveStation.
The corresponding access LED blinks green when a drive is being accessed. During RAID maintenance, the power LED glows purple.
Replacing Hard Drives
If a hard drive fails, the corresponding disk access LED on the front of the DriveStation will glow red. Obtain another hard drive with the same capacity to replace the failed hard drive.
The access LED for the failed hard drive glows red. Turn off the DriveStation, remove the AC adapter, and replace the hard drive.
■ Using in RAID 0, Spanning, or Normal Mode
If a drive fails when using in RAID0 Mode, Spanning Mode, or Normal Mode, the data in the RAID array and data in the hard drive is lost. The data cannot be recovered even if the hard drive is replaced.
Under "Status" for the failed drive number, the text "Error occurred" is displayed. Turn off the DriveStation and replace the failed hard drive.
Notes When Replacing Hard Drive
・ The DriveStation is a precision device. Handle it with care, and do not drop it or subject it to sudden jolts or impact. ・ The DriveStation weighs about 5.5 kg. Handle it with care to prevent injury. ・ The front panel is attached to the front of the DriveStation body by magnets. If the DriveStation is lifted by the front panel, it could become detached from the body and fall. When lifting, be sure to always grasp the sides of DriveStation body to take it out. ・ Perform the replacement work carefully, and take care to avoid injuring your hands on the metal parts inside the DriveStation. ・ When replacing the hard drive, never disassemble parts whose instructions are not provided in this manual. Be aware that any breakdowns or damage due to disassembly of the DriveStation are outside the scope of the warranty. ・ To prevent damage due to electrostatic discharges, touch your hand on a nearby metal object (such as a door knob or aluminum window frame) to discharge any built-up static electricity. ・ Operation is not possible if all four hard drives in the DriveStation are replaced at the same time. ・ Operation is not guaranteed when using hard drives other than the specific hard drives with the same capacity designated for replacement.
Replacing a Hard Drive
The procedure for replacing a hard drive is shown below. After replacing the hard drive, reassemble by performing the removal procedure in reverse.
The access LED for the failed hard drive number appears solid red. Make a note of the access LED number. This is the number of the hard drive that will be replaced.
Turn off the computer, and disconnect the DriveStation from the computer.
Turn off the DriveStation, and remove the AC adapter and USB cable.
The front cover is attached by magnets. Pull the cover straight off towards the front.
Find the hard drive cartridge release lock for the number corresponding to the glowing red access LED. To open the cartridge, pull it towards you while pressing the tab to the left.
Note: When installing a new drive, press in the lock mechanism until it clicks into place.
Go to Next Page HD-QLU3 User Manual
Perform the removal procedure in reverse to install a new OP-HD series hard drive with cartridge (sold separately).
Reconnect the cables to their original locations, then turn on the DriveStation.
Connect the DriveStation to the computer.
If RAID 5, RAID 10, or RAID 1 was configured, the access LED will blink red as the array rebuilds.
Hard drive replacement is now complete.
Installing Software on a Windows PC
Insert the DriveNavigator CD into your computer.
The DriveNavigator will launch automatically. If Windows displays the message “Do you want to allow the following program to make changes to this computer?”, click [Continue] or [Yes].
Click [Begin Installation].
The License Agreement will open. Click [I accept].
Click [Additional Software Installation].
Select desired software and click [Install].
The wizard will guide you through installation.
TurboPC TurboPC can increase data transfer speeds for your Buffalo product.
TurboCopy uses caching to increase data transfer speeds.
Backup Utility is software to back up and restore data from your PC. To use, select a source drive to be backed up and a target location for backup data.
This software uses some of the memory in your computer as a virtual hard drive.
Buffalo Tools Launcher
Buffalo Tools Launcher lets you easily launch software from the Buffalo utility suite. Just click an icon to launch the desired Buffalo tool or utility.
eco Manager eco Manager lets you put the DriveStation into sleep mode to save power.
SecureLockMobile encrypts the data on your DriveStation, preventing it from unauthorised access.
NovaBackup is backup software.
※ For the most up-to-date information and latest products, go to www.buffalotech.com.
Interface Transfer speed
External dimensions Power Consumption Power Operating Environment Temperature Humidity
Compatible OS USB Max 5 Gbps (USB 3.0) *
Max 480 Mbps (USB 2.0) Max 12 Mbps (USB 1.1) NTFS (1 partition), RAID 5 149 (W) x 154 (D) x 233 (H) mm (excluding protruding parts) 90 W (Max) AC 100 - 240 V 50/60 Hz 41° - 95° F; 5° - 35° C 20 - 80% (no condensation) Windows XP (32-bit) Windows Vista (32-bit or 64-bit) Windows 7 (32-bit or 64-bit) Windows Server 2008 R2 (64-bit) Windows Server 2008 (32-bit or 64-bit) Windows Server 2003 R2 (32-bit) Windows Server 2003 (32-bit) Mac OS X 10.4 or later (models with Intel Processor)
* For best results, this drive should be connected to a high-speed USB 3.0 port. If you use this drive with a low-speed
USB 2.0 or 1.1 interface, transfer speeds will be much slower.
Universal Serial-Bus-Controller
Universal Serial-Bus-Controller
Grün Orange Orange Orange
Max. 5 Gbit/s (USB 3.0) *
Max. 480 MBit/s (USB 2.0) Max. 12 MBit/s (USB 1.1)
NTFS (1 Partition), RAID 5
Verde Naranja Naranja Naranja
Rojo Rojo Verde Naranja Naranja Naranja
Vert Vert Orange Orange
Vert Orange Orange Orange
Rouge Rouge Vert Orange Orange Orange
5 Gbits/s max (USB 3.0) *
480 Mbits/s max (USB 2.0) 12 Mbits/s max (USB 1.1)
NTFS (1 partition), RAID 5
20 - 80 % (sans condensation)
Controller Universal serial bus
Controller Universal serial bus
(RaidUtility) sul Desktop.
Quando appare il messaggio "The password was set (Password impostata)" cliccare [OK].
Max 5Gbps (USB 3.0) *
Max 480 Mbps (USB 2.0) Max 12 Mbps (USB 1.1)
Impostazioni predefinite
出现信息“If the disk configuration is changed, all data on the drive will be erased. Are you sure you want to proceed?(更改磁盘配置将擦除硬盘中的所有
数据。确定要继续吗?)”时,请单击 [Yes(是)]。