HA-890 - Vacuum Cleaner TEKA - Free user manual and instructions
Find the device manual for free HA-890 TEKA in PDF.

| Product type | Built-in oven |
| Brand | TEKA |
| Model | HA-890 |
| Dimensions (W x H x D) | 595 x 595 x 575 mm (approx.) |
| Weight | 35 kg (approx.) |
| Electrical supply | 220-240 V, 50/60 Hz, 16 A |
| Maximum power | 3000 W (estimate) |
| Cooking functions | Conventional, Grill, MaxiGrill with fan, Conventional with fan, Lower heating element, Defrost |
| Number of functions | 6 |
| Control type | Electronic with Touch Control |
| Display | Electronic clock and temperature display |
| Meat probe | Yes, with temperature display and automatic shut-off |
| Programming | Cooking duration, end of cooking, duration + end, timer |
| Child safety | Yes, control lock |
| Interior lighting | Side lamp, switchable |
| Door | Aluminum profile with 3 glass panes, temperature less than 60 K above ambient |
| Interior material | Easy-clean enamel (catalytic on rear panel) |
| Included accessories | Rack, baking tray, roasting pan, telescopic guides, removable handle, meat probe |
| Maintenance | Easy cleaning with catalytic enamel; replaceable bulb (resistant to 300 °C) |
| Spare parts available | Bulb, probe, trays, rack, telescopic guides |
| Repairability | TEKA technical support; bulb and probe user-replaceable |
| General information | Manual available in multiple languages; translations on request |
Frequently Asked Questions - HA-890 TEKA
User questions about HA-890 TEKA
0 question about this device. Answer the ones you know or ask your own.
Ask a new question about this device
Download the instructions for your Vacuum Cleaner in PDF format for free! Find your manual HA-890 - TEKA and take your electronic device back in hand. On this page are published all the documents necessary for the use of your device. HA-890 by TEKA.
USER MANUAL HA-890 TEKA
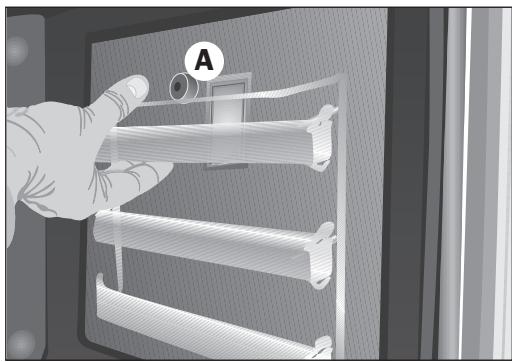
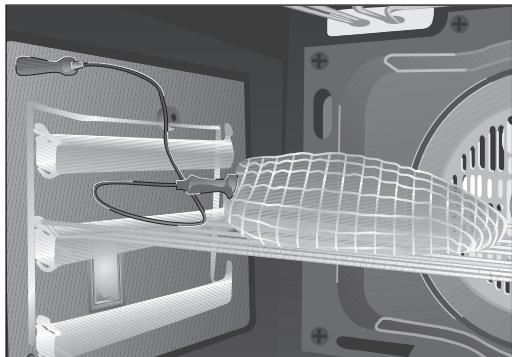
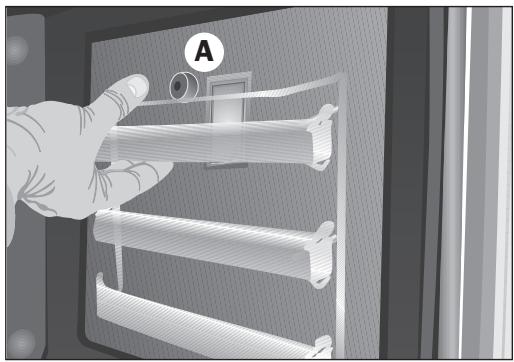
- Puxe as guias telescópicas, soltando o parafuso (A).
(^*) Inside oven and trays with easy cleaning enamel.
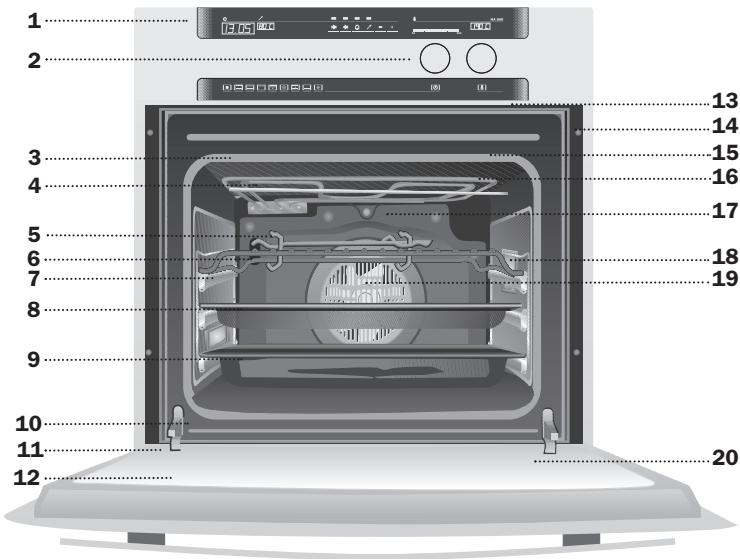
1 Control Panel
2 Insertable Controls
3 Oven Seal
4 Grill element
5 Tray Handle
6 Grid
7 Telescopic Guides
8 Cake Tray*
9 Roasting Tray(*)
10 Door switch
11 Hinge
12 Aluminium-framed Triple-glazed Door
13 Air Outlet
14 Fixing to Unit
15 Grill Screen
16 Smoke Outlet
17 Catalytic Rear Panel
18 Side lights
19 Fan
20 Large Tempered Inner Glass
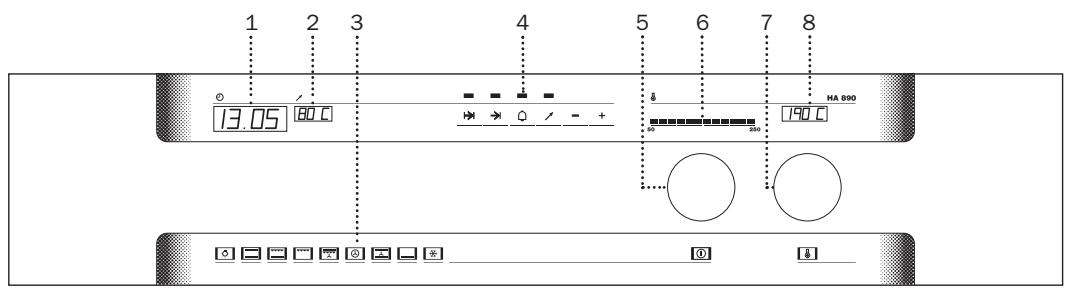
Control Panel

Modelo HA-890
1 Electronic Clock.
2 Meat Sensor Temperature Display.
3 Selected Cooking Function Indicator.
4 Electronic Clock Touch-Control.
5 Function Selection Control.
6 Indicator of Temperature inside the Oven.
7 Temperature Selection Control.
8 Temperature Selection Display.
Switching the oven off
When the oven is turned off, the cooking function indicator goes out and the word "OFF" appears on the temperature display.
Oven light
Lights up the inside of the oven. The light also comes on when a cooking function is in progress. If you do not want the light to come on while cooking (to save energy), turn the function selection control until the symbol flashes. The oven light will proceed to go out after a short pause.
Conventional
It is used for sponges and cakes where the heat received must be uniform to achieve a spongy texture.
Grill and Lower element
Special for roasts. It can be used for any piece, whatever its size.
Grill
For preparing dishes with superficial roasting. It allows the outer layer to be browned without affecting the inside of the food. Ideal for flat food, such as steaks, ribs, fish, toast.
MaxiGrill with fan
Allows uniform roasting at the same time as surface browning. Ideal for grills. Special for large volume pieces, such as poultry, game etc. It is recommended to put the item on a rack with a tray beneath to collect the stock and juices.
Caution
While using the Grill or MaxiGrill with fan, the door must be kept closed.
Turbo
The fan distributes the heat produced by an element located at the rear of the oven. Due to the uniform heat distribution, it allows roasting and baking to take place at two heights at the same time.
Conventional with fan
Appropriate for roasts and cakes. The fan spreads the heat uniformly inside the oven.
Lower element
Heats only from beneath. Suitable for heating dishes and raising pastry and similar.
Defrosting
Recommendations for thawing out frozen food
Frozen food can be thawed out using a system of hot air with two power levels: HI for all kinds of meat and LO for fish, pastry and bread. When the thawing function has been chosen, the HI and LO levels can be selected with the temperature selection control. The level chosen appears on the temperature display.
- Unpacked food should be placed on the oven tray or in a receptacle suitable for use in ovens.
Large pieces of meat or fish should be thawed out on an oven rack, placing the oven tray underneath to collect the resulting liquid.
- Meat and fish do not need to be thawed out completely before cooking, and can be cooked when the surface is soft enough for seasoning.
- Once thawed out, food should always be cooked.
Consult the following table for thawing times and the required thawing level:
| FOOD | LO LEVEL | HI LEVEL | ||
| Weight | Time | Weight | Time | |
| Bread | 1 lb | 35 min | ||
| Cakes | 1 lb | 25 min | ||
| Fish | 1 lb | 30 min | ||
| Fish | 2 lb | 40 min | ||
| Chicken | 2 lb | 75 min | ||
| Chicken | 3 lb | 90 min | ||
| T-bone steak | 1 lb | 40 min | ||
| Minced meat | 1 lb | 60 min | ||
| Minced meat | 2 lb | 120 min | ||
The times given above are only an indication. Thawing times depend on room temperature, the weight of the frozen food and the degree to which it is frozen.
Using the Oven
Choosing a cooking function
To select a cooking function, extract the function selection control and turn it until the symbol for the function you want to use flashes on the control panel. Two beeps are then heard before the cooking function lights up permanently.
To turn the oven off, turn the function selection control (5) until there is no symbol on the control panel and the word OFF appears on the temperature display (8), or touch the symbol on the glass for more than 2 seconds. The oven turns itself off.
Important
At the start of the cooking process, the oven pre-heats quickly until the selected temperature is reached. The fan inside the oven comes on during this pre-heating process.
Choosing a cooking temperature
When a cooking function has been chosen, a temperature specific to the function chosen appears on the control panel temperature display (8) by default.
To change this temperature, extract the temperature selection control (7) and turn until the desired temperature appears.
During the fast pre-heating stage, the light on the temperature indicator (6) flashes as the
temperature inside the oven increases. When the pre-heating stage finishes, the indicator light comes on permanently to show the temperature inside the oven.
When the oven is turned off, the temperature indicator light stays on until the oven cools down.
Using the Electronic Clock
Important
Your electronic clock is equipped with TouchControl technology. The controls are operated by simply touching the desired symbol on the glass with your fingertip.
The sensitivity of the touch controls constantly adapts to accommodate atmospheric conditions. When connecting your oven to the mains electricity supply, make sure that the glass surface on the control panel is clean and free of all obstacles.
If the clock does not respond correctly when the glass is touched, disconnect your oven from the mains supply and reconnect it a few seconds later. Doing this automatically resets the sensors, which should now react to touch once again.
Setting the time on the electronic clock
When the oven is connected, 00.00 flashes on the clock display. The time on the clock can be set by touching the + and - symbols on the glass. Two beeps are then heard to confirm the setting.
If you wish to modify the set time on the clock, touch symbols +, and at the same time to enter the change-time mode. Release symbols and , and change the time using symbols + and -. Two beeps are then heard to confirm the new setting.
Manual operation
When the time has been set on the clock, the oven is ready for use. Choose a temperature and a cooking function.
To turn the oven off, turn the function selection control (5) until there is no symbol on the control panel and the word OFF appears on the temperature display (8), or touch the symbol on the glass for more than 2 seconds. The oven turns itself off.
Functions of the electronic clock
Cooking time: to cook for a set period of time. When the set time comes to an end, the oven turns itself off automatically.
End-of-cooking time: to cook until a specific time is reached. When the set time is reached, the oven turns itself off automatically.
Cooking time and end-of-cooking time: to set the cooking time and the end-of-cooking time. When this function is used, the oven turns itself on automatically in order to cook for the period of time set (cooking time) before turning itself off automatically at the time set for the end-of-the cooking process (end-of-cooking time).
Alarm: the alarm sounds at the end of the time period set. The oven does not need to be working to use this function.
Child safety: to block the oven when small children are likely to be present.
Setting a cooking time
1 Touch symbol on the glass until the indicator light above the symbol starts flashing.
2 Set the period of time for cooking by touching the ^+ symbol on the glass.
3 Two beeps are then heard, and the flashing indicator light comes on permanently to indicate that the oven is set to turn itself off automatically.
4 The clock shows the real time again.
5 Choose a temperature and a cooking function.
6 To modify the set time, touch symbol and then touch the + and - symbols on the glass. Two beeps are heard to confirm the new setting and the real time appears on the clock again.
7 When the period of time set for cooking comes to an end, the oven turns itself off, the alarm sounds and the indicator light starts flashing.
8 Touch any symbol on the glass to cancel the alarm.
NOTE
If symbol is touched for more than two seconds, the time remaining before the end of the cooking process is displayed and the indicator light flashes.
Setting an end-of-cooking time
1 Touch symbol on the glass until the indicator light above the symbol starts flashing.
2 Set the specific time you want the cooking process to end at by touching the ^+ symbol on the glass.
3 Two beeps are then heard and the flashing indicator light comes on permanently to indicate that the oven is set to turn itself off automatically.
4 The clock shows the real time again.
5 Choose a temperature and a cooking function.
6 To modify the set time, touch symbol and then touch the + and - symbols on the glass. Two beeps are heard to confirm the new setting and the real time appears on the clock again.
7 When the end-of-cooking time is reached, the oven turns itself off, the alarm sounds and the indicator light starts flashing.
8 Touch any symbol on the glass to cancel the alarm.
NOTE
Touch symbol to display the end-of-cooking time that has been set.
Setting a cooking time and an end-of-cooking time
1 Set the cooking time (length of time).
2 Set the end-of-cooking time.
3 Choose a temperature and a cooking function.
4 The oven remains off and the indicator lights above symbols and light up. The oven is set for a cooking time and an end-of-cooking time.
5 When the time to start cooking is reached, the oven turns itself on and cooks for the period of time set as the cooking time.
6 When the set end-of-cooking time is reached, the oven turns itself off, the alarm sounds and the indicator lights above symbols and start flashing.
7 Touch any symbol on the glass to cancel the alarm.
Setting the alarm
1 Touch symbol on the glass until the indicator light above the symbol starts flashing.
2 Set the period of time at the end of which you want the alarm to sound by touching symbol + on the glass.
3 Two beeps are then heard and the indicator light comes on permanently to indicate that the alarm is set.
4 To modify the set time, touch symbol on the glass and then touch symbols + and - . Two beeps are heard to confirm the new setting, and the real time appears on the clock again.
5 When the period of time set for the alarm comes to an end, the alarm sounds and the indicator light starts flashing.
6 Touch any symbol on the glass to cancel the alarm.
NOTE
If symbol is touched for more than two seconds, the time remaining before the alarm is set to sound is displayed, and the indicator light flashes.
IMPORTANT
A setting can be cancelled by touching symbols ^+ and - on the glass and the relevant function at the same time.
In the event of a mains electricity supply failure, all the settings on the electronic clock are deleted and 00.00 flashes on the clock display. It is necessary to set the time and the cooking function again.
Child safety function
The oven controls and settings can be blocked to prevent small children from interfering with them. To block the controls, touch symbols and on the glass at the same time. A beep is heard and flashing dots
appear between the digits on the clock to indicate that the oven controls are blocked.
If the child safety function is activated when the oven is off, then the oven cannot be turned on. If this safety function is activated while another function is in progress, then the controls on the electronic clock are blocked.
To deactivate the child safety function, touch symbols , and on the glass at the same time again. A beep is heard to confirm deactivation.

Using the meat sensor
The meat sensor measures the temperature inside roasts. When this temperature reaches a set level, the oven turns itself off automatically.
Cooking with the meat sensor ensures optimum cooking results regardless of the type or weight of the meat being roasted.
Inserting the sensor
- Insert the sensor before starting to cook.
- Insert the sensor in one side of the roast in such a way that the tip reaches the centre.
- The sensor should be completely inserted up to the handle.
- Roasts should be turned halfway through the cooking process. This should be remembered in order to prevent problems with the sensor.
- The tip of the sensor should not be in contact with bone, fat or hollow sections, as may be the case with poultry.
Using the meat sensor
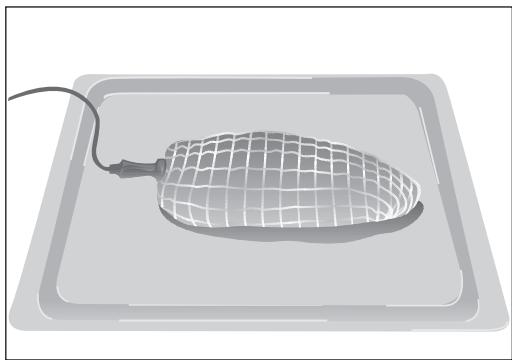
- Place the roast inside the oven with the meat sensor in position.
-
Plug the meat sensor into the socket located in the top left-hand corner of the oven.
-
When the sensor is connected, a set temperature appears on the meat sensor temperature display on the control panel and the indicator light above the symbol flashes.
- Touch symbol and then + and - if you wish to modify the recommended temperature.
- Two beeps are then heard and the indicator light above the symbol comes on permanently.
- The sensor temperature display (2) shows the current temperature inside the roast.
- Choose a cooking function and an oven temperature for the roast. Consult the cooking tables.
- When the temperature inside the roast reaches the set temperature, the oven turns itself off and the alarm sounds for a short period of time.
- Touch any symbol on the glass to cancel the alarm.
- The roast is cooked and ready to be served.
Table indicating general temperatures for cooking with the meat sensor.
| FOOD | Sensor temperature | Comments |
| Roast-beef | 35 - 40 °C | RARE |
| Roast-beef | 45 - 50 °C | MEDIUM |
| Roast-beef | 55 - 60 °C | WELL DONE |
| Leg of lamb | 65 - 70 °C | |
| Joint | 80 - 85 °C | |
| Loin of pork | 65 - 70 °C | |
| Ham | 80 - 85 °C | |
| Chicken | 75 - 80 °C | |
| Roast turkey | 80 - 85 °C |
Tray Handle
The tray handle is used when you need to move the tray to check the cook. See figures. To handle the tray out the oven, you need to use gloves to protect yourself.
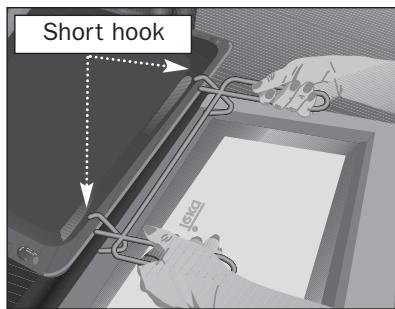
Cake tray handle position. You must put the short hook over the tray.
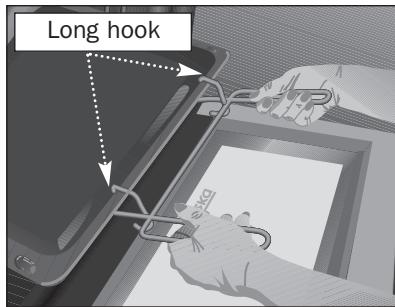
Roasting tray handle position. You must put the long hook over the tray.
Changing the oven bulb
CAUTION
To change the bulb, first ensure that the oven is disconnected from the power supply.
- Ease out the telescopic guides, releasing them from the bolt (A).
- Loosen the lens from the lampholder with the help of the appropriate tool.
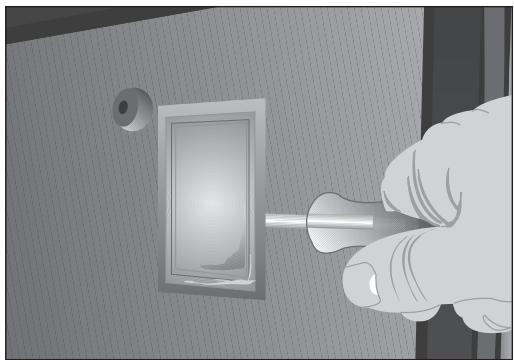
Exchange the bulb.
- Replace the lens, making sure it fits in the correct position without forcing it.
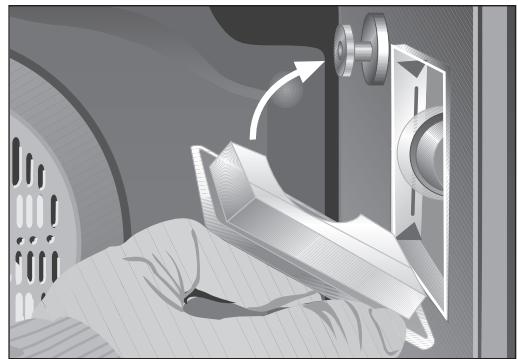
The replacement bulb must be temperature resistant to 300^ . These can be ordered from the Technical Service Department.
Technical Information
This oven has got a door temperature of below 60 K (as per EN 60335-1/2-6).
HA-890