AV TR 3 WIRELESS MULTIROOM AUDIO VIDEO LINK - Wireless multiroom audio/video system VIVANCO - Free user manual and instructions
Find the device manual for free AV TR 3 WIRELESS MULTIROOM AUDIO VIDEO LINK VIVANCO in PDF.
User questions about AV TR 3 WIRELESS MULTIROOM AUDIO VIDEO LINK VIVANCO
0 question about this device. Answer the ones you know or ask your own.
Ask a new question about this device
Download the instructions for your Wireless multiroom audio/video system in PDF format for free! Find your manual AV TR 3 WIRELESS MULTIROOM AUDIO VIDEO LINK - VIVANCO and take your electronic device back in hand. On this page are published all the documents necessary for the use of your device. AV TR 3 WIRELESS MULTIROOM AUDIO VIDEO LINK by VIVANCO.
USER MANUAL AV TR 3 WIRELESS MULTIROOM AUDIO VIDEO LINK VIVANCO
Transmitter/Receiver:
Operating Frequencies (3 Channels):
2471,1343 MHz
Transmit power output:
Modulation:
Video :
@ 75Ω
Audio :
Antenna:
2435,0621-2453,0982
10.W
<10mW FM (video and audio)
Composite Video: 1V p-p
STEREO
Hidden omni-directional
IR-remote IR output:
Power consumption:
Dimension:
mm
Weight:
Operating temperature:
Operational Range:
Remote Control Range:
Primary Voltage Power Adapters:
CE0678
434,1523 MHz
9V DC, 300mA
130 mm×32 mm×105
160g
0-40°C
up to 100m (line of sight)
up to 70m (line of sight)
230V,50Hz
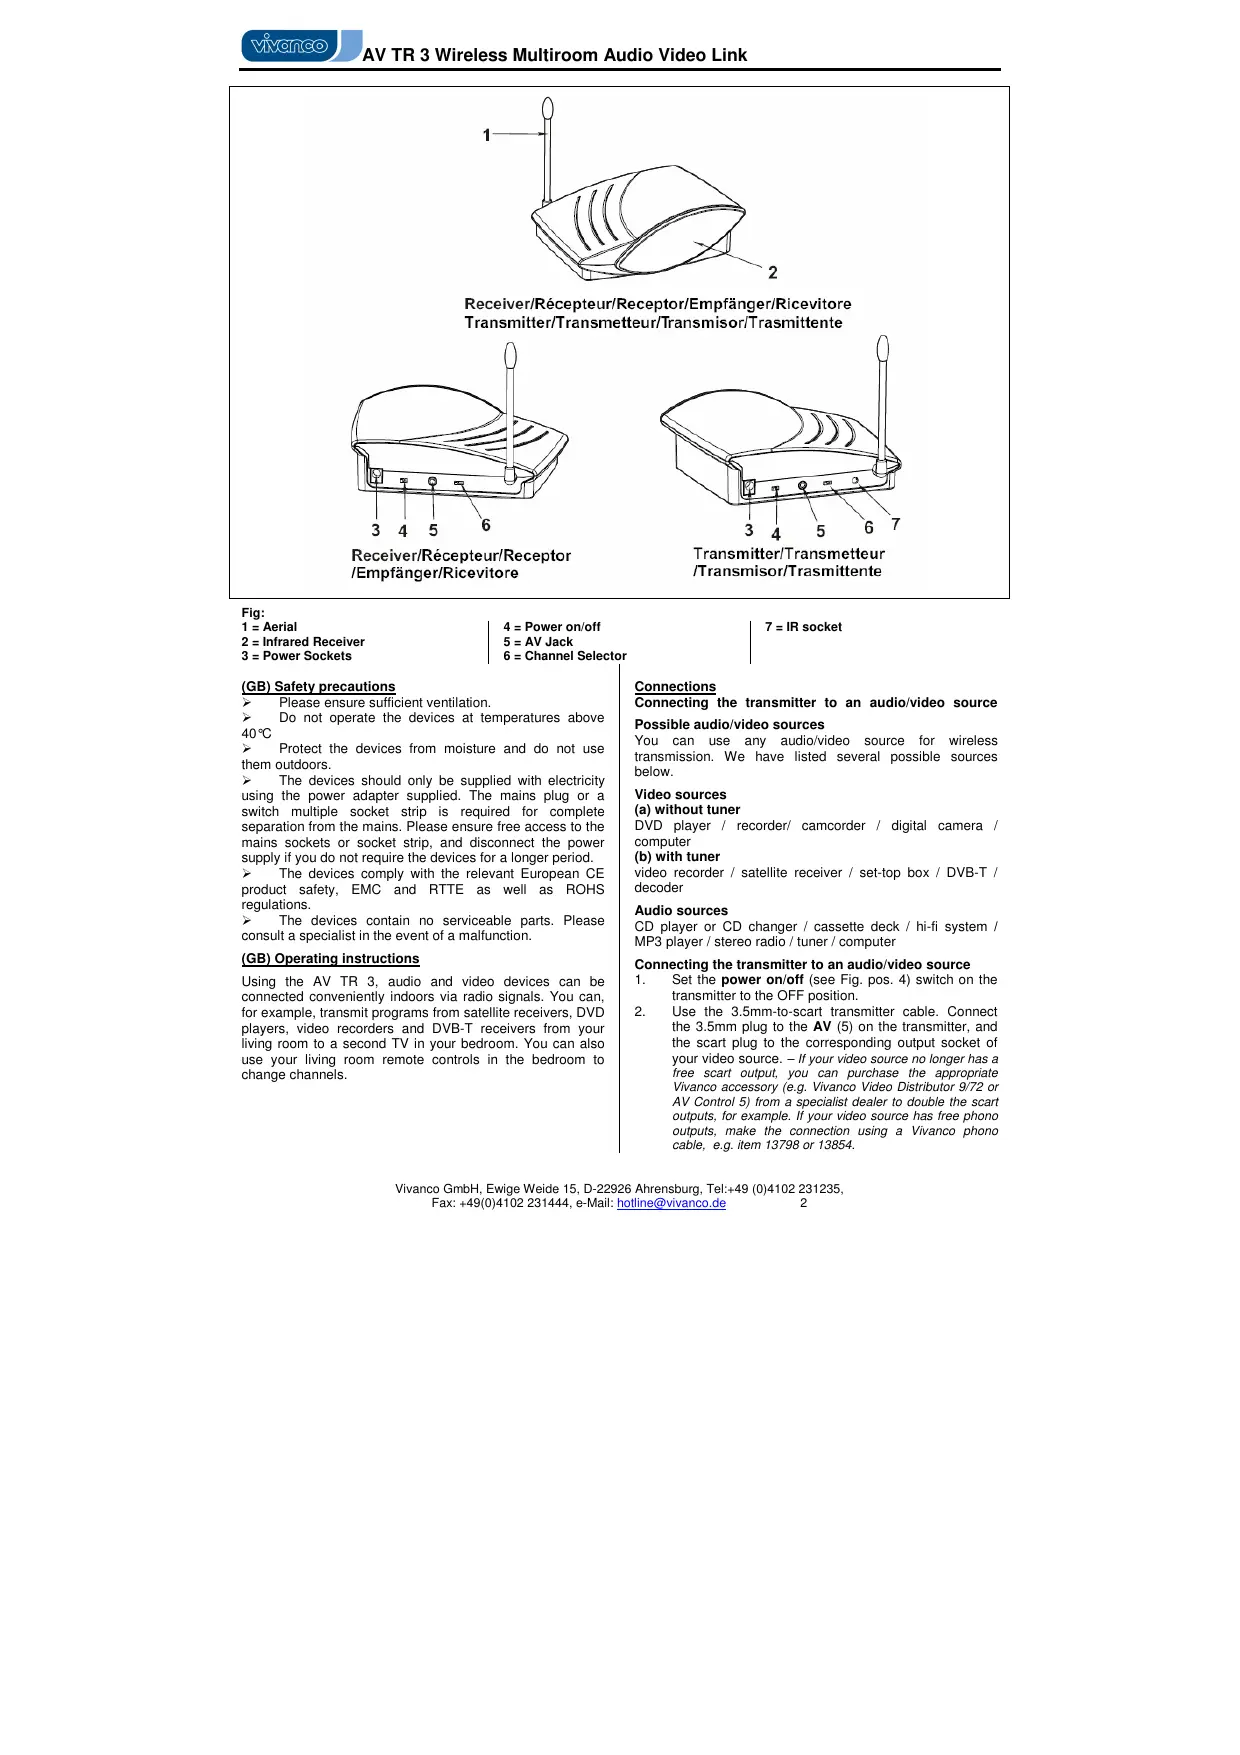
Receiver/Récepteur/Receptor/Empfänger/Ricevitore Transmitter/Transmetteur/Transmisor/Trasmittente
Receiver/Récepteur/Receptor /Empfänger/Ricevitore
Transmitter/Transmetteur /Transmisor/Trasmittente
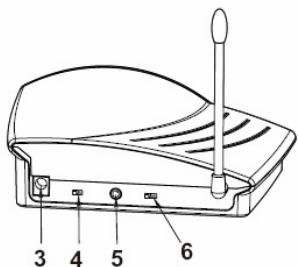
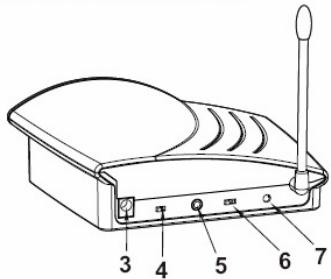
Fig:
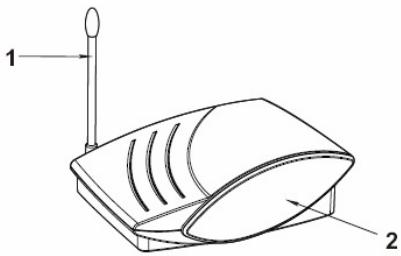
1 = Aerial
2 = Infrared Receiver
3 = Power Sockets
4 = Power on/off
5 = AV, Jack
6 = Channel Selector
7 = IR socket
(GB) Safety precautions
Please ensure sufficient ventilation.
Do not operate the devices at temperatures above 40^
Protect the devices from moisture and do not use them outdoors.
The devices should only be supplied with electricity using the power adapter supplied. The mains plug or a switch multiple socket strip is required for complete separation from the mains. Please ensure free access to the mains sockets or socket strip, and disconnect the power supply if you do not require the devices for a longer period. The devices comply with the relevant European CE product safety, EMC and RTTE as well as ROHS regulations.
The devices contain no serviceable parts. Please consult a specialist in the event of a malfunction.
(GB) Operating instructions
Using the AV TR 3, audio and video devices can be connected conveniently indoors via radio signals. You can, for example, transmit programs from satellite receivers, DVD players, video recorders and DVB-T receivers from your living room to a second TV in your bedroom. You can also use your living room remote controls in the bedroom to change channels.
Connections
Connecting the transmitter to an audio/video source
Possible audio/video sources
You can use any audio/video source for wireless transmission. We have listed several possible sources below.
Video sources
(a) without tuning
DVD player / recorder/ camcorder / digital camera / computer
(b) with tunes
video recorder / satellite receiver / set-top box / DVB-T / decoder
Audio sources
CD player or CD changer / cassette deck / hi-fi system /MP3 player / stereo radio / tuner / computer
Connecting the transmitter to an audio/video source
- Set the power on/off (see Fig. pos. 4) switch on the transmitter to the OFF position.
-
Use the 3.5mm-to-scart transmitter cable. Connect the 3.5mm plug to the AV (5) on the transmitter, and the scart plug to the corresponding output socket of your video source. - If your video source no longer has a free scart output, you can purchase the appropriate Vivanco accessory (e.g. Vivanco Video Distributor 9/72 or AV Control 5) from a specialist dealer to double the scart outputs, for example. If your video source has free phono outputs, make the connection using a Vivanco phono cable, e.g. item 13798 or 13854.
-
Use one of the power adapters supplied. Connect the power adapter to the DC IN 9 VDC power socket (3) on the transmitter, then plug the power adapter into a mains socket.
- Now position the transmitter as described in the section "Optimal positioning of transmitter and receiver".
- Set the POWER OFF ON (4) switch on the transmitter to the ON position. The LED lights to indicate readiness to operate.
Connecting the transmitter to an audio source
- For the exclusive transmission of audio signals you require a phono to 3.5mm cable (Vivanco accessory, e.g. 13798 or 13854).
- Connect the 3.5mm plug to the AV (5) socket of the transmitter, and the audio phono plugs to the corresponding output sockets of your audio source. Make sure the polarity (red/white) is correct.
- Use one of the power adapters supplied. Connect the power adapter to the DC IN 9 VDC power socket (3) on the transmitter, then plug the power adapter into a mains socket.
- Now position the transmitter as described in the section "Optimal positioning of transmitter and receiver".
- Set the POWER OFF ON (4) switch on the transmitter to the ON position. The LED lights to indicate readiness to operate.
Connecting the receiver
When transmitting audio/video signals, the receiver can be connected
direct to a TV or
via an intermediary video recorder. For pure audio transmission, the receiver can be connected direct to a hi-fi system.
Direct connection of the receiver to a TV
- Set the power on/off switch (4) on the receiver to the OFF position.
- Use the 3.5mm-to-scart receiver cable supplied. Connect the 3.5mm plug to the AV socket (5) on the receiver, and connect the scart plug to the corresponding scart socket on your TV.
- Then connect the power adapter of the receiver.
- Now position the receiver as described in the section "Optimal positioning of transmitter and receiver".
- Set the POWER OFF ON (4) switch on the receiver to the ON position. The LED lights to indicate readiness to operate.
Connecting the receiver via an intermediary video recorder
- Set the power on/off (4) switch on the receiver to the OFF position.
- Use the 3.5mm-to-scart receiver cable supplied. Connect the 3.5 mm plug to the AV socket (5) on the receiver, and connect the scart plug to the corresponding scart socket on your video recorder or DVD recorder.
- Then connect the power adapter of the receiver.
- Now position the receiver as described in the section "Optimal positioning of transmitter and receiver".
- Set the POWER OFF ON (4) switch on the receiver to the ON position. The LED lights to indicate readiness to operate.
The connection between video recorder and TV can be made via a scart connection between the two devices or using an antenna cable.
Connecting the receiver for pure audio transmission
- Set the power on/off (4) switch on the receiver to the OFF position.
- Use a 3.5mm-to-phono cable, e.g. optional Vivanco 13798 or 13854. Connect the 3.5mm plug to the AV socket (5) on the receiver, and connect the phono plugs to the corresponding phono input sockets on your audio device, e.g. amplifier.
- Then connect the power adapter of the receiver.
- Now position the receiver as described in the section "Optimal positioning of transmitter and receiver".
- Set the POWER OFF ON (4) switch on the receiver to the ON position. The LED lights to indicate readiness to operate.
Transmission of remote control signals from receiver to transmitter
This audio/video transmitter/receiver set not only allows the wireless transmission of picture and sound signals, but also lets you control audio/video sources using the existing remote controls from another room. The infrared signal for remote control is captured by the infrared window IR (2) of the receiver, converted into radio signals and then emitted to the audio/video source as an infrared signal by an infrared sensor on the transmitter.
- Connect the supplied infrared sensor cable to the IR socket (7) of the transmitter.
- Position the infrared sensor in front of the infrared window of your audio/video source(s).
- To control the device, point the remote control of your AV source at the IR window (2) of your FM receiver. As a control, the transmission of IR signals is audible.
Selecting a transmission channel
To ensure optimal signal transmission, 3 different transmission channels are available. The transmitter and receiver must always be set to the same transmission channel, e.g. CHANNEL 1, using the slide controls (6) on the rear of the devices. - To improve transmission quality, you should select the best channel. A channel could, for example, already be occupied by your neighbour.
Optimal positioning of transmitter and receiver
If required, the transmission quality can be optimised by moving and/or revolving the transmitter and/or receiver and/or their aerials. - Sources of interference: radio signals can be disrupted by electromagnetic radiation, e.g. from microwave ovens, therefore optimisation as described above may not help. In such cases, the source of interference, e.g. the microwave, must be switched off.
Hotline
If you have any questions regarding the AV TR 3, please call the Vivanco Hotline: tel. 01442 246088. Or send an e-mail to: Consumer@vivanco.co.uk
Videorecorder / Satellite Receiver / Set-Top-Box / DVB-T / Decoder
Audioquellen
suoraan television tai
(RUS)PykoBoDCTBO no 3kCnIyataaun
UCTpoctBO AV TR 3 no3B0JareT yOo6bHIM o6pa3oM CB7a3b Mexdy co60y ayDno- n BnuDeoAnnapatpy, HaxoJaIyOcB B Dome, no paNIOKaHAM. HanpImep, MOxHO nepeDaBaTB npOrpAmMbI c CnyTHNKOBOR pnpEMHHka, C DVD-Npeepa, BnuDeoMaHHTOfoHa, pnEMeHHaCnFOHBA HOHOMeHHaCnFOHO HOHOMeHHaCnFOHO HOHOMeHHaCnFOHO HOHOMeHHaCnFOHO HOHOMeHHaCnFOHO HOHOMeHHaCnFOHO HOHOMeHHaCnFOHO HOHOMeHHaCnFOHO HOHOMeHHaCnFOHO HOHOMeHHaCnFOHO HOHOMeHHaCnFOHo HOHOMeHHaCnFOHO HOHOMeHHaCnFOHO HOHOMeHHaCnFOHO HOHOMeHHaCnFOHO HOHOMeHHaCnFOHO HOHOMeHHaCnFOHO HOHOMeHHaCnFOHO HOHOMeHHaCnFOHO HOHOMeHHaCnFOHO HOHOMeHHaCnFOGO HOHOMeHHaCnFOHO HOHOMeHHaCnFOHO HOHOMeHHaCnFOHO HOHOMeHHaCnFOHO HOHOMeHHaCnFOHO HOHOMeHHaCnFOHO HOHOMeHHaCnFOHO HOHOMeHHaCnFOHO HOHOMeHHaCnFOHO HOHOMeHHaCnFOHS HOHOMeHHaCnFOHS HOHOMeHHaCnFOHS HOHOMeHHaCnFOHS HOHOMeHHaCnFOHS HOHOMeHHaCnFOHS HOHOMeHHaCnFOHS HOHOMeHHaCnFOHS HOHOMeHHaCnFOHS HOHOMeHHaCnFOHS HOHOMeHHaCnFOSH HOHOMeHHaCnFOSH HOHOMeHHaCnFOSH HOHOMeHHaCnFOSH HOHOMeHHaCnFOSH HOHOMeHHaCnFOSH HOHOMeHHaCnFOSH HOHOMeHHaCnFOSH HOHOMeHHaCnFOSH HOHOMeHHaCnFOSH HOHOMeHHaCnFOSh HOHOMeHHaCnFOSH HOHOMeHHaCnFOSH HOHOMeHHaCnFOSH HOHOMeHHaCnFOSH HOHOMeHHaCnFOSH HOHOMeHHaCnFOSH HOHOMeHHaCnFOSH HOHOMeHHaCnFOSH HOHOMeHHaCnFOSH HOHOMeHHaCnFOS HOHOMeHHaCnFOSH HOHOMeHHaCnFOSH HOHOMeHHaCnFOSH HOHOMeHHaCnFOSH HOHOMeHHaCnFOSH HOHOMeHHaCnFOSH HOHOMeHHaCnFOSH HOHOMeHHaCnFOSH HOHOMeHHaCnFOSH HOHOMeHHaCnFOSS HOHOMeHHaCnFOSS HOHOMeHHaCnFOSS HOHOMeHHaCnFOSS HOHOMeHHaCnFOSS HOHOMeHHaCnFOSS HOHOMeHHaCnFOSS HOHOMeHHaCnFOSS HOHOMeHHaCnFOSS HOHOMeHHaCnFOSS HOHOMeHHaCnFOS HOHOMeHHaCnFOSS HOHOMeHHaCnFOSS HOHOMeHHaCnFOSS HOHOMeHHaCnFOSS HOHOMeHHaCnFOSS HOHOMeHHaCnFOSS HOHOMeHHaCnFOSS HOHOMeHHaCnFOSS HOHOMeHHaCnFOSS HOHOMeHHaCnFOFFHO HOOOLOOLOOLOOLOLOLOLOLOLOLOLOLOLOLOLOLOLOLOLOLOLOLOLOLOLOLOLOLOLOLOLOLOLOLOLOLOLOLOLOLOLOLOLOLOLOLOLOLOLOLOLOLOLOLOLOLOLOLOLOLOLOLOLOLOLOLOLOLOLOLOLOLOLOLOLOLOLOLOLO
IopKJIIOUeHne
IopKJIouyHnepePaTUnka(TpaHcMnTTepa)K nCTOuHnkyayDno- N BvDoeocnHaHa
Bo3MOXHbIe ICTOUYHKn aYdNO- n BnDEOCnHaJa
Дябсробогнй поразчпгьсялбовисточьaydno-и видаocinнана.Нжke поразчпсеньы HekoTOpbbe BO3MOxHbIe NCTOCHNKI.
NCTOUYHKBIDEOCHHana
(a) 6e3 npneHno yactn (TIOheP)
DVD-nleep/pekopdep/Buideokamepa/Zucfpobawka kamepa /komnblboter
(b) c npneMHoY aactbIO (THOHeP)
BudoeMaHHTOFOH / cnTnHKOBbI npMeMHNK / TeNEB3NHOHNABaOHEHTCKaPnCTaBA / npMeMHK ΣfnpoBOHO HaeMHORO BeuAHH (DVB-T) / Deokep
NCTOuHnKn aynocnHaNoB
CD-Ппeep ИИ CD-ЧeнДжeр / Касстная Дeкa / HiFiyctановka / MP3-Ппeep / cTepeOMarHnToIa / TJOHeP / KOMbIbOTep
IpoKlIOUeHne nepeaTUnka (TpAHCMTTeP/nepeaTUnK) K IcTOUHky ayDnO- n BIVDeOcunHaHa
- YctaHOBITE nepeKInOHTeIb power on/off (TtTaHne BKN./BbIKn.) (CM. Ha pnc. no3. 4) Na nepeDaTuKHe B noloxene OFF (BblKn.).
- VcnoIb3yIte KaBEnIbepeaTnKna, rHe3do 3,5 MM Ha SCART. CoeINHITe KOHTAKThb IuTekep 3,5 MM c rHe3dOM AV (5)Ha nepeaTnKe, a SCART-1wTekep - c COOTBeCTByUOIMb BxOHNbM rHe3dOM BaWero nctouHnka BIneoCnHana. - Ecnu Bau ucmOnHk eDeoocuaHana He Umeem CeooBoHOzo SCART- bixOda, mo e CneuAnu3upoeAHHo mopoeJe moXHo npuOBepcm coMeemcmTuOue npuHadLeXnHocMu Vivanco, HapPumep dny ydeoHua Ycncn SCART-bixOdo (hApnPumep, eDeopacnpedenumen9/72 unu AV Control 5).Ecnu Bau ucmOnHuk eDeoocuaHana Umeem CeooBOHbe bixOdb muna "mIoBnah", mo cIeMy eblonHmb ndcoeDuHue npu nomou K6eNc 3aueKnoi npou3oDcmea Vivanco, HapPumep apmukyn 13798 unu 13854.
- NcnoIb3yIe OINH nnpIaeraemblx cTeBbIX 6nOKOB. IIOcoEiINHe cTeBOI 6nOK K THeEyd IOaAHnPaXeHN -rHE3do DC IN (3) Ha nepeDaTtKe I BKNIOUHTe cTeBOI 6nOK Bpo3eTyK.
- PaoNoJoxnTepeB nepeDaTHNK B COOTBETCTBNu C yka3aHnMn C rIabe "OttmAbHoe pa3MeueHne nepeDatUkna N npMeHHNa".
- YctahOBnTE nepeKlnOHTeB pOwER OFF ON (IINTAHNE BblKn.BkN.)4Ha nepeDaTuHke B noLoXeHNe ON (BkN); cBeueHne CbTeOnDIOHoro INdNKAtopa nok3a3bBaet rotobHOCTb KpaOte.
IpoKJIouyHeNe nepeJaTcuKa / TpaHcMnTTepa K nCTOuHnky aayDnOcHrHaJa
- EcnI Tpe6yeTcna nepedabatb ToJbKO aydnocnHnbl, TO DoCTaTOHOn AynIOKa6eB c 3aueNkO TNHa "TOLbNaH", 3,5 MM (CneunPnHaNLeXHoCTn Vivanco, HanpIMPe 13798 nn 13854).
- CoeINHInTe KOHTaKTHbI WTekep C rHe3dOM AV (5) nepedatYnka, a TaXKe C COOTBeTcTBUOuIMN BbIXoDhMbI rHe3dAmn BaJero nCTOuHnKa ayDIOuRHaNoB. CneJIte pRn 3tOM 3a npabunbHO nnlpaHocTbO (KpaCHb/6bIb).
-
NcnoIb3yIe OINn npiJanaeAembix cTeBbIX 6NoKOB. IIOcOeINHnTE cTeBOI 6NoK THeEyD yNoaun HnapRjKeHn -rHe3do DC IN (3) nepeDatuHa BKNlouHTe cTeBOI 6NoK Bpo3eTky.
-
PaoIOnoJoxnTe Tenebp NepeDaTnK B COOTBETCTBNu C yka3aHnMn C rIaBe "OITNImaJIbHoe pa3MeueHne nepeDatTuHa N npMeHMnKa."
- YctahOBnTE nepeKlnOHTeB pOwER OFF ON (IINTAHNE BblKn.BkN.)4Ha nepeDaTHKe B noLoXeHNe ON (BkN); cBeueHne CbTeOnIOndHO rHdNKAtopa nok3a3bBaet rotobHOCTb KpaOte.