
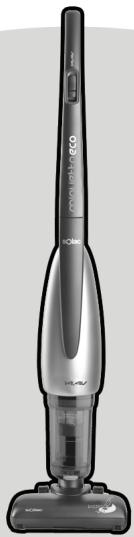
AE2510 - Vacuum Cleaner SOLAC - Free user manual and instructions
Find the device manual for free AE2510 SOLAC in PDF.

| Brand | SOLAC |
| Model | AE2510 |
| Product type | Cordless / stick vacuum |
| Dimensions (approx.) | Height 112 cm, width 28 cm, depth 22 cm |
| Weight (approx.) | 3.2 kg |
| Power supply | Rechargeable Ni-Cd battery, mains charger 220-240 V ~ 50/60 Hz |
| Initial charging time | At least 15 hours |
| Main functions | Vacuuming hard floors, carpets and rugs; integrated multi-function brush |
| Dust bin capacity | Approximately 0.5 L (estimate) |
| Filtration | Double filter: protective filter and main filter |
| Charge indicator | Red LED light during charging |
| Recommended maintenance | Empty the bin and clean the filters after each use |
| Washing filters | Under running water with a mild detergent; dry completely before reassembling |
| Main spare parts | Dust bin, filters (protective and main), multi-function brush, battery |
| Repairability | Battery and repairs exclusively by a SOLAC authorized technical service |
| Safety | Do not vacuum ashes, cigarettes, embers, sharp objects, wet dirt or liquids; keep out of reach of children |
| Warranty | 2 years against manufacturing defects (excluding normal wear, professional use, etc.) |
| Disposal | Do not throw in the trash; dispose at a recycling point; remove and recycle battery separately |
Frequently Asked Questions - AE2510 SOLAC
User questions about AE2510 SOLAC
0 question about this device. Answer the ones you know or ask your own.
Ask a new question about this device
Download the instructions for your Vacuum Cleaner in PDF format for free! Find your manual AE2510 - SOLAC and take your electronic device back in hand. On this page are published all the documents necessary for the use of your device. AE2510 by SOLAC.
USER MANUAL AE2510 SOLAC
BARREDORA ELECTRICA
CORDLESS ELECTRIC BROOM
BALAI ÉLECTRIQUE SANS CÂBLE
KABELLOSER ELEKTROBESEN
ASPIRADOR SEM FIOS
SCOPA ELETTRICA SENZA FILI
SNOERLOZE STOFZUIGER
BEZDRÂTOVÉ ELEKTRICKY VYSAVAC
ODKURZACZ BEZPRZEWODYWY
BEZDROTVÁ ELEKTRICKÁ METLA
AKKUMULÁTOROS KÉZIPORSZÍVÓ
ELEKTPRUÇECKA NOДОЧENTA经BAE3 KABENI
BEZICNI ELEKTRICI USISAVAC
ASPIRATOR VERTICAL FÄRA CABLU (CU ACUMULATOR)
INSTRUCCIONES DE USO
INSTRUCTIONS FOR USE
MODE D'EMPLOI
GEBRAUCHSANLEITUNG
INSTRUÇões DE USO
ISTRUZIONI PER L'USO
GEBRUKSAANWIJZING
NÁVOD K POUZITÍ
INSTRUCJA OBSLUGI
NÁVOD NA POUZITIU
HASNÁLATI UTASÍTÁS
Инсрукцяna 3a уnotpe6a
UPUTE ZA UPOTREBU
INSTRUÇIUNI DE UTILIZARE
5-9 ESPANOL
10-14 • ENGLISH
15-19 FRANÇAIS
20-24 DEUTSCH
25-29 • PORTUGUES
30-34 ITALIANO
35-39 NEDERLANDS
40-44 CESKY
45-49 POLSKI
50-54 • SLOVENCINA
55-60 MAGYAR
61-65 6bIrapck
66-70 • HRVATSKA
71-75·ROMÁNA


1 ATENCLON
- Read these instructions before switching on the appliance. Keep them for future reference.
- This appliance is designed for home use, not for industrial use.
- Connect and use the appliance only according to the information given on the power unit specifications plate.
IMPORTANT: Never use the vacuum cleaner without the dust canister (6) and the filters (9 and 10) correctly in place.
IMPORTANT: To maintain constant suction power, we recommend you empty the canister (6) and clean the filters (9 and 10) after each use. Full dust canisters (6) or blocked filters reduce the suction power of the appliance.
- Never wash the filters in a washing machine.
IMPORTANT: Before using the appliance for the first time, charge the battery for a minimum of 15 hours to reach full charge.
- The batteries for using the appliance must be replaced only by a technical service approved by the manufacturer.
- Never vacuum live ash, cigarettes, splinters, sharp objects, wet dirt or liquids.
- This appliance is not intended for use by children or other persons without assistance or supervision if their physical sensory or mental capabilities present then from using if safety. Children should be supervised to ensure that they do not play with the appliance.
- Keep the appliance out of the reach of children.
- For safety reasons, if the power cord or the charger is damaged, it must be replaced by a technical service centre authorised by the manufacturer.
- Never use the broom or the plug with wet hands.
- Do not get the appliance wet or put it in water.
- Do not replace the nickel-cadmium batteries with non-rechargeable batteries.
- If the appliance is used incorrectly, liquid may leak from the battery. Do not touch this liquid!
- Use only the supplied charger.

CAUTION!: When you want to dispose of the appliance, NEVER throw it in the rubbish bin. Take it to your nearest CLEAN POINT or the waste collection centre closest to your home for processing. In this way, you will be helping to take care of the environment.
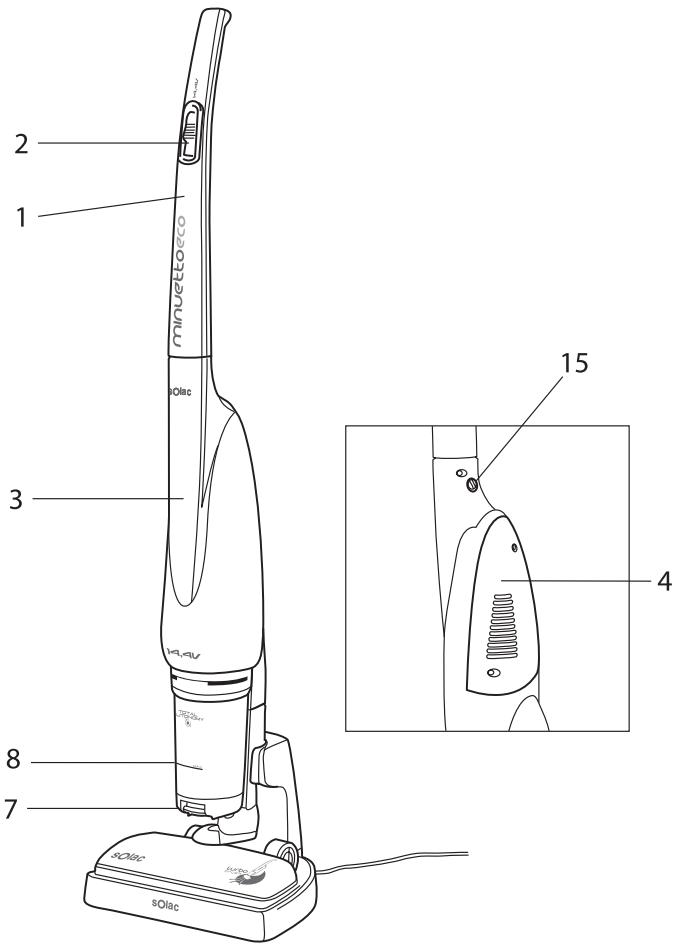
2 DESCRIPTION OF THE APPLIANCE
1 Handle
2 ON/OFF button
3 Main body of appliance
4 Battery cover
5 Battery unit
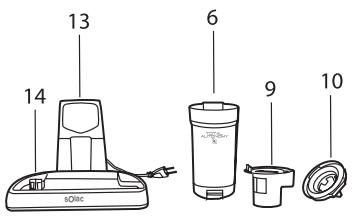
6 Dust canister
7 Canister removal button
8 Maximum canister fill level
9 Protection filter
10 Filter
11 Multi-purpose brush
12 Multi-purpose brush connection/disconnection button
13 Charger
14 Charge indicator
15 Fastening screw
CHARGING
Important: before using the appliance for the first time, charge the battery for a minimum of 15 hours to reach full charge.
Do not use chargers not supplied with the appliance.
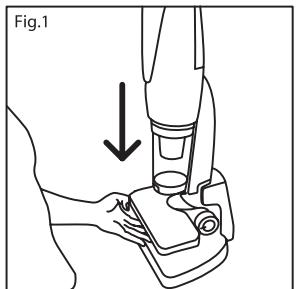
1 Plug the charger (13) into the mains. The charger may heat up when used for long periods. This is normal and is not dangerous.
2 Place the broom on the charger. (Fig. 1). Make sure the on/off button (2) is off. The red pilot light (14) comes on during charging. If the charge indicator does not come on, make sure the charger is correctly connected to the mains and the connection cable is in correct condition.
Charging is possible only within a temperature range of 5^ to 40^ .
Important: Always recharge the broom on the charger (13) after each use. This makes sure the battery is fully charged ready for the next time it is used. Leaving the battery uncharged for continued periods has a negative effect on its service life.

Uncharge the batteries completely now and then for maximum performance.
3 USER INSTRUCTIONS
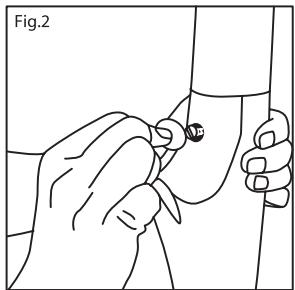
1 Insert the handle (1) in the opening on the main body of the broom (3) and fasten both parts together by tightening the fastening screw (15) with a coin. (Fig. 2).
2 Make sure the dust canister (6) and filters (9 and 10) are installed correctly. See the section titled Cleaning the dust canister and filters.
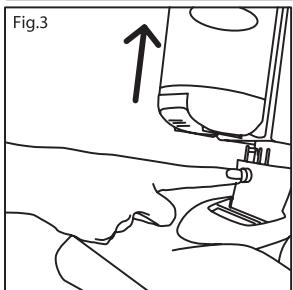
3 Insert the multi-purpose brush (11) into the suction nozzle and press it in until you hear a click. To remove the brush, gently press the multipurpose connection/disconnection button (12) and pull it out. (Fig. 3).
The multi-purpose brush (11) is ideal for vacuuming all kinds of floors, carpets and rugs.
4 To turn the broom on, slide the on/off button (2) down.
5 Once you have finished cleaning, turn the broom off by sliding the on/off button (2) up.
Important: After each use, place the broom on the charger (13) to keep the suction power at peak level. This makes sure the battery is fully charged ready for the next time it is used.
CLEANING THE DUST CANISTER AND FILTERS
A Before starting to clean and maintain the appliance, make sure you have unplugged the appliance.
When the dust stored in the canister reaches the maximum level mark (8), you should empty the canister. To ensure the continued top-quality performance of your appliance, we recommend cleaning the canister and filters after each use.
When you need to empty the dust canister, disconnect the appliance and proceed as follows:
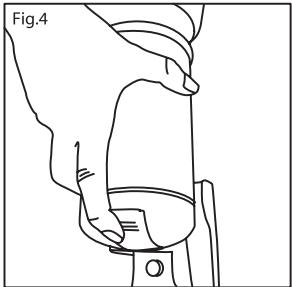
1 Press the canister removal button (7) upwards and remove the canister. (Fig. 4).
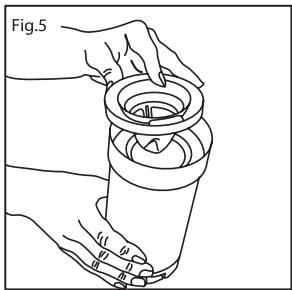
2 Remove the filter (10) by holding the canister and pulling the filter tab out. (Fig. 5). Shake the filter out in the rubbish bin or use a brush to clean it.
3 Remove the protection filter (9) by pulling it upwards. (Fig. 6). Shake the filter out in the rubbish bin, banging it lightly against the sides of the bin until no more dust falls off.
4 Once you have removed the filters from the canister, empty the canister into the rubbish bin.
5 If it is excessively dirty, wash the dust canister and filters under running water with a gentle detergent. Important: make sure they are completely dry before fitting them back in the canister.
6 Insert the protective filter (9) in the dust canister, making sure the air inlet hole on the filter coincides with the air inlet nozzle on the canister. Push the filter into position in the canister.
7 Fit the filter (10) by pressing it into the canister as far as possible.
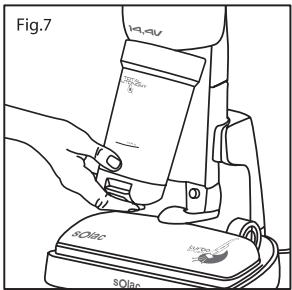
8 Reinsert the dust canister in the broom body (3). To do this, make sure the air inlet hole on the canister coincides with the suction nozzle hole. Press it in place until the canister removal button (7) is in the correct position. (Fig. 7). You will hear a click.
4 IMPORTANT INFORMATION FOR DISPOSING OF THE BATTERY
The battery must be removed from the appliance before it is scrapped.
The battery is to be disposed of safety.
The batteries should only be removed when they no longer work.

Used batteries should not be thrown away with domestic rubbish; they should be disposed of separately. Batteries should be recycled according to European Directive 91/147/EEC.
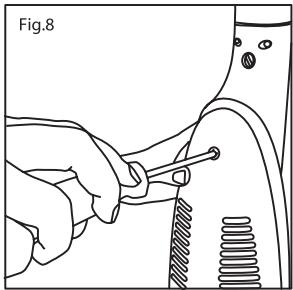
1 To do so, remove the battery: make sure the broom is switched off and removed from the charger before taking it apart to remove the battery.
2 Remove the three screws on the air outlet grill at the rear of the broom body using a screwdriver. (Fig. 8). Remove the battery unit.
Ask your distributor or local council how to dispose of the batteries.
All repairs and battery replacements should be carried out by a technical service centre authorised by the manufacturer.
5 LIMITS TO WARRANTY
This product is guaranteed for two years from the date of sale against any faults due to manufacture or materials. These include labour costs and spare parts or the replacement of the appliance should either of the first two choices be impossible or impractical.
The warranty shall be rendered null and void by any of the following:
- If the corresponding bill of sale, receipt or delivery note is not provided or if the information on these documents is altered.
- If the appliance has been used for professional cleaning and not for domestic cleaning only.
- If the appliance has been taken apart or altered by anyone outside the technical service centres authorised by SOLAC.
- The warranty shall not cover deterioration due to normal use of the product.
- If the breakdown is the result of lime scale in the water, because it has been knocked or dropped or due to the use of harmful, chemical, obstructive or corrosive products.
- If the breakdown is the result of inappropriate maintenance or lack of cleaning.
- If the appliance has been connected to a voltage other than that indicated on the specifications label.
- If the appliance has been used incorrectly and not according to the instructions for use.
1 ATTENTION
2 BESCHRIJVING VAN HET APPARAAT


Brand : SOLAC
Model : AE2510
Category : Vacuum Cleaner