
ZYWALL USG 300 - Firewall/Router ZYXEL - Free user manual and instructions
Find the device manual for free ZYWALL USG 300 ZYXEL in PDF.
| Product Type | Firewall/Router |
| Brand | ZYXEL |
| Model | ZyWALL USG 300 |
| Network Ports | 7 RJ-45 ports (ge1 to ge7) |
| Console Ports | 1 RS-232 console port, 1 RS-232 AUX port |
| Management Interface | Web (HTTPS), serial console |
| Default LAN IP Address | 192.168.1.1 |
| LAN DHCP Server | Enabled by default |
| LAN Zone | Port 1 (ge1) |
| WAN Zone | Port 2 and 3 (ge2, ge3) |
| DMZ Zone | Ports 4 and 5 (ge4, ge5) |
| WLAN Zone | Port 6 (ge6) |
| Auxiliary Port | AUX port for backup modem |
| Reset Button | Yes (RESET) - restores factory settings |
| Setup Wizard | Yes, for initial setup |
| Built-in Security Features | IDP, content filtering (trial) |
| Rack Mounting | Yes, 19-inch mounting kit included |
| Package Contents | ZyWALL, Ethernet cable, console cable, power cord, CD, mounting kit, quick start guide |
| Minimum System Requirements | Web browser, computer with Ethernet port |
| Power Supply | Power cord included |
Frequently Asked Questions - ZYWALL USG 300 ZYXEL
User questions about ZYWALL USG 300 ZYXEL
0 question about this device. Answer the ones you know or ask your own.
Ask a new question about this device
Download the instructions for your Firewall/Router in PDF format for free! Find your manual ZYWALL USG 300 - ZYXEL and take your electronic device back in hand. On this page are published all the documents necessary for the use of your device. ZYWALL USG 300 by ZYXEL.
USER MANUAL ZYWALL USG 300 ZYXEL
IP Address http://192.168.1.1
User Name admin
Password 1234
CONTENTS
ENGLISH 2
DEUTSCH 9
ESPANOL 16
FRANÇAIS 23
ITALIANO 30
日本語 37
PYCCKN 44
简体中文 51
繁體中文 57
1 Checking the Package Contents
Your package should include one of each of the following:
ZyWALL USG 300
-
RJ-45 Ethernet cable
-
Configuration Reference Card
Power cord
-
RS-232 console Y-cable
-
Compact disk (CD)
-
Rack-mounting kit
Printed Quick Start Guide
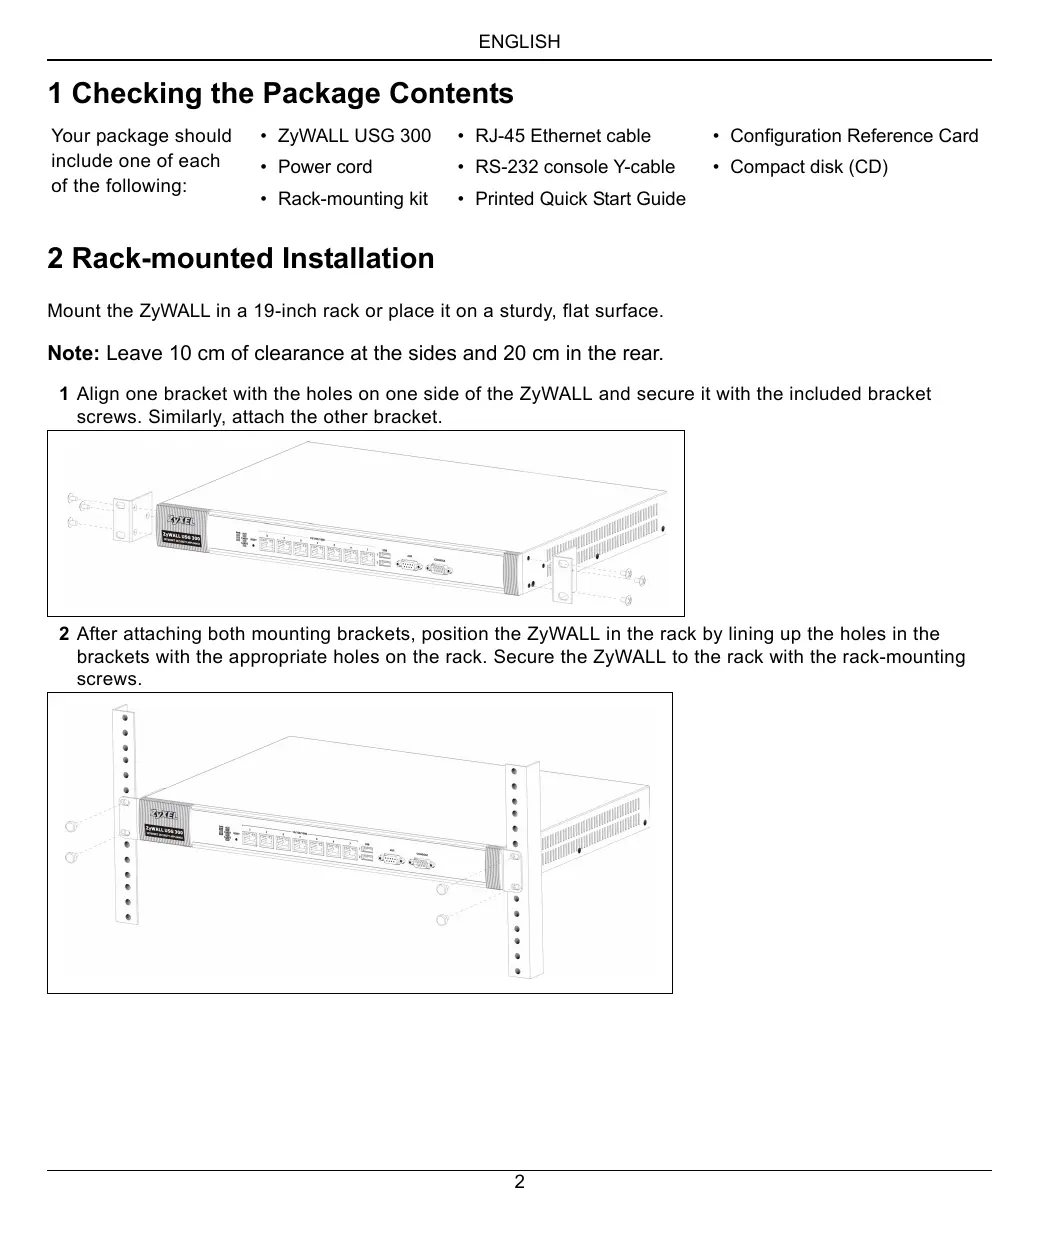
2 Rack-mounted Installation
Mount the ZyWALL in a 19-inch rack or place it on a sturdy, flat surface.
Note: Leave 10 cm of clearance at the sides and 20 cm in the rear.
1 Align one bracket with the holes on one side of the ZyWALL and secure it with the included bracket screws. Similarly, attach the other bracket.
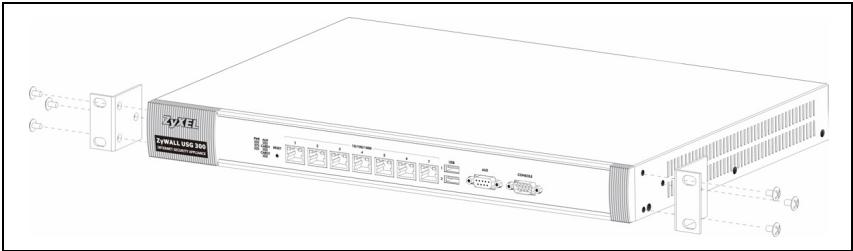
2 After attaching both mounting brackets, position the ZyWALL in the rack by lining up the holes in the brackets with the appropriate holes on the rack. Secure the ZyWALL to the rack with the rack-mounting screws.
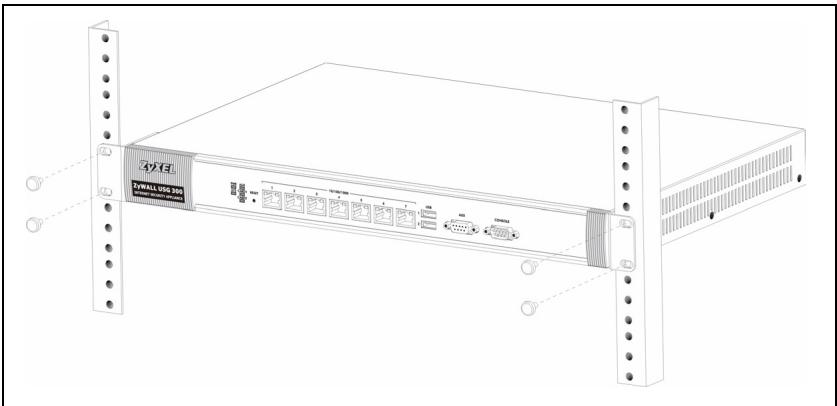
3 Connecting the Hardware
Make sure that the power switch on the rear panel is turned off before you make the hardware connections.
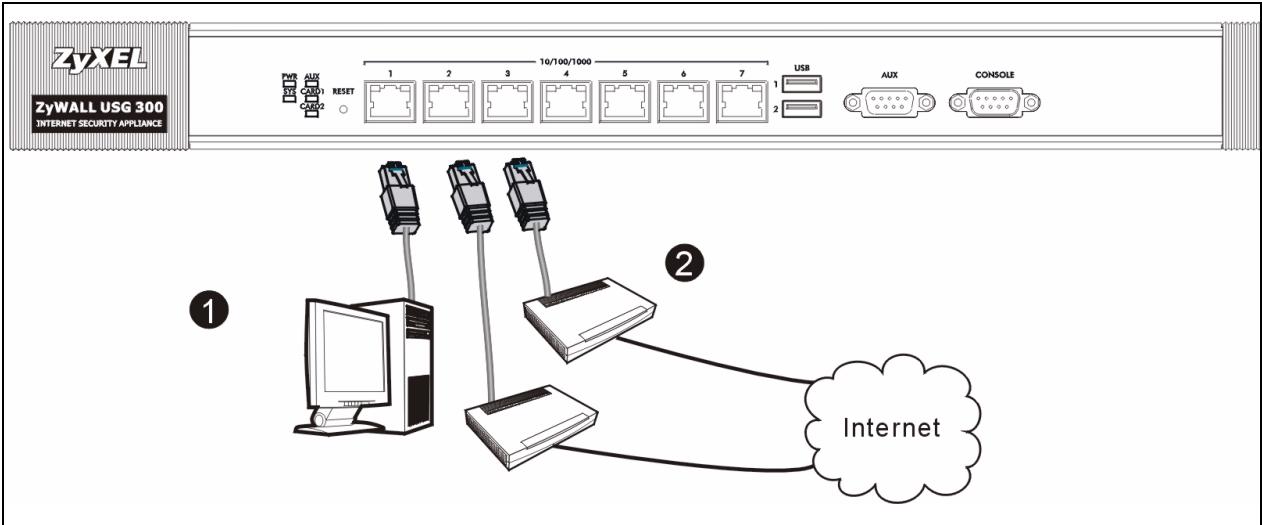
1 It is recommended that you configure the ZyWALL before using it to protect your network. Use an Ethernet cable to connect a computer to port 1.
2 Use another Ethernet cable(s) to connect port 2 and/or port 3 to an Ethernet jack with Internet access.

3 Use the included power cord to connect the power socket on the rear panel to a power outlet.
4 Push the power switch to the on position and look at the front panel. The PWR light turns on. The SYS light blinks during system testing and initialization and then stays on when the system is ready.
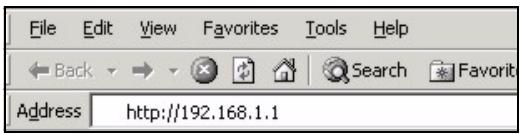
4 Web Login
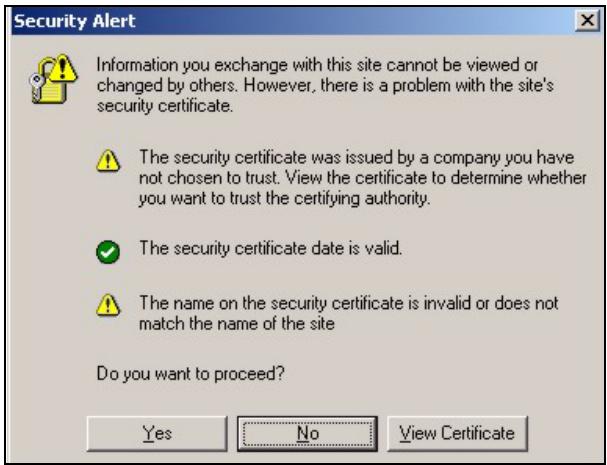
1 Launch your web browser and go to http://192.168.1.1 (the ZyWALL automatically redirects you to https:// 192.168.1.1).
2 Click Yes to proceed if you get a security alert or certificate screen.
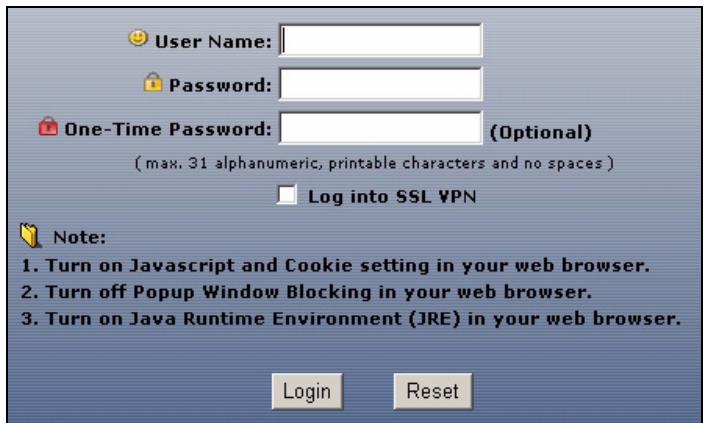
3 Enter admin as the user name and 1234 as the password. Click Login.
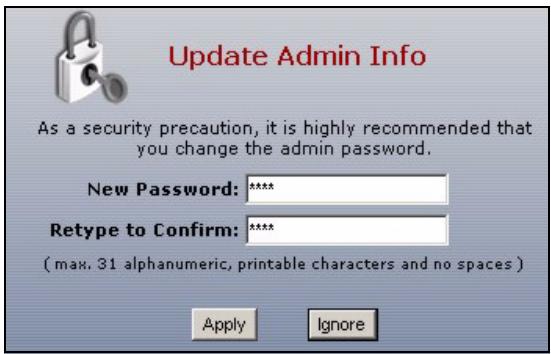
4 It is strongly recommended that you change the password. Type and retype a new password, and click Apply.
5 Installation Setup Wizard
The Status screen
opens. Click the
Wizard icon in the
upper right corner.
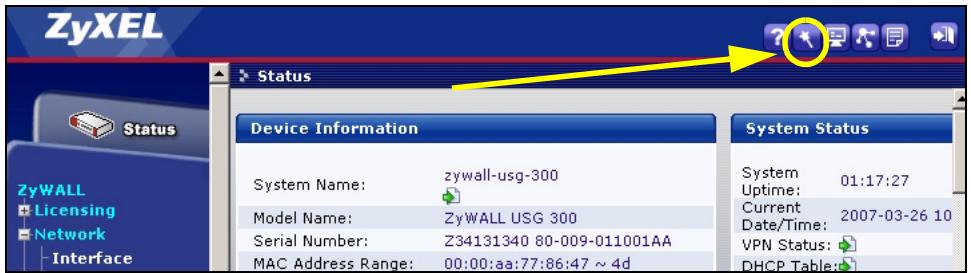
Use an installation setup wizard to connect to the Internet and register the ZyWALL and/or activate trial services, like IDP and content filter.
Note: Use the installation wizard only for initial configuration starting from the default configuration.
Changes you make in the installation wizard may not be applied if you have already changed the ZyWALL's configuration.
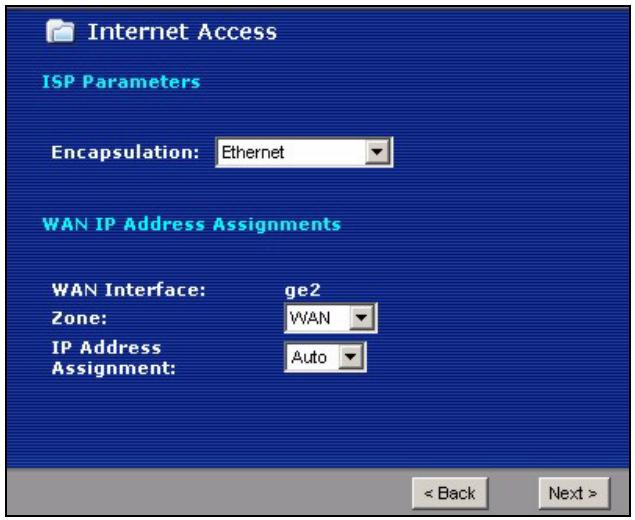
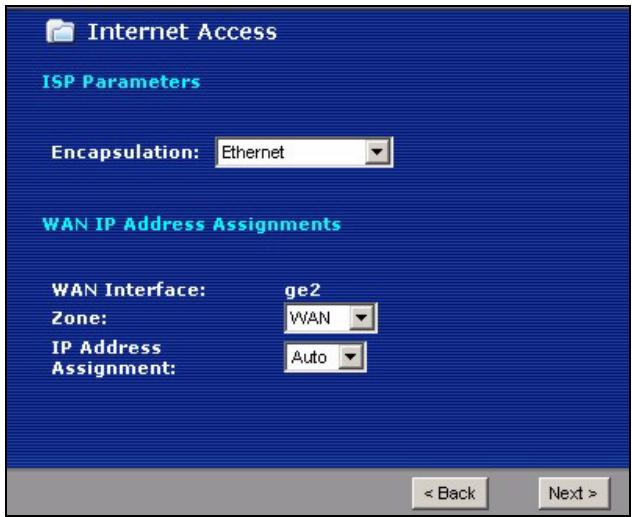
- INSTALLATION SETUP, ONE ISP sets up a single Internet connection for ge2.
- INSTALLATION SETUP, TWO ISP sets up Internet connections for ge2 and ge3.

INSTALLATION SETUP, ONE ISP
(helps user quickly configure the 2yWALL USG 300 to secure Internet connection)

INSTALLATION SETUP, TWO ISP
(helps user quickly configure the ZyWALL USG 300 to secure Internet connection)
The wizard screens vary depending on the encapsulation type you use. Refer to information provided by your ISP and the web help screens to know what to enter in each field. You can leave fields blank if you don't have that information.
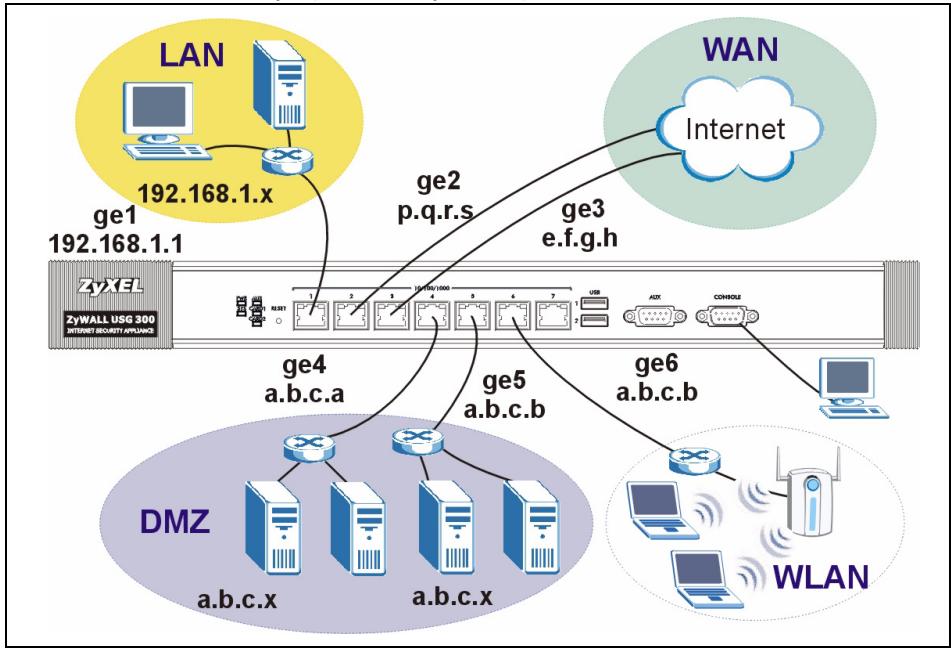
6 Default Settings and Port Details
The ZyWALL is configured for the following network topology by default.
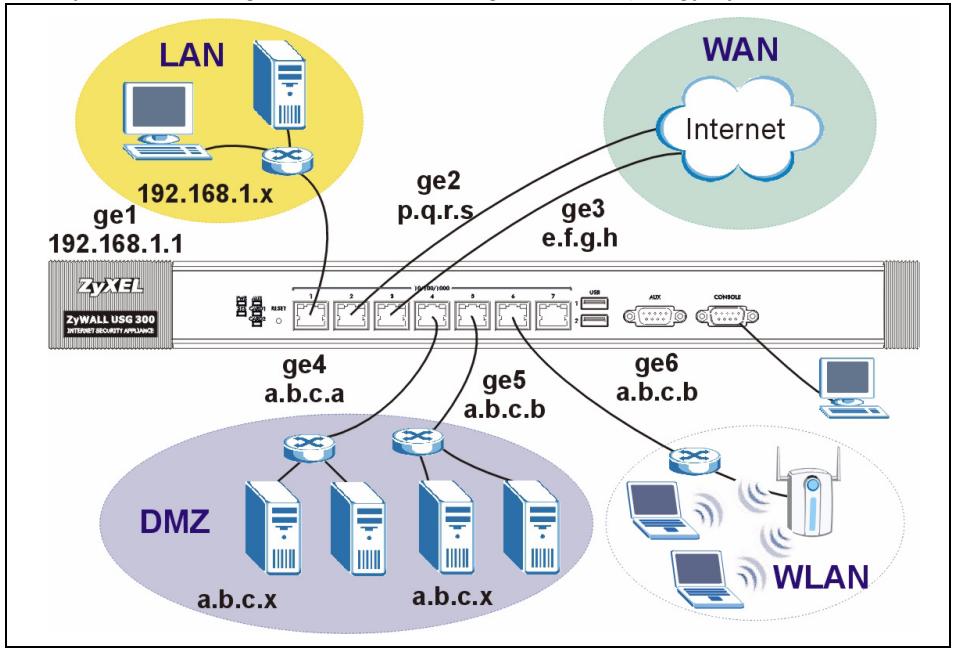
| Port | Interface | Zone | IP Address and DHCP Settings | Suggested Use With Default Settings |
| 1 | ge1 | LAN | 192.168.1.1, DHCP server enabled | Protected LAN |
| 2, 3 | ge2, ge3 | WAN | DHCP clients | Connections to the Internet |
| 4, 5 | ge4, ge5 | DMZ | None, DHCP server disabled | Public servers (such as web, e-mail and FTP) |
| 6 | ge6 | WLAN | 10.59.0.1, DHCP server enabled | Wireless access points |
| 7 | ge7 | None | None, DHCP server disabled | Optional |
| AUX | aux | None | None | Auxiliary modem |
| CONSOLE | N/A | None | None | Local management |
| Label | Type | Cable to Use |
| 1~7 | RJ-45 | 8-wire Category 5e or above Ethernet cable |
| AUX, CONSOLE | RS-232 | RS-232 |
Note: The USB ports and extension card slots are reserved for future use.
7 Troubleshooting
| Problem | Corrective Action |
| None of the LEDs turn on. | Make sure that you have the power cord connected to the ZyWALL and plugged in to an appropriate power source. Make sure you have the ZyWALL turned on. Check all cable connections. |
| If the LEDs still do not turn on, you may have a hardware problem. In this case, you should contact your local vendor. | |
| Cannot access the ZyWALL from the LAN. | Check the cable connection between the ZyWALL and your computer or switch. Refer to section 3 for details. |
| Ping the ZyWALL from a LAN computer. Make sure your computer's Ethernet card is installed and functioning properly. Also make sure that its IP address is in the same subnet as the ZyWALL's.In the computer, click Start, (All) Programs, Accessories and then Command Prompt. In the Command Prompt window, type "ping" followed by the ZyWALL's LAN IP address (192.168.1.1 is the default) and then press [ENTER]. The ZyWALL should reply. | |
| If you've forgotten the ZyWALL's password, use the RESET button. Press the button in for about 5 seconds (or until the PWR LED starts to blink), then release it. It returns the ZyWALL to the factory defaults (password is 1234, LAN IP address 192.168.1.1 etc.; see your User's Guide for details). | |
| If you've forgotten the ZyWALL's IP address, you can use the commands through the console port to check it. Connect your computer to the CONSOLE port using a console cable. Your computer should have a terminal emulation communications program (such as HyperTerminal) set to VT100 terminal emulation, no parity, 8 data bits, 1 stop bit, no flow control and 115200 bps port speed. | |
| Cannot access the Internet. | Check the ZyWALL's connection to the Ethernet jack with Internet access. Make sure the Internet gateway device (such as a DSL modem) is working properly. |
| Check ge2's status in the Status screen. Use the installation setup wizard again and make sure that you enter the correct settings. |
8 Procedure to View a Product's Certification(s)
1 Go to www.zyxel.com.
2 Select your product from the drop-down list box on the ZyXEL home page to go to that product's page.
3 Select the certification you wish to view from this page.
(helps user quickly configure the ZyWALL USG 300 to secure Internet connection)

INSTALLATION SETUP, TWO ISP
(helps user quickly configure the ZyWALL USG 300 to secure Internet connection)
(helps user quickly configure the 2yWALL USG 300 to secure Internet connection)

INSTALLATION SETUP, TWO ISP
(helps user quickly configure the ZyWALL USG 300 to secure Internet connection)
(helps user quickly configure the 2yWALL USG 300 to secure Internet connection)

INSTALLATION SETUP, TWO ISP
(helps user quickly configure the ZyWALL USG 300 to secure Internet connection)
(helps user quickly configure the 2yWALL USG 300 to secure Internet connection)

INSTALLATION SETUP, TWO ISP
(helps user quickly configure the ZyWALL USG 300 to secure Internet connection)
(helps user quickly configure the 2yWALL USG 300 to secure Internet connection)

INSTALLATION SETUP, TWO ISP
(helps user quickly configure the ZyWALL USG 300 to secure Internet connection)
(helps user quickly configure the ZyWALL USG 300 to secure Internet connection)

INSTALLATION SETUP, TWO ISP
(helps user quickly configure the ZyWALL USG 300 to secure Internet connection)
B npoucece paobotb MaCTepa MoryT NOBtbcra Te
HINn HNbIe 3KpaHbI, B 3aBucmOcTN OT
HCnoJIb3yEmoTO TnPa INKanCyrJaun. NcNoJb3yIte
dJIa3aONHeHn IOneN CBeDeHnA,
npEOCTaBLeHbIe INTEpHET-IPoBaIdepom n
coDEpXaUncEcaB W web-CnCTeme cnpaBKn. B
OTcyTCTBVe HEo6xOIMoN INΦopMaun OCTaBBTe
NOJe NycTbIM.
6 3начени Конфигурацноньix napametpoB И NCПОЛьЗВане NOPTOB B COCTОHи NOCTaBKN
B coctoHnn noctabKn yctpoiCtBO ZyWALL paccuHaHO Ha nCnoJIb3ObaHne B cIeDyuIeTOnIoIorHn CETn.
(helps user quickly configure the ZyWALL USG 300 to secure Internet connection)

INSTALLATION SETUP, TWO ISP
(helps user quickly configure the ZyWALL USG 300 to secure Internet connection)
- CONTENTS
- Checking the Package Contents
- Rack-mounted Installation
- Connecting the Hardware
- Web Login
- Installation Setup Wizard
- INSTALLATION SETUP, ONE ISP
- INSTALLATION SETUP, TWO ISP
- Default Settings and Port Details
- Troubleshooting
- Procedure to View a Product's Certification(s)
- 3начени Конфигурацноньix napametpoB И NCПОЛьЗВане NOPTOB B COCTОHи NOCTaBKN
Brand : ZYXEL
Model : ZYWALL USG 300
Category : Firewall/Router