
PLA-450 - Powerline Adapter ZYXEL - Free user manual and instructions
Find the device manual for free PLA-450 ZYXEL in PDF.
| Product Type | Powerline Adapter (PLC) with Wi-Fi access point |
| Brand | ZYXEL |
| Model | PLA-450 |
| Dimensions (approx.) | 100 x 60 x 30 mm |
| Weight (approx.) | 200 g |
| Power supply | Mains 100-240 V AC, 50/60 Hz (integrated into the plug) |
| Connectivity | HomePlug AV (PLC), Wi-Fi 802.11 b/g/n, Ethernet 10/100 Mbps |
| Ports | 1 LAN Ethernet RJ-45 port |
| Antenna | External removable antenna (screw-on) |
| Wireless security | WPA-PSK, WPA2-PSK |
| Powerline security | Network Name with pre-shared key, DAK (Device Access Key) |
| Main functions | Create a Powerline network, extend Wi-Fi network, bridge between Ethernet and Powerline |
| Configuration | Web interface (http://192.168.1.2), default password 1234 |
| Maintenance and cleaning | Clean with a dry, soft cloth. Do not use liquids or aerosols. Disconnect before cleaning. |
| Safety instructions | Do not expose to water or humidity. Use only in a dry indoor environment. Do not open the case. |
| Spare parts and repairability | No user-serviceable parts. In case of failure, contact ZYXEL support. |
| General information | Manufacturer warranty: 2 years. Technical support at www.zyxel.com. |
| Box contents | PLA-450 adapter, yellow Ethernet cable, power cord, antenna, CD with user guide, quick installation guide |
Frequently Asked Questions - PLA-450 ZYXEL
User questions about PLA-450 ZYXEL
0 question about this device. Answer the ones you know or ask your own.
Ask a new question about this device
Download the instructions for your Powerline Adapter in PDF format for free! Find your manual PLA-450 - ZYXEL and take your electronic device back in hand. On this page are published all the documents necessary for the use of your device. PLA-450 by ZYXEL.
USER MANUAL PLA-450 ZYXEL
IP Address http://192.168.1.2
```bash User Name admin
Password 1234
CONTENTS
ENGLISH 2
DEUTsCH 19
ESPANOL 38
FRANÇAIS 57
ITALIANO 77
PYCCKNI 97
SVENSKA 117
繁體中文 135
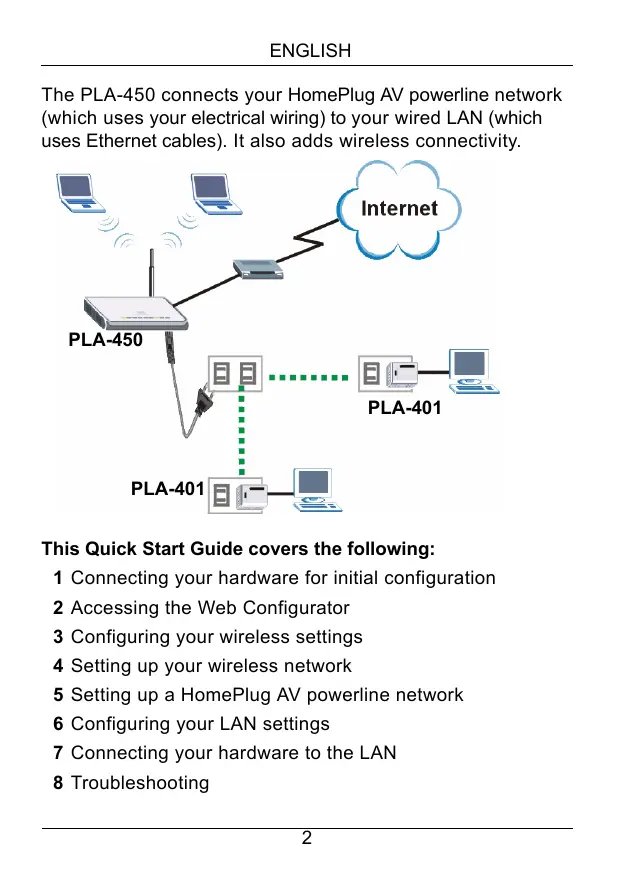
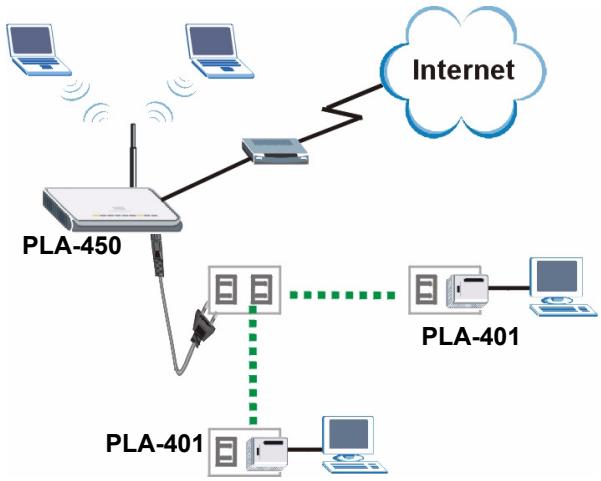
The PLA-450 connects your HomePlug AV powerline network (which uses your electrical wiring) to your wired LAN (which uses Ethernet cables). It also adds wireless connectivity.
This Quick Start Guide covers the following:
1 Connecting your hardware for initial configuration
2 Accessing the Web Configurator
3 Configuring your wireless settings
4 Setting up your wireless network
5 Setting up a HomePlug AV powerline network
6 Configuring your LAN settings
7 Connecting your hardware to the LAN
8 Troubleshooting
See the User's Guide on the included CD for details on all of the PLA-450's features. If a screen does not pop-up when you insert the included CD, use Windows Explorer (My Computer) to go to the CD-ROM (commonly drive D) and browse for the User's Guide.
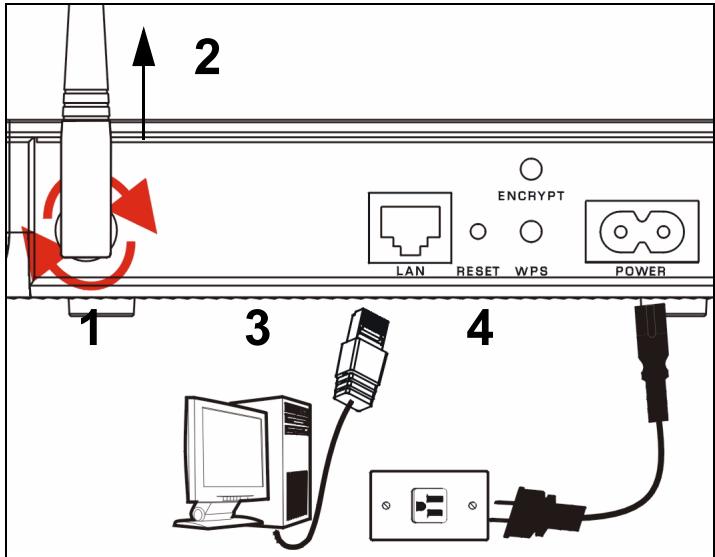
1 Initial Hardware Connections
1 Screw the antenna clockwise onto the antenna connector. Make sure it is securely attached.
2 Point the antenna up (perpendicular to the ground).
3 Use the yellow (Ethernet) cable to connect your computer to the LAN port.
4 Use the included power cord to connect the POWER socket to an appropriate power source. This is also your powerline connection.
1.1 Lights Turn On
- Power ( ): blinks until the device is ready.
- HomePlug (): other HomePlug AV device(s) detected.
- WLAN (): the wireless LAN is on.
- LAN (呈呈): the connection to your computer is OK.

If a light does not turn on, check your connections. If this doesn't help, disconnect the PLA-450 from its power source, wait for a few seconds and reconnect it.
2 Accessing the Web Configurator
2.1 Set Up Your Computer's IP Address

Note down your computer's current IP settings before you change them.
First, set your computer to use a static IP address in the 192.168.1.3 - 192.168.1.254 range with a subnet mask of 255.255.255.0. This ensures that your computer can communicate with your PLA-450. See the Setting up Your Computer's IP Address appendix in the User's Guide for how to set up your computer's IP address.
2.2 Log Into the Web Configurator
1 Launch an Internet browser (such as Internet Explorer). Enter "http://192.168.1.2" and click Go (or press Enter).


If the login screen does not display, see Troubleshooting for suggestions.
2 The default password (1234) is entered for you. Click Login.
PLA-450
Welcome to your device Configuration Interface
Enter your password and click "Login"

Password :

(max. 30 alphanumeric, printable characters and no spaces)

Note:
Please turn on the Javascript and ActiveX control setting on Internet Explorer when operating system is Windows XP and service pack is SP2.
Login
Reset
3 Change the password in the next screen and click Apply.
4 Click Go to Basic setup.
Please select Basic or Advanced mode
Use Basic mode if you need to make basic configuration changes.
Use Advanced mode if you need access to more advanced features.
Go to Basic setup
GO TO Advanced Setup
Exit
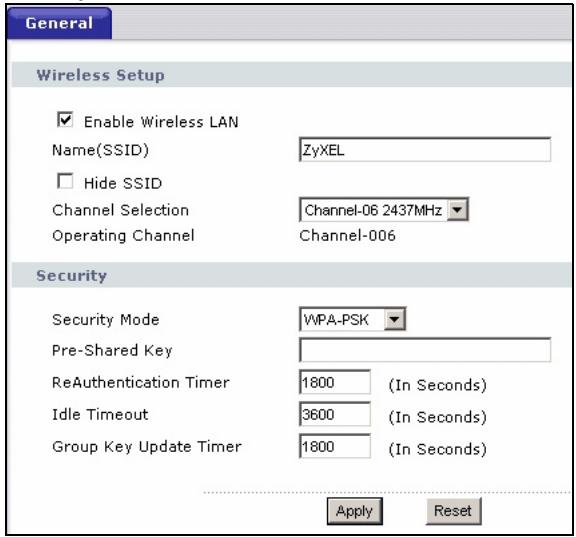
3 Wireless Configuration
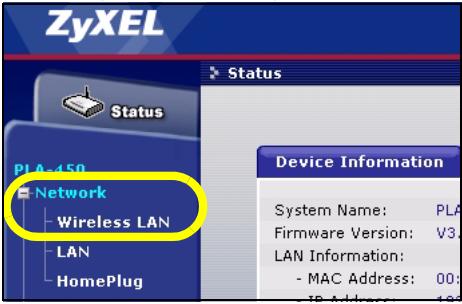
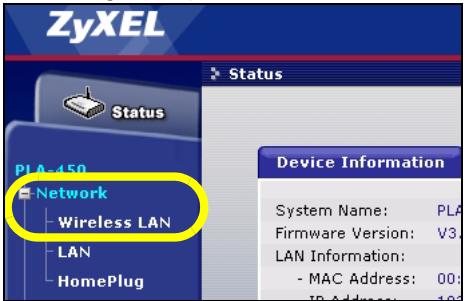
1 Click Network > Wireless LAN in the navigation panel.
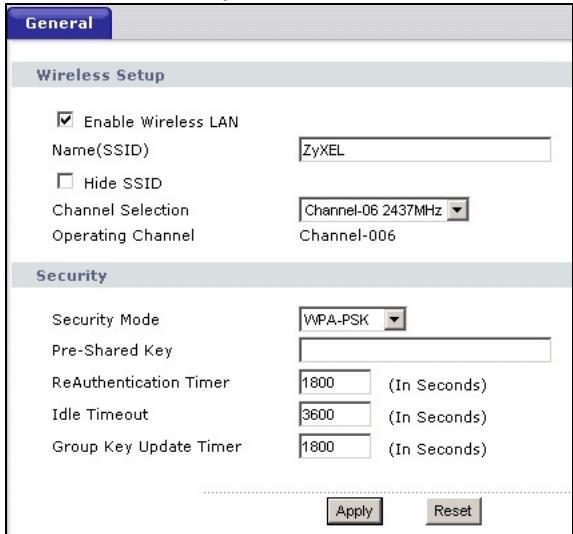
2 The following screen appears.
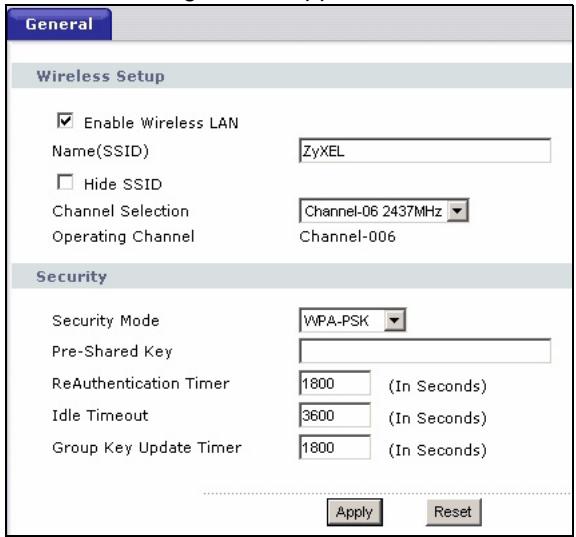
- Name: Enter a descriptive name (up to 32 printable English keyboard characters) for your wireless network.
- Security Mode: Select WPA-PSK.
- Pre-Shared Key: Type a pre-shared key. Use 8 to 63 English keyboard characters (including spaces and symbols). It is case-sensitive. Write it down to use in your wireless clients so they can connect to the PLA-450.

Write down the name and pre-shared key to use in the wireless clients later.
3 Click Apply.
You have configured your PLA-450's wireless settings. Use the following section to configure your wireless devices to connect to the PLA-450.
4 Wireless Network Setup
Do the following to set up a wireless network with computers with wireless network cards or adapters. You need the network name and pre-shared key you configured in section 3.
1 Open your wireless adapter's utility (yours may be different from the one shown here).
2 Select your network's name (SSID) and click Connect.

3 Follow your wireless utility's instructions to add your computer to the wireless network. When finished, open an Internet browser such as Internet Explorer to surf the Internet.
For more information see the User's Guide for a tutorial on adding a computer to your wireless network.
5 HomePlug AV Network Setup
Follow these steps to set up your HomePlug AV network for the first time.
1 Make sure your PLA-450 and other HomePlug AV powerline devices are connected to power outlets and turned on.
2 Log in to the web configurator if you haven't already and click Go to Basic setup. Click Network > HomePlug to begin setting up your network.
3 The Network Name is like a password for your network. A HomePlug AV adaptor can only access your network if it has the correct Network Name.
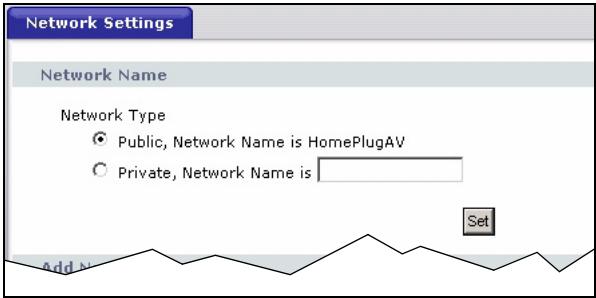
- Select Public, Network Name is HomePlugAV to set your Network Name to the default (HomePlugAV). Choose this less secure option to easily detect when a new HomePlug AV device (with the default network name) is connected to your wiring, without having to change its network password.
- Select Private, Network Name is and type a Network Name if you want to make your network more secure.
4 Click Set to set the Network Name. All devices listed as Active in the My HomePlug Network table below now
have the Network Name you selected. With the same Network Name they are now all on the same network.
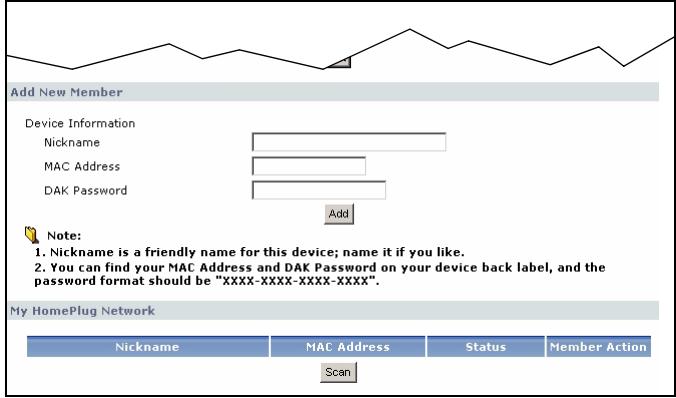
5 Add a new device to your network by typing its MAC Address and DAK Password in the Add New Member section. The DAK Password is found along with the MAC Address on a label attached to the device. The DAK (Device Access Key) is a password to access a为主线 device. Then type a Nickname such as "Mary's room" to help you identify the device. Click Add. The device's should appear as Active in the My HomePlug Network table below.
- If a message MAC address error appears, check the MAC Address is correctly entered.
- If a message DAK format error appears, check the DAK Password is correctly entered.
6 Click Scan in the My HomePlug Network table to detect other HomePlug AV devices.
- If a device is Active, it is connected to your network.
- If a device is Out of Network your PLA-450 has the details of this device but cannot detect it. Check it is connected to a power outlet and turned on.
- If a device is Not Member, use the Edit icon.
- If a device fails to appear in the table, try adding it in the Add New Member section. See Troubleshooting for more suggestions.
7 When you are finished setting up your powerline network, connect your powerline adapters to the devices you want on your network, such as computers and a router for connection to the Internet. See the diagram on page 2 for an example.
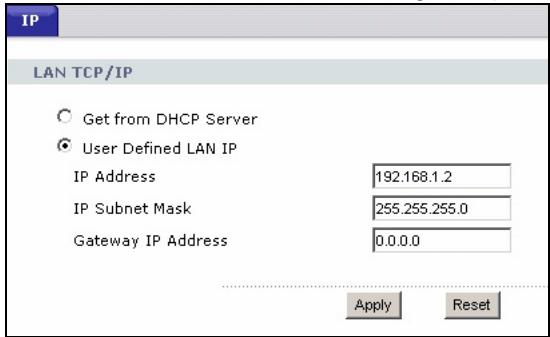
6 Configure LAN Settings
Set your PLA-450's IP address to be on your network.
1 Click Network > LAN in the navigation panel.
ENGLISH
- Select Get from DHCP Server to get an IP address from a DHCP server on your network. If you have a router, it likely includes a DHCP server function.
- To use a specific (fixed) IP address, select User Defined LAN IP address and enter it. You only need to change the subnet mask or default gateway if you have specific ones for the PLA-450 to use.
2 Click Apply. The PLA-450 now uses the new IP settings; you can no longer connect to the PLA-450 using the default IP address.

If you change the PLA-450's IP address, use the new IP address to access the web configurator. If the PLA-450 gets the IP address from a DHCP server, check the DHCP server to find the IP address it assigns to the PLA-450. Refer to your DHCP server's documentation for more information.
3 If you changed your computer's IP address in section 2.1, return it to its previous setting.
4 Change the wireless settings in the wireless stations to match those of the PLA-450. Refer to your wireless adapter's documentation.
The PLA-450 is now ready to connect to your switch or router.

If the PLA-450 cannot communicate with the network, ensure that the PLA-450 is using an IP address on the same subnet as your router.
7 Install the Hardware
Now that you have configured the PLA-450, use this section to connect it to your network so you can use it.
1 Disconnect your computer from the LAN port.
2 Use the yellow (Ethernet) cable to connect the LAN port to your Internet connection (this could be through a broadband modem or gateway).


You do not need to use the ENCRYPT and WPS buttons. They are reserved for future use.
8 Test Your Internet Connection
1 Make sure you are using a computer connected to the PLA-450 through the wireless LAN or the HomePlug AV powerline network.
2 Open an Internet browser (such as Internet Explorer). Enter "http://www.zyxel.com" and click Go (or press Enter). When you see the ZyxEL website, you know your network connection settings are properly configured.
Troubleshooting

The login screen does not display.
1 Make sure your computer is using a static IP address in the 192.168.1.3 - 192.168.1.254 range with a subnet mask of 255.255.255.0. See the Setting up Your Computer's IP Address appendix in the User's Guide for how to set up your computer's IP address.
2 If you cannot access the web configurator using Internet Explorer in Windows XP or Windows Server 2003, check your web browser's security settings (see the Pop-up Windows, JavaScripts and Java Permissions appendix in the User's Guide).

Wireless Internet access is not working.
1 On a computer connected to the PLA-450, make sure your PLA-450 and the computers on your wireless network are using the same wireless and wireless security settings. See the chapter on Wireless LAN in the User's Guide for more information.
2 If you are using a security key but do not know what your key is, press RESET on your PLA-450 for 10 seconds or until the power light flashes. The settings on your device
return to their factory default. Use the directions in this guide to configure your settings again.

I cannot access the HomePlug AV powerline network.
1 Make sure that the network password is the same on all of your HomePlug AV adapters and that the DAKs for your HomePlug AV devices are typed correctly.
2 Make sure your powerline adapters are HomePlug AV compliant. The PLA-450 does NOT recognize earlier versions of HomePlug adapters such as HomePlug 1.0 or 1.0.1.
3 Make sure your powerline adapters are all on the same electrical wiring. Connect another power line adapter into an outlet close to your PLA-450's power outlet. They are probably now on the same electrical wiring. Check the HomePlug light. If it now lights up your power line adapter was probably previously on separate electrical wiring. Ask an electrician for more information on the electrical wiring in your building.

I cannot see new HomePlug AV devices.
1 Go to the PLA-450 web configurator HomePlug screen (see section 5).
2 Add the new member.
3 Set the Network Name again.
4 Scan the HomePlug AV network again.
Viewing Your Product's Certifications
1 Go to http://www.zyxel.com.
2 Select your product from the drop-down list box on the ZyXEL home page to go to that product's page.
3 Select the certification you wish to view from this page.
Welcome to your device Configuration Interface
Enter your password and click "Login"

Password :

(max. 30 alphanumeric, printable characters and no spaces)

Note:
Please turn on the Javascript and ActiveX control setting on Internet Explorer when operating system is Windows XP and service pack is SP2.
Login
Reset
Please select Basic or Advanced mode
Use Basic mode if you need to make basic configuration changes.
Use Advanced mode if you need access to more advanced features.
Go to Basic setup
Go to Advanced Setup
Exit
3 Drahtloskonfiguration
Welcome to your device Configuration Interface
Enter your password and click "Login"

Password :

(max. 30 alphanumeric, printable characters and no spaces)

Note:
Please turn on the Javascript and ActiveX control setting on Internet Explorer when operating system is Windows XP and service pack is SP2.
Login
Reset
Please select Basic, or Advanced mode
Use Basic mode if you need to make basic configuration changes.
Use Advanced mode if you need access to more advanced features.
Go to Basic setup
Go to Advanced Setup
Exit
3 Configuration sans fil
Welcome to your device Configuration Interface
Enter your password and click "Login"

Password :

(max. 30 alphanumeric, printable characters and no spaces)

Note:
Please turn on the Javascript and ActiveX control setting on Internet Explorer when operating system is Windows XP and service pack is SP2.
Login
Reset
Please select Basic, or Advanced mode
Use Basic mode if you need to make basic configuration changes.
Use Advanced mode if you need access to more advanced features.
Go to Basic setup
Go to Advanced Setup
Exit
Welcome to your device Configuration Interface
Enter your password and click "Login"

Password :

(max. 30 alphanumeric, printable characters and no spaces)

Note:
Please turn on the Javascript and ActiveX control setting on Internet Explorer when operating system is Windows XP and service pack is SP2.
Login
Reset
3ИЗмehnte napoьВ NOЯВиБшмс OkHe N UцелКнHTe Ha KhoNke Apply (Примehntb).
4 Μεπκητe Na Go to Basic setup (ΠepeιTι K 6a3OBoi nactροιke).
Please select Basic, or Advanced mode
Use Basic mode if you need to make basic configuration changes.
Use Advanced mode if you need access to more advanced features.
Go to Basic setup
Go to Advanced Setup
Exit
3 Konfugrupaizna 6ecnpobodnoi cetn
1 Μεικηνιte Ha nyHKTe Network > Wireless LAN (CeTb > Beçπροboŋha JIBC) Ha naHeɪn Habɪraúŋn.
2IorBntcCneDyHooee OKHO.
BaW PLA-450 TepeB roTOB K IOdkJIIOUeHINK KOMMyTaTOpy IINI MapuPyTu3aTOpY.

Ecni PLA-450 He moKet nOdkHouHTbcra K cTeN, To npOBepbTe nCnOJIb3OBAHne PLA-450 IPaDpeCa C ToJ Xe MaCKoI pOcTeN, UTo N y MapuTy3aTopa.
7 YcTaHOBka o6OpyIDoBaHnIa
YcTpaHHe HEnCnPaBHOCTeI

HaДисплес He ПОЯВьяETСОКНО BXODa B CnCTeMу.
1 U6eIntecb, yTo Ha BaW KOMnbIoTepe nCnObl3yET IP-aDpec B npEeJax Dnana30Ha 192.168.1.3 - 192.168.1.254 c MaCKoI pOcTeN 255.255.255.0. HnΦopMauzi o HacTpoIke IP-aDpeCa BaWero KOMNbIoTepa npUBeHena B npuIIOxHm HAcTpoIka IP-aDpeCa BaWero KOMNbIoTepa B PyKOBODCTBe nOJIb3OBAteIeI.
2 EcInn Bbl He MoKeTe BoTn B Be6-KoHpIpyaTop npn nOmoOn Internet Explorer B Windows XP nnn Windows Server 2003,To npOBepbTe hAcTroPoiKn 6e3OpacNoCTn BaIbero 6pay3epa (CMOTpNIte npnIoXeHne BcIIbIbAIOUne OkHa, JavaScripts n Java Permissions B PykoBoDCTBe noJIb3OBAteJIa).

He pa6oTaET 6ecnpoBODHoi DoCTyn B INHTepHET.
1 Пюверъг, совпадаю Ли настpoй Кбсправдовьон 6e3oanachocTN ha PLA-450 n Ha kompbIoTepe, NOДКЛЮчEHOM Kбсправдовьон сети.Болee порбная ИнфорmaцьnpиВеDEнaВ pa3dene "Бсправдовьог导 NBC"PykoBOdCTBa noJb3ObaTeЯ.
2 Ecni Bbl 3a6bIJI KJIIOH 6e3OJaCHOCTI, TO HaxMITE KHOKNKY RESET (CBPOC) Ha PLA-450 B TeueHne 10 cekynd do hauana MIRaHn IHNdkaTopa NITaHn. Ppi 3tOM npametpbI BaIero BepHyTCK 3aBOckm HacptpoKaM. Choba HAcTpoTe cetb, IcNoJIb3yJ yka3aHn JaHHoro pyKOBoDCTBa.

He mory nonyuntb doctyn K cetn HomePlug AV.
1 Y6eIntecb, yTO Bce aAnantepb CeTu HomePlug AV IcNoJIb3yOT OINH NTOJKe npoJIb, a TaKKe npaBnJIbHOCTb BBOJa npaMaTePBo DAK.
2 Y6eIntecb B COBMeCTMIOcTn aadantepOB HomePlug AV. UcToPiCTBO PLA-450 HE 6yJeT paCno3HaBaTb aadantepbl HomePlug paHHnx Bercn, TAKNX kaK HomePlug 1.0 nJIn 1.0.1.
3 Y6eIntecb, yTO Baun cTeBbIe aanTepbl HomePlug AV NOkNIOUeHbK OndHou N ToJ Xe 3NeKTPnueCKOc CETn. POnkNIOuHTe dpyroR aanTep HomePlug AV K po3etKe BO3ne PLA-450. Tenepb OHn DOJXHbI 6bITb NOkNIOUeHbK OndHou N ToJce 3NeKTPnueCKOc CETn. IpoBepbTe INDnKaTop HomePlug . EcIn OH n CeJuc BKNIOUeH, To Ckopee Bcero Baaw aanTep HomePlug AV 6bln NOkNIOUeH K DpyroR 3NeKTPnueCKO npOBODke. IOnyUnTB INΦopMaunIO o6 3NeKTPnnpOBODKE B 3daHm MoxHO y 3NeKTPNKOB.

He BnKy HOBbIX ycTpoiCTb HomePlug AV.
1 BoiDnte B OKHO HomePlug Be6-KoHΦnrgypaTopa PLA-450 (cM. pa3dien 5).
2ДобавытEOBOrOучacTHиKa.
3 CHOBA yCTaHOBnTe Network Name.
4 Choba npockaHpyte ceTb HomePlug AV.
PpocmToP cepTnΦnKaTOB BaUeRo n3dEJIHn
1 PioceTe caT http://www.zyxel.com.
2 BbIbePte BaW npOdyKT n3 BbIpaJaIoUeTo cIncKa Ha domaHne CTpaHnCe ZyXEL n nepeiDnTe Ha ero CTpaHnCy.
3 BbIbepuTe Ha 3ToI CTpaHnue cepTnΦnKAT, KOTOpBb Bbl XOTnte npOCMOTpeTb.
Welcome to your device Configuration Interface
Enter your password and click "Login"

Password :

(max. 30 alphanumeric, printable characters and no spaces)

Note:
Please turn on the Javascript and ActiveX control setting on Internet Explorer when operating system is Windows XP and service pack is SP2.
Login
Reset
Please select Basic or Advanced mode
Use Basic mode if you need to make basic configuration changes.
Use Advanced mode if you need access to more advanced features.
Go to Basic setup
Go to Advanced Setup
Exit
3 Trådlös konfiguration
1 Klicka på Network > Wireless LAN (nätverk-trådlösst LAN) i navigationspanelen.
2 Foljande skarm visas.
Welcome to your device Configuration Interface
Enter your password and click "Login"

Password :

(max. 30 alphanumeric, printable characters and no spaces)

Note:
Please turn on the Javascript and ActiveX control setting on Internet Explorer when operating system is Windows XP and service pack is SP2.
Login
Reset
Please select Basic or Advanced mode
Use Basic mode if you need to make basic configuration changes.
Use Advanced mode if you need access to more advanced features.
Go to Basic setup
so to Advanced Setup
Exit
3 無線設定
- CONTENTS
- This Quick Start Guide covers the following:
- Lights Turn On
- Accessing the Web Configurator
- Set Up Your Computer's IP Address
- Log Into the Web Configurator
- PLA-450
- Password :
- Note:
- Wireless Configuration
- Click Apply.
- Wireless Network Setup
- HomePlug AV Network Setup
- Configure LAN Settings
- ENGLISH
- Install the Hardware
- Test Your Internet Connection
- Troubleshooting
- Viewing Your Product's Certifications
- Drahtloskonfiguration
- Configuration sans fil
- Konfugrupaizna 6ecnpobodnoi cetn
- 2IorBntcCneDyHooee OKHO.
- YcTaHOBka o6OpyIDoBaHnIa
- YcTpaHHe HEnCnPaBHOCTeI
- He pa6oTaET 6ecnpoBODHoi DoCTyn B INHTepHET.
- He mory nonyuntb doctyn K cetn HomePlug AV.
- PpocmToP cepTnΦnKaTOB BaUeRo n3dEJIHn
- Trådlös konfiguration
- Foljande skarm visas.
- 無線設定
Brand : ZYXEL
Model : PLA-450
Category : Powerline Adapter