
CX2033MFP - Multifunction Printer OKI - Free user manual and instructions
Find the device manual for free CX2033MFP OKI in PDF.
| Product Type | Multifunction printer (copier, scanner, fax) |
| Brand / Model | OKI CX2033MFP |
| Main functions | Copy, scan, fax, print |
| Print resolution | 600 x 600 dpi |
| Automatic Document Feeder (ADF) capacity | Up to 50 sheets (75 g/m²) |
| Standard paper tray (Tray 1) | Capacity: 150 sheets; sizes: Letter, Legal, A4, A5, A6, B5, Executive |
| Multipurpose tray (MPT) | Capacity: 50 sheets (or 10 envelopes); sizes: from 64 x 148 mm to 216 x 1200 mm |
| Upper output tray | Capacity: 250 sheets; face down |
| Rear output tray | Capacity: 100 sheets; face up; for heavy media |
| Duplex printing | Optional (duplex unit, ref. OKI 43347501) |
| Media weight | Tray 1: 64-120 g/m²; MPT: 75-199 g/m² |
| Supported sizes | Letter, Legal (14, 13.5, 13), A4, A5, A6, B5, Executive, C5, DL, COM-9, COM-10, Monarch, banners (up to 1200 mm) |
| Toner type | 4 separate cartridges: Black, Cyan, Magenta, Yellow |
| Toner cartridge references | Black: 43865768, Cyan: 43865767, Magenta: 43865766, Yellow: 43865765 |
| Image drum references | Black: 56121104, Cyan: 56121103, Magenta: 56121102, Yellow: 56121101 |
| Display | Control panel with LCD screen |
| Connectivity | Ethernet, USB (estimation) |
| Cleaning | Cleaning of ADF rollers and pad, ADF glass cleaning |
| Safety | Turn off before maintenance; caution hot surfaces (fuser unit) |
| Spare parts | Toner cartridges, image drums, ADF pad (ref. 43103001) |
| General information | Manual available in FR, EN, ES, PT; OKI technical support |
Frequently Asked Questions - CX2033MFP OKI
User questions about CX2033MFP OKI
0 question about this device. Answer the ones you know or ask your own.
Ask a new question about this device
Download the instructions for your Multifunction Printer in PDF format for free! Find your manual CX2033MFP - OKI and take your electronic device back in hand. On this page are published all the documents necessary for the use of your device. CX2033MFP by OKI.
USER MANUAL CX2033MFP OKI
Walk-up Operation ..... 4
General Information .....4
Control Panel Basics .....5
Scanner Control Panel. . . . . . . . 6
Printer Control Panel.....9
Loading Documents for Scanning10
Copy.....11
Send.....12
Fax....14
Duplex Printing ..... 17
Clearing Media Jams ..... 18
Scanner (ADF) Jams.....18
Printer Jams .....19
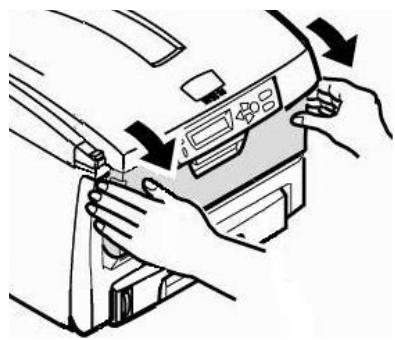
Tray 1 26
Multi Purpose Tray [MPT] .... 27
Exit Trays....29
Maintenance 30
Replacing Toner Cartridges . . . . 30
Cleaning the ADF Rollers & Pad .34
Cleaning the ADF Glass. . . . . . . 35
Replacing the ADF Pad .....36
Error Messages .... 37
Service & Support ..... 42
Table des matières
natural_image
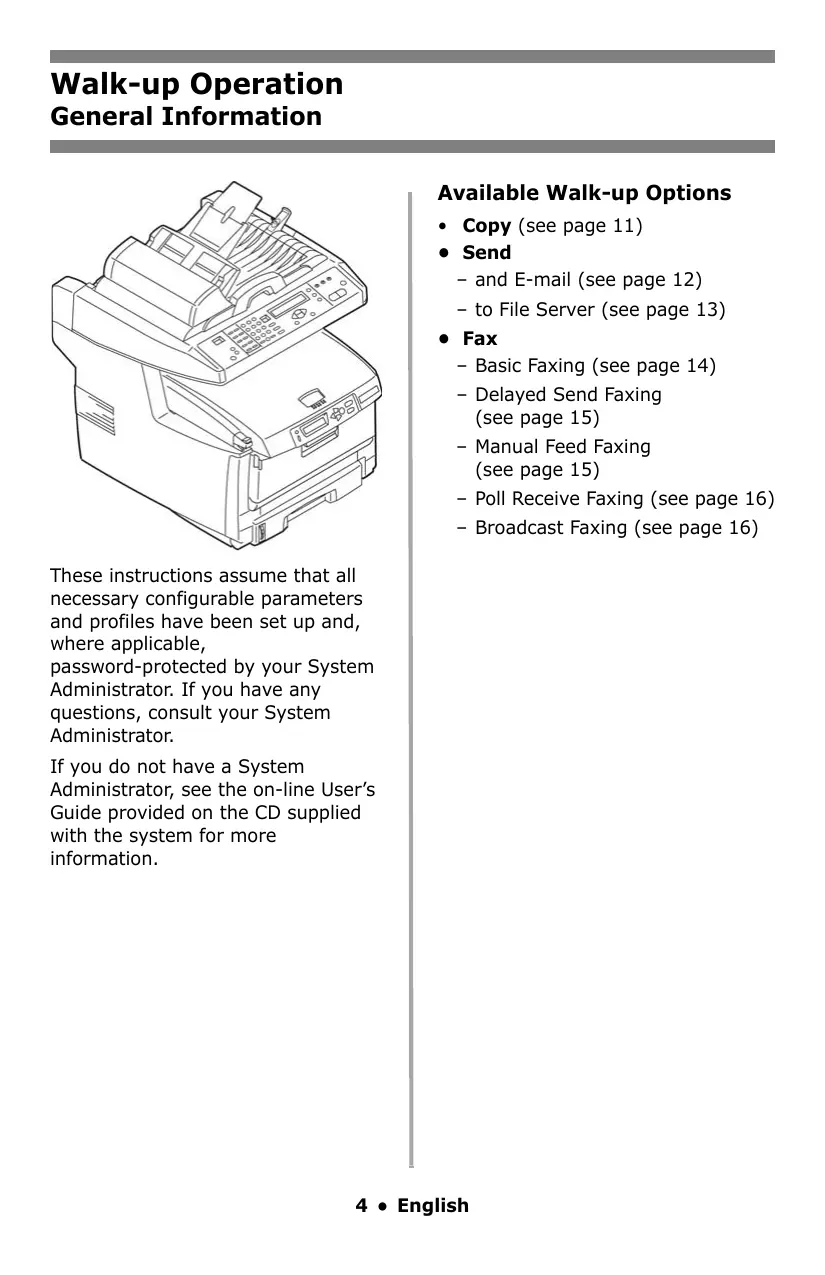
Line drawing of a printer with paper feeders and control panel (no text or symbols)These instructions assume that all necessary configurable parameters and profiles have been set up and, where applicable, password-protected by your System Administrator. If you have any questions, consult your System Administrator.
If you do not have a System Administrator, see the on-line User's Guide provided on the CD supplied with the system for more information.
Available Walk-up Options
- Copy (see page 11)
- Send
- and E-mail (see page 12)
- to File Server (see page 13)
- Fax
- Basic Faxing (see page 14)
- Delayed Send Faxing (see page 15)
- Manual Feed Faxing (see page 15)
- Poll Receive Faxing (see page 16)
- Broadcast Faxing (see page 16)
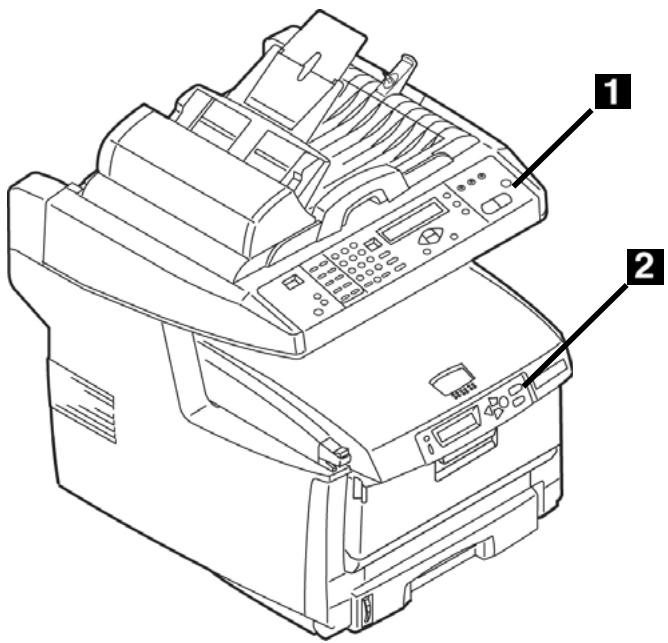
text_image
Technical diagram of a printer with labeled parts, showing front and back views with numbered annotations.1 Scanner Control Panel
The scanner control panel is used when making copies, sending faxes and scanning documents (see pages 11, ff.).
2 Printer Control Panel
The printer control panel is used for setting the printer defaults and to print out reports (see page 9).
text_image
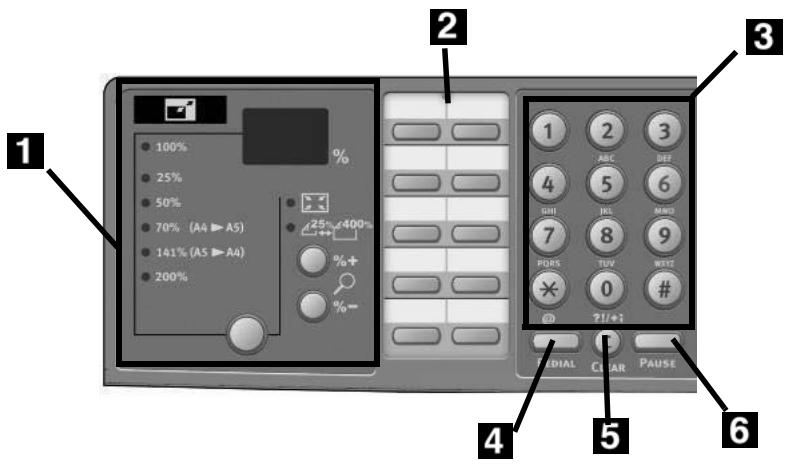
1 2 3 4 5 6 100% 25% 50% 70% (A4 ▶ A5) 141% (A5 ▶ A4) 200% 25% 400% %+ % - 1 2 3 4 5 6 GUI JKL MND 7 8 9 PURS TUV WNT # 0 # ?U+: MEDIAL CLEAR PAUSE1
Zoom Function
Available only in the Copy mode. Use the zoom keys
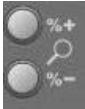
to increase or decrease scaling in 1% increments from 25% up to 400% . Selected value appears in the % box.
Use the zoom preset key
text_image
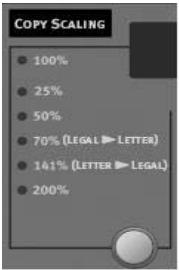
COPY SCALING 100% 25% 50% 70% (LEGAL ► LETTER) 141% (LETTER ► LEGAL) 200%to select a preset percentage of 100% (the default), 25%, 50%, 70%, 141%, or 200%.
| 2 | One Touch KeypadProvides one-touch dialing of your most often used or favorite fax numbers. |
| 3 | Alpha-Numeric KeypadUsed to enter the copy quantity, fax number or e-mail address. |
| 4 | Redial KeyUsed to manually resend a fax. |
| 5 | Clear KeyUsed to delete an entry from the LCD panel. |
| 6 | Pause KeyPress to insert a “-” within a fax number which causes a pause to occur during dialing. This is used when dialing an extension. |
Note:
For more detailed information, see the on-line User's Guide or check with your System Administrator.
Walk-up Operation Scanner Control Panel (cont.)
text_image
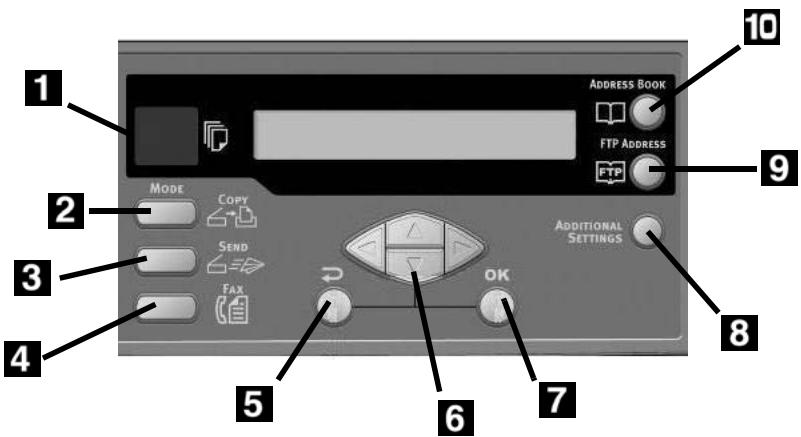
1 2 3 4 5 6 7 8 9 10 ADDRESS BOOK FTP ADDRESS MODE Copy SEND Fax ADDITIONAL SETTINGS FTP| 1 | Copy Count DisplayIndicates the number of copies selected. |
| 2 | Copy Mode KeyUsed to select Copy mode (also the default working mode). |
| 3 | Send Mode KeyUsed to select Send mode. |
| 4 | Fax Mode KeyUsed to select Fax mode. |
| 5 | Return KeyUsed to cancel selections and go back to the top level of the setting.The key is also used to cancel any previous input. |
| 6 | Arrow KeysUsed to move the cursor in the LCD up/down/left/right. The up/down keys are used to switch function indication. |
| 7 | OK KeyUsed to select and confirm current setting selections. |
| 8 | Additional SettingsUsed to execute additional settings of "Copy" and "Send" modes. (The settings are available only for three minutes. After three minutes, the settings will automatically return to the default value). |
| 9 | FTP AddressUsed to indicate the stored FTP address for the "Send" function. This key is only available in the "Send" mode. |
| 10 | Address BookUsed to indicate the stored E-mail addresses for the Send function. Also used to indicate the stored Fax numbers for the fax function. Press once to view speed dial numbers, press twice to view group dial numbers. |
Note:
For more detailed information, see the on-line User's Guide or check with your System Administrator.
Walk-up Operation Scanner Control Panel (cont.)
text_image
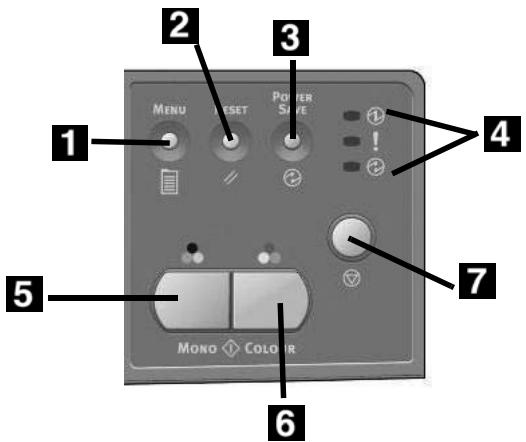
MENU RESET Power Save 1 2 3 4 5 Mono COLOR 6 7| 1 | Menu KeyPress to access the menu to set up the system. |
| 2 | Reset KeyPress and hold for 5 seconds to change the scanner to the factory default settings. |
| 3 | Power Save KeyPress once to go to “sleep” mode (continuous press is invalid). |
| 4 | Power LEDsIlluminates to indicate “power on and ready”.Illuminates to indicate error condition.Illuminates to indicate power save mode. |
| 5 | Mono KeyPress to send or copy documents in monochrome. |
| 6 | Color KeyPress to send or copy documents in color. |
| 7 | Stop KeySelect to stop all operation (LCD indication shifts to stand-by screen for each function). Does not effect settings |
Note:
For more detailed information, see the on-line User's Guide or check with your System Administrator.
Walk-up Operation
Printer Control Panel
text_image
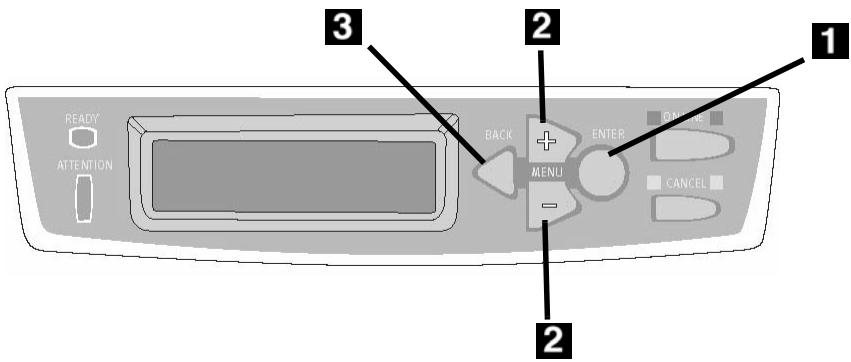
3 2 1 READY ATTENTION BACK MENU ENTER CANCEL 2| 1 | Enter KeyPress to enter the menu mode or to engage a new setting. |
| 2 | +/- KeysPress to scroll through the menu entries. |
| 3 | Back KeyPress to cancel the selection or to exit the menu item. |
Using the Printer Control Panel
Use the printer control panel
- to set the printer defaults (media size/weight/ type for each tray, feed tray, etc.)
- to print out reports, including the MenuMap which provides a list of all printer menu items and the current settings for each.
For more information on the printer menu items, see "Contents of Each Printer Menu" in the on-line User's Guide or check with your System Administrator.
How to Print the MenuMap
- Press the ENTER key.
- Press the + key.
Information Menu appears on the display. - Press the ENTER key twice. The MenuMap prints.
Walk-up Operation Loading Documents for Scanning
Loading a Document
Automatic Document Feed
- Up to 50 sheets 20-lb. (75 g/m ^2 ) paper
- No staples, clips, ragged edges.
- Document size:
- min. 4.5" x 5.5"
(114 x 140 mm)
- max. 8.5" x 14"
(216 x 356 mm)
- Weight Range: 16 to 28 lb. (60 to 105 g/m²)
Adjust the guides (1) for paper size and load documents face up, with the top edge entering the scanner.
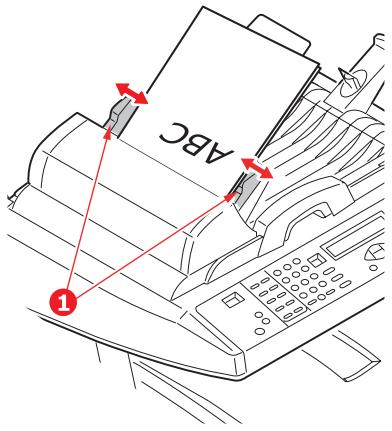
text_image
ABC ①Scanner Glass
- Document size:
- maximum 8.5" x 11.69" (216 x 297 mm)
• Maximum thickness
approximately 0.75" (20 mm)
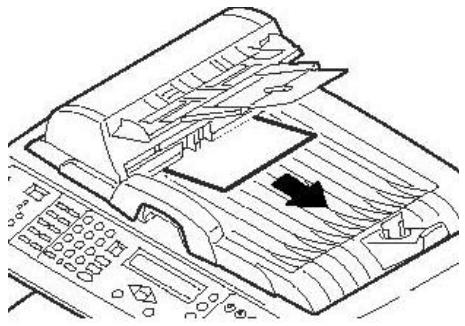
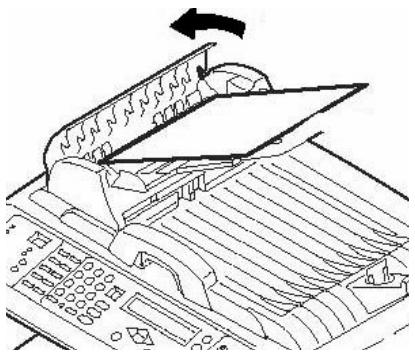
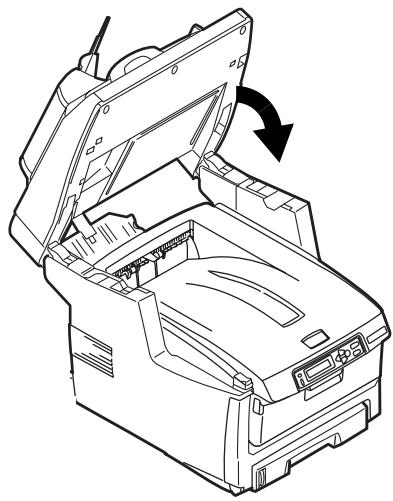
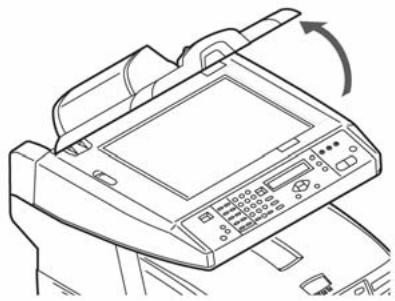
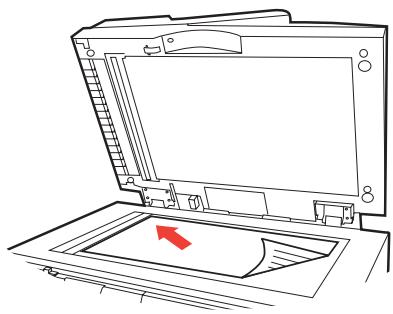
- Open the scanner lid.

natural_image
Line drawing of a printer with control panel and scroll arrow (no text or symbols)- Load the document face down, with the top edge to the left.

natural_image
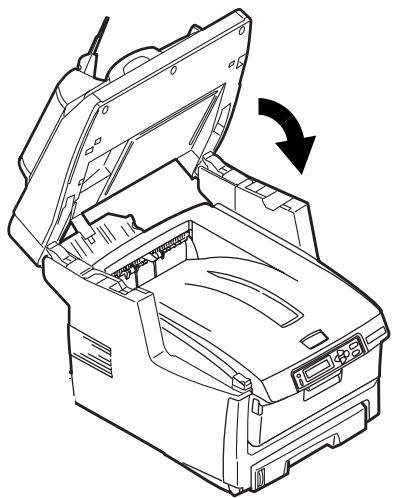
Line drawing of an open computer monitor with a red arrow pointing to the screen area (no text or symbols present)- Close the scanner lid.
Walk-up Operation Copy
For more information, check with your System Administrator or see the on-line User's Guide provided with your system.
Important
The system default is the Copy mode and the COPY key is illuminated. If it is not, press the COPY key.
Using the Default Settings
- Load the document (see page 10).
- Press the Mono key or the COLOR key.
Using Special Settings
- Load the document (see page 10).
- Use the numeric keypad to set the number of copies (up to 99).
- Press the ADDITIONAL SETTINGS key.
- Change the Copy settings* on the display using the Up, Down, Left and Right Arrow keys and the OK key.
- Press the MONO key or the COLOR key.
\*Copy Settings
The default setting is in bold italic.
| Density | -2, -1, 0, 1, 2Set the print density higher or lower. |
| Quality | Speed, Text, Photo.Set the print mode which provides the best results.E.g., if the document has many pictures, change this setting to Photo. |
| Collate | OFF, ON |
| Duplex | OFF, Short Edge, Long Edge (see page 17).(appears only when the optional duplex unit is installed) |
| N-up | 1in1, 4in1 (Horizontal), 4in1 Vertical).Set for multiple images on one page. |
| Edge Erase | 0, 6, 13, 19, 25 mm.Set amount of document perimeter to be erased. |
| Margin Shift (R) | 0, 6, 13, 19, 25 mm.Set the document image to shift left or right. |
| Margin Shift (B) | 0, 6, 13, 19, 25 mm.Set the document image to shift up or down. |
| Paper Supply | Legal, Letter, A4, A5. |
| Input Tray | Auto, Tray 1, Tray 2(appears only if the optional second tray is installed), MPT |
Send Options
- Scan and E-mail
- Scan to File Server
Note
These instructions assume that all needed basic data (e.g., e-mail addresses) is already programmed in the system.
Scan and E-mail
- Load the document (see page 10).
- Press the SEND key.
-
Enter the e-mail address in the "To" field in one of these ways.
-
Press the ADDRESS BOOK key and use the arrow keys to navigate to the address. Press the OK key.
-
Type the initial letter of the address using the numeric keypad. Press the OK key.
-
To send to additional addresses, add a comma and repeat the previous step.
- Press the RETURN (☐) key to go back to the main e-mail display.
- Enter the e-mail Subject. Press the OK key.
- Enter any cc and bcc addresses. Press the OK key.
-
To make additional settings*:
-
Press SEND.
- Press ADDITIONAL SETTINGS.
- Use the arrow keys and the OK key to make your choices.
-
Press the RETURN (→) key.
-
Press the MONO key or the COLOR key.
Additional Settings for Scanning
The default setting is in bold italic.
| Attachment | File name of scanned document. |
| From | Set what appears under "From" on the email. |
| Reply to Address (up to 64 cvcharacters) | Set the address to which the recipient should reply, if different from the "From" address. |
| Color Output format | Select:File format: PDF, TIF, JPG, or MTIF,Compression rate: Low, Medium, High. |
| B&W output format | Set:Multilevel B&W Gray: On, Off.File format: PDF, TIF, MTIFCompression rate: Low, Medium, High. |
| Resolution | 75, 100, 150, 200, 300, 400, 600 dpi. |
| Manual Feed | Disable, Enable.Change to Enable to concatenate multiple scanned documents into one e-mail. |
| Document Size | A4, Letter, Legal. |
| Density | -2, -1, 0, 1, 2Set the print density. |
Walk-up Operation Send (cont.)
Scan to File Server
Send scanned documents to a server or a personal computer's file folder.
Note
These instructions assume that the System Administrator has set up and stored the necessary profiles.
- Load the document (see page 10).
- Press the SEND key.
- Press the FTP ADDRESS key.
- Use the arrow keys to select the desired profile from the list.
- Press the OK key.
- Press the MONO key or the COLOR key.
Note
Check with your System Administrator or see the on-line User's Guide on the CD supplied with your system for more information.
Walk-up Operation Fax
Your system has multiple fax modes, including
- Basic Faxing (see below)
- Delayed Send Faxing (see page 15)
• Manual Feed Faxing (see page 15)
• Poll Receive Faxing (see page 16) - Broadcast Faxing (see page 16)
Basic Faxing
Note
These instructions assume that all needed basic data (e.g., date and time) has already been programmed into the system.
- Load the document (see page 10).
- Press the FAX key.
-
Enter the destination fax number:
-
Use the numeric keypad to type in the number, or
- Press the appropriate pre-programmed One Touch key, or
-
Search the phone book by pressing the Address Book key – once for speed dial entries or – twice for group dial entries. Use the arrow keys to navigate. Press the OK key when done.
-
Optional: Press the Additional Settings key and use the arrow and OK keys to make additional fax mode settings*.
-
Press the RETURN (☐) key to go back to the main fax screen.
-
Press the MONO key to start scanning.
\*Additional Fax Settings
The default setting is in bold italic.
| Quality | Standard, Fine, ExtraFine, Photo Change the setting to adjust the quality of the scanned image. |
| Density | -2, -1, 0, 1, 2 Set the print density. |
| Document Size | A4, Letter, Legal. |
| Delayed send | Real time, |
| Manual Feed | Off, On |
| Poll Receive | Off, On |
| Overseas Mode | Off, On Change the setting to On to avoid transmission problems when faxing overseas. |
Delayed Send Faxing
Set the date and time you wish the fax to be transmitted. The system will scan and store your document ready for sending at the specified time.
- Load the document (see page 10).
- Press the FAX key.
- Enter the destination fax number (see "Enter the destination fax number:" on page 14).
- Press the Additional Settings key.
- Use the down arrow key to navigate to Delayed Send. Press the OK key.
- Use the arrow keys and numeric keypad to set the date and time the fax is to be sent. Press the OK key.
- Press the RETURN (☐) key to return to to the fax screen.
- Press the MONO key.
Manual Feed Faxing
If you need to send multiple sets of documents from the ADF or glass, enable the "Manual Feed" option:
- Load the document (see page 10).
- Press the FAX key.
- Enter the destination fax number (see "Enter the destination fax number:" on page 14).
- Press the Additional Settings key.
- Use the down arrow key to navigate to Manual Feed. Press the OK key.
- Use the down arrow key to select On. Press the OK key.
- Press the RETURN (→) key to return to to the fax screen.
- Press the MONO key to start scanning.
Walk-up Operation
Fax (cont.)
Poll Receive Faxing
Polling is a process in which documents are loaded into your system, and the system is then set to wait for a call from a remote location before faxing. If the remote machine is set to hold data in memory for transmission to a local machine when contacted, the procedure is called "polling receive".
- Load the document (see page 10).
- Press the FAX key.
- Press the Additional Settings key.
- Use the down arrow key to navigate to Polling Receive. Press the OK key.
- Use the down arrow key to select On. Press the OK key.
- Press the RETURN (→) key to return to to the fax screen.
- Enter the desired location using the One Touch keys or the numeric keypad.
- Press the Mono key to begin polling.
Broadcast Faxing
You can send a fax to multiple locations at the same time.
- Load the document (see page 10).
- Press the Fax key.
- Enter the first destination fax number. See "Enter the destination fax number:" on page 14.
- Press the OK key.
- Enter additional phone numbers (up to 100), pressing the OK key after each number is entered.
- Press the Mono key.
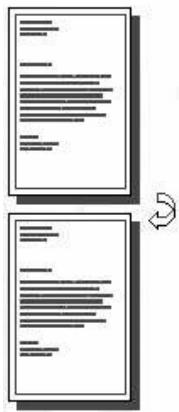
Duplex Printing
(Printing on Both Sides of the Page)
Duplex printing requires that the optional Duplex Unit (OKI P/N 43347501) be installed.
text_image
Diagram showing two document pages with horizontal lines and a curved arrow indicating rotation or refresh.Short Edge

text_image
Diagram showing two document pages with horizontal lines and a rotation arrow indicating rotation.Specifications
Paper Weight
20 to 28 lb. US Bond (75 to 105 g/m ^4 ).
Note
If you experience curling with 20 or 24 lb. paper, switch to 28 lb.
Paper Feed
Tray 1, Optional Tray 2 or MP Tray.
Paper Exit
Top Exit tray or Rear Exit tray.
Paper Sizes
• Letter, Legal-14, Legal-13.5, Legal-13, A4, A5, Executive, B5.
- Custom: MP Tray only, range 5.8" x 8 ^1/4 " (148 x 210 mm) to 5.5" x 14" (215.9 x 355.6 mm)
How to Print a File Using the Duplexer
Open the file you wish to print and click File → Print. Select the MC560 MFP printer.
Windows PostScript Emulation
- Click Properties.
- On the Layout tab, select Long Edge or Short Edge under Print on Both Sides.
Windows PCL Emulation
- Click Properties.
- On the Setup tab, select Long Edge or Short Edge under 2-Sided Printing.
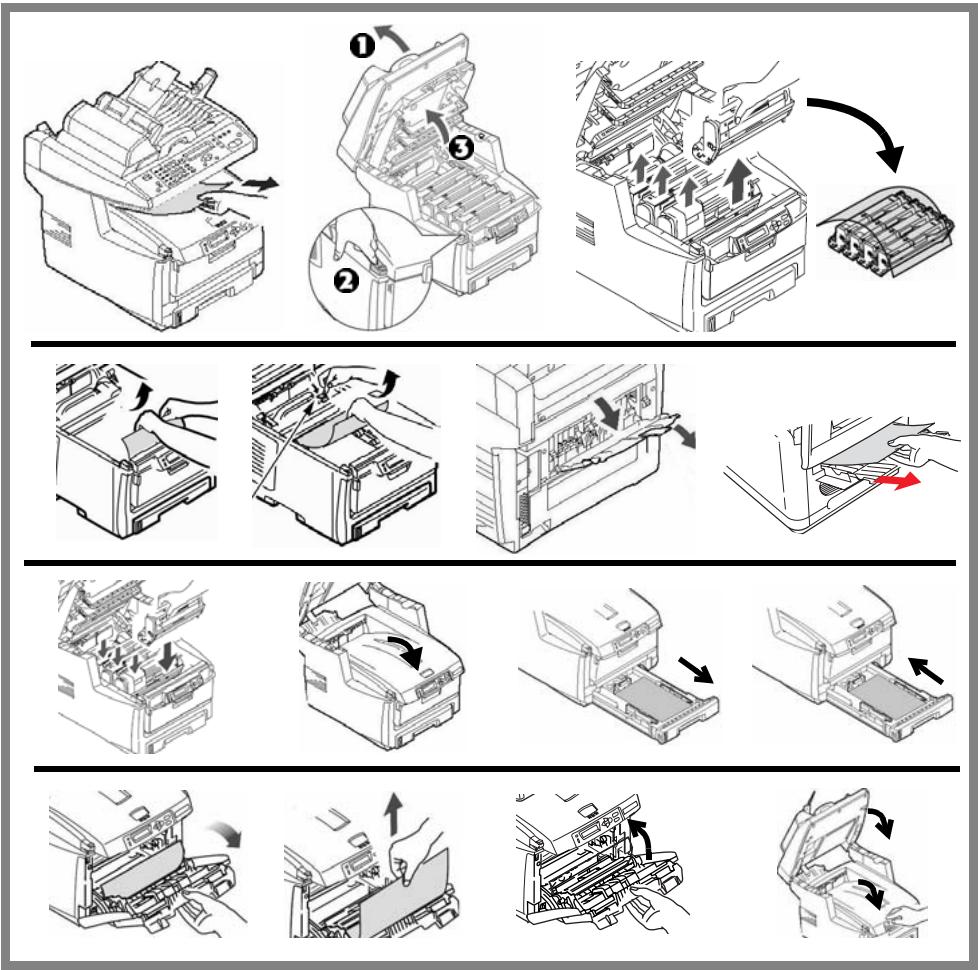
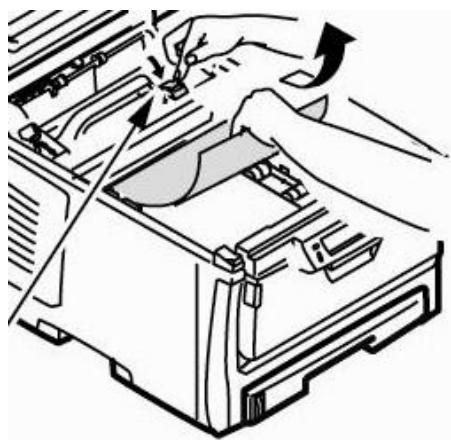
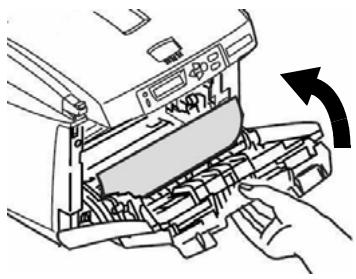
Clearing Media Jams Scanner (ADF) Jams
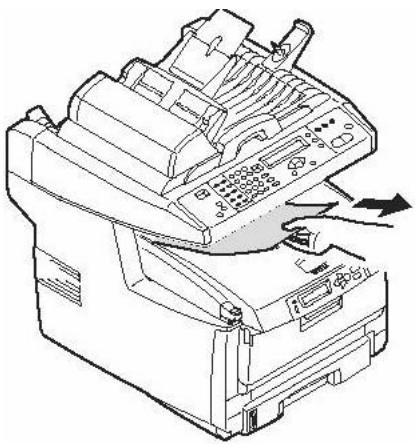
If a sheet is well advanced out of the ADF, simply grip it and pull gently to draw it fully out.
natural_image
Diagram of a printer's internal structure with a paper feeding into a tray, showing no text or symbols.If the sheet is not well advanced:
natural_image
Diagram of a mechanical device with a folded component and directional arrow (no text or symbols)
text_image
Technical diagram showing a mechanical assembly with labeled components and directional arrows indicating flow or movement.
text_image
Technical diagram of a vehicle roof structure with labeled components and directional arrows indicating assembly or movement.Clearing Media Jams Printer Jams
In General
When "Paper Jam" appears on the second line of the printer display, there is paper jammed in the printer section of the unit.
Depending on where the paper is jammed, there may be more than one sheet stuck in the printer.
If one sheet is removed and there are still more sheets in the printer, the initial message will go away temporarily, then "Paper Jam" will appear again.
The box below contains a summary of the basic process for clearing jams. For more details see the pages which follow.
Clearing Media Jams Printer Jams (cont.)
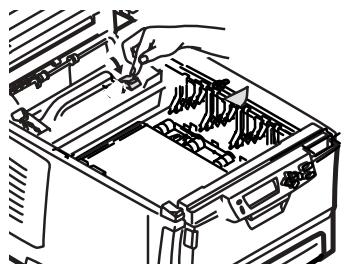
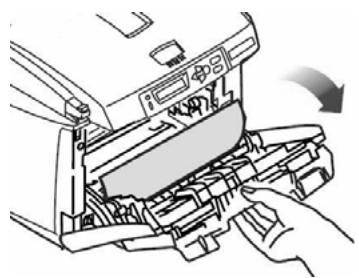
- If a sheet is well advanced out of the top of the printer, simply grip it and pull gently to draw it fully out. If it does not remove easily, leave it alone for now.
natural_image
Line drawing of a printer with a hand operating the mode of the paper (no text or symbols present)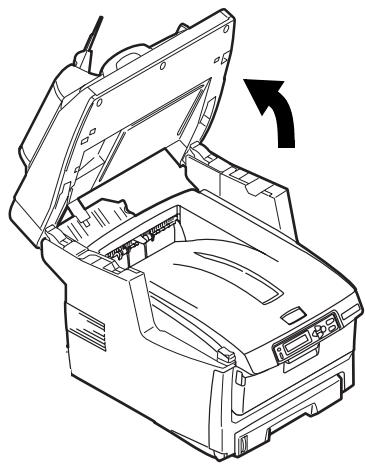
natural_image
Line drawing of an open industrial machine with a curved arrow indicating rotation (no text or symbols)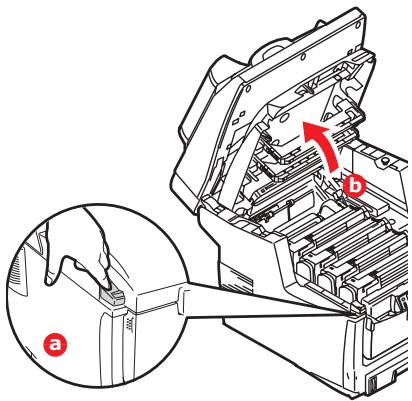
text_image
Technical diagram of a mechanical device with labeled parts and an inset view showing a hand holding a tool.Caution
The fuser may be hot! It is clearly labelled. Do not touch.
Note the location of the various color toner cartridges.
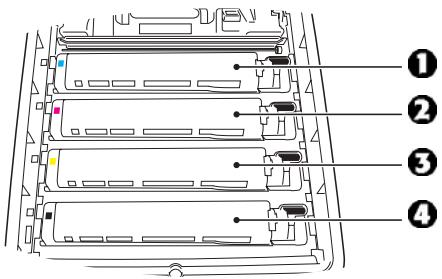
text_image
Diagram of a multi-chamber electronic device with numbered components labeled 1 to 41 = Cyan
2 = Magenta
3 = Yellow
4 = Black
Caution!
Do not touch the green image drum surface or expose it to light for more than 5 minutes.
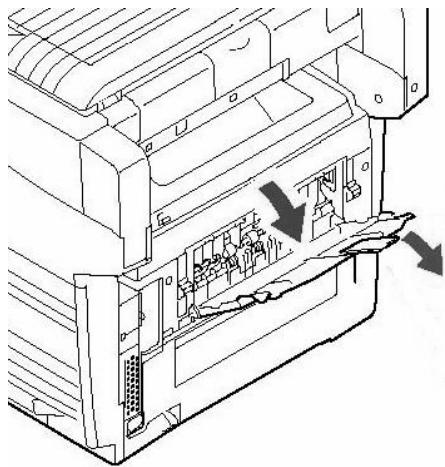
Clearing Media Jams Printer Jams (cont.)
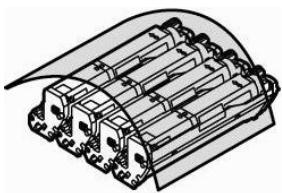
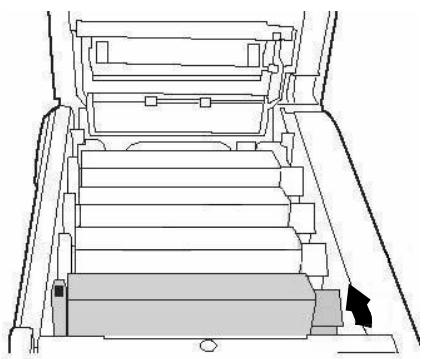
- Remove all the image drums/toner cartridges, and place them on a flat surface.
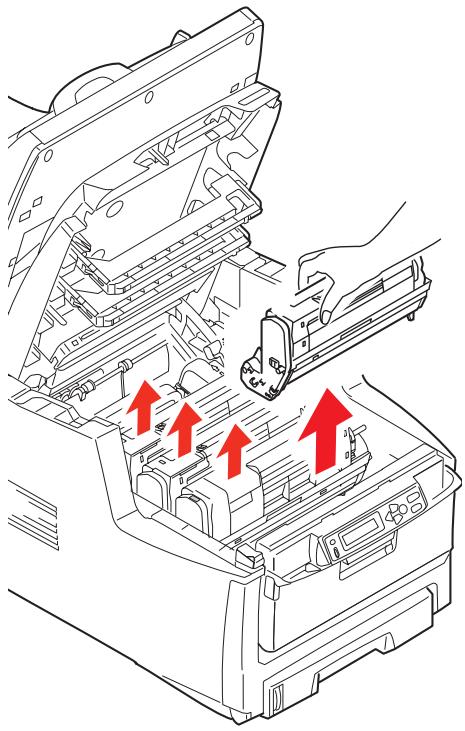
natural_image
Technical line drawing of a printer internal structure with red arrows indicating assembly or movement (no text or symbols present)- Cover them to protect them from light.
natural_image
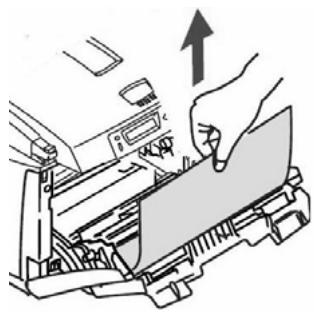
Technical line drawing of a multi-layered mechanical component with no visible text or symbols- Gently remove any jammed sheet(s).
natural_image
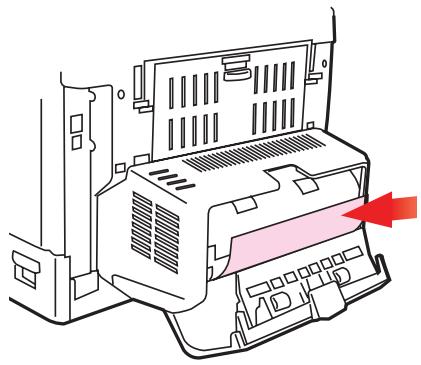
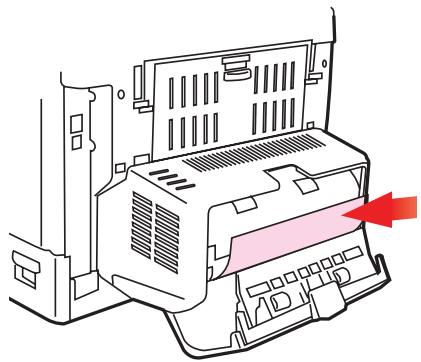
Line drawing of a hand inserting a card into a device (no text or symbols)- If a sheet is stuck in the fuser, pull the fuser release lever forward, then remove the sheet.
natural_image
Illustration of hands operating a printer with a paper clip and mechanical parts (no text or symbols visible)Clearing Media Jams Printer Jams (cont.)
- If the sheet is difficult to remove from the fuser:
a. Lower the rear exit tray

natural_image
Technical line drawing of a mechanical device with internal components and directional arrows indicating movement (no text or symbols)b. Reach in and push the fuser release lever and pull the sheet out from the back.
natural_image
Line drawing of a hand inserting into a device into a rack (no text or symbols)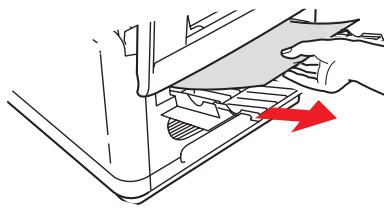
natural_image
Line drawing of a hand pressing down on a mechanical component with a red arrow indicating motion (no text or symbols)c. Close the rear exit tray.
- Replace the image drums/toners, being careful to install them in the proper sequence.
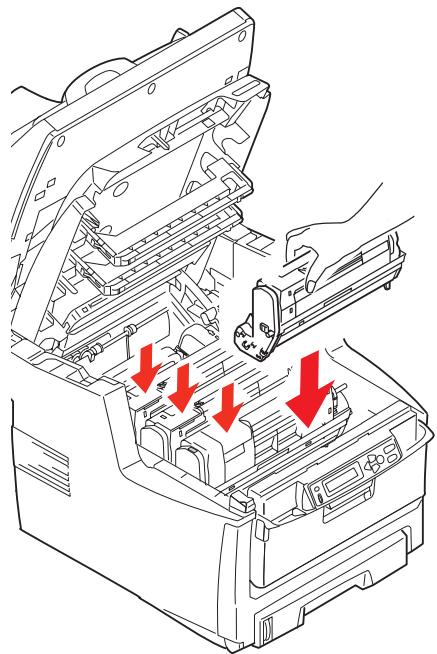
natural_image
Technical line drawing of an open industrial machine with red arrows indicating downward motion (no text or symbols present)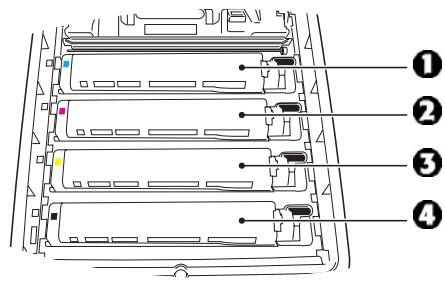
text_image
Diagram of a multi-chamber computer rack with numbered labels pointing to different components1 = Cyan
2 = Magenta
3 = Yellow
4 = Black
Clearing Media Jams Printer Jams (cont.)
- Lower the printer cover to protect the image drums from light, but do not latch it.
natural_image
Technical line drawing of a mechanical component with an arrow indicating rotational motion (no text or symbols)11..If your MFP has a duplex unit installed:
a. Press the cover release and open the cover.
natural_image
Illustration of a hand inserting a component into a computer drive (no text or symbols visible)b. Remove any sheets in this area.
natural_image
Diagram of a printer or printer device with a red arrow pointing to the interior panel (no text or symbols present)c. Close the cover.
natural_image
Technical line drawing of a computer drive or chassis with an arrow indicating a component (no text or symbols present)Clearing Media Jams Printer Jams (cont.)
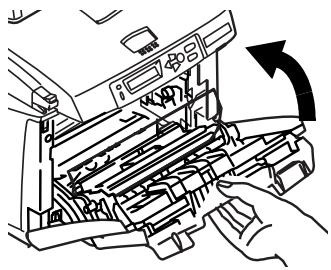
- Lift the front cover release and open the front cover.
natural_image
Illustration of a printer's internal structure with hands inserting a component (no text or symbols visible)- Remove any jammed paper.

natural_image
Illustration of a hand pressing down on a printer's screen with an upward arrow (no text or symbols)- Close the front cover.
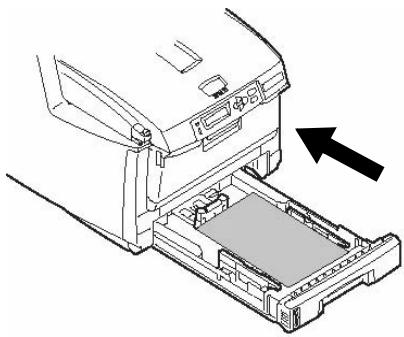
natural_image
Line drawing of a printer's internal structure with hands operating it (no text or symbols)- Pull out the paper tray and remove any jammed paper.

natural_image
Diagram of a printer's internal structure showing paper feeding into a tray, with an arrow indicating the process (no text or symbols present)- Close the tray.

natural_image
Diagram of a printer or scanner device with an arrow pointing to the internal structure (no text or symbols present)Clearing Media Jams Printer Jams (cont.)
- Press down on the printer cover to latch it.

natural_image
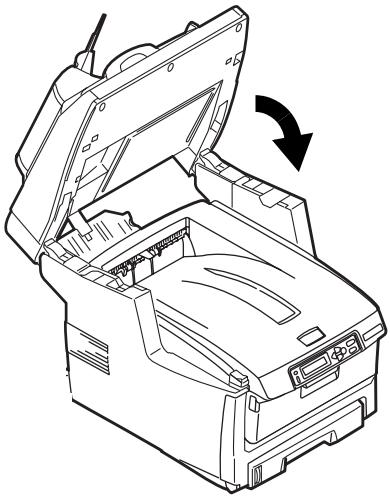
Line drawing of a printer with a hand inserting a component (no text or symbols)- Gently lower the scanner into place.
natural_image
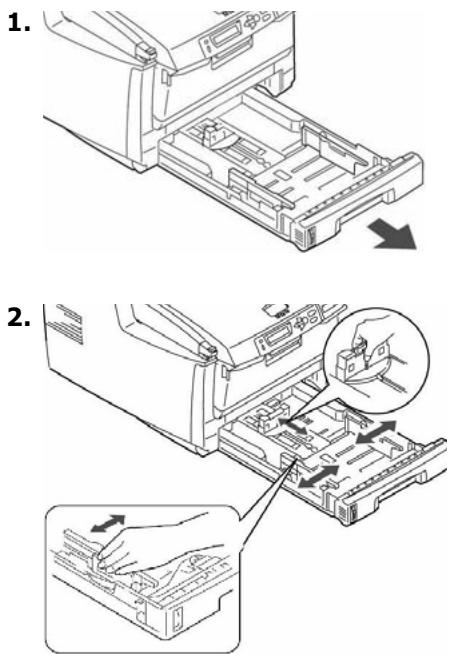
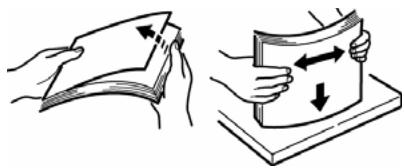
Line drawing of an open industrial machine with a curved arrow indicating rotation (no text or symbols)Tray 1
Media Specifications
| Weight Range | 17 to 32 lb. US Bond (64 to 120 g/m2) |
| Sizes | Standard Sizes: Letter, Legal-14, Legal-13.5, Legal-13, A4, A5, A6, B5, ExecutiveCustom Sizes: Min. 4.13" x 5.83" [105 x 148 mm], Max. 8.5" x 14" [216 x 356 mm], (Non-standard sizes must be defined in driver before printing: check with your System Administrator.) |
| Types | Paper, Letterhead Stationery, Recycled |
| Capacity | 300 sheets of 20-lb. (75 g/m2) paper |
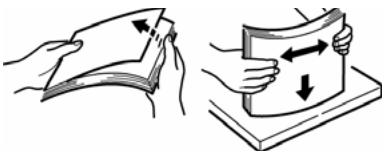
Loading Paper
natural_image
Illustration showing two-step folding or cutting process: one being folded, the other being cut with arrows indicating direction (no text or symbols)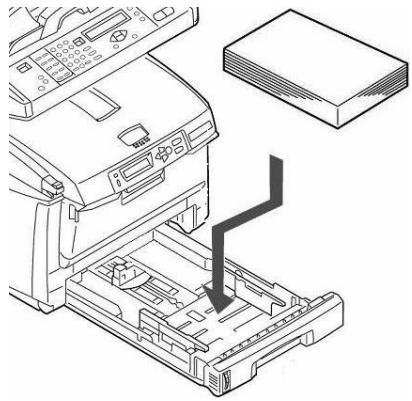
natural_image
Technical line drawing of a printer with a paper stack and a black arrow indicating a component (no text or symbols present)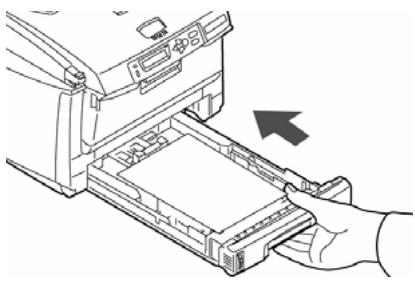
natural_image
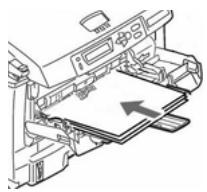
Illustration of a hand inserting a device into a rack, with an arrow indicating the process (no text or symbols present)Multi Purpose Tray [MPT]
Media Specifications
| Weight Range | 20 to 54 lb. US Bond (42 to 110 lb. Index, 75 to 199 g/m ^2 metric) |
| Sizes: | Standard Sizes: Letter, Legal-14, Legal-13.5, Legal-13, A4, A5, A6, B5, Executive, C5, DL, COM-9, COM-10, MonarchCustom Sizes: Min. 2.51" x 5.83" [64 x 148 mm], max. 8.5" x 47.24"[216 x 1200 mm] (Non-standard sizes must be defined in driver before printing: check with your System Administrator.) |
| Types | Paper, Letterhead Stationery, Card Stock, Labels, Transparencies, Envelopes, Banner Paper |
| Capacity: | 50 sheets of 20-lb. (75 g/m ^2 ) paper10 envelopes50 transparenciesLabels: max. feed stack = about 3/8-Inch (10 mm)Banner Paper: single sheet 8.25 to 8.5" (210 to 216 mm) wide x 47.24" (1200 mm) long |
Loading Print Media
Note
Use the rear exit path (straight through) for heavy paper, transparencies, envelopes and labels. See page 29.
natural_image
Illustration of hands operating a printer with arrows indicating process (no text or symbols)
natural_image
Diagram of a printer's internal structure showing paper feed, paper tray, and paper holder (no text or symbols)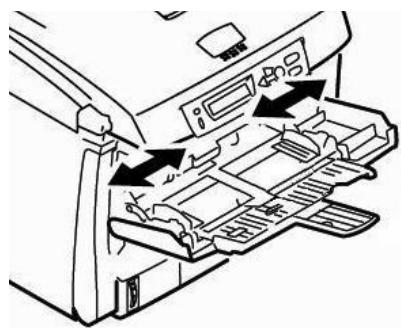
natural_image
Line drawing of a printer's internal structure showing mode shift and ventilation slots (no text or symbols)Multi Purpose Tray [MPT] (cont.)
![OKI CX2033MFP - Multi Purpose Tray [MPT] (cont.) - 1](/content/2019/11/163183/images/e0296e373aca9b5ae5cc7f1e732a77f258414ca9bc876064fa493df77ceef813.jpg)
text_image
4.![OKI CX2033MFP - Multi Purpose Tray [MPT] (cont.) - 2](/content/2019/11/163183/images/2a560e51a423aaf1f5affad68ab1e72b70b0ba299de75651fab727cfe87fa546.jpg)
text_image
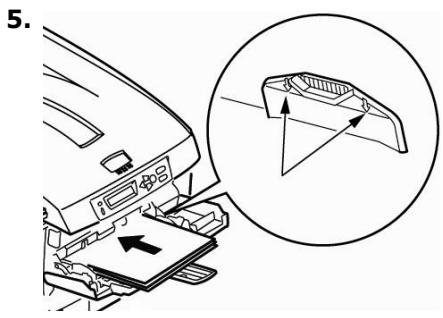
5.- Press the blue tray latch button inwards to release the paper platform so that the paper is lifted and gripped in place.
![OKI CX2033MFP - Multi Purpose Tray [MPT] (cont.) - 3](/content/2019/11/163183/images/b04e62ffdb8faa43190472fa01d69ee6779badbaba60e552271463fd075212bd.jpg)
natural_image
Diagram showing a hand pressing down on a device component with a black arrow indicating downward motion (no text or symbols present)Special Media
Letterhead Stationery
- For single-sided printing: load face up, top edge into the printer.
natural_image
Diagram of a printer's internal structure showing paper feeding into a slot (no text or symbols)- For double-sided printing (optional duplex unit must be installed): load face down with top edge away from the printer.
Envelopes
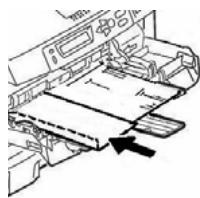
natural_image
Diagram of a printer's internal structure showing paper feeding into a slot (no text or symbols)Load envelopes face up, top edge to the left and short edge facing into the printer.
Labels

natural_image
Line drawing of a car interior with a roof-mounted device and a grid base (no text or symbols)Load labels face up, top edge into the printer.
Banner Paper
- Hand feed banner paper one sheet at a time.
- Use the rear exit.
Top Exit Tray (Face Down)
This is the exit tray that is normally used.

natural_image
Line drawing of a printer with an arrow pointing to the top panel (no text or symbols present)- For papers up to 47 lb. US Bond (176 g/m ^2 ).
- Holds up to 250 sheets of 20-lb. US Bond (75 g/m ^4 ) paper.
- Sheets exit face down.
Rear Exit Tray (Face Up)
- Provides straight-through, curl-free print path required for envelopes, labels and heavy paper.
- Handles paper up to 54 lb. US Bond (203 g/m ^4 ).
- Holds up to 100 sheets of 20-lb. US Bond (75 g/m ^4 ) paper.
- Sheets exit face up: for multi-page documents, select reverse order printing in your application Print dialog box.
Important!
If the rear tray is open, all printed pages will exit there regardless of the printer driver setting.
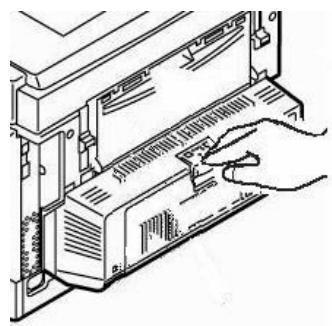
Opening the Rear Exit Tray
natural_image
Technical line drawing of a mechanical assembly with internal components and directional arrows (no text or symbols)Toner Cartridge Order Nos.
Black 43865768
Cyan 43865767
Magenta .....43865766
Yellow. . . . . . . . . 43865765
Image Drum Order Nos.
Black .....56121104
Cyan 56121103
Magenta .....56121102
Yellow. . . . . . . . . 56121101
Where to Purchase
- Consult the dealer where you purchased your system.
- Consult an Oki Data Authorized Sales or Service Dealer. For the nearest dealer, call 1-800-654-3282.
- U.S., Puerto Rico, Guam, U.S. Virgin Islands: Order on the Internet at www.okiprintingsolutions.com.
- U.S. only: Order toll-free at 1-800-654-3282, using VISA®, MasterCard®, AMEX®.
Note
Always use genuine Oki Data toner cartridges in your system.
Maintenance
Replacing Toner Cartridges (cont.)
To Replace a Toner Cartridge
The following steps show replacement of the black toner cartridge. Other color toner cartridges are replaced in the same manner.
- Power off!
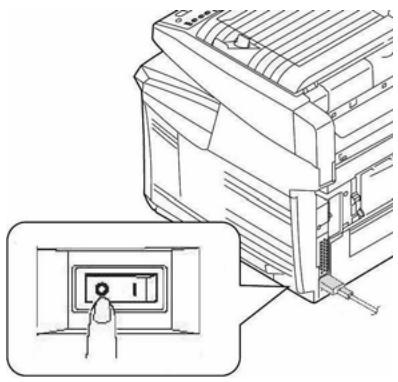
natural_image
Technical line drawing of a mechanical device with an inset showing a hand pressing a button (no text or symbols present)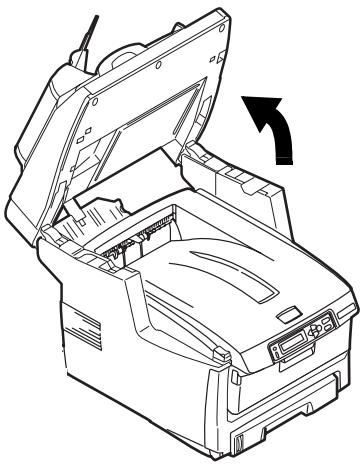
natural_image
Line drawing of an open industrial machine with a black arrow indicating rotation (no text or symbols)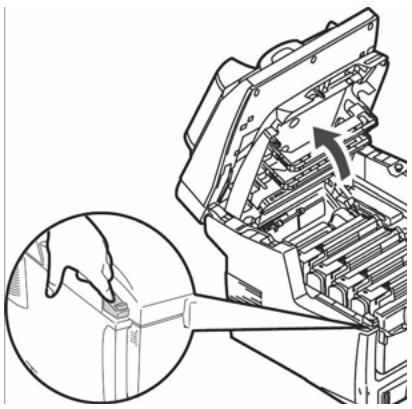
natural_image
Technical line drawing of a mechanical assembly with an inset showing a hand operating a component (no text or symbols present)CAUTION! The fuser (behind the cyan toner) may be HOT.
- Locate the toner cartridge that needs to be replaced:
text_image
Technical diagram of a mechanical assembly with numbered components labeled 1 to 41 = Cyan
2 = Magenta
3 = Yellow
4 = Black
Important!
Make sure the lever is pulled all the way forward before attempting to remove the toner cartridge!
Maintenance
Replacing Toner Cartridges (cont.)
- Pull the colored lever on the right side of the toner cartridge towards the front of the printer to close the cartridge.
natural_image
Technical line drawing of a mechanical component with no visible text or symbols- Remove the used toner cartridge.
text_image
Diagram showing a printer or scanner with labeled components and directional arrows indicating motion or movement.Important!
Discard toner cartridges in accordance with local regulations!
- Unpack the new toner cartridge and shake it back and forth to distribute the toner.
natural_image
Illustration of a hand holding a cylindrical device with red bidirectional arrows indicating movement or force (no text or symbols)- Remove the tape.

natural_image
Illustration of hands holding a cylindrical device with a red arrow indicating rotation or movement (no text or symbols)- Insert the new toner cartridge in the unit.
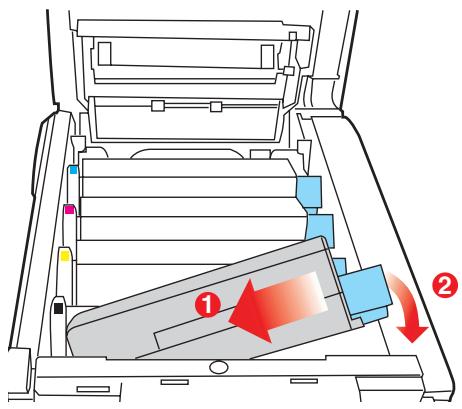
text_image
Diagram of a printer drawer with labeled parts and directional arrows indicating movement or flowMaintenance
Replacing Toner Cartridges (cont.)
- Push the lock lever toward the back of the printer until it stops.
natural_image
Technical line drawing of a mechanical assembly with no visible text or symbols- Use the lens cleaner supplied with the toner cartridge (or a clean soft cloth) to gently clean the LED head.
natural_image
Hand inserting a small object into a rack of books (no text or symbols visible)- Close the printer cover and press down to latch it.
natural_image
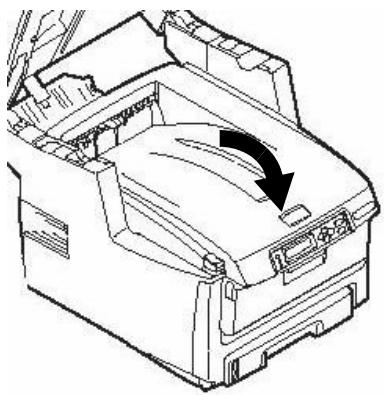
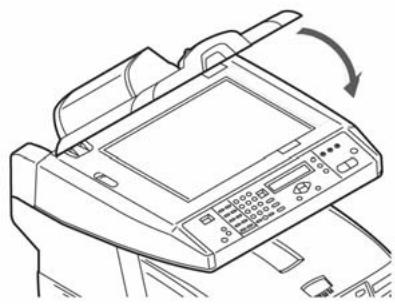
Line drawing of a printer's front panel with a hand inserting a slot (no text or symbols)- Gently lower the scanner into place.
natural_image
Line drawing of an open industrial machine with a black arrow indicating rotation (no text or symbols)Maintenance Cleaning the ADF Rollers & Pad
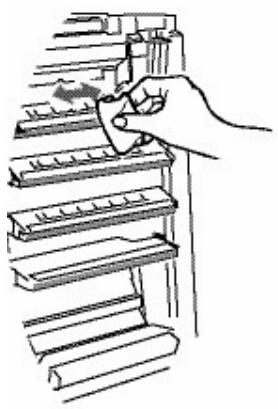
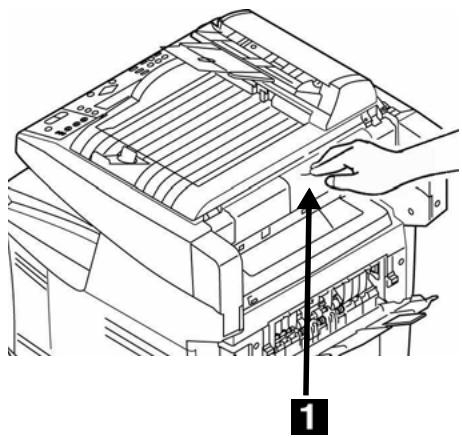
If documents are not feeding smoothly through the ADF, please follow these cleaning procedures.
- Moisten a soft, lint-free cloth with isopropyl alcohol (common rubbing alcohol).
- Open the ADF cover.
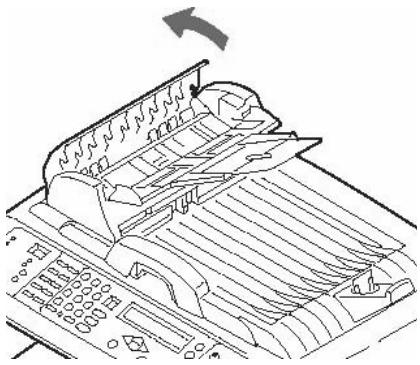
natural_image
Technical line drawing of a mechanical device with internal components and a directional arrow (no text or symbols)- Clean the feed rollers by moving the moistened cloth from side to side while rotating the rollers. Be careful not to snap or damage the springs (1).
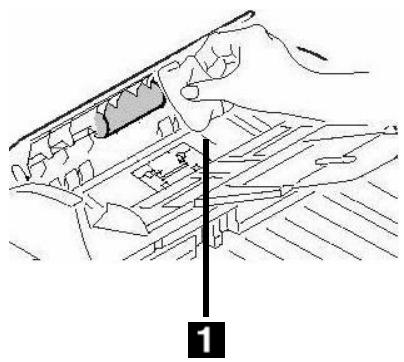
text_image
Technical diagram showing a hand operating a mechanical component with labeled parts and a numbered arrow indicating direction.- Clean the pad by moving the moistened cloth up and down along the pad (1).
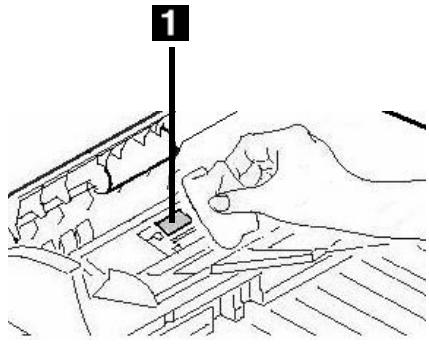
text_image
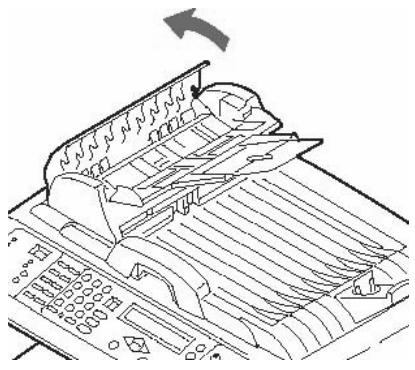
1- Close the ADF cover.
Maintenance Cleaning the ADF Glass
To ensure optimum image quality and performance, clean the glass occasionally to remove dust or any toner particles.
- Open the document cover.
natural_image
Line drawing of a printer with control panel and scroll arrow (no text or symbols)- Dip a soft clean cloth with isopropyl alcohol (95%).
- Gently wipe the document glass (1) and the white sheet beneath the document cover (2).
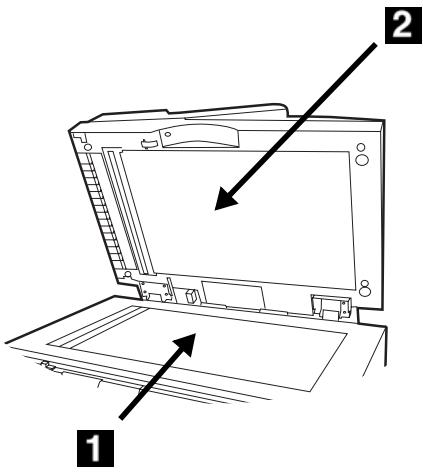
text_image
Diagram of an open laptop with labeled parts and directional arrows indicating assembly or navigation.- Close the document cover.

natural_image
Line drawing of a printer with a scroll wheel and control panel (no text or symbols)Maintenance Replacing the ADF Pad
After scanning approximately 100,000 pages through the ADF, the pad module can become worn out and can cause feeding problems.
Note
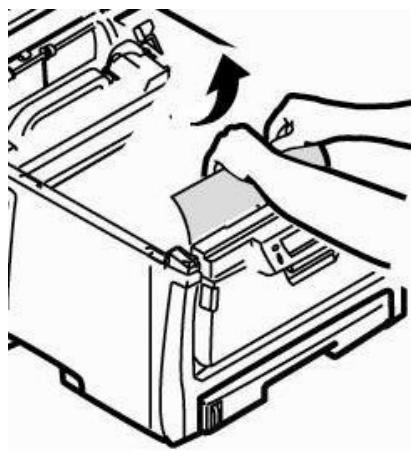
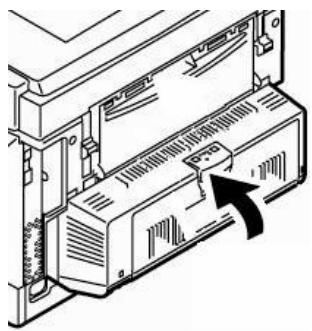
One replacement ADF pad is included with your unit. It is stored behind a swing-down cover (1) on the back of the unit:
natural_image
Line drawing of a printer with a hand inserting a cable into the cover (no text or symbols)For additional ADF pads, order Oki P/N 43103001 (see "Where to Purchase" on page 30).
- Open the ADF cover.
natural_image
Technical line drawing of a mechanical device with internal components and a directional arrow (no text or symbols)- Press the white plastic arms on the sides of the ADF pad inward and pull the pad out.
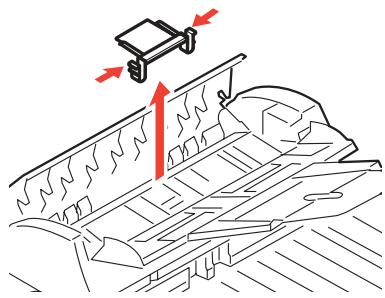
natural_image
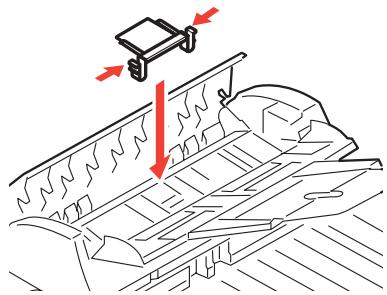
Technical line drawing of a mechanical component with red arrows indicating motion or force direction (no text or symbols)- Press both arms of the new ADF pad inward. Place the pad into the holder until it snaps into place
natural_image
Diagram showing a vehicle on a roof with red arrows indicating motion or force, no text or symbols present.- Close the ADF cover.
Error Messages
Toner Cartridges & Paper Jams
Some of the more common error messages appear below. For additional error messages see your on-line User's Guide.
Toner Cartridges
XXX TONER EMPTY
Replace the toner cartridge corresponding to color XXX. See page 30.
CHECK TONER CARTRIDGE EEE:YYY IMPROPER LOCK LEVER
The lever for the toner cartridge color indicated is not pushed all the way back.
- EEE = 544: Yellow Drum
- EEE = 545: Magenta Drum
- EEE = 546: Cyan Drum
- EEE = 547: Black Drum
Lift the scanner unit and open the printer cover. Push the lock lever for the color toner cartridge indicated toward the back of the printer as far as it will go. Close the printer cover and gently lower the scanner unit back into place.
If this does not clear the message, call your local service dealer.
CHECK TONER CARTRIDGE XXX TONER SENSOR ERROR
Call your local service dealer.
Paper Jams
(See also "Printer Covers" on page 41)
EEE: PAPER JAM
Appears on the second line of the display to indicate that paper is jammed in the printer. Run through the paper jam clearing procedure (see page 19).
Error Messages (cont.)
Image Drums & E-Mail
Image Drums
REPLACE IMAGE DRUM EEE: XXX DRUM LIFE
The color image drum indicated is reaching its end of life.
- EEE = 350: Yellow Drum
- EEE = 351: Magenta Drum
- EEE = 352: Cyan Drum
- EEE = 353: Black Drum
Open and close the cover to clear the message and continue printing.
Make sure you have a replacement drum In hand.
REPLACE IMAGE DRUM EEE: XXX DRUM LIFE
The color image drum indicated needs to be replaced.
- EEE = 560: Yellow Drum
- EEE = 561: Magenta Drum
- EEE = 562: Cyan Drum
- EEE = 563: Black Drum
Replace the image drum. (See the instructions supplied with the new image drum.)
CHECK IMAGE DRUM EEE:XXX DRUM MISSING
The image drum is no installed correctly.
Lift the scanner unit and open the printer cover. Check that the indicated color image drum is properly installed. Close the cover.
MAILBOX UNAVAILABLE CHECK "TO" ADDRESS
The requested mail action not taken because the "TO" address was not found. Correct the "TO" address and try again.
FILE SIZE IS TOO LARGE
The file size is larger than the "scan size limit" allowed.
Reduce the file size and try again.
Error Messages (cont.) Media Trays
Tray 1, Tray 2 (Optional), MP Tray
LOAD SSS EEE:YYY EMPTY
Printing request was issued to an empty tray. Load media size SSS into the tray.
- EEE = 490: MP Tray
- EEE = 491: Tray 1
- EEE = 492: Tray 2 (option)
LOAD SSS/TTT AND PRESS EEE:YYYYMEDIA MISMATCH
The media size (SSS) and/or type (TTT) in the tray does not match the print data. Load SSS/TTT paper in the tray.
- EEE = 460: MP Tray
- EEE = 461: Tray 1
- EEE = 462: Tray 2 (option)
LOAD SSS IN MP TRAY AND PRESS ON-LINE SWITCH
The print job is looking for the appropriate media in the Multi-Purpose Tray. Load the indicated media size (SSS) in the tray.
INSTALL PAPER CASSETTE 440:YYY OPEN
The paper tray (YYY) has been removed. Reinstall the tray.
Error Messages (cont.)
Scan to File Server
Scan to File Server
FTP LOGIN ERROR CHECK LOGIN NAME
Check your login name and try again.
If you continue to have problems, check with your System Administrator.
FTP PASSWORD ERROR CHECK PASSWORD IN FOLDER
Check your password and try again.
If you continue to have problems, check with your System Administrator.
MAKE SURE PRIVILEGE
Appears on the second line of the display to indicate that you do not have authorization to perform this action.
Check with your System administrator.
FILE NAME NOT ALLOWED CHANGE FILE NAME
Change the file name to meet the naming conventions of the FTP server's operating system.
NETWORK SHARE NAME INCORRECT CHECK DIRECTORY IN FOLDER
The CFIFS Network share name is incorrect.
Check the directory in the profile and make sure it follows UNC, such as \ComputerShare\directory.
COMPUTER NAME ERROR MAKE SURE COMPUTER NAME IN DIRECTORY
CIFS Computer name error. Make sure the computer name is the directory and is correct.
Error Messages (cont.) Printer Covers & Miscellaneous
Printer Covers
CLOSE COVER EEE: COVER OPEN
- EEE = 310: Top Cover
- EEE = 311: Front Cover
If the message persists, call your local service dealer.
CLOSE COVER 316: DUPLEX COVER OPEN
Close the duplex unit cover.
If the message persists, call your local service dealer.
OPEN UPPER COVER 401: PAPER MULTI FEED
An innappropriate length paper was fed from a tray.
- Check the paper in the trays.
- Check for a paper jam (see page 19).
- Open and close the top cover to continue printing.
OPEN FRONT COVER 400: PAPER SIZE ERROR
Inappropriate size paper was fed from a tray.
- Check the paper in the trays.
- Open and close the front cover.
If the message persists, check for a paper jam (see page 19).
Miscellaneous
TURN OFF SCNER TURN ON AGAIN
Turn off the unit, then turn it on again. If the message persists, contact your service dealer.
ADD MORE MEMORY 420: MEMORY OVERFLOW
The amount of data in the file being printed has exceeded the printer's memory.
- Reduce the size of the file being printed (e.g., print the file as separate groups of pages instead of all the pages at one time).
- Install additional memory in the printer (check with your System Administrator or see the on-line User's Guide).
Service & Support
Consult the dealer where you purchased your MFP System.
OKI is a registered trademark of Oki Electric Industry Company, Ltd.
AmEx is a registered trademark of American Express Co.
MasterCard is a registered trademark of MasterCard International, Inc.
VISA is a registered trademark of Visa.
Windows is either a registered trademark or trademark of Microsoft Corporation in the United States and other countries.
natural_image
Line drawing of a printer with paper feeders and control panel (no text or symbols)text_image
Technical diagram of a printer with labeled parts, showing internal structure and component layouttext_image
1 2 3 4 5 6 7 8 9 100% 25% 50% 70% (A4 ▶ A5) 141% (A5 ▶ A4) 200% 25% 400% %+ %- 1 2 3 ABC DEF 4 5 6 GHI IHL MINI 7 8 PORS TUV WIST × 0 # CD ?/+? DIGIAL CLEAR PAUSE1 Zoom Function
natural_image
Line drawing of a printer with a scroll wheel and control panel (no text or symbols)natural_image
Line drawing of an open laptop with a red arrow pointing to the screen area (no text or symbols)text_image
Two document pages with placeholder text and a circular arrow indicating refresh or update.Petit côté

text_image
Diagram showing two document pages with horizontal lines and a rotation arrow indicating direction or transformation.Spécifications
natural_image
Technical line drawing of a printer internal structure with no visible text or symbolsnatural_image
Diagram of a mechanical device with internal components and an arrow indicating rotation (no text or symbols)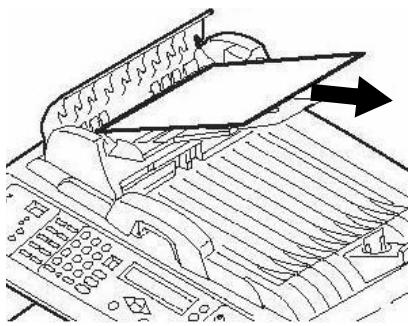
text_image
Technical diagram showing a mechanical device with labeled components and directional arrows indicating flow or movement.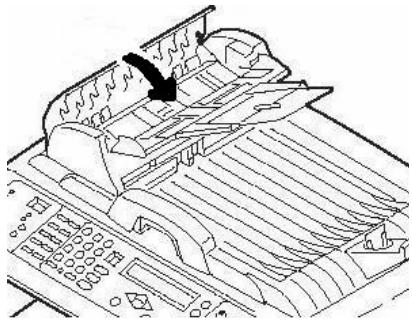
natural_image
Technical line drawing of a mechanical assembly with no visible text or symbolsnatural_image
Line drawing of a printer with a hand inserting a button to the front panel (no text or symbols present)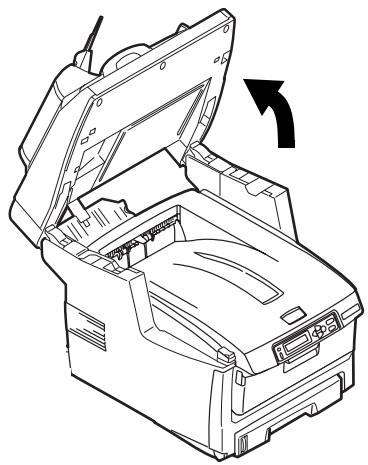
natural_image
Line drawing of an open industrial machine with a curved arrow indicating rotation (no text or symbols)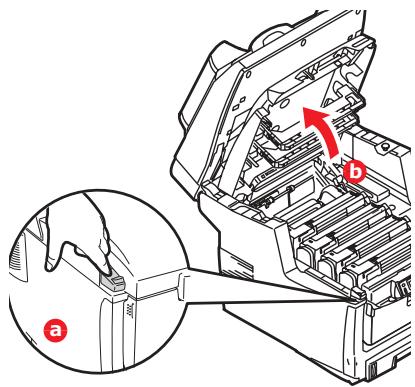
text_image
Technical diagram of a mechanical assembly with labeled parts and an inset view showing a hand holding a tool.Attention
text_image
Diagram of a multi-chamber electronic device with numbered components labeled 1 to 41 = Cyan
2 = Magenta
3 = Jaune
4 = Noir
Attention!
natural_image
Technical line drawing of a printer internal structure with red arrows indicating assembly or movement (no text or symbols present)natural_image
Technical line drawing of a multi-layered mechanical component with no visible text or symbolsnatural_image
Line drawing of a hand inserting a card into a device (no text or symbols)natural_image
Illustration of a hand using a tool to adjust or install electronic components (no text or symbols visible)natural_image
Technical line drawing of a mechanical assembly with internal components and directional arrows (no text or symbols)natural_image
Illustration of a hand using a tool to cut or remove a component, with a red arrow indicating the direction (no text or symbols present)natural_image
Line drawing of a printer's internal structure with red arrows indicating downward motion (no text or symbols)
text_image
Diagram of a multi-chamber electronic device with numbered components labeled 1 to 41 = Cyan
2 = Magenta
3 = Jaune
4 = Noir
natural_image
Technical line drawing of a mechanical component with an arrow indicating rotational motion (no text or symbols)natural_image
Illustration of a hand inserting a component into a computer drive (no text or symbols visible)natural_image
Diagram of a printer internal structure with a red arrow indicating a component (no text or symbols present)c. Fermez le capot.

natural_image
Technical line drawing of a computer RAM module with an arrow indicating a component (no text or symbols present)natural_image
Illustration of a printer's internal structure being inserted, showing hands operating the component (no text or symbols present)natural_image
Illustration of a hand pressing down on a printer's side panel with an upward arrow (no text or symbols)natural_image
Illustration of a hand inserting a device into a machine (no text or symbols visible)natural_image
Diagram of a printer drawer with an arrow indicating compression or disassembly (no text or symbols present)natural_image
Diagram of a printer's internal structure showing paper feeding into a tray with an arrow indicating orientation (no text or symbols present)natural_image
Line drawing of a printer with a hand operating the lid (no text or symbols)- Gently lower the scanner into place.
natural_image
Line drawing of an open industrial machine with a curved arrow indicating rotation (no text or symbols)Bac 1
natural_image
Diagram of a printer's internal structure showing the base frame and paper holder (no text or symbols)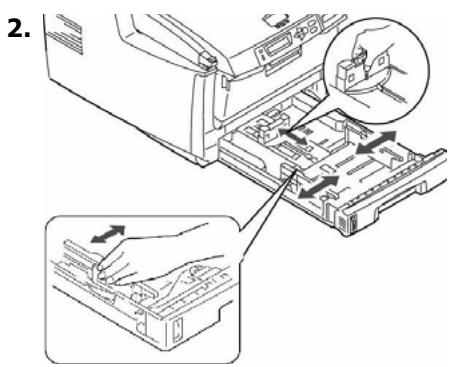
text_image
2.
text_image
3.
text_image
4.
natural_image
Illustration of a hand inserting a physical device into a rack, with an arrow indicating the direction (no text or symbols present)natural_image
Illustration of hands operating a printer with arrows indicating process (no text or symbols)
natural_image
Line drawing of a printer's internal structure showing paper feeding and printing (no text or symbols)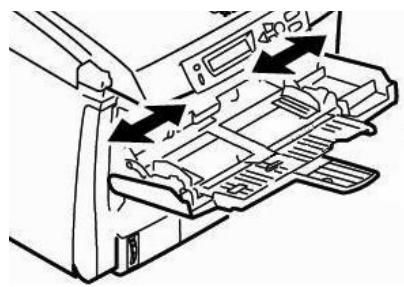
text_image
Diagram showing printer paper feeding into a printer with labeled arrows indicating process flowBac multifonction[MPT] (suite)
![OKI CX2033MFP - Bac multifonction[MPT] (suite) - 1](/content/2019/11/163183/images/611314731caf43ccb0f3a549d14351b699e260da8f937f1403f74829ac961e41.jpg)
text_image
4.![OKI CX2033MFP - Bac multifonction[MPT] (suite) - 2](/content/2019/11/163183/images/bba07d9d1d0e69b438936c88d63a7b54cc650aeb4f334a0d9d5f0c960bac4845.jpg)
text_image
5.natural_image
Diagram of a car interior showing a device being inserted into a seatbelt, with no visible text or symbols.Support spécial
Papier à en-tête
natural_image
Diagram of a printer's internal structure showing paper feeding into a printer (no text or symbols visible)natural_image
Technical line drawing of a printer or printer with a paper feeding into a slot (no text or symbols visible)natural_image
Line drawing of a robotic arm gripping a grid device (no text or symbols)natural_image
Line drawing of a printer with an arrow pointing to the paper (no text or symbols present)natural_image
Technical line drawing of a mechanical assembly with internal components and directional arrows indicating movement (no text or symbols)Maintenance
natural_image
Technical line drawing of a mechanical device with an inset showing a close-up of a component (no text or symbols present)
natural_image
Technical line drawing of an open mechanical device with a black arrow indicating rotation (no text or symbols)
natural_image
Technical illustration of a mechanical assembly with an inset showing a hand inserting a component into a housing (no text or symbols present)natural_image
Technical line drawing of a mechanical component with no visible text or symbolstext_image
Diagram showing a device being placed on a tray with labeled arrows and components, indicating motion or assembly.Importante!
natural_image
Illustration of a hand pressing down on a cylindrical device with red directional arrows indicating movement (no text or symbols)natural_image
Illustration of a hand holding a cylindrical device with a blue handle, emitting red motion arrows (no text or symbols)text_image
Diagram of a printer drawer with labeled parts and directional arrows indicating movement or flowMaintenance
Remplacement de la cartouche de toner (suite)
natural_image
Technical line drawing of a mechanical assembly or ladder system (no text or symbols)natural_image
Hand inserting a small object into a rack of shelves (no text or symbols visible)natural_image
Line drawing of a printer's front panel with a hand inserting a slot (no text or symbols)natural_image
Line drawing of an open industrial machine with a black arrow indicating rotation or assembly (no text or symbols)Maintenance (suite)
natural_image
Technical line drawing of a mechanical device with internal components and a directional arrow (no text or symbols)text_image
Diagram showing a hand inserting a component into a device with labeled parts and a numbered arrow indicating direction.natural_image
Line drawing of a printer with control panel and scroll arrow (no text or symbols)text_image
Diagram of a laptop with labeled parts, showing front and side views with arrows indicating direction.- Fermez le capot document.
natural_image
Line drawing of a printer with a scroll wheel and control panel (no text or symbols)natural_image
Line drawing of a printer with a hand operating the cover (no text or symbols)natural_image
Diagram of a mechanical component with internal structure and directional arrow (no text or symbols)natural_image
Technical line drawing of a mechanical component with red arrows indicating motion or force (no text or symbols)natural_image
Diagram of a vehicle interior with a mounted vehicle and directional arrows indicating motion (no text or symbols)MAILBOX UNAVAILABLE CHECK "TO" ADDRESS
LOAD SSS IN MP TRAY AND PRESS ON-LINE SWITCH
CHARGEZ SSS DANS BAC MF ET APPUYER SUR ONLINE
natural_image
Line drawing of a printer with paper feeders and control panel (no text or symbols)text_image
Technical line drawing of a printer with labeled parts 1 and 2natural_image
Line drawing of a printer with a scroll wheel and control panel (no text or symbols)natural_image
Line drawing of an open computer case with a red arrow indicating a component or feature (no text or symbols present)text_image
Diagram showing two document pages with horizontal lines and a curved arrow indicating rotation or refresh.Borde corto
text_image
Diagram showing two document pages with horizontal lines and a circular arrow indicating rotation or change.Especificaciones
Gramaje del papel
20 a 8 lb. US Bond (75 a 105 g/m ^4 ).
Nota
Si el papel de 20 o 24 lb. (75 a 90 g/m²)se dobla, utilice papel de 28 lb. (105 g/m²)
Alimentación papel
natural_image
Diagram of a printer's internal structure with an arrow indicating a component (no text or symbols present)natural_image
Diagram of a mechanical device with internal components and an arrow indicating rotation (no text or symbols)
text_image
Technical diagram of a mechanical device with labeled components and directional arrows indicating motion or movement.
natural_image
Technical line drawing of a mechanical component with no visible text or symbolsnatural_image
Line drawing of a printer with a hand operating the mode of the paper (no text or symbols present)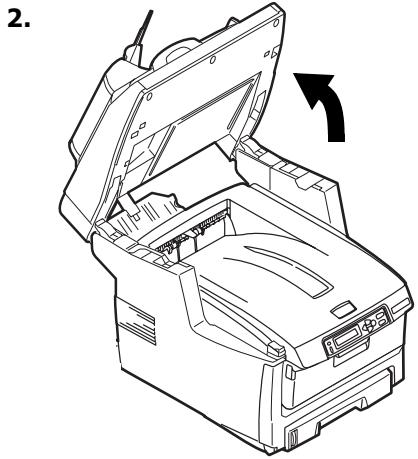
natural_image
Line drawing of an open industrial machine with a curved arrow indicating rotation (no text or symbols)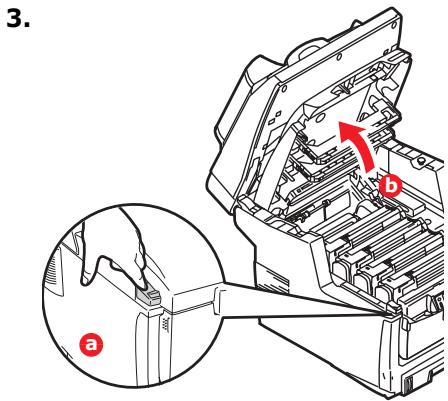
text_image
3. a btext_image
Diagram of a multi-chamber electronic device with numbered components labeled 1 to 41 = Cian
2 = Magenta
3 = Amarillo
4 = Negro
natural_image
Technical line drawing of a printer internal structure with red upward arrows indicating assembly or operation (no text or symbols present)natural_image
Technical line drawing of a mechanical assembly with multiple cylindrical components (no text or symbols)natural_image
Line drawing of a hand inserting a card into a device (no text or symbols)natural_image
Illustration of hands operating a printer or scanner device with a tool, no text or symbols visiblenatural_image
Technical line drawing of a mechanical device with internal components and directional arrows indicating movement (no text or symbols)natural_image
Illustration of a hand using a tool to cut or adjust a component on a surface, with a red arrow indicating the process (no text or symbols present)natural_image
Technical line drawing of a printer internal structure with red arrows indicating downward motion (no text or symbols present)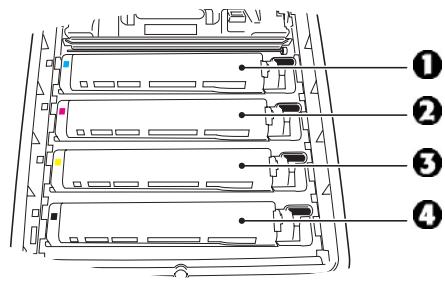
text_image
Diagram of a multi-chamber computer rack with numbered labels pointing to different compartments or ports.1 = Cian
2 = Magenta
3 = Amarillo
4 = Negro
natural_image
Technical line drawing of a mechanical component with an arrow indicating rotational motion (no text or symbols)natural_image
Illustration of a hand inserting a component into a computer drive (no text or symbols visible)b. Retire el papel.
natural_image
Diagram of a printer printer with a red arrow pointing to the printer cover (no text or symbols present)c. Cierre la tapa.

natural_image
Technical line drawing of a computer chassis with an arrow indicating a component (no text or symbols present)natural_image
Illustration of a printer's internal structure being inserted, showing hands operating the component (no text or symbols present)natural_image
Illustration of a hand pressing down on a printer's side panel with an upward arrow (no text or symbols)natural_image
Illustration of a printer's internal structure with hands inserting a component (no text or symbols visible)natural_image
Diagram of a printer's internal structure showing a tray and base with an arrow indicating direction (no text or symbols present)- Cerrar la bandeja.

natural_image
Technical line drawing of a printer or printer with an arrow indicating a component (no text or symbols present)natural_image
Line drawing of a printer with a hand inserting a component (no text or symbols)natural_image
Line drawing of an open industrial machine with a black arrow indicating rotation (no text or symbols)natural_image
Technical line drawing of a printer drawer with an arrow indicating motion (no text or symbols present)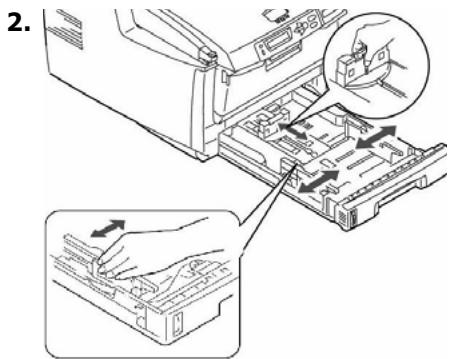
text_image
2.
natural_image
Illustration showing two hand-drawn steps: one folding a sheet with arrows indicating direction, the other holding a document with arrows indicating rotation (no text or symbols present)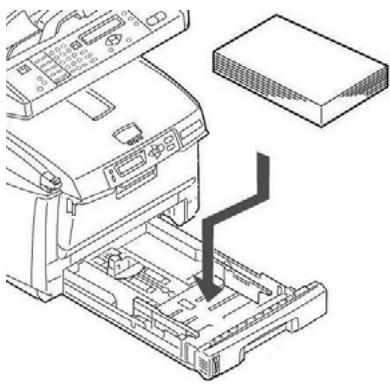
natural_image
Technical line drawing of a printer assembly with a paper box inserted (no text or symbols visible)
natural_image
Illustration of a hand inserting a device into a rack, with an arrow indicating the process (no text or symbols present)natural_image
Illustration of hands operating a printer with arrows indicating process (no text or symbols)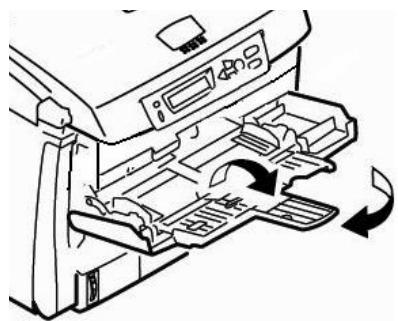
natural_image
Diagram of an HP printer internal structure showing paper feed, print tray, and scroll wheel (no text or labels)
natural_image
Line drawing of a printer's internal structure showing mode shift and page layout (no text or symbols)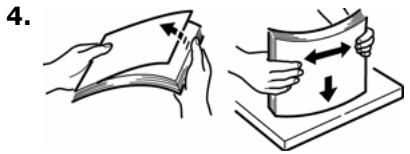
text_image
4.
text_image
5.natural_image
Diagram showing a hand pressing down on a device component with a black arrow indicating downward motion (no text or symbols present)Medios especiales
Papel membrete
natural_image
Diagram of a printer's internal structure showing paper feeding into a slot (no text or symbols)natural_image
Diagram of a printer's internal structure showing paper feeding into a slot (no text or symbols)natural_image
Line drawing of a printer's internal structure with no visible text or symbolsnatural_image
Line drawing of a printer with a paper feed and control panel, showing no text or symbols on the device itself.natural_image
Technical line drawing of a mechanical assembly with internal components and directional arrows (no text or symbols)Mantenimiento
natural_image
Technical line drawing of a mechanical device with an inset showing a hand pressing a button (no text or symbols present)
natural_image
Technical line drawing of a mechanical device with an open lid and internal compartments, showing a right-hand arrow (no text or symbols present)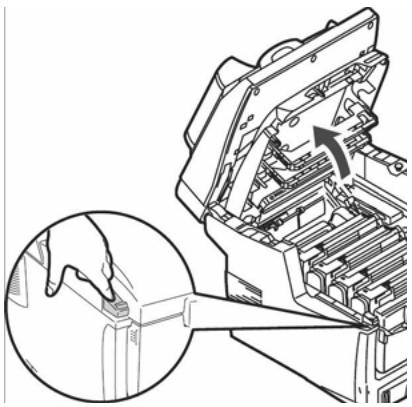
natural_image
Technical line drawing of a mechanical assembly with an inset showing a hand inserting a component (no text or symbols present)text_image
Technical diagram of a mechanical assembly with numbered components labeled 1 to 41 = Cian
2 = Magenta
3 = Amarillo
4 = Negro
iImportante!
natural_image
Technical line drawing of a mechanical component with no visible text or symbolstext_image
Diagram showing a printer or scanner with labeled directional arrows (① and ②) indicating movement or orientation.iImportante!
natural_image
Illustration of a hand pressing down on a cylindrical device with red directional arrows indicating motion (no text or symbols)- Retire la cinta.

natural_image
Illustration of hands holding a cylindrical device with red arrows indicating motion or force (no text or symbols)text_image
Diagram of a printer drawer with labeled parts and directional arrows indicating movement or flowMantenimiento
natural_image
Technical line drawing of a mechanical assembly with no visible text or symbolsnatural_image
Hand holding a tool interacting with stacked electronic components (no text or symbols visible)natural_image
Line drawing of a printer with a hand inserting a component (no text or symbols)natural_image
Line drawing of an open industrial machine with a black arrow indicating rotation (no text or symbols)natural_image
Technical line drawing of a mechanical device with internal components and a directional arrow (no text or symbols)text_image
Diagram showing a hand inserting a component into a device with labeled parts and a numbered arrow indicating direction.natural_image
Line drawing of a printer with control panel and scroll arrow (no text or symbols)text_image
Diagram of an open laptop with labeled parts and directional arrows indicating assembly or movement.natural_image
Line drawing of a printer with control panel and scroll wheel (no text or symbols)Mantenimiento
natural_image
Line drawing of a printer's internal structure with a hand adjusting the top panel (no text or symbols)natural_image
Technical line drawing of a mechanical component with no visible text or symbolsnatural_image
Diagram of a vehicle interior with a moving cart and directional arrows indicating movement (no text or symbols)natural_image
Diagram showing a vehicle on a ramp with red arrows indicating motion or force, no text or symbols present- Cierre la cubierta del ADF.
MAILBOX UNAVAILABLE CHECK "TO" ADDRESS
EEE:YYY MEDIA NO COINCIDE
420: MEMORY OVERFLOW
AÑADE MEMORIA
420: DESBORDE MEMORIA
natural_image
Line drawing of a printer with paper feeders and control panel (no text or symbols)text_image
Technical diagram of a printer with labeled parts, showing internal structure and component layouttext_image
1 2 3 4 5 6 7 8 9 100% 25% 50% 70% (A4 ▶ A5) 141% (A5 ▶ A4) 200% 25% 400% %+ %- 1 2 3 ABC DEF 4 5 6 GHI IHL MINI 7 8 PORS TUV WIST × 0 # CD ?/+? DIGIAL CLEAR PAUSE1 Função de Zoom
natural_image
Line drawing of a printer with control panel and scroll arrow (no text or symbols)- Posicione o documento virado para baixo, com a borda superior à esquerda.
natural_image
Line drawing of an open laptop with a red arrow pointing to the screen area (no text or symbols)- Feche a tampa do scanner.
text_image
Two document pages with placeholder text and a circular arrow indicating refresh or update.Borda curta

text_image
Diagram showing two document pages with horizontal lines and a rotation arrow indicating rotation.Especificações
Gramatura do papel
20 a 28 lb. US Bond (75 a 105 g/m ^4 ).
Nota
natural_image
Technical line drawing of a printer or printer with a paper feeding into the cover (no text or symbols visible)natural_image
Diagram of a mechanical device with internal components and an arrow indicating rotation (no text or symbols)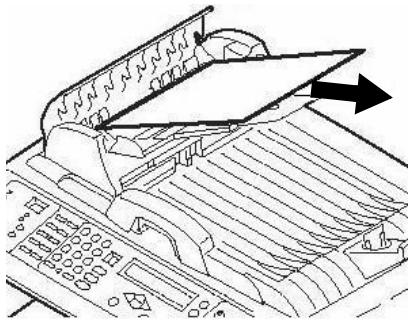
text_image
Technical diagram of a mechanical device with labeled components and directional arrows indicating motion or movement.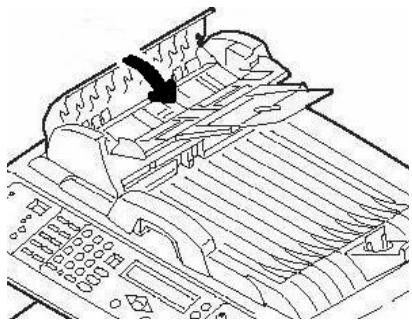
natural_image
Technical line drawing of a mechanical component with arrows indicating motion or force direction (no text or symbols)natural_image
Line drawing of a printer with a hand inserting a cable into it (no text or symbols present)
natural_image
Line drawing of an open industrial machine with a curved arrow indicating rotation (no text or symbols)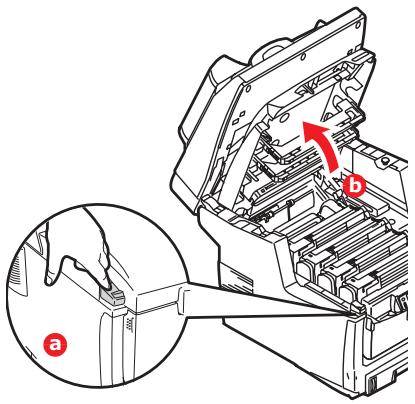
text_image
Technical diagram of a mechanical assembly with labeled parts and an inset view showing a hand holding a tool.Atenção!
text_image
Diagram of a multi-chamber electronic device with numbered components labeled 1 to 41 = Ciano
2 = Magenta
3 = Amarelo
4 = Preto
Atenção!
natural_image
Technical line drawing of a printer internal structure with red upward arrows indicating assembly or movement (no text or symbols present)natural_image
Technical line drawing of a mechanical assembly with multiple cylindrical components (no text or symbols)natural_image
Line drawing of a hand inserting a card into a device (no text or symbols)natural_image
Illustration of hands operating a printer or scanner device with a tool, no visible text or symbolsnatural_image
Technical line drawing of a mechanical device with internal components and directional arrows indicating movement (no text or symbols)natural_image
Illustration of a hand using a tool to cut or remove material from a mechanical component, with a red arrow indicating the process (no text or symbols present)natural_image
Technical line drawing of a printer internal structure with red arrows indicating downward motion (no text or symbols present)
text_image
Diagram of a rack-mounted device with numbered components labeled 1 to 41 = Ciano
2 = Magenta
3 = Amarelo
4 = Preto
natural_image
Technical line drawing of a mechanical component with an arrow indicating rotational motion (no text or symbols)natural_image
Illustration of a hand inserting a component into a computer drive (no text or symbols visible)natural_image
Diagram of a printer internal structure with a red arrow indicating a component (no text or symbols present)c. Feche a tampa.

natural_image
Technical line drawing of a computer drive or chassis with an arrow indicating a component (no text or symbols present)natural_image
Illustration of a hand inserting a device into a rack (no text or symbols visible)- Remova todo o papel atolado.
natural_image
Illustration of hands operating a printer with an upward arrow indicating motion (no text or symbols present)- Feche a tampa frontal.
natural_image
Illustration of a printer's internal structure with hands inserting a component (no text or symbols visible)- Puxe a bandeja para papel para fora e retire todo o papel atolado.

natural_image
Diagram of a printer's internal structure showing a tray and base with an arrow indicating direction (no text or symbols present)- Feche a bandeja.
natural_image
Technical line drawing of a printer or printer with an arrow indicating a component (no text or symbols present)natural_image
Line drawing of a printer with a hand inserting a component (no text or symbols)natural_image
Line drawing of an open industrial machine with a curved arrow indicating rotation (no text or symbols)natural_image
Illustration of a hand inserting a physical device into a machine (no text or symbols visible)natural_image
Illustration of hands operating a printer with arrows indicating process (no text or symbols)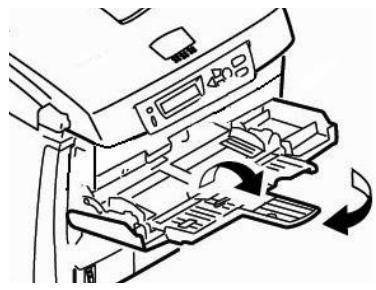
natural_image
Line drawing of a printer's internal structure showing paper feed, print tray, and paper holder (no text or symbols)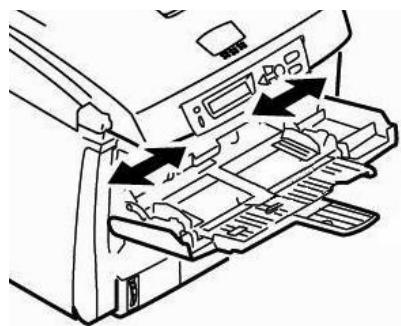
natural_image
Line drawing of a printer's internal structure showing mode shift and page layout (no text or symbols)Bandeja multiusos [MPT] (cont.)
![OKI CX2033MFP - Bandeja multiusos [MPT] (cont.) - 1](/content/2019/11/163183/images/39ffefd74dc6a663fa540d6631115b9391b20cc90a5d2e459e55969c33c3420c.jpg)
natural_image
Illustration showing two hand-drawn diagrams: one with a folded paper and arrow, the other holding a document with arrows (no text or symbols)![OKI CX2033MFP - Bandeja multiusos [MPT] (cont.) - 2](/content/2019/11/163183/images/71fd41676d261f19cacb78961843cbce4e518623d3c99b60c8be04c8e8865cc0.jpg)
natural_image
Diagram showing a printer with an arrow pointing to a device panel, and a magnified inset of the device (no text or symbols present)natural_image
Diagram showing a device being inserted into a container with a black arrow indicating the process (no text or symbols present)natural_image
Technical line drawing of a printer's internal structure with an arrow indicating a loading or movement (no text or symbols present)natural_image
Diagram of a printer's internal structure showing paper feeding into a slot (no text or symbols)natural_image
Line drawing of a printer's front panel and paperboard (no text or symbols)natural_image
Line drawing of a printer with control panel and paperclip, no text or symbols presentnatural_image
Technical line drawing of a mechanical assembly with internal components and directional arrows indicating movement (no text or symbols)Manutenção
Troca do cartucho de toner
natural_image
Technical line drawing of a mechanical device with an inset showing a hand pressing a button labeled '1' (no text or symbols present)
natural_image
Line drawing of an open industrial machine with a directional arrow indicating rotation (no text or symbols)
natural_image
Technical line drawing of a mechanical assembly with an inset showing a hand holding a tool (no text or symbols present)natural_image
Technical line drawing of a mechanical component with no visible text or symbols- Retire o cartucho de toner usado.
text_image
Diagram showing a device being shifted with labeled arrows, indicating motion or rotation direction.Importante!
natural_image
Illustration of a hand pressing down on a cylindrical device with red directional arrows indicating movement (no text or symbols)- Retire a fita.
natural_image
Illustration of hands holding a cylindrical device with red arrows indicating motion or force (no text or symbols)- Instale o cartucho de toner na impressora.

text_image
Diagram of a printer drawer with labeled parts and directional arrows indicating movement or flownatural_image
Technical line drawing of a mechanical component with no visible text or symbolsnatural_image
Hand holding a tool interacting with stacked books or documents (no visible text or symbols)natural_image
Line drawing of a printer's front panel with a hand inserting a slot (no text or symbols)natural_image
Line drawing of an open industrial machine with a black arrow indicating rotation (no text or symbols)Manutenção
Limpeza dos roletes e do bloco separador do AAD
natural_image
Diagram of a mechanical device with internal components and directional arrow (no text or symbols)text_image
Technical diagram showing a hand operating a mechanical component with labeled parts and a numbered arrow indicating direction.natural_image
Line drawing of a printer with control panel and scroll arrow (no text or symbols)text_image
Diagram of a laptop with labeled parts and directional arrows indicating assembly or navigationnatural_image
Line drawing of a printer with a scroll wheel and control panel (no text or symbols)Manutenção
natural_image
Line drawing of a printer's internal structure with a hand adjusting the top panel (no text or symbols)natural_image
Technical line drawing of a mechanical component with no visible text or symbolsnatural_image
Diagram of a vehicle interior with a moving cart and directional arrows indicating movement (no text or symbols)natural_image
Diagram showing a vehicle on a roof with red arrows indicating motion or force direction (no text or symbols)- Feche a tampa do ADA.
Mensagens de erro
Cartuchos de toner & Atolamentos de papel
MAILBOX UNAVAILABLE CHECK "TO" ADDRESS
CAIXA DE CORREIO INDISPONÍVEL VERIFICAR ENDEREÇO "TO" (PARA)
LOAD SSS IN MP TRAY AND PRESS ON-LINE SWITCH
CARREGAR SSS NA BANDEJA MF E PRESSIONE O BOTÃO ONLINE
- EEE = 310: Tampa superior
- EEE = 311: Tampa frontal