
MPS930B - Multifunction Printer OKI - Free user manual and instructions
Find the device manual for free MPS930B OKI in PDF.
| Product type | Monochrome multifunction printer |
| Brand | OKI |
| Model | MPS930B |
| Dimensions (W x D x H) | 620 x 680 x 850 mm |
| Weight | approx. 65 kg |
| Power supply | 220-240 V, 50/60 Hz |
| Power consumption | 800 W printing, 20 W standby |
| Print speed | up to 38 ppm (A4) |
| Print resolution | 1200 x 1200 dpi |
| Supported paper sizes | A3, A4, A5, Letter, Legal, Tabloid, Envelopes, Postcards |
| Paper tray capacity | Trays 1 and 2: 500 sheets each; Multipurpose tray: 100 sheets; High-capacity feeder: 2000 sheets |
| Main functions | Printing, copying, scanning, automatic duplex, stapling, punching |
| Maintenance and cleaning | Clean rollers, empty punch waste bin, replace toner and drum cartridges |
| Safety | PIN password lock, emergency stop, electrical shock precautions |
| Spare parts and repairability | Toner cartridges, drum, staples, fuser unit, rollers, maintenance kit (300,000 pages) |
| General information | LCD screen, control panel with keys, options: finisher unit, high-capacity feeder, tabloid tray |
Frequently Asked Questions - MPS930B OKI
User questions about MPS930B OKI
0 question about this device. Answer the ones you know or ask your own.
Ask a new question about this device
Download the instructions for your Multifunction Printer in PDF format for free! Find your manual MPS930B - OKI and take your electronic device back in hand. On this page are published all the documents necessary for the use of your device. MPS930B by OKI.
USER MANUAL MPS930B OKI
Loading Trays 1 & 2. 9
Loading the MPT Tray. 11
Loading the HCF Tray. 13
Jams 16
Trays 1-2 17
Multi-Purpose Tray (MPT) 19
High Capacity Feeder Tray 21
Additional Jam Locations 23
Finisher 33
Troubleshooting 36
Replacement Supplies 42
Service & Support. 43
Table des matieres
Service et support 84
Contidente
Generalidades de la
Impresora 85
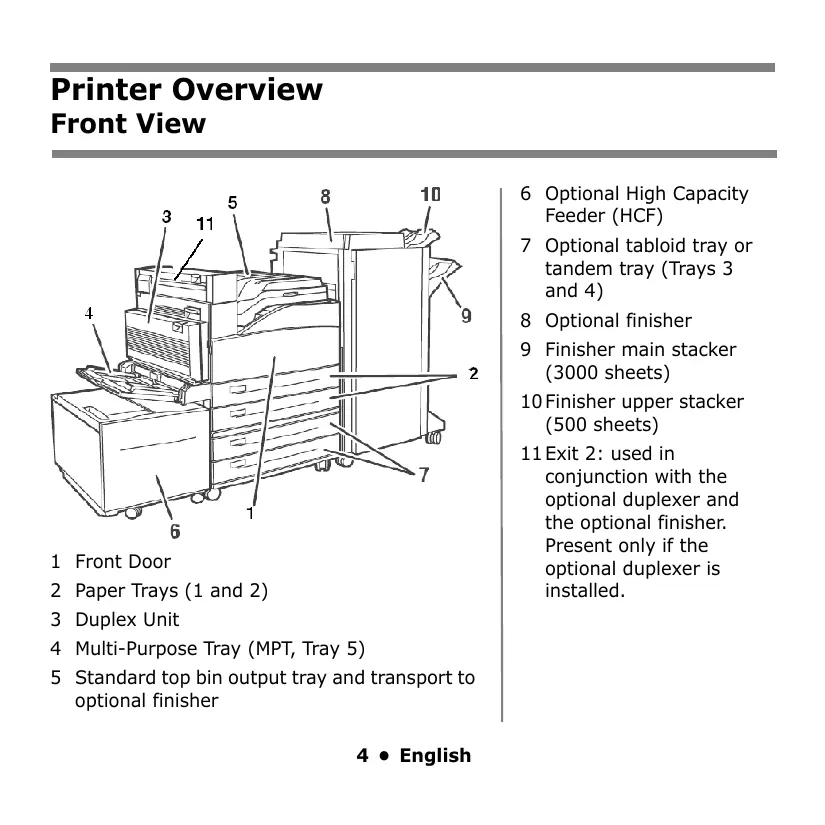
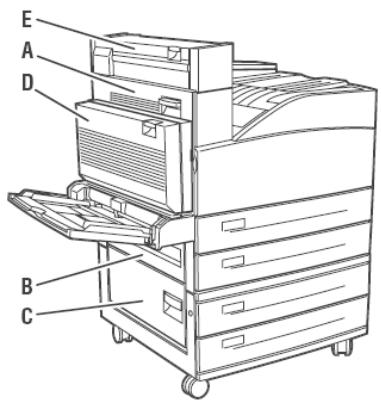
1 Front Door
2 Paper Trays (1 and 2)
3 Duplex Unit
4 Multi-Purpose Tray (MPT, Tray 5)
5 Standard top bin output tray and transport to optional finisher
6 Optional High Capacity Feeder (HCF)
7 Optional tabloid tray or tandem tray (Trays 3 and 4)
8 Optional finisher
9 Finisher main stacker (3000 sheets)
10 Finisher upper stacker (500 sheets)
11 Exit 2: used in conjunction with the optional duplexer and the optional finisher. Present only if the optional duplexer is installed.
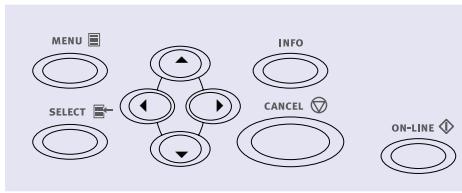
Printer Overview Operator Panel Overview

READY light
Off: printer is idle
On: printer is active
Blinking: printer is waiting, processing
ATTENTION light
Off: no error
On: there is an error requiring user intervention
CANCEL Button
Cancel a print job.
ON-LINE Button
Toggles the printer on-line and offline.
MENU Button
Press to enter or exit the menu.
SELECT Button
Press to select the Menu or Submenu shown on the second line of the display or choose and save the setting shown on the second line of the display.
NEXT/PREVIOUS Buttons
Press to move to the Next () or Previous () Menu, Submenu, or Setting within the same level of the menu structure.
FORWARD/BACK Buttons
Press to move Forward (▶) or Back (▲) one level in the menu structure to the menu shown on the first line of the display.
Printer Overview Basic Operator Panel Functions
Print a Summary of the Printer's Settings
Press the Info button on the Operator Panel to print a configuration summary including:
- Status of menu options
Media selections in trays - Installed options
Cancel a Print Job at the Printer
At the Operator Panel:
- Press the Cancel button.
- Press the On-line button.
Note that pages that are printing at the moment will finish printing.
Reset Printer to Factory Defaults
At the Operator Panel:
- Press Menu.
- Press Next (▲) until Maintenance Menu is displayed.
- Press Select. You may be prompted to enter a password.
- Press Forward (▶) until Menu Reset is displayed.
- Press Select to reset the menus to their factory defaults (i.e., "execute").
- Press Menu. The printer resets and goes back to the Ready to Print state.
Using the Printer Menu
Changing Settings
B93On
NETWORK MENU

ON-LINE
- Press Menu.
- Press Next (▲) and Previous (▼) to scroll through the menus until the one you want is displayed.
- Press Select.
- Press Forward (▶) and Back (←) to cycle through the submenus for the selected menu until the one you want is displayed.
- Press Select.
-
Press Next () and Previous () to scroll through the options until the one you want is displayed.
-
Press Select.
An asterisk appears next to the setting. - To exit Menu mode, press 3 or press the Menu button.
Note: If there is a conflict between settings in the menu, Printing Preferences, or Embedded Web Server and printer settings set via your application, the application settings supersede any other setting.
Using the Printer Menu
Entering a Pin Number
How to Enter a Pin Number at the Operator Panel
- Press Menu. Press Next (▲) until the Print Jobs menu is displayed. Press Select.
- Press Forward (▶). You are prompted to enter a pin number.
- Use Next () and Previous () to specify the first digit in the pin number, then press Forward () to enter the digit.
-
Repeat step 3 until all digits are entered. Press Select.
-
Press Next (▲) until the Print Menu is displayed. Press Select.
- Press Next (▲) until your document is displayed. Press Select.
- To print the document: Press Next () to specify the number of copies. Press Select to print.
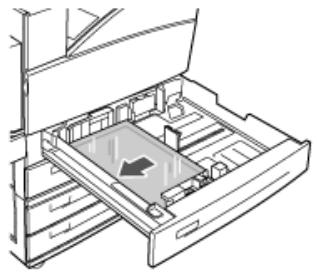
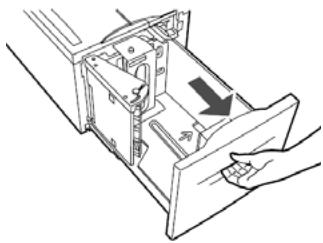
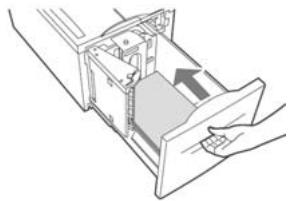
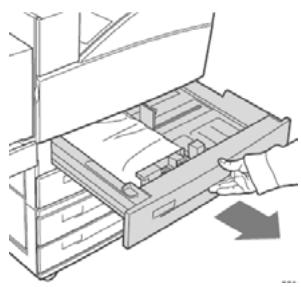
Print Media Loading Trays 1 & 2
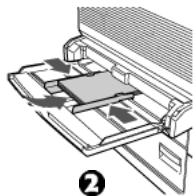
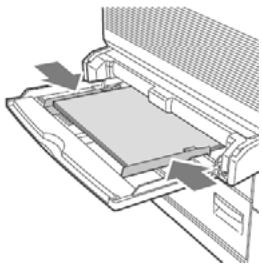
Loading Media in Trays 1-2
1.
2.
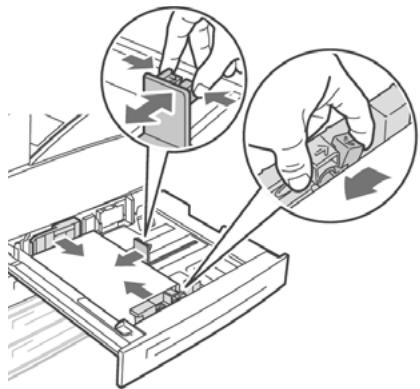
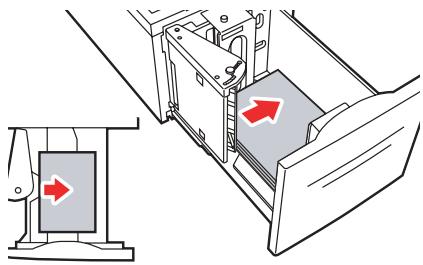
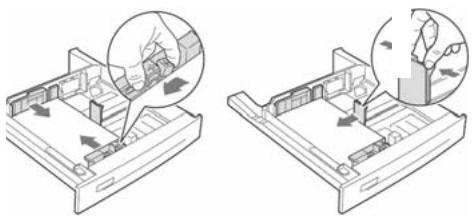
Note: Put side to be printed face up.
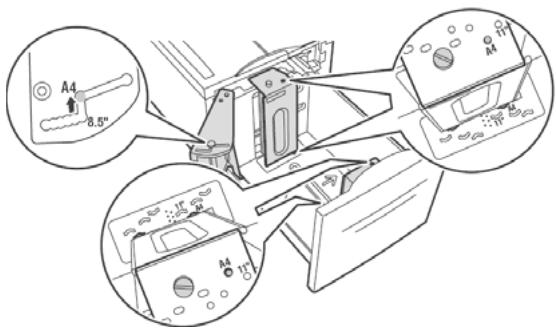
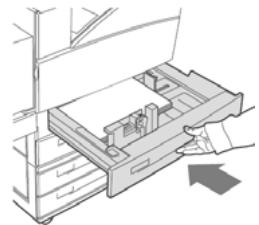
- Slide the paper tray back into the machine. If custom sizes of paper are used, make the appropriate changes in your Printer Properties and at the Operator Panel as needed.
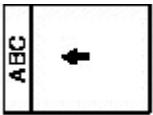
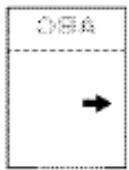
For Letterhead stationery:
Long edge feed—face up, top toward the front of the printer.
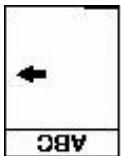
Short edge feed face up, top to the left:
Print Media Loading Trays 1 & 2 (cont.)
For Transparency:
Long edge feed—face up, top toward the front of the printer.
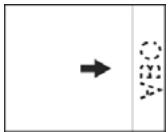
For Labels:
Insert the label sheets long-edge feed and face up. Place the top of the label page toward the front of the printer.

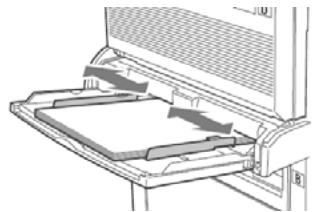
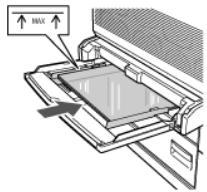
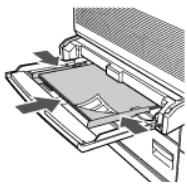
Print Media Loading the MPT Tray
Loading the MPT Tray (Tray 5)
1.

2.
3.

- Insert paper print side down. If necessary, adjust the paper guides to the size of the paper.
For Letterhead Stationery (Letter, A4 or B5):
Long edge feed—aim the top toward the back of the printer:
Short edge feed—aim the top into the printer:

11 • English
Print Media
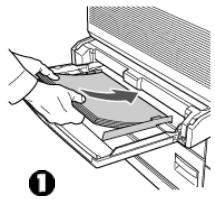
Loading the MPT Tray (cont.)
For Transparency:
Long-edge feed and print side face down.
For Labels:
Insert the label sheets long-edge feed and face down. Place the top of the page toward the front of the printer.
For Envelopes:
Flap side up, aimed into the printer:
Place postcards face down.
1 = Large postcards, long edge feed.
2 = Small postcards, short edge feed.
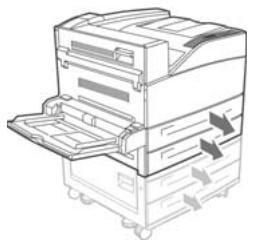
Print Media Loading the HCF Tray
Loading the Optional High Capacity Feeder (HCF)
1.
- If loading paper with a different width or length, adjust the paper guides.

Print Media
Loading the HCF Tray (cont.)

3.
4.
For Letterhead stationery:
Long edge feed—face down, top toward the front of the printer.
Short edge feed face down, top to the left:
Print Media
Loading the HCF Tray (cont.)
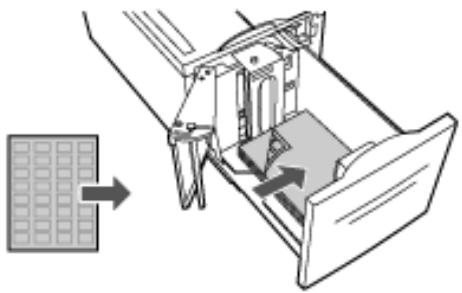
For Labels:
Insert the label sheets long-edge feed and face down. Place the top of the page toward the front of the printer.
Jams
In General
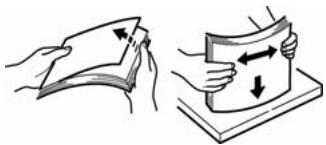
If you are experiencing frequent paper jams, check the following items:
- Is the printer level?
- Is the media you are using within specification? Media that is too light or too heavy will often cause jams.
- Are the settings (printer and driver) appropriate for the media being used?
- Do not use creased or curled media.
- Remove the media from the tray. Fan and align the stack. Replace the media.
CAUTION!
To avoid electric shock, never touch areas labelled "High Voltage."
To avoid burns, never touch a labelled area found on or near the heat roller.
If a sheet of paper is wrapped around the heat roller, to avoid injuries or burns, do not try to remove it by yourself. Switch off the machine immediately and contact your service provider.
Components inside doors may be hot.
Note:
For more information, see the on-line User's Guide on the Documentation CD.
Jams
Trays 1-2
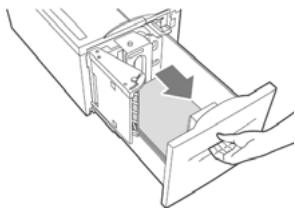
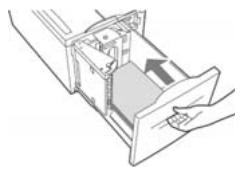
Jam in Trays 1-2
- Pull out the tray specified on the Operator Panel.
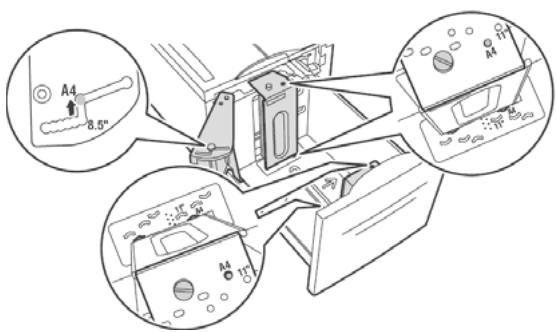
- Verify that the length and width guides are pressed against the paper
- Push the tray completely into the printer. Specify the size of the paper in the Operator Panel.
Jams
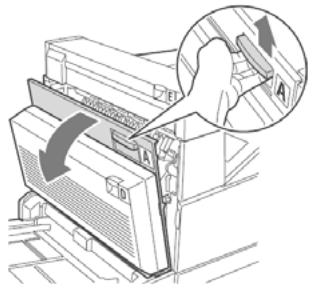
Trays 1-2 (cont.)
- Open Door A.

- Pull the jammed paper out of the printer. Press the green handle to make paper easier to remove. Be
sure that all paper fragments are removed.
- Close Door A.
Jams
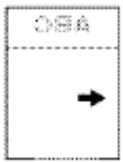
Multi-Purpose Tray (MPT)
Jam in MPT (Tray 5)
- Verify that the width guides are pressed against the paper.
- If the paper size and type shown on the display match the size and type of the paper in the tray, press the ON-LINE button.
If the paper size shown on the display does not match the size of the paper in the tray, change the setting in the printer menu.
- Open Door A.

Jams
Multi-Purpose Tray (cont.)
- Pull the jammed paper out of the printer. Press the green handle to make the paper easier to remove. Be sure that all paper fragments are removed.

- Close Door A.
Jams
High Capacity Feeder Tray
Jam in HCF (Tray 6)
- Pull out the HCF tray.
- Verify that the paper guides are set correctly.

21 • English
Jams
High Capacity Feeder Tray
- Push the tray back in.
- Specify the size of the paper in the Operator Panel using the Media Menu.
- Open Door A.
- Pull jammed paper out of the printer. Press the green handle to make paper easier to remove. Be sure that all paper fragments are removed.
- Close Door A.
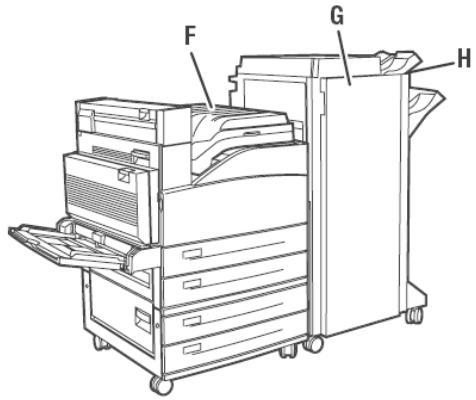
This diagram shows the possible jam locations when used with all the optional equipment.
Jams
Additional Jam Locations
See the following pages for explanations of how to clear jams at each of these locations.
Jams
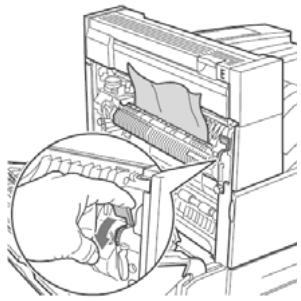
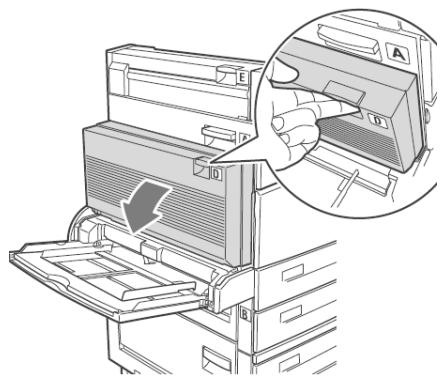
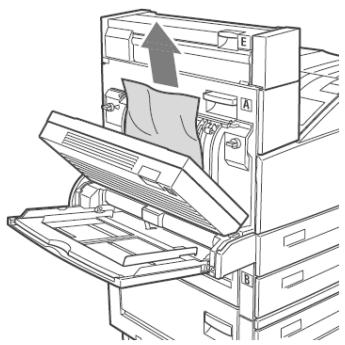
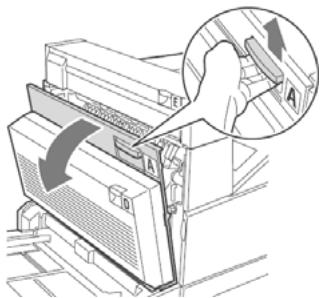
Jam at Location "A"
Jam at A
- Open Door A.
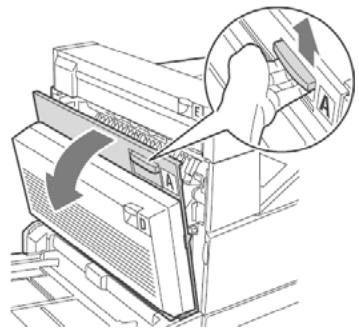
- Pull the jammed paper out of the printer. If necessary, press the green handle to make paper easier
to remove. Be sure that all paper fragments are removed.
- Close Door A.
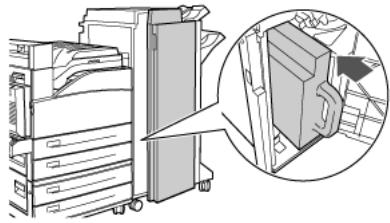
Jams
Jam at Location "B"
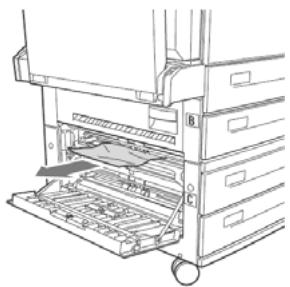
Jam at B
- If your printer has the optional HCF (Tray 6), slide it away from the printer.
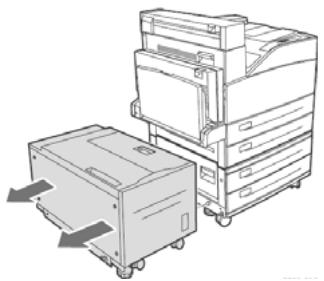
- Open Door B.
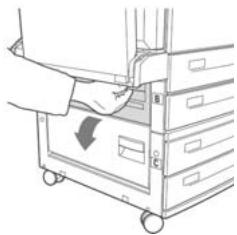
- Pull the jammed paper out of the printer. Be sure that all paper fragments are removed.
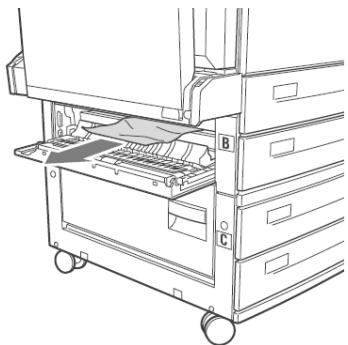
- Close Door B.
- If your printer has an HCF, slide it back in until it latches with the printer.
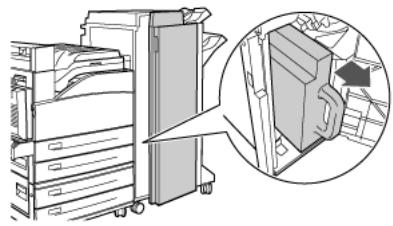
Jams
Jam at Location "C"
Jam at C
- If your printer has the optional HCF (Tray 6), slide it away from the printer.
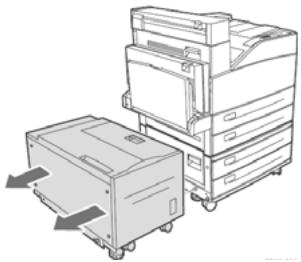
- Open Door C.
- Pull the jammed paper out of the printer. Be sure that all paper fragments are removed.
- Close Door C.
- If your printer has the optional HCF, slide it back in the printer until it latches with the printer.
Jams
Jam at Location "D"
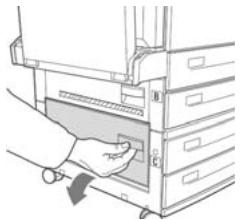
Jam at D
- Open Door D.
- Pull the jammed paper out of the printer. Be sure that all paper fragments are removed.
- Close Door D.
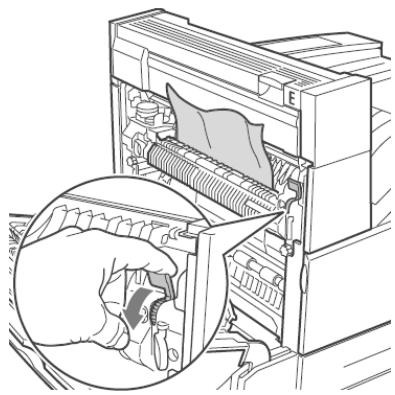
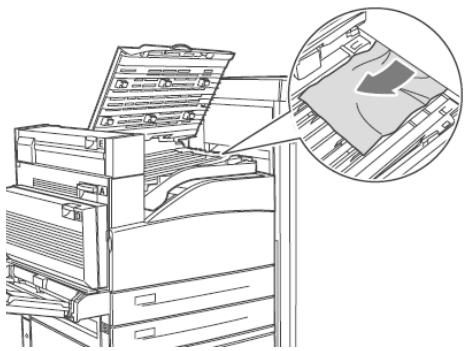
Jams
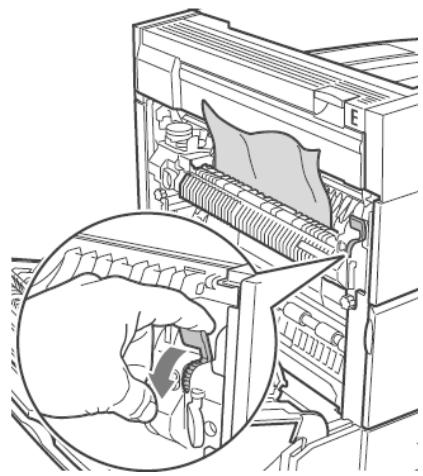
Jam at Location "E"
Jam at E
- Open Door A.
- Open Door E.
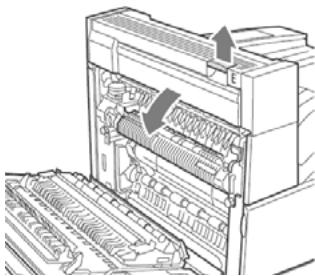
- Pull the jammed paper out of the printer. Press the green handle to make paper easier to remove. Be sure that all paper fragments are removed.
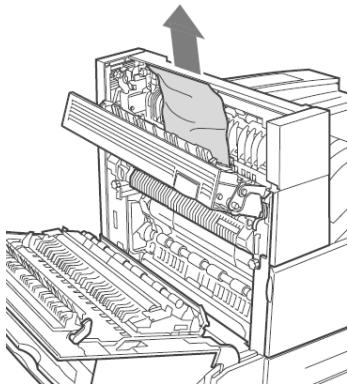
- Close Door E.
- Close Door A.
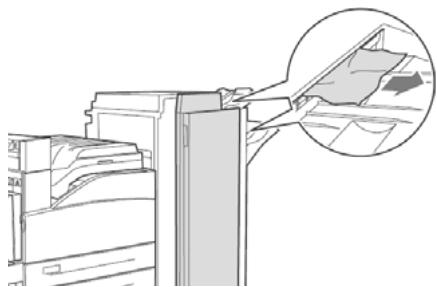
Jams
Jam at Location "F"
Jam at F
- Open Door F.
- Pull the jammed paper out of the printer. Be sure that all paper fragments are removed.
- Close Door F.
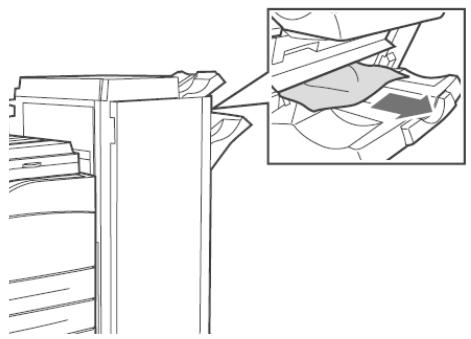
Jams
Jam at Location "G"
Jam at G (Optional Finisher)
- If visible, pull the jammed paper out of the stacker upper tray
- Open Door G.
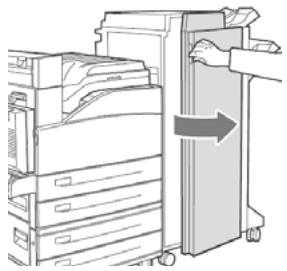
- Depending on the instructions shown on the display, open handle 2a, handle 2b, or handle 3 as shown on the instruction labels.
- Note: If the stapler is in the way, slide the stapler toward you, then to the right.
- If you opened handle 2a or handle 2b, rotate knob 2c counter clockwise as needed.
- Pull the jammed paper out of the printer. Be sure that all paper fragments are removed.
- Close the handles that were opened
- Close Door G.
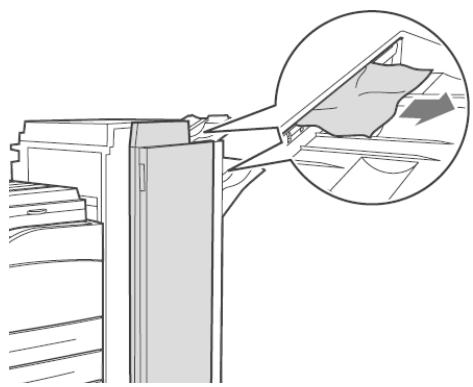
Jams
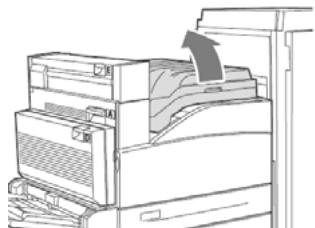
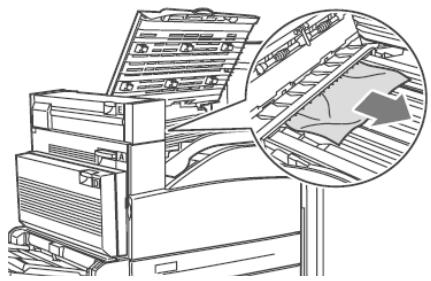
Jam at Location "H"
Jam at H (Optional Finisher)
- Lift Door H.
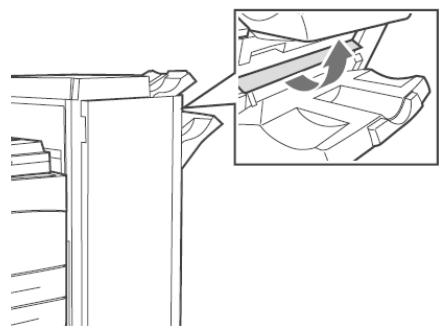
- Pull the jammed paper out of the printer. Be sure that all paper fragments are removed.
- Close Door H.
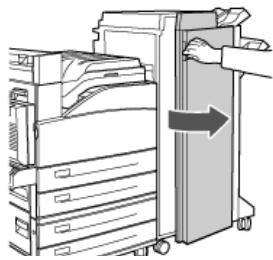
Jams
Jam at the Stacker Upper Tray
Jam at the Stacker Upper Tray (Optional Finisher)
- Pull the jammed paper out of the stacker upper tray.
- Open Door G and pull the jammed paper out of the printer.
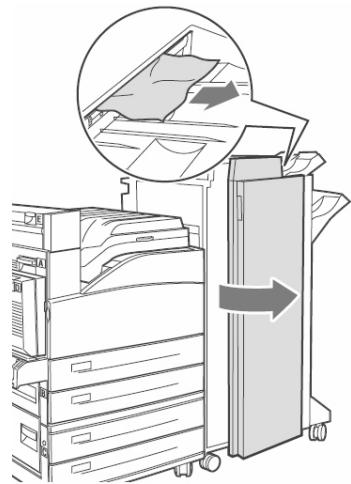
- Close Door G.
Finisher
Using the Stapler
Note
Applies only to units equipped with the optional finisher.
Staple Options
There are four staple options:
None (the default)
Top, 1 staple
PORTRAIT


LANDSCAPE
Bottom, 1 staple
PORTRAIT


LANDSCAPE
Dual, 2 staples
PORTRAIT


LANDSCAPE
Adding Staples
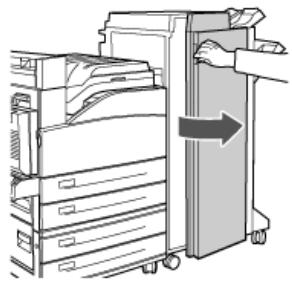
- Open Door G.
- Slide the stacker toward you, then to the right.
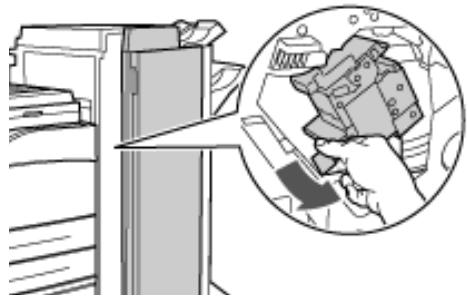
Finisher Using the Stapler
- Remove the staple unit by lifting it up and out.
- If present, remove the depleted staple cartridge.
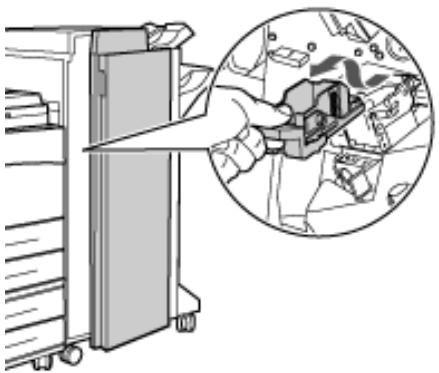
-
Insert new staple cartridge.
-
Insert staple unit into finisher.
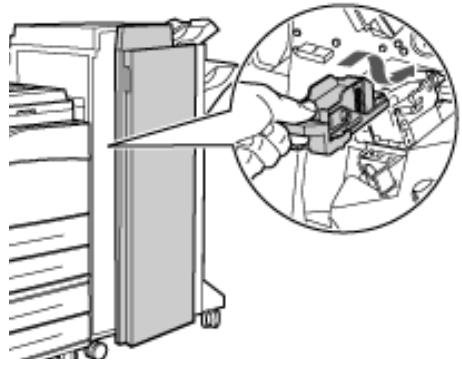
- Close Door G.
For more information, see the on-line User's Guide on the Documentation CD provided with your printer or at http://my.okidata.com.
Finisher
Using the Hole Puncher
The optional Finisher has a hole puncher. When the printer detects that the punch waste box is full, a warning appears on the display.
Printing will continue - punching will not.
For more information, see the on-line User's Guide on the Documentation CD.
Emptying the Punch Waste Basket
- Open Door G.
- Remove the Punch Waste Box and empty the contents.
- Place the Punch Waste Box back in the Finisher.
- Close Door G.
Troubleshooting
Print Problems
Some common print problems and possible causes are described below. For more troubleshooting information, see the on-line User's Guide on the Documentation CD provided with your printer or at http://my.okidata.com
Light Print

Overall image is lighter than normal.
- Paper may be damp.
- You may be using Draft mode.
- The toner level may be low.
- Drum cartridge near end of life.
BlackPrints

Entire page is printed black.
- The drum cartridge may be defective.
- Printable data from the computer may be corrupted.
Troubleshooting Print Problems (cont.)
BlankPrints

Entire page is blank with no visible print.
- If you just installed a new drum cartridge, the yellow sealing tape may still be in place.
- Multiple sheets may have been fed from the paper tray at the same time.
- Printable data may not have been received from the computer.
Horizontal, Vertical Line Deletions
There are areas of print deletions that appear across the paper; there are areas of print deletions that form narrow lines.
- The drum cartridge may not be installed correctly.
- The drum cartridge may be defective or at the end of its life.
- The transfer roller may be defective.
Troubleshooting Print Problems (cont.)
Horizontal Dark Streaks
There are black lines that appear horizontally on the page.
- The drum cartridge may be defective or at the end of its life.
The paper path may be contaminated with toner. - The fuser may be defective.
Repetitive Vertical Dark Streaks
PRINTED IMAGE
There are black lines that appear vertically on the page.
- The paper path may be contaminated with toner.
- The drum cartridge may be defective or at the end of its life.
- The fuser may be defective.
- The transfer roller may be defective.
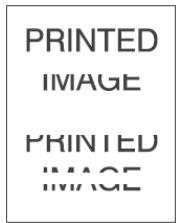
Troubleshooting Print Problems (cont.)
Dark Spots or Marks
PRINTED IMAGE
There are dark spots or marks that appear in a random pattern on the page.
- The paper path may be contaminated with toner.
- The drum cartridge may be defective.
- The fuser may be defective.
- The transfer roller may be defective.
Unfused or Partially Fused Image
PRINTED IMAGE
The printed image is not fully fused to the paper and easily rubs off.
The paper may be damp.
- Heavy or unusual paper may be in the tray.
- The printer may be located in an environment with extreme temperature or humidity.
- The fuser may be defective.
Troubleshooting Print Problems (cont.)
Wrinkled Prints
PRINTED IMAGE
The pages are wrinkled, creased, or torn.
- The paper is not loaded correctly in the appropriate tray.
The paper may be in poor condition.
The paper may be damp. - The fuser may be at the end of its life.
Blurred Prints
The image is blurred at the edges.
The paper may be in poor condition.
The paper may be damp.
- The drum cartridge may be defective.
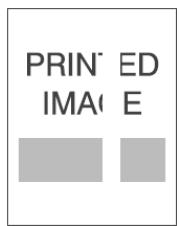
Troubleshooting Print Problems (cont.)
Random or Spot Deletions
PRINTED IMAGE
Areas of the print are extremely light or missing.
The paper may be in poor condition.
The paper may be damp.
- The drum cartridge may be defective or at the end of its life.
Replacement Supplies
Purchasing Information
Where to Purchase
- Consult the dealer where you purchased your printer
Consult an Oki Data Authorized Sales or Service Dealer. For the nearest dealer, call 1-800-654-3282.
U.S., Puerto Rico, Guam, U.S. Virgin Islands only: Order on the Internet at www.okiprintingsolutions.com
U.S. only: Order toll-free at 1-800-654-3282, using VISA®, MasterCard® or AMEX®. - Check office supply catalogs.
Note:A Maintenance Kit is required every 300,000 pages. Contact your service representative when the printer display panel requests it.
Service & Support
First ...
Consult the store where you purchased your printer.
Additional OKI Resources
Available 24 hours a day, 7 days a week
- Visit MY.OKIDATA.COM for the latest information on
- drivers and utilities
troubleshooting - Product news
- and much more!
Call 1-800-654-3282.
OKI is a registered trademark of Oki Electric Industry Company, Ltd.
AMEX is a registered trademark of American Express Co.
MasterCard is a registered trademark of MasterCard International, Inc.
VISA is a registered trademark of Visa.