Power Espresso Coldbrew Latte - Coffee machine CECOTEC - Free user manual and instructions
Find the device manual for free Power Espresso Coldbrew Latte CECOTEC in PDF.


User questions about Power Espresso Coldbrew Latte CECOTEC
0 question about this device. Answer the ones you know or ask your own.
Ask a new question about this device
Download the instructions for your Coffee machine in PDF format for free! Find your manual Power Espresso Coldbrew Latte - CECOTEC and take your electronic device back in hand. On this page are published all the documents necessary for the use of your device. Power Espresso Coldbrew Latte by CECOTEC.
USER MANUAL Power Espresso Coldbrew Latte CECOTEC
POWER ESPRESSO COLDBREW LATTE DARK

Índice - Index
SAFETY INSTRUCTIONS 6
ESPAÑOL 47
ENGLISH 58
FRANÇAIS 68
DEUTSCH 79
ITALIANO 90
PORTUGUÊS 101
NEDERLANDS 111
POLSKI 122
ČEŠTINA 132
MAGYAR 143
ΕΛΛΗΝΙΚΑ 153
TÜRKÇE 164
العربيبة 174
CATALÀ 183
FIGURES 195
NOTA
EU01_108988 - Power Espresso ColdBrew Latte Dark
EN • The coding in this manual is generic and applies to all code variants of the appliance.
Please read these instructions carefully before using the appliance. Keep this instruction manual for future reference or new users.
- All safety instructions must be closely followed when
using the appliance.
- This appliance can be used by children aged 8 years and above and persons with reduced physical, sensory, or mental capabilities or lack of experience and knowledge if they have been given supervision or instruction concerning use of the appliance in a safe way and understand the hazards involved. Children shall not play with the appliance. Cleaning and user maintenance must not be carried out by children unless they are over 8 years old and are under supervision. Keep this appliance and its power cable out of reach of children under the age of 8.
- Check the power cord regularly for visible damage. If the power cord is damaged, it must be replaced by Cecotec's Official Technical Support Service or similar qualified personnel to avoid risks.

• This symbol means: "Caution, hot surface".
Accessible surfaces are likely to heat up during use.
- This appliance is designed for domestic use only and is not intended for bars, restaurants, farmhouses, hotels, motels, and offices.
- WARNING: the filling opening must not be opened during operation.
- WARNING: take precautions to avoid spillage of liquids on the cable.
- WARNING: incorrect or improper use can be dangerous for the user and damage the appliance. Use the appliance only for the purposes described in this
manual. The surface of the heating element is subject to residual heat after use.
- Ensure that the mains voltage matches the voltage specified on the appliance rating label and that the plug is earthed.
- Do not immerse the cord, plug, or any other non-removable part of the appliance in water or any other liquid or expose electrical connections to water. Make sure your hands are dry before handling the plug or switching on the appliance.
- Do not twist, bend, pull, or damage the power cable. Protect it from sharp edges and heat sources. Never let the power cord come into contact with hot surfaces. Do not let the cable hang over the edge of the working surface or worktop.
- Turn off and unplug the appliance from the mains supply when not in use and before cleaning it. Pull from the plug, not the cable, to disconnect it from the outlet.
- Place the appliance on a dry, stable, flat, heat-resistant surface.
- Do not use the appliance under the following circumstances:
- On or near a gas or electric hob, in heated ovens, or near open flames.
- On soft surfaces (such as carpets) or where it may tip over during use.
- Outdoors or in areas with high humidity levels.
- Do not wash the appliance in dishwashers.
- Maintain a minimum safety distance of 20 cm to the sides and 30 cm on top of the appliance when in operation.
- Do not place the appliance under cabinets or kitchen furniture, as the steam emitted may damage them.
- Do not overfill the filter.
- Do not operate the appliance without water.
- Never operate the appliance without a suitable container positioned below the coffee spout and milk container spout.
- Supervise children to ensure they do not play with the product. Strict supervision is necessary if the product is being used by or near children.
https://cecotec.es/es/information/declaration-of-conformity
1. Parts and components
Figure 1:
- Water tank lid
- Water tank
- Milk container lid
- Milk dispensing tube lever
- Upper plate cup warmer
- Control panel
- Cup holder
- Drip tray
- Single-cup filter
- Double-cup filter
- Portafilter
- Portafilter handle
- Measuring spoon/Tamper
Icons
Fig. 2
A. Power on/off touch icon
B. Cold Espresso touch icon
C. Cappuccino/Latte touch icon
D. Single/Double Espresso touch icon
E. Americano/Frothed milk touch icon
F. AutoClean touch icon
Note:
The graphics in this manual are schematic representations and may not exactly match the product.
2. Before use
● This appliance comes in a packaging designed to protect it during transport.
Remove the appliance from its box. You can keep the original box and other packaging materials in a safe place to prevent damage to the appliance if you need to transport it in the future. If you wish to dispose of the original packaging, make sure all items are recycled properly.
- Check that all parts and components are included and in good condition. If any of them are missing or damaged, please contact Cecotec's Official Technical Support Service immediately.
Box content:
- Coffee machine
- Portafilter
- Single-cup filter
- Double-cup filter
- Measuring spoon
- Instruction manual
- Do not remove the product's serial number in order to keep proper traceability if technical assistance is required.
System purge
Perform this process in the following cases:
- Before the coffee machine's first use.
-
When the appliance is not going to be used for an extended period.
● After reinstalling the water tank. -
Fill the water tank and milk container with filtered water up to 2/3 full.
- Place a container at the outlet of both tanks.
- Press the touch icon F. AutoClean to purge the system: water will flow out of the milk dispensing tube for approximately 30 seconds and out of the coffee spout for approximately 30 seconds.
- At the end of the cycle, carefully discard the water in the glass and the water in the milk reservoir. The coffee maker is purged and ready for use.
3. Operation
Pre-safety: ensure the coffee machine is switched off and disconnected from the mains socket.
Filling the water tank:
- Remove the water tank and fill it with cold water. Place the tank firmly in position.
- Fill the tank only with cold, safe water. Do not exceed the MAX mark. Close the water tank lid before inserting it.
Filling the milk container:
- If you are going to prepare a beverage with milk, remove the milk reservoir, open the milk reservoir lid and pour in the required amount of cold milk. Make sure the
ENGLISH
milk level is below the MAX mark.
- Replace the milk reservoir and check that it is securely fastened.
Filter holder preparation
- Insert the 1-cup filter or the 2-cup filter into the filter holder. Fig. 3
- Add ground coffee into the filter using the measuring spoon/presser. Between 9 and 12 g.
- The coffee compaction pressure is as important as the variety and the degree of grinding. Always keep the filter clean and free of coffee residues. Fig. 4
Guidance on milling and extraction:
- If the grind is too fine: over-extraction and bitterness will occur, with a mottled and irregular crema.
- If the grind is too coarse: the water will flow too fast and the cream will be insufficient.
Dosing and Pressing
- Add more coffee if necessary until the filter is full.
● Press again with the presser. Fig. 4 - Clean any coffee residue from the rim of the portafilter to ensure a proper seal and prevent leakage.
- Pressing influences flow and cream:
● Very firm pressing: the espresso will flow slowly and generate more crema. - Loose pressing: the espresso will flow faster and generate less crema.
Placement of the filter holder and preparation of the cup area
- Secure the filter holder in the preparation head: slide the handle to the left to face the coupling, turn it to the right until it locks and release it. The filter holder must be firm and oriented to the front at 90°. Fig. 5.
- Invert the cup holder when using a small cup to prepare a cappuccino.
Note for Cappuccino/Latte: be sure to adjust the lever/selector of the milk frothing system so that the end of the milk tube is inside the cup.
Switching on
Connect the power cord and press the touch icon A. Power on/off. When the indicators are fixed, the coffee maker is ready for use.
Beverages
Cool espresso (1-cup filter)
ENGLISH
- Fill the water tank with cold water and press the B touch icon. Cool Espresso. The coffee maker will dispense approximately 60 ml of coffee (±30%).
- Use very cold water for best results.
Espresso
Press touch icon D. Single/Double Espresso. The light will flash indicating preheating. When it is fixed, the coffee maker will prepare and serve the espresso. The coffee maker will dispense approximately 30 ml of coffee ( ± 30%).
Double Espresso
Press and hold the touch icon D. Single/Double Espresso for 3 seconds. The light will flash during preheating and, when it is steady, extraction will begin. The coffee maker will dispense approximately 60 ml of coffee ( ± 30%).
Tips:
- After preparing hot espresso, let the coffee maker cool completely before making Cool espresso.
- Press and hold the touch icon B. Cool Espresso for 3 seconds to dispense hot water and speed up the appliance's cooling process. The coffee maker is ready again.
American (1-cup filter):
Press the touch icon E. Americano/Frothed milk. The light flashes during preheating and, when it remains steady, the preparation starts. The coffee maker will dispense approximately 120 ml of coffee ( ±30% ).
Cappuccino (1-cup Filter):
- Before preparing your cappuccino, adjust the desired amount of frothed milk by sliding the container lid's rotating froth knob to the left for more foam and to the right for less foam.
- Press the touch icon C. Cappuccino/Latte once to brew a single cappuccino. The coffee maker will first dispense milk (approx. 50 ml) and then an espresso (approx. 30 ml) directly into the cup. The output volume is approximately 80 ml (+/-30%). Only one cup is prepared per cycle.
Note: The amount of froth can be adjusted during the brewing cycle.
Latte (1-cup filter):
- Before preparing your cappuccino, adjust the desired amount of frothed milk by sliding the container lid's rotating froth knob to the left for more foam and to the right for less foam.
● Press and hold the touch icon C. Cappuccino/Latte for 3 seconds to prepare a
ENGLISH
single latte. The coffee machine will first dispense milk (approx. 120 ml) and then an espresso (approx. 40 ml) directly into the cup. The output volume is approximately 160 ml (+/-30%). Only one cup is prepared per cycle.
Note: The amount of froth can be adjusted during the brewing cycle.
Milk froth:
To froth milk without coffee or add more foam to your beverage, press and hold the E. Americano/Frothed Milk touch icon for 3 seconds. The cycle stops automatically after 20 seconds.
After preparing milk drinks
When you have finished preparing milk-based beverages, you can either store the milk container in the fridge (as shown in Figure 6) or dispose of any remaining milk.
4. Cleaning and maintenance
Cleaning the coffee machine's housing
- Clean the exterior surface with a soft, slightly damp cloth. Do not use abrasive cleaners or scouring pads, as they may scratch the surface.
- Do not leave the filter holder attached to the preparation head for prolonged periods, as this may affect the tightness between the head and the filter holder.
- Do not immerse the machine in water.
Cleaning the milk container and milk dispensing tube
Although the milk container can be stored in the fridge, it is important to clean both the container and milk dispensing tube regularly to prevent blockages and residue. Proceed as follows:
- Remove the milk container from the coffee machine.
- Remove the milk tank cover.
- Empty any remaining milk. Thoroughly wash the milk container and its lid with warm soapy water. Rinse the parts with clean water and dry them well. Do not use abrasive cleaners or scouring pads, as they may scratch the surface.
- Place a large empty cup under the milk dispensing tube.
- Press the touch icon F. AutoClean once. The coffee maker will expel water from the milk dispensing tube (approximately 30 seconds) and from the coffee spout (approximately 30 seconds). Let the machine run for a few seconds until you no longer see any milk in the cup. The process stops automatically after about 1 minute.
- Remove any water residue from the milk reservoir and then insert it back into the brewer.
Cleaning the brewing head, portafilter and filters
ENGLISH
- Completely turn off the coffee maker with the side switch and unplug it from the outlet.
- Wait for the machine's hot metal parts to cool down.
- Remove the filter holder and discard the contents. Wash the portafilter and filter with warm soapy water and rinse with clean water. Do not wash the portafilter or filters in the dishwasher.
- Clean the bottom of the machine's brewing head with a damp cloth or kitchen paper to remove any ground coffee residue.
- Reattach the portafilter (without filters) to the machine's brewing head.
- Place a large empty cup under the portafilter.
- Switch on the coffee machine and press the touch icon D. Single/Double Espresso once to circulate only water until it stops automatically.
Cleaning the water tank
Remove the water tank, empty the remaining water and preferably empty the tank between uses. Wash with soapy water, rinse well and dry.
Note: The water tank is dishwasher safe.
Descaling/Internal cleaning
When to decalcify
- If the D. Single/Double Espresso and E. Americano/Frothed Milk touch icons flash simultaneously, the coffee machine requires descaling.
Recommendation: to be performed every 4 weeks.
Cycle counter and warning
The coffee maker counts each preparation cycle. When 300 cycles are reached:
- After each brewing process the reminder is activated: the D. Single/Double Espresso and E. Americano/Frothed Milk touch icons flash 5 times and 5 beeps sound.
● After the warning, the coffee maker enters standby mode, but another cycle can be started immediately.
● The warning will persist after each cycle until descaling is complete. - At the successful completion of descaling, the counter is reset and the warning disappears.
Preparation prior to decalcification
- Fill the water tank with water and coffee machine descaling solution up to the MAX mark, following the product package instructions.
- Place the portafilter with filter but without ground coffee in the machine.
- Place a collection container of at least 1 liter under the brewing head and under the milk dispensing tube. Remove the drip tray if necessary.
ENGLISH
- Plug in the coffee maker and turn it on.
Phase 1: Descaling
- Press and hold the D. Single/Double Espresso and E. Americano/Frothed Milk touch icons simultaneously for 5 seconds.
- The first icon will flash and the second icon will be fixed.
- The descaling solution will first circulate through the coffee circuit for approximately 2 minutes.
- The rest of the solution will pass through the milk system circuit (milk dispensing tube). This will take several minutes.
- When finished, the touch icon E. Americano/Frothed Milk will flash and the touch icon D. Single/Double Espresso will remain steady. The initial phase of the descaling process has finished.
- Empty the collecting container and replace it.
Phase 2: Rinsing
- It is necessary to rinse with clean water to remove any limescale residue. Rinse the water tank and fill it with clean water.
- During rinsing, the touch icon E. Americano/Frothed Milk will flash and the touch icon D. Single/Double Espresso will remain steady.
- After a few minutes, the remaining water will flow out of the milk dispensing tube. This will take several minutes.
- Descaling is complete once all water has passed through the system. You will hear a signal and all icons will illuminate on the panel.
- Switch off the machine and empty the collecting container.
- Rinse the filter holder under running water and make sure it is completely dry before using it again.
5. Troubleshooting
This table summarizes the most frequent incidents and how to correct them. Apply the proposed method for each cause and, if the problem persists, contact Cecotec's Official Technical Support Service. For safety reasons, turn off, disconnect and let the coffee maker cool down before intervening.
| Problem | Cause | Method |
| No coffee comes out | There is air in the circuit.No water in the water tank. | Before each use or after refilling the water tank, press the touch icon F. AutoClean once to circulate water for one minute and purge the system.Fill the water tank and circulate water through the brewer without the filter to ensure that it is fully primed. |
| The coffee is ground too fine or has been over-tampered. | Empty the filter and rinse it; dry it with a cloth. Fill with ground coffee and press properly. Clean the edge of the filter before inserting it. | |
| No steam coming out of the milk dispensing tube | The tube is obstructed. | Contact Cecotec's Official Technical Support Service. |
| No water in the water tank. | Fill up the water tank. Run hot water through the milk dispensing tube to check that it flows. | |
| Water comes out of the outside of the filter | There is too much ground coffee in the filter. | Switch off and let the machine cool down, clean and refill with the appropriate ground coffee. |
| There is ground coffee on the edge of the filter. | Switch off the coffee machine and let it cool down; clean the rim of the filter and sealing gasket. | |
| After several continuous preparations, the temperature is too high and the water boils. | Switch off the coffee machine and let it cool down. | |
| Water comes out of the outside of the filter | There is ground coffee on the edge of the filter. | Remove coffee residue from the rim and clean the area. Ensure the correct coupling of the filter holder. |
| Altered coffee flavor | Water has been in the water tank too long or there is inadequate cleaning. | Clean and descale the coffee maker. |
| Little or no steam comes out of the milk dispensing tube. | Blockage of the milk dispensing tube. | Clean and descale the milk system circuit. |
| Poor milk foam | Skim milk has been used. | Use whole milk for better results. |
6. Disposal of old electrical and electronic appliances

This symbol indicates that, according to the applicable regulations, the product and/or battery must be disposed of separately from household waste. When this product reaches the end of its shelf life, you should dispose of the batteries/accumulators and take them to a collection point designated by the local authorities.
For detailed information on how to properly dispose of electrical and electronic equipment and/or the corresponding batteries, consumers should contact their local authorities. Information regarding national packaging recycling systems and their marking can be found on our website.
Compliance with the above guidelines will help protecting the environment.
7. Copyright
The intellectual property rights over the texts in this manual belong to CECOTEC INNOVACIONES, S.L. All rights reserved. The content of this publication may not, either in part or in its entirety, be reproduced, stored in a retrieval system, transmitted or distributed by any means (electronic, mechanical, photocopying, recording or similar) without prior authorisation from CECOTEC INNOVACIONES, S.L.
8. Simplified EU Declaration of Conformity

Cecotec Innovaciones hereby declares that this appliance complies with the essential requirements and other relevant provisions of the regulations applicable in the European Union. This appliance has been designed, manufactured and tested in compliance with required safety and quality standards. The full text of the EU Declaration of Conformity can be found on the following website:
https://cecotec.es/es/information/declaration-of-conformity
9. Technical specifications
Product: EU01_108988
Product reference: Power Espresso ColdBrew Latte Dark
Rated power: 1350 W
Voltage: 220 - 240 V
Frequency: 50 - 60 Hz
The power consumption of the appliance in any off-mode condition is 0.23 W.
ENGLISH
The period after which the appliance automatically switches to off mode is 25 minutes.
Technical specifications may change without prior notice to improve product quality. Made in China | Designed in Spain
10. Technical support and warranty
Cecotec shall be liable to the end user or consumer for any lack of conformity that exists at the time of product delivery under the terms, conditions and deadlines established by applicable regulations.
Repairs should be carried out by qualified personnel.
If you detect any problem with the product or have any queries, please contact Cecotec's Official Technical Support Service at +34 96 321 07 28.
FRANÇAIS
https://storececotec.it/it/information/declaration-of-conformity
https://cecotec.pt/pt/information/declaration-of-conformity
Cappuccino (1-kops filter):
https://cecotec.es/es/information/declaration-of-conformity
9. Technische specificaties
Product: EU01_108988
Productreferentie: Power Espresso Cold Brew Latte Dark
Nominaal vermogen: 1350 W
Spanning: 220 - 240 V
https://cecotec.es/es/information/declaration-of-conformity
9. Dane techniczne
Produkt: EU01_108988
https://cecotec.es/es/information/declaration-of-conformity
9. Müszaki adatok
Termék: EU01_108988
https://cecotec.es/es/information/declaration-of-conformity
https://cecotec.es/es/information/declaration-of-conformity
https://cecotec.es/es/information/declaration-of-conformity
- المواصفات الفنية
EU01_108988 : المنتج
Power Espresso Cold Brew Latte Dark : مرجع المنتج
Fig 2:

Fig 3:
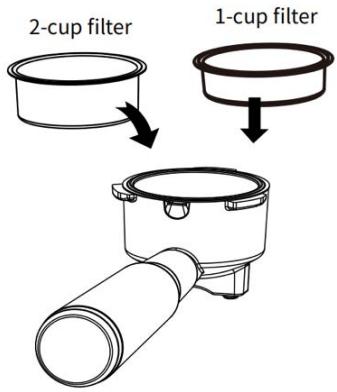
Fig 4:

Fig 5:


Fig 6:

www.cecotec.es
Cecotec Innovaciones S.L. Av. Reyes Católicos, 60 46910, Alfafar, Valencia (Spain)
- POWER ESPRESSO COLDBREW LATTE DARK
- NOTA
- PARTS AND COMPONENTS
- FIGURE 1
- ICONS
- FIG. 2
- NOTE
- BEFORE USE
- BOX CONTENT
- SYSTEM PURGE
- OPERATION
- FILLING THE WATER TANK
- FILLING THE MILK CONTAINER
- ENGLISH
- FILTER HOLDER PREPARATION
- DOSING AND PRESSING
- PLACEMENT OF THE FILTER HOLDER AND PREPARATION OF THE CUP AREA
- SWITCHING ON
- BEVERAGES
- ESPRESSO
- DOUBLE ESPRESSO
- TIPS
- AMERICAN (1-CUP FILTER)
- CAPPUCCINO (1-CUP FILTER)
- LATTE (1-CUP FILTER)
- MILK FROTH
- AFTER PREPARING MILK DRINKS
- CLEANING AND MAINTENANCE
- CLEANING THE COFFEE MACHINE'S HOUSING
- CLEANING THE MILK CONTAINER AND MILK DISPENSING TUBE
- CLEANING THE WATER TANK
- DESCALING/INTERNAL CLEANING
- WHEN TO DECALCIFY
- CYCLE COUNTER AND WARNING
- PREPARATION PRIOR TO DECALCIFICATION
- PHASE 1: DESCALING
- PHASE 2: RINSING
- TROUBLESHOOTING
- DISPOSAL OF OLD ELECTRICAL AND ELECTRONIC APPLIANCES
- COPYRIGHT
- SIMPLIFIED EU DECLARATION OF CONFORMITY
- TECHNICAL SPECIFICATIONS
- TECHNICAL SUPPORT AND WARRANTY
- FRANÇAIS
- CAPPUCCINO (1-KOPS FILTER)
- TECHNISCHE SPECIFICATIES
- DANE TECHNICZNE
- MÜSZAKI ADATOK
Brand : CECOTEC
Model : Power Espresso Coldbrew Latte
Category : Coffee machine