Drumfit Wayhome 1000 Runner Sprint - Fitness Equipment CECOTEC - Free user manual and instructions
Find the device manual for free Drumfit Wayhome 1000 Runner Sprint CECOTEC in PDF.


| Product type | Folding treadmill for home use |
| Brand | Cecotec |
| Model | Drumfit Wayhome 1000 Runner Sprint |
| Dimensions (unfolded) | Approximately 160 x 70 x 125 cm |
| Net weight | Approximately 40 kg |
| Maximum user weight | 100 kg |
| Power supply | 220-240 V, 50/60 Hz |
| Motor | 1.5 HP DC motor |
| Adjustable speed | 1 to 12 km/h |
| Incline | Manually adjustable on several levels |
| Running surface | 120 x 40 cm |
| Display | LCD screen with backlight |
| Training programs | 12 predefined programs |
| Heart rate | Integrated pulse grips |
| Maintenance and cleaning | Clean with a damp cloth, check belt lubrication |
| Safety | Emergency stop key, child lock |
| Spare parts and repairability | Cecotec after-sales service for spare parts |
| General information | Instruction manual included, official warranty |
Frequently Asked Questions - Drumfit Wayhome 1000 Runner Sprint CECOTEC
User questions about Drumfit Wayhome 1000 Runner Sprint CECOTEC
0 question about this device. Answer the ones you know or ask your own.
Ask a new question about this device
Download the instructions for your Fitness Equipment in PDF format for free! Find your manual Drumfit Wayhome 1000 Runner Sprint - CECOTEC and take your electronic device back in hand. On this page are published all the documents necessary for the use of your device. Drumfit Wayhome 1000 Runner Sprint by CECOTEC.
USER MANUAL Drumfit Wayhome 1000 Runner Sprint CECOTEC
DRUMFIT
- Parts and components 58
- Before use 58
- Product assembly 59
- Operation 59
- Information on exercising 61
- Cleaning and maintenance 62
- Troubleshooting 63
- Technical specifications 64
- Disposal of old electrical and electronic appliances 64
- Technical support and warranty 64
- Copyright 65
SOMMAIRE
Please, keep this instruction manual in a safe place for future reference or new users.
- Read these instructions carefully before assembling or using the treadmill. These instructions contain important information that will help you get the best out of your equipment.
- Safe and efficient use can be only achieved if the machine is properly assembled, maintained, and used.
- It is your responsibility to make sure every user is informed about the warnings and precautions stated in this instruction manual.
- This appliance can be used by children aged 8 years and above and persons with reduced physical, sensory, or mental capabilities or lack of experience and knowledge if they have been given supervision or instruction concerning the use of the appliance in a safe way and understand the hazards involved. Children must not play with the appliance. Cleaning and maintenance should not be carried out by children without supervision.
- Keep children and animals away from the working area as small parts could cause risk of suffocation if swallowed.
- Keep children and animals away from the machine. It is designed for adults only.
- Check that the screws and nuts are securely fastened before using the treadmill. The safety level of the machine can be only maintained through regular examination for damage and/or signs of wear and tear.
- Always use the treadmill as indicated in this instruction manual. If you find any defective piece when assembling or testing the treadmill, or if it makes unusual noise during use, stop using it immediately and contact the Technical Support
Service of Cecotec. Do not use the treadmill until the problem has been solved.
- Any misuse or non-compliance with these instructions voids the warranty and the manufacturer's liability.
- Before starting an exercise programme, you should consult your doctor to determine if you have any physical or health conditions that could create a risk to your safety or prevent you from using the treadmill properly. Your doctor's advice is essential if you are taking medication that affects your heart rate, blood pressure, or cholesterol level.
- Be aware of your body signals. Incorrect or excessive exercise can deteriorate your health. Stop exercising if you experience any of the following symptoms: pain, tightness in your chest, irregular heartbeat, extreme shortness of breath, dizziness, or nausea. If you experience any of these conditions, you should consult your physician before continuing with your training programme.
- Care must be taken when lifting or moving the treadmill so as not to injure your back.
- Keep your hands and any loose clothing or objects away from all moving parts.
- Make sure you have enough space to lay out the parts before starting.
- Do not place any sharp objects around the treadmill.
- This product is intended for household use only. Do not use it in shops, institutions, or for therapeutic purposes. It is not recommended for outdoor use.
- You are buying this equipment to exercise at your own risk. If you have any health condition or feel you may be at risk of one, please consult with your physician or doctor before starting any exercise programme.
- Follow the recommended warm-up and stretching exercises
before using the equipment to exercise.
- Only one person at a time should use the treadmill.
- Wear appropriate clothing when using the treadmill. Avoid wearing loose clothing which may get caught in the treadmill or that may restrict or prevent movement. Start using the treadmill at a slow speed, holding on to the handlebars firmly.
- This product is suitable for a maximum user weight of 100 kg.
- This training device is not suitable for high-precision purposes.
- Exercise extreme caution when adjusting the belt. Keep your fingers, hair, and clothing away from the belt.
- Do not cover the belt with sheets or any textile item, nor use it if covered with any of these items. It may get hot and cause fire, injury, or electric shock.
- If repairs are required, please consult your supplier for further information or contact Cecotec Customer Service.
- Take into account the maximum positions of the adjustable components.
- Treadmill location:
- Place the treadmill on a flat, smooth, and stable surface with a protective floor covering or carpet.
- Make sure you leave a minimum of 2 metres around the treadmill.
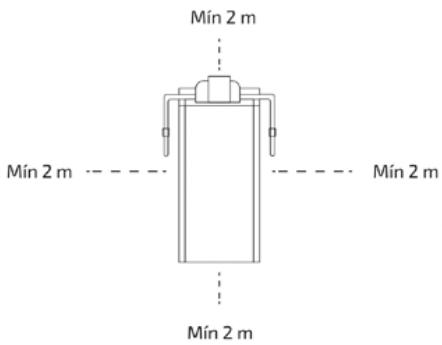
- Do not place anything behind the treadmill that could obstruct the emergency exit.
- Do not stand on the treadmill if you are not using it or if you are preparing to use it. Place both feet on the treadmill's side borders. Get on it only when you are ready.
- Never start at full speed.
- Do not jump on the treadmill.
- Keep the treadmill away from excessive humidity and dust.
- Make sure that those present during the exercise are aware of potential hazards, e.g., protruding moving parts.
- Incorrect/excessive training can cause injuries.
- Do not arch your back when using the treadmill, always try to keep your back straight.
- WARNING: the heart rate sensors may be inaccurate, as it is not a medical device. Sensors can give you estimated heart rate information.
- If you feel any discomfort, stop exercising immediately. It may be dangerous for your health. If it persists, go immediately to the nearest medical centre.
- WARNING: do not run the treadmill when folded up.
- WARNING: wait for the running surface to come to stop completely before folding the treadmill.
- Noise emission under load is higher than without load.
- To make an emergency stop, place your hands on the handlebars, and place your feet on the side borders.
- Always attach the safety clip to your clothing at waist level and attach the safety key to the control panel before starting your workout.
- To prevent accidents, this treadmill comes with a safety key to be securely attached to your clothing. In the event that you accidentally trip or slip while walking or running on the treadmill, remove the safety key from the console to stop
the treadmill's motor. Re-insert the safety key to resume the training.
INSTRUCTIONS DE SÉCURITÉ
- Heart rate sensors
- Handlebar
- Control panel
- Safety key
- Support bars
- Walking belt
- Side rails
- Holes for the adjustment of the walking belt
- S1 M8x35 Oval head screw (x2)
- S2 M8x16 Oval head screw (x4)
- S3 M8 Curved washer (x4)
- Allen key
- Safety key
Note: the graphics in this manual are schematic representations and may not exactly match the device.
2. BEFORE USE
- This appliance is packaged in a way as to protect it during transport. Take the device out of its box and remove all packaging materials. You can keep the original box and other packaging elements in a safe place. This will help you prevent damage to the device when transporting it in the future. In case the original packaging is disposed of, make sure all packaging materials are recycled accordingly.
- Make sure all parts and components are included and in good conditions. If there is any piece missing or in bad conditions, contact the official Cecotec Technical Support Service immediately.
Box content
- Treadmill
- Tools for assembly
- Lubricating oil
- Instruction manual
3. PRODUCT ASSEMBLY
Step 1
- For this step, it is recommended that you are assisted by another person. One person should hold the left/right handlebar support bars in place while the other tightens the screws.
- Use two screws S1, S2 and two S3 to fix both left/right handlebar support bars to the base frame as shown in figure 2. The assembly is the same for both sides.
Step 2
- Connect the control panel cable to the main cable coming from the right handlebar support bar as shown in figure 3.
- Insert both handlebar stems into the left/right support bars. Attach both handlebars to the left/right support bars using two S2 and two S3 screws as shown in figure 3.
Please note:
While inserting the handlebar stems into the left/right support bars, make sure that the cables inside the right support bar are correctly connected and be careful not to crush them.
4. OPERATION
Fig. 4 key:
- Pulse indicator: displays your current heart rate in beats per minute (bpm). To activate, grasp the touch sensors to measure your pulse during training. The display will show your beating after 2-5 seconds. For the most accurate measurement, grasp the sensors with both hands.
- Speed indicator: it shows the current speed from the lowest, 1km / h , to the highest speed, 10km / h .
- Time indicator: it shows the elapsed training time in minutes and seconds. The time starts counting from 0:00 to 99:59 in 1 second increments.
- Distance indicator: it shows the cumulative distance travelled during training.
- Calorie indicator: it shows the total number of calories burned during training. (These data are indicative for comparing different training sessions and should not be used for medical treatment).
- Programmes: press this button to select the pre-set training programme mode (P01-P12).
- Start: press this button to start training.
- Stop: press this button to stop training.
- Decrease speed:
- Press the decrease speed button in the manual mode to lower the desired training time or distance settings.
- Press the decrease speed button in the pre-set training programme mode (P01-P12) to lower the desired training time settings.
ENGLISH
-
Increase speed:
-
Press the increase speed button in the manual mode to increase the desired training time or distance settings.
- Press the increase speed button in the pre-set training programme mode (P01-P12) to increase the desired training time settings.
- Mode: press this button to select different functions (time or distance) and therefore set personalised training goals using the manual mode.
Operation
Before starting a training session, make sure that the safety key is correctly placed in the control panel and that the safety clip is securely attached to a piece of clothing.
Warning:
Always stand on the side rails when running the treadmill; never run the treadmill while standing on the belt.
Quick Start
Press the start button to switch on the treadmill. The display will show a 3-second countdown window (counting "3-2-1") before the treadmill starts moving. The treadmill shall start moving with an initial speed of 1 km/h. You can press the increase speed or decrease speed button to increase or decrease speed during training.
Training in manual programme mode
You can pre-set the desired time or distance before starting a training session. You can only pre-set one of the functions.
Time adjustment
- Press the mode button until you see the time indicator start to flash. Press the increase or decrease speed buttons to change the setting. Each increment is 1 minute.
- The pre-set target time interval is 5:00 to 99:00 minutes. Once the target time is pre-set, press the start button to start the training session. The treadmill shall start moving with an initial speed of 1 km/h. You can press the increase speed or decrease speed button on the display or in the handlebars to increase or decrease speed during training.
Distance adjustment
Press the mode button on the control panel until the distance indicator starts flashing. Press the increase or decrease speed buttons to change the setting. The pre-set target distance range is 0.50 to 65 kilometres; the default distance is 1 kilometre. Once the target distance is pre-set, press the start button to start the training session.
Training in pre-set programme mode (p01-p12):
Fig. 5
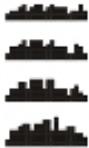
- The control panel offers 12 pre-set programmes (P01-P12). Before you start, you can choose one of the 12 pre-set training programmes.
- Press the programme button on the control panel to select one of the training programmes. The time indicator light will start flashing. Press the increase or decrease speed buttons to change the time setting. Each increment is 1 minute. The pre-set target time interval is 5:00 to 99:00 minutes. Once the target time is pre-set, press the start button to start the training session. When the pre-set training program time reaches 0:00, the machine will beep to alert you, and the treadmill will stop automatically.
Intensity increase
- You can increase the training intensity by increasing the incline of the appliance. In figure 6, you can see the 4 possible incline positions.
- To adjust the incline, lift the back of the belt and pull the safety pin. When you have positioned the legs at the desired incline, you must insert the locking pin again to fix the incline.
Emergency brake
Before starting a training session, make sure that the safety key is correctly placed in the control panel and that the safety clip is securely attached to a piece of clothing you are wearing. If dropped, the clip will pull the safety key and the treadmill will stop immediately to help prevent injury.
5. INFORMATION ON EXERCISING
A proper workout should consist of the following three phases:
- Warm-up: consisting of 5 to 10 minutes of stretching and light exercise. A proper warm-up increases your body temperature, heart rate, and circulation in preparation for exercise. Fig. 7
- Training: consisting of 20 to 30 minutes of exercise. (Note: during the first few weeks of exercise do not keep your heart rate high for more than 20 minutes). Fig. 8
- Cool-down: 5 to 10 minutes of stretching exercises. This will increase the flexibility of your muscles and will help prevent injuries. Fig. 7
Workout routine
To maintain or improve your physical condition, exercise three times per week, with at least one day of rest between workouts. After a few months of regular exercise, you may exercise up to five times a week, if desired. Keep in mind that the key to success is making exercise a regular and enjoyable part of your everyday life.
6. CLEANING AND MAINTENANCE
Cleaning
- After each training session, make sure to clean the appliance and remove any remaining sweat.
- Clean the treadmill with a cotton cloth and a mild cleaning product. Do not use abrasives or solvents. Be careful not to allow too much moisture to enter the display, as this could damage the machine and create a risk of electric shock.
- Please keep the treadmill, especially the control panel, away from direct sunlight to prevent damage to the display.
Adjusting the walking belt
- The belt is pre-adjusted to the platform at the factory, but, after prolonged use, it may loosen and require readjustment. To adjust the belt, turn the treadmill on and let it run at a speed of 6–8 km/h. Use the Allen key provided to turn the rear roller adjustment bolts to centre the belt. If the belt moves to the left, turn the left adjustment bolt 90° clockwise. The belt should begin to correct itself as shown in Figure 9.
- If the belt moves to the right, turn the right adjustment bolt 90° clockwise, and the belt should begin to correct itself. Continue turning the adjusting bolts until the belt is well centred as shown in figure 10.
- If the belt slips during use, turn off and unplug the treadmill. Using the Allen key provided, turn the left and right adjustment bolts of the rear rollers 90° clockwise as shown in Figure 11. Then switch the treadmill back on and let it run at a speed of 6 km/h. Run over the belt to determine if the belt is still slipping. Repeat this process until the belt stops slipping.
Storage
Store the treadmill in a closed, clean and dry place. Never leave or use it outdoors. Make sure that the machine is switched off and the power cord is unplugged from the mains socket.
Folding/unfolding the treadmill
- Before folding or unfolding the treadmill you must make sure that the belt is stationary, and the treadmill is not connected to a power outlet.
- Folding: lift the treadmill platform up towards the control panel until it fixes into place.
- Unfolding: press the plastic part on the pneumatic cylinder with your foot as shown in figure 12.
CAUTION: if the treadmill does not fold correctly, it is because of improper assembly. The screws on the side rails should be better secured and the position of the control panel should be adjusted.
Lubricating the walking belt
Correctly greasing the mechanisms that make up the treadmill will not only ensure a better functioning of the treadmill but will also extend its lifespan. After the first 25 hours of use (or 2-3 months) apply a little lubricant and then repeat the operation every 50 hours of use (or 5-8 months).
How to check the lubrication status of the walking belt
- Lift one side of the belt and touch the surface of the board. If the surface is slippery to the touch, no further lubrication is required.
- If the surface is dry to the touch, apply a small amount of lubricant.
How to apply the lubricant
- Lift one of the sides of the belt.
- Apply a little lubricant under the surface of the board as shown in figure 13. Make sure that the lubricant reaches the centre of the platform.
- Run the treadmill at low speed for 3-5 minutes to distribute the lubricant evenly.
ATTENTION: do not over-lubricate the platform. Wipe off any excess lubricant from under the belt.
7. TROUBLESHOOTING
| Problem | Possible causes | Solution |
| The treadmill does not switch on | The machine is not plugged in. | Plug the power cord correctly into a power outlet. |
| The safety key is not properly fitted. | Put the safety key back on. | |
| The circuit breakers in the house's electrical panel have tripped. | Turn the circuit breakers back up or call an electrician to replace the electrical panel. | |
| The main switch of the treadmill has tripped. | Wait 5 minutes and try to start the treadmill again. | |
| The belt is slippery | The belt is not sufficiently tensioned. | Adjust the belt tension. |
| The belt brakes when stepped on | The belt is not sufficiently lubricated. | Lubricate the belt. |
| The belt is too tight. | Adjust the belt tension. | |
| The belt is not centred | Belt tension is not uniform with respect to the rear roller. | Centre the belt. |
8. TECHNICAL SPECIFICATIONS
Product reference: 07180
Product: DrumFit WayHome 1000 Runner Sprint
Voltage: 220-240 V\~, 50/60 Hz
Power: 600 W
Maximum user weight: 100 kg
HC Class
Speed: 1-10 km/h
Running surface: 100 x 40 cm
Size: 125 x 69 x 106 cm
Weight: 30 kg
Technical specifications may change without prior notification to improve product quality.
Made in China | Designed in Spain
9. DISPOSAL OF OLD ELECTRICAL AND ELECTRONIC APPLIANCES

This symbol indicates that, according to the applicable regulations, the product and/or batteries must be disposed of separately from household waste. When this product reaches the end of its shelf life, you should dispose of the cells/batteries/accumulators and take them to a collection point designated by the local authorities.
Consumers must contact their local authorities or retailer for information concerning the correct disposal of old appliances and/or their batteries.
Compliance with the above guidelines will help protecting the environment.
10. TECHNICAL SUPPORT AND WARRANTY
Cecotec shall be liable to the end user or consumer for any lack of conformity that exists at the time of delivery of the product under the terms, conditions, and deadlines established by the applicable regulations.
It is recommended that repairs be carried out by qualified personnel.
If at any moment you detect any problem with your product or have any doubt, do not hesitate to contact the official Cecotec Technical Support Service at +34 963 210 728.
11. COPYRIGHT
The intellectual property rights over the texts in this manual belong to CECOTEC INNOVACIONES, S.L. All rights reserved. The contents of this publication may not, in whole or in part, be reproduced, stored in a retrieval system, transmitted, or distributed by any means (electronic, mechanical, photocopying, recording or similar) without the prior authorization of CECOTEC INNOVACIONES, S.L.
FRANÇAIS
1. PIÈCES ET COMPOSANTS
Img. 1
Training in handmatige programmamodus:
7. PROBLEEMOPLOSSING
Product: DrumFit WayHome 1000 Runner Sprint
Spanning: 220-240 V\~, 50/60 Hz
Vermogen: 600 W
Fig./Img./Abb./Afb./Rys./Obr. 2

Fig./Img./Abb./Afb./ Rys./Obr. 3

Fig./Img./Abb./Afb./Rys./Obr. 4
WARM-UP
RANDOM
SK RUN
COMPCTIT

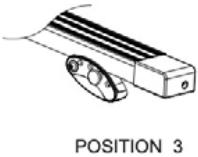

Fig./Img./Abb./Afb./Rys./Obr. 6
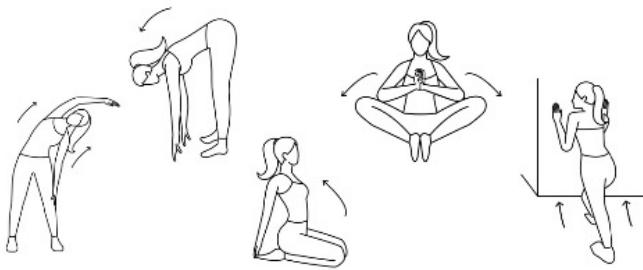
Fig./Img./Abb./Afb./ Rys./Obr. 7

Fig./Img./Abb./Afb./ Rys./Obr. 8

Tool:

Fig./Img./Abb./Afb./ Rys./Obr. 9

Tool:

Fig./Img./Abb./Afb./ Rys./Obr. 10

Tool:
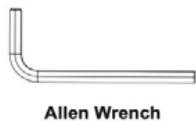
Fig./Img./Abb./Afb./ Rys./Obr. 11
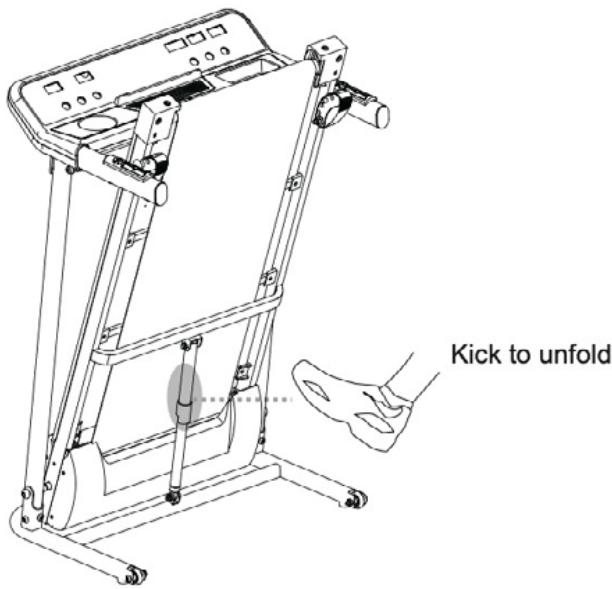
Fig./Img./Abb./Afb./ Rys./Obr. 12
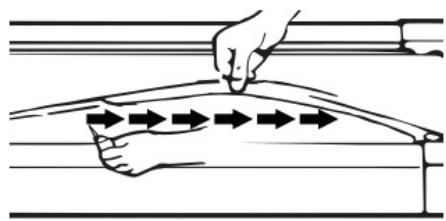
Fig./Img./Abb./Afb./ Rys./Obr. 13
www.cecotec.es

- SOMMAIRE
- INSTRUCTIONS DE SÉCURITÉ
- BEFORE USE
- BOX CONTENT
- PRODUCT ASSEMBLY
- STEP 1
- STEP 2
- PLEASE NOTE
- OPERATION
- FIG. 4 KEY
- ENGLISH
- QUICK START
- TRAINING IN MANUAL PROGRAMME MODE
- TIME ADJUSTMENT
- DISTANCE ADJUSTMENT
- FIG. 5
- INTENSITY INCREASE
- EMERGENCY BRAKE
- INFORMATION ON EXERCISING
- WORKOUT ROUTINE
- CLEANING AND MAINTENANCE
- CLEANING
- ADJUSTING THE WALKING BELT
- STORAGE
- FOLDING/UNFOLDING THE TREADMILL
- LUBRICATING THE WALKING BELT
- HOW TO CHECK THE LUBRICATION STATUS OF THE WALKING BELT
- HOW TO APPLY THE LUBRICANT
- TROUBLESHOOTING
- TECHNICAL SPECIFICATIONS
- DISPOSAL OF OLD ELECTRICAL AND ELECTRONIC APPLIANCES
- TECHNICAL SUPPORT AND WARRANTY
- COPYRIGHT
- FRANÇAIS
- PIÈCES ET COMPOSANTS
- IMG. 1
- TRAINING IN HANDMATIGE PROGRAMMAMODUS
- PROBLEEMOPLOSSING
Brand : CECOTEC
Model : Drumfit Wayhome 1000 Runner Sprint
Category : Fitness Equipment