
CREATIVE PHOTOGRAPHY KIT - Creative Photography Kit POLAROID - Free user manual and instructions
Find the device manual for free CREATIVE PHOTOGRAPHY KIT POLAROID in PDF.
| Product Type | Creative Photography Kit |
| Brand | Polaroid |
| Model | Creative Photography Kit |
| Kit Contents | 2 plastic trays, 1 Brayer roller, watercolor paper, contact paper, thermometer, 1 polyester film sheet, tweezers, distilled water, Polaroid 669 ER Polacolor peel-apart film (3.25 x 4.25 inches) |
| Main Uses | Image transfer and emulsion transfer from Polaroid films |
| Film Compatibility | Polaroid 669 ER Polacolor peel-apart film 3.25'' x 4.25'' |
| Required Equipment | Daylab™ CopySystem (or compatible equivalent) |
| Water Temperature for Emulsion Transfer | 71°C (160°F) |
| Development Time (Image Transfer) | 10 seconds after pulling the tab |
| Development Time (Emulsion Transfer) | 60 seconds after pulling, then drying for 24 hours |
| Handling Precautions | Avoid contact with skin, eyes, and mouth. Wear gloves. Ventilate the room. |
| Cleaning | Wash trays with soap and water. Wash roller with hot water after each use. |
| Image Storage | Archival boxes, stable temperature and humidity. Avoid direct sunlight. |
| Image Protection | Spray with UV-protectant. Frame under glass with UV protection. |
| Image Duplication | Scanning with a flatbed scanner. |
| Safety and Disposal | Keep waste out of reach of children and animals. Use a closed container. |
Frequently Asked Questions - CREATIVE PHOTOGRAPHY KIT POLAROID
User questions about CREATIVE PHOTOGRAPHY KIT POLAROID
0 question about this device. Answer the ones you know or ask your own.
Ask a new question about this device
Download the instructions for your Creative Photography Kit in PDF format for free! Find your manual CREATIVE PHOTOGRAPHY KIT - POLAROID and take your electronic device back in hand. On this page are published all the documents necessary for the use of your device. CREATIVE PHOTOGRAPHY KIT by POLAROID.
USER MANUAL CREATIVE PHOTOGRAPHY KIT POLAROID
Polaroid Image Transfer Instructions
Supplies needed to begin:
-
Daylab™ CopySystem (or other hardware that takes Polaroid 3 14 × 4 14 Peel Apart Film)
-
Polaroid Creative Photography Kit that contains:
-
2 plastic trays*
- 1 Brayer Roller*
- Watercolor Paper* (for beginners, use Hot Pressed paper which is less textured)
- Contact Paper
Thermometer
- Timer*
1 sheet of polyester film
Tongs
-
Distilled Water
-
Paper Towels
- Polacolor 669 ER 3 14 × 4 14 Peel Apart Film
- 4 × 6'' images or objects that you want to copy (if using Daylab™ CopySystem)
-
Flat surface
-
needed for Image Transfer
Prepare the paper:
- Cut your paper to the size preferred for the transfer.
- Heat the distilled water to a lukewarm temperature.
- Immerse the paper into warm water for a few seconds. Remove paper and blot to remove excess water.
Make the Exposure:
- Load the Polaroid film (Polacolor 669 ER) into the Daylab™ CopySystem.
- Switch the unit on and wait for the green light to illuminate.
- Place the picture or object onto the glass area of the Daylab™ CopySystem face down.
- Place the cover on top of it to block out the light from the room.
- Press "start" to make the exposure.
- Set your timer to 10 seconds.
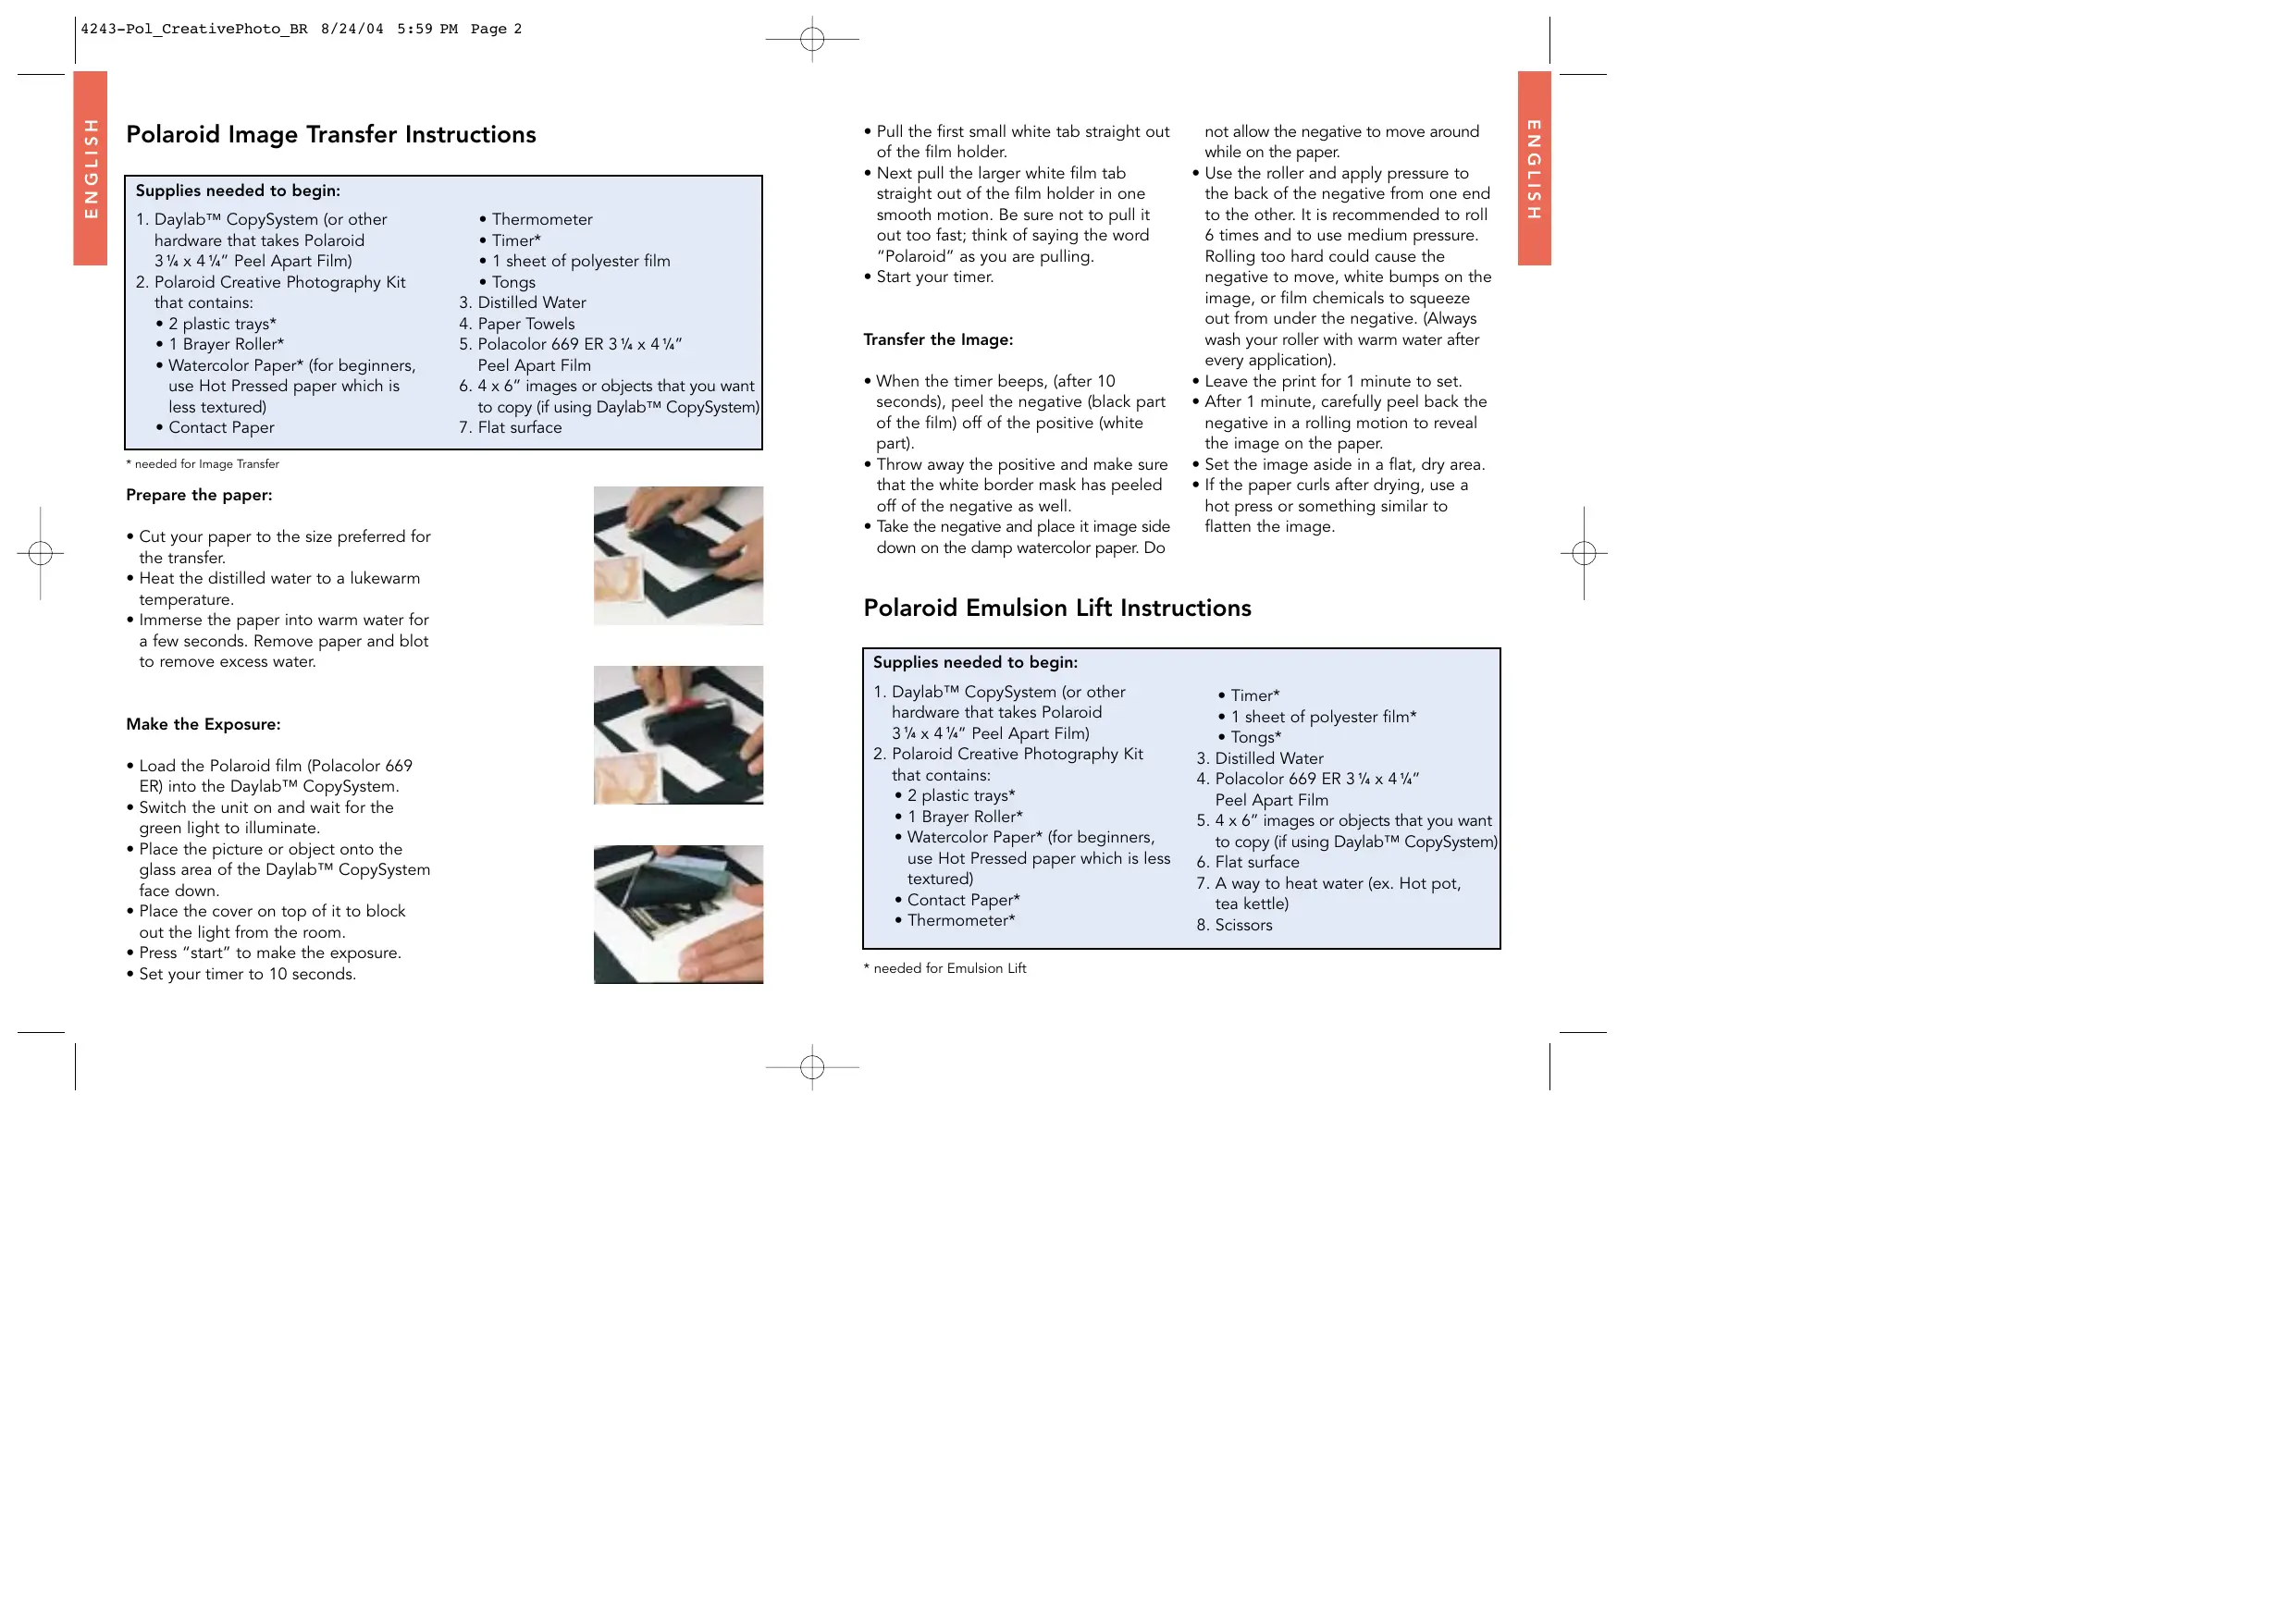
- Pull the first small white tab straight out of the film holder.
- Next pull the larger white film tab straight out of the film holder in one smooth motion. Be sure not to pull it out too fast; think of saying the word "Polaroid" as you are pulling.
- Start your timer.
Transfer the Image:
- When the timer beeps, (after 10 seconds), peel the negative (black part of the film) off of the positive (white part).
- Throw away the positive and make sure that the white border mask has peeled off of the negative as well.
Take the negative and place it image side down on the damp watercolor paper. Do
not allow the negative to move around while on the paper.
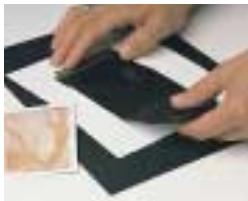
- Use the roller and apply pressure to the back of the negative from one end to the other. It is recommended to roll 6 times and to use medium pressure. Rolling too hard could cause the negative to move, white bumps on the image, or film chemicals to squeeze out from under the negative. (Always wash your roller with warm water after every application).
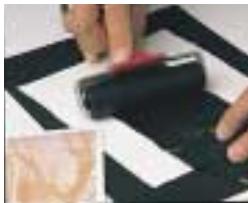
- Leave the print for 1 minute to set.
- After 1 minute, carefully peel back the negative in a rolling motion to reveal the image on the paper.
- Set the image aside in a flat, dry area.
- If the paper curls after drying, use a hot press or something similar to flatten the image.
Polaroid Emulsion Lift Instructions
Supplies needed to begin:
- Daylab™ CopySystem (or other hardware that takes Polaroid
314× 414'' Peel Apart Film)
-
Polaroid Creative Photography Kit that contains:
-
Watercolor Paper* (for beginners, use Hot Pressed paper which is less textured)
-
2 plastic trays
1 Brayer Roller -
Contact Paper*
Thermometer* -
Timer
1 sheet of polyester film
Tongs* -
Distilled Water
- Polacolor 669 ER 3 14 × 4 14 Peel Apart Film
- 4 x 6" images or objects that you want to copy (if using Daylab™ CopySystem)
- Flat surface
- A way to heat water (ex. Hot pot, tea kettle)
- Scissors
Make the Exposure
(To be done at least 24 hours before making an Emulsion Lift):
- Load the Polaroid film (Polacolor 669 ER) into the Daylab™ CopySystem.
- Switch the unit on and wait for the green light to illuminate.
- Place the picture or object onto the glass area of the Daylab™ CopySystem face down.
- Place the cover on top of it to block out the light from the room.
- Press "start" to make the exposure.
- Pull the first small white tab straight out of the film holder.
- Next pull the larger white film tab straight out of the film holder in one smooth motion. Be sure not to pull it out too fast; think of saying the word "Polaroid" as you are pulling.
- Wait 60 seconds and peel the white positive away from the black negative. Throw away the negative.
- Let the print dry naturally for 24 hours or you can speed up the process by blow-drying the print on a low setting for several minutes.
SBS
Lift the Emulsion:
- Heat the distilled water to 160^ / 71^ (Caution: Hot water may cause burns)
- Apply contact paper to the back of the Polaroid image (the print must be completely dry before doing this process) to prevent the backing from disintegrating in the water.
- Trim contact paper to the size of the Polaroid image.
- Fill one tray with the hot distilled water and other tray with cold distilled water
- Place Polaroid image in the hot water
- Keep the thermometer in the hot water tray to make sure that the water stays at 160^ F / 71^ C . If it drops below that, pour more hot water into the tray.
- After 4 minutes, you should start to notice the emulsion/image lifting or "bubbling" off of the white paper back of the Polaroid print.
- Use the tongs to lift the corner of the print out of the hot water and place it into the cold water.
- In the second tray, use your fingers to
start pushing the emulsion off of the paper backing. To do this, start at the corner of the image and gently place your finger in between the paper and the emulsion. You will see the emulsion start to float away from the paper.
- Once the emulsion has completely released itself from the paper backing, throw the paper in the trash.
Transfer the Emulsion:
- Make sure that the image is face up in the water. That means that when you are looking at the emulsion in the tray, it is the way you want to look at it on the paper. If the image is backward, you will need to flip it over. Do so gently with your fingers.
Take the watercolor paper and place it in the water underneath the floating image. - Take two corners of the image and place them up against the paper so that the image and paper are in between your fingers. Your fingers should be holding the two corners onto the paper.
- Gently pull the paper (with image attached) out of the water.
- The emulsion should be attached to the paper but could have wrinkles and may not be as flat as you would like it.
-
If you want to change the look of the image, you can then dip parts of the paper back into the water to release the image and be able to manipulate it as you like.
-
Once out of the water, you can also push the emulsion around on the paper until it starts to dry.
- Once you have the image as you like it, starting at the center, gently roll the image out in all directions.
- Continue to roll until all the air and water are out from under the image
- Place the image aside to dry.
- If the paper curls after drying, use a hot press or something similar to flatten the image.
- Spray the image with a UV protective sealant to prevent peeling & flaking.
- For instructions on using the polyester film to transfer the emulsion to other surfaces, please see the Polaroid website.
When cleaning up:
- The hot water bath will cool and non-hazardous crystals will appear. Be sure to clean out trays after use with soap and water.
Always wash the roller with warm water after each time you use it.
Recommendation for preserving and display:
- Spray your image - as with any color photograph, exposure to UV light and the environment can affect fading, etc. Polaroid recommends spraying a Polaroid transfer with UV coating to protect from harmful light as well as from moisture and the environment.
- Mat your image - If your image is going to be displayed, you will first need to choose a mat for your image. This will keep your image from touching the glass which could harm the image.
- Frame your image - Polaroid also recommends framing images with UV-absorber glass or acrylic plastic to ensure that the image will not be harmed.
- Display your image - Finally, if at all possible, keep images away from direct sunlight and use low lighting to illuminate the image.
If the image is to be put in a scrapbook or album, take care to use photo corners to apply the image to the pages. Use an album that contains "acid-free pages". Before applying the image, make sure to spray with UV coating.
Storage:
- If you are not going to frame your images or put them in albums, store them in archival boxes to ensure their stability.
- Store images in a temperature and humidity-controlled area. As with
any color photograph, changes in temperature and humidity can cause cracks to the image and create color shifts.
Copying your final image:
- With today's technology, it is easy to make a digital copy of your image with a scanner. If you have a flatbed scanner at home, simply place your final dry image on it and make the scan. This will allow you to make several copies of one image easily, or to keep a copy of that image if something should happen to the original.
Caution when handling film chemicals:
- Avoid contact with skin, eyes and mouth.
- If contact occurs with skin, wipe off immediately and wash with water.
- If eye or mouth contact occurs, quickly flush the area with plenty of water. If irritation occurs, see a doctor.
- Keep discarded materials in a closed container, away from children, animals, clothing and furniture (paste can cause staining).
- Be sure to keep room properly ventilated.
Glossary
Peel Apart Film: Most consumers think of Polaroid film as the square film with borders that develops itself inside a "sandwich" made up of several layers (Polaroid 600 film). Peel-apart films are the first generation of Polaroid films and are similar in that they develop themselves but need to be manually pulled out of the film holder, thus spreading the chemicals throughout the film plane, and developing the picture. Once that picture has fully developed, the negative must be peeled away from the positive, displaying the final image.
Polaroid Negative: the long paper "negative" image that contains the green chemical pod and the white tab with black arrows. This piece is normally thrown away when making traditional Polaroid prints. The image is recorded onto the negative and once pulled out of the film holder and through the rollers, thus spreading the chemicals, the image begins to transfer from the negative to the positive. That is why with Image Transfer, you have to peel the two apart early, to stop the image from going onto the positive, and allowing it to go onto the watercolor paper instead.
Polaroid Positive: the image, or "print." For Image Transfers, it is a faded image of the original scene. The positive has 4 even white borders around the edges and a manufacturing code (letters and numbers) on the back. This positive or print is much like a normal print that you would get from a 35mm camera. While processing, the image is transferred from the negative to the positive. After the full development time, the entire image is transferred and one is able to peel the positive away from the negative revealing the final image. The Polaroid positive contains the emulsion layer on the top that is then able to be "lifted" off during the Emulsion Lift process.
Daylab™ CopySystem: A product produced by Daylab™ Corporation that is much like a traditional photocopier, but copies a photo or
object onto Polaroid peel-apart film. The Daylab™ CopySystem can be found in some photo stores and online. www.daylab.com.
Polacolor 669 ER: This is the name of the film that should be used when doing Image Transfer and Emulsion Lift. Polaroid makes several kinds of film in several different sizes. Polacolor 669 ER is a color peel apart film that measures 314 × 414 . Polacolor 669 ER can be purchased at most photography stores and found online.
Hot pressed paper: Watercolor paper comes in several different styles and sizes. When starting out, Polaroid recommends using Hot pressed paper because it is smoother than other kinds and is therefore easier to use. As you improve at Image Transfer, you can move onto more textured papers and surfaces.
Polaroid Emulsion: The plastic layers of Polaroid film containing imaging dyes that make up the photograph.
RESOURCES:
- Polaroid Creative Techniques Guide
- Polaroid CD ROM - videos on "How To"
- Polaroid Transfers by Kathleen Carr
- Polaroid Manipulations by Kathleen Carr
- Photographer's Guide to Polaroid Transfer by Christopher Grey
"Polaroid and "Pixel Design" are registered trademarks of Polaroid Corporation, Waltham, MA, USA 02451 "Daylab" is a trademark of Daylab Corporation, Murrieta, CA, USA 92562. www.polaroid.com