PROA54BPR00 - Mobile Phone POLAROID - Free user manual and instructions
Find the device manual for free PROA54BPR00 POLAROID in PDF.
User questions about PROA54BPR00 POLAROID
0 question about this device. Answer the ones you know or ask your own.
Ask a new question about this device
Download the instructions for your Mobile Phone in PDF format for free! Find your manual PROA54BPR00 - POLAROID and take your electronic device back in hand. On this page are published all the documents necessary for the use of your device. PROA54BPR00 by POLAROID.
USER MANUAL PROA54BPR00 POLAROID
natural_image
Abstract geometric shape with gradient shading (no text or symbols)Polaroid
PROA54BPR-001 USER MANUAL
VERSION:
1.0.0
text_image
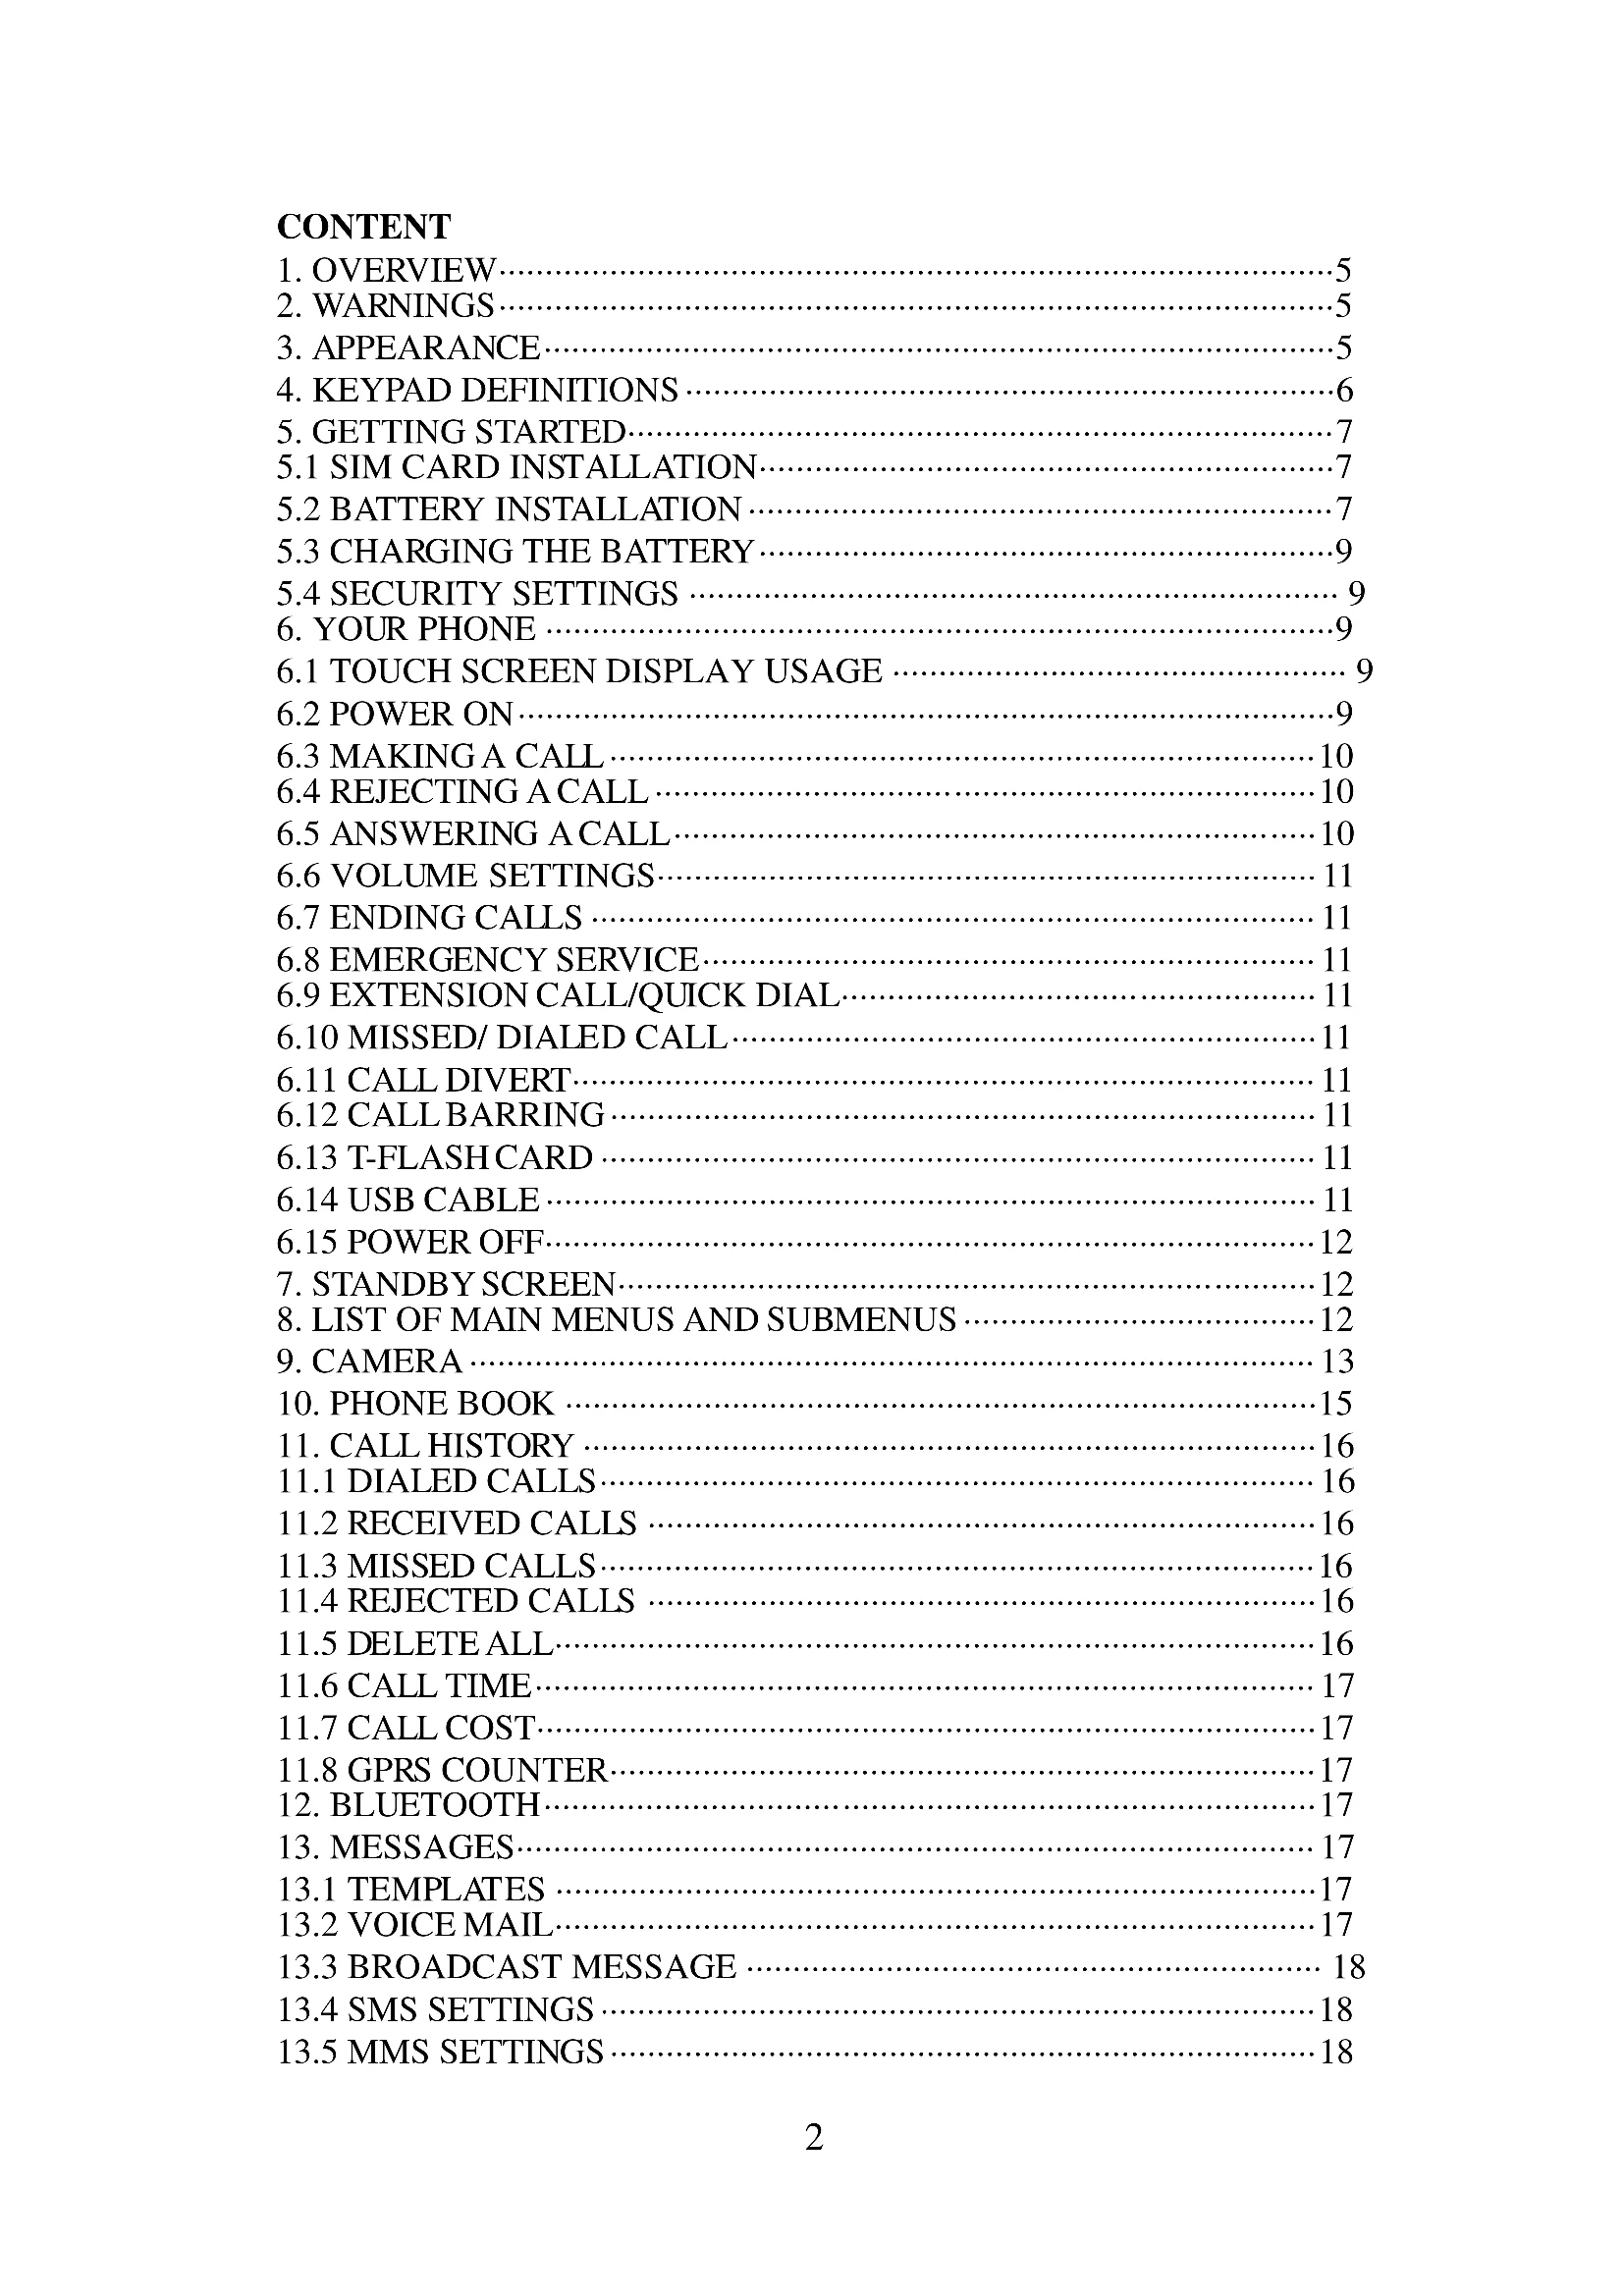
6:35 PM Browser Cathamom Calendar Camera Car Store Clock Contacts Email Facebook Gallery Search Maps Market Messaging MP3 Store Music PolaroidCONTENT
- OVERVIEW....5
- WARNINGS....5
- APPEARANCE....5
- KEYPAD DEFINITIONS 6
- GETTING STARTED....7
5.1 SIM CARD INSTALLATION....7
5.2 BATTERY INSTALLATION 7
5.3 CHARGING THE BATTERY 9
5.4 SECURITY SETTINGS 9 - YOUR PHONE 9
6.1 TOUCH SCREEN DISPLAY USAGE 9
6.2 POWER ON....9
6.3 MAKING A CALL....10
6.4 REJECTING A CALL 10
6.5 ANSWERING A CALL....10
6.6 VOLUME SETTINGS.... 11
6.7 ENDING CALLS 11
6.8 EMERGENCY SERVICE....11
6.9 EXTENSION CALL/QUICK DIAL 11
6.10 MISSED/ DIALED CALL....11
6.11 CALL DIVERT.... 11
6.12 CALL BARRING 11
6.13 T-FLASHCARD 11
6.14 USB CABLE 11
6.15 POWER OFF....12 - STANDBY SCREEN....12
- LIST OF MAIN MENUS AND SUBMENUS 12
- CAMERA 13
- PHONE BOOK 15
- CALL HISTORY 16
11.1 DIALED CALLS....16
11.2 RECEIVED CALLS 16
11.3 MISSED CALLS 16
11.4 REJECTED CALLS 16
11.5 DELETE ALL....16
11.6 CALL TIME.... 17
11.7 CALL COST....17
11.8 GPRS COUNTER....17 - BLUETOOTH....17
13.MESSAGES....17
13.1 TEMPLATES 17
13.2 VOICE MAIL....17
13.3 BROADCAST MESSAGE 18
13.4 SMS SETTINGS 18
13.5 MMS SETTINGS 18
13.6 MESSAGE MEMORY ...... 19
13.7 WRITE MESSAGE....19
13.8 CHATBOX 20
13.9 INBOX....21
13.10 OUTBOX 22
13.11 DRAFTBOX....23
13.12 SENTBOX 24
14. MULTIMEDIA....24
14.1 PHOTOS 24
14.2 AUDIO PLAYER 25
14.3 VIDEO PLAYER 25
14.4 SOUND RECORDER.... 26
15. ORGANIZER....26
15.1 ALARM 26
15.2 CALENDAR 27
15.3 UDX....28
15.4 CALCULATOR....28
15.5 WORLD CLOCK 28
15.6 TIMER 28
15.7 STK 28
16. INTERNET....29
16.1 URL 29
16.2 HOMEPAGE 29
16.3 BOOKMARKS....29
16.4 HISTORIES ......29
16.5 SAVE FILES 29
16.6 SNAPSHOT 30
16.7 WAP SETTINGS 30
17. PASTIME....30
17.1 PICTURE BROWSER....30
17.2 E-BOOK READER 30
17.3 LINK GAME....31
17.4 BOXMAN 31
18. SETTINGS....31
18.1 CALL SETTINGS 31
18.2 PEN CALIBRATION 33
18.3 PHONE SETUP.... 33
18.4 SECURITY SETUP....35
18.4.1 PIN 35
18.4.2 PIN2 35
18.4.3 PRIVACY PROTECT 36
18.4.4 AUTO KEY 36
18.4.5 RED KEY LOCKS KEYPAD 36
18.4.6 POWER ON PWD 36
18.4.7 THEFTROOF 36
18.5 NETWORK SETUP 36
18.5.1 NETWORK COUNT 36
18.6 RESTORE FACTORY SETTINGS 36
19. USER PROFILES....36
20. FILE MANAGER....37
21. ENTRY MODE 37
21.1 LETTER ENTRY MODE 37
21.2 NUMBER ENTRY MODE 37
22. ACCESSORIES....37
23. CARE AND MAINTENANCE 37
24. TECHNICAL INFORMATION 39
1. Overview
Thank you for purchasing our PROA54BPR-001 mobile phone.
2. Warnings
Not following these simple guidelines may be dangerous or illegal. Read the complete user guide for further information.
TURN ON SAFELY
Do not turn on the phone when wireless phone is prohibited or when it may cause interference or danger.
ROAD SAFETY
Obey all road safety laws. Always use both of your hands to operate the vehicle while driving.
INTERFERENCE
All wireless phones may be sensitive to interference, which may affect performance.
TURN OFF IN HOSPITALS
Follow all restrictions. Turn off the phone near medical equipment.
TURN OFF ON AIRCRAFTS
Follow all restrictions. Wireless devices can cause interference on aircrafts.
TURN OFF WHEN REFUELING
Do not use the phone at/near refueling stations. Do not use near fuel or chemicals.
USE SENSIBLY
Only qualified personnel may install or repair this product.
ENHANCEMENTS AND BATTERIES
Use only appropriate enhancements and batteries. Do not connect incompatible products.
WATER-RESISTANCE
Your phone is not water-resistant. Keep it dry.
BACKUP COPIES
Remember to make back-up copies or keep a written record of all important information stored in your phone.
CONNECTING TO OTHER DEVICES
When connecting to any external device, read its user guide for detailed safety instructions. Do not connect with incompatible products.
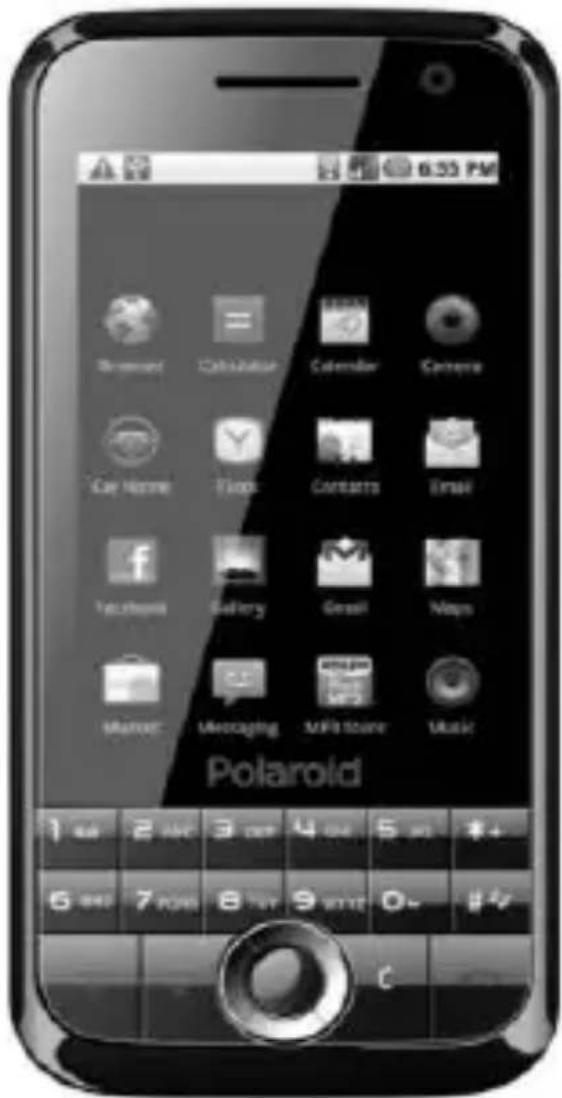
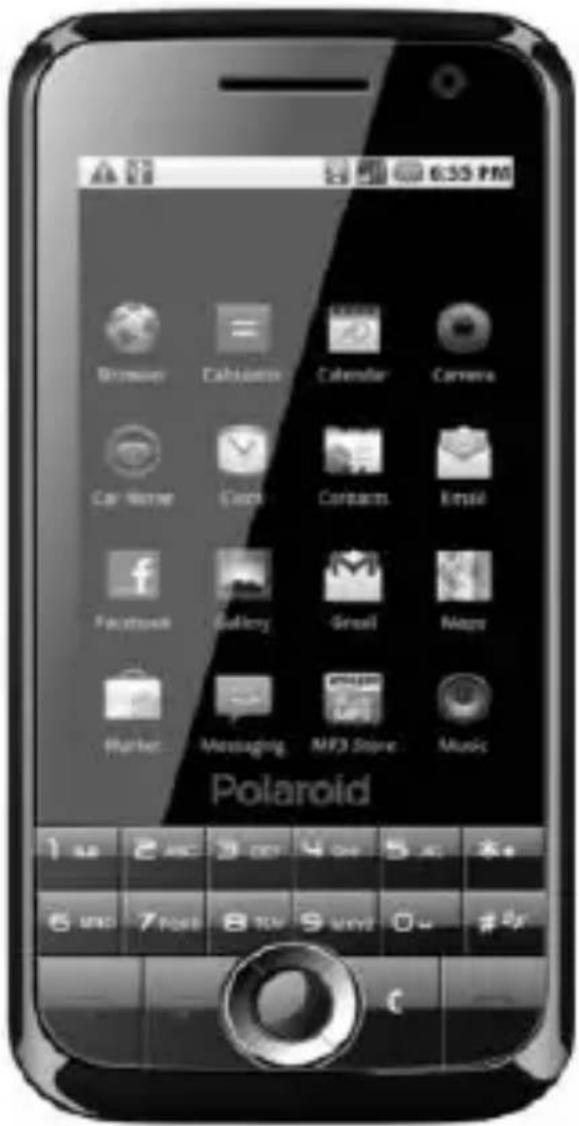
3. Appearance
- Keypad Definitions
| Key | Definitions |
| Left Soft key/Right Soft key | 1. Execute functions that the left-down/right-down corner indicator shows.2. In the standby mode, press Left Soft key to access Menu, Right Soft key to access Name. |
| Navigation key | 1. In other modes, it is used as the navigation/direction key except for some special functions.2. In the standby mode, press navigation keys to select the icons list on the screen, and then press OK key confirm to enter. |
| OK key | 1. After inputting numbers, press this key to do options.2. In the standby mode, press navigation keys to select the icons list on the screen, and then press OK key confirm to enter. |
| End key | 1. Mainly used as power on/off.2. Press to return to standby screen in any interface.3. End calls or reject incoming calls. |
| Dial key | 1. Press this key to dial or receive an incoming call.2. When in the standby mode, press this key to access Dialed Calls of SIM1. |
| SIM2 key | 1. In the standby mode, press this key to access Dialed Calls of SIM2.2. Press this key to dial or receive an incoming call. |
| Audio Player Key | 1. In the standby mode, press this key to access Audio Player. |
| * Key | 1. After inputting phone number, quick press * key twice, then the symbol "P" appears and input the extension number. You can make an extension call. |
| # Key | 1. In text editing interface, press "#" key to switchtext the input method.2. Press and hold "#" key to transfer the profile of General/ Meeting/ Vibrate. |
5. Getting Started
5.1 SIM Card Installation
When you subscribe to a cellular network, you will receive a plug-in SIM card complete with your subscription details, such as your PIN, and available optional services.
Caution: Do not bend or scratch your SIM card. Avoid exposing your SIM card to static electricity, water, or dirt.
natural_image
Exploded view diagram of a smartphone showing internal components (no text or labels)Tips Face the gold color contact point of SIM card towards the cell phone and push the SIM card into the slot.
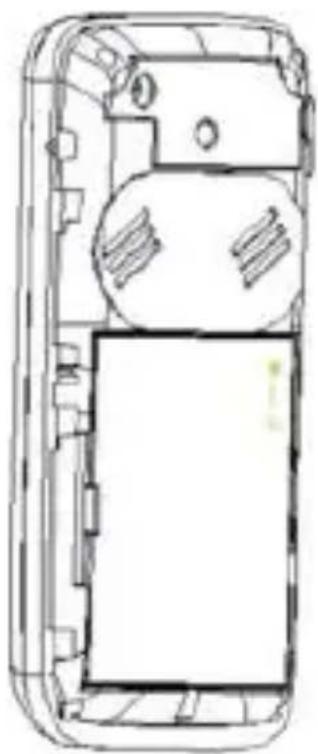
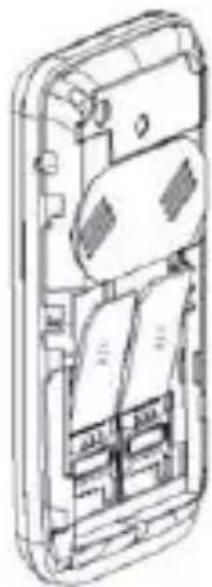
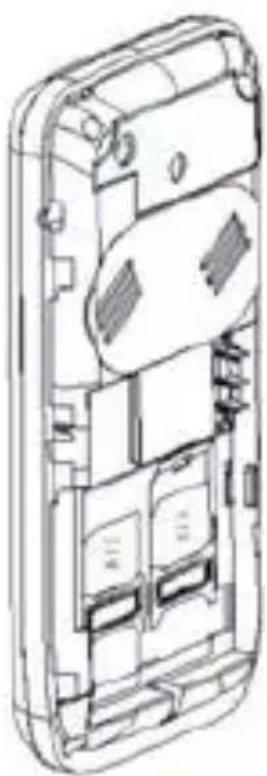
5.2 Battery Installation
natural_image
Exploded view diagram of a smartphone showing internal compartments and casing (no text or labels)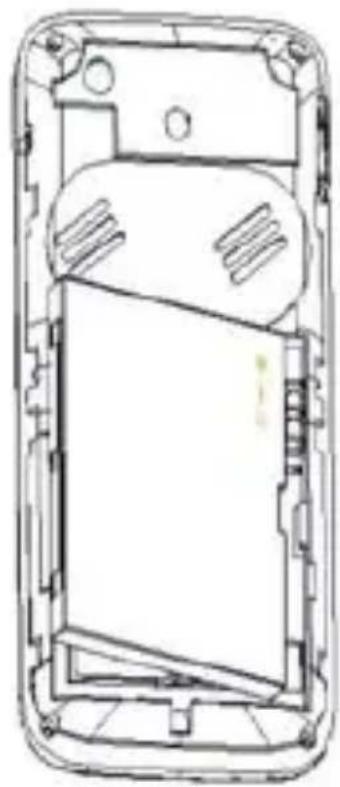
natural_image
Technical line drawing of a mobile phone casing showing internal components and mounting points (no text or symbols)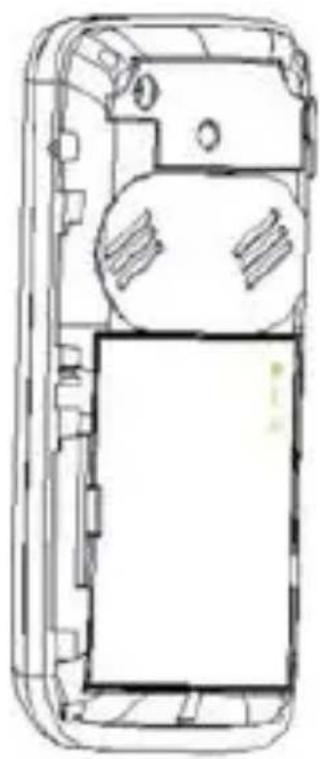
natural_image
Top-down line drawing of a mobile phone casing showing internal components and casing (no text or symbols)Caution: Install according to the illustration above to avoid breaking the battery connectors.
5.3 Charging the Battery
Insert the charger; the flash symbol on the charger plug must face upwards.
Connect the charger to a standard wall outlet and the battery power icon in the up-right corner of the screen will start scrolling. When the battery bar stops scrolling, the battery charge is complete. Press the two sides of the charger plug and disconnect the charger from the phone.
- When the battery is low, a "low battery" message will display across the screen and the battery icon will seem empty. If the battery level is insufficient, the phone will turn off automatically. Do not use your phone under low battery state for an extended period of time or it may cause battery damage.
5.4 Security Settings
—PIN code
PIN code (Personal Identity Number) prevents unauthorized use of your phone. The PIN code is provided by your network operator with the SIM card.
If you enter the wrong code three times in a row, the PIN code will be blocked. To unblock the PIN code, you need to enter your PUK. Your PUK is provided by your network operator.
- Power on Pwd
Activate/Modify/Deactivate Startup password (the length of the password is 4-8 digital numbers).
If you activate the "Startup password", you need to enter the password each time you turn the phone on. If you want to modify the Startup password or deactivate "Startup password", enter Modify/ Deactivate option to set.
6. Your Phone
6.1 Touch Screen Display Usage
This phone use touch screen. Press the icons list at the bottom of the screen, you can directly access: Phone Book, Video Player, Messages, Audio Player, and Menu.
6.2 Power On
- Press power key and hold to turn on your phone, light the backlight, and display power on animation.
- If you do not insert a SIM card, or the SIM card has incomplete connection, your phone will show "Insert SIM". In this condition, you can only access part of the menu and only permission using some urgent calling.
- If the PIN code is blocked, the alert message for inputting PUK code will display on the screen before power on.
The phone will search the network automatically after power on.
If your phone registers to network correctly, the name of the network and signal strength will display; if your phone can't register or can't register correctly, you can only access emergency calls and other functions that do not rely on the network.
6.3 Making a Call
In standby mode, press numerical keys to input phone number or touch corresponding icons in dial panel to dial phone number. After finish inputting phone numbers, press the dial key or SIM2 key to make a call. If you're making a long distance call, add the area code preceding the telephone number.
Press left soft key or OK key to access Options.
- Add to Phone Book
Add a phone number to telephone directory
- Add to Existing Contact
Add a phone number to the name already existed
- Send SMS
Send message to a certain number
- Send MMS
Send MMS message to a certain number
- Insert WPN
Pause P/Wait W
- SIM 1 Call
Dial the number of SIM card 1
- SIM 2 Call
Dial the number of SIM card 2
- IP Call
Dial IP phone
- Show or hide the dial panel
6.4 Rejecting a Call
Press end key to reject an incoming call.
6.5 Answering a Call
When you receive a call, the phone will ring or vibrate and will display an incoming call indicator. Press the dial key or SIM2 key to answer.
Press left soft key to access:
Turn on Handfree
Shuttle
•Phone Book
- Messages
-Call History
- Start Recording
•Mute
6.6 Volume Settings
During a call, press navigation keys to adjust the volume.
6.7 Ending Calls
Press the end key to end or cancel a call.
6.8 Emergency Service
You can dial an emergency call without the SIM card.
Contact your service provider to get the emergency call number.
6.9 Extension Call/Quick Dial
After inputting phone number, quickly press key (*) twice until the symbol "P" appears, then input the extra number.
6.10 Missed/ Dialed Call
Enter main menu->Call History -> check Missed/Dialed calls.
In standby mode, press dial key to check Dialed calls of SIM1, press SIM2 Key to check Dialed calls of SIM2.
6.11 Call Divert
When the call divert is activated, incoming calls will be diverted to voice mail or other phone numbers according to the call divert settings.
6.12 Call Barring
When the call barring activated, some of the calls will be barred according to the call barring setting condition. Contact your service provider to sign up for call barring.
6.13 T-flash Card
Insert the T-Flash card into phone from the side slot. This will expand the Flash memory of the phone.
Tap Multimedia menu, you can browse MP3, MP4, picture, etc.
6.14 USB Cable
You can transfer and store files, such as MP3, MP4 and pictures from PC, through USB cable, to the U-disk in phone or identified SD card that is inserted.
The operating method is as follows:
- Connect: Plug the IO port of the cable into your phone, and the USB port into the PC.
Read & write mode:
T-Flash card: Install the T-Flash card, and connect the phone set to PC, if the phone set is power off, it can be charged or used as a U-disk.
- File transfer
- File folder instruction: Find the mobile memory (T-FLASH card) in "my computer", double click it, and you will find the folders as follows:
"Photos" is used to store the picture.
"My Music" is used to store the MP3 music file.
"Videos" is used to store the video file.
These folders is preset by the system, don't change the folders' name.
-Read &Write: You can copy the files in T-Flash to PC hard disk, or copy the files in PC hard disk to the folder of the T-Flash card.
- Quit: On the PC side, select taskbar->delete hardware safely, exit the T-Flash card identified states, stop the T-Flash card, and pull out the USB cable.
6.15 Power Off
In standby mode, press and hold power key to turn off phone.
7. Standby Screen
Press and hold power key to turn on your phone, phone will light the backlight and display power on animation.
On the screen, icons indicate the network name, signal strength, battery levels, time and date, and phone configure information. Refer to icons information in standby screen.
8. List of Main Menus and Submenus
In standby screen, press left key to access the main menu. The main menu includes items: (1) Camera (2) Phone Book (3) Call History (4) Bluetooth (5) Messages (6) Multimedia (7) Organizer (8) Internet (9) Pastime (10) Settings (11) User Profiles (12) File Manager, all together 12 items.
List of main menus and sub menus as below
Camera
Pone Book
Call History Dialed Calls
Received Calls
Missed Calls
Rejected Calls
Delete All
Call Time
Call Cost
GPRS Counter
Bluetooth Open Bluetooth
Bluetooth Visibility
Paired Device
My Bluetooth Name
Bluetooth File Location
Help
Messages Write Message
ChatBox
Inbox
Outbox
Draftbox
Sentbox
Multimedia Photos
Audio Player
Video Player
Sound Recorder
Organizer Alarm
Calendar
UDX
Calculator
World Clock
Timer
STK
Internet SIM1
SIM2
Pastime Picture Browser
E-Book Reader
Link Game
Boxman
Settings Call Settings
Pen Calibration
Phone Setup
Security Setup
Network Setup
User Profiles General
Meeting
Vibrate
Indoor
Outdoor
Bluetooth
File Manager
9. Camera
Camera:
Press left soft key or OK key to select the function. The photo can be previewed in the screen; press OK key to shoot and right soft key to back.
After saving the photo, you can access options to: Delete, Set as
Wallpaper, and Photos.
In shoot mode, press left soft key to access Options:
-Photos
Change Folder
Send: MMS/ Bluetooth
Slide Play
Delete
Set as Wallpaper
Rename
Edit Picture
Mark: Mark/ Unmark/ Mark All/ Unmark All
Detail: File Name/ Date/ Time/ Size/ Location/ Resolution
Slide Setting: Select Effect (None/ Box Extend/ Grid Extend/ Rightward
Extend/ Leftward Extend/ Upward Extend/ Downward Extend/ Order
Effect); Slide Delay Time (2S/ 3S/ 6S/ 10S/ 16S/ 20S)
- Settings
Quality: High/Normal/Brief
Avoid Glitter: 50Hz/60Hz
Shutter: Active/Deactive
Auto Save: Active/Deactive
Tips Prompt: Active/Deactive
- Storage: Select file folder to store
•Help: Supply the help information
Use the navigation keys, you can choose and enter the functions list on the right screen:
- Shoot Mode: Back DC/ Back DV/ Fore DC/ Fore DV
Size: 1280x960, 640x480, 320x240, 240x320
•Scene Mode: Normal/ Night
Light
Contrast
- Add Frame: No Frame/ Frame1/ Frame2/ Frame3/ Frame4
•Burst: Forbidden/ 3 Photos/ 6 Photos
- White Balance: Auto/ Incandescence/ Fluorescent/ Sun Light/ Cloudy
Delay: Forbidden/ 3S/ 10S
- Effect Settings: Normal/ B&W/ Red/ Green/ Blue/ Yellow/ Negative/ Canvas
Video Recorder:
Select the “camera” icon on the screen to shift camera into video recorder. Press left soft key to access Options:
•Videos
New Folder
Use Audio: Screensaver/ Power on Animation/ Power off Animation
Forward: MMS/ Bluetooth
Delete
Detail: Filename/ Date/ Time/ Size/ Location/ Resolution/ Duration
Edit: Rename/ Copy
Search
Sort: By name/By time/By size/By type
Mark: Mark/ Unmark/ Mark All/ Unmark All
Memory Query: Memory Card
-Settings
Avoid Glitter: 50Hz/60Hz
Audio: Active/Deactive
Type: 3Gp/Avi
Tips Prompt: Active/Deactive
• Storage: Select file folder to store
- Help: Supply the help information
Use the navigation keys, you can choose and enter the function list on the right screen:
Shoot Mode: Back DC/ Back DV/ Fore DC/ Fore DV
-Size: 320x240, 176x144, 160x128, 128x96
•Light
Contrast
- Effect Settings: Normal/ B&W/ Red/ Green/ Blue/ Yellow/ Negative/ Canvas
10. Phone Book
You can store contacts' personal information and numbers while also search for previously stored contacts.
Press left soft key to access Options:
- Add New Entry
- Phonebook Search
- Detail: check the detail of contact.
- Write Message: Send SMS/ Send MMS
- Dial Up: Dial Directly/ IP Dial
- Send Vcard: By SMS/ By Bluetooth
- Delete
- Mark: Mark/ Mark All
- Copy: Copy to SIM1/ Copy to SIM2/ Copy to Phone/ Copy to Card
- Others: Speed Dial Setting/ Own Number/ Memory Query/ Double Line Display
11. Call History
11.1 Dialed Calls
Display the latest Dialed Calls list.
Press Ok key to view the Detail, or press left soft key to access options:
- Detail
Display the information of dial calls (Number, Date, Time, Duration, Style, and SIM Name)
- Call
Recall the number
- Edit
Edit the number
- Save
Save the number to Phone/SIM1/SIM2
- Send Message
•SMS
Send SMS to receiver
-MMS
Send MMS to receiver
- Add to Existing Contact
Add the number to existing contact
- Set as Rejected Number
Set as rejected number.
- IP Call
Enter SIM1/SIM2 Add IP prefix number to the number and call.
- Delete
Delete the number.
- Delete All
Delete all numbers.
11.2 Received Calls
Refer to "Dialed Calls"
11.3 Missed Calls
Refer to "Dialed Calls"
11.4 Rejected Calls
Refer to "Dialed Calls"
11.5 Delete All
Delete all records.
11.6 Call Time
Display information details of SIM1/SIM2: Last Call, Received Calls, Dialed Calls, and All Calls. Press left soft key to "Reset".
11.7 Call Cost
Press up/down navigation key to check: All Costs, Max Costs, Cost Rate, and Cost Reset.
11.8 GPRS Counter
Select SIM1 or SIM2 first, and press OK key to display information of Last Sent, Last Receive, Total Sent, and Total Receive. Press left soft key to "Reset".
12. Bluetooth
- Open/Close Bluetooth
- Bluetooth Visibility
• Show phone
Hidden - Paired Device
- My Bluetooth Name
- Bluetooth File Location
- Help
13. Messages
After entering Messages, press left soft key to access Options: Templates, Voice Mail, Broadcast Message, SMS Settings, MMS Settings, and Message Memory.
13.1 Templates
Press up/down navigation key to select a template:
- Edit
Edit the template. - Send
Send the template by SMS.
- Back
Exit to the upper submenu.
13.2 Voice Mail
Select SIM1 or SIM2.
- Line 1 Number
- Retrieve Message
-Number Settings
This function needs a network supply. Please contact with your service provider for more information.
- Line 2 Number
Refer to "Line 1 number".
- Fax Number
Refer to "Line 1 number".
- Data Number
Refer to "Line 1 number".
13.3 Broadcast Message
- Read
Read broadcast
- Startup
Select the startup: Turnon/Deactivate
- Channel
Add Channel/ List Channel
- Language
Select language: All language/ English etc.
13.4 SMS Settings
- SIM1 Msg Center
Set SIM1 message center number. It is suggested not to change the default number if you don't know the correct one. Contact your operator provider to get your Message center number.
- SIM2 Msg Center
Set SIM2 message center number. It is suggested not to change the default number if you don't know the correct one. Contact your operator provider to get your Message center number.
- Message Validity Period
Set the message validity: 1 Hour/ 6 Hours/ 24 Hours/ 72 Hours/ 1 Week/ Maximum
- Status Report
Set the status report: Activate/ Deactivate
- Save Sent Messages
Set the save sent messages: Prompt/ Save/ Not Save
- Prior Storage Medium
Set the store medium: SIM/ Phone
13.5 MMS Settings
- SIM1 MMS Count
- SIM2 MMS Count
- Arrive Report
Set: Activate/ Deactivate.
- Read Report
Set: Activate/ Deactivate.
- Anonymity
Set: Activate/ Deactivate.
- Priority
Set: High Priority/ Medium Priority/ Low Priority.
- Retrieve MMS
Set: Retrieve Manual/Retrieve Auto
- Play Sound
Set: Activate/ Deactivate.
- Adversting
Set: Activate/ Deactivate.
- Message Validity Period
Set: 12 Hours/ 1 Day/ 1 Week/ Maximum.
- Storage
Set: Picture/Music/Movie
Reset all the settings to the original values.
- Delete SMS Notification of MMS Push
13.6 Message Memory
- SMS
Check the memory of SMS (Phone, SIM1, and SIM2)
- MMS
Check the memory of MMS (MMS Memory not download/WAP Push Memory/OTA Memory)
13.7 Write Message
13.7.1 New SMS
This function can begin a new SMS.
After completing the SMS, press left soft key to access to options:
- Send
Input number or press left soft key to access to "PB". Select SIM1 or SIM2 to send the SMS.
- Insert Template
Press up/down navigation key to select a template to insert to SMS.
- Contact Info
Insert a number to SMS.
- Add Phiz
Select a phiz to insert to SMS.
- Save
Save the edited SMS to draftbox from SIM1 or SIM2.
13.7.2 New MMS
- Send
Send the MMS.
- To
- Add Addressee
- Add Group
Delete
- Modify
- Cc
Refer to "To".
- Bcc
Refer to "To".
- Edit Title
- Edit Content
Press left soft key to access to "Options"
- Edit text
- Insert Slide
- Insert Picture
- Insert Sound
- Insert Video
- Delete Slide
- Set Slide Time
- Preview
Preview the MMS
- Save
Save the MMS to draftbox.
- Set Send Ontime
13.8 ChatBox
After enter Chatbox, press up/down navigation key to select messages.
Press OK key to check the details of message, and then press left soft key to access Options:
- Reply
SMS: Reply SMS to sender.
-MMS: Reply MMS to sender.
- Check
- Call
-Dial: Select SIM1 or SIM2 to call the sender.
- IP Dial: Select SIM1 or SIM2 to call the sender.
- Delete
Delete the message
- Delete All
Delete all the messages.
13.9 Inbox
13.9.1 SMS
After entering the Inbox, press up/down navigation key to select messages. Press OK key to check the details of message, or press left soft key to access Options:
- Reply
- SMS: Reply SMS to sender.
•MMS: Reply MMS to sender.
- Delete
Delete the message.
- Call
- Dial: Select SIM1 or SIM2 to call the sender.
• IP Dial: Select SIM1 or SIM2 to call the sender.
—Lock
Lock the message
—Mark
Mark
Unmark
Mark All
Unmark All
SIM1 Storage SMS
SIM2 Storage SMS
Phone Storage SMS
MMS
—Sort
Time: Arrange the messages according to the time.
Name: Arrange the messages according to the senders' names.
Subject: Arrange the messages according to the subjects.
Type: Arrange the messages according to the type.
13.9.2 MMS
Press left soft key to enter options
- Reply
•SMS: Edit SMS reply to sender.
•MMS: Edit MMS reply to sender.
- Delete
Delete
- Call
Dial/IP Dial
- Lock
Lock MMS.
- Mark
Mark
Unmark
Mark All
Unmark All
SIM1Storage SMS
SIM2 Storage SMS
Phone Storage SMS
MMS
- Sort
Time: Arrange the messages according to the time.
Name: Arrange the messages according to the senders' names.
Subject: Arrange the messages according to the subjects.
Type: Arrange the messages according to the type.
13.10 Outbox
13.10.1 SMS
Checks the information of unsuccessfully sent message in outbox.
Access to "Options":
- Send
Resend the message.
- Delete
Delete the message.
—Lock
Lock the message.
—Mark
Mark
Unmark
Mark All
Unmark All
SIM1 Storage SMS
SIM2 Storage SMS
Phone Storage SMS
MMS
—Sort
Time: Arranged the messages according to the time.
Name: Arranged the messages according to the senders' names.
Subject: Arranged the messages according to the subjects.
Type: Arranged messages according to the type.
13.10.2 MMS
Press up/down navigation key to select MMS, open it and do the following options:
- Send
Send MMS.
- Play
Play MMS.
- Delete
Delete the MMS
- Edit
Edit MMS
13.11 Draftbox
You can save unsent and edit incomplete messages in draftbox.
Press left soft key to access to "Options":
- Delete
Delete the message.
- Edit
Edit the message.
- Lock
Lock this message.
—Mark
Mark
Unmark
Mark All
Unmark All
SIM1 Storage SMS
SIM2 Storage SMS
Phone Storage SMS
MMS
—Sort
Time: Arranged the messages according to the time.
Name: Arranged the messages according to the senders' names.
Subject: Arranged the messages according to the subjects.
Type: Arranged messages according to the type.
13.12 Sentbox
Check the message in sentbox.
13.12.1 SMS
Select one message to open, and then access Options:
- Forward
You can forward the selected message to others.
- Delete
Delete the message.
- Call
Dial/IP Dial
- Detail
You can check the Contact, Date, Time, and Pos.
13.12.2 MMS
Select one message to open, and then access Option:
- Play
Play the message
- Delete
Delete the message.
- Forward
You can forward the selected message to others.
- Message Details
Display details of message.
14. Multimedia
14.1 Photos
Choose photos to preview or return. Access to Options:
Change Folder
- Send: MMS/Bluetooth
.Slide Play
-Delete
- Set as Wallpaper
•Rename
- Edit Picture
• Mark: Mark/Unmark/Mark All/Unmark All
- Detail: File Name/Date/Time/Size/Location/Resolution
Slide Setting: Select Effect (None/ Box Extend/ Grid Extend/ Rightward
Extend/ Leftward Extend/ Upward Extend/ Downward Extend/ Order Effect); Slide Delay Time (2S/ 3S/ 6S/ 10S/ 16S/ 20S)
14.2 Audio Player
This function menu is used to store and play the multimedia file.
Press the left soft key or "OK" key to enter and use the Navigation keys to operate the MP3 player.
Press up and down navigation key to adjust volume. Press left soft key to access Options:
• Music Lib
- Current Play List
• Display mode: Detail/Lyric
- Repeat: Activate/Deactivate
• Shuffle: Activate/Deactivate
- Set Ring: Set Call Ring/ Set Alarm Ring
•EQ Setting: Regular/Classic/Odeum/Jazz/Rock/Soft Rock
- Add to List
14.3 Video Player
Preview the videos. Press "*" key and "#" key to adjust volume. Press navigation keys to operate the video player and left soft key to access to "List", then "Options":
-Play
- Add Video Item
- Update List
- Delete from List
- Detail: Name, Date, Time, Resolution, Duration, and Size
- Set As Screensaver
•Power On Animation
- Power Off Animation
•Mark: Mark/Unmark/Mark All/Unmark All
When the video player is playing, you can shift between full screen and half screen by touching the screen.
14.4 Sound Recorder
You can take a recorder in this function.
From the top to the bottom: Play/Pause, Stop, Record, File list. In the play mode, use "*" key and "#" key to adjust the volume. Press OK button to record. After record, access Options:
• Audition
- Record Again
Delete
- Send: MMS/ Bluetooth
- Record File List
After entering the file list, select one file, access to Options:
New folder
Set as Call Ring: SIM1/SIM2
-Forward: MMS/Bluetooth
Delete
•Detail
Check the file detail: Filename, Date, Time, Size, and Location
- Edit: Rename/Copy
- Search
- Sort: By name/By time/By size/By type
·Mark: Mark/Unmark/Mark All/Unmark All
• Memory Query: Memory Card
15. Organizer
15.1 Alarm
The alarm clock feature sounds an alert or makes a vibration alert at a time you specify.
- Alarm1
•Edit
Set alarm of name, time, ring and mode.
- Enable/Disable
Set alarm1 activate or deactivate.
- Alarm2
Refer to "Alarm1".
- Alarm3
Refer to "Alarm1".
- Alarm4
Refer to "Alarm1".
- Alarm5
Refer to "Alarm1".
15.2 Calendar
You can use this feature to view the year, date and solar term easily. Use navigation keys to navigate other date. Press left soft key to access:
- New Schedule
-Name
Enter the schedule name.
Date
Edit the schedule date.
·Time
Edit the schedule time
•Ring
Fixed rings/ More Rings
•Freq
Set Freq: Once/ Everyday/ Every Week/ Every month/ Every year/ No Awake.
Deadline
Press left soft key to save and right soft key to return.
- View Schedule
View schedule
- All Schedule
Display all schedules.
- Check
• Edit
- New Schedule
Delete
- Delete All
- Clear Today Calendar Delete today schedule.
- Clear All
Delete all schedules.
- Go to Date
Enter the Solar calendar and it can go to the date you want to check.
- By Week
- New Schedule
• View Schedule - All Schedule
-Clear Today Calendar
Clear All - Go to Date
By Month
15.3 UDX
-
PB Import
•PB Import phone
PB Import sim1
•PB Import sim2
•Detail -
PB Export
-Records on handset
•Records on SIM1
-Records on SIM2
15.4 Calculator
This feature can use your phone as a calculator for simple calculations.
Press number keys or touch correspond icons to enter numbers. Use
following direction keys to calculate :
Up, down, left, right key: 4, -, ×,
OK key: Show the calculation result.
* Key: Decimal point
15.5 World Clock
Use the left/right key to select the time zone, then "Options"
- Set as Local
- Set as Daylight Saving Time
15.6 Timer
This function counts down time, when it reaches 00, your phone rings or vibrates.
15.7 STK
If your SIM card supports STK function, the phone can display different
first level menu according to different STK card. This function needs the network provider support. If user finds STK function can't operate normally, please contact the network provider. If the network provider does not support this function, we do not claim any responsibility whatsoever.
16. Internet
Select SIM/SIM2 to enter, and then press left soft key:
16.1 URL
Enter the website to connect with this WAP page.
16.2 Homepage
Enter the homepage; it will connect with default page automatically.
16.3 Bookmarks
You can select, add bookmark, enter the bookmark's address, name and save it. Press left soft key to access options:
- Access
Connect with WAP page.
- View
Check the details of bookmark
- Edit
Edit the name and information of bookmark.
- Delete
Delete the bookmark.
- Delete all
Delete all bookmarks.
16.4 Histories
Save the browsed WAP page. Select up/down navigation key to select page and press the left soft key to confirm.
- Access
Connect with WAP page.
•View
Check the details WAP page
Delete
Delete the WAP page.
Delete all
Delete all WAP pages.
16.5 Save Files
- Save Snapshot
• Save Image Files
- Save Sound Files
16.6 Snapshot
If you want to browse the page but not update if frequently, you can save it and browse it in the Snapshot.
16.7 WAP Settings
- Browser setting
You can select "Delete Cache, Network Count SIM1, Network Count SIM2, Image Download, Play Background Sound, and Accept Pushmsg".
—Prior Storage Medium
-Picture
•Music
•Movie
- GPRS Setting
- Send: MMS/Bluetooth
Slide Play
- Delete
-Set as Wallpaper
-Rename
- Edit Picture
• Mark: Mark/Unmark/Mark All/Unmark All
•Detail: File Name/Date/Time/Size/Location/Resolution
- Slide Setting: Select Effect (None/ Box Extend/ Grid Extend/ Rightward Extend/ Leftward Extend/ Upward Extend/ Downward Extend/ Order Effect); Slide delay Time (2S/ 3S/ 6S/ 10S/ 16S/ 20S).
17.2 E-Book Reader
Read E-Book stored in the T-Flash Card.
Press left soft key to access Option:
- Add Bookmark
• See Bookmark
- Jump First Page
Jump Last Page
Jump Pages
Turn Off Backlight
Press right soft key to back to the TXT file list, use navigation keys to select the TXT files. Press left soft key to access "Options":
•Detail: Filename, Date, Time, Size, and Location.
- Last Read Books
- Send With Bt
Delete
Mark: Mark/ Cancel mark/ Mark all/ Cancel all mark
- Settings: Browse Page method/ Color
17.3 Link Game
New Game
- Continue
High Score
-Class
• Help
17.4 Boxman
New Game
- Continue
Select Scene
• Help
18. Settings
18.1 Call Settings
18.1.1 Dual SIM Settings
- Set Dual Sys Call Forward
•SIM Enable Select: Only SIM1 Open/ Only SIM2 Open/ Dual SIM Open
SIM Settings: Call/ SMS/ MMS/ Internet/ Prompt Dial/ Original SIM Reply
Set SIM Name
·Dual SIM Settings Wizard
Help
18.1.2 Network Select
This function can let you select the network manually or automatically.
Select SIM1/SIM2 and then access:
- Auto Select
Press the left key and Ok, the mobile phone will search various networks.
This operation will let your phone register the most suitable network.
- Manual Select
Press the left soft key and Ok, the mobile phone will search various networks. You can select the suitable network from the listed networks.
18.1.3 Call Divert
Select SIM1/SIM2
Unconditional
• If Busy
- If No Answer
If Unreachable
- Cancel All Diverts
18.1.4 Call Barring
Select SIM1/SIM2
*All Outgoing Calls: Activate/Deactivate/Check Status
- All Incoming Calls: Activate/Deactivate/Check Status
- Incoming When Roam: Activate/Deactivate/Check Status
*All Intl Outgoing: Activate/Deactivate/Check Status
Outgoing Intl Roam: Activate/Deactivate/Check Status
- Cancel All Barring
- Change Password
18.1.5 Call Waiting
Select SIM1/SIM2
- Activate
- Deactivate
Check Status
18.1.6 Hide ID
Select SIM1/SIM2
- Hide ID
- Display ID
- Display ID by Network
18.1.7 Line Switching
Select SIM1/SIM2
—Line 1
—Line 2
18.1.8 Flight Mode
—Active
—Select When Power On
18.1.9 More
—IP Number
In this function, you can set IP call to enter the number.
Select SIM1/SIM2 first and then use the up/down navigation key to select the number and press left soft key to access:
SIM1
• Active/ Cancel
Modify
SIM2
Active/ Cancel
- Modify
—50 Secs Warning
Set: Activate/ Deactivate.
—Connect Prompt
Set: Activate/ Deactivate.
—Answer/Reject Mode
Set: SMS reply after reject/anykey answer
—Auto Redial
Set: Activate/ Deactivate.
18.2 Pen Calibration
18.3 Phone Setup
18.3.1 Time and Date
- Set Time
- Set Date
- Time Display Type
12 Hours
-24 Hours
- Date Display Type
Year-Mon-Day
Mon-Day-Year
Day-Mon-Year
- Network Updates Time Automatically
Set Activate or Deactivate
18.3.2 Language
You can choose several languages under this function.
18.3.3 Display Characteristic
18.3.3.1 Wallpaper Settings
-
Wallpaper One/Wallpaper Two/ Wallpaper Three/ More Paper
18.3.3.2 Set Idle Display
You can choose: Network Operator, Today Schedule, and Custom Word.
This can be multiple selected.
18.3.3.3 Set Screensavers
Set Screensavers here.
18.3.3.4 LCD Backlight
Set Bcklightness and Time here.
18.3.3.5 Keypad Light -
20 Sec
- 10 Sec
5 Sec - Night Mode
- Deactivate
18.3.3.6 Animation Effect
- 3D Style Main Menu
- Power On Animation
Default
• More Animation
- Power Off Animation
Default
-More Animation
- 3D Style
3D Style List Roll
-3D Style Screen Roll
18.3.3.7 Clock Style
You can choose Simulant Clock, or Digital Clock.
18.3.4 Input Modes
- Handwriting Language: set writing language
- Handwriting Speed: Fast/Normal/Slow
- Handwriting boldness: Thick/Common/Thin
- Handwriting Color
18.3.5 Set Shortcut
The original set: Write SMS, Internet, Alarm, User Profiles, and Bluetooth.
You can choose others functions for shortcut: Write SMS; Audio Player; Video Player; Camera; Choose Ring; User Profiles; Alarm; Game; File Manager; Bluetooth; Calendar; Calculator; Internet; E-Book Reader; Message Inbox; Sound Recorder; Dual SIM Settings; Outbox; Dial; Phone Book; Messages.
18.3.6 Schedule Power On/Off
- Auto Power On
• Edit
--Time
--Mode: Once/Every Day/ Every Week
-Enable/Disable
- Auto Power Off
- Edit
--Time
--Mode: Once/Every Day/ Every Week
- Enable/Disable
18.3.7 Power Management
Check battery capacity here.
18.4 Security Setup
18.4.1 PIN
Select SIM1/SIM2
- Activate
- Modify
- Deactivate
18.4.2 PIN2
Select SIM1/SIM2
- Modify
18.4.3 Privacy Protect
- Settings
Enter the password: 1234, then you can set the follow items as privacy protection: Call History, Messages, Camera, Name, File Manager, E-Book Reader, Calendar, and Mass Storage.
- Password Change
18.4.4 Auto Key
- Deactivate
- 5 sec
- 15 sec
- 30 sec
- 1 minute
- 5 minutes
18.4.5 Red Key Locks Keypad
- Activate
- Deactivate
18.4.6 Power on Pwd
18.4.7 Theftroof
- Activate
- Deactivate
- Modify Pwd
18.5 Network Setup
18.5.1 Network Count
18.6 Restore Factory Settings
Input password 1234 to restore factory settings.
19. User Profiles
- General
- Meeting
- Vibrate
- Indoor
- Outdoor
- Bluetooth
Press left soft key to enter "Options": Active/ Settings/ Rename/Enhancing ring.
20. File Manager
New Folder
Delete
•Detail
- Edit: Rename/ Copy
Search
- Sort: By name, By time, By size, and By type.
Mark: Mark, Unmark, Mark All, Unmark All
•Memory Query: Memory Card
21. Entry mode
You can use several methods for entering text and numbers. By selecting a Text Entry Mode, the phone provides a few Text Entry Mode for new adding, editing contact records, finding contacts, editing SMS and writing memos.
Select Text Entry Mode:
21.1 Letter entry mode
Press a key once to insert the first letter on the key, twice for the second letter, etc. If you pause briefly, the last letter in the display is accepted and the text awaits the next entry.
For example, press the "2" key continuously, it will appear "a", "b", "c", "2" one by one.
21.2 Number entry mode
Number Entry Mode can input the number in the text, such as telephone number. Tap the proper number and input it.
22. Accessories
You can use accessories approved by our company, the other accessories can be provided by the seller.
Extra battery
We provide several kind of lithium battery with different capacity.
Traveler charger
Super sleek, useful charger can charge the mobile phone very quickly. Plug the charger into the electrical plugs and connects the other side connects to the left side of the phone.
You can check the charging progress in the screen of the phone, it will not power on automatically when charging.
23. Care and maintenance
Battery care
- Your device is powered by a rechargeable battery. When the power is weak, please charge the battery. In order to extend the lifespan of the battery, use all the battery's power before recharging.
- Unplug the charger from the electrical plug and the device when not in use. Do not leave the battery connected to a charger more than a week. Overcharging may shorten its lifespan.
- Extreme temperatures can affect the ability of your battery to charge. Battery needs the fit temperature. If the surrounding temperature is over 40^ , the battery cannot be charged.
- Use the battery only for its intended purpose. Never use any charger or battery that is damaged.
Do not short-circuit the battery. Accidental short-circuiting can occur when a metallic object such as a coin, clip, or pen causes direct connection of the positive (+) and negative (-) terminals of the battery.
(These look like metal strips on the battery.) Short-circuiting the terminals may damage the battery or the connecting object.
- Leaving the battery in hot or cold places, such as in a closed car in summer or a freezer in winter conditions, will reduce the capacity and lifetime of the battery. Always try to keep the battery between 59^ and 77^ (15°C and 25°C). A hot or cold battery may not function temporarily, even when the battery is fully charged.
- Battery performance is particularly limited in temperatures below freezing.
- Do not dispose of batteries in a fire! Dispose of batteries according to local regulations. Please recycle when possible. Cellphones are not considered household waste.
Mobile phone maintenance
- Keep the device dry. Precipitation, humidity, and all types of liquids or moisture can contain minerals that will corrode electronic circuits. If your device does get wet, remove the battery and allow the device to dry completely before replacing it.
- Do not use or store the device in dusty, dirty areas. Its moving parts and electronic components can be damaged.
- Do not store the device in hot areas. High temperatures can shorten the life of electronic devices, damage batteries, and warp or melt certain plastics.
- Do not store the device in cold areas. When the device returns to its normal temperature, moisture can form inside the device and damage electronic circuit boards.
- Do not attempt to open the device other than as instructed in this guide.
- Do not drop, knock, or shake the device. Rough handling can break internal circuit boards and fine mechanics.
- Do not use harsh chemicals, cleaning solvents, or strong detergents to clean the device.
- Do not paint the device Paint can clog the moving parts and prevent
proper operation.
- Use only the supplied or an approved replacement antenna.
Unauthorized antennas, modifications, or attachments could damage the device and may violate regulations governing radio devices.
All of the above suggestions apply to your device, battery, charger, or any enhancement. If any device is not working properly, take it to the nearest authorized service facility for service.
24. Technical Information
Weight:0.334kg(compete set)
Battery work times refer to the list below (Will not announce if the capacity is changed):
The operation time of the battery depends on conditions such as:
• Transmitting power level
• Signal (distance between the phone and the base station)
• Network parameters defined by the operator
- Phone use (WAP, games, SMS)
- Charging procedure used
power:5V
Exclusions:
Subject to the exclusions contained below:
-
Damage due to the improper use.
-
User does not follow the manual.
Explanation:
The company has the final right of the explanation for this document.
Software upgrades will not be announced.
Disposal of old electrical appliances
The European directive 2002/96/EC on Waste Electrical and Electronic Equipment (WEEE), requires that old household electrical appliances must not be disposed of in the normal unsorted municipal waste stream.
Old appliances must be collected separately in order to optimize the recovery and recycling of the materials they contain, and reduce the impact on human health and the environment.
The crossed out “wheeled bin” symbol on the product reminds you of your obligation, that when you dispose of the appliance, it must be separately collected.
Consumers should contact their local authority or retailer for information concerning the correct disposal of their old appliance.
All pictures are for reference only in the instruction book; please refer to the actual phone.
"At full volume, prolonged listening to the portable audio device
may damage the user's hearing"

text_image
CEwww.idcom-support.com

text_image
PolaroidMANUEL D'UTILISATEUR PROA54BPR-001
VERSION :
1.0.0
text_image
6:35 PM Smartout Catalization Calculator Camera Car Name Tools Contacts Email Tecahara Gallery Email Maps Maser Messaging WiFi Store Music Polaroid 1 400 2 AMC 3 DDR 4 ONE 5 MHz 6 MHz 7 MHz 8 MHz 9 MHz 0+ 1+2TABLE DES MATIERES
- APERÇU 45
- AVERTISSEMENTS......45
- APPARENCE 45
-
DEFINITIONS DU BLOC NUMERIQUE......46
-
COMMENT DEMARRER 47
5.1 INSTALLATION DE LA CARTE SIM 47
5.2 INSTALLATION DE LA BATTERIE 48
5.3 RECHARGER LA BATTERIE 49
5.4 CONFIGURATION DE SECURITE 49
- VOTRE TELEPHONE 50
6.1 UTILISATION D'AFFICHAGE A ECRAN TACTILE....50
6.2 MISE EN MARCHE 50
6.3 FAIRE UN APPEL 50
6.4 REJECTION D'APPEL 51
6.5 REPONDRE A UN APPEL 51
6.6 CONFIGURATION VOLUME....51
6.7 METTRE FIN AUX APPELS 51
6.8 SERVICE D'URGENCE....51
6.9 APPEL D'EXTENSION/COMPOSITION RAPIDE ……51
6.10 APPEL MANQUE/ COMPOSE....51
6.11 RENVOYER APPEL 51
6.12 INTERDICTION D'APPEL 52
6.13 CARTE T-FLASH 52
6.14 CABLE USB 52
6.15 METTRE EN ARRET 52
-
ECRAN DE VEILLE 52
-
LISTE DES MENUS PRINCIPAUX ET DES SOUS-MENUS……53
-
CAMERA 54
-
ANNUAIRE TELEPHONIQUE 56
-
HISTORIQUE D'APPEL 56
11.1 APPELS COMPOSES 56
11.2 APPELS REÇUS 57
11.3 APPELS MANQUES 57
11.4 APPELS REJETES 57
11.5 SUPPRIMER TOUT 57
11.6 DELAI D'APPEL 57
11.7 COUT DE L'APPEL 57
11.8 COMPTEUR GPRS 57
-
BLUETOOTH 57
-
MESSAGES....58
13.1 MODELES 58
13.2 BOITE VOCALE 58
13.3 MESSAGE A DIFFUSION GENERALE....58
13.4 CONFIGURATION SMS....58
13.5 CONFIGURATION MMS 59
13.6 MEMOIRE MESSAGE....59
13.7 ECRIRE MESSAGE....60
13.8 BOITE DE DIALOGUE....61
13.9 BOITE DE RECEPTION 61
13.10 BOITE D'ENVOI 62
13.11 BROUILLON 63
13.12 MESSAGES ENVOYES 64
- MULTIMEDIA 64
14.1 PHOTOS64
14.2 LECTEUR AUDIO 65
14.3 LECTEUR VIDEO 65
14.4 ENREGISTREUR DE SON 66
- ORGANISATEUR......66
15.1 ALARME 66
15.2 CALENDRIER 67
15.3 UDX 68
15.4 CALCULATRICE 68
15.5 HORLOGE UNIVERSEL 68
15.6 MINUTERIE....69
15.7 STK 69
- INTERNET......69
16.1 URL....69
16.2 PAGE D'ACCUEIL 69
16.3 SIGNETS 69
16.4 HISTORIQUES 69
16.5 SAUVEGARDER LES FICHIERS....70
16.6 INSTANTANE....70
16.7 CONFIGURATION WAP 70
- PASSE TEMPS 70
17.1 NAVIGATEUR D'IMAGE....70
17.2 LECTEUR DE LIVRE ELECTRONIQUE....71
17.3 LIEN JEU 71
17.4 BOXMAN 72
- CONFIGURATION 72
18.1 CONFIGURATION APPEL....72
18.2 CALIBRAGE DU STYLET....74
18.3 REGLAGE DU TELEPHONE....74
natural_image
Technical line drawing of a smartphone internal compartments (no text or symbols)natural_image
Exploded view diagram of a smartphone showing internal components (no text or labels)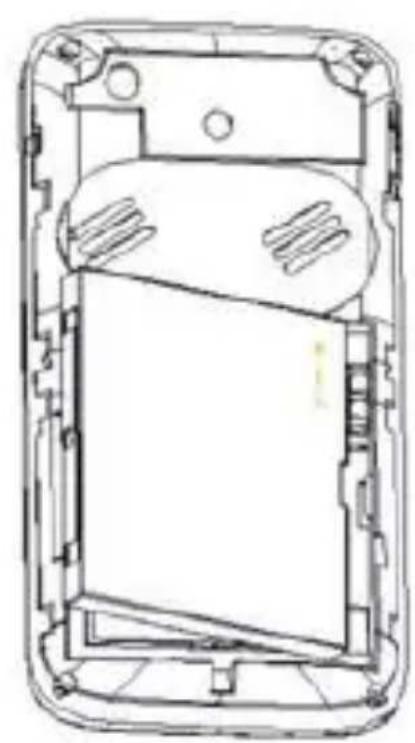
natural_image
Cross-sectional diagram of a mobile phone casing showing internal components and casing (no text or symbols)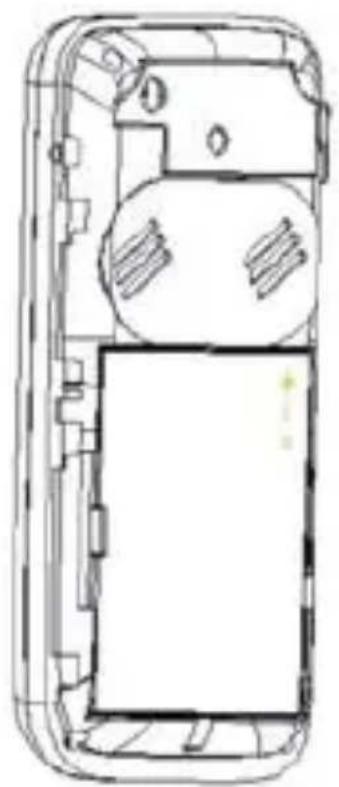
natural_image
Top-down schematic of a mobile phone casing showing internal components and wiring (no text or labels)Audio : Activer/Désactiver
Type : 3Gp/Avi
13.6 Mémoire Message
- SMS
Composer/Composition IP
- Verrouiller
Verrouiller MMS.
- Sélectionner
Sélectionner
Désélectionner
Sélectionner Tout
Désélectionner Tout
Stockage de SMS de SIM1
Stockage de SMS de SIM2
Composer/Composition IP
- Détail
•Edition: Renommer/Copier
Recherche
- Activer/Désactiver
Configurer alarmel activer ou désactiver.
- Alarme2
Voir « Alarme1 ».
- Alarme3
Voir « Alarme1 ».
- Alarme4
Voir « Alarmel ».
- Alarme5
Voir « Alarmel ».
15.2 Calendrier
- Activer/Désactiver
natural_image
Abstract geometric shape with gradient shading (no text or symbols)Polaroid
PROA54BPR-001GEBRUIKSHANDLEIDING
VERSIE:
1.0.0
text_image
6:55 PM Browse Catalina Calendar Camera Car Poster Click Contacts Email Facebook Gallery Gmail Maps Market Messaging MPD Store Music Polaroid 1 4 2 AND 3 OFF 4 OFF 5 OFF 未+ 5 MHz 7 PQRS 8 TW 9 KEY 0 - # /INHOUDSOPGAVE
- OVERZICHT .... - 1 -
- WAARSCHUWINGEN ....- 1 -
- UITERLIJK....- 1 -
- TOETSENPANEELBESCHRIJVING....- 2 -
- VAN START GAAN.... - 3 -
5.1 SIM KAART INSTALLEREN ...... - 3 -
5.2 BATTERIJ INSTALLEREN ....- 4 -
5.3 BATTERIJ OPLADEN.... - 6 -
5.4 BEVEILIGINGSINSTELLINGEN.... - 6 - - UW TELEFOON.... - 6 -
6.1 AANRAAKSCHERM GEBRUIKEN.... - 6 -
6.2 INSCHAKELEN.... - 6 -
6.3 OPROEP PLAATSEN - 7 -
6.4 OPROEP WEIGEREN.... - 7 -
6.5 OPROEPBEANTWOORDEN.... - 7 -
natural_image
Exploded view diagram of a mobile phone showing internal components (no text or labels)Press left soft key to access to "Options":
- Wissen
Het bericht wissen.
- Bewerken
•Activeren/Deactiveren
Alarm1 instelling activeren of deactiveren.
- Alarm2
Zie a.u.b. "Alarm1".
- Alarm3
Zie a.u.b. "Alarm1".
- Alarm4
Zie a.u.b. "Alarm1".
- Alarm5
Zie a.u.b. "Alarm1".
15.2 Kalender
natural_image
Abstract geometric shape with gradient shading, no text or symbols presentPolaroid
PROA54BPR-001
BEDIENUNGSANLEITUNG
VERSION:
1.0.0
text_image
6:35 PM Browser Cableware Calendar Camera Car Name Cash Contacts Email Facebook Gallery Small Maps Marker Messaging MF3 Store Music PolaroidINHALT
- ÜBERSICHT.... - 42 -
- WARNUNGEN - 42 -
- AUFBAU - 42 -
- TASTATURERLÄUTERUNG - 43 -
- INBETRIEBNAHME - 44 -
5.1 INSTALLATION DER SIM-KARTE - 44 -
5.2 EINLEGEN DER BATTERIE.... - 44 -
5.3 BATTERIE LADEN.... - 46 -
5.4 SICHERHEITSEINSTELLUNGEN.... - 46 -
6. IHR MOBILTELEFON - 46 -
6.1 BENUTZUNG DES TOUCHSCREEN-DISPLAYS ...... - 46 -
6.3 ANRUFEN - 47 -
6.4 EINEN ANRUF ABLEHNEN.... - 47 -
6.5 EINEN ANRUF ENTGEGENNEHMEN - 47 -
6.6 LAUTSTÄRKEEINSTELLUNGEN ...... - 48 -
6.7 GESPRÄCHE BEENDEN.... - 48 -
6.8 NOTFALL-SERVICE - 48 -
6.9 NEBENSTELLENANRUF/KURZWAHL - 48 -
6.10 VERPASSTE/GETÂTIGTE ANRUFE...... - 48 -
6.11 ANRUFUMLEITUNG - 48 -
6.12 ANRUFSPERRE - 48 -
6.13 T-FLASHKARTE - 48 -
6.14. USB-KABEL.... - 48 -
6.15 AUSSCHALTEN - 49 -
7. STANDBY-BILDSCHIRM - 49 -
8. LISTE DER WICHTIGSTEN MENÜS UND UNTERMENÜS ...... - 49 -
9. KAMERA - 51 -
10. TELEFONBUCH - 53 -
11. ANRUFHISTORIE.... - 53 -
11.1 GEFÜHRTE ANRUFE - 53 -
11.2 ANGENOMMENE ANRUFE - 54 -
11.3 VERPASSTE ANRUFE - 54 -
11.4 ABGELEHNTE ANRUFE - 54 -
11.5 ALLE LÖSCHEN - 54 -
11.6 ANRUFZEIT - 54 -
11.7 GESPRÄCHSKOSTEN - 54 -
11.8 GPRS-ZÄHLER - 54 -
12. BLUETOOTH.... - 54 -
13. NACHRICHTEN.... - 54 -
13.1 VORLAGEN.... - 54 -
13.2 SPRACHNACHRICHT - 55 -
13.3 RUNDSENDE-NACHRICHT - 55 -
13.4 SMS-EINSTELLUNGEN - 55 -
13.5 MMS-EINSTELLUNGEN - 56 -
13.6 NACHRICHTENSPEICHER.... - 56 -
13.7 NACHRICHT SCHREIBEN....- 56 -
13.8 CHATBOX - 57 -
13.9 POSTEINGANG - 58 -
13.10 POSTAUSGANG - 59 -
13.11 ENTWÜRFE - 60 -
13.12 GESENDETE NACHRICHTEN ...... - 60 -
14. MULTIMEDIA.... - 61 -
14.1. FOTOS.... - 61 -
14.2 AUDIOPLAYER - 61 -
14.3 VIDEOPLAYER.... - 62 -
14.4 TONRECORDER - 62 -
- ORGANIZER.... - 63 -
15.1 WECKER-63-
15.2 KALENDER - 63 -
15.3 UDX....- 65 -
15.4 RECHNER ...... - 65 -
HANDELN SIE UMSICHTIG
text_image
Black-and-white image of a mobile phone with app icons and status bar visible

natural_image
Black smartphone with a logo on top (no visible text or symbols)- Tastaturerläuterung
natural_image
Exploded view diagram of a smartphone showing internal components (no text or labels)natural_image
Exploded view diagram of a smartphone showing internal compartments and casing (no text or labels)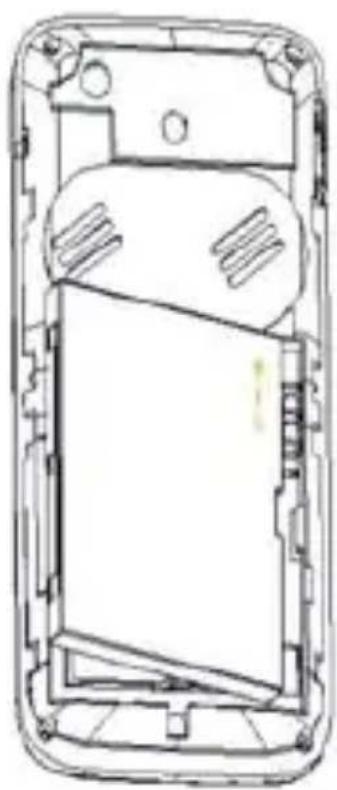
natural_image
Technical line drawing of a smartphone internal panel (no text or symbols)