Bolero Squad I 3600 Fullflex - Refrigerator CECOTEC - Free user manual and instructions
Find the device manual for free Bolero Squad I 3600 Fullflex CECOTEC in PDF.


| Product type | Built-in induction cooktop |
| Brand | Cecotec |
| Model | Bolero Squad I 3600 Fullflex |
| Number of cooking zones | 3 cooking zones |
| Type of cooking zones | Induction |
| Fullflex zone | Yes, extendable zone for large cookware |
| Product dimensions (W×D×H) | 59 × 52 × 5 cm (approx.) |
| Cutout dimensions | 56 × 49 cm (approx.) |
| Net weight | 8 kg (approx.) |
| Power supply | 230 V ~ 50 Hz |
| Total power | 3600 W |
| Power levels | 9 + Booster |
| Timer | Yes, with automatic shut-off |
| Child lock | Yes |
| Pan detection | Yes |
| Automatic safety shut-off | Yes |
| Safety | Safety lock, automatic shut-off in case of overheating, pan detection |
| Maintenance | Clean with a damp cloth, do not use a steam cleaner |
| Installation | Built-in, must be installed by an authorized specialist |
| Spare parts | Available from the official Cecotec customer service |
Frequently Asked Questions - Bolero Squad I 3600 Fullflex CECOTEC
User questions about Bolero Squad I 3600 Fullflex CECOTEC
0 question about this device. Answer the ones you know or ask your own.
Ask a new question about this device
Download the instructions for your Refrigerator in PDF format for free! Find your manual Bolero Squad I 3600 Fullflex - CECOTEC and take your electronic device back in hand. On this page are published all the documents necessary for the use of your device. Bolero Squad I 3600 Fullflex by CECOTEC.
USER MANUAL Bolero Squad I 3600 Fullflex CECOTEC
BOLERO SQUAD I 3600 FULLFLEX
BOLERO SQUAD I 3600 FULLFLEX WHITE
BOLERO SQUAD I 3600 FULLFLEX GREY
bolero
Safety instructions 9
- Parts and components 62
- Before use 62
- Installation 63
- Hob operation 64
- Cleaning and maintenance 68
- Troubleshooting 69
- Technical specifications 70
- Disposal of old electrical and
electronic appliances 71 - Technical support and warranty 72
- Copyright 72
SOMMAIRE
EN · The coding in this manual is generic and applies to all code variants of the appliance.
Before using the appliance, read the following instructions carefully. Keep this instruction manual for future reference or new users.
- The installation and connection of the appliance must be carried out by authorised specialists. The manufacturer is not liable for damage caused by installation or connection errors.
- The appliance must be properly fitted and installed in a suitable and approved kitchen unit and worktop.
- This appliance is designed for domestic use only and is not intended for bars, restaurants, farmhouses, hotels, motels, and offices.
- WARNING: if the surface is cracked, unplug the appliance to avoid electric shock.
- The appliance heats up during use. Avoid touching the heating elements inside.
- WARNING: the appliance and its accessible parts may heat up during use. Be careful with the heating elements. Children under 8 years of age should be kept away from the appliance unless continuously supervised.
- Do not steam-clean the appliance.
- Metal objects such as knives, forks, spoons, and lids should not be placed on the surface of the hob, as they could become hot.
-
Stop operation of the the hob by means of its control device and not by means of the container detector after use.
-
The appliance is not intended to operate by means of an external timer or a separate remote-control system.
- WARNING: unattended cooking on a greasy or oily hob can be dangerous and may result in a fire. NEVER attempt to extinguish a fire with water. Switch off the appliance and cover the flames, e.g., with a fireproof lid or blanket.
- CAUTION: always supervise the cooking process. Continuously monitor the cooking during operation.
- WARNING: fire hazard. Do not place objects on the cooking surfaces.
- WARNING: only use hob protectors designed by the kitchen-appliance manufacturer or found to be suitable by the latter in the instructions for use, or corresponding built-in hob protectors. The use of unsuitable protectors can cause accidents.
- Do not install the appliance behind a decorative panel to avoid overheating.
- This appliance can be used by children aged 8 years and above and people with reduced physical, sensory, or mental capabilities or lack of experience and knowledge if they have been given supervision or instruction concerning use of the appliance in a safe way and understand the hazards involved. Children must not play with the appliance. Cleaning and user maintenance should not be carried out by unsupervised children.
- Remove all labels and stickers from the ceramic glass.
- Do not modify the appliance in any way.
- The induction hob cannot be used as a support or work surface.
- The appliance must be earthed in accordance with local regulations.
-
Do not place the appliance on top of a dishwasher or tumble dryer to avoid steam damage.
-
Turn off the cooking areas after use.
- Monitor the cooking of very fatty or oily foods to avoid fire.
- Be careful not to burn yourself while or after using the appliance.
- Make sure that no cords of any fixed or mobile appliance touch the glass or hot cookware.
- Magnetic objects (credit cards, calculators, etc.) must not be placed near the appliance when plugged in.
- Never cover the appliance with a cloth or protective film to prevent overheating and fire.
- Cookware with worn or damaged bottoms can damage the ceramic glass.
- Sand or other abrasive materials may damage the ceramic glass.
- Prevent objects of any size from falling onto the ceramic-glass panel.
- Avoid hitting the edges of the hob with cookware.
- Make sure the appliance is sufficiently ventilated according to these instructions.
- Do not place or leave empty cookware on the induction hob.
- Sugar, synthetic materials, or aluminium foil must not come into contact with the cooking areas. These may cause breakage or other damage to the ceramic-glass panel due to cooling: switch on the appliance and remove them from the cooking area immediately (being careful not to burn yourself).
- Never place hot containers on the control panel.
- If there is a drawer under the built-in appliance, make sure there is enough space between the contents of the drawer and the bottom of the appliance (at least 2 cm). This is essential to ensure proper ventilation.
- Never store flammable objects (e.g., aerosols) in the drawer
under the induction hob. Drawers and their contents must be heat resistant.
- Precautions in the event of a fault: if you notice a fault, switch off and unplug the appliance.
- The appliance must be repaired by qualified professionals. Do not try to fix the appliance yourself.
- Always make sure that cookware is well centred on the cooking zone. The bottom of the cookware should cover as much of the cooking area as possible.
- The magnetic field of the appliance may affect the operation of pacemakers. For further information, please contact the purchase store or refer to a doctor. These devices must comply with EU Council Directive 90/385/EEC of 20 June 1990 and with EN 45502-2-1, EN 45502-2-2.
- Do not use aluminium or synthetic containers to prevent them from melting due to the residual heat of the cooking areas.
- NEVER try to put out the fire with water. Turn off the appliance and smother the flame with, e.g., a fireproof lid or blanket.
- USING POOR QUALITY COOKWARE OR ANY INDUCTION ADAPTER FOR NON-MAGNETIC COOKWARE IS A BREACH OF WARRANTY. CECOTEC IS NOT LIABLE FOR ANY DAMAGE CAUSEDTOTHEINDUCTIONHOBAND/ORITSSURROUNDINGS.
INSTRUCTIONS DE SÉCURITÉ
BOLERO SQUAD | 3600 FULLFLEX | WHITE | GREY
ESPAÑOL
BOLERO SQUAD I 3600 FULLFLEX | WHITE | GREY
ESPAÑOL
BOLERO SQUAD I 3600 FULLFLEX | WHITE | GREY


ESPAÑOL
Observaciones:
BOLERO SQUAD | 3600 FULLFLEX | WHITE | GREY
ESPAÑOL
BOLERO SQUAD | 3600 FULLFLEX | WHITE | GREY
ENGLISH
1. PARTS AND COMPONENTS
Fig. 1
- Induction area 1
- Induction area 2
- Induction area 3
- Flex zone
- Control panel
Fig. 2
- Power icon
- Lock icon
- Keep Warm function icon
- Flex zone icon
- Cooking-area selection icon
- Power/Time selection icons
- Booster icon
- Timer icon
- Start/pause icon
NOTE:
The graphics in this manual are schematic representations and may not exactly match the device.
2. BEFORE USE
- This appliance is packaged in a way as to protect it during transport. Take the appliance out of its box and remove all packaging materials. You can keep the original box and other packaging elements in a safe place to prevent damage to the appliance if you need to transport it in the future. In case the original packaging is disposed of, make sure all packaging materials are recycled accordingly.
- Make sure all parts and components are included and in good conditions. If there is any piece missing or in bad conditions, contact the official Cecotec Technical Support Service immediately.
Box content
- Induction hob
- Instruction manual
ENGLISH
3. INSTALLATION
3.1 Before installing the hob
- Check that the worktop is level and of sufficient size.
- If you install the induction hob over an oven, the latter must have a built-in cooling fan.
- Comply with all local and electrical safety requirements.
- Install and fit an accessible and approved safety switch with 3 mm contact separation on all poles.
- Use heat-resistant and easy-to-clean materials on the surrounding walls.
Warnings
- The installation must only be carried out by qualified personnel.
- Do not install the hob above appliances such as dishwashers, refrigerators or washing machines.
- The electrical connection must be adequate, and no adapters should be used.
- The power cable must not touch parts that can become hot or exceed 75 °C.
- Consult a licensed electrician for installation and any necessary modifications.
- The cable must be checked periodically and must not be bent or pressed.
- Cecotec cannot be held responsible for accidents resulting from improper grounding.
3.2 Preparation of worktop
- Drill a hole in the worktop according to the measurements shown in figure 3 and the table.
- A minimum clearance of 5 cm must be left around the hole.
- Make sure that the worktop is at least 30 mm thick and heat resistant.
3.3 Necessary measurements
| L (mm) | W (mm) | H (mm) | D (mm) | A (mm) | B (mm) | X (mm) |
| 590 | 520 | 58 | 54 | 565 | 495 | 50 minimum |
3.4 Ventilation
- Always make sure the hob is well ventilated and that the air inlet and outlet are not blocked.
- The safety distance between the hob and a cabinet over the hob must be at least 760 mm. See figure 4 to ensure proper ventilation of the hob.
| A (mm) | B (mm) | C (mm) | D | E |
| 760 | 50 minimum | 30 mm | Air inlet | Air outlet 10 mm |
ENGLISH
3.5 After installing the hob
- Make sure that the power cable is not accessible through cabinet doors or drawers.
- Maintain adequate ventilation from the outside of the cabinet to the base of the hob.
- If the hob is located on drawers or furniture, install a thermal protection barrier.
3.6 Connecting to power supply
Before connecting the hob:
- Check that the electrical installation is suitable for the power rating of the hob.
- Make sure that the voltage corresponds to the value specified in this instruction manual.
- The connection must comply with current regulations and be protected by a circuit breaker. If the cable is damaged, please contact the official Cecotec Technical Support Service.
4. HOB OPERATION
4.1 Using the icons
- The icons respond to touch, no pressure is required. You will hear a beep every time the hob detects a finger.
- Keep the icons clean and dry, making sure that no objects (e.g. kitchen utensils or cloths) are covering them, as even a thin film of water can affect their operation.
4.2 Cookware suitable for the induction hob
Ferromagnetic cookware
- Cookware suitable for cooking with an induction hob is made of ferromagnetic material such as enamelled steel, cast iron or stainless steel. To find out if a container is suitable, check if it is attracted by a magnet.
Special cookware
- There are other types of suitable containers whose base is not entirely ferromagnetic. Before use, check the diameter of the base and make sure that the induction hob detects them.
Choosing the right cookware
- Do not use cookware with serrated edges or with a curved base.
- Make sure to use flat-bottomed cookware that matches the size of the cooking area. A slightly larger diameter increases efficiency, while a smaller diameter may affect efficiency.
- Always place the cookware in the centre of the cooking zone.
- Higher quality cookware in the base can improve heat distribution, saving time and energy.
- Protecting the Glass Surface: lift the cookware if you need to move it to avoid damaging the glass.
ENGLISH
- Empty cookware or very thin base: do not place empty cookware or containers with a very thin base on the lit hob to avoid damage.
4.3 Detection of cookware
- The cooking areas will not work if the diameter of the base of the cookware is too large or too small. The base of the cookware should match as closely as possible the base of the cooking area in which it is to be placed.
- The hob shall display a warning symbol < if there is no cookware, if the cookware is too small or unsuitable.
- The hob will automatically switch off after 2 minutes if there are no suitable containers.
- If the symbol is shown:
- The hob will not heat up unless a suitable container is placed in the cooking area.
- The display will automatically switch off after 2 minutes if no cookware is placed on the hob.
4.4 Switching on the hob
- Press the power icon. A beep will sound and "0" and "--" will be displayed, which means the appliance has entered standby mode.
- Place a suitable cookware on the cooking area you wish to use.
- Press the icon of the desired cooking area; the number "0" will flash.
- Adjust the power level using the “-” and “+” icons.
4.5 Adjusting the power level
To adjust the power of the cooking area at any time, select the desired area. When the digits start flashing, adjust the power with the corresponding icons.
4.6 After cooking
- Press the icon of the cooking area you wish to switch off.
- Adjust the power level using the "-" and "+" icons until "0" and then "H" is displayed.
- Switch the induction hob off by pressing the power icon. If "H" is displayed, it means that the surface temperature is above 60 °C and will disappear when the surface has cooled down. If you want to heat up more cookware, use the area that is still hot to save energy.
4.7 Booster function
This function temporarily increases the power for rapid heating. Use with caution.
- Press the icon of the cooking area you wish to use.
- Then, press the >>> icon to select the power level "b" (Booster).
- To cancel this function, press the icon of the corresponding cooking area and select the desired power level.
Warning: be careful when frying, as oil and fat heat up very quickly, especially if you use the
BOLERO SQUAD I 3600 FULLFLEX | WHITE | GREY
ENGLISH
Booster function. At extremely high temperatures, oil and grease can burn, posing a serious fire hazard.
4.8 Flexible Zone
This flexible cooking zone is located on the left side of the induction hob. It can be used as a single zone or two independent zones.
- Press the icon of the cooking area you wish to use.
- Press the Flex zone icon. The power level of the upper and lower cooking zones will be the default ("5").
- Adjust the power with "-" and "+".
- If you wish to change the power level later, press one of the icons on the cooking zones that make up the flex zone. When the power level digits start flashing, you can change this setting.
4.9 Keep warm function
- Press the desired cooking area.
- Then, press the Keep Warm function icon:
- First press: level 1 shall be activated.
- Second press: level 2 shall be activated.
- Third press: level 3 shall be activated.
- To deactivate, use the “-” and “+” icons.
4.10 Start/Pause function
- When the hob is operating, press the start/pause icon to pause cooking.
- The values on the display will flash.
- To resume cooking, press the start/pause icon twice.
4.11 Timer
Set the timer as countdown
- Press the timer icon. "30" shall be displayed.
- Adjust the time by pressing the '-' and '+' icons.
- Once set, the countdown will start immediately, and the remaining time will be displayed.
- To cancel the timer, press the corresponding icon. “- -” shall be displayed.
Setting the timer to switch off a cooking area
- Press the icon of the cooking area you wish to use.
- Next, press the Timer icon. "30" shall be displayed.
- Adjust the time by pressing the '-' and '+' icons.
- To cancel the timer, press the programmed area and then press the Timer icon; “- -” will be displayed.
ENGLISH
Setting the timer to switch off more than one area
- If more than one area is programmed, the timer display will show the shortest time.
Note: the red dot next to the power of the corresponding cooking area will flash.
- When the countdown ends, the corresponding cooking area will switch off automatically.
- To change the time, once programmed, repeat all the above steps.
4.12 Safety and protection
Locking the icons
- To lock the icons, press the Lock icon.
- Press and hold the Lock icon for 3 seconds to deactivate the lock function.
- When the hob is locked, all icons are disabled except the Power icon for possible emergency shutdown. If you use this option, you will have to unlock the icons the next time you switch on the hob.
Overheating protection
The hob features a sensor that automatically switches off the hob if an excessive temperature is detected.
Automatic safety shutdown
The hob switches off automatically if 120 minutes pass without any operation being performed.
Fan
The fan regulates the internal temperature. Even if the hob is switched off, the fan will continue to run until the hob is cooled down.
Note: it is normal for the fan to continue to run after the hob is switched off; it will stop when the hob is sufficiently cool.
Tips on energy saving
- When food starts boiling, reduce the power.
- Use a lid to reduce cooking times and save energy.
- Reduce the amount of oil or fat used to shorten cooking times.
- Start cooking at a high-power level and reduce the level when the food has heated up.
Simmering
- Slow cooking takes place below boiling point, at about 85 °C. It is suitable for preparing some soups and stews, as it enhances the flavours without overcooking the food. It should also be used for cooking egg-based sauces thickened with flour.
- Some recipes may require a higher setting than the minimum for the food to cook properly in the recommended time.
ENGLISH
5. CLEANING AND MAINTENANCE
Regular inspection
- Periodically inspect the surface of the hob to ensure that there is no damage or stubborn stains.
- Verify that the icons and indicator lights are working properly.
Safety precautions
- Never use flammable products to clean the hob.
- Make sure that the hob is completely dry before plugging it back into the mains.
Daily cleaning
- Clean the hob after each use to avoid build-up of residues that may be more difficult to remove over time.
- Use a damp cloth to remove minor spills and dry the surface completely.
- Use specific cleaners for induction hobs. Avoid abrasive or acidic products that may damage the surface.
Handling of large spills
- In the case of large spills, act quickly to prevent residues from burning and sticking to the surface of the hob.
- Follow the steps outlined in the "Sugary food spills" section for effective clean-up.
Types of dirt and how to clean it
A Common dirt on glass surface
(Fingerprints, marks, food stains or spills of unsweetened food):
- Disconnect the hob by means of the enabled circuit breaker or differential.
- Use an induction hob cleaner while the surface is still warm (but make sure it does not burn).
- Wipe the hob and dry the glass with a clean cloth or kitchen paper.
- Plug the hob back into the power socket.
Notes:
- When the hob is switched off, there will be no warning that the surface is hot, but that does not mean that it is not hot.
- Use special scouring pads for induction hobs.
- Do not use aggressive, corrosive or abrasive cleaners that may damage the hob. Always read the label to check the suitability of the cleaning product or scouring pad you are using.
- Never leave residue on the surface; the glass may become stained.
ENGLISH
B Spillage of sugary foods
- Remove them immediately with a spatula or a suitable scraper for induction hobs but be careful with the hot surfaces of the cooking area.
- Disconnect the hob by means of the enabled circuit breaker or differential.
- Hold the spatula at a 30° angle and scrape off the dirt to an area that is completely cool.
- Clean the dirt or spill with a cloth or paper towel.
Notes:
- Remove melted sugary food stains or spills as soon as possible. If left to cool down on the glass, they may be difficult to remove or may even permanently damage the hob.
- Cutting hazard: when the safety cover is retracted, the blade of the scraper may be sharp as a razor. Use it with extreme care and always store it safely and out of the reach of children.
C Stains and spills on the control panel
- Disconnect the hob by means of the enabled circuit breaker or differential.
- Wipe the icons with a clean, damp sponge or cloth.
- Dry the control panel completely.
- Plug the hob back into the power socket.
Notes:
- If the control panel is dirty, the icons may not work properly.
- Be sure to clean and dry the control panel area thoroughly before reconnecting the hob to the power supply.
6. TROUBLESHOOTING
If a fault occurs, the induction hob will display the corresponding fault codes:
| Error codes | ||
| Error | Possible cause | Solution |
| E 1 / E 2 | Undervoltage (< 85 V) or overvoltage (> 285 V) protection. | If the voltage at the socket is lower or higher than specified, consult a qualified electrician. |
| E 3 | The sensor is short-circuited or there is an open circuit. | Contact the official Cecotec Technical Support Service. |
| E 4 | IGBT is short-circuited or there is an open circuit. | Contact the official Cecotec Technical Support Service. |
ENGLISH
| E 5 | The temperature of the induction coil sensor exceeds 280 °C. | Switch off the induction hob and wait for it to cool down. |
| E 6 | IGBT sensor temperature is too high. | Check that the ventilation is correct and that the fans are not obstructed. |
| Er | Internal failure of control circuits. | Contact the official Cecotec Technical Support Service. |
| Et | There is some liquid on the icons on the control panel. | Clean the control panel and dry it thoroughly. |
| U | You have not fitted any cookware or the cookware you have fitted is not suitable for induction cooking. | Use another container. |
7. TECHNICAL SPECIFICATIONS
References: EU01_100143 / EU01_104163 / EU01_100833
Models: Bolero Squad I 3600 FullFlex / Bolero Squad I 3600 FullFlex White / Bolero Squad I 3600 FullFlex Grey
Power: 6200 W (Boost 7400 W)
Voltage: 220-240 V\~
Frequency: 50-60 Hz
A: 1200 W / 1500 W
B: 2600 W / 3000 W
C: 2000 W / 2600 W
D: 3000 W / 3600 W
| Symbol | Value | Unit | |
| Model reference | EU01_100143 / EU01_104163 / EU01_100833 | ||
| Type of cooking hob | Domestic electric hob | ||
| Number of cooking areas | 2 |
ENGLISH
| Heating technology (induction hotplates and cooking areas, radiation hotplates, solid hotplates) | Induction cooking areas and zones | ||
| Symbol | Value | Unit | |
| For circular lamps or cooking zones: diameter of the usable area of each electric cooking spot, rounded to the nearest 5 mm | ∅ | 30 | cm |
| For non-circular lamps or cooking zones: width and length of the usable surface of each lamp or electric cooking area, rounded to the nearest 5 mm | l | 38 | cm |
| W | 19 | cm | |
| Energy consumption per lamp or cooking area, calculated per kg (*) | ECElectric\ cooking | 180.7162.8189.8187.5 | Wh/kg |
| Energy consumption of the hob, calculated per kg (*) | ECelectric\ hob | 180.2 | Wh/kg |
Technical specifications may change without prior notification to improve product quality. Made in China | Designed in Spain
8. DISPOSAL OF OLD ELECTRICAL AND ELECTRONIC APPLIANCES

This symbol indicates that, according to the applicable regulations, the product and/or batteries must be disposed of separately from household waste. When this product reaches the end of its shelf life, you should dispose of the cells/batteries/accumulators and take them to a collection point designated by the local authorities.
Consumers must contact their local authorities or retailer for information concerning the correct disposal of old appliances and/or their batteries.
Compliance with the above guidelines will help protecting the environment.
ENGLISH
9. TECHNICAL SUPPORT AND WARRANTY
Cecotec shall be liable to the end user or consumer for any lack of conformity that exists at the time of delivery of the product under the terms, conditions and deadlines established by the applicable regulations.
Repairs should be carried out by qualified personnel.
If at any moment you detect any problem with your product or have any doubt, do not hesitate to contact the official Cecotec Technical Support Service at +34 96 321 07 28.
10. COPYRIGHT
The intellectual property rights over the texts in this manual belong to CECOTEC INNOVACIONES, S.L. All rights reserved. The contents of this publication may not, in whole or in part, be reproduced, stored in a retrieval system, transmitted, or distributed by any means (electronic, mechanical, photocopying, recording or similar) without the prior authorization of CECOTEC INNOVACIONES, S.L.
FRANÇAIS
1. PIÈCES ET COMPOSANTS
Img. 1
BOLERO SQUAD | 3600 FULLFLEX | WHITE | GREY
FRANÇAIS
3. INSTALLATION
BOLERO SQUAD | 3600 FULLFLEX | WHITE | GREY
FRANÇAIS
4.4 Allumer la plaque
BOLERO SQUAD I 3600 FULLFLEX | WHITE | GREY


FRANÇAIS
4.11 Minuterie
BOLERO SQUAD I 3600 FULLFLEX | WHITE | GREY
FRANÇAIS
BOLERO SQUAD | 3600 FULLFLEX | WHITE | GREY
FRANÇAIS
10. COPYRIGHT
BOLERO SQUAD | 3600 FULLFLEX | WHITE | GREY
DEUTSCH
3. MONTAGE
BOLERO SQUAD I 3600 FULLFLEX | WHITE | GREY
DEUTSCH
BOLERO SQUAD I 3600 FULLFLEX | WHITE | GREY
DEUTSCH
BOLERO SQUAD I 3600 FULLFLEX | WHITE | GREY
DEUTSCH
Tägliche Reinigung:
BOLERO SQUAD | 3600 FULLFLEX | WHITE | GREY
DEUTSCH
BOLERO SQUAD | 3600 FULLFLEX | WHITE | GREY
DEUTSCH
8. RECYCLING VON ELEKTRO- UND ELEKTRONIKGERÄTEN

BOLERO SQUAD | 3600 FULLFLEX | WHITE | GREY
ITALIANO
3. INSTALLAZIONE
BOLERO SQUAD | 3600 FULLFLEX | WHITE | GREY
ITALIANO
BOLERO SQUAD I 3600 FULLFLEX | WHITE | GREY


ITALIANO
4.11 Timer
BOLERO SQUAD I 3600 FULLFLEX | WHITE | GREY
ITALIANO
BOLERO SQUAD I 3600 FULLFLEX | WHITE | GREY
PORTUGUÊS
Ventilador
BOLERO SQUAD | 3600 FULLFLEX | WHITE | GREY
PORTUGUÊS
C Manchas e derrames no painel de controlo:
BOLERO SQUAD | 3600 FULLFLEX | WHITE | GREY
NEDERLANDS
1. ONDERDELEN EN COMPONENTEN
Fig. 1
- Kookzone 1
- Kookzone 2
- Kookzone 3
- Flexibele zone
- Bedieningspaneel
Fig. 2
BOLERO SQUAD I 3600 FULLFLEX | WHITE | GREY
NEDERLANDS
| A (mm) | B (mm) | C (mm) | D | E |
| 760 | Minimum 50 | 30 min | Luchtingang | Luchtuitlaat 10 mm |
BOLERO SQUAD I 3600 FULLFLEX | WHITE | GREY
NEDERLANDS
Ventilator
BOLERO SQUAD I 3600 FULLFLEX | WHITE | GREY
NEDERLANDS
6. PROBLEEMOPLOSSING
Referenties: EU01_100143 / EU01_104163 / EU01_100833
Modellen: Bolero Squad I 3600 FullFlex / Bolero Squad I 3600 FullFlex White / Bolero Squad I 3600 FullFlex Grey
Vermogen: 6200W (Boost 7400W)
Voltage: 220-240V\~
Frequentie: 50-60Hz
A: 1200W/1500W
B: 2600W/3000W
C: 2000W/2600W
D: 3000W/3600W
BOLERO SQUAD | 3600 FULLFLEX | WHITE | GREY
NEDERLANDS
BOLERO SQUAD | 3600 FULLFLEX | WHITE | GREY
POLSKI
1. CZĘŚCI I KOMPONENTY
Rys. 1
BOLERO SQUAD I 3600 FULLFLEX | WHITE | GREY
POLSKI
BOLERO SQUAD I 3600 FULLFLEX | WHITE | GREY
POLSKI
BOLERO SQUAD I 3600 FULLFLEX | WHITE | GREY


POLSKI
A: 1200 W/1500 W
B: 2600 W/3000 W
C: 2000 W/2600 W
D: 3000 W/3600 W
BOLERO SQUAD | 3600 FULLFLEX | WHITE | GREY
POLSKI
BOLERO SQUAD | 3600 FULLFLEX | WHITE | GREY
ČEŠTINA
1. DÍLY A SOUČÁSTI
Obr. 1
BOLERO SQUAD | 3600 FULLFLEX | WHITE | GREY
ČEŠTINA
6. ŘEŠENÍ PROBLÉMŮ
Reference: EU01_100143 / EU01_104163 / EU01_100833
Modely: Bolero Squad I 3600 FullFlex / Bolero Squad I 3600 FullFlex White / Bolero Squad I 3600 FullFlex Grey
A: 1200 W/1500 W
B: 2600 W/3000 W
C: 2000 W/2600 W
D: 3000 W/3600 W
BOLERO SQUAD | 3600 FULLFLEX | WHITE | GREY
TÜRKÇE
3. KURULUM
BOLERO SQUAD I 3600 FULLFLEX | WHITE | GREY
TÜRKÇE
BOLERO SQUAD I 3600 FULLFLEX | WHITE | GREY
TÜRKÇE
BOLERO SQUAD | 3600 FULLFLEX | WHITE | GREY
TÜRKÇE
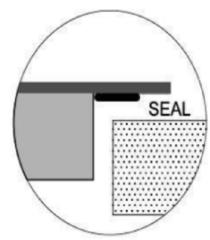
Fig./Img./Abb./Afb./Rys. 3
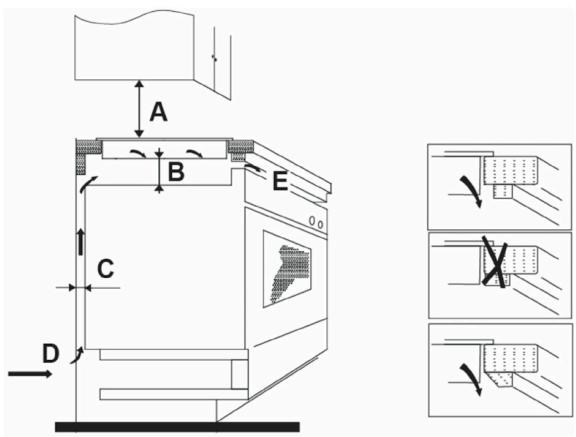

Fig./Img./Abb./Afb./Rys. 4
BOLERO SQUAD | 3600 FULLFLEX | WHITE | GREY
www.cecotec.es
- SOMMAIRE
- INSTRUCTIONS DE SÉCURITÉ
- ESPAÑOL
- OBSERVACIONES
- ENGLISH
- PARTS AND COMPONENTS
- FIG. 1
- FIG. 2
- NOTE
- BEFORE USE
- BOX CONTENT
- INSTALLATION
- 3.1 BEFORE INSTALLING THE HOB
- WARNINGS
- 3.2 PREPARATION OF WORKTOP
- 3.4 VENTILATION
- 3.5 AFTER INSTALLING THE HOB
- 3.6 CONNECTING TO POWER SUPPLY
- HOB OPERATION
- 4.1 USING THE ICONS
- 4.2 COOKWARE SUITABLE FOR THE INDUCTION HOB
- FERROMAGNETIC COOKWARE
- SPECIAL COOKWARE
- CHOOSING THE RIGHT COOKWARE
- 4.3 DETECTION OF COOKWARE
- 4.4 SWITCHING ON THE HOB
- 4.5 ADJUSTING THE POWER LEVEL
- 4.6 AFTER COOKING
- 4.7 BOOSTER FUNCTION
- 4.8 FLEXIBLE ZONE
- 4.9 KEEP WARM FUNCTION
- 4.10 START/PAUSE FUNCTION
- 4.11 TIMER
- SET THE TIMER AS COUNTDOWN
- SETTING THE TIMER TO SWITCH OFF A COOKING AREA
- SETTING THE TIMER TO SWITCH OFF MORE THAN ONE AREA
- 4.12 SAFETY AND PROTECTION
- LOCKING THE ICONS
- OVERHEATING PROTECTION
- AUTOMATIC SAFETY SHUTDOWN
- FAN
- TIPS ON ENERGY SAVING
- SIMMERING
- CLEANING AND MAINTENANCE
- REGULAR INSPECTION
- SAFETY PRECAUTIONS
- DAILY CLEANING
- HANDLING OF LARGE SPILLS
- TYPES OF DIRT AND HOW TO CLEAN IT
- A COMMON DIRT ON GLASS SURFACE
- NOTES
- B SPILLAGE OF SUGARY FOODS
- C STAINS AND SPILLS ON THE CONTROL PANEL
- TROUBLESHOOTING
- TECHNICAL SPECIFICATIONS
- DISPOSAL OF OLD ELECTRICAL AND ELECTRONIC APPLIANCES
- TECHNICAL SUPPORT AND WARRANTY
- COPYRIGHT
- PIÈCES ET COMPOSANTS
- IMG. 1
- FRANÇAIS
- 4.4 ALLUMER LA PLAQUE
- 4.11 MINUTERIE
- DEUTSCH
- MONTAGE
- TÄGLICHE REINIGUNG
- RECYCLING VON ELEKTRO- UND ELEKTRONIKGERÄTEN
- ITALIANO
- INSTALLAZIONE
- PORTUGUÊS
- VENTILADOR
- C MANCHAS E DERRAMES NO PAINEL DE CONTROLO
- NEDERLANDS
- ONDERDELEN EN COMPONENTEN
- VENTILATOR
- PROBLEEMOPLOSSING
- POLSKI
- CZĘŚCI I KOMPONENTY
- RYS. 1
- ČEŠTINA
- DÍLY A SOUČÁSTI
- OBR. 1
- ŘEŠENÍ PROBLÉMŮ
- TÜRKÇE
- KURULUM
Brand : CECOTEC
Model : Bolero Squad I 3600 Fullflex
Category : Refrigerator