Bolero Dresscode 2000 Autodosis - Refrigerator CECOTEC - Free user manual and instructions
Find the device manual for free Bolero Dresscode 2000 Autodosis CECOTEC in PDF.


User questions about Bolero Dresscode 2000 Autodosis CECOTEC
0 question about this device. Answer the ones you know or ask your own.
Ask a new question about this device
Download the instructions for your Refrigerator in PDF format for free! Find your manual Bolero Dresscode 2000 Autodosis - CECOTEC and take your electronic device back in hand. On this page are published all the documents necessary for the use of your device. Bolero Dresscode 2000 Autodosis by CECOTEC.
USER MANUAL Bolero Dresscode 2000 Autodosis CECOTEC
Safety instructions 7
-
Parts and components 60
-
Before use 60
-
Installation 60
-
Operation 63
-
Control panel information 67
-
Extra functions 72
-
Cleaning and Maintenance 74
-
Troubleshooting 76
-
Technical specifications 80
-
Disposal of old electrical appliances 87
-
Technical support and warranty 87
-
Copyright 87
SOMMAIRE
- Before starting the machine, read the instructions carefully and keep them for future reference.
- Read the entire manual before assembling and using the equipment.
- Cecotec takes no responsibility for any damage caused by misuse or manipulation of the appliance.
- Any misuse or non-compliance with these instructions voids the warranty and the manufacturer's liability..
- Do not place the washing machine in humid places or exposed to wind, rain or sun.
- Make sure that the socket is properly grounded and that the water supply connection is reliable.
- This appliance can be used by children aged 8 years and above and persons with reduced physical, sensory or mental capabilities or lack of experience and knowledge if they have been given supervision or instruction concerning the use of the appliance in a safe way and understand the hazards involved.
- Do not allow children to play with the appliance. The cleaning and maintenance of the appliance should not be carried out by children without supervision.
- Children should be supervised that they do not play with the appliance.
- If the cable is damaged, it must be replaced by the manufacturer, the supplier or qualified persons in order to avoid a hazard.
- Remove from the power supply by pulling the plug, never the cable.
- The new hose-sets supplied with the appliance are to be used and that old hose-sets should not be reused.
- For appliances with ventilation openings in the base, do not
block the openings with a carpet.
- Children under 3 years old must stay away from the device and be supervised at all times.
- The maximum allowable inlet water pressure is 1 MPa for appliances intended to be connected to the water mains. The minimum allowable inlet water pressure required for the correct operation of the appliance is 0.1 MPa.
- Maximum load capacity: 10 kg.
- Only suitable for household use.
- This appliance is intended for use in domestic and similar applications.
- Do not wash or dry articles that have been cleaned in, washed in, soaked in, or dabbed with combustible or explosive substances (such as wax, oil, paint, petrol, degreasers, dry-cleaning solvents, kerosene, etc.). This may result in fire or explosion.
- Do not use explosives, toxic solvents, detergents containing petrol, alcohol, etc. Use only detergents suitable for washing machines, especially for the washing machine drum.
- Avoid electric shock, fire and personal injury due to inappropriate behaviour.
- In case of anomalies (abnormal noises, burning smell, smoke, etc.), immediately disconnect the power plug to stop the machine and contact the Cecotec Customer Service.
- In case of malfunction, contact the Cecotec Technical Service, otherwise the warranty will be void.
- Fire may occur due to abnormal heating caused by sharing the power outlet with other electrical equipment.
- Do not handle the power plug with wet hands.
- Turn off the power before servicing and repairing the washing machine.
INSTRUCTIONS DE SÉCURITÉ
- Top cover
- Control panel
- Lifter
- Draining hose
- Plug
- Filter cover
- Compartment
- Door
- Drum
- 4 adjustable feet
- Draining pump filter
*The graphics in this manual are schematic representations and may not exactly match the product.
2. BEFORE USE
- Take all the parts out of the box and remove all packaging materials.
- Check carefully that the pieces are not damaged and there are no parts missing. If so, contact the Technical Support Service of Cecotec.
Box contents:
- Small parts package.
- Instruction manual.
- 4 plastic cups for the bolt holes.
- Spanner.
- Cold water inlet hose.
- U-shaped elbow
- Bottom cover
3. INSTALLATION
Step 1. Removing the transport bolts
- The washing machine is equipped with transport bolts to prevent possible damage to the interior during transport.
- It is necessary to remove the transport bolts before use.
To remove them, follow these steps:
- Unscrew all transport bolts about 30 mm with the spanner in the direction of the arrow. Fig. 2
- Push the 4 transport bolts horizontally inwards and loosen them. Fig. 3
- Take the transport bolts out together with the rubber part and the plastic part. Fig. 4
- For safety and to reduce noise, you must install the plastic taps in the holes after removing the bolts.
- To transport the washing machine, you must remove the taps and place the bolts again. To do so, stand and place the transport bolt in the hole. Keep pushing in the indicated direction until it clicks. Fig. 5
Important
Keep the transport bolts and the spanner for future transports.
Warning:
- Otherwise, the machine may suffer irreparable damage.
- Cecotec cannot be held responsible for any damage caused by failure to remove the bolts during the use of your washing machine, nor for any damage caused if you choose to transport it without placing the bolts correctly.
Step 2. Location
- The washing machine can only be installed in closed spaces.
- The washing machine must be installed on a solid surface.
- Do not install the machine on carpets or floorings. This may cause sliding of the device during spinning.
- Do not store flammable liquids near the device.
- Do not install the washing machine where it can receive direct sunlight.
- For appliances with ventilation openings in the base, do not block the openings with a carpet.
- Do not install the washing machine on humid areas.
- If you want to install your washing machine inside a compartment or cupboard, this is the minimal distance for a stable operation:
| Sides | 25 mm |
| Upper part | 25 mm |
| Rear part | 50 mm |
| Front part | 550 mm |
ENGLISH
- If you want to install a washing machine and a dryer in the same place, the front of the compartment or cupboard must have an opening of at least 550 mm, without obstacles. A washing machine alone does not require a specific ventilation opening.
Note:
- Do not install the washing machine on an unsteady platform.
- Do not install the washing machine in an area in which water could freeze. It can damage the washing machine condition.
Step 3. Feet adjustment
Place the washing machine on a solid and level surface (if necessary, use a level).
If the floor is uneven, adjust the 4 adjustable feet as necessary; do not insert unstable items under the washing machine to level it.
- Take the spanner and loosen the nut clockwise. Fig. 6
- Select the feet height and fix them by turning them clockwise to lift them and counterclockwise to lower them. Fig. 7.
Important
Turn the nut counterclockwise. Fig. 8
Step 4. Water supply hose connection
- If the hose is not installed, tighten it to the washing machine.
- Tighten the inlet tube to the tap by hand with the spanner by tightening the nut. Fig. 9
- Open the tap, after connection, to check if there are any leaks.
Warning
- Check the hose is not twisted or stretched.
- Do not place the draining hose in a bucket or bathtub.
- Check regularly if the inlet hose is broken or cracked. If so, replace it if necessary.
Step 5. Draining hose connection. Fig. 10
- Connect the draining hose to a draining pipe.
- Place the U-shaped elbow, if it is not installed, in the end of the draining hose.
Warnings
- Make sure the draining hose is not twisted.
- Secure the hose so it does not fall. After the washing phase, the washing machine will drain the hot water.
- To make an extension use a hose of the same type and secure the connections with clips.
Electrical connections
- The washing machine requires a 220-240V 50 Hz power supply.
- The power supply cable of the washing machine has an earthed plug. This plug must be connected to a 10 amp earthed socket.
- If you do not have a suitable socket and fuse with these conditions, make sure a qualified electrician carries out the work.
- The warranty does not cover damage caused by improper use of the mains connection.
Warnings:
- Do not handle the electric circuit and/or the plug if your hands are wet.
- Before handling and/or cleaning the machine, disconnect it from the mains.
- Clean the housing of the appliance with a wet cloth.
- Do not use abrasive detergents.
- Never force the door open or stand on top of it.
- If you detect that your washing machine has been damaged during transport, do not use it.
- Do not use an extension cord.
- Use only the power cord supplied by Cecotec.
- Improper connection may result in electric shock.
4. OPERATION
Before the first washing cycle
Cecotec advises you to perform a short first wash cycle to remove any residue during the manufacturer's test.
- Open the tap.
- Close the door.
- Pour detergent (more or less 30 ml) in the detergent compartment.
- Select the short programme.
We recommend that the first wash cycle should be without any load and at low spin speed (rpm).
Washing preparation
Step 1: Select the clothes to be washed according to...
Type of fabric/label symbol
Cottons, blended fibres, easy care/synthetics, wool, hand wash items.
Colour
- Separate coloured clothes from white clothes.
ENGLISH
- New coloured clothes should be washed separately.
Load
Wash items with different sizes to improve washing efficiency and drum distribution.
Delicate clothes
Use a zipped bag for small items (socks, stockings, garments with hooks - bras, curtains...).
It is advisable to remove curtain rings before washing, or place them in a cotton bag.
Step 2: Empty every pocket:
To ensure that your clothes do not have objects such as coins, safety pins... that may damage the drum and/or other parts of the washing machine.
Step 3: Clothes fasteners:
Close zips, fasten buttons or hooks; tie loose belts or straps.
Emergency door opening (Fig. 11)
- On those occasions when special circumstances or power outages require it, you can activate the emergency opening with the filter door locking lever.
- To do so, open the filter cover, pull the locking lever downwards (use a tool if necessary) and next you will be able to open the door.
Warning:
- Use only in case of extreme emergency.
- Extreme caution as the water may be at high temperatures. It is advisable to wait a reasonable time for the water to cool down.
- Activate the drum draining before activating the emergency door opening (check the "filter" section in the "Cleaning and Maintenance" section for more information). If you do not follow these indications, it may result in personal injury and damage to property.
Note
-
Do not use this opening when the machine is working properly.
-
Make sure before using the emergency opening system that the interior drum is not spinning and that the water level is lower than the inlet water level for the laundry. If it is not, drain the water with the drain tube or loosening the filter slowly.
Loading the washing machine
Respect the load sizes indicated in the manual. Do not squeeze the laundry in the drum.
Note
Overload may result in unsatisfactory washing and wrinkled clothes.
Detergents and additives
To obtain the best results and help preserve the washing machine condition, from Cecotec we advise you to use a high-efficiency, low-foaming detergent.
Choose your detergent according to:
- Type of fabric (cottons, easy care/synthetics, delicates, wool).
- Note: use only specific detergents to wash wool.
- Colour.
- Washing temperature.
- Degree and type of soiling.
Notes
- If you detect any whitish residue, brush the fabric.
- To prevent this, use liquid detergents.
- Use only specific detergents and additives for household washing machines.
- Make sure you use dyes or bleaches suitable for use in household washing machines.
- Softeners may contain products that could damage your washing machine.
- Do not use solvents.
- Do not wash fabrics that have been treated with solvents or flammable liquids.
Detergent compartment (Fig. 12)
There are three compartments.
- Fig. 12. 1. Detergent compartment. In this compartment you can pour detergent, stain remover and water softener (water hardness class 4).
- Fig. 12. 2. Powder detergent compartment: When you want to use powder detergent, cancel the AutoDosing function.
- Fig. 12. 3. Softener detergent: you can pour fabric softener in this compartment. Add additives up to the "MAX" mark.
Detergent and fabric softener
Consider:
- The load.
- Degree and type of soiling.
- Water hardness in the area. Hard water requires more detergent than soft water.
- Follow the detergent manufacturer's instructions for a complete load.
- For half load: 3/4 of the amount used for a complete load.
- For a minimum load (approximately 1 kg): 1/2 of the amount used for a complete load.
Note
- Excess detergent can cause excessive foaming, which reduces the washing efficiency. If the washing machine detects excessive foam, it may not perform the spinning function.
- Insufficient detergent can cause the laundry to deteriorate over time and also calcify the heating system, drum and hoses.
ENGLISH
- Keep detergents and additives in a safe and dry place, out of the reach of children.
- To avoid dosing problems when using highly concentrated liquid and powder detergents, use the special detergent ball or bag supplied with the detergent and place it directly into the drum.
- Check, in case of use, that descaling products, dyes or bleaches are compatible for use in washing machines. They could contain compounds which could damage the washing machine parts.
- Do not use solvents in the washing machine (e.g. turpentine, benzine).
AutoDosing function
- By default, when you use the washing machine for the first time, the automatic function will be activated.
- The washing machine will always remind you the last option selected, in the successive washing.
- If you want to activate the AutoDosing function, press "detergent".
- Press the detergent icon repeatedly until it turns off (it should not be illuminated).
- When this mode is deactivated, the word "auto" will not appear on the display.
- In this mode, the washing machine determines smartly the amount of detergent and softener required for each washing according to the laundry weight.
Add detergent/softener.
- Add the liquid detergent and softener in the compartments indicated for the automatic function. Fig. 12
- Add the powder detergent when the AutoDosing function is deactivated.
- If the liquid detergent/softener icons are on, it means there is not enough of these products. (Fig. 13)
The maximum necessary amount to fill the compartments is:
- Detergent: 0.65 litres.
- Softener: 0.35 litres.
- You can set the amount dosed automatically, if desired, setting low, medium or high, depending on the washing power. (Fig.14)
Manual mode
- You can also cancel the "auto" option and add detergent and softener manually. If you want to add detergent or softener manually, you must ensure the automatic function is active. Press repeatedly until the indicator light turns off.
Warning
- Make sure that, before starting the washing, the compartment is properly closed.
- Do not exceed these recommendations. Product may overflow.
- It is recommended to use a low-foaming detergent.
- If you are going to move the washing machine, remove the compartment and keep it in a safe place.
Selecting a programme
- After loading the laundry and the detergent according to the programme, and closing the door, press the On/Off icon.
- Press the programme.
- Select the spinning temperature and speed.
- If you want you can add extra functions, like "Time Save", "Power Save", etc...
- Press the Start/Pause icon.
- The display will show the programme length (hour and minutes), the temperature and the different functions selected.
Cancelling the programme or changing the options
- Stop the machine by holding down the On/Off icon for 2 seconds.
- Press the On/Off icon to switch on the machine. Select the programme and the settings.
- Press the Start/Pause icon to start the new programme without adding extra detergent.
5. CONTROL PANEL INFORMATION
Fig. 15
| A | On/Off icon |
| B | Start/Pause icon |
| C | Programme knob |
| D | Programme and function status display |
| E | DelayEnd icon |
| F | Favorites icon |
| G | Spin speed icon |
| H | Temperature icon |
| I | Detergent icon |
| J | Softener icon |
| K | Prewash icon |
| L | Extra rinse icon |
| M | Time save icon |
| N | Energy save icon |
| O | Add clothes icon |
| P | Mute icon |
| Q | Child lock icon |
| Programme | Care labels | Material | Max. weight |
| Washing temperature selected according to the care label instructions | |||
| Cotton:--, 20°C,30°C,40°C,60°C,95°C |  | Heavily and moderately soiled cotton or linen.For heavily soiled laundry, select the prewash function. | 10.0 |
| AllergyCare Steam (2) 40°C,60°C, |  | Suitable for high temperature resistant fabrics that fade less, it removes allergens such as pollen, dust mites and parasites through high temperature steam. | 2.0 |
| Eco 40-60 (1)(3) | - | You can clean, together, washable cotton clothes at 40°- 60°C with normal soiling degree. | 10.0 |
| Wool: --, 20°C,30°C, 40°C |  | Machine washable wool. (Check the care label). | 2.0 |
| BabySafe Steam (2): 40°C, 60°C,95°C |  | Suitable for baby clothes and underwear etc., sterilises and disinfects with high temperature steam. | 2.0 |
| DarkWash: --, 20°C,30°C, 40°C, 60°C | Dark cotton fabrics and dark easy-care fabrics | 4.0 | |
| Express 15'--, 20°C, 30°C, 40°C |  | Cotton, mixed fabrics. Items with little use or recently bought. | 1.0 |
| Mix--, 20°C, 30°C, 40°C |  | Mixed loads of moderately soiled cotton and synthetic fabrics. | 4.0 |
| Sportswear--, 20°C, 30°C, 40°C |  | Sports and leisurewear made from microfibre fabrics. | 2.0 |
| 20°C | -- | This programme is suitable for lightly stained, cotton laundry, with energy saving. | 10.0 |
| AutoClean95°C | -- | Programme to remove dirt and bacterial residues that may breed in the machine after a period of use, especially when low temperature washings are used regularly. | - |
| Down20°C, 30°C, 40°C |  - - | Machine washable items filled with synthetic fibres, such as pillows, duvets and quilts; also suitable for down-filled items. | 2.0 |
| Rinse + Spin | This programme carries out two spinnings and rinses by default. | 10.0 | |
| Spin Only | Select the spinning time and speed manually. | 10.0 |
| Programme | Functions of the washing programmes | ||
| Delay end | Prewash | Extra Rinse | |
| Cotton:--, 20°C,30°C,40°C,60°C,95°C, | * | * | * |
| AllergyCare Steam (2)40°C,60°C, | * | * | * |
| Eco 40-60 (1)(3) | * | - | - |
| Wool: --, 20°C, 30°C, 40°C | * | - | * |
| BabySafe Steam (2): 40°C,60°C, 95°C | * | * | * |
| DarkWash: --, 20°C, 30°C,40°C, 60°C | * | * | * |
| Express 15'--, 20°C, 30°C, 40°C | * | - | * |
| Mix--, 20°C, 30°C, 40°C | * | * | * |
| Sportswear--, 20°C, 30°C, 40°C | * | * | * |
| 20°C | * | * | * |
| AutoClean95°C | * | - | - |
| Down20°C, 30°C, 40°C | * | - | * |
| Rinse + Spin | * | - | * |
| Spin Only | * | - | - |
| Spinning (rpm) | ||||||
| Time Save | Power Save | Default rinses | Spin | Temp. | ||
| * | * | 2 | * | * | 1400 | |
| * | - | 4 | * | * | 1400 | |
| - | - | 2 | * | - | 1400 | |
| * | * | 2 | * | * | 600 | |
| * | - | 3 | * | * | 1400 | |
| * | * | 2 | * | * | 1000 | |
| - | - | 1 | * | * | 800 | |
| * | * | 2 | * | * | 1400 | |
| * | * | 2 | * | * | 1000 | |
| * | - | 2 | * | 1400 | ||
| - | - | 1 | - | - | 800 | |
| * | * | 2 | * | * | 600 | |
| - | - | 2 | * | - | 1400 | |
| - | - | 0 | * | - | 1400 | |
ENGLISH
* Optional function
- It cannot be selected
— — Highest water temperature
- (1) The wash performance test programmes are: Eco 40-60.
- (2) BabySafe and AllergyCare steam are suitable to sterilize coloured laundry.
- (3) The Eco 40-60 programme is used to assess compliance with EU eco-design legislation.
- ** The times indicated for each programme match the length with standard loads and temperatures. Other loads and temperatures will need different programme length.
- When you see water mist on the door glass, do not put your hand on the door glass or open the dispenser. You could get burned.
6. EXTRA FUNCTIONS
Mute function
- You can mute every audible warning, except alerts.
- To do so, hold down the Spin and Favorites icons at once for 2 seconds. The mute function icon will turn on.
- To reset the sounds, hold down the Spin and Favorites icons at once for 2 seconds and the mute function icon will turn off.
Automatic weighing
- When the washing machine displays “--”, after turning it on, it means it is automatically weighing.
- According to the laundry weight, the machine will show you the duration of the programme (hours:minutes).
Door closing icon
- When you start the programme, the door will be locked and the icon will flash. Do not open the door at this time, as this could result in personal injury.
- After some seconds, the icon will be steady.
- The door will be unlocked.
- When the programme ends, the door will unlock automatically.
- If you press the Start/Pause icon, if it is safe to do so, the door will unlock and the icon will turn off. Now you will be able to open the door.
DelayEnd function
This function allows you to adapt the washing machine according to your needs and programme the washing machine to finish whenever you want.
- You can only press this icon during standby mode (that is, before choosing any programme).
-
Once you enter the DelayEnd mode, every time you press the icon, the time will increase in 1-hour intervals.
-
If you hold down the icon, time will increase fast.
- If the selected programme time is over 1 hour, this time will appear by default on the control panel, before choosing the DelayEnd mode. Next, every time you press this icon, time will increase.
- You can cancel the selection before the programme starts by turning the programme knob and choosing another programme.
- DelayEnd time must be over the programme length. For example, if the selected programme takes up 1:30, the DelayEnd time selected must be between 2:00 and 24:00.
- When the process starts, the icon will flash. When it is running, the DelayEnd icon will turn on.
Child Lock function
With this function you can increase safety when children are around.
- When a programme starts, hold down the Temp. and Spin icons at once for 3 seconds, then the icon will turn on and the child lock will be on.
- To deactivate the child lock, follow the same steps.
- Every icon is protected.
- When you press the On/Off icon, the lock will be off.
- When the programme finishes, the lock will be off.
Favorites function
- Press the On/Off icon.
- Select the washing programme and the settings.
- Hold down the Favorites icon for 3 seconds.
- It will be saved as your favourite programme.
- Press Favorites when you want to use this programme and then press Start/Pause to start.
- If you use this programme for the first time, and you have never used the Favorites programme, you can press this icon lightly and by default the linen and cotton programme and its default settings will be adjusted..
- Press the icon and it will turn on.
- Repeat the process or press other icons to exit the programme.
- If you want to overwrite the programme, select other functions and hold down the icon for 3 seconds.
Note:
You can only save one programme.
Softener/detergent release
- Select the softener/detergent icons and set the release volume.
- You can only activate it on the standby mode.
- After pressing the icon, you must select the desired volume in these levels: High - Half -
ENGLISH
Low - Off.
- After selecting the softener/detergent volume, its first use will be saved. This way, next time you use the washing machine, the volume will be the one selected the last time.
- When the user uses the machine for the first time, the softener/detergent release volume is automatic by default.
- When the softener/detergent release is activated, if the washing machine detects the softener/detergent amount in the compartment is too small, it will show the softener addition icon on the display.
Add clothes
- If you want to add more clothes during the washing cycle, press the Start/Pause icon.
- If the add clothes icon is on, you can open the washing machine.
- On the display the remaining time and lock will flash.
- When the icon is off, you can open the door.
- If the icon does not turn on and the door lock icon does not flash, the time has been exceeded or the temperature is over 50° C, you cannot add more clothes.
Programme completion
When the programme ends, the display will show "End".
If you do not perform any action in the first two minutes, the machine will turn off.
- Hold down the On/Off icon for 2 seconds to turn it off.
- Close the stopcock.
- Open the door and take the laundry out.
- Allow it to air slightly to remove moisture.
7. CLEANING AND MAINTENANCE
Device exterior and control panel
- You can wash it with a soft, damp cloth.
- You can use a little non-abrasive detergent.
- Use a soft cloth to dry it.
Door sealing
- Check the sealing condition regularly.
- Clean it with a damp cloth if necessary.
Detergent compartment (Fig. 16)
- Press and hold the release lever on the inside of the compartment, slide it open and remove it from the machine.
- Open the lids on both compartments, add water and shake to remove the detergent
remains. Repeat the operation until it is clean.
- Clean the valve caps on both compartments with a soft brush.
- Clean the components of the compartment under running water with a soft brush.
- Clean the compartment gap in the machine with a soft brush.
- Once you finish cleaning, slide the compartment into position, ensuring it freely moves to its closed position.
Filter
In Cecotec we advise you to check and clean the filter regularly, at least twice or three times a year, and mostly:
- If the product does not drain correctly or does not spin correctly.
- If the pump is blocked by a strange body (for example, buttons, coins or pins).
Important (Fig. 17)
Make sure water has completely cooled down before draining the machine.
- Stop it and unplug it.
- Use a slotted screwdriver to prise off the cover. Press it firmly to the right and open it.
Note:
Be careful not to damage the surface of the washing machine.
- Place a container under the filter door and then empty with the emergency drain pipe (NOT INCLUDED). Next, loosen the filter counterclockwise and remove it.
- Clean the filter and its compartment.
- Make sure that the pump rotor moves freely.
- Insert the filter again and tighten it clockwise until it stops.
- Place the cover back.
Water supply hose
Check regularly the water supply hose is in good condition (not broken or cracked). If necessary, replace it with a hose of the same kind.
Mesh filter for the water connection (Fig. 18)
Check and clean regularly the mesh filter.
- Close the stopcock.
- Loosen the faucet inlet hose.
- Clean the interior mesh filter.
- Tighten the faucet inlet hose again.
- Screw off the inlet hose from the backside of the machine.
- Remove the mesh filter from the washing machine connection with universal pliers and clean it.
- Place the mesh filter again and tighten it again to the inlet hose.
ENGLISH
Maintenance and lime prevention advice:
- Remove the laundry as soon as possible from the drum.
- Use the AutoClean programme to clean the drum.
- Clean the filter (it is advisable to do it after the AutoClean programme).
- Do not exceed the maximum load.
- Use the adequate products in the recommended amounts.
- Leave the door open after every wash.
Transport and storage
Two people are needed to handle the washing machine. Never lift the device by grabbing the surface during transport.
- Unplug the device from the electric circuit. Do not pull the cord. Always disconnect the plug.
- Close the stopcock.
- Disconnect the drain and inlet hoses.
- Remove the water from the hoses and the device.
- Place the transport bolts.
Electrical connections
Use only a grounded electrical outlet.
- The power supply must be adequate for the 10 A rated current of the machine.
- Do not use an extension cord or multiple sockets.
- The power cord must be exclusively replaced by an authorised electrician.
8. TROUBLESHOOTING
Your laundry is equipped with automatic safety functions.
This system allows you to early detect faults and the safety system can react adequately. These faults are often so minor that they can be quickly resolved.
Draining warning
If the pipe is pressurised, emptying will not run smoothly.
In case it is not completely drained for a long period of time, the draining failure icon will be displayed and the display will indicate "F03" to warn the user.
The washing machine does not turn on, there is no indicator light on
Check:
- The washing machine is plugged to the power socket.
- The power socket works. Check with another electronic device.
The washing machine does not turn on
Check:
- You have pressed the Start/Pause icon.
- The door is properly closed.
- The "Closed water faucet" light is on. Open the faucet and press the Start/Pause icon.
The washing machine stops during the programme (depending on the model)
Check:
- The washing machine safety system has been activated.
- The foam level. If the foam level is high, the washing machine will activate a programme to remove foam. The machine will work again automatically after some time.
There are detergent or additives remains in the detergent compartment after ending the washing.
Check:
- The softener compartment lid grille and the detergent compartment lid grille are correctly installed.
- The detergent dispenser and all the parts are clean.
- There is enough water entering. The mesh filters from the water supply may be blocked.
The machine vibrates during the spinning cycle
Check:
- The washing machine is level.
- All 4 legs are resting on the floor.
- The transport bolts have been removed.
Warning
Before using the washing machine, it is necessary to remove the transport bolts.
The final spin results are not optimum
- Your washing machine has an imbalance detection and correction system.
- If the machine detects excess weight, it can reduce the spin speed or stop spinning completely. This prevents damage to the washing machine.
Others:
- Check that the spin speed selection does not display 0..
- If the laundry is still too wet at the end of the cycle, remove the laundry and repeat the spinning cycle.
- Excessive foam formation may prevent spinning. Use the appropriate amount of detergent.
Time indicator: the programme time shown initially changes for a time period
Some factors affect the washing machine so that it can recalculate the remaining programme run time and update it if necessary. Factors like:
ENGLISH
- Excessive foam formation;
- Unbalanced load due to heavy garments;
- Prolonged heating time due to low inlet water temperature.
In addition, during the filling phase, the machine determines the load and, if necessary, adjusts the initial programme time displayed on the screen. You will recognise these periods because an animation will appear on the time display.
Error codes
Here are some codes that the control panel may display if the washing machine stops when the programme is running.
Check the following table and possible solutions.
| Error code list | ||
| Error on the display | Error description | Possible solution |
| “F01” | Water inlet fault | Check if:- The faucet is completely open.- There is enough water pressure.- The water inlet pipe is connected.- The filtering net in the water inlet pipe is blocked.- The water pipe is frozen.- Press the Start/Pause icon after fixing the error.- If the error still appears, contact the Cecotec Customer Service. |
| "F03" | Draining fault | The washing machine is not drained. Stop the programme.Turn off the washing machine and disconnect it from the power supply.Check if:- The draining pipe is connected.- The draining pump filter is not blocked.- Important: Make sure the device has completely cooled down before draining it.- The draining hose is frozen.- Plug the device again into a power supply.- Select and start the Spin programme or hold down the On/Off icon for 3 seconds and restart the desired programme.- If the error still appears, contact the Cecotec Customer Service. |
| "F13" | Door lock fault | - The door lock does not work properly.- Start a programme 3 times to check if the door is locked.- Open it and close it again.- Press the Start/Pause icon after fixing the error. If the error still appears, contact the Cecotec Customer Service. |
| "F14" | Door unlock fault | Door opening error- Press the Start/Pause icon.- The washing machine will try to open the door.- The error will not disappear until you do not unlock the door.- Or press the On/Off icon to restart the washing machine and the error will disappear. |
| "F24" | Overflow or too much foam. | The water level reaches the overflow level.- Remove it by pressing the Start/Pause icon and drain the water.- Select and start the desired programme.- If the error occurs again, disconnect the appliance from the mains and contact the Cecotec Customer Service. |
| Another error "F04-F98" | Electronic module failure. | Electronic module failure.- Stop the machine by holding down the On/Off icon for 2 seconds.- If the error disappears, press the On/Off icon.- If the error occurs again, disconnect the appliance from the mains and contact the Cecotec Customer Service. |
| "Unb" | Unbalance warning | The unbalance error can be solved with the following methods.Clothing entanglement.- Hold down the On/Off icon for 2 seconds to stop the machine, open the door, shake out the laundry and put it back into the machine, then select the Spin programme to re-dry it.Clothes too light.- Hold down the On/Off icon for 2 seconds to stop the machine, open the door, shake out the laundry and put it back into the machine, then select the Spin programme to re-dry it. |
If the washing machine still does not work properly, contact the Customer Service.
9. TECHNICAL SPECIFICATIONS
*Technical specifications may change without prior notification to improve product quality.
Reference: 02357/ 02358
Model: Bolero DressCode 2000 Autodosis /Silver
Washing capacity: 10.0 kg
Dimensions: 60 x 61 x 85 cm (width x depth x height).
Nominal voltage: 220-240 V\~, 50 HZ
IPX4
Heating power: 1750 W
Water circulation: 0.1-1 MPa
Manufactured in China | Designed in Spain
| Summary of the test result with the "ECO 40-60" programme | ||||
| Model identifier: 02357_02358_Bolero DressCode 2000 Autodosis/ Silver | ||||
| General product parameters: | ||||
| Parameter | Symbol | Unit | Precision | Result |
| Capacity (kg) | c | Kg | 0.5 | 10.0 |
| Weight Factor | A | 0.001 | 0.301 | |
| Weight Factor | B | 0.001 | 0.249 | |
| Weight Factor | C | 0.001 | 0.450 | |
| Rated capacity for the ECO 40-60 programme at nominal capacity | Ew, full | kWh | 0.001 | 1.017 |
| Rated capacity for the ECO 40-60 programme at nominal capacity | Ew, half | kWh | 0.001 | 0.640 |
| Rated capacity for the ECO 40-60 programme at nominal capacity | Ew, quarter | kWh | 0.001 | 0.250 |
| Weighted energy consumption | Ew | kWh | 0.001 | 0.578 |
| Weighted energy consumption per 100 cycles | E100 | kWh | 1 | 58 |
| Standard energy consumption | SCEw | kWh | 0.001 | 0.988 |
| Energy Efficiency Index (EEIW) | EEI | 0.1 | 58.5 | |
| Energy efficiency class | B | |||
| Water consumption of the ECO 40-60 programme at nominal capacity | Ww, full | litre | 0.1 | 55.1 |
| Water consumption of the ECO 40-60 programme at nominal capacity | Ww, half | litre | 0.1 | 40.0 |
| Water consumption of the ECO 40-60 programme at nominal capacity | Ww, quarter | litre | 0.1 | 19.5 |
| Weighted water consumption | Ww | litre | 1 | 35 |
| Washing efficiency index of the ECO 40-60 programme at nominal capacity | lw, full | 0.01 | 1.04 | |
| Washing efficiency index of the ECO 40-60 programme at nominal capacity | lw, half | 0.01 | 1.04 | |
| Washing efficiency index of the ECO 40-60 programme at nominal capacity | lw, half | 0.01 | 1.04 | |
| Rinse effectiveness for the ECO 40-60 programme at nominal capacity | IR, full | g/kg | 0.1 | 4,2 |
| Rinse effectiveness for the ECO 40-60 programme at nominal capacity | IR, full | g/kg | 0.1 | 3.7 |
| Rinse effectiveness for the ECO 40-60 programme at nominal capacity | IR, quarter | g/kg | 0.1 | 3.4 |
| Programme duration of the ECO 40-60 programme at nominal capacity | tcap, full | min | 1 | 217 |
| Programme duration of the ECO 40-60 programme at nominal capacity | tcap, full | min | 1 | 170 |
| Programme duration of the ECO 40-60 programme at nominal capacity | tcap, quarter | min | 1 | 170 |
| Temperature reached for minimum 5 min inside the load during ECO 40-60 programme at nominal capacity | TMAX, full | °C | 1 | 43 |
| Temperature reached for minimum 5 min inside the load during ECO 40-60 programme at nominal capacity | TMAX, half | °C | 1 | 37 |
| Temperature reached for minimum 5 min inside the load during ECO 40-60 programme at nominal capacity | TMAX, quarter | °C | 1 | 25 |
| Spin speed in the spinning phase of the ECO 40-60 programme at nominal capacity | S, full | rpm | 1 | 1411 |
| Spin speed in the spinning phase of the ECO 40-60 programme at nominal capacity | S, half | rpm | 1 | 1411 |
| Spin speed in the spinning phase of the ECO 40-60 programme at nominal capacity | S, quarter | rpm | 1 | 1409 |
| Remaining moisture content for the ECO 40-60 programme at nominal capacity | D, full | % | 0.1 | 54.1 |
| Remaining moisture content for the ECO 40-60 programme at nominal capacity | D, half | % | 0.1 | 52.8 |
| Remaining moisture content for the ECO 40-60 programme at nominal capacity | D, quarter | % | 0.1 | 52.9 |
| Weighted remaining moisture content | D | % | 1 | 53 |
| Spin-drying efficiency class | B | |||
| Power consumption in 'off mode' | Po | W | 0.01 | 0.48 |
| Power consumption on 'standby mode'Does 'standby mode' include the display of information? | Psm | W | 0.01 | -- |
| Time when automatically switching to off or standby mode | Ts | min | 1 | 2 |
| Time in delayed start mode | Tds | h | 1 | 24 |
| Power consumption in delayed start mode | Pds | W | 0.01 | 2.40 |
| Power consumption on standby mode in network standby conditions | Psm | W | 0.1 | - |
| Acoustic airborne noise emission during the ECO 40-60 programme (spinning cycle) | (dB(A) re 1 pW) | 1 | 71 | |
| Product information sheetCOMISSION DELEGATED REGULATION (EU) 2019/2014 with regard to energy labelling of household washing machines and household washer-dryers. | ||||
| Supplier's name or trade mark: Cecotec Innovaciones, S.L. | ||||
| Supplier's address: C/ de la Pinadeta, s/n 46930 Quart de Poblet (Valencia) SPAIN | ||||
| Model identifier: 02357_022358_ Bolero DressCode 2000 Autodosis / Silver | ||||
| General product parameters: | ||||
| Parameter | Value | Parameter | Value | |
| Capacity (kg) | 10.0 | Dimensions in cm | Height | 85 |
| Width | 60 | |||
| Depth | 61 | |||
| EEIw (a) | 59.3 | Energy efficiency class (a) | B (c) | ||
| Washing efficiency index (a) | 1.04 | Rinsing effectiveness (g/kg) (b) | 4,2 | ||
| Energy consumption in kWh per cycle, based on the Eco 40-60 programme. Actual energy consumption will depend on how the appliance is used | 0.586 | Water consumption in litre per cycle, based on the Eco 40-60 programme. Actual water consumption will depend on how the appliance is used and on the hardness of the water | 38 | ||
| Maximum temperature inside the treated textile (°C) (a) | Capacity | 41 | Residual moisture content (%) (a) | Capacity | 54 |
| Half | 37 | Half | 53 | ||
| Quarter | 25 | Quarter | 53 | ||
| Spin speed (rpm) (a) | Capacity | 1400 | Spin-drying efficiency class (a) | B (c) | |
| Half | 1400 | ||||
| Quarter | 1400 | ||||
| Programme duration (h:min) (a) | Capacity | 3:59 | Type | Every type | |
| Half | 3:00 | ||||
| Quarter | 3:00 | ||||
| Airborne acoustical noise emissions in the spinning phase (dB(A) re 1 pW) (a) | 71 | Airborne acoustical noise emission class (spinning phase) (a) | A (c) | ||
| Off-mode (W) | 0.49 | Standby mode (W) | N/A | ||
| Delay start (W) (if applicable) | 3.60 | Networked standby (W) (if applicable) | N/A | ||
| Minimum duration of the guarantee offered by the supplier: 2 years | |||||
| This product has been designed to release silver ions during the washing cycle NO | |||||
| Further information: | |||||
| Weblink to the supplier's website, where the information in point 9 of Annex II to Commission Regulation (EU)2019/2023 (1) (b) is found: www.storececotec.es | |||||
| (d) For the eco 40-60 program.(e) Changes to these items shall not be considered relevant for the purposes of paragraph 4 of Article 4 of Regulation (EU) 2017/1369.(f) if the product database automatically generates the definitive content of this cell, the supplier does not have to enter these data. | |||||
10. DISPOSAL OF OLD ELECTRICAL APPLIANCES

This symbol indicates that, according to the applicable regulations, the product and/or battery must be disposed of separately from household waste. When this product reaches the end of its shelf life, you should dispose of the batteries/accumulators and take them to a collection point designated by the local authorities.
Consumers must contact their local authorities or retailer for information
concerning the correct disposal of old appliances and/or their batteries.
Compliance with the above guidelines will help to protect the environment.
11. TECHNICAL SUPPORT AND WARRANTY
Cecotec shall be liable to the end user or consumer for any lack of conformity that exists at the time of delivery of the product under the terms, conditions and deadlines established by the applicable regulations.
It is recommended that repairs be carried out by qualified personnel.
If at any moment you detect any problem with your product or have any doubt, do not hesitate to contact Cecotec official Technical Support Service at +34 963 210 718.
12. COPYRIGHT
The intellectual property rights over the texts in this manual belong to CECOTEC INNOVACIONES, S.L. All rights reserved. The contents of this publication may not, in whole or in part, be reproduced, stored in a retrieval system, transmitted or distributed by any means (electronic, mechanical, photocopying, recording or similar) without the prior authorization of CECOTEC INNOVACIONES, S.L.
FRANÇAIS
1. PIÈCES ET COMPOSANTS
Img. 1
Symbol "Türverriegelung"
8. PROBLEEMOPLOSSING
Fig. / Img. / Rys. / Obr. 1


Fig. / Img. / Rys. / Obr. 2

Fig. / Img. / Rys. / Obr. 3

Fig. / Img. / Rys. / Obr. 4

Fig. / Img. / Rys. / Obr. 5

Fig. / Img. / Rys. / Obr.7
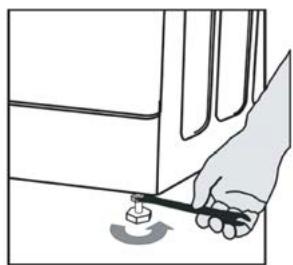

Fig. / Img. / Rys. / Obr.8

Fig. / Img. / Rys. / Obr.9


Fig. / Img. / Rys. / Obr.10
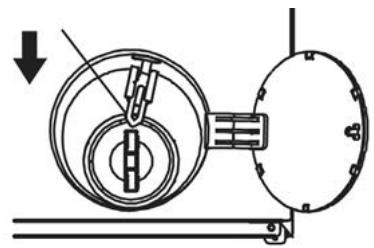
Fig. / Img. / Rys. / Obr. 11
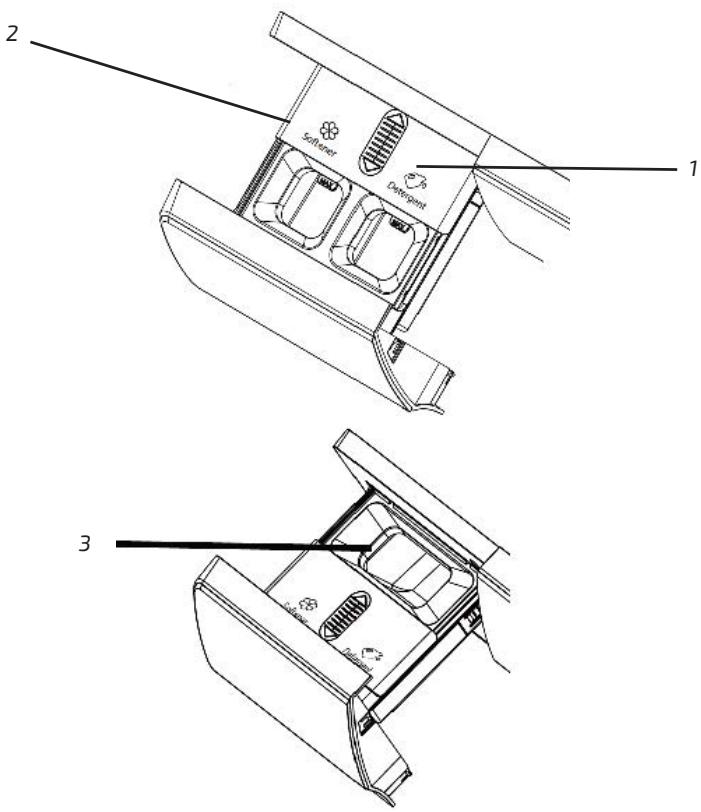
Fig. / Img. / Rys. / Obr. 12
Suavizante Softener

AutoDosis
AutoDosing

Detergent
Fig. / Img. / Rys. / Obr. 13
Suavizante Softener
Auto


AutoDosis
AutoDosing
Auto


Detergent
Fig. / Img. / Rys. / Obr. 14
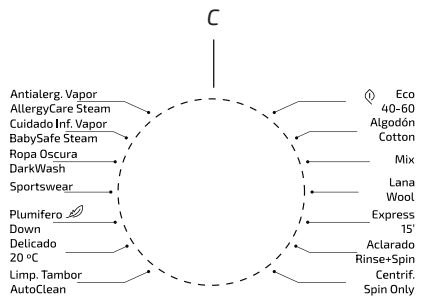

Fig. / Img. / Rys. / Obr. 15
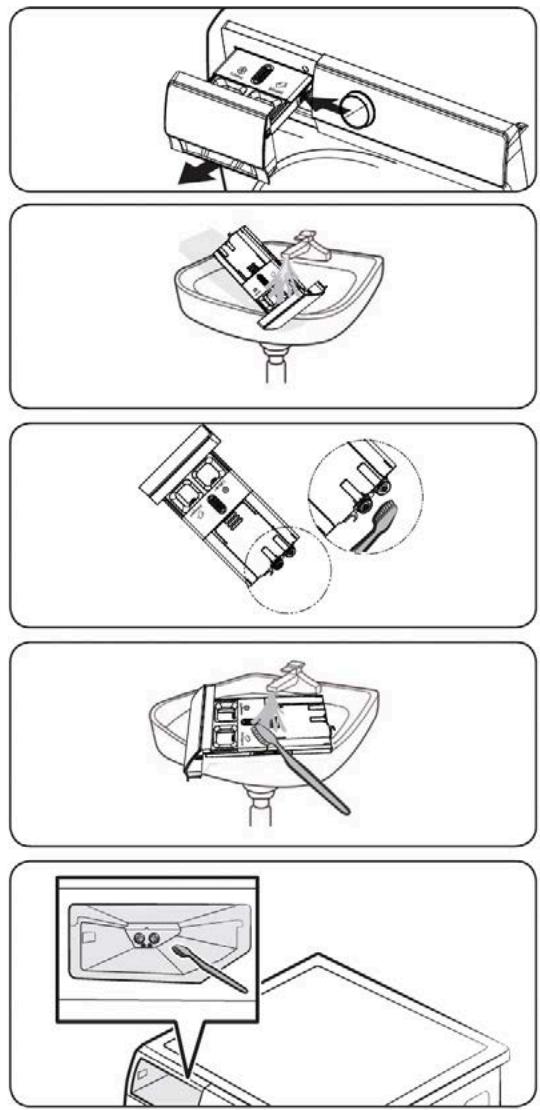
Fig. / Img. / Rys. / Obr. 16


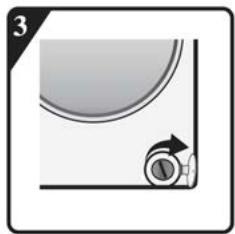

Fig. / Img. / Rys. / Obr. 17

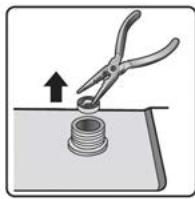


Fig. / Img. / Rys. / Obr. 18
www.cecotec.es
Quart de Poblet, Valencia (Spain)
YV01211108
- SOMMAIRE
- INSTRUCTIONS DE SÉCURITÉ
- BEFORE USE
- BOX CONTENTS
- INSTALLATION
- STEP 1. REMOVING THE TRANSPORT BOLTS
- IMPORTANT
- WARNING
- STEP 2. LOCATION
- ENGLISH
- NOTE
- STEP 3. FEET ADJUSTMENT
- STEP 4. WATER SUPPLY HOSE CONNECTION
- STEP 5. DRAINING HOSE CONNECTION. FIG. 10
- WARNINGS
- ELECTRICAL CONNECTIONS
- OPERATION
- BEFORE THE FIRST WASHING CYCLE
- WASHING PREPARATION
- TYPE OF FABRIC/LABEL SYMBOL
- COLOUR
- LOAD
- DELICATE CLOTHES
- EMERGENCY DOOR OPENING (FIG. 11)
- LOADING THE WASHING MACHINE
- DETERGENTS AND ADDITIVES
- NOTES
- DETERGENT COMPARTMENT (FIG. 12)
- DETERGENT AND FABRIC SOFTENER
- AUTODOSING FUNCTION
- ADD DETERGENT/SOFTENER
- MANUAL MODE
- SELECTING A PROGRAMME
- CANCELLING THE PROGRAMME OR CHANGING THE OPTIONS
- CONTROL PANEL INFORMATION
- OPTIONAL FUNCTION
- EXTRA FUNCTIONS
- MUTE FUNCTION
- AUTOMATIC WEIGHING
- DOOR CLOSING ICON
- DELAYEND FUNCTION
- CHILD LOCK FUNCTION
- FAVORITES FUNCTION
- SOFTENER/DETERGENT RELEASE
- ADD CLOTHES
- PROGRAMME COMPLETION
- CLEANING AND MAINTENANCE
- DEVICE EXTERIOR AND CONTROL PANEL
- DOOR SEALING
- DETERGENT COMPARTMENT (FIG. 16)
- FILTER
- IMPORTANT (FIG. 17)
- WATER SUPPLY HOSE
- MESH FILTER FOR THE WATER CONNECTION (FIG. 18)
- MAINTENANCE AND LIME PREVENTION ADVICE
- TRANSPORT AND STORAGE
- TROUBLESHOOTING
- DRAINING WARNING
- THE WASHING MACHINE DOES NOT TURN ON, THERE IS NO INDICATOR LIGHT ON
- THE WASHING MACHINE DOES NOT TURN ON
- CHECK
- THE WASHING MACHINE STOPS DURING THE PROGRAMME (DEPENDING ON THE MODEL)
- THERE ARE DETERGENT OR ADDITIVES REMAINS IN THE DETERGENT COMPARTMENT AFTER ENDING THE WASHING
- THE MACHINE VIBRATES DURING THE SPINNING CYCLE
- THE FINAL SPIN RESULTS ARE NOT OPTIMUM
- OTHERS
- TIME INDICATOR: THE PROGRAMME TIME SHOWN INITIALLY CHANGES FOR A TIME PERIOD
- ERROR CODES
- TECHNICAL SPECIFICATIONS
- DISPOSAL OF OLD ELECTRICAL APPLIANCES
- TECHNICAL SUPPORT AND WARRANTY
- COPYRIGHT
- FRANÇAIS
- PIÈCES ET COMPOSANTS
- IMG. 1
- SYMBOL "TÜRVERRIEGELUNG
- PROBLEEMOPLOSSING
Brand : CECOTEC
Model : Bolero Dresscode 2000 Autodosis
Category : Refrigerator