
DUAL TRIGGER WIRELESS RECHARGEABLE - Wireless game controller THRUSTMASTER - Free user manual and instructions
Find the device manual for free DUAL TRIGGER WIRELESS RECHARGEABLE THRUSTMASTER in PDF.
| Product Type | Wireless Game Controller |
| Brand | Thrustmaster |
| Model | Dual Trigger Wireless Rechargeable |
| Compatibility | PC (Windows 98 SE, Me, 2000, XP) and PlayStation 2 |
| Connectivity | Wireless via Gameport receiver |
| Power | 2 Ni-Cd AA 1000mAh 1.2V rechargeable batteries (included) |
| Estimated Battery Life | Approximately 15 hours |
| Charging | USB docking station or separate cable |
| Estimated Charging Time | Approximately 4 hours |
| Vibration Type | Force feedback with two independent motors, low/high levels |
| Buttons | 8 analog action buttons, 2 analog sticks, 2 programmable triggers, D-pad, START, SELECT, MODE, MAPPING, CONNECT buttons |
| Triggers | Programmable, progressive action |
| Memory | Internal EEPROM retaining configuration |
| Wireless Range | Approximately 10 meters |
| Dimensions (estimated) | 150 x 105 x 65 mm |
| Weight (estimated) | 320 g |
| Maintenance | Clean with a slightly damp soft cloth; do not use solvents |
| Safety | Do not twist the cable, do not spill liquid, use only specified batteries |
| Spare Parts Available | Rechargeable batteries, charging cable, docking station, Gameport receiver |
| Repairability | 2-year warranty; contact technical support for repairs |
| Box Contents | Controller, docking station, Gameport receiver, USB cable, charging cable, installation CD-ROM, manual |
| Sleep Function | Automatic shutdown after 5 minutes of inactivity |
| Multiplayer | Up to 4 controllers simultaneously |
Frequently Asked Questions - DUAL TRIGGER WIRELESS RECHARGEABLE THRUSTMASTER
User questions about DUAL TRIGGER WIRELESS RECHARGEABLE THRUSTMASTER
0 question about this device. Answer the ones you know or ask your own.
Ask a new question about this device
Download the instructions for your Wireless game controller in PDF format for free! Find your manual DUAL TRIGGER WIRELESS RECHARGEABLE - THRUSTMASTER and take your electronic device back in hand. On this page are published all the documents necessary for the use of your device. DUAL TRIGGER WIRELESS RECHARGEABLE by THRUSTMASTER.
USER MANUAL DUAL TRIGGER WIRELESS RECHARGEABLE THRUSTMASTER
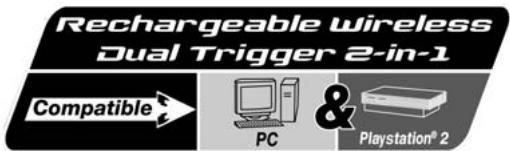
Rechargeable wireless
Dual Trigger 2-in-1
Compatible


PC
Playstation® 2
User Manual
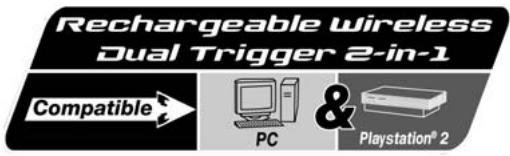
TECHNICAL FEATURES
- Programmable and progressive triggers
- 8 analog action buttons
- START + SELECT buttons
- 2 analog mini-sticks + 2 digital action buttons
- D-Pad (Point Of View)
- Switch (Gamepad OFF / Vibration Low/High)
- MODE button (Analog / Digital)
- MAPPING button (for programming trigger functions)
- CONNECT button
- 2 built-in independent motors
-
Gameport receiver
-
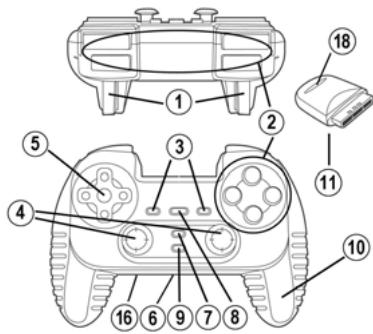
Docking station
- DC out
- Gameport connector slot on docking station
- Charging connectors
- DC in
- USB connector on docking station
- Receiver Button
- Independent charging cable (not shown)
- 2 rechargeable batteries Ni-Cd AA 1000mAh 1.2V (not shown)
SAFETY NOTICE
- Do not twist or pull on the cable.
- Do not spill liquid on the cable and/or connectors.
- In the event of malfunction during use due to electrostatic emission, please exit the game and unplug the device from your PC or console. Resume normal game play by plugging the device back in and restarting the game.
- Never insert non-rechargeable batteries or batteries with a different reference into your gamepad!
INSTALLATION OF THE RECHARGEABLE BATTERIES
- Remove the gamepad's battery compartment cover.
- Insert rechargeable batteries, then replace the cover.
INSTALLATION ON PC
System requirements: PC (Windows 98SE, Me, 2000, XP) equipped with USB port.
The CD-ROM included with this product allows you to install the Force Feedback drivers.
- Insert the installation CD-ROM into your CD-ROM drive. Follow the on-screen instructions to install the Force Feedback drivers. Once the installation is complete, click Finish and restart your computer.
- Once your computer has restarted, connect the USB connector on the docking station (17) to one of your computer's USB ports. Windows 98/Me/2000/XP will automatically detect the new device. (If you are connecting a USB device for the first time, Windows may ask you to insert the Windows CD-ROM during the installation procedure in order to install the required system files.)
- Driver installation:
Windows 98: the Add New Hardware Wizard will search for the appropriate drivers. Click Next.
Follow the on-screen instructions to complete the installation.
Windows Me/2000/XP: the drivers are installed automatically.
- Select Start/All Programs/Thrustmaster/Force Feedback driver/Control Panel.
The Game Controllers dialog box displays the gamepad's name with OK status.
USING YOUR GAMEPAD ON PC
- To play on PC, plug the gameport receiver (11) into the gameport connector slot on the docking station (14).
- Set the gamepad's switch (6) to one of the VIB positions to turn the gamepad on. Connection between the gamepad and the gameport receiver is automatic and the LED stops flashing.
-
In the Control Panel, click Properties to configure your gamepad:
-
Test device: allows you to test and visualize the buttons, the D-Pad, and the axes of the 2 mini-sticks and the 2 triggers.
- Test forces: allows you to test 8 vibration effects and configure the vibration effect settings.
INSTALLATION ON PS2
- Remove the gameport receiver (11) from the gameport connector slot on the docking station (14).
- Plug the gameport receiver (11) into a controller port on your console.
- Turn on the gamepad using the switch (6).
- Turn on your console and start up your game.
You are now ready to play!
ADVANCED FUNCTIONS
- Switch (6):
- OFF position = gamepad is turned off.
- VIB LOW position = gamepad is turned on, vibration mode is on low (saves battery power).
- VIB HIGH position = gamepad is turned on, vibration mode is on high (uses more battery power).
- MODE button (7): press this button to switch between modes.
- Analog mode (default): MODE button (7) lights up blue.
- Digital mode: MODE button (7) is not lit up.
- CONNECT button (9):press this button to switch between modes.
- "Connect" LED is flashing quickly = no signal between gamepad and receiver (not connected).
- "Connect" LED is lit up = strong signal between gamepad and receiver.
- "Connect" LED is off = gamepad is in sleep mode.
-
"Connect" LED is flashing slowly = low battery power (vibration function will be disabled in order to save power). You should recharge the batteries.
-
SLEEP MODE:
-
The gamepad automatically turns off when it has not been used for 5 minutes.
-
To "wake" it, press any button.
-
MULTIPLAYER / CHANNEL AUTO-SWITCHING INFORMATION:
-
You can play with up to 4 Dual Trigger Gamepads. All channels are detected automatically.
-
When playing in multiplayer mode, if you wish to switch gamepads in the course of a game, press the Receiver (19) and CONNECT buttons on your gamepad simultaneously.
-
CHARGING THE RECHARGEABLE BATTERIES:
-
To recharge the batteries, connect the USB connector on the docking station (17) to a USB port on your PC or PlayStation 2.
- Place your gamepad on the docking station, taking care to position the gamepad's charging connectors on top of the docking station's charging connectors (15) and make sure that they make contact.
- The CHARGE LED turns red during charging.
- When the batteries are fully charged, the CHARGE LED turns green.
- Note: you can use the gamepad while it is charging. To do so, connect the independent charging cable (19) to the gamepad's DC in (16) and the docking station's DC out (13) connectors.
TRIGGER MAPPING
All analog buttons and mini-stick directions (axes) can be mapped to the left and right triggers (except D-Pad and START, SELECT, L3 and R3 buttons).
-
MAPPING button (8) (used to map left and right triggers):
-
Press and release the MAPPING button (LED flashes slowly).
- Press and release the button or direction you want to assign to the trigger (LED flashes quickly).
-
Press and release the trigger assigned to this function (LED turns off).
-
EEPROM:
Your gamepad includes an internal memory chip, which stores your last mapping configuration even if you turn your gamepad off.
- TRIGGER BEHAVIOR:
Triggers react differently according to whether you map 2 separate analog axes, one same analog axis or 2 separate analog buttons to them. Below are 3 different examples (in this case, for racing games).

PS2 recommended
PC recommended
PC and PS2 alternative

2 analog (PS2) or digital (PC) buttons are mapped to the 2 triggers.
- On PS2, this configuration is the most useful for racing games (because of the progressive analog buttons).
- You are in the same configuration as a PS2 Force Feedback racing wheel (i.e. in 3-axis mode).
- On PC, this configuration is possible but not the best (because of the digital buttons).
- This enables you to separately regulate analog (PS2) or digital (PC) control of the left and right triggers (there is no "master" trigger).
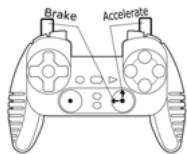
- 2 separate axes are mapped to the 2 triggers.
- On PC, this configuration is the most useful for lots of racing games (because of the progressive analog buttons).
- You are in the same configuration as a PC Force Feedback racing wheel (i.e. in 3-axis mode).
- This enables you to separately regulate analog control of the left and right triggers (there is no "master" trigger).
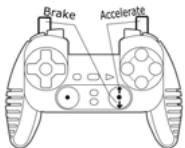
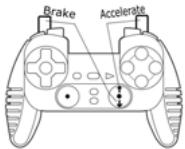
One same axis is mapped to the 2 triggers.
In this case the left trigger is the "master" trigger.
If you press the left and right triggers together, your car will brake.
- This allows you to use the right trigger to control your car's speed, and briefly use the left trigger for powerful braking control.
EXAMPLES OF OTHER POSSIBLE MAPPING
The triggers provide intuitive performance in all types of games: action and FPS (progressive zoom, view, lateral movement or fire), racing (progressive gas, brake, emergency brake, manual transmission), sports (progressive pass, shoot, punch or jump...) and more.
Thus, many mapping configurations are available, according to the possibilities offered by your game. If your game does not accept your current mapping configuration, the triggers will produce strange reactions; in this case, please try defining another mapping configuration (using other axes and buttons).
For a better understanding of all the possibilities available on PC, try them out in "Game Controllers" (Thrustmaster Control Panel).
WARNING: NEVER INSERT NON-RECHARGEABLE BATTERIES OR BATTERIES WITH A DIFFERENT REFERENCE INTO YOUR GAMEPAD!
TECHNICAL SUPPORT
If you encounter a problem with your product, please go to http://ts.thrustmaster.com and click Technical Support. From there you will be able to access various utilities (Frequently Asked Questions (FAQ), the latest versions of drivers and software) that may help to resolve your problem. If the problem persists, you can contact the Thrustmaster products technical support service ("Technical Support"):
By email:
In order to take advantage of technical support by email, you must first register online. The information you provide will help the agents to resolve your problem more quickly. Click Registration on the left-hand side of the Technical Support page and follow the on-screen instructions. If you have already registered, fill in theUsername and Password fields and then click Login.
By telephone:
| United Kingdom | 0207 216 0047 | price of a national phone call, Monday to Friday from 12PM to 4PM and from 5PM to 10PM |
| United States / Canada | 514-279-9911 | price of a long distance phone call, Monday to Friday from 7AM to 11AM and from 12PM to 5PM (Eastern time) |
| Denmark | 82 33 28 58 | price of a national phone call, Monday to Friday from 1PM to 5PM and from 6PM to 11PM |
| Finland | 09 81 71 01 54 | price of a national phone call, Monday to Friday from 2PM to 6PM and from 7PM to 12AM |
| Netherlands | 0900 2026765 | €0.30/min, Monday to Friday from 1PM to 5PM and from 6PM to 11PM |
| Norway | 23 50 01 16 | price of a national phone call, Monday to Friday from 1PM to 5PM and from 6PM to 11PM |
| Sweden | 08-51992032 | price of a national phone call, Monday to Friday from 1PM to 5PM and from 6PM to 11PM |
WARRANTY INFORMATION
Worldwide, Guillemot Corporation S.A. ("Guillemot") warrants to the consumer that this Thrustmaster product will be free from material defects and manufacturing flaws for a period of two (2) years from the original date of purchase. Should the product appear to be defective during the warranty period, immediately contact Technical Support, who will indicate the procedure to follow. If the defect is confirmed, the product must be returned to its place of purchase (or any other location indicated by Technical Support).
Within the context of this warranty, the consumer's defective product will, at Technical Support's option, be either repaired or replaced. Where authorized by applicable law, the full liability of Guillemot and its subsidiaries (including for indirect damages) is limited to the repair or replacement of the Thrustmaster product. The consumer's legal rights with respect to legislation applicable to the sale of consumer goods are not affected by this warranty.
This warranty shall not apply: (1) if the product has been modified, opened, altered, or has suffered damage as a result of inappropriate or abusive use, negligence, an accident, normal wear, or any other cause not related to a material defect or manufacturing flaw; (2) in the event of failure to comply with the instructions provided by Technical Support; (3) to software not published by Guillemot, said software being subject to a specific warranty provided by its publisher.
Additional warranty provisions
In the United States of America and in Canada, this warranty is limited to the product's internal mechanism and external housing. Any applicable implied warranties, including warranties of merchantability and fitness for a particular purpose, are hereby limited to two (2) years from the date of purchase and are subject to the conditions set forth in this limited warranty. In no event shall Guillemot Corporation S.A. or its affiliates be liable for consequential or incidental damage resulting from the breach of any express or implied warranties. Some States/Provinces do not allow limitation on how long an implied warranty lasts or exclusion or limitation of incidental/consequential damages, so the above limitation may not apply to you. This warranty gives you specific legal rights, and you may also have other legal rights which vary from State to State or Province to Province.
COPYRIGHT
© 2005 Guilemot Corporation S.A. All rights reserved. Thrustmaster® is a registered trademark of Guilemot Corporation. PlayStation® is a registered trademark of Sony Computer Entertainment Inc. Microsoft® Windows® is a registered trademark of Microsoft Corporation in the United States and/or other countries. All other trademarks and brand names are hereby acknowledged and are property of their respective owners. Illustrations not binding. Contents, designs and specifications are subject to change without notice and may vary from one country to another.
ENVIRONMENTAL PROTECTION RECOMMENDATION
At the end of its working life, this product should not be disposed of with standard household waste, but rather dropped off at a collection point for the disposal of Waste Electrical and Electronic Equipment (WEEE) for recycling.
This is confirmed by the symbol found on the product, user manual or packaging.
Depending on their characteristics, the materials may be recycled. Through recycling and other forms of processing Waste Electrical and Electronic Equipment, you can make a significant contribution towards helping to protect the environment.
Please contact your local authorities for information on the collection point nearest you.
FAQs, tips and drivers available at www.thrustmaster.com
INFORMATIONS RELATIVES À LA GARANTIE
Alternative PC & PS2
- Selecteer Start/Programma's/Thrustmaster/Force Feedback driver/Control Panel.
INFORMATIE MET BETREKKING TOT DE GARANTIE
Alternative PC / PS2
EC-DECLARATION OF CONFORMITY TO THE ESSENTIAL REQUIREMENTS OF THE APPLICABLE DIRECTIVE 1999/5EEC
We, Authorized Representative Thrustmaster, Carentoir France, declare under our sole responsibility that the Radio-communication product :
Brand Name: Thrustmaster
Model Name: Rechargeable Wireless Dual Trigger 2-in-1 Gamepad
Model Number: 2960674
is fully in conformity with the essential requirements of the Council Directive 1999/5/EEC (R&TTE).
TouchSense® Technology Licensed from Immersion Corporation.
Protected by one or more of the following patents:
U.S. Patent: 4823634, 4896554, 5184319, 5185561, 5220260, 5235868, 5389865, 5414337, 5459382, B1 5459382, 5482056, 5513100, 5559412, 5576727, 5589854, 5592401, 5623582, 5629594, 5631861, 5676157, 5691898, 5701140, 5721566, 5724264, 5731804, 5734373, 5739811, 5767839, 5769640, 5790108, 5805140, 5821920, 5825308, 5828197, 5831408, 5844392, 5872438, 5880714, 5889672, 5907487, 5929607, 5930741, 5929846, 5956484, 5959613, 5999168, 6015473, 6020875, 6020876, 6020967, 6024576, 6028593, 6037927, 6042555, 6046727, 6050718, 6050962, 6057828, 6059506, 6061004, 6067077, 6078308, 6078876, D427635, D6088017, D6088019, D6100874, D6101530, D6104158, D6104379, D6104382, D6106301, D6110130, D6125337, D6128006, D6131097, D6134506, D6147674, D6148280, D6154198, D614201, D6116126, D612190, D6166723, D6169540, D6184868, D6191774, D6195592, D6201533, D6211861, D6215470, D6219032, D6232891, D6243078, D6246390, D6252578, D6256011, D6259382, D6271828, D6271833, D6275213 B1, D6278439, D6281651, D6288705, D629170, D7554023,*RE37374, D629174, C6300937, C6300938, C6304091, C6310605, C6317116, C6323837, C6342880, C6343349, C6348911, C6353850, C635427, C6366272,C6374255,C6380925,C6396232 C6400352C ^ 已 6411276,F ^ 已 6413229,D ^ 已 6424333,F ^ 已 6424356,F ^ 已 6429846,F ^ 已 6433771,F ^ 已 6448977,F ^ 已 6449692,F ^ 已 6470302 F ^ 已 6486872,F ^ 已 6497672,F ^ 已 6563487,F ^ 已 6564168,F ^ 已 6580417,F ^ 已 6636197,F ^ 已 6639581,F ^ 已 665400O,F ^ 已 66614O3,C ^ 已 68BOSHJQF ^ 已 6BOSHJQF ^ 已 6BOSHJQF ^ 已 6BOSHJQF ^ 已 6BOSHJQF ^ 已
Europe: 0843808, 0803114, 0870296, 0804786, 0974889; Australia: 649655, 670311, 671705, 734986, 735467, 762226, 770385; Canada: 2271129, 2139336, 2278726, 2120247, 2167304, 2233206, 2210725, 2075178, 227379, 2261893, 2287349, 2223289; France: 852770 (EP), 00/01312; Germany: 29923332.4, 29922298.5, P69231634.5 (EP), 69607189 (EP), 29923633.4, 20014425.1, 20012536.1, 20102767.4, 20080209.7, 29923303, 20022244.9, 20100824.1, 20080263.1, 20080257.5, 20200955.6; Italy: 1315182, 852770 (EP), 609363 (EP); Japan: 3084433, 3085481, 3069791, 2000-008994, 2000-001158, 3290436; Korea: 257172, 258353, 252706; Sweden: 519661; Switzerland: 852770 (EP), 609363 (EP); Taiwan: UM-108174; United Kingdom: 23449730, 2346455B, 2347990, 2349731, 2346952, 2384613, 2350698B, 2387241B, GB238721B, GB2353116, 609363 (EP), 852770 (EP), 2343499^
- User Manual
- TECHNICAL FEATURES
- SAFETY NOTICE
- INSTALLATION OF THE RECHARGEABLE BATTERIES
- INSTALLATION ON PC
- USING YOUR GAMEPAD ON PC
- INSTALLATION ON PS2
- ADVANCED FUNCTIONS
- TRIGGER MAPPING
- - TRIGGER BEHAVIOR:
- EXAMPLES OF OTHER POSSIBLE MAPPING
- WARNING: NEVER INSERT NON-RECHARGEABLE BATTERIES OR BATTERIES WITH A DIFFERENT REFERENCE INTO YOUR GAMEPAD!
- TECHNICAL SUPPORT
- By email:
- WARRANTY INFORMATION
- Additional warranty provisions
- COPYRIGHT
- ENVIRONMENTAL PROTECTION RECOMMENDATION
- INFORMATIONS RELATIVES À LA GARANTIE
- Alternative PC & PS2
- INFORMATIE MET BETREKKING TOT DE GARANTIE
- EC-DECLARATION OF CONFORMITY TO THE ESSENTIAL REQUIREMENTS OF THE APPLICABLE DIRECTIVE 1999/5EEC
Brand : THRUSTMASTER
Model : DUAL TRIGGER WIRELESS RECHARGEABLE
Category : Wireless game controller