
DVD 568 HC - DVD player CLATRONIC - Free user manual and instructions
Find the device manual for free DVD 568 HC CLATRONIC in PDF.

| Product Type | Home cinema DVD player with integrated amplifier |
| Brand | CLATRONIC |
| Model | DVD 568 HC |
| Power Supply | 230 V ~ 50 Hz, 150 W max |
| Receiver Weight | 4.5 kg |
| Dimensions (approx.) | 430 x 350 x 60 mm (receiver) |
| Supported Formats | DVD, CD audio, MP3, CD-R/RW |
| Video Outputs | Composite, S-Video, SCART (RGB) |
| Audio Outputs | Analog stereo, digital coaxial, digital optical, Subwoofer |
| Speaker Power | Subwoofer: 15 W, Front: 2 x 7 W, Rear: 2 x 7 W, Center: 7 W |
| Main Functions | DVD/CD/MP3 playback, FM/AM radio (50 FM / 20 AM), zoom, A-B repeat, random, programming, equalizer, level adjustment |
| Auxiliary Inputs | 2 AV inputs (audio/video) |
| Remote Control | Yes, with AAA batteries (not included) |
| Maintenance and Cleaning | Soft dry cloth; do not use abrasive products |
| Safety | Do not open the casing; class 1 laser; surge protection |
| Spare parts and repairability | Contact Clatronic after-sales service (hotline or email) |
Frequently Asked Questions - DVD 568 HC CLATRONIC
User questions about DVD 568 HC CLATRONIC
0 question about this device. Answer the ones you know or ask your own.
Ask a new question about this device
Download the instructions for your DVD player in PDF format for free! Find your manual DVD 568 HC - CLATRONIC and take your electronic device back in hand. On this page are published all the documents necessary for the use of your device. DVD 568 HC by CLATRONIC.
USER MANUAL DVD 568 HC CLATRONIC
Instructions for use
Page 19-33

Inhaltsübersicht
Fernbedienung 3/6
13 CLR Clear (loschen)
Audio (Audiotracks) 12
A-B Wiederholung 12
KLASSE 1 - LASER PRODUKT
DTS Digital Surround

AUDIO (Audio Tracks)
Display (RDS Display Formate)
Remote Control 3/21
Front Panel and Connections 3
Important Information 20
General Information 20
Media Formats .20
DVD Properties .20
Handling the Media .20
Inserting the Batterie into the Remote Control .21
Connecting the System .21
Description of the Video Connection Options .21
Connecting Peripheral Devices .23
Connecting Digital Receivers .23
Antennas .23
FM Cable Socket .24
Positioning the Speakers .24
Connecting the Speakers .24
Using Headphones .25
Connecting the Power Supply .25
Operations and Functions .25
Startup: ON/OFF/STANDBY .25
Power Saving Mode .25
Selecting the Video/Audio Source .25
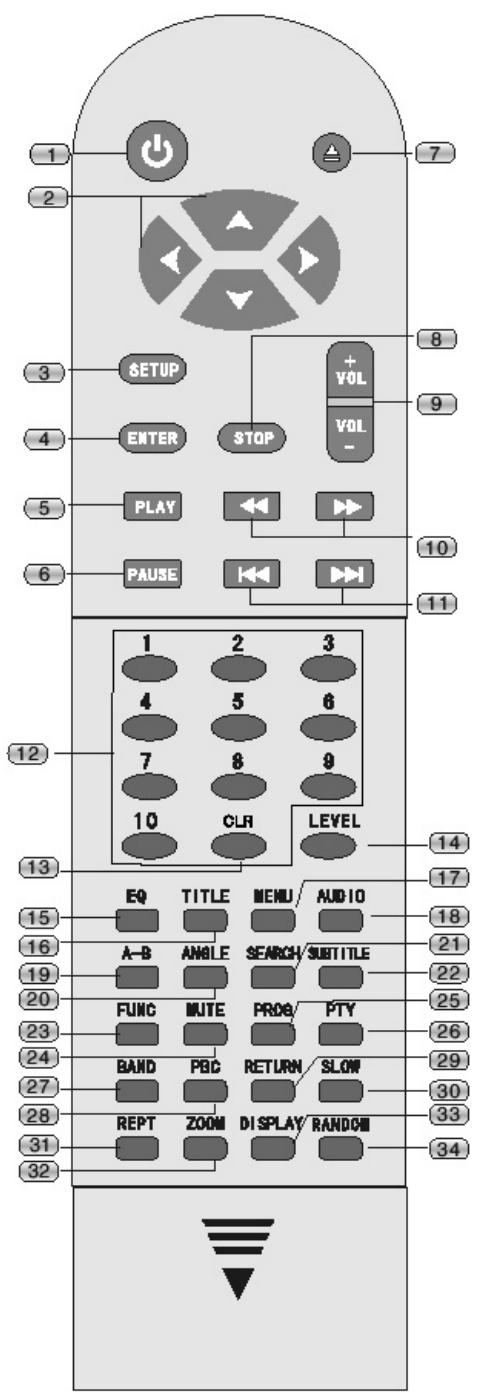
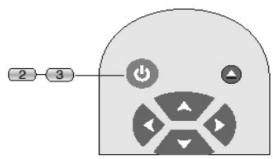
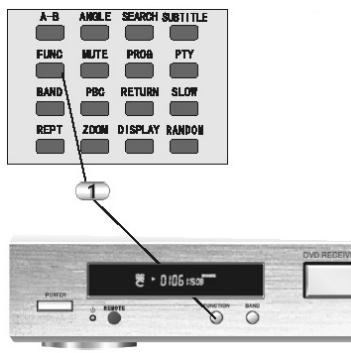
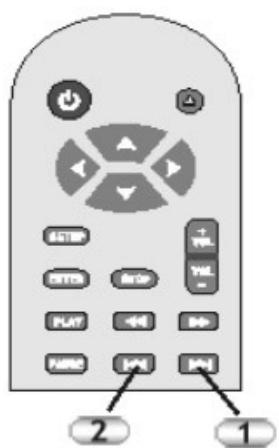
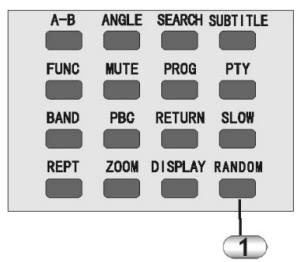
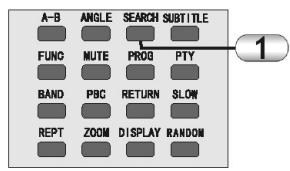
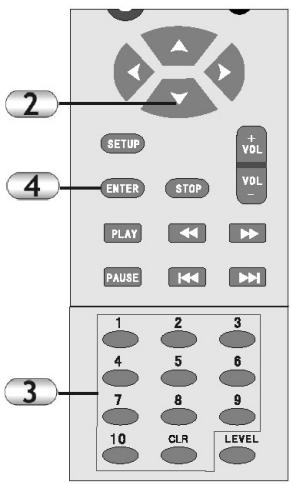
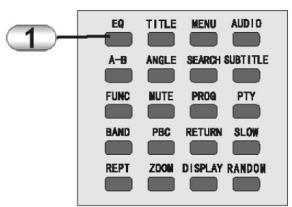
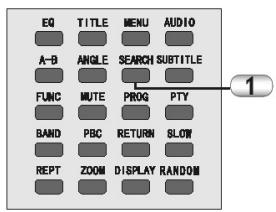
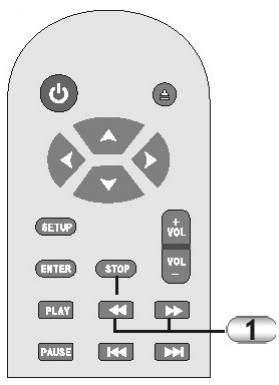
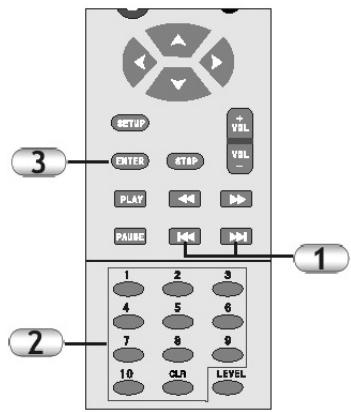
Remote Control
Description of the Buttons
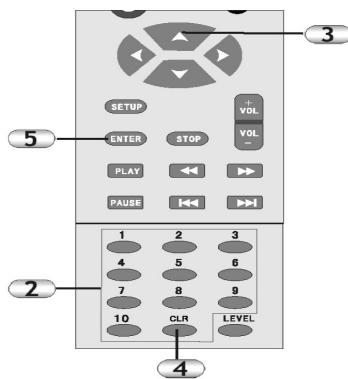
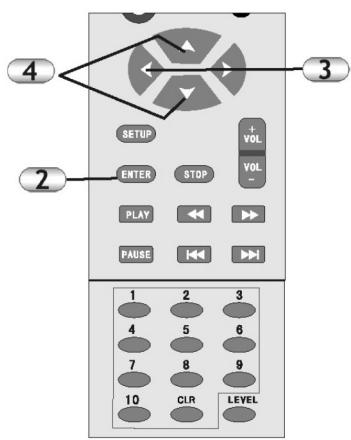
1 STANDBY (ready mode On/Off)
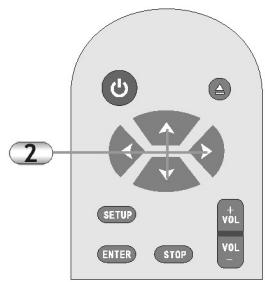
2 / / / Arrow buttons (navigation)
3 SETUP (device settings)
4 ENTER (confirm)
5 PLAY
6 PAUSE
7 ▲OPEN/CLOSE
8 STOP 9 VOLUME+/-
10 Fast (fast search)
11 SKIP (forward/backward)
12 Number buttons 1-10/>10
13 CLR Clear (delete)
14 LEVEL
15 EQ (equalizer function)
16 TITLE (jump to title track)
17 MENU (main menu)
18 AUDIO (language selection/audio track)
19 A-B (A-B repeat function)
20 ANGLE (camera perspective)
21 SEARCH (search/jump)
22 SUBTITLE
23 FUNC Function (source selection)
24 MUTE
25 PROG Program
26 PTY (search by program type)
27 BAND (FM/AM)
28PBC
29 RETURN
30 SLOW (slow motion)
31 REPT Repeat
32 ZOOM
33 DISPLAY (select display information)
34 RANDOM (random play)
Setting the Volume/Mute .25
Selecting the Video Channel on the Television .26
Inserting a Data Carrier .26
Selecting Menu Items .26
PLAY/PAUSE/STEP/STOP .26
SKIP Forward/Backward .26
SEARCH Forward/Backward .26
SLOW MOTION Forward/Backward .27
ZOOM .27
M MENU/TITLE .27
ANGLE (Camera Pespective) .27
SUBTITLE .27
Audio (Audio Tracks) .27
A-B Repeat .27
RANDOM .28
REPEAT .28
Program Function .28
SEARCH (DVD Mode) .28
LEVEL (Level Adjustment/Tone Control) .28
Equalizer .28
Tuner (Radio Mode) .29
Settings .30
Troubleshooting .32
Technical Specifications .33
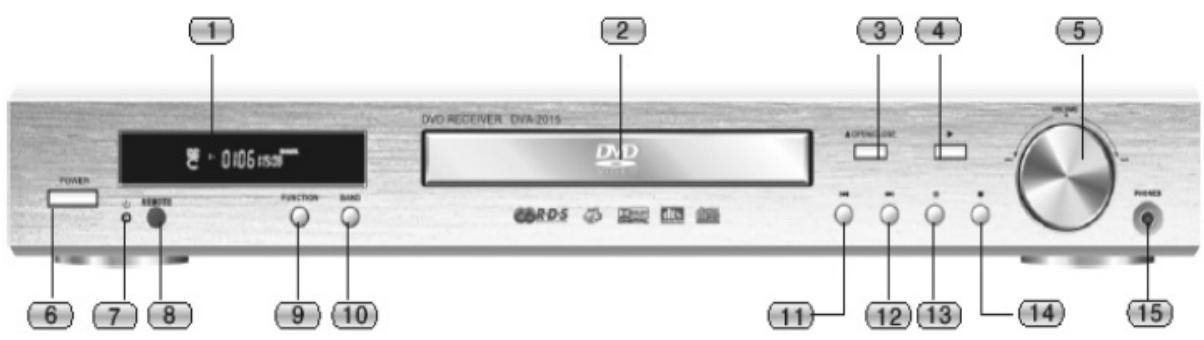
Front Panel and Connections
Front Panel
1 Display
2 Drive
3 ▲ OPEN / CLOSE
4 PLAY
5 VOLUME
6 POWER (On/Off)
7 Standby LED (Ready mode display)
8 REMOTE Sensor
9 FUNCTION (DVD/TUNER/AV1/AV2)
10 BAND (FM/AM)
11 Skip backward
12 Skip forward
13 Pause
14 Stop
15 PHONES (headphone output)
Connections
IMPORTANT INFORMATION
We would like to congratulate you on your decision to buy this device. It is in your own interest to attentively read through the entire operating manual. This will help you to avoid malfunctions and damage to the product and thus ensure that you can enjoy using the product for many years to come.
Important Safety Instructions
- Do not subject the device to direct sunlight, high humidity, dirt, strong vibrations or extrem temperatures.
- Place the device on a solid, horizontal surface.
- Make sure that the device is sufficiently ventilated. Never put it on a soft surface such as a carpet. Make sure that there is at least 20~cm clearance at the back of the device.
- Never open the housing of the device. The internal components have to be cleaned by qualified technicians.
- Ensure that no fluids or objects can get into the device.
- Have the device repaired by qualified technicians only.
- If one of the following occurs, immediately separately the device from the power supply:
a. The power cable or plug is damaged.
b. A foreign object or fluids have penetrated into the device.
c. The device no longer functions correctly.
d. The device has fallen down or the housing is damaged. - Please store this operating manual carefully, so that you can refer to it in future.
- The device should only be cleaned with a duster or with a soft, slightly moist cloth that does not generate fluff. To not use caustic or strong cleaning agents. When cleaning the device, ensure that no moisture penetrate into the device. Unplug the device before you clean it.
- The fuse of the device is not accessible to the user. When required, have the fuse replaced by qualified technicians only.
11.Make sure that the mains voltage to which you connect the device always matches the mains voltage specified on the back of the device. - In the event of malfunctions, please read the TROUBLSHOOTING section at the end of this operating manual before you hand in the device for repairs.
13.If you are not going to use the device for a longer period of time, unplug it from the power supply.
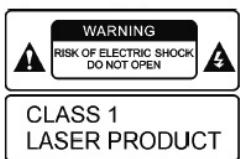
WARNING
RISK OF ELECTRIC SHOCK DO NOT OPEN
CLASS 1
LASER PRODUCT
EXEMPTION FROM LIABILITY
Despite our careful efforts, we cannot assume any liability for the accuracy, completeness and topicality of the technical information in this manual. We reserve the right to make technical changes without prior notice.
Status: October 2002
GENERAL INFORMATION
Media Formats
The device can read and play the following media and media formats:
Media:
DVD
CD
CD-R
CD-RW
Formats:
DVD
MP3
CD Digital Audio
CD-R, CD-RW, MP3 and other self-recorded CD media/ data can only be played if the corresponding standards have been strictly adhered to. MP3 files must created as *.mp3 data, in the ISO9660 format. The file names should not be longer than 8 characters.
DVD Properties
In the following, symbols that can be found on commercial DVDs are listed and explained.
2
Regional code

Dolby Digital Surround

DTS Digital Surround
Number of available subtitles
Supported screen formats

Age restriction
Handling the Media
Do not touch the surface of the CDs/DVDs. Hold the disk only by its edges. Make sure that there are no fingerprints on the media.
Do not apply any stickers to the CDs/DVDs. The stickers can cause the disk to become unbalanced.
Never subject the CDs/DVDs to high temperatures or direct sunlight.
Store the CDs/DVDs upright, avoid dirt and moisture.
Clean the CDs/DVDs with a soft cloth only. Always proceed from the inside out.
REMOTE CONTROL
Inserting the Batterie into the Remote Control
- Open the battery compartment.
- Insert two AAA/LR03 batteries. Observe the proper polarity (as indicated by the symbols in the battery compartment).
- Close the battery compartment cover.
Note:
- Always change the complete set of batteries; do not replace only one battery.
- Do not use any rechargeable (Ni-Cd) batteries.
- The batteries must not be recharged, short-circuited, taken apart, heated or thrown into a fire.
- Do not drop the remote control or subject it to any impacts. Otherwise the parts inside might be damaged or the remote control may not work properly.
- If the remote control is not used for a prolonged period, please remove the batteries. Otherwise electrolyte may leak from the batteries, resulting not only in malfunctioning but also causing burns if in contact with the body.
- Wipe off all electrolyte residues from the remote control and then install new batteries.
- Should your body come into contact with electrolyte, please wash it off carefully with water.
Note: Batteries should not be disposed of in domestic waste. Please return used batteries to the appropriate collection points or the dealer where you bought them.
Using the Remote Control
Point the remote control towards the remote sensor of the device. When the device receives the remote control's signal, it reacts accordingly. The remote control has an effective range of approx. 6m.
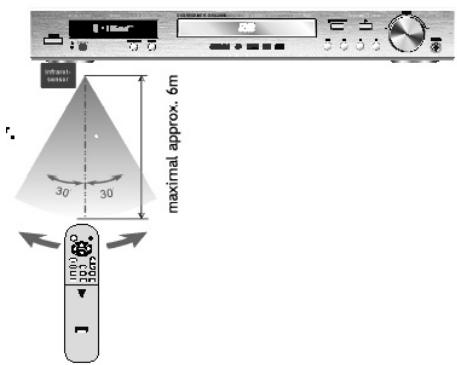
The functions of the remote control could be disturbed if the device is exposed to strong light sources.
The remote control might function improperly when other remote controls are used in close proximity to the device. Do not put any objects on the remote control, as this can cause the batteries to discharge if a button is pressed down continuously.
There should be no large objects between the remote control and the device.
To ensure that the maximum range of the remote control stays intact, do not operate the device behind tinted glass.
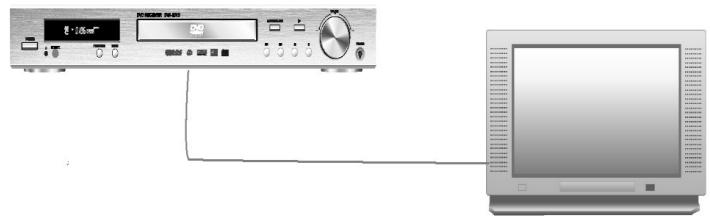
CONNECTING THE SYSTEM
Description of the Video Connection Options
Only connect the device to the power supply when all other system cables have been connected.
The device is equipped with 3 video outputs: S-Video (only for DVD), Video (composite video), and SCART (RGB, the latter only for DVD).
There are two AV inputs available for connecting additional AV devices.

Video output: This output only supplies the image of the integrated DVD player. Video signals from the AV inputs (TV and AV) are not transmitted via this output. If you want to use this output, you have to activate the Monitor Output in the device settings (see „Settings“ chapter). S-Video output: This output also only supplies the video signal of the integrated DVD player.
SCART output: This output also transmits the video signal that has been selected by means of the FUNCTION button. In addition to the composite video signal, the video signal of the intergrated DVD player is provided as RGB video, which provides a higher quality of video transmission. Additionally the SCART output supplies the audio channels (L/R). To have full functionality, the SCART output has to be activated in the device settings (see the „Settings" chapter).
TV and AV: You can use these two audio/video inputs to connect additional AV devices (for example a video recorder or video camera) to the system. To select the source, use the FUNCTION button.
CONNECTING THE SYSTEM
Connecting to a Television via Video (DVD Only)
The following section describes various options for connecting a television with the system. Please use only one option, even if your television offers several connection options. If this is not adhered to, damage to the system or the television is possible.
If you want to use this output, you have to activate the Monitor Output in the device settings (see „Settings" chapter).
Connect the Video output of the system with a corresponding Video (ln) socket or the television.
If you occasionally want to listen to the sound via the intergrated speakers of the television, you have to set up an additional audio connection. To do so, connect the two audio outputs of the (L/R) with the corresponding inputs on your television (Audio L/R in).
The video signals of the TV and AV inputs are not transmitted to the television. This connection is only recommended if no devices (or only audio devices) will be connected to the TV and AV inputs.
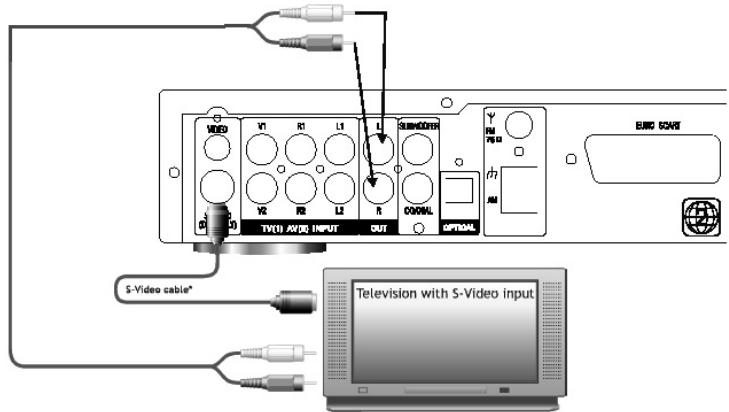
Connecting to a Television via S-Video (DVD Only)
Connect the S-Video output with the corresponding S-Video input on your television. This method yields a higher quality video transmission than the previously described connection via the Video socket.
* Not included in scope of supply
If you want to listen to the sound via the integrated speakers on your television, you have to set up an additional audio connection. To do so, connect the two audio outputs (L/R) with the corresponding audio inputs on your television.
The video signals of the TV and AV inputs are not transmitted to the television. This connection is only
recommended if no devices (or only audio devices) will be connected to the TV and AV inputs.
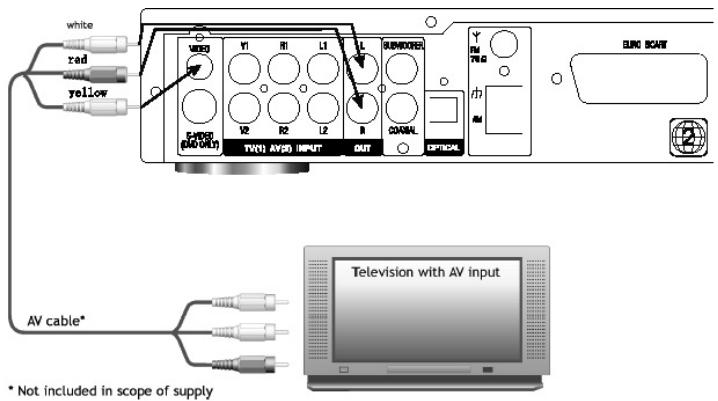
Connecting to a Television via AV OUTPUT
Connect the AV OUTPUT (Video, Audio (L/R) to the corresponding AV input on your television, by means of an AV cable.
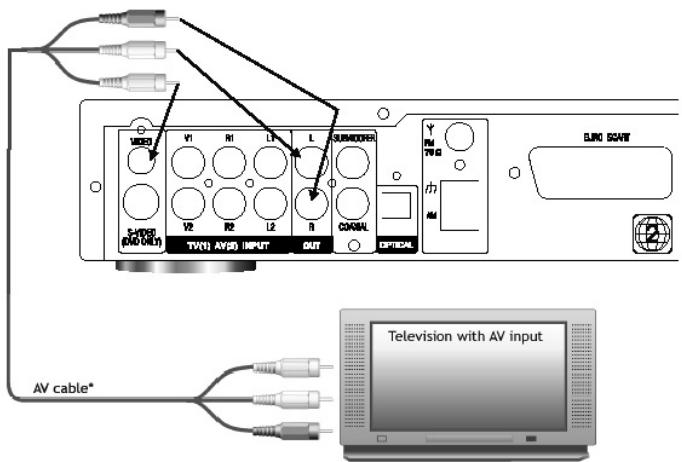
Not included in scope of supply
Pay attention to the colour coding:
red = right channel
white = left audio channel
yellow = video signal
With this connection method, the video signals that are active at TV an AV inputs are also transmitted to the television, if the corresponding signal source has been selected.
This connection is recommended when video signals will actually be present at the video channels of the V1 and V2 inputs.
Connecting to a Television via EURO SCART
Connect the SCART output of the system to a vacant SCART input on your Television by using a SCART cable with all pins connected. With this connection method, the audio as well as video signals are transmitted to the television.
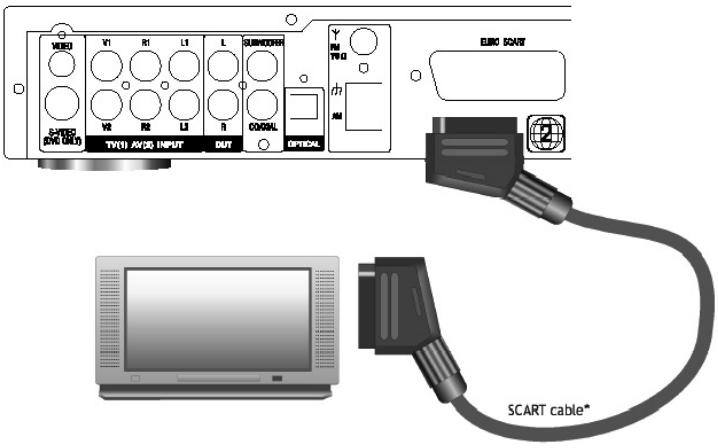
* Not included in scope of supply
If the SCART socked on your television capable of receiving RGB signals, the video signal of the integrated DVD player will be transmitted in RGB format.
This guarantees high image quality.
The video signals received at the TV and AV inputs are transmitted as composite video.
To have full functionality, the SCART output has to be activated in the device settings (see the „Settings" chapter). This connection is recommended if your television has a vacant SCART socket.
Connecting Peripheral Devices (Examples)
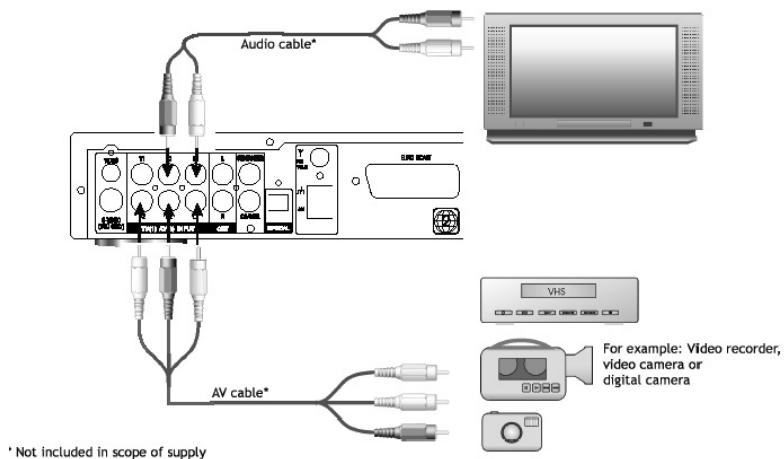
Connect the TV and AV inputs with the corresponding outputs on your peripheral devices.
Here it is irrelevant whether you use all inputs, or only either the audio or the video channels (for example an MD player or digital camera).
Please take note that the video channels can only be transmitted via SCART.
Connecting an Active Subwoofer
If required, connect your active subwoofer with the subwoofer output of the system.
Please use a well-shielded cinch (RCA) cable to prevent humming noises.
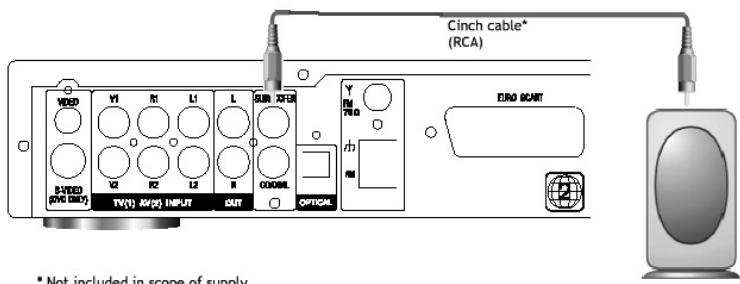
* Not included in scope of supply
Connecting External Digital Receivers (example)
Connect one of the digital outputs with the corresponding input of your digital receiver.
Please keep in mind that only the audio data of the integrated DVD player can be transmitted to the digital outputs.
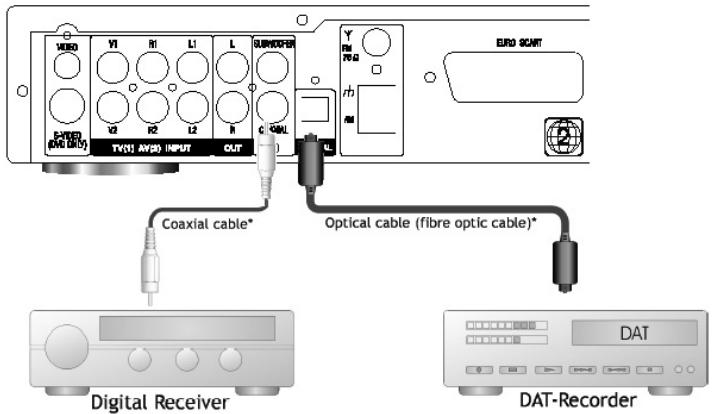
Not included in scope of supply
Furthermore keep in mind that different data formats (RAW/PCM) are used, depending on the application (see the „Settings“ chapter).
The RAW format can transmit up to 7.1 channels, where as only one stereo signal is transmitted when the PCM format is used.
For more information on this topic, read the user manual of your peripheral device.
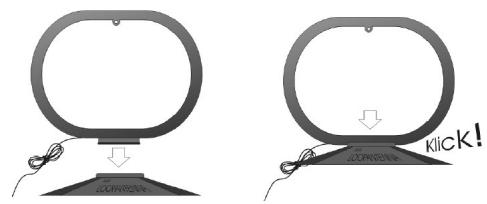
Assembly and Setup of the AM Loop Antenna
Assemble the AM loop antenna by inserting the loop into the base (see illustration).
Position the AM for the best possible reception – as as possible from the system, television and cables.
If you cannot achieve satisfactory reception, use an exterior antenna.
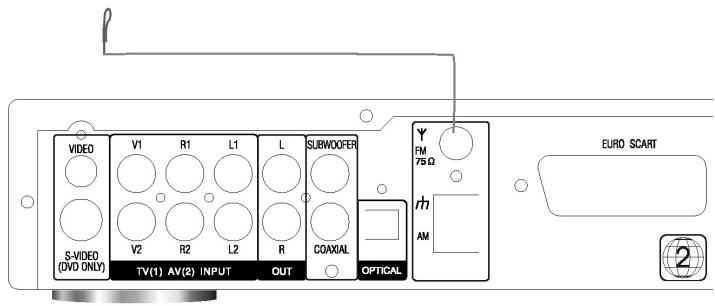
Connecting the AM Antenna
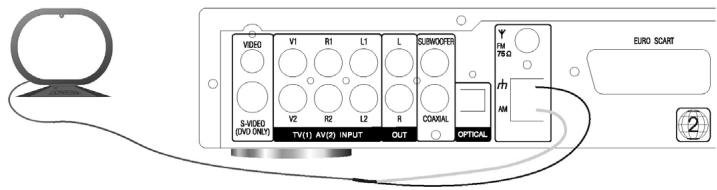
Connect both wires of the AM loop antenna with the inputs labelled 和 and AM (see illustration).
To do so, press the respective tab (1.), insert the stripped part of the wire into the opening (2.) and release the tab (3.).
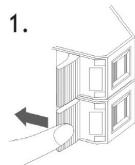
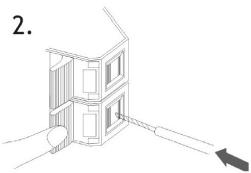
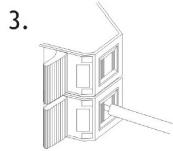
Connect the end of the white isolated cable to the AM terminal, and the end of the black isolated cable to the terminal.
Connecting and Positioning the Interior FM Antenna
Connect the interior FM antenna with the FM/75 Ω antenna socket. Plug the cable lug on to the pin in the middle of the socket.
Select a station and position the antenna for the best possible reception and the least possible distortions. If the reception quality is not satisfactory, use an exterior antenna.
FM Cable Socket
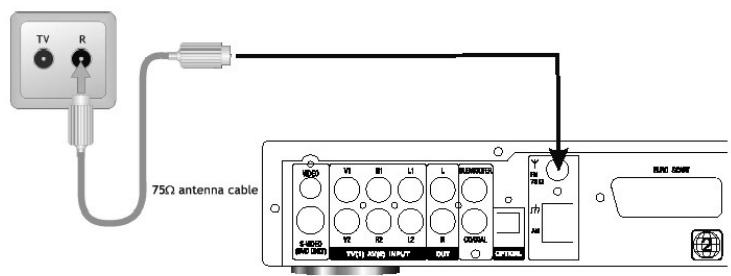
Not Included in scope of supply
If you have cable television, you can also connect the provided radio socket of the cable network with this socket. For this purpose, use a cable with 75 impedance.
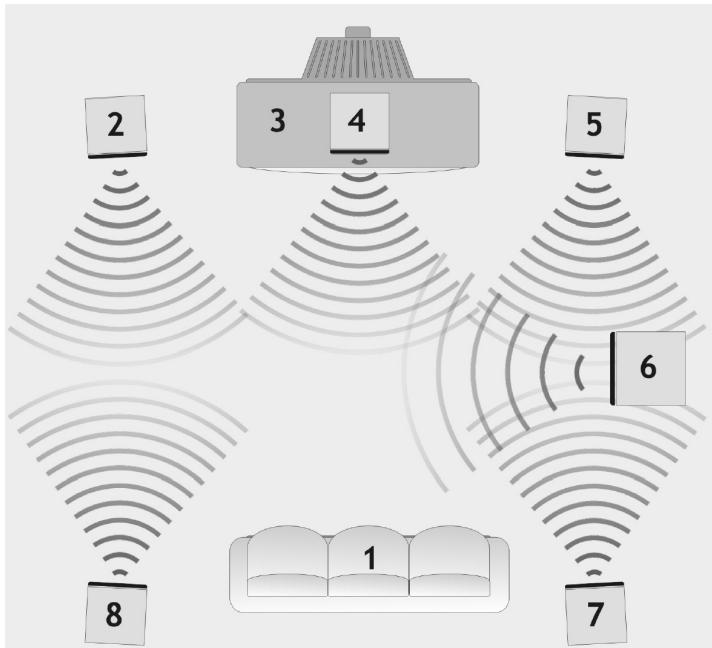
Positioning the Speakers
Before you connect the speakers, position them correctly. The correct positioning is important for maximum sound enjoyment. Perfect speaker positioning depends on the properties of the room and the walls. The illustration below shows a possible speaker layout.
1 Listener's position
2 Front speaker, left
3 Television
4 Center speaker
5 Front speaker, right
6 Subwoofer
7 Rear speaker, right
8 Rear speaker, left
The front and center speaker should be positioned on the same height, at the height of the ears of the listener. The rear speakers should be positioned a little higher than the ears of the listener. The subwoofer can be positioned anywhere in the room. The efficiency of the subwoofer can be increased by positioning it in a corner of the room.
Connecting the Speakers
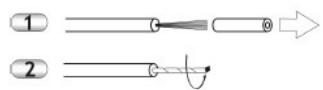
- Strip approx. 15mm of insulation off the cables.
- Carefully twist the wire strands together.
- Open the socket terminals by flipping the tabs up or down respectively.
- Insert the stripped and twisted cable ends into the openings.
- Lock the cable ends into position by means of the tabs.
Use this method to connect the individual speaker outputs with the respective speakers. Observe the correct polarity. Always connect the red terminal on the device with the red terminal on the speaker, etc.
One of the speaker cable wires is marked. This makes it easier for you to set up the connections correctly.
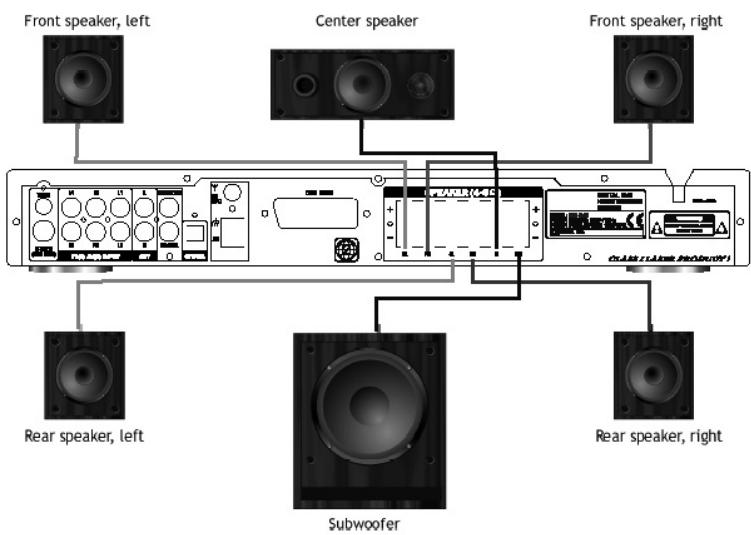
To prevent damage to the electronics, make sure that the two poles of the speaker cable cannot come into contact with each other.
Using Headphones
Insert the jack plug of the headphones (Not included in scope of supply) into the „Phones“ output on the front panel of the device.
The speaker outputs are muted when headphones are used.

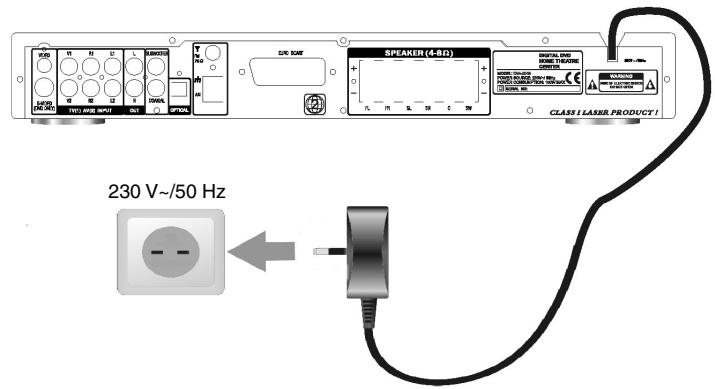
Connecting the Power Supply
- Only connect the device to the power supply when all other system cables have been connected.
- Prior to connecting the device with the power supply, make sure that all connections have been set up correctly.
- Prior to connecting the device with the power supply, make sure that the mains voltage is 230V /50Hz .
Connect the system with the power supply by plugging the power plug into the power socket.
OPERATION AND FUNCTIONS
Startup: On/Off/Standby
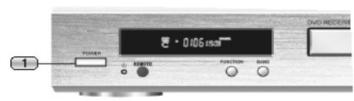
- Press the POWER button on the front of the device to switch on the device.
-
Press the STANDBY button on the remote control to switch the device to Standby mode. Only the red Standby LED on the front panel of the device is lit.
-
Press the STANDBY button again to go back to Operate mode. The device is now in DVD mode. If there is no data carrier in the drive, "NO DISK" will appear on the display after a few seconds.
Since the system uses some electricity while it is in Standby mode, you are advised to switch it off with the mains power switch whenever you are not going to be using it for a longer period of time.
Power Saving Mode
The device is equipped with an automatic power management function.
If the device is in STOP mode, and no button is pressed for 10 min., the device automatically goes to Standby mode to save electricity. If the drive is open, it automatically closes before the device switches to the Standby mode.
Be environment-friendly.
Switch off the device immediately after use.
This function is only available in DVD mode.
Selecting the Video/Audio Source
After you switch it on, the device is in DVD mode.
- 'Repeatedly press the FUNCTION button on the remote control or the front of the device to select between the following modes:
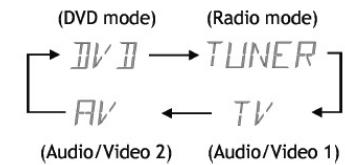
The device needs a few seconds to accept the selection. The selected source appears on the display.
Setting the Volume/Mute
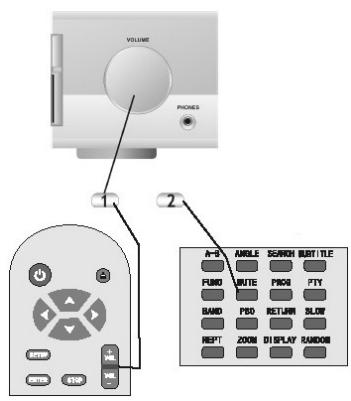
-
To set the total volume, use the VOLUME control on the front of the device, or the VOLUME buttons on the remote control. The current volume settings appear on the device display in steps from 0 to 40.
-
If you press the MUTE button, the audio outputs of the system are switched to mute. The symbol appears on the display to indicate this status. The original volume can be restored by repeatedly pressing this button.
Selecting the Video Channel on the Television
On your television, select the video channel to which you have connected the device (for example TV, AV, S-VIDEO ...).
If you do not know how to do this, read the user manual of your television.
Inserting a Data Carrier
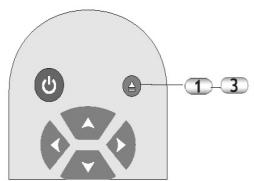
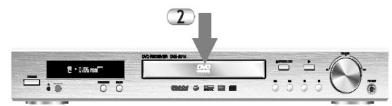
- While in DVD mode, open the drive by pressing the OPEN/CLOSE button on the remote control or on the front of the device.
- Insert the data carrier (for example DVD) into the drive. The labelling must face upwards.
- Press the OPEN/CLOSE button again to close the drive.
"appears on the display of the device and the device reads the data format. Subsequently playback automatically starts.
It can take a few seconds to read the data format.
Selecting Menu Items
Most commercial DVDs have a start screen with a menu where, for example, the dialog language, subtitles and audio formats can be selected.
- Use the arrow buttons on the remote control to select the desired menu item.
- Confirm your selection by pressing ENTER.
To return to the main menu of the DVD, press the MENU button on the remote control.
Play / Pause / Step / Stop
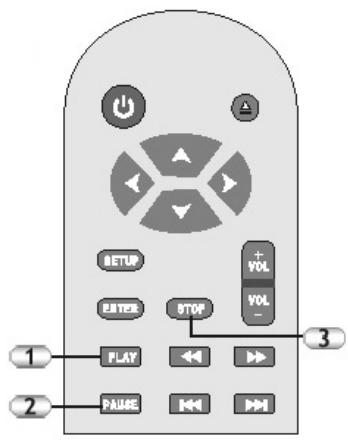
- Press the PLAY button to start playback.
- Press the PAUSE button to halt the playback. You can view single frames step-by-step by repeatedly pressing the PAUSE button . Press the PLAY button , to continue playback.
3 Press the STOP button once to stop the playback. The device saves the current position. Press the PLAY button to continue playback from this position. Press STOP twice to stop playback entirely.
If you switch the signal source while a DVD is playing, the current position in the film is lost.
Skip Forward/Backward
- Press the right side of SKIP button to jump to the next chapter.
- Press the left side of SKIP button to jump to the previous chapter.
Search Forward/Backward

- Press the right side of to search in fast forward. Press the button repeatedly to search at different speeds.

- Press the left side of to search in fast rewind. Press the button repeatedly to search at different speeds.

- Press the button to resume the normal playback.
In some sections these functions might not be possible. The device is muted during the search.
Slow Motion Forward/Backward
- Press the SLOW button to view a sequence in slow Motion.
During slow motion playback, the audio outputs are muted.
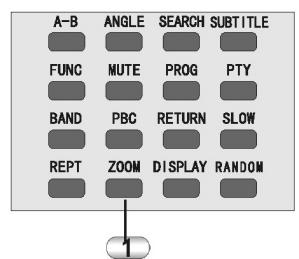
Zoom
- Press the ZOOM button to increase the size of a section of the image. Press the button repeatedly for different zoom factors.
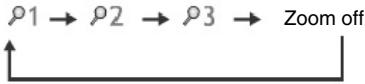
- You can use the arrow key to shift the image section that you are enlarging.
Increasing the size of an image section decreases its quality.
Menu / Title
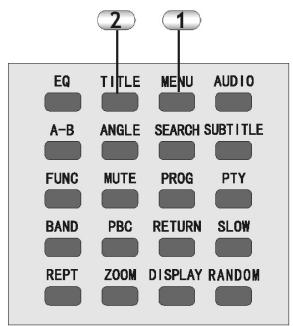
- Press the MENU button o return to the DVD menu. There you can usually select the audio format, subtitles and other features.
- Press the TITLE button to return to the title track of a data carrier. The title track is the first track on a DVD. This option is not supported by all DVDs.
Angle (Camera Perspective)
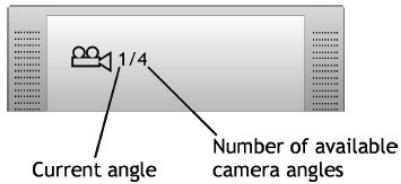
Some DVDs offer several camera angles for some scenes.
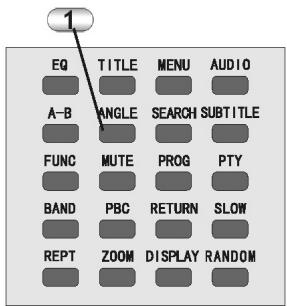
- Press the ANGLE button repeatedly to select between the camera angles. A camera icon appears on the screen:
Subtitle
Some DVDs are equipped with various subtitles.
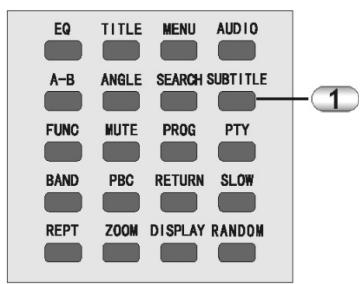
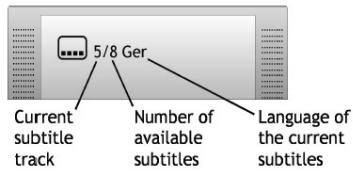
- Press the SUBTITLE button repeatedly to select between the available subtitles. The subtitle icon appears on the screen:
Audio (audio tracks)
Some DVDs are equipped with various audio tracks.
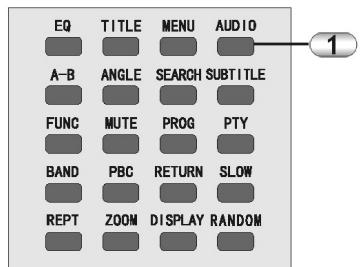
- Press the AUDIO button repeatedly to select between the available audio tracks. The audio track icon appears on the screen:

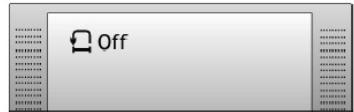
A-B Repeat
You can use the A-B Repeat function to specify a certain range. The DVD player then automatically repeats this range.
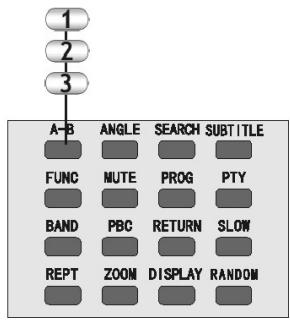
- During playback, press the A-B button on the remote control to determine the starting point of the loop.
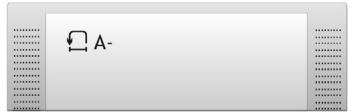
- Press this button again to determine the end. The DVD player now repeats the section between point A and B.
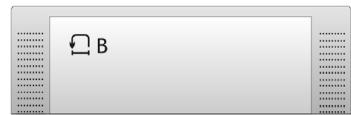
- Press the button again to resume normal playback.
Random
- Press the RANDOM button once to display the current playback status on the screen. Press the button repeatedly to switch the random mode on and off. Display on the TV set (mixing on/mixing off).
Repeat
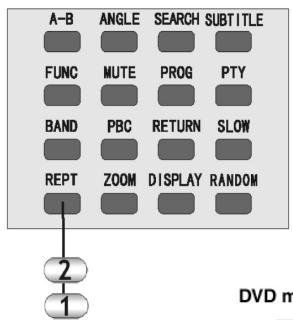
- During playback, press the REPEAT button to display the current repeat status on the screen.
- Press the REPEAT button repeatedly to activate the following repeat modes:
Program Function
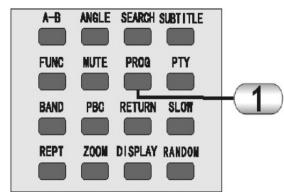
- Make sure that there is a data carrier in the device. Press the PROG button to display the programming table on the screen:
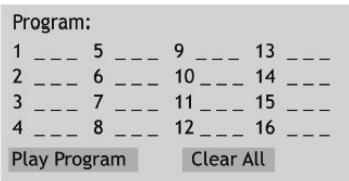
-
Use the number buttons to enter the desired titles (chapters) in the desired order.
-
Use the arrow buttons to jump between the program spaces.
- If you mistyped something, use the CLR button to delete the numbers.
- Start the completed program. To do so, select the Play Program option by using the arrow buttons and press ENTER.
Data carriers with only one track cannot be programmed.
Search (DVD Mode)
In DVD mode, the SEARCH function helps you to quickly find certain sections on the data carrier.
- Press the SEARCH button to view the following input template on the screen:
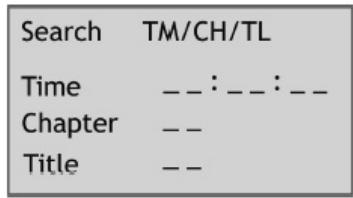
- Use the arrow buttons to select the desired search criterion.
- Subsequently use the number buttons to enter the desired target.
- Confirm your selection by pressing ENTER
Level (Level Adjustment/Tone Control)
The LEVEL button lets you access the settings for the sound levels of the individual channels and the tone control.

- Press the LEVEL button repeatedly to go to the following settings:
MLVOL -01 Front speaker, left (-10 to +10)
MRVOL -02 Front speaker, right (-10 to +10)
SLVOL 03 Rear speaker, left (-10 to +10)
SRVOL 04 Rear speaker, right (-10 to +10)
CNVOL 00 Center speaker (-10 to +10)
SWVOL -05 Subwoofer (-10 to +10)
BASS +6 Bass (-6 to +6)
TREBLE -1 Treble (-6 to +6) - Use the VOL buttons to change the respective value.
In Stereo mode the settings for the rear and center speakers, as well as the subwoofer, are not available (see the "Settings" chapter).
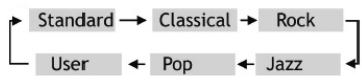
Equalizer
For stereo playback from CD, you can influence the sound by means of the equalizer function, in addition to the bass and treble control.
- Press the EQ button to activate the equalizer function. The following appears on the screen:
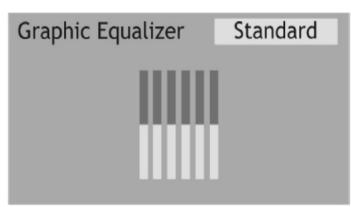
-
Press the ENTER button repeatedly to go to the individual preset and to the user-defined tone setting.
-
Here you can use the arrow buttons to select the individual frequency bands and
-
use the arrow but-tons to adjust them as desired.
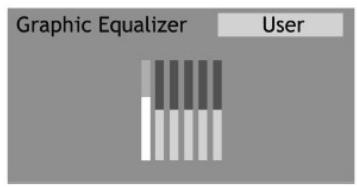
In the multi-channel mode, the equalizer function is not available (see the "Settings" chapter).
In Tuner and AV mode, the equalizer function is not available.
Tuner (Radio Mode)
Press the FUNCTION button to switch to Radio mode TUNER appears on the display. After several seconds the display changes. Now it displays the currently frequency that is currently selected (for example FM 10325 MHz).
Automatic Station Search
- Press the SEARCH button to start the automatic station search.
The device starts to scan for available radio stations by ascending frequency and consecutively saves all
detected stations on the memory locations. After the process has been completed, the radio station that has been saved on the first memory location will be played.
There are 50 memory locations for FM stations, and 20 for AM stations.
Manually Setting a Radio Station
- Press the left or the right of the search onto search backward or forward for stations. The device scans for the next station and then stops the search.
Press the arrow buttons to adjust the frequency, if required.
Manually Saving a Station

- Set the desired station as described earlier.
- Press the SETUP button. The programm icon on the display starts to blink TUNED
- Use the number buttons to enter the desired program location (for example 2-3).
- Use the SETUP button to confirm the saving process.
Selecting Station Locations
- Press the SKIP button to go to the next station location. Or:
- Use the number buttons to enter the desired location.
- Subsequently confirm your selection by pressing ENTER
Deleting station locations
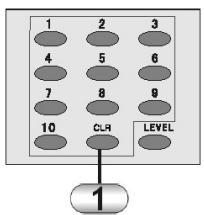
- Select the respective station location, as described above, and press the CLR button to delete the location. The station locations beyond the deleted station move up in the order of locations.
FM and AM
- Use the BAND button to select between the FM and AM bands.
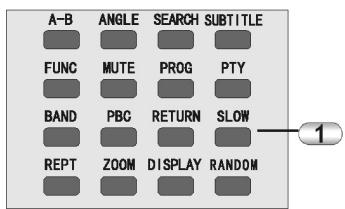
PTY (Automatic Search by Program Type)
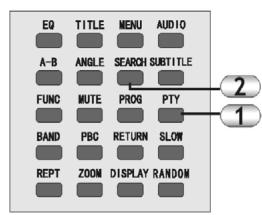
- Press the PTY button to select between the following topics:
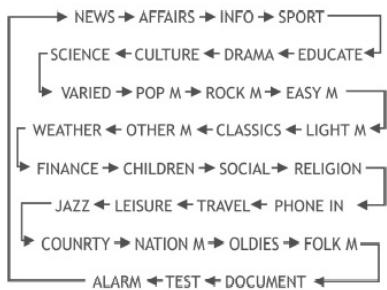
- Subsequently press the SEARCH button to start the search. SEARCH appears on the display. As soon as a corresponding station has been found, the search stops.
This function depends on the local radio stations. A respective genre can only be located if the corresponding station transmits the appropriate information.
Display (RDS Display Formats)

- Press the DISPLAY button repeatedly to display the various types of RDS information:

RT: The name of the station is displayed on the display.
PTY: The genre of the station is displayed.
Frequency display: The current station's frequency is displayed.
The corresponding data can only be displayed if it is transmitted by the respective radio station.
Settings
Device Settings (Setup)
A number of device settings can be configured in the Settings menu of the device.
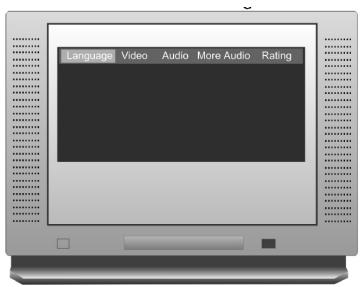
- While the device is in Stop mode, press the SETUP button. The settings menu appears on the screen.
2.Use the arrow buttons to select the desired menu item. - Confirm your selection by pressing ENTER . Subsequently additional options appear.
You can exit the Setup menu at any time by pressing the SETUP button.
OSD Menu (on-screen language)
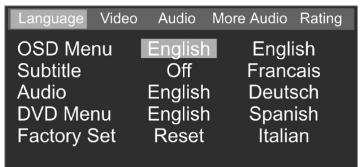
1.Use the arrow button to select "OSD Menu".
2. Confirm your selection by pressing ENTER
3.Use the arrow button to select the desired language.
4. Confirm your selection by pressing ENTER again.
Subtitles
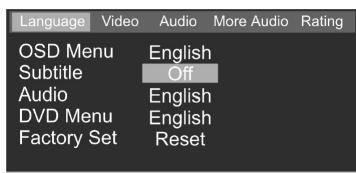
1.Use the arrow button to select "Subtitle".
2. Confirm your selection by pressing ENTER
3. You can access the following options by repeatedly pressing the ENTER button :

- After you have chosen your preference, you can go to the next menu item by using the arrow button.
Audio (DVD Dialogue Language)
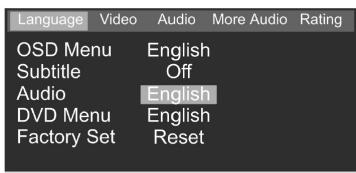
1.Use the arrow button to select "Audio".
2. Confirm your selection by pressing ENTER
3. You can access the following options by repeatedly pressing the ENTER button :

- After you have chosen your preference, you can go to the next menu item by using the ♥ arrow button.
DVD Menu (Language)
If a DVD menu is available in several languages, you can select which language you prefer (if it is available).
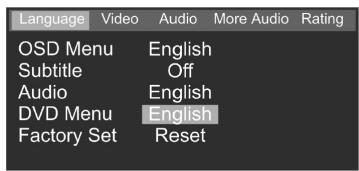
1.Use the arrow button to select "DVD Menu"
2. Confirm your selection by pressing ENTER
3. You can access the following options by repeatedly pressing the ENTER button :

- After you have chosen your preference, you can go to the next menu item by using the arrow button.
Default (Restore Default Settings)
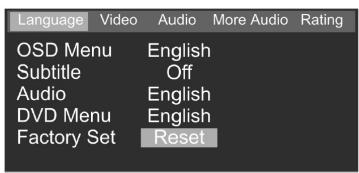
1.Use the arrow buttons to select "Factory Set".
2. Confirm your selection by pressing ENTER. This resets all values that can be specified in the Setup menu to the default values (except for the parental control function and the Rating Level).
TV Shape
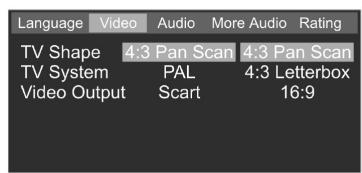
1.Use the arrow button to select "TV Shape".
2. Confirm your selection by pressing ENTER
3.Use the arrow button to select the desired option.
4. Confirm your selection by pressing ENTER
4:3 Pan Scan: Use this setting for normal TVs with a screen ratio of 4:3. This setting uses the full height of the screen. Films that were not recorded in "cinema Format" will be displayed with black bars on the left and right of the screen.
4:3 Letterbox: This setting is also suitable for 4:3 television screens. In this case the full width of the screen is used. Films that were recorded in "cinema format" will be displayed with black bars at the top and bottom of the screen.
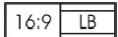
16:9: Only use this setting if you are using a television with a 16:9 screen in your system.
TV System (video norm)
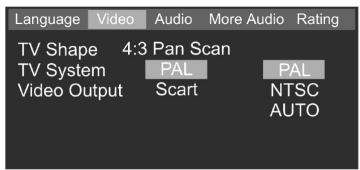
- Use the arrow button to select "TV System".
- Confirm your selection by pressing ENTER
3.Use the arrow button to select the desired option. - Confirm your selection by pressing ENTER
PAL: Use this setting for a PAL-compatible television (for example in Western Europe).
NTSC: Use this setting for an NTSC-compatible television (for example in USA or Japan).
AUTO: Only use this setting for modern devices that support both PAL and NTSC.
The DVD player always outputs the video signal in the standard in which it has been recorded on the DVD.
Video Output
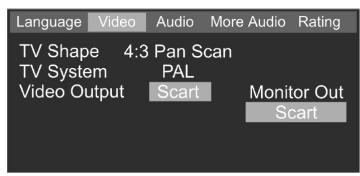
- Use the arrow button to select "Video Output"
-
Confirm your selection by pressing ENTER
3.Use the arrow button to select the desired option. -
Confirm your selection by pressing ENTER
Monitor Out: Select this option if you want to use the "Monitor Out" composite video output.
Scart: Select this option if you are using the Scart output of the device.
Audio (Mixing/Data Transmission)
Here you can determine how the system should handle various audio data.
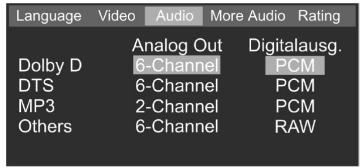
1.Use the and arrow buttons to select the data format for which you want to change the settings.
2. Confirm your selection by pressing ENTER
3. Use the arrow button left to output that you want to using ENTER
- Now use the arrow buttons 念 and to select the desired option and confirm by pressing ENTER
6-Channel: The audio signals are transmitted to all 6 channels (speakers) of the system.
2-Channel: The audio signals are only transmitted to the two front speakers.
PCM: This data format only supports 2 audio channels. Use this setting if you want to listen to the audio signal via an external stereo audio amplifier with a digital input.
RAW: This data format supports up to 7.1 channels. Use this setting if you want to listen to the audio signal via an external digital amplifier with integrated Dolby Digital and/or DTS decoder (connect via coaxial or digital output).
Off: If you are not using the digital audio output, select "Off" to minimise interference between the signals. MP3 output is only possible in 2-channel format.
More Audio (extended audio settings)
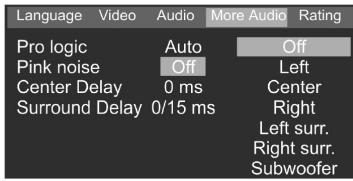
- Use the 和 and 和 arrow buttons to select the desired menu item.
- Press the ENTER button to confirm your selection.
- Use the and arrow buttons to select the desired option and again press ENTER to confirm.
Pro Logic On: Select this option if you selected the "Others - 6 Channel" option in the Audio menu. The Prologic Decoder also divides 2 channel recordings (for example from CD) between the individual channels.
Pro Logic Off: Select this option if you selected the "Others - 2 Channel" option in the Audio menu.
Pro Logic Auto: Select this option if only Pro Logic-coded recordings should be divided between the individual channels.
Pink noise: Select the respective channel to which the noise signal should be transmitted. This is used for fine-tuning the levels and to check the functionality of the respective channels.
Center Delay: This delay time serves to compensate the run-time differences between the front channels and the center channel.
Sourround Delay: This can be used to compensate runtime differences between the front and rear channels.
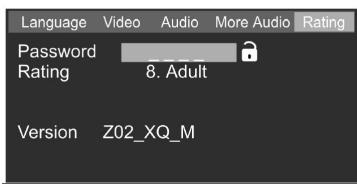
Parental Control function
- Use the arrow button to select "Rating".
- Press the ENTER button repeatedly to select the desired Rating Level.
-
Use the 念 and 念 -sword".
-
Use the number buttons to enter a 4-digit number that you can easily remember.
- Press ENTER to apply the password.
The lock icon closes "” and the rating level cannot be modified until the correct password has been entered again. The factory setting is >>9999<<.
Please take care to remember your password, because subsequently the rating cannot be modified without the password!
This function only takes effect when a corresponding "Rating Level" has been specified in the software of the data carrier.
The DVD player will not play any DVD with a higher rating than the one specified here.
DVDs with content that is not suitable for children should always be locked away.
Troubleshooting
| PROBLEM | CAUSE / SOLUTION |
| Nothing happens, all displays stay dark. | ·The power plug is not plugged in (don't laugh - check)! ·No mains power available. ·Check whether the power socket conducting current (for example by plugging in a lamp or similar). ·The device is not switched on. |
| Only the POWER LED is on. | The device is in STANDBY mode. Press the STANDBY button on the remote control. |
| The system does not react to the remote control. | ·Make sure that there are no large objects between the remote control and the device. ·Replace the batteries of the remote control. |
| The image is black and white or partially distorted. | The wrong video standard has been selected. Set the video standard to the standard that your television supports. |
| The system does not play any sound. | ·Check the audio connections. If you connected your television via the S-Video or Composite Video outputs, you have to set up the audio connections additionally. ·Check whether headphones are plugged in. |
| The device does not read recorded CD-Rs/CD-RWs correctly. | ·Record the CD-R/CD-RW at a lower speed (1x or 2x speed). ·Check that the standards of the respective data format have been strictly adhered on. |
| MP3s are not played or not played correctly. | Make sure that the data carrier contains MP3 files only. |
| The Skip and Search functions do not work. | Sometimes certain sectors of some data carriers have been programmed in a way that does not support these functions. The Skip function does not work if there is only one chapter on the DVD. |
Technical specifications
| Operating voltage | 230 V-50 Hz |
| Power consumption | 150 W max. |
| Operating temperatur | +5 bis +35°C |
| Operating humidity | 5-90% |
| Weight (receiver) | 4,5 kg |
| Video output level | 1Vpp 75 Ω |
| Y output level (S-Video) | 1Vpp 75 Ω |
| C output level (S-Video) | 0,300V pp 75 Ω (PAL) |
| 0,286V pp 75 Ω (NTSC) | |
| Audio output level | 2V RMS |
| Dynamic range | 102 dB (DVD) |
| Distortions (CDDA) | 0,025% |
| Wow and flutter | <±0,001% |
| Input sensitivity | 500 mV (10 kΩ) |
| Digital output | RCA (coaxial) |
| Headphone output | 3,5mm jack, min. 32 Ω |
| Laser wavelength | 655 Nm |
| Tuner | PLL Quarz Digital Synthesizer |
| Frequenzy range | FM: 87,50-108 MHz |
| (50 kHz/step) | |
| AM: 522-1620 KHz | |
| (9 kHz/step) | |
| Station memory | FM: 50, |
| AM: 20 | |
| Max. speaker capacity: | |
| Subwoofer | 15 W |
| Front speaker | 7 W X 2 |
| Rear speaker | 7 W X 2 |
| Center speaker | 7 W |
| Accessories | Remote control |
| AM loop antenna | |
| FM dipole antenna |
Note: The technical data and the design of this product can be changed in the course of future development without print notice.

This device has been tested according to all relevant current CE guidelines, such as electromagnetic compatibility and low voltage directives, and has been constructed in accordance with the latest safety regulations.
Subject to technical changes without prior notice!
Guarantee
The device supplied by our Company is covered by a 24 month guarantee starting on the date of purchase (receipt).
During the life of the guarantee any fault of the device or its accessories *) ascribable to material or manufacturing defects will be eliminated free of charge by repairing or, at our discretion, by replacing it. The guarantee services do not entail an extension of the life of the guarantee nor do they give rise to any right to a new guarantee!
Proof of the guarantee is provided by the proof of purchase. Without proof of purchase no free replacement or repair will be carried out.
For repairs or replacement during the life of the guarantee return the device in its original packing together with the proof of purchase to your dealer.
*) Damage to accessories does not mean automatic free replacement of the whole machine. In such cases please contact our hotline. Broken glass or breakage of plastic parts are always subject to a charge.
Defects to consumables or parts subject to wearing (e.g. motor pistons, kneading blades, drive shafts, spare remote control, spare toothbrushes, saw blades, etc.) as well as cleaning, maintenance or the replacement of said parts are not covered by the guarantee and hence are to be paid!
The guarantee lapses in case of unauthorized tampering.
After the expiry of the guarantee
After the expiry of the guarantee repairs can be carried by the competent dealer or repair service against the payment of the ensuing costs.
- Inhaltsübersicht
- AUDIO (Audio Tracks)
- Display (RDS Display Formate)
- Remote Control
- Description of the Buttons
- Front Panel and Connections
- Front Panel
- Connections
- IMPORTANT INFORMATION
- Important Safety Instructions
- EXEMPTION FROM LIABILITY
- GENERAL INFORMATION
- Media Formats
- DVD Properties
- Handling the Media
- Inserting the Batterie into the Remote Control
- Note:
- Using the Remote Control
- CONNECTING THE SYSTEM
- Description of the Video Connection Options
- Connecting to a Television via Video (DVD Only)
- Connecting to a Television via S-Video (DVD Only)
- Connecting to a Television via AV OUTPUT
- Connecting to a Television via EURO SCART
- Connecting Peripheral Devices (Examples)
- Connecting an Active Subwoofer
- Connecting External Digital Receivers (example)
- Assembly and Setup of the AM Loop Antenna
- Connecting the AM Antenna
- Connecting and Positioning the Interior FM Antenna
- Connecting the Speakers
- Using Headphones
- Connecting the Power Supply
- OPERATION AND FUNCTIONS
- Startup: On/Off/Standby
- Power Saving Mode
- Selecting the Video/Audio Source
- Setting the Volume/Mute
- Selecting the Video Channel on the Television
- Inserting a Data Carrier
- Selecting Menu Items
- Play / Pause / Step / Stop
- Skip Forward/Backward
- Search Forward/Backward
- Slow Motion Forward/Backward
- Menu / Title
- Angle (Camera Perspective)
- Subtitle
- A-B Repeat
- Random
- Repeat
- Program Function
- Search (DVD Mode)
- Level (Level Adjustment/Tone Control)
- Equalizer
- Tuner (Radio Mode)
- Automatic Station Search
- Manually Setting a Radio Station
- Manually Saving a Station
- Selecting Station Locations
- Deleting station locations
- FM and AM
- PTY (Automatic Search by Program Type)
- Display (RDS Display Formats)
- Settings
- Device Settings (Setup)
- OSD Menu (on-screen language)
- Subtitles
- Audio (DVD Dialogue Language)
- DVD Menu (Language)
- Default (Restore Default Settings)
- TV Shape
- TV System (video norm)
- Video Output
- Audio (Mixing/Data Transmission)
- More Audio (extended audio settings)
- Technical specifications
- Guarantee
- After the expiry of the guarantee
Brand : CLATRONIC
Model : DVD 568 HC
Category : DVD player