DB 2898 - Iron CLATRONIC - Free user manual and instructions
Find the device manual for free DB 2898 CLATRONIC in PDF.

User questions about DB 2898 CLATRONIC
0 question about this device. Answer the ones you know or ask your own.
Ask a new question about this device
Download the instructions for your Iron in PDF format for free! Find your manual DB 2898 - CLATRONIC and take your electronic device back in hand. On this page are published all the documents necessary for the use of your device. DB 2898 by CLATRONIC.
USER MANUAL DB 2898 CLATRONIC
6 Vulopening watertank
NL
Autonettoyant (Self-Clean)
Autolimpieza (Self-Clean)
E
Autolimpeza (Self-Clean)
Autopolizia (Self-Clean)
1
Selvrens (self-clean)
General Safety Instructions
GB
- Read the operating instructions carefully before putting the appliance into operation and keep the instructions including the warranty, the receipt and, if possible, the box with the internal packing.
- The appliance is designed exclusively for private use and for the envisaged purpose. This appliance is not fit for commercial use. Do not use it outdoors (except if it is designed to be used outdoors). Keep it away from sources of heat, direct sunlight, humidity (never dip it into any liquid) and sharp edges. Do not use the appliance with wet hands. If the appliance is humid or wet, unplug it immediately. Do not put it in water.
- When cleaning or putting it away, switch off the appliance and always pull out the plug from the socket (pull on the plug, not the cable) if the appliance is not being used and remove the attached accessories.
- Do not operate the machine without supervision. If you should leave the workplace, always switch the machine off or remove the plug from the socket (pull the plug itself, not the lead).
- To protect children from the dangers posed by electrical appliances, make sure that the cable is hanging low and that children do not have access to the appliance.
- Check the appliance and the cable for damage on a regular basis. Do not use the appliance if it is damaged.
- Do not try to repair the appliance on your own. Always contact an authorized technician. To avoid the exposure to danger, always have a faulty cable be replaced only by the manufacturer, by our customer service or by a qualified person and with a cable of the same type.
Use only original spare parts. - Pay careful attention to the following "Special Safety Instructions".
Special Safety Instructions
WARNING! The ironing base (10) becomes hot very quickly and takes a long time to cool down. Please do not touch it.
- When not using the iron, always place the appliance vertically on its base (9).
- Before filling the water tank (8) remove the mains lead. Please do not fill the water tank higher than the MAX mark (approx. 300ml).
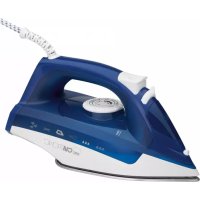
Numbering of the Controls
1 Continuously adjustable temperature regulator
6 Filler opening for the water tank
2 Control lamp
7 Spray nozzle
3 Steam jet button
8 Transparent water container
4 Steam volume regulator
9 Base
5 Spray button
10 Stainless Steel Soleplate
11 Flexible line cord entry
GB
First Use of the Machine
Clean the ironing base with a slightly damp cloth.
- Fill the water reservoir at the refill opening (6), using a filling container. Preferably use distilled water or clear tap water (maximum water hardness level 2). If water is harder, used distilled water only.
- Do not fill battery water, water from the clothes dryer and water containing additives (such as starch, perfume, softener or other chemicals) into the water reservoir. This could damage the iron due to residues forming in the steam chamber. These residues may cause impurities to the fabric when dropping out of the holes in the soleplate.
Using the Machine
NOTE: Only clothes should to be ironed with this machine.
- Remove any protective films and adhesive labels from the stainless steel soleplate before using the appliance.
- Completely unwind the line cord.
Ironing without steam (steam jet regulator on O)
- Place the iron on its stand.
- Turn the steam regulator (4) to O.
- Electrical connection
Make sure that the iron voltage (see name plate) and the line voltage match.
- Always set the temperature control to _n0 before connecting the appliance to a power point, or before disconnecting it.
- Sort out the garments according to their ironing temperatures. Start with the lower temperatures. It is set with the thermostat (1):
Synthetics, silk
low temperature
Wool
medium temperature
Cotton,linen
high temperature
MAX
maximum temperature
- Only connect the machine to a properly installed safety socket, 230V / 50Hz
- The control lamp (2) lights up. As soon as it shuts off, the set temperature is reached. Now you can start to iron.
- Always pull the plug out of the socket after using the iron.
Steam Ironing (90)
GB
For this a high temperature is needed (cotton, linen).
The quantity of steam can be regulated using the steam quantity regulator (4).
O no steam
Small steam volume
Medium steam volume
MAX Large steam volume
Extra steam can be added with the steam jet function (3).
Caution: the steam is hot. Danger of scalding!
When ironing at low temperatures, make sure that you reduce the quantity of steam or iron without steam. If the temperature is too low water may leak from the soleplate. The appliance features an "anti-leakage function" which deactivates the steam mode if the temperature chosen is insufficient for steam operation.
Refilling the water tank
Always disconnect the mains plug before refilling water.
- Set the steam control (4) to "O" (no steam). Open the lid of the refill inlet (6) and carefully pour in the water. Do not exceed the maximum line as marked on the water reservoir.
Spray Function (
In order to moisten a section to be ironed press the spray button (5).
Vertical Steam
This can be used to produce a jet of steam in a vertical direction.
Note: To avoid excess water leaking from the soleplate do not operate the steam burst for more than 5 seconds without interruption.
Self-Cleaning (Self-Clean)
- Half fill the water tank with water.
- Heat the machine up to its maximum temperature. After the control lamp goes off remove the machine from the mains supply.
- Now hold the iron horizontally over a sink. Hold the steam control in the "SELF CLEAN" position. Now rock the device backwards and forwards until the tank is empty. The steam control automatically returns to position O.
- Place the machine back on its stand and heat it up again. To clean the base now iron over a clean cotton cloth.
GB
Cleaning and Storage
Always remove the mains lead before cleaning!
Clean the casing with a slightly damp cloth.
Clean the iron with a slightly humid cloth.
- Always return the steam regulator to the "O" position after use and empty the water tank in order to prevent any leaks.
This device has been tested according to all relevant current CE guidelines, such as electromagnetic compatibility and low voltage directives, and has been constructed in accordance with the latest safety regulations.
Subject to technical changes without prior notice!
Guarantee
The device supplied by our Company is covered by a 24 month guarantee starting on the date of purchase (receipt).
During the life of the guarantee any fault of the device or its accessories. *) ascribable to material or manufacturing defects will be eliminated free of charge by repairing or, at our discretion, by replacing it. The guarantee services do not entail an extension of the life of the guarantee nor do they give rise to any right to a new guarantee!
Proof of the guarantee is provided by the proof of purchase. Without proof of purchase no free replacement or repair will be carried out.
If you wish to make a claim under the guarantee please return the entire machine in the original packaging to your dealer together with the receipt.
*) Damage to accessories does not mean automatic free replacement of the whole machine. In such cases please contact our hotline. Broken glass or breakage of plastic parts are always subject to a charge.
Defects to consumables or parts subject to wearing (e.g. motor pistons, kneading blades, drive shafts, spare remote control, spare toothbrushes, saw blades, etc.) as well as cleaning, maintenance or the replacement of said parts are not covered by the guarantee and hence are to be paid!
The guarantee lapses in case of unauthorized tampering.
After the expiry of the guarantee
After the expiry of the guarantee repairs can be carried by the competent dealer or repair service against the payment of the ensuing costs.
4 Regulator ilosci pary
9 Podstawka
Samostici fungke (Self-Clean)
MbOCTaBJIeM 3a cO6oI npaBO Ha TEXHmueckne n3MeHeHnI!
TapaHTnHoe 683aTeIbCTBO
TapaHTmHbCpOK Ha TeppuTOpn PoCCmckOepeaun yCTaHaBnBaetcnoHOMOHyIMN PpeCTaBUTeJIaMn.
Kaccobbyuek yBJIeTcra rapaHTnHbIM TaIOHOM. Be3 HrO HeBO3MOxEH 6ecpNaTHb peMOHT UIN 3AmHa N3dEInJ.
B CNYae BO3HNKOBXHn pIrpENTHnI NO rapaHTnI, IpEbYBmTE N3dJIeN E NOHOKOMPJIeKTaunC, COpINHaJIbHOyIyAKOBKO IN KACCObMbIcKOM TROPOBTOUKe, PnpOABuEE 3TO N3dJIeN.
RUS
*) DeΦeKtI npHaadJIeXHcOTeH He cLyKJpnpHInHOINa ABTOmatuecko3 aMeHb BCero 13eJIeBn. B ATOM Clyuae pO3BOHnTe HAM, NOxAnyIcTa, nO rOpae IINHn! PA6bntbIe CTeKJIHNbIe IN PONOMaHbIe NlactMaccOBbe DetAaBo3MeUaOTcT OToBko 3a DOONHInTeBHyIO ONIATy!
Дeфекты ИЗнашиBaemьх ппнадлжХСТЕ ИЛТушCxя DeТале (Нарример KOHTаКТьгle UIETKMI MOTOPOB, CMeNTeJIbHьLE KJPOKI, ПИВODнБуpeMHN, 3aNaCHьгпlbTы UYPaBLeHЯ, 3aNaCHьгпьс 3y6bHьLE UIETKII, ПИЛbHьLE NOLOTHA И.T.D.), a TAKKE YNCTKa, TEXO6CnyXKBaHme IINI 3aMeHa TpyuXСя DeTале He NOnaДaIOT ПОд rapaHTnIO, И PO3TomY pOBoDЯrTcS 3a OTeJbHyO onlata!
TapaHTnTepaETcPnBCKpbITnN3dEInnIOCTOpOHHMNIUaAMN.
Pocje rapaHTn
Iocne okOHuaHnCpoka rapaHTn, peMOHT n3dJIeI nnPOn3BOJNTc 3a onlaTy, COOTBETCTByUOzIMM MaCTepCKIMN INI NyHKtAMn CepBNCHO O6ClyKJBBaHn.
Technische Daten
Model: DB 2898