BQS 2794 - Electric grill CLATRONIC - Free user manual and instructions
Find the device manual for free BQS 2794 CLATRONIC in PDF.

| Product Type | Electric Grill |
| Brand | CLATRONIC |
| Model | BQS 2794 |
| Power Supply | 230 V, 50 Hz |
| Water Tank Capacity | 1.5 L |
| Maximum Weight on Grill | 2 kg |
| Minimum Distance from Walls | 15 cm |
| Functions | Grilling, simmering, keeping warm |
| Adjustable thermostat with indicator light | Yes |
| Removable grill | Yes |
| Reflector plate | Included |
| Grease collection tray | Included |
| Removable legs (tabletop or floor use) | Yes |
| Maintenance | Clean with a damp cloth; grill, plate and tray washable with soapy water; do not immerse the heating element |
| Safety | Hot surface; do not use charcoal; do not pour water on grease; do not overload |
| Warranty | 24 months |
Frequently Asked Questions - BQS 2794 CLATRONIC
User questions about BQS 2794 CLATRONIC
0 question about this device. Answer the ones you know or ask your own.
Ask a new question about this device
Download the instructions for your Electric grill in PDF format for free! Find your manual BQS 2794 - CLATRONIC and take your electronic device back in hand. On this page are published all the documents necessary for the use of your device. BQS 2794 by CLATRONIC.
USER MANUAL BQS 2794 CLATRONIC
General Safety Instructions
- Read the operating instructions carefully before putting the appliance into operation and keep the instructions including the warranty, the receipt and, if possible, the box with the internal packing.
- The appliance is designed exclusively for private use and for the envisaged purpose. This appliance is not fit for commercial use. Do not use it outdoors (except if it is designed to be used outdoors). Keep it away from sources of heat, direct sunlight, humidity (never dip it into any liquid) and sharp edges. Do not use the appliance with wet hands. If the appliance is humid or wet, unplug it immediately. Do not put it in water.
- When cleaning or putting it away, switch off the appliance and always pull out the plug from the socket (pull on the plug, not the cable) if the appliance is not being used and remove the attached accessories.
- Do not operate the machine without supervision. If you should leave the workplace, always switch the machine off or remove the plug from the socket (pull the plug itself, not the lead).
- To protect children from the dangers posed by electrical appliances, make sure that the cable is hanging low and that children do not have access to the appliance.
- Check the appliance and the cable for damage on a regular basis. Do not use the appliance if it is damaged.
- Do not try to repair the appliance on your own. Always contact an authorized technician. To avoid the exposure to danger, always have a faulty cable be replaced only by the manufacturer, by our customer service or by a qualified person and with a cable of the same type.
- Use only original spare parts.
- Pay careful attention to the following "Special Safety Instructions".
Special safety notes for this unit
- Caution: During operation the temperature of the exposed surface may be very hot. Danger of burns!
- Caution: Charcoal or similar fuels must not be used for this device.
- Keep at an adequate safety distance from inflammable objects such as furniture, curtains, etc. Keep at a minimum distance of at least 15cm from the wall.
- Place the unit on a flat and heat-resistant surface.
- Allow the unit to cool down before you put it away.
- Never let any water get into the fat.
- Distribute weight evenly on the grill shelf. Maximum weight: 2 kg.
If the unit is used outdoors, take the following precautions:
Use the unit only in fine weather conditions.
- After use, NEVER leave the unit outdoors.
Preliminary Operations
GB
Overview of the Components
1 Heating element
7 Handle
2 Temperature regulator with control lamp
8 Wind protection
3 Fixing screw
9 Heating grill
4 Leg
10 Reflective metal sheet
5 Grill tray
11 Stand
6 Grill grid
12 Grill shelf
a Wing nut
c Assembling trestle
b Screw
d Standing leg
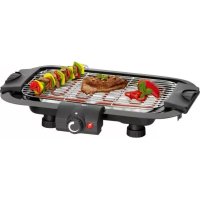
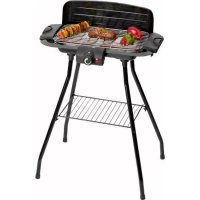
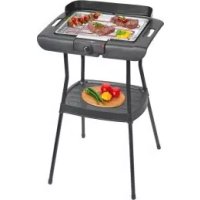
You can assemble the grill with the legs as a stand-alone device or without the legs as a table grill. Please assemble all the parts as shown in the diagram.
Grill tray:
- Release the fixing screw (3).
- Remove any packaging material that may be present.
- Clean the gridiron (6) and the reflective metal sheet (10) with a damp cloth.
Fix the heating element (1) back into place with the screw (3). - Hook the feet (11) into the brackets on the bottom of the grill trough.
- Fill in 1.5 m of cold water up to the "MAX" mark in the trough.
Stand-alone grill (see illustration 1):
- Insert the assembly trestle (c) as far as the drill hole in the middle of the leg (d).
- Hook the journal of the assembly trestle (c) into the holes of the free surface (12).
Fix the components using the screw (b) and the wing nut (a). - When all the legs have been assembled, attach the feet of the grill trough on to the top ends of the legs.
- Please check whether all the legs are correctly positioned in the feet.
Before using for the first time, fill the grill tray with water and use it for 15 minutes to remove the protective film from the heating coil. Select the MAX thermostat position. The presence of smoke is normal. Make sure that a sufficient level of ventilation is available.
Preheat the device before use for approximately 5 minutes.
Usage
- Insert the plug in a duly installed 230V/50Hz protective contact socket.
- Set the thermostat for the desired use: a low or medium temperature for warming or cooking, MAX. for rapid cooking and grilling. The LED shuts off when the desired temperature is reached.
GB
- Lay the food directly on the grill grid. Never use plates, trays or aluminum foil beneath the food. The grilling time depends on the thickness of the food and the set temperature. Thick foods are grilled more quickly by piercing it with metal skewers. Turn the food from time to time.
- Should the water level drop below the MIN mark after continuous use, pull the plug from the socket and fill with water until the MAX mark is reached.
Switching-off: Turn the thermostat to 0^ and pull the plug.
Cleaning
- Always pull the plug from the mains socket before cleaning and wait until the unit has cooled down.
- Release the fixing screw (3).
- Clean the unit with a slightly dampened cloth. Never dip the heating element into water!
The gridiron, reflective metal sheet and trough can be cleaned in soapy water. - Never use a steel brush or other scratching objects.
- Assemble all the parts as shown in the diagram.
Fix the heating element (1) back into place with the screw (3).
This device has been tested according to all relevant current CE guidelines, such as electromagnetic compatibility and low voltage directives, and has been constructed in accordance with the latest safety regulations.
Subject to technical changes without prior notice!
Guarantee
The device supplied by our Company is covered by a 24 month guarantee starting on the date of purchase (receipt).
During the life of the guarantee any fault of the device or its accessories *) ascribable to material or manufacturing defects will be eliminated free of charge by repairing or, at our discretion, by replacing it. The guarantee services do not entail an extension of the life of the guarantee nor do they give rise to any right to a new guarantee!
Proof of the guarantee is provided by the proof of purchase. Without proof of purchase no free replacement or repair will be carried out.
If you wish to make a claim under the guarantee please return the entire machine in the original packaging to your dealer together with the receipt.
*) Damage to accessories does not mean automatic free replacement of the whole machine. In such cases please contact our hotline. Broken glass or breakage of plastic parts are always subject to a charge.
Defects to consumables or parts subject to wearing (e.g. motor pistons, kneading blades, drive shafts, spare remote control, spare toothbrushes, saw blades, etc.) as well as cleaning, maintenance or the replacement of said parts are not covered by the guarantee and hence are to be paid!
The guarantee lapses in case of unauthorized tampering.
After the expiry of the guarantee
After the expiry of the guarantee repairs can be carried by the competent dealer or repair service against the payment of the ensuing costs.
PL
c MoHTaXHbI KPOHHTeIH
b BnHT
d Tpy6uataa cToiKa
PnIb MOxHO hONoB3OaBb C Tpy6Uatoi CToKoB V KaueCTBe NOCTABKn Hnn 6e3 Hee, Kac HactoIbHb BapMaHT. Co6epnte grnIb KaK 30 nok3aHa Ho pncsYHe.
PoiDIOH rpiJIA:
Clerka otKpyTnte KpeNexHbI BnHT (3).
- YdaJIte n3 rpiJIA OCTaTKU yNAKOBOHOro MaTePnAJa.
- Празпгел рашлес (6) и peфлеслес (10) валжно травликов.
3aФИКСИРУTe HArpeBaTeIbHbI 3JIeMEnT (1) npn NOMOuN BInTa (3).
BCTaBbTe HOxKn (11) B KpeJIeHnHa HIXKHeI CTOpOHe ZaII.
- HaJIeTe B HIXKHOU BaHHy rpnIa XoJIoHNoB OBoIb, IOn MeTkn "MAX".
Tpnlb Ha nOndTaBKe (CM. pnc. 1)
- Поведende монтajхны кронштейн (с) К OTверстю в сеpeдино Тубачаю CTоикn (d).
3aKpeNITe 7tntbMOHTaXHOrO KPOHHTeHa (c) B OTBepCTnX NOHOCa (12).
3aΦHKcpyIe BCE deTALn Prn NOMOUs BnHTa (c) n 6apaWkoBOr raIKu (a). - Pocne MOHTaKa Tpy6aTbIX CTOEK HAdeHbTe HOXKn HaaN Ha IN BepXHIOU qACTb.
- PpOKoHTpoIpyuIte, npaBnIbHO IIN CnIaT TpyCbA TbIe CTOnKIN B HOXKaX.
RUS
Ipeep nepBbIM npriroTOBJIeHEm,ДЯ ydaJIeHn3aUHTHO CMA3KN C HArpeBaTeHbO rJEMeHTA, HAnOpHtE PIOJDOH grPnIA BODI IN BKJIIOHTe erO Ha nPm.15 MInyT. UcTaHObITE peYJIrTOP TemIepaTpby B NOLOKeHne "MAX". IoRBAHHeIe NERKOrO DbMa npri 3ToM - HopMaJIbHOe RaJIeHne. ObecNeuBte DOCTATOCHyIO BEHTINIAUIO NOMeUeHnA.
Ipeed npirotoBneHnem pa3oRpei Te np6op B teueHn im. 5 mHyT do pa6ooye TempeaTybl.
Iopraokpa60tbI
BCTaBte CTeBHyO BnIky B po3eTKy C hAnpRzHeHmE CTeN 230 B,50 Tc, OCHAUEHHy 3aUHTbIMK KOHTAKTAMN U YCTAHOBJIeHHyB COOTBETCTBmC npednucHnMn.
B 3aBnCIMoCTN OT NOTpe6HocT N yctaHOblte peyIyTApo TEmpeAtpbyB HuxHoe NOLOXeHne: NOLOXeHne peYIyTApo OT MAnOro DO cpeIhero - IJnI NOIOrpeBaHnI Nk TuJeHnE, NoIOXeHne "MAX" - IJNl B6tPoro TUSeHnE n IOJxapuBaHn. KaTolbko Pnp6Op pa3OgrePecTdo yctaHOblenHou TEmpeAtpbyB, KOHTpOlbHna JAmNoKHa nOTyHET.
Pa3MeCTIe npOyKTbI, npEHa3HaueHHbIe IJn npOxapnBaHn, HENoCpeCDTBeHNO ha peUeTke rPJIa. Hn B Koem cIyae He CTabTe Ha rpINb TaepiKn, pONoHcBtI He HApKpbIaBaiTe pEwETky rPIna AnOMHNHeBOI FOJIbTOB. BpEm npriToGobHnnpOdykTa 3aBVCNT OT erO np3MepOB u YCTaHOBLeHNO TMPePAtypb. ToIcTbe KcCKn CkOpE npOxaparTC eCLN IN npEdbapntelbHO HAnKOLOTb WAmypom. BpEM O T BpEmEH nepeBopauHbAIte npOyKT.
- EcnB P3e3yIbState DInTeIbHOB paObToB yOpBeH BOIb B NOdoHe rPnIa yIaN HIXe MeTKn "MIN", TO chAraJl OTKIOHITpe Np6Op OT cETn, a 3aTeM DoJIeHTe Heo6XDoHMoe KOJIueCTBO BOIb DO MeTK "MAX".
BbIKIOUeHHe: yCTaHOBInTe peryIaTOp TemnepaTypbHa "0" n BbIHbTe BUNKy n3 pO3eTKN.
YXoJ 3a yCtpoiCTBOM
- Pēneid ΜΥΤΚΟ BCERdA BbHIMMaTe BIVIky i3 pOeTKn JxNITe NOKa πριδoP OCTbHET.
Clerka otKpyTne KpeNexHbI BnHT (3). - Пострпто прибор слегka влажно травков. He noprужaite HargpebaTeIbHbI 3IeMeHTB BODy!
- Пюмов Te paшпер, peфелков И похною BaHHу Гиль в моюем pactворе.
He npimehnTe IJy uCTKnpoBOLOHbIe 1eTKn nIu dpYrue capaiaoune npedMeTbl.
Co6epnte rpnJIb kak yka3aHO ha pncyHke.
3aФИКСИРУTe HArpeBaTeIbHbI ΘJIeMEnT (1) npn IMOUIN BInHTa (3).
3To n3JeHHe npOoiIO BCE Heo6xOIMbIe IaKTyAJIbIbIe npOBepKn,
npEInncaHbIe DnpeKTINBO CE, K npIM. Ha 3NeKtPOMarHITMyO
COBMeCTnMOCTb I COOTBeTcBVe Tpe6OBAHmK Hn3KOBOLTHoI TeXnIke, OHO
6bIto TaKke CkOHCTpOpBOHaIO N NoCTpoEHO C yTeTom NocJeHNx Tpe6OBAHnIO TeXnIke Be3OnaCHOtN.
Mbl octabJlem 3a co6oI npaBO Ha texHnueckne n3MeHeHHa!
TapaHTnHoe o63aTeJIbCTBO
TapaHTnHbCpOK Ha TepPITOpIN Pocnckoi ΦePaun yCTaHaBnBaETcnoJIHMOOHbIMN ppeCTaBNTeJIaMn.
Kaccobby uek yBJIeTcra rapaHTnHbIM TaIOHOM. Be3 Hero HeBO3MOxeh 6ecIpaTHb peMOHT nJIN 3aMeHa n3dEIny.
B Cnyae BO3NKHOBXHNI PnITeHNI NO rapaHTMI, npeJbYBIte N3dJIeN B IIOJIHOI KOMKIEKTaUMC, C OPIINHAJIbHOI YNAKOBOKII N KACCObMbIcKcOM TROPOBTOUKe, pOJDAJBWSe 3TO N3dJIeN.
*) DepeKtby npHaadJeXHcTeH He cnykat pnpHInOH dIy ABToMaTHeCKO3aMeHb CBeO r3dJIa. B 3OTm cJyae No3BOnHTe HAM, NOxAJyNCTa, no coprAeHnHn! Pa36bTbe cTeKJHnHe nNoJOMaHbIe INaCTMaccBOBIE DetAIN BO3MeuAOTcToJbKO 3a DOnoJHnTeJbHyO ONATy!
DepeKbI N3HaJIbMaEBMbX npHAnJLekHoCTeN IIN TpyUxxCr DeTalei (HaPIMep KOHTAChTBHe UeTKN MOTOPOB, CMEcTIeBbHbe KpIOKn, PnIBOdHbe peMHN, 3aNaChbIyIypaBHeNHa, 3aNaChbIe 3y6bHe UeTKN, nIIbHbe NOLOTHa N T.D.), a TAKKe HcTKe, TeXo6ClyNuBaHBe NII He ZAMeHa TpyUxxCr DeTaleIe H nonaAdHO TNOI rapaHTnIO, IN NoOTOMy PPOBOADTCr 3a OTJeBHyIO ONlATy!
TapaHTy TepaETc npu BCKpbITn IN3dEInna NocTOPOHHmN JINaAMN.
Pocne rapaHTn
Iocne OKOHuaHnCpoka rapaHTn, peMOHT n3dJIIN pON3BOUNTc 3a ONJATy, COOTBETCTBYUOUMM MaCTepCKHM NII INYHKtAMN CepBNCHO O6ClnyKbAHn.
Technische Daten
Modell: BQS 2794