
S12 - Headset PLANTRONICS - Free user manual and instructions
Find the device manual for free S12 PLANTRONICS in PDF.
| Product Type | Telephone headset with amplifier |
| Brand | PLANTRONICS |
| Model | S12 |
| Power supply | 2 AAA batteries (not included) for the amplifier |
| Battery life | Approximately 20 hours of continuous use (estimate) |
| Microphone type | Adjustable boom microphone |
| Earpiece type | Ear bud with ear loop and adjustable headband |
| Main functions | Hands-free headset, amplifier, mute button, listening and transmission volume adjustment, compatibility selector |
| Phone compatibility | Telephones with handset (except one-piece phones with keypad on handset) |
| Indicator lights | Firefly line indicator (green), headset mode indicator (green), low battery indicator (orange), mute indicator (red) |
| Available adjustments | Listening volume, transmission volume, compatibility selector (sliding switch) |
| Included accessories | S12 amplifier, adjustable headband, ear bud, clothing clip, phone-amplifier cable |
| Spare parts and optional accessories | Euro power cable, neckband, leatherette ear cushions, foam ear cushions, ear cushion ring, malleable ear loop |
| Warranty | 2 years from date of purchase (keep original receipt) |
| Customer service | 0825 0825 99 (€0.15 incl. tax/min) or website www.plantronics.com |
| Safety precautions | Do not use near water, avoid heat sources, do not insert objects, do not disassemble |
| Care and cleaning | Clean with a soft dry cloth, avoid liquids |
Frequently Asked Questions - S12 PLANTRONICS
User questions about S12 PLANTRONICS
0 question about this device. Answer the ones you know or ask your own.
Ask a new question about this device
Download the instructions for your Headset in PDF format for free! Find your manual S12 - PLANTRONICS and take your electronic device back in hand. On this page are published all the documents necessary for the use of your device. S12 by PLANTRONICS.
USER MANUAL S12 PLANTRONICS
Plantronics Acoustics
Italia Srl
Milano, Italia
Numero Verde: 800 950934
+39 02951 1900
Plantronics Iberia, S.L.
Madrid, Espana
Tel: 902 41 51 91
+34916404744
Nordic Region
Tel: Finland: 0201 550 550
Tel: Sverige: 031 28 95 00
Tel: Danmark: 44 35 05 35
Plantronics Middle East,
Eastern Europe, Africa
and India
Tel: +44 (0)1793 842443
Plantronics Ltd, Interface Business Park, Bincknoll Lane
Wootton Bassett, Wiltshire SN4 8QQ. ENGLAND
www.plantronics.com
S12 HEADSET
SYSTEM
User Guide
Bedienungsanleitung
Brugervejledning
Manual del usuario
World Leader in Communications Headsets
C
36816-01 Rev B
Plantronics
2 year Warranty
and Repair
Service
Plantronics 2 year Warranty and Repair Service
UK Products under warranty are replaced free of charge.
All units serviced to full production standards using original factory parts.
0800410014
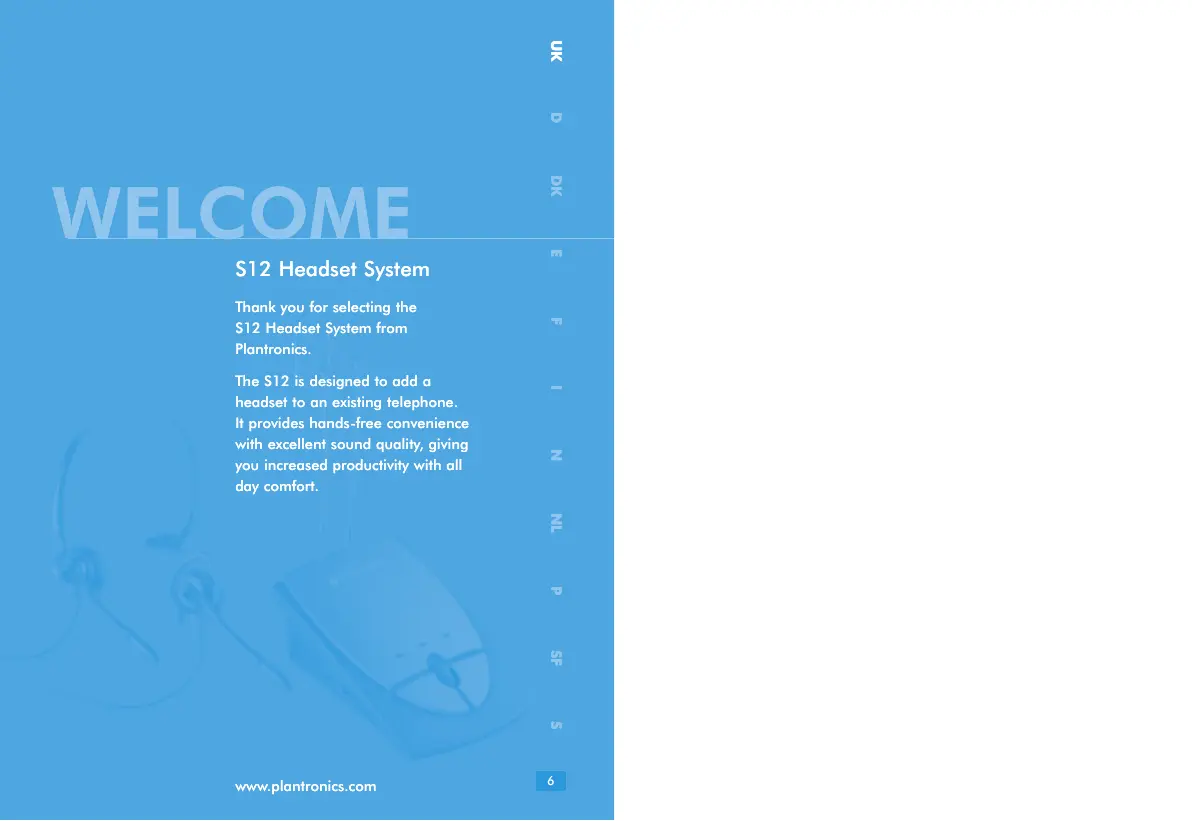
Thank you for selecting the
S12 Headset System from
Plantronics.
The S12 is designed to add a headset to an existing telephor
It provides hands-free convenience with excellent sound quality, giving you increased productivity with all day comfort.
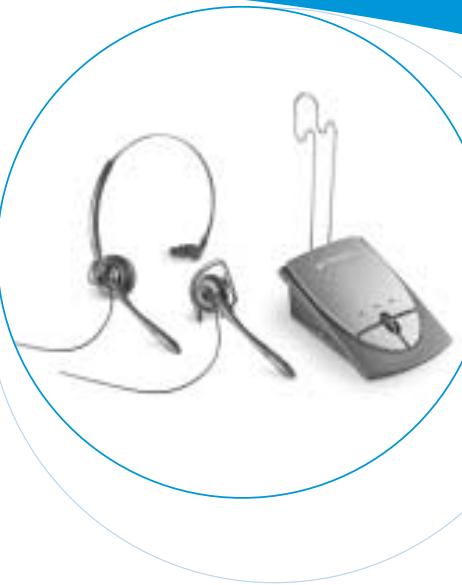
DIAGRAM KEY
HEADSET
1 Adjustable Headband 13 Headset Indicator (Green LED)
2 Headset Assembly 14 Power Indicator (Amber LED)
3 Clothing Clip 15 Mute Indicator (Red LED)
4 Headset Plug 16 Listen Volume Control
5 Microphone Boom 17 Mute Button
6 Ear Cushion Assembly 18 Headset/Handset Button
7 Earloop 19 Transmit Volume Control
8 Pivot Ball Ring 20 Transmit Volume Switch
9 FireflyTM In-Use Indicator 21 Cord (Telephone to Amplifier)
BASE FRONT
10 Headset Holder 22 Headset Socket
11 Compatibility Slide Switch 23 Handset Socket
12 S12 Amplifier 24 Telephone Base Socket
IMPORTANT SAFETY INFORMATION

PLEASE READ THE FOLLOWING INSTRUCTIONS BEFORE USE:
When using your telephone equipment these basic safety precautions should be followed to reduce the risk of fire, electric shock, and injury to persons.
- Read and understand all instructions.
- Follow all warnings and instructions marked on the product. The symbol identifies and alerts the user to the presence of important operating and service instructions.
- Do not use this amplifier on one piece telephones where the key pad is the handset.
-
Do not locate base unit near water, for example, near a bathtub, wash bowl, kitchen sink, or laundry tub, in a wet basement or near a swimming pool.
-
Do not place this product on an unstable cart, stand or table. The product may fall, causing serious damage.
- This product should never be placed near or over a radiator or heat register. It should not be placed in a built-in installation unless proper ventilation is provided.
- Never push objects of any kind into this product as they may touch dangerous voltage points or short out parts that could result in a risk of fire or electric shock. Never spill liquid of any kind on the product.
- To reduce the risk of electric shock, do not disassemble.
- Keep all product cords and cables away from operating machinery.
- Avoid using a telephone (other than a cordless type) during an electrical storm. There may be a remote risk of electric shock from lightning.
- Do not use the telephone to report a gas leak in the vicinity of the leak.
The S12 complies with the following EU directives:
89/336/EEC - The EMC directive
73/23/EEC - The low Voltage Directive
GETTING STARTED
INSTALL BATTERIES
Fig. A The batteries on your amplifier will need to be installed before you can use your headset. You should disconnect the amplifier from your telephone before doing this. To install the batteries, remove the silver cover on the top of the amplifier. Remove the battery door. Put the batteries into the compartment and replace the covers (Refer to Fig A on page 4). The amplifier has a low battery warning light (14), if this is illuminated then you should replace the batteries as soon as possible.
CONNECT THE AMPLIFIER
Fig. B Unplug your telephone handset cord from the telephone base.
Fig. C Plug your telephone handset cord into the S12 Amplifier Handset Socket (23).
Connect the Cord (21) between the Telephone Base Socket (24) on the S12 Amplifier (12) and your telephone base.
Plug the headset plug into the Headset Socket (22).
Route the cord through the cable management channel on the bottom of the amplifier (not shown).
SET AMPLIFIER COMPATIBILITY SWITCH
Fig. D Put on your headset and press the Headset/Handset Button (18). The Headset Indicator (13) should be flashing.
Fig. E Lift the telephone handset off the cradle and place it on your desk.
If you hear a clear dial tone, you can proceed to Make A Test Call.
If you don't hear a dial tone, adjust the Compatibility Slide Switch (11) and follow the process below:
Slide the Compatibility Slide Switch (11) until you hear a clear dial tone.
There may be multiple settings with a dial tone. Select the one that sounds most like the handset of your telephone.
Experimenting with various switch settings will not harm the amplifier or your telephone.
MAKE A TEST CALL
Verify that the Mute Button (17) is off and the Mute Indicator (15) is not illuminated.
Remove the telephone handset from the cradle and place on your desk.
If you do not hear a dial tone in the headset, press the Headset/Handset Button (18) so that the Headset Indicator (13) is flashing.
Use your telephone keypad to call a friend or colleague.
Adjust the listen volume using the Listen Volume Control (16).
If your friend or colleague cannot hear you, or you hear a buzz or hum, try changing the Compatibility Slide Switch (11).
Adjust how loud you sound to the other party by adjusting the Transmit Volume Control (19).
If you sound too loud move the Transmit Volume Switch (20) to its lower setting and adjust the Transmit Volume Control (19).
After completing the call, return the handset to its cradle.
USING YOUR HEADSET
TO RECEIVE CALLS WITH YOUR HEADSET
Put on your headset.
When your telephone rings, push the Headset/Handset Button (18) so that the Headset Indicator (13) is flashing.
Remove the handset from the cradle and place it on your desk.
Begin talking to your calling party.
When you are finished, hang up the handset.
TO USE YOUR TELEPHONE HANDSET
Push the Headset/Handset Button (18) so that the Headset Indicator (13) is not illuminated.
Use the telephone handset as normal.
TO SWITCH FROM YOUR TELEPHONE HANDSET TO YOUR HEADSET
Alert your caller that there will be a short delay, and put on your headset.
Push the Headset/Handset Button (18) so that the Headset Indicator (13) is flashing.
Resume talking through your headset.
TO SWITCH FROM YOUR HEADSET TO YOUR TELEPHONE HANDSET
Alert your caller that there will be a short delay, and then release the Headset/Handset Button (18) so that the Headset Indicator (13) is not illuminated.
Remove your headset and pick up your handset.
Resume talking through your telephone handset.
TO USE THE MUTE FUNCTION
Depress the Mute Button (17) so that the Mute Indicator (15) is flashing. You will be able to hear your caller but they can't hear you.
Release the Mute Button (17) to deactivate the mute function. The Mute Indicator (15) is not illuminated.
TROUBLESHOOTING
PROBLEM
I cannot hear a dial tone.
Make sure all cable connections are correct and firmly in place.
Pay special attention that the handset and short cords are properly connected.
Make sure you have pressed the Headset/Handset Button and the Headset Indicator is flashing.
Make sure the telephone handset is off the hook.
Adjust the Listen Volume Control.
Adjust the Compatibility Slide Switch.
Ensure that the headset is centered on your ear.
PROBLEM
Caller cannot hear my voice.
Make sure the Mute Button is turned off and the Mute Indicator is not illuminated.
Adjust the Transmit Volume Control Switch.
Increase the outgoing volume by adjusting the Transmit Volume Control.
Adjust your headset so that the microphone is closer to your mouth.
PROBLEM
I hear a hum in the headset.
Adjust the Compatibility Slide Switch until the sound is clear.
Trying other settings will not harm the Amplifier or your telephone.
PLANTRONICS HELP DESK
For further information telephone 0800 410014 or visit our website at
www.plantronics.com
OPTIONAL PARTS AND ACCESSORIES
The following spares and accessories are available from your Plantronics supplier:
- Power Supply - UK 35505-01, Euro 35505-02
- Behind-the-Head Neckband - 62800-01
- Ear Cushion Leatherette - 38198-01
- Foam Cushion/Ring Set - 38177-01
- Earloop kit, Conformable - 45651-01
WARRANTY AND SERVICE
- Plantronics guarantees the satisfactory condition of the equipment with regard to manufacturing and material defects for 2 years from the date of purchase. (Please retain the original receipt).
- This product should be installed and used in accordance with the instructions detailed in this user guide, and serviced at an approved Plantronics Service Centre. Failure to comply with these conditions may render the warranty void.
- This does not affect your statutory rights.
WILLKOMMEN
Headset-System S12
73/23/CEE - Directive Basse tension
DEMARRAGE
INSTALLATION DES BATTERIES
PEÇAS E ACCESSORIES OPGIONAIS
GARANTIA E ASSISTÊNCIA
89/336/EEC - EMC-directivet
73/23/EEC - Lågspännningsdirektivet
KOMMA IGÁNG
INSTALLERA BATTERIER
RINGA ETT PROVSAMTAL
TA EMOT SAMTAL MED HEADSETET
Satt pa dig headset.
- Plantronics Acoustics
- Italia Srl
- Plantronics Iberia, S.L.
- Nordic Region
- Plantronics Middle East,
- Eastern Europe, Africa
- and India
- S12 HEADSET
- SYSTEM
- Plantronics
- year Warranty
- and Repair
- Service
- Plantronics 2 year Warranty and Repair Service
- DIAGRAM KEY
- HEADSET
- BASE FRONT
- IMPORTANT SAFETY INFORMATION
- PLEASE READ THE FOLLOWING INSTRUCTIONS BEFORE USE:
- The S12 complies with the following EU directives:
- GETTING STARTED
- INSTALL BATTERIES
- CONNECT THE AMPLIFIER
- SET AMPLIFIER COMPATIBILITY SWITCH
- MAKE A TEST CALL
- USING YOUR HEADSET
- TO RECEIVE CALLS WITH YOUR HEADSET
- TO USE YOUR TELEPHONE HANDSET
- TO SWITCH FROM YOUR TELEPHONE HANDSET TO YOUR HEADSET
- TO SWITCH FROM YOUR HEADSET TO YOUR TELEPHONE HANDSET
- TO USE THE MUTE FUNCTION
- TROUBLESHOOTING
- PROBLEM
- PLANTRONICS HELP DESK
- OPTIONAL PARTS AND ACCESSORIES
- WARRANTY AND SERVICE
- WILLKOMMEN
- Headset-System S12
- DEMARRAGE
- INSTALLATION DES BATTERIES
- PEÇAS E ACCESSORIES OPGIONAIS
- GARANTIA E ASSISTÊNCIA
- KOMMA IGÁNG
- INSTALLERA BATTERIER
- RINGA ETT PROVSAMTAL
- TA EMOT SAMTAL MED HEADSETET
Brand : PLANTRONICS
Model : S12
Category : Headset