YM400E - Yogurt maker CUISINART - Free user manual and instructions
Find the device manual for free YM400E CUISINART in PDF.
| Product type | Yogurt and cheese maker |
| Brand | Cuisinart |
| Model | YM400E |
| Capacity | 6 glass pots of 125 ml, 2 plastic pots of 250 ml, 2 cheese molds |
| Pot material | Glass (125 ml), plastic (250 ml) |
| Control panel | LCD screen, +/- keys, Yogurt and Cheese modes |
| Timer | Adjustable from 1 to 19 hours, automatic stop with audible signal |
| Power supply | Mains plug, 220-240 V, 50/60 Hz, estimated power 50 W |
| Main functions | Making yogurt, fromage blanc, cheese curds, fresh cheeses |
| Fermentation temperature | 40-45 °C for yogurt, suitable for cheese |
| Care and cleaning | Pots, lids and cheese molds are dishwasher safe (top rack). Wipe the base with a damp cloth. Do not immerse. |
| Safety | Do not immerse the base, do not open the base, unplug after use, do not use non-provided accessories |
| Spare parts and repairability | Repairs by manufacturer only. No user-serviceable parts. |
| General information | Designed by Cuisinart in collaboration with chefs. Brushed stainless steel design. Use for pasteurized, UHT, raw, soy, powdered milk. |
Frequently Asked Questions - YM400E CUISINART
User questions about YM400E CUISINART
0 question about this device. Answer the ones you know or ask your own.
Ask a new question about this device
Download the instructions for your Yogurt maker in PDF format for free! Find your manual YM400E - CUISINART and take your electronic device back in hand. On this page are published all the documents necessary for the use of your device. YM400E by CUISINART.
USER MANUAL YM400E CUISINART
Yoghurt & Cheese Maker
SOMMAIRE
a.Before using for the first time 12
b. Using the control panel. 12
c. Making yoghurt. 12
d. Making fromage blanc and fromage frais 14
- Cleaning and maintenance. 15
- Safety precautions 16
INHALTSVERZEICHNIS
2. CARACTERISTIQUES PRODUIT
Congratulations on your purchase!
For over 30 years, Cuisinart® has been developing a full range of kitchen appliances that allow both kitchen enthusiasts and great chefs to express their creativity to the fullest.
All Cuisinart® appliances are the result of a close working relationship between engineers and great names in Cuisine, like Paul Bocus, the brand's charismatic ambassador. Every product combines strength, innovation, performance and ergonomics.
Made with professional materials like brushed stainless steel, our products fit easily into every kitchen thanks to a simple and elegant design.
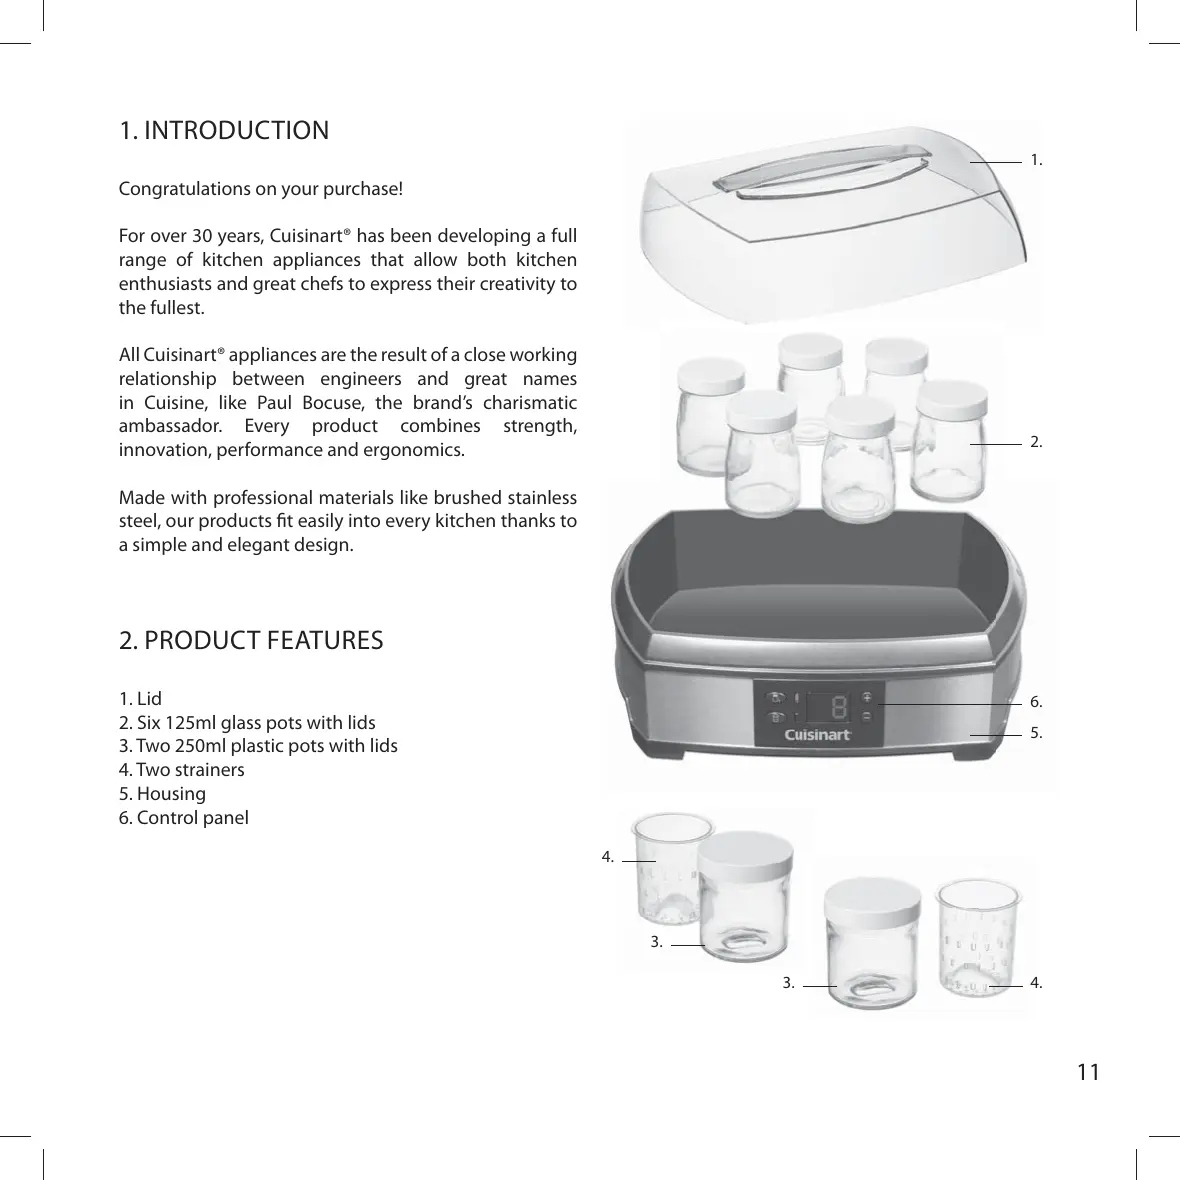
2. PRODUCT FEATURES
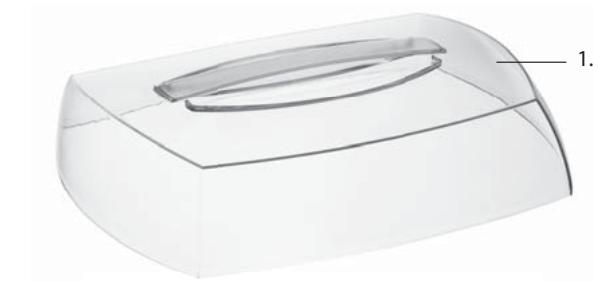
- Lid
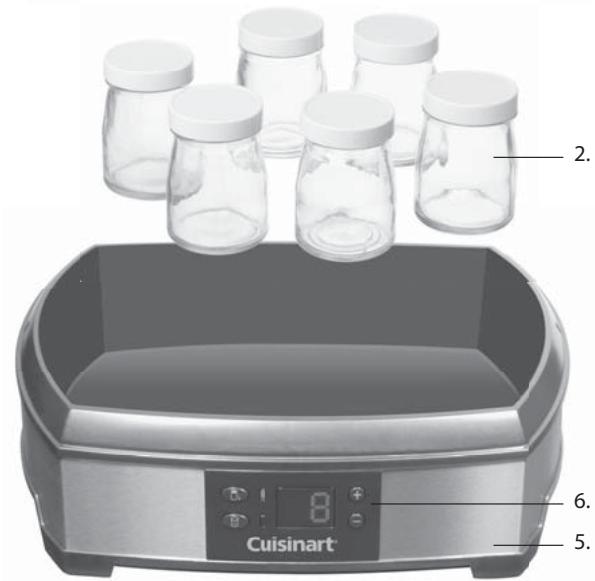
- Six 125ml glass pots with lids
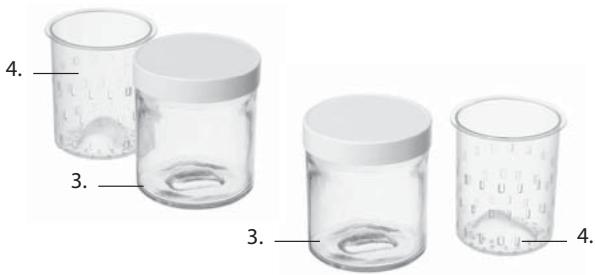
- Two 250ml plastic pots with lids
- Two trainers
- Housing
- Control panel
3. USE
A. BEFORE USING FOR THE FIRST TIME
- Before using for the first time, remove the product from its packaging. Wash all the utensils (pots, strainers and lids) in warm, soapy water. Rinse and dry completely.
- For perfect results, place your product on a level surface. Do not move the machine when making yoghurt and place it on a steady surface that is not affected by the vibrations of other appliances (like the refrigerator).
B. USING THE CONTROL PANEL
This product has two operating modes:

: ideal temperature for making yoghurt.

:ideal temperature for making fromages blancs, faisselle cheese and fromages frais.
The preparation time may be adjusted for each mode:
- : increase the preparation time (up to 19 hours)
: reduce the preparation time (down to 1 hour)
C. MAKING YOGHURT
Basic Recipe
Use ingredients that are at room temperature:
- 1 litre pasteurised full fat milk
-
1 plain yoghurt
-
Prepare the recipe (basic recipe or your own recipe).
- Pour the preparation into the 125ml pots.
- Place the pots without their lids in the yoghurt maker.
- Place the clear lid on the yoghurt maker.
-
Plug the yoghurt maker into an electrical outlet.
-
Press the button, the indicator light confirms that the 'yoghurt' mode has been started. The default time (8 hours) will be displayed on the screen.
- Adjust the preparation time according to your recipe or your preferences by pressing the ^ + ^ and - buttons.
- When the unit is on, the timer will count down every hour. The last hour will be counted down in minutes. At the end of the cycle, the unit will beep three times to indicate that the yoghurt maker has completed the process and will then turn itself off.
Note: To turn the yoghurt maker off before the preparation is complete, press the button.
- Cover the individual pots with the lids and place them in the refrigerator for at least 4 hours before sampling the yoghurt.
Chef's Advice
To master yoghurt making, it is important to have a good understanding of how milk is transformed into yoghurt.
Requirements
yoghurt is the result of fermented milk. For fermentation to occur, the milk must be heated to a temperature of between 40 and 45^ and the thermophilic bacteria added to the warm milk. The bacteria in fact need this heat to develop. If it is too hot, they will die. If, by contrast, the milk is too cold, they will not multiply. The Cuisinart® yoghurt maker has been designed to ensure that the perfect conditions are provided. Its role is therefore to raise and maintain the temperature to a stable level so that the enzymes can develop.
Choosing the milk
The fat content of the milk has a direct influence on the flavour, texture and nutritional value of final product. Also, the firmest yoghurt is made from full fat milk. It is also the tastiest and fattiest and it provides the most energy. Partly-skimmed milk makes thinner, more liquid yoghurt.
Pasteurised semi-skimmed or full fat milk
This is the most used milk and gives the best results.
Sterilised UHT semi-skimmed or full fat milk
This produces a relatively firm yoghurt without skin.
Raw milk
It is recommended that this milk be boiled before using to kill any harmful bacteria. If you use goat or sheep milk, the resulting yoghurt will not be as firm.
Soy milk
Make sure you use UHT soy milk that contains fructose, honey or malt. At least one of these ingredients is absolutely necessary for the milk to ferment.
Powdered milk
Adding 4 to 5 spoonfuls to your preparations will produce yoghurt that is firmer and richer in calcium and proteins.
Recommended preparation times
Full fat milk : 8 to 9 hours Semi-skimmed milk : 10 hours Soy milk : 9 to 10 hours Pre-boiled raw milk : 8 hours
These times are recommended for milk that is at room temperature. The colder the milk, the more the preparation time must be increased.
The enzymes
- You can use several different kinds of enzymes:
- A commercial plain yoghurt (preferably without milk protein).
- Yoghurt from your last production cycle. In this case, make sure you only repeat this process 6 to 8 consecutive times.
- A dry or freeze-dried enzyme. Follow the instructions for use of the enzyme.
Tips
- The yoghurt can be kept in the refrigerator for between 7 and 10 days, but the taste is best in the 4 days following its production.
- People who are allergic or intolerant to cow milk may use sheep milk or soy milk. Sheep milk is rich in proteins and easier to digest.
- Water may condense on the lid of the yoghurt maker. When removing the lid, take care not to allow the accumulated water to drip into the prepared yoghurt.
- For sweetened yoghurt, add the equivalent of 125ml of sweetened condensed milk to the basic preparation.
D. MAKING FROMAGE BLANC AND FROMAGE FRAIS
Basic recipe
Use ingredients that are at room temperature:
- 1 litre pasteurised full fat milk
- 2 petits suisses
-
2 drops of rennet
-
Prepare the recipe (basic recipe or your own recipe).
- Place the strainers in the 250ml pots making sure that the strainers touch the bottom of the pot.
- Pour the preparation into the 250ml pots.
-
Place the pots, uncovered, in the cheese maker.
-
Place the clear lid on the cheese maker.
- Plug the cheese maker into an electrical outlet.
- Press the button, the indicator light will confirm the 'cheese' mode has started.
The default time (8 hours) will be displayed on the screen. - Adjust the preparation time according to your recipe or your preferences by pressing the ^+ and - buttons.
- When the unit is on, the timer will count down every hour. The last hour will be counted down in minutes. At the end of the cycle, the unit will beep three times to indicate that the cheese maker has completed the process and then turn itself off.
Note: To turn the cheese maker off before the preparation is complete, press the button.
Straining fromage blanc - strainer
- Remove the pots from the cheese maker.
- Strain by turning the strainer one quarter turn in the pot. (fig. 1)
- Place the pots in the refrigerator. Place the lid on the strainer to protect from odors.
- The longer the cheese is allowed to drain, the firmer it will be.
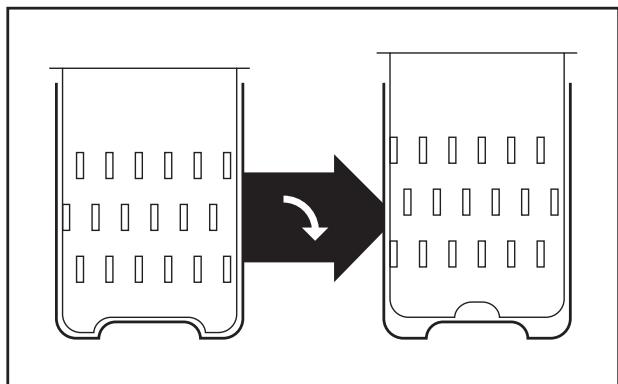
fig. 1
Draining time:
Fromage blanc : 2 to 4 hours
Note : It is important to remove the whey during the straining process.
The cheese may be eaten as soon as it has drained.
After the longest draining stage, it is possible to start the maturing process.
Preparing and maturing cheese
- For dry cheese, remove the fromage frais from the mould and place on butter muslin or a tea towel and place in a sieve for 12 hours in the refrigerator.
- Remove your cheese from the cloth and lightly salt it. It is also possible to flavour it with different herbs or spices like cumin, coriander, paprika, pepper, other herbs, and so on.
- Turn your cheese every 12 hours and salt it again.
- Repeat this operation for 2 to 4 days.
- To mature your cheese, place it in a well-ventilated cellar at a temperature of about 15^ C and turn it every day. The maturing time will depend on your preferences. With a little time, you will have sufficiently mastered maturing to obtain a result that suits you.
Chef's advice
Choosing the milk
The creamier the milk, the thicker and more mellow your cheese will be. The best results are therefore obtained by using whole fresh or UHT milk.
To use raw milk, it is recommended that the milk be boiled before using it to kill any harmful bacteria. If sheep or goat milk is used, more whey will be produced.
Suggested preparation times
Full fat milk: 12 hours
Semi-skimmed milk: 14 hours
Pre-boiled raw milk: 10 hours
These times are suggested if you are using milk that is at room temperature. The colder the milk, the more time will be needed for preparation.
The Enzymes
You can use several different enzymes:
- A commercial 'petit-suisse' style fromage frais
- A 125 ml pot of fromage blanc or some whey from your last production cycle. In this case, make sure you only repeat this process 4 consecutive times.
- A dry or freeze-dried enzyme. Follow the instructions for using the enzyme.
The whey
The whey must be used in addition to the enzymes to curdle the milk. You can buy whey in liquid form at the chemist. Two to six drops per litre of milk will be enough to prepare your cheeses.
Tips
- At the end of preparing your recipe, gently add the whey. Then mix gently without whipping for best results.
- You can keep fromages blancs in your refrigerator for one week.
- Water may condense on the lid of the cheese maker. When you remove the lid, be careful not to allow the accumulated water to drip onto the prepared cheese.
4. CLEANING AND MAINTENANCE
- Ensure that your unit has cooled completely before cleaning or storing. Always unplug the unit from the electrical outlet and clean it carefully before storing.
-
The pots, lids and yoghurt maker lid may be washed in warm soapy water and dried with a tea towel or they may be placed in the top rack of the dishwasher.
-
Use a damp cloth to clean the housing and the inside of the yoghurt maker. Do not use abrasive cleaning agents.
- Do not immerse the housing of the yoghurt maker in water or any other liquid.
5. SAFETY PRECAUTIONS

-
CAUTION: The polythene bags over the product or packaging may be dangerous. To avoid all danger of suffocation, keep out of the reach of babies and children. These bags are not toys.
-
Keep these instructions for future reference.
- Unplug the appliance immediately after use, before attaching or removing accessories and before cleaning the unit.
- Never immerse the plug, the lead or the housing in water or any other liquid.
- Keep yoghurt in the refrigerator for no longer than 10 days.
- Keep cheese in the refrigerator for no longer than 7 days.
- Never place the unit in the refrigerator.
- If the lead is damaged, it must be replaced by the manufacturer, its after-sales service or similarly qualified professionals to avoid danger.
- Use only the accessories provided with the unit.
- Do not use the appliance if it has fallen or if it appears to be damaged.
- Do not allow the lead to hang over the kitchen table or worktop, and keep it away from hot surfaces to avoid all risk of damage.
- IMPORTANT: Do not open the unit's housing. No parts contained in this unit may be repaired or replaced by the user. Repairs must be carried out by the manufacturer only.
- This unit is not intended for use by people (adults and children) whose physical, sensory or mental capacities are reduced, or by persons who lack experience or
knowledge, unless they are supervised or have been given instructions beforehand on the use of the unit and are adequately supervised so they don't use it as a toy.
- This appliance complies with the basic requirements of Directives 2004/108/EC (Electromagnetic Compatibility) and 2006/95/EC (Safety of domestic electrical appliances).
- This appliance should be used only for the uses described in this booklet and following all the instructions.
ELECTRICAL AND ELECTRONIC EQUIPMENT AT THE END OF LIFE.
In everybody's interest and to participate actively in protecting the environment:
Do not discard these products with your household waste. Use return and collection systems available in your country.
Some materials can in this way be recycled or recovered.