
CPT440E - Toaster CUISINART - Free user manual and instructions
Find the device manual for free CPT440E CUISINART in PDF.
| Product Type | 4-Slot Toaster |
| Brand | Cuisinart |
| Model | CPT440E |
| Power Supply | 220-240 V, 50/60 Hz, 1500 W (estimated) |
| Dimensions (L x W x H) | 30 x 20 x 25 cm (estimated) |
| Weight | 2.5 kg (estimated) |
| Housing Material | Brushed stainless steel |
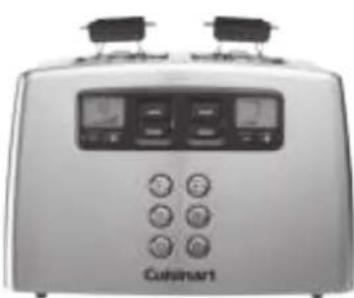
| Slots | Extra-wide slots (4 independent slots) |
| Controls | Dual control panel for independent settings per pair of slots |
| Browning Levels | 7 levels (1 to 7) |
| Functions | Toast, Bagel (one-side toasting), Defrost, Reheat, Cancel |
| LCD Display | Displays browning level and remaining time |
| Accessories | Pastry reheating rack (2 pieces) |
| Cord storage | Under the appliance for excess cord storage |
| Crumb tray | Removable for easy cleaning |
| Audible signal | At end of cycle |
| Safety | Automatic shut-off, do not use metal utensils in slots |
| Cleaning | Exterior with damp cloth, crumb tray washable, do not immerse |
| Repair | Consult a qualified professional for any repair |
Frequently Asked Questions - CPT440E CUISINART
User questions about CPT440E CUISINART
0 question about this device. Answer the ones you know or ask your own.
Ask a new question about this device
Download the instructions for your Toaster in PDF format for free! Find your manual CPT440E - CUISINART and take your electronic device back in hand. On this page are published all the documents necessary for the use of your device. CPT440E by CUISINART.
USER MANUAL CPT440E CUISINART
A. Using the appliance 12
B. Using the special features 12
C. Using the pastry attachment 12
- Advice from the chefs 13
- Cleaning and maintenance 13
INHALTSVERZEICHNIS
legrement plus long.
risk of suffocation, keep these bags out of the reach of babies and children. These bags are not toys.
under kitchen wall elements.
when plugged in. Pull on the plug to unplug, never on the cord.
not be inserted in the toaster.
or under kitchen wall cabinets.
qualified persons in order to avoid a hazard.
risk of injury.
physical, sensory or mental capabilities or lack of experience and knowledge if they have been given supervision or instruction concerning use of the appliance in a safe way and understand the hazards involved. Children shall not play with the appliance. Cleaning and user maintenance shall not be made by children without supervision.
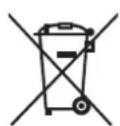
Discarding electrical and electronic equipment at the end of life
m = 311 ;
In everyone's interest and to actively participate in the collective effort to protect the environment:
Some material can be recycled or recovered.
1. INTRODUCTION
Congratulations on your purchase!
For over 30 years, Cuisinart
kitchen appliances that lets both passionate amateurs and great chefs express their creativity to the fullest.
All Cuisinart
between engineers and great names in Cookery like Paul Bocuse, the brand's charismatic ambassador. Every product combines sturdiness, innovation, performance and ergonomics.
Made with professional materials like brushed stainless steel, our products will easily fit into any kitchen thanks to their simple and elegant design.
2. CHARACTERISTICS
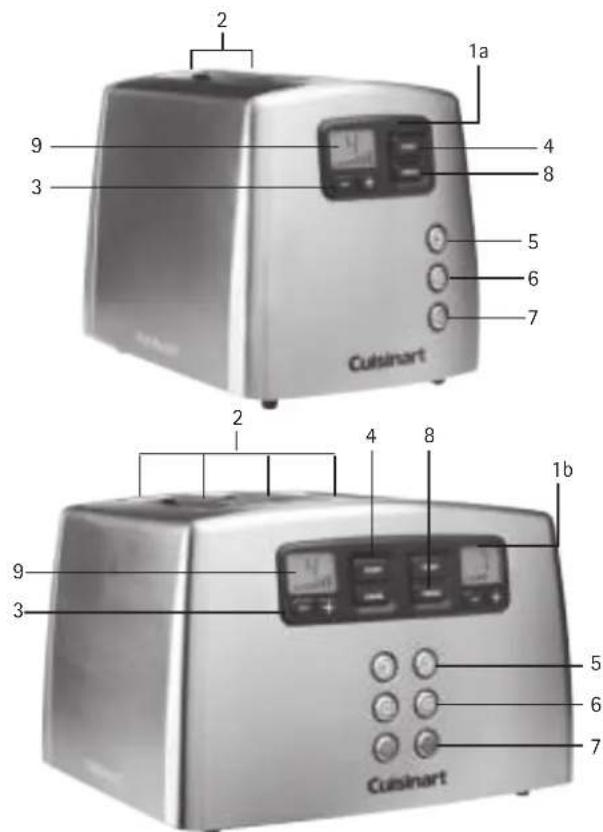
1a.Commandpanel: The command panel lets you operate and adjust the two slots.
1b. Dual control panel: Two independent sets of controls let you toast your slices of bread separately. The control panel on the left controls slots 1 and 2; the panel on the right controls slots 3 and 4.
2. Extra-wide slots: These allow you to toast a great variety of foods.
3. Colour control buttons: Select the desired colour: seven settings, from light to dark.
4. TOAST Button: This setting activates the toasting cycle.
5. Button: This setting allows you to toast just one side of a piece of bread or bagel. A LED indicator lights up when this feature has been selected.
6. Button: This feature lets you first defrost and then toast frozen bread. A LED indicator lights up when this feature has been selected.
7. Button: This button lets you reheat without browning or toasting. A LED indicator lights up when this feature has been selected.
8. CANCEL Button: This button interrupts the toasting cycle.
9. LCD Display: Backlit LCD screens display the level of browning selected and a countdown of the toasting time remaining.
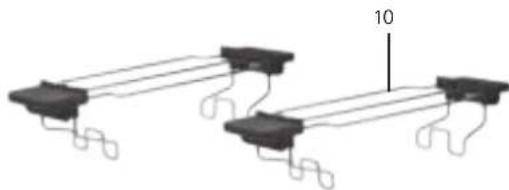
10. Pastry attachment: Lets you reheat pastries that don't fit into the toaster slots.
3. USE
A. Using the appliance
Unwind the power lead. Check that the crumb tray is positioned correctly and that nothing is in the toaster slots. Plug the power lead into the mains socket.
N.B. The power lead storage is used for storing excess power lead and keeps your work surface clear.
- Insert one or more slices of bread.
- Select the browning level you want using the - or -ton:
| Browning level Colour | |
| 1-2 light | |
| 3-5 medium | |
| 6-7 dark |
- Start the toasting cycle by pressing TOAST . Your bread will automatically go down into the toaster slot.
- When the cycle is complete, the toaster will automatically raise the toast. If would like to stop the cycle before it is finished, simply press CANCEL.
Tips :
between the guides.
toaster as these could create a fire hazard.
B. Using the special features
I. Feature
This feature first defrosts and then toasts the bread. The toast cycle is thus slightly longer.
- Insert one or more slices of bread.
- Select the desired browning setting depending on the initial tempature and/or thickness of the bread.
- Press . A blue LED indicates this feature is activated.
- Press TOAST to start the defrost cycle.
- When the defrost cycle is completed, the toaster will automatically
raise the bread. If would like to stop the cycle before it is finished, simply press CANCEL
II. Feature
This feature allows you to reheat bread without browning or toasting.
- Insert one or more slices of bread.
- Press . A blue LED indicates this feature is activated.
- Press the reheat cycle.
- When the cycle is complete, the bread will rise automatically. If you would like to stop the cycle before it is finished, simply press CANCEL
III. ④ Feature
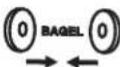
This feature reduces the heat on one side of each of the toasting slots so that only one side of the bread or bagel is toasted.
An embossed icon located on the top of the toaster,
just above the control panel, shows you the correct way to insert your bagel pieces. The side to be toasted should always face toward the centre of the pair of toasting slots.
- Insert one or more slices of bread or halved bagels.
- Press . A blue LED indicates that this feature is activated.
- Press the cycle.
- When the cycle is completed, the toaster will automatically raise the bread or halved bagel. If would like to stop the cycle before it is finished, simply press CANCEL
C. Using the pastry attachment
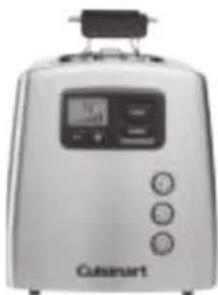
This attachment lets you reheat pastries or breads that are too big for the toaster slots.
-
Place the attachment(s) over each of the slots used.
-
Place your pastry on the pastry rack.
- Select the lightest toast setting (setting 1).
- Start the heat cycle by pressing TOAST
5.Ifyouwouldliketostoptophyclebeforeitisfinished,simplypress
CANCE
4. ADVICE FROM THE CHEFS

with different moisture levels will require different toasting times.
than normal.
setting.
toast, sometimes significantly longer, since more moisture must evaporate from the bread before toasting can occur. Two cycles may be necessary for very thick slices.
etc. from the surface of the bread before inserting it into the toaster. This will help prevent pieces of fruit from falling into the toaster or sticking to the guides in the slot.
than usual. The toaster is designed to heat the whole toasting chamber for two slices. By selecting a lower setting for a single slice, you won't burn your bread.
can become hot before the surface has browned. Never leave the appliance unattended while toasting or warming pastries.
5. CLEANING AND MAINTENANCE
of the toaster with a damp cloth and dry thoroughly. If you use a cleaning product, apply a little to a cloth and not directly onto the toaster before cleaning.
discard the crumbs. Wipe clean and replace in the toaster. Never turn on the toaster before replacing the crumb tray.
toaster upside down and gently shake. Never insert any hard or sharp instruments into the slot as this could damage the toaster and the safety of the appliance can no longer be guaranteed.
space on the underside of the toaster.
SicheRheiTShiNWeiSe

m = 311

Brand : CUISINART
Model : CPT440E
Category : Toaster