
CJE500E - Juicer CUISINART - Free user manual and instructions
Find the device manual for free CJE500E CUISINART in PDF.
| Product Type | Centrifugal Juice Extractor |
| Brand | Cuisinart |
| Model | CJE500E |
| Dimensions (approx.) | 30 x 20 x 40 cm |
| Weight (approx.) | 4.5 kg |
| Power Supply | 230 V, 50 Hz |
| Juice Carafe Capacity | 500 ml |
| Pulp Container Capacity | 1150 ml |
| Filter Material | Stainless Steel |
| Main Functions | Centrifugal extraction, adjustable flow spout, extra-large feeding chute |
| Safety | Safety bar with locking, automatic shut-off in case of overflow |
| Maintenance | Removable parts dishwasher safe (except motor base) |
| Cleaning | Cleaning brush included, clean filter immediately after use |
| Spare Parts | Available from Cuisinart after-sales service |
| Repairability | Repairability index not provided, standard parts |
| Included Accessories | Pusher, cleaning brush |
| Color | Brushed stainless steel |
Frequently Asked Questions - CJE500E CUISINART
User questions about CJE500E CUISINART
0 question about this device. Answer the ones you know or ask your own.
Ask a new question about this device
Download the instructions for your Juicer in PDF format for free! Find your manual CJE500E - CUISINART and take your electronic device back in hand. On this page are published all the documents necessary for the use of your device. CJE500E by CUISINART.
USER MANUAL CJE500E CUISINART
Cuisinart®
natural_image
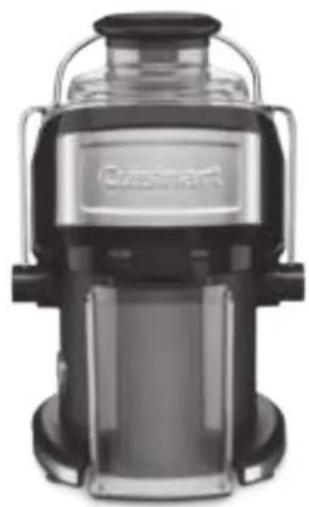
Exterior view of a modern kitchen electric shaver with a clear glass lid (no visible text or symbols)Compact Juice Extractor
SOMMAIRE
CONSIGNES DE SÉCURITÉ 4
SAFETY PRECAUTIONS. 9
- Introduction 11
- Product Features 11
- Using the product . . . . . . . . . . . . . . . . . . . . . . . . . . . . . . . . . . . . . . . . . . . 12
A. Assembling the juice extractor 12
B. Dismantling the juice extractor . . . . . . . . . . . . . . . . . . . . . . . . . . . . . . . . . . . . . . 12
C. Using the juice extractor 12
- Cleaning and maintenance 13
- FAQ 13
INHALT
natural_image
Three-step line drawing of a portable device with a handle, showing step-by-step assembly (no text or symbols)natural_image
Three-step line drawing of a hand using a blender to lift a cup, no text or symbols presentnatural_image
Line drawings of a hand using a blender to press or adjust the product (no text or symbols present)natural_image
Line drawing of a hand using a tool to cut or adjust a circular component (no text or symbols)- QUESTIONS / RÉPONSES
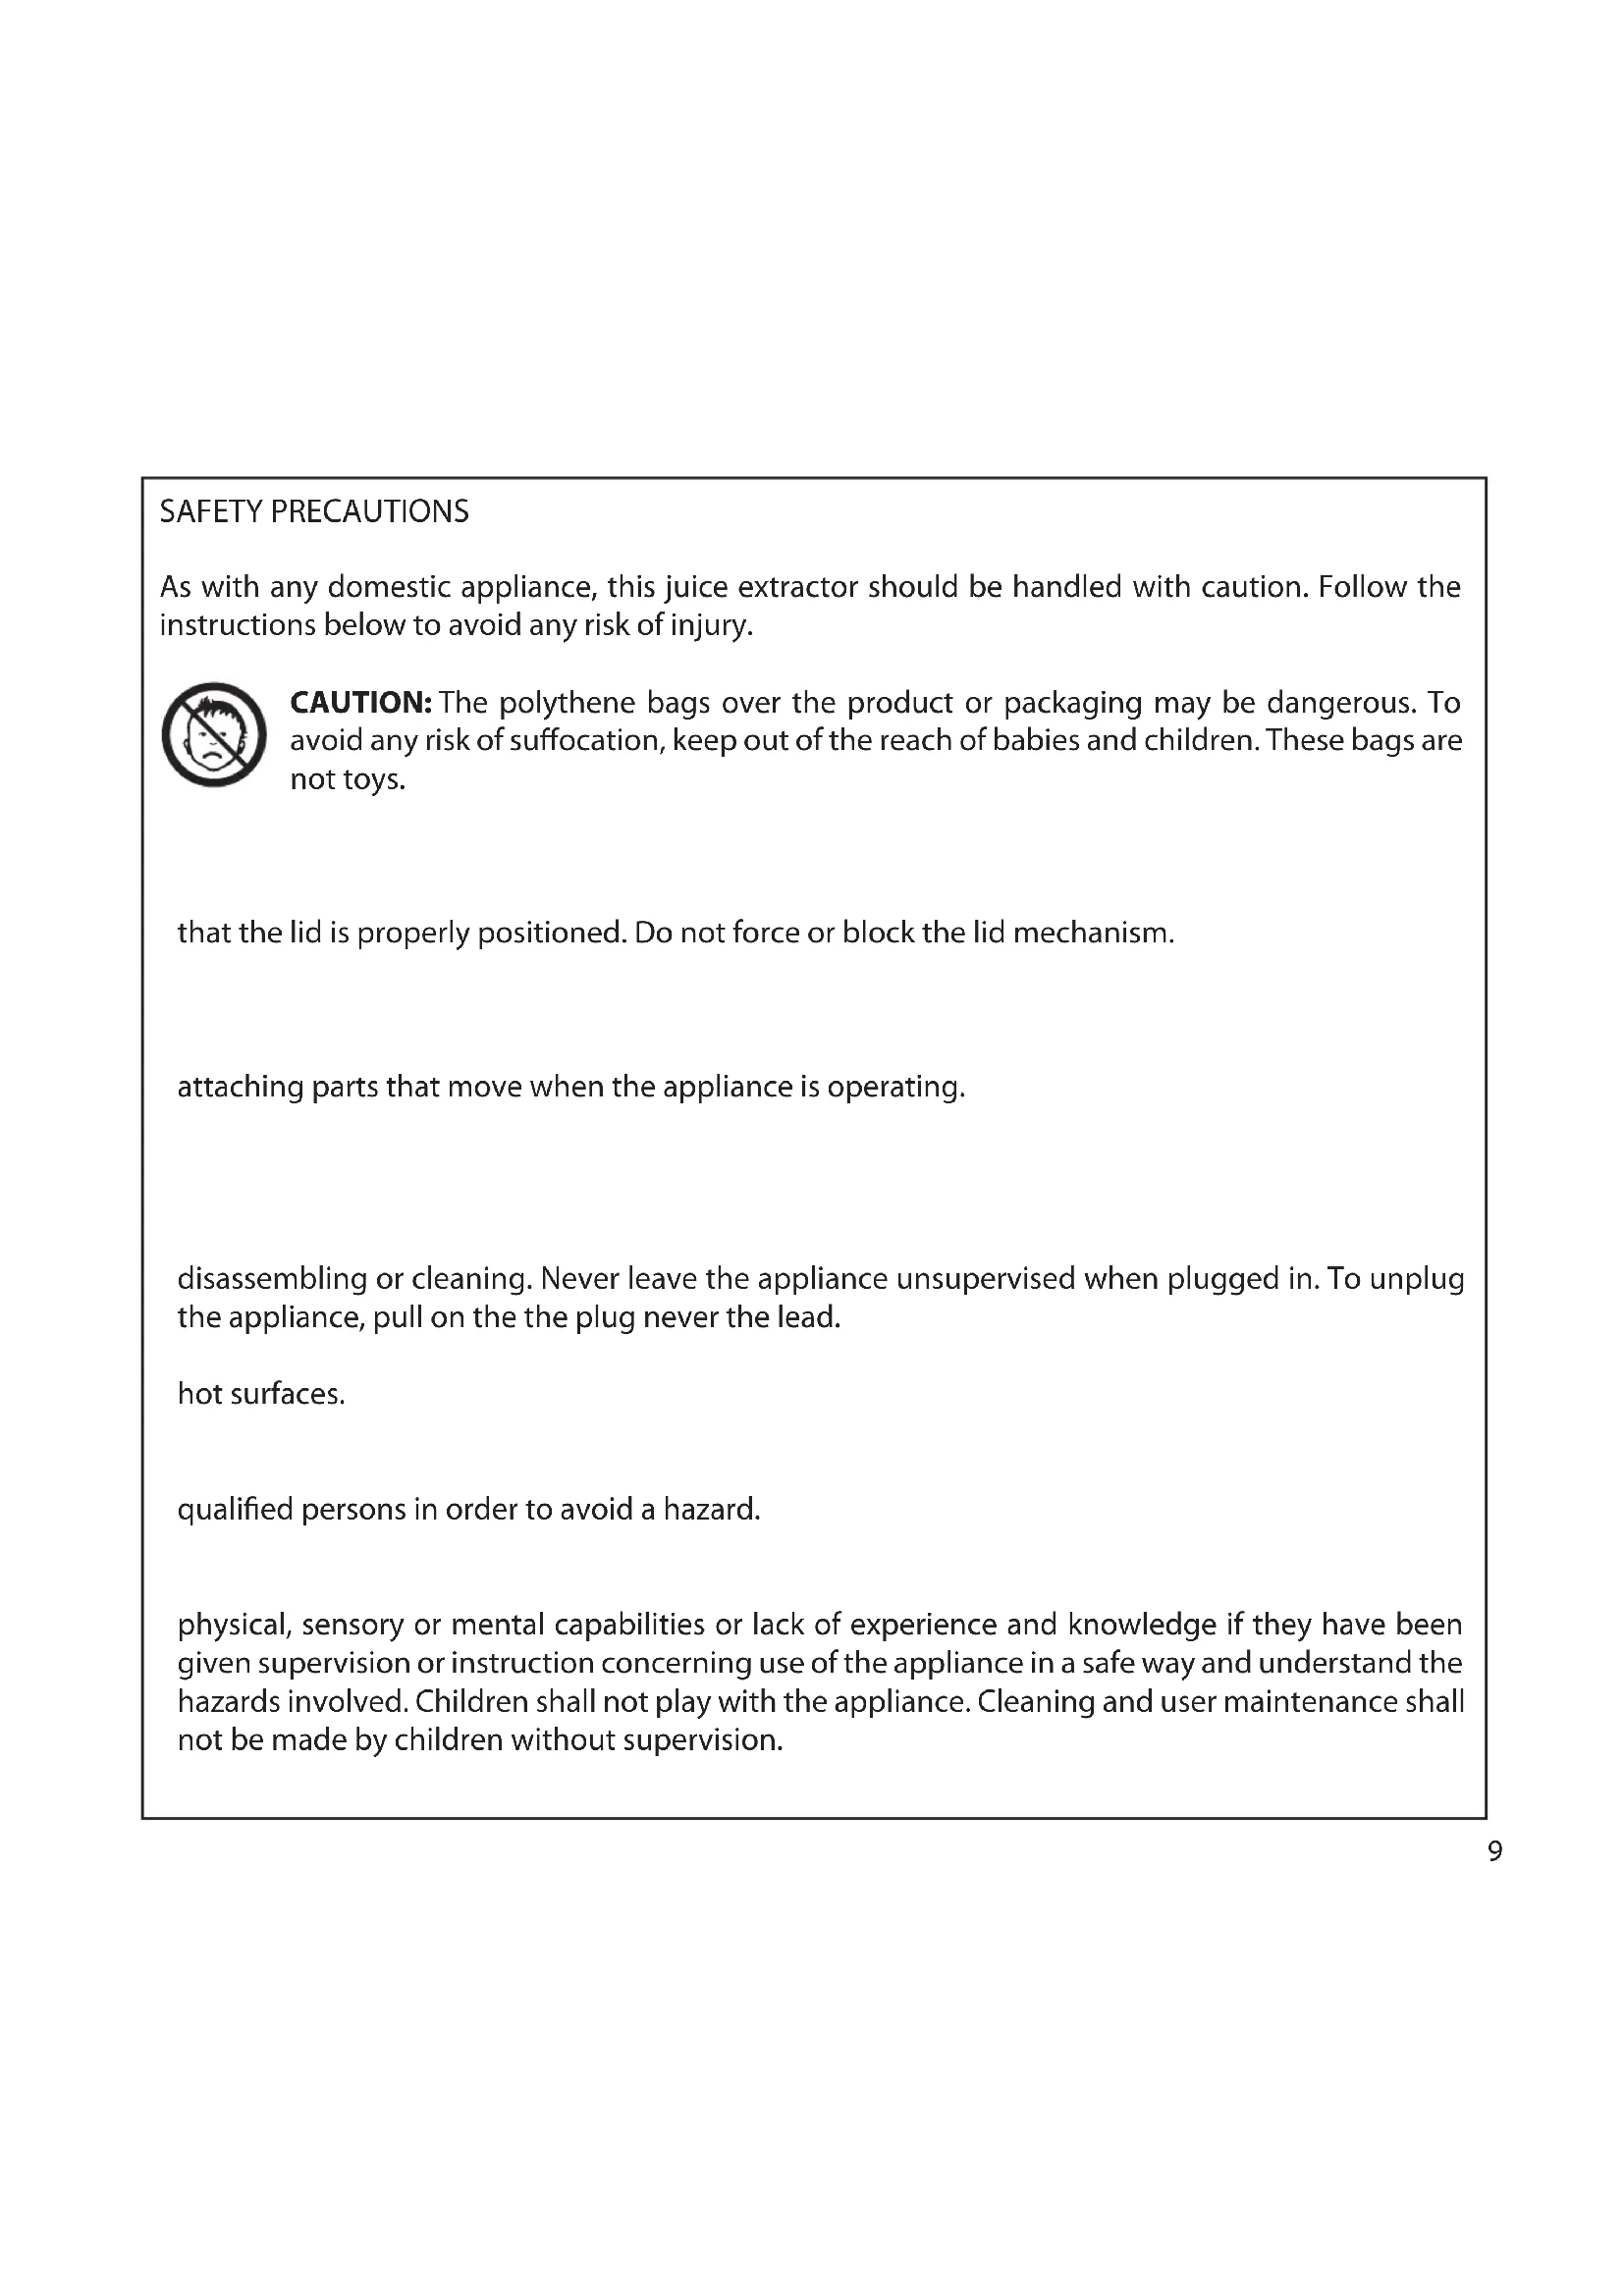
As with any domestic appliance, this juice extractor should be handled with caution. Follow the instructions below to avoid any risk of injury.

CAUTION: The polythene bags over the product or packaging may be dangerous. To avoid any risk of suffocation, keep out of the reach of babies and children. These bags are not toys.
that the lid is properly positioned. Do not force or block the lid mechanism.
attaching parts that move when the appliance is operating.
disassembling or cleaning. Never leave the appliance unsupervised when plugged in. To unplug the appliance, pull on the plug never the lead.
hot surfaces.
qualified persons in order to avoid a hazard.
physical, sensory or mental capabilities or lack of experience and knowledge if they have been given supervision or instruction concerning use of the appliance in a safe way and understand the hazards involved. Children shall not play with the appliance. Cleaning and user maintenance shall not be made by children without supervision.
Electrical and electronic equipment at the end of life.

In everybody's interest and to participate actively in protecting the environment:
Some materials can in this way be recycled or recovered.
1. INTRODUCTION
Congratulations on your purchase!
kitchen appliances that lets passionate amateurs and great chefs express their creativity to the fullest.
between engineers and great names in Cookery like Paul Bocuse, the brand's charismatic ambassador. Every product combines sturdiness, innovation, performance and ergonomics.
Made with professional materials like brushed stainless steel, our products will easily fit into any kitchen thanks to their simple and elegant design.
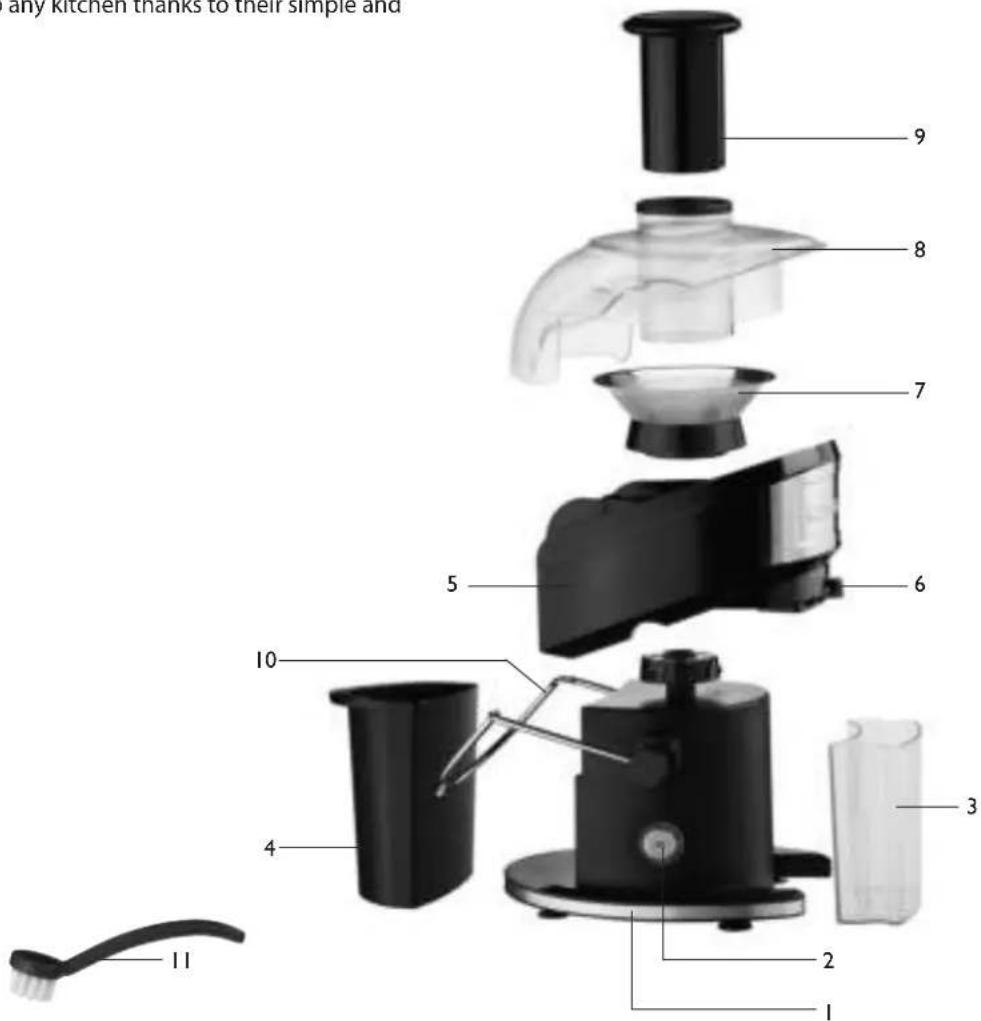
2. PRODUCT FEATURES
- Housing base
- I/O switch with blue LED indicator light
- Juice pitcher (500 ml)
- Pulp container (1150 ml)
- Filter housing
- Adjustable flow spout
- Stainless steel filter
- Lid with extra large feed tube
- Pusher
- Safety bar
- Cleaning brush
3. USING THE PRODUCT
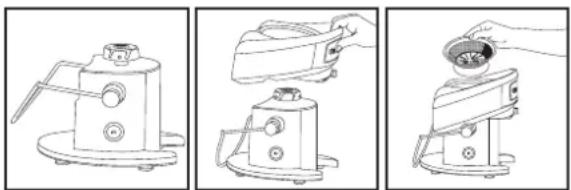
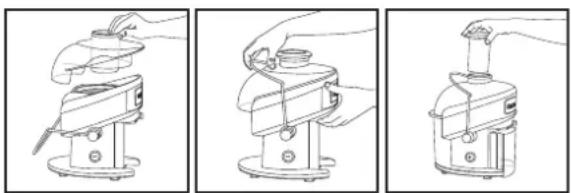
A. ASSEMBLING THE JUICE EXTRACTOR
- Place the juice extractor housing base on a level surface.
- Make sure the safety bar is placed horizontally to the housing base, that is, in an unlocked position.
- Place the filter housing on the housing base.
- Firmly lock the filter to the middle of the filter housing ensuring that it is securely in place.
CAUTION: Careful not to touch the blades at the bottom of the filter.
natural_image
Three-step line drawing of a kitchen appliance with a handle, showing step-by-step assembly (no text or symbols)- Put the lid on the filter housing by aligning the feed tube with the filter.
- Put the safety bar in the locked position by pulling the bar onto the lid. Pull the bar back until it clicks into place.
- Slide the pusher into the feed tube by aligning the slot of the pusher into the recess located inside the feed tube.
natural_image
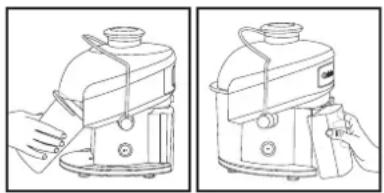
Three-step line drawing of a hand using a blender, showing step-by-step assembly (no text or symbols)- Put the pulp container in place at the back of the juice extractor by slightly tilting its opening to slide it under the lid.
-
Place the juice pitcher under the flow spout at the front of the juice extractor with the handle facing the front.
-
Make sure that the pour spout is properly open. Never press fruit when the pour spout is closed.
natural_image
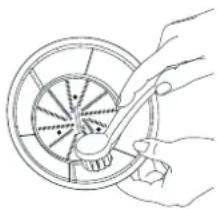
Line drawings of a two-step cooking process: one showing a hand using a blender, the other showing a hand holding a tool (no text or symbols present)B. DISMANTLING THE JUICE EXTRACTOR
- Turn off and unplug the juice extractor.
- Remove the pusher from the feed tube.
- Remove the pulp container from the juice extractor.
- Lower the security bar into the unlocked position.
- Lift and remove the lid from the filter housing.
- Gently remove the filter housing without removing the filter. You will only be able to remove the filter once the housing has been removed.
CAUTION: Do not touch the blades at the bottom of the filter.
-
Make sure the flow spout is in the closed position. Remove the juice pitcher.
C. USING THE JUICE EXTRACTOR -
Make sure that the juice extractor is properly assembled. (See instructions section 3A).
- Plug the unit into a 230V mains socket.
- Check that the flow spout is open. NEVER PRESS FRUIT WHEN THE POUR SPOUT IS CLOSED.
- Wash the selected fruit or vegetables.
- Press the I/O button to start the fruit extractor. The ring of blue light will come on.
- Lift the pusher and remove it from the feed tube. Insert the food and push the food using the pusher, pressing firmly.
- The juice will flow into the juice pitcher and the pulp will collect in the pulp container.
- When all the juice has been extracted, press the I/O button to turn off the juice extractor.
- Close the flow spout before removing the juice pitcher.
4. CLEANING AND MAINTENANCE
in water. They are also dishwasher safe.
Clean it using a damp sponge, cloth or household paper towel only. When doing so, use washing up liquid, never use abrasive cleaning products which could scratch the surface.
after use. Vegetables and fruit will harden if you leave them to dry on the appliance parts, which will make it more difficult to clean.
- Unplug the juice extractor.
- Remove the parts of the extractor by following the dismantling instructions (section 3B).
- First rinse the parts in cold water. Then clean the pulp container, the juice pitcher, the pusher, the lid and the filter in warm, soapy water or place these parts in the dishwasher. Do not use metal brushes or sponges.
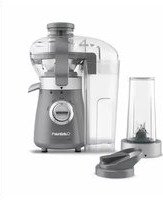
CAUTION: Handle the filter with care when washing because the blades at the base of the basket are very sharp. For more juice, always carefully clean the filter using the brush provided.
natural_image
Line drawing of a hand using a tool to cut or rotate a circular object (no text or symbols)-
Dry all parts with a towel.
-
FAQ
| PROBLEM SOLUTION | |
| The juice extractor does not turn on. | positioned in the recesses. extracting juice. |
| fully opened can slow the flow of juice. Turn off the juice extractor and clean the filter. | |
| Herbs or leafy vegetables are difficult to push down the feed tube. | between the other ingredients. |
| The ingredients leak from the feed tube. | in the pulp container. Turn off the juice extractor and remove the pulp. Replace the pulp container and start the juice extractor. |
| Some juice is always leaking from the appliance when it is turned off. | closed properly. |
| The appliance turns on but the juice/pulp does not flow. | properly positioned. |
SICHERHEITSHINWEISE
natural_image
Three-step line drawing of a kitchen appliance with a handle, showing step-by-step assembly (no text or symbols)natural_image
Three-step line drawing of a hand using a digital brush or scanner device, showing step-by-step assembly (no text or symbols)natural_image
Line drawings of a two-step cooking process: one showing hand pressing a griddle, the other holding a tool (no text or symbols)natural_image
Line drawing of a hand using a tool to adjust or install a circular component (no text or symbols)3. GEBRUIK VAN HET APPARAAT
A. MONTAGE VAN DE SAPCENTRIFUGE
natural_image
Three-step line drawing of a kitchen appliance: adding a fan to a stand, adding a cloth to a tray, and adding a lid to a bowl (no text or symbols)natural_image
Three-step line drawing of a hand using a digital blender, showing step-by-step assembly (no text or symbols)natural_image
Line drawings of a hand using a blender to lift a cup (no text or symbols present)B. DEMONTAGE VAN DE SAPCENTRIFUGE
natural_image
Line drawing of a hand using a wrench to adjust the wheel rim (no text or symbols)natural_image
Line drawing of a hand using a wrench to handle a circular object with radial lines (no text or symbols)natural_image
Three-step line drawing of a kitchen appliance: adding a fan to a stand, adding a cloth or paper to a tray, and adding a lid (no text or symbols)natural_image
Three-step line drawing of a hand using a blender to lift a cup, showing mechanical components and motion (no text or symbols)natural_image
Line drawings of a two-step cooking process: one being filled with liquid, the other holding a paper (no text or symbols)B. DESMONTAR LA LICUADORA
natural_image
Line drawing of a hand using a tool to cut or rotate a circular object (no text or symbols)


Brand : CUISINART
Model : CJE500E
Category : Juicer