
CSB801E - Mixer CUISINART - Free user manual and instructions
Find the device manual for free CSB801E CUISINART in PDF.
| Product type | Immersion blender with accessories |
| Brand | Cuisinart |
| Model | CSB801E |
| Body material | Brushed stainless steel |
| Measuring bowl material | Stainless steel |
| Power | 500 W (estimated) |
| Speeds | Continuous speed control + Turbo button |
| Included accessories | Mixing foot, balloon whisk, 2 beaters, chopper, adapter |
| Chopper bowl capacity | 300 g (meat, vegetables) |
| Measuring bowl capacity | 1 L (estimated) |
| Mixing foot length | Approximately 20 cm (estimated) |
| Weight | 1.2 kg (estimated) |
| Dimensions (L x W x H) | 40 x 10 x 10 cm (estimated) |
| Main functions | Blend, whisk, beat, chop, emulsify |
| Use | Domestic |
| Care and cleaning | Clean body with a damp sponge; foot, whisk and beaters by hand; measuring bowl dishwasher safe |
| Safety instructions | Do not immerse body; unplug before cleaning; handle blades with care; not for use by children |
| Spare parts and repairability | Accessories available from manufacturer; repair by qualified professional |
| Warranty | 2 years (standard) |
| Certifications | CE, WEEE recycling |
Frequently Asked Questions - CSB801E CUISINART
User questions about CSB801E CUISINART
0 question about this device. Answer the ones you know or ask your own.
Ask a new question about this device
Download the instructions for your Mixer in PDF format for free! Find your manual CSB801E - CUISINART and take your electronic device back in hand. On this page are published all the documents necessary for the use of your device. CSB801E by CUISINART.
USER MANUAL CSB801E CUISINART
Safety precautions. 12
- Introduction 14
- Product features 14
3.Use 15
a. Assembling the hand blender. 15
b.Use the hand blender. 15
c. Using the Balloon Whisk Attachment 15
d. Using the Beaters 16
e. Using the Chopper Attachment 16
4.Advice from the chefs 18
5. Cleaning and maintenance. 18
INHALTSVERZEICHNIS
2. CARACTERISTIQUES PRODUIT
-
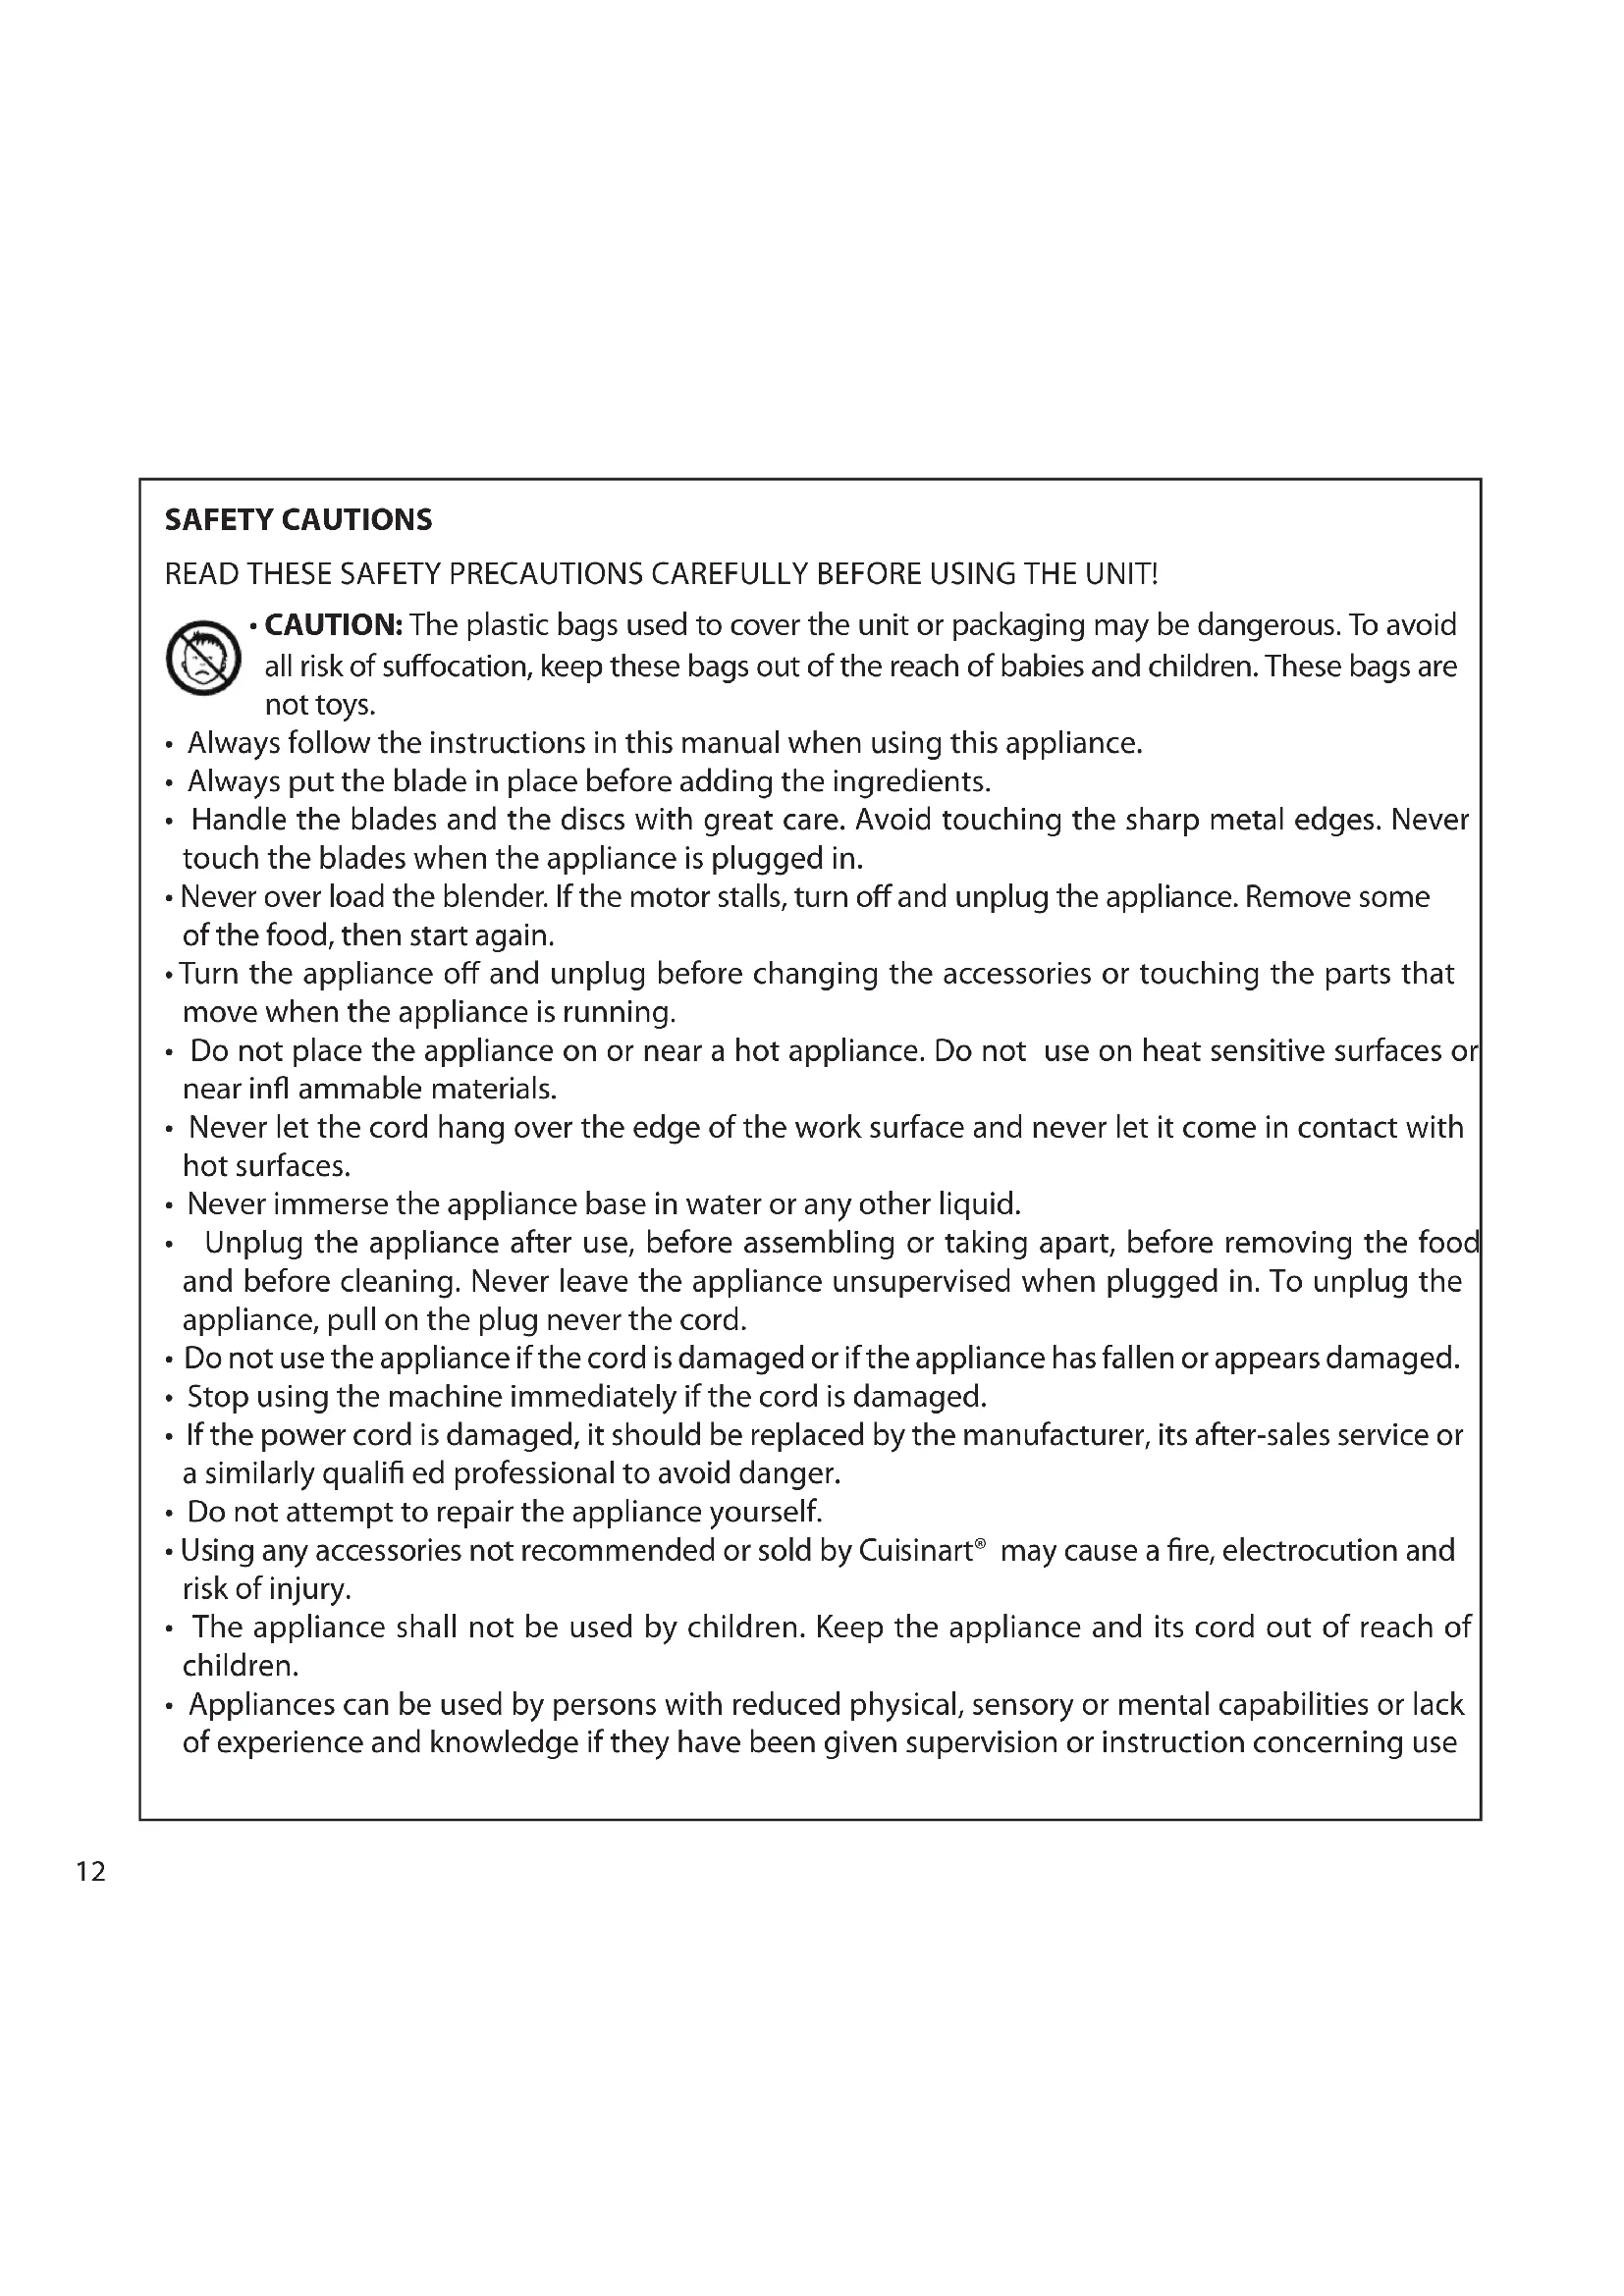
CAUTION: The plastic bags used to cover the unit or packaging may be dangerous. To avoid all risk of suffocation, keep these bags out of the reach of babies and children. These bags are not toys.
-
Always follow the instructions in this manual when using this appliance.
- Always put the blade in place before adding the ingredients.
- Handle the blades and the discs with great care. Avoid touching the sharp metal edges. Never touch the blades when the appliance is plugged in.
- Never over load the blender. If the motor stalls, turn off and unplug the appliance. Remove some of the food, then start again.
- Turn the appliance off and unplug before changing the accessories or touching the parts that move when the appliance is running.
- Do not place the appliance on or near a hot appliance. Do not use on heat sensitive surfaces or near infl ammable materials.
- Never let the cord hang over the edge of the work surface and never let it come in contact with hot surfaces.
- Never immerse the appliance base in water or any other liquid.
- Unplug the appliance after use, before assembling or taking apart, before removing the food and before cleaning. Never leave the appliance unsupervised when plugged in. To unplug the appliance, pull on the plug never the cord.
- Do not use the appliance if the cord is damaged or if the appliance has fallen or appears damaged.
- Stop using the machine immediately if the cord is damaged.
- If the power cord is damaged, it should be replaced by the manufacturer, its after-sales service or a similarly qualified professional to avoid danger.
- Do not attempt to repair the appliance yourself.
- Using any accessories not recommended or sold by Cuisinart® may cause a fire, electrocution and risk of injury.
- The appliance shall not be used by children. Keep the appliance and its cord out of reach of children.
- Appliances can be used by persons with reduced physical, sensory or mental capabilities or lack of experience and knowledge if they have been given supervision or instruction concerning use
of the appliance in a safe way and understand the hazards involved.
Children shall not play with the appliance.
- Do not use this appliance outdoors.
- This appliance is intended for household use only.
Electrical and electronic equipment at the end of life

In everybody's interest and to participate actively in protecting the environment:
- Do not discard these products with your household waste.
- Use return and collection systems available in your country.
Some materials can in this way be recycled or recovered.
1. INTRODUCTION
Congratulations on your purchase!
For over 30 years, Cuisinart® has been developing a full range of kitchen appliances that allow both kitchen enthusiasts and great chefs to express their creativity to the fullest.
All Cuisinart® appliances are the result of a close working relationship between engineers and great names in Cuisine, like Paul Bocuse, the brand's charismatic ambassador. Every product combines strength, innovation, performance and ergonomics.
Made with professional materials like brushed stainless steel, our products fit easily into every kitchen thanks to a simple and elegant design.
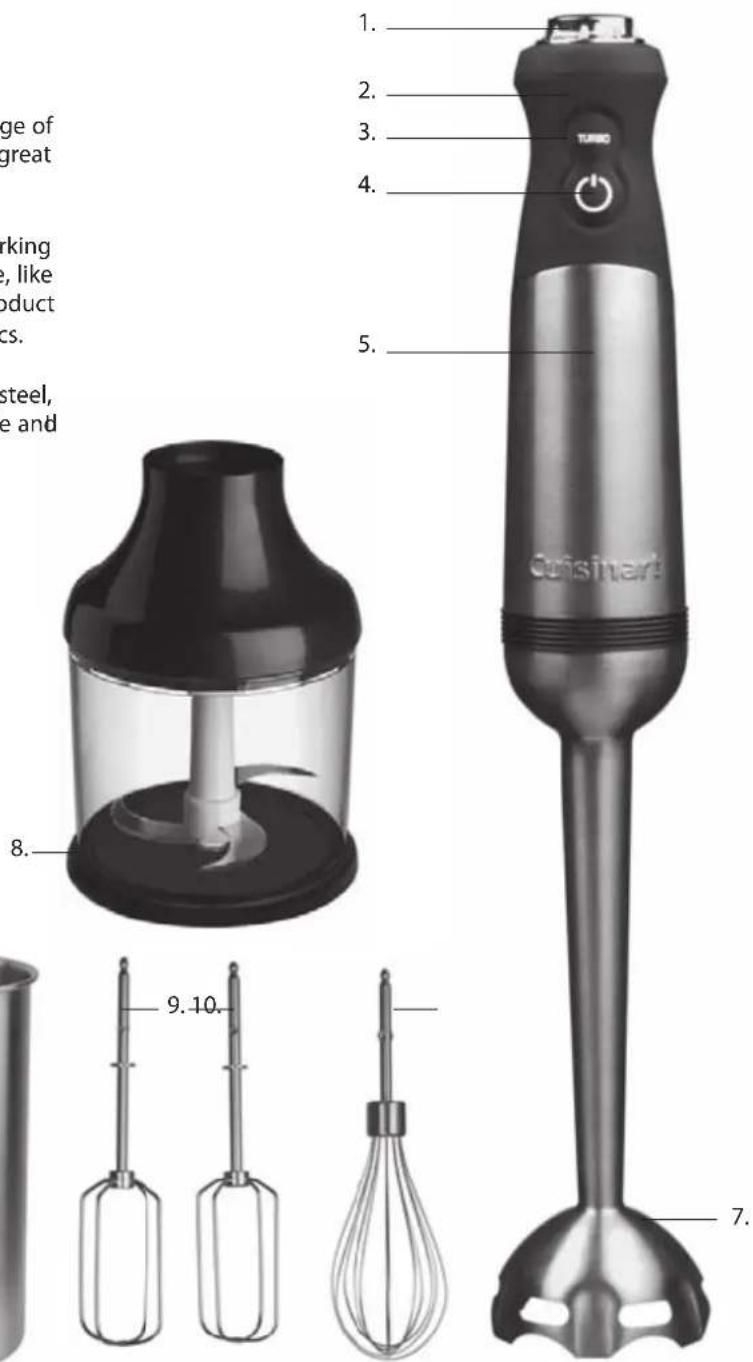
2.PRODUCT FEATURES
- Speed variator
- Anti-slip handle
- Turbo button
- ON/OFF button
- Stainless steel motor housing
- Stainless steel measuring jug
- Anti-splash guard
- Chopper
- Beaters (X2)
- Balloon Whisk
- Adaptor
3. USE
The hand blender lets you mix and blend while adding as little air as possible to your preparation. All you need to do is move it slightly up and down to prepare the tastiest of recipes. To prevent splashes, never remove the hand blender from your preparation while it is running.
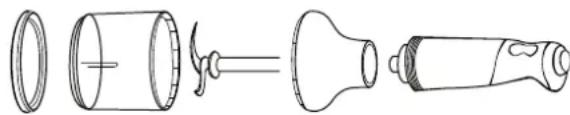
A. ASSEMBLING THE HAND BLENDER
- To attach the blender shaft, line it up with the body and twist in a clockwise direction to lock into place.
- Plug the unit into the mains.
B. USE THE HAND BLENDER
- Place the blender into the preparation to be mixed while ensuring that the base of the shaft is sufficiently immersed.
- Select the lowest speed, press and hold the ON button (L) The blender will continue to operate as long as the button is pressed. During operation, increase the speed if necessary.
- Always begin by using the lowest speed, then turn the ring toward the + to increase the speed.
-
By pressing the Turbo button, you can attain the highest operating speed. You can also use this button in short bursts during operation, working in pulses, without touching the speed variator (see figure 1).
-
To stop the blender, release the ON ( ) or turbo button.
- Unplug the unit after use.
N.B. Do not hold the button on for longer than 60 seconds at a time.
C. USING THE BALLOON WHISK ATTACHMENT
- To attach the balloon whisk, align the motor housing with the adaptor and turn the adaptor anti-clockwise to secure into place.
- Align the end of the stainless steel whisk attachment with either opening of the adapter.
- Push end into opening until it locks into position.
- Plug into the mains.
- Place the appliance into mixture that will be whisked.
- With the speed dial set to minimum, press and hold the ON/OFF button. The appliance will continue to run as long as the switch is pressed in. To turn the appliance off, release the ON/OFF button and the motor will stop.
- Use the variable speed control dial on top of the motor housing to increase the speed. For an extra burst of power, press the "Turbo" button on the front of the housing above the ON/OFF button.
- Unplug immediately after use.


figure 1
D. USING THE BEATERS
- To attach the beaters, align the motor housing with the adaptor and turn anti-clockwise to secure into place.
- Insert the beater into the two holes on the adaptor and push until they click into place.
- Plug cord into the mains.
- Place the appliance into mixture that will be beaten.
- With the speed dial set to minimum, press and hold the ON/OFF button. The appliance will continue to run as long as the switch is pressed in. To turn the appliance off, release the ON/OFF button and the motor will stop.
- Use the variable speed control dial on top of the motor housing to increase the speed. For an extra burst of power, press the "Turbo" button on the front of the housing above the ON/OFF button.
- Unplug immediately after use.

E. USING THE CHOPPER ATTACHMENT
- Use the chopper attachment for chopping meat, vegetables and dried fruit.
- Put the appliance on a stable, flat surface. Take the chopper blade and place it into the centre of the Chopper Bowl.
- Add ingredients into the Chopper Bowl.
N.B. Make sure that larger parts of food are cut into small pieces of even size.
- Put the lid on the Chopper Bowl and push gently until it fits tightly.
- Attach the Motor Housing to the lid and turn in a clockwise direction until it is securely in place.
- Plug cord into the mains.
- Switch on the appliance and hold firmly during the chopping process. When the chopping task is complete, press the ON/OFF button then inplug from the outlet.
- Remove the Motor Housing from the Chopper lid.
- Remove Chopper lid from the Chopper Bowl; then remove Chopper Blade carefully. Refer to the following table for chopping guide.
| Food Maximum | quantity | Approx. operation time (sec) | Preparation |
| Carrots 300g 15-20 Peeled | cut into 2cm pieces. | ||
| Apple 300g 15-20 Peeled and cored, cut into 2cm pieces. | |||
| Mild Cheddar Cheese 100g 15-20 Cut into 2cm pieces. | |||
| Eggs 6 5-10 Hard-boiled and peeled, cut into quarters. | |||
| Meats (raw or cooked) 300g 15-20 Cut into 2cm pieces. Raw meat will take slightly longer to process than cooked meat. | |||
| Walnuts 150g 10-15 Use halved or broken. Scrape down sides of bowl to ensure even processing. | |||
| Onions 300g 10-15 Peeled | cut into quarters. | ||
| Parsley | 400g | 10 | To ensure successful results, it is essential the bowl and parsley are completely dry. Remove any stalks. |
| Dough | 160g flour + 160 ml water | 10 (High speed) |
4. ADVICE FROM THE CHEFS

- Never immerse the motor housing in water or any other liquid.
- The base of the blender should never be fully immersed, leave a space of approximately 2.5cm below the motor housing.
- When using the blender on a non-stick surface, take care not to damage the coating with the blender.
- Cut most solid foods into 2.5cm cubes to blend them easily.
- You can also pour liquid ingredients into the measuring jug.
- To avoid splashes, make sure the base of the shaft is always immersed when the unit is running.
- Never leave the hand blender in a pot on a hot hob.
- Never include pieces of hard fruit, bone or any other hard matter in your ingredients to be blended. These could damage the blades
- The level of the preparation will increase when blended, so the amount of liquid used should be adjusted.
- The addition of hot liquids speeds up the mixing process of solids and liquids.
- For recipes that call for ice, use crushed ice for best results.
Gently move the blender up and down to mix and blend the ingredients evenly. - The blender can also be used to make milk froth for your cappuccino or latte.
- Also use the blender to prepare your gravies and sauces.
- For best results when adding celery to a sauce, remove the celery's hard fibres using a peeler before blending.
- The blender cannot be used to prepare dough or pastry.
5. CLEANING AND MAINTENANCE
Always clean the motor housing and the blender shaft carefully after each use.
Never immerse the motor housing in water or any other liquid.
Unplug the unit.
- Remove the blender shaft from the motor housing.
- Clean the motor housing with a damp sponge or cloth.
Never use abrasive cleaning products which could scratch the surface.
- Clean the blender shaft by hand in warm water with soft soap. Handle the blender shaft carefully. The blades are sharp and could cause injury.
- Clean the measuring jug in warm, soapy water or in the dishwasher.
SICHERHEITSHINWEISE
Coating: gloss vanishing in cover
Colors(Cover): 1C+1C(BLACK)
(Inside): 1C+1C(BLACK)
Date: OCT/11/2014 Co-ordinator: Astor You'Andy WS Chan
F CSB801E IB-12/468B(1.0) Operatior: ReAeVer
宝发柯式印刷
Tel:0769-87720314 8788632B Fax:0769-87720324
E-MAIL:pofatpropress@pofat.com
BLACK
1009


- INHALTSVERZEICHNIS
- CARACTERISTIQUES PRODUIT
- Electrical and electronic equipment at the end of life
- INTRODUCTION
- 2.PRODUCT FEATURES
- USE
- ASSEMBLING THE HAND BLENDER
- USE THE HAND BLENDER
- USING THE BALLOON WHISK ATTACHMENT
- USING THE BEATERS
- USING THE CHOPPER ATTACHMENT
- ADVICE FROM THE CHEFS
- CLEANING AND MAINTENANCE
- SICHERHEITSHINWEISE
- 宝发柯式印刷
- BLACK
Brand : CUISINART
Model : CSB801E
Category : Mixer