
SQ 8 - Vacuum Cleaner NILFISK - Free user manual and instructions
Find the device manual for free SQ 8 NILFISK in PDF.
| Product type | Wet and dry vacuum cleaner |
| Brand | NILFISK |
| Model | SQ 8 |
| Tank volume | 80 liters |
| Power consumption | 2800 W (230 V) |
| Supply voltage | 230 V / 50-60 Hz |
| Protection fuse | 16 A |
| Max. air flow | 390 m³/h |
| Max. vacuum | 230 Pa |
| Sound level | 74.5 dB(A) at 1 m |
| Filter surface area | 1000 cm² |
| Cord length | 7.5 m |
| Protection class | I |
| Protection rating | IP X4 (protected against water splashes) |
| Dimensions (L × W × H) | 615 × 620 × 950 mm |
| Weight | 29 kg |
| Types of waste vacuumed | Non-flammable dry dust and liquids |
| Filter cleaning function | Manual filter cleaning button (5 to 10 pulses) |
| Indicator lights | Green LED (ready), yellow LED (clean filter), flashing (tank full) |
| Included accessories | Flexible hose, Ø 50 mm adapter, dust bag (5 bags ref. 61603), filter cartridge (ref. 61605) |
| Regular maintenance | Drain tank via hose, clean/rinse tank, replace bag and cartridge |
Frequently Asked Questions - SQ 8 NILFISK
User questions about SQ 8 NILFISK
0 question about this device. Answer the ones you know or ask your own.
Ask a new question about this device
Download the instructions for your Vacuum Cleaner in PDF format for free! Find your manual SQ 8 - NILFISK and take your electronic device back in hand. On this page are published all the documents necessary for the use of your device. SQ 8 by NILFISK.
USER MANUAL SQ 8 NILFISK
Total Cleaning Confidence
Wichtige Sicherheitshinweise 2
GB Important safety notes. 4
F Consignes de sécurité importantes 6
NL Belangrijke veiligheidsinstrukties 8
① Avvertenze importanti per la sicurezza ... 10
BRAND-BZW. EXPLOSIONSGEFAHR

Before putting the cleaner into operation, be sure to also read the enclosed operating instructions thoroughly and keep them close at hand for future reference.
The cleaner may only be used by persons trained in its use and expressly authorised to use it.
GENERAL
Operation of this cleaner is subject to the applicable national regulations.
In addition to these operating instructions and the binding regulations on accident prevention applicable in the country of use, the generally acknowledged technical rules for safe and correct working must also be observed.
Any method of work endangering health or safety is forbidden!
HEALTH-ENDANGERING DUSTS*)
This cleaner is not suitable for picking up health-endangered dusts.
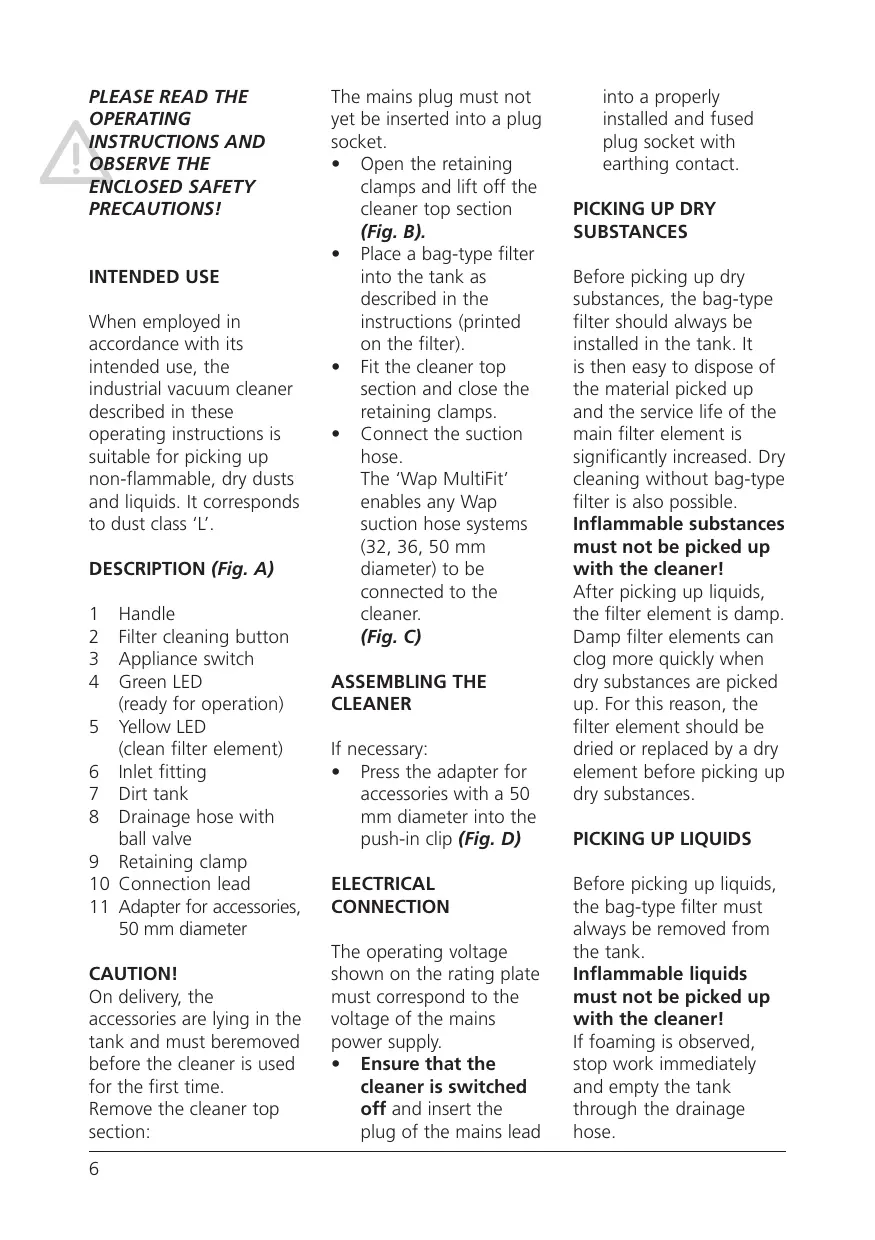
FIRE AND EXPLOSION HAZARD

The following materials must not be picked up with the cleaner:
Hot materials (glowing cigarettes, hot ashes, etc.)
Inflammable, explosive or aggressive fluids (e.g. petrol, solvents, acids, alkalines, etc.)
Inflammable, explosive dusts (e.g. magnesium or aluminium dust, etc.).
APPLIANCE PLUG SOCKET
Before connecting any appliance to the appliance plug socket, the cleaner must always be switched off.
If appliances are connected to the appliance plug socket, ensure that these appliances are also switched off when being connected to the appliance plug socket.
CAUTION!
The operating instructions and the safety precautions contained therein must be observed when using appliances connected to the appliance plug socket of the cleaner.
USING FOR THE FIRST TIME
Before using the cleaner for the first time, check that it is in a good and safe condition.
Plugs and connectors of mains leads must be at least splash water-proof.
Check the mains connection and mains plug.
Inspect the mains lead at regular intervals for damage or signs of ageing. Use the cleaner only when the mains lead is in a good and safe condition.
(Damaged mains leads present a danger of electric shocks!)
Use the cleaner only with an undamaged filter element.
DURING OPERATION
Take care not to damage the mains lead (e.g. by driving over, pinching or dragging). Pull out the mains plug only directly at the plug, i.e. not by pulling at the mains lead.
Before picking up liquids, the filter bag must be removed and the function of the float switch checked. If foaming is observed, stop work immediately and empty the tank.
MAINTENANCE AND REPAIR
CAUTION!
Before cleaning and servicing the cleaner, always remove the mains plug.
Carry out only maintenance operations described in these operating instructions. Use only original Wap spare parts.
Do not make any technical modifications to the cleaner.
CAUTION!
Your safety could be endangered as a result!
For all other maintenance and repair work, please contact the Wap Service department or an authorised specialist workshop!
ELECTRICAL EQUIPMENT
Check the rated voltage of the cleaner before connecting it to the mains power supply. Ensure that the voltage specified on the rating plate corresponds to the local mains voltage.
When connected to the mains power supply with a mains lead of type H 07 RN-F 3G 1.5 mm², the cleaner may also be used outdoors.
When using an extension lead or replacing the mains lead, the lead type specified by the manufacturer must always be used.
We recommend that the power supply to the cleaner be connected via an earth-leakage circuit breaker which interrupts the power supply either if the earth leakage current exceeds 30mA for 30 ms, or it contains an earthing test current circuit.
When using an extension lead, observe the minimum cross-sections of the leads:
| Cable length m | Cross-section mm2 |
| up to 20 | 1.5 |
| 20 to 50 | 2.5 |
Always arrange the current-carrying parts (plug sockets, plugs and connectors) and lay extension leads so that the protection class of the cleaner is maintained.
CAUTION!
Never spray the top section of the cleaner with water: Danger for persons, danger of short circuits.
The latest edition of the IEC Regulations must be observed.
POUR VOTRE PROPRE SÉCURITÉ
FOR APPARATET TAS I BRUK
VEDLIKEHOLD OG REPARASJON
OBS!
För rengjöring og vedlikehold av støvsugeren ma stöpselet alltid frakopies stikkontakten.
KONSERWACJA I NAPRAWY
Incentive International A/S
Kongens Nytorv 28
P.O.Box 2064
1013 Copenhagen K
Tel.: +45 33 11 11 42
Fax: +45 33 93 46 36
E-mail: incentive@incentive-dk.com
SUBSIDIARIES
AUSTRALIA
ALTO Overseas Inc.
1B/8 Resolution Drive
P.O.Box 797
Caringbah, N.S.W. 2229
Tel.: +61 295 24 61 22
Fax: +61 295 24 52 56
AUSTRIA
24 Constellation Road
Rexdale
Ontario M9W 1K1
Tel.: +1 416 6 75 58 30
Fax: +1 416 6 75 69 89
CROATIA
Wap ALTO Strojevi za ciscenje, d.o.o.
Siget 18a
10020 Zagreb
Tel.: +385 16554144
Fax: +385 165 54 112
E-mail: admin.wap@wap-sistemi.hr
CZECH REPUBLIC
ALTO Cleaning Systems
(UK) Ltd.
Bowerbank Way
Gilwilly Industrial Estate, Penrith
Cumbria CA11 9BN
Tel.: +44 1 7 68 86 89 95
Fax: +44 1 7 68 86 47 13
E-mail: sales@alto-uk.com
JAPAN
Representative Office
5-2, Sakyo 1-Chome
631-0801 Nara City
ALTO Cleaning Systems, Inc.
12249 Nations Ford Road
28134 Pineville
Tel.: +1 704 971 1240
Fax:+17049711241
E-mail: info@altocsi.com
ALTO U.S. Inc.
16253 Swingley Ridge Road, Suite 200
63017-1544 Chesterfield, Missouri
Tel.: +1 636 530 0871
Fax: +1 636 530 0872
E-mail: info@alto-us.com
ALTO U.S. Inc.
2100 Highway 265
72764 Springdale, Arkansas
Tel.: +1 479 750 1000
Fax: +1 479 756 0719
E-mail: info@alto-us.com
ALTO U.S. Inc.
1100 Haskins Road
43402 Bowling Green
Tel.: +1 419 352 7
Fax:+14193537187
E-mail: info@alto-us.com

Total Cleaning Confidence
D Betriebsanleitung 2
GB Operating Instructions 6
F Notice d'utilisation 10
NL Gebruiksaanwijzing 14
Istruzioni sull'uso 18
N Driftsinstruks 22
S Bruksanvisning 26
DK Driftsvejledning 30
Kajttohje 34
SLO Navodilo za uporabo 38
HR Uputstvo za rad 42
SK Prevadzkovy námod 46
Cz Provozní námod 50
PL Instrukcja obstugi 54
Kezelésiutasítas 58
E Instruetiones de manejo 62
P Instruções de operação 66
GR O8nyiec 8eitoupyiae 70
TR Isletme kilavuzu. 74
A


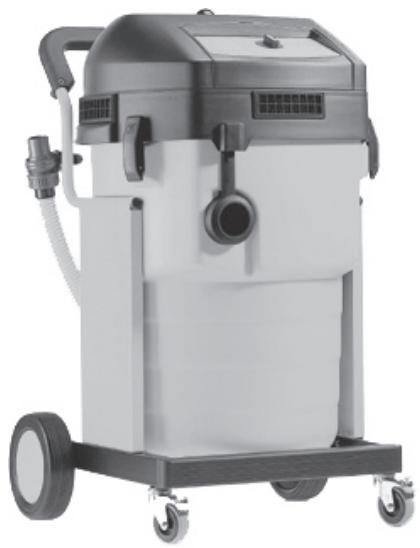
When employed in accordance with its intended use, the industrial vacuum cleaner described in these operating instructions is suitable for picking up non-flammable, dry dusts and liquids. It corresponds to dust class 'L'.
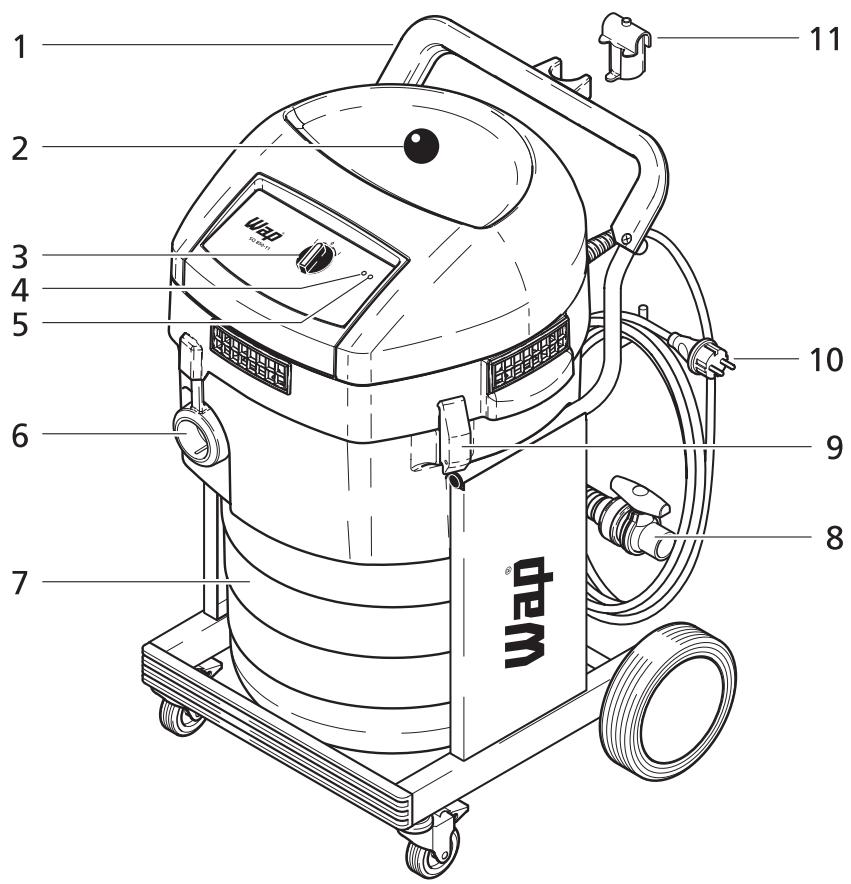
DESCRIPTION (Fig. A)
1 Handle
2 Filter cleaning button
3 Appliance switch
4 Green LED (ready for operation)
5 Yellow LED (clean filter element)
6 Inlet fitting
7 Dirt tank
8 Drainage hose with ball valve
9 Retaining clamp
10 Connection lead
11 Adapter for accessories, 50 mm diameter
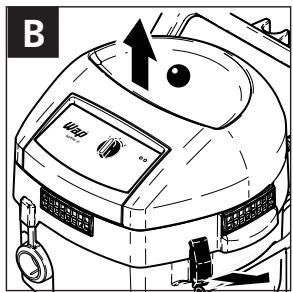
CAUTION!
On delivery, the accessories are lying in the tank and must beremoved before the cleaner is used for the first time. Remove the cleaner top section:
The mains plug must not yet be inserted into a plug socket.
- Open the retaining clamps and lift off the cleaner top section (Fig. B).
- Place a bag-type filter into the tank as described in the instructions (printed on the filter).
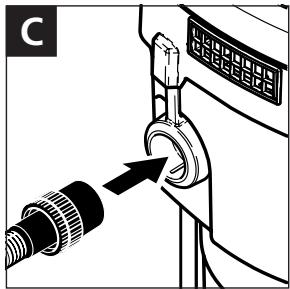
- Fit the cleaner top section and close the retaining clamps.
- Connect the suction hose. The 'Wap MultiFit' enables any Wap suction hose systems (32, 36, 50 mm diameter) to be connected to the cleaner.
(Fig. C)
ASSEMBLING THE CLEANER
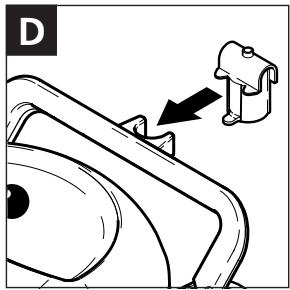
If necessary:
- Press the adapter for accessories with a 50 mm diameter into the push-in clip (Fig. D)
ELECTRICAL CONNECTION
The operating voltage shown on the rating plate must correspond to the voltage of the mains power supply.
- Ensure that the cleaner is switched off and insert the plug of the mains lead
into a properly installed and fused plug socket with earthing contact.
PICKING UP DRY SUBSTANCES
Before picking up dry substances, the bag-type filter should always be installed in the tank. It is then easy to dispose of the material picked up and the service life of the main filter element is significantly increased. Dry cleaning without bag-type filter is also possible.
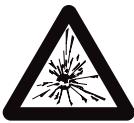
Inflammable substances must not be picked up with the cleaner!
After picking up liquids, the filter element is damp. Damp filter elements can clog more quickly when dry substances are picked up. For this reason, the filter element should be dried or replaced by a dry element before picking up dry substances.
PICKING UP LIQUIDS
Before picking up liquids, the bag-type filter must always be removed from the tank.
Inflammable liquids must not be picked up with the cleaner!
If foaming is observed, stop work immediately and empty the tank through the drainage hose.
SWITCHING ON THE CLEANER
Two operating modes are possible:
Switch position '1':
The cleaner operates with reduced suction power.
Switch position 'I'
The cleaner operates with maximum suction power
(Fig. E).
NOTE!
When moving the switch from position 'I' to position 'II' or vice versa, always leave it in the '0' position for at least 3 seconds.
DURING WORK
If the yellow LED lights up: The suction power is no longer optimal. The filter element needs cleaning.
- Switch off the cleaner.
Pull up and then release the filter cleaning button. This cleans the filter element. Repeat the procedure between about 5 and 10 times.
If the yellow LED flashes, the cleaner has switched off:
The maximum filling level for picking up fluids has been reached.
- Empty the tank through the drainage hose.
AFTER FINISHING WORK
-
Switch off the cleaner and pull the plug of the mains lead out of the plug socket.
-
Clean the dirt tank and rinse with clear water if necessary.
Wind up the mains lead (Fig. F).
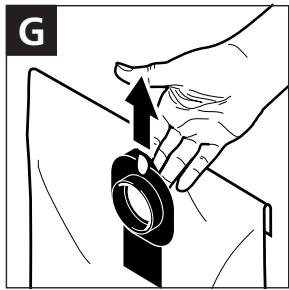
CHANGING THE BAG-TYPE FILTER
- Close the bag-type filter sleeve with the slide (Fig. G).
Pull the bag-type filter sleeve off the inlet fitting. - Dispose of the used bag-type filter in accordance with the local waste disposal regulations.
- Place a new bag-type filter into the tank as described in the instructions (printed on the filter).
IMPORTANT!
Push the bag-type filter sleeve completely onto the inlet fitting.
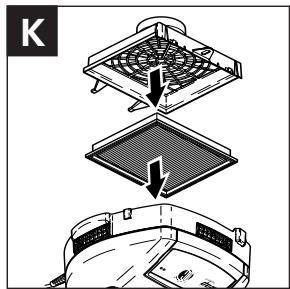
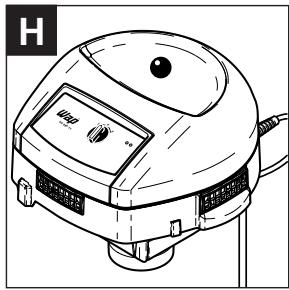
REPLACING THE FILTER ELEMENT
- Switch off the cleaner and pull the plug of the mains lead out of the plug socket.
- Remove the cleaner top section from the dirt tank and place to one side with the filter element facing upwards (Fig. H).
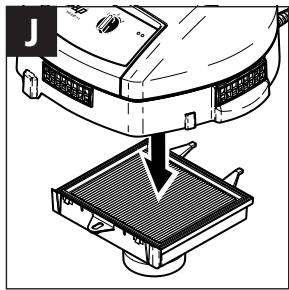
- Press the retainer clamp and remove the filter holder (Fig. J).
-
Remove the used filter element and replace it with a new one.
-
Push on the filter holder and click the retainer clamp into position (Fig. K).
- Dispose of the used filter element in accordance with the local waste disposal regulations.
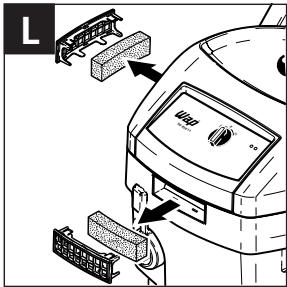
CLEANING THE POROUS FILTER
Once a year or as required, remove the cassette with the porous filter, clean the filter and replace if necessary (Fig. L).
TESTS AND APPROVALS
Electrotechnically tested according to test methods/principles:
As a result of these tests, suitable for higher load for commercial application.
Electrotechnical tests must be performed in accordance with the provisions of the Accident Prevention Regulations (VBG4) and to DIN VDE 0701 Part 1 and Part 3. In accordance with DIN VDE 0702, these tests must be performed at regular intervals and after repair or modification.
| Problem | Cause | Remedy | |
| + | Motor does not start | >Fuse of mains plug socket has blown | Reset the fuse |
| >Overload protection switch has tripped | Allow the cleaner to cool down for approx. 5 minutes; if the cleaner does not start again automatically, contact the Service Dept. | ||
| + | Reduced suction power | >Bag-type filter full | See the section entitled „Changing the bag-type filter" |
| >Suction hose clogged | Clean suction hose | ||
| >Filter element clogged (yellow LED lights up) | See the section entitled „Replacing the filter element" | ||
| >Ball valve at drainage hose is open | Close the ball valve | ||
| + | Motor cuts out (yellow LED flashes) | >Tank is full | Switch off the cleaner and empty the tank through the drainage hose |
| >Tube for checking the liquid level (rubber) is soiled | Clean (not with compressed air!) | ||
GUARANTEE
Guarantee and warranty are subject to our General Conditions of Sale and Delivery.
Changes in line with technical innovations reserved.
TECHNICAL DATA
| EU | CH | GB/ZA | GB | ||
| Voltage | Volt | 230 | 230 | 230 | 110 |
| Mains frequency | Hz | 50/60 | 50/60 | 50/60 | 50/60 |
| Power consumption | Watt | 2800 | 2000 | 2400 | 2000 |
| Fuse | A | 16 | 10 | 13 | 20 |
| Volume flow (air) | max. m3/h | 390 | 340 | 370 | 310 |
| Vacuum | max. Pa | 230 | 180 | 210 | 180 |
| Measuring surface sound pressure level measured at a distance of 1 m in accordance with DIN 45 635, Part 1 (4/84) in a free field at max. volume flow. | dB(A) | 74.5 | 72.3 | 73.6 | 72.3 |
| SQ 850-1 | ||
| Filter surface area | cm2 | 1000 |
| Mains lead | m | 7.5 |
| Protection class | I | |
| Protective system (splash water-protected) | IP X4 | |
| Interference suppressed to | EN 50081 | |
| Tank volume | l | 80 |
| Width | mm | 615 |
| Depth | mm | 620 |
| Height | mm | 950 |
| Weight | kg | 29 |
| Order No. for bag-type filter elements (pack of 5 elements) | 61603 | |
| Order No. for filter element | 61605 | |
| Order no. for filter cassette (1 set = 4 units) | 62007 |
PRIERE DE LIRE LA NOTICE D'UTILISATION ET D'OBSERVER LES CONSIGNES DE SECURITE!
UTILISATION
REEMPLACEMENT DUSAC A POUSSIERE
BESKRIVELSE (ILL. 1)
OPSUGNING AF TØRRE STOFFER
OPSUGNING AF VAESKER
TARKASTUKSET JA HYVAKSYMISET
EU Declaration of Conformity
Vacuum Cleaner for Wet and Dry Operation
Produ
SQ850-11
Type:
230V-,50Hz,IPX4
Description:
The design of the unit corresponds to the following pertinent regulations:
EC Machine Directive 89/392/EWG
EC EMV Directive 73/396/EWG
EC EMV Directive 89/336/EWG
Applied harmonised standards:
EN 292
EN 60335-1-69
EN 60335-2-69
EN 55014, EN 55104, EN 61000-3-2
Applied national standards and technical specifications:
ppa. Lau, Dipl. Eng. (FH) Head of Research and Development
Bellenberg, 11.02.1998

EN55014,EN55104,EN61000-3-2
390 South Woods Mill Road
Suite 300
Chesterfield
Missouri 63017-3433
1B/8 Resolution Drive
P.O.Box 797
Caringbah, N.S.W. 2229
Tel: (+61) 2 9524 6122
Fax: (+61) 2 9524 5256
AUSTRIA
24 Constellation Road
Rexdale
Ontario M9W 1K1
Tel: 1 416 675 5830
Fax: 1416 675 6989
DENMARK
ALTO Danmark A/S
Industrikvarteret,
9560 Hadsund
Tel: (+45) 72182100
Fax: (+45) 72 18 21 05
ALTO Danmark A/S
(food division)
Blytækkervej 2,
9000 Aalborg10
Tel: (+45) 72 18 21 00
Fax: (+45).72 18 20 99
FRANCE
ALTO France S.A.
B.P. 44, 4 Place d'Ostwald
67036 STRASBOURG Cedex 2
Tel: (+33) 388288400
Fax: (+33) 388300500
GERMANY
ALTO/Wap Bellenberg
WAP/ALTO Cleaning Systems (UK) Ltd.
Gilwilly Industrial Estate
Penrith, Cumbria CA11 9BN
Tel: (+44) 1768 86 89 95
Fax: (+44) 1768 86 47 13
Telex: 64309 kewg
JAPAN
Representative Office
Naruse-build 4F
7-2 Shinbashi 1-Chome,
Minato-Ku
Tokyo 105-004
Tel: (+81) 335693807
Fax: (+81) 335693808
NETHERLANDS
Representative Office
271 Bukit Timah Road
04-11 Balmoral Plaza
Singapore 259708
Tel: (+65) 8366 455
Fax: (+65) 8366 456
SWEDEN
ALTO Sverige AB
Aminogatan 18, Box 40 29
431 04 Molndal
Tel: (+46) 31 27 16 00
Fax: (+46) 31 87 24 19
USA
ALTO U.S. Inc
2100 Highway 265
Springdale
Arkansas 72764
Tel: (+1) 501 750 1000
Fax: (+1) 5017560719
ALTO U.S. Inc
1100 Haskins Road
Bowling Green
Ohio 43402
Tel: (+1) 4193527511
Fax: (+1) 4193537187
ALTO U.S.Inc
P.O.Box 4369
1500 North Belcher Road
Clearwater
Florida 33765
Tel: (+1) 7274614555
Fax: (+1) 7274615193
- BRAND-BZW. EXPLOSIONSGEFAHR
- GENERAL
- HEALTH-ENDANGERING DUSTS*)
- FIRE AND EXPLOSION HAZARD
- APPLIANCE PLUG SOCKET
- CAUTION!
- USING FOR THE FIRST TIME
- (Damaged mains leads present a danger of electric shocks!)
- DURING OPERATION
- MAINTENANCE AND REPAIR
- ELECTRICAL EQUIPMENT
- POUR VOTRE PROPRE SÉCURITÉ
- FOR APPARATET TAS I BRUK
- VEDLIKEHOLD OG REPARASJON
- KONSERWACJA I NAPRAWY
- SUBSIDIARIES
- AUSTRALIA
- AUSTRIA
- CROATIA
- CZECH REPUBLIC
- JAPAN
- A
- DESCRIPTION (Fig. A)
- (Fig. C)
- ASSEMBLING THE CLEANER
- ELECTRICAL CONNECTION
- PICKING UP DRY SUBSTANCES
- Inflammable substances must not be picked up with the cleaner!
- PICKING UP LIQUIDS
- Inflammable liquids must not be picked up with the cleaner!
- SWITCHING ON THE CLEANER
- DURING WORK
- AFTER FINISHING WORK
- CHANGING THE BAG-TYPE FILTER
- IMPORTANT!
- REPLACING THE FILTER ELEMENT
- CLEANING THE POROUS FILTER
- TESTS AND APPROVALS
- GUARANTEE
- PRIERE DE LIRE LA NOTICE D'UTILISATION ET D'OBSERVER LES CONSIGNES DE SECURITE!
- UTILISATION
- REEMPLACEMENT DUSAC A POUSSIERE
- BESKRIVELSE (ILL. 1)
- OPSUGNING AF TØRRE STOFFER
- OPSUGNING AF VAESKER
- TARKASTUKSET JA HYVAKSYMISET
- EU Declaration of Conformity
- Vacuum Cleaner for Wet and Dry Operation
- DENMARK
- FRANCE
- GERMANY
- NETHERLANDS
- SWEDEN
- USA
Brand : NILFISK
Model : SQ 8
Category : Vacuum Cleaner