A5 Alh50024 - Television CECOTEC - Free user manual and instructions
Find the device manual for free A5 Alh50024 CECOTEC in PDF.


| Product Type | LED TV |
| Brand | Cecotec |
| Model | A5 Series Alh50024 |
| Screen Size | 50 inches (127 cm) |
| Resolution | 4K Ultra HD (3840 x 2160) |
| Connectivity | Wi-Fi, Ethernet, Bluetooth, HDMI (x3), USB (x2) |
| Smart TV Functions | Android TV, Netflix, YouTube, built-in apps |
| Power Supply | 100-240 V, 50/60 Hz |
| Power Consumption (standby) | 0.5 W |
| Power Consumption (max) | 120 W |
| Dimensions (with stand) | 1125 x 700 x 250 mm |
| Dimensions (without stand) | 1125 x 650 x 80 mm |
| Weight (with stand) | 15.2 kg |
| Weight (without stand) | 14.5 kg |
| VESA Wall Mount Standard | 400 x 200 mm |
| Sound System | 2 x 10 W speakers, Dolby Audio |
| Care and Cleaning | Clean with a soft, dry cloth, avoid abrasive products |
| Safety Instructions | Do not expose to moisture, use on a stable surface, unplug during storms |
| Spare Parts and Repairability | Remote control, stand, wall mount kit available; repair possible by a professional |
| Package Contents | TV, remote control, batteries, power cable, stand, documentation |
| Warranty | 2 years |
| Energy Class | A+ (old) / G (new label) |
| EAN Code | 8435... (check on packaging) |
Frequently Asked Questions - A5 Alh50024 CECOTEC
User questions about A5 Alh50024 CECOTEC
0 question about this device. Answer the ones you know or ask your own.
Ask a new question about this device
Download the instructions for your Television in PDF format for free! Find your manual A5 Alh50024 - CECOTEC and take your electronic device back in hand. On this page are published all the documents necessary for the use of your device. A5 Alh50024 by CECOTEC.
USER MANUAL A5 Alh50024 CECOTEC
Safety instructions 8
-
Before use 71
-
Installation 71
-
Operation 73
Remote control 89
-
Troubleshooting 90
-
Technical specifications 92
-
Disposal of old electrical and electronic appliances 93
-
Technical support and warranty 93
-
Copyright 93
-
Simplified Declaration of Conformity 93
SOMMAIRE
Read these instructions thoroughly before using the appliance. Keep this instruction manual for future reference or new users.
- DANGER: RISK OF ELECTRIC SHOCK. DO NOT OPEN. To reduce the risk of electric shock, do not remove the lid and refer servicing to qualified personnel.
- In the event of any type of incident, breakdown, revision or maintenance, contact the Official Cecotec Technical Support Service.
- ⚠️ Please pay particular attention to the information marked with this symbol: important instructions for use/operation.
- ⚠ Warning: pay particular attention to the information marked with this symbol: danger of electric shock.
- Do not use this appliance near water.
- Clean it only with a dry cloth.
- Do not block any ventilation openings. Install the appliance with the specifications of the manufacturer.
- Do not install it near heat sources like radiators, heaters or any other appliances that may produce heat.
- Do not tamper with the protection of the earthed plug on the appliance. A polarized plug has two blades with one wider than the other. An earthed plug has two blades and a third
earthed blade. If the plug does not fit your outlet, consult an electrician to have the outlet replaced.
- Protect the power cable to prevent it from being damaged.
- Only use accessories specified by the manufacturer.
- Only use it with wall mount, table, etc. specified by the manufacturer, or sold with the appliance. If you use a table with wheels, be careful when moving it to avoid injury.
- Unplug the appliance during thunderstorms or if you do not plan to use it for long periods of time.
- Caution: to reduce the risk of fire or electric shock, do not expose the appliance to rain or moisture.
- Make sure that the mains socket is accessible and close to the appliance.
- This appliance is not intended for built-in installation unless adequate ventilation is provided, or the manufacturer's instructions are followed.
- Do not expose the appliance to dripping or splashing and do not place objects filled with liquids (such as vases) on the appliance.
- Do not place any object that may create a hazard on top of the appliance (for example, objects filled with liquid, lighted candles, etc.)
- Wall or ceiling mounting: the appliance should be mounted on the wall or ceiling only according to the manufacturer's recommendations.
- Never place the TV, remote control or batteries near naked flames or other sources of heat, including direct sunlight. To prevent fire, always keep candles or other sources of fire away from the TV, remote control and batteries.
- The USB terminal accepts 0.5 A under normal operating conditions.
- Save maintenance instructions for use by authorized
personnel. To reduce the risk of electric shock, do not perform any maintenance operations other than those included in the instruction manual, unless you are qualified to do so.
- Do not expose batteries to excessive heat sources such as sunshine, fire or the like.
- This equipment is a class II or double insulated electrical appliance. It has been designed in such a way that it does not require a safety earthed connection.
- The maximum room temperature for use is 45 °C. The maximum altitude of use is 2000 meters above sea level.
- ATTENTION: TO REDUCE THE RISK OF ELECTRIC SHOCK DO NOT REMOVE THE COVER (OR REAR PANEL). IT DOES NOT CONTAIN PARTS THAT CAN BE CHANGED BY THE USER. PLEASE CONTACT QUALIFIED TECHNICAL PERSONNEL.
- In extreme weather (storms, lightning) and long periods of inactivity (going on holiday) disconnect the TV set from the mains. The mains plug is used to disconnect the TV set from the power supply and must therefore always be accessible. If the TV is not disconnected from the mains, the device will still consume power even if the TV is in standby mode or switched off.
- WARNING: this appliance is not intended for use by people (including children) without the ability/experience in operating such a device and without supervision, unless they have been given supervision or instruction concerning use of the appliance by a person responsible for their safety.
- Use this TV set at an altitude of less than 2000 metres above sea level, in dry locations and in regions with mild or tropical climates. The TV is designed for domestic and similar indoor use.
- To facilitate ventilation, leave at least 5 cm of free space around the TV. Ventilation should not be impeded by covering
or blocking the ventilation openings with items such as newspapers, tablecloths, curtains, etc.
- The power cable must be easily accessible. Do not place the TV or any furniture, etc., on the power cord or step on it. A damaged cord may cause a fire or electric shock. Grasp the power cord by the plug; do not unplug the TV by pulling on the power cord. Never touch the cable with wet hands, as this may cause a short circuit or electric shock. Never knot the cable or splice it with other cables. It must be replaced when damaged, and only a professional can do this. If the cable or any other part of the device is damaged, contact the Official Cecotec Technical Support Service.
- Do not expose the TV set to dripping and splashing liquids and do not place objects containing liquids, such as vases, cups, etc., or other objects on top of the TV set (e.g. on shelves above the TV set). Do not expose the TV set to direct sunlight or open flames, such as lighted candles on top of or near the TV set. Do not place any heat sources such as electric heaters, radiators, etc. near the TV. Do not place the TV set on the floor or on inclined surfaces.
- To avoid choking hazards, keep plastic bags out of the reach of babies, children and pets.
- Carefully attach the wall mount to the TV. If the wall mount is provided with screws, tighten the screws firmly to prevent the TV from tilting. Do not over-tighten the screws and mount the wall mount rubbers properly.
- Do not dispose of batteries in fire or with hazardous or flammable materials.
- WARNING: Never expose batteries to excessive heat such as sunlight, fire or the like. VERY IMPORTANT: You MUST NOT allow anyone, especially children, to insert any objects through holes, slots or any TV openings.
- Excessive volume in headphones may cause hearing loss problems.
INSTRUCTIONS DE SÉCURITÉ
$$ T V 2 4" > M 4 $$
$$ T V 3 2" > M 6 $$
$$ \mathrm{TV} 4 0 ^ {\prime \prime} > \mathrm{M6} $$
Pulse ▼ / ▲ para elegir entre Apagado (OFF)/10s/20s/30s/60s/5min.
- This appliance is packaged in a way as to protect it during transport. Take the appliance out of its box and remove all packaging materials. You can keep the original box and other packaging elements in a safe place to prevent damage to the device if you need to transport it in the future. In case the original packaging is disposed of, make sure all packaging materials are recycled accordingly.
- Make sure all parts and components are included and in good conditions. If there is any piece missing or in bad conditions, contact the official Cecotec Technical Support Service immediately.
Box content:
- TV
- Remote control
- AA batteries (x2)
- Instruction manual
Note:
The graphics in this manual are schematic representations and may not exactly match the appliance.
2. INSTALLATION
Installing the wall mount
For fixing the TV to the wall:
Fig. 1
- First, place a soft cloth on the table and then place the television on top of it. This will prevent scratches to the screen.
- Use a screwdriver to remove the screws attached to the stand (as shown in figure 1). Then, carefully remove the stand.
- Choose a mount that can be fixed to the wall according to the dimensions of the TV, as shown in figure 1.
- Drill four holes in the wall and fit four screws.
- Use the screwdriver to fix the screw on the back of the TV. Next, hang the TV on the wall.
Fig. 1 key:
- Wall
- Wall mount
- Wall
- Wall screw
ENGLISH
NOTE:
- The wall mount (VESA) is not included.
- When installing the TV, be sure to keep it at a safe distance from other appliances.
- If necessary, contact a competent technician to avoid danger.
- The figure is for reference only.
- Follow the instructions in the manual to secure the TV to the wall mount.
- Install the VESA mount on the wall.
NOTE:
- Use the following screws (not included) for wall mounting (VESA):
$$ T V 2 4 ^ {\prime \prime} > M 4 $$
$$ T V 3 2" > M 6 $$
$$ T V 4 0 ^ {\prime \prime} > M 6 $$
Installation and connection of the TV
Schematic diagram of connection to external devices (Fig. 2)
Fig. 2 key:
1.- DVD
2.- Set-top box
3.- AV input connection
4.- HDMI input connection
5.- USB connection
6.- TV antenna connection
7.- RJ45 connection
8.- AV input connection
9.- AV output connection
TV configuration. Fig. 3
- Place the TV in a stable location that can bear its weight.
- To avoid hazards, keep the TV away from water or heat sources (such as a light, candle or heating appliance), and ensure adequate ventilation at the rear of the TV.
Connecting the antenna and power supply
- Connect the antenna cable to the antenna socket on the back of the TV.
- Connect the TV's power cable (AC 100-240 V\~50/60 Hz).
Switching on the TV
- Once you have connected the TV's power cable, the TV will enter standby mode and a red indicator light will light up. Press the power button on the TV or on the remote control to switch it on.
Note: if the model has a CI card slot at the top, you will find a silicone plug in the accessory bag. Insert it into the slot when the IC card is not in use.
For models without CI cards, the silicone plug is not included.
Fig. 3 key:
1. TV signal output
Note: the figure is for reference only.
Stand installation
The TV is delivered with the stand separately. To fit it, follow the instructions below.
- Remove the TV, stand and accessories from their packaging.
- The TV screen can easily get scratched, so place a soft cloth on a table and place the TV face down on it.
Note: always unplug the power cable before attaching or removing the stand. - Take the stand. Align the screw holes of the stand and the TV. Then insert the screws into the corresponding holes and tighten them.
Note: to ensure the stability of the TV set, tighten all screws securely.
The stand of some TV models is designed with a snap-on type. In other words, you only have to fit the TV into the stand, you don't have to screw it.
NOTE: some models do not include a stand.
Note the direction of the stand.
Bottom view of the TV (front side down). Fig. 4
Note: the figure is for reference only.
Tip:
To ease the stand installation and avoid damage, we advise you to use a PH2 type screwdriver.
Fig. 5
3. OPERATION
Using the TV for the first time
Connect an RF cable to the "RF-In" input of the TV and to the input of your TV antenna.
ENGLISH
Make sure the appliance is plugged in.
Follow the instructions to carry out the first setup.
Selecting the language
Press ▼ / ▲ to select the system language and choose TV mode.
Fig. 6.
Selecting the country
After setting the language, you can access the Internet settings page. Confirm and connect to the Internet. Select the country of your choice, confirm and proceed to the next page.
Fig. 7
Fig. 8
Fig. 9
Terms and Conditions
Press ▼ / ▲ to select the relevant “Privacy/Terms and Conditions” notice and press OK to go to the next step.
Fig. 10
Signing in
Sign in to your VIDAA account. If you have not created an account, first create one and then sign in.
Fig. 11
Choose NETFLIX or Enjoy VIDAA TV.
Fig. 12
Make sure the device is connected, then press ▼ / ▲ ◀ / ▶ to select the primary input source.
Fig. 13
HOME screen
When you have finished the first configuration, you can access the HOME menu screen.
Fig. 14
Press MENU to access the HOME screen.
Press ▼ / ▲ ◀ / ▶ to select the desired option.
Fig. 15

Inputs: press to select an input source.

Settings: press to choose between various settings.
Inputs
Press the INPUTS menu.
Press ▼ / ▲ ◀ / ▶ to select the desired input.
Press ENTER to confirm.
Fig. 16
Press OK to access the settings.
Fig. 17
Picture
1.- Press the MENU to enter the main menu, press ▼ / ▲ to select the picture menu.
2.- Press ▼ / ▲ to select the option you want to configure.
3.- Press ENTER to confirm the settings.
4.- After finishing the configuration, press ENTER to save and return to the previous menu.
Fig. 18
Press ▼ / ▲ to select the picture mode, then press ▼ / ▲ and ENTER to confirm the desired option.
You can choose between the following picture modes:
- Standard: this is the default mode; it ensures a high quality image under normal lighting conditions.
- Cinema Day: adapts the contrast, colour and brightness of the screen for more vivid colours.
- Cinema Night: adapts the contrast, colour and brightness of the screen for a softer picture.
- Dynamic: adapts the contrast, colour and brightness of the screen to achieve colour balance in the dynamic image.
- Sports: this is the most suitable mode for watching sports videos.
Screen aspect ratio (dimensional ratio)
Adjust the aspect ratio to reduce or enlarge the screen image.
Press ▼ / ▲ to select the aspect ratio.
Press ◀ /▶ to select the desired setting. You can choose between:
- Automatic
- 16:9
- 4:3
- Panoramic
- Film zoom
- Direct
ENGLISH
Game mode
Press ▼ / ▲ to select and then press ◀ / ▶ to choose ON/OFF.
Picture mode settings
Press ▼ / ▲ to select and then press ◀ / ▶ and ENTER to enter.
Fig. 19
Apply picture settings
In this menu, you can adjust the current picture mode to apply to all sources or only to the current source.
Press ▼ / ▲ to select and then press ◀ / ▶ and ENTER to enter.
(Options: All sources/Current source).
Backlighting/Brightness/Contrast/Colour saturation/Sharpness
Press ▼ / ▲ to select and then press ◀ / ▶ to choose between:
- Backlight: adjust the picture backlight (Options: Off/Low/High).
- Brightness: adjust the picture brightness.
- Contrast: adjust the picture contrast.
- Colour saturation: adjust the picture colour density.
- Sharpness: adjust the sharpness of the picture contours.
Adaptive contrast
In this menu, you can automatically darken dark areas and lighten light areas of pictures to bring out all the details.
Press ▼ / ▲ to select and then press ◀ / ▶ to choose between Off/Low/Medium/High.
Noise reduction
You can set different options to remove noise intensity from the picture.
Press ▼ / ▲ to select and then press ◀ / ▶ to choose between Off/Low/Medium/High.
MPEG Noise reduction (Audio/Video compression format)
You can set different options to remove MPEG noise intensity.
Press ▼ / ▲ to select and then press ◀ / ▶ to choose between Off/Low/Medium/High.
Colour temperature
You can set different options to adjust the overall colour of the picture.
Press ▼ / ▲ to select and then press ◀ / ▶ to choose between Soft1/Soft2/Standard/Cold.
Expert settings
You can adjust the colour tuner and "Gamma" to best suit the content you are viewing.
Press ▼ / ▲ to select and then press ◀ / ▶ to enter the submenu.
Fig. 20
Colour tuner
You can adjust the hue, saturation and brightness of the colour settings.
Press ▼ / ▲ to select and then press ◀ / ▶ to enter the submenu and adjust the settings.
White balance
You can adjust the intensity of the red, green and blue lights to achieve a picture with natural colours.
Press ▼ / ▲ to select and then press ◀ / ▶ to adjust the settings.
Black level (HDMI source only)
You can adjust the HDMI signal range to best suit the displayed content.
Press ▼ / ▲ to select and then press ◀ / ▶ to adjust the settings.
Gamma adjustment
You can adjust the Gamma correction to improve contrast in very light or very dark areas.
Press ▼ / ▲ to select and then press ◀ / ▶ to choose between 2.0/2.2/2.4/BT.1886.
Gamma calibration
You can adjust the selected Gamma curve.
Press ▼ / ▲ to select and then press ◀ / ▶ to enter the submenu and adjust the settings.
RGB only mode
You can adjust the RGB video signal.
Press ▼ / ▲ to select and then press ◀ / ▶ to choose between Off/Red/Green/Blue.
Overedging
You can select whether or not to hide the margins of the picture when they go beyond the edges of the screen.
Press ▼ / ▲ to select and then press ◀ / ▶ to choose between ON/OFF.
Reset current mode
Press ▼ / ▲ to select and then press ◀ / ▶ to enter the submenu.
Fig. 21
Sound
Press MENU to see the main menu. Press ▼ / ▲ to select SOUND in the main menu.
Fig. 22
1.- Press ▼ / ▲ to select the option you want to adjust in the SOUND menu.
2.- Press ENTER to confirm.
3.- After finishing the configuration, press ENTER to save and return to the previous menu.
ENGLISH
Sound mode
Press ▼ / ▲ to select your favourite sound mode.
(Optional: Standard/Movie/Music/Speech/Entertainment/Sports).
- Standard: produces a balanced sound in any kind of environment.
- Movie: increases the surround sound effect and provides a more powerful response from the subwoofer (speaker that reproduces low-pitched audio frequencies).
- Music: preserves the original sound. Ideal for music programmes or videos.
- Speech: both high and low frequencies are attenuated to improve the reproduction and clarity of the human voice.
- Entertainment programmes (Late Night): improves the reproduction and clarity of the human voice at low volume levels.
- Sports: optimised sound for enjoying sports events.
Sound mode settings
Press ▼ / ▲ to select and then press ◀ / ▶ to enter the submenu.
Fig. 23
Apply audio settings
In this menu, you can adjust the current audio mode to apply to all sources or only to the current source.
Press ▼ / ▲ to select and then press ▶ and ENTER to choose between Current source/All sources.
Equaliser
Press ◀ /▶ to select and adjust the desired equaliser option.
You can choose between: 100Hz/500Hz/1.5KHz/5KHz/10KHz
Wall mount setup/Auto volume control
Press ▼ / ▲ to select and then press ◀ / ▶ to choose ON/OFF.
Reset current mode
Press ▼ / ▲ to select and then press ◀ / ▶ to choose YES/NO.
Speakers
Press ▼ / ▲ to select and then press ◀ / ▶ to enter the submenu.
Fig. 24
Audio output
Press ▼ / ▲ to select and then press ▼ / ▲ to choose between ARC/TV speaker/SPDIF only.
- ARC (audio return channel function)
- TV speakers
- SPDIF (digital interface format).
Digital audio output
Press ▼ / ▲ to select and then press ▼ / ▲ to choose between the options.
Digital audio delay
Press ▼ / ▲ to select and then press ▼ / ▲ to choose between the options. It delays the audio signal to compensate for this difference in processing time.
Lip Sync (voice synchronisation)
Press ▼ / ▲ to select and then press ◀ / ▶ to choose between the options.
Balance
Balances the sound of the left and right channels.
Press ▼ / ▲ to select and then press ◀ / ▶ to adjust the settings.
Network
Press MENU to see the main menu.
Press ▼ / ▲ to select Network in the main menu.
Fig. 25
Press ▼ / ▲ to select between:
- Network configuration.
- Internet connection.
- Connection via Wireless Network.
- Connection via LAN.
Network configuration
Press ▼ / ▲ to select and configure the network.
Internet connection
Press ▼ / ▲ to select and verify the Internet connection.
Wireless Network connection
Press ▼ / ▲ to select and then press ◀ / ▶ to choose ON/OFF.
LAN connection
Press ▼ / ▲ to select and then press ◀ / ▶ to choose ON/OFF.
ENGLISH
Channel
Press MENU to see the main menu.
Press ◀ /▶ to select CHANNEL in the main menu.
Fig. 26
1.- Press ▼ / ▲ to select the option you want to adjust in the CHANNEL menu.
2.- Press ENTER to confirm.
3.- After finishing the configuration, press ENTER to save and return to the previous menu.
Automatic channel detection (Auto Scan)
This function allows an automatic search for an effective programme channel.
Press ▼ / ▲ to select and then press OK to configure.
Rescan (duplicate search)
You can choose to redo a channel search or change the settings.
Fig. 27
Channel reception
Press ◀ /▶ to select and then press ▼ / ▲ to choose between Satellite/Antenna/Cable.
Fig. 28
Network operator
Press ◀ /▶ to select and then press ▼ / ▲ to configure.
Fig. 29
Mode settings
Press ◀ /▶ to select and then press ▼ / ▲ to choose between Channel/Scan mode/LCN.
Fig. 30
Auto scan
If you want to stop the automatic search, press Stop or Exit.
Fig. 31
Fig. 32
Channel management
Press ▼ / ▲ to select and edit channel.
Fig. 33
Advanced settings
Press ▼ / ▲ to select and then press ENTER and ▶ to enter the advanced settings.
Fig. 34
Manual scan
Press ▼ / ▲ to select and then press ENTER to enter the manual channel scan.
Press ▼ / ▲ to choose between DTV Manual scan (digital TV)/ATV Manual scan (analogue TV).
DTV manual scan
Press ▼ / ▲ to select and then press ENTER to enter the DTV manual channel scan. Fig. 35
ATV manual scan
Press ▼ / ▲ to select and then press ENTER to enter the ATV manual channel scan. Fig. 36
Automatic channel list update
Press ▼ / ▲ to select and then press ◀ / ▶ to choose between ON/OFF.
Automatic programme guide update
Press ▼ / ▲ to select automatic programme guide update. Fig. 37
Automatic programme update
Press ▼ / ▲ to select and then press ◀ / ▶ to choose between ON/OFF.
Channel selection
Press ▼ / ▲ to select the channel list. Fig. 38
Cl+ (Common Interface) module settings
Press ▼/ ▲ to select, you can review the advanced settings menu of the Cl+ module.
Accessibility
Press ▼ / ▲ to select and then press ENTER to enter the accessibility menu. Fig. 39
Menu scheme
Press ▼ / ▲ to select and then press ◀ / ▶ to choose between Dark/Light.
High contrast menu
Press ▼ / ▲ to select and then press ◀ / ▶ to choose between ON/OFF.
Transparency menu
Press ▼ / ▲ to select and then press ◀ / ▶ to choose between Off/Medium/High.
ENGLISH
Subtitles for hearing-impaired people
Press ▼ / ▲ to select and then press ◀ / ▶ to choose between ON/OFF.
Audio type
Press ▼ / ▲ to select and then press ENTER to enter the submenu.
Press ◀ / ▶ to choose between Normal/Audio Description/Spoken Subtitles/All Supplementary Audio.
Dialogue enhancement
Press ▼ / ▲ to select and then press ENTER to enter the submenu
SYSTEM
Press MENU to see the main menu.
Press ◀ /▶ to select SYSTEM in the main menu.
Fig. 40
Fig. 41
1.- Press ▼ / ▲ to select the option you want to set in the SYSTEM menu.
2.- Press ENTER to confirm.
3.- After finishing the configuration, press ENTER to save and return to the previous menu.
Time
Press ▼ / ▲ to select.
Fig. 42
Time format
Press ▼ / ▲ to set the time display to be 12 or 24-hour format.
Date/Time
You can set the date and time.
Press ▼ / ▲ to select, then press ENTER ▶ to configure.
Time zone
You can select your time zone.
Press ▼ / ▲ to select and then press ENTER ▶ to enter the settings submenu.
Daylight saving
Press ▼ / ▲ to choose between OFF/ON/Sync from DTV.
Setting the timer
Press ▼ / ▲ to select the timer setting.
Fig. 43
Sleep timer
Press ▼ / ▲ to choose between OFF/15/30/60/90/120 minutes/User defined.
Power on timer
Press ▼ / ▲ to select the power on timer.
Fig. 44
Power off timer
Press ▼ / ▲ to select the power off timer.
Fig. 45
Timeout menu
Press ▼ / ▲ to choose between OFF/10s/20s/30s/60s/5min.
Auto sleep
Press ▼ / ▲ to choose between OFF/3H/4H.
Auto standby with no signal
Press ▼ / ▲ to choose between OFF/15min.
System PIN
Press ▼ / ▲ to select the system PIN.
You can change the PIN you use to access parental controls, automatic channel scanning and reset to factory defaults.
Parental control
Press ▼ / ▲ to select the Parental Control PIN.
Activate parental controls to prevent children from watching certain programmes.
Language and location
Press ▼ / ▲ to select your location.
Fig. 46
Location
Press ▼ / ▲ to select and then press ENTER ▶ to confirm.
Menu language
Press ▼ / ▲ to select and then press ENTER ▶ to confirm.
Primary audio
Press ▼ / ▲ to select and then press ENTER ▶ to confirm.
ENGLISH
Secondary audio
Press ▼ / ▲ to select and then press ENTER ▶ to confirm.
Primary subtitle
Press ▼ / ▲ to select and then press ENTER ▶ to confirm.
Secondary subtitle
Press ▼ / ▲ to select and then press ENTER ▶ to confirm.
Digital teletext
Press ▼ / ▲ to select Western Europe/Eastern Europe/Russian/Arabic/Persian/Greek
Application settings
Press ▼ / ▲ to select the application settings.
Fig. 47
Content sharing
Press ▼ / ▲ to select and then press ◀ / ▶ to choose between ON/OFF
HbbTV (Hybrid DTT Technology)
Press ▼ / ▲ to select and then press ◀ / ▶ to choose between ON/OFF
Clear cache
Press ▼ / ▲ to select and then press ENTER ▶ to enter the submenu.
Delete cookies
Press ▼ / ▲ to select and then press ENTER ▶ to enter the submenu.
Do Not Track (Online Privacy Protection)
Press ▼ / ▲ to select and then press ENTER ▶ to enter the submenu.
Prime Video
Press ▼ / ▲ to select and then press ENTER ▶ to confirm.
Netflix
Press ▼ / ▲ to select and then press ENTER ▶ to confirm.
HDMI & CEC
Press ▼ / ▲ to select and then press ENTER to enter the submenu and confirm.
Fig. 48
Press ▼ / ▲ to choose between CEC Control/Device Auto Power Off/Device Auto Power On/TV Auto Power On/CEC Device Lists.
NOTE: all options are available only when the CEC control is ON.
CEC Control
Press ▼ / ▲ to select and then press ◀ / ▶ to choose between ON/OFF.
NOTE: all options are available only when the CEC control is ON.
Device auto power off
Press ▼ / ▲ to select and then press ◀ / ▶ to choose between ON/OFF.
Device auto power on
Press ▼ / ▲ to select and then press ◀ / ▶ to choose between ON/OFF.
TV auto power on
Press ▼ / ▲ to select and then press ◀ / ▶ to choose between ON/OFF.
CEC device lists
Press ▼ / ▲ to select and then press ENTER to enter.
Use mode
Press ▼ / ▲ to select and then press ◀ / ▶ to choose between Home mode/Store mode.
Advanced settings
Press ▼ / ▲ to select and then press ENTER ▶ to confirm.
Fig. 49
Fig. 50
TV name
Press ▼ / ▲ to select and then press ENTER ▶ to edit the TV name.
Screensaver
Press ▼ / ▲ to select and then press ENTER ▶ to choose between OFF/5min/10min/20min.
Input labels
Press ▼ / ▲ to select and then press ENTER ▶ to choose between TV/AV/HDMI1/HDMI2/HDMI3.
ENGLISH
Notifications
Press ▼ / ▲ to select and then press ENTER ▶ to enter the submenu and confirm.
Enhanced viewing
Press ▼ / ▲ to select and then press ENTER ▶ to enter the submenu and confirm.
Setup wizard
Press ▼ / ▲ to select and then press ENTER ▶ to enter the submenu and confirm.
Sports mode auto detection
Press ▼ / ▲ to select and then press ◀ / ▶ to choose between ON/OFF.
Fast power on
Press ▼ / ▲ to select and then press ◀ / ▶ to choose between ON/OFF.
Power on mode
Press ▼ / ▲ to select and then press ENTER ▶ to confirm.
Support
Press ▼ / ▲ to select and then press ENTER ▶ to confirm.
Fig. 51
System info
You can see the system information.
Press ▼ / ▲ to select and then press ENTER ▶ to enter the submenu.
Self-diagnosis
You can perform a self-test to check the sound, picture and connections of the TV.
Press ▼ / ▲ to select and then press ENTER ▶ to enter the submenu.
E-manual
Press ▼ / ▲ to select and then press ENTER ▶ to enter the submenu.
NOTE: Not available for all models.
System update
You can set your TV to receive the latest firmware updates.
Press ▼ / ▲ to select and then press ENTER ▶ to enter the submenu.
Disclaimer and Privacy
Enter to read the details of the disclaimer.
Press ▼ / ▲ to select and then press ENTER ▶ to enter the submenu.
Mobile app download
Press ▼ / ▲ to select and then press ENTER ▶ to enter the submenu.
NOTE: Not available for all models.
Restore to factory defaults
Press ▼ / ▲ to select and then press ENTER ▶ to enter the submenu and confirm.
MULTIMEDIA
Press ▼ / ▲◀ / ▶ to select MEDIA on the home page or press the MEDIA button on the remote control, then press OK to enter the MEDIA CENTRE menu.
Fig. 52
Video
Press ▼ / ▲ to choose Video/All, then press ▼ / ▲◀ /▶ to select "Movies".
Press Menu to display the configuration options on the left side of the screen.
Fig. 53
Zoom mode
Press ▼ / ▲ to select and then press OK to confirm.
Rotate
Press ▼ / ▲ to select and then press OK to choose between 90° right/90° left
Audio only
Press ▼ / ▲ to select and then press OK to confirm.
Repeat mode
Press ▼ / ▲ to select and then press OK to choose between No repetition/Repetition on/Repeat All.
Playback start position
Press ▼ / ▲ to select and then press OK to confirm.
Information
Press ▼ / ▲ to select and then press OK to see.
Playlist
Press ▼ / ▲ to select and then press OK to see all available videos.
Audio
Press ▼ / ▲ to choose between Audio/All, then press ▼ / ▲◀ /▶ to select "Music".
Fig. 54
ENGLISH
Intervals
Press ▼ / ▲ to select and then press OK to choose between 5s/10s/20s.
IMPORTANT: descriptions and names of menus/sub-menus are subject to change.
CONNECTORS
Figure 55 shows the different connectors on the TV. Their position and number may vary depending on the model.
Fig. 55 key:
1.- AV Input: External Audio/Video signal input.
2.- HDMI Input: Digital signal input from the HDMI video connector.
3.- ANT 75: Antenna connection (75/VHF/UHF).
4.- USB input: Connection of USB devices for playback of multimedia files.
5.- Optical output: Connection of SPDIF receivers.
6.- RJ45 connection: Internet connection via cable.

WARNING:
Do not touch or come close to the HDMI and USB terminals and avoid electrostatic discharge from touching these terminals while they are in operation mode, or it will cause the TV to malfunction or stop operating.
TV buttons (not available on all models)
The TV must be plugged in (indicator light on).
Fig. 56
Show/hide icons: press this icon when the icons do not appear. These will disappear again after 5 seconds of inactivity.
Selection of icons: by briefly pressing this icon, you can scroll to the right to select the desired icon.
Selection of icon function: press and hold this icon to get the function of the selected icon. Icon description:

Switch-off icon: it corresponds to the POWER button on the remote control.

Menu icon: it corresponds to the MENU button on the remote control.

Source icon: it corr esponds to the SOURCE button on the remote control.

CH+ icon (go to next channel): it corresponds to the CH+ button on the remote control.

CH- icon (go back to the previous channel): it corresponds to the CH- button on the remote control.

Volume+ icon (increase volume): it corresponds to the VOL+ button on the remote control.
Volume- (decrease volume): it corresponds to the VOL- button on the remote control.
REMOTE CONTROL
- POWER: Turns the TV on or puts it into standby mode.
- RECEIVER
- MUTE: Press to mute the sound. Press again or press VOL+ to turn the sound back on.
- 0 - 9: Press 0-9 to directly select a channel while watching TV. The channel will change after 2 seconds. This also applies to teletext mode.
- FREE: Press to connect to FREE TV.
- DEEZER: Press to connect to Deezer TV.
- INPUTS: Press to display/select the source signal options.
- VOL+/VOL-: Press these buttons to increase/decrease the volume.
- CH+/CH-: (next/previous channel): Press these buttons to navigate through the channels.
- INFO: Press to display the channel information (name, number, etc.).
- BROWSER: Press to connect to the browser.
- MEDIA: Press to display the available sources and select the desired one.
- NAVIGATION BUTTONS ▼▲◀▶ : They allow you to navigate through the on-screen menus and adjust system settings to suit your preferences.
- BACK: press to return to a previous menu.
- EXIT: Press this button to exit the menu or submenu and cancel the corresponding function (if applicable).
- HOME: Press to see the main menu.
- NETFLIX: Press to connect to NETFLIX (Internet connection required).
- YOUTUBE: Press to connect to YOUTUBE (Internet connection required).
- PRIME VIDEO: Press to connect to PRIME VIDEO (Internet connection required).
- PLEX: Press to connect to PLEX (Internet connection required).
- COLOURED BUTTONS: Control in Teletext mode, selection of items in the menu and MHEGS in the DVB menu.
- SUBT: press this button to display and set the language of the current DTV channel.
- EPG: Press to access the EPG (Electronic Programme Guide) menu.
- MEDIA CONTROL: Play/Pause.
- CH.LIST: Press to access the channel list.
- TXT (teletext): Press this button to activate or deactivate teletext.
- APPS CUSTOMISATION: Press and hold to access the home page.
- MENU: Press to display the OSD settings menu on the screen (On Screen Display).
- OK: Press to confirm a selection or setting.
Fig. 57
ENGLISH
NOTE: The type of remote control may vary depending on the TV model.
Placing the batteries
- Slide down and pull out the battery compartment cover at the back of the remote control to remove it. Insert two AAA batteries into the battery compartment observing the polarity (+/-). Do not insert new and old batteries or different types of batteries.
- Then, slide the cover back.
Using the remote control
- Unless otherwise stated, the remote control can control all functions of the TV.
- Always point the remote directly at the sensor located on the front of the TV
CAUTION: do not ingest batteries, there is a danger of chemical burns. This product contains batteries. Swallowing batteries can cause severe internal burns in just 2 hours and can cause death. Keep new and used batteries out of the reach of children. If the battery compartment does not close securely, stop using the product and keep it out of the reach of children. If you think batteries may have been swallowed or placed inside any part of the body, seek immediate medical attention.
4. TROUBLESHOOTING
| No power supply | Check whether the AC cable of the TV is connected or not. If there is still no power, disconnect the plug and reconnect it after 60 seconds. Reconnect the power supply. |
| The TV is not receiving the signal correctly | If there are tall buildings or mountains near the TV set, the screen may suffer from ghosting or double images. If this is the case, you can fix the picture manually by adjusting the direction of the external antenna. |
| If you use an indoor antenna, it may be more difficult to pick up the signal. Set the direction of the antenna to ensure good reception. If signal reception does not improve, you may need to switch to an external antenna. | |
| No picture | Check if the antenna at the back of the TV is properly connected. |
| Check other channels to see if the issue persists. | |
| No sound | Try turning up the volume. |
| Check if the TV sound is muted or not. | |
| There is audio, but there is no picture, or the picture is faded | Try adjusting the contrast and brightness. |
| Static noise affects video and audio quality | Check if the antenna at the back of the TV is properly connected. |
| Split lines appear on the screen | Electrical appliances such as hair dryers, vacuum cleaners, etc. may interfere with the TV set. Turn off these types of devices. |
| The remote control doesn't work | Remove the plastic that wraps the remote control. Try moving the remote control closer to the TV and press any button. Make sure the batteries are installed correctly or try using new batteries. |
| The TV will go into standby mode if there is no response after a few minutes. | |
| There is no image (PC mode) | Check if the cable is connected to the HDMI port correctly or if it is bent. |
| Screen too bright or dark (PC mode) | Adjust the brightness or contrast in the main menu. |
| No response from PC | Check if the screen resolution of the PC screen is set to a resolution that is compatible with that of the TV. |
| Lines appear when connecting a device to the RCA port | Be sure to use a good quality cable. |
| The problem persists | Unplug the power cable wait 30 seconds and plug it back into the power outlet. If the problem persists, do not try to repair the TV yourself. Contact the official Cecotec Technical Support Service. |
Do not leave the TV set displaying a static picture, whether it is a paused video, menu screen, etc. for a long period of time to avoid screen burn-in.
ENGLISH
If none of these situations match your problem, do not attempt to disassemble or repair the appliance by yourself. Repairs carried out by unqualified people may result in injury or serious malfunctions. Contact the official Cecotec Technical Support Service. The repair must be carried out by an authorised technician, and you must use only original spare parts.
Unauthorised self-maintenance or maintenance will affect the safe use of the product and the application of the warranty policy.

NOTE:
Any electrical repairs to this appliance must conform to local and/or state laws. Please contact the official Cecotec Technical Support Service in case of doubt and before carrying out any of the above operations. Always disconnect the device from the power supply when opening it.
5. TECHNICAL SPECIFICATIONS
Product reference: 00990 / 00992 / 00991
Product: A5 series ALH50024 / A5 series ALH50032 / A5 series ALF50040
| Product | ALH50024 | ALH50032 | ALF50040 |
| Product reference | 00990 | 00992 | 00991 |
| QR |  |  |  |
| Power | 36 W | 56 W | 90 W |
| Inches | 24 | 32 | 40 |
| Technology | LED | LED | LED |
| Resolution | HD | HD | Full HD |
| Voltage | 100 – 240 V~ | ||
| Frequency | 50 / 60 Hz | ||
| Shelf life | 60.000 hours (approx.) | ||
The terms HDMI and HDMI High-Definition Multimedia Interface, and the HDMI logo are trademarks or registered trademarks of HDMI Licensing LLC in the United States and other countries.
Technical specifications may change without prior notice to improve product quality. Made in China | Designed in Spain
6. DISPOSAL OF OLD ELECTRICAL AND ELECTRONIC APPLIANCES

This symbol indicates that, according to the applicable regulations, the product and/or batteries must be disposed of separately from household waste. When this product reaches the end of its shelf life, you should dispose of the cells/batteries/accumulators and take them to a collection point designated by the
local authorities.
Consumers must contact their local authorities or retailer for information concerning the correct disposal of old appliances and/or their batteries.
Compliance with the above guidelines will help protecting the environment.
7. TECHNICAL SUPPORT AND WARRANTY
Cecotec shall be liable to the end user or consumer for any lack of conformity that exists at the time of delivery of the product under the terms, conditions, and deadlines established by the applicable regulations.
It is recommended that repairs are carried out by qualified personnel.
If at any moment you detect any problem with your product or have any doubt, do not hesitate to contact the official Cecotec Technical Support Service at +34 96 321 07 28.
8. COPYRIGHT
The intellectual property rights over the texts in this manual belong to CECOTEC INNOVACIONES, S.L. All rights reserved. The contents of this publication may not, in whole or in part, be reproduced, stored in a retrieval system, transmitted, or distributed by any means (electronic, mechanical, photocopying, recording or similar) without the prior authorization of CECOTEC INNOVACIONES, S.L.
9. SIMPLIFIED DECLARATION OF CONFORMITY
CE Cecotec Innovaciones hereby declares that the televisions, models 00990_A5 series ALH50024, 00992_A5 series ALH50032 and 00991_A5 series ALF50040 are in compliance with the Radio Equipment Directive 2014/53/EU.
The full text of the EU Declaration of Conformity can be found on the following website: www.cecotec.es
FRANÇAIS
1. AVANT UTILISATION
- Mur
- Support
- Mur
- Vis murale
NOTE :
Configuration expert
$$ T V 2 4" > M 4 $$
$$ T V 3 2" > M 6 $$
$$ \mathrm{TV} 4 0 ^ {\prime \prime} > \mathrm{M6} $$
Prodotto: A5 series ALH50024 / A5 series ALH50032 / A5 series ALF50040
Prodotto: A5 series ALH50024 / A5 series ALH50032 / A5 series ALF50040
$$ T V 2 4" > M 4 $$
$$ T V 3 2 ^ {\prime \prime} > M 6 $$
$$ \mathrm{TV} 4 0 ^ {\prime \prime} > \mathrm{M6} $$
Prima ▼ / ▲ para escolher OFF/10s/20s/30s/60s/5min.
$$ T V 3 2" > M 6 $$
$$ T V 4 0" > M 6 $$
Kies NETFLIX of log in op SMART VIDAA TV.
Fig. 11
4. PROBLEEMOPLOSSING
$$ T V 2 4" > M 4 $$
$$ T V 3 2" > M 6 $$
$$ T V 4 0" > M 6 $$
$$ T V 2 4" > M 4 $$
$$ T V 3 2" > M 6 $$
$$ T V 2 4" > M 4 $$
Ürün: A5 series ALH50024 / A5 series ALH50032 / A5 series ALF50040
Ürün: A5 series ALH50024 / A5 series ALH50032 / A5 series ALF50040
1

2

3

Fig./Img./Abb./Afb./Rys.1


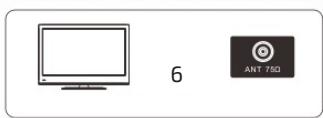
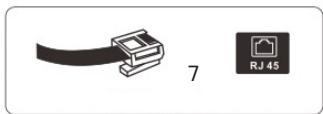
Fig./Img./Abb./Afb./Rys. 2

Fig./Img./Abb./Afb./Rys. 3

Fig./Img./Abb./Afb./Rys. 4


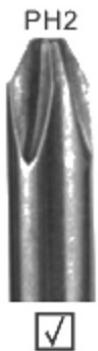
Fig./Img./Abb./Afb./Rys. 5

Fig./Img./Abb./Afb./Rys. 6

Fig./Img./Abb./Afb./Rys. 7
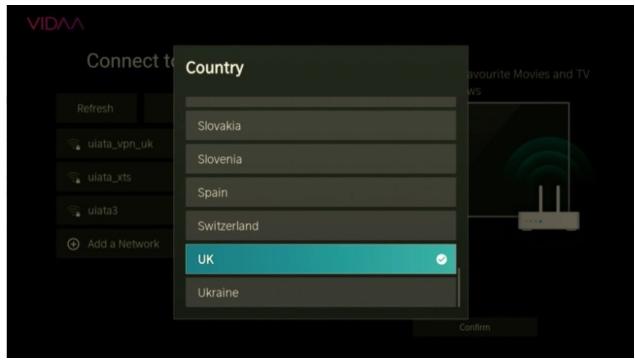
Fig./Img./Abb./Afb./Rys. 8

Fig./Img./Abb./Afb./Rys. 9
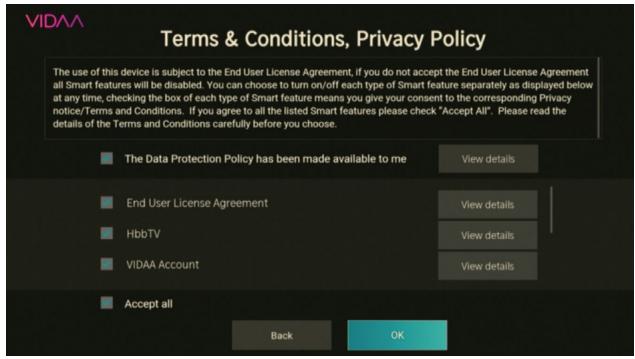
Fig./Img./Abb./Afb./Rys. 10
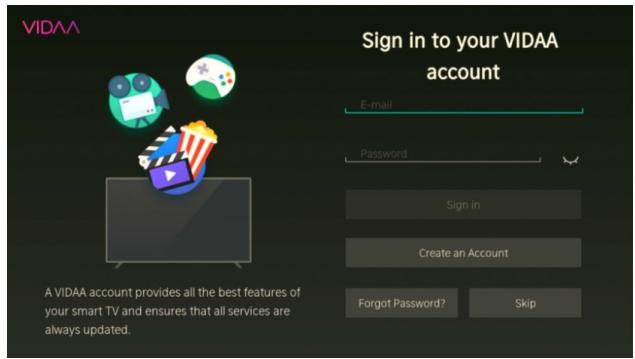
Fig./Img./Abb./Afb./Rys. 11
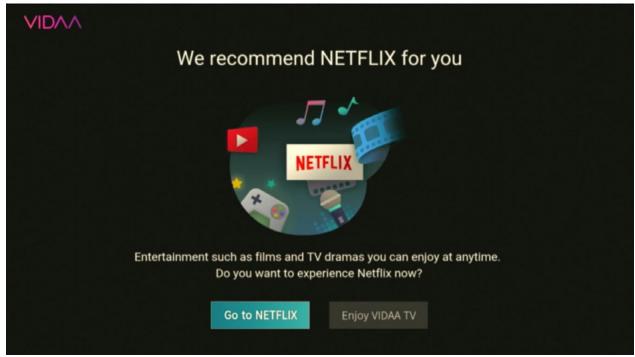
Fig./Img./Abb./Afb./Rys. 12

Fig./Img./Abb./Afb./Rys. 13

Fig./Img./Abb./Afb./Rys. 14

Fig./Img./Abb./Afb./Rys. 15

Fig./Img./Abb./Afb./Rys. 16
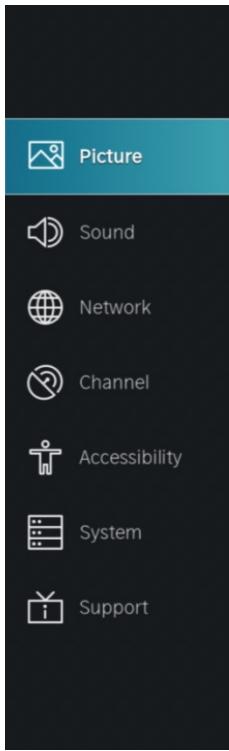
Fig./Img./Abb./Afb./Rys. 17
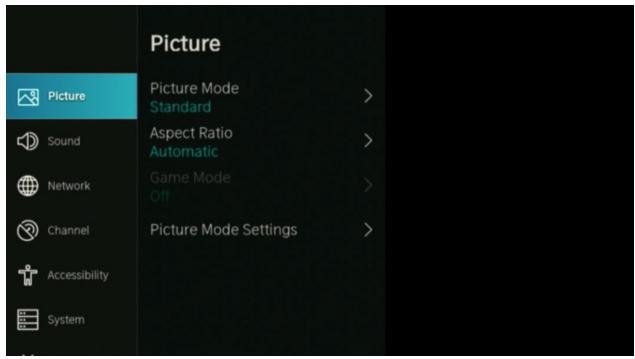
Fig./Img./Abb./Afb./Rys. 18
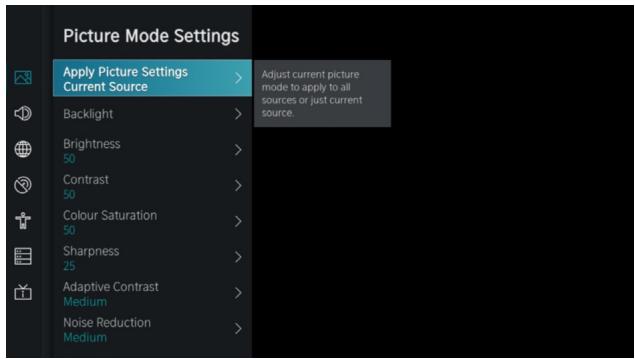
Fig./Img./Abb./Afb./Rys. 19

Fig./Img./Abb./Afb./Rys. 20
Reset Current Mode
The current picture settings will revert back to the factory default settings. Do you want to continue?
Cancel
OK
Fig./Img./Abb./Afb./Rys. 21

Fig./Img./Abb./Afb./Rys. 22

Fig./Img./Abb./Afb./Rys. 23

Fig./Img./Abb./Afb./Rys. 24
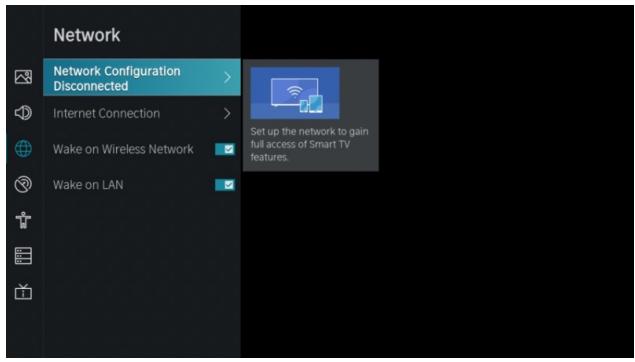
Fig./Img./Abb./Afb./Rys. 25
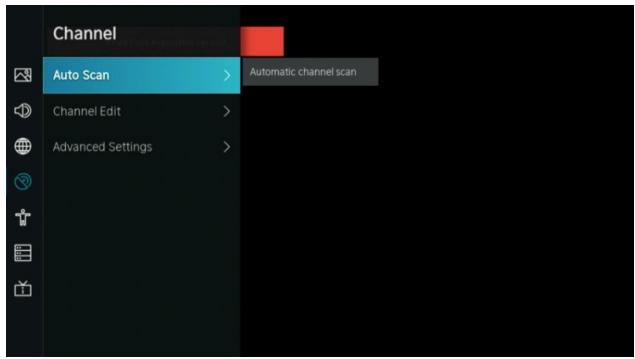
Fig./Img./Abb./Afb./Rys. 26

Fig./Img./Abb./Afb./Rys. 27
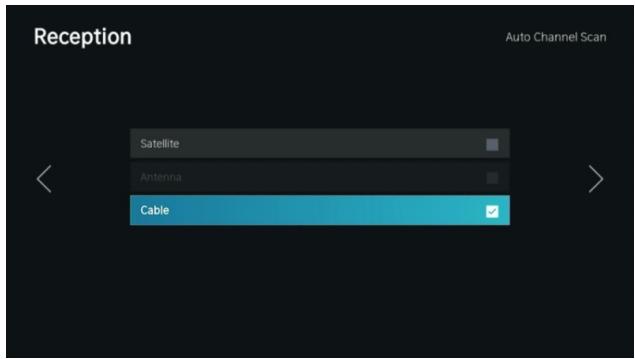
Fig./Img./Abb./Afb./Rys. 28
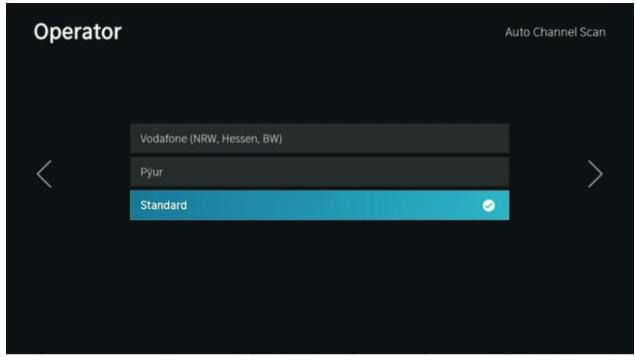
Fig./Img./Abb./Afb./Rys. 29

Fig./Img./Abb./Afb./Rys. 30

Fig./Img./Abb./Afb./Rys. 31

Fig./Img./Abb./Afb./Rys. 32

Fig./Img./Abb./Afb./Rys. 33

Fig./Img./Abb./Afb./Rys. 34

Fig./Img./Abb./Afb./Rys. 35

Fig./Img./Abb./Afb./Rys. 36

Fig./Img./Abb./Afb./Rys. 37

Fig./Img./Abb./Afb./Rys. 38

Fig./Img./Abb./Afb./Rys. 39

Fig./Img./Abb./Afb./Rys. 40

Fig./Img./Abb./Afb./Rys. 41

Fig./Img./Abb./Afb./Rys. 42
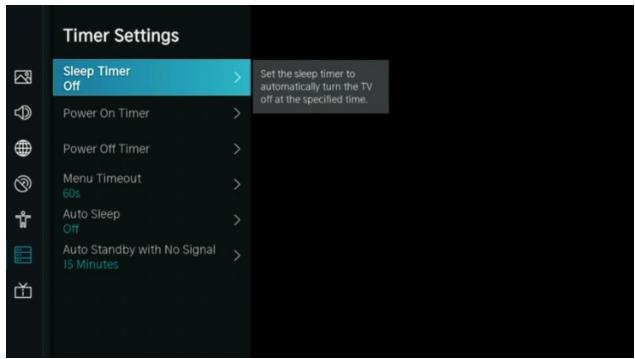
Fig./Img./Abb./Afb./Rys. 43

Fig./Img./Abb./Afb./Rys. 44

Fig./Img./Abb./Afb./Rys. 45

Fig./Img./Abb./Afb./Rys. 46
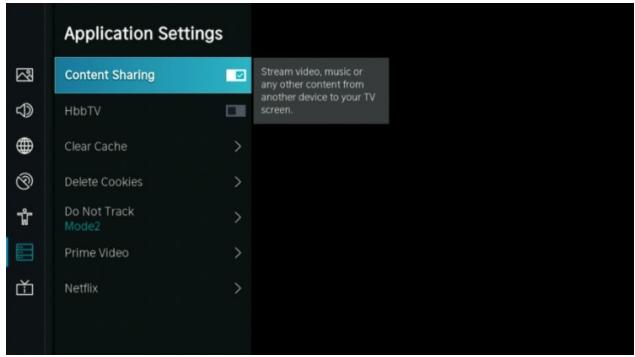
Fig./Img./Abb./Afb./Rys. 47

Fig./Img./Abb./Afb./Rys. 48

Fig./Img./Abb./Afb./Rys. 49
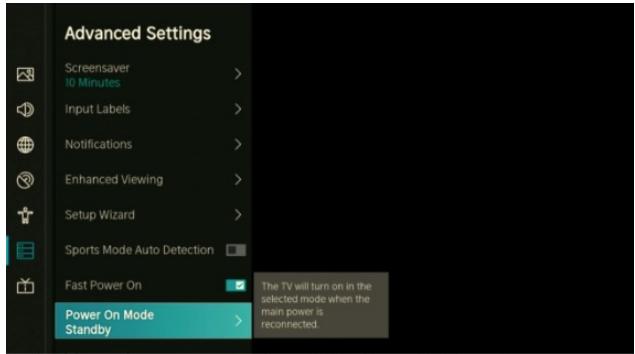
Fig./Img./Abb./Afb./Rys. 50
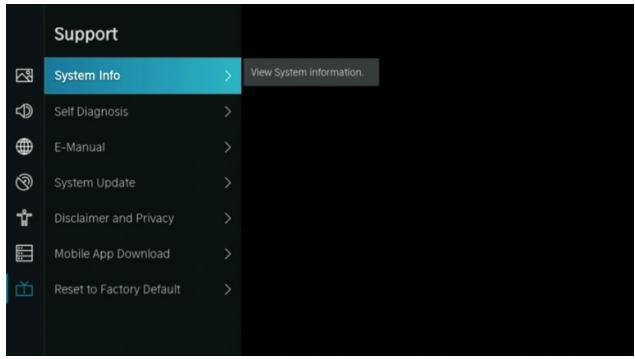
Fig./Img./Abb./Afb./Rys. 51

Fig./Img./Abb./Afb./Rys. 52

Fig./Img./Abb./Afb./Rys. 53

Fig./Img./Abb./Afb./Rys. 54

Fig./Img./Abb./Afb./Rys. 55

Fig./Img./Abb./Afb./Rys. 56

Fig./Img./Abb./Afb./Rys. 57
www.cecotec.es
- SOMMAIRE
- INSTRUCTIONS DE SÉCURITÉ
- Box content:
- INSTALLATION
- Installing the wall mount
- ENGLISH
- NOTE:
- Installation and connection of the TV
- Schematic diagram of connection to external devices (Fig. 2)
- Fig. 2 key:
- TV configuration. Fig. 3
- Connecting the antenna and power supply
- Switching on the TV
- Fig. 3 key:
- TV signal output
- Stand installation
- OPERATION
- Using the TV for the first time
- Selecting the language
- Selecting the country
- Terms and Conditions
- Signing in
- HOME screen
- Inputs
- Picture
- Screen aspect ratio (dimensional ratio)
- Game mode
- Picture mode settings
- Apply picture settings
- Backlighting/Brightness/Contrast/Colour saturation/Sharpness
- Adaptive contrast
- Noise reduction
- MPEG Noise reduction (Audio/Video compression format)
- Colour temperature
- Expert settings
- Colour tuner
- White balance
- Black level (HDMI source only)
- Gamma adjustment
- Gamma calibration
- RGB only mode
- Overedging
- Reset current mode
- Sound
- Sound mode
- Sound mode settings
- Apply audio settings
- Equaliser
- Wall mount setup/Auto volume control
- Speakers
- Audio output
- Digital audio output
- Digital audio delay
- Lip Sync (voice synchronisation)
- Balance
- Network
- Network configuration
- Internet connection
- Wireless Network connection
- LAN connection
- Channel
- Automatic channel detection (Auto Scan)
- Rescan (duplicate search)
- Channel reception
- Network operator
- Mode settings
- Auto scan
- Channel management
- Advanced settings
- Manual scan
- DTV manual scan
- ATV manual scan
- Automatic channel list update
- Automatic programme guide update
- Automatic programme update
- Channel selection
- Cl+ (Common Interface) module settings
- Accessibility
- Menu scheme
- High contrast menu
- Transparency menu
- Subtitles for hearing-impaired people
- Audio type
- Dialogue enhancement
- SYSTEM
- Time
- Time format
- Date/Time
- Time zone
- Daylight saving
- Setting the timer
- Sleep timer
- Power on timer
- Power off timer
- Timeout menu
- Auto sleep
- Auto standby with no signal
- System PIN
- Parental control
- Language and location
- Location
- Menu language
- Primary audio
- Secondary audio
- Primary subtitle
- Secondary subtitle
- Digital teletext
- Application settings
- Content sharing
- HbbTV (Hybrid DTT Technology)
- Clear cache
- Delete cookies
- Do Not Track (Online Privacy Protection)
- Prime Video
- Netflix
- HDMI & CEC
- CEC Control
- Device auto power off
- Device auto power on
- TV auto power on
- CEC device lists
- Use mode
- TV name
- Screensaver
- Input labels
- Notifications
- Enhanced viewing
- Setup wizard
- Sports mode auto detection
- Fast power on
- Power on mode
- Support
- System info
- Self-diagnosis
- E-manual
- System update
- Disclaimer and Privacy
- Mobile app download
- Restore to factory defaults
- MULTIMEDIA
- Video
- Zoom mode
- Rotate
- Audio only
- Repeat mode
- Playback start position
- Information
- Playlist
- Audio
- Intervals
- CONNECTORS
- TV buttons (not available on all models)
- REMOTE CONTROL
- Placing the batteries
- Using the remote control
- TROUBLESHOOTING
- TECHNICAL SPECIFICATIONS
- DISPOSAL OF OLD ELECTRICAL AND ELECTRONIC APPLIANCES
- TECHNICAL SUPPORT AND WARRANTY
- COPYRIGHT
- SIMPLIFIED DECLARATION OF CONFORMITY
- FRANÇAIS
- AVANT UTILISATION
- NOTE :
- Configuration expert
- PROBLEEMOPLOSSING
Brand : CECOTEC
Model : A5 Alh50024
Category : Television