
PHKS 1400 - Circular saw PARKSIDE - Free user manual and instructions
Find the device manual for free PHKS 1400 PARKSIDE in PDF.
| Product type | Portable circular saw |
| Brand | PARKSIDE |
| Model | PHKS 1400 |
| Rated power | 1400 W |
| Rated voltage | 230 V ~ 50 Hz |
| No-load speed | 1800 - 5200 rpm (variable) |
| Saw blade (diameter x bore x cutting thickness x body thickness) | 210 x 30 x 1.8 x 2.6 mm |
| Cutting depth at 90° | 0 - 75 mm |
| Cutting depth at 45° | 0 - 48 mm |
| Weight | 7.1 kg |
| Sound pressure level | 107.5 dB(A) |
| Sound power level | 120.5 dB(A) |
| Vibrations (hand-arm) | < 9.3 m/s² |
| Electronic speed adjustment | Yes (4-position preselector) |
| Anti-restart safety | Yes (two-hand switch) |
| Cutting depth adjustment | Yes (graduated, by wing screw) |
| Cutting angle adjustment | Yes (0° to 45°, graduated) |
| Parallel guide | Yes (with scale) |
| Movable protective guard | Yes |
| Riving knife | Removable for plunge cuts |
| Chip extraction | Yes (connection for external extraction) |
| Compatible materials | Solid wood, chipboard, plastic, aluminium, plaster, rock wool |
| Maintenance | Clean regularly, avoid liquids, keep ventilation slots clean |
| Spindle lock | Yes (for blade change) |
Frequently Asked Questions - PHKS 1400 PARKSIDE
User questions about PHKS 1400 PARKSIDE
0 question about this device. Answer the ones you know or ask your own.
Ask a new question about this device
Download the instructions for your Circular saw in PDF format for free! Find your manual PHKS 1400 - PARKSIDE and take your electronic device back in hand. On this page are published all the documents necessary for the use of your device. PHKS 1400 by PARKSIDE.
USER MANUAL PHKS 1400 PARKSIDE
and safety instructions
SCIE CIRCULAIRE PORTATIVE
Mode d'emploi
HANDKREISSÄGE PHKS 1400
For sawing natural wood, chipboard, plastic and aluminium
Dear Customer! We are delighted that you have decided to purchase our high quality PHKS 1400 circular saw. Please make sure you familiarise yourself fully with the way the equipment works before you use it for the first time and that you understand how to handle electrical power tools correctly. Please read the instructions below and the accompanying safety advice carefully. By doing this you will be able to work in complete safety and achieve better results.
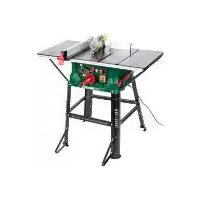
FEATURES OF THE PHKS 1400
ON-OFF switch
Safety switch
Electronic speed control
4 Adjustable depth stop
Sawdust outlet
6 Bevel cutting capacity with angle gauge
Guide plate
3 Parallel guide fence with millimetre scale
9 Retractable guard
10 Tips for use
⑪ Depth of cut gauge
⑫ Wing nut on parallel guide fence
TECHNICAL INFORMATION
Nom. power consumption: 1400 W
No load speed: 1800 - 5200 rpm
Blade: 210 × 30 × 1.8 × 2.6 mm
Cutting depth at 90^ .. 0-75 mm
Cutting depth at 45^ .. 0-48 mm
Nom. voltage: 230V 50Hz
Weight: 7.1 kg
The A weighted noise level of the equipment is typically:
Sound pressure level: 107.5dB(A) - Sound power level 120.5dB(A)
Hand/arm vibration is typically less than 9.3m / s^2
SPECIFIC SAFETY ADVICE
To be read in conjunction with the advice in the accompanying booklet on safety.
Before starting any work on the machine, e.g. setting the guide plate etc., always take the plug out of the socket.
- Never remove chips or splinters while the equipment is operating - always remove the plug from the socket first.
Always wear ear defenders and eye protection when working with the circular saw. In addition we recommend wearing safety gloves, robust anti-slip footwear and an industrial apron.
Check the circular saw, power cable and plug for damage before every use. Always have any damaged parts repaired or replaced at a specialist repair centre.
Always keep the power cable well out of the saw's working area and feed the cable from the rear of the machine.
If you are working for long periods on wood or materials that give rise to a lot of dust, fit the saw with a suitable tested vacuum extraction device.
Always use the saw's integrated safety devices, e.g. the safety switch and the retractable guard.
Check to see that the retractable guard moves freely before every use.
Do not drill into the saw housing as that will interfere with the protective insulation (Use stick-on labels, plates etc.).
Persons under the age of 16 are not to use this equipment.
Only operate the retractable guard using the lever provided. As the saw comes into contact with the material, the retractable guard automatically swings away. The guard is not to be fastened back into the open position. In addition, please make sure all the moving parts on the guard function without hindrance and all parts of the machine that cover the saw blade are working properly.
- When plunging make sure that the saw cannot kickback, e.g. clamp with a cross piece.
Secure round section wood on both sides of the saw blade against rotation.
Do not use on asbestos based materials.
Make sure that the diameter, thickness and other saw blade parameters are suitable for use in the circular saw.
Make sure the saw blade speed rating is suitable for the spindle rotation speed of the circular saw.
Cracked or distorted saw blades are not to be used. HSS (High Speed Steel) saw blades are not to be used.
The distance between the reamer and the saw teeth is to be set to 5mm maximum. The distance between the point of the reamer and the deepest point of the saw blade is to be 5mm maximum.
Always remove the reamer for plunging work.
When you switch off the saw, do not use any additional means of stopping the saw blade.
Do not lock the ON-OFF switch for hand fed work.
SETTING THE GUIDE PLATE
The basic setting or the angle of the guide plate to the saw blade is 90^ . If you wish to make an alteration to this angle use the adjustment screw.
Please read the section on accurately setting the angle of cut.
SETTING THE ANGLE OF CUT
You can use the angle gauge to set the angle of cut accurately. Slacken the wing nuts on each side of the cut angle adjuster. ⑥, set the required angle on the scale and tighten the wing nuts again.
Caution - Check the angle of cut with a trial cut.
SETTING THE DEPTH OF CUT
Note: We recommend that the depth of cut is set if possible 5mm greater than the material thickness. This will ensure you have a clean cut. Release the wing nut on the depth stop 4, set the required depth of cut on the scale ⑪ and tighten the wing nut again.
ON/OFF SWITCH
For safety purposes, the saw has a safety switch ②. The on/off switch ① will not self engage. To switch the saw motor on, first press the safety switch ② and then (keeping the safety switch pressed) press the on/off switch ①. Once the motor is running you can release the safety switch.
To turn off the saw motor, release the on/off switch 1
SETTING THE WIDTH OF CUT / PARALLEL GUIDE
Release the wing nut ② on the parallel guide 3. Set the required width of cut on the scale and tighten the wing nut again.
HANDLING THE CIRCULAR SAW
- Switch on the motor as described in the section "On/off switch" and then set the front edge of the guide plate down on the material.
- Align the circular saw with the parallel guide 3 or with a drawn cutting line.
- Hold the circular saw with both hands on the handles ⑩ and saw using moderate force.
SETTING THE SPEED
Using the following advisory settings as a guide, set the rpm on the electronic control wheel to an appropriate value. Turn the wheel until the required rpm setting is opposite the arrow marking () .
(1 = lowest rpm to 4 = highest rpm):
| Material | Thickness | rpm setting |
| Hard- and softwoods (natural wood) with & across grain | to max. depth of cut | 4 |
| Chipboard, hardboard | 5 - 20 mm | 3-4 |
| Chipboard | greater than 20 mm | 4 |
| Veneered plywood, plywood | 2 - 20 mm | 3 |
| Coated and veneered board | to max. depth of cut | 4 |
| PVC board | up to 30 mm | 2 |
| Acrylic sheet, Plexiglas | up to 25 mm | 2-3 |
| Aluminium sheet | 2 - 12 mm | 2-3 |
| Aluminium sections | 1.5 - 3 mm | 2-3 |
| Plasterboard | all thicknesses | 1-2 |
| Rock wool board | all thicknesses | 1 |
| Cement bound woodwool board | up to 20 mm | 1 |
FITTING/REMOVAL AND SETTING OF THE REAMER
Caution: The distance between the reamer and the saw blade is not to be more than 5mm . If the reamer is removed e.g. for plunging then this distance must be reset.
Fitting/removal of the reamer (44):
- Release the wing nut on the depth stop and swing the saw to meet the stop. This reveals the fastening screw for the reamer and loosens it.
- Screw out the fastening screw 1 and remove the reamer.
CAUTION / IMPORTANT: After plunging, the reamer must be refitted before further use.
Setting the reamer (a5):
The distance between the reamer and the saw blade teeth is to be set to 5mm max. and the gap between reamer and the deepest point of the saw blade is to be set to 5mm max.
CHANGING THE SAW BLADE
- Swing back the retractable guard and secure it. Secure the spindle by placing a piece of wood between the saw blade and the guide plate.
- Unscrew the fastening bolt with a hexagonal spanner. Remove the washer and spring washer 3 (13).
- Remove the saw blade from the mounting flange.
- Replacement of the saw blade takes place in the reverse order.
CAUTION: The arrow on the saw blade must point in the direction of rotation (marked with an arrow on the saw body).
Parallel alignment of the blade:
If the circular saw pulls to the left or right then the saw blade is not parallel to the guide plate edge or the parallel guide.
To correct this:
- Remove the wing nut and plain washer and release wing nuts.
- Swing the guide plate down and turn to the side, so that the adjustment plate can be positioned.
- Align the saw blade to be parallel using the adjustment plate.
SAWDUST REMOVAL
The sawdust removal vent can be connected ( = not supplied with accessories)
- Connection spout
- Sawdust collection system*
- 35mm dia. vacuum hose connection to external suction equipment*
MAINTENANCE OF THE CIRCULAR SAW
- Clean out the circular saw regularly (remove sawdust and splinters of wood etc.). For best results do it immediately after use.
- Do not allow liquids to get into the circular saw. Use a damp cloth to clean the housing. Do not use petrol, solvents or cleaning fluids that attack plastic.
- Keep the ventilation airways open and cleaned out.
TIPS AND TRICKS
- When sawing at an angle to meet a stop, the stop (parallel stop/batten) must be offset. To make sure use a trial cut beforehand.
If you are going to use a wider cut than the parallel guide allows, we recommend that you use a guide rail or run the machine along a clamped-on batten.
If you are sawing towards a check with a drawn line use the appropriate value in the window: right angled cut (reading "0"), 45^ cut (reading "45") for each cutting angle
To avoid pulling away the coating on sensitive surfaces, e.g. coated plywood or doors, stick on some rough paper tape along the cut line. This has the additional advantage of the cut line being more easily seen on the tape than on a smooth surface. An even more effective way of avoiding the surface pulling off at the cut edge is to attach a piece of thin wood which is then sawn at the same time.
The PHKS 1400 circular saw is equipped with INTELLIGENT POWER CONTROL.
This automatic power control ensures that within a certain oscillation range the output from the jigsaw remains constant even when cutting harder and more resistant materials.
You can find other practical tips for electric power tools in the accompanying booklet and safety advice.

PARKSIDE
SCIE CIRCULAIRE PORTATIVE PHKS 1400
KYKAIKO IPIONI XEIPOZ PHKS 1400
XEPIIeMOe TOY KYKAIKOY PIONIOY XEIPoS
- Evpyonoieote nvnxavn onwnc nepiypapetai oTo To avoyka kai to KlaiaioTOC oukeuncKai tonoetnte nvt mte Tpo nTc nakopieac 7 OTO uko nou θeTe va koyete.
- PpooapuoTe Tm npxavn OTo To npaalnnO tnpiyma 8 n oE mua ypaun nou exe TpaBnEi.
- Kpatwvtac mV mXavn ka e Ta duo xepia ano tic lae c 10 koyte to uliko nou te, ouwc me liyniieon.
PYOMIH TOY APIOMOY STPOΦΩN
O akolouoC nivakacexei oujoueutikoxapaktpa.IpoaapooTe tv apiio oTPOoovToV
nEeKpoviko puoiotnpa otpoov 3 avaoya e To uAIO KOU TE VA KOUETe. TSejuTE TO
nEeKpoviko puoiotnpa otpoov OTIuunto apioo otpoov OTO npa oTo pIoC () {1=muKpoteocduvatoc apiooc otpoov/4=eyiotoc duvatoc apiooc otpoov}
YAIKO
Paxos ulikou Bauiia apiou oTropov
SYNTHPHEH TOY KYKAIKOY PIPIONIOY XEIPOZ
| STATEMENT OF CONFORMITY | |
| We, Kompernaß Handelsgesellschaft mbH, Burgstr. 21, 0-44867 Bochum, Germany, hereby declare that this product conforms with the following EC regulations: | |
| (89/392 EEG) | |
| EC low voltage regulations: | (73/23/EFG) |
| Electromagnetic compatibility: | (89/336 EEG) |
| Applicable harmonised standards: | EN 50144-1:1998, EN 50144-2-5:1996 |
| EN 50014-2:1997, EN 55014-1:1993 + A1:1997, | |
| Type: PHKS 1400 | EN 61000-3-2:1995 + A1 + A2, |
| Bochum, 30.11.2001 | EN 61000-3-3:1995 |
| Hans Kompernaß | |
| - Managing Director - | |

- SCIE CIRCULAIRE PORTATIVE
- HANDKREISSÄGE PHKS 1400
- For sawing natural wood, chipboard, plastic and aluminium
- FEATURES OF THE PHKS 1400
- TECHNICAL INFORMATION
- SPECIFIC SAFETY ADVICE
- SETTING THE GUIDE PLATE
- SETTING THE ANGLE OF CUT
- SETTING THE DEPTH OF CUT
- ON/OFF SWITCH
- SETTING THE WIDTH OF CUT / PARALLEL GUIDE
- HANDLING THE CIRCULAR SAW
- SETTING THE SPEED
- FITTING/REMOVAL AND SETTING OF THE REAMER
- CHANGING THE SAW BLADE
- Parallel alignment of the blade:
- SAWDUST REMOVAL
- MAINTENANCE OF THE CIRCULAR SAW
- TIPS AND TRICKS
- PARKSIDE
- SCIE CIRCULAIRE PORTATIVE PHKS 1400
- KYKAIKO IPIONI XEIPOZ PHKS 1400
- XEPIIeMOe TOY KYKAIKOY PIONIOY XEIPoS
- PYOMIH TOY APIOMOY STPOΦΩN
- YAIKO
- Paxos ulikou Bauiia apiou oTropov
- SYNTHPHEH TOY KYKAIKOY PIPIONIOY XEIPOZ
Brand : PARKSIDE
Model : PHKS 1400
Category : Circular saw