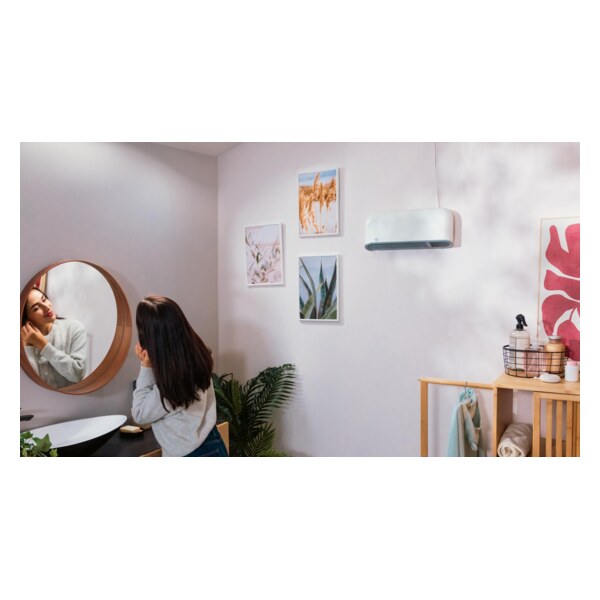
ReadyWarm 2000 Max Box Ceramic Connected - Auxiliary heating CECOTEC - Free user manual and instructions
Find the device manual for free ReadyWarm 2000 Max Box Ceramic Connected CECOTEC in PDF.


| Product type | Ceramic space heater |
| Brand | Cecotec |
| Model | ReadyWarm 2000 Max Box Ceramic Connected |
| Nominal power | 2000 W |
| Supply voltage | 220-240 V ~ 50 Hz |
| Recommended heating area | Up to 25 m² |
| Heating element | PTC Ceramic |
| Adjustable thermostat | Yes |
| Programmable timer | Yes, up to 24 h |
| Operating modes | Heat, fan only, eco, anti-freeze |
| Connectivity | Wi-Fi, Cecotec mobile app |
| Remote control | Included |
| Dimensions (W x H x D) | 22 x 30 x 20 cm |
| Net weight | 2.2 kg |
| Color | White and black |
| Noise level | 45 dB (in silent mode) |
| Anti-tilt safety | Yes |
| Overheat protection | Yes |
| Protection class | II |
| Maintenance and cleaning | Unplug and clean with a dry cloth |
| Spare parts available | Yes, on the Cecotec website |
| Repairability | Repairability index: 7.5/10 |
| Warranty | 2 years |
Frequently Asked Questions - ReadyWarm 2000 Max Box Ceramic Connected CECOTEC
User questions about ReadyWarm 2000 Max Box Ceramic Connected CECOTEC
0 question about this device. Answer the ones you know or ask your own.
Ask a new question about this device
Download the instructions for your Auxiliary heating in PDF format for free! Find your manual ReadyWarm 2000 Max Box Ceramic Connected - CECOTEC and take your electronic device back in hand. On this page are published all the documents necessary for the use of your device. ReadyWarm 2000 Max Box Ceramic Connected by CECOTEC.
USER MANUAL ReadyWarm 2000 Max Box Ceramic Connected CECOTEC
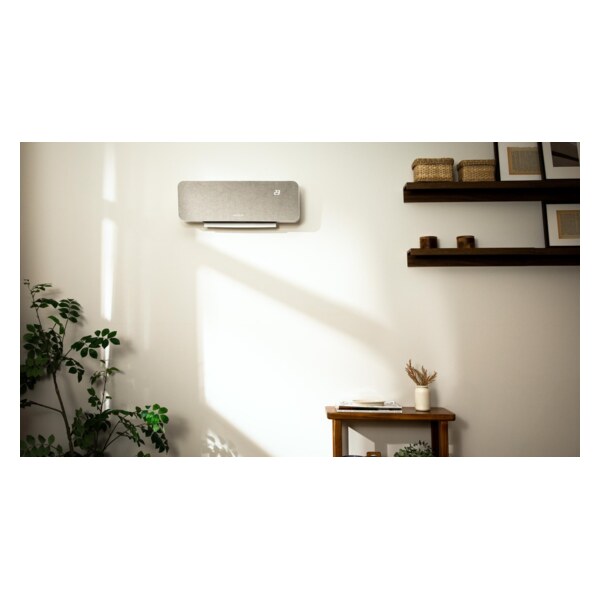
Calefactor cerámico de pared / Wall-mounted PTC heater.

natural_image
White CECUAC air conditioner unit with a curved white top and control panel (no visible text or symbols on the device body)ES: Este producto no es adecuado para calefacción primaria. Este producto está indicado únicamente en lugares abrigados o para una utilización puntual. / EN: This product is not suitable for primary heating purposes. This product is only suitable for well insulated spaces or occasional use / FR: Cet appareil ne convient pas pour une utilisation en tant que chauffage primaire. Cet appareil a été conçu seulement pour être utilisé dans des espaces intérieurs ou pour une utilisation momentanée / DE: Dieses Produkt ist nicht für als Hauptheizgerät geeignet. Dieses Produkt ist nur für geschützten Orten oder zur gelegentlichen Verwendung geeignet / IT: Questo apparecchio non è adatto a scopi di riscaldamento primario. Il suo utilizzo è indicato solo in luoghi riparati o per uso occasionale / PT: Este produto não é adequado para ser utilizado como aquecimento primário. Destina-se a uma utilização ocasional e apenas em locais abrigados / NL: Dit product is niet geschikt voor primaire verwarming. Dit product is alleen geschikt voor gebruik op beschutte plaatsen of voor occasioneel gebruik / PL: Ten produkt nie nadaje się do pierwotnego ogrzewania. Ten produkt jest wskazany tylko do miejsc ostoniętych lub do okazjonalnego użytku / CZ: Tento produkt není vhodný pro primární vytápění. Tento produkt je vhodný pouze na chráněnych místech nebo pro příležitostné použitíá
- Parts and components 35
- Before use 36
- Installation 36
- Operation 37
- Cleaning and maintenance 41
- Technical specifications 41
- Disposal of old electrical and electronic appliances 43
- Technical support and warranty 44
- Copyright 44
- Simplified eu declaration of conformity. 44
SOMMAIRE
Read these instructions thoroughly before using the device. Keep this instruction manual for future reference or new users.
- Ensure that the mains voltage matches the voltage specified on the device rating label and that the plug is earthed.
- This device is designed for domestic use only and is not intended for bars, restaurants, farmhouses, hotels, motels, and offices.
- Do not immerse the cable, plug, or any other non-removable part of the device in water or any other liquid or expose electrical connections to water. Make sure your hands are dry before handling the plug or switching on the device.
- Check the power cable regularly for visible damage. If the cable is damaged, it must be replaced by the official Cecotec Technical Support Service to avoid any danger.
- Do not place the appliance close to heat sources, flammable substances, wet surfaces or allow it to come into contact with water or other liquids. Do not use outdoors.
- Do not cover the device during operation.
- Do not introduce or allow objects to be introduced in the device, this could cause risk of electrical shock, fire or damage.
- Always turn off and unplug the appliance when not in use and before moving it. Pull from the plug, not the cable, to
disconnect it from the outlet.
- Avoid using extension cords, as they could overheat and cause risk of fire.
- The appliance must not be placed directly under a power socket.
- You must install the appliance at least 1.8 m above the ground.
- The heating appliance must be installed in such a way that the switches and other controls cannot be touched by a person in the bathroom or shower.
- CAUTION: some of the product's parts may become very hot and cause burns. Particular attention should be paid when children and/or vulnerable people are present.
- Keep the device out of the reach of children under 3 years old, unless constantly supervised.
- Children between 3 and 8 years old should only switch the appliance on or off when it has been placed in its normal, intended operating position and if they have been given supervision or instruction concerning the use of the appliance in a safe way and understand the hazards involved. Children between 3 and 8 years old should not plug in, adjust, and clean the appliance and should not carry out maintenance tasks.
- This appliance can be used by children aged 8 and above and persons with reduced physical, sensory, or mental capabilities or lack of experience and knowledge, as long as they have been given supervision or instruction concerning the use of the appliance in a safe way and understand the hazards involved. Children must not play with the appliance. Cleaning and maintenance should not be carried out by children without supervision.
- Supervise children to prevent them from playing with the appliance. Close supervision is necessary when the appliance is being used by or near children.
INSTRUCTIONS DE SÉCURITÉ
Producto: ReadyWarm 2000 Max Box Ceramic Connected
Potencia: 2000 W
Voltaje: 230 V
- On/off switch
- Power cable
Remote control. Fig. 3
- Mode selection icon
- Power selection button
- Power button
- Increase button
- Timer icon
- Decrease button
NOTE:
The graphics in this manual are schematic representations and may not exactly match the device.
ENGLISH
2. BEFORE USE
- This appliance is packaged in a way as to protect it during transport. Take the device out of its box and remove all packaging materials. You can keep the original box and other packaging elements in a safe place. This will help you prevent damage to the device when transporting it in the future. In case the original packaging is disposed of, make sure all packaging materials are recycled accordingly.
- Make sure all parts and components are included and in good conditions. If there is any piece missing or not in good condition, immediately contact the official Cecotec Technical Support Service.
Box content
- Heater
- Assembly kit
- Remote control
- Instruction manual
3. INSTALLATION
Fig. 4
Fix the heater horizontally on a vertical wall in the dimensions indicated, the screen should be facing the floor without tilting it.
- Fig. 4.1 Drill two holes in the wall and have a distance of 360 mm.
- Fig. 4.2 Once the holes have been drilled and the plugs are in place.
- Fig. 4.3 Secure the wall bracket with screws.
- Fig. 4.4 Position the equipment carefully. Make sure that the appliance is securely fixed by making an "L" movement.
Warning
Before using the heater, make sure it is properly fixed to the wall.
4. OPERATION
- Plug in the appliance.
- Press the rear switch, located on the side, to the I position.
- Press the on/off icon to turn the appliance on. The ⏻ indicator will light up.
- Press the on/off icon to turn the appliance off.
- Unplug the appliance when not in use.
Temperature settings
- When the display shows the temperature, press / to adjust it.
- By default, ECO mode is set 4 °C below the Comfort mode temperature.
Setting the time/day
- Press and hold the Ⓛ icon for 3 seconds to access the time and day setting.
- The display will show ♂, press △ / △ to select the current day. Note that the following codes will be displayed:
d1 = Monday
d2= Tuesday
d3 = Wednesday
d4 = Thursday
d5 = Friday
d6 = Saturday
d7 = Sunday
-
Press the ⏻ icon again to confirm the day setting and access the time setting. The display will show 🔍 to indicate you are setting the time.
-
Press the △ / △ icons to set the current time.
-
Press the ⏻ icon again to confirm the hour setting and access the minute setting. The display will show 🔒 to indicate you are setting the minutes.
-
Press the △ / △ icons to set the current minutes.
-
Press Ⓛ to confirm the minute settings.
Note:
Both the time and the day will be reset to the factory settings in case of power failure.
ENGLISH
Heating mode
- Press the ≡icon to select a mode. Each time the ≡icon is pressed, the heating mode will operate in a continuous cycle as shown below:

flowchart
graph TD
    A["Sun Icon"] --> B["Directional Arrow 1"]
    B --> C["P1"]
    C --> D["P2"]
    D --> E["P3"]
    E --> F["F1"]
    F --> G["F2"]
- Comfort mode: press the △ / △ icons to adjust the temperature from 10 °C to 35 °C.
- ECO mode: press the △ / △ icons to adjust the temperature from 6 °C to 31 °C.
NOTE: by default, ECO mode is set 4 °C below the Comfort mode temperature.
- Anti-frost mode: the display will show F^-1 . The default temperature is 7 °C and cannot be changed.
- P1/P2/P3: these are the pre-set heating programmes.
Note: if you have not performed the date and time setting or have not completed the setting, the first time you try to select any of the programmes, you will be asked to set the date and time before.
- Programme P1: it is a programme that is configured from Monday to Sunday as shown in the following figure and cannot be configured:

- Programme P2: it is configured from Monday to Friday as shown in the following figure and cannot be configured:

- Programme P2: it is configured from Saturday to Sunday as shown in the following figure and cannot be configured:

- Programme P3: it is configured from Monday to Friday as shown in the following figure and can be configured:

- Programme P3: it is configured from Saturday to Sunday as shown in the following figure and can be configured:

P3 programme configuration
- Press the ≡ icon until the P3 mode is activated, as above.
- Press and hold the ≡ 📤 icon for 3 seconds to enter the day setting.
- The screen will display 🔊 to tell you that you are setting the day. Press the △ / △ icons to select the day you want to set, the day code is the same as above. Press the ≡ 📞 icon to confirm the day and enter the hour setting.
- The display will show 📄, press the ≡icon again to select Comfort, ECO, or Anti-frost mode.
- Press the / icons to change the time and select the desired mode in each hour as indicated in step 4.
- Repeat these steps until programming is complete for each time and each day.
Note: after setting the desired mode for the 23rd hour, pressing again will return to the daytime setting.
- When d7 appears on the display, press to confirm all P3 programme settings.
Power setting
Press the 11 button on the remote control to adjust the power:
- Fan mode: will display H0.
- Low mode: will display H1.
- High mode: will display H2.
Timer
The timer can be set in two ways to select the desired switch-off time.
Option A
- Press the Ⓛ icon, the display will show ☐ flashing.
ENGLISH
- Press and hold the ⏻ icon, and with the same icon the display will show 2h - 4h - 8h - 0h in cycle.
Option B
- Press and hold the Ⓛ icon.
- Press the icons △ / △ to choose from a range of 0 to 9 h.
Open Window Detection function
- To activate the Open Window Detection function, press the ≡ and △ icons simultaneously. The display will show F0, after 3 seconds, the display will show the set temperature.
- To deactivate the Open Window Detection function, press the and icons at the same time, the display will show F . After 3 seconds, the display will show the set temperature.
Wi-Fi connectivity and mobile App
In order to link your product with our App, please follow the steps below.
For both scanning modes and proper connectivity turn on Bluetooth.
Automatic-scanning mode:
- Download the Cecotec app from Google Play or the App Store.
- If it is the first time you use it, register an account. If not, log in.
- Press and hold the ≡ icon for more than 3 seconds. The 📋 indicator will light up and flash rapidly.
- Once in the app, press on the "+" symbol in the top right corner and the "Add device" option.
- Once inside this option, a "Discovering Devices" box should appear, and then "ReadyWarm 2000 Max Box Ceramic Connected" device should appear.
- Select the device.
- Enter the password of the Wi-Fi the mobile device is connected to and select "confirm". Remember that the network must be 2.4 GHz.
- Wait for the connection to complete.
Manual-connection mode:
- Download the Cecotec app from Google Play or the App Store.
- If it is the first time you use it, register an account. If not, log in.
- Once you have entered the App, tap "+" on the top right-hand corner and tap air treatment. Then select the device from the list "ReadyWarm 2000 Max Box Ceramic Connected".
- Switch on your device and press and hold the ≡ icon for more than 3 seconds. The indicator will light up and flash rapidly.
- Enter your Wi-Fi password and press confirm. Remember the Wi-Fi network must be 2.4 GHz.
- Then, pairing will start automatically.
5. CLEANING AND MAINTENANCE
- Always turn off and unplug the appliance before cleaning it.
- Use a soft, damp cloth and a mild soap solution if desired to carefully clean the exterior surface of the product.
CAUTION: allow the appliance to cool completely before cleaning or handling.
- Do not allow water or other liquids to enter the interior of the product.
- It is recommended to clean the appliance on a regular basis. Vacuum the grilles of the appliance to remove dust and dirt that may have accumulated on the inside and outside.
CAUTION: do not use aggressive detergents, chemicals, or solvents for cleaning, as they may damage the product's finish.
6. TECHNICAL SPECIFICATIONS
Product reference: 08282
Product: ReadyWarm 2000 Max Box Ceramic Connected
Power: 2000 W
Voltage: 230 V
Frequency: 50-60 Hz
Class II
Model identifier: 08282_ReadyWarm 2000 Max Box Ceramic Connected
| Item | Symbol | Value | Unit | Item | Unit | |
| Heating power | Type of heat input, for electric storage local space heaters only (single select) | |||||
| Rated heat output | P_nom | 2.0 | kW | Manual heat charge control with integrated thermostat | No | |
| Minimum heat output (indicative) | P_min | 1.0 | kW | Manual heat charge control with room and/or outdoor temperature feedback | No | |
| Maximum continuous heat output | P_max,c | 2.0 | kW | Electronic heat charge control with room and/or outdoor temperature feedback | No | |
| Auxiliary electricity consumption | Fan assisted heat output | No | ||||
| At nominal heat output | el_max | 0.000 | kW | Type of heat output/room temperature control (single select) | ||
| At minimum heat output | el_min | 0.000 | kW | Single stage heat output and no room temperature control | No | |
| In standby mode | el_SB | 0.001 | kW | Two or more manual stages, no room temperature control | No | |
| With mechanic thermostat room temperature control | No | |||||
| With electronic room temperature control | No | |||||
| Electronic indoor temperature control and internal/daily timer | No | |||||
| Electronic indoor temperature control and internal/weekly timer | Yes | |||||
| Other control options (multiple selections possible) | ||||||
| Room temperature control, with presence detection | No | |||||
| Room temperature control, with open window detection | Yes | |||||
| With distance control option | Yes | |||||
| With adaptive start control | No | |||||
| With working time limitation | Yes | |||||
| With black bulb sensor | No | |||||
| Contact information: | Cecotec innovaciones SL., Av. Reyes Católicos, 60, 46910, Alfafar, Valencia (Spain) | |||||
Technical specifications may change without prior notification to improve product quality.
Made in China | Designed in Spain
7. DISPOSAL OF OLD ELECTRICAL AND ELECTRONIC APPLIANCES

This symbol indicates that, according to the applicable regulations, the product and/or batteries must be disposed of separately from household waste. When this product reaches the end of its shelf life, you should dispose of the cells/batteries/accumulators and take them to a collection point designated by the local authorities.
Consumers must contact their local authorities or retailer for information concerning the correct disposal of old appliances and/or their batteries.
Compliance with the above guidelines will help protecting the environment.
ENGLISH
8. TECHNICAL SUPPORT AND WARRANTY
Cecotec shall be liable to the end user or consumer for any lack of conformity that exists at the time of delivery of the product under the terms, conditions, and deadlines established by the applicable regulations.
It is recommended that repairs be carried out by qualified personnel.
If at any moment you detect any problem with your product or have any doubt, do not hesitate to contact the official Cecotec Technical Support Service at +34 963 210 728.
9. COPYRIGHT
The intellectual property rights over the texts in this manual belong to CECOTEC INNOVACIONES, S.L. All rights reserved. The contents of this publication may not, in whole or in part, be reproduced, stored in a retrieval system, transmitted, or distributed by any means (electronic, mechanical, photocopying, recording or similar) without the prior authorization of CECOTEC INNOVACIONES, S.L.
10. SIMPLIFIED EU DECLARATION OF CONFORMITY.
CE Cecotec Innovaciones hereby declares this heater, model 08282_ReadyWarm 2000 Max Box Ceramic Connected, complies with the Directive 2014/53/EU on radio equipment.
The complete text of the EU declaration of conformity is available in the following Internet address: www.cecotec.es
1. PIÈCES ET COMPOSANTS
Img. 1
Prodotto: ReadyWarm 2000 Max Box Ceramic Connected
Potenza: 2000 W
Voltaggio: 230 V
Frequenza: 50-60 Hz
Classe II
Product: ReadyWarm 2000 Max Box Ceramic Connected
Vermogen: 2000 W
Voltage: 230 V

natural_image
Simple diagram showing a hand pointing to a dot and a dashed line, labeled '2' (no text or symbols beyond label)
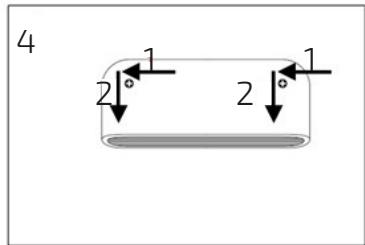
Fig./Img./Abb./Afb./Rys. 4
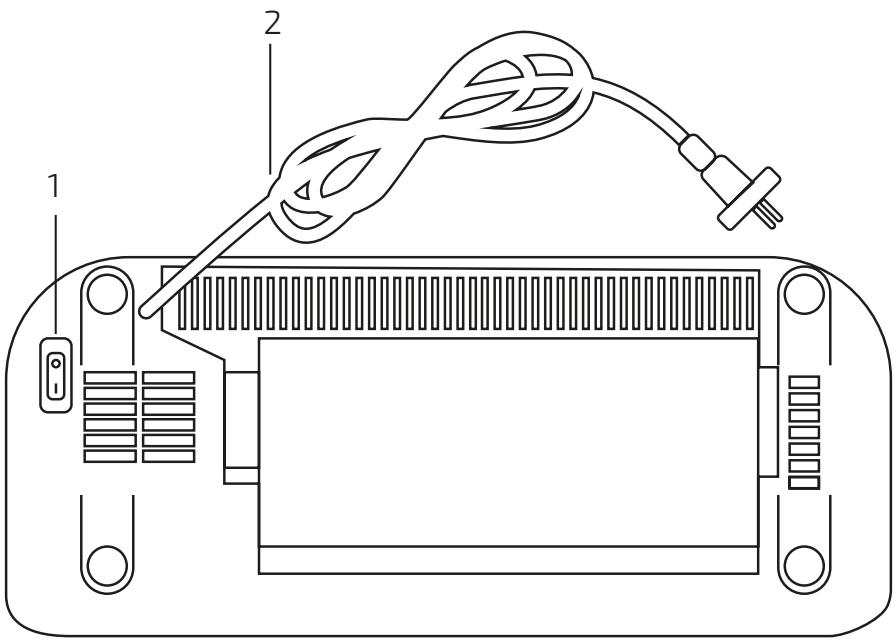
Fig./Img./Abb./Afb./ Rys. 5
www.cecotec.es
- SOMMAIRE
- INSTRUCTIONS DE SÉCURITÉ
- Remote control. Fig. 3
- NOTE:
- ENGLISH
- BEFORE USE
- Box content
- INSTALLATION
- Fig. 4
- Warning
- OPERATION
- Temperature settings
- Setting the time/day
- Heating mode
- P3 programme configuration
- Power setting
- Timer
- Option A
- Option B
- Open Window Detection function
- Wi-Fi connectivity and mobile App
- Automatic-scanning mode:
- Manual-connection mode:
- CLEANING AND MAINTENANCE
- TECHNICAL SPECIFICATIONS
- DISPOSAL OF OLD ELECTRICAL AND ELECTRONIC APPLIANCES
- TECHNICAL SUPPORT AND WARRANTY
- COPYRIGHT
- SIMPLIFIED EU DECLARATION OF CONFORMITY.
- PIÈCES ET COMPOSANTS
- Img. 1
Brand : CECOTEC
Model : ReadyWarm 2000 Max Box Ceramic Connected
Category : Auxiliary heating