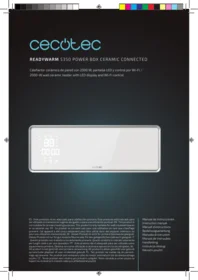
ReadyWarm 5350 Power Box Ceramic Connected - Auxiliary heating CECOTEC - Free user manual and instructions
Find the device manual for free ReadyWarm 5350 Power Box Ceramic Connected CECOTEC in PDF.


| Product Type | Space Heater |
| Brand | Cecotec |
| Model | ReadyWarm 5350 Power Box Ceramic Connected |
| Heating Technology | Ceramic |
| Power | 2000 W |
| Power Supply | 220-240 V ~ 50/60 Hz |
| Dimensions (L x D x H) | 25 x 20 x 30 cm |
| Weight | 2.5 kg |
| Connectivity | Integrated WiFi |
| Thermostat | Electronically adjustable |
| Timer | Programmable up to 24 hours |
| Operating Modes | Heat, fan only, energy saving |
| Remote Control | Included |
| Noise Level | ~45 dB |
| Safety | Automatic shut-off in case of overheating, frost protection |
| Maintenance and Cleaning | Clean with a soft, dry cloth; do not immerse |
| Spare Parts and Repairability | Available through Cecotec customer service |
Frequently Asked Questions - ReadyWarm 5350 Power Box Ceramic Connected CECOTEC
User questions about ReadyWarm 5350 Power Box Ceramic Connected CECOTEC
0 question about this device. Answer the ones you know or ask your own.
Ask a new question about this device
Download the instructions for your Auxiliary heating in PDF format for free! Find your manual ReadyWarm 5350 Power Box Ceramic Connected - CECOTEC and take your electronic device back in hand. On this page are published all the documents necessary for the use of your device. ReadyWarm 5350 Power Box Ceramic Connected by CECOTEC.
USER MANUAL ReadyWarm 5350 Power Box Ceramic Connected CECOTEC
Safety instructions 5
-
Parts and components 23
-
Before use 23
-
Product assembly 23
-
Operation 23
-
Connectivity 27
-
Cleaning and maintenance 28
-
Technical specifications 28
-
Disposal of old electrical appliances 28
-
Technical support and warranty 29
SOMMAIRE
Read these instructions thoroughly before using the appliance. Keep this instruction manual for future reference or new users.
- Make sure that the mains voltage matches the voltage stated on the rating label of the appliance and that the wall outlet is grounded.
- This product is designed only for household use. Do not use for industrial or commercial purposes.
- The appliance must not be placed immediately below a socket.
- Do not place the appliance close to heat sources, flammable substances, wet surfaces or allow it to come into contact with water or other liquids. Do not operate outdoors.
- If the appliance falls into water, do not touch it and unplug it immediately.
- Do not immerse the cord, plug, or any non-removable part of the appliance in water or any other liquid, nor expose the electrical connections to water. Make sure your hands are dry before handling the plug or switching on the appliance.
- Check the power cord regularly for visible damage. If the cord is damaged, it must be replaced by the official Technical Support Service of Cecotec in order to avoid any type of danger.
- Do not introduce or allow objects to be introduced in the air inlet or outlet, this could cause risk of electrical shock, fire or damage.
- The appliance is not intended to be used by children under the age of 8. It can be used by children over the age of 8, as long as they are given continuous supervision.
- This product can be used by children and persons with reduced physical, sensory or mental capabilities or lack of experience and knowledge, as long as they have been given supervision or instruction concerning the use of the appliance in a safe way and understand the hazards involved.
- Supervise young children to make sure that they do not play with the appliance. Close supervision is necessary when the appliance is being used by or near children.

INSTRUCTIONS DE SÉCURITÉ
- Power switch
- Air outlet
- Control panel
- Remote control
- Screws for wall mounting (x2)
- Plugs x2
2. BEFORE USE
- Take the product out of the box and remove all packaging materials.
- Check for any visible damage. If any is observed, contact as soon as possible the Technical Support Service of Cecotec for advice or reparation.
3. PRODUCT ASSEMBLY
- The product must be installed on a wall before operation. Do not use unless it is correctly installed. The device can be operated by means of the control panel or the remote control.
- Use a drill to make 2 holes in the wall at a distance of 33 cm from each other and at a depth of 8 mm.
- Place the 2 plugs in the holes and fix them in place by screwing them in with the screws, leaving 10 mm protruding from the wall.
- Aligning the holes on the back of the product with the screws in the wall, place the device against the wall and carefully rest it on the screws. Slide the device backwards until it is correctly fixed. Fig. 2
4. OPERATION
- Plug the cable into a 220-240V socket, with a beep, the power light will come on and the heater will display the default temperature, flashing for 3 seconds.
- As soon as the appliance is turned on, the display will light up.
- The product can be controlled from the control panel or from the mobile device (Smartphone).
ENGLISH
Control panel
Fig.3
- Modes
- Timer
- Temperature setting
- Window mode
- Weekly schedule
- ECO mode
- Max mode
- On/off button
Heating
- Turn on the power switch to turn on the device. The product will enter in standby mode and the display will show the following: Fig. 4
- Press the power button on the remote control, the product will operate in fan mode and the display will show "- -".
- Press the mode button once to activate the low power heating mode (1000 W). The screen will display “-- / I”.
- Press the ECO mode button to switch the heating to economy mode. Fig. 5
- Press the Max. mode button to set the heating to maximum power mode with fan. Fig. 6
- Press the power button on the remote control again to turn off the device.
- The device will enter standby mode and switch off after 30 seconds.
Remote control
- Press the On/off button to turn the device on.
-
Press the mode button repeatedly until the desired operating mode is selected:
-
Fan without heating
- Heating in eco mode
- Heating at full power with oscillation
- Heating at maximum power
Fig. 7
- Press the power button on the remote control again to turn off the device.
- The device will enter standby mode and switch off after 30 seconds.
Temperature setting
- This function can only be configured with the remote control.
- Press the On/off button to turn the device on.
- Use the plus/minus buttons to select the desired temperature from 10°C to 49°C. While setting the temperature, the °C symbol will be lit.
- Press the mode button to cancel the temperature setting and select eco mode to set
the heating at low power or max mode to set the maximum power. The °C symbol will illuminate.
- The device will automatically switch to full power heating mode when the room temperature drops 4^ C below the set temperature.
- The appliance will automatically switch to the Low power heating mode when the room temperature falls from 0 °C to 2 °C below the set one.
- The device will automatically turn off when the room temperature is higher than the set one. The fan will activate for 30 seconds to cool down the appliance and then will enter standby mode. If the room temperature falls 2^ below the set temperature, the device will automatically turn back on.
Switching on/off (via control panel and remote control or from standby mode)
- Press the timer button to set the time you want the device to switch on, from 1 to 12 hours (the corresponding symbol will light up).
- The display will show the countdown timer. At the set time, the product will automatically switch on and start operating.
- In case no temperature or programme has been set, the product will operate and switch off automatically after 12 hours. Fig. 8
Switching off during operation (via remote control or mobile device)
- Press the timer button to set the temperature at which you want the device to switch on, from 1 to 12 hours (the corresponding symbol will light up).
- The device will automatically switch off at the set time.
- Example: to configure the automatic shutdown at 8 hours, see the following image. Fig. 9
Weekly cleaning schedule (via remote control only)
- Setting the current time with the remote control.
- Press the On/off button to turn the device on.
- Press SET to select the hour (00 to 23).
- Press SET to select the minutes (00 to 59).
- Press SET to select the day of the week.
- Press the plus/minus buttons and select: d1: Monday, d2: Tuesday, d3: Wednesday, d4: Thursday, d5: Friday...
- Press OK to confirm the settings.
- Example: Wednesday, 9:30, temperature: 25 °C.
- Fig. 10
- To display the current time and temperature, press SET again.
- If the power switch is turned off or the power goes out, the time and day must be set again.
Weekly programming (via remote control only)
- Press the On/off button to turn the device on.
- Press the weekly schedule button to enter the weekly schedule setting. The corresponding
ENGLISH
symbol will light up.
- Press DAY to select the day you want to program the heating (d1, d2, d7...).
- Press EDIT to select the number of periods to be programmed (P1, P2, P6...).
- Press TIME/ON to select the time you want to switch on (00, 01, 22-23...). Only the hour can be programmed, not the minutes.
- Press TIME/OFF to select the time you want to switch off (00, 01, 22-23...). Only the hour can be programmed, not the minutes.
Note
The switch-off time must be after the switch-on time.
- Press the plus/minus buttons to set the time for the selected period.
- Press OK to confirm the settings.
- Repeat steps 3 to 7 to schedule the other periods on the same day.
- Repeat steps 2 to 8 to programme the other days of the week.
- Press the weekly programming button to activate (symbol illuminated) or deactivate (symbol off) the weekly programming mode.
- When all settings are saved and the device is in operation, press DAY/ EDIT TIME/ON and TIME/OFF to check the set time and periods of each day.
Note:
- When the on and off times coincide, the device will remain in standby mode.
- If no temperature is configured, the default temperature will be 23 °C.
- When the room temperature is 23^ C or higher, the device will turn off or not turn on.
- In case the power switch is turned off, the weekly programme settings will be deleted.
- Example: set up on Monday 1, between 7:00 and 13:00.
Fig. 11
Open window mode (configurable only from remote control or smartphone)
- Press the On/off button to turn the device on.
- Press the "window open" mode button on the remote control to activate the open window mode (the open window button and the temperature button will light up).
- Press the plus/minus buttons to set the temperature of the open window mode.
- During this mode, the device will stop operating and go into standby mode when the room temperature drops by 5 to 10°C in less than 10 minutes. Press the power button again to turn on the device.
Warning
In case the open window and weekly schedule modes are in operation at the same time, the device will continue to shut down when the temperature drops by 5 to 10^ C in less than 10 minutes, even if it is programmed to operate.
Remote control
Fig.12
- On/off button
- Timer
- Modes
- Oscillation
- Child lock system
- Automatic
- Temperature setting
- Increase
- Decrease
Note
After the appliance is turned on, when the heating function is not switched on, it will be switched off directly. The product will not enter the shutdown process by waiting 30 seconds, but will go directly into standby.
Note
- The remote control requires 1 x CR2025 3V battery (not included).
- Slide the battery compartment's cover down to open it.
- Insert a battery into the compartment, noting the polarity of the battery (see diagram below).
- Close the battery compartment.
Warning
Keep the batteries out of the reach of children.
5. CONNECTIVITY
Manual pairing process
Fig.13
- Download the Cecotec app on your mobile device.
- Open the Cecotec app and create an account.
- Select the device you want to pair. In this case, click on add new device or on the "+" button at the top right as shown in the image below.
- Select the device, which is located in the Air Treatment section and is the "ReadyWarm"
ENGLISH
device.
- Connect the ReadyWarm to the light and switch it on.
- In order to pair, you need to observe on the product that the Wi-Fi image flashes quickly. In case the Wi-Fi image flashes slowly, press and hold the Start/stop button on the lower right side of the device until it starts flashing faster.
- Follow the instructions given by the application to complete the pairing. Remember to check that your wifi network is operating at 2.4 GHz.
6. CLEANING AND MAINTENANCE
- Turn off and unplug the appliance and allow it to cool down before cleaning it.
- Do not use abrasive cleaners or scouring pads to clean the product.
- Use a soft, dampened and clean cloth to clean the product's outer housing. Be careful not to touch the heating element.
- If the product is not going to be used for a long period of time, unplug it and store it in a dry and safe place where it is protected from dust.
7. TECHNICAL SPECIFICATIONS
Product reference: 05822
Product: Ready Warm 5350 Power Box Ceramic Connected
Power and voltage: 1000 W - 2000 W, 220-240 V, 50 Hz
Made in China | Designed in Spain
8. DISPOSAL OF OLD ELECTRICAL APPLIANCES
The European directive 2012/19/EU on Waste Electrical and Electronic Equipment (WEEE), specifies that old household electrical appliances must not be disposed of with the normal unsorted municipal waste. Old appliances must be collected separately, in order to optimise the recovery and recycling of the materials they contain and reduce the impact on human health and the environment.
The crossed out “wheeled bin” symbol on the product reminds you of your obligation to dispose of the appliance correctly.
Consumers must contact their local authorities or retailer for information concerning the correct disposal of old appliances and/or their batteries.
9. TECHNICAL SUPPORT AND WARRANTY
This product is under warranty for 2 years from the date of purchase, as long as the proof of purchase is submitted, the product is in perfect physical condition, and it has been given proper use, as explained in this instruction manual.
The warranty will not cover the following situations:
- The product has been used for purposes other than those intended for it, misused, beaten, exposed to moisture, immersed in liquid or corrosive substances, as well as any other fault attributable to the customer.
- The product has been disassembled, modified, or repaired by persons, not authorised by the official Technical Support Service of Cecotec.
- Faults deriving from the normal wear and tear of its parts, due to use.
The warranty service covers every manufacturing defect of your appliance for 2 years, based on current legislation, except consumable parts. In the event of misuse, the warranty will not apply.
If at any moment you detect any problem with your product or have any doubt, do not hesitate to contact Cecotec Technical Support Service at +34 963 210 728.
1. PIÈCES ET COMPOSANTS
Img. 1
Prodotto: Ready Warm 5350 Power Box Ceramic Connected
Product: Ready Warm 5350 Power Box Ceramic Connected
Vermogen en voltage: 1000 W - 2000 W, 220-240 V, 50 Hz
Fig./Img./Abb./Rys./Obr. 2

Fig./Img./Abb./Rys./Obr. 3

Fig./Img./Abb./Rys./Obr. 4

Fig./Img./Abb./Rys./Obr. 5

Fig./Img./Abb./Rys./Obr. 6
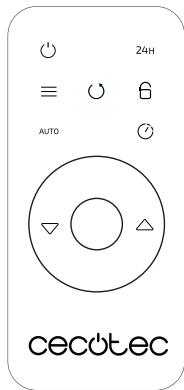
Fig./Img./Abb./Rys./Obr. 7

DAY

Fig./Img./Abb./Rys./Obr. 8
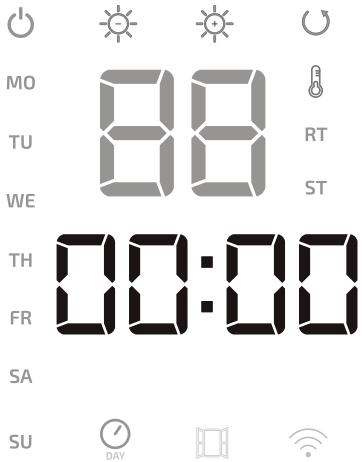
Fig./Img./Abb./Rys./Obr. 9

Fig./Img./Abb./Rys./Obr. 10

Fig./Img./Abb./Rys./Obr. 11

Fig./Img./Abb./Rys./Obr. 12
1

- SOMMAIRE
- INSTRUCTIONS DE SÉCURITÉ
- BEFORE USE
- PRODUCT ASSEMBLY
- OPERATION
- ENGLISH
- Control panel
- Fig.3
- Heating
- Remote control
- Fig. 7
- Temperature setting
- Switching on/off (via control panel and remote control or from standby mode)
- Switching off during operation (via remote control or mobile device)
- Weekly cleaning schedule (via remote control only)
- Weekly programming (via remote control only)
- Note
- Note:
- Warning
- Fig.12
- CONNECTIVITY
- Manual pairing process
- Fig.13
- CLEANING AND MAINTENANCE
- TECHNICAL SPECIFICATIONS
- DISPOSAL OF OLD ELECTRICAL APPLIANCES
- TECHNICAL SUPPORT AND WARRANTY
- PIÈCES ET COMPOSANTS
- Img. 1
Brand : CECOTEC
Model : ReadyWarm 5350 Power Box Ceramic Connected
Category : Auxiliary heating