
MINI CAM 35 AF CAMERA SET - Camera EBENCH - Free user manual and instructions
Find the device manual for free MINI CAM 35 AF CAMERA SET EBENCH in PDF.

| Product type | Autofocus viewfinder camera, fully automatic, 35mm format |
| Photo format | 24 × 36 mm (small format) |
| Brand | EBENCH |
| Model | MINI CAM 35 AF CAMERA SET |
| Viewfinder | Bright frame with autofocus frame, green display (focus) and red (flash) |
| Exposure | Fully automatic |
| Autofocus system | Focus lock with green light, half-pressed shutter |
| Flash | Automatic, on/off, charging time max. 10 seconds with fresh batteries |
| Sensitivity setting | Automatic DX system for ISO 100 to 400 films |
| Power supply | Lithium battery 1 × 3 V CR123A |
| Other functions | Red-eye reduction, self-timer, double exposure, autofocus lock, auto rewind |
| Minimum shooting distance | 1.5 m |
| Flash guide number (ISO 400) | 2.5 m to 6.0 m |
| Film loading | By DX cartridge, leader until loading mark |
| Maintenance | Clean with a soft, dry cloth; do not use solvents, alcohol or abrasives |
| Safety | Turn off after use; do not open the back during rewinding; replace battery without film |
| Battery disposal | Do not dispose in household waste; comply with local regulations |
Frequently Asked Questions - MINI CAM 35 AF CAMERA SET EBENCH
User questions about MINI CAM 35 AF CAMERA SET EBENCH
0 question about this device. Answer the ones you know or ask your own.
Ask a new question about this device
Download the instructions for your Camera in PDF format for free! Find your manual MINI CAM 35 AF CAMERA SET - EBENCH and take your electronic device back in hand. On this page are published all the documents necessary for the use of your device. MINI CAM 35 AF CAMERA SET by EBENCH.
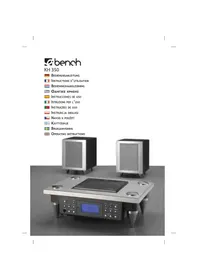
USER MANUAL MINI CAM 35 AF CAMERA SET EBENCH
SET APPAREL PHOTO AF
KIT CAMERA AF
JUEGO DE CAMARA AF
CONJUNTO MAQUINA FOTOGRÁFICA AF
AF CAMERASET
ΣET KAMEPA Σ AF

| D | Bedienungsanleitung | Seite | 4-11 |
| GB | Operating instructions | Page | 12-19 |
| F | Mode d'emploi | Page | 20-27 |
| I | Instruzioni per l'uso | Pagina | 28-35 |
| E | Instrucciones de service | Pagina | 36-43 |
| P | Instruções de service | Pagina | 44-51 |
| NL | Gebruiksaanwijzing | Pagina | 52-59 |
| GR | OΔHΓΕΣ ΑΕΙΤΟΥΡΓΙΑΣ | Σελιδα | 60-67 |
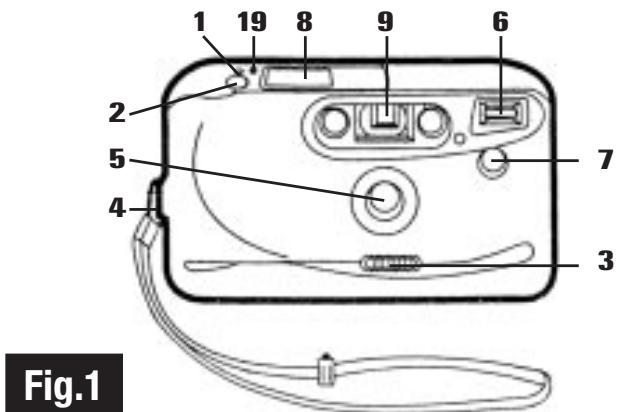

IDENTIFICATION, FIG. 1
- Multifunction switch
2.Shutter Release Button - Lens Cover/Power Switch
- Wrist Strap Holder
- Lens
- Flash
- Red Eye Reduction LED
- LCD Panel
- Viewfinder
-
Rewind Fork
-
Film Door Latch
- Film Guide Rails
- Tripod Socket
- Film Take-up Drum
- Film Loading Mark
- Battery Cover
- Film Door
- DX Film Window
- Film Rewind Switch
- Sprocket Wheel
TECHNICAL INFORMATION
Type: Fully automatic autofocus viewfinder camera, 35mm
Film format: 35mm,24× 36mm
Viewfinder: with bright line viewfinder, autofocus frame, green display for focusing, red display for switched off flash (OFF ) or insufficient light
Exposure: Fully automatic
Autofocus system: Focus stop shows green light with half-pressed shutter release.
Flash: Automatic switching in and switching off
Flash charging time: Max. 10 seconds with fresh batteries
Film speed setting: Automatic DX system for film ISO 100 to 400.
Energy source: 1 x 3V lithium batteries CR 123A
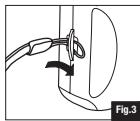
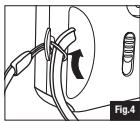
a) ATTACHING WRIST STRAP, FIG. 3-4
Thread the small looped end of wrist strap through the Wrist Strap Holder (4). Insert the other end through the protruding loop and pull taut to securely fasten the strap.
b) LOADING BATTERY
Only-use lithium 3V CR 123 A. Ni-Cad rechargeable or Carbon-Zinc penlight batteries are not suitable.
- Open the battery cover and follow the battery orientation shown in the battery compartment.
- Replace batteries when flash recharging time becomes too slow (say more than 30 seconds).
- Warning: After use always switch the camera off (see section c), as standby operation can drain the batteries.
c) LENS COVER/POWER SWITCH
- To turn on camera, slide the Lens Cover/Power Switch (3) to the left. The camera is now ready to take photographs. Also, the "Auto " symbol on the LCD Panel (8) displays steadily, and when film is loaded the appropriate frame number will be displayed.
- When picture taking is complete, slide the Lens Cover Switch to the right until it clicks fully closed. This will also switch off the camera's power.
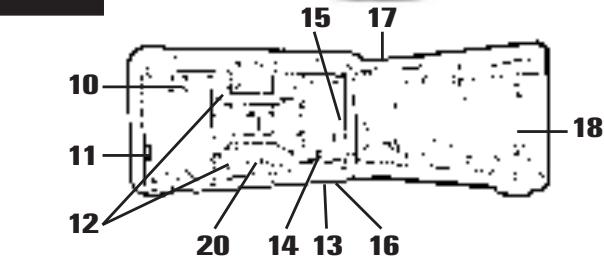
d) LCD PANEL, FIG. 2
When the camera is loaded with a battery and the camera is turned ON, the Liquid Crystal Display Panel (Fig 2) will display as appropriate the following functions:
no film loaded; frame counting; " 念 " charging; "auto 念 " (ON and READY); red eye reduction and self-timer.
When the battery door is opened to replace battery, the LCD panel will go blank and the frame counter will reset to zero. For convenience, replace the battery only when film is not loaded.
Fig 2 a) LCD indicates "0" - "No film loaded".
Fig 2 b) LCD indicates "1" which appears after 4th frame advance. This means film is satisfactorily loaded. Camera is now ready for taking the first picture.
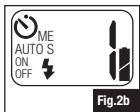
Fig 2 c) LCD displays blinking flash " 求" symbol indicating flash is still charging. Camera is ready for picture taking when " 求" symbol stops blinking and displays continuously.
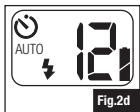
Fig 2 d) LCD displays " " to show that self timer has been activated.
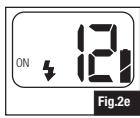
Fig 2 e) Press the multifunction switch (1) and select the function ON . The automatic flash is now switched off and the flash is automatically switched in synchronously on release of the shutter and compensates for shadows, e.g. when the subject is in front of a very bright background (sun, light sky).
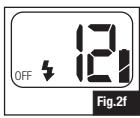
Fig 2 f) Switch off the automatic flash when you wish to take photographs in normal daylight. Press the multifunction switch (1) and select the function OFF The shutter is set to fully open in order to ensure the best possible exposure. To take the photograph, press the shutter release (2).
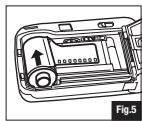
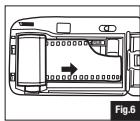
e) LOADING FILM, FIG. 5-6
Use ISO 100, 200 or 400 colour print film with DX coding for best results.
1) Open Lens Cover/Power Switch [see section c] to turn on the camera.
2) Open the Film Door (17) by pushing the Film Door Latch (11) downwards.
3) Insert the Film Cartridge by inserting the top end first, then snap in the bottom. Push cartridge firmly flat so that the film leader lies flat and does not loop upwards (Fig. 5-6).
4) Pull out the film leader until the tip reaches the Film Loading Mark (15) next to the Film Take-up Drum (14).
- Make sure that the film lies flat between the Film Guide Rails (12) and that the perforations are engaged with the Sprocket Wheel (20).
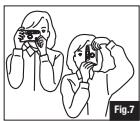
f) TAKING PICTURES — Daylight & flash, FIG. 7
1) Hold the camera firmly in both hands (Fig.7). Be careful not to block the Lens (5), Flash (6), or LED (7) with your fingers or hair.
2) You may hold the camera in horizontal or vertical format (turn the camera so that the flash is on top). Check that the camera's power is ON (refer to section c). The "Auto " symbol on the LCD will light.
3) Remember to keep a minimum focus distance of 1.5m from your subject and compose the picture carefully in the Viewfinder. At close distances part of the image may be truncated in the actual picture, so allow room when you compose the picture.
4) Gently depress the Shutter Release Button fully to take the picture. The film will immediately advance to the next frame ready for further picture taking.
5) The Flash will fire automatically, if required, for correct exposure.
6) At very low light levels the Red-Eye Reduction feature may be required for pictures of people or pets. Hold the Shutter Release Button halfway down for about 1 second to automatically activate Red Eye Reduction and then depress it fully to take the picture. Refer to section g) RED-EYE REDUCTION for additional information.
7) Flash Distance Guide
ISO 100: 1.5 m to 3.0 m
ISO 200: 2.0 m to 4.5 m
ISO 400: 2.5 m to 6.0 m
The range of the flash depends on the film speed you are using. Make sure your subject is positioned within the flash range to ensure proper exposure.
Pictures of people or pets taken at low light levels may exhibit "Red-Eye" effect. The eye pupils appear as red spots in the pictures.
This can be reduced by having your subject look away from the camera or by turning on bright room lights. Additionally this camera is equipped with a Red-eye Reduction feature.
Depressing the Shutter Release Button halfway will turn on a high power Red Eye Reduction LED (10) on the front of the camera. This will cause the subject's eye pupils to close partially, reducing the "Red-Eye" effect.
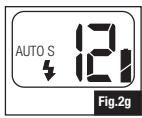
Red-eye reduction AUTO-S (Fig. 2g) will be most effective when your subject is in the center of the picture.
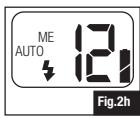
h) MULTIPLE EXPOSURES, FIG. 2h
This function allows you to take double or multiple exposures. Press the multifunction switch (1) and select the function (ME). Then press the shutter release (2) and take the first exposure. In this mode the film is not wound on, but the camera is ready to take another photograph.
For example:
You wish to combine the clear outlines and details of a sunset with the lights (e.g. streetlights) of a town. Unfortunately, the lights are not yet switched on. This is how you can do it:
Set up your camera, ideally on a stand, sight on your subject and press the multifunction switch (1) and then select the function (ME). Press the shutter release (2) and make the first exposure. As soon as the town lights have been switched on, select the function OFF with the multifunction switch and make the second exposure.
Note: You can make even more exposures on the same negative. To do this, select the multiple exposure function (ME) again before the additional exposure.
i) REWINDING THE FILM
At the end of the roll of film, the motor film advance will stop automatically, and you will not be able to take more pictures.
1) The film will automatically begin to rewind and the frame counter on the LCD Panel will count backwards. The motor will stop automatically when the film is fully rewind.
2) When motor sound stops, indicating rewinding is complete, check that the frame counter reads "0". Open the film door and remove the film for processing.
3) If motor sound is unusually slow or laboured, batteries may need to be replaced.
4) If you wish to wind the film back before the end of the film is reached, press the rewind button (19).
- Warning: Do not open the film door during rewind. Wait until rewinding of film is complete, otherwise your pictures will be ruined.
k) SELF-TIMER
Pre-select automatic shutter (O) release with multifunction switch (1) and press the shutter release to a take picture. After the shutter release (2) is pressed, the self release indicator (7) is illuminated for 8 seconds. Then the display flashes for a further 5 seconds before the shutter is released and the photograph taken.
I) CARING FOR YOUR CAMERA
- Keep the Lens Cover closed when not using the camera.
- Protect the camera from dirt, rain, dampness or high heat.
- Do not use solvents, alcohol or abrasive cleaners to clean the camera body.
m) TROUBLE SHOOTING
WARNING: TO AVOID RISK OF ELECTRICAL SHOCK, DO NOT ATTEMPT TO TAKE THIS CAMERA APART.
Symptoms, probable Causes/Suggested Correction
1) Symbol "Auto" continues to blink for a long time.
- Battery is worn out and needs to be replaced.
2) Blurry Pictures
- Camera shake - hold the camera firmly and press the Shutter Release Button gently. Use tripod in poor light situation to minimise shake and improve picture sharpness.
- Subject is closer than 1.5m .
3) Dark under exposed Pictures
- Too far from your subject for flash pictures.
4) Bright over exposed Pictures
- Too close to your subject for flash pictures.
5) Depressing the Shutter Release Button has no effect
- If you are loading a new film and frame counter reads zero, the film may be misloaded. Open the film door and reload the film.
- Film may be jammed - rewind the film and return it to your photo lab for processing.
- Battery may be old - replace the battery.
6) Frame counter resets to zero
- Opening the battery door to change batteries will cause the frame counter to reset to zero. The camera will continue to operate correctly, but the indicated frame count will be incorrect until your next film is loaded.
n) AUTOFOCUS LOCK
The camera's autofocus system will focus on whatever is in the centre area of the picture. If your main subject is near the edge of the picture you can use the autofocus lock feature.
1) Centre your main subject in the viewfinder.
2) Depress and hold the Shutter Release Button halfway to lock the focus ON.
3) While still holding the Shutter Release Button halfway, recompose the picture as you desire it and take the picture.
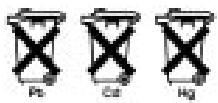
o) BATTERY DISPOSAL
Contribute to environmental protection!
- Do not dispose of used batteries or accumulators in household garbage bins.
- In some countries you are legally obliged to handle disposal of used batteries by taking either to a public collection station or to where batteries were originally purchased.
- Please check with your local authority about specific regulations and location of collection bins where old batteries may be placed.
- Batteries are labelled with symbols containing harmful substances: Pb (Lead); Cd (Cadmium); Hg (Mercury).
- Protect the environment and dispose of used batteries appropriately.
NOMENCLATURE, FIG. 1
d) DISPLAY DE CRISTAL LIQUIDO (LCD), FIG. 2
d) PAINEL LCD, FIG. 2
d) LC-DISPLAY, AFB. 2
- IDENTIFICATION, FIG. 1
- TECHNICAL INFORMATION
- a) ATTACHING WRIST STRAP, FIG. 3-4
- b) LOADING BATTERY
- c) LENS COVER/POWER SWITCH
- d) LCD PANEL, FIG. 2
- e) LOADING FILM, FIG. 5-6
- f) TAKING PICTURES — Daylight & flash, FIG. 7
- h) MULTIPLE EXPOSURES, FIG. 2h
- i) REWINDING THE FILM
- k) SELF-TIMER
- I) CARING FOR YOUR CAMERA
- m) TROUBLE SHOOTING
- Symptoms, probable Causes/Suggested Correction
- n) AUTOFOCUS LOCK
- o) BATTERY DISPOSAL
- NOMENCLATURE, FIG. 1
- d) DISPLAY DE CRISTAL LIQUIDO (LCD), FIG. 2
- d) PAINEL LCD, FIG. 2
- d) LC-DISPLAY, AFB. 2
Brand : EBENCH
Model : MINI CAM 35 AF CAMERA SET
Category : Camera