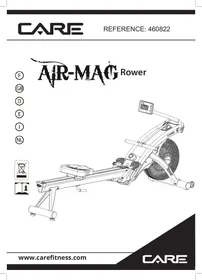
RAMEUR - Rowing Machine CARE FITNESS - Free user manual and instructions
Find the device manual for free RAMEUR CARE FITNESS in PDF.
User questions about RAMEUR CARE FITNESS
0 question about this device. Answer the ones you know or ask your own.
Ask a new question about this device
Download the instructions for your Rowing Machine in PDF format for free! Find your manual RAMEUR - CARE FITNESS and take your electronic device back in hand. On this page are published all the documents necessary for the use of your device. RAMEUR by CARE FITNESS.
USER MANUAL RAMEUR CARE FITNESS
E mail: sav@carefitness.com
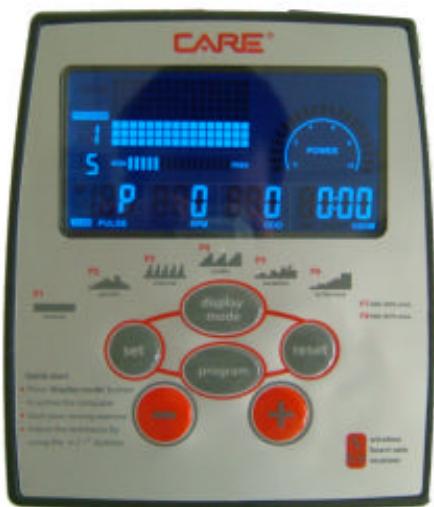
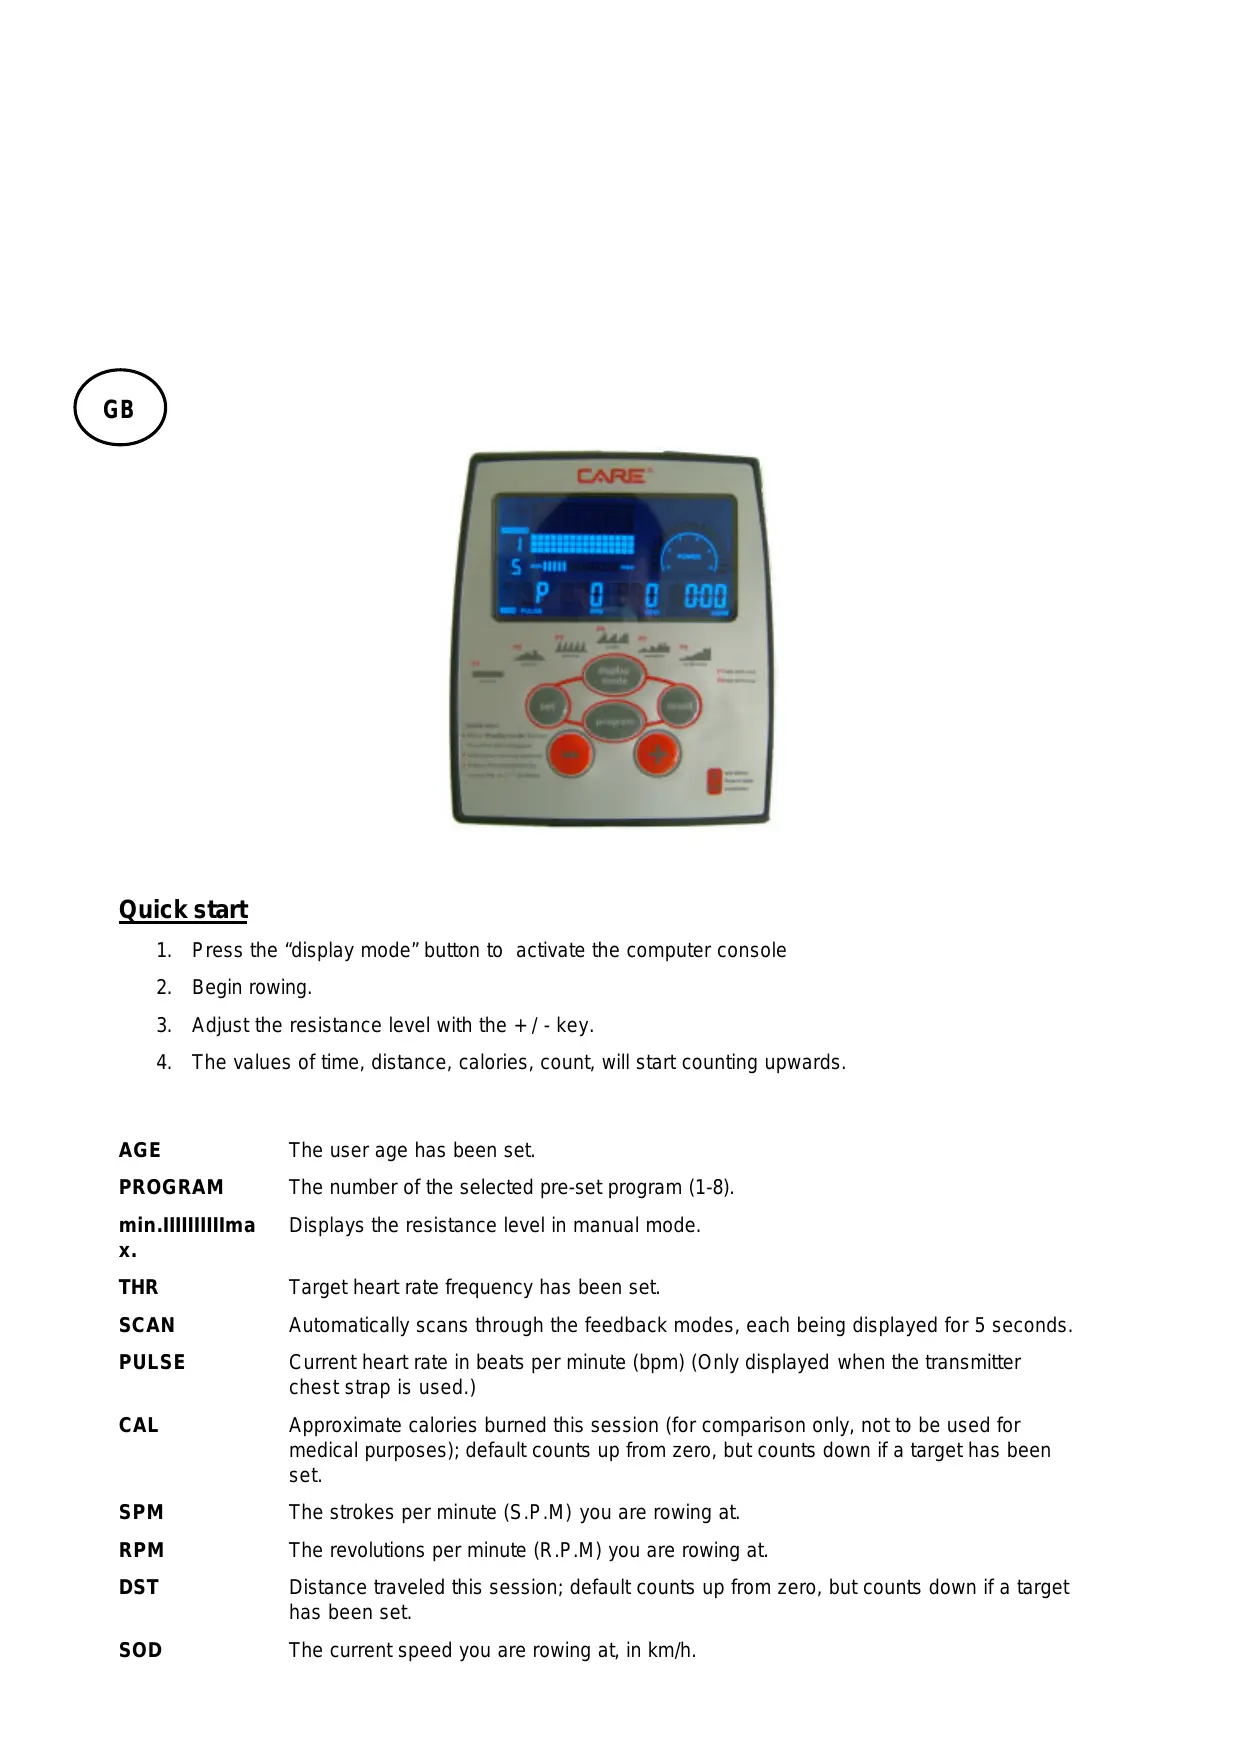
Quick start
- Press the "display mode" button to activate the computer console
- Begin rowing.
- Adjust the resistance level with the + / - key.
- The values of time, distance, calories, count, will start counting upwards.
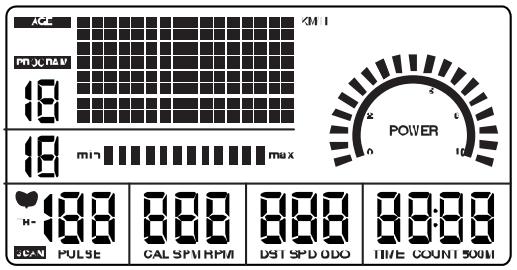
AGE The user age has been set.
PROGRAM The number of the selected pre-set program (1-8).
min.IlllIlllIma Displays the resistance level in manual mode.
X.
THR Target heart rate frequency has been set.
SCAN Automatically scans through the feedback modes, each being displayed for 5 seconds.
PULSE Current heart rate in beats per minute (bpm) (Only displayed when the transmitter chest strap is used.)
CAL Approximate calories burned this session (for comparison only, not to be used for medical purposes); default counts up from zero, but counts down if a target has been set.
SPM The strokes per minute (S.P.M) you are rowing at.
RPM The revolutions per minute (R.P.M) you are rowing at.
DST Distance traveled this session; default counts up from zero, but counts down if a target has been set.
SOD The current speed you are rowing at, in km/h.
ODO Total distance traveled since last battery changed.
TIME Time exercised this session; default counts up from zero, but counts down if a target has been set.
COUNT Stroke exercised this session; default counts up from zero, but counts down if a target has been set.
500M Expected exercise time for 500 meters traveled.
POWER The force of each rowing stroke.
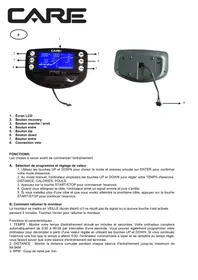
Screen Display
BUTTONS
| Pre-workout | During workout | |
| display mode | Switch different mode values. | Select display mode. |
| program | Press repeatedly to select a program (p1~p8). | |
| set | Confirm current target values setting. | |
| reset | Reset current setting value, press & hold for total reset. | |
| + | Increase values setting in “target setting” mode. | Increase the resistance level. |
| - | Decrease values setting in “target setting” mode. | Decrease the resistance level. |
PROGRAM
There are 5 pre-set programs available for you to choose from. The resistance level adjusts automatically throughout the program.
- Press "program" button to chose your program (p2~p6).
- Press "set" button to confirm your selection.
- Press "display mode" button to enter the "time" mode.
- The value of "00:00" will be flashing in the "time" window.
- Press "+" or "-" button to set your workout time.
- Press "set" to confirm your setting.
- Start rowing to begin your workout.
NOTE: You can change the resistance level at any point during the workout and the rest of segments will be adjusted by scale automatically.
NOTE: You can also add to your program targets based on time, distance, calories, stroke or pulse rate. To do this, see the "Target Program" instruction below.
NOTE: Each program is made up of 16 segments and the length of each segment will depend on the time you set for your workout.
| P1 manual | P2 aerobic | P3 interval | P4 cardio | P5 variation | P6 to the max | P7 HRC 60% max. P8 HRC 85% max. |
H.R.C. (Heart Rate Control)
HRC program works by automatically adjusting the resistance to keep your working out at your target heart rate. To do this the console will need your pulse reading throughout the exercise, which it gets from you wearing a chest strap transmitter.
If your heart rate is too high the resistance is decreased.
If your heart rate is too low the resistance is increased.
This console features 2 heart rate control program:
? 60% - Target to operate at 60% of your maximum heart rate to lose weight.
? 85% - Target to operate at 85% of your maximum heart rate to improve your stamina.
- Press & hold "display mode" button for 5 sec. to enter the "age" mode.
- Press "+" or "-" button to set your age. Press "display mode" to confirm your setting.
- Press "program" button to choose your program (p7-60% Max. HR/p8-85% Max. HR). Press "set" button to confirm your selection.
- The value of "THR" will be flashing in the "pulse" window. Press "set" to confirm your target heart rate setting.
- Start rowing to begin your workout.
NOTE: You can also add to your program targets based on time, distance, calories or stroke. To do this, see the "Target Program" instruction below.
Target Program
You can choose to workout by setting a target based on pulse rate, calories burned, distance traveled, time or the strokes rowed you want to achieve.
When you reach your target the rower will sound a short alarm.
Set to your desired program as described previously, but before pressing "set" to begin your exercise.
- The value of "0" will be flashing in the "pulse" window.
- Press "+"or"-button to set your Target Pulse Rate. Press "set" to confirm your setting.
- The value of "0" will be flashing in the "calories" window.
- Press "+" or :"" button to set your Target Calories. Press "set" to confirm your setting.
- The value of "0" will be flashing in the "distance" window.
- Press "+" or "-" button to set your Target Distance. Press "set" to confirm your setting.
- The value of "00:00" will be flashing in the "time" window.
- Press "+" or "-" button to set your Target Time. Press "set" to confirm your setting.
- The value of "0" will be flashing in the "count" window.
- Press "+" or "-" button to set your Target Storke. Press "set" to confirm your setting.
- Start rowing to begin your workout.
NOTE: You only have to set one of the targets described above, and once done you can press "set" to go straight into your workout, however, if you set multiple targets the workout will end when the first target is reached
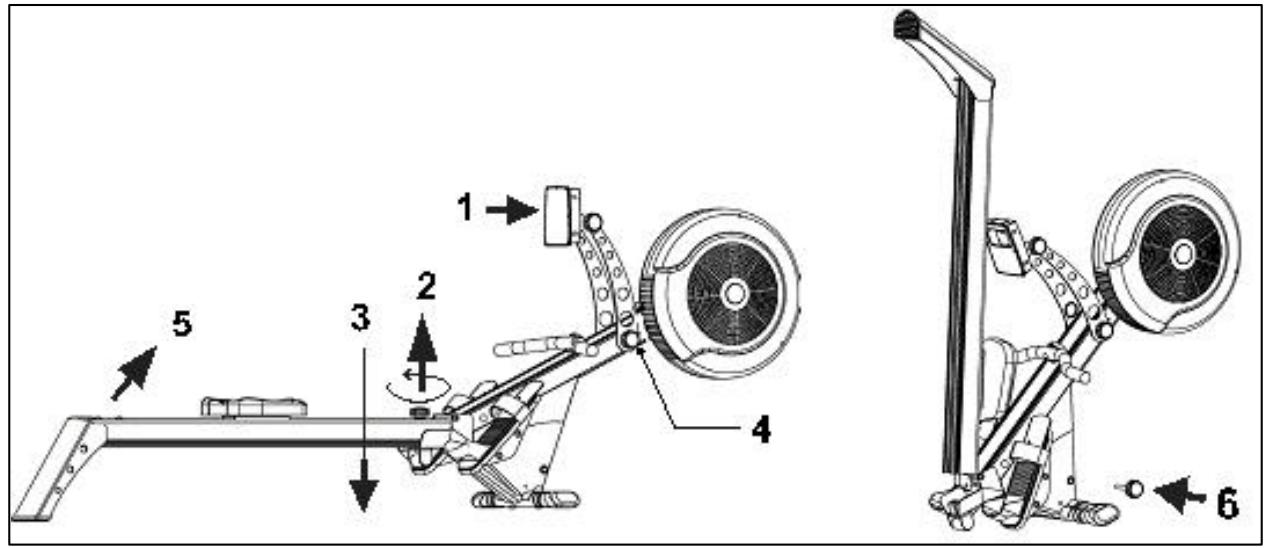
FOLDING FOR STORAGE
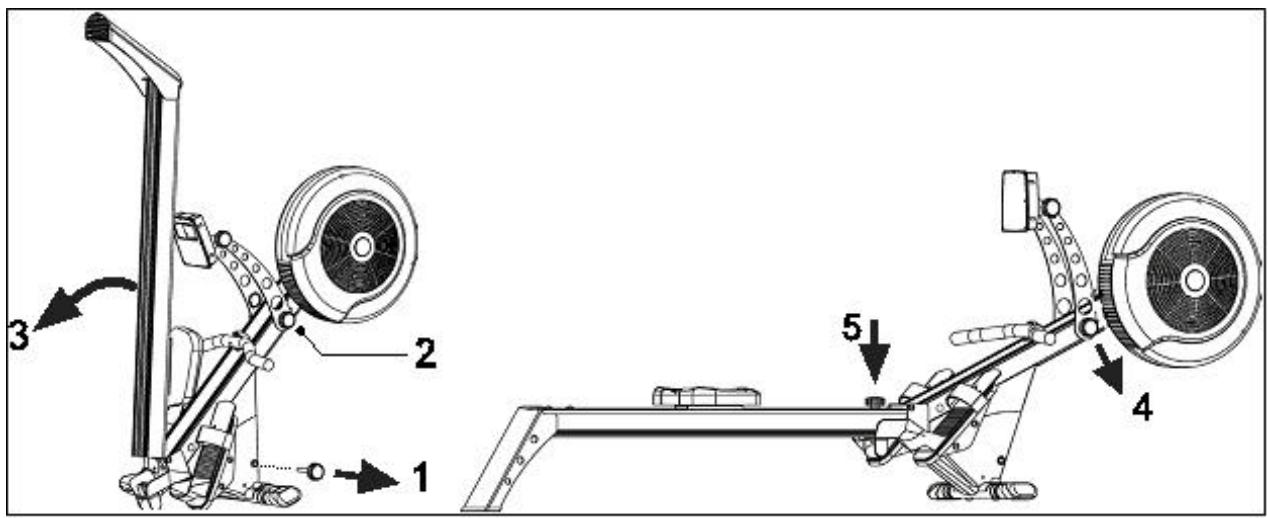
UNFOLD FOR USE

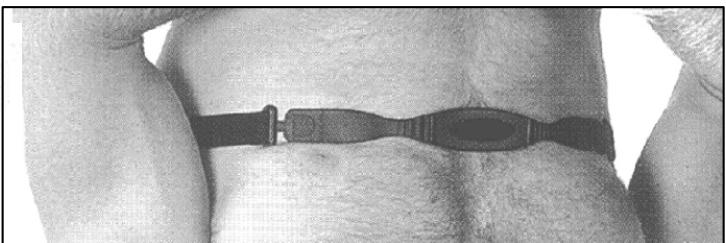
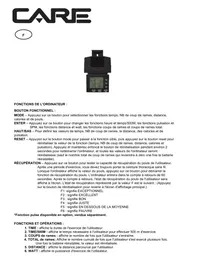
It is recommended that you wear the transmitter against your bare skin to ensure flawless operation. However if you wish to wear the transmitter over a shirt, moisten the shirt well under the rubber electrodes.
? Attach the adjustable elastic strap to the transmitter.
? Moisten the rubber electrodes on the underside of the belt as shown.
Water or saliva can be used.
THE KEY TO FLAWLESS OPERATION IS TO WET THE RUBBER ELECTRODE AREAS WELL.
? The transmitter should be positioned next to your skin with the logo facing forwards in the middle of the chest, just below the breast.
? Adjust the strap to ensure a secure but comfortable fit.
? The transmitter is activated automatically when on the body and is deactivated automatically when removed.
NOTE: If you have difficulty obtaining a good regular heart rate reading, please check the belt, which may need adjusting. The rubber electrodes must be flat against the skin, and the belt must be in the correct position on the chest ---Not too low !!
Check the electrodes are wet.
Check that the belt is clean, with no accumulated sweat or dirt.
CARE AND MAINTENANCE
? Thoroughly wipe the transmitter, and allow the elastic strop to dry after each use. Store your chest transmitter in a cool dry place.
? Do not expose your chest transmitter to direct sunlight for extended periods such as leaving it in a car.
? Do not expose your chest transmitter to extreme temperatures above 122^
Fahrenheit (50^) or below 14^ Fahrenheit (-10^)
REPLACING THE TRANSMITTER BATTERY
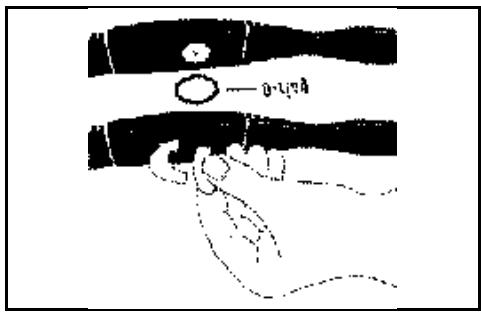
Unscrew the battery hatch with a coin and remove the old battery. Ensure that the new battery is inserted into the hatch correctly with the plus sign facing the battery hatch.
Check that rubber gasket is clean, correctly fitted and not damaged, then close the hatch securely.
The transmitter utilizes a 3 volt 2032 cell.
Cardio - Training:
Before programming your training, it is essential to take account of your age, particularly for people of more than 35 years of age, as well as your physical condition. If you have a sedentary lifestyle
without regular physical activity, it is vital that you consult your doctor to determine the level of intensity of your training. Once determined, do not attempt to achieve your maximum during the first training sessions. Be patient; your performance will quickly improve.
This enables you to develop your cardiovascular system (fitness of the heart / blood vessels). During Cardio-Training, the muscles need a supply of oxygen and nutritive substances. They also need to liminate waste. Our heart increases its rhythm and sends a larger amount of oxygen to the body by means of the cardiovascular system.
The more often you exercise regularly and repetitively, the more your heart will develop, just like any other muscle. In daily life, this translates into the ability to bear greater physical effort and improve your intellectual faculties.
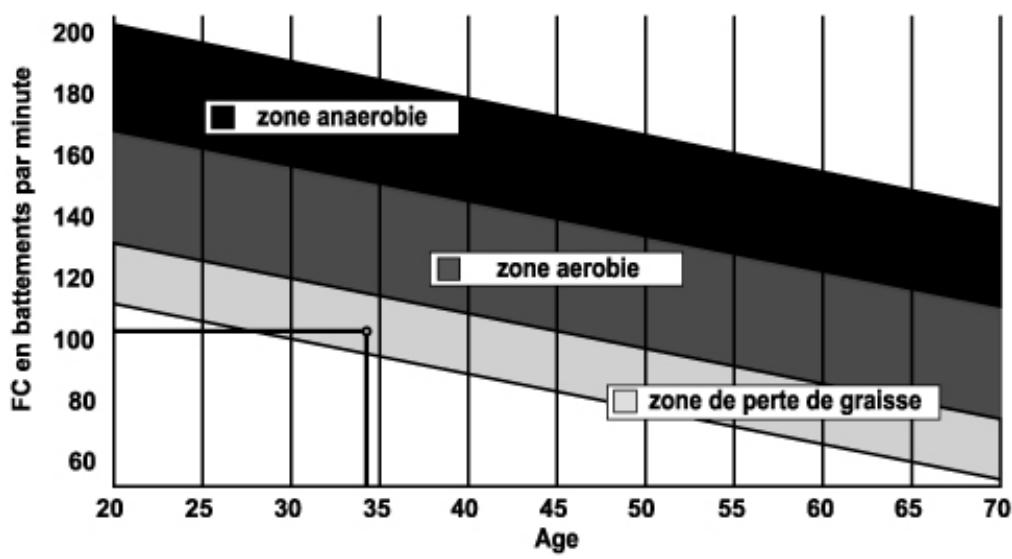
Definition of your work Zone:
The Maximum Heart Rate (MHR) = 220 - age (180 - age for sedentary people).
The Warming Up Zone and Cooling Down Zone are equal to 55% of your MHR.
The Fat Loss Zone is between 55 / 65% of your MHR.
The Aerobic Zone is between 65 / 85% of your MHR.
The Anaerobic Zone is between 85% of your MHR and your MHR.
Make a diagram of the target zones
The progressive training stages:
A warming up phase:
Start each training session by warming up progressively (10-20 min, more if you are over 50) which will put your muscles on standby and gently increase your heart rate. Gently increase your pulse to 55% of your MHR (Maximum Heart Rate).
Keep your Heart Rate at this level for the duration of the warming up time. If you
begin your training too quickly, you are in danger of increasing the risk of tendon or muscle injury.
2) A work phase:
This is the main part of the training session. Depending on your specific goals and your initial physical condition, weight loss, improvement of cardiovascular resistance (aerobic work), development of stamina (anaerobic work), it is possible to choose the appropriate target zone.
The Fat Loss Zone, 55 - 65%
The heart rate must be low and the duration of the exercise quite long. This zone is advised for people resuming physical activity after a long period of idleness, who
are trying to eliminate excess weight or are susceptible to cardiac problems. Do not forget that for this type of training the duration of the exercise must be at least 30 minutes and the Heart Rate (HR) between 55 and 65% of the MHR. - Gradually increase from 30 to 60 minutes per session.
Exercise 3 or 4 times a week.
The Aerobic Zone, 65 - 85%
This zone is recommended for those who are in good physical condition who train regularly. By training in this zone, you will improve your physical condition but avoid overworking.
Duration: 20 to 30 minutes per session.
Frequency: At least 3 or 4 times a week.
The Anaerobic Zone, 85% - MHR
This zone is exclusively for experienced athletes and is never recommended without medical approval and supervision. This zone is designed only for very fit people. It is used for interval training (or for short sprints) to help you to improve or measure your level of stamina. The time spent in this zone must be brief to avoid the risk of accident.
3) A cooling down phase:
This entails a reduction of exertion (10 to 20 min). It enables you to return your cardiovascular system to normal (55% of your MHR) and prevent or reduce muscular pain such as cramp and stiffness. You must follow the training with a session of stretching exercises while your joints are still warm. This relaxes the muscles and helps to prevent stiffness. Stretch slowly and gently. You must never stretch until you reach the pain threshold. Hold each stretch for 30 to 60 seconds while breathing out.
Check your progress
As it improves, your cardiovascular system will have an HR which will be lower when at rest. You will take longer to reach your target zone and it will be easier for you to maintain it. Sessions will seem easier and easier and you will have more stamina in your daily life.
If, on the other hand, your HR is higher than usual when at rest, you will have to rest or reduce the intensity of your training.
Do not be discouraged by the initial sessions. Motivate yourself by scheduling specific training times. Work hard!
To order spare parts
To guarantee an efficient service, make sure you have the following items before you contact our After Sales Service:
The name or reference of the product.
Contact us from Monday to Friday between 9h00 and 12h00 and 13h00 and 17h00 (except for public holidays).
C.A.R.E. After Sales Service
Email: sav@carefitness.com

E-mail: sav@carefitness.com
Snelstart
De harttraining (cardiotraining):
2 tot 3 trainingen per week = circa 30 minutes per keer.
1 tot 2 trainingen per week = circa 50 minutes per keer.
E-mail: sav@carefitness.com