
D2010 - Auxiliary heating ZIBRO - Free user manual and instructions
Find the device manual for free D2010 ZIBRO in PDF.
| Product type | Portable dehumidifier |
| Brand | ZIBRO |
| Model | D2010 |
| Dimensions (H x W x D) | 54.5 cm x 35 cm x 21 cm |
| Weight | 11.5 kg |
| Power supply | 230 V, 50 Hz |
| Power consumption | 0.19 - 0.27 kW (min. - max.) |
| Dehumidification capacity | Up to 10 L/day (at 32 °C, 80 % RH) 5.7 L/day (at 27 °C, 80 % RH) |
| Water tank capacity | 1.6 litres |
| Compressor type | Low volume |
| Refrigerant | R134A (170 g) – GWP = 1300 |
| Noise level | 50 dB(A) |
| Main functions | Automatic dehumidification, automatic defrost function, 2-speed fan (silent/normal), digital temperature and humidity display, automatic shut-off at adjustable humidity level (40%-70%), continuous mode via drain hose |
| Visual and audible indicators | Indicator light and beep when tank is full |
| Maintenance and cleaning | Washable air filter (every 100 operating hours minimum); removable water tank; external cleaning with a damp cloth |
| Safety | Automatic shut-off when tank is full, 3-minute safety delay before compressor restart, frost protection, shut-off at too low temperature |
| Spare parts and repairability | Repairs exclusively by an authorized technician; replaceable power cord; original parts recommended |
| Warranty | 2 years on equipment and manufacturing defects (upon presentation of proof of purchase) |
| Recycling | Do not dispose of with household waste; contains fluorinated greenhouse gas (R134A); take to an approved recycling center |
| Accessories included | Small drying rack for clothes, transparent hose for continuous drainage |
Frequently Asked Questions - D2010 ZIBRO
User questions about D2010 ZIBRO
0 question about this device. Answer the ones you know or ask your own.
Ask a new question about this device
Download the instructions for your Auxiliary heating in PDF format for free! Find your manual D2010 - ZIBRO and take your electronic device back in hand. On this page are published all the documents necessary for the use of your device. D2010 by ZIBRO.
USER MANUAL D2010 ZIBRO
OPBEVARING AF APPARATET
FÖRVARING AV APPARATEN
Congratulations with the purchase of your dehumidifier. You have acquired a high quality product which will give you many years of pleasure, if you use it responsibly. Please read the user's manual first in order to ensure the optimum life span of your dehumidifier. On behalf of the manufacturer, we provide a two-year warranty on material or manufacturing defects. Enjoy your dehumidifier.
Yours sincerely,
PVG International B.V.
Customer Service Department
USER MANUAL (GB)
TABLE OF CONTENTS:
- FUNCTION OVERVIEW
- SAFETY INSTRUCTIONS
- OPERATION
- CLEANING AND MAINTENANCE
- TROUBLESHOOTING
- WARRANTY
- SPECIFICATIONS
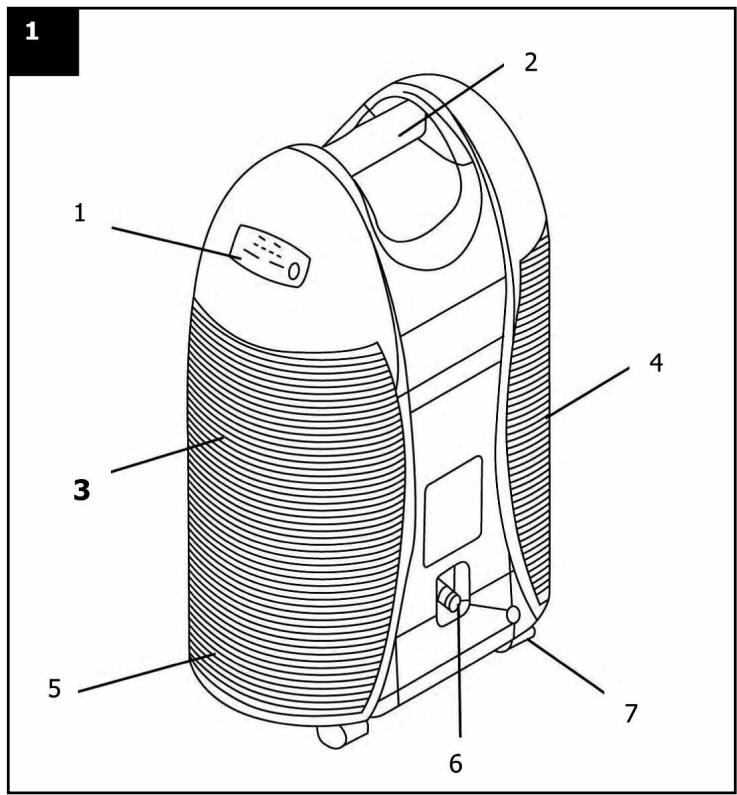
1. FUNCTION OVERVIEW
ILLUSTRATION 1:
- Control panel
- Carrying handle
- Air outlet
- Air intake and washable filter
- Water tank
- Water outlet/outflow for continuous dehumidification
7.Wheel
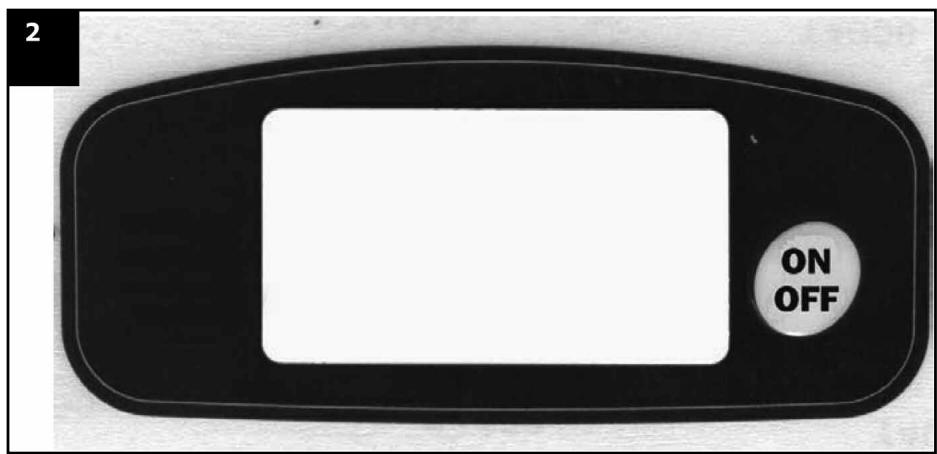
ILLUSTRATION 2:
Zibro D 2010 kontrolpanel
ON OFF On / off
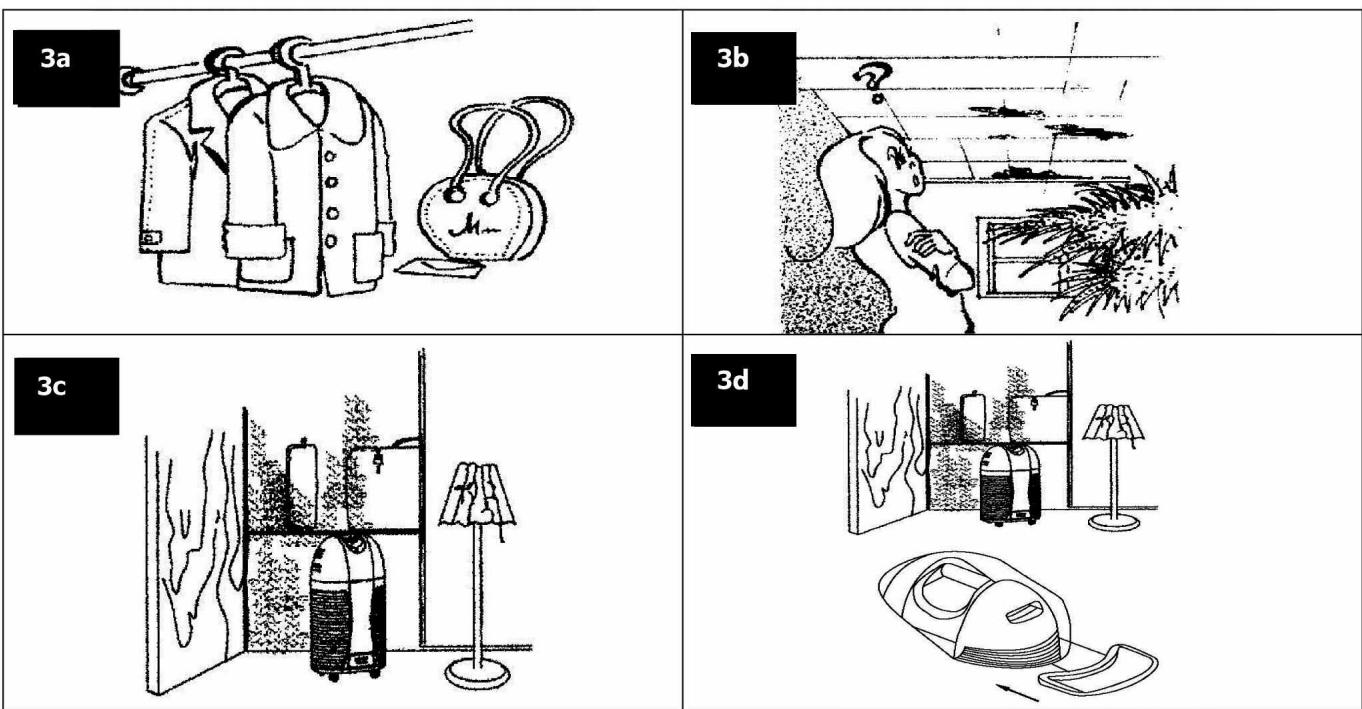
ILLUSTRATION 3a:
The appliance can prevent clothes and leather goods from going mouldy. Open the drawers before switching the dehumidifier on.
ILLUSTRATION 3b:
The appliance can prevent ceilings, glass partitions and windows from steaming up. For optimal results, keep doors and windows closed.
ILLUSTRATION 3c:
The appliance can remove odours from book shelves and cupboards. Open the door to the cupboard, and place the dehumidifier with its front towards the cupboard to ensure optimal dehumidification.
ILLUSTRATION 3d:
The appliance can also be used to dry gloves, handkerchiefs and small items of clothing. A small shelf accompanies the appliance on which small items of clothing can be hung to dry. The shelf can be attached to the dehumidifier by placing the shelf's two feet in the top slot of the grille on the air outlet. Smaller items of clothing placed on or hung down from the shelf can be dried using the hot air from the air outlet. The shelf is removed by pressing it out sideways from the dehumidifier.
GENERAL
Zibro D 2010 combines the benefits of more efficient dehumidification controlled by advanced technology. The appliance has the following additional functions:
- Acoustic and visual warning signal when the built-in water tank is full.
Automatic defrost function. - Ventilator with two speeds: Quiet or normal operation.
The appliance has a maximum capacity of 10 litres of water per day at a room temperature of 32^ and relative humidity of 80% .
This user manual contains valuable information on the use and maintenance of your new appliance. Read the instructions carefully before using the appliance for the first time and save them for later use. By keeping your appliance in good repair, you will be able enjoy it for many years to come.
2. SAFETY INSTRUCTIONS
- Do not connect the appliance to a damaged socket.
-
Avoid using the appliance in the following places:
-
next to or in the vicinity of a heat source or open flame
- areas where oil may splash
- areas in direct sunlight
- areas where water may splash
- near bath tubs, cabinet showers or swimming pools
-
in greenhouses
-
Never put objects in the air intake or outlet. In particular, make sure that children are warned of these dangers.
- Avoid blocking the grille to the air intake and outlet when the appliance is running.
- You must keep the appliance upright to ensure the compressor functions correctly. If this is not possible, the appliance must remain upright for at least 24 hours before it is turned on.
- Always remove the cord from the socket before cleaning.
- Avoid covering the appliance while it is running.
- Always check that the appliance is upright on a solid, flat surface.
- Switch off the appliance before removing the cord from the socket.
- If the appliance falls over, the cord must be removed from the socket immediately.
- Avoid taking the appliance apart or trying to repair it yourself. All repairs must be carried out by an authorised service engineer.
- If the cord is damaged, it must be replaced by a qualified service engineer.
- The device MUST always have an earthed connection. If the power supply is not earthed, you may not connect the unit. The plug must always be easily accessible when the unit is connected. Read these instructions carefully and follow the instructions.
- Never use an extension cable to connect the device to the electric power supply. If there is no suitable, earthed wall socket available, have one installed by a recognised electrician.
STORING THE APPLIANCE
- If the appliance is not going to be used for a long time, it is important to ensure that the built-in water tank is empty, and to remove the rubber plug from the outflow to ensure that no water is left in the appliance.
- Clean the air filter and refit it.
- Cover the appliance and store it in a dry place.
DISPOSING OF THE APPLIANCE
The appliance contains a certain amount of coolants, and when the appliance is going to be scrapped, it should be taken to the local recycling station which can dispose of such materials.
3. OPERATION

PLEASE READ THIS CAREFULLY BEFORE CONNECTING THE UNIT!
Transportable dehumidifiers are ideal for the home and office. They improve the indoor climate, leading to a healthy environment. Dehumidifiers prevent mould and fungus while keeping the relative air humidity low, which ensures unfavourable conditions for dust mites.
GENERAL INFORMATION ON DEHUMIDIFIERS:
You may only see water in the water tank after approximately 8 days of using the dehumidifier for the following reasons:
- after transportation, the fuel in the dehumidifier needs time to 'settle'.
- the built-in hygrostat needs time to determine the relative humidity of the room.
- there is a pipe linked to the permanent drain that must be filled up with water (happens automatically) before the water begins to drip down into the water tank.
The air dehumidifier is suitable for dehumidifying a room of up to 75m^2 . However, this depends on the ambient temperature and the relative humidity. The effect of the air dehumidifier is higher at a combination of high temperature and high air humidity. A relative humidity of around 50% and below is recommended for living areas.
FUNCTIONS
The appliance can run in either "Stand-Alone Mode", where all humidity is removed from the surrounding air and collected in the built-in water tank in the appliance, or "Continuous Draining Mode", where the water is removed from the air and led to an external drain via the built-in outflow using the attached plastic hose.
STAND-ALONE MODE
Here, the rubber plug is placed in the outlet pipe on the back of the appliance, and all humidity is removed from the air and collected in the built-in water tank. When the tank is full, the light on the control panel comes on 7 , the appliance switches off and also emits a short beep to show that the water tank is full. Once this happens, the water tank must be removed and emptied. When the empty tank is replaced, the dehumidifier starts again automatically.
CONTINUOUS DRAINING MODE
Here, the rubber plug is removed from the outflow pipe on the back of the appliance and one end of the accompanying transparent, flexible plastic pipe is pushed over the outflow pipe. (The rubber plug can be pushed over the protruding tap above the outflow pipe to avoid it getting lost). The other end of the plastic pipe is led downwards to a place where the humidity can drain away continuously. As a result, water does not collect in the built-in tank, and the visual and acoustic signals indicating that the built-in water tank is full do not function. The appliance runs continuously when used in this manner.
FULL WATER TANK
Using the "Stand-Alone" function, humidity is removed from the air and collected in the built-in water tank. When the tank is full, the light on the control panel comes on, the appliance switches off and also emits a short beep to show that the water tank is full. When this happens, the water tank must be removed and emptied. Once the empty tank is replaced, the dehumidifier starts again automatically. The tank should be placed back in place for the appliance to run.
DIGITAL DISPLAY
- Connect the appliance to the power supply. Switch on using the "ON/OFF" button (2-3 seconds). The equipment starts in LOW position (energy saving). The current room temperature and air humidity are shown in the electronic display. This is also the setting for continued dehumidification.
Then:
- Press "ON/OFF" once: The appliance shuts down when the relative humidity is lower than 40%
- Press "ON/OFF" twice: The appliance shuts down when the relative humidity is lower than 50%
- Press "ON/OFF" three times: The appliance shuts down when the relative humidity is lower than 60%
- Press "ON/OFF" four times: The appliance shuts down when the relative humidity is lower than 70%
- Press "ON/OFF" five times: HIGH speed (maximum) dehumidification level is activated. The current room temperature and air humidity are shown in the electronic display. This is also the setting for continuous dehumidification.
- Press "ON/OFF" six times: The appliance shuts down when the relative humidity is lower than 40%
- Press "ON/OFF" seven times: The appliance shuts down when the relative humidity is lower than 50%
- Press "ON/OFF" eight times: The appliance shuts down when the relative humidity is lower than 60%
- Press "ON/OFF" nine times: The appliance shuts down when the relative humidity is lower than 70%
- Press "ON/OFF" ten times: the dehumidifier returns to the start setting, which is the lowest setting for dehumidification (energy saving function). Then repeat the process above.
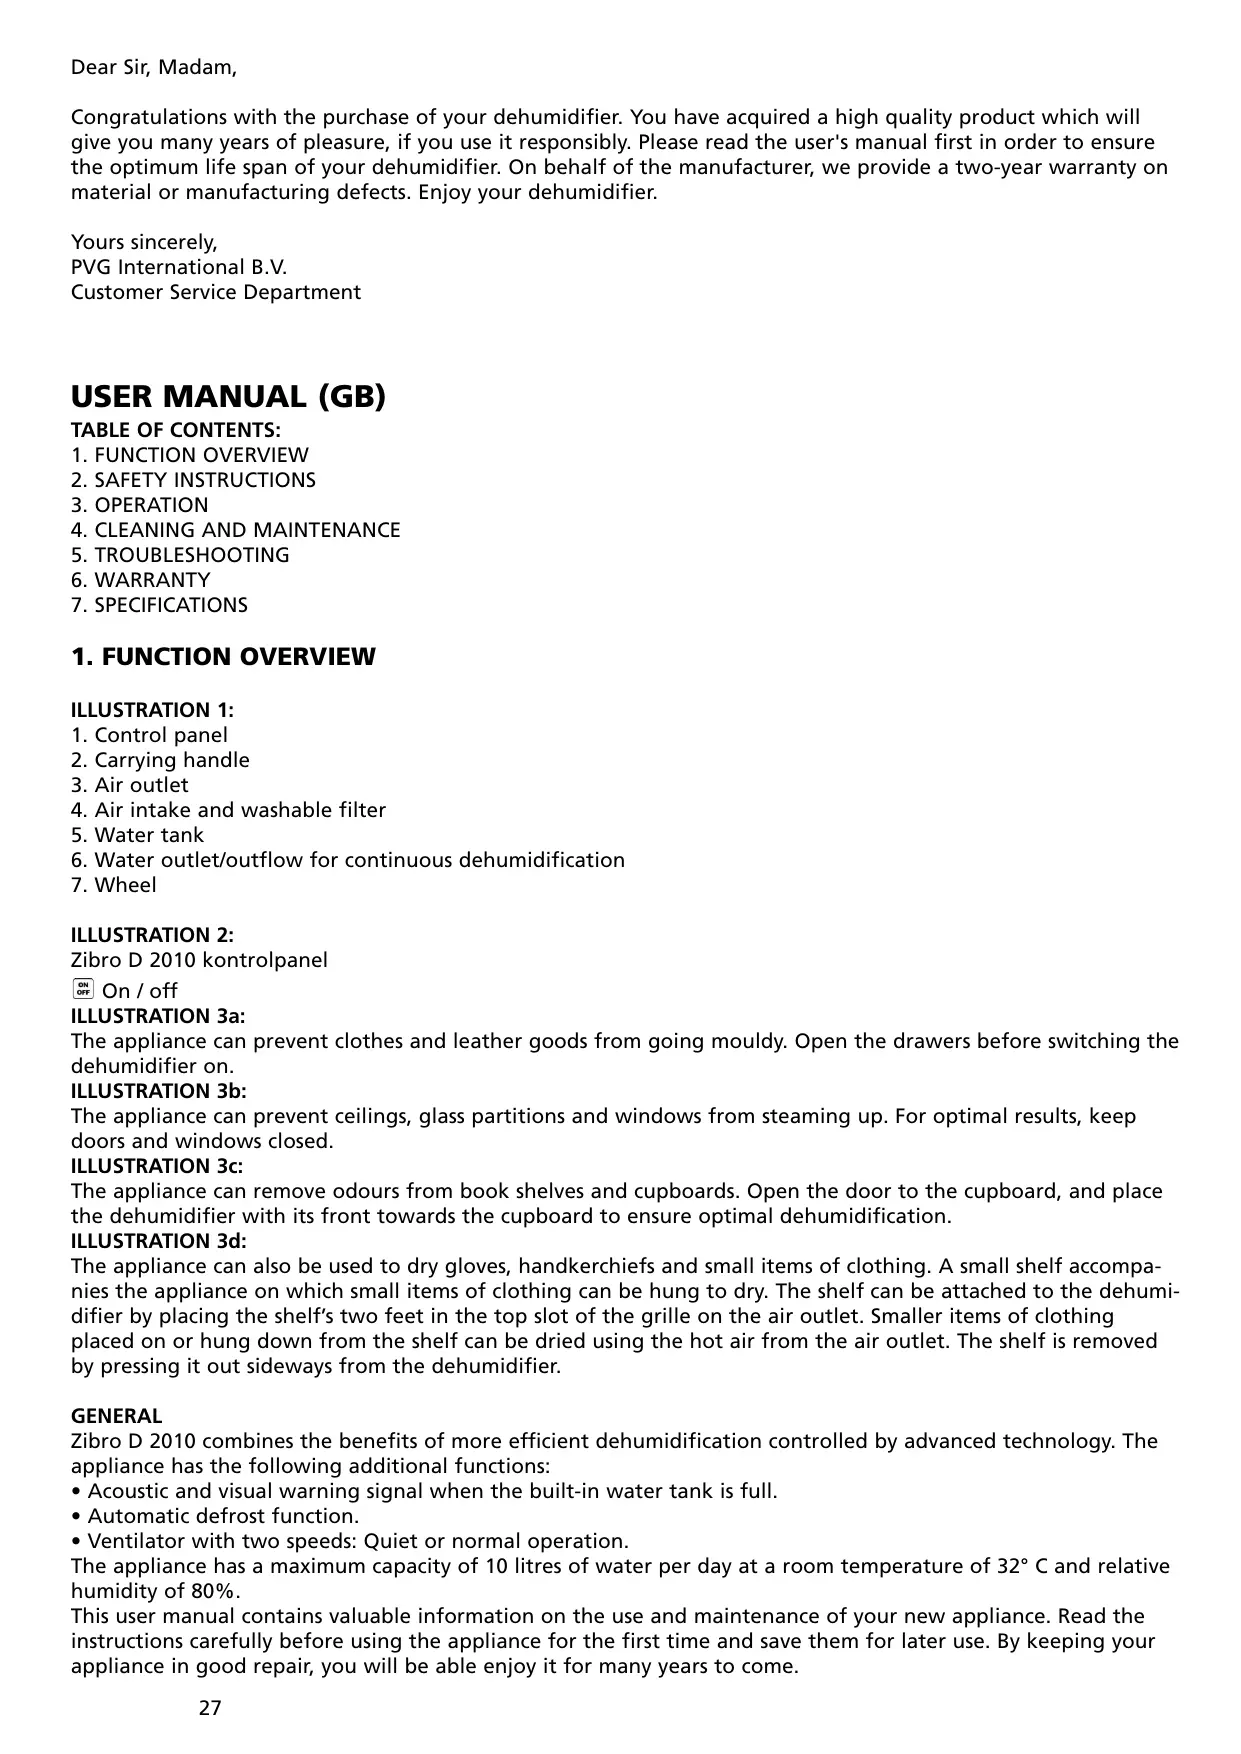
The display shows the temperature in the room (a), the relative humidity (b) and the relative humidity by which the appliance will shut down (c).
4. CLEANING AND MAINTENANCE
CLEANING THE AIR FILTER
- The air filter must be cleaned regularly. The frequency of cleaning depends on the amount of dust, but under normal circumstances it is suggested that cleaning be undertaken after 100 hours of operation and more often in very dusty conditions.
- Switch off the appliance and remove the cord from the socket.
- Access to the air filter is gained by removing the cover to the air intake on the side of the appliance. This is done by removing the cover horizontally from the appliance.
- The air filter can now be removed by pressing down the 2 pins on top of the filter and twisting the filter top off before the filter is removed.
- The filter should be cleaned using a vacuum cleaner or rinsed under running water. It should then be left to dry in a location with good ventilation. Avoid using alcoholic detergents to clean the filter.
- Replace the filter by pushing the bottom part in behind the protruding parts and turning the top part in place so the pins click in place. Replace the cover of the air intake on the appliance.
- The appliance can now be connected to the socket and operated in the normal way.
5. TROUBLESHOOTING
| SYMPTOM | POSSIBLE CAUSE | POSSIBLE SOLUTION |
| Fan and compressor not working | No current, or voltage is too low Plug or cord damaged Motor stop Voltage is too low | Check the power supply to the dehumidifier, or contact your electrical supplier Contact a qualified electrician |
| Fan works, but compressor does not | Within the safety delay, which is three minutes | Will return to normal condition after three minutes |
| Compressor working, but fan not | Fan fault | Contact a qualified electrician |
| No dehumidifying or low capacity | Unit may be set to defrost Filter is clogged Gas leaking Temperature & RH too low | Clean filter Contact a qualified electrician |
| Noise from unit | Uneven surface Motor or compressor assembly loose Noise from water supply | Place the dehumidifier on an even surface Contact a qualified electrician |
| Dehumidifier is covered with ice | Filter is clogged Defrost setting does not work | Clean filter Switch off. Contact a qualified electrician |
| Dehumidifier is covered with ice Water is overflowing | Water tank is leaking Fault on the primary tank's liquid level coupler | Contact a qualified electrician |
6. WARRANTY
The Zibro units have a 24-month warranty period. The warranty period starts on the day the new unit is purchased. The warranty on batteries is limited to 6 months after purchase. Consumables or defects causing a negligible effect on the operation or value of the equipment are not covered. The warranty must be proven by presentation of the original purchase receipt, on which the date of purchase and the unit model are indicated.
WARRANTY HANDLING
A faulty unit needs to be returned to PVG service centre accompanied by a valid purchase note. If the unit develops a fault during the warranty period, PVG or its officially appointed service centre will repair any defect caused by material or manufacturing faults free of charge. PVG will at its discretion fulfil its warranty obligations by either repairing or replacing the faulty units or parts of the faulty units. In case of replacement, the colour and model can be different from that of the original purchased unit. The initial purchase date shall determine the start of the warranty period. The warranty period is not extended if the unit is replaced or repaired by PVG or its officially appointed service centre.
DISCLAIMER OF WARRANTY
Damage or defects caused by incorrect treatment or operation and damage resulting from the use of nonoriginal parts or accessories not recommended by PVG are not covered by the warranty. The warranty does not cover damage caused by outside factors, such as lightning, water and fire, nor any damage caused during transportation. No warranty can be claimed if the serial number on the units has been changed, removed or rendered illegible. Any warranty claims will be invalid if the unit has been repaired, altered or modified by the buyer or by unqualified, non-officially appointed PVG service centres.
7. SPECIFICATIONS
| Model no. | Zibro D 2010 |
| Voltage | 230 V, 50 Hz |
| Power output | 0.19 - 0.27 kW (min. - max.) |
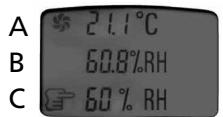
| Dehumidification | 10 litres/day (at 32°C and relative humidity of 80%) 5.7 litres/day (at 27°C and relative humidity of 60%) |
| Compressor type | Low-volume |
| Coolant | R134A (170 g) |
| Sound pressure level | 50 dB (A) |
| Capacity of built-in water tank | 1.6 litre |
| Weight | 11.5 kg |
| Dimensions (H x W x D) | 54.5 cm x 35 cm x 21 cm |
FOR FURTHER INFORMATION, PLEASE VISIT
www.zibro.com
PERFORMANCE GRAPH
(to be used as indication only)
Waste electrical products should not be disposed with household waste. Please recycle where facilities exist. Check with your local authority or retailer for recycling advice.
Environmental information: This equipment contains fluorinated greenhouse gases covered by the Kyoto Protocol. It should only be serviced or dismantled by professional trained personnel.
This equipment contains R134A refrigerant in the amount as stated in the table above. Do not vent R134A into atmosphere: R134A, is a fluorinated greenhouse gas with a Global Warming Potential (GWP) = 1300
WEGDOEN VAN HET APPARAAT
APPLICATION DE LA GARANTIE
email: appliance@appliance-group.com

PVG Espana S.A.
Pol. Ind. San José de Valderas II
email: appliance@appliance-group.com

UNITED KINGDOM
Scott Brothers Ltd.
The Old Barn, Holly House Estate
Cranage, Middlewich, CW10 9LT UK
tel.: +44 1606 837787
fax: +44 1606 837757
email: sales@scottmail.co.uk

ITALIA
PVG Italy SRL
Via Niccolò Copernico 5
50051 CASTELFIORENTINO (FI)
tel: +39 571 628 500
fax: +39 571 628 504
email: pvgitaly@zibro.com

NORGE
Appliance Norge AS
Vogellunden 31
1394 NESBRU
tel: +47 667 76 200
fax: +47 667 76 201
email: appliance@appliance-group.com

NEDERLAND
PVG International B.V.
P.O.Box 96
5340 AB OSS
tel: +31 412 694 694
fax: +31 412 622 893
email: pvgnl@zibro.com

PORTUGAL
Gardena, Lda
email: appliance@appliance-group.com

SLOVENIJA
Montekod.o.o.
Neubergerjeva 4
1000 Ljubljana
tel: +386 (0)1 437 1273
fax: +386 (0)1 437 1273
email: info@zibro.si

TURKEY
- OPBEVARING AF APPARATET
- FÖRVARING AV APPARATEN
- USER MANUAL (GB)
- TABLE OF CONTENTS:
- FUNCTION OVERVIEW
- ILLUSTRATION 1:
- ILLUSTRATION 2:
- ILLUSTRATION 3a:
- ILLUSTRATION 3b:
- ILLUSTRATION 3c:
- ILLUSTRATION 3d:
- GENERAL
- SAFETY INSTRUCTIONS
- STORING THE APPLIANCE
- DISPOSING OF THE APPLIANCE
- OPERATION
- PLEASE READ THIS CAREFULLY BEFORE CONNECTING THE UNIT!
- GENERAL INFORMATION ON DEHUMIDIFIERS:
- FUNCTIONS
- STAND-ALONE MODE
- CONTINUOUS DRAINING MODE
- FULL WATER TANK
- DIGITAL DISPLAY
- Then:
- CLEANING AND MAINTENANCE
- CLEANING THE AIR FILTER
- TROUBLESHOOTING
- WARRANTY
- WARRANTY HANDLING
- DISCLAIMER OF WARRANTY
- SPECIFICATIONS
- FOR FURTHER INFORMATION, PLEASE VISIT
- www.zibro.com
- PERFORMANCE GRAPH
- WEGDOEN VAN HET APPARAAT
- APPLICATION DE LA GARANTIE
- UNITED KINGDOM
- ITALIA
- NORGE
- NEDERLAND
- PORTUGAL
- SLOVENIJA
- TURKEY
Brand : ZIBRO
Model : D2010
Category : Auxiliary heating