MD 82309 - Car stereo MEDION - Free user manual and instructions
Find the device manual for free MD 82309 MEDION in PDF.
| Product type | Car stereo with CD/MP3 player, FM/MW radio, Bluetooth, USB, SD/MMC, AUX |
| Brand | MEDION |
| Model | MD 82309 |
| Dimensions (W × D × H) | 178 × 175 × 50 mm |
| Weight | Approx. 1.0 kg |
| Power supply | 12 V DC (negative ground) |
| Output power | 4 × 15 W RMS max. |
| Fuse | 15 A |
| FM radio bands | 87.5 – 108 MHz (FM1, FM2, FM3) |
| MW radio bands | 522 – 1620 kHz (MW1, MW2) |
| Bluetooth | Version 2.0 (hands-free profile, A2DP, AVRCP) |
| CD/MP3 player | Laser class 1, audio CD, CD-R/RW, MP3, WMA |
| USB port | USB 1.1 and 2.0, up to 8 GB (USB flash drives, MP3 players) |
| SD/MMC reader | SD up to 4 GB, MMC up to 512 MB |
| AUX input | 3.5 mm stereo jack |
| Radio functions | RDS (AF, TA, PTY, EON), auto/manual search, 30 presets (18 FM + 12 MW) |
| Equalizer | Presets: Classic, Rock, Pop, Flat, None; + Loudness |
| Recording function | Record CD → USB/SD, radio/AUX → USB/SD, MP3/WMA formats |
| Front panel | Detachable (anti-theft protection), backlit buttons |
| Security | 15 A fuse, circuit breaker, panel reset, installation instructions |
| Maintenance and cleaning | Soft dry cloth; do not use solvents or chemical detergents |
| Spare parts and repairability | Replaceable fuse (15 A), interchangeable front panel; repair by authorized workshop |
| General information | Compliant with R&TTE 1999/5/EC; delivered with ISO bracket, removal keys, manual |
Frequently Asked Questions - MD 82309 MEDION
User questions about MD 82309 MEDION
0 question about this device. Answer the ones you know or ask your own.
Ask a new question about this device
Download the instructions for your Car stereo in PDF format for free! Find your manual MD 82309 - MEDION and take your electronic device back in hand. On this page are published all the documents necessary for the use of your device. MD 82309 by MEDION.
USER MANUAL MD 82309 MEDION
RELIGION: Religion, Ethik
AVRCP (Audio Video Remote Control Profile)
Safety instructions 7
Keep electrical equipment out of reach of children 7
Purpose 7
Road safety. 7
Correct repair procedure 7
Sunlight 8
The CD player 8
Drives and connections. 8
Cleaning the unit. 8
Installation. 8
Contents of package 9
Installation 10
Installation instructions 10
ISO slot and connections. 10
Assembling the mounting frame 11
Connections on the back of the radio. 12
Use car radio. 14
Control panel 14
Reset 15
Removing the unit. 15
Information on the cables 16
General functions. 19
Switching on/off and mute 19
Sound settings with PUSH/SEL 19
Advanced settings with PUSH/SEL 20
Display. 22
Mode 22
Reset 22
Radio mode: Basic functions 23
Selecting the waveband 23
Searching for a station 23
Storing stations 24
Calling up stations 24
Radio mode: Radio Data System 25
Alternative frequencies (AF button). 25
TA - traffic announcement 26
PTY - Programme Type Code 26
Operation with data media
(Audio CDs, MP3, USB, SD/MMC, AUX) 29
The CD drive 29
USB slot 30
SD/MMC card reader 30
AUX IN connection 31
Playback functions 31
Search functions for MP3 and JPEG data carriers. 32
Recording function. 34
Record from audio CD 34
Copying MP3 files 35
Recording from radio or audio input 35
Deleting photos 36
Using Bluetooth function. 37
Pairing the telephone with the car radio 37
Starting/ending call 37
Reject call 38
Redalling, caller list. 38
Switching call to mobile telephone 38
Voice dialling 38
Deleting pairing. 39
Conference call 39
Audio streaming (A2DP) 39
AVRCP (Audio Video Remote Control Profile) 39
Troubleshooting 40
Replacing fuse. 41
Disposal information. 41
Technical data 42
Declaration of conformity 43
Overview
Control panel
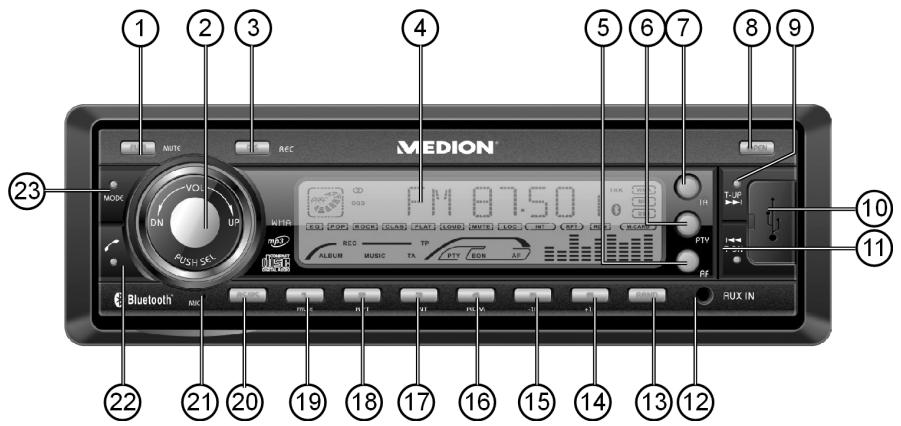
- PWR: Hold down for a few seconds to switch the device on and off; MUTE: Press briefly to switch the sound on and off.
- VOL+/:-Multipurpose control to set the volume.
PUSH/SEL ("Push/Select"): When you press the multipurpose control repeatedly you call up other modes in succession. You can then set these modes by turning the button.
Turn PUSH/SEL wheel after pressing the AS/PS button for the search function on data media: Enter characters and numbers.

Each setting only stays active for a few seconds before it switches back to the default volume setting ("VOL"). You can end the setting by pressing the ENT button.
Press multipurpose control briefly to select the following audio settings:
VOL: Volume, BRS: Bass, TRE: Treble BAL: Balance of the left and right speaker, FRD: Fader (volume of the rear speakers).
Press multipurpose control for longer to call up a different sequence of modes for radio function, time setting etc. Within this sequence switch to the next mode by briefly pressing it.
INVOL 17: Set the volume for when the radio switches on (17 in the default setting).
RDJ00:00 (00:00 represents the time): Time setting, refer to page 20.
TAVOL: Set the default volume for traffic messages. Refer to page 20.
EON ON: Switch "EON" function on and off (OFF). Refer to "Radio mode: Radio Data System", page 25.
REC: Set MP3 (MP3) or WMA (WMA) as the recording format. Refer to page 21.
TELVOL: Default volume for the telephone for Bluetooth operation. Refer to Bluetooth operation on page 21.
DSP NONE: Use the multipurpose control to select between the audio settings FLRT (normal), CLASSIC, ROCK and POP (refer also to page 19).
LOUD OFF: Switch on loudness to increase bass and treble (ON) or switch off OFF (OFF) (only in radio mode).
LOC: Local search mode (see page 21). OFF: Normal reception.
STEREO: In FM band select stereo or mono mode (NONO). The NONO setting can improve the reception if stereo reception is poor (only in FM radio mode).
- DIS ("Display"): Display information for the current mode;
REC: Set recording function (refer to page 34) - Display
- AF ("Alternative frequency"):
Press briefly to switch AF mode on and off; Hold down to switch regional mode in AF mode on and off; refer to page 25
- PTY ("Program Type"): Search for stations with certain program content
- TA ("Traffic announcement"): Activate the TA function (refer to page 26)
- OPEN: Open control panel
- T-UP: Search for next channel;
-
USB slot
-
T-DN: Search for previous channel;
- AUX IN: Connect another audio device with jack plug
- BAND: Select band in radio mode (FM 1, FM2, FM3, MW1, MW2); ENTER: Confirm entries
- 6: Number and station button 6;/ +10: ten tracks up for data media (CD, MP3, SD/MMC, USB)
- 5: Number and station button 5; -10: ten tracks down for data media (CD, MP3, SD/MMC, USB)
-
4: Number and station button 4; RDM ("Random"): Random playback of data media (CD, MP3, SD/MMC, USB)
-
3: Number and station button 3; INT ("Intro"): Intro function for data media (CD, MP3, SD/MMC, USB)
- 2: Number and station button 2; RPT ("Repeat"): Repeat function for data media (CD, MP3, SD/MMC, USB)
- 1: Number and station button 1; PAUSE: Pause and playback for data media (CD, MP3, SD/MMC, USB)
- AS/PS: Automatic station memory/ SCH ("Search"): Title search for data media (CD, MP3, SD/MMC, USB);
- MIC: Microphone
- TALK: Speak (Bluetooth function)
- MODE: Select operating mode: Radio - CD/MP3 - USB - SD/MMC - AUX;
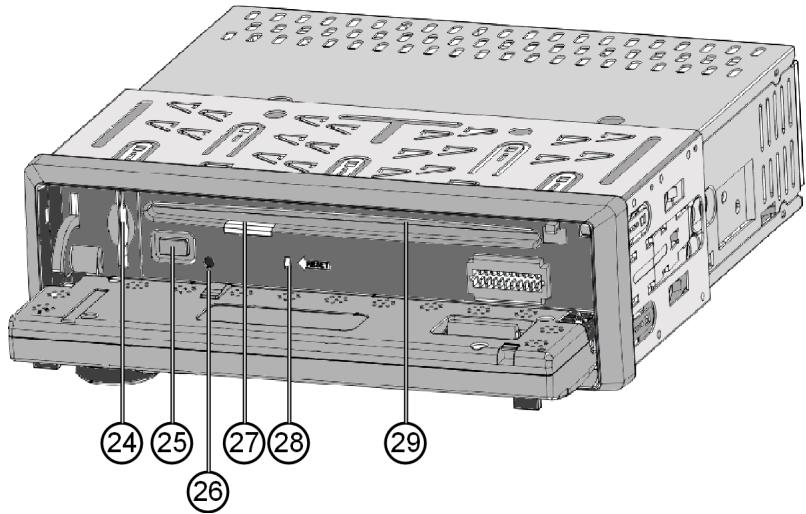
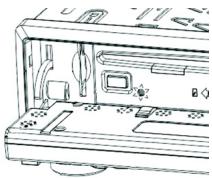
Behind the control panel
- Slot for an SD/MMC card.
- :Eject CD
- Red LED (anti-theft protection)
- Operating LED for CD drive
- Reset opening: reset to factory settings
- CD compartment
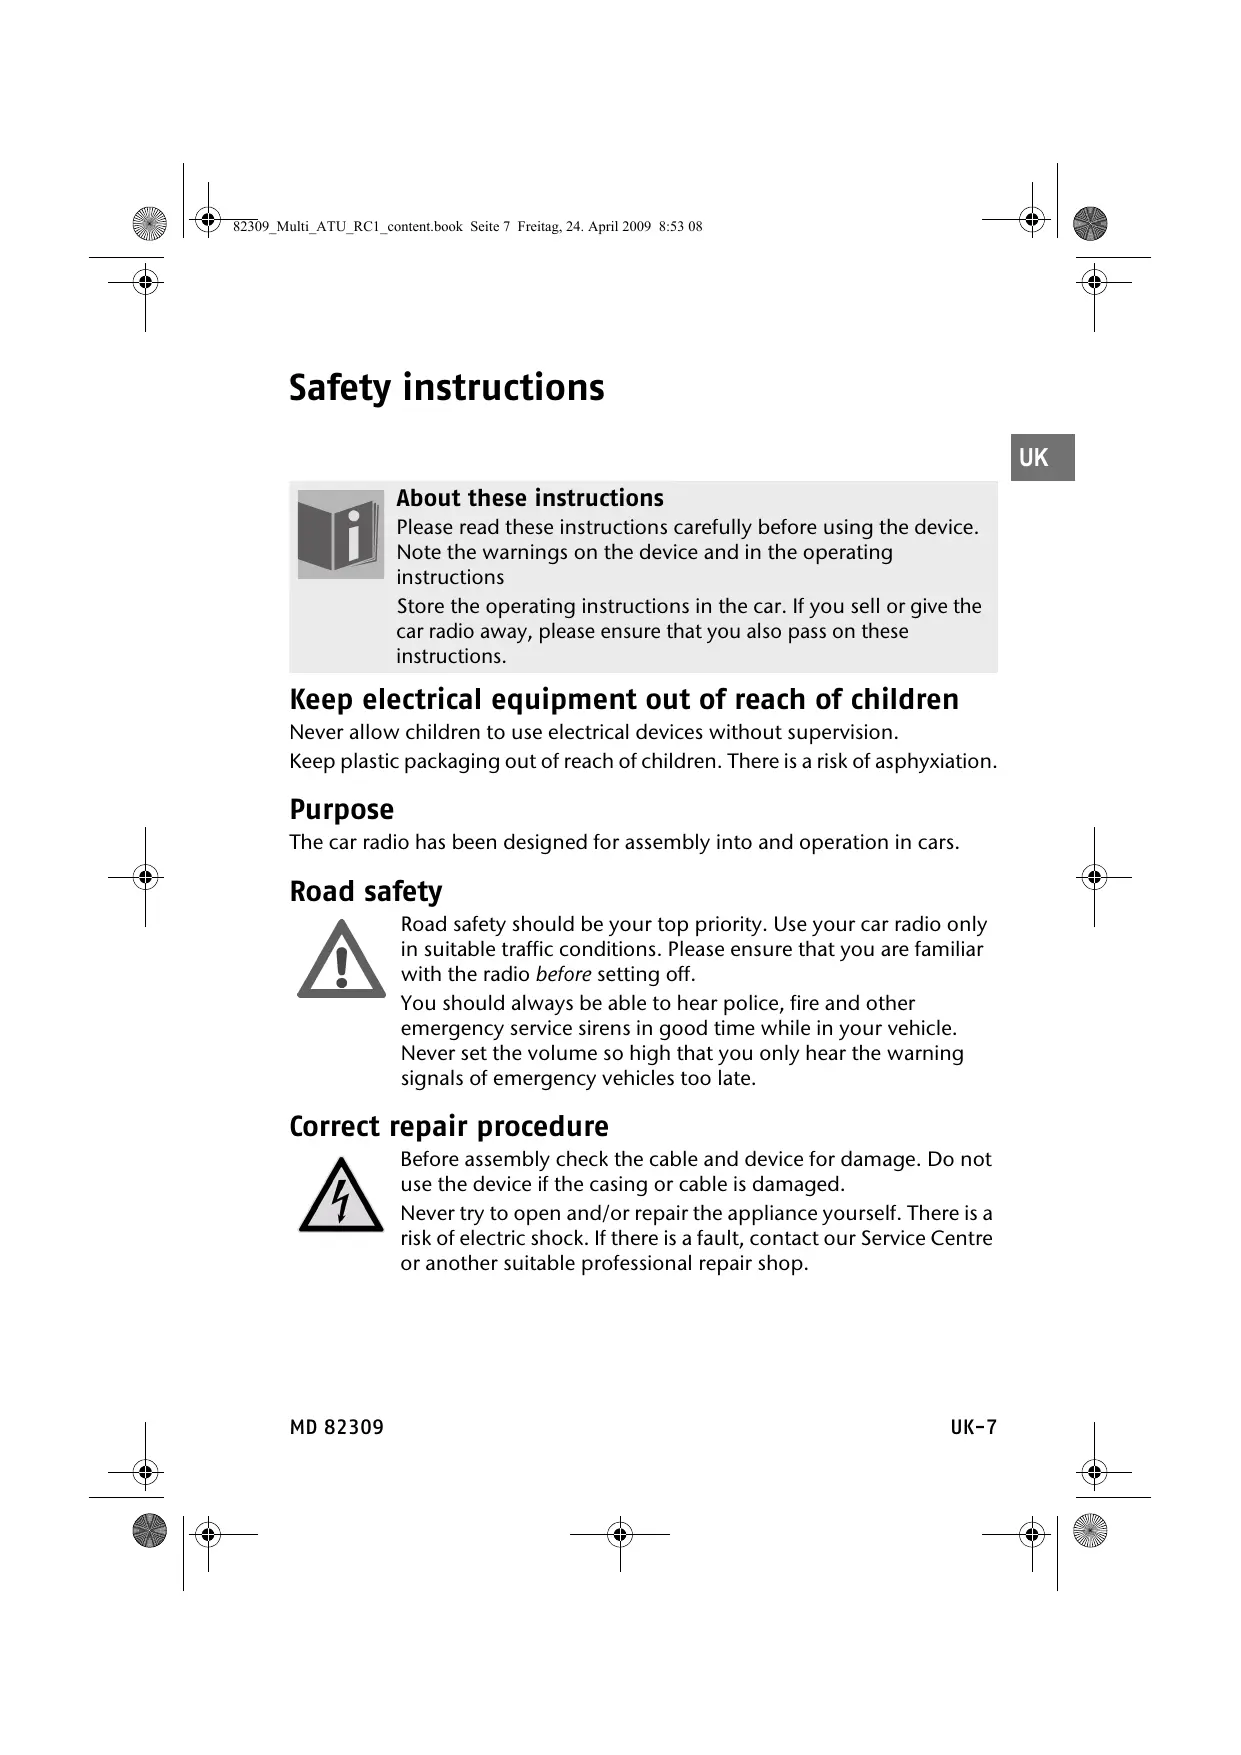
Safety instructions
UK

About these instructions
Please read these instructions carefully before using the device. Note the warnings on the device and in the operating instructions
Store the operating instructions in the car. If you sell or give the car radio away, please ensure that you also pass on these instructions.
Keep electrical equipment out of reach of children
Never allow children to use electrical devices without supervision.
Keep plastic packaging out of reach of children. There is a risk of asphyxiation.
Purpose
The car radio has been designed for assembly into and operation in cars.
Road safety

Road safety should be your top priority. Use your car radio only in suitable traffic conditions. Please ensure that you are familiar with the radio before setting off.
You should always be able to hear police, fire and other emergency service sirens in good time while in your vehicle. Never set the volume so high that you only hear the warning signals of emergency vehicles too late.
Correct repair procedure
Before assembly check the cable and device for damage. Do not use the device if the casing or cable is damaged.
Never try to open and/or repair the appliance yourself. There is a risk of electric shock. If there is a fault, contact our Service Centre or another suitable professional repair shop.
Sunlight
If the interior of the vehicle has heated up strongly e. g. when standing in sunlight for a long period of time, do not start up the car radio immediately. Wait until you have driven the car for a while and the car radio has cooled down.
The CD player
The CD player is a class 1 laser product. The device has a safety system that prevents dangerous laser rays escaping from the device during normal use. In order to avoid injury to the eyes, never tamper with or damage the unit's safety system.
Drives and connections
Do not insert any foreign bodies into the openings of the car radio (disk compartment, USB slot, card slot, AUX slot). This could damage the compartments and slots.
Always insert disks into the disk compartment with the title side upwards. Never apply great force to insert a disk or card or connect an external device. If you feel resistance try a different method or medium.
Cleaning the unit
Use a dry, soft cloth to clean the device. Do not use chemical solutions and cleaning products because these may damage the unit's surface and/or inscriptions.
Protect the appliance from moisture and heat. Do not touch the device with wet hands. There is a risk of electric shock!
Installation
If you wish to install your car radio yourself, please refer to the installation and connection instructions in this manual. We recommend that the device is installed by a trained technician. This ensures that the device will work perfectly. Incorrect cabling may result in damage to the device and your car.
Contents of package
Please check your purchase to ensure all items are included and contact us within 14 days of purchase if any components are missing. With the product that you purchased you receive:
Car radio
2 ISO sockets with cables
Control panel
Case
- Mounting frame (inserted)
2 keys to remove the mounting frame and remove the device
□ Other fixing material for individual assembly
These operating instructions
Warranty card
Installation
Installation instructions

Before mounting disconnect the minus pole from the car battery! There is a risk of short-circuit and electric shock!
- Check whether the connections on your vehicle match those of the car radio (refer to "Arrangement of the ISO block", P. 13).
- Do not lay the cables under tension, over sharp edges or near parts that could heat up. Ensure that you do not bend or twist the cable.
- Insert the unit into the proper slot or select a location to install the unit that will not affect the driver's ability to drive.
- Connect the cable shortly before finally installing the device. Ensure that this has been connected correctly and that the system works properly.
If changes have to be made to the vehicle, consult your vehicle dealer/ specialist workshop.
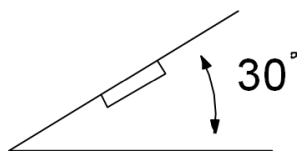
Install the unit in such a manner that no injury can be caused during heavy braking.
If the unit is installed out of balance by over 30^ from horizontal it may affect the output. - Avoid installing the unit near strong heat sources (e.g. direct sunlight or heating air), dust, pollution or excessive shocks. This could damage the device.
- During assembly comply with all the instructions in these operating instructions. Check all connections before re-attaching the car battery.
Maximum installation angle!
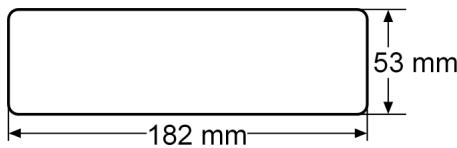
ISO slot and connections
The car radio has been designed for assembly in a standard ISO slot. The size must be at least 53 × 182 mm .
The ISO slot normally has two ISO sockets and one antenna socket.

If your vehicle does not have an ISO slot or the connections, the cable sockets supplied can be used. Contact your specialist workshop, retailer or departments in department stores. Refer also to the "Information on the cables", page 16 chapter.
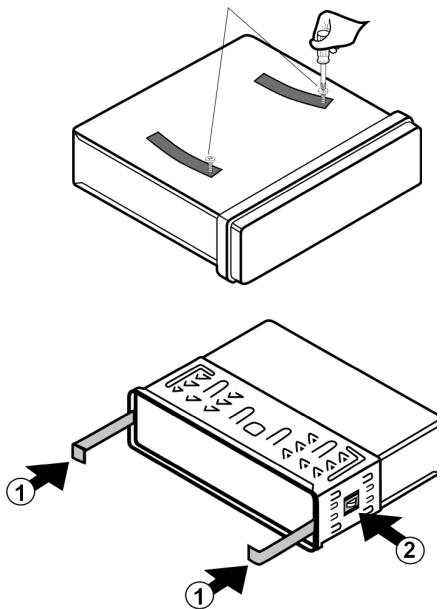
Assembling the mounting frame
Before installation remove the two transportation safety screws in the top radio casing (recognizable because of their red flags) with a Phillips screwdriver!
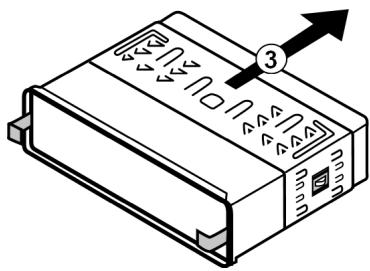
On delivery the mounting frame is pulled over the car radio. First remove the mounting frame from the casing of the car radio.
To do so insert the two keys supplied to the left and right between the device and mounting frame (1) until the keys click into place (2).
- Then push the mounting frame backwards over the device using the keys (3).
Insert the mounting frame in the ISO installation slot.

To fix the mounting frame in the installation slot use a screwdriver to bend as many flaps as possible outwards. Select the flaps that you want to connect with the housing of the installation slot.
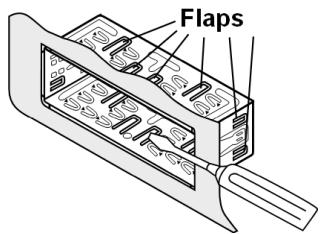

Then check that the frame is held securely. The frame must be fixed firmly so that it can not release even if the car breaks heavily.
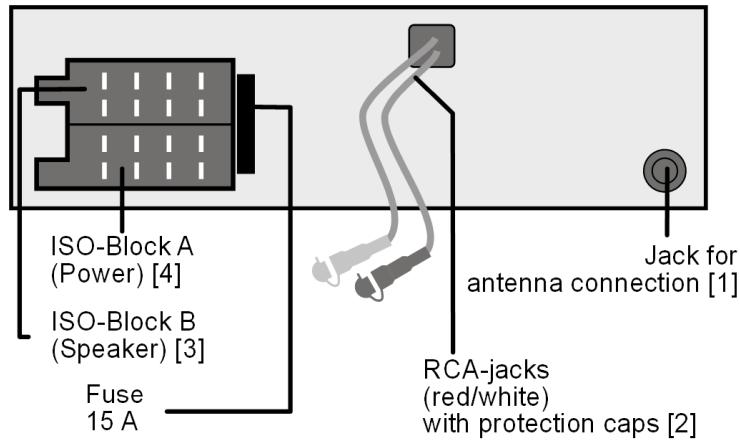
Connections on the back of the radio
Overview of the back of the radio:
Prepare cable connections
- Pull the connections in the ISO slot in your car so far out that you can connect them to the connections on the car radio.
Connect the cables
Please use the car radio's ISO block for installation. - If your car's ISO plug does not match the car radio's ISO sockets you can buy appropriate adapters in specialist workshops, retailers or department stores.

The two ISO plugs in your vehicle create safe and correct electrical connections (for the speakers and power connections). If however you want to lay cables individually we will explain the relevance of the cables at the end of this chapter.
[1] Connect the vehicle's antenna plug to the car radio's antenna socket.
[2] If you want to use an external amplifier you can connect it with the red/white audio cinch sockets. Please refer to your instructions for the amplifier.
[3][4] Connect the two ISO plugs on the vehicle with the two ISO blocks on the car radio (A for power and B for the speakers).
Test station memory
In some types of vehicle the default assignment of the permanent plus and alternating plus has been exchanged by the factory for the ISO block A in the ISO plug (refer to "Assignment of the ISO socket block on the car radio", page 18). This means that the station memory does not work.
Before finally inserting the car radio use the following procedure to check whether the channels stay saved:
Re-connect the car battery.
Switch the vehicle's ignition on.
Switch the radio on.
- Save stations automatically by holding down the AS/PS button for around two seconds (on this also refer to "Automatic saving", page 24).
Switch the vehicle's ignition off.
- Switch the ignition on again and test whether the stations are still saved (to do so press the station buttons 1 to 6).
If the stations have been saved you can insert the radio.
If the stations are no longer saved you should use an adapter that is available from specialist retailers or arrange for a specialist workshop to modify the cables. In this case refer to the "Information on the cables", page 16 chapter.
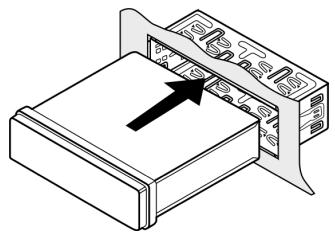
Use car radio
- Push the car radio carefully into the slot until it clicks into place.
While pushing the radio, take care to ensure that the cables are not bent, squashed or under tension during the process.
Control panel
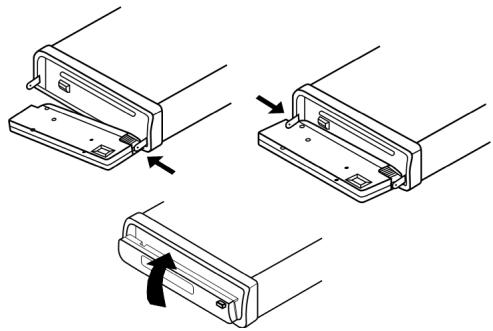
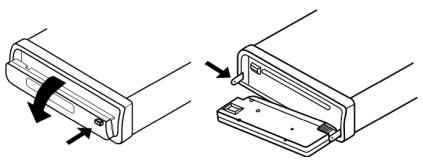
Inserting the control panel
- First insert the control panel with the bottom right corner on the pin to the bottom right of the frame (as shown in the diagram). You can also insert the operating panel first with the bottom left corner on the pin in the frame.
Then press the left (or right) side until it clicks into place.
Flip the control panel upwards.
Check that the control panel is properly in place and secure. If the control panel is not fitted properly, error messages appear in the display and/or several keys will not function properly.
Removing the control panel
Press the OPEN button.
Press the control panel somewhat to the right or left and then pull one and then the other side away.
Anti-theft

When the panel is not attached, the LED anti-theft protection light will flash on the unit.
Contacts
If the control panel is removed the contacts in the control panel and radio are free.

Ensure that contacts that are free do not get dirty. This would affect the proper operation of the car radio. For protection, always keep the control panel in its case.
Clean the contacts if necessary with a clean, lint-free dry cloth.
Reset
To start up the radio use the tip of a pen or other sharp object to press the RESET opening.
If the car radio does not work properly and this can not be resolved by switching it off and on, press the tip of a pen or other sharp object into the RESET opening.
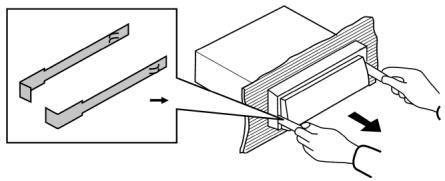
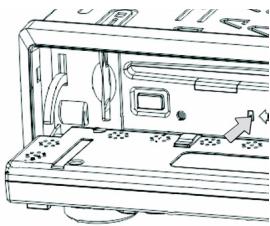
Removing the unit
Remove the control unit.
Pull the blind frame away.
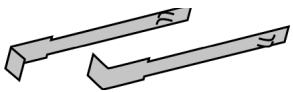
- Insert the left and right keys into the relevant gaps on the sides of the device. The two holding flaps will be bent back and you can remove the unit.
Information on the cables

The information on the cables is to be used if the cables are to be laid individually. To do so, contact a specialist workshop and hand over the supplied ISO plug and the information from this chapter.
You do not need the following information to connect the radio to the ISO plugs in your vehicle.
Two ISO sockets are supplied with cables:
Plugs with power cables for ISO socket block A
Plugs with speaker cables for ISO socket block B
Overview of ISO socket A: power

Memory back-up (yellow)
The yellow memory back-up cable must be connected with the permanent plus. Otherwise the station memory function does not work (refer to "Assignment of the ISO socket block on the car radio", page 18).
Antenna relay cable (blue)
The blue cable is available for a relay-controlled antenna. The relay extends the antenna automatically when the radio is switched on. When it is switched off the antenna is retracted.
This relay cable can also be used to control an external amplifier. Please refer to the amplifier's operating instructions for the correct connections.

Never connect the blue cable to the engine cable of the relay controlled antenna; this could damage the radio!
Overview of ISO socket B: Speakers
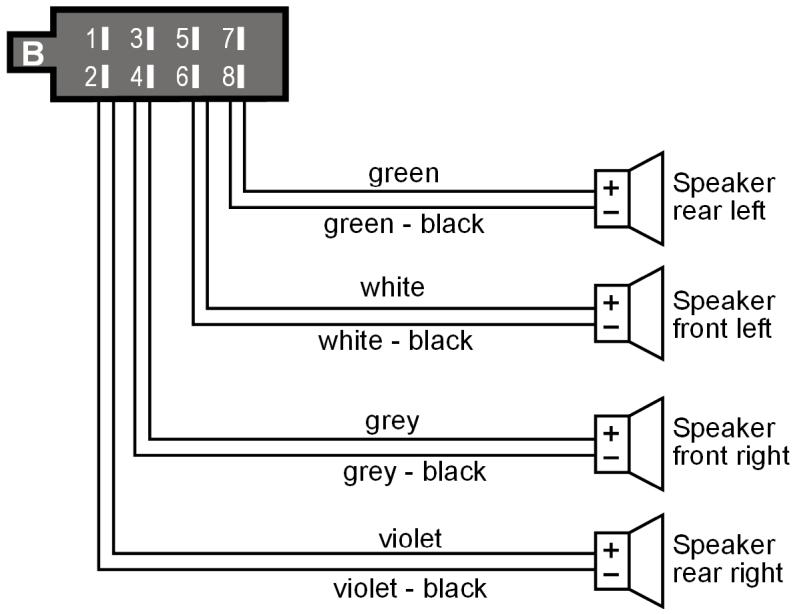

If the vehicle only has front speakers and the cables for the rear speakers are not required the free ends of these cables must be insulated properly.
Assignment of the ISO socket block on the car radio
| ISO block | BLOCK B - Speakers | BLOCK A - Electricity supply | ||
| B 1|3|5|7|2|4|6|8| | 1 | rear right + | 1 | |
| 2 | rear right - | 2 | ||
| 3 | front right + | 3 | ||
| A 1|3|5|7|2|4|6|8| | 4 | front right - | 4 | Permanent plus (permanent 12V supply from main electrical system) |
| 5 | front left + | 5 | Car antenna (also for external amplifiers, etc.) | |
| 6 | front left - | 6 | ||
| 7 | rear left+ | 7 | Switched plus (switched 12V voltage, via ignition) | |
| 8 | rear left - | 8 | Earth | |
Problems due to incorrect cable connections
In some types of vehicle the default assignment of the permanent plus and alternating plus has been exchanged by the factory for the ISO block A in the ISO plug. If this is the case in your vehicle, certain functions may be impaired: stations may not be stored properly, for example.
To solve this, the red cable (switched plus) and the pink cable (permanent plus) will need to be reversed in the ISO block. Appropriate adapters are available from specialist retailers for this.
General functions

Do not switch the radio on for longer periods of time if the engine is not running. This could discharge the car battery and the car would no longer start.
Switching on/off and mute
- Hold down the PWR/MUTE button for a few seconds to switch the device on and off.
The device also switches on if you press any button except the OPEN open button.
If you press the PWR/MUTE button briefly you only switch the sound on and off ("MUTE" = switch to mute).
Press PWR/MUTE again to turn the sound back on.
Sound settings with PUSH/SEL
Volume
The PUSH/SEL multipurpose control has the basic function (without pressing the button) of controlling the volume (VOL + / VOL -) .
Turn the wheel to the left or right to turn the volume up or down.

Always set the volume such that you can still clearly hear the sirens of emergency vehicles!
Bass/treble/balance/fader
Press the PUSH/SEL multipurpose control to display the current settings for bass (BRS), treble (TRE), balance (BAL) and fader (FRD).
Turn the PUSH/SEL multipurpose control to modify the settings.

The bass and treble can not be set if the equalizer DSP NONE setting was modified (refer to "Equalizer" below).
Advanced settings with PUSH/SEL
Using the PUSH/SEL multipurpose control you can also set the initial volume, time setting, volume of the traffic announcement, EON function, recording format, equalizer, loudness, reception sensitivity and stereo signal.
- Hold down the PUSH/SEL multipurpose control for around 2 seconds and then press it repeatedly to open the following settings:
INVOL - set initial volume
- Turn the PUSH/SEL multipurpose control to set the default volume with which the radio should switch on.
ADJ - Set clock time
Your car radio is fitted with an RDS controlled clock. The time is set automatically if the EON function is active and will still function even when the radio is switched off. If you are unable to receive an RDS signal, you can adjust the time displayed manually.
- Turn the PUSH/SEL multipurpose control to the right to set the hours and to the left to set the minutes.
TAVOL - Set volume for traffic announcements
You can set a louder volume for traffic announcements so that you can clearly hear the announcements when the radio volume is set to low.
- Turn the PUSH/SEL multipurpose control to set the volume for the traffic announcements.
EON - Switch EON function on/off
The extended other network information EON provides additional functions for locating a station with traffic announcements. Specifically, the device also switches to a station with traffic announcements (or a particular PTY type) if you are listening to a station that does not provide travel announcements. After the announcement it switches back to the previous station.
- Turn the PUSH/SEL multipurpose control to switch the EON function on (EON ON) or off (EON OFF).
On delivery and after a reset EON ON is active.
REC - Set recording format
Turn the PUSH/SEL multipurpose control to set the format for recording MP3 or wMR (WindowsMedia-Audio) files on SD/MMC or USB media.
TELVOL - set telephone volume
- Turn the PUSH/SEL multipurpose control to set the default volume for a telephone call.
DSP - Set equalizer
You can add a sound setting for the sound.
- Turn the PUSH/SEL multipurpose control to select between the CLRS, ROCK, POP, FLAT and NONE settings.
In the FLRT setting all equalizer settings are set to zero.

If you want to select a different setting to the default DSP NONE you can no longer control the treble and bass separately (see "Sound settings with PUSH/SEL" on page 19).
LOUD - Switch loudness function on/off
- Turn the PUSH/SEL multipurpose control to switch the loudness function on (EON ON) or off (EON OFF).
The loudness function increases the bass sounds at low volume.
LOC - Set reception sensitivity (only in radio mode)
- Turn the PUSH/SEL multipurpose control to dampen the reception sensitivity at the antenna input (LOC ON) or to set it to normal sensitivity (LOC OFF).

If you only want to receive local stations when locating stations if the function is switched on it is active for FM stations. To prevent strong dampening of the antenna signal after the station search, reset normal sensitivity (LOC OFF).
STEREO
Set stereo or mono reception (only in FM radio mode)
Most FM stations transmit in stereo. The display will show ① for stereo reception. If the reception conditions are unfavourable it may be necessary to set mono to improve the reception quality.
- Turn the PUSH/SEL multipurpose control to either set stereo (STEREO) or mono (MONO) reception.
Display
-
By pressing the DIS/REC button repeatedly you can change the screen display as follows:
During radio operation: "CT" (Clock time) time > PTY settings > Radio frequency > RDS indicator.
During CD operation: "CT" (Clock time) time > PTY settings > Frequency > RDS indicator > Playback or CD/MP3 information.
In USB or card operation: "CT" (Clock time) time > PTY settings* > Frequency > RDS indicator.>Playback information for the USB data media or the SD/MMC card
□ In AUX mode: "CT" (Clock time) time > PTY settings > Frequency* > RDS indicator > Indicator "RUX". -
The PTY functions are sent in differing scope by different stations; see also the "Radio mode: Radio Data System", page 25chapter.
If no RDS or PTY information is received PTY NONE is displayed on the screen. Each message appears for just a few seconds.
** If no frequency is received PS NONE is displayed on the screen.
Mode
Press the MODE button repeatedly to switch between radio reception, CD operation (CD), card operation (SD/IMC), USB operation (USB) and AUX operation (AUX).
Please note that a medium must be inserted or connected before you can switch into that mode.
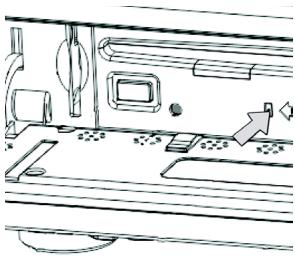
Reset
To reset the car radio to the factory settings press the RESETbutton with a pointed object, such as a pen. It is located behind the control panel.
Press RESET
- before first use, after connecting the cable,
- if not all function keys are working,
- when an error message appears in the display.
Radio mode: Basic functions
Selecting the waveband
Press the BAND button to switch between FM (F1, F2, F3) and medium wave (MW1 and MW2). You can store up to 6 stations in each band.
The three bands FM1, FM2 and FM3 and the two bands MW1 and MW2 each cover the same frequency range. This is how you can save up to 18 stations in the FM band and 12 stations in the MW band.
Searching for a station
Search automatically
- Briefly press either the or button to start the automatic station search. The device will search for the next station automatically.
To stop the function, press 1 or again.
Manual search
If you hold down the 1 or 2 button for a bit longer the radio switches to manual search mode. The display shows MANUAL.
Change the value again with or .
Searching for an AF station
In AF mode the radio automatically changes to a station in the FM band with an alternative frequency which transmits the same programme when reception of the original frequency is too weak ("AF" = "Alternative frequency") (Refer to "Alternative frequencies (AF button)", page 25).
To turn AF mode on press the AF button once. The display will show the AF indicator.
- In one of the bands FM1, FM2 or FM3 press the or button to search the FM band in order to find stations that are broadcasting an AF signal. The search stops each time a station is found.
To deactivate AF mode press the AF button again. The indicators disappear.

On delivery or after a reset AF mode is switched on.
Storing stations
Saving manually
After the search function has found a station press one of the 1 to 6 buttons for around two seconds. In each band (FM1, FM2, FM3, MW1 and MW2) you can save 6 stations.
The radio will switch back into automatic search mode after a few seconds.
Automatic saving
Press the AS/PS button for around two seconds. The current band is searched for the six strongest stations. The stations found are automatically saved to memory spaces 1 to 6. The stations found are played in succession for about five seconds. Then the station that is saved in memory space 1 is played.
If you want to stop the search press one of the station buttons 1 to 6.
Calling up stations
Calling up individual stations
Use BAND to select the band.
You can start one of the saved stations by pressing the relevant station button 1 to 6.
Running through saved stations
You can call up the saved stations for the current transmission areas.
Use BAND to select the band.
Press the AS/PS button briefly. All stored stations will be played one after another for about five seconds.
When you hear the station you want to listen to press the AS/PS button briefly.
Radio mode: Radio Data System
The Radio Data System is a service provided by radio stations. In addition to traditional music and voice services they also broadcast additional information in the form of encrypted digital signals and these are displayed by the car radio. This information – such as the station's name or name of the track being played – is shown on the screen.
If the station does not send any RDS signals, the frequency is shown rather than the station's name.
If the station that sends RDS signals also provides traffic announcements "TP" ("Traffic Programme") is shown on the screen.
Alternative frequencies (AF button)
One function of RDS is the AF function in the FM band ("AF" = "Alternative Frequencies"). In RDS mode if you leave the range of a transmitting station you switch automatically to another frequency. The change is only successful if the PI codes match (the PI code is the programme identification that uniquely marks the programmes and station chains). This avoids switching to a frequency which is occupied by a different programme.
- Briefly press the AF button to switch the AF function for the RDS mode on or off. If the function is on the display shows "AF".
The AF indicator in the display flashes when no RDS information is available.
Regional programme mode
Some stations transmit regional programmes at certain times. In regional programme mode the radio can not switch to a frequency that is broadcasting another regional programme.
To switch the regional programme mode on or off hold down the AF button for longer than 2 seconds. When switching on the display briefly shows REG ON.
TA - traffic announcement
"TA ("Traffic Announcement"). If the station sends RDS signals and provides traffic announcements and the TA function is switched on, the radio switches automatically from other modes (e. g. CD) if a traffic announcement is broadcast. The volume level for traffic announcements is raised to the level set in the TA VOL function if it is below this level (on delivery "16"; refer to page 20).
Stations that broadcast traffic announcements are shown by TP on the screen.
- Press the TA button to switch the TA function on or off. For stations that transmit traffic announcements "TA" flashes on the screen. For stations that do not transmit traffic announcements "TA" is displayed permanently.
- When the traffic announcement is broadcast the "TA" lights up permanently. For stations that do not transmit traffic announcements the radio switches to the station broadcasting the traffic announcement.
- You can interrupt the radio if it changes from CD/MP3 mode, SD/MMC mode or from a channel without traffic announcements to a channel with traffic announcements. To do so press the TA button briefly. The TA function is now paused and the device switches back to the previously selected mode without the TA mode being switched off.

When the TA function is switched on during the station search only stations that broadcast a traffic announcement signal are found and saved.
PTY - Programme Type Code
"PTY" is a function using which the car radio searches for stations with preselected programme contents.
To activate the PTY search, press the PTY button. The display reads PTy.
- When searching for stations using the or button only channels with the currently selected PTY code are considered (refer to list on next page).
To deactivate the PTY search, press the PTY button again.
Set PTY code
- Hold down the PTY button and then turn the PUSH/SEL multipurpose control to select the desired PTY code.
Search for stations using the PTY code
If when displaying a PTY code you briefly press the PTY button, the or buttons, a search starts for stations that match this PTY code.

If no PTY information is received NOT FMD is displayed on the screen. Then the search ends with the last station set.
The following programme types are possible:
NEWS: News
AFFAIRS: Current affairs
INFO: Advice, info
SPORT: Sport events
EDUCATE: Education
DRAMA: Radio drama
CULTURE:Culture
SCIENCE: Science and technology
VARIANT: Miscellaneous
POP M: Pop music
ROCK M: Rock music
EASY M: Easy listening
LIGHT M: Light classical music
CLASSICS: Classical
OTHER M: Other music
WEATHER: Weather
FINANCE: Finance, stock market
CHILDREN: Children's programmes
SOCIAL: Social, activities
RELIGION: Religion, ethics
PHONE IN: Phone in stations
TRAVEL:Travel
LEISURE: Leisure activities
JAZZ: Jazz
COUNTRY: Country music
NATION M: Music from other countries
OLDIES: Oldie music
FOLK M: Folk music
DOCUMENT: News reporting
TEST: Emergency test
ALARM: Alarm messages

Please note that this information will depend on the region, the broadcaster and the station.
Operation with data media (Audio CDs, MP3, USB, SD/MMC, AUX)
The car radio has various drives and connections that can play various audio formats:
| Drives and connections | Data media and formats |
| CD drive | For commercial audio CDs and own CDs with MP3 or WMA files. The CDs can also have the CD-R and CD-RW format. |
| USB slot | For USB sticks* or MP3 players* |
| SD/MMC card reader | For SD/MMC memory cards* with MP3 or WMA files |
| AUX IN connection | To connect external audio devices, e. g. a CD player, via a 3.5 mm jack plug |
| A2DP mode | The audio files are transferred from the Bluetooth device to the radio. |
| * The system cannot be guaranteed compatible with all MP3 players, USB sticks and memory cards available on the market |

The playback functions of the various data media are mostly identical and are described in these instructions (refer to page 31).
MP3 and WMA files have their own search and display function (refer to page 32).
The CD drive
The CD drive is located behind the control panel. In addition to commercial audio CDs the car radio can also play CD-R and CD-RW formats.
Inserting and removing CDs
Press the OPEN button to fold down the control panel.
Insert the CD into the slot with the labelled side upwards.
Close the control panel again. The data is read (refer to the next section "display when reading in"); then playback starts.
To remove the CD open the control panel again. Press the OPEN button und (eject). The CD will be ejected. The car radio will change back to radio mode.

Do not drive with a CD projecting from the device. Remove the CD first.
Display when reading in
When the data is being read "TOC REERD" = (TOC = Table of Contents) = reading table of contents is displayed.
If the data carrier does not contain any data "NO FILES" is displayed.
No "jumping" on impact
This function compensates for vibrations, for instance from a bumpy road, and ensures playback without interruptions. When the device is switched on the memory is automatically filled with data:
- for audio CDs for 8 seconds;
- for MP3 CDs for 100 seconds;
USB slot
You can connect an MP3 player or another data medium to the USB slot on the front of the unit.
Your car radio can process USB data media up to 8 GB (certified).
For this the directory structure may contain a maximum of 99 folders and 990 files.
Connect the USB device
- Connect your USB device (e.g. a USB stick or MP3 player) to the slot. The display shows TOC READ. The radio will search for MP3 or WMA files on the storage medium and USB will appear on the display.
If the device is in another mode (radio, CD, you can select the USB slot with the MODE button.
Search and playback functions for files on an external storage medium work in the same way as for MP3 CD's.
SD/MMC card reader
The SD/MMC drive is located behind the control panel.
Inserting and removing cards
Press the OPEN button to fold down the control panel.
Insert the memory card with the contacts to the right and the bevelled corner upwards in the card slot. The radio will search for MP3 or WMA files on the storage medium and SD/MMC will appear on the display.
If the device is in another mode (radio, CD), you can select the USB slot with the MODE button.
AUX IN connection
You can connect another audio device, e. g. a CD player with a 3.5 mm jack plug to the car radio's AUX IN socket.
The display now shows RUX .
If the device is in another mode (radio, CD), you can select the USB slot with the MODE button.
Search and playback functions for files on an external storage medium work in the same way as for audio CD and MP3 CDs.
Playback functions
To playback via the mobile phone refer also to "Audio streaming (A2DP)", page 39.
Playback and pause
- You can pause the playback by pressing the PAUSE button (1). During the pause the screen flashes.
Press the button again to start playing again.
Skipping tracks
By pressing the or buttons, you can select the previous or next track on the CD. The track number is shown on the display.
Press the -10 and +10 buttons (number keys 5 and 6) to jump forward on backwards 10 tracks.
Fast forward/rewind
Hold down the or buttons for longer to start fast forward or backwards. Release the buttons to end fast forward or backward.
Repeat
Press the RPT button (number key 2) once. RPT appears in the display. The current track will then be repeated.
Pressing the button again will change the playback mode back to normal.
Preview track
Press the INT button (number key 3). All tracks are played in succession for around 10 seconds each.
Pressing the button again will change the playback mode back to normal.
Random track playback
Press the RDM button (number key 4). The player will "shuffle" through the tracks, playing them in a random order.
Pressing the button again will change the playback mode back to normal.
Search for a track
Press the AS/PS button. The current track number flashes on the screen.
Turn the PUSH/SEL multipurpose control or press the
山 / 山 button to play a different track.
For multiple digit track numbers turn the PUSH/SEL multipurpose control to enter the last digit and then press the PUSH/SEL multipurpose control to display the next digit etc.
- When you have the desired track number press the BAND button to playback the track.
Search functions for MP3 and JPEG data carriers
The MP3 format has special search functions. In addition to track numbers you can also search on track names and directory names.
The use of this function and other MP3-specific functions will depend to some degree on the MP3 CD itself. Please bear this in mind when producing this type of CD (refer to next chapter).
All common MP3 encodings can be played back.
Producing MP3 CDs; ID3 tags

As with data CDs, MP3 files (CD-ROMs, USB sticks etc.) may contain individual tracks or folders. When producing a data carrier please ensure that you only save the tracks in folders and that none are saved on the same level as the folders. Mixing tracks and folders at the same level may produce playback problems.
When producing an MP3 files you can also save so-called "ID3 tags" (we recommend using an ID3 tag editor for entries). This is a block of information stored on an MP3 CD lying "behind" the actual music information of the MP3. This may include such items as the artist, track, album name, year of publication and a short comment.
The car radio can read this block of information and show it on the display. The various pieces of information are displayed in succession in scrolling text.
Track search
Search for track numbers
A track number is searched in the same way as for an audio CD (see "Search for a track" on page 32). Not only the tracks in the highest directory level but rather all tracks on the data carrier are displayed.
Search for track name (characters)
Press the AS/PS button twice. The first position flashes.
- You can search in the current directory for the beginning of the title by choosing a letter with the PUSH/SEL multipurpose control or the / buttons.
- When you have found the first letter of the track press PUSH/SEL. The letter is shown on the screen and the next position flashes.
- Use the PUSH/SEL multipurpose control or the / buttons to find the second letter of the track and press the PUSH/SEL multipurpose control when you have found it. The second letter is shown on the screen and the third position flashes.
- Use the PUSH/SEL multipurpose control or the / buttons to find the third letter of the track and press the PUSH/SEL multipurpose control when you have found it. The third letter is shown on the display.
Finally press the BAND button to playback the track.
Searching for directories
Searching from root directory
Press AS/PS three times. The top directory (root directory) appears.
- With the multipurpose control PUSH/SEL or the / button you can now scroll through all the directories and tracks and select a directory.
Press BAND to play back the tracks in this directory.
Recording function

Note: Please observe the legal regulations applicable where you live for producing copies of copyrighted works. If you have any doubts, please contact a local expert.
Record from audio CD
You can also use your car radio to record data from the CD player onto the external USB data medium or an SD/MMC card.
Hold down the DIS/REC button in CD mode.
U5B ALL is displayed.
(If the destination for the recording is SD/MMC SD/MMC ALL is displayed).
Press DIS/REC several times to select either recording option USB/MMC-ALL (record all tracks) or USB/MMC -ONE (record one track).
Start the recording by pressing the BAND button.
Audio data is now stored on the USB drive in the selected format (MP3 or WMA, see "REC - Set recording format" on page 21). During recording RECORD will appear on the display.
Then an "R" in front signifies the recording.

Note: When the USB data medium is full the recording switches automatically to the card reader if a memory card has been inserted (refer to next chapter).
To stop the recording ahead of time, briefly press the BAND button again. The recording is saved after WRIT is displayed briefly on the screen. The recording is also ended if you switch to another mode (radio, AUX,...).
- You can play back the data by switching to the USB or SD/MMC mode with the MODE button and calling up individual titles from the USB drive.
Copying MP3 files
You can also copy individual tracks from an MP3-CD onto the external USB data medium or an SD/MMC card.
- When playing a track from an MP3-CD hold down the DIS/REC button. COPY MNC is displayed.
Press the DIS/REC several times to select either the copy option COPY USB (copy to USB data medium) or COPY MMC (copy to SD/MMC card).
Note: If only one data medium is in the device the copy process starts immediately! The copy process is ended if you switch to another mode (radio, AUX,...).
Start the copying process by pressing the BAND button.
During the copying process COPY is displayed on the screen with a percentage from 01 to 1000 indicating the progress of copying. After displaying COPY 100 the copy process is complete and the MP3 track playback is continued.
Recording from radio or audio input
You can also use your car radio to record data from the radio or audio input to a USB stick or memory card.
Insert the memory medium into the card compartment or the USB slot and use the MODE button to select the radio or RUX mode.
If necessary start playback of the external audio device.
Hold down the DIS/REC button.
REC MNC is displayed.
Press the DIS/REC several times to select either the record option USB (record to USB data medium) or MMC (record to SD/MMC card).
Start the copying process by pressing the BAND button.
To stop the recording, briefly press the BAND button again. The recording is also ended if you switch to another mode (radio, AUX,...). The recording is saved after WRIT is displayed briefly on the screen.

Notes on recording files
The recordings are saved on the data medium with the following names:
Audio-CD recordings: TRAC01, TRAC02 ...
MP3 CD recordings: MUSIC01, MUSIC02 ...
Radio recordings: TUNERO1, TUNERO2 ...
AUX recordings: AUXIN01, AUXIN02...
Audio CD and radio recordings are recorded in stereo and with a bit rate of 128 kbps or a sampling frequency of 44 Khz.
When copying MP3 files the recording format of the source is transferred.
Deleting photos
You can delete recordings and tracks in MP3/WMA format from a USB or SD/MMC data medium.
Use the MODE button to select the USB or SD/MMC mode and start playing the file that you want to delete.
Hold down the DIS/REC button.
DELETE is displayed.
Hold down the DIS/REC button to cancel the deletion process,
Press the BAND button to delete the track.
Using Bluetooth function
The car radio has a Bluetooth function that enables you to use the radio as a hands-free device for your mobile phone.
Of course this requires a mobile phone that supports the Bluetooth function and is compatible with the car radio.
Bluetooth symbol 8
The Bluetooth symbol on the screen indicates the status of the Bluetooth connection:
Flashing slowly (every 5 seconds): Standby
Flashing quickly (every second): Establishing connection
Permanently on: Connection active
Pairing the telephone with the car radio
Search for Bluetooth devices on your mobile phone.
After a successful search the entry CAR RADIO is shown on the mobile phone screen.
- Select this entry for pairing and enter the password 0000 for the car radio in the subsequent password query. You may need to confirm establishing the connection again.
After successful pairing the car radio screen briefly shows CONNECT and the Bluetooth symbol appears permanently on the screen.
Establishing automatic connection
When switching on the car radio the most recently registered mobile phone is paired with the car radio. If after a minute no connection can be made to the mobile phone the connection set up is aborted.
- If the Bluetooth connection is in standby (no connection to mobile phone active) press the TALK button for around 2 seconds. The car radio now tries to set up a connection with the most recently registered mobile phone.
Starting/ending call
An incoming call is indicated by the call signal via the car's loudspeaker and the caller's number is displayed on the car radio's screen.
- You accept the incoming call by pressing the TALK button on the front of the device.
- You end the call by pressing the TALK button on the front of the device again.
Reject call
To reject an incoming call press the TALK button on the front of the device for more than 2 seconds.
Redalling, caller list
Press the TALK button to call up the Bluetooth menu.
- Turn the PUSH/SEL multipurpose control to select one of the two following entries. Select an entry by briefly pressing the TALK button:
L-BIRL (redial)
After selecting redial REDIRL is displayed. After pressing the TALK button again the last number called from the mobile phone is dialled.
CALL LST (call list)

This entry is only shown if calls have already been received.
After pressing the TALK button again the last call received is displayed.
Turn the multipurpose control to display other calls.
Press the TALK button to stop playback.
Press the TALK button for longer than 2 seconds to leave the Bluetooth menu.
Switching call to mobile telephone
Press the TALK button for longer than 2 seconds to switch the call to the mobile phone.
This cancels the Bluetooth connection. When the call is ended, the connection is established again.
Voice dialling

Note: Voice dialling may need to be set up on the mobile phone. Read the instructions for your mobile phone for how to do this.
Press the TALK button for longer than 2 seconds until the entry VOICE DIAL is shown on the screen.
After the beep say the name of the person in the mobile phone's telephone directory to dial the number.
Deleting pairing
If no Bluetooth connection is active briefly press the TALK button. The screen displays the DEL PAIR entry.
The mobile phone that was most recently paired is now deleted and will no longer be connected automatically.
Conference call
If another call is received during a call briefly press the TALK button to accept it.
Use the MODE button to switch between the calls.
Audio streaming (A2DP)
Your car radio uses the A2DP profile (Advanced Audio Distribution Profile) and can therefore playback the audio data of your mobile phone.
On your mobile phone select an audio file and start playback.
The car radio's screen shows the entry A2DP and the audio file is played back via the car radio's speakers.

Note
On the mobile phone it may be necessary to switch playback to via a Bluetooth stereo headset.
Read the instructions for your mobile phone for how to do this.
The car radio does not switch to A2DP mode automatically for some mobile phones. In this case switch to A2DP mode by pressing the MODE repeatedly until A2DP is shown on the screen.
AVRCP (Audio Video Remote Control Profile)
AVRCP is a Bluetooth profile to remotely control audio and video devices. Use the PAUSE button (number pad 1) to stop and restart playback of the audio file on the mobile phone.
Use the or buttons to open the previous or next audio file on the mobile phone.
Troubleshooting
| PROBLEM | POSSIBLE CAUSE/SOLUTIONS |
| The device cannot be switched on. | The ignition is not switched on. |
| One of the fuses is defective. | |
| The CD cannot be loaded or is ejected. | There is already a CD in the car radio. |
| The CD has been put in the wrong way round. | |
| The disk is contaminated or damaged. | |
| The temperature in the car is too high. Wait until the environmental temperature has normalised. | |
| Condensation! Switch the player off for a few hours and then retry. | |
| No sound | The volume has been set to minimum. |
| Cables are not properly connected. | |
| Function buttons do not work. | The integrated microcomputer cannot work because of interference. Reset (press a sharp object into the reset opening). |
| The control panel is not properly fitted. | |
| The CD skips. | The installation angle is more than 30°. |
| The disk is contaminated or damaged. | |
| Errors on CDs you have created yourself. Check the CD in another playback device. | |
| Device connected to the USB slot does not work. | The USB slot is intended for devices that conform to the USB norm. Not all devices available on the market comply with these norms. Possibly the attached device does not comply with these norms. |
| Radio and/or automatic search do not work. | The antenna cable is not connected properly. |
| The station signals are too weak. Set the station manually. | |
| Station memory does not work. | The cable for the permanent plus (yellow) is not connected properly. For this, refer to the “Installation”, page 10 chapter. |
| Your mobile phone is not recognised. | The mobile phone is not compatible with the Bluetooth unit. |
Replacing fuse.
The car radio has a 15 A fuse on the back that is released if there are voltage peaks or a short circuit.
In this case replace the fuse with one of the same type of switch off characteristics as the one stated in the technical data.
Before switching on the car radio again ensure that the problem that tripped the fuse has been resolved.
Disposal information
Packaging

All packaging and packaging materials that are no longer required can and should be recycled.

Appliance
At the end of its life, the radio should not be disposed of in household rubbish. Enquire about the options for environmentally-friendly and appropriate disposal.
Technical data
General features
| Operating voltage: | DC 12V, negative earth connection |
| Device dimensions: | 178 x 175 x 50mm (W x D x H) |
| Output power: | 4 x 15 Watt (RMS) |
| Fuses: | 15 amp |
Radio
| VHF (FM): | 87.5 – 108 MHz |
| Medium wave (MW): | 522 to 1620 kHz |
| Bluetooth version: | 2.0 |
CD/MP3 player
| Laser output: | Class 1 laser product |
| Frequency range: | 40 Hz – 18kHz |
| MPEG rate | 64 - 320kbps |
| MP3 playback | ISO 9660 & Joliet MP |
Connection
AUX: 3.5 mm jack plug
Supported formats
CD: Audio-CDs, CD-Rs, CD-RWs
USB storage medium: 1.1 and 2.0 up to 8 GB (certified)
Memory cards: SD up to 4 GB (SDHC > 4GB) MMC up to 512 MB


These days there are many non-standard CD recording and copy protection procedures in use and a wide range of CD-R and CD-RW disks on the market. This can occasionally lead to read errors or delays. This does not mean the player is faulty.
This device has been approved in accordance with Directive 2004/104/EEC (last amended by Directive 2006/28/EC) on "Electromagnetic compatibility" (so-called e approval).
Subject to technical modifications.

10R-02 9671
Declaration of conformity
MEDION AG hereby declares that the device MD 82309 conforms to the fundamental requirements and other regulations of the relevant European Directive on Radio and Telecommunications Equipment (R&TTE 1999/5/EC).
Further information on the Declaration of Conformity can be obtained from our Service Centre on request.
C∈0678
Table des matières
Vue d'ensemble. 4
Basses/Aigus/Balance/Fader
FINANCE: finances, Bourse
Retirez immediatement le CD.
AVRCP (Audio Video Remote Control Profile)
CD: CD audio, CD-R, CD-RW
(Audio-CD's, MP3, USB, SD/MMC, AUX). 32
Bluetooth-weergave 8
AVRCP (Audio Video Remote Control Profile)
AVRCP (Audio Video Remote Control Profile) 41
Odstrańovani poruch 42
Vymena pojistky 43
Pokyny pro likvidaci 43
Technické udaje 44
Prohlášeni shodě 45
CZ
Přehled
Ovladacipanel

- PWR: stisknutim na několik sekund prístroj zapnete a vypnete.
FINANCE: finance, burza