
MP3 BOOMBOX MD 81651 - Portable speaker MEDION - Free user manual and instructions
Find the device manual for free MP3 BOOMBOX MD 81651 MEDION in PDF.

| Product Type | Portable speaker with CD player, cassette player, FM/MW radio and USB port |
| Mains Power Supply | 230 V ~ 50 Hz |
| Main Battery Power | 8 batteries 1.5 V R20/LR20 (not supplied) |
| Backup Battery Power | 3 batteries 1.5 V AA R6/LR6 (not supplied) |
| Maximum Music Output Power | 2 × 20 W (PMPO) |
| Sinusoidal Power | 2 × 2 W (10 % K) |
| Radio Frequency Ranges | FM: 87.5-108 MHz / MW: 522-1620 kHz |
| Compatible Audio Formats (CD) | CD Audio, CD-R, CD-RW, MP3 (sampling freq. 16-48 kHz) |
| Connectivity | USB 1.1/2.0 port, 3.5 mm headphone jack, FM telescopic antenna |
| Main Features | FM/MW radio, CD/MP3 player, cassette player, USB playback, 5-mode equalizer (FLAT/JAZZ/ROCK/CLASSIC/POP), bass enhancement, 3D Surround, timer/sleep, programming up to 60 CD tracks |
| Radio Station Memory | Up to 20 stations per band |
| Display | LCD display with backlight, ID3 information display for MP3 |
| Maintenance and Cleaning | Unplug before cleaning; use a dry, soft cloth; avoid solvents and chemicals |
| Safety | Do not open the device; class 1 laser; keep away from children; do not expose to moisture or open flames |
| Weight and Dimensions | Not specified in the manual |
Frequently Asked Questions - MP3 BOOMBOX MD 81651 MEDION
User questions about MP3 BOOMBOX MD 81651 MEDION
0 question about this device. Answer the ones you know or ask your own.
Ask a new question about this device
Download the instructions for your Portable speaker in PDF format for free! Find your manual MP3 BOOMBOX MD 81651 - MEDION and take your electronic device back in hand. On this page are published all the documents necessary for the use of your device. MP3 BOOMBOX MD 81651 by MEDION.
USER MANUAL MP3 BOOMBOX MD 81651 MEDION
Overview of the Device
- CD compartment
- Telescopic antenna
- 3D SURROUND ON / OFF - Switch the surround sound on / off
- PRESET/FOLDER + button
- PRESET/FOLDER - button
- CD modus: REPEAT - Repeat function
Radio modus: MONO-ST. - Switch from Stereo to Mono
- RANDOM: Random playback (CD)
- EQ/BBS: Equalizer and bass amplification settings (CD)
- VOLUME +: Volume control
- VOLUME -: Volume control
- MUTE: Mute setting
- POWER: On/Off button
- FUNCTION: Select function Radio, CD, Cassette and USB
- BAND: Band selection (AM/FM)
- PAUSE: Cassette button Pause
- STOP/EJ.: Cassette button Stop and cassette ejection
- F.FWD: Cassette button Forward
- REW: Cassette button Backward
- PLAY: Cassette button Play
- RECORD: Cassette button Record
- PLAY/PAUSE:Playback/InterruptPlayback
- LCD Display
- LED STANDBY
- STOP: Stop playback
- Right loudspeaker
- Left loudspeaker
- TIMER/SLEEP - Activate Timer / automatic Sleep function
- TIMER SET/TIME DISPLAY - Setting for Timer
- SKIP/TUNING - Radio programme search / select CD title
- SKIP/TUNING - Radio programme search / select CD title
- ID3 – Information display in the case of MP3 files
- MEMORY/CLK-ADJ. - Store radio programme / set the time (for Display, TIMER and SLEEP)
- Cassette compartment
- PHONES - Earphone connection
- ~ AC INPUT - DC adaptor jack
- Battery compartment
- Battery compartment for the backup function
- USB port
Table of contents
Safety Instructions 3
About this manual 3
Electrical devices do not belong in the hands of children 3
Setting the product up safely 3
Mains connection 3
In the case of damage 3
In the case of disruptions to function 4
CD-Player 4
Battery Handling 4
Cleaning the device 4
Set-up. 5
Unpacking. 5
Check the contents of the box 5
Connecting the power 5
Battery operation - Inserting batteries into the device 5
Inserting backup batteries 5
a. Setting the time 6
Optional: Connecting Headphones 6
Basis Functions 7
Setting the device on / off 7
Adjusting Sound and Volume 7
Volume. 7
Bass boost 7
i. Equalizer setting 7
3D Surround 7
Mute 7
Setting the source of playback 7
Radio Operation 8
Antenna 8
Selecting a radio station 8
Storing programmes 8
8
Adjusting Mono / Stereo 8
CD/MP3 Operation 9
Notes about the CD compartment 9
Inserting a Disc 9
Displays after the insertion of an audio CD or an MP3 CD 9
Removing a Disc 9
PLAY, PAUSE, STOP - Audio CD and MP3 CD 9
Title search and fast forward 9
Audio CD 9
MP3 CD (searching in the folders) 10
REPEAT function. 10
RANDOM 10
Program playing order of titles 10
Making lists 10
Playing lists 10
Deleting lists 10
Cassette Operation 11
Inserting cassette 11
Playing, stopping, interrupting a cassette 11
Autostop 11
Record 11
Suitable cassettes 11
Prepare the record. 11
USB Operation 12
Recycling and Disposal 13
Packaging 13
Device 13
Batteries 13
Technical Data 13
Safety Instructions
About this manual

Please observe the following safety instructions carefully before putting the unit into operation. Take note of the warnings on the unit and in this manual. Always keep the instruction manual near at hand. If you sell or pass on the product, make sure to include this manual together with the unit.
Electrical devices do not belong in the hands of children
Do not let children use electrical devices unattended.
Swallowing batteries may be fatal. Therefore always keep the unit and batteries inaccessible to young children. If a battery has been swallowed, consult a doctor immediately.
Also, keep the plastic packaging out of reach for children to avoid danger of suffocation.
Setting the product up safely
Pay attention to the following environmental conditions when setting up the device:
- The device is not designed for operating in rooms with high relative air humidity (e.g. the bathroom).
- Choose a flat, firm surface to set the product on.
- Make sure that the unit is not exposed to sunlight or other direct heat (e. g. from radiators).
- The device must not be subjected to strong direct sunlight.
- Make sure that the unit does not get into contact with dripping water, splash water or humidity. Do not place any objects filled with liquid, such as vases, on the device for the above reason. Do not operate the device in the proximity of baths, pools or swimming pools, etc.
- Make sure that no open fire sources, such as candles, are placed on the unit.
- Do not cover the ventilation slots, so that sufficient ventilation will always be guaranteed. The ventilation must not be obstructed by covering the ventilation openings with objects (such as newspapers, blankets, curtains, etc). Maintain a minimum distance of approx. 10cm above and below and of approx. 5cm at the other sides from walls or furniture.
Mains connection
Connect the unit to an easily accessible power socket (230V ~ 50Hz) close to the unit. In case the unit has to be disconnected quickly, the plug has to be within easy reach.
If the device has been taken from a cold room into a warm room, delay connecting it with a mains cable.
Otherwise, the condensation arising may possibly destroy the device. Once the device has reached room temperature, it will be possible to bring the device into operation without risk.
Make sure that the mains cable does not become an obstacle. The connection line must not be pinched or squashed.
In the case of damage
Do not operate the device if the device or the mains cable demonstrates obvious damage or the device has been dropped.
Pull the mains plug out of the socket immediately in the case of damage to the device or the mains cable.
Under no circumstances attempt to open or repair the unit yourself. There is danger of electric shock! Do not touch the mains cable of the device either.
Refer all servicing to our Service Centre or to another qualified workshop.
In the case of disruptions to function
It may be that there has been an electrostatic discharge if the device demonstrates disruptions to function. Pull out the mains cable and remove the batteries in this case. Then, replace the batteries and reconnect the device to the mains. The device is reset in this way.
CD-Player

he CD player is a Class 1 laser product. The unit is equipped with a safety system that prevents the emergence of dangerous laser beams during normal operation. To avoid injury to the eye, do not manipulate or damage the safety system of the unit.
Battery Handling
The unit can be operated with batteries. Please observe strictly the following:
- Keep children away from batteries. If by any chance, batteries are swallowed, consult a medical doctor immediately.
- Do not heat or dispose of in fire. Do not short-circuit batteries and do not disassemble them.
- Clean the battery and device contacts before inserting the batteries if necessary.
Always replace all the batteries at the same time. - Replace batteries with a new batteries of the same type. Do not use different types of battery; do not mix used and new batteries.
- Do not reverse the positive (+) and negative (-) terminals.
- Remove the batteries, if you will not be using the device for a longer period.
- Remove exhausted batteries from the device immediately. There will be increased danger of leakage!
- Do not subject the batteries to any extreme conditions; for example, do not place the device on radiators! There will be increased danger of leakage!
- Never attempt to recharge ordinary batteries! There will be the danger of an explosion!
- Remove exhausted batteries from the device immediately. Clean the contacts before you insert new batteries. There will be the danger of corrosion by battery acid!
- If battery acid has leaked, avoid contact with the skin, eyes or mucus membranes under all circumstances! Rinse the spot with plenty of cold water and find a doctor immediately, if the battery acid has nevertheless come into contact with the skin.
Cleaning the device
Always disconnect the AC mains plug before cleaning the unit. To clean the unit, only use a moistened, soft cloth. Do not apply chemical solvents or cleaning agents, as they may damage the surface and/or labelling of the unit.
Set-up
Unpacking
Remove all packaging material including the transport cardboard in the CD-compartment.

ATTENTION!
To avoid danger of suffocation, do not let young children play with plastic bags!
Check the contents of the box
After unpacking the product, make sure that the following items are supplied:
the device
- Mains cable
- Instruction manual with guarantee card
Connecting the power
- Connect the mains plug to the AC socket at the back of the unit.
- Connect the mains plug to an easily accessible mains socket 230V 50Hz . The STANDBY LED lights up.

REMARK
Power will be supplied by the mains network if batteries are inserted at the same time.
Please pay attention to the fact that the device also indicates a low consumption of electricity if it is connected to the mains but is switched off. We recommend detaching the device from the mains if it is not being operated, for this reason.
Battery operation - Inserting batteries into the device
The battery compartment is located on the back of the device.
- Pull out the mains plug.
- Open the battery compartment by pushing the lid downwards by the catches.
- Insert eight 1.5 V R20/LR20 batteries so that the minus pole lies at the springs. Pay attention to the drawings in the battery compartment!
- Replace the battery compartment cover until it engages audibly.
The power will only be provided by the batteries if the mains cable is not connected to the mains at the same time.
Inserting backup batteries
You can insert three 1.5 V R6/LR6 AA batteries (not contained in the delivery) into the battery compartment, so that the time will be retained, even in the case of a power failure. The battery compartment for the backup batteries is located within the main battery compartment of your device.
- Pull out the mains plug.
- Open the battery compartment by pressing the flaps of the cover downwards.
- Remove the eight 1.5 V R20/LR20 batteries from the device, if you have already installed them as described in the previous section.
- Remove the cover of the battery compartment of the back-up batteries.
- Insert three 1.5 V R6/LR6 AA batteries. Pay attention to the correct polarity. The drawing in the device will assist you in this.
- Close the battery compartment.
a. Setting the time
Set the time when the device is in the readiness mode.
- Press the MEMORY/CLK-ADJ. Button; the hour indication in the display will flash.
- Press the SKIP/TUNING button to insert the hours.
- Press the MEMORY/CLK-ADJ. Button again; the minute indication in the display will flash.
- Press the SKIP/TUNING button to insert the minutes.
- Press the MEMORY/CLK-ADJ.; button again to save the settings.

REMARK
The time display will flash when the power connection has been recreated after a power failure or interruption. Reset the time as described above.
Optional: Connecting Headphones
On the back of the device you will find the headphone socket (PHONES)..
- Connect the headphones with a 3.5 mm jack plug. The loudspeaker is then deactivated automatically.

ATTENTION!
High volumes when using earphones or headphones can lead to a loss of hearing. Set the volume to the minimum before putting on earphones or headphones! Your hearing can be damaged if it is subjected to high volumes too suddenly or for too long!
Basis Functions
Setting the device on / off
- Switch the device on by pressing the POWER Button.
- Switch the device off by pressing the POWER Button again.
Adjusting Sound and Volume
Volume
- Press the VOLUME + button to increase the volume.
- Press the VOLUME - button to decrease the volume.

REMARK
The volume level has a setting range from 0 to 40.
Bass boost
- Press the EQ/BBS Button for 2 seconds, in order to switch the bass amplification on. The message X BAS ON will appear in the display.
- Press the EQ/BBS Button for 2 seconds again, in order to switch the bass amplification off. The message X BAS OFF will appear in the display.
Equalizer setting
This device has 5 predefined equalizer settings: FLAT, JAZZ, ROCK, CLASSIC and POP. You will set them as follows in the playback mode:
- Press the EQ/BBS Button, in order to set the equalizer modes available. The different modes will appear in sequence in the display.
3D Surround
- Press 3D SURROUND in to turn on the 3D Surround function.
- Press 3D SURROUND out to turn off the 3D Surround function.
Mute
- Press MUTE, in order to switch the sound playback to mute. The MUTE indication will appear in the display.
- Press MUTE again, order to switch the sound playback on. The MUTE indication will disappear in the display.
Setting the source of playback
You have the possibility of setting different sources of playback with your device. You can listen to the radio, CDs or cassettes and play MP3 files from a USB stick.
- Press the FUNCTION Button, to switch between the TUNER, TAPE, CD or USB sources of playback.

REMARK
Insert the corresponding medium in the case of the Tape, CD and USB functions.
Radio Operation
- Press FUNCTION until TUNER is displayed.
LINE
Antenna
- For FM reception the device is equipped with a pivoting telescopic antenna. Adjust the antenna to get optimal FM reception.
- There is a built-in ferrite antenna for MW reception. Turn the device to the ideal receiving position.
Selecting a radio station
- Press BAND to select AM or FM.
- Set the required programme with the SKIP/TUNING Buttons. You will be able to set the programme manually with a single button press. The progress of the search will stop automatically at the next programme (Autoscan) if you hold the button pressed for longer than a second.
Storing programmes
Up to twenty programmes can be stored for each frequency range.
- Set the required programme as described in the previous section.
- Press the MEMORY/CLK-ADJ. Button. The flashing MEMORY indication will appear in the display and the 00 memory position will flash.
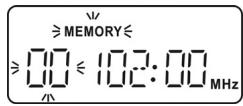
- Press the PRESET/FOLDER + or - Buttons, in order to search for the required memory position.
- Press the MEMORY/CLK-ADJ. Button, in order to confirm your selection.

REMARK
Press the buttons PRESET/FOLDER + or - until Memory and 00 are blinking. It will be necessary to press the MEMORY/CLK-ADJ. Button again if the displays are no longer flashing.
Calling up stored programmes
- Press the BAND Button, in order to switch between VHF and MW (medium wave).
- Press the PRESET/FOLDER + or - Buttons, in order to select the required programme.

REMARK
The stored programmes will be deleted as soon as the device is separated from the electricity supply and the back-up batteries have been discharged or have not been inserted.
Adjusting Mono / Stereo
- Press the REPEAT/MONO-ST. Button, in order to switch between Mono and Stereo in the VHF range.

Notes about the CD compartment
Do not place any foreign objects in the CD compartment, because the mechanism can be destroyed by this.
Do not leave the CD compartment cover open for a longer period, in order to avoid contamination by dust.
Do not touch the lens in the CD compartment under any circumstances.
The playback may be delayed or may start at a different point, if the CD is very dirty or if it exhibits pronounced fingerprints.
Dirt on the scanning lens can lead to interruptions during the playback or to other faults.
Use a standard vacuum brush (available in a photographic supplies shop), if you want to remove dust particles from the CD compartment.
Inserting a Disc
- Before opening the CD compartment, fold the handle to the back.
- Open the CD compartment by lifting the cover over one of the two OPEN openings.
- Insert a disc into the disc compartment with the title side upwards.
- Close the CD compartment.
- Press the FUNCTION button until CD is displayed.
- The device will feed in the titles. READING is displayed and then the total number of titles. The device will go into the Stop mode after this. The number of tracks and the total running time will be displayed.
Displays after the insertion of an audio CD or an MP3 CD
- The total number of tracks will appear in the display, if the audio CD or the MP3 CD has been inserted correctly. (Stop mode).
- No Disc will appear if no CD or an unreadable CD has been inserted.
- Open will appear if the CD compartment is open.
Removing a Disc
- Do not open the CD compartment while the disc is playing or rotating. Press first STOP.
- Open the CD compartment by lifting the cover over one of the two OPEN openings.
- Take hold of a CD at the side in order to remove it.
PLAY, PAUSE, STOP - Audio CD and MP3 CD
- Press the PLAY/PAUSE button to start playback. The number of the current title is displayed.
- Press the PLAY/PAUSE button again to interrupt playback. The playback time will flash.
- Press the PLAY/PAUSE button again to continue playback.
- Press the STOP button to end playback. The device is now in the stop modus and the total number of titles are displayed on the CD.
Title search and fast forward
Audio CD
- Press the SKIP/TUNING Buttons, in order to jump one track back or forwards. You will reach the start of the current track during the playback with SKIP/TUNING.
- You will start a fast search forwards or backwards, if you hold the SKIP/TUNING Buttons pressed down during the playback.
MP3 CD (searching in the folders)
The tracks, such as files on a data CD, can be stored in folders (files, albums) on MP3 CDs.
- Carry the search out as in the case of an audio CD, if there are no folders on the MP3 CD.
-
You will have to open the folder first and search for the track in the respective folder, if there are folders on the MP3 CD.
-
You will search in a folder (album) by repeated pressing of the PRESET/FOLDER + or - Buttons. The folder and the number of files contained in it will be displayed.
- You will select the required track in the folder selected with the SKIP/TUNING Button.
REPEAT function
All the tracks on a CD or a specified title will be repeated continuously in the case of the Repeat function.
- Press the REPEAT/MONO-ST. Button once, in order to repeat the current track. The REPEAT message will appear in the display. The track will be repeated endlessly.
- Press the REPEAT/MONO-ST. Button again, to repeat the whole CD. The REPEAT ALL message will appear in the display.
- Only in the case of MP3 CDs with folders: Press the REPEAT/MONO-ST. Button twice, to repeat the current folder. The REPEAT FOLDER message will appear in the display.
- Press the REPEAT/MONO-ST. Button until the display disappears, in order to end the REPEAT function.
RANDOM
The tracks on the CD will be played in a random sequence in the case of random playback.
- The Random message will appear in the display.
- The tracks will be played in a random sequence from the next track.
- Press the RANDOM Button again, to end the function. The Random message will disappear.
Program playing order of titles
You can programme the order in which up to 60 tracks are played he unit must be in stop mode (if necessary press PLAY and STOP).
Making lists
- Press the MEMORY/CLK-ADJ. Button in the Stop mode. O and P - 01 will appear in the display and the MEMORY indication will flash.
- Select the track that you want to store at the first programme position with the SKIP/TUNING Buttons. The programme position will flash in the display. Select a folder with the PRESET/FOLDER + or - Buttons in the case of MP3 CDs.
- Press the MEMORY/CLK-ADJ. Buttons, in order to store the required track in the list.
- Repeat these steps, in order to store additional tracks.
Playing lists
- Press the PLAY/PAUSE Buttons, to play back the programmed lists.
- You will be able to use the repeat and playback functions on the list as described above with the RANDOM and REPEAT/MONO-ST. Buttons.
Deleting lists
The programmed list will be deleted,
If you press the STOP Button;
- If you change the source of playback by means of the FUNCTION Button;
- If you open the CD compartment in the Stop mode.
Cassette Operation
Inserting cassette
- Press the STOP/EJ. button to open the cassette compartment.
- Place a cassette into the guide tracks of the compartment, with the tape side upwards and the side that is intended to be played forwards.
- Shut the compartment.
- Press the FUNCTION button until TAPE is displayed.
Playing, stopping, interrupting a cassette
- Press the PLAY button to playback the cassette. The tape will run leftwards.
- You can interrupt the playback running by means of the PAUSE Button. Press the PAUSE Button again, to continue the playback.
- Stop the playback by pressing the STOP/EJ. button.
- v.

Never switch from fast running to another function without stopping the tape beforehand. That could damage the tape or the device.
Autostop
The tape will stop automatically, if the end of the tape has been reached during playback or recording. The tape will not stop automatically in the case of fast forward or rewind. Press the STOP/EJ. Button at the end of the tape.
Record
You will be able to record from the radio, a CD and from USB.

Suitable cassettes
The first recordings may only be partly deleted if chrome-dioxide tapes already with recordings on them are recorded over on this device. We recommend using new cassettes for recordings with chrome-dioxide tapes for this reason. You will achieve better playback characteristics with ferrite tapes.
Prepare the record
- Insert a cassette.
- Set the required source of playback (TUNER, CD or USB) with the FUNCTION Button.
- Select the track to be recorded with the SKIP/TUNING Buttons in the case of CD and USB.
- Press the PAUSE button.
- To start recording press the RECORD button. The PLAY Button is pressed down automatically at the same time.
- You will be able to interrupt the recording by pressing the PAUSE Button and releasing the PAUSE again at the end.
- Stop recording by pressing PAUSE or STOP.
USB Operation
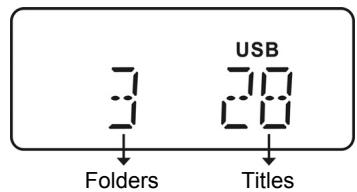
- Press the FUNCTION button until USB is displayed.
- Plug the USB connector of a USB stick into the USB socket. This is located on the top of the device. The USB reading will appear in the display and the total number of the folder and the tracks will be displayed.

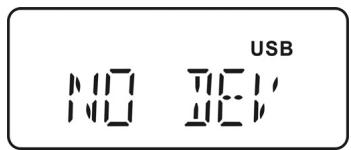
REMARK
If no USB stick or MP3 Player is connected the display shows NO DEV.
- The buttons for CD/MP3 operation have the same functions in the case of USB operation and can be used as described in the chapter concerning CD/MP3 operation.
- Press the STOP Button and pull it out, to remove the USB stick.
Recycling and Disposal
Packaging

To avoid damage during transport, the dived is stored in a packaging. Packaging is produced mostly from materials which can be disposed of in an environmentally friendly manner and be professionally recycled.
Device

At the end of its life, the appliance must not be disposed of in household rubbish. Enquire about the options for environmentally-friendly disposal.
Batteries

Do not dispose of used batteries in the household rubbish! They must be deposited at a collection point for used batteries.
Technical Data
Mains input: 230V 50Hz
Batteries (not included):
Mono cells: 8 × 1,5 ~V , size D, R20/LR20
Back-up mignon batteries 3 × 1,5 ~V , size AA, R6/LR6
VHF radio frequency range: 87,5 - 108 MHz
Medium wave radio frequency range: 522 – 1620 kHz
Headphones: 3.5 mm jack plug
USB port USB version 1.1 and 2.0
Music peaks output performance: 2 × 20 W PMPO
Sinus performance: 2 × 2W (10% K)
CD Player: Laser Class 1

MP3 coding:
Sampling Frequency: 16.0, 24.0, 22.05, 32.0, 44.1, 48.0 KHz
Playable discs: Audio CD, CD-R, CD-RW, MP3-Disk

When playing audio-CDs, only use CDs which are labelled as follows:

Please note: There are numerous, often not standardized techniques of CD recording and copying protection, as well as a great variety of blank CD-Rs and CD-RWs. Therefore reading mistakes or delays may occur in rare cases. This is no malfunction of the device.
Subject to technical modifications!
Filas (no incluidas):
Filas Mono: 8 x 1,5 V, hora D, R20/LR20
Piles (non fournies) :
8x1,5V,typeD,R20/LR20
REPEAT - Gentagefungtion
PLAY, PAUSE, STOP - CD audio e CD MP3
Quando su"This is the most beautiful thing in the world. It's a beautiful place to live and it's also a great place to work."
Quando su"This is the most beautiful thing in the world. It's a beautiful place to live and it's also a great place to work."
Frequenza radio MW (AM): 522 - 1620 kHz
- Overview of the Device
- Table of contents
- Safety Instructions 3
- Set-up. 5
- Basis Functions 7
- Radio Operation 8
- CD/MP3 Operation 9
- Cassette Operation 11
- USB Operation 12
- Recycling and Disposal 13
- Technical Data 13
- Safety Instructions
- About this manual
- Electrical devices do not belong in the hands of children
- Setting the product up safely
- Mains connection
- In the case of damage
- In the case of disruptions to function
- CD-Player
- Battery Handling
- Cleaning the device
- Set-up
- Unpacking
- Check the contents of the box
- Connecting the power
- REMARK
- Battery operation - Inserting batteries into the device
- Inserting backup batteries
- a. Setting the time
- Optional: Connecting Headphones
- ATTENTION!
- Basis Functions
- Setting the device on / off
- Adjusting Sound and Volume
- Volume
- Bass boost
- Equalizer setting
- 3D Surround
- Mute
- Setting the source of playback
- Radio Operation
- Antenna
- Selecting a radio station
- Storing programmes
- Calling up stored programmes
- Adjusting Mono / Stereo
- Notes about the CD compartment
- Inserting a Disc
- Displays after the insertion of an audio CD or an MP3 CD
- Removing a Disc
- PLAY, PAUSE, STOP - Audio CD and MP3 CD
- Title search and fast forward
- Audio CD
- MP3 CD (searching in the folders)
- REPEAT function
- RANDOM
- Program playing order of titles
- Making lists
- Playing lists
- Deleting lists
- Cassette Operation
- Inserting cassette
- Playing, stopping, interrupting a cassette
- Autostop
- Record
- Suitable cassettes
- Prepare the record
- USB Operation
- Recycling and Disposal
- Packaging
- Device
- Batteries
- Technical Data
- REPEAT - Gentagefungtion
- PLAY, PAUSE, STOP - CD audio e CD MP3
Brand : MEDION
Model : MP3 BOOMBOX MD 81651
Category : Portable speaker