
DISNEY TV PRINCESS MD 3723 - Television MEDION - Free user manual and instructions
Find the device manual for free DISNEY TV PRINCESS MD 3723 MEDION in PDF.

| Brand | MEDION |
| Model | DISNEY TV PRINCESS MD 3723 |
| Product type | Color TV with Disney Princess design |
| Screen size | 37 cm (14 inches) - visible diagonal 33 cm |
| Power supply | 230 V ~ 50 Hz, 44 W |
| Color system | PAL / SECAM-L |
| Number of channels | 80 maximum |
| Tuner | Hyperband |
| Audio in TV mode | Mono |
| Audio in AV mode | Stereo |
| Connectivity | 75 ohm antenna, SCART, front Audio/Video input (RCA), 3.5 mm headphone jack |
| Remote control | Yes, with 2 x 1.5 V R03/LR03/AAA batteries |
| Included accessories | 2 Disney legs, detachable speaker, user manual, warranty documents |
| Main features | Automatic and manual channel search, picture adjustment (brightness, contrast, sharpness), sleep timer, mute function, SKIP, QUICK VIEW |
| Safety | Instructions: do not open, unplug before cleaning, avoid moisture and heat sources, keep out of reach of children |
| Maintenance and cleaning | Unplug before cleaning, use a dry soft cloth, avoid solvents |
| Batteries | Used batteries: do not dispose of in household waste, drop off at collection point |
| Recycling | End-of-life device: do not throw away, inquire at town hall for recycling |
| Weight and dimensions | Not specified in the manual (estimate: approx. 5-7 kg, dimensions ~35x35x30 cm) |
| Available OSD languages | French, German, Italian, Spanish, English |
Frequently Asked Questions - DISNEY TV PRINCESS MD 3723 MEDION
User questions about DISNEY TV PRINCESS MD 3723 MEDION
0 question about this device. Answer the ones you know or ask your own.
Ask a new question about this device
Download the instructions for your Television in PDF format for free! Find your manual DISNEY TV PRINCESS MD 3723 - MEDION and take your electronic device back in hand. On this page are published all the documents necessary for the use of your device. DISNEY TV PRINCESS MD 3723 by MEDION.
USER MANUAL DISNEY TV PRINCESS MD 3723 MEDION
Safety instructions 4
General view 6
Remote control 7
Inserting the batteries in the remote control 7
Installation 8
Unpacking the device 8
Checking package contents 8
Setting up 8
Connectors 9
Connecting other equipment 9
Key functions 10
Switching on/off 10
Setting the volume 10
Programme selection 10
Other key functions 11
Menu settings 12
Selecting the OSD Language 12
Programme setting 12
Adjusting the picture 14
Troubleshooting 15
Technical data 16
Disposal 16
GB-3

SAFETY INSTRUCTIONS

About these instructions
Read these instructions carefully before using the system; note the warnings on the unit and in the operating instructions
Always keep the operating instructions close to hand. If you sell or give the device away, make sure you also hand over these instructions.
Never put electrical devices into children's hands
Never allow children to use electrical devices without supervision.
If swallowed, batteries may endanger life. Therefore keep the device and batteries out of the reach of children. If a battery is swallowed get immediate medical assistance.
Keep plastic packaging out of the reach of children. There is a risk of asphyxiation.
Setting the unit up safely
Place the device on a sturdy, level surface. It is not designed for use in rooms that are very humid (e.g. bathrooms). Always ensure that
- there is adequate ventilation (do not place the appliance in a shelving system or where curtains or furniture may obstruct the ventilation holes),
- there are no direct heat sources (e.g. heaters) that could affect the device,
- the device is not in direct sunlight;
- you avoid contact with water spray and drips (e.g. do not place vases on the unit),
- the unit is not placed close to magnetic fields (e.g. loudspeakers),
- naked flames such as lit candles are not placed on the unit,
- no foreign bodies penetrate within the device.

Leave access to the power socket.
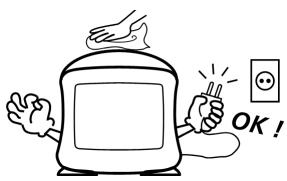
Only plug the unit into a mains plug (230 V ~ 50 Hz) that is easy to reach and is close to the place where you have set the unit up. The mains plug must be freely accessible so that you can unplug the device quickly if you should need to do so.
Lay the mains cable in such a way that it lies free and is not pinched at any point or liable to be ripped from the plug or appliance. It should not be under tension at the point where it leaves the device.
Never undertake your own repairs
If the plug, cable or appliance is damaged, pull the plug immediately from the mains socket.
Never try to open and/or repair the device yourself. There is a risk of electric shock. If there is a defect contact our service centre or other suitable specialist workshop.
GB
Storms
Pull the mains plug and antenna cable if you are away for a long period of time or there is a thunder storm.
Degaussing
Television sets are sensitive to magnetic field changes that arise when the appliance is moved to another position or particular electrical equipment is operated in the vicinity of the TV. These magnetic fields can induce patches of colour impurity.
If such colour impurities occur, switch of the device and leave it off for at least 60 minutes. The set will degauss itself when next switched on.
X-rays
The X-radiation from this device is adequately screened in accordance with the X-ray regulations.
Cleaning the unit
Before cleaning, pull the plug out of the mains socket. Use a dry, soft cloth to clean the unit. Avoid the use of chemical solutions and cleaning products because these may damage the unit's surface an/or labels.
GB-5

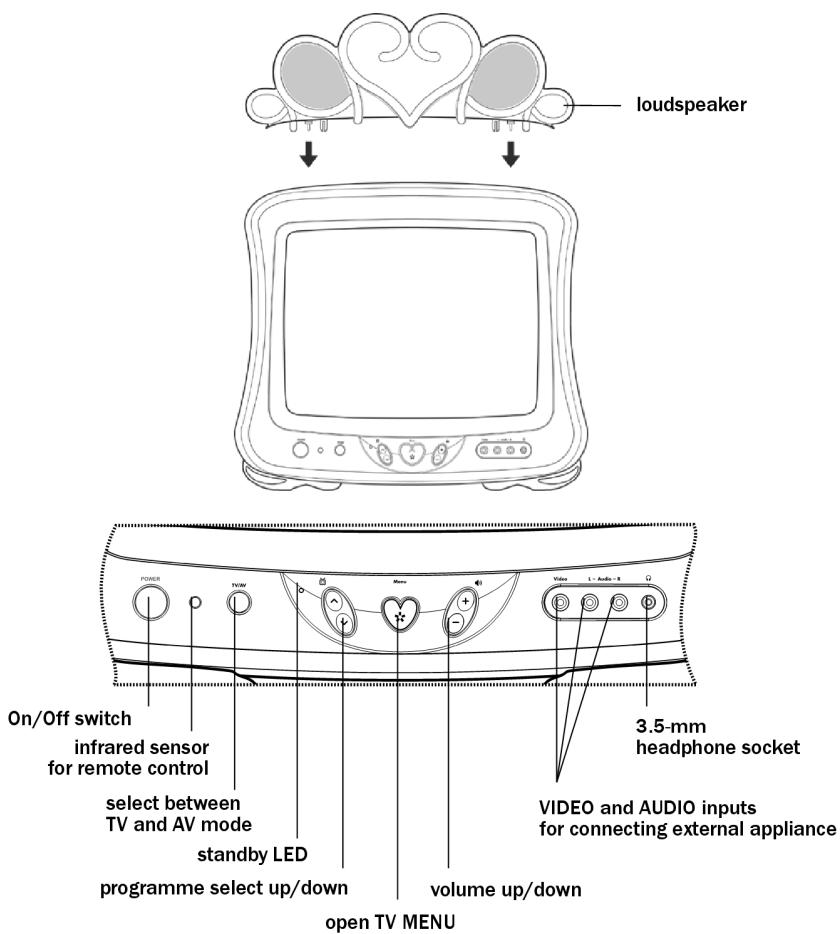
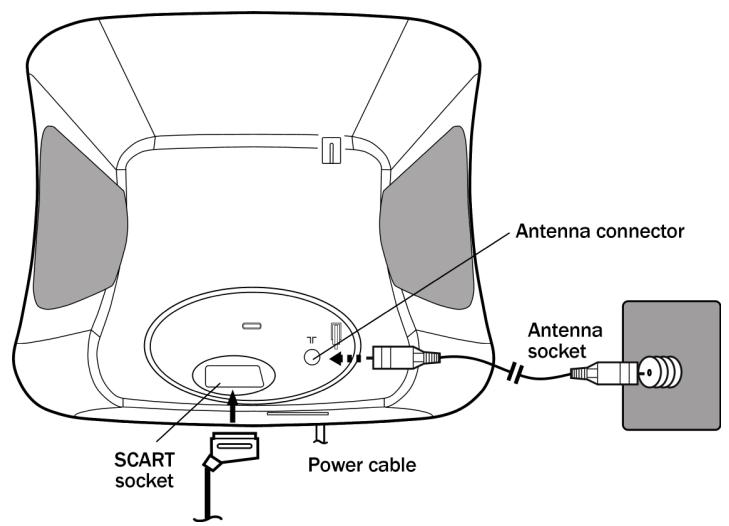
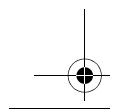
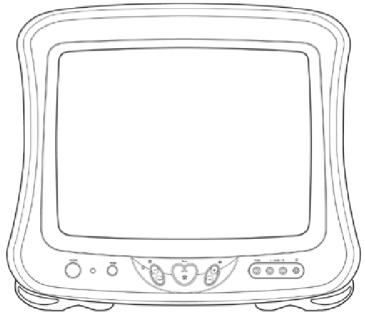
GENERAL VIEW
Note: Antennas and SCART cables are not included.
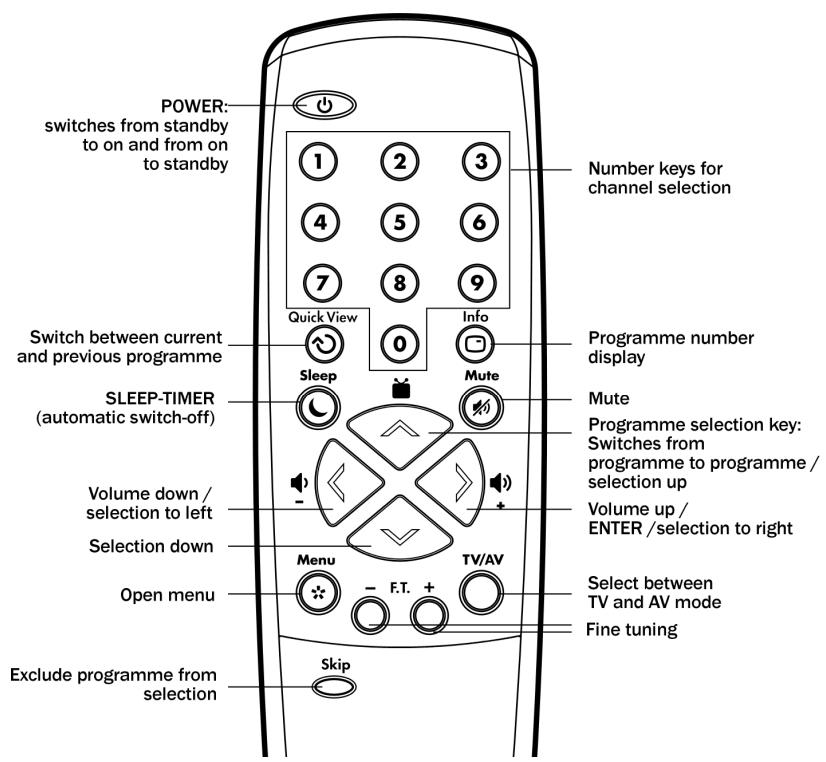
REMOTE CONTROL
GB
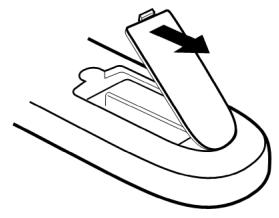
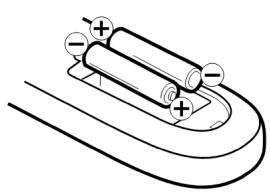
Inserting the batteries in the remote control
To be able to use the remote control, insert 2 × 1.5V (R03/LR03/AAA) batteries in the battery compartment:
- to remove the battery compartment cover, push the clip in the direction of the cover,
- Insert the two batteries, paying attention to the polarity (with the negative end against the springs),
- replace the cover.
1
2
3

GB-7

DISNEY
INSTALLATION
Unpacking the device
Remove all packing materials.

WARNING!
Do not let children play with the plastic film. There is a risk of asphyxiation.
Checking package contents
When unpacking, ensure that the following parts are included:
1xTVset
1 x Remote control
- 2 × 1.5 ~V R03/LR03/AAA batteries
- 2 × "Disney feet"
1 x loudspeaker
- Operating instructions and guarantee documents
Setting up
Place the unit on a sturdy, horizontal, vibration-free surface. The set must not be subjected to vibration or shocks.
Observe the installation conditions in the safety instructions.
Fitting the "Disney feet"
The "Disney feet" supplied can but do not have to be fitted.
Tip the TV set carefully backwards so that it lies on its back.
- Fit the Disney foot marked RIGHT to the right-hand foot of the appliance as seen from the front. The two clips must click firmly into the recesses in the appliance.
- In the same way, press the Disney foot marked LEFT onto the other foot of the appliance.
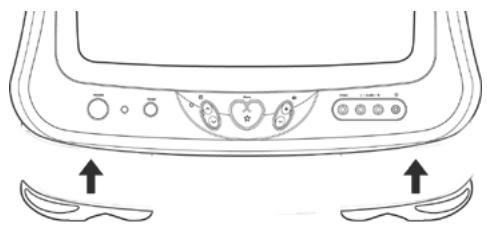
GB-8

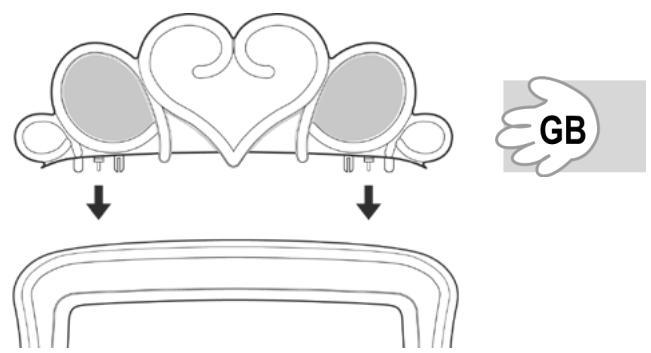
Fitting the loudspeakers
For sound output, the loudspeaker must be fitted.
- Place the loudspeaker on the TV set, fitting the plug-and-socket connections between loudspeaker and TV set. The underside of the loudspeaker must be flush with the TV set.
Connectors
Antenna connector
To connect to the house antenna or cable system, connect a double-screened cable from the antenna socket to the television set.
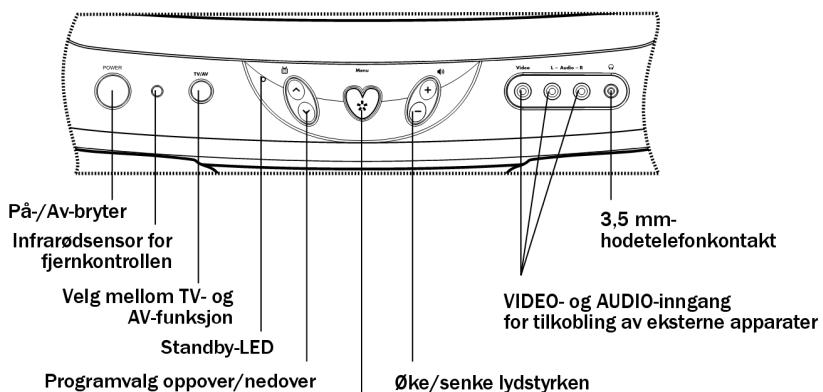
Headphone connection
On the front of the set is a headphone socket, suitable for any normal headphones fitted with a 3.5- mm jack plug. When headphones are in use, the loudspeakers are turned off.

CAUTION!
Too high a volume, especially when using headphones, can damage your hearing. For this reason, you should turn the volume right down before connecting the headphones.
Power connection
Do not connect the appliance to the mains until you have made all the other connections. Insert the device's plug into a mains socket (230 V ~ 50 Hz) that is close to the place where you have set the up the device.
Connecting other equipment
The SCART socket on the rear and the Audio/Video outputs on the front panel can be used to connect various audio and video appliances (video-recorders, SAT receivers etc.).
To connect an external appliance, connect it
- either with a SCART cable (SCART socket on rear of TV)
- or with audio Cinch cables (AV connectors on front panel of TV).
Please note the instructions regarding additional equipment in the operating instructions.
GB-9
DISNEY
KEY FUNCTIONS
Switching on/off
- Press the POWER switch on the device to switch it to standby mode. The standby indicator will light up.
- Press the button on the remote control to turn on the set. The standby indication will go out.

When turned off at the POWER switch, the last used settings are stored. If the appliance is turned off while in standby mode, it returns to standby mode when next switched on via the POWER key. If turned off while showing a programme from a particular station, it will show that same station when next switched on by pressing POWER.
When in standby, the set can be switched on by pressing a programme select button on the set or on the remote control.
Setting the volume
- Press the or button to turn the volume up or down.
- To turn the sound off completely, press MUTE.
- Press MUTE again or a volume button to turn the sound back on.
Programme selection
- The programme selection keys can be used to select any one of the stored programmes.

- The number keys can be used to enter the programme number directly: - for a one-digit programme number, simply enter the required number; the sign for a second digit will disappear from the screen after a few seconds, - for a two-digit programme number, enter the two digits one after the other without a long pause between them.
(1)
(2)
(3)

Programmes on which the SKIP button was used (see below) can only be selected with the number keys.
(4)
(5)
(6)
- The INFO button displays the number of the current programme on the screen. Press INFO again to turn off the programme number display.
⑦
(8)
9
- The QUICK VIEW button can be used to switch back and forth between the current programme and the one previously selected.
0
Info

Quick View

Other key functions
TV/AV
This switches between TV operation and an externally connected appliance, e. g. video recorder.
Sleep Timer
Press the SLEEP button to program an automatic turn-off.
- Press SLEEP once - the minutes will be shown as 0. With each further press, the sleep timer is incremented by 10 minutes up to a maximum of 120 minutes.
- To turn off the sleep timer, press SLEEP repeatedly until "0" is displayed. The OSD disappears after a few seconds.
Skip
With the SKIP function, you can leave out a programme when zapping with the programmeme select buttons.
- Select the programme that you wish to leave out and press SKIP. The colour of the programme number in the OSD will change. This means that the programme can no longer be selected with a programme selector button.
- In order to be able to select the programme again, select it with the number keys and press SKIP again.


MENU SETTINGS

OSD Language
The menu language used in these instructions is English.
You can also set the OSD (on-screen display) to German, French, Italian or Spanish.
Selecting the OSD Language
- Press the MENU key. The OSD menu will appear ^1 .
Using the keys, select LANGUAGE 2. - Confirm with . The language menu will be displayed.
Using the buttons, select the desired language. When selecting a language the menu changes immediately. - To close the on-screen menu, press MENU again.
Programme setting
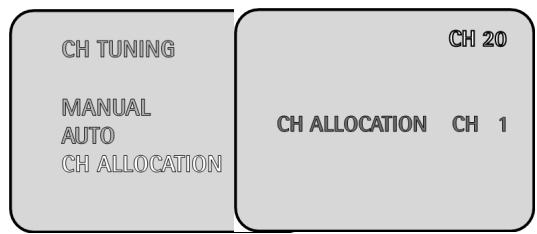
With the automatic programme search, all receivable programmes are saved sequentially under programme numbers 1 to 80.
- Press the MENU key. The OSD menu will appear.
Using the buttons, select CH TUNING. Confirm with
Automatic station search
- Select AUTO and confirm with. Automatic station search will start: each station found is briefly displayed and stored under a programme number. The programme number (CH 1, CH 2 ...) appears at top right.
The initial search is for PAL transmitters (TV standard in most European countries), followed by SECAM-L (TV standard in France).

PICTURE

CH TUNING

LANGUAGE
LANGUAGE/SPRACHE/LANGUE/ LINGUA/LENGUA
ENGLISH
DEUTSCH
FRANCAIS
ITALIANO
ESPANOL

PICTURE

CH TUNING

LANGUAGE
CH TUNING
MANUAL
AUTO
CH ALLOCATION

CH 3


GB-12


Reallocating programme numbers
You can change the allocation of programme numbers manually:
- Select CH ALLOCATION and confirm with . The programme number of the current displayed station appears at upper right ("20 in the illustration).
- With the buttons, select the station for which you wish to change the programme number.
- Confirm with . The programme number following "CH ALLOCATION" appears marked in pink.
- With the buttons, select the new programme number ("7" in the illustration) for the current station and confirm with . In this example, the programme number is changed from 20 to 7.

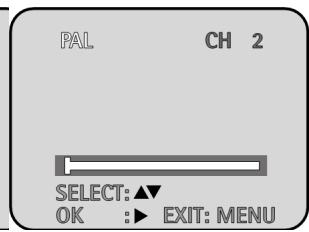
Manual station search
If you find, after automatic station search, that a station is missing, you can set this manually.
- Select MANUAL from the CH TUNING menu and confirm with . The manual station search window will appear.
Using the buttons, select either PAL or SECAM-L. - Confirm with . The white band indication is marked pink and F.TUNE + - (fine tune) is displayed.
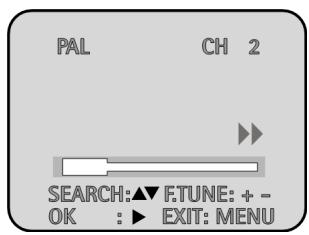
-
Press or to start manual station search forwards or backwards. The progress indication moves until a station is found and then stops. The programme number (CH) indication appears, marked in pink.
-
If you wish to save this station, allocate the programme number.
- If you are looking for another station, press or again.
- You can fine-tune the picture with the - F.T. + buttons on the remote control. The arrows above the band indication blink each time a button is pressed.
- To allocate the programme number, press repeatedly until the desired programme number (CH 1, CH 2, ...) appears. The station is now stored under the desired programme number.
- To close the menu, press MENU again.
DISNEY
Adjusting the picture
- Press the MENU button. The OSD menu will appear.
Using the buttons, select PICTURE. - Confirm with . The last picture setting to be adjusted, e.g. SHARPNESS, will be displayed.
- Use the buttons to reduce (to the left) or increase (to the right) the sharpness.
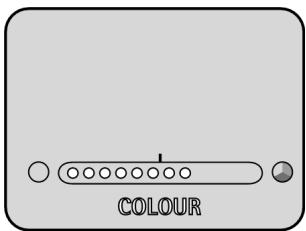
- Using the button, the remaining picture settings can be called up one after the other: CONTRAST, COLOUR, BRIGHTNESS:
PICTURE
CH TUNING
LANGUAGE
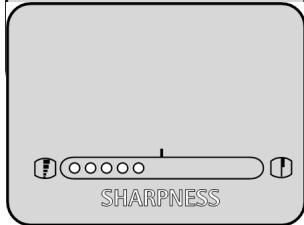

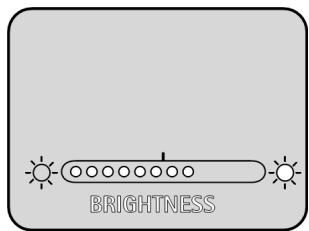
- again, you can use the buttons to reduce (to the left) or increase (to the right) the settings.
- The last item in the picture settings menu is RESET - EXECUTE. Confirm with . All picture settings will be reset to the factory preset values.
RESET
(+)
EXECUTE
TROUBLESHOOTING
If faults occur, check first whether you can correct the problem yourself. The following table can be helpful.
GB
| Fault | Possible cause |
| The screen remains dark | Is the set plugged into the mains? |
| Is the main fuse / circuit breaker in order? | |
| Has the main switch been pressed (standby indication on)? | |
| No sound | Is the sound muted? |
| Is the loudspeaker fitted? | |
| Poor picture quality | Adjust contrast and brightness |
| Is the antenna cable or SCART cable connected correctly? | |
| Only noise (snow on the screen and hissing from the speakers) | Check the antenna connection. |
| You may need to fine-tune manually. | |
| No colours | Is the programme being transmitted in colour? |
| Adjust the colour manually. |

TECHNICAL DATA
Mains voltage: 230V 50Hz
Power consumption: 44 W
Audio system: TV mode: mono
AV mode: stereo
CRT size: 37 cm (14-inch); 33 cm visible diagonal
Hyperbandtuner
Colour system: PAL/SECAM
Number of programmes:80
Connections:
Antenna, 75 Ohm
SCART
Front AV (Cinch)
Headphones, 3.5 mm
Subject to technical changes.
Disposal
Packaging
All packaging and packaging materials that are no longer required can and should be recycled.
Batteries

Do not put used batteries in the household rubbish. The batteries must be deposited at a collection point for used batteries.
Device
At the end of its life, the TV set must not be disposed of in household rubbish. Seek the advice of your local authority on correct, environmentally-friendly disposal.
GB-16

FRANÇAIS
F
TABLE DES MATIÈRES
Colocar as baterias no telecomando 7
Instalacao 8
Desembalar o aparelho 8
Colocar as baterias no telecomando
Monter "Disney-fooderne"
Innstille program 12
Innstille bilde 14
Problemløsning 15
Tekniske data 16
Kassering 16
N-3

SIKKERHETSANVISNINGER

Omdenveiledningen
OVERSIKT OVER APPARATET

Apne TV-MENU