
MD 30113 - Television MEDION - Free user manual and instructions
Find the device manual for free MD 30113 MEDION in PDF.


| Product Type | Television |
| Brand | MEDION |
| Model | MD 30113 |
| Screen Size | 32 inches (81 cm) |
| Resolution | 1366 x 768 (HD Ready) |
| Backlight Type | LED |
| Refresh Rate | 60 Hz |
| Tuner | DVB-T/T2/C/S2 |
| HDMI Ports | 2 |
| USB Ports | 1 |
| Composite Input | 1 |
| Headphone Output | 1 |
| Power Consumption (max) | 50 W |
| Standby Power Consumption | < 0.5 W |
| Power Supply | AC 220-240 V, 50/60 Hz |
| Dimensions (with stand) | 732 x 480 x 180 mm |
| Dimensions (without stand) | 732 x 430 x 80 mm |
| Weight (without stand) | 5.5 kg |
| VESA Mount | 200 x 200 mm |
| Operating Temperature | 5°C to 35°C |
| Storage Temperature | -20°C to 60°C |
| Included Accessories | Remote control, batteries, stand, user manual |
| Warranty | 2 years (valid in EU) |
Frequently Asked Questions - MD 30113 MEDION
User questions about MD 30113 MEDION
0 question about this device. Answer the ones you know or ask your own.
Ask a new question about this device
Download the instructions for your Television in PDF format for free! Find your manual MD 30113 - MEDION and take your electronic device back in hand. On this page are published all the documents necessary for the use of your device. MD 30113 by MEDION.
USER MANUAL MD 30113 MEDION
General Information....10
Purpose of use....10
Included in the box....10
Safety instruction 11
Safety....11
Point of use....11
Repair 13
Intended Environment....13
Power Supply....13
Standards/electro-magnetic compatibility....14
Batteries and Proper Treatment....14
Setting Up.... 16
Unpacking....16
Connecting an antenna 17
Connecting the power supply 17
Turning the LCD TV on and off 17
First Time Installation.... 18
Searching for digital channels 18
Seeking analogue channels....20
Automatic channel seeking....20
Basic Functions 21
Sound Settings....22
Setting the Picture 22
Zoom in PC mode 23
Other picture settings....23
Displaying information....23
Select external device....24
Video text 25
To operate video text....25
Select video text pages 25
Useful features for video text....26
The IDTV menu 28
Help Menu 28
Channel List....29
Sorting the channels in the Channel List 30
Deleting channels from the Channel List....30
Renaming channels....30
Blocking channels 31
Establishing favourites 31
Removing a channel from a Favourite List....32
Navigating through the favourite channels with the blue button....32
Installation Menu....33
Configuration Menu....34
Menu Timers....36
TV settings 37
Common interface....37
"Picture in Picture" or "Picture at Picture" 38
Sources for PIP and PAP 38
Activating and modifying the PIP function....39
Activating and modifying the PAP function 41
The OSD menu....43
Navigating within the Menu....43
Menu PICTURE....44
Menu SOUND....46
Menu FUNCTION ....50
Menu INSTALL 52
Save video recorder manually ....54
PROGRAM TABLE....55
Menu SOURCE....57
Menu in PC mode....59
Connections and examples of connections....60
Headphones....64
DVD player....64
Video recorder....65
DVD recorder 65
Receiver (SAT, DVB-T, decoder, etc.) 66
DVD or video recorder and Sat-receiver....66
Camcorder 67
Device with HDMI or DVI output....68
PC....68
Troubleshooting 70
Do you require additional Support? 71
Specifications....72
Maintenance....73
Recycling....74
Pixel errors with LCD TVs 75
Wall Mounting....76
Accessories....76
Safety instructions for wall mounting 76
Mounting the hanging elements and the device 77
Remove base....77
Fixing the steel rails to the wall 78
Introduction
1
Congratulations on choosing to buy a Tevion® product. By doing so you now have the assurance and peace of mind that comes with purchasing a product made by one of Europe's leading manufacturers.
All products brought to you by Tevion® are manufactured to the highest standards of performance and safety, and, as part of our philosophy of customer service and satisfaction, are backed by our comprehensive 3 Year Warranty.
Please fill in and return the Warranty Card to the address provided.
We hope you will enjoy using your purchase for many years to come.
Overview
2
LCD-TV
Front

- TFT screen
- Loudspeakers
- On/off light with integrated infra-red sensor
On/off light: the blue light will come on when the device is in stand-by mode. It will go off if the device is switched on.
Infra-red sensor: receiving area for infra-red signals from the remote control.
Operating controls on the side
- STANDBY: to switch the LCD-TV off temporarily.
- TV/AV: to select the input signal: TV (antennea, EXT-1, EXT-2, EXT-1 S, BAV, S-Video, HDMI 1, HDMI 2, YPbPr, PC.
- MENU: with this key you can display the screen menu to make adjustments to your equipment.
-
- P/CH -: you can switch TV channel using these keys.
-
-
- : you can regulate the volume of your equipment with these keys.
-

Rear
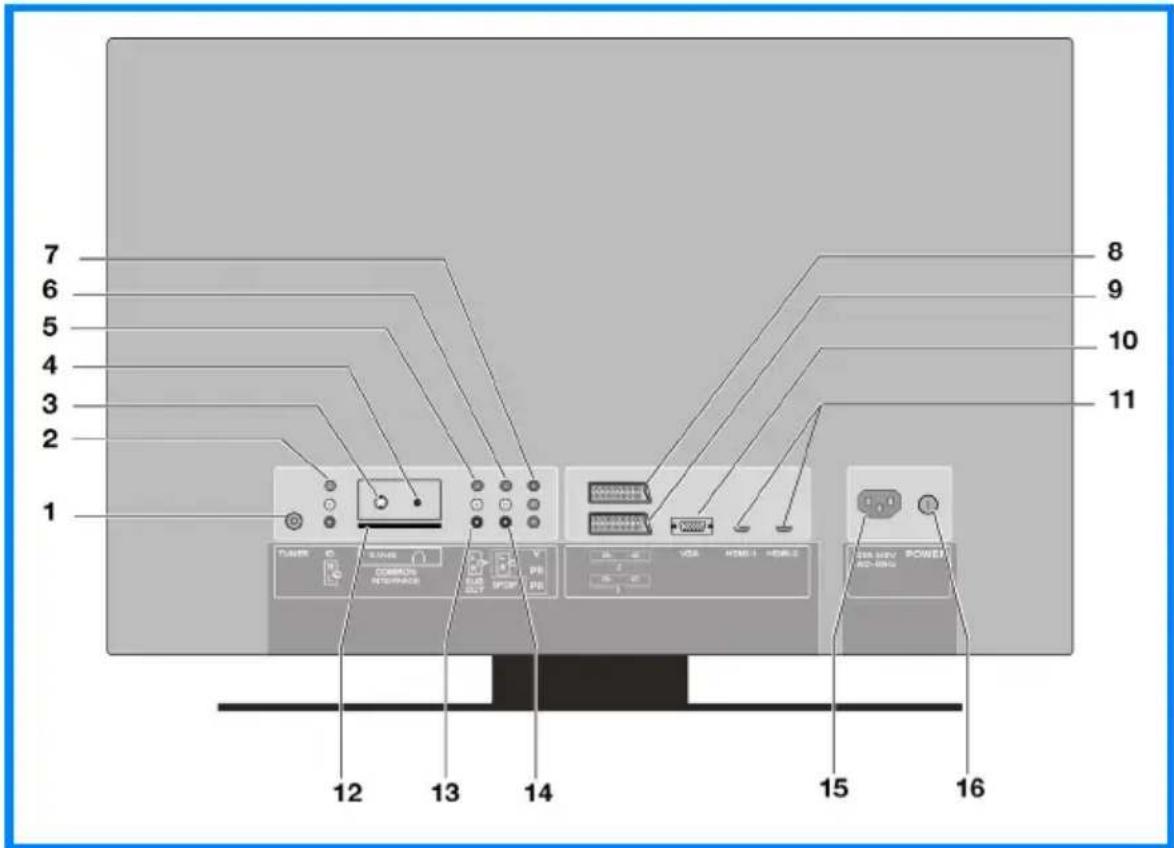
- Aerial - connection for co-axial aerial
- VIDEO-input (yellow) and AUDIO-inputs (red/white): to connect a device using an RCA cable.
- Headphone connection: to connect headphones with a 3.5 mm TRS stereo connector.
- S-VHS input: to connect a device using an S-VHS cable.
- L - R Audio output: to connect devices with Audio input
- L - R Audio input: to connect devices with Component Audio output.
- Y - PB - PR Component inputs: to connect devices with Component output.
- SCART 1: 1st SCART connecting
- SCART 2: 2nd SCART connection
- VGA-INPUT: to connect a PC.
- HDMI-1; HDMI-2 inputs: to connect a device with a HDMI output
- .Common Interface: insert slot for the use of pay-TV cards
- SUB OUT: output to connect an external active sub woofer
- SPDIF: digital audio output (optical) to connect devices with optical audio input
- Power in: to connect the supplied power cable.
- On/off switch: to put the device into stand-by mode and switch it off again.
Connecting an antenna
Connect the aerial connection and the LCD-TV by means of a double screened aerial cable (not supplied) when connecting the device to the room aerial or cable system. natural_image
Diagram showing connection between a device panel and a WAND antenna via cable (no text or symbols present)Connecting the power supply
 Insert the plug on the supplied power cable into the connecting bush (1) (220-240 V \~ 50 Hz) on the device and insert the other end into an easily accessible 230 V \~ 50 Hz power socket.Turning the LCD TV on and off
1. Press the on/off switch (2) on the back of the device. The stand-by mode will be activated and a blue light on the front will come on. 2. You can switch on the device by pressing a digit key on the remote control or a P/CH channel selection key on the remote control or on the device itself. The light on the front will go out. 3. You can put the device back into stand-by mode with the stand-by key on the remote control or with the stand-by key on the right side of the device. 4. Press the on/off switch on the back of the device again to switch the device off completely. The IDTV Menu will appear when you switch your device on for the first time. You will be greeted in different languages and requested to select the language of the IDTV Menu.  You will be able to move upwards or downwards in the Menu by means of the ▲ ▼ directional buttons. Press the OK button to confirm your selection. You will receive information about using the IDTV Menu in the Help Menu; press the INFO button to call up the Help Menu. You will leave the Help Menu by pressing the INFO button again.Searching for digital channels
The initial installation will start after you have confirmed the language with OK.  Select the country required with the ◀ directional buttons and press OK. The digital transmitter, the query concerning the automatic search process of the transmitter, will appear.  Click on Yes with the ◀ directional buttons and press OK to start the digital search process of the transmitter. Click on No with the ◀ directional buttons and press OK to stop the process. IDTV will search through the UHF channels 21 to 68 and for terrestrial digital TV channels automatically. The names of the channels found will be displayed. This process will last about five minutes. You will be able to press the M button at any time, to stop the search. The following Menu will be displayed during the automatic search process of the transmitter:  You will be requested to start the search for analogue channels after the conclusion of the digital search process of the transmitter.  Click on No with the ◀ directional buttons and press OK to stop the process. Click on Yes with the ◀ directional buttons and press OK to start the analogue search process of the transmitter. The TV device will switch to the analogue TV mode.Seeking analogue channels
\- If you wish to change the pre-set country setting, set the required country with the ◀ ▶ directional key. The country setting has an effect on the sequence in which channels are stored.  - Then select if necessary the Language message with the directional key ▼ and choose the required language with the ◀ ▶ directional keys. - If you wish to change the pre-set for the video text language, use the directional key ▼ to select the message TXT Language (Language for teletext) and use the ◀ ▶ directional keys to select the required language region Westen, Ost (East), Turk/Gre (Turkish/Greek), Kyrillisch or Arabisch. - Then confirm the message "CHECK ANTENNA CABLE" by pressing the OK key or pressing the red key. - You can cancel this process by pressing the blue key.Automatic channel seeking
Automatic channel seeking will now commence. This takes a few minutes. You can cancel this process with the blue key.  The channels are stored in a country-specific sequence in the channel locations. It is possible to store a maximum of 100 channels. After automatic storage of channels is complete, the programme table will be displayed. If this table is not modified further, it will close after a few minutes. The channel on channel location 1 will appear.Switching between DVBT and analogue reception
You will be able to switch between terrestrial digital reception and analogue reception at any time, while a television programme is being displayed, with the TV/DTV button.Having information displayed
The information box will inform you about the channel selected and the programme showing. The name of the channel will be displayed together with the list number of the channel; the strength of the signal will also be shown. The programme currently showing and the next programme beginning will be displayed, together with their starting and finishing times.  - Press the INFO button, to have the information box displayed. The box will be faded out if you press the INFO button again. - You will obtain the same information when switching to a different programme.  Programme data will not be transmitted by all channels. 'No data available' will be displayed in the information box if the names and times of the programmes are not transmitted.Channel Search
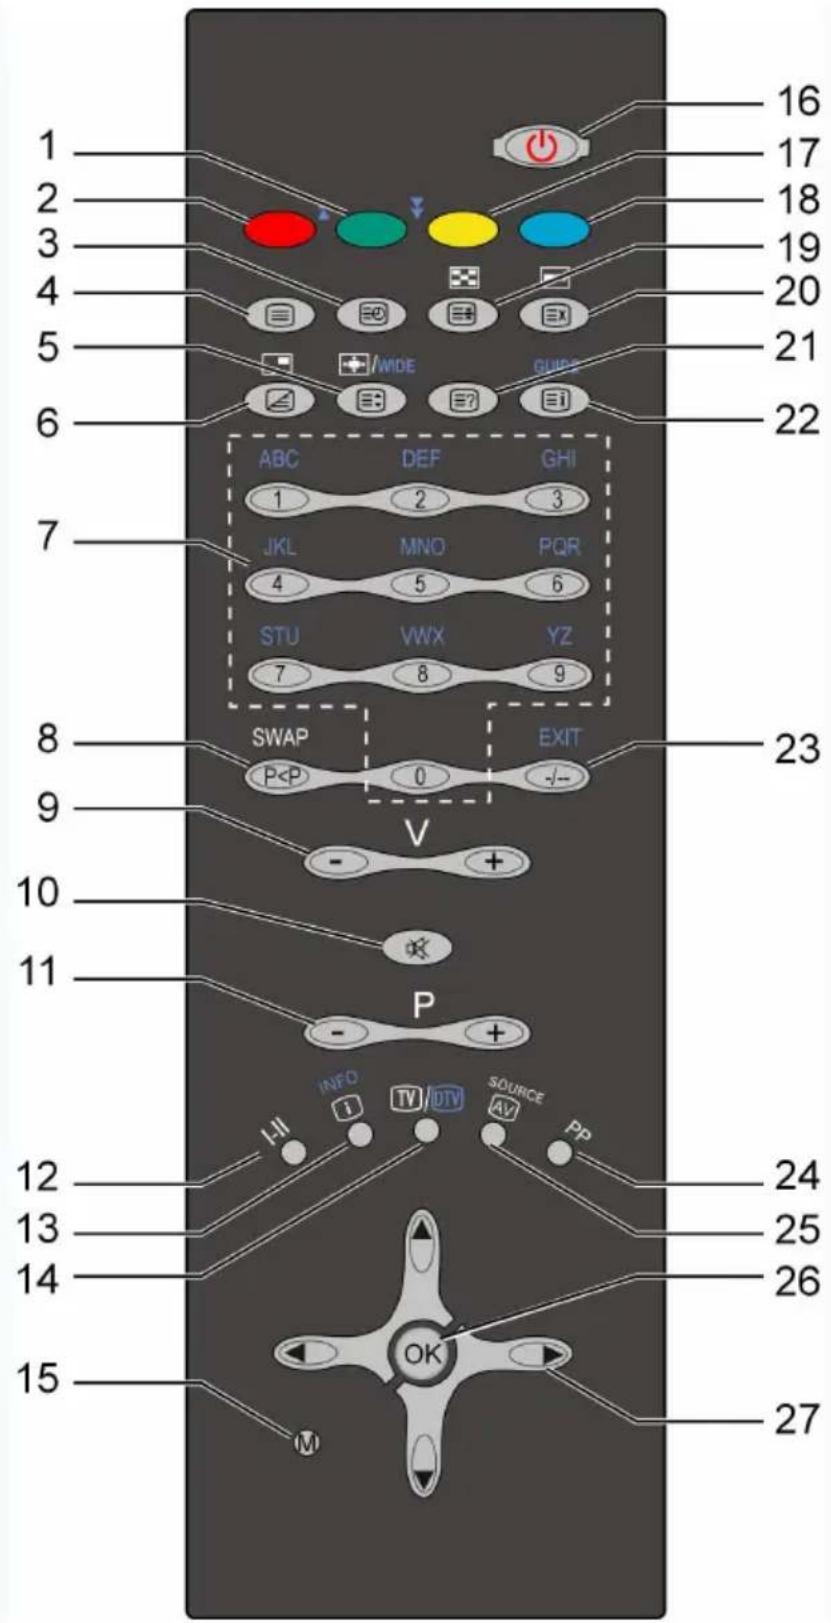
- You can select a channel by pressing the P key on the remote control (or P/CH on the device) or by selecting the channel directly using a digit key. - For a number with two digits first press the -/-- key. - You can select the most recent displayed channel with the PSound Settings - You can increase or decrease the volume with the volume keys + V - on the remote control or + ▲ - on the device. - You can switch off the sound completely and switch it on again with the key (Switch sound off). - You can choose between mono- and stereo reproduction, Dual I and Dual II, with the I-II key. Dual I and Dual II can only be reproduced if the current broadcast supports the DUAL mode (e.g. with bilingual broadcasts).
Setting the Picture
Zoom mode (key)
Press on the ✕ key to switch between the following picture formats. • Auto: the transmitted format is automatically set to the input signal. • 16:9: a picture in 16:9-format will be expanded to full screen size. • 4:3: for undistorted display of the picture in 4:3-format. \- Panoramic: the picture is stretched on the left and right sides to fill up the screen. In this case the upper and/or lower edges are somewhat cut off. \- 14:9 Zoom: a picture in 14:9-format ("Letterbox") will be expanded to the upper and lower edges of the screen. \- Cinema: a picture in 16:9-format will be expanded to full screen size. flowchart
graph TD
    A["Rectangle with circles"] --> B["Rectangle with circles"]
    C["Rectangle with circles"] --> D["Rectangle with circles"]
    E["Rectangle with circles"] --> F["Rectangle with circles"]
    G["Rectangle with circles"] --> H["Rectangle with circles"]
natural_image
Diagram showing transformation of a square with circular holes into a larger square with circles (no text or symbols)Zoom in PC mode
• You can make use of the 4:3 and 16:9 formats in PC mode.Other picture settings
• You can pause and again release the picture with the OK key. \- You can select the picture mode with the PP ("Personal Preferences") key: Natural, Cinema, Dynamic.Displaying information
\- Press on the INFO key to display the following current settings: \- Channel location and channel name; – Volume setting (Mono of Stereo); – Picture setting. \- You will receive the same information when you switch over to another channel. \- You can display the time in TV mode by pressing the 🔒 key (Time/Sub-page videotext).Select external device
\- You can select the IN connections on the connected devices with the AV/ SOURCE key.  Note that the source (the connected device) will only be recognised if this source is highlighted in the SOURCE menu when switching through with the AV/ SOURCE key. • P–DTV : TV function (aerial signal) / DVB-T function - EXT - 1: device on SCART 1 input • EXT - 2: device on SCART 2-input - EXT-2 S: device with S-Video output on SCART 2 connection • BAV: device on yellow/white/red RCA inputs • S-VIDEO: device on S-Video connection • HDMI-1: HDMI input 1 • HDMI-2: HDMI input 2 - YPbPr: device on Component video and audio inputs • PC: device on PC input Your LCD-TV supports 1000 pages of Teletext. This means that the device does not need to search following input of one of these 1000 pages, but will immediately display the page in question. Video text is a free service that is broadcast by the majority of television stations and offers current information in relation to news, the weather, television programmes, share prices, subtitles and other subjects. Your LCD TV offers many useful functions for operating Video text and multi-page text, storing sub-pages or fast navigation.To operate video text
1. Select a TV station on which video text is being transmitted. 2. Press on the ☐ key to display the basic/index page of the video text. 3. The TV picture will be displayed on the left after you have pressed the key again. 4. By pressing the ☐ key again, you will switch over again to TV mode. 5. Press the TV key to return to TV mode.Select video text pages
Number keys
- Enter the video text page required directly as three-digit number with the number keys. - The page number selected will be displayed in the upper left corner of the screen. The video text counter will search un-til the page number selected has been found.Channel selection keys
\- You can scroll forwards and backwards through the video text pages with the channel selection keys.Colour buttons
\- If text is displayed in colour at the bottom of the screen, you can select the associated content immediately by pressing the associated RED, GREEN, YELLOW or BLUE keys. Subpages
Some video text pages contain sub-pages. For example, 1/3 will be displayed at the lower edge of the screen. The sub-pages will be faded in successively at intervals of approx. 30 seconds. You will also be able to call up the sub-pages yourself by pressing the button. A four-digit entry field will appear, into which you will be able to enter the number of a sub-page (e.g. 0002). You can scroll through the sub-pages with the directional keys ◀ ▶.Useful features for video text
Combination of video text and TV picture
\- Press the 🔒 key to display Teletext transparently (the TV picture is visible in the background). INDEX
\- Press this button to select the index page that displays the list of Teletext contents. STOP
The video text page that you have selected may contain more information than will fit on the screen. In this case the information will be sub-divided across several sub-pages. The sub-pages will be scrolled through with regular pauses in between. - Press the STOP key to prevent pages from changing automatically. The STOP symbol will be displayed in the top left corner of the screen and the automatic switching over of pages will be interrupted. - Press the STOP key again to resume automatic changing of pages. Suppress TT Search
If you press the key in video text mode, the video text display will move to the background. With this you can bridge waiting times until the required page displays. - Select the required page number in the video text mode. - Press on the ☒ key to switch to TV mode while waiting for the video text page. A field will appear in the top left corner with the required page number or the ☒ symbol while searching continues. - The page number will be displayed as soon as the required page is found. - Press the ☒ key again to display the required page. Displaying hidden text
- You can display hidden information, such as solutions to riddles, puzzles or quizzes, by pressing the ☑ key once. - If you press the ☑ key again, the answers will be hidden again. Doubling the size of the page
- This function displays the video text information doubled in size. - Press the button, to enlarge the upper half of the page. - Press the 📋 button again, to display the lower half of the page enlarged. - Pressing the 📄 button again will return the video text to its normal size. The IDTV Menu (Integrated Digital Television) can only be displayed when you are viewing a terrestrial digital broadcast. You will be able to switch IDTV to the analogue mode with the TV/DTV button (below left on the remote). - Press the Menu button M; the Menu to the right will appear on the screen: - You will choose the options from the Main Menu with the ▲▼ directional buttons. - You will choose the options from a Menu with the ▲ ▼ ◀ ▶ directional buttons. - You will choose a setting in a sub-menu with the ◀ ▶ directional buttons. - Confirm the selection and store the setting with the OK button. - Close the Menu or jump back to the previous Menu with the Menu button M. - Leave the Main Menu with the Exit button. It will usually be shown which buttons are available to you when operating the respective Menu in the lower menu strip. Help Menu
You will be able to call up helpful information about the Menu functions with the INFO button in most Menus.Channel List
The Channel List is where you will organize your channels. You will be able to carry out the following actions in this Menu: • Navigation through the whole list of channels - Shift channels \* (Move) - Delete channels (Delete) - Rename channels (Edit Name) • Block channels (Lock) • Establish favourites (Favourites) \* The "Shift" option of the Channel List may not be displayed, according to your selection of a country during the initial installation. Select Channel List, the first entry in the Main Menu, with the ▲ ▼ directional buttons. Then press OK, in order to display the Channel List. Scrolling through the whole Channel List
You will select the previous or the next channel with the ▲ ▼ directional buttons. You will be able to use the red or the green button, to scroll one page up or down. If you wish to view a particular channel, select it with the ▲▼ directional buttons and then press the OK button, while the "Selection" entry in the Channel List Menu has been emphasized by the • or • button.Sorting the channels in the Channel List
Select the channel to be moved with the ▲ ▼ directional buttons. Select the "Move" function in the Channel List Menu with the ◀ ▶ directional buttons. The 'Move' function will be displayed next to the OK entry in the lower Menu strip. Press OK; a dialogue window will open. Enter the required channel number and press OK. You will be asked whether you wish to exchange the two channels, if a channel position is already occupied. Select Yes and confirm with OK. The channels will be exchanged and the Channel List will be updated. Select No and confirm with OK. The channels will retain their positions.Deleting channels from the Channel List
Select the channel to be deleted with the ▲ ▼ directional buttons. Select the "Delete" function in the Channel List Menu with the directional buttons. The "Delete" function will be displayed next to the OK entry in the lower menu strip. Press OK, in order to delete the selected channel from the Channel List. The following message will subsequently appear on the screen: "The selected service will be permanently deleted, and favourite list will be turned off. Are you sure?" Select the required option with the ◀ ▶ directional buttons. The selected channel will be deleted if you press the OK button while "Yes" is selected. The deletion process will be stopped if you select "No".Renaming channels
You will select the channel that you wish to rename with the ▲ ▼ directional buttons. Select the "Edit Name" function in the Channel List Menu with the directional buttons. The "Edit Name" function will be displayed next to the OK entry in the lower menu strip. You will be able to move the selected channel to the required position in the Channel List with the OK button. The Channel List will be updated. Now, you will be able to move to the previous or the next signal with the directional buttons. You will now be able to move through the set of symbols (scrolling) with the ▲▼ directional buttons. Confirm the change and update the Channel List with OK. Press the M button to stop the application; you will store the new name with the OK button.Blocking channels
You will be able to protect access to particular channels (for the protection of young people, for example) by a password, by means of the channel block. You will have to know the password (password at delivery: 0000; it can be changed in the Settings Menu), in order to block a channel. - Select the channel to be blocked with the ▲ ▼ directional buttons; then choose the "Lock" option with the ◀ ▶ directional buttons. - Now press the OK button; a password window will be displayed. The 'Enter Password' message will appear.Establishing favourites
You will be able to establish various channels as favourites; you will be able to have only your favourite channels displayed when scrolling through the channels in this way. - Select the "Favourites" entry in the lower section of the Channel List Menu, in order to establish a favourite channel. - Now, press the OK button; the 'Process Favourite List' Menu will be displayed on the screen. You will be able to organize your favourite channels into the following lists: List 1, List 2, List 3, List 4 or List 5. You will be able to allocate your favourite channels to different categories (e.g. sport, music, etc.) by using five different lists. You will also be able to release only the channels from the selected list for scrolling through, by activating the number of the Favourite List in the Favourites Mode sub-menu of the Configuration Menu. You will be able to enter a channel in a Favourite List as follows: - Select the channel that you wish to enter into a Favourite List with the ▲ ▼ directional buttons. - Select a list number with the ◀ ▶ buttons. - The selected channel will be added to the selected list by pressing the OK button. - A symbol, indicating the Favourite List in which the channel is located, will be displayed in the case of each channel.Removing a channel from a Favourite List
- Select the channel that you wish to remove from the Favourite List. - Select the list number from which the channel should be removed; then press the OK button. The symbol indicating the position of the channel in the list will disappear from the Menu. - Pay attention to the fact that a channel may have been added to several Favourite Lists.Navigating through the favourite channels with the blue button
You will be able to navigate through the lists of favourite channels by pressing the blue button. You will move sequentially right to the top in each list at each press on the blue button. You will be able to scroll through the list of favourite channels in the respective list with the P+ or P- buttons while a Channels List is selected. You will have to activate the Favourite Mode in the Settings Menu, in order to be able to use this function. Installation Menu| Menu Point Settings | |
| Automatic Search | The automatic search process of the transmitter will be started by pressing the OK button while the Automatic Search entry is selected.The following message will appear on the screen: Please check the antenna connection. Do you want to start automatic search? Your previous channel list will be replaced.Select "Yes" or "No" with the ◀ ► directional buttons, then press OK to confirm it. The search process of the transmitter will be started if you have selected "Yes". |
| Manual Search | The multiplex number for searching for channels will be entered manually in the case of the manual search. The signal strength, the signal quality and the network name will be displayed in the lower area of the screen in the case of each valid channel number. Channels already existing in the Channel List will not be stored again, both in the case of the manual search and in that of the automatic search, so that no unnecessary duplicates will arise.The manual search will be started by pressing OK while the manual Search entry is selected. |
| First Time Installation | Select the First Time Installation entry and press OK if you wish to recreate the factory setting. The existing Channel List will be deleted, if you confirm the following question concerning whether you really want to overwrite the current settings with yes.The search process of the transmitter will be started automatically, as if you had started the device for the first time, after the recreation of the factory setting. See the Chapter „First Time Installation“, on Page 18. |
Configuration Menu
You will be able to have the settings for each channel displayed and change them if necessary in this Menu.| Menu Point Settings | |
| Favourite Mode | You will be able to take the channel into a Favourites List here.Off,List 1,List 2,List 3,List 4,List 5. |
| Channel List | You will be able to set the Channel List to TV only or Radio only. You will be able to restrict the navigation to the selected type of channel in this way. You will only be able to switch through the radio channels with the P+ and P - buttons if Radio only has been set. |
| Language Settings | You will be able to open the System Language, Audio Language and Subtitle Language sub-menus here. |
| System Language | You will be able to select the language of the IDTV Menu here. |
| Audio Language | Several sound channels in different languages can be transmitted at the same time in the case of terrestrial, digital television channels. You will select which sound channel (which language) should be transmitted with this function, if you have switched to channels that have several audio tracks.The ‘Selection of the audio language’ display will be faded in when the yellow button is pressed. |
| Subtitle Language | Subtitles for those with damaged hearing can be faded onto the screen in the case of many terrestrial, digital television channels. You will select the required subtitle language and activate the automatic display of subtitles with this function, provided that they are transmitted. |
| Parental Settings | A dialogue window will open when you select this point. The password (or the key to the block) will be retrieved. This password will have been set at '0000' at the delivery of the device. The dialogue window will open the protective settings if the entry is correct. |
| Maturity Lock | You will be able to change the age here. |
| Menu Lock | You will be able to block the individual Menus of the IDTV here, in order to prevent an inadvertent change to the settings. |
| Set Lock key | You will be able to change the password here. Enter the four-digit password by means of the numerical keys. |
| Time Settings | You will be able to change the time settings here.You will not be able to change the current time or the time zone if Auto has been selected.You will be able to set the selected time zone backwards or forwards by full hours respectively, if you change the Time Zone Setting entry from Auto to Manual.Select the option with the ▲ ▼ directional buttons and change the value with ◀ ▶ . |
| Receiver-Upgrade | You will be able to search for the newest software for the receiver and to update it (upgrade) here.The message “Completed searching for upgrade. No new Software was found.” will be displayed on the screen after the search has been completed, if no new software is available. The version number of the software found will be displayed otherwise. |
Menu Timers
You will be able to establish up to five different timer events; these events will be displayed in the Channel Timer Menu. The number of the event, the channel to be selected, starting time, ending time, date and mode will be displayed here. In addition, it will be shown whether an event is active (and will be performed) or not. Select the respective mode with the ▲ ▼ directional buttons and press OK, to fix an event; the Time Entry Window will be displayed. You will be able to make six settings here: type of channel, channel name, starting time, ending time, date and mode (frequency) here.| Menu point Settings | |||
| Type | TVTextRadio | Only channels of the selected type will be displayed. | |
| Name: | 3. | TV | You will select the channel through which the required programme will be transmitted here. |
| Start: | 00:00 | Enter the required starting time here. | |
| End: | 00:00 | Enter the required ending time here. | |
| Date: | 03/06/2005 | Enter the required date here. | |
| Mode: | DailyweeklyOnce | You will establish how often the event should be carried out with the Settings Mode. | |
TV settings
You will call up the Menu Picture of the analogue OSD Menu in this Menu, see Page 43.Common interface
You will have to register with a corresponding provider in advance if you wish to view channels with a fee. You will receive a Conditional Access Module (CAM Module) and a special card from your provider after the registration. You will install these components in your television device in the following way. Switch the television device off and pull out the mains plug. First, insert the CAM Module into the socket behind the connection cover on the left of the television device (observed from the front). Then, insert the card.  The CAM Module must be inserted correctly the right way up; it cannot be pushed in the wrong way up. The CAM Module or the television device can be damaged if you attempt to push in the CAM Module with force. Connect the television device to the power supply, switch it on and wait for a moment, until the card is recognized. The following installation steps are necessary in addition in the case of some CAM Modules. Please install the CAM Module by calling up the IDTV Menu initially, then the Common Interface and then pressing the OK button. (The CAM Installation Menu will only be displayed if necessary.) You will display the relevant information in this way: Call up IDTV; press the M button, then select Common Interface and press the OK button. 'No Common Interface Module recognized' will be displayed on the screen if no module has been inserted. You will find detailed information about the settings in the documentation supplied with the module.  Pay attention to the fact that you must only insert or remove the CI Module if the device is in the STANDBY Mode or is SWITCHED OFF."Picture in Picture" or "Picture at Picture"
You can display two images from different sources simultaneously on the LCD-TV screen with thePIP and PAP functions (e.g. TV picture and picture from connected DVD player). \- PIP ("Picture in Picture"): A small picture (the PIP window) appears within the main picture. \- PAP ("Picture in Picture" = The pictures are displayed side by side. natural_image
Illustration of a butterfly and flower with an inset showing a horse (no text or symbols)natural_image
Two black-and-white illustrations: one showing a butterfly on a hill, the other showing a galloping horse (no text or symbols)Sources for PIP and PAP
If you wish to display two pictures in the PIP or PAP mode, the picture from one source must come from one connection of type A and the picture from the other source from one connection of type B on the LCD-TV. - The following sources of type A are available: Aerial (TV, TV picture), Digital TV (DTV), SCART connections (EXT-1, EXT-2 and EXT-2 S), Video-Audio RCA connections and (BAV), S-Video. - The following sources of type B are available: HDMI 1 and HDMI 2, Component connections (YPbPr) and PC. You can therefore combine the TV picture with the picture from a connected PC, or the picture from a DVD player on a SCART connection with the picture from a DVD player on a HDMI connection.Activating and modifying the PIP function
1. Connect a device (e.g. a DVD player) to one of the type B inputs (HDMI 1, HDMI 2, YPbPr or PC). 2. If the LCD-TV does not itself display the picture from the external device, select the source with the AV/SOURCE key or in the SOURCE menu (see page 57). The picture from the external device is now the main picture. 3. Press the key ☐. The PIP window (small picture) will now appear with the TV programme (aerial signal) within the main picture. - You can select another channel for the TV picture in the PIP window with the channel select keys. - You can select another source for the PIP window with the AV/SOURCE key (a device that is connected to one of the type A inputs). - You can switch the sound reproduction between the main window (connected device) and the PIP window with the directional keys ◀ ▶ . - You can swap the PIP window and the main picture with the P>P/SWAP key. - You can close the PIP window by pressing □ again.The PIP menu
You can enter various settings for the PIP window. - While the PIP window is displayed, press on the menu key M and open the FUNCTION menu (see also "Navigating within the Menu", page 43). - Open the PIP menu with the directional key ▶.    Menu point Settings| PIP ON/OFF | Switching the PIP function on or off. |
| PIP Picture | Open the PIP Picture sub-menu with the directional key ▶ . The settings correspond with those on the PICTURE menu, see page 44 |
| PIP Position | Select a position within the main picture with the ◀ ▶ key. |
| PIP Source | Select the source for the PIP picture.When the main picture source is TV, DTV, EXT-1, EXT-2 or BAV, the PIP Window can only be set to HDMI-1, HDMI-2, YPBPR; PC source or vice versa. |
| PIP Programme | Select the programme with the directional keys ◀ ▶ or the digit keys. |
| PIP SWAP | With this you can swap the PIP picture and the main picture. |
Activating and modifying the PAP function
1. Connect a device (e.g. a DVD player) to one of the type B inputs (HDMI 1, HDMI 2, YPbPr or PC). 2. If the LCD-TV does not itself display the picture from the external device, select the source with the AV/SOURCE key or in the SOURCE menu (see page 57). The picture from the external device is now the main picture. 3. Press the key ☐. The PAP window (small picture) will now appear with the TV programme (aerial signal) within the main picture. - You can select another channel for the TV picture in the PAP window with the channel select keys. - You can select another source for the PAP window with the AV/SOURCE key (a device that is connected to one of the type A inputs). - You can switch the sound reproduction between the main window (connected device) and the PIP window with the directional keys ◀ ▶ . - You can swap the PIP window and the main picture with the P>P/SWAP key. - You can close the PIP window by pressing □□ again.The PAP menu
You can enter various settings for the PAP window. - While the PIP window is displayed, press on the menu key M and open the FUNCTION menu (see also "Navigating within the Menu", page 43). - Open the PAP menu with the directional key ▶.    Menu point Settings| PAP ON/OFF | Switching the PAP function on or off. |
| PAP Picture | Open the PAP Picture sub-menu with the directional key ▶ . The settings correspond with those on thePICTURE menu, see page 44. |
| PAP Source | Select the source for the PAP picture.When main picture source is TV, DTV, EXT-1, EXT-2 or BAV, PAP Window can only be set to HDMI-1, HDMI-2, YPBPR; PC source or vice versa. |
| PAP Programme | Select the programme with the directional keys ◀ ▶ or the digit keys. |
| PAP SWAP | With this you can swap the PIP picture and the main picture. |
Navigating within the Menu
1. Press the M button to activate the OSD. 2. Select the options from the main menu with the directional keys ◀ ▶ . 3. Select the options from a menu with the directional keys ▲ ▼ . 4. Go back to the main menu with the directional key ▲. 5. Open a sub-menu with directional key ▶ (not available in every menu). 6. Go back to the menu above with the menu key M. 7. Set the required value or enter another selection with directional keys ◀ ▶. Close the menu with the menu key M and confirm the selection at the same time. NB: the menu will close automatically after approx. 15, 30 or 60 seconds if no key is pressed (setting in menu Function). ATTENTION:
The menus described here may vary from the menus on your screen because of possible technical modifications.Menu PICTURE
 Menu point Settings| Mode | Select image mode: Natural, Cinema, Dynamic. This function corresponds to the operation of the PP key. |
| Contrast | Reduce or increase the contrast (0-63). |
| Brightness | Reduce or increase the brightness (0-63). |
| Sharpness | Reduce or increase the sharpness (0-15). |
| Colour | Reduce or increase the saturation (0-63). |
| Colour Temp | Select hue: Normal, Warm, Cold. |
| Noise Reduction | You can reduce noise in the image with this function and improve the image quality if the signal is weak. Select from Off, Low, Medium or High. |
| Film Mode | Films are recorded with a different number of images per second than are TV images. Select On when you watch a film to see the image quality of scenes with rapid movement better. |
| Menu point Settings | |
| 3 D Comb | The 3D comb filter is used to improve colour transitions and the colour quality of images. Select On or Off. |
| Zoom | Here you can select the image settings, as with the WIDE key. |
| Reset | Reset all image settings to the factory settings with ▶ or OK. |
| Store | Store the settings here with ▶ or OK. |
Menu SOUND
 Menu point Settings| Volume | Basic setting of the volume when switching on (range 0-63). Select a limited basic volume. |
| Equalizer | Open EQUALIZER sub-menu: See following section |
| Balance | Balance between left and right loudspeaker (range -32 - 32). |
| Headphone | Opens HEADPHONE sub-menu: See next section but one. |
| Sound Mode | Sound mode: Choose between Stereo and Mono. If the current broadcast supports the DUAL mode (e.g. with bilingual broadcasts) then you can also choose here between Dual I and Dual II (original language and synchronisation). This function corresponds to the operation of the I-II key. |
| AVL | The AVL (Automatic Volume Limiting) function aligns the various volumes of the various transmissions with each other. Off: Original volumes; On: Equal volume |
| Menu point Settings | |
| Effect | Switch sound effect on or off.If the currentSound Modeis set to Mono, the sound will be perceived as with stereo reproduction if the sound effect is switched on.If the currentSound Modeis set to Stereo, the sound will have greater depth. |
| Dynamic Bass | Set the bass sounds toLow,HighorOff.TheHighsetting is not recommended at high volume. |
| Subwoofer | If an external active subwoofer is connected to the LCD-TV, a significantly better basic reproduction will be achieved. Switch the subwoofer on, if you connect an external active subwoofer.If the subwoofer is switched on, the Dynamic Bass will not be available.Select Subwoofer with the directionally keys ◀ ▶ . Switch the subwoofer function on or off. |
| SRS TruSurr XT | Switch surround effect on or off. |
| Store | Store the settings here with ▶ orOK. |
Submenu EQUALIZER
bar
Equalizer ● Presetting | Frequency | Value | |---|---| | 120 Hz | -3 | | 500 Hz | 5 | | 1.5 kHz | 1 | | 5 kHz | -2 | | 10 kHz | 8 | UserMenu point Settings
Sound Mode
Make your choice from various Equalizer pre-sets. With the Pop, Rock, Jazz and Classic settings the sound settings are optimised for the type of music in question; Normal is the normal setting.User
You can define your own setting with the User setting: Choose a frequency band with ▲ ▼ Choose a value with ◀ ▶.Submenu HEADPHONE
Menu point Settings
volume
Set the volume of the headphones (range 0-63). (You can only set the volume of the main speakers with the + V - loudspeaker keys.) WARNING!
In the first instance set the volume to a value at the lowest end of the scale before you put on the headphones. Then select a comfortable volume. Excessive volume can damage your hearing.Sound Mode
Choose between Stereo and Mono for the headphones. If the current broadcast supports the DUAL mode (e.g. with bilingual broadcasts) then you can also choose here between Dual I and Dual II (original language and synchronisation).Balance
Balance between left and right loudspeaker for the headphones.Menu FUNCTION
 Menu point Settings| PIP | PIP Menu; see "The PIP menu" on page 40 |
| PAP | PAP Menu; see "The PAP menu", on page 42. |
| Sleep Timer | Select the time after which the device is automatically turned off. You can set the time in steps of 10 minutes (maximum 2 hours) with the directional keys ◀ ▶ . The time for the Sleep Timer will start to run as soon as you have set the switch off time.Select Off to switch off this function. |
| Child Lock | If you put the setting to On, then the keys on the device will be blocked (with the exception of the on/off switch) |
| Language | Choose the language for the OSD menu. This will change immediately. |
| Ext-2 Out | This sets which signal will be put out as the output signal via the SCART-2 connection. Choose between TV, EXT-1, BAV, YPbPr Audio, PC and Audio. - If HDMI is selected as the input source, the HDMI Audio option is also available. |
| Menu point Settings | |
| PC Audio In | This sets which signal will be input via the PC-AUDIO input. Choose between TV, EXT-1, EXT-2, BAV, YPbPr Audio and PC Audio. |
| Blue Background | If the LCD-TV does not receive any signal, a blue background will appear instead of "snow" or a black image. |
| Menu Background | Here you can make the menu background more or less transparent by means of the directional key ◀ ▶ . |
| Menu Timeout | Here you can set the time after which the OSD menu will automatically close: 15, 30 or 60 seconds. |
| Teletext Language | The pre-set is West. If you are in a different language region, you can change the language setting: East, Turk/Gre, Cyrillic or Arabic. |
| Standard Format | Set the standard zoom here to Panomara, 16:9, 4:3 or 14:9-Zoom. |
Menu INSTALL
Under normal circumstances, the automatic channel seek function looks for the available channels and these are automatically stored on the channel locations in the order they are found. You can reorder the channel locations in the channel table (see menu "PROGRAM TABLE"). The INSTALL menu moreover puts you into a position to search for individual channels manually and to store them as well as to adjust the picture to the optimum setting.  Menu point Settings| Program Table | Open the channel table (see following section) with ▶. |
| Program | This displays the number of the channel location of the current channel. You can select another channel location with the directional keys ◀ ▶ or with the digit keys (0 to 99).Store the new channel location with the OK key or by selecting the Store option and pressing on ▶. The Stored... message will then be displayed.Remember that the current channel will be saved onto the selected channel location. The channel will be stored under the channel number (e.g. "C-25") and not under the channel name.It is advisable to reserve channel location 0 if you want to connect a video recorder. |
| Band | The television frequency band is sub-divided into channel types C (Normal channel) and S (Special channel). This displays the channel type of the currently set channel. |
| Channel | This displays the channel number of the currently set channel. You can select another channel with ◀ ▶. |
| Menu point Settings | |
| Colour System | Here you select a country-specific TV colour standard: Auto (the correct colour system is set automatically), PAL (for PAL 50 MHz), SECAM, PAL 60. If the video standard (see following option) is set to "I", then SECAM is not available.If an external source is selected (EXT - 1, etc.), NTSC 3.58 and NTSC 4.43 (usual colour format in North America) are also available.Choosing an incorrect colour system will result in an incorrect picture. |
| Sound System | Here you select a country specific TV system (video standard): BG (West Europe), I (Great Britain), L, L' (France) or DK (countries in Eastern Europe).Choosing an incorrect video standard can also result in an incorrect picture. |
| Fine Tune | Here you can adjust the picture of the currently selected channel with ◀ ▶ . |
| Search | Here you can search channels manually.Start a search up or down with the directional keys ◀ ▶ .The search will be interrupted with every programme that is found. The MHz value will be displayed.You can assign a location to the channel under the Program menu option. Remember that when you save a different channel that location will be written over.You can adjust the channel further using the Fine Tune menu option (see previous section).Store the channel by pressing the OK key or by selecting the Store option and pressing on ▶ . The Stored... message will then be displayed. |
| Store | Saving selected channel (see Program and Search options). |
Save video recorder manually
The manual search function can, for example, be used to set a video recorder on the LCD-TV. Once the LCD-TV and the video recorder are connected via the aerial, you should tune your video recorder to the test signal. • Perform the manual search action on the LCD-TV. Once the test signal has been found, store the test signal under channel location 0 (no TV channel is stored on this channel location).PROGRAM TABLE
The channel table displays the currently stored channels. The channels are displayed under their channel names, insofar as the TV channel supports this function. The channel number S- or C- if the name cannot be displayed. Here "S" stands for special channel and "C" for normal channel ("Channel"). The channel memory can store 100 channels. Activate the cursor in the table with the directional key ▼ . You can open another column by going to the right column with the directional key ▶ and pressing ▶ again.  Menu point Settings| Name | Now you can change the channel name.Highlight the required channel name and press the red key.You can now change the first letter. Select a symbol with the directional keys ▲ ▼ . – The symbols are displayed in the following sequence: A B C [t/m] Z a b c [t/m] z ( ) * + , . / [space] - _ 0 1 2 [t/m] 9 .Use the directional key ▶ to go to the next letter, and so on. At the end press the red key again to store the name. |
| Delete | Select the channel you wish to remove from the list and then press the yellow key.Press the yellow key again to confirm. The channels underneath will shift up one place in the table. |
| Insert | With this you can shift a channel to another location.Select the required channel and press the green key. Move the channel to the required location with ▲ ▼ and press the green key again. The other channels will move as well. |
Menu point Settings
APS
You can search for channels automatically with APS. Press the blue key. A text will appear: "WARNING! All Prestored Programs will be deleted". Select another country if necessary with the directional keys ◀ ▶ The country setting has an effect on the sequence in which channels are stored. Press the blue key if you want to cancel the function. Press the red key or OK to start searching. The channel table will be displayed after the search is finished.Menu SOURCE
You can select another input source in this menu. You can also highlight a source so that you can select this directly with the AV key.  Menu point Settings| TV | Aerial use (TV channel) |
| DVB-T | Aerial use of Digital Video Broadcasting Terrestrial |
| EXT-1 | Left SCART connection (analogue) |
| EXT-2 | Right SCART connection (analogue) |
| EXT-2 S | Right SCART connection with transmission of S-Video picture signals (analogue) |
| BAV | Video-Audio input - yellow/red/white (analogue) |
| S-VIDEO | S-Video input (analogue) |
| HDMI 1 | Right HDMI input (digital) |
| HDMI 2 | Left HDMI input (digital) |
| YPbPr | Component inputs (analogue) |
| PC | PC input (digital) |
Menu in PC mode
The OSD menu has the following option in PC mode:Menu PC POSITION
| Menu point Settings | |
| Autoposition | If the picture has shifted, you can select the Autoposition option and press OK to move it back to the middle of the screen. This function has to be performed with a full picture, otherwise the settings will not match. |
| H Position | Here you can change the horizontal position of the picture with the use of ◀ ▶ . |
| V Position | Here you can change the vertical position of the picture with the use of ◀ ▶ . |
| Phase | If the PC picture does not display clearly, you can align the picture signal here with the pixels on the LCD-TV with the use of ◀ ▶ . This makes the picture sharper and more even. |
| Dot Clock | Pixel frequency. This setting synchronises the signal display with the pixel frequency of the screen. This corrects errors that can appear as vertical stripes with pixel intensive reproductions (such as tables or texts with small fonts). Adjust the pixel frequency with ◀ ▶ . |
Connections and examples of connections
The connections are on the rear of the device.  | Connection Name of source | Examples of connections | ||
| 1 | TUNER | P-(Channel number) | Aerial Socket:connection for co-axial aerial |
| 2 | L | BAV | VIDEO input (yellow):Connect devices such as camcorders, DVD players, decoders (e.g. satellite receivers), etc. |
| R | AUDIO inputs L-R (red/white):Connect the left and right audio channels of the source here, if you want to reproduce the sound through the LCD-TV (e.g. camcorder).You will need RCA cables for these connections. | ||
| 3 | S-VHS | S-VIDEO | S-VHS input (S-VIDEO) to connect a device to an S-VIDEO output (e.g. camcorder). You will need an S-Video cable for this connection. |
| 4 | Connect headphones on earphones | Headphone | here with a 3.5 mm TRS stereo connector to be able to hear the sound from your device via this connection.The main loudspeaker will remain switched on. |
 | Using this appliance at full volume for extended periods of time may cause damage to the hearing capacity of the listener. | ||
| 5 | R | Audio output L - R (left - right): Connect an audio amplifier here. Use a suitable Cinch cable to do this. The connection combination with a subwoofer (SUB OUT, connection 13.) is recommended. | |
| L | |||
| 6 | R | AUDIO input L - R (left - right): Component inputs to connect devices to Component output, such as camcorders, DVD players, decoders (e.g. satellite receivers), etc. You will need a red/white RCA cable for the audio link. | |
| L | |||
| 7 | Y | YPbPr | Y - PB - PR input (left - right): Component inputs to connect devices to Component output, such as camcorders, DVD players, decoders (e.g. satellite receivers), etc. You will need a green/blue/red Component cable for this connection for the video link. |
| PB | |||
| PR | |||
| 8 | 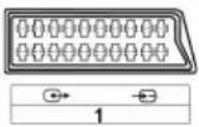 | EXT-1 | SCART input to connect devices such as video recorders, DVD players, games consoles, decoders (e.g. satellite receivers), etc.You will need a SCART cable for this connection. |
| 9 |  | EXT-2 | Same as EXT-1. |
| 10 | VGA PC | VGA connection. Connect your PC or notebook here. For this you need a VGA cable. | |
| 11 | HDMI 1 | Digital connection: to connect an apparatus with an HDMI output. For this you need an HDMI cable. | |
| HDMI 2 | Same as HDMI 1 | ||
| 12. |  | Employ this insert slot for the use of pay-TV cards. Please insert the card that you have received from the channel operator into the slot. . | |
| 13. | SUB OUT | You will be able to connect an external active subwoofer at the subwoofer output (Subwoofer Out) and achieve a significantly better basic reproduction.Use a suitable Cinch cable to connect the subwoofer. | |
| 14. | SPDIF | Digital audio output socket (optical): for the connection of an amplifier or a receiver with a digital input socket. Use a suitable optical cable for this. | |
Headphones
Connect the headphones to the headphone connection. The main loudspeakers will remain on when the headphones are connected. Regulate the volume level of the headphones by means of the volume keys and the Switch Off Sound key. You can adjust the volume of the headphones in the SOUND menu, HEADPHONE sub-menu, see Submenu HEADPHONE. WARNING!
In the first instance set the volume to a value at the lowest end of the scale before you put on the headphones. Then select a comfortable volume. Excessive volume can damage your hearing  Using this appliance at full volume for extended periods of time may cause damage to the hearing capacity of the listener.DVD player
 Connect a DVD player with a SCART cable to the SCART-1 or SCART-2 connections. You can also use red-white (for sound reproduction) and yellow (for picture transmission) RCA cables. You can also use a S-VHS cable as an alternative to the yellow RCA cable. If the DVD player has YUV outputs (Y Pb Pr), it is advisable to connect these using a Component cable (green/blue/red RCA) to the Y-Pb-Pr and L-R Component inputs on the LCD-TV.Video recorder
Connect an aerial cable to the aerial socket of the LCD TV and the aerial output of the video recorder, if you want to connect a video recorder to the LCD TV. Connect another aerial cable to the aerial input of the video recorder and the aerial socket on the wall. In addition you can connect an LCD-TV and a video recorder with each other using a SCART cable. If you want to transmit stereo sound you will need a SCART connection. DVD recorder
You can connect a DVD recorder to one of the two SCART connections on the LCD-TV using a SCART cable. In addition connect the aerial cable in the manner described in the "Video Recorder" section (see above.) Receiver (SAT, DVB-T, decoder, etc.)
Connect a device that is intended to be used as a receiver for the LCD TV (e.g. SAT receiver, DVB-T receiver, decoder, set-top box) or a DVD recorder to the SCART socket, with a SCART cable.  Apart from with SCART cables you can also connect the device with RCA cables: \- Connect (red-white) audio RCA cables to the audio inputs on the LCD-TV and the audio outputs on the external device. \- Connect a (yellow) video RCA cable to the video input on the LCD-TV and the audio output on the external device. \- Apart from using a video RCA cable you can also connect an S-Video video cable to the S-Video input on the LCD-TV and the S-Video output on the external device.DVD or video recorder and SAT-receiver
If you want to connect a DVD or video recorder and a satellite receiver at the same time, you can use the following connection method: flowchart
graph TD
    A["LCD-TV"] --> B["Sat-RECEIVER"]
    B --> C["VIDEO RECORDER"]
    B --> D["Antenna"]
    B --> E["OUT"]
    B --> F["IN"]
    B --> G["AV 1: SCART OUT / TV"]
    B --> H["AV 2: SCART IN / DECODER"]
    B --> I["LNB"]
    B --> J["AV 1: SCART OUT / TV"]
    B --> K["AV 2: SCART IN / DECODER"]
Device with HDMI or DVI output
HDMI ("High Definition Multimedia Interface") is the only interface in the entertainment electronics sector with which one can transmit audio and video data digitally at the same time. HDMI can process all picture and sound systems known at this time, including HDTV (High Definition Television), so that it can reproduce a resolution of 1080 i without loss of quality. Many devices from the entertainment electronics sector, such as DVD players, are equipped these days with HDMI or DVI outputs.External device with HDMI output
1. Connect an HDMI cable (not supplied) to one of the two HDMI inputs on the LCD-TV and the HDMI output on the external device. 2. Once you have connected the HDMI device then switch on the LCD-TV. 3. Then switch on the external HDMI reproduction device.External device with DVI output
If the external device has a DVI output, you can also connect it to the HDMI input (HDMI is backwards compatible with DVI - "Digital Visual Interface"). For this you need an HDMI-to-DVI adapter. Given that no sound can be transmitted via the DVI output, you also need to connect an audio cable with a TRS stereo connector. If you want to reproduce the sound through the LCD-TV connect audio RCA cables (red-white) - To the component audio inputs (position 6 on page 60) on the LCD-TV in case of HDMI-1 input. - To the audio inputs (position 2 on page 60) on the LCD-TV in case of HDMI-2 input.PC
The LCD-TV can be connected as a screen or additional monitor to your PC or notebook. The image on your PC or notebook will then be displayed on the LCD-TV. Connect the LCD-TV as follows: 1. Switch off both devices. 2. Connect a VGA cable (screen cable; not supplied) to the VGA input on the LCD-TV and to the output for the video card on the PC or the notebook. 3. Tighten the screws on the screen cable with your fingers so that the plug makes a good connection. 4. If you also want sound, connect an audio cable to the AUDIO (position 2 on page 60) input. 5. Switching the LCD-TV on first. 6. Only then switch on the PC or notebook. 7. Press the ☐ key on the remote control in order to switch to PC mode. The PC image will appear on the LCD-TV. You can return to TV mode with the TV key. If you use the LCD-TV as a second screen with your PC, then it may sometimes be necessary to adjust the screen settings in the operating system. You will find further information about matters you need to pay attention to when using more than one screen in the user manual for your PC or notebook. Many times, problems have simple causes. We would like to give you some tips to solve some common problems. Should these tips not help, please call us!There is no picture or sound.
- Check whether the mains cable has been connected to the socket and the mains adapter correctly. - Check whether the signal reception has been set to TV. - Check whether the mains switch of the device on the rear of the device has been switched on.There is no picture. There is no picture from AV.
• Make sure the Contrast/Brightness is properly adjusted. • Make sure all external devices are connected properly. - Check whether the correct AV setting has been selected. - If you want to select an input source with AV you need to highlight this in the SOURCE menu.There is no sound.
• Make sure the volume is not set to minimum. • Make sure the sound is not set to mute.There is no picture or sound, just noise.
\- The reception may be weak. Make sure the aerial is not disconnected.The picture is not clear.
• The reception may be weak. • Make sure the aerial is not disconnected.The picture is too bright or too dark.
\- Check the contrast and brightness settings.The remote control does not work.
- Check whether the batteries in the remote are operational and have been inserted correctly. • Make sure the remote sensor window is not under strong lighting. - Switch the device off and on again with the mains switch at the rear.The picture is not sharp.
• The reception may be weak. • Make sure the aerial is not disconnected. - Check the sharpness and noise suppression settings in the PICTURE menu.A double or triple image will be displayed.
- Check if the aerial is correctly oriented. - The signal may be reflected off hills or buildings.The picture is spotted.
- There may be interference from automobiles, trains, high voltage lines, neon light, etc. - There may be interference between the antenna cable and power cable. Try moving them further apart.There are stripes on the screen or colors fade.
• Is the unit receiving interference from other devices? - Transmission antennas of radio broadcasting station and transmission antennas of amateur radio and cellular phones may also cause interference. - Place the unit as far apart as possible from device that may cause possible interference.The operating buttons on the device do not function.
• The child-lock may have been activated.Do you require additional Support?
If the suggestions in the above section have not solved your problem, please contact the hotline. We will try and help you over the telephone. However, before you contact your Service Center, please keep the following information available: • What external devices have been connected? • What messages appear on your display? - During which operating step has the problem arisen? - When a PC has been connected to the device: – What is the system configuration? \- Which software were you using when the problem arose? • What steps have you already undertaken to solve the problem? - If you have already been given a customer number, please keep this available. Input voltage: 230 V \~ 50 Hz Visible display size: 42 inch (107 cm) TFT; 16:9-display Power consumption: 270 W Power consumption standby: < 1 W TV system: PAL, SECAM, B/G, D/K, I, L/L' Tuner: Aerial, DVB-T Channels: VHF (Band I/III) FM (BAND U) HYPERBAND KABEL-TV (S1-S20)/(S21-S41) Audio: Stereo Channel positions: 100 Antenna interface: 75 Ohm Connections: 2 x HDMI with HDCP encoding, 2 x SCART, composite VIDEO (cinch), component YUV (cinch), S-video (mini din), 2 x stereo audio in (cinch), audio out (cinch), headphone (3.5 mm jack), subwoofer out (cinch); SPDIF, VGA (15 pin d-sub), 1 x CI Slot, Dimensions (W x H x D, incl. stand): 1012 x 712 x 280 mm (W x H x D, without stand): 1012 x 661 x 130 mm Weight (incl. stand): approx. 20 kg (24 kg)  Copyright © 2008 All rights reserved. This manual is protected by copyright. All rights reserved. Copying mechanically, electronically and any other way is prohibited unless written permission from the manufacturer is obtained. The company MEDION ^® owns the copyright. Subject to technical and optical changes as well as printing errors. The lifespan of the LCD-TV can be extended by the following means: 1. Before cleaning, always remove the power adapter plug and all connecting cables. 2. Do not use any solvents, corrosive or gaseous cleaning agents. 3. Clean the display with a soft, lint-free cloth. 4. Ensure that no water droplets remain on the screen. Water can cause permanent discoloration. 5. Do not expose the screen to bright sunlight. 6. Please keep the packaging material well and use it exclusively to transport the device. ATTENTION!
There are no user-serviceable or user-cleanable parts inside the device.Packaging
 Your device is packaged to protect it against damage during transportation. The packaging is manufactured from materials that can be sent to a specialist recycling facility and disposed of in an environmentally-friendly way.Device
 At the end of its life, the appliance must not be disposed of in household rubbish. Enquire about the options for environmentally-friendly disposal.Batteries
 Do not dispose of used batteries in the household rubbish! They must be deposited at a collection point for used batteries.Pixel errors with LCD TVs
Individual pixels or groups of them can fail in rare cases, in spite of the most up-to-date manufacture, because of the highly complex technology. Active matrix LCDs (TFT) with a resolution of 1366 x 768 pixel,(WXGA) which are in turn composed of three sub-pixels each (red, green, blue), contain about 3 million addressable transistors. Because of this very high number of transistors and their extremely complex production process occasionally defective or incorrectly addressed pixels or sub-pixels may occur.  Description Accepted Number| Bright sub-pixels | 1 sub-pixel Max. 2 | |
| Two lying next to each other (horizontally/vertically) | 0 | |
| Distance Minimum distance between light and dark sub-pixels | Min. 5 mm | |
| Dark sub-pixels | Individual | Max. |
| Two lying next to each other Max. 2 | ||
| Distance Minium distance between light and dark sub-pixels | Min. 5 mm | |
| Total number of bright and dark sub-pixels | Max. 7 | |
Accessories
The following accessories are supplied with the LCD-TV: 2 steel rails, 4 screws, 4 plastic hanging elements, 1 drill template, 1 illustrated mounting manual (applies to several types of device). You will also need 8 raw plugs and screws for fixing to the wall (available in trade shops).Safety instructions for wall mounting
Be certain to adhere to the following safety instructions when mounting the unit on the wall: - The LCD-TV must only be mounted onto straight perpendicular walls. - Check before mounting if the load-bearing capacity of the wall equals at least three times the weight of the device (16 kg). Ask a qualified fitter for advice if in doubt. - Switch the LCD-TV off before starting with mounting. The mains cable and aerial cable must be unplugged. - At least two persons are required to carry out mounting. - You will require an electric drill and a cross-head screwdriver to carry out the mounting.  ATTENTION! Make sure that the raw plugs and screws that you select are suitable for your wall.Mounting the hanging elements and the device
1. Push the supplied M4 x 10 screws through the plastic hanging elements. The side with the smallest diameter on the plastic hanging elements is to be found on the outside. 2. Tighten the screws with the plastic hanging elements in the correct screw holes on the rear of the device. natural_image
Diagram showing a screw being inserted into a housing component (no text or symbols)Remove base
The base of the device is fixed to the rear with six screws. 1. Undo the six screws with a cross-head screwdriver. 2. Lift up the device, away from the base. Fixing the steel rails to the wall
1. Select a location on the wall where there is sufficient distance between the LCD-TV and other objects (see section Point of use). Bear in mind that the hanging elements on the rear of the device will fit into the narrow ends of the hanging openings in the steel rails. 2. Mark the eight drill holes in the wall with the supplied drill template. 3. Drill the eight holes for the raw plugs in the wall. 4. Insert the raw plugs. ATTENTION!
The raw plugs must fit tightly! Do not hang the device on the wall if the raw plugs are not tightly fixed. 5. Attach the two steel rails each with four screws. The narrow sides of the hanging openings must face downwards. 6. Now you can hang the LCD-TV on the steel rails.
- General Information....10
- Safety instruction 11
- Setting Up.... 16
- First Time Installation.... 18
- Basic Functions 21
- Video text 25
- The IDTV menu 28
- "Picture in Picture" or "Picture at Picture" 38
- The OSD menu....43
- Connections and examples of connections....60
- Troubleshooting 70
- Specifications....72
- Recycling....74
- Wall Mounting....76
- Introduction
- Overview
- LCD-TV
- Front
- Operating controls on the side
- Rear
- Purpose of use - This device serves to receive and transmit television channels. The different connection possibilities will enable an additional expansion of the sources of reception and transmission (Receiver, DVD-Player, DVD-Recorder, Video Recorder etc.). - This device is only suitable for using in dry, internal rooms. • This device is not suitable as a data screen for office use. - This device is intended for personal use only. It not intended for commercial use in a heavy industry environment. Use under extreme environmental conditions can result in damage to your device. HD ready
- Included in the box
- Safety
- Point of use
- Repair
- Intended Environment
- Power Supply
- Standards/electro-magnetic compatibility
- Batteries and Proper Treatment
- NOTE:
- Unpacking
- Putting the batteries into the remote control
- ATTENTION!
- Connecting an antenna
- Connecting the power supply
- Turning the LCD TV on and off
- Searching for digital channels
- Seeking analogue channels
- Automatic channel seeking
- Switching between DVBT and analogue reception
- Having information displayed
- Channel Search
- Sound Settings - You can increase or decrease the volume with the volume keys + V - on the remote control or + ▲ - on the device. - You can switch off the sound completely and switch it on again with the key (Switch sound off). - You can choose between mono- and stereo reproduction, Dual I and Dual II, with the I-II key. Dual I and Dual II can only be reproduced if the current broadcast supports the DUAL mode (e.g. with bilingual broadcasts). Setting the Picture
- Zoom mode (key)
- Zoom in PC mode
- Other picture settings
- Displaying information
- Select external device
- To operate video text
- Select video text pages
- Number keys
- Channel selection keys
- Colour buttons
- Subpages
- Useful features for video text
- Combination of video text and TV picture
- INDEX
- STOP
- Suppress TT Search
- Displaying hidden text
- Doubling the size of the page
- Help Menu
- Channel List
- Scrolling through the whole Channel List
- Sorting the channels in the Channel List
- Deleting channels from the Channel List
- Renaming channels
- Blocking channels
- Establishing favourites
- Removing a channel from a Favourite List
- Navigating through the favourite channels with the blue button
- Configuration Menu
- Menu Timers
- TV settings
- Common interface
- "Picture in Picture" or "Picture at Picture"
- Sources for PIP and PAP
- Activating and modifying the PIP function
- The PIP menu
- Activating and modifying the PAP function
- The PAP menu
- Navigating within the Menu
- ATTENTION:
- Menu PICTURE
- Menu SOUND
- Submenu EQUALIZER
- Menu point Settings
- Sound Mode
- User
- Submenu HEADPHONE
- volume
- WARNING!
- Balance
- Menu FUNCTION
- Menu INSTALL
- Save video recorder manually
- PROGRAM TABLE
- APS
- Menu SOURCE
- Menu in PC mode
- Menu PC POSITION
- Connections and examples of connections
- Headphones
- DVD player
- Video recorder
- DVD recorder
- Receiver (SAT, DVB-T, decoder, etc.)
- DVD or video recorder and SAT-receiver
- Device with HDMI or DVI output
- External device with HDMI output
- External device with DVI output
- PC
- There is no picture or sound.
- There is no picture. There is no picture from AV.
- There is no sound.
- There is no picture or sound, just noise.
- The picture is not clear.
- The picture is too bright or too dark.
- The remote control does not work.
- The picture is not sharp.
- A double or triple image will be displayed.
- The picture is spotted.
- There are stripes on the screen or colors fade.
- The operating buttons on the device do not function.
- Do you require additional Support?
- Packaging
- Device
- Batteries
- Pixel errors with LCD TVs
- Accessories
- Safety instructions for wall mounting
- Mounting the hanging elements and the device
- Remove base
- Fixing the steel rails to the wall
Brand : MEDION
Model : MD 30113
Category : Television