
LIFE P17102 (MD 30911) - Television MEDION - Free user manual and instructions
Find the device manual for free LIFE P17102 (MD 30911) MEDION in PDF.


| Product Type | Television |
| Brand | Medion |
| Model | LIFE P17102 (MD 30911) |
| Screen Size | 17 inches (43 cm) |
| Display Technology | LED LCD |
| Resolution | 1366 x 768 (HD) |
| Aspect Ratio | 16:9 |
| Refresh Rate | 60 Hz |
| Brightness | 250 cd/m² |
| Contrast Ratio | 1000:1 |
| Viewing Angle | 178° (H) / 178° (V) |
| Built-in Speakers | 2 x 3W |
| Inputs | HDMI, VGA, USB, Composite AV, RF Antenna |
| Outputs | Headphone Jack, Digital Audio Out (Coaxial) |
| Power Supply | AC 100-240V, 50/60Hz |
| Power Consumption (Standby) | <0.5W |
| Dimensions (with Stand) | Approx. 405 x 280 x 165 mm |
| Dimensions (without Stand) | Approx. 405 x 250 x 45 mm |
| Weight | Approx. 2.5 kg |
| VESA Mount | 100 x 100 mm |
| Remote Control | Included |
| Energy Efficiency Class | A+ |
| Manual Language | English |
Frequently Asked Questions - LIFE P17102 (MD 30911) MEDION
User questions about LIFE P17102 (MD 30911) MEDION
0 question about this device. Answer the ones you know or ask your own.
Ask a new question about this device
Download the instructions for your Television in PDF format for free! Find your manual LIFE P17102 (MD 30911) - MEDION and take your electronic device back in hand. On this page are published all the documents necessary for the use of your device. LIFE P17102 (MD 30911) by MEDION.
USER MANUAL LIFE P17102 (MD 30911) MEDION
natural_image
Front view of a black horizontal television displaying the brand 'MEDION' on a stand (no additional text or symbols visible)Table of contents
1. About these Instructions....3
1.1. Warning Symbols and Keywords....3
1.2. Proper use....3
1.3. Full HD 4
1.4.Contents....4
2. Safety Instructions....5
2.1. Operating Safety 5
2.2. Set-Up Location 5
2.3. Repairs....6
2.4. Intended Environment....6
2.5. Safety when connecting....6
2.6. Power Supply....6
2.7. Battery Handling 7
2.8. Information about Conformity....8
3. Device Overview....9
3.1. Front....9
3.2. Rear and right-hand side....10
3.3. Remote Control....11
4. Start of Operation.... 13
4.1. Unpacking 13
4.2. Installation....13
4.3. Inserting Batteries into the Remote Control 13
4.4. Connecting the antenna....14
4.5. Connecting power supply 14
4.6. Switching the LCD TV on and off....14
4.7. Channel search when switching on for the first time....15
5. Operation 16
5.1. Channel selection....16
5.2. Sound settings 16
5.3. Screen settings....16
5.4. Displaying information 17
5.5. Displaying Information....17
5.6. Opening the favourites list....17
5.7. Selecting the source 17
6. Teletext....18
6.1. Using teletext 18
7. Connecting devices 19
7.1. Connecting headphones 19
7.2. Digital amplifier via coaxial connection 19
7.3. Connecting a soundbar/surround sound system....19
7.4. Connecting a DVD/Blu-ray player 19
7.5. Connecting a video recorder 20
7.6. Connecting a DVD recorder....20
7.7. Connecting a receiver (SAT, DVB-T, decoder, etc.) 20
7.8. Connecting a DVD/video recorder and SAT receiver 21
7.9. Connecting a camcorder....21
7.10. Device with HDMI or DVI output....21
7.11. Connecting a PC 22
7.12. Connecting a network....22
8. Via the OSD menu 23
8.1. Navigating in the menu....23
8.2. The menu system in detail....24
9. PVR function....41
9.1. Start/stop recording directly....42
9.2. Programming recording....42
9.3. Playing back recordings....42
10. EPG – Programme guide....42
11. Media portal 43
11.1. Media library....43
12. HbbTV system 44
- Internet 44
- MEDION® Life Remote App 45
- Data protection MEDION® Smart TV....45
- Troubleshooting 46
16.1.Do You Need More Help? 47 - LED-Backlight TV pixel faults 47
- Cleaning......48
- Disposal 48
- Technical Data 49
20.1. Product data sheet 51 - Legal Notice 52
- Index....53
1. About these Instructions

Before using the device for the first time, you should read these operating instructions thoroughly and follow the safety advice. This device may only be used as described in the operating instructions.
Always keep these operating instructions at hand but store them safely so that you can pass them on to a new owner should you sell the unit.
1.1. Warning Symbols and Keywords
 | DANGER!Warning of immediate risk of fatal injury!WARNING!Warning: possible mortal danger and/or serious irreversible injuries!CAUTION!Warning: possible light or moderate injuries! |
 | CAUTION!Please follow the guidelines to avoid property damage. |
 | PLEASE NOTE!Additional information on using the device! |
 | PLEASE NOTE!Please follow the guidelines in the operating instructions. |
 | WARNING!Warning: danger of electric shock! |
 | WARNING!Warning: danger due to excessive volume! |
| • Bullet point/information on operating steps and results | |
| ► Tasks to be performed | |
1.2. Proper use
- This device is used to receive and play back TV programmes. Thanks to its various connection options, it can also be used to receive and play back media from various external sources (receiver, DVD player, DVD recorder, video recorder, PC, etc.). Your device offers a number of options for usage.
- The device is intended for private use only and not for industrial/commercial use.
- Please note that we shall not be liable for damage caused by improper use.
- Do not modify the device without our consent and do not use any auxiliary equipment which we have not approved or supplied.
- Use only spare parts and accessories which we have supplied or approved.
- Heed all the information in these operating instructions, especially the safety information. Any other use is deemed improper and can cause personal injury or damage to the device.
- Do not use the device in extreme environmental conditions.
- This product is intended for use in dry, indoor areas only.
- This device is not suitable as a data monitor for office workplaces.
EN
1.3. Full HD
Your LED-Backlight TV is equipped with the feature "Full HD". This means that it is capable of displaying high-resolution television programmes (HDTV). The prerequisite for this is a HDTV signal.

1.4. Contents
Please check the items received in the box and inform us within 7 days from purchase if anything is missing. Your statutory rights are not affected.

WARNING!
Keep packaging material such as plastic film away from children. There is a risk of suffocation if used improperly.
You should receive the following items
• LED backlight TV
- Remote control (RC1208) incl. 2 × 1.5 V batteries (type LRO3/AAA)
- AV adapter
- YUV adaptor
• Wi-Fi dongle (Wistron, Vezzy 200, MSN 4004 4275)
- USB extension cable
- Stand incl. fastening screws
- Documentation
2. Safety Instructions
2.1. Operating Safety
- Children should be supervised to ensure they do not play with this unit. This unit is not intended for use by people (including children) with reduced physical, sensory or mental abilities or for those without experience and/or knowledge, unless they are supervised by a person responsible for their safety or they have been instructed on its use.

WARNING!
Keep packaging material such as plastic film away from children. There is a risk of suffocation if used improperly.

WARNING!
Never open the housing of the LED-Backlight TV (electrical shock, short circuit and fire hazard)!

WARNING!
Never insert any objects through the slots and openings of the LED-Backlight TV (electrical shock, short circuit and fire hazard)!
- The slots and openings on the LED-Backlight TV are for ventilation purposes. Do not cover these openings (overheating, fire risk)!
- Do not put any pressure on the display. There is a risk that the screen may break.
- The remote control has a class 1M infrared diode. Never use optical devices to look at the LED.

CAUTION!
There is a risk of injury if the screen is damaged! Recover all broken pieces using protective gloves and send them to your Service Centre for proper waste disposal. Then wash your hands with soap because chemicals may have leaked out.
- To avoid damaging the screen do not touch it with fingers or sharp objects.
- Contact customer services if:
– the power cable is burnt or damaged
– liquid has penetrated the device
– the device is not operating correctly
– the device has fallen, or the casing is damaged
2.2. Set-Up Location
- In the first hours of operation, new devices may emit a typical, unavoidable but completely harmless smell, which will decline increasingly in the course of time. We recommend that you ventilate the room regularly, in order to counteract the formation of the smell.
- Keep your LED-Backlight TV and all connected devices away from moisture and avoid dust, heat and direct sunlight.
- Do not use the device outdoors because other effects such as rain, snow etc. can also damage the device.
- The device must not be exposed to water droplets or spray. Do not place objects that are filled with water (such as vases) on the device. The container may tip over and the liquid will impair the electrical safety.

CAUTION!
Keep candles and all other types of open flames away from the product to prevent the spread of fire.
- Make sure that there is enough clearance in the wall units! Ensure a minimum separation of 10 cm around the device for sufficient ventilation.
- Operate all components on a stable, level and vibration-free base, to prevent the LED-Backlight TV from falling over.
- Avoid dazzle, reflections and strong bright-dark contrast in order to protect your eyes.
- The optimal viewing distance is 3 times the screen diagonal.
2.3. Repairs
• Repairs to your LED-Backlight TV should only be carried out by qualified specialists.
- Please contact our authorised service centre if you have any problems with your LED-Backlight TV.
- Make sure to use only replacement parts provided by the manufacturer. The device may sustain damage if unsuitable replacement parts are used.
2.4. Intended Environment
- The device can be operated at an ambient temperature of +5° C to +35° C and a relative humidity of 20% - 85% (non condensing).
- In the switched-off state the LED-Backlight TV can be stored from -20°C to +60°C .
- Keep the device at a distance of at least one metre from high frequencies and magnetic sources of interference (television, loudspeaker boxes, mobile telephones etc.) to avoid malfunctioning.

WARNING!
After transporting the LED-Backlight TV wait until the device has reached ambient temperature before switching it on.
Large changes in temperature or fluctuations in humidity can cause moisture to build up due to condensation within the LED-Backlight TV, which can cause an electrical short circuit.
- During thunderstorms or if the device is not going to be used for long periods, remove the plug from the mains socket and the aerial cable from the aerial socket.
2.5. Safety when connecting
2.6.PowerSupply
- Even when switched off, some components of the device are live. In order to disconnect the power to your LED-Backlight TV or to completely isolate the device from voltage sources remove the mains plug from the mains socket.

WARNING!
Do not open the device's housing. There is a risk of electric shock when the housing is open. The device does not contain any parts requiring maintenance.
- Only plug the LED-Backlight TV into an earthed socket with 220-240 V\~ 50 Hz. Contact you electricity provider if you are not sure if the socket is earthed or not.
- The socket must be near the LED-Backlight TV and easily accessible.
- In order to disconnect the power to your LED-Backlight TV or to completely isolate the device from voltage sources remove the mains plug from the mains socket.
- For extra safety, we recommend using an over-voltage protection device to prevent your LED-Backlight TV sustaining damage as a result of power surges or lightning strikes.
-
If you are using an extension cable, make sure that it complies with UK Electrical Safety requirements. If in doubt, contact your electrician.
-
Position the cable so that nobody is able to step on it or trip over it.
- Do not place any objects on the cable to avoid damaging it.
2.7. Battery Handling

WARNING!
Batteries can contain combustible materials. If not handled correctly batteries can leak, become very hot, ignite or even explode, which could damage your device or/and your health.
Please ensure compliance with the following advice:
- Keep batteries away from children. Contact your doctor immediately if a battery is swallowed.
- Never charge batteries (unless it is clearly indicated).
- Never discharge batteries by high power output.
- Never short-circuit the batteries.
- Never expose the batteries to excessive heat such as sunshine, fire or similar.
- Do take apart or deform the batteries. Your hands or fingers could get injured or battery fluids could get into your eyes or onto your skin. If this should happen then rinse the affected areas immediately with a large amount of clean water and contact your doctor immediately.
- Avoid heavy impacts and vibrations.
• Always observe the correct polarity. - Make sure that the plus (+) and minus (-) poles are correctly inserted in order to avoid short circuits.
- Never mix new and old batteries or different types of batteries. This could cause your device to malfunction. In addition, the weaker batteries would discharge too much.
- Immediately remove used batteries from the device.
- Remove the batteries from the device if you do not intend to use it for a long period of time.
- Replace all the old batteries in a device with new batteries of the same type.
- Isolate the contacts of the batteries with sticky tape if you want to store or dispose of them.
- Clean the contacts on the battery and device before inserting.
2.8. Information about Conformity
The device fulfils electromagnetic compatibility and electricity safety requirements.
The device complies with the fundamental requirements and the relevant regulations of EMC Directive 2004/108/EC, the Low Voltage Directive 2006/95/EC and Directive 2011/65/EU (RoHS).
This device fulfils the basic requirements and the relevant regulation of the Ecodesign Guideline 2009/125/EG (Commission Regulation 642/2009).
Your device complies with the fundamental requirements and the relevant regulations of R&TTE Directive 1999/5/EC.
Due to the 5 GHz frequency range of the supplied wireless LAN solution, the device may only be used inside buildings in the EU.

3. Device Overview
3.1. Front

1) LCD screen
2) Mains switch
3) Infrared sensor: Reception field for the infrared signals from the remote control Operating light: Lights up blue when the appliance is in standby mode.
3.2. Rear and right-hand side

1) COMMON INTERFACE (CI+): Card slot for connecting CI modules
2) USB (5V === , 500 mA max.): USB connection for media playback and recording (PVR)
3) SIDE AV: Audio/video input (via included cinch adapter)
4) For connecting headphones with a 3.5 mm jack plug
5) Y Pb Pr: Component inputs for connecting devices with component output (via included cinch adapter)
6) HDMI 1-3: HDMI connection for devices with HDMI output
7) ANT.: Aerial connection (DVB-T/DVB-T2/DVB-C/analogue)
8) VGA: Connection for connecting a PC
9) SCART: SCART connection(input/output)
10) SPDIF Coax. OUT: Digital audio output (coaxial)
11) LAN: Network connection to connect to the Internet
12) - ▲ +: Set the volume or navigate in the menu MENU (press both buttons at the same time): Call up the on-screen menu, to make settings on the device.
13) P/CH +/- : Select a channel or navigate in the menu
14) TV/AV: Select source
15) Standby button: switches the device on or into standby mode
16) Fixing holes for a wall bracket (hole spacing 200 x 200 mm).

PLEASE NOTE!
When mounting the device, make sure that you use M6 screws. The length of the screws corresponds to the thickness of the wall bracket plus a max. of 13 mm.
3.3. Remote Control
EN

1) LED display for confirming button selection
2) Switching between DVB-T and DVB-C programmes/multifunction button for programme position or input source
3) : Switch LCD TV on/off (standby mode on/off)
4) EXIT: Exit menu
5) LANG: Analogue TV: stereo/mono;
Digital TV: select audio language (if available)
6) SIZE: Select screen format
7) SLEEP: Activate/deactivate sleep timer
8) FAV: Activate favourites list
9) EPG: Digital TV: call up electronic programme guide
10) SOURCE: Select input signal of connected devices
11) : Increase (F) or decrease (-) volume.
12) Numeric keys:
TV: programme selection, teletext: page selector
13) : Set previous TV channel
14) : Activate teletext
Press 2x = set transparent
Press 3x = close
15) Direction button ▲: Up in menu
Digital TV: select the info bar of the current channel, teletext: select next page;
Direction button ▼ : Down in menu,
Digital TV: select the info bar of the current channel, teletext: select previous page;
Direction button ◀ : Left in menu
teletext: call up sub-page;
Direction button ▶ : right in menu
teletext: call up sub-page
16) OK: Confirm selection in certain menus
17) P -/+: Programme selection buttons
TV: select next (+) / previous (−) channel;
teletext: select next (+) / previous (−) page
18) RETURN: Go back one level in menus
19) MENU: Open and close menu
20) PRESET: Select picture mode
21) INFO: Digital TV: display info (e.g. current channel number)
GREEN BUTTON/REPEAT: For teletext or menus
YELLOW BUTTON/ROOT: For teletext or menus
BLUE BUTTON/TITLE: For teletext or menus
25) Media button
◀: Fast rewind;
▶: Fast forward;
● : Start recording (PVR);
■: Stop playback;
▶ : Start playback;
4. Start of Operation

CAUTION!
Before starting up please make sure that you read the "Safety instructions" section
4.1. Unpacking
- Select a suitable place for setting up the device.
- Open the box very carefully to avoid damaging the device. The device could be damaged if you use a knife with a long blade to open the box.
- The box contains a number of small items (including batteries). Keep these items out of reach of children; the parts are easy to swallow.
- Store the packaging material in a safe place; only use this box to transport the TV.

WARNING!
Keep packaging material such as plastic film away from children. There is a risk of suffocation if used improperly.
4.2. Installation
Attach the base stand as shown in the drawing. Carry out this step before connecting the LED-Backlight TV.


4.3. Inserting Batteries into the Remote Control
▶ Open the battery compartment cover on the back of the remote control.
▶ Insert two LR03 (AAA) 1.5-V batteries in the battery compartment of the remote control. Check the battery polarity (inscribed on the bottom of the battery compartment).
▶ Replace the cover.

CAUTION!
Remove the batteries if the device will not be used for long periods. The remote control can be damaged by leaking batteries.
4.4. Connecting the antenna
Your LCD TV supports different antenna signals.
You can feed the following image signals via the connection labelled ANT.:
• via analogue cable / an analogue home aerial
• via a DVB-T 2 antenna or
• via a DVB-C 2 connector (digital cable)
Connect the antenna cable from either the house aerial/the analogue cable connection, the DVB-T antenna or the DVB-C connection to the antenna connection on the LCD television.

NOTE!
To receive encrypted/subscription channels you will need to use a CAM module and an appropriate card. Insert the CAM module (available from dealers) in the appropriate slot on the left side of the device (Common Interface). You can then insert the card from your provider into the CAM module.
4.5. Connecting powersupply
Plug the device into an easily accessible 220–240 V \~ 50 Hz mains socket.
4.6. Switching the LCD TV on and off
▶ Set the power switch on the lower right-hand side of the device to ON. The device switches to standby mode and the display on the front will light up.
To switch the device on, press
- on the remote control: the Standby/On button ⏻, one of the number buttons or one of the P-/+ buttons;
- on the device: the STANDBY button.
▶ Use the Standby/On button ⏻ on the remote control to switch the device back into standby mode. The device will be switched off but continues to use power.

NOTE!
If there is no input signal, the device automatically switches to standby mode after five minutes. A countdown timer will be shown on the screen until this occurs. This function is not available with all sources.
4.7. Channel search when switching on for the first time
You will be guided through the first time installation when you switch the device on for the first time.
Using the direction buttons ▼ ▲ you can move up or down in the menu and select the required language. After confirming the selected language with OK the first time installation will begin.
▶ Use ◀ ▶ to select the desired country. The country setting will influence the order in which the channels are stored. Also, there are a number of options preset for the individual countries.
▶ If you would also like to change the default settings for the teletext language, use the direction button ▼ to select the entry TELETEXT SPRACHE then use the direction buttons ◀ ▶ to select the desired language region ◀ ▶ WEST, EAST, CYRIL-LIC, TURK/GRE or ARABIC.
▶ If Siyou would also like to search for encrypted channels, set the option to YES.
▶ Then press OK to continue. A query about the digital antenna signal will appear.
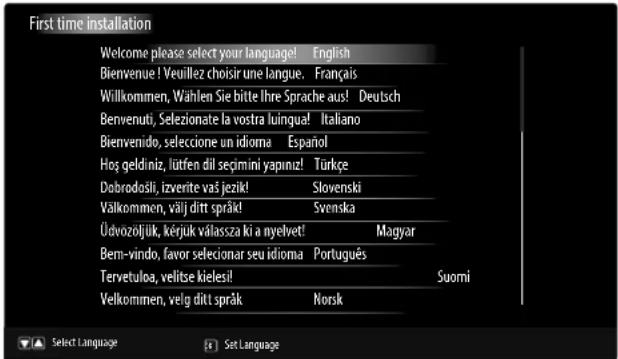

Now you are asked to carry out the network settings. Select NO, if you want to skip this step. If you select YES, the network options appear:
▶ Here you can select the network type WIRELESS DEVICE or WIRED DEVICE.
If you are using USB Wi-Fi dongles, choose the option WIRELESS DEVICE as your network type and confirm with OK. The television will scan for available wireless networks. Select the desired network. If this is secured, you must enter the network password. See also the documentation that came with your wireless router.
If you have selected the setting WIRED DEVICE, a dynamic connection is automatically created as soon as you connect the LCD TV to the Internet.
You can also enter a static IP address. To do this, press the green button to access the ADVANCED menu. Here you can use the number buttons to enter the required IP address to connect your TV to the Internet. Using the red button, you switch between DYNAMIC and STATIC
Here you specify whether the digital antenna signal is to be fed in via AERIAL (DVB-T) or CABLE (DVB-C). The search for digital TV channels will take place according to this setting.
▶ To stop the search at any time, press the MENU button.

Search type setting: Antenna
To start the digital channel search, use the direction buttons ◀ to select YES and then press OK. To cancel, use the direction buttons ◀ to select NO and then press OK.

Search type setting: Cable
To start the digital channel search, use the direction buttons ◀ to select YES and then press OK. To cancel, use the direction buttons ◀ to select NO and then press OK.
After the end of the automatic channel programming, the channel appears. If the list is not processed further, it closes after a few minutes.
If the channel list does not close automatically, press the MENU button to exit the function.

NOTE!
The first time installation described here corresponds to the option FIRST TIME INSTALLATION in the INSTALL AND RETUNE menu.
5. Operation
5.1. Channel selection
To select a channel, either press one of the P +/- buttons on the remote control, P/CH +/- on the device or select the channel directly using the number buttons.
For a two- or three-digit number, press the number buttons in the appropriate order.
▶ Use the ○ (SWAP) button to select the last channel played.
By pressing the OK button on the remote control you can call up the channel list, select the channel with the ▲ and ▼ buttons and confirm with OK.
5.2. Sound settings
▶ You can increase or decrease the volume by pressing the volume buttons - ▲ + on the remote control or on the device.
▶ Use the button to switch the volume fully off and on again.
- Pressing the LANG button will display the current audio language.
5.3.Screensettings
▶ Use the PRESET to choose between the screen modes: NATURAL, CINEMA, GAME, SPORTS, DYNAM-IC.
▶ Depending on the programme, the pictures are displayed in the formats 4:3 or 16:9. Use the SIZE button to adjust the picture format.
AUTO: The format displayed is automatically adjusted to match the input signal.
| FULL SCREEN: (only in HDMI mode and for HDTV programmes received via cable or satellite): Pixel-exact reproduction of the image (1:1). |  |  |
| 16:9: Here you can stretch out the left and right sides of a normal image (aspect ratio 4:3) by an equal amount to fill the entire width of the screen. |  | 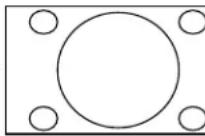 |
| SUBTITLE: With this function, a widescreen image (aspect ratio 16:9) with subtitles is zoomed to full screen size. |  | 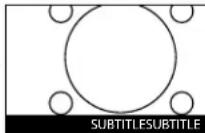 |
| 14:9: With this function, a wide image (aspect ratio 14:9) is zoomed to the upper and lower edges of the screen. |  | 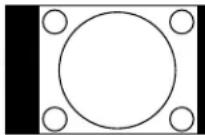 |
| 14:9 ZOOM: This option sets the 14:9 picture format. |  | 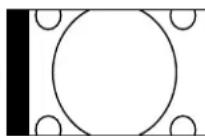 |
| 4:3: Is used to view a standard image (aspect ratio 4:3) as this is its original format. |  |  |
| CINEMA: With this function, a widescreen image (aspect ratio 16:9) is zoomed to full screen size. |  |  |
You can also change the picture format setting in the menu PICTURE> ADVANCED SETTINGS > PICTURE ZOOM.
EN

NOTE!
You can move the screen content up or down by pressing the ▲/▼ buttons if the picture format 14:9 ZOOM, CINEMA or SUBTITLE is selected.
NOTE!
Please note that, depending on the video source selected, not all picture formats are available.
5.4. Displaying information

5.5. Displaying Information
▶ Press the INFO button to show information about the current programme.
▶ You can get the same information when you switch over to a different channel.

PLEASE NOTE!
After pressing MENU you can open the electronic user manual by pressing INFO.
5.6. Opening the favourites list
In the menu CHANNEL LIST > FAVOURITES you can add channels to a favourites list.
▶ Press S the FAV button to activate the favourites list. The favourite icon will be displayed next to the channel name in the programme information.
▶ Use the P +/- buttons to switch between channels in the favourites list.

NOTE!
When you call up the channel list with OK, the favourites list is shown automatically.
▶ Alternatively, use the ▲ and ▼ buttons to select your favourites and call them up with the OK button.
Press the FAV button again to deactivate the favourites list. The icon in the programme information disappears.
5.7. Selecting the source

NOTE!
Please note that when connecting with the SOURCE button the source (the connected device) will only be recognised if it has been activated in the menu SETTINGS, submenu SOURCES.
▶ Use the SOURCE button to select the source of the connected devices. When the SOURCE menu is open, you can press the corresponding digit to select the desired source directly.
-
TV TV operation (plays back antenna and cable signals)
-
EXT 1 Device on the SCART socket
-
SIDE AV Audio/video input on the side of the device using adapter (AV)
-
HDMI1 HDMI input 1
-
HDMI2 HDMI input 2
-
HDMI3 HDMI input 3
-
YPBPR Device on the YPbPr input using adapter (YUV)
-
VGA/PC Device on the PC input
▶ Use the direction buttons ▼ ▲ to go to the desired source.
▶ Confirm your selection with OK
6. Teletext
Teletext is a free service broadcast by most channels and contains the latest news, weather, TV programmes, share prices, subtitles and other information. Your TV offers many useful functions for using teletext including multipage text, subpage saving and high-speed navigation.
6.1. Using teletext
Your remote control has special buttons for operating the teletext.
▶ Select a TV channel that broadcasts teletext.
▶ Press ☐ button once to display the start/index page.
▶ Pressing 📄 again makes the text transparent in front of the TV image.
▶ Pressing ☐ a third time switches the device back into TV mode.
6.1.1.Selectingateletextpage
Number buttons
▶ Enter the number of the desired teletext page as a three digit number using the number buttons.
The selected page number is displayed in the top left corner of the screen. The teletext counter searches until it finds the selected page number.
Scrolling through pages
Using the channel selector buttons or the direction buttons ▲ and ▼ you can scroll back and forth through the teletext pages.
Colour buttons
If coloured text entries are displayed at the lower edge of the screen then you can select the contents directly by pressing the appropriately coloured button RED, GREEN, YELLOW and BLUE.
Subpages
Some teletext pages have subpages. The lower edge of the screen may contain something like 1/3, for example. The subpages are displayed one after another at an interval of about half a minute. You can call up these subpages by pressing the ◀ or ▶ button. A four-digit input box appears in which you can enter the number of the subpage (e.g. 0002). Alternatively you can scroll through the subpages using the direction buttons ◀ ▶.
INDEX
▶ Use the RETURN button to select the index page, which has a list of the teletext content.
7. Connecting devices
7.1. Connecting headphones
Connect headphones to the headphone jack (☐). You can adjust the volume in the menu SOUND, submenu HEADPHONE. To mute the device's speakers while using headphones, press the ✗ button or turn down the volume in the menu SOUND, submenu VOLUME

WARNING!
The use of headphones at excessive volumes can produce dangerous acoustic pressure and lead to permanent hearing damage. Before pressing play, set the volume to the lowest setting. Start playback and increase the volume to a comfortable level. Changing the basic settings of the equaliser can also increase the volume and thus cause permanent damage to your hearing.

WARNING!
Using headphones/earphones to listen to a device at high volumes for an extended period can damage your hearing.
7.2. Digital amplifi er via coaxial connection
Via the SPDIF Coax. OUT connection, you have the option of outputting the audio signal of your LCD TV via a digital amplifier.
To do this, connect a coaxial cable to the SPDIF Coax. OUT connection on the LCD TV and the corresponding input on the amplifier.
7.3. Connecting a soundbar/surround sound system
If you would like to optimise the sound output by connecting a soundbar or surround sound system, the following connection types are available:
On the SPDIF Coax. OUT connection
If your soundbar/surround sound system has a coaxial SPDIF connector, use a cinch cable (not included) to connect this to the SPDIF Coax. OUT connection on the LCD TV.
If your soundbar/surround sound system has an optical SPDIF connector, use an adapter (optical to coaxial, not included) to connect this to the SPDIF Coax. OUT connection on the LCD TV.
Via the headphone output
▶ Use a 3.5 mm jack to 2 x cinch adapter (not included) to connect the headphone output ( ) of the LCD TV with the sound inputs of the soundbar/surround sound system. In the menu SOUND, submenu HEADPHONE/LINEOUT you should then select the setting LINE-OUT. After this, the volume of the headphone output can no longer be set via the HEADPHONE option.
Via the SCART connection
▶ Use a SCART to 2 x cinch adapter (not included) to connect the SCART connection of the LCD TV with the sound inputs of the soundbar/surround sound system.
7.4. Connecting a DVD/Blu-ray player
There are a number of options for connecting a DVD/Blu-ray player:
With a HDMI cable
If the DVD/Blu-Ray has an HDMI connection, connect an HDMI cable (not supplied) to one of the HDMI sockets on the LCD TV. No additional cable is required for sound transmission.
With a component video cable (3 x cinch to 3.5 mm jack)
If the DVD/Blu-ray player has YUV outputs (YPbPr), it is recommended that you connect it to the YPbPr connection on the LCD TV using cinch cables and the supplied YUV adapter cable (3 x cinch (green/blue/red) to 3.5 mm jack).

PLEASE NOTE!
Use only the supplied YUV adapter.
For sound transmission, connect the supplied AV adapter to the SIDE AV connection and connect a stereo cinch cable (red and white plugs) to the corresponding sockets on the adapter and the audio inputs on the device.

PLEASE NOTE!
Use only the supplied AV adapter.
With a SCART cable
Connect a DVD/Blu-Ray player to the SCART socket using a SCART cable. No additional cable is required for sound transmission.
With an AV adapter
Connect the AV adapter with the side AV connector on the LCD TV.
Connect a stereo cinch cable (red and white plugs) between the AV adapter and the audio outputs on the external device.
Connect a video cinch cable (yellow plug) between the AV adapter and the video output on the external device.

PLEASE NOTE!
Use only the supplied AV adapter.
7.5. Connecting a video recorder
- Connect an antenna cable between the antenna socket on the LCD TV and the output on the video recorder. - Connect an additional antenna cable between the antenna input on the video recorder and the antenna socket in the wall.
You can also use a SCART cable to connect the LCD TV and the video recorder. This is recommended for high-quality picture and sound quality. If you wish to transfer stereo sound, you will need a SCART connection.
Connect the SCART cable to the SCART socket on the LCD TV.
Connect the other end of the SCART cable to the SCART OUT socket on the video recorder.
7.6. Connecting a DVD recorder
Connect one end of the SCART cable to the SCART OUT socket on the DVD recorder.
Connect the other end of the SCART cable to the SCART socket on the LCD TV.
Connect an antenna cable to the antenna socket on the LCD TV and the antenna output on the DVD recorder.
Connect an additional antenna cable between the antenna input on the DVD recorder and the antenna socket in the wall.
7.7. Connecting a receiver (SAT, DVB-T, decoder, etc.)
There are various options for connecting a receiver (e.g. SAT receiver, DVB-T receiver, decoder, set-top box) to your LCD TV.
With a HDMI cable
If the receiver has an HDMI connection, connect an HDMI cable (not supplied) to one of the HDMI sockets on the LCD TV. No additional cable is required for sound transmission.
With a component video cable (3 x cinch to 3.5 mm jack)
If the receiver has YUV outputs (YPbPr), it is recommended that you connect it to the YPbPr connection on the LCD TV using cinch cables and the supplied YUV adapter cable (3 x cinch (green/blue/red) to 3.5 mm jack).

PLEASE NOTE!
Use only the supplied YUV adapter.
For sound transmission, connect the supplied AV adapter to the SIDE AV connection and connect a stereo cinch cable (red and white plugs) to the corresponding sockets on the adapter and the audio inputs on the device.

PLEASE NOTE!
Use only the supplied AV adapter.
With a SCART cable
▶ Use a SCART cable to connect a receiver to the SCART socket. No additional cable is required for sound transmission.
With an AV adapter
Connect the AV adapter with the side AV connector on the LCD TV.
Connect a stereo cinch cable (red and white plugs) between the AV adapter and the audio outputs on the external appliance.
Connect a video cinch cable (yellow plug) between the AV adapter and the video output on the external appliance.

PLEASE NOTE!
Use only the supplied AV adapter.
7.8. Connecting a DVD/video recorder and SAT receiver
If you want to connect a DVD recorder or video recorder and a SAT receiver at the same time, you can do so as follows:
▶ Connect the receiver as described above.
Now connect the receiver using a SCART cable plugged into the SCART output on the DVD recorder and the SCART input on the receiver.
Connect an antenna cable between the antenna socket on the LCD TV and the antenna output on the recorder.
Connect an additional antenna cable between the antenna input on the DVD recorder and the antenna output on the decoder.
Connect the SAT receiver to the LNB on the parabolic antenna.
7.9. Connecting a camcorder
Connect the AV adapter cable with the side AV connector on the LCD TV.
Connect a stereo cinch cable (red and white plugs) between the AV adapter and the audio outputs on the external appliance.
Connect a video cinch cable (yellow plug) between the AV adapter and the video output on the external appliance.

PLEASE NOTE!
Use only the supplied AV adapter.
7.10. Device with HDMI or DVI output
HDMI ("High Definition Multimedia Interface") is the only interface in the area of consumer electronics that transmits audio and video data simultaneously. It handles all standard current image and sound formats, including HDTV (high-definition TV), which means it can also display resolutions of 1080p without any loss in quality.
Many consumer electronic devices, e.g. DVD players, are now equipped with HDMI or DVI outputs.
7.10.1. Connecting an external device with an HDMI output
Connect an HDMI cable (not supplied) to one of the HDMI inputs on the LCD TV and to the HDMI output of the external device.
▶ Switch the LCD TV on when the HDMI device is connected.
▶ Switch on the external HDMI playback device.
7.10.2. Connecting an external device with a DVI output
If the external device has a DVI output then you can also connect it to the HDMI input (HDMI is downwards compatible to DVI – "Digital Visual Interface"). For this you will need a HDMI-DVI adapter.
The DVI output does not transmit sound so you will also have to connect an audio cable. Connect a stereo cinch cable (red and white plugs) between the AV adapter and the audio outputs on the external appliance.
7.11. Connecting a PC
The LCD TV is connected to your PC or notebook like a monitor or additional monitor. The picture on your notebook or PC is then transmitted to the LCD TV.
Connect the LCD TV to the PC as follows:
▶ Switch both devices off.
Connect a VGA cable (monitor cable; not supplied) to the VGA input of the LCD TV and to the graphic card output of the PC or notebook.
▶ Tighten up the screws of the monitor cable with your fingers, so that the plug is correctly seated in the socket.
If you also want to send a sound signal, connect an audio cable to the side AV socket using the AV adapter.
▶ First switch on the LCD TV.
▶ Then switch on the PC/notebook.
▶ Use SOURCE to select PC mode.
The PC display appears on the LCD TV. Press the SOURCE button to return to TV mode.
If you use the LCD TV as a second monitor for your PC you might have to change the display properties of your operating system. To do this, please read the operating instructions of your PC/notebook to find out the operational requirements for using multiple monitors.
7.12. Connectinganetwork
Connecting via a router/switch/hub
▶ Use a suitable cable to connect your PC to one of the LAN connections of the router/switch/hub (e.g. LAN).

PLEASE NOTE!
To be able to use the DLNA function, the other hardware must be on the same network.
▶ Use another LAN output of the router/switch/hub (e.g. LAN) to connect your TV. Connect the LAN port on the rear of the TV to the LAN connection on the router/switch/hub.
Connecting via a network connection
Depending on your network configuration, you can connect your TV to a LAN network. To do this, use an ethernet cable to connect your TV directly to the network socket on the wall.
Via a Wi-Fi stick
If you have the option to connect to a Wi-Fi router, use a Wi-Fi stick and connect it to the USB port on the TV. To set up the Wi-Fi network, read the section "NETWORK SETTINGS" on page 34.

PLEASE NOTE!
Connect your Wi-Fi stick using the supplied USB extension cable to ensure optimum reception.
8. Via the OSD menu
8.1. Navigating in the menu
▶ Press the MENU button to activate the OSD.
▶ You can use the direction buttons ▲ ▼ to select the options from the main menu.
▶ Press OK to call up the selected option from the main menu.
▶ You can use the direction buttons ▲▼ to select the options from a menu.
▶ Use the RETURN button to move back one menu screen and back to the main menu.
▶ Use the direction buttons ◀ ▶ ▲ ▼ to enter a desired value or make another selection.
▶ Use the EXIT or MENU buttons to close the menu.
Please note that, depending on the presets, the menu closes automatically if no button is pressed.

PLEASE NOTE!
The OSD menu also displays the following options along the bottom.
You can select the following main menus:
• PICTURE menu
- SOUND menu
- SETTINGS menu
• INSTALL AND RETUNE menu
• CHANNEL LIST menu
• MEDIA BROWSER menu

PLEASE NOTE!
Due to technical changes, the menus described here may differ from the menus actually displayed on the screen.
PLEASE NOTE!
Not all menus are available, depending on the source you selected. If VGA/PC is selected as the source, other options will appear in the picture settings.

PLEASE NOTE!
After pressing MENU you can open the electronic user manual by pressing INFO.
8.2. The menu system in detail
8.2.1. Picture menu

| Menu Item Settings | |
| MODE | Select picture mode:NATURAL, CINEMA, GAME, SPORTS, DYNAMIC.This function corresponds to the PRESET button. |
| CONTRAST | Increase or decrease contrast (on a scale of 0 – 63). |
| BRIGHTNESS | Increase or decrease brightness (on a scale of 0 – 63). |
| SHARPNESS | Increase or decrease sharpness (on a scale of 0–31). |
| COLOUR | Increase or decrease colour saturation (on a scale of 0 – 63). |
| POWER SAVE MODE | If you set the energy-saving mode to ECO, the TV switches into energy-saving mode and the brightness of the TV is set to the optimum level.When the energy-saving mode is activated, the option BACKLIGHT is not available.PLEASE NOTE! In the picture mode DYNAMIC, it is not possible to activate energy-saving mode. In the picture mode DYNAMIC, it is not possible to activate energy-saving mode. |
| BACKLIGHT | Here you can use the direction buttons ◀ ▶ to set the background lighting to the levels LOW, MEDIUM, HIGH and AUTO . |
| NOISE REDUC-TION | With this function you can reduce the image noise and improve the image quality in weak analogue signals. Select between OFF, LOW, MEDIUM and HIGH. |
| Menu Item Settings | ||
| ADVANCED SET-TINGS | Advanced settings | 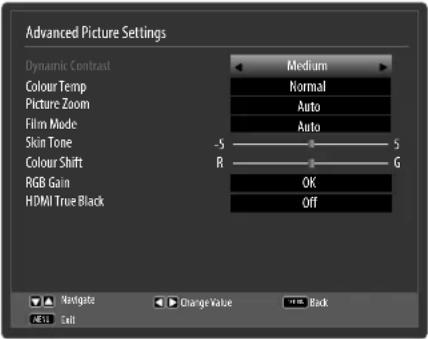 |
| DYNAMIC CONTRAST | Set dynamic contrast: LOW, MEDIUM, HIGH, OFF. | |
| COLOUR TEMP | Select colour tone: NORMAL, WARM, COOL. | |
| PICTURE ZOOM | Set the picture format here.This function corresponds to the SIZE button. | |
| FILM MODE | To play back films taken on the video camera without judder, switch the film mode to the AUTO position. | |
| SKIN TONE | Set skin tone | |
| COLOUR SHIFT | Set colour shift | |
| RGB GAIN | Set colour gain individually | |
| HDMI TRUE BLACK | HDMI TRUE BLACK (optional): If the picture is coming in via an HDMI input, this option is available in the Picture Settings menu.You can use this feature to boost the black of the images. You can set this function to “ON” to activate HDMI True Black mode. | |
| RESET | Press OK to reset all picture settings to the factory defaults. | |
EN
8.2.2. Picture menu in VGA/PC mode
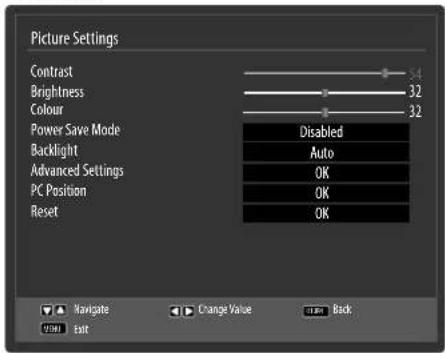
| Menu Item Settings | ||
| CONTRAST | Increase or decrease contrast (on a scale of 0–63). | |
| BRIGHTNESS | Increase or decrease brightness (on a scale of 0–63). | |
| COLOUR | Increase or decrease colour saturation (on a scale of 0–63). | |
| POWER SAVE MODE | Is disabled in this mode. | |
| BACKLIGHT | Here you can use the direction buttons ◄ ▶ to set the background lighting to the levels LOW, MEDIUM, HIGH and AUTO. | |
| ADVANCED SETTINGS | Advanced settings |  |
| DYNAMIC CONTRAST | Set dynamic contrast: LOW, MEDIUM, HIGH, OFF. | |
| COLOUR TEMP | Select colour tone: NORMAL, WARM, COOL. | |
| PICTURE ZOOM | Set the picture format here.This function corresponds to the SIZE button. | |
| FILM MODE | Function for optimised image playback during movies | |
| SKIN TONE | Set skin tone | |
| RGB GAIN | Set colour gain individually | |
| PC POSITION AUTOPOSITION | TOPOSITION | If you want to move the image, select the AUTOPOSITION entry and press OK to move it back to the centre. This should be done in the full image mode to ensure the settings match. |
| H POSITION | You can use ◀ ▶ to adjust the horizontal position of the picture. | |
| V POSITION | You can use ◀ ▶ to adjust the vertical position of the picture. | |
| DOT CLOCK | With this setting the picture signal is synchronised to match with the monitor's pixel rate. This corrects errors that can appear as vertical stripes in pixel-dense images (like tables or text with small fonts). Set the frame rate using ◀ ▶ . | |
| PHASE | If the PC picture is not clear, you can use ◀ ▶ to adjust the picture signal to suit the LCD TV pixels. This will result in a clear image with an even, sharp display. | |
| RESET | Use ▶ or OK to reset all picture settings to the factory defaults. | |
EN
8.2.3. Sound menu

| Menu Item Settings | |
| VOLUME | Standard volume settings when switching on (scale 0–63) Select a moderate volume. |
| EQUALIZER | You can select the presets MUSIC, MOVIE, SPEECH, FLAT, CLASSIC and USER in the equaliser menu. The settings in the equaliser menu can only be changed if the equaliser mode is set to USER. |
| BALANCE | Set the balance between the left and right speakers (scale -31 to +31). |
| HEADPHONE | Set the headphone volume here. This can only be changed if the setting HEADPHONE has been selected under the HEADPHONE/LINEOUT option. |
 WARNING!Using headphones/earphones to listen to a device at high volumes for an extended period can damage your hearing. WARNING!Using headphones/earphones to listen to a device at high volumes for an extended period can damage your hearing. | |
| SOUND MODE | Standard setting STEREO. If the current programme supports DUAL mode (e.g. dual-language broadcasts), you can also choose here between DUAL I and DUAL II (original language and dubbed language). |
| AVL | This function compensates for the different volume levels between different programmes. Set to OFF to hear the original volume settings. Set to ON to hear a constant volume. |
| HEADPHONE/LINEOUT | Select the audio signal for the headphones. The setting HEADPHONE allows adjustment of the volume. In the setting LINE-OUT the signal has a pre-defined volume which cannot be changed. If this setting is selected, an external amplifier can be connected to the device. |
| DYNAMIC BASS | Set the bass enhancement to ON or OFF. |
| SURROUND SOUND | Activate/deactivate the surround sound effect. |
| DIGITAL OUT | Set the audio type for the digital output here. |
8.2.4. Settings menu
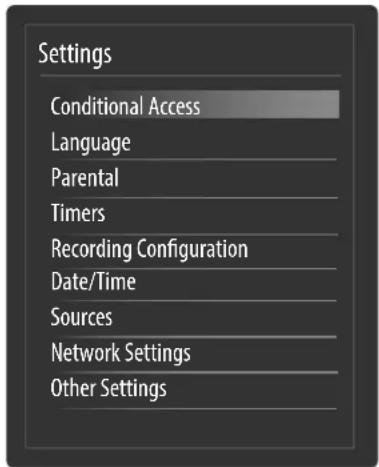
EN
| Menu Item Settings | |
| CONDITIONAL ACCESS | If you would like to watch pay channels, you must subscribe to a corresponding provider. After subscribing, your service provider will provide you with a conditional access module (CA module) and a special card. Information about the settings can be found in the documentation supplied with the module.Install the CI components in your TV as follows:► Switch the TV off and pull out the plug.► Insert the CI module into the slot on the side of the LCD TV. Afterwards, insert the card.PLEASE NOTE! Please note that you should only insert or remove the CI module when the device is disconnected from power.WARNING! Please note that you should only insert or remove the CI module when the device is disconnected from power.WARNING! The CI module must be inserted the right way round; it cannot be pushed in the wrong way round. The CI module or TV set could be damaged if you try to insert the CI module with force.► Connect the TV to the power supply, switch it on and wait a moment until the card is detected.Some CI modules require additional setup steps, which you can perform in the CONDITIONAL ACCESS menu.If no module is inserted, the message “NO COMMON INTERFACE MODULE DETECTED” appears on the screen. The CI module must be inserted the right way round; it cannot be pushed in the wrong way round. The CI module or TV set could be damaged if you try to insert the CI module with force.► Connect the TV to the power supply, switch it on and wait a moment until the card is detected.Some CI modules require additional setup steps, which you can perform in the CONDITIONAL ACCESS menu.If no module is inserted, the message “NO COMMON INTERFACE MODULE DETECTED” appears on the screen. |
| Menu Item Settings | |||
| LANGUAGE | All language settings are shown and set in the LANGUAGE SETTINGSmenu. |  | |
| MENU | Here you can choose the language for the OSD menu, in other words, for the on-screen notifications.The language changes immediately. Do not set a language you do not understand. | ||
| PREFERRED | These settings will be used if available. Otherwise the current settings will be used. | ||
| AUDIO | If a programme, e.g. a film, is broadcast in several languages, you can select the spoken language here (e.g. original language). | ||
| SUBTITLE | If the programme includes subtitles for the hard-of-hearing, you can set the preferred language here. | ||
| TELETEXT | The default setting isWEST. If you are in another language region, you can change the language setting:WEST, EAST, CYRILLIC, TURK/GRE or ARABIC. | ||
| GUIDE | If there are several languages available for the programme guide, you can use this option to select your preferred language. | ||
| CURRENT AUDIO | Here you can set the audio language of the current programme (if more than one language is supported). | ||
SUBTITLES Here you can set the subtitles for the current programme (if available). | |||
| PARENTAL | If you confirm this with OK, a dialogue box will open. A password (or the locking key) is requested. On delivery of the equipment, this password is set to "0000". If the password is entered correctly, the dialogue box for security settings opens. | ||
| MENU LOCK | The MENU LOCK setting locks or unlocks menu access. You can block access to the installation menu or disable the entire menu system. | ||
| CHILD LOCK | If the child lock is activated, the TV can only be operated via the remote control. In this case, the buttons on the operating panel on the TV are all disabled (with the exception of the standby/on button). If the child lock is activated, you can switch the TV to standby mode with the standby/on button.To switch the TV back on, you will need the remote control. When a button is pressed, the message "CHILD LOCK ON" appears on the screen while the menu remains hidden. | ||
| SET PIN | Set a new PIN number. Use the number buttons to add a new PIN number. You must re-enter the new PIN code to confirm.IMPORTANT! Make a note of the new PIN. Otherwise the device must be reset to the factory defaults and all settings and channel listings will be lost. Make a note of the new PIN. Otherwise the device must be reset to the factory defaults and all settings and channel listings will be lost. | ||
| TIMERS | You can use the SLEEP TIMER to programme the device to switch off automatically. You can set the time in 30-minute increments (maximum 2 hours). The sleep timer countdown begins immediately after the setting has been made. Select OFF to deactivate the function. |  | |
| NETWORK TYPE | Setting the reception type (DVB-T, DVB-C or analogue). | ||
| TIMER TYPE | TIMER or RECORD.In the TIMER menu you can enter the beginning and the end times of a programme you do not want to miss. Proceed as follows:Press the yellow button to add a programme to the timer, or, if the programme already exists, the green button to edit the settings.The timer function can be used to switch to another channel at a pre-set time (when the device is switched on). If the device is in the stand-by mode, the analogue sound and image signals will be played back via the SCART connection at the set time. The device will, however, not switch on. In this way, you can record a programme on a video recorder, for example, while in standby mode. In this case, the LED on the front of the device flashes.If you choose the RECORD setting, a hard drive or a USB stick must be connected to the USB port. The programmed broadcast will then be recorded onto this medium.NOTE! If the USB stick malfunctions and an error message is displayed (for instance, insufficient memory capacity, even though the stick is empty) it can be formatted by the LCD TV using the menu option RECORDING CONFIGURATION > FORMAT DISK. If the USB stick malfunctions and an error message is displayed (for instance, insufficient memory capacity, even though the stick is empty) it can be formatted by the LCD TV using the menu option RECORDING CONFIGURATION > FORMAT DISK. | ||
| CHANNEL | Select the channel. | ||
| RECORD TYPE | This is preset and cannot be changed. | ||
| DATE | Enter the date.Use the number buttons to change digits in the square brackets. | ||
| START | Enter the start time. | ||
| END | Enter the end time. | ||
| DURATION | The duration is determined automatically. | ||
| REPEAT | Select the intervals at which the timer is to be repeated. | ||
| CHANGE/DELETE | If DISALLOWED is selected, a lock icon appears. In this case, you can only open the entry with the PIN. | ||
| PLAYBACK | Activate/deactivate playback. Selecting the setting ALLOWED will allow you to play back recordings. | ||
 NOTE!Please note that a storage medium must be connected. NOTE!Please note that a storage medium must be connected. | |||
| Menu Item Settings | |||
| RECORDING CONFIGURATION (PVR) | In the SETTINGS menu, select the RE-CORDING CONFIGURATION option to set up the recording configura-tion. |  | |
| START EARLY: Here you can specify that the recording is to begin before the set start time.END LATE: Here you can specify that the recording is to stop before the set end time.MAX TIMESHIFT: Here you can set the max. timeshift time The timeshift function allows you to use II to pause playback during recording or to rewind or fast forward using the ◀ and ► buttons. The recording will continue unaffected in the background. The maximum time off-set can be set here.AUTO DISCARD: You can set the automatic deletion of recordings with this option. The fol-lowing options are available:- DISCARD: None / Oldest / Longest / Shortest- UNPLAYED: Included / Not included. A selection is only possible if Oldest, Longest or Shortest have been selected under the option "DISCARD".HARD DISK INFORMATION: To show details about the USB hard drive, select this option and press OK. Hard drive information includes details such as how much storage space is still available.FORMAT DISK: Select the menu option FORMAT DISK. To do this, you must now en-ter the PIN. The default PIN is 0000. The message "THIS WILL REMOVE ALL RECORD-INGS AND TIMERS" appears. Select YES if you want to start the formatting or NO to can-cel the operation. Confirm with OK. | |||
| You can use the Media Buttons to operate the recording and playback functions directly. | Starting recording | ||
| To start playback | |||
| Pause playback | |||
| Stop playback | |||
| The player does not work | |||
| Fast backward | |||
| Fast forward | |||
| The player does not work | |||
| Menu Item Settings | |||
| DATE/TIME | Here you can change the time settings. | ||
| DATUM / TIME: Display the set date and time. The entries cannot be changed. | |||
| TIME SETTINGS MODE: If you change the setting from AUTO to MANUAL, you can adjust the selected time zone forwards or backwards by full hours. | |||
| TIME ZONE: Only active if the previous point has been set to “MANUAL”.Select the value with ◀ ▶ . The current time will be changed accordingly. | |||
| SOURCES | In this menu you can activate/deactivate or select the source. Deactivate a source by selecting it and pressing ◀ ▶ . Deactivated sources do not appear in the pick list that opens when you press SOURCE.If you want to rename a source, press the red button (ZOOM). Afterwards, you can then change the name using the direction buttons ◀ ▶ ▲ ▼. | ||
| NETWORK SETTINGS | Here you can select the network type WIRELESS DEVICE or WIRED DEVICE.If you are using USB Wi-Fi dongles, choose the option WIRELESS DEVICE as your net-work type and confirm with OK. The television will scan for available wireless networks. Select the desired network. If this is secured, you must enter the network password. See also the documentation that came with your wireless router.If you have selected the setting WIRED DEVICE, a dynamic connection is automatically created as soon as you connect the LCD TV to the Internet.You can also enter a static IP address. To do this, press the green button to access the ADVANCED menu. Here you can use the number buttons to enter the required IP address to connect your TV to the Internet. Using the red button, you switch between DYNAMIC and STATIC . | ||
| OTHER SETTINGS |  | ||
| MENU TIMEOUT | Here you can set the time after which the OSD menu automatically closes. | ||
| SCAN ENCRYPTED CHANNELS | If you want to search for encrypted channels, select YES. If you only want to search for free channels ("free-to-air"), select NO. | ||
| HBBTV | Select the setting ON to enable the option of viewing HbbTV content via the Internet.This service must be available in your region | ||
| BLUE BACKGROUND | If the LCD TV is not receiving a signal the screen will turn blue rather than show "snow" or a black background. | ||
| SOFTWARE UPGRADE | Here you can find the latest software for the TV and update it.The update takes around 30 minutes. Do not interrupt the process. The search progress is displayed. | ||
| SOFTWARE VERSION | Version display. | ||
| HARD OF HEARING | If the channel broadcasts special audio signals for the hearing-impaired,you can change the setting to ON to receive these signals. | ||
| AUDIO DESCRIPTION | If the channel broadcasts special audio signals for the visually impaired,you can change the setting to ON to receive these signals. | ||
| AUTO TV OFF | Here you can set the time interval for the auto shutdown function. Once the interval is reached, the TV will switch off. | ||
| STANDBY SEARCH | If this function is set to ON, the TV will search for available channels while it is in standby mode. If the device finds any new or not yet stored channels, a menu appears in which you can accept or reject the changes. | ||
| MEDIA RENDERER | Switching on the media renderer. This function allows the exchange of data with other multimedia devices such as PCs, smartphones, cameras, etc. | ||
| POWER UP MODE | Select the power-on mode STANDBY or LAST STATE. When you press the Power button, this turns the device on in standby mode or re-trieves the most recently selected setting. | ||
| VIRTUAL REMOTE | Activate/deactivate the virtual remote control. This allows the operation of the TV via other devices. | ||
| DYNAMIC CHANNEL UP-DATE | Activate/deactivate the automatic channel update. | ||
8.2.5. Install and Retune menu
Install and Retune
Automatic channel scan (Retune)
Manual channel scan
Network channel scan
Analogue fine tune
First time installation
| Menu Item Setting | |
| AUTOMATIC CHANNEL SCAN (RETUNE) | The automatic channel search function helps you to search for and save new channels on your TV.A number of search options are available.Once you have selected the search option, press OK. Confirm the query with YES and press OK to start the channel search.Press MENU to cancel the search prematurely. In this case, any found channels will not be saved. |
| MANUAL CHANNEL SCAN | This function is used for the direct entry of channels or satellite transponders. |
| NETWORK CHANNEL SCAN | Selection between digital cable and/or DVB-T channel groups. This searches for related channels to the currently selected station. The information sent in this respect is independent of the selected channel and leads to different resultsNOTE! The existing channel list is replaced when the network search is started. The existing channel list is replaced when the network search is started. |
| ANALOGUE FINE TUNE | Here you can fine-tune analogue channels. |
| FIRST TIME INSTALLATION | This function is similar to the initial installation that occurs after switching on for the first time. NOTE!Carrying out the first time installation again will reset all settings back to factory defaults, including the PIN. NOTE!Carrying out the first time installation again will reset all settings back to factory defaults, including the PIN. |
8.2.6. Channel list menu

The channel list is the place where you manage your channels. In this menu, the following options are available:
- Edit channel list
- Favourites
• Active channel list
Edit channel list

Scroll through entire channel list
▶ Use the direction buttons ▲ ▼ to select the previous or next channel.
To scroll up or down a page, you can use the P+ button or the P- button.
▶ If you would like to watch a particular channel, mark it with the direction buttons ▲▼ and then press the OK button.
Moving a channel within the channel list
▶ Use the direction buttons ▲ ▼ to select the channel you want to move.
▶ Use the direction buttons ◀ ▶ to select the function MOVE.
The MOVE function appears in the lower menu bar next to the OK entry.
▶ Press OK; a dialogue box will open.
Enter the channel number you want and press OK. If the position is already occupied, you will be asked if you want to move the channel anyway.
▶ Select YES and confirm your selection with OK. The channel will be entered and the other channel will be shifted down one position.
▶ Select NO and confirm your selection with OK. The channels remain where they are.
Deleting channels from the channel list
▶ Use the direction buttons ▲ ▼ to select the channel you want to delete.
▶ Use the direction buttons ◀ ▶ to the select the function DELETE in the channel list menu.
The DELETE function appears in the lower menu bar next to the OK entry.
▶ Press OK to delete the selected channel from the channel list.
After this, the following message appears on the screen:
„THE SELECTED SERVICE WILL BE PERMANENTLY DELETED. ARE YOU SURE?“
▶ Select YES and confirm your selection with OK. The channel will be deleted and the channel list is updated.
▶ Select NO and confirm your selection with OK. The delete operation is cancelled.
Rename channels
▶ Use the direction buttons ▲ ▼ to select the channel that you want to rename.
▶ Use the direction buttons ◀ to the select the function EDIT NAME in the channel list menu. The EDIT NAME function appears in the lower menu bar next to the OK entry.
▶ Press OK to rename the selected channel.
Now you can use the directional buttons ◀ to jump to the previous or next character
▶ Use the direction buttons ▲ ▼ to move through the character set (scroll).
▶ Confirm the change and update the channel list with OK.
To cancel the editing press the MENU button, save the new name by pressing OK.
Lock channel
You can use the lock function to password protect access to certain channels. To lock a channel, you have to know the password (default password on delivery: 0000, it can be changed in the SETTINGS > PARENTAL menu).
▶ Select the channel to be locked with the direction buttons ▲▼.
▶ Select the LOCK option with the direction buttons ◀ ▶.
Now press OK; a password window appears. The message: ENTER PIN appears.
▶ Enter the PIN number. A lock icon appears behind the locked channel in the channel list.

PLEASE NOTE!
To activate the channel lock, the device must first be turned off once.
You can now lock more channels by selecting them with the direction buttons ▲▼ and confirming with OK. A lock icon appears behind every locked channel in the channel list.
To unlock the channel, proceed in the same way as locking. After you enter the PIN, the lock icon behind the selected channel disappears and it is unlocked.
Set channel list filter
You can use a filter to carry out a targeted search for specific channels or sort according to custom criteria.
Press the blue button to open the channel list filter. There are a number of various filter criteria available.
Depending on the selected filter, the corresponding selection is shown in the channel list.
Favourites

EN
You can set various channels as favourites; in this way when scrolling through the channels you need only show your favourite TV channels.
To set a favourite, select the entry FAVOURITES in the CHANNEL LIST menu.
Now press the OK button; the FAVOURITE LIST menu is displayed on the screen.
How to add a channel to your favourites list
▶ Use the direction buttons ▲▼ to select the channel that you want to add to the favourites list.
Press the OK button to add the channel to the favourites list. The favourite icon appears behind the channel.
▶ Repeat the process as required for additional channels.
You also have the option to select the channels with the yellow button (individually) or the green button (all) and add them to the favourites list with the OK button.
Removing channels from the favourites list
▶ Use the direction buttons ▲▼ to select the channel with the favourite icon that you want to remove from the favourites list.
▶ Press the OK button to remove the channel from the favourites list. The favourite icon disappears.
▶ Repeat the process as required for additional channels.
You also have the option to select the channels with the yellow button (individually) or the green button (all) and remove them from the favourites list with the OK button.
Calling up/using/exiting the favourites list
▶ Activate the favourites list with the FAV button. The favourite icon appears next to the channel name in the programme information.
▶ Use the P+ button or the P- button to call up channels in the favourites list.
Pressing the FAV button again deactivates the favourites list; all of the channels in the channel list are now available again.
Active channel list
You can select the kinds of channels that appear in the channel list. In the ACTIVE CHANNEL LIST submenu you can set the channel type.
8.2.7. Media browser menu
If you connect a USB data medium to the LCD TV, you can play music files, images and videos.

CAUTION!
Notes on using USB devices
Under certain circumstances, some USB devices (MP3 players) may not be compatible with this LCD TV.
Connect the USB device directly. Do not use any separate cables as these can lead to compatibility issues.
Do not pull out the USB device while a file is playing.
Quick connection and disconnection of USB devices is dangerous. In particular, you should not unplug and reconnect the USB device repeatedly in quick succession. This can lead to physical damage to the USB device and, in particular, to the LCD TV itself.
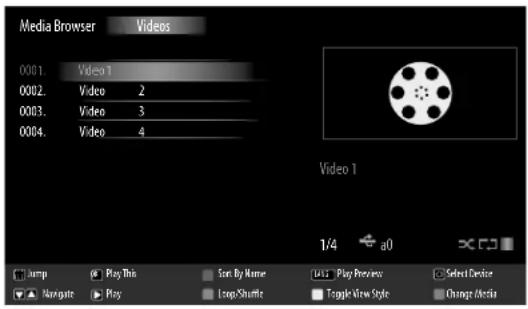
Connect the USB data medium and press the MEDIA button on the remote control. The media browser screen appears. In addition, you can also open the media browser via the function of the same name in the main menu. The following choices are available:
• VIDEOS - To play back video files
0..9: Jump
OK: Play selection
RED BUTTON: Sort by name
LANG: Play preview
☐SWAP): Select device (if several USB or network drives are available)
▼ ▲ : Navigate
▶ : Play
GREEN BUTTON: Continuous/Random
YELLOW BUTTON: Change view
BLUE BUTTON: Change media type
• PHOTOS - To play back photo files
▼ ▲: Navigate
0..9: Jump
OK: View full screen
▶ : Slide show
GREEN BUTTON: Preview image
RED BUTTON: Sort by date
YELLOW BUTTON: Change view
BLUE BUTTON: Change media type
(QSWAP): Select device (if several USB or network drives are available)

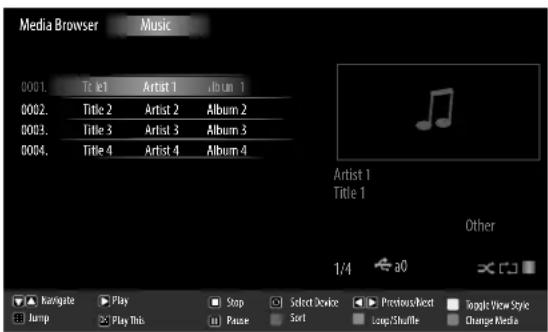
• MUSIC - To play music files
▼ ▲: Navigate
▶ : Play
■: Stop
(SWAP): Select device (if several USB or network drives are available)
◀ ▶ : Back/forwards
YELLOW BUTTON: Change view
0..9: Jump
OK: Play selection
II : Pause
RED BUTTON: Sort
GREEN BUTTON: Continuous/Random
BLUE BUTTON: Change media type

PLEASE NOTE!
If a certain file type is not available on the USB data medium, a corresponding message will be displayed.

PLEASE NOTE!
The ○ (SWAP) option will only be displayed if several USB connections and/or networks are available.
- ALL 3 - Play back all media types
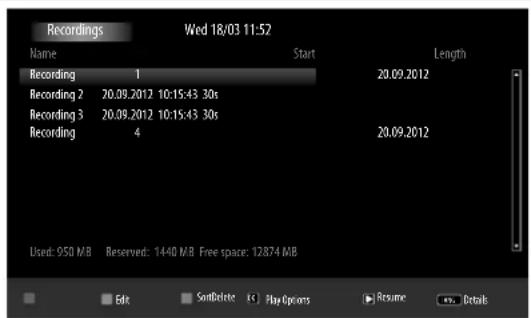
- RECORDINGS - In this option, the recorded programmes on the connected USB stick/USB hard drive can be displayed and played back.
RED BUTTON: Delete
GREEN BUTTON: Edit
BLUE BUTTON: Sort
OK: Playback options
▶ : Continue
LANG: Details
- SETTINGS - Go to the settings for the media browser
Depending on the selected option, various different functions are available. These are shown on the lower part of the screen.
▶ To exit the media browser, press the MENU button.
Use DLNA network service
The DLNA network service allows data exchange between devices that support the DLNA function.
▶ Connect the LCD TV to a network.
▶ Switch on the LCD-TV and open the MEDIA BROWSER via the menu.
▶ Select the SETTINGS option.
▶ Under VIEW STYLE, select the option FOLDER.
▶ Press the RETURN key to return to the main menu of the media browser.
▶ Select the desired media type and confirm with OK. All available networks are listed.
▶ Select the desired media server or the network you want to access. All available files are displayed.

PLEASE NOTE!
The available commands are shown on the lower edge of the screen.
DLNA software download
You can download the free DLNA software via the link http://www.nero.com/mediahome-tv. Install the DLNA software on your PC, notebook or similar multimedia device to access all your photos, audio and video files on your LCD TV, simply and wirelessly via the network.
9. PVR function
You can use your LCD TV to record TV programmes on a USB data medium (e.g. USB stick). You can record directly, with a time delay or at programmed times. Channels that are decrypted with a CI+ module cannot be recorded.
Before you can make a recording, select the appropriate settings in the menu SETTINGS > RECORDING CONFIGURATION.
9.1. Start/stop recording directly
▶ First, select the TV channel that you want to record.
▶ Press the ● button (red). The recording starts.
To stop the recording, press ■. A message appears. Stop the recording completely with YES or press NO to resume recording.
9.2. Programming recording
You can programme the device to record programmes at a defined time, see the menu
SETTINGS > TIMERS.
9.3. Playing back recordings
The recorded programmes are played back on the media player. All programmes can be found on the corresponding data medium via the RECORDINGS menu.
10. EPG – Programme guide
Use the EPG button to open the electronic programme guide.
The table shows the current programme as well as the next programme for the available channels.
▶ Use ▲ ▼ to select a channel and scroll through the channel offering with ◀ ▶.

PLEASE NOTE!
The displayed program information is provided by the broadcasters. If no programme information is displayed, this is not an error on your LCD TV.
The following table shows the options for the PROGRAM GUIDE
| Button Item Function | ||
| ▲▼<▶ | NAVIGATION | You move through the programme guide using the direction buttons. |
| RED BUTTONPREV | DAY | Calls up the programme for the previous day.This is only possible up to the current day. The programme for the past will not be displayed. |
| GREEN BUTTONNE | XT DAY | Calls up the programme for the following day. |
| YELLOW BUTTONZ | OOM | Shrink time window |
| BLUE BUTTONFILTER | ER | If you are looking for a specific programme, you can use a filter to re-strict the selection. |
| SELECTGENRE | Set the category for the displayed programmes. | |
| INFOEVENT | DETAILS | Shows a detailed description of the selected programme (if available).Press INFO again to hide the description.If the description is a little longer, scroll through the text using the +P-buttons. |
| 0...9 | JUMP | Use the number buttons to select another channel. |
| OK | OPTIONS | While the selected channel is running, only the option KANAL WÄHLEN is available. Press the OK button to change the channel.If the selected programme is in the future, the option TIMER FÜR SENDUNG EINSTELLEN is also available. Select this option to add this channel to the timer. |
| SEARCH | Search for programmes Set the day here as well as the category. | |
| ○(SWAP) | NOW | Jump back to the current timeline. |
| ●/■ | REC./STOP | Starting/stopping a PVR recording |
11. Media portal
Use the Internet button 📋 to access the media portal. Here you have access to news, social networks, games, shopping and much more via the pre-installed applications. An Internet connection is required for this function.
Use the direction buttons ◀ ▶, ▲ and ▼ to scroll through the different apps and confirm your selection with the OK button.
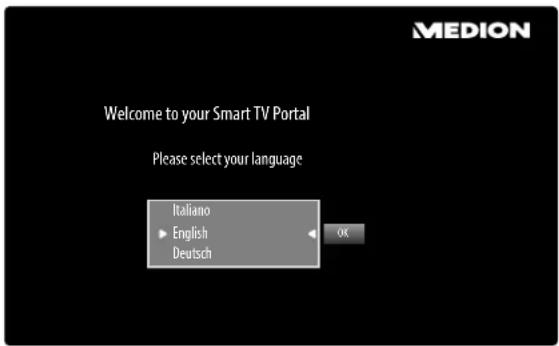
▶ After pressing the Internet button ⚙ select the desired language.

PLEASE NOTE!
The start view of the media portal appears only on first use or after a reset of the media portal under SETTINGS.
Afterwards, the home screen of the media portal appears where a preselection of certain apps is displayed. The following options can be selected here:
| Red button [ZOOM] | REGISTER | Here you can register as a new user. Alternatively you can use the Internet site medion.fxmconnect.com. |
| Green button [REPEAT] | ADD FAVOURITE | Press the green button to add the currently selected app to your favourites.PLEASE NOTE! This function cannot be selected until you have registered as a user under REGISTER. This function cannot be selected until you have registered as a user under REGISTER. |
| Yellow button [ROOT] | SETTINGS | Here you can specify which language areas the apps should be selected from. In addition, you can reset the portal so that the home screen of the portal is reset to the factory default. |
| Blue button [TITLE] | HELP | Here you will find guidance on using the media portal |
▶ You can press the Internet button 📋 (or the RETURN button) at any time to exit the app and return to the home screen. Use the EXIT button to exit the media portal and switch to normal TV operation.
11.1. Media library
You will also find the media library in the media portal. Enjoy numerous video clips and other media files from the internet, which have already been sorted for you according to genre and date and are constantly updated. Select your favourites and find individual entries again conveniently using the search function. An Internet connection is required for this function.
Use the direction buttons ◀ ▶, ▲ and ▼ to navigate through the media library.
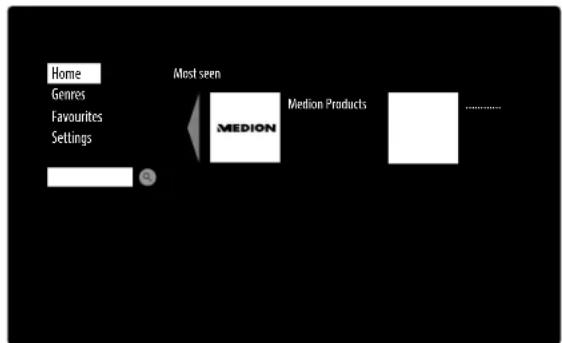
| HOME PAGE | The most frequently watched media files are listed here. |
| GENRES | Here you will find a list of media files sorted by genre. |
| FAVOURITES | Here, all the files are displayed that you have previously marked as favourites.▸ To add a media file as a favourite, select it, press the OK button and then the green button [REPEAT]. A star appears on the right-hand side of the screen.▸ To remove media files from the favourites list, select them and press the red button [ZOOM]. The star on the right-hand side of the screen disappears.▸ The blue button [TITLE] brings you back to the selection. |
| SETTINGS | Here you can set the language for the media library. |
12. HbbTV system
HbbTV (Hybrid Broadcast Broadband TV) enables a combination of broadcasting and Internet content that can usually be accessed and displayed by the red button on the remote control.
HbbTV services include standard radio/TV stations, catch-up TV, video on demand, EPG, interactive advertising, customisation options, polls, games, social networks and other multimedia applications.
HbbTV applications cannot be called up unless the broadcaster sends these signals and there is an Internet connection on the TV. The scope and operation vary depending on the channel and the broadcaster.
Whether a broadcaster offers HbbTV applications or not, is shown via a brief on-screen display. The exact form and the location is dependent on the individual applications. Use the red button to open and close the application pages. Navigate within the applications using the colour buttons on the remote control; this can vary depending on the channel and the programme. Pay attention to the messages within the applications.
13. Internet
The Open Browser is an app in the media portal and provides you access to the Internet. After opening, predefined web pages and their logos are shown that you can select directly. You can use the keyboard functionality to enter URL addresses directly or control web pages via the activated search function. Use the arrow keys ◀ ▶ on the remote control to navigate through the options and confirm your selection with OK.

PLEASE NOTE!
Note that Internet pages with Flash content are not supported by the Open Browser. It is also not possible to download content.
14. MEDION® Life Remote App
The MEDION® Life Remote app is the innovative way to operate your MEDION® television from your smartphone via your home network.
The MEDION® Life Remote application makes use of the properties of your mobile phone – such as touch screen capability and G sensor – to provide easy-to-use, convenient and improved options for operating your MEDION® LCD TV. Not only that: you also have the option of operating your television via touch pad and directly entering text when calling up Internet pages.

PLEASE NOTE!
Please note that the television to be controlled must be in the same network as the smartphone.
Apple QR code Android QR code

Scan the QR code to install the app directly onto your smartphone or tablet.

15. Data protection MEDION® Smart TV
Your Internet-capable TV provides an Internet service function (HbbTV, portal and Open browsing). These functions enable you to access services, content, software and products provided by third parties in the Internet. In addition, you have access to open Internet content. Your device checks automatically whether new software versions are available for your device. In the process, your device sends out the IP address, the software version and the MAC address of the device. This data is required to make use of the software update service.
Access to applications in the portal or via HbbTV can, depending on the provider, require a registration, setting up a user account and/or a subscription. Registration may require the provision of personal data and the selection of a unique and secret password. Please check the privacy policy of the vendor beforehand.
MEDION® shall not be liable if the HbbTV, the portal or a service does not comply with the user's requirements, nor is it able to guarantee that such a service can be used safely and error-free without restriction, and in particular without interruption, at the required time.
MEDION ® shall not be liable for the information or content provided via HbbTV, the portal or the open Internet, nor for their use or reliability. When you purchase your Smart TV, special guarantees are provided. The validity of these guarantees, including the related disclaimers, remains in force.
If you have any further questions on the topic of data protection or on how to use your Smart TV, contact MEDION® via the heading Data protection on the www.medion.com website.
16. Troubleshooting
Malfunctions can sometimes have quite trivial causes, but on other occasions they are the result of defective components. We would like to give you a few options for rectifying your problem. If these tips don't do the trick, then we'll be more than pleased to help you out. Just give us a call!
| Fault Solution | |
| There is no picture and no sound. | Check if the power cable is inserted properly into the socket and connected properly to the device.Check if the signal receiver is set toTV.Check to ensure the switch on the power cable is on. |
| There is no picture. There is no AV picture. | Check to ensure the contrast and brightness settings are correct.Check if all external devices have been connected properly.Check to ensure you have selected the correct AV source.Any input source that you want to select withAVmust be marked in the SOURCESmenu. |
| There is no sound.Ensure that the volume has not been set to the minimum level.Ensure the mute setting is not active. To do this, press the button with the crossed-out speaker symbol in the upper left-hand corner of the remote control.If you have connected a satellite receiver or DVD player to the TV set via a SCART cable, check whether the cable is seated firmly in the SCART socket. | |
| There is no picture and no sound. I can hear noise, though. | The reception might be poor. Check if the antenna is connected properly. |
| The picture is not clear.The reception might be poor.Check if the antenna is connected properly. | |
| The picture is too bright or too dark. | Check the settings for contrast and brightness. |
| The picture is not sharp.The reception might be poor.Check if the antenna is connected properly.Check the settings for sharpness and noise reduction in thePICTURE menu. | |
| There is a double/triple picture.Check if the antenna is aligned properly.Waves might be reflected off buildings or mountains. | |
| The picture is pixellated. | There might be interference from cars, trains, power lines, neon lights, etc.There might be interference between the antenna and power cables. Position the cables further apart. |
| There are stripes on the display or the colours are faded. | Is there interference from another device?Transmission antennae on radio stations, amateur radios and portable phones can also cause interference.Operate the device as far as possible from the device that might be causing the interference. |
| The buttons on the device are not working properly. | The child lock might be on. |
| No reception/poor reception over a wireless network connection (Wi-Fi) | Check whether your USB Wi-Fi dongle is connected to the device.Ensure that all necessary settings have been made.Connect the USB Wi-Fi dongle to the device using a USB extension cable and align this for optimum reception. |
| The remote control does not work | Check if the batteries are fully charged and have been inserted in the right direction.Ensure the sensor field is not exposed to strong light.Switch off the device at the power cable and then on again. |
16.1. Do You Need More Help?
If the suggestions in the previous section did not rectify your problem please contact us. The following information would help us:
• What is the MD Number?
• What external devices are connected?
• What messages appear on the screen?
- When operating the device, at which step did the problem occur?
- If you have a PC connected to the device:
– How is your computer configured?
- What software were you using when the problem occurred?
- What steps have you already taken to try and rectify the problem?
- Please provide your customer number if you have one.
17. LED-Backlight TV pixel faults
Despite the most modern production methods, the highly complex technology involved in producing this type of device means there may be individual or multiple pixel drop-outs (dead pixels). This is rare, however.
For active matrix TFTs with a resolution of 1920 x 1080 pixels, which are each made up of three sub-pixels (red, green, blue), there are a total of approx. 6.2 Mio. control elements in use. Occasionally one or more pixels can fail or become incorrectly controlled because of this very high number of transistors and the associated extremely complex manufacturing processes used.

| Pixel fault class Defect type | type 1continuouslylit pixel | Defect type 2continuouslyblack pixel | Defect type 3Defect sub-pixel | |
| lit black | ||||
| 0 | 0 | 0 | 0 | 0 |
| I | 1 | 1 | 2 | 1 |
| 1 | 3 | |||
| 0 | 5 | |||
| II 2 | 2 | 5 | 5-n* | 0 |
| 0 | 2xn* | |||
| 10 | ||||
| III | 5 | 15 | 50 | 0 |
| 50-n* | 2xn* | |||
| 0 | 100 | |||
| IV | 50 | 150 | 500 | 0 |
| 500-n* | 2xn* | |||
| 0 | 1000 | |||
n*=1.5
The permitted number of faults of the above-mentioned types in every fault class is based on a number of one million pixels and must be recalculated in accordance with the actual physical resolution of the display.
Your device complies with the European ISO 9241-307 Class II standard (class of pixel defect).
18. Cleaning
You can increase the lifespan of your device as follows:

WARNING!
Always unplug the unit and disconnect all cables before cleaning.
- To protect the LED-Backlight TV from scratches, protective film has been applied to the high-gloss finish. Remove the films after you have set up the LED-Backlight TV set correctly.
- If the high-gloss finish becomes dirty, wipe off the dust first. Then wipe down gently with a cleaning cloth. If you do not wipe off the dust first, or if you apply too much pressure when wiping down the high-gloss finish, you could scratch the high-gloss finish.
- Do not use solvents, corrosive or aerosol detergent to clean.
- Clean the screen with a soft, lint-free cloth.
- Ensure that no water droplets remain on the LED-Backlight TV. Water droplets may result in permanent discolouration.
- To avoid damage to the equipment, water must not be allowed to get into the interior of the device.
- Do not place the screen in strong sunlight or near ultraviolet light.
- Store the packaging material in a safe place; only use this box to transport the LED-Backlight TV.

ATTENTION!
None of the parts inside the housing require cleaning or maintenance.
19. Disposal

Packaging
Your device has been packaged to protect it against transportation damage. Packaging materials are raw materials and can therefore be reused or recycled.
Device
Old devices should not be disposed of with the normal household rubbish. In accordance with Directive 2012/19/EU, the device must be properly disposed of at the end of its service life. This involves separating the materials in the device for the purpose of recycling and avoiding any impact on the environment. Take old devices to a collection point for electrical scrap or a recycling centre. Contact your local waste disposal company or your local authority for more information on this subject.

Batteries
Do not dispose of used or defective batteries in the household rubbish. Batteries should be taken to a collection point for used batteries.
20. Technical Data
| LED-Backlight TV | MEDION* |
| Device name: P17102 (MD 30911) | |
| Nominal voltage 220 - 240 V ~ 50 Hz | |
| Screen size 106.4 cm/42" LCD; 16:9 display | |
| Power consumption max. 75 watts | |
| Power consumption on standby < 0.50 W | |
| Power consumption in off mode 0.01 W | |
| Speaker output 2 x 8 W RMS | |
| Physical resolution: 1920 x 1080 | |
| TV system Pal B/G, D/K, I; Secam L,L' | |
| Programme positions 199 (ATV), 800 (DTV) | |
| Bands | |
| VHF (bands I/III) | |
| UHF (band U) | |
| HYPERBAND | |
| CABLE TV (S1–S20) / (S21–S41) | |
| HD DVB-T | |
| DVB-T2 | |
| HD DVB-C | |
| Connections | |
| Antenna connection (analogue TV, DVB-T, DVB-T2 or DVB-C) | |
| 2 x USB ports | |
| 1 x LAN RJ45 | |
| Video | |
| 3 x HDMI in with HDCP decoding | |
| 1 x SCART | |
| 1 x VGA (15 pin D-Sub) | |
| AV in (3.5 mm mini jack to cinch adapter) | |
| YPbPr in (YUV) (3.5 mm mini jack to cinch adapter) | |
| Audio | |
| Stereo audio in for AV/YPbPr (YUV)/PC (3.5 mm mini jack to cinch adapter) | |
| Headphone output (3.5 mm jack) | |
| Digital audio output (SPDIF, coax.) | |
EN
| Drives/storage media | |
| Drives USB, Common Interface (CI+) Slot | |
| Supported formats via USB4 | Photo: JPG, JPEG, JPE, BMP, PNG |
| Music: MP3, WMA, WAV | |
| Film: MPEG 1/2/4, MKV, Xvid, MOV, MP4, DAT, VOB, H263, FLV | |
| Capacities: USB max. 1 TB | |
| Remote control | |
| Transmission type: Infrared | |
| LED class 1 | |
| Battery type 2 x 1.5V AAA (R03/LR03) | |
| Dimensions/ambient temperatures | |
| Permissible ambient temperature 5°C-35°C | |
| Permissible relative humidity 20%-85% | |
| Dimensions without stand(W x H x D) | approx. 965 x 572 x 98 mm |
| Dimensions with stand(W x H x D) | approx. 965 x 618 x 220 mm |
| Weight with stand approx. 9.0 kg | |
| Weight without stand approx. 10.0 kg | |
| Wall mounting Vesa standard, hole spacing 200 x 200 mm | |
| MSN | |
| LED-Backlight TV | MD30911, MSN 3001 8577 |
| Wi-Fi dongle | Wistron, Vezzy 200, MSN 4004 4275 |



www.tuv.com ID 1000000000
20.1. Product data sheet
As per regulation 1062/2010.
EN

Power consumption on standby 0,34 W
Power consumption in the OFF mode 0.01 W
Physical resolution: 1920 x 1080
21. Legal Notice
Copyright © 2015
All rights reserved.
This operating manual is protected by copyright.
Mechanical, electronic and any other form of reproduction is prohibited without the written permission of the manufacturer
Copyright is owned by the company:
Medion AG
Am Zehnthof 77
45307 Essen
Germany
The operating manual can be reordered via the service hotline and is available for download via the service portal at www.medion.com/gb/service/start/.
You can also scan the QR code above and download the operating manual onto your mobile device via the service portal.
22. Index
A
Automatic shutdown 35
B
Batteries....7
C
Channel guide 15, 16, 37
Channel list ....37
Child lock 31,38
CI module 10,29
Cleaning....48
Connecting devices 19
Connection....6
Aerial 14
Device with HDMI 21
Power supply 14
Soundbar/surround sound system ....19
D
DLNA....22,41
E
EPG 42
Equalizer 28
F
Factory settings
LCD TV 36
Favourites....39
Front....9
Full HD 4
H
HbbTV....44
Headphones....19,28
|
Initial operation 13
Installation 13
Installation location 8
Internet 44
L
Language 30
Life Remote App 45
M
Media browser 40
Media library 43
Media portal 43
Menu....23
N
Network 22,34
0
Operating safety 5
Operation....16
OSD menu 23
P
Password....31, 38
Pixel faults ....47
Portal....43
Power supply 6
Connecting power supply 14
Product data sheet 51
PVR....33
R
Receiver....20
S
Safety instructions ....5
Connection....6
Operating safety 5
Power supply 6
Screen settings 16
Selecting the source 17
Settings 29
Setting the volume 16
Software update ....35
Station search 15,36
T
Technical data 49
Teletext....18
Colour buttons 18
Number buttons 18
Programme selection key 18
Sub-pages 18
Troubleshooting 46
U
USB 10,40
W
Wi-Fi 15,22,34
MEDION®
- Table of contents
- About these Instructions....3
- Safety Instructions....5
- Device Overview....9
- Start of Operation.... 13
- Operation 16
- Teletext....18
- Connecting devices 19
- Via the OSD menu 23
- PVR function....41
- EPG – Programme guide....42
- Media portal 43
- HbbTV system 44
- About these Instructions
- Warning Symbols and Keywords
- Proper use
- Full HD
- Contents
- WARNING!
- Safety Instructions
- Operating Safety
- CAUTION!
- Set-Up Location
- Repairs
- Intended Environment
- Safety when connecting
- 2.6.PowerSupply
- Battery Handling
- Information about Conformity
- Device Overview
- Front
- Rear and right-hand side
- PLEASE NOTE!
- Remote Control
- Start of Operation
- Unpacking
- Installation
- Inserting Batteries into the Remote Control
- Connecting the antenna
- NOTE!
- Connecting powersupply
- Switching the LCD TV on and off
- Channel search when switching on for the first time
- Search type setting: Antenna
- Search type setting: Cable
- Operation
- Channel selection
- Sound settings
- 5.3.Screensettings
- Displaying information
- Displaying Information
- Opening the favourites list
- Selecting the source
- Teletext
- Using teletext
- 6.1.1.Selectingateletextpage
- Number buttons
- Scrolling through pages
- Colour buttons
- Subpages
- INDEX
- Connecting devices
- Connecting headphones
- Digital amplifi er via coaxial connection
- Connecting a soundbar/surround sound system
- On the SPDIF Coax. OUT connection
- Via the headphone output
- Via the SCART connection
- Connecting a DVD/Blu-ray player
- With a HDMI cable
- With a component video cable (3 x cinch to 3.5 mm jack)
- With a SCART cable
- With an AV adapter
- Connecting a video recorder
- Connecting a DVD recorder
- Connecting a receiver (SAT, DVB-T, decoder, etc.)
- Connecting a DVD/video recorder and SAT receiver
- Connecting a camcorder
- Device with HDMI or DVI output
- Connecting an external device with an HDMI output
- Connecting an external device with a DVI output
- Connecting a PC
- Connectinganetwork
- Connecting via a router/switch/hub
- Connecting via a network connection
- Via a Wi-Fi stick
- Via the OSD menu
- Navigating in the menu
- The menu system in detail
- Picture menu
- Picture menu in VGA/PC mode
- Sound menu
- Settings menu
- Install and Retune menu
- Channel list menu
- Edit channel list
- Scroll through entire channel list
- Moving a channel within the channel list
- Deleting channels from the channel list
- „THE SELECTED SERVICE WILL BE PERMANENTLY DELETED. ARE YOU SURE?“
- Rename channels
- Lock channel
- Set channel list filter
- Favourites
- How to add a channel to your favourites list
- Removing channels from the favourites list
- Calling up/using/exiting the favourites list
- Active channel list
- Media browser menu
- Notes on using USB devices
- Use DLNA network service
- DLNA software download
- PVR function
- Start/stop recording directly
- Programming recording
- Playing back recordings
- EPG – Programme guide
- Media portal
- Media library
- HbbTV system
- Internet
- MEDION® Life Remote App
- Data protection MEDION® Smart TV
- Troubleshooting
- Do You Need More Help?
- LED-Backlight TV pixel faults
- Cleaning
- ATTENTION!
- Disposal
- Packaging
- Device
- Batteries
- Technical Data
- Product data sheet
- Legal Notice
- Index
- A
- B
- C
- D
- E
- F
- H
- |
- L
- M
- N
- 0
- P
- R
- S
- T
- U
- W
- MEDION®
Brand : MEDION
Model : LIFE P17102 (MD 30911)
Category : Television