
MD 33332 - Television MEDION - Free user manual and instructions
Find the device manual for free MD 33332 MEDION in PDF.


| Product Type | LCD TV |
| Brand | Medion |
| Model | MD 33332 |
| Display Size (Diagonal) | 32 inches (81 cm) |
| Resolution | 1366 x 768 (WXGA) |
| Brightness | 500 cd/m² |
| Contrast Ratio (Typical) | 1200:1 |
| Response Time | 8 ms |
| Viewing Angle (H/V) | 178° / 178° |
| Power Supply | AC 230 V ~ 50 Hz |
| Power Consumption (Operating) | < 200 W |
| Power Consumption (Standby) | Approx. 3 W |
| TV System | PAL / SECAM / B/G / D/K / I / L / L' |
| Audio System | Multi-Stereo / NICAM |
| Channel Storage | 100 channels |
| Antenna Input | 75 Ohm (RF IN) |
| Connections | 1x RF, 1x VGA (D-SUB), 2x HDMI, 2x SCART, 1x YPbPr, 1x S-Video, 1x AV (CVBS), 1x PC Audio, 1x Headphone |
| Dimensions (W x H x D) with Stand | 810 x 620 x 245 mm |
| Weight (with Stand) | Approx. 15 kg |
| Features | HD Ready, Teletext, Sleep Timer, Child Lock, OSD Multi-Language, Multiple Picture & Sound Modes, Auto Format, Blue Screen, Dynamic Contrast |
| Included Accessories | Remote Control, 2x AAA Batteries, Power Cord, Documentation |
Frequently Asked Questions - MD 33332 MEDION
User questions about MD 33332 MEDION
0 question about this device. Answer the ones you know or ask your own.
Ask a new question about this device
Download the instructions for your Television in PDF format for free! Find your manual MD 33332 - MEDION and take your electronic device back in hand. On this page are published all the documents necessary for the use of your device. MD 33332 by MEDION.
USER MANUAL MD 33332 MEDION
Notes on this manual....3
HD ready 3
Service....3
Purpose of use ....3
Included in the box 3
Safety instruction ....4
Operating Safety 4
Point of use 4
Repair....4
Intended Environment....5
Power Supply 5
FCC Compliance Statement 5
Batteries and Proper Treatment....6
Get to know the device....7
Control elements....7
Connections 8
Examples of connections 9
Video recorder....9
DVD Player via SCART....9
DVD Player via Y Pb Pr 10
Receiver (SAT, DVB-T, decoder, etc.), DVD recorder.... 10
Computer / devices with a digital output (e.g. HDMI)....11
Remote Control 12
Setting Up 13
Unpacking....13
Installing the batteries 13
Connecting an antenna....13
Connecting the power supply 13
First installation 13
Basic functions 14
Turning the LCD TV on and off 14
Navigating within the Menu....14
Country Setting....14
Language setting....15
Automatic channel search (RF IN aerial connection) 15
Channel selection....15
Sound settings 15
Setting the picture....16
Picture format 16
Picture setting....16
Displaying information....16
Selecting the signal source 16
Teletext....17
To operate Teletext....17
Select Teletext pages 17
Number keys [20] 17
PGUP / PGDW buttons [12].... 17
SUBPAGE [12] 17
Colour buttons [13] / Fastext 17
Useful features for Teletext 17
INDEX [12]....17
SIZE [12] 17
REVEAL [12] 17
CANCEL [12] / Concealed search 18
▶II HOLD [16].... 18
The OSD menu....19
Menu PICTURE 19
Menu SOUND 19
Menu ADVANCE....20
Menu SYSTEM 20
Menu TV-CHANNEL....21
Video recorder manual storage 21
The OSD in the PC mode....22
Menu PC 22
Menu SOUND 22
Menu GEOMETRY....22
Menu SYSTEM 23
Troubleshooting....24
Do you require additional Support? 25
Maintenance....25
Recycling 25
Specifications 26
Pixel errors with LCD TVs....26
Copying this manual....27
Notes on this manual
Read these instructions carefully under all circumstance and follow all the instructions listed. You will guarantee the reliable operation and a long life expectancy of your LCD TV in this way. Always keep these instructions at hand, close to your LCD TV. In the event that you transfer ownership of this LCD TV, please provide these instructions to the new owner.
HD ready
- Your LCD-TV is equipped with the 'HD ready' feature. This means that it can transmit high resolution television programmes (HDTV) in principle. It is the prerequisite that an HDTV signal is sent to the LCD TV by an external set-top box (HD-STB).
Service
Contact us (cf. the service address on the back of these Instructions for Use) if problems with your LCD TV arise. Furthermore, you will find useful information regarding troubleshooting on page 24 of this manual.
Purpose of use
- This device serves to receive and transmit television channels. The different connection possibilities (receiver, DVD player, DVD recorder and VCR, etc.) will enable an additional expansion of the sources of reception and transmission (Receiver, DVD-Player, DVD-Recorder, Videorecorder etc.).
• This device is only suitable for using in dry, internal rooms. - This device is intended for personal use only. It not intended for commercial use in a heavy industry environment. Use under extreme environmental conditions can result in damage to your device.
Included in the box
- LCD Television
- Connection cable
- Remote control incl. 2 batteries type R03 (AAA) 1,5V
- Documentation
Note!
Use only the supplied power cord.
Safety instruction
Operating Safety
- Do not allow children to play unattended on electrical equipment. Children may not always correctly recognize danger.
- Keep the packing materials, such as foil away from children. The danger of suffocation could arise in the case of misuse.
- Never open the housing of the TFT display (electric shock, short-circuit and the danger of fire)!
- Do not insert any objects through the slots and openings into the inside of the TFT (electrical shock, short-circuit and the danger of fire)!
- Slots and openings in the TFT display are for ventilation purpose. Do not cover these openings, as otherwise this may lead to overheating (overheating, danger of fire)!
- The remote control has a class 1m infrared diode. Do not examine the LED with optical instruments!
- Never exert pressure on the display. This could damage the display.
- An injury hazard exists when the display breaks. Wear protective gloves to pack the broken parts and send them into your service center for proper disposal. Then wash your hands with soap, because it is possible for chemicals to escape.
- Do not touch the display with your fingers or with sharp objects to avoid damage.
Please proceed as outlined in the service center section:
- if the AC cable overheats or is damaged
- if liquid has gotten into the display
- if the device does not work properly
- if the device is dropped or the housing damaged
Point of use
- In the first hours of operation, new devices may emit a typical, unavoidable but completely harmless smell, which will decline increasingly in the course of time.
We recommend you to ventilate the room regularly, in order to counteract the formation of the smell. During the development of this product, we have made sure that the applicable limits are clearly fallen below.
- Keep your LCD TV and all units connected to it away from moisture and avoid dust, heat and direct sunlight. Failure to observe these instructions can lead to malfunctions or damage to the LCD TV.
- Do not operate your device in the open air, because external influences, such as rain, snow, etc. could damage the device.
- Do not subject the device to drops or splashes of water and do not place any vessels filled with water, such as vases, on the device. Water penetrating the device can impair its electrical safety.
- Do not place any open sources of fire (candles or similar objects) on the device.
- Pay attention to sufficiently large clearances in the wall cupboard. Maintain a minimum clearance of 10 cm around the device for sufficient ventilation.
- Place and operate all units on a stable, level and vibration-free surface in order to avoid the LCD TV from falling.
- Avoid dazzle, reflections, extreme light/dark contrast in order to save your eyes and ensure a pleasant, ergonometric work station.
- The optimum viewing distance is approx. 3-5 times the screen diagonal.
- Furniture today is coated with a wide variety of paints, varnishes and plastic finishes, and treated with a broad spectrum of cleaning and polishing products. As a result there is always a slight possibility that some of these substances may contain ingredients that will attack and soften the rubber feet on the bottom of the device. You may wish to place a non-slip mat under the device.
Repair
- Leave all repairs of your LCD TV to authorized and qualified personnel only.
- Should a repair be necessary, please contact one of our authorized service center only.
Intended Environment
- The device can be operated at an ambient temperatures of between +41°F and +95°F (5°C to 35°C).
- Provide an interval of at least one meter from high-frequency and magnetic sources of interference (television sets, loudspeakers, mobile telephones, etc.) in order to avoid malfunctions and data loss.
- After transporting your LCD TV please wait until it has assumed the ambient temperature before connecting and switching it on. Extremely high variations in the temperature or humidity may result in condensation forming on the inside of the LCD TV which could cause an electrical short-circuit.
- Pull the plug out of the socket and the aerial cable from the aerial socket during a thunderstorm or if the television will not be used for a longer period.
Power Supply

Please pay attention: Pats of the device are still live, even if the mains switch is switched off. Pull the mains plug out of the socket, to interrupt the power supply to your LCD TV or to release the device from voltage completely.
- Operate your TFT display mains (power supply) only on grounded sockets with 230 V \~ 50 Hz.
- For additional safety we recommend use of an excessive voltage protection device to protect your LCD TV from damage resulting from voltage surges or lightning.
• To interrupt the display from mains (power supply) disconnect the plug from the socket. - The power socket must be in the vicinity of your LCD TV and within reach of the power cables.
- You should lay the TFT Display cables in a manner that no one can trip or step on it.
• To avoid damage of cable do not place any objects or furniture on the cable.
FCC Compliance Statement
This equipment has been tested and found to comply with the limits for a Class B digital device, pursuant to Part 15 of FCC Rules. These limits are designed to provide reasonable protection against harmful interference in a residential installation. This equipment generates, uses, and can radiate radio frequency energy and, if not installed and used in accordance with the instructions, may cause harmful interference to radio communications. However, there is no guarantee that interference will not occur in a particular installation. If this equipment does cause harmful interference to radio or television reception, which can be determined by turning the equipment off and on, the user is encouraged to try to correct the interference by one or more of the following measures:
- Reorient or relocate the receiving antenna.
- Increase the separation between the equipment and receiver.
- Connect the equipment into an outlet on a circuit different from that to which the receiver is connected.
- Consult the dealer or an experienced technician for help.
Changes or modifications not expressly approved by the party responsible for compliance could void the user's authority to operate the equipment. Shielded interface cables, if any, must be used in order to comply with the emission limits.
Batteries and Proper Treatment
Batteries may contain combustible materials. By misuse, this may cause battery leakage, heat, explosion or ignition, bringing about injury or damage to the device. Please observe strictly the following matters:
- Keep children away from batteries. If by any chance, the batteries are swallowed, consult a doctor immediately.
- Do not charge batteries (except rechargeable batteries).
- Do not forcibly discharge batteries.
- Do not short-circuit batteries.
- Do not heat or dispose off in fire.
- Do not disassemble or deform batteries. Your hands and fingers may be injured, or the liquid of the battery may get into your eyes or adhere to your skin. If this happens, rinse with a large quantity of water immediately and consult a doctor.
- Do not expose batteries to strong impact by dropping or throwing the batteries.
- Do not reverse the positive (+) and negative (-) terminals to avoid short-circuit.
- Do not mix used and new or different types of batteries together.
- Remove promptly the used batteries from the device.
- Remove the batteries from your device if it is not to be used for a longer period.
- Clean the battery and device contacts, if necessary, before inserting batteries.
- Replace all batteries with new batteries of the same type at the same time.
Get to know the device
Control elements

| Control | Function |
| CH+/CH-/P+/P- | Change the channel by means of these buttons. |
| V+/V- | Press to turn up or turn down the volume. |
| TV/AV/INPUT | Call up the list of the sources available with this button. You will change between the PC, HDMI 1, HDMI 2, TV, AV, S-VIDEO, SCART1, SCART2 (AV), SCART2 (YC) and YPBPR reception sources with the CH+/CH-/P+/P- buttons. |
| MENU | Call up the OSD 1 menu with this button, in order to make changes on your device. |
| POWER (STANDBY) | Put the device into operation while switched off;While switched on: switch to the Standby Mode. |
| Operation indicator | Shines red, if the device is in the Standby Mode.Shines green, if the device is switched on. |
| Main switch Switch the device off completely by means of this button. | |
Connections

| Connection | Possible connections |
| POWER | Connect the mains connection cable supplied with the device here. |
| HDMI 1 | HDMI input for the connection of devices with an HDMI output, e. g. DVD player, SAT or DVB-T receiver, computer, etc.You will need an HDMI cable (not in the scope of the delivery) for this connection. |
| HDMI 2 | HDMI input for the connection of devices with an HDMI output, e. g. DVD player, SAT or DVB-T receiver, computer, etc.You will need an HDMI cable (not in the scope of the delivery) for this connection. |
| VGA | VGA inputVGA input for the connection of devices with a VGA output, e. g. computer, etc.You will need a SCART cable (not in the scope of the delivery) for this connection. |
| PCAUDIO | Audio input for PC (VGA) |
| CVBS (AV) | Video input |
| Y/PB/PR | Y/Pb/Pr component inputComponent input for the connection of devices with a component output, e. g. DVD player, SAT or DVB-T receiver, video camera, computer, etc.You will need a component cable (not in the scope of the delivery) for this connection. |
| L / R | Audio inputConnect the left and the right audio channel of the source (e.g. camcorder), the sound of which you want to transmit through the LCD TV, here. |
| SCART 1 | SCART connectionSCART input for the connection of devices with a SCART input, e. g. DVD player, video recorder, SAT or DVB-T receiver, games consoles, etc.You will need a SCART cable (not in the scope of the delivery) for this connection. |
| S-VIDEO | S-Video input |
| RF IN | Aerial connectionConnect the aerial cable (not in the scope of the delivery) here. |
| PHONE | Connect headphones or earphones here with a 3.5 mm TRS stereo connector to be able to hear the sound from your device via this connection. The main loudspeaker will remain switched on. Using this appliance at full volume for extended periods of time may cause damage to the hearing capacity of the listener. Using this appliance at full volume for extended periods of time may cause damage to the hearing capacity of the listener. |
| SCART 2 | SCART connectionSCART input for the connection of devices with a SCART input, e. g. DVD player, video recorder, SAT or DVB-T receiver, games consoles, etc.You will need a SCART cable (not in the scope of the delivery) for this connection. |
Examples of connections
Video recorder
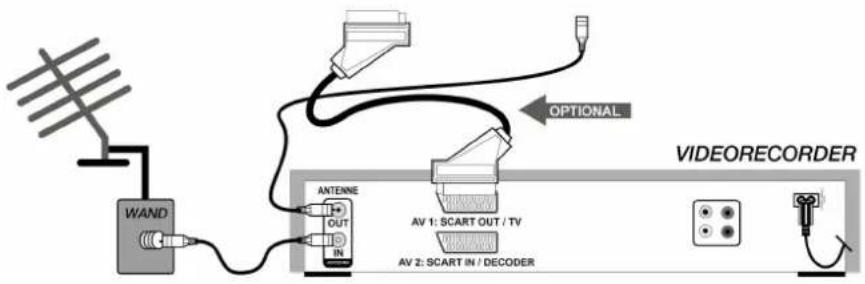
Connect an aerial cable to the aerial socket of the LCD TV and the aerial output of the video recorder, if you want to connect a video recorder to the LCD TV. Connect another aerial cable to the aerial input of the video recorder and the aerial socket on the wall.
Alternatively, you can connect the LCD-TV and the video recorder with a SCART cable. This is advisable for a high picture and sound quality.

DVD Player via SCART
Connect a DVD player with a SCART cable.


DVD Player via Y Pb Pr
Connect a DVD player with Y - PB - PR and AUDIO L - R (left - right). You will need a green/blue/red Component cable for this connection for the video link, as well as a red/white RCA cable for the audio link.


Receiver (SAT, DVB-T, decoder, etc.), DVD recorder
Connect a device that is intended to be used as a receiver for the LCD TV (e. g. SAT receiver, DVB-T receiver, decoder, set-top box) or a DVD recorder to the SCART socket, with a SCART cable.
Apart from this, connect the aerial cable as described in the 'Video recorder' section (see above).


Computer / devices with a digital output (e.g. HDMI)
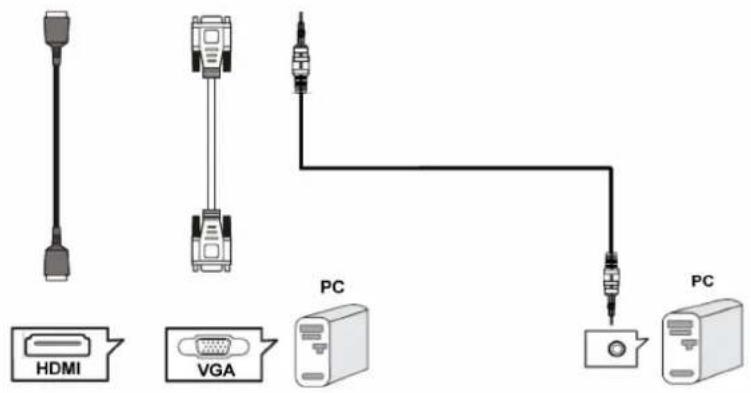
Connect a computer with a VGA cable. If your computer has a SCART, COMPONENT or HDMI output, you will be able to transmit the computer display by means of one of these connections.

flowchart
graph LR
    A["Hybrid"] --> B["PC"]
    C["HDMI"] --> D["VGA"]
    D --> E["PC"]
    E --> F["PC"]
Note
Only choose one possibility, in order to avoid problems with the signal allocation, even if your computer offers several connection possibilities.
Remote Control

- no function
- no function
- no function
- Mono / Stereo / Dual sound
- Mute
- Input selection Call up the list of the sources available with this button. You will shift between the PC, HDMI, TV, SCART1, SCART2, YPBPR1 and YPBPR2 sources of reception with the ▲▼ directional keys.
- Exit menu
- Call up the Menu; back to the previous Menu
- Previous channel Switch back to the channel displayed previously.
- ◀ ▶ ▲ ▼ directional keys for navigation within the Menus OK - You will have to confirm your selection with this button in some Menus.
- CHANNEL + / - You will select the next (+) or the previous (-) channel in the Television Mode. You will select the next (+) or the previous (-) page in the Videotext Mode.
- Teletext buttons: PGUP = Teletext previous page PGDW = Teletext next page TXT = Switch video text on/off INDEX = index page SIZE = Enlarge video text REVEAL = Show concealed text SUBPAGE = sub-page CANCEL = Fade video text out
- Teletext: Coloured buttons for navigation within video text
- Select picture format: AUTO, 16:9, ZOOM1, ZOOM2, 4:3, PANORAMA
- SLEEP function: time setting for switching the device off automatically
- Teletext: hold teletext page
- INFO: For displaying information, such as the current channel number and the picture format.
- VOLUME + / - For increasing (+) or decreasing (-) the volume.
- Select double-digit channels
- Number keys Television mode: channel selection; Teletext mode: Entry of the three-digit numbers, with which the page is selected.
- Select audio mode: FILM, MUSIC, USER, STANDARD
- Select picture mode: FILM, VIVID, USER, STANDARD
- STANDBY button button, for switching the LCD TV on/off.
Setting Up
Note
Read the Safety Information Chapter from Page 1 ff under all circumstances before bringing the device into operation.
Unpacking
- Please keep the packaging material well and use it exclusively to transport the television.
Installing the batteries
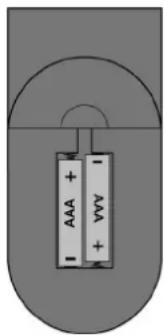
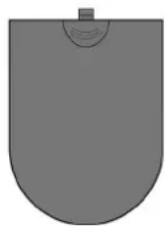
- Open the battery compartment of the remote.
- Install two AAA size, type R03 batteries according to the correct polarity (marked in the battery compartment).
- Close the battery compartment.
Attention!
Remove the batteries from the remote, if the device will not be used for a longer period. The remote could be damaged by leaking batteries.
Connecting an antenna
- Connect the aerial socket and the television device to the RF IN connection with a doubly screened aerial cable (not in the scope of the delivery) for the connection to the external aerial or the cable plant.
Connecting the power supply
- Plug the power supply cable into the power supply socket of the device.
- Connect the mains connection cable supplied with the device to a well accessible 230 V \~ 50 Hz mains socket.
First installation
When turning on the LCD TV for the first time an automatic programme search window pops up. Enter in SYSTEM SETTING the affordable information concerning COUNTRY and LANGUAGE and start the AUTO TUNE with YES.
Basic functions
Turning the LCD TV on and off
- Put the main switch on the lower section of the television in the 'I' (ON) setting. The device will go into Standby Mode and the display on the front will shine red.
- Press either the STANDBY button on the device or on the remote to switch the device on.
- After some seconds picture and sound will appear.
- You will switch the device back to the Standby Mode with the STANDBY button.
- Put the main switch on the lower section of the television in the '0' (OFF) setting, in order to switch the device off completely.
Navigating within the Menu
- Press the MENU button [8], in order to activate the OSD.
- Select the options from the Main Menu with the ▲/▼ directional buttons.
- Confirm the option selected from the Main Menu and open the sub-menu with the ▲/▼ directional buttons.
- Select the options from the sub-menu with the ▲/▼ directional buttons.
- Confirm the option selected from the sub-menu in which you want to make changes or settings with the ▲/▼ directional buttons.
- Set the required vale or make a different selection with the ▲/▼ directional buttons.
- You will return to the superordinate Menu with the MENU button [8].
- You will close the Menu and confirm the selection at the same time with the EXIT button [7].
Note
Please pay attention to the fact that the Menu will close automatically after approx. 15 seconds, if no button has been pressed.
Country Setting
- Press the MENU button [8] on the remote control.
- Select the TV- CHANNEL Menu point (5th Menu point in the Main Menu strip on the left of the picture [MAIN MENU] with the ▼ directional button.
- Confirm with the ▶ directional button. The COLOR SYSTEM entry will be emphasized.
- Select the COUNTRY Menu point with the ▼ directional button.
- Select the country that you require with the ◀ ▶ directional buttons.
- Confirm your selection with the OK button.
- Press the button EXIT [7], to exit the OSD menu.
Language setting
The OSD of your LCD TV is set to English in the delivery status. Set the OSD to the language that you require as follows:
- Press the MENU button [8] on the remote control.
- Select the SYSTEM Menu point (4th Menu point in the Main Menu strip on the left of the picture [MAIN MENU] with the ▼ directional button.
- Confirm with the ▶ directional button. The SPLEEP TIMER entry will be emphasized.
- Select the OSD LANGUAGE Menu point with the ▼ directional button. The OSD Menu will be faded out and the OSD LANGUAGE ENGLISH strip will appear on the screen.
- Select the language that you require with the ◀ ▶ directional buttons.
- Confirm your selection with the OK button. The OSD will appear.
- Press the button EXIT [7], to exit the OSD menu.
Note
The Menu will close automatically if you do not press a button for longer than 15 seconds when operating the OSD. However, you can vary the length of the display. Read the 'Menu SYSTEM Menu' on Page 20 for this.
Automatic channel search (RF IN aerial connection)
- Press the MENU button [8] on the remote control].
- Select the TV-CHANNEL Menu point (5th Menu point in the Main Menu strip on the left of the picture [MAIN MENU] with the ▼ directional button.
- Confirm with the ▶ directional button. The COLOR SYSTEM entry will be emphasized.
- Select the AUTO TUNE Menu point with the ▼ directional button.
- Confirm with the ▶ directional button. The APS YES entry will be emphasized.
- Confirm with the ▶ directional button, in order to start the automatic channel search. A bar showing the course of the search will appear on the screen. Wait for the search to finish. It will take several minutes. Press the EXIT button to interrupt the process.
- The channels will be deposited in channel positions in a country-specific sequence. 100 channels can be stored.
Note
You will be able to change the sequence of the channel positions according to your requirements. Read how you can sort the channels under the PROGRAM INSERT Menu point in the in the 'TV-CHANNEL Menu' section from Page 21.
The channel search will be made by means of the respectively connected device, in the case of devices connected through SCART or Component. Use the Instructions for Use of the signal source connected (e.g. DVB-T receiver or SAT receiver) as an aid.
Channel selection
- Press either one of the CH+ / CH- buttons on the device or one of the CHANNEL buttons [11] on the remote, or select the channel directly by means of a number key, in order to select a channel. Enter the two numbers rapidly one after the other for a double digit number.
- You will select the channel broadcast most recently with the Ⓢ button [9].
Sound settings
- You will increase or reduce the volume with the VOLUME volume buttons [18] on the remote or V+/V- on the device.
- Press the Ⓗ button [5] to switch the sound off or on again completely. The MUTE message will appear on the screen.
- You will choose between MONO and STEREO output with the NICAM button [4]; DUAL A and DUAL B. DUAL A and DUAL B will only be able to appear if the current broadcast supports the DUAL Mode (e.g. in the case of dual-language broadcasts).
Setting the picture
Picture format
You will be able to switch between the following picture formats with the 📄 Picture Format button [14]:
- AUTO: The format transmitted will be set to the input signal automatically or the full picture will be presented.
• 16:9: The picture will be presented in the 16:9 format.
• ZOOM1/ZOOM2: Enlarged presentation.
• 4:3: The picture will be presented in the 4:3 format. - PANORAMA: The 4:3 picture will be stretched at its left and right edges, in order to fill the screen; the upper and lower edges will be rather reduced at the same time.
Picture setting
- You will choose between the MOVIE, VIVID, USER and STANDARD Picture Modes with the →|→|← button [22].
Displaying information
- Press the i button [17], in order to have the channel position and name displayed.
- You will receive the same information if you switch to a different channel.
Selecting the signal source
- You will call up the list of the available sources with the TV/AV / INPUT button on the device or the 📋 button [6] on the remote. The following sources of a signal will be available to you:
• PC: Device at the VGA socket
• HDMI 1: Device at the HDMI 1 socket
• HDMI 2: Device at the HDMI 2 socket
• TV: Operation with RF IN socket
• AV: TV or aerial operation
• S-VIDEO: Device at the S-VIDEO socket
• SCART1: Device at the SCART connection 1
• SCART2 (AV): Device at the SCART connection AV
• SCART2 (YC): Device at the SCART connection YC
- YPBPR: Device at the Component connection
- You will switch between to sources of input with the CH +/CH - / P+/P- buttons or the ▲/▼ directional buttons on the remote.
Teletext
Teletext is a free service that is broadcast by the majority of television stations and offers current information in relation to news, the weather, television programs, share prices, subtitles and other subjects. Your LCD TV offers many useful functions for operating Teletext and multi-page text, storing sub-pages or fast navigation.
To operate Teletext
- Select a TV station on which Teletext is being transmitted.
- Press the TXT [12] once to appear the Teletext screen.
- The device will be switched back to the TV Mode by pressing the TXT button [12] again.
Select Teletext pages
Number keys [20]
- Enter the video text page required directly as three-digit number with the number keys.
- The page number selected will be displayed in the upper left corner of the screen. The video text counter will search until the page number selected has been found.
PGUP / PGDW buttons [12]
- Switch backwards and forwards through the video text pages with PGUP and PGDW [12].
SUBPAGE [12]
- Some video text pages contain sub-pages. For example, 1/3 will be displayed at the lower edge of the screen. The sub-pages will be faded in successively at intervals of approx. 30 seconds.
You will also be able to call up the sub-pages yourself by pressing the Ⓔ button. A four-digit entry field, into which you will be able to enter the number of a sub-page (e.g. 0002), will appear.
Colour buttons [13] / Fastext
- You will be able to select the content directly, by pressing the corresponding RED, GREEN, YELLOW and BLUE colour buttons, if coloured text entries have been inserted at the lower edge of the picture.
Useful features for Teletext
INDEX [12]
- Press this button to select the index page that displays the list of Teletext contents.
SIZE [12]
Select double height text.
- Press the SIZE button to enlarge the top half of the page.
- Press the SIZE button again to enlarge the bottom half of the page.
- Press the SIZE button once more to return to the normal display.
REVEAL [12]
- Press the REVEAL button once to display concealed information, such as solutions of riddles, puzzles, or a quiz.
- Press the REVEAL button again to conceal the revealed answers.
CANCEL [12] / Concealed search
In the Teletext mode, pressing the CANCEL button, will switch the screen to the TV mode while waiting for the next text page.
- Select required page number in Teletext mode.
- Press the CANCEL button to switch to TV mode while waiting for the text page. A field with the page number searched for and hyphens that will rotate as long as the search lasts will appear in the left upper corner.
- The page number will replace the hyphens as soon as the page required has been found.
- Press the CANCEL button again to display the required page.
HOLD [16]
The video text page that you have selected will possibly contain more information than will fit on the screen. The information will be divided between several sub-pages in this case. The sub-pages will succeed each other at regular intervals.
- Press the ▶ button [16], in order to prevent the page changing automatically. A symbol will be displayed at the left lower corner of the screen and the automatic page change will be interrupted.
- Press the ▶ button [16] again, to permit the automatic page change again.
The OSD menu
The OSD in the LCD TV Mode will be described in the following. Other options, which you can look up from Page 22, will be available to you in the PC Mode.
Note
The Menus described here can deviate from those on your screen because of possible technical changes.
Menu PICTURE
| Menu point Setting | |
| PICTURE MODE | USER: The Picture settings set by the user. |
| STANDARD: Standard setting. | |
| MOVIE: Optimized the film picture. | |
| VIVID: Optimized the vivid pictures. | |
| CONTRAST | Reduce or increase the contrast (0 – 100). |
| BRIGHTNESS | Reduce or increase the brightness (0 – 100). |
| HUE | Reduce or increase the colour intensity (0 – 100). (only in the case of NTSC) |
| SATURATION | Reduce or increase the saturation (0 – 100). |
| SHARPNESS | Reduce or increase the sharpness (0 – 100). |
| COLOR | NORMAL: Normal colouring. |
| WARM: Increases the proportion of warm colours. | |
| COOL: Increases the proportion of cold colours. | |
| SCALE | AUTO: The format transmitted will be set to the input signal automatically or a full picture will be presented. |
| 16:9: The picture will be presented in the 16:9 format. | |
| ZOOM1/ZOOM2: Enlarged presentation. | |
| 4:3: The picture will be presented in the 4:3 format. | |
| PANORAMA: The 4:3 picture will be stretched at the left and right edges, in order to fill the screen; the upper and/or the lower edge will be rather cut off at the same time. | |
Menu SOUND
| Menu point Setting | |
| SOUND MODE | USER: the Tone sound settings set by the user. |
| STANDARD: Standard setting. | |
| MOVIE: Increases the film sound. | |
| MUSIC: The optimized setting for music. | |
| BASS | Setting the bass tones (0 – 100). |
| TREBLE | Setting the high tones (0 – 100). |
| BALANCE | Setting the balance between the left and the right loudspeakers (0 – 100). |
| MTS | Switching between Mono / Stereo |
| EQUALIZER | You will select a frequency band (120 Hz, 500 Hz, 1K5 Hz, 5K Hz, 10K Hz) with ▲/▼. |
| You will set the value of the frequency band selected with ◀/►. | |
Menu ADVANCE
| Menu point Setting | |
| 3D NR | Switch the noise suppression on/off. |
| TXT LANGUAGE | The presetting is WEST. You will be able to change the language setting to EAST, RUSSIAN, ARABIC or FARSI if you live in a language area with a different alphabet. |
| AUTO FORMAT | ON / OFF |
| SCART2 OUT | Set the output signal of SCART2 |
| CHILD LOCK | Activate the relevant child protection by means of a password. The standard password is 0000. Use the 9538 master password, if you have changed the password and mislaid it. |
| BLUE SCREEN | A blue screen will be displayed, if no signal is received in the case of a channel, if this option is set to ON. |
Menu SYSTEM
| Menu point Setting | |
| SLEEP TIMER | Select a period of time, after which the device will switch off independently. You will be able to set the time in steps (maximum 2 hours) with the directional buttons. The sleep timer period will begin immediately after the setting with ◀ ▶. |
| OSD LANGUAGE | Select the language of the OSD Menu. It will change immediately. |
| OSD H - POSITION | Set the horizontal position of the OSD. |
| OSD V - POSITION | Set the vertical position of the OSD. |
| OSD DURATION | Set when the OSD should be faded out if the device is not being used. |
| INFORMATION | Displays the firmware version of the OSD. |
| RESET | You will reset the factory setting by means of this Menu point. All settings made manually will be deleted. The values will now be in the status at delivery. The list of channels will be retained. |
| DYNAMIC CONTR. | Set the background lighting related to the screen content, when dynamic contrast is on. |
Menu TV-CHANNEL
| Menu point Setting | |
| COLOR SYSTEM | Auto, PAL, SECAM |
| SOUND SYSTEM | Auto, B/G, I, D/K, L, L' |
| AUTO TUNE | Automatic channel search |
| COUNTRY | GERMANY, SWITZER, BELGIUM, NETHER, UK, IRELAND, DENMARK, FINLAND, ITALY, ... |
| MANUEL PROGRAM | You will be able to carry out a manual channel search here.1. Select the channel position under the CHANNEL point.2. Go to the SEARCH option and start a search of the frequency band downwards or upwards with the ◀ ▶ directional buttons. The search will stop and the STORE option will be marked each time that a channel is found.3. Store the channel with OK. .You will be able to make a further fine tuning in the FINE TUNING Menu point (see below). |
| ORGANIZE | You will see the channels currently stored in the channel table. The channels will appear with their channel names, provided that the broadcasting institution supports this function.Changing the channel name:1. Go to the channel position required and press the red colour button. Now, you will be able to change the initial letters: select a symbol with the ▲ ▼ directional buttons. The symbols will appear in the sequence of: A B C [to] Z 0 1 2 [to] 9 ( ) * + , . / [BLANK] –. You will be able to enter up to a maximum of 5 symbols.2. Go to the next letter and so on with the ▶ directional button.3. Press the red colour button again at the end, in order to store the name.Deleting a channel:1. Select the channel that you want to delete from the list and press the green colour button. The following channels will move up the table.Entering a channel:You will be able to shift a channel to a different position here.1. Select the channel and press the yellow colour button.2. Shift the channel to the required position with ▲ ▼ and press the red colour button. The other channels will be shifted with it accordingly. |
| FINE TUNING | You will be able to make a fine adjustment to the channel currently selected with ◀ ▶ here. |
| AFT | Automatic fine tuning. The automatic fine tuning will start, in the case of a deterioration of the signal, if this option is switched on. |
Video recorder manual storage
For example, you can use the manual search to set a video recorder to the LCD TV.
Set your video recorder to the test signal after the LCD TV and the video recorder have been connected to each other by means of the aerial (compare Page 8).
- Carry out the manual search with the LCD TV.
- Store the test signal on channel position 0 (this channel position will not be occupied by a television channel), when the signal has been found.
The OSD in the PC mode
Menu PC
| Menu point Setting | |
| CONTRAST | Increase or reduce the contrast (0 – 100). |
| BRIGHTNESS | Increase or reduce the brightness (0 – 100). |
| COLOR MODE | Set the COLOR TEMP. to NORMAL, COOL, WARM, USER or SRGB. You will be able to set the values for R (rot), G (grün) and B (blau) yourself if COLOR TEMP. has been set to MANUELL. |
| SCALE | Choose between the two Normal and Centre picture formats. |
| AUTO | Carry out the automatic control through this. The optimum values for the H. position, V. position, phase and cycle of the TFT screen will be set here automatically. |
Menu SOUND
| Menu point Setting | |
| SOUND MODE | USER: The Tone Mode set in the ‘Equalizer’ Menu by the user.MOVIE: Increases the film sound.MUSIC: The setting optimized for music.STANDARD: Standard setting. |
| BASS | Setting of the bass tones (0 – 100). |
| TREBLE | Setting of the high tones (0 – 100). |
| BALANCE | Setting of the balance between the left and the right loudspeakers (0 – 100). |
| EQUALIZER | You will set a frequency band (120 Hz, 500 Hz, 1K5 Hz, 5K Hz, 10K Hz) with ▲/▼.You will set the value in the frequency band selected with ◀/►. |
Menu GEOMETRY
| Menu point Setting | |
| H - POSITION | Set the horizontal picture of the LCD display. |
| V - POSITION | Set the vertical picture of the LCD display. |
| CLOCK | Set the cycle of the TFT screen. The higher the value, the broader the display will appear. The lower the value, the more the display will be compressed. |
| PHASE | Set the phase, in order to optimize the display of your TFT screen. |
| CHILD LOCK | Password |
Menu SYSTEM
| Menu point Setting | |
| SLEEP TIMER | Select a period of time, after which the device will switch off independently. You will be able to set the time in 15-minute steps (maximum 1 hour) with the directional buttons. The sleep timer period will begin immediately after the setting with ◀ ▶ . |
| OSD LANGUAGE | Select the language of the OSD Menu. It will change immediately. |
| OSD H - POSITION | Set the horizontal position of the OSD. |
| OSD V - POSITION | Set the vertical position of the OSD. |
| OSD DURATION | Set when the OSD should be faded out if the device is not being used. |
| INFORMATION | Displays the firmware version of the OSD. |
| RESET | You will reset the factory setting by means of this Menu point. All settings made manually will be deleted. The values will now be in the status at delivery. |
| DYNAMIC CONTR. | Set the background lighting related to the screen content, when dynamic contrast is on. |
Troubleshooting
Many times, problems have simple causes. We would like to give you some tips to solve some common problems. Should these tips not help, please call us!
There is no picture or sound.
- Check whether the mains cable has been connected to the socket and the mains adapter correctly.
- Check whether the signal reception has been set to TV.
- Check whether the mains switch of the device on the upper side of the device has been switched on.
There is no picture. There is no picture from AV.
• Make sure the Contrast/Brightness is properly adjusted.
- Make sure all external devices are connected properly.
- Check whether the correct AV setting has been selected.
There is no sound.
- Make sure the volume is not set to minimum.
- Make sure the sound is not set to mute.
There is no picture or sound, just noise.
- The reception may be weak. Make sure the aerial is not disconnected.
The picture is not clear.
• The reception may be weak.
- Make sure the aerial is not disconnected.
The picture is too bright or too dark.
- Check the settings of CONTRAST / BRIGHTNESS / BACKLIGHT in the PICTURE Menu.
The remote control does not work.
- Check whether the batteries in the remote are operational and have been inserted correctly.
- Make sure the remote sensor window is not under strong lighting.
- Switch the device off and on again with the mains switch.
The picture is not sharp.
• The reception may be weak.
- Make sure the aerial is not disconnected.
- Check the settings of the picture sharpness in the PICTURE Menu.
The picture is spotted.
- There may be interference from automobiles, trains, high voltage lines, neon light, etc.
- There may be interference between the antenna cable and power cable. Try moving them further apart.
There are stripes on the screen or colors fade.
- Is the unit receiving interference from other devices?
Transmission antennas of radio broadcasting station and transmission antennas of amateur radio and cellular phones may also cause interference. - Place the unit as far apart as possible from device that may cause possible interference.
The operating buttons on the device do not function.
- The child-lock may have been activated.
Do you require additional Support?
If the suggestions in the above section have not solved your problem, please contact the hotline. We will try and help you over the telephone. However, before you contact your Service Center, please keep the following information available:
- If you have already been given a customer number, please keep this available.
• What external devices have been connected?
• What messages appear on your display? - During which operating step has the problem arisen?
• What steps have you already undertaken to solve the problem?
Maintenance
- Before cleaning, always remove the power adapter plug and all connecting cables.
- Do not use any solvents, corrosive or gaseous cleaning agents.
- Clean the display with a soft, lint-free cloth.
- Ensure that no water droplets remain on the screen. Water can cause permanent discoloration.
- Do not expose the screen to bright sunlight.
- Please keep the packaging material well and use it exclusively to transport the device.
Attention!
There are no user-serviceable or user-cleanable parts inside the device.
Recycling

Packaging
Your device is packaged to protect it against damage during transportation. The packaging is manufactured from materials that can be sent to a specialist recycling facility and disposed of in an environmentally-friendly way.
Device
At the end of its life, the appliance must not be disposed of in household rubbish. Enquire about the options for environmentally-friendly disposal.
Batteries
Do not dispose of used batteries in the household rubbish! They must be deposited at a collection point for used batteries.
Specifications
| MD 33332 | |
| Visible display size | 32" (81 cm) |
| Input voltage | AC 230V~ 50Hz |
| Power consumption | < 200 W |
| Power consumption standby | approx. 3 W |
| TV system | PAL, SECAM, B/G, D/K, I, L,L' |
| Audio | Multi-Stereo / Nicam |
| Channel positions | 100 |
| Antenna interface | 75 Ohm |
| Connections | 1 x RF, 1 x D-SUB (VGA), 2 x HDMI, 2 x SCART, 1 x YPbPr, 1 x S-VIDEO, 1 x AV |
| Response time | 8 ms |
| Viewing angle h/v | 178°/178° (typ.) |
| Contrast | 1200:1 (typ.) |
| Brightness | 500 cd/m2 |
| Physical resolution | 1366 x 768 |
| Dimensions (W x H x D) (incl. stand) | 810 x 620 x 245 |
| Weight (incl. stand) | approx. 15 Kg |
Subject to change without notice!
Pixel errors with LCD TVs
Individual pixels or groups of them can fail in rare cases, in spite of the most up-to-date manufacture, because of the highly complex technology.
Active matrix LCDs (TFT) with a resolution of 1366 x 768 pixel,(WXGA) which are in turn composed of three sub-pixels each (red, green, blue), contain about 3.1 million addressable transistors. Because of this very high number of transistors and their extremely complex production process occasionally defective or incorrectly addressed pixels or sub-pixels may occur.

| Description Acceptable Number | ||
| Bright Sub Pixel | 1 Sub-pixel Max. 2 | |
| Two lying next to each other (horizontally/vertically) | 0 | |
| Distance | Minimum distance between light and dark sub-pixels | Min. 10 mm |
| Dark Sub Pixel | Individual | Max. |
| Two lying next to each other Max. 2 | ||
| Distance | Minimum distance between light and dark sub-pixels | Min. 10 mm |
| Total number of bright and dark sub pixel | Max. 7 | |
The Table describes the maximum number of pixel faults that are permitted to arise on the screen, without involving a guarantee case. Under certain circumstances, a guarantee case will be present if the number of faults given above is exceeded in one category.
Copying this manual
This document contains legally protected information. All rights reserved. Copying in mechanical, electronic and any other form without the written approval of the manufacturer is prohibited.
Copyright © 2007
All rights reserved.
This manual is protected by copyright. All rights reserved. Copying mechanically, electronically and any other way is prohibited unless written permission from the manufacturer is obtained.
The company MEDION ® owns the copyright.
Subject to technical and optical changes as well as printing errors.
- Notes on this manual....3
- Purpose of use ....3
- Safety instruction ....4
- Get to know the device....7
- Examples of connections 9
- Remote Control 12
- Setting Up 13
- Basic functions 14
- Teletext....17
- The OSD menu....19
- The OSD in the PC mode....22
- Troubleshooting....24
- Maintenance....25
- Recycling 25
- Specifications 26
- Pixel errors with LCD TVs....26
- Copying this manual....27
- Notes on this manual
- HD ready
- Service
- Purpose of use
- Included in the box
- Note!
- Safety instruction
- Operating Safety
- Point of use
- Repair
- Intended Environment
- Power Supply
- FCC Compliance Statement
- Batteries and Proper Treatment
- Get to know the device
- Connections
- Examples of connections
- Video recorder
- DVD Player via SCART
- DVD Player via Y Pb Pr
- Receiver (SAT, DVB-T, decoder, etc.), DVD recorder
- Computer / devices with a digital output (e.g. HDMI)
- Note
- Remote Control
- Setting Up
- Unpacking
- Installing the batteries
- Attention!
- Connecting an antenna
- Connecting the power supply
- First installation
- Basic functions
- Turning the LCD TV on and off
- Navigating within the Menu
- Country Setting
- Language setting
- Automatic channel search (RF IN aerial connection)
- Channel selection
- Sound settings
- Setting the picture
- Picture format
- Picture setting
- Displaying information
- Selecting the signal source
- Teletext
- To operate Teletext
- Select Teletext pages
- Number keys [20]
- PGUP / PGDW buttons [12]
- SUBPAGE [12]
- Colour buttons [13] / Fastext
- Useful features for Teletext
- INDEX [12]
- SIZE [12]
- REVEAL [12]
- CANCEL [12] / Concealed search
- HOLD [16]
- The OSD menu
- Menu ADVANCE
- Menu SYSTEM
- Menu TV-CHANNEL
- Video recorder manual storage
- The OSD in the PC mode
- Troubleshooting
- There is no picture or sound.
- There is no picture. There is no picture from AV.
- There is no sound.
- There is no picture or sound, just noise.
- The picture is not clear.
- The picture is too bright or too dark.
- The remote control does not work.
- The picture is not sharp.
- The picture is spotted.
- There are stripes on the screen or colors fade.
- The operating buttons on the device do not function.
- Do you require additional Support?
- Maintenance
- Recycling
- Packaging
- Device
- Batteries
- Specifications
- Pixel errors with LCD TVs
- Copying this manual
Brand : MEDION
Model : MD 33332
Category : Television