
DF-710 - Multifunction Printer KYOCERA - Free user manual and instructions
Find the device manual for free DF-710 KYOCERA in PDF.
| Product Type | Document Finisher (Model DF-710) |
| Dimensions (W × D × H) | 684 mm × 563 mm × 1087 mm |
| Weight | Approx. 55 kg |
| Number of bins | 3 (Bin A, B, C) |
| Bin A capacity (A4, 64 g/m²) | Up to 3,000 sheets |
| Bin B capacity (A4, 64 g/m²) | Up to 200 sheets |
| Bin C capacity (A4, 64 g/m²) | Up to 50 sheets |
| Maximum stapling capacity (64 g/m²) | 30 to 50 sheets depending on size |
| Stapled paper weight | 90 g/m² or less |
| Available finishing modes | Sort (on/off), stapling (corner, two staples), booklet folding, punch (optional), mail bin (optional), folder (optional) |
| Compatible paper sizes (sort) | A3, B4, A4, A4R, B5, Folio, 11×17", 8½×14", 8½×13½", 8½×13", 8½×11", 11×8½", 8K, 16K |
| Compatible paper sizes (booklet folding) | A3, B4, A4R, 11×17", 8½×14", 8½×11" |
| Compatible paper sizes (optional punch) | Depending on model: 2, 3, or 4 holes; paper weight 45-200 g/m² |
| Optional mail bin capacity (7 bins) | Up to 100 sheets per bin (A4, 64 g/m²) |
| Optional folder capacity | Up to 16 sheets; center fold |
| Consumables | Staple cartridges (cartridge holder A, B, C optional) |
| Routine maintenance | Cleaning of internal parts by technician; emptying of punch scrap bin |
| Safety precautions | Do not place on unstable surface, avoid heat sources, do not disassemble, unplug before cleaning, do not look at paper output while operating |
| Optional accessories | Punch, mail bin (7 bins), folder |
Frequently Asked Questions - DF-710 KYOCERA
User questions about DF-710 KYOCERA
0 question about this device. Answer the ones you know or ask your own.
Ask a new question about this device
Download the instructions for your Multifunction Printer in PDF format for free! Find your manual DF-710 - KYOCERA and take your electronic device back in hand. On this page are published all the documents necessary for the use of your device. DF-710 by KYOCERA.
USER MANUAL DF-710 KYOCERA
This section uses illustrations to explain operation of the finisher when installed to a full-color machine. Usage operation is the same when installed to other machines.
This guide mainly explains usage when used with the copier feature. See the Extended Driver User Guide for more information on usage from a computer when using the printer feature.
Safety Information 3
Names of Parts 7
Operation 8
Maintenance. 16
Troubleshooting 20
Specifications 36
2 Deutsch
ALWAYS read this Operation Guide thoroughly before use. After reading, keep it together with the Operation Guide for the machine to install this Finisher (hereinafter, the machine).
Refer to the Operation Guide for the machine for information on the service representative for your product.
The sections of this Operation Guide and parts of this product marked with symbols are safety warnings. These are designed to protect the user, other individuals and surrounding objects, and ensure correct and safe usage of the product.

DANGER: Indicates that serious injury or even death will very possibly result from insufficient attention to or incorrect compliance with the related points.

WARNING: Indicates that serious injury or even death may result from insufficient attention to or incorrect compliance with the related points.

CAUTION: Indicates that personal injury or mechanical damage may result from insufficient attention to or incorrect compliance with the related points.
Symbols
The symbol indicates that the related section includes safety warnings. Specific points of attention are indicated inside the symbol.

[General warning]
The symbol indicates that the related section includes information on prohibited actions. Specifics of the prohibited action are indicated inside the symbol.

[Warning of prohibited action]

[Disassembly prohibited]
The symbol indicates that the related section includes information on actions which must be performed. Specifics of the required action are indicated inside the symbol.

[Alert of required action]

[Remove the power plug from the outlet]

[Always connect the machine to an outlet with a ground connection]
Please contact your service representative to order a replacement if the safety warnings in this Operation Guide are illegible or if the guide itself is missing (fee required).

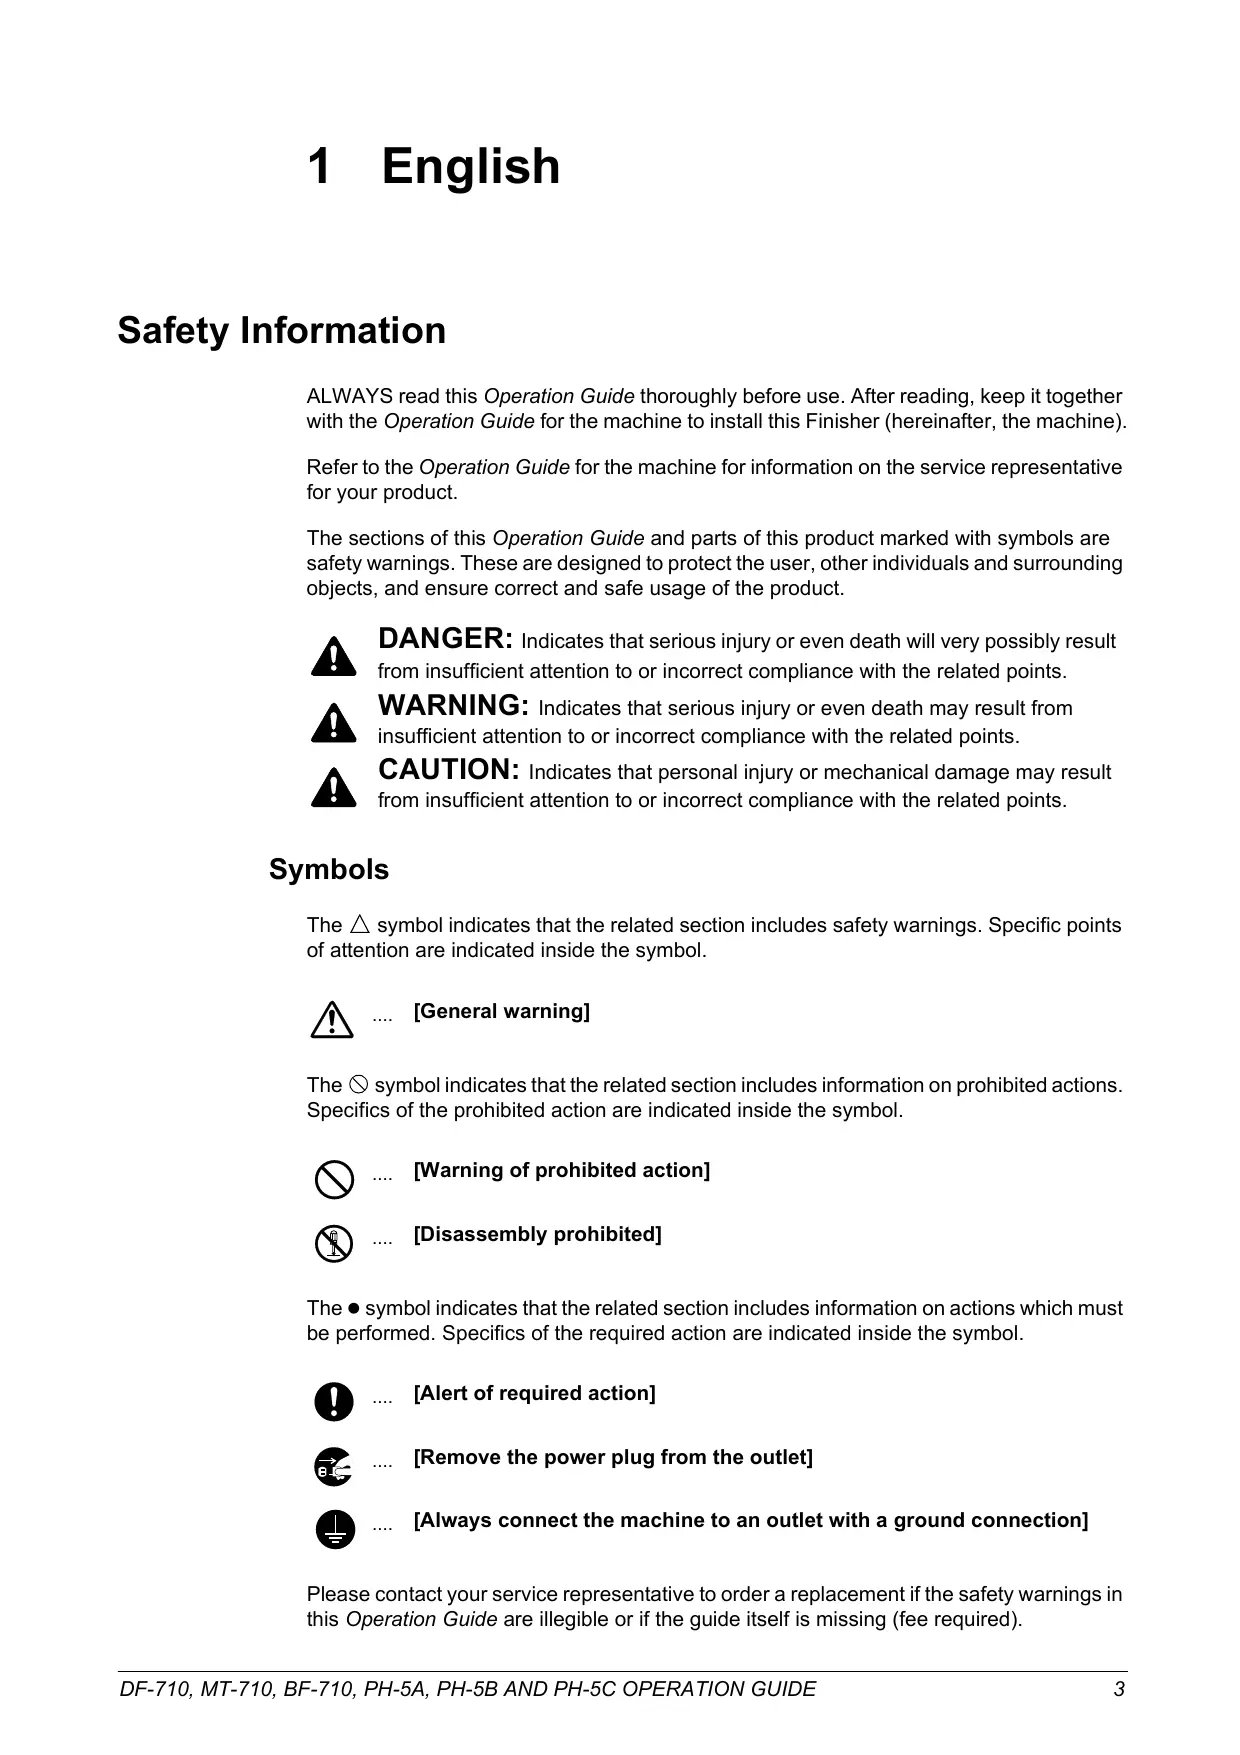
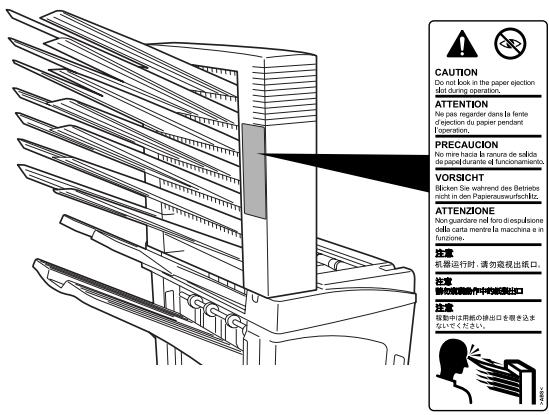
CAUTION LABELS
Caution labels have been attached to the Document Finisher at the following locations for safety purposes. BE VERY CAREFUL to avoid getting your fingers caught in or burned by the finisher when clearing a paper jam.
LABEL 1
CAUTION: Paper is ejected into the eject section at high speeds.
Do not look into the eject section while the machine is in operation.
NOTE: DO NOT REMOVE THESE LABELS.

INSTALLATION PRECAUTIONS
Environment

CAUTION
Avoid placing this product on or in locations which are unstable or not level. Such locations may cause the product to fall down or fall over. This type of situation presents a danger of personal injury or damage to the product.
Avoid locations near radiators, heaters, or other heat sources, or locations near flammable items, to avoid the danger of fire.


Other precautions
Depending upon the location in which this product is installed, adverse environmental conditions may affect its performance. Ensure this product is installed in an air-conditioned room (recommended room temperature: around 73.4^ (23^) , humidity: around 50% ) and avoid the following locations when selecting a site for installation:
- bright locations near a window or with exposure to direct sunlight
- locations with vibrations
- locations with drastic fluctuations in temperature or humidity
- locations with direct exposure to hot or cold air
Handling of plastic bags

WARNING
Keep the plastic bags that are used with this product away from children. The plastic may cling to their nose and mouth causing suffocation.


PRECAUTIONS FOR USE
Cautions when using this product

WARNING
DO NOT place metallic objects or containers with water (flower vases, flower pots, cups, etc.) on or near this product. This type of situation presents a danger of fire or electrical shock should any water fall inside.

DO NOT damage, break or attempt to repair the signal line. DO NOT place heavy objects on the signal line, pull it, bend it unnecessarily or cause any other type of damage. These types of situations present a danger of fire or electrical shock.

NEVER attempt to repair or disassemble this product or its parts as there is a danger of injury or fire.

If this product becomes excessively hot, smoke appears, there is an odd smell, or any other abnormal situation occurs, there is a danger of fire or electrical shock. Immediately turn OFF (O) the machine's main power switch, remove the machine's power plug from its outlet and contact your service representative.

If anything harmful (paper clips, water, other fluids, etc.) falls into this product, turn OFF (O) the machine's main power switch immediately, remove the machine's power plug from its outlet and contact your service representative. If you continue to use this product without taking these steps, there is a danger of fire or electrical shock.

ALWAYS contact your service representative for maintenance or repair of internal parts.

CAUTION
For safety purposes, ALWAYS turn OFF (O) the machine's main power switch and remove the machine's power plug from its outlet when performing cleaning operations on this product.

DO NOT touch the ejection tray when the product is in operation as there is a danger of injury.

If dust accumulates within this product, there is a danger of fire or other problems. It is therefore recommended that you consult with your service representative in regard to cleaning of internal parts. This is particularly effective if performed prior to seasons of high humidity. Consult with your service representative in regard to the cost of cleaning the internal parts of the product.

Other Precautions
DO NOT place heavy objects on this product or cause other damage to the product.
When lifting or moving the product, contact your service representative.
Do not touch electrical parts, such as connectors or printed circuit boards. They could be damaged by static electricity.
DO NOT attempt to perform any operations not explained in this Operation Guide.
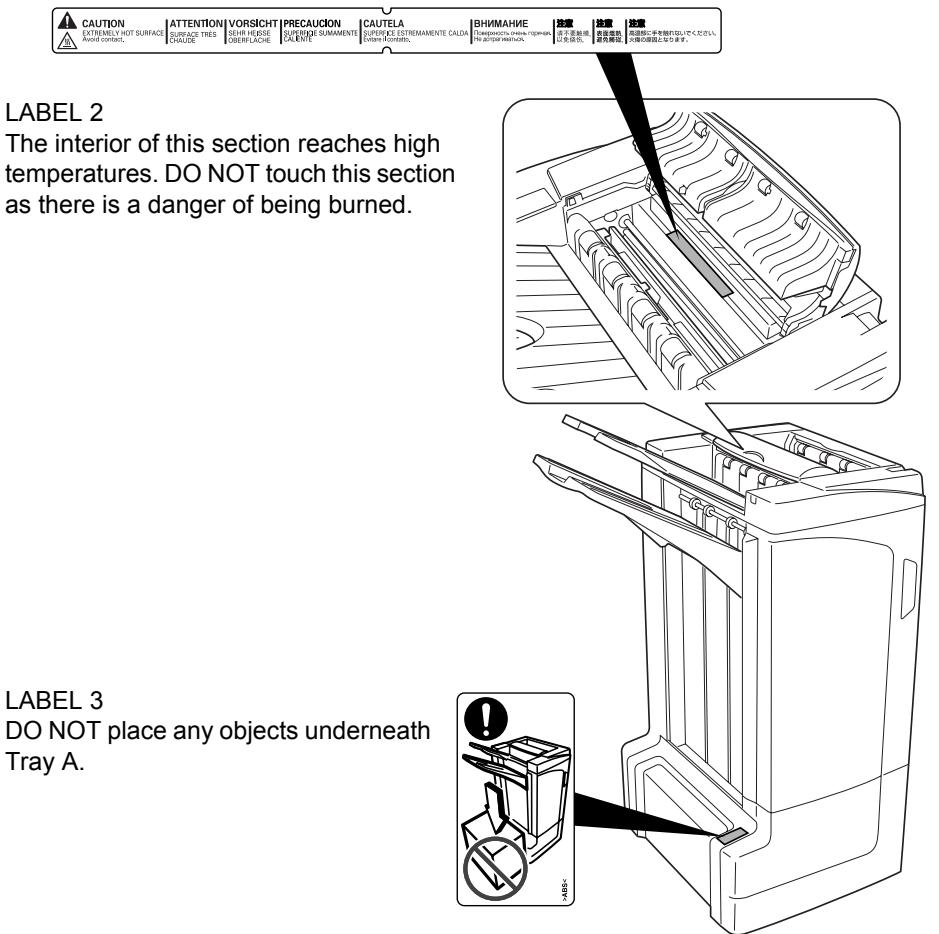
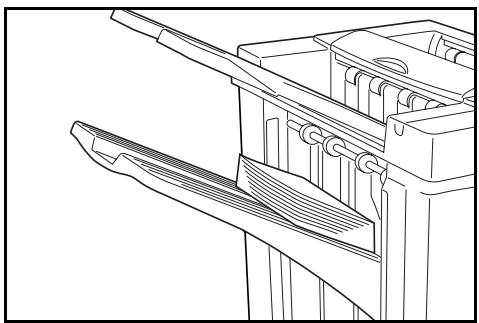
Names of Parts
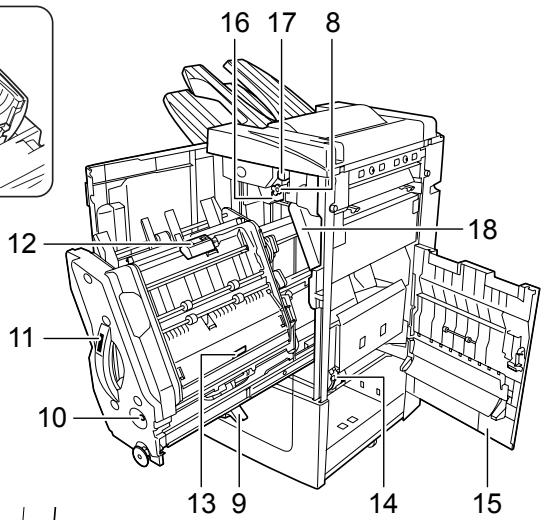
Document Finisher (main body)
1 Tray A
2 Tray B
3 Tray C
4 Finisher release lever
5 Front cover
6 Top cover
7 Paper guide plate (D1)
8 Conveyor knob (D2)
9 Internal tray paper holder (D3)
10 Internal tray confirmation window
11 Internal tray (D5)
12 Internal tray cover (D6)
13 Internal tray cover (D7)
14 Staple cartridge holder A
15 Right cover (D8)
16 Pressure roller bottom adjust knob (E1)
17 Pressure roller top adjust knob (E2)
Hole Punch Unit (option)
18 Waste Hole Punch box
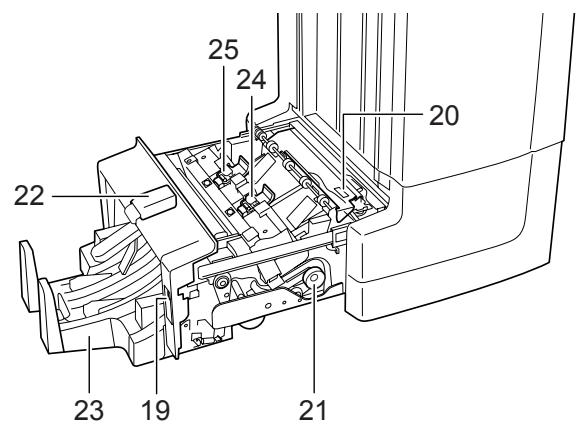
Center-Folding Unit (option)
19 Unit release lever
20 Paper guide plate (D9)
21 Center-Folding Unit conveyor knob (D10)
22 Center-Folding Unit top cover
23 Folding tray
24 Staple cartridge holder B
25 Staple cartridge holder C
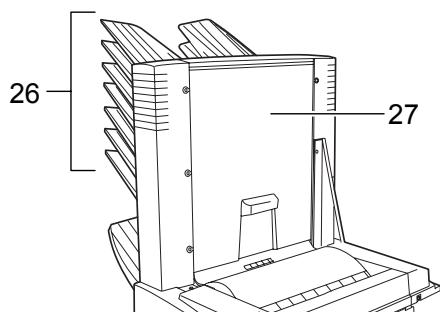
Mailbox (option)
26 Trays 1-7
27 Mailbox cover
Operation
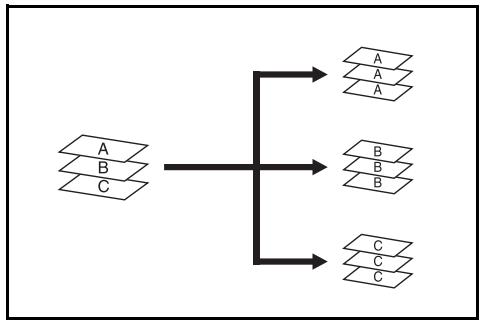
Sort: ON Mode
Sorts copies of multiple originals into identical sets.
The following paper sizes can be used in Sort:ON Mode:
A3,B4,A4,A4R,B5,Folio, 11× 17^ 81 / 2× 14^ ,81 / 2× 131 / 2^ ,81 / 2× 13^ , 81 / 2× 11^ ,11× 81 / 2^ ,8K and 16K

1 Select Sort: On Mode on the operation panel of the machine.
2 Load the originals in the Document Processor, or one at a time on the Platen.
NOTE: Refer to the Operation Guide for the machine for Document Processor and Platen specifications.
3 Select other features as required and press Start.
4 Copies are ejected onto the specified tray.
If Tray A is selected, each copy set can be offset from the previous set. Refer to the Operation Guide for the machine for further details.
The machine displays a message when Tray A, Tray B and Tray C have reached their tray capacity. Remove all copies from each tray when this message is displayed.
NOTE: The maximum number of copies that can be stored on Tray A, Tray B and Tray C differs depending on the size of copy paper being used. For further information refer to page 36.
5 On completion of the job, remove the copies.
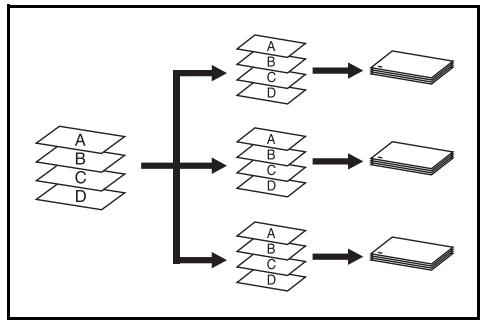
Sort: OFF Mode
Groups the copies of each individual original together in one stack.
The following paper sizes can be used in Sort:OFF Mode:
A3,B4,A4,A4R,B5,Folio, 11× 17^ 81 / 2× 14^ ,81 / 2× 131 / 2^ ,81 / 2× 13^ , 81 / 2× 11^ ,11× 81 / 2^ ,8K and 16K
1 Select Sort: Off Mode on the operation panel of the machine.
2 Load the originals in the Document Processor, or one at a time on the Platen.
NOTE: Refer to the Operation Guide for the machine for Document Processor and Platen specifications.
3 Select other features as required and press Start.
4 Copies are ejected onto the specified tray.
If Tray A is selected, each stack can be offset from the previous stack. Refer to the Operation Guide for the machine for further details.
The machine displays a message when Tray A, Tray B and Tray C have reached their tray capacity. Remove all copies from each tray when this message is displayed.

NOTE: The maximum number of copies that can be stored on Tray A, Tray B and Tray C differs depending on the size of copy paper being used. For further information refer to page 36.
5 On completion of the job, remove the copies.
Staple Mode
Sorts and staples each copy set.
Stapling options are as follows:
Upper Left Single Staple
Upper Right Single Staple
Double Staple
NOTE: Only Tray A is used during staple mode. For stapling specifications, refer to page 36.
Auto Selection Staple Mode
Staple mode is available even if the paper size is different if the paper width is the same as shown in the below combinations. The staple capacity is 30 sheets.
A3 and A4
B4 and B5
11×17"and 11× 8~1 / 2^
8 1 / 2 × 14 and
81 / 2 × 11
1 Select Sort: On Mode on the operation panel of the machine.
2 Select the staple setting required.
| Cassette Paper Load Direction | Cassette Paper Load Direction | |||
| Original Orientation: Top Edge | A A A A A A A A A A A A A A A A A A A A A A A A A A A A A A A A A A A A A A A A A A A A A A A A A A A | A A A A A A A A A A A A A A A A A A A A A A A A A A A A A A A A A A A A A A A A A A A A A A A A A B B B B B B B B B B B B B B B B B B B B B B B B B B B B B B B B B B B B B B B B B B B B B B B B B B A A A A A A A A A A A A A A A A A A A A A A A A A A A A A A A A A A A A A A A A A A A A A A A A A B | ||
| Original Orientation: Top Edge | A A A A A A A A A A A A A A A A A A A A A A A A A A A A A A A A A A A A A A A A A A A A A B B B B B | A A A A A A A A A A A A A A A A A A A A A A A A A A A A A A A A A A A A A A A A A A A A A A A A A | ||
| Original Orientation: Left Top Edge | A A A A A A A A A A A A A A A A A A A A A A A A A A A A A A A A A A A A A A A A A A A A A A A A A | |||
| Original Orientation: Left Top Edge | A A A A A A A A A A A A A A A A A A A A A A A A A A A A A A A A A A A A A A A A A A A A A | A A A A B B B B B B B B B B B B B B B B B B B B B B B B B B B B B B B B B B B B B B B B B B B B B B |
NOTE: Refer to the Operation Guide for the machine for more detailed information.
3 Load the originals in the Document Processor, or one at a time on the Platen.
NOTE: Refer to the Operation Guide for the machine for Document Processor and Platen specifications.
4 Select other features as required and press Start.
5 Copies will be stapled and ejected onto Tray A, face down.
If Tray A reaches its maximum capacity, a message displays. Remove all copies from Tray A to continue.
NOTE: The maximum number of copies that can be stored on Tray A differs depending on the size of copy paper being used. For further information refer to page 36.

6 On completion of the job, remove the copies.
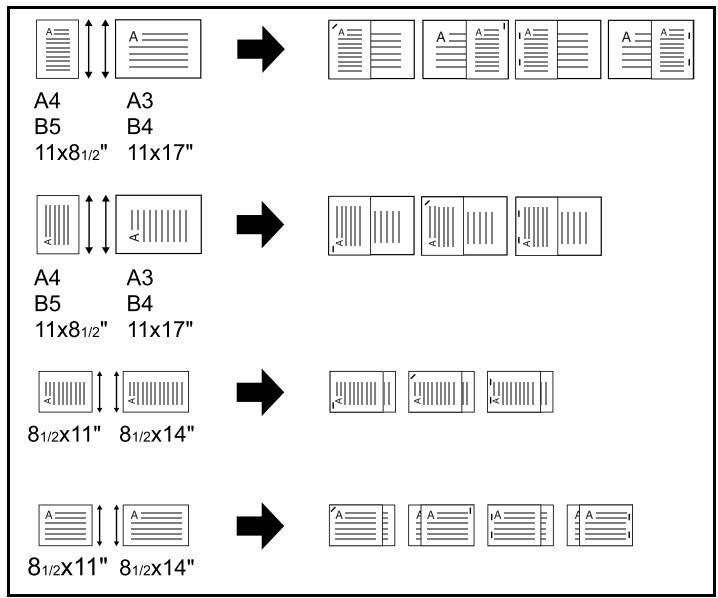
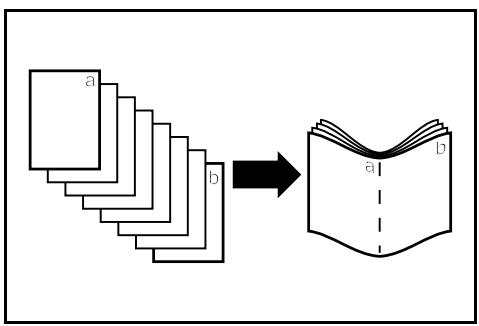
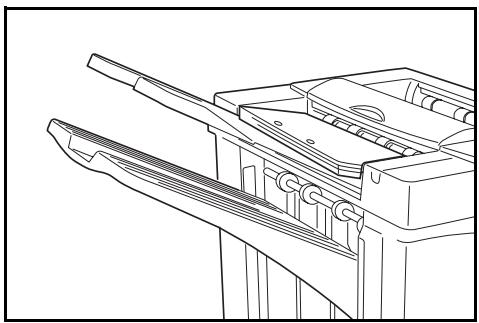
Booklet Stitching Mode
In this mode, copies are stapled in two positions in the center of the paper.
The following paper sizes can be used in Booklet Stitching mode:
A3,B4,A4R, 11× 17^ ,8 1 / 2× 14" and 812× 11^
Stapling Capacity: 2 to 16 sheets at a time.
NOTE: The optional Center-Folding Unit is required for automatic folding. Only the folding tray is used for Booklet Statching mode.
Booklet Feature (Sheet originals): Delivers booklet of two-sided copies with facing pages from one-sided or two-sided originals. Booklets such as magazines can be created by folding at the center.
Booklet Feature (Facing originals): Copies book originals to booklets consisting of two-sided copies with facing pages. Booklets such as magazines can be created by folding at the center.
1 Select the Booklet Stitching mode on the operation panel of the machine.
NOTE: Refer to the Operation Guide for the machine for more detailed information.
2 Load the originals in the Document Processor, or one at a time on the Platen.
NOTE: Refer to the Operation Guide for the machine for Document Processor and Platen specifications.

A maximum of 16 sheets can be bound in a single operation. Up to 64 original sheets can be loaded at one time.
3 Select other features as required and press Start.
4 Copies will be automatically stapled and ejected onto the folding tray.
If the maximum capacity is reached, a message displays. Remove all copies from the folding tray to continue.
NOTE: For further information refer to Center-Folding Unit (option) on page 37.
5 On completion of the job, remove the copies from the folding tray.
Hole Punch Mode
This mode produces hole punched copies automatically.
Hole Punch mode can be used with Sort: ON, Staple and Sort: OFF modes.
The following paper sizes can be used:
Inch models
2-hole punch: 81 / 2× 14^ , 81 / 2× 131 / 2^ 81 / 2× 13^ , 81 / 2× 11^ , 51 / 2× 81 / 2^ A3,B4,A4,A4R,B5,B5R,A5R and Folio
3-hole punch: 11 × 17" , 11 × 8 12 , A3 and A4
Metric models
2-hole punch: A3, B4, A4, A4R, B5, B5R, A5R, Folio, 8 1/2 × 14", 8 1/2 × 13 1/2", 8 1/2 × 13", 11 × 8 1/2", 8 1/2 × 11" and 5 1/2 × 8 1/2"
4-hole punch: A3, A4, 11 × 17 and 11 × 8 1/2
Paper weights must be between 45g / m^2 and 200g / m^2 .
NOTE: Punching requires the optional punching unit. Tray C cannot be specified as the output destination for punch mode.
1 Select Hole Punch mode on the operation panel of the machine.
NOTE: Refer to the Operation Guide for the machine for more detailed information.
2 Load the originals in the Document Processor, or one at a time on the Platen.
Ensure the orientation of the originals is the same as that selected for Hole Punch mode on the machine.
NOTE: Refer to the Operation Guide for the machine for Document Processor and Platen specifications.
3 Select other features as required and press Start.
4 The copies are automatically hole punched and ejected onto the selected tray.
NOTE: Holes are punched in each copy individually, therefore the location of the holes may vary on each sheet.
On completion of the job, remove all the copies.
Interrupt Mode
1 Specify the settings for interrupt mode at from the machine operation panel.
NOTE: For more information on interrupt mode operation, see the machine operation guide. Specify the output tray at the machine.
2 Take out the any existing original and set the original to use for interrupt mode.
3 Set desired copier functions or output tray destination and press Start. Copying begins and paper is output to the selected tray.
When done copying in interrupt mode, turn off interrupt copy mode from the machine itself.
4 Replace the original and press Start. Copying of the interrupted job resumes.
Mailbox Mode
Paper printed at the machine can be output to the optional mailbox. This feature is useful when sharing the printer among multiple computers to output paper to specific trays for each user.
The following paper sizes can be used:
A3, B4, A4, A4R, B5, B5R, A5R, Folio, 11 × 17" , 81/2 × 14" , 81/2 × 131/2" , 81/2 × 13" , 11 × 81/2" , 81/2 × 11" , 51/2 × 81/2" , 8K, 16K and 16KR

NOTE: The maximum number of copies that can be stored in each tray will differ depending on the size of copy paper being used. For further information refer to page 37.
Preparation for Usage
Write the name of the user of each tray on the labels provided and attach the labels to the side of each tray.
NOTE: Attach the labels in the location indicated on the illustration. The bins to which labels should be applied are 1, 2, 3, 4, 5, 6, 7 as counted from the top down.

Configuring Mailbox Output
1 Use the printer driver on your computer to select a mailbox tray (mailbox) between 1 and 7.
2 Select the paper size, page(s) to be printed and number of prints required.
3 Print the job. Prints will be ejected onto the selected tray (mailbox).
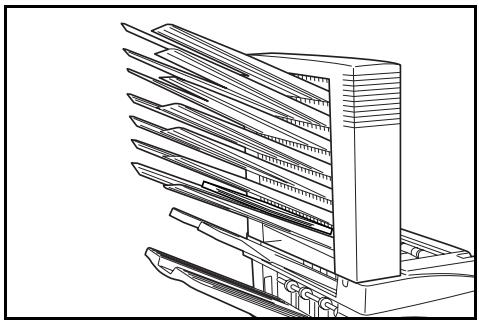
4 On completion of the job, remove all prints from the tray (郵信箱).
Configuring Mailbox Output
To use the machine to select the tray required, refer to the Operation Guide for the machine. On the full color machine, the output tray can be specified with the copy and fax functions. On the monochrome machine, the output tray can be specified with the copy, fax, and printer functions.
Maintenance
Replacing Staples
The finisher contains staple cartridge holder A.
The optional folding unit contains staple cartridge holders B and C. The refill procedure for staple cartridge holders B and C are the same as for staple cartridge holder A.
If a message displays indicating that staples have run out, the staple cartridge holder need to be replenished with staples.
NOTE: If the Staple Unit runs out of staples, contact your service representative or the place of purchase.
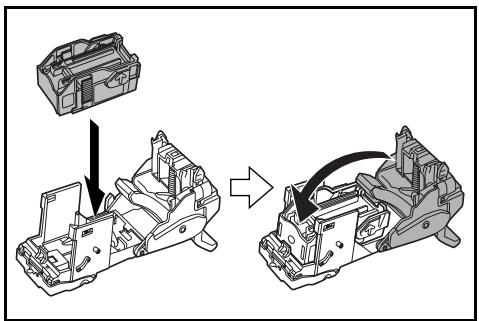
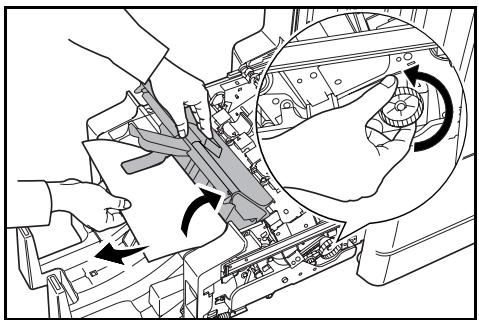
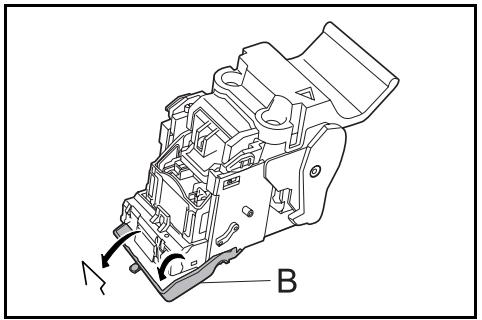
Refilling Staple Cartridge Holder A
Follow the steps below to refill staples.
NOTE: See page 17 to refill staple cartridge holder B/C of the optional folding unit.
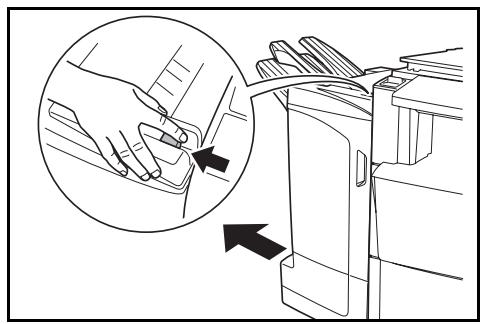
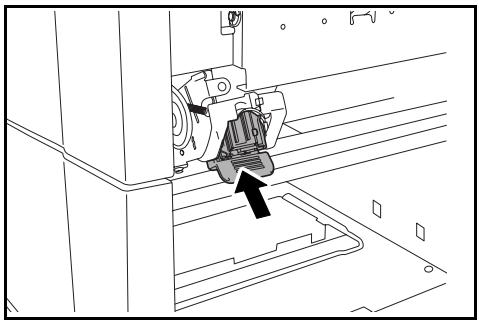
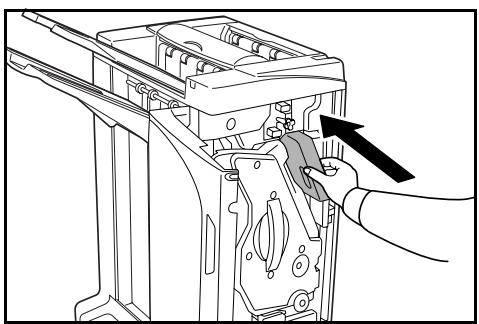
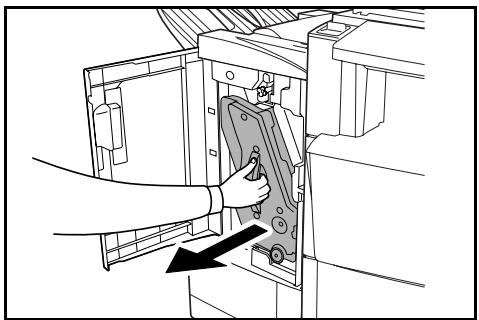
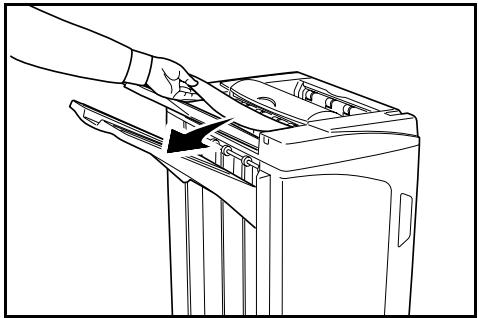
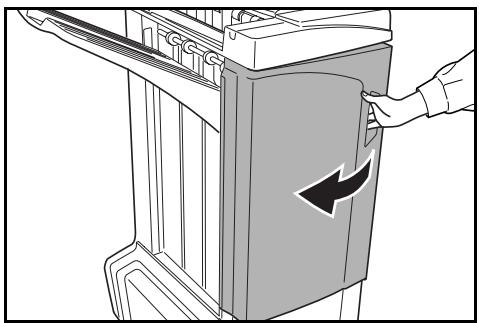
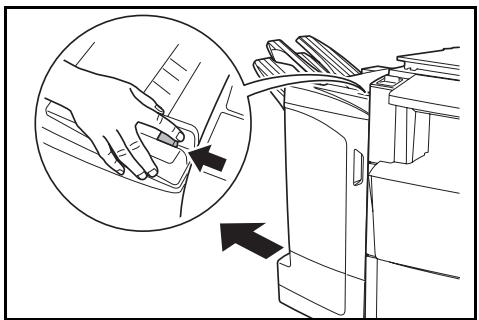
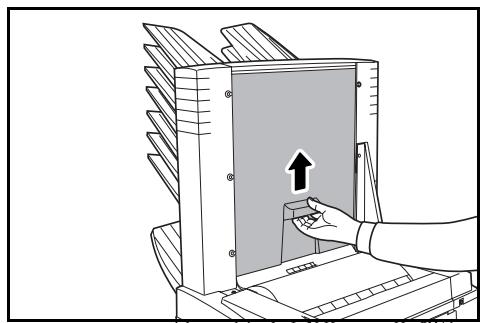
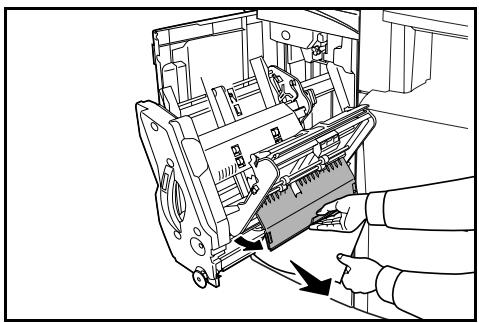
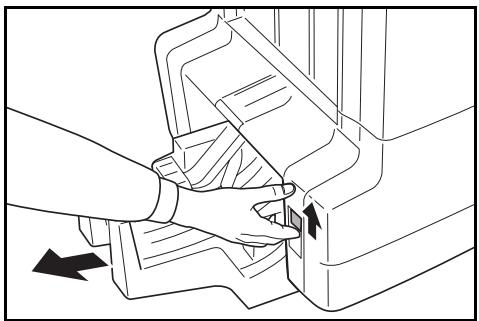
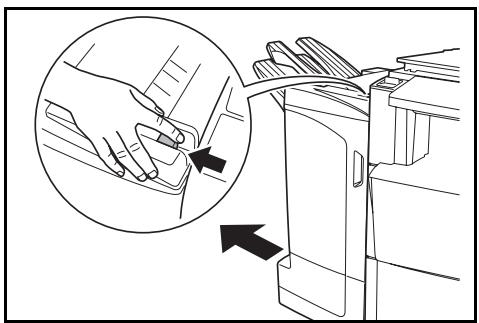
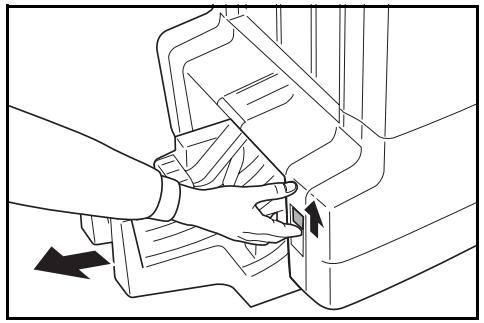
1 While pushing the finisher release lever, pull the finisher out from the machine.
2 Open the right cover (D8).
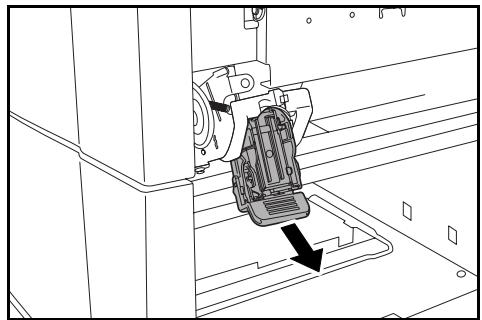
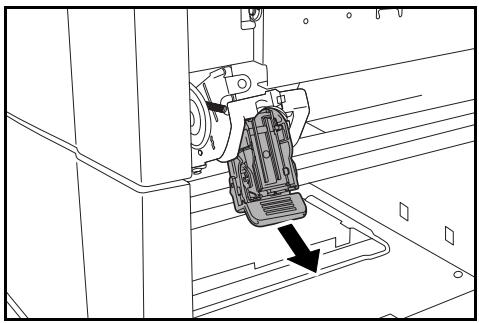
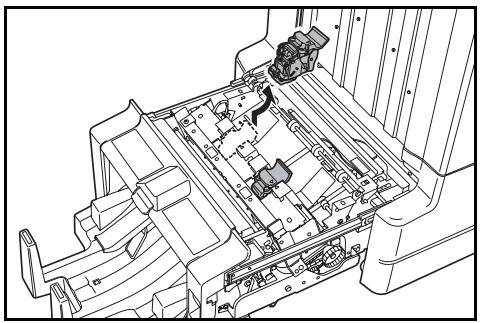
3 Remove the staple cartridge holder.
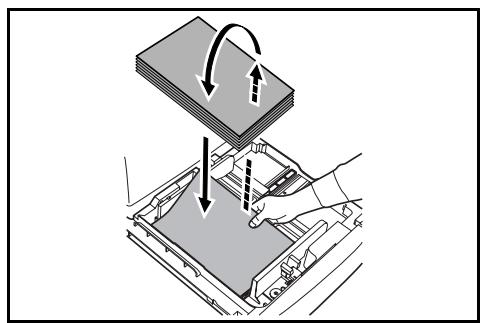
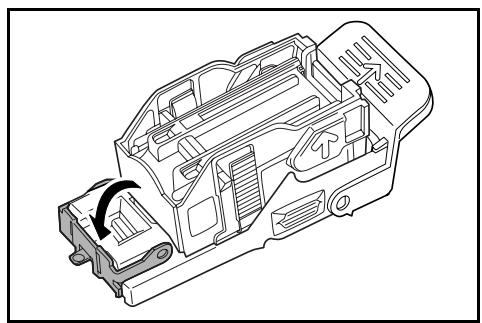
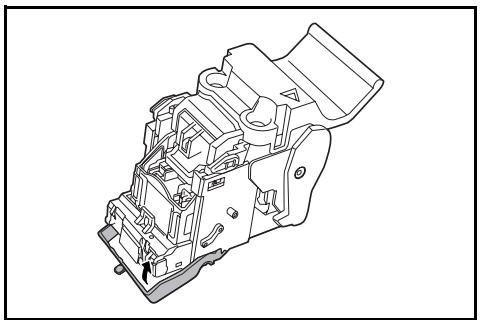
4 Remove the empty staple cartridge from the staple cartridge holder.
NOTE: The staple cartridge can only be removed when it contains no more staples.
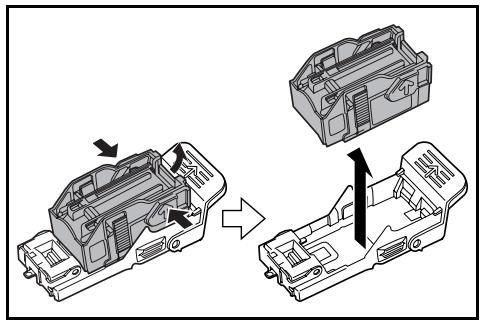
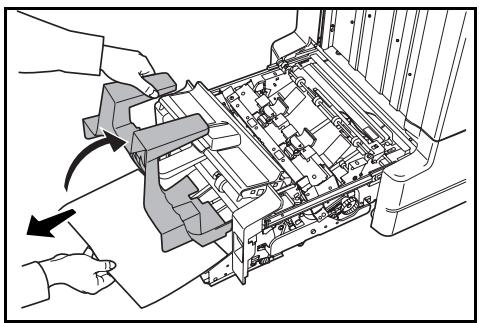
5 Insert the new staple cartridge into the staple cartridge holder.

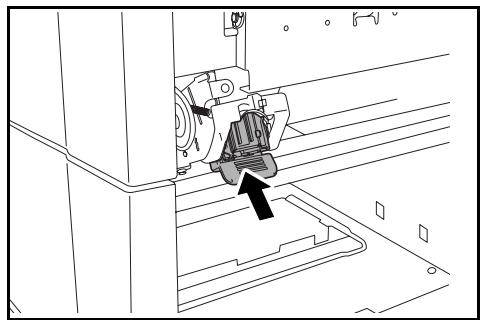
6 Re-install the staple cartridge holder. The staple cartridge holder will click into place when it has been inserted correctly.
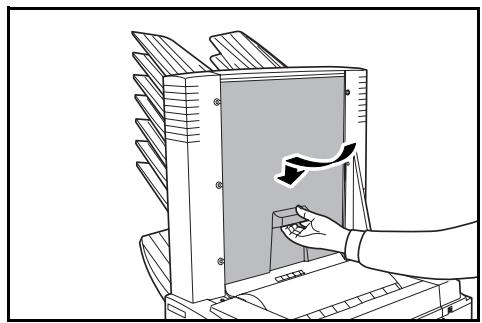
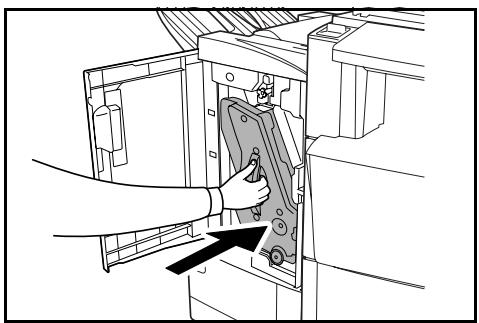
7 Close the right cover (D8) and re-install the finisher back into position on the machine.
Refilling Staple Cartridge Holders B/C (Option)
Follow the steps below to refill staples for the optional folding unit. Follow the same procedure to refill staple cartridge holders B and C.
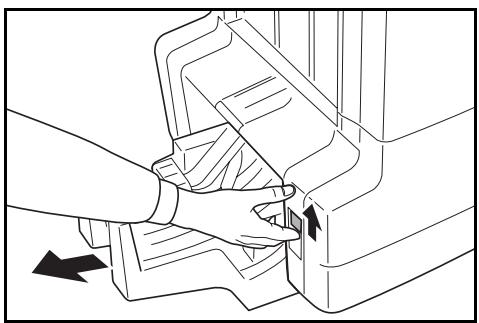
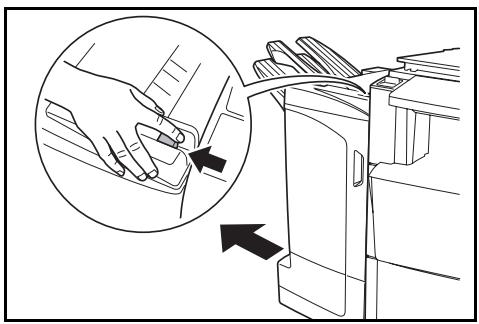
1 Push the folding unit release lever and pull out the folding unit.
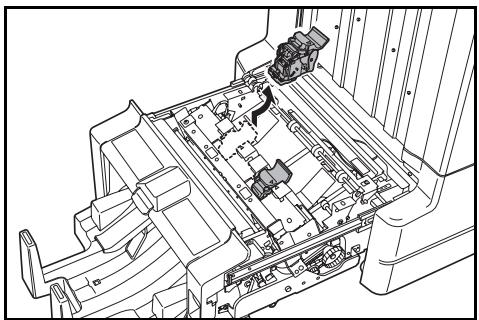
2 Remove staple cartridge holder B or C.
3 Open the stopper and remove the empty staple cartridge.
NOTE: The staple cartridge can only be removed when it contains no more staples.
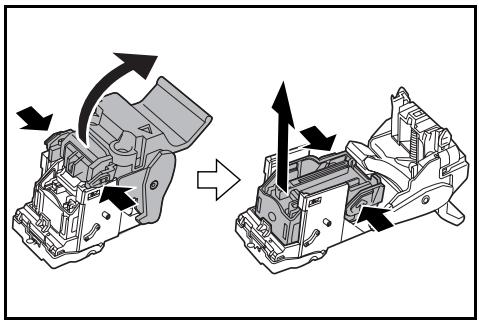
4 Insert the new staple cartridge into the staple cartridge holder and close the stopper.
5 Re-install the staple cartridge holder.
When re-installing, align the triangle marks on the staple cartridge holder and the staple unit. The staple cartridge holder will click into place when it has been inserted correctly.
6 Push the folding unit back into position.
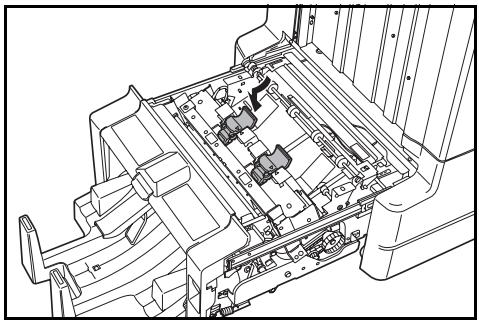
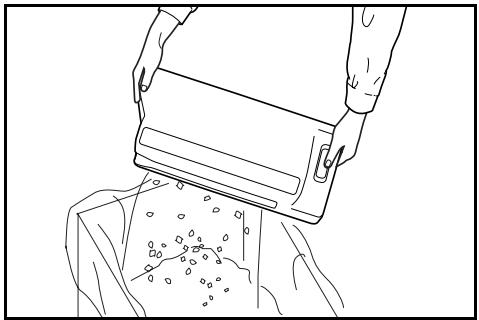
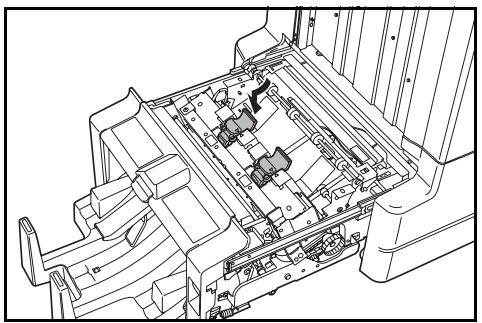
Emptying the Waste Hole Punch Box
If a message is displayed on the machine operation panel indicating that the waste punch box is full, be sure to empty the scraps in the waste hole punch box.
Leave the main power switch on the machine switched ON ( | ) while performing this procedure.
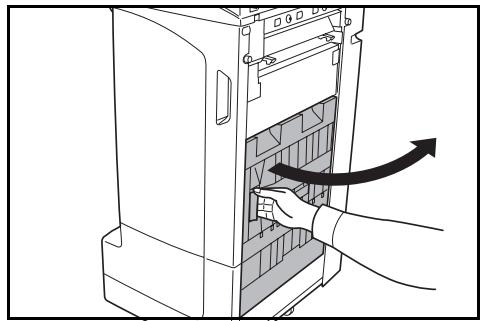
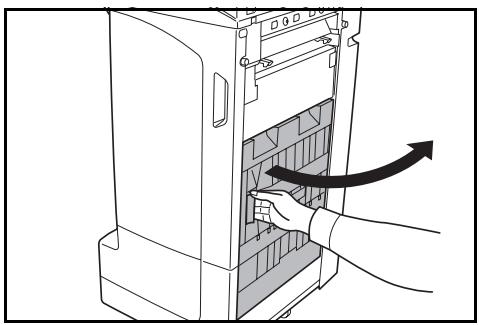
1 Open the front cover.

2 Grasp the waste hole punch box handle and remove the box from the Document Finisher.
NOTE: Take care not to spill the waste hole punch scraps when removing the container.
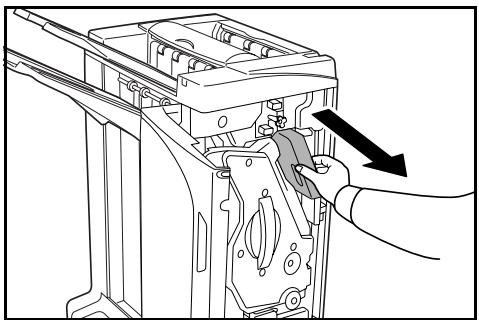
3 Dispose of the hole punch scraps appropriately.
4 Re-install the waste hole punch box. Align it with the guides in the Document Finisher.
5 Close the front cover.
Troubleshooting
Paper
If ejected copies are not flat or are stacked unevenly, turn over the paper in the cassette and reload it. If copies are curled, refer to Curled Output on page 31.
If a paper jam occurs, check the side guide located in the cassette is adjusted to the size of paper loaded.
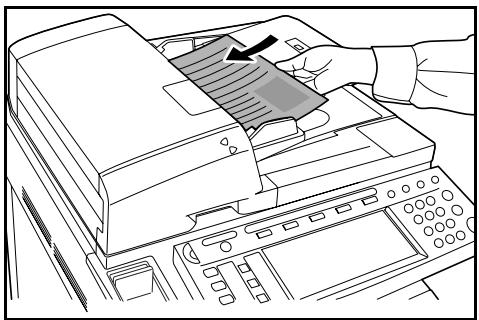
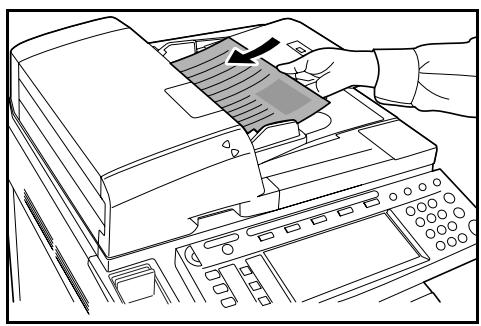
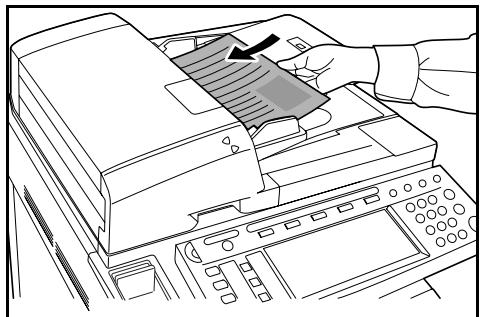
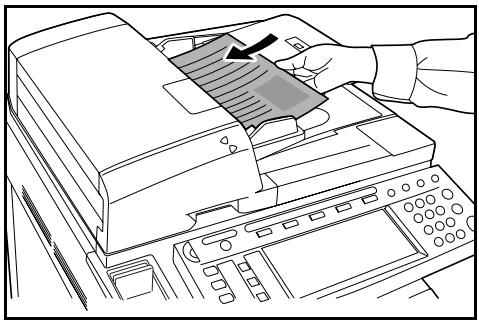
Clearing Paper Jams
When a paper jam occurs, copying stops and the machine operation panel will display a message indicating a paper jam has occurred.
NOTE: Leave the main power switched ON ( | ) while performing the procedure to clear paper jams. The machine operation panel will return to the display previous to the paper jam when the paper jam has been cleared.
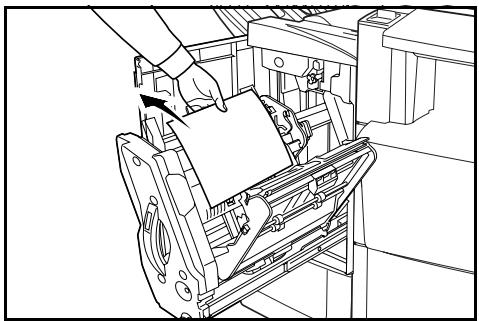
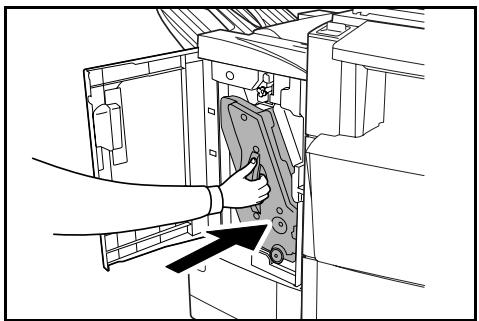
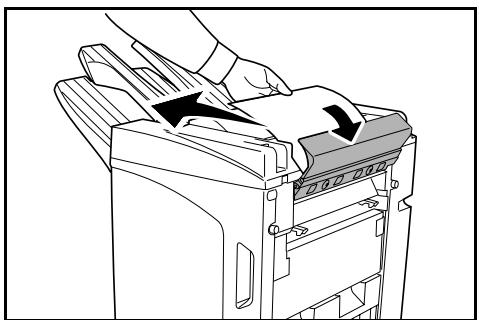
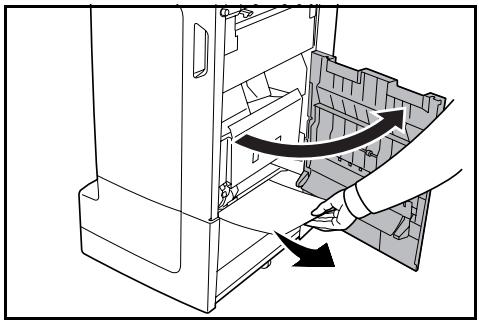
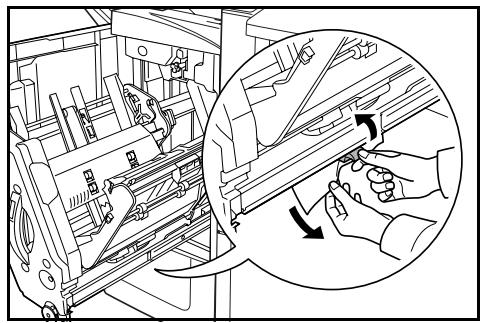
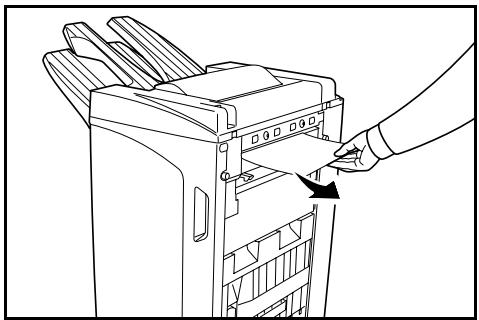
Coupling Section
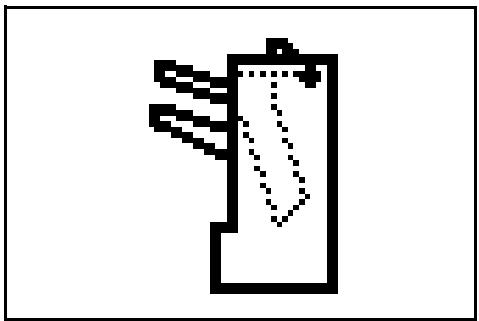
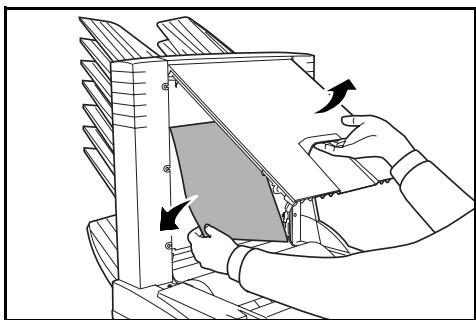
If the illustration shown displays on the machine's operation panel, there is a paper jam in the coupling section between the Document Finisher and the machine.
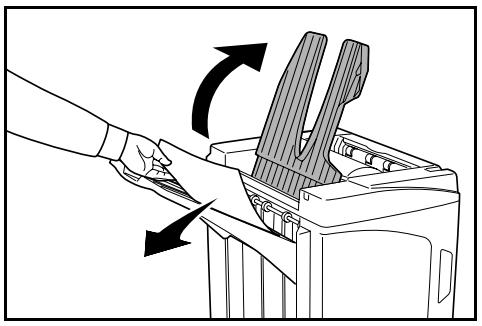
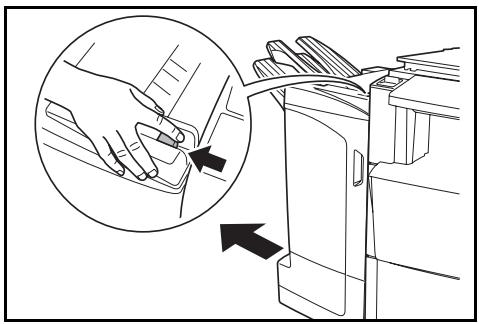
1 While pushing the finisher release lever, pull the finisher out from the machine.
2 Remove the jammed paper.
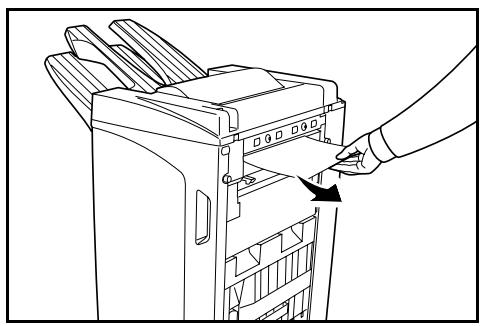
3 Open the tray C and front cover.
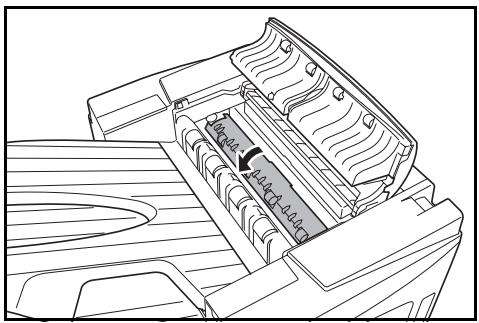
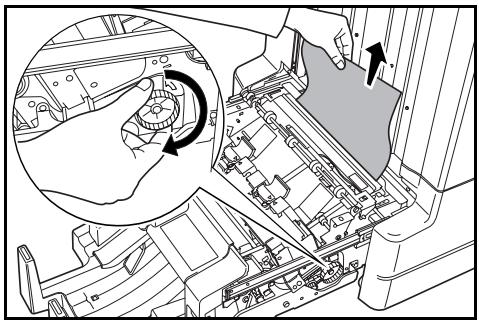
4 Turn the conveyor knob (D2) to the left to feed the paper along to enable easy removal.
5 Close Tray C and the front cover, and re-install the finisher back into position on the machine.
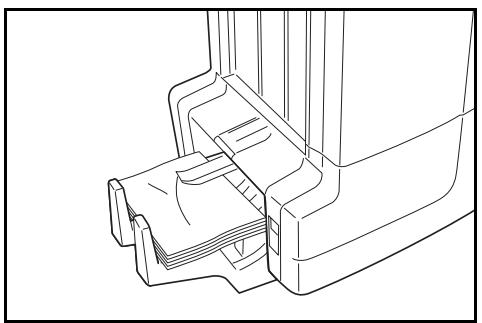
Tray A
If the illustration shown displays on the machine's operation panel, there is a paper jam in the conveyor section to Tray A.
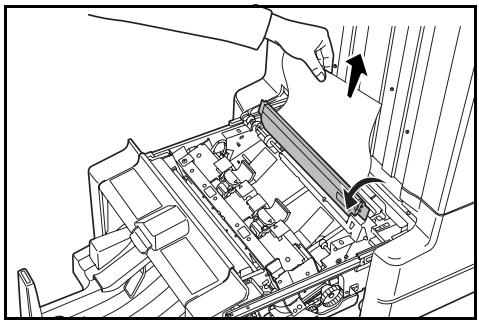
1 Lift open Tray B and remove the jammed paper.
2 Open the front cover.
3 Pull out the internal tray (D5).
4 Open the internal tray cover (D6).
5 Remove the jammed paper.
NOTE: If a jammed paper is located at the bottom of the tray and it is difficult to remove, lift the internal tray holder (D3) and remove the jammed paper from the lower side of the tray.
6 Close the internal tray cover (D6).
CAUTION: Close the internal tray cover (D6) securely until the magnet catches.
7 Push the internal tray (D5) back into position and close the front cover.
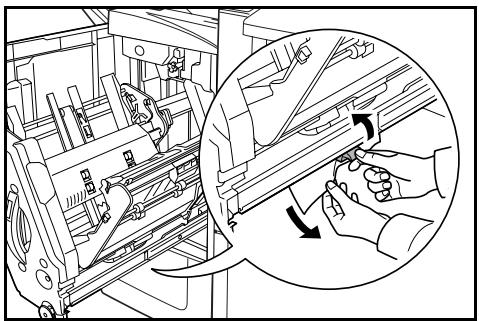
Tray B
If the illustration shown displays on the machine's operation panel, there is a paper jam in the conveyor section to Tray B.
1 Remove any jammed paper from the ejection section.
2 Open the tray C.
3 Open the paper guide plate (D1) and remove the jammed paper.
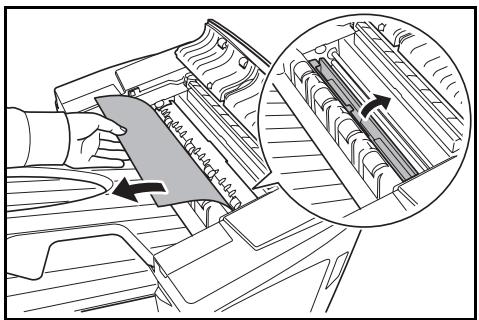
4 Open the front cover.
5 Turn the conveyor knob (D2) to the left to feed the paper along to enable easy removal.

6 Close the paper guide plate (D1).
NOTE: Be sure to the close paper guide plate (D1). Failure to do so will cause paper jams.
7 Close the tray C and front cover.
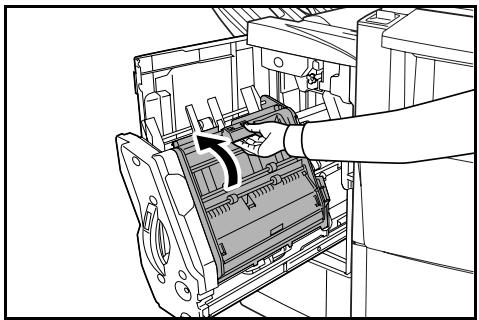
Tray C
If the illustration shown displays on the machine's operation panel, there is a paper jam in the conveyor section to Tray C.
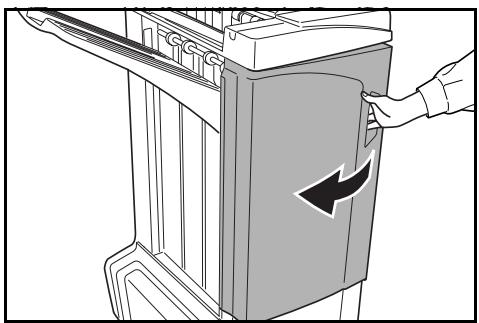
1 While pushing the finisher release lever, pull the finisher out from the machine.
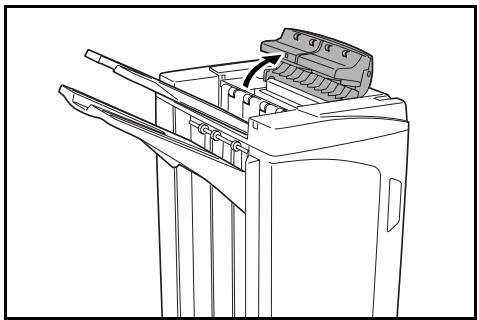
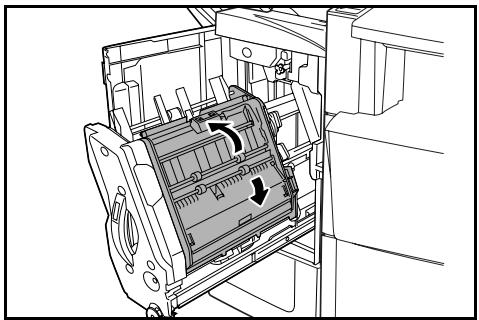
2 Open the top cover and remove the jammed paper.
3 Close the top cover and re-install the finisher back into position on the machine.
Conveyor / Internal Tray
If the illustration shown displays on the machine's operation panel, there is a paper jam in the conveyor section to the internal tray.
NOTE: If frequent jamming occurs in the conveyor or internal tray, the paper may be excessively curled. Adjust curling referring to page 31 for when output pages are curled.
1 Open the tray C and front cover.
2 Turn the conveyor knob (D2) to the left to feed the paper along to enable easy removal.
3 Follow step 3 onward on page 22 to remove jammed paper.
Mailbox (option)
If the illustration shown displays on the machine's operation panel, there is a paper jam in the Mailbox.

1 Open the mailbox cover.
2 Remove the jammed paper.

3 Close the mailbox cover.
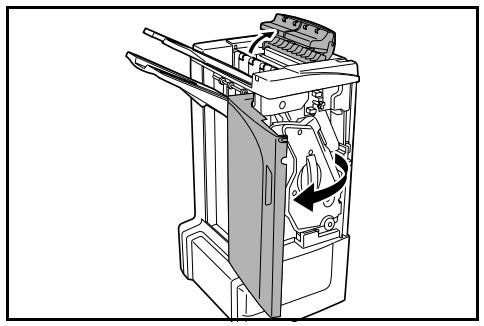
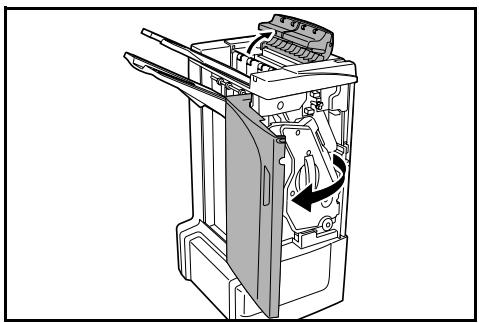
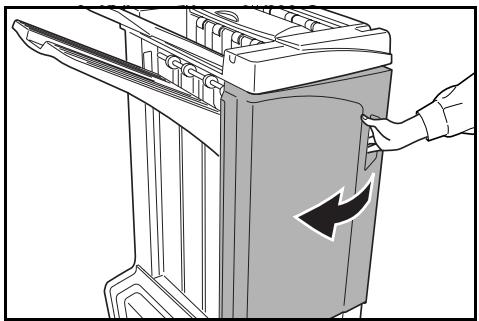
Center-Folding Unit (option)
Conveyor Section
If the illustration shown displays on the machine's operation panel, there is a paper jam in the conveyor section of the Center-Folding Unit.
1 While pushing the finisher release lever, pull the finisher out from the machine.
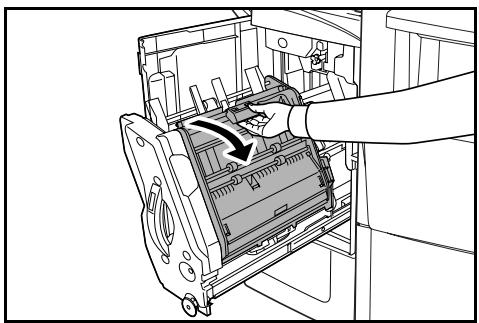
2 Open the right cover (D8) and remove the jammed paper.
If there is no paper jam in the right cover (D8), proceed to the following step.
3 Close the right cover (D8) and re-install the finisher back into position on the machine.
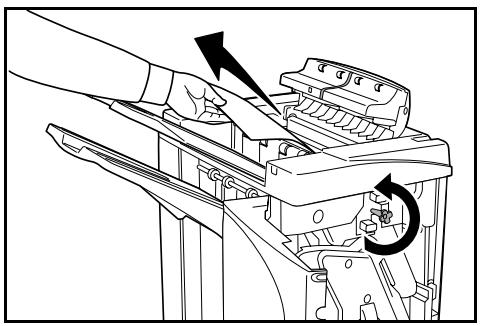
4 Open the front cover.
5 Pull out the internal tray (D5).

6 Open the internal tray cover (D6).
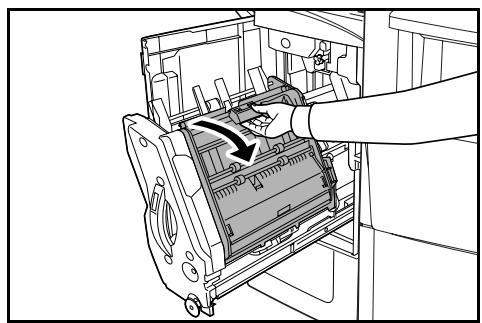
7 Remove the jammed paper.
NOTE: If a jammed paper is located at the bottom of the tray and it is difficult to remove, lift the internal tray holder (D3) and remove the jammed paper from the lower side of the tray.
8 Open the internal tray cover (D7) and remove the jammed paper.
9 Close the internal tray cover (D6) and internal tray cover (D7).
NOTE: Close the internal tray cover (D6) securely until the magnet catches.
10 Push the internal tray (D5) back into position and close the front cover.
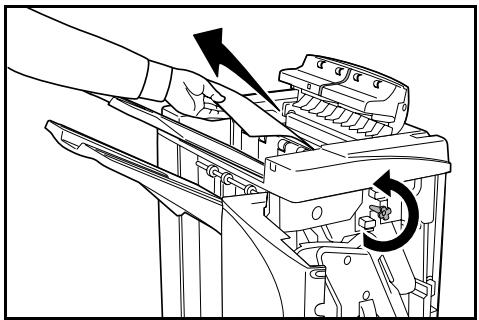
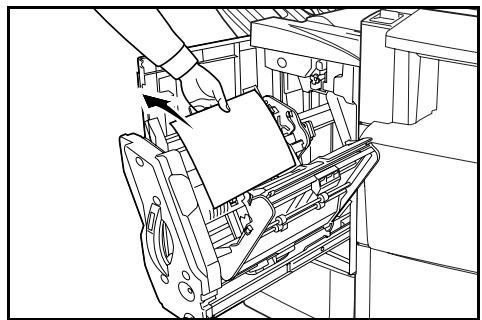
Ejection Section
If the illustration shown displays on the machine's operation panel, there is a paper jam in the ejection section of the Center-Folding Unit.
1 Push the folding unit release lever and pull out the folding unit.
2 Turn the center-folding unit conveyor knob (D10) to right to feed the paper along to enable easy removal, and remove the paper.
3 Open the folding unit paper plate guide (D9) and remove the paper jam.
4 Open the folding unit top cover and turn the folding unit conveyor knob (D10) to the left to feed the paper further along for easy removal.
5 Lift open the folding tray and remove any jammed paper.
6 Close the open trays and covers, and return the folding unit to its original position.
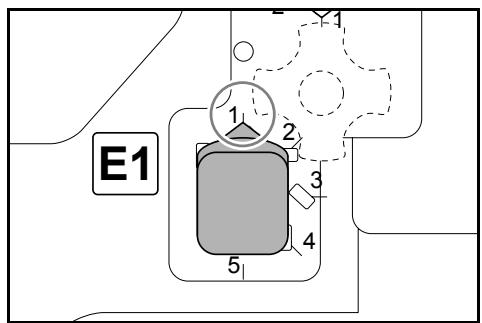
Cautions to be taken when the internal tray is pulled out
If you turn off the power or open the front cover accidentally during operation of the document finisher and the internal tray confirmation window (1) becomes red, the internal tray (D5) is automatically locked and cannot be pulled out.
If you turn off the main power, turn the power on again. If you open the front cover, close it. Then, the internal tray confirmation window (1) becomes black and the lock of the internal tray (D5) is released.

Before pulling out the internal tray (D5), make sure that the internal tray confirmation window (1) is black.
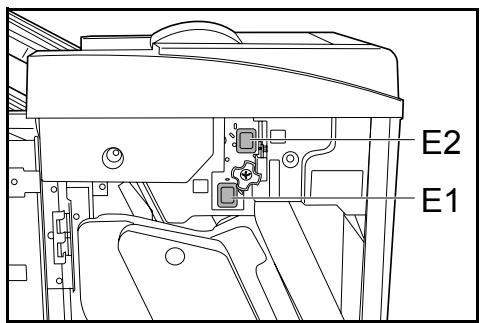
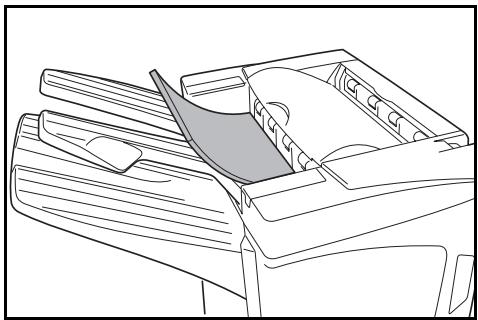
Curled Output
If the copies ejected are curled, adjust using the pressure roller bottom adjuster knob (E1) and pressure roller top adjuster knob (E2).
NOTE: Curled paper can cause frequent paper jams in the conveyor and internal trays. If this occurs, follow the steps below to adjust for paper curling.
Paper curled downward

1 Open the front cover.
2 Set pressure roller top adjust knob (E2) to '1'. For operation method, see Paper curled upward on page 32.
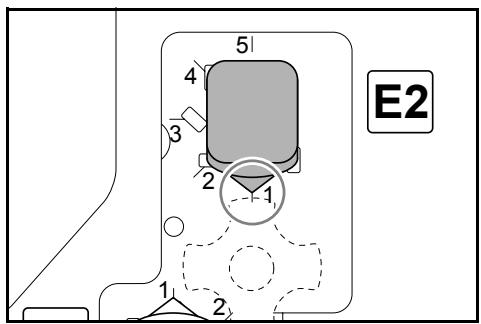
3 Pull pressure roller bottom adjust knob (E1) outward and turn in the direction of a higher number.
Align the knob with a number to lock the knob by setting the knob protrusions into the frame cutout area.
4 Close the front cover.
Paper curled upward
1 Open the front cover.
2 Set pressure roller bottom adjust knob (E1) to '1'. For operation method, see Paper curled downward on page 31.
3 Pull pressure roller top adjust knob (E2) outward and turn in the direction of a higher number.
Align the knob with a number to lock the knob by setting the knob protrusions into the frame cutout area.
4 Close the front cover.
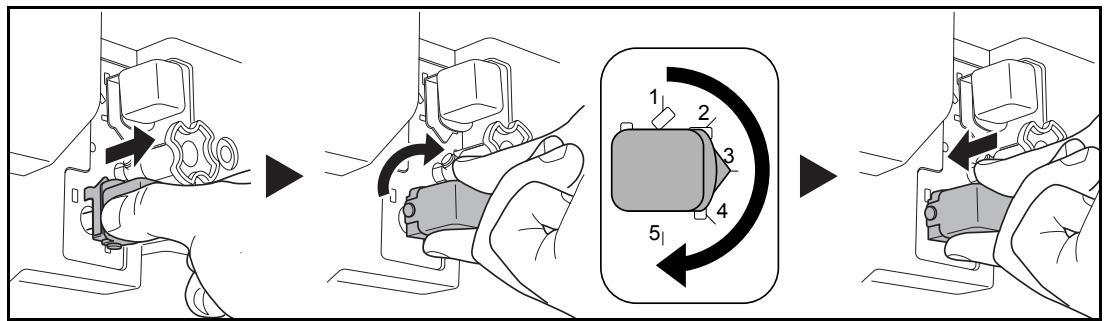
Clearing a Staple Jam
If a message indicating a staple jam is displayed on the machine's operation panel, remove the jammed staples.
Staple cartridge holder A
Follow the steps below to remove jammed staples.
NOTE: See page 35 to clear staple jams in the optional folding unit.
1 While pushing the finisher release lever, pull the finisher out from the machine.
2 Open the right cover (D8).
3 Re-install the staple cartridge holder A.
4 Open the cover plate (A) of the staple cartridge holder A and remove any jammed staples.
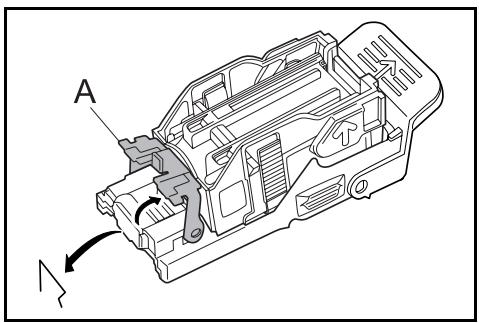
5 Close the cover (A) plate of the staple cartridge holder into its original position.
6 Re-install the staple cartridge holder. The staple cartridge holder will click into place when it has been inserted correctly.
7 Close the right cover (D8) and re-install the finisher back into position on the machine.
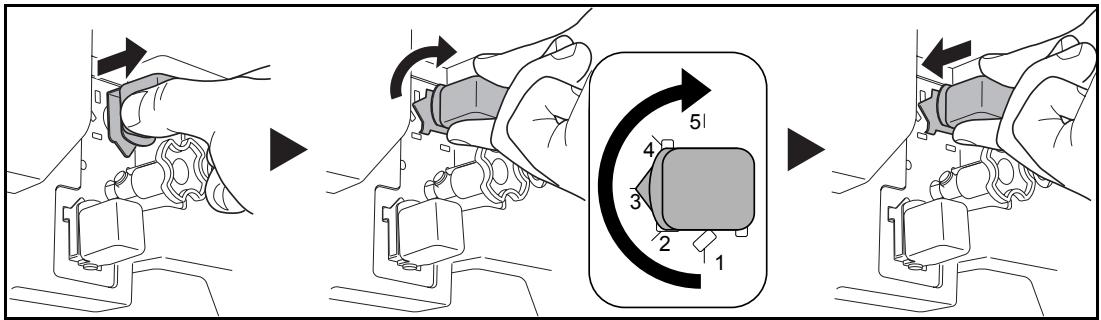
Staple cartridge holder B/C
Follow the steps below to remove jammed staples from the optional folding unit.
1 Push the folding unit release lever and pull out the folding unit.
2 Remove staple cartridge holder B or C.
3 Open the cover plate (B) of the staple cartridge holder and remove any jammed staples.
4 Close the cover (B) plate of the staple cartridge holder into its original position.
5 Re-install the staple cartridge holder.
When re-installing, align the triangle marks on the staple cartridge holder and the staple unit. The staple cartridge holder will click into place when it has been inserted correctly.
Push the folding unit back into position.
Specifications
NOTE: Specifications are subject to change without notice.
| Item | Description | |
| Type | Floor model | |
| Number of Trays | 3 | |
| Tray Capacity | Tray A (64 g/m2weight paper) | A3, B4, Folio,11 × 17", 8 1/2 × 14", 8 1/2 × 13 1/2", 8 1/2 × 13", 8K: 1500 sheets |
| A4, A4R, B5, 11 × 8 1/2", 8 1/2 × 11", 16K: 3000 sheets | ||
| Tray B (64 g/m2weight paper) | A3, B4, Folio,11 × 17", 8 1/2 × 14", 8 1/2 × 13 1/2", 8 1/2 × 13", 12 × 18", 8K: 100 sheets | |
| A4, A4R, B5, B5R, A5, A5R, B6R, A6R, 11 × 8 1/2", 8 1/2 × 11", 5 1/2 × 8 1/2", 16K, 16KR: 200 sheets | ||
| Tray C (64 g/m2weight paper) | A4, B5, A5, A5R, B6R, A6R, 11 × 8 1/2", 5 1/2 × 8 1/2", 16K: 50 sheets | |
| Staple Unit | Stapling Capacity (64 g/m2weight paper) | A3, B4, Folio, 11 × 17", 8 1/2 × 14", 8 1/2 × 13 1/2", 8 1/2 × 13", 8K: 30 sheets |
| A4, A4R, B5, 11 × 8 1/2", 8 1/2 × 11", 16K: 50 sheets | ||
| Auto Select Staple Mode: 30 sheets | ||
| Paper Weight | 90 g/m2or less | |
| Tray Capacity | Stapling 2 to 4 sheets: 150 sets | |
| Stapling 5 to 10 sheets: 100 sets | ||
| Stapling 11 to 30 sheets: 50 sets | ||
| Stapling 31 to 50 sheets: 3000 sheets† | ||
| Dimensions (W × D × H) | 684 mm × 563 mm × 1087 mm26 15/16" × 22 3/16" × 42 13/16" | |
| Weight | Approx. 55 kg / Approx. 121 lbs. | |
Limited to A4, A4R, B5, 11 × 8 12 , 8 12 × 11 and 16K.
Hole Punch Unit (option)
| Item | Description | |
| Paper Size (64 g/m2 weight paper) | Tray A | A3, B4, A4, A4R, B5, Folio, 11 × 17", 8 1/2 × 14", 8 1/2 × 13 1/2", 8 1/2 × 13", 11 × 8 1/2", 8 1/2 × 11" |
| Tray B | A3, B4, A4, A4R, B5, B5R, A5R, Folio, 11 × 17", 8 1/2 × 14", 8 1/2 × 13 1/2", 8 1/2 × 13", 11 × 8 1/2", 8 1/2 × 11", 5 1/2 × 8 1/2" | |
Mailbox (option)
| Item | Description |
| Number of Trays | 7 |
| Paper Size | A3, B4, A4, A4R, B5, B5R, A5R, Folio, 11 × 17", 8 1/2 × 14", 8 1/2 × 13 1/2", 8 1/2 × 13", 11 × 8 1/2", 8 1/2 × 11", 5 1/2 × 8 1/2", 8K, 16K, 16KR |
| Maximum Number for Storage (64 g/m2 weight paper) | A3, B4, Folio, 11 × 17", 8 1/2 × 14", 8 1/2 × 13 1/2", 8 1/2 × 13", 8K: 50 sheets/bin |
| A4, A4R, B5, B5R, A5R, 11 × 8 1/2", 8 1/2 × 11", 5 1/2 × 8 1/2", 16K, 16KR: 100 sheets/bin | |
| Dimensions (W × D × H) | 510 mm × 400 mm × 470 mm 20 1/16" × 15 3/4" × 18 1/2" |
| Weight | 10 kg or less / 22 lbs. or less |
Center-Folding Unit (option)
| Item | Description |
| Sizes | A3, B4, A4R, 11 × 17", 8 1/2 × 14", 8 1/2 × 11" |
| Number of Sheets | 1 to 16 (no stapling for 1 sheet) |
| Maximum Number for Storage (64 g/m2 weight paper) | 5 or less copies in a set: 30 sets 6 to 10 copies in a set: 16 sets 11 to 16 copies in a set: 10 sets |
| Paper Weight | 60-200 g/m2 (1 cover sheet only for 81 g/m2 or greater) |
2 Deutsch
Sicherheitshinweise
| Papierkassetten-Einzugsrichtung | Papierkassetten-Einzugsrichtung | |
| Original-Ausrichtung:Oberkante | A A A A A A A A A A A A A A A A A A A A A A A A A A A A A A A A A A A A A A A A A A A A A A A A A A A A A A A A A A A A A A A A A A A A A A A A A A A A A A A A A A A A A A A A A A A A A A A A A A A A A | A A A A A A A A A A A A A A A A A A A A A A A A A A A A A A A A A A A A A A A A A A A A A A A A A A A A A A A A A A A A A A A A A A A A A A A A A A A A A A A A A A A A A A A A A A A A A A A A A A |
| Original-Ausrichtung:Oberkante | A A A A A A A A A A A A A A A A A A A A A A A A A A A A A A A A A A A A A A A A A A A A A A A A A A A A A A A A A A A A A A A A A A A A A A A A A A A A A A A A A A A A A B B B B B B B B B B B B B B B B B B B B B B B B B B B B B B B B B B B B B B B B B B B B B B B B B B B B B B B B B B B B B B B B B B B B B B B B B B B B B B B B B B B B B B B B B B B B B B B B B B B B BB B B B B B B B B B B B B B B B B B B B B B B B B B B B B B B B B B B B B B B B B B B B B B B B B B B B B B B B B B B B B B B B B B B B B B B B B B B B B B B B B B B B B B B B B B B B B B B B B B B B C C C C C C C C C C C C C C C C C C C C C C C C C C C C C C C C C C C C C C C C C C C C C C C C C C C C C C C C C C C C C C C C C C C C C C C C C C C C C C C C C C C C C C C C C C C C C C C C C C C C G C C C C C C C C C C C C C C C C C C C C C C C C C C C C C C C C C C C C C C C C C C C C C C C C C C C C C C C C C C C C C C C C C C C C C C C C C C C C C C C C C C C C C C C C C C C C C C C C C C C D C C C C C C C C C C C C C C C C C C C C C C C C C C C C C C C C C C C C C C C C C C C C C C C C C C C C C C C C C C C C C C C C C C C C C C C C C C C C C C C C C C C C C C C C C C C C C C C C C C C E C C C C C C C C C C C C C C C C C C C C C C C C C C C C C C C C C C C C C C C C C C C C C C C C C C C C C C C C C C C C C C C C C C C C C C C C C C C C C C C C C C C C C C C C C C C C C C C C C C C T T T T T T T T T T T T T T T T T T T T T T T T T T T T T T T T T T T T T T T T T T T T T T T T T T T T T T T T T T T T T T T T T T T T T T T T T T T T T T T T T T T T T T T T T T T T T T T T T T T T F F F F F F F F F F F F F F F F F F F F F F F F F F F F F F F F F F F F F F F F F F F F F F F F F F F F F F F F F F F F F F F F F F F F F F F F F F F F F F F F F F F F F F F F F F F F F F F F F F F F f f f f f f f f f f f f f f f f f f f f f f f f f f f f f f f f f f f f f f f f f f f f f f f f f f f f f f f f f f f f f f f f f f f f f f f f f f f f f f f f f f f f f f f f f f f f f f f f f f f f d d d d d d d d d d d d d d d d d d d d d d d d d d d d d d d d d d d d d d d d d d d d d d d d d d d d d d d d d d d d d d d d d d d d d d d d d d d d d d d d d d d d d d d d d d d d d d d d d d d d c c c c c c c c c c c c c c c c c c c c c c c c c c c c c c c c c c c c c c c c c c c c c c c c c c c c c c c c c c c c c c c c c c c c c c c c c c c c c c c c c c c c c c c c c c c c c c c c c c c c t t t t t t t t t t t t t t t t t t t t t t t t t t t t t t t t t t t t t t t t t t t t t t t t t t t t t t t t t t t t t t t t t t t t t t t t t t t t t t t t t t t t t t t t t t t t t t t t t t t t f f f f f f f f f f f f f f f f f f f f f f f f f f f f f f f f f f f f f f f f f f f f f f f f f f f f f f f f f f f f f f f f f f f f f f f f f f f f f f f f f f f f f f f f f f f f f f f f f f f g f f f f f f f f f f f f f f f f f f f f f f f f f f f f f f f f f f f f f f f f f f f f f f f f f f f f f f f f f f f f f f f f f f f f f f f f f f f f f f f f f f f f f f f f f f f f f f f f f f f r r r r r r r r r r r r r r r r r r r r r r r r r r r r r r r r r r r r r r r r r r r r r r r r r r r r r r r r r r r r r r r r r r r r r r r r r r r r r r r r r r r r r r r r r r r r r r r r r r r r R R R R R R R R R R R R R R R R R R R R R R R R R R R R R R R R R R R R R R R R R R R R R R R R R R R R R R R R R R R R R R R R R R R R R R R R R R R R R R R R R R R R R R R R R R R R R R R R R R R R | C O N S U R P I M E L E N T I E N T I E N T I E N T I E N T I E N T I E N T I E N T I E N T I E N T I E N T I E N T I E N T I E N T I E N T I E N T I E N T I E N T I E N T I E N T I E N T I E N T I E N T I E N T I E N T I E N T 1 1 1 1 1 1 1 1 1 1 1 1 1 1 1 1 1 1 1 1 1 1 1 1 1 1 1 1 1 1 1 1 1 1 1 1 1 1 1 1 1 1 1 1 1 1 1 1 1 1 2 2 2 2 2 2 2 2 2 2 2 2 2 2 2 2 2 2 2 2 2 2 2 2 2 2 2 2 2 2 2 2 2 2 2 2 2 2 2 2 2 2 2 2 2 2 2 2 2 2 1 1 1 1 1 1 1 1 1 1 1 1 1 1 1 1 1 1 1 1 1 1 1 1 1 1 1 1 1 1 1 1 1 1 1 1 1 1 1 1 1 1 1 1 1 1 1 1 1 0 0 0 0 0 0 0 0 0 0 0 0 0 0 0 0 0 0 0 0 0 0 0 0 0 0 0 0 0 0 0 0 0 0 0 0 0 0 0 0 0 0 0 0 0 0 0 0 0 0 1 1 1 1 1 1 1 1 1 1 1 1 1 1 1 1 1 1 1 1 1 1 1 1 1 1 1 1 1 1 1 1 1 1 1 1 1 1 1 1 1 1 1 1 1 1 1 1 1 3 3 3 3 3 3 3 3 3 3 3 3 3 3 3 3 3 3 3 3 3 3 3 3 3 3 3 3 3 3 3 3 3 3 3 3 3 3 3 3 3 3 3 3 3 3 3 3 3 3 0 0 0 0 0 0 0 0 0 0 0 0 0 0 0 0 0 0 0 0 0 0 0 0 0 0 0 0 0 0 0 0 0 0 0 0 0 0 0 0 0 0 0 0 0 0 0 0 0 2 2 2 2 2 2 2 2 2 2 2 2 2 2 2 2 2 2 2 2 2 2 2 2 2 2 2 2 2 2 2 2 2 2 2 2 2 2 2 2 2 2 2 2 2 2 2 2 2 0 0 0 0 0 0 0 0 0 0 0 0 0 0 0 0 0 0 0 0 0 0 0 0 0 0 0 0 0 0 0 0 0 0 0 0 0 0 0 0 0 0 0 0 0 0 0 0 0 8 8 8 8 8 8 8 8 8 8 8 8 8 8 8 8 8 8 8 8 8 8 8 8 8 8 8 8 8 8 8 8 8 8 8 8 8 8 8 8 8 8 8 8 8 8 8 8 8 8 0 0 0 0 0 0 0 0 0 0 0 0 0 0 0 0 0 0 0 0 0 0 0 0 0 0 0 0 0 0 0 0 0 0 0 0 0 0 0 0 0 0 0 0 0 0 0 0 0 4 4 4 4 4 4 4 4 4 4 4 4 4 4 4 4 4 4 4 4 4 4 4 4 4 4 4 4 4 4 4 4 4 4 4 4 4 4 4 4 4 4 4 4 4 4 4 4 4 4 0 0 0 0 0 0 0 0 0 0 0 0 0 0 0 0 0 0 0 0 0 0 0 0 0 0 0 0 0 0 0 0 0 0 0 0 0 0 0 0 0 0 0 0 0 0 0 0 0 6 6 6 6 6 6 6 6 6 6 6 6 6 6 6 6 6 6 6 6 6 6 6 6 6 6 6 6 6 6 6 6 6 6 6 6 6 6 6 6 6 6 6 6 6 6 6 6 6 6 0 0 0 0 0 0 0 0 0 0 0 0 0 0 0 0 0 0 0 0 0 0 0 0 0 0 0 0 0 0 0 0 0 0 0 0 0 0 0 0 0 0 0 0 0 0 0 0 0 5 5 5 5 5 5 5 5 5 5 5 5 5 5 5 5 5 5 5 5 5 5 5 5 5 5 5 5 5 5 5 5 5 5 5 5 5 5 5 5 5 5 5 5 5 5 5 5 5 5 0 0 0 0 0 0 0 0 0 0 0 0 0 0 0 0 0 0 0 0 0 0 0 0 0 0 0 0 0 0 0 0 0 0 0 0 0 0 0 0 0 0 0 0 0 0 0 0 0 3 3 3 3 3 3 3 3 3 3 3 3 3 3 3 3 3 3 3 3 3 3 3 3 3 3 3 3 3 3 3 3 3 3 3 3 3 3 3 3 3 3 3 3 3 3 3 3 3 8 8 8 8 8 8 8 8 8 8 8 8 8 8 8 8 8 8 8 8 8 8 8 8 8 8 8 8 8 8 8 8 8 8 8 8 8 8 8 8 8 8 8 8 8 8 8 8 8 4 4 4 4 4 4 4 4 4 4 4 4 4 4 4 4 4 4 4 4 4 4 4 4 4 4 4 4 4 4 4 4 4 4 4 4 4 4 4 4 4 4 4 4 4 4 4 4 4 1 1 1 1 1 1 1 1 1 1 1 1 1 1 1 1 1 1 1 1 1 1 1 1 1 1 1 1 1 1 1 1 1 1 1 1 1 1 1 1 1 1 1 1 1 1 1 1 1 8 8 8 8 8 8 8 8 8 8 8 8 8 8 8 8 8 8 8 8 8 8 8 8 8 8 8 8 8 8 8 8 8 8 8 8 8 8 8 8 8 8 8 8 8 8 8 8 8 11 11 11 11 11 11 11 11 11 11 11 11 11 11 11 11 11 11 11 11 11 11 11 11 11 11 11 11 11 11 11 11 11 11 A = A A = A A = A A = A A = A A = A A = A A = A A = A A = A A = A A = A A = A A = A A = A A = A A = A A = A A = A A = A A = A A = A A = A A = A A = A A = B A = B A = B A = B A = B A = B A = B A = B A = B A = B A = B A = B A = B A = B A = B A = B A = B A = B A = B A = B A = B A = B A = B A = B A = B A = b A = b A = b A = b A = b A = b A = b A = b A = b A = b A = b A = b A = b A = b A = b A = b A = b A = b A = b A = b A = b A = b A = b A = b A = b A = a A = a A = a A = a A = a A = a A = a A = a A = a A = a A = a A = a A = a A = a A = a A = a A = a A = a A = a A = a A = a A = a A = a A = a A = a A = b A = b A = b A = b A = b A = b A = b A = b A = b A = b A = b A = b A = b A = b A = b A = b A = b A = b A = b A = b A = b A = b A = b A = b A =b A = b A = b A = b A = b A = b A = b A = b A = b A = b A = b A = b A = b A = b A = b A = b A = b A = b A = b A = b A = b A = b A = b A = b A = b A = B A = b A = b A = b A = b A = b A = b A = b A = b A = b A = b A = b A = b A = b A = b A = b A = b A = b A = b A = b A = b A = b A = b A = b A = a A = b A = b A = b A = b A = b A = b A = b A = b A = b A = b A = b A = b A = b A = b A = b A = b A = b A = b A = b A = b A = b A = b A = b A = a A = c A = c A = c A = c A = c A = c A = c A = c A = c A = c A = c A = c A = c A = c A = c A = c A = c A = c A = c A = c A = c A = c A = c A = c A = c A = b A = b A = b A = b A = b A = b A = b A = b A = b A = b A = b A = b A = b A = b A = b A = b A = b A = b A = b A = b A = b A = b A = b A = b A = c A = c A = c A = c A = c A = c A = c A = c A = c A = c A = c A = c A = c A = c A = c A = c A = c A = c A = c A = c A = c A = c A = c A = c A =c A = c A = c A = c A = c A = c A = c A = c A = c A = c A = c A = c A = c A = c A = c A = c A = c A = c A = c A = c A = c A = c A = c A = c A = c A = e A = e A = e A = e A = e A = e A = e A = e A = e A = e A = e A = e A = e A = e A = e A = e A = e A = e A = e A = e A = e A = e A = e A = e A = e A = c A = c A = c A = c A = c A = c A = c A = c A = c A = c A = c A = c A = c A = c A = c A = c A = c A = c A = c A = c A = c A = c A = c A = c A = d A = d A = d A = d A = d A = d A = d A = d A = d A = d A = d A = d A = d A = d A = d A = d A = d A = d A = d A = d A = d A = d A = d A = d A = d A = c A = c A = c A = c A = c A = c A = c A = c A = c A = c A = c A = c A = c A = c A = c A = c A = c A = c A = c A = c A = c A = c A = c A = c A = p A = p A = p A = p A = p A = p A = p A = p A = p A = p A = p A = p A = p A = p A = p A = p A = p A = p A = p A = p A = p A = p A = p A = p A = p A = c A = c A = c A = c A = c A = c A = c A = c A = c A = c A = c A = c A = c A = c A = c A = c A = c A = c A = c A = c A = c A = c A = c A = c A = C A = c A = c A = c A = c A = c A = c A = c A = c A = c A = c A = c A = c A = c A = c A = c A = c A = c A = c A = c A = c A = c A = c A = c A = c A = f A = f A = f A = f A = f A = f A = f A = f A = f A = f A = f A = f A = f A = f A = f A = f A = f A = f A = f A = f A = f A = f A = f A = f A = f A =f A = f A = f A = f A = f A = f A = f A = f A = f A = f A = f A = f A = f A = f A = f A = f A = f A = f A = f A = f A = f A = f A = f A = f A = f A = c A = c A = c A = c A = c A = c A = c A = c A = c A = c A = c A = c A = c A = c A = c A = c A = c A = c A = c A = c A = c A = c A = c A = c A = a A = a A = a A = a A = a A = a A = a A = a A = a A = a A = a A = a A = a A = a A = a A = a A = a A = a A = a A = a A = a A = a A = a A = a A = c A = c A = c A = c A = c A = c A = c A = c A = c A = c A = c A = c A = c A = c A = c A = c A = c A = c A = c A = c A = c A = c A = c A = d A = c A = c A = c A = c A = c A = c A = c A = c A = c A = c A = c A = c A = c A = c A = c A = c A = c A = c A = c A = c A = c A = c A = c A = d A = f A = f A = f A = f A = f A = f A = f A = f A = f A = f A = f A = f A = f A = f A = f A = f A = f A = f A = f A = f A = f A = f A = f A = f A = e A = e A = e A = e A = e A = e A = e A = e A = e A = e A = e A = e A = e A = e A = e A = e A = e A = e A = e A = e A = e A = e A = e A = e A = f A = f A = f A = f A = f A = f A = f A = f A = f A = f A = f A = f A = f A = f A = f A = f A = f A = f A = f A = f A = f A = f A = f A = f A = d A = d A = d A = d A = d A = d A = d A = d A = d A = d A = d A = d A = d A = d A = d A = d A = d A = d A = d A = d A = d A = d A = d A = d A = f A = f A = f A = f A = f A = f A = f A = f A = f A = f A = f A = f A = f A = f A = f A = f A = f A = f A = f A = f A = f A = f A = f A =f A =f A =f A =f A =f A =f A =f A =f A =f A =f A =f A =f A =f A =f A =f A =f A =f A =f A =f A =f A =f A =f A =f A =f A =f A = f A =f A =f A =f A =f A =f A =f A =f A =f A =f A =f A =f A =f A =f A =f A =f A =f A =f A =f A =f A =f A =f A =f A =f A = f A = f A = f A = f A = f A = f A = f A = f A = f A = f A = f A = f A = f A = f A = f A = f A = f A = f A = f A = f A = f A = f A = f A =f A =c A =c A =c A =c A =c A =c A =c A =c A =c A =c A =c A =c A =c A =c A =c A =c A =c A =c A =c A =c A =c A =c A =c A =c A =c A = c A =c A =c A =c A =c A =c A =c A =c A =c A =c A =c A =c A =c A =c A =c A =c A =c A =c A =c A =c A =c A =c A =c A =c A =c A =e A =e A =e A =e A =e A =e A =e A =e A =e A =e A =e A =e A =e A =e A =e A =e A =e A =e A =e A =e A =e A =e A =e A =e A =e A = e A= e A= e A= e A= e A= e A= e A= e A= e A= e A= e A= e A= e A= e A= e A= e A= e A= e A= e A= e A= e A= e A= e A= e A= e A= e A = e A= e A= e A= e A= e A= e A= e A= e A= e A= e A= e A= e A= e A= e A= e A= e A= e A= e A= e A= e A= e A= e A= e A= e A= c A= c A= c A= c A= c A= c A= c A= c A= c A= c A= c A= c A= c A= c A= c A= c A= c A= c A= c A= c A= c A= c A= c A= c A= c A= e A= e A= e A= e A= e A= e A= e A= e A= e A= e A= e A= e A= e A= e A= e A= e A= e A= e A= e A= e A= e A= e A= e A= e A= c A= B= b B= b B= b B= b B= b B= b B= b B= b B= b B= b B= b B= b B= b B= b B= b B= b B= b B= b B= b B= b B= b B= b B= b B= b B= b B= b |
2 Retirez le papier coince.
5 Retirez le papier coince.

2 Retirez le papier coince.
7 Retirez le papier coince.

| Direzione di caricamento carta nel cassetto | Direzione di caricamento carta nel cassetto | |
| Orientamento originale: Margine superiore | A A A A A A A A A A A A A A A A A A A A A A A A A A A A A A A A A A A A A A A A A A A A A A A A A A A | A A A A A A A A A A A A A A A A A A A A A A A A A A A A A A A A A A A A A A A A A A A A A A A A A B B B B B B B B B B B B B B B B B B B B B B B B B B B B B B B B B B B B B B B B B B B B B B B B B B A A A A A A A A A A A A A A A A A A A A A A A A A A A A A A A A A A A A A A A A A A A A A A A A A B |
| Orientamento originale: Margine superiore sinistro | A A A A A A A A A A A A A A A A A A A A A A A A A A A A A A A A A A A A A A A A A A A A A A A A A C C C C C C C C C C C C C C C C C C C C C C C C C C C C C C C C C C C C C C C C C C C C C C C C C C B B B B B B B B B B B B B B B B B B B B B B B B B B B B B B B B B B B B B B B B B B B B B B B B B C C C C C C C C C C C C C C C C C C C C C C C C C C C C C C C C C C C C C C C C C C C C C C C C C A A A A A A A A A A A A A A A A A A A A A A A A A A A A A A A A A A A A A A A A A A A A A A A A A C | A A A A A A A A A A A A A A A A A A A A A A A A A A A A A A A A A A A A A A A A A A A A A A A A A E E E E E E E E E E E E E E E E E E E E E E E E E E E E E E E E E E E E E E E E E E E E E E E E E E B B B B B B B B B B B B B B B B B B B B B B B B B B B B B B B B B B B B B B B B B B B B B B B B B E E E E E E E E E E E E E E E E E E E E E E E E E E E E E E E E E E E E E E E E E E E E E E E E E C C C C C C C C C C C C C C C C C C C C C C C C C C C C C C C C C C C C C C C C C C C C C C C C C E E E E E E E E E E E E E E E E E E E E E E E E E E E E E E E E E E E E E E E E E E E E E E E E E F F F F F F F F F F F F F F F F F F F F F F F F F F F F F F F F F F F F F F F F F F F F F F F F F F E E E E E E E E E E E E E E E E E E E E E E E E E E E E E E E E E E E E E E E E E E E E E E E E E G G G G G G G G G G G G G G G G G G G G G G G G G G G G G G G G G G G G G G G G G G G G G G G G G G E E E E E E E E E E E E E E E E E E E E E E E E E E E E E E E E E E E E E E E E E E E E E E E E E L L L L L L L L L L L L L L L L L L L L L L L L L L L L L L L L L L L L L L L L L L L L L L L L L L E E E E E E E E E E E E E E E E E E E E E E E E E E E E E E E E E E E E E E E E E E E E E E E E E I I I I I I I I I I I I I I I I I I I I I I I I I I I I I I I I I I I I I I I I I I I I I I I I I I E E E E E E E E E E E E E E E E E E E E E E E E E E E E E E E E E E E E E E E E E E E E E E E E E M |
| 力SETS内 用紙方向 | 力SETS内 用紙方向 | |
| 原稿SETS向き:奥 | A A A A A A A A A A A A A A A A A A A A A A A A A A A A A A A A A A A A A A A A A A A A A A A A A A A | A A A A A A A A A A A A A A A A A A A A A A A A A A A A A A A A A A A A A A A A A A A A A A A A A B B B B B B B B B B B B B B B B B B B B B B B B B B B B B B B B B B B B B B B B B B B B B B B B B B A A A A A A A A A A A A A A A A A A A A A A A A A A A A A A A A A A A A A A A A A A A A A A A A A B |
| 原稿SETS向き:奥 | A A A A A A A A A A A A A A A A A A A A A A A A A A A A A A A A A A A A A A A A A A A A B B B B B B | A A A A A A A A A A A A A A A A A A A A A A A A A A A A A A A A A A A A A A A A A A A A A A A A A C C C C C C C C C C C C C C C C C C C C C C C C C C C C C C C C C C C C C C C C C C C C C C C C C C B B B B B B B B B B B B B B B B B B B B B B B B B B B B B B B B B B B B B B B B B B B B B B B B B C C C C C C C C C C C C C C C C C C C C C C C C C C C C C C C C C C C C C C C C C C C C C C C C C A A A A A A A A A A A A A A A A A A A A A A A A A A A A A A A A A A A A A A A A A A A A A A A A A C |
| 原稿SETS向き:左 | A A A A A A A A A A A A A A A A A A A A A A A A A A A A A A A A A A A A A A A A A A A A A A A A A E E E E E E E E E E E E E E E E E E E E E E E E E E E E E E E E E E E E E E E E E E E E E E E E E E C C C C C C C C C C C C C C C C C C C C C C C C C C C C C C C C C C C C C C C C C C C C C C C C C E E E E E E E E E E E E E E E E E E E E E E E E E E E E E E E E E E E E E E E E E E E E E E E E E B B B B B B B B B B B B B B B B B B B B B B B B B B B B B B B B B B B B B B B B B B B B B B B B B E E E E E E E E E E E E E E E E E E E E E E E E E E E E E E E E E E E E E E E E E E E E E E E E E F F F F F F F F F F F F F F F F F F F F F F F F F F F F F F F F F F F F F F F F F F F F F F F F F F E E E E E E E E E E E E E E E E E E E E E E E E E E E E E E E E E E E E E E E E E E E E E E E E E O O O O O O O O O O O O O O O O O O O O O O O O O O O O O O O O O O O O O O O O O O O O O O O O O O E E E E E E E E E E E E E E E E E E E E E E E E E E E E E E E E E E E E E E E E E E E E E E E E E L L L L L L L L L L L L L L L L L L L L L L L L L L L L L L L L L L L L L L L L L L L L L L L L L L E E E E E E E E E E E E E E E E E E E E E E E E E E E E E E E E E E E E E E E E E E E E E E E E E R R R R R R R R R R R R R R R R R R R R R R R R R R R R R R R R R R R R R R R R R R R R R R R R R R E E E E E E E E E E E E E E E E E E E E E E E E E E E E E E E E E E E E E E E E E E E E E E E E E P P P P P P P P P P P P P P P P P P P P P P P P P P P P P P P P P P P P P P P P P P P P P P P P P P F F F F F F F F F F F F F F F F F F F F F F F F F F F F F F F F F F F F F F F F F F F F F F F F F G G G G G G G G G G G G G G G G G G G G G G G G G G G G G G G G G G G G G G G G G G G G G G G G G G E E E E E E E E E E E E E E E E E E E E E E E E E E E E E E E E E E E E E E E E E E E E E E E E E G G G G G G G G G G G G G G G G G G G G G G G G G G G G G G G G G G G G G G G G G G G G G G G G G C C C C C C C C C C C C C C C C C C C C C C C C C C C C C C C C C C C C C C C C C C C C C C C C C G G G G G G G G G G G G G G G G G G G G G G G G G G G G G G G G G G G G G G G G G G G G G G G G G F F F F F F F F F F F F F F F F F F F F F F F F F F F F F F F F F F F F F F F F F F F F F F F F F C |
This machine has passed all quality controls and final inspection