
COPIA 9020 - Photocopier OLIVETTI - Free user manual and instructions
Find the device manual for free COPIA 9020 OLIVETTI in PDF.
| Product type | Office copier |
| Brand | Olivetti |
| Model | COPIA 9020 |
| Dimensions (W × D × H) | 697 × 617 × 541 mm |
| Weight | 58 kg |
| Power supply | 230 V, 50 Hz, 15 A |
| Power consumption | Operating: approx. 1,500 W (estimated); standby: energy saving function |
| Copy speed (A4) | 20 copies/min |
| Copy speed (A3) | 11 copies/min |
| First copy time | 8 seconds (A4, upper tray) |
| Warm-up time | Approximately 30 seconds at 20 °C |
| Maximum number of copies | 99 |
| Fixed reproduction ratios | 1:1, reduction 1:0.707 (A3→A4), enlargement 1:1.414 (A4→A3), zoom from 50% to 200% |
| Paper sizes | B5, B5R, A4, A4R, B4, A3 |
| Standard paper capacity | 2 trays of 250 sheets each + multi-bypass feeder of 50 sheets |
| Paper weight | 64 to 128 g/m² (multi-bypass feeder) |
| Available options | Automatic document feeder (ADF), 10/20-bin sorter, 10-bin sorter-stapler, copy counter, large capacity tray (1,000 sheets) |
| Routine maintenance | Cleaning the glass, cover, charging corona wire, and conveying/separation unit |
| Consumable replacement | Toner cartridge (monocomponent), staples for sorter-stapler |
| Safety | Adjustable auto shut-off (10 min to 2 h), energy saving function, jam and error indications |
Frequently Asked Questions - COPIA 9020 OLIVETTI
User questions about COPIA 9020 OLIVETTI
0 question about this device. Answer the ones you know or ask your own.
Ask a new question about this device
Download the instructions for your Photocopier in PDF format for free! Find your manual COPIA 9020 - OLIVETTI and take your electronic device back in hand. On this page are published all the documents necessary for the use of your device. COPIA 9020 by OLIVETTI.
USER MANUAL COPIA 9020 OLIVETTI
PUBLICATION ISSUED BY:
Olivetti Lexikon, S.p.A.
Documentazione
77, Via Jervis - 10015 Ivrea (Italy)
Copyright © 2000, Olivetti
ENERGY STAR is a U.S. registered mark.
Cassetto LCT (Large Capacity Tray) 29
ILLUSTRAZIONI
Con这对于 the reader, this is a very interesting and stimulating book. It provides a detailed account of the history of the Italian literature, including the discovery of several important figures and the discovery of many famous characters.
AREA USCITA COPIE (Zona sinistra)
USA:LTR-LTRR-LGL-LDG
CARATTERISTICHE GENERALI
Tip:
Piano esposizione:
Fotocondutlore:
Toner:
ENERGY STAR is a U.S. registered mark.
The manufacturer reserves the right to carry out modifications to the product described in this manual at any time and without any notice.
The C mark affixed to the product certifies that the product satisfies the basic quality requirements.

Your attention is drawn to the following actions that could compromise the characteristics of the product:
- incorrect electrical supply;
- incorrect installation; incorrect or improper use, or, in any case, not in accordance with the warnings given in the User Manual supplied with the product;
- replacement of original components or accessories with others of a type not approved by the manufacturer, or carried out by unauthorized personnel.
CONTENTS
BEFORE USE
Page
Warning on installation and use 1
Basic machine components 2
Console 2
COPIER FUNCTIONS
How to make copies 4
Setting the auto shut-off time 5
Setting the number of copies 5
Regulating the exposure (Dark/Light) 5
Selecting the copy format 6
Reductions/enlargements 6
Using the manual multi-feeder 7
Copying adjacent pages on separate sheets 8
Copying on special media 8
Manual front-rear copying 9
INDICATIONS/REFILLING/JAM CLEARANCE
Indicator lights 10
Adding paper 10
Removing a paper jam 11
Adding toner 13
MAINTENANCE/ACCESSORIES/TECHNICAL DATA
Operator troubleshooting 14
Regular cleaning 15
Materials and optional accessories 16
General characteristics 17
OPTIONAL UNITS
ADF (Automatic Document Feeder) 17
Sorter 10/ Sorter 20 20
Stapler Sorter 10 23
Control card copy counter 28
LCT TRAY (Large Capacity Tray) 29
ILLUSTRATIONS
Console (Section A back of cover)
Basic Machine (Section B back of cover)
Optional Units (Sections C/D/E/F/G back of cover)
NOTES ON USE OF INSTRUCTION MANUAL
Structure of the Manual
The various functioning possibilities of the photocopier are described in four different sections:
- BEFORE USE
- COPIER FUNCTIONS
- INDICATIONS/REFILLING/JAM CLEARANCE
- MAINTENANCE/ACCESSORIES/TECHNICAL DATA
The last section, "OPTIONAL UNITS" contains all the instructions for the customized configurations made possible by adding optional units.
Graphic Representations
All operation illustrations are incorporated in the text. On the back of the cover you will find all the illustrations for the console, the components of the basic machine and the optional units.
Keys
The name of the keys are always followed by the letter A (which defines the graphic section) and by a reference number which identifies it on the console.
WARNING ON INSTALLATION AND USE
The environmental conditions affect the correction functioning of the copier. Do not install the machine in environments which present the following conditions:
- Temperature and humidity that are too high or too low, for example next to a tap, a water heater, a humidifier, an air conditioner, a radiator or a stove.
- Direct sunlight (if this is unavoidable, make sure that the copier is shaded by a curtain or blind).
- Poor ventilation.
- Environments that are dusty or close to ammoniacal gas emissions, alcohol or solvents.
- Areas subject to vibrations or unstable surfaces.
- Areas subject to rapid changes in temperature. The copier quality could be damaged by condensation forming on the machine when it is heated up quickly after being stored in a cold environment.
- Near to televisions, radios, computers or other electronic equipment.
Safe power supply
- Connect the copier to a 220/240 V AC wall socket of at least 15 A.
- Use earthed walls sockets, which are easy to access and used only by the copier.
- Place the power supply cable so that it cannot be crushed (damaged cables could cause accidents).
- The general on/off switch is used for operating functions only. To disconnect the copier, unplug of the power supply cord.
Installation area
- Leave at least 10cm between the copier and the wall to allow sufficient air circulation.
- Make sure there is enough room around the copier to allow easy access.
Before moving the copier
- The electrical specifications of the copier are indicated on the label attached to the back of the machine.
If you need to move the machine to another location, check that the electrical characteristics are suitable. If not, contact your dealer.
Precautions for use
- Do not disassemble or modify the copier.
- Carefully remove staples and clips from original documents to prevent them falling into the copier.
- Take great care when operating in the fusing area, which may be very hot.
- Do not switch off the copier or open the front panel while copies are being made, as this may cause paper jams.
- Do not use aerosol sprays near the copier.
- If the copier fails to function properly, refer to the chapter on Operator Troubleshooting. In most cases, you will be able to resolve the problem yourself. If you cannot, switch off the copier, remove the power supply cord from the socket and call the Technical Assistance Service.
- The manufacturer declines any responsibility in the case of misuse, improper installation, connection to unauthorized equipment, use of non-original accessories, tampering by unauthorized persons.
BASIC MACHINE COMPONENTS (B back of cover)
- Document cover
- Copy collection tray
- Console
- Control card copy counter
- On-Off switch
- Manual multi-feeder tray
- Manual multi-feeder
- Paper feeder tray
- Copyboard glass
- Setting device
- Fuser area knob
- Small brush
- Paper transfer unit lever
- Charging wire corona unit cleaning rod
- Developer unit lever
- Right door
- Black toner developer unit
- Transfer/separation corona unit
CONSOLE (A back of cover)
| DESCRIPTION | OPERATING FUNCTION | |
| 1. | Sort indicator | Indicates sort in progressive order |
| 2. | Sort/Staple indicator | Indicates staple copies mode |
| 3. | Group mode | Sorts copies by group |
| 4. | Sort/Group/Staple-Sort | Selects sort/group and staple sort mode |
| 5. | Separation indicator | Indicates selection of separation mode |
| 6. | Separation key | Selects copying of the original on two separate sheets |
| 7. | Reproduction ratio indicators | Indicates the set ratios |
| 8. | Auto and Format Indicator | Indicates the automatic selection of the paper (AUTO), or the selected format. |
| 9. | Paper jam indicator | Indicates jammed paper. |
| 10. | Control card indicator | Indicates that the card is not inserted or has not been read |
| 11. | Paper out indicator | Indicates there is no paper |
2
| 12. Toner out indicator | Indicates there is no toner |
| 13. Auto zoom indicator | Signals the automatic selection of the reproduction ratio |
| 14. Display | Displays the number of copies or the reproduction ratio |
| 15. Reset key | Returns the copier to its original status |
| 16. Clear/stop key | Clears the setting and stops the copying |
| 17. Exposure regulator | Selects the copy tone |
| 18. Automatic exposure key | Automatically selects the copy tone |
| 19. Automatic exposure indicator | Indicates selection of automatic exposure mode |
| 20. Fixed reductions key | Selects fixed reductions. |
| 21. 1:1 ratio key | Selects 1:1 copy ratio |
| 22. Fixed enlargement key | Selects fixed enlargements |
| 23. Paper selection and feed key | Selects the automatic mode for paper, tray, multi-feeder or LCT tray (optional) |
| 24. Paper jam location and type of feeder | Indicates the location of the feeder indicator paper jam and the type of feeder |
| 25. Automatic zoom key | Selects automatic zoom mode |
| 26. - Zoom key | Selects reductions up to 50% |
| 27. Zoom indicator | Indicates selection of zoom mode |
| 28. Zoom + key | Selects enlargements up to 200% |
| 29. Reproduction ratio display key | Displays the enlargement/reduction ratio value |
| 30. Print key | Starts copying |
| 31. Numerical keys | Sets the number of copies |
| 32. Standby key | Selects standby mode to save energy |
1. Power On
On/off switch in "I" position.
The LED lights up and the PRINT key (A-30) flashes (green). The copier is ready for settings and the print command.
Once the warm-up phase is over (approx. 30 s), the PRINT key led (A-30) stays on (orange) and the copy procedure is executed automatically (if the PRINT key (A-30) has been pressed at the warm-up phase).
Copier power on conditions (standard mode)
Copy ratio 1:1
Exposure regulator automatic
Paper selection automatic
Number of copies 1

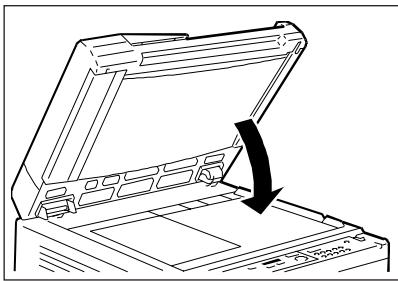
2. Position of the original
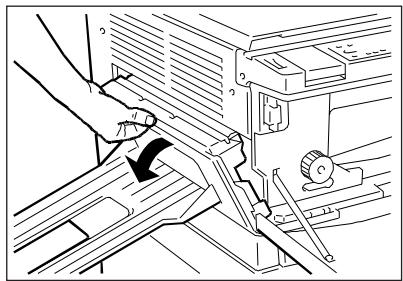
Lift the cover, place the original face down on the clipboard glass aligned with the reference mark “ ” on the top left corner.
3. Setting the copy mode
To change the copy parameters in Standard mode, following the instructions in the following sections:
Setting the number of copies (page 5)
Regulating the exposure (page 5)
Selecting the copy format (page 6)
Reductions and enlargements (page 6)
4. Copying
Press the PRINT key (A-30). During copying, the key indicator remains lit (orange).
CLEAR/STOP key
Press the CLEAR/STOP key (A-16) if you want to stop copying or change the number of copies set.
RESET key
To return to Standard mode, press the RESET key (A-15).
SELF-RESET FUNCTION
If no copies are made for 2 minutes, or no key is pressed, the self-reset functions will automatically return the copier to standard mode.
STANDBY FUNCTION (Energy Saving)
To save energy when the copier is not being used, press the STANDBY key (A-32) to activate the energy saving function (press the same key again to deactivate it).
When the function is active, all the console indicators switch off leaving only those of the STANDBY key and the power on switch lit up.
Notes
- Switch off the copier when it is not going to be used for some time (e.g. overnight).
- When the standby function is deactivated to make copies, less warm-up time is necessary than when the machine has been switched off.
AUTOMATIC STANDBY FUNCTION
The standby function is activated automatically when the copier has not been used for 15 minutes. Also in this case, the indicator lights on the console switch off. The STANDBY key flashes (orange), and the power on switch remainslit. Press the STANDBY key (A-32) to deactivate the function.
SETTING THE AUTO SHUT-OFF TIME
If the copier is not used for 30 minutes, the power will turn OFF automatically. To turn the power back ON, press the Power Switch.
The Auto Shut-Off mode time can be set from 10 minutes to 2 hours.
- Press the A (A-19) key for 5 seconds or more.
- The default time selection (A-4) is displayed on the control panel display.
- Select the desired time setting with the ZOOM + (A-28) and - ZOOM (A-26) or Number Keys.
- The selected timer setting (A-1 through A-9) is shown on the control panel display.
| Display | A-1 | A-2 | A-3 | A-4 | A-5 | A-6 | A-7 | A-8 | A-9 |
| Time [min.] | 10 | 15 | 20 | 30 | 40 | 50 | 60 | 90 | 120 |
- Press the Sorter (A-4) key to store the timer settings and exit this mode.
If you do not want to specify the time, press the Reset (A-15) key to exit without storing the timer setting.
SETTING THE NUMBER OF COPIES
Use the NUMERICAL keys (A-31) to select the required number of copies. A maximum of 99 copies can be set. To change the setting, press the CLEAR/STOP key (A-16) and then make the new selection.
REGULATING THE EXPOSURE (Dark/Light)
Automatic
With automatic exposure control mode, the copier automatically adjusts the degree of exposure to suit the original.
This mode is activated at machine power on (Standard mode) and the AUTOMATIC EXPOSURE INDICATOR (A-19) lights up.
When manual mode is activated, return to automatic mode by pressing the AUTOMATIC EXPOSURE key (A-18).
Manual
Cancel automatic exposure mode by pressing the AUTOMATIC EXPOSURE key (A-18) (the AUTOMATIC EXPOSURE INDICATOR (A-19) light switches off) and use the EXPOSURE REGULATOR (A-17).
To make darker copies, move the cursor to the right (dark half moon).
To make lighter copies, move the cursor to the left (light half moon).
SELECTING THE COPY FORMAT
Automatic selection (Standard mode)
The copier automatically selects the paper format most suited to the original and the reproduction ratio. Automatic selection is already active at machine power on. When manualselection is active, proceed as follows to change to automatic selection:
- Place the original on the copyboard glass and lower the cover.
- Press the PAPER SELECTION key (A-23) until the AUTO INDICATOR (A-8) switches on.
Note:
- Automatic selection and automatic zoom cannot be selected at the same time.
- If the required paper format (selected automatically) is not available, the format led flashes and the led of the alternative copy format, selected automatically by the copier to complete the copying process, switches on.
Manual selection
Press the PAPER SELECTION (A-23) key until the led of the required paper format led lights up.
REDUCTIONS AND ENLARGEMENTS
To reduce or enlarge copies, the user can select from 3 different possibilities: with fixed ratios, with zoom and with automatic zoom.
Fixed reductions/enlargements
With this mode, an original in standard format can be copied to a smaller or larger standard size paper (e.g. A3 -> A4 or A4 -> A3).
Selections
ENLARGEMENTS Max 200% A4 > A3
A3 > A4
REDUCTIONS Min 50%
Press the FIXED ENLARGEMENTS key (A-22) to copy to a larger format.
Press the FIXED REDUCTIONS key (A-20) to copy to a smaller format.
To return to 100% reproduction ratio, press the 1:1 RATIO key (A-21).
Reductions/Enlargement with the zoom
Using the zoom, you can produce reduced or enlarged copies by selecting a reproduction variable between 50% and 200% with 1% increments.
Press the ZOOM+ key (A-28) to increase the reproduction ratio.
Press the -ZOOM key (A-26) to decrease the reproduction ratio.
When you press the Zoom key, the reproduction ratio is displayed for 2 seconds.
To see the value again, press the REPRODUCTION RATIO DISPLAY key (A-29).
Reductions/enlargements with automatic zoom
The reproduction ratio is set automatically (by the copier) according to the size of the original and the paper format.
Press the AUTOMATIC ZOOM key (A-25) to activate the automatic selection of the reproduction ratio.
When this function is activated, the relative LED lights up.
Note
Automatic zoom is not possible when using the manual feeder or the universal tray.
USING THE MANUAL MULTI-FEEDER
The manual multi-feeder should be used when the tray with the required format, or the special media feeder, is not inserted.
Up to 50 sheets (weighing between 64g / m^2 to 128g / m^2 ) can be used.
Operating sequence:
- Place the original on the copyboard glass
- Press the FEED key (A-23) until the feeder led lights up

3. Lift the cover of the multi-feeder
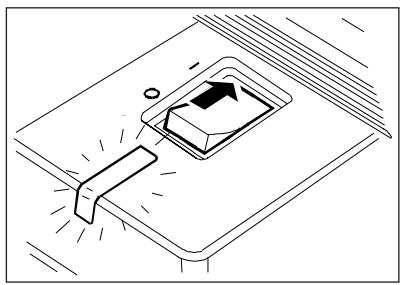
4. Insert the sheets and regulate the alignment guide according to the copy format.

- Close the cover.
- Press the PRINT key (A-30) to start copying
- Once copying has finished, press the FEED key (A-23) to return to the cassette feeder.
COPYING ADJACENT PAGES ON SEPARATE SHEETS
This procedure is used to copy adjacent pages of a book or newspapers on two separate sheets, without moving the original.
It can also be used to copy two A4 size documents at the same time in one single copying operation.
Notes
- The cassette feeder (A4 format) should be used with this procedure.
- This procedure is possible when using the multi-feeder or the ADF.
Operating sequence
- Press the SEPARATION key (A-6)
- Place the original on the copyboard glass with the spine of the book aligned with the A4 reference and the highest page number on the left, so that the pages will be copied in consecutive order.
- Lower the cover and press the PRINT key (A-30). If more than two copies of each page are to be made, all the copies of the left-hand page should be made first, and then all the copies of the right hand page.
- Once copying is complete, press the SEPARATION key (A-6) to activate the mode.
It is possible to make copies on special media, such as OHP film, postcards and adhesive labels.
Operating Sequence
- Place the original on the copyboard glass, aligned with the reference marked.
- Lift the cover of the multi-feeder.
- Insert the special media and regulate the alignment guide according to the copy format.
- Close the cover of the multi-feeder and press the FEEDER key (A-23).
- Enter the number of copies required, using the NUMERICAL keys (A-31).
- Press the PRINT key (A-30) to start copying.
Notes
- When using special media such as OHP film, follow the instructions on the packaging.
- Postcards (A6 format) must be feed horizontally.
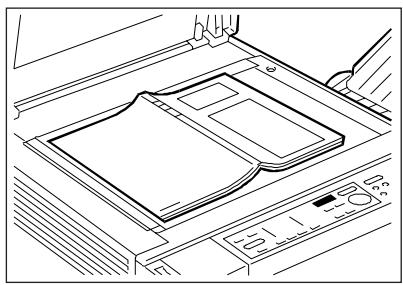
MANUAL FRONT-REAR COPYING
Example: The reproduction of a double-sided document to a front-rear copy.
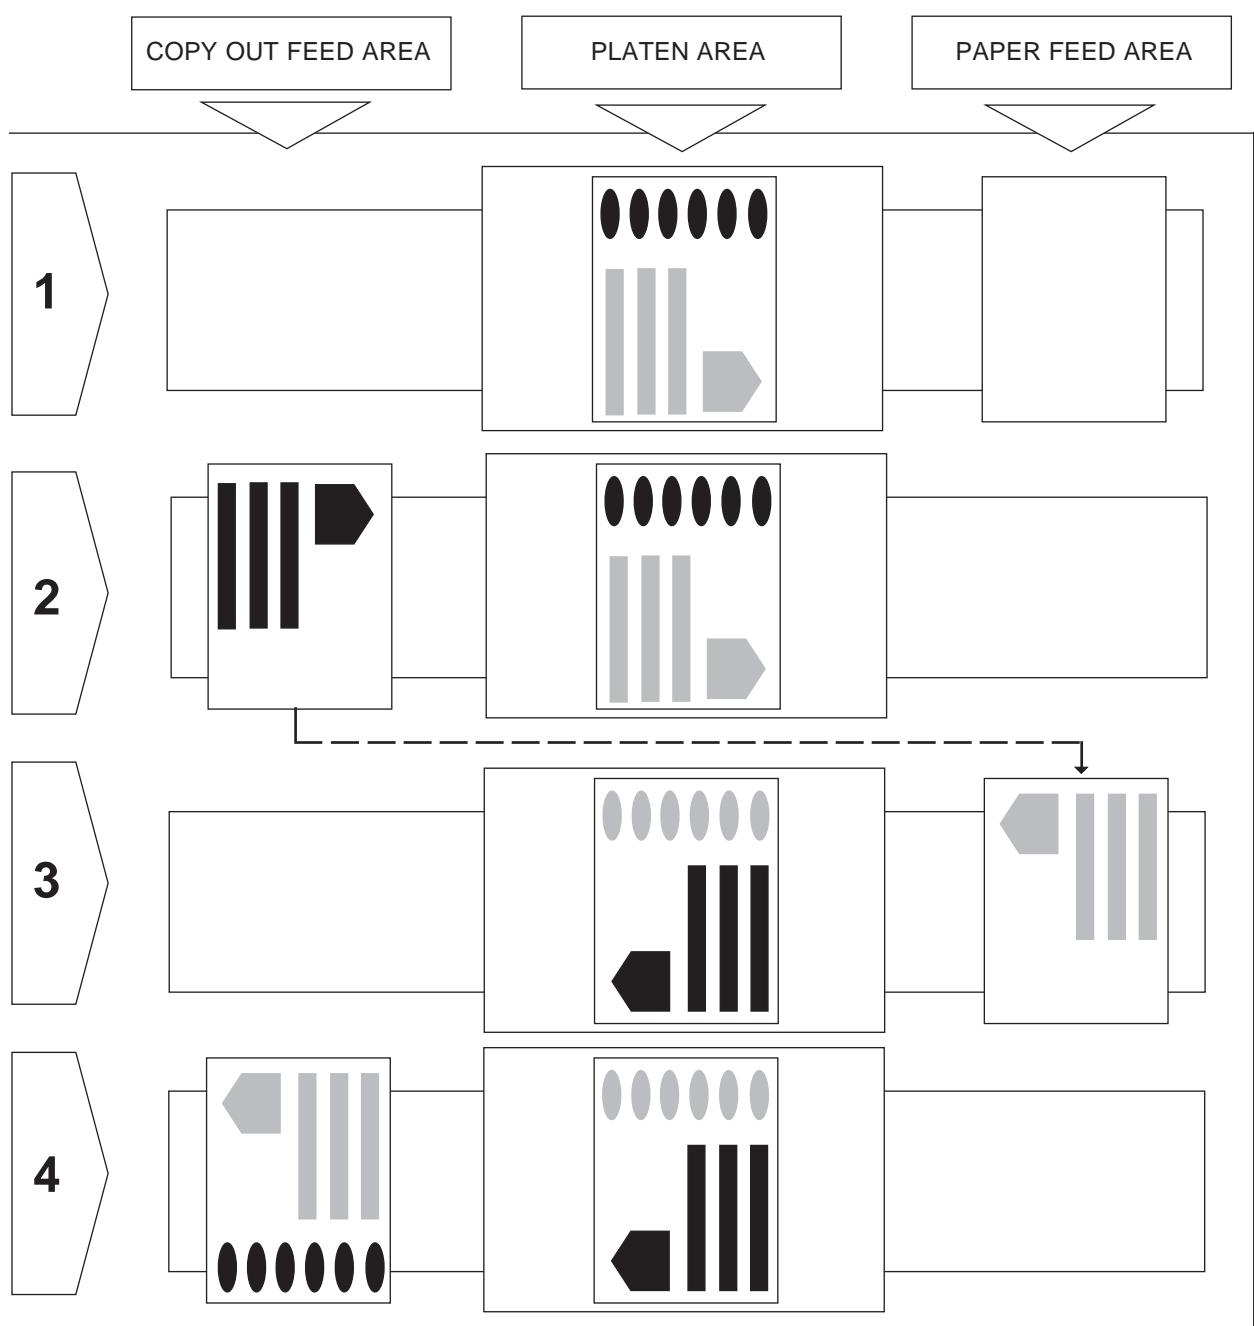
- Place the original on the copyboard glass and press the PRINT key (A-30).
- Make the copy (1st side).
- Position the original as shown in the figure (second side) and insert the copy in the multi-feeder upside down and positioned as shown in the figure. Press the PRINT key (A-30).
- Make the copy (2nd side).
INDICATOR LIGHTS

TONER
The LED lights up when there is no toner. To add toner, refer to the section "Adding toner" on page 13.

PAPER
The LED lights up when there is no paper in the selected device (cassette, manual multi-feeder or optional LCT tray). In this case, the operator must add paper (see the section "Adding paper" on page 10).

PAPER JAM
The LED flashes to indicate a paper jam (see the section "Removing a paper jam" on page 11).

CONTROL CARD (Optional unit)
When the LED flashes, check that the control card is inserted correctly. If the LED continues flashing, contact the Technical Assistance Service.
"E" INDICATOR (Call the Technical Assistance Service)
The error code "E" followed by a number on the display indicates that the copier is not operating correctly. Switch the copier off and then on again. If the problem persists, unplug the machine and call the Technical Assistance Service, notifying them of the error code.
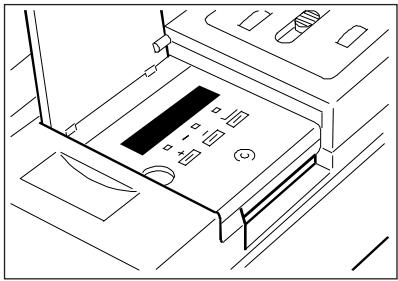
ADDING PAPER
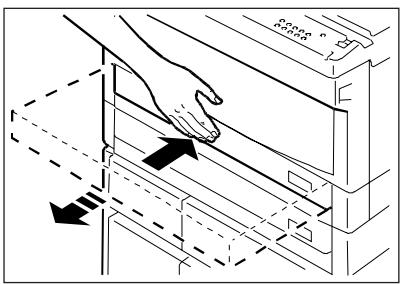
1. Open the cassette by pressing on the indicated area.
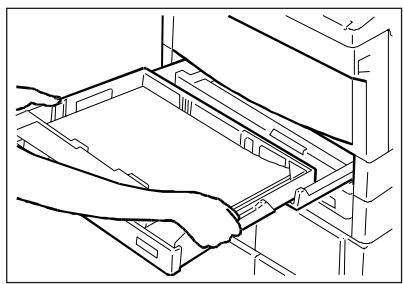
2. Add paper to the cassette. Do not insert paper beyond the maximum level.
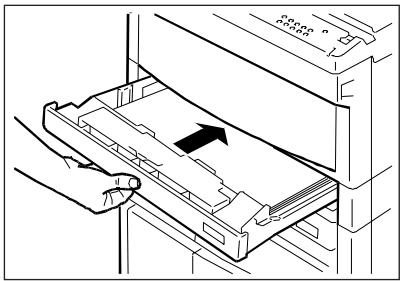
4. Slowly push the cassette until it clicks into position.
3. Align the sheets under the corner tabs.
Notes
- When the no paper led flashes during a copying cycle, add the paper first and then press the PRINT key (A-30). The copier continues to print the remaining number of copies.
- Up to 250 sheets can be inserted in the cassette (80 g/m² paper).
- Any unused paper can be returned to the original packaging and kept in a clean and dry environment.
REMOVING A PAPER JAM
If paper jams in the copier, the PAPER JAM INDICATOR (A-9) flashes. At the same time, the location of the paper jam is indicated by the PAPER JAM LOCATION INDICATOR (A-24).
PAPER JAM LOCATION DIAGRAM
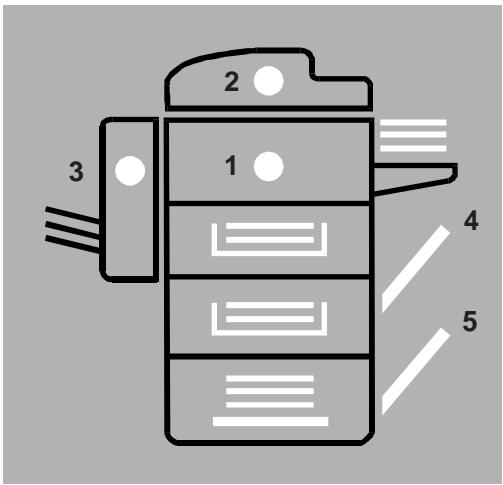
- Paper transfer area (front part)
2.ADF
3.Sorter - Feed area (right area)
- LCT tray
JAMMING AREAS AND REMOVAL
The following examples indicate the areas where jamming may occur and demonstrate how the operator may clear them.
Occasionally, jams may occur (for example, 2 sheets) in two different areas of the copier at the same time.
The operator still has all the necessary indications available (the PAPER JAM LOCATION INDICATOR /A-24). To remove paper, proceed as described below.
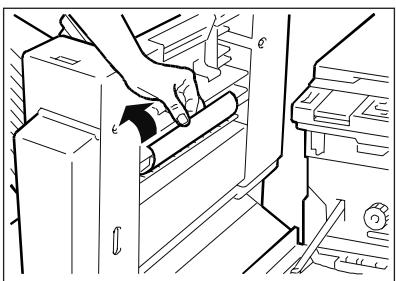
PAPER TRANSFER AREA (front area)
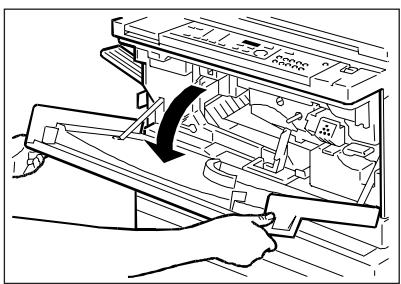
1. Open the front panel
2. Move the lever to the left
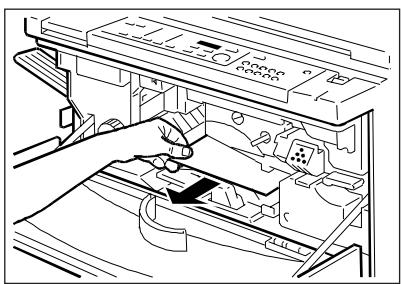
- Remove the paper taking care not to tear it. If this is unavoidable, make sure that all the pieces are removed. Avoid touching the cylinder (see dashed line area in the diagram) as this could get damaged.
- Return the lever to its original position.
- Close the front panel.
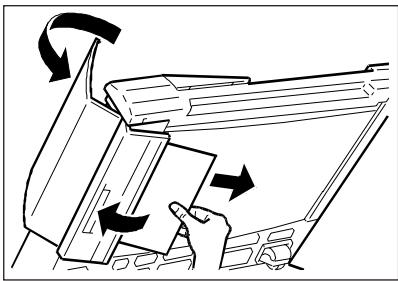
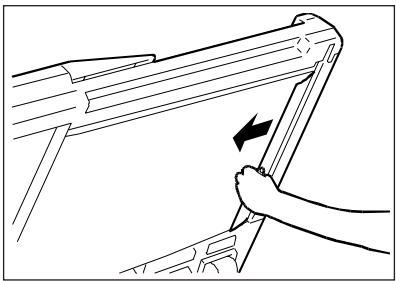
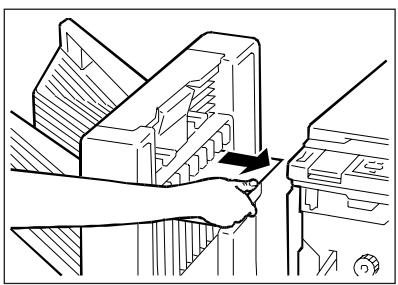
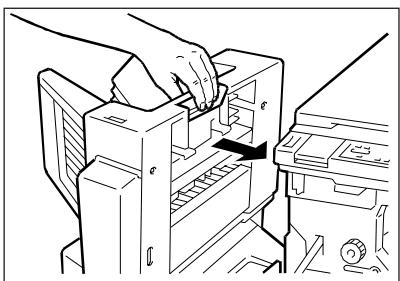
PAPER FEED AREA
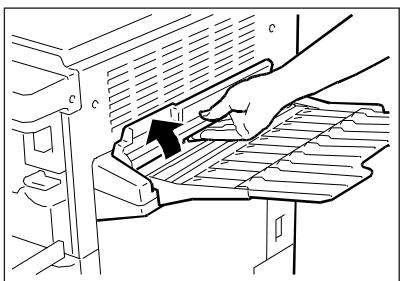
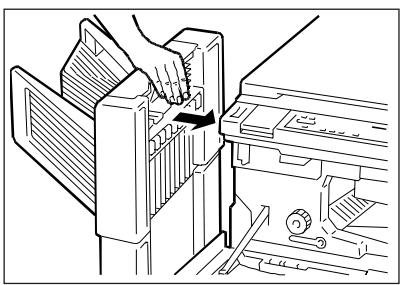
1. Open the front panel. Lift the cover, and use the feed handle to disconnect the multi-feeder. If the LCT tray is inserted, open the right hand panel on the tray.
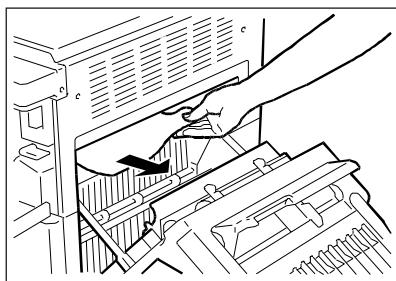
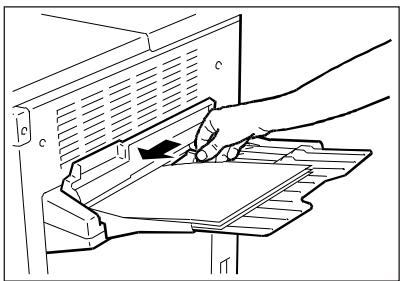
2. Remove the jammed paper.
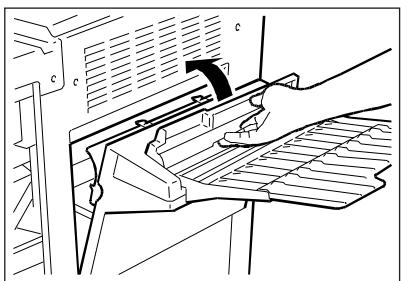
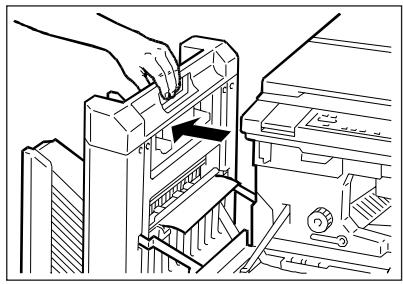
3. Reconnect the multi-feeder. Close the cover and the front panel.
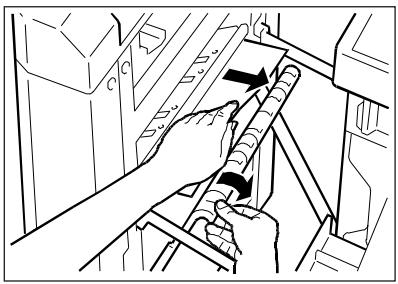
COPY OUTFEED AREA (Left-hand side)

1. Remove the paper from the copy collector tray.
2. Turn the knobb anticlockwise and remove the jammed sheet.
3. First close left-hand panel then the front panel.
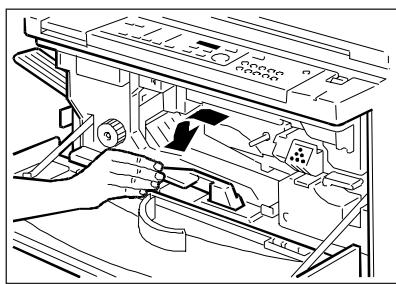
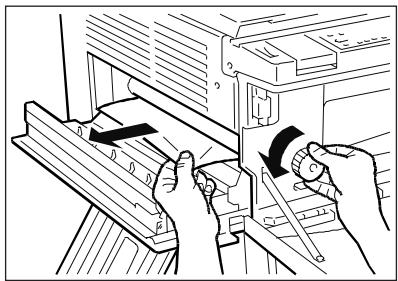
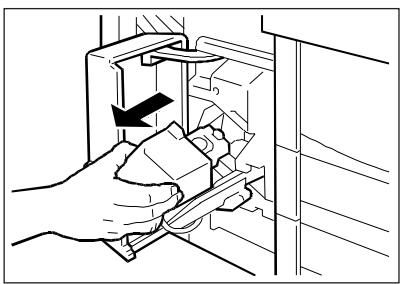
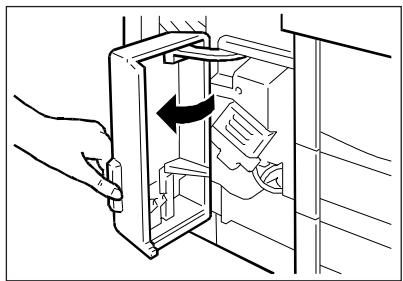
ADDING TONER
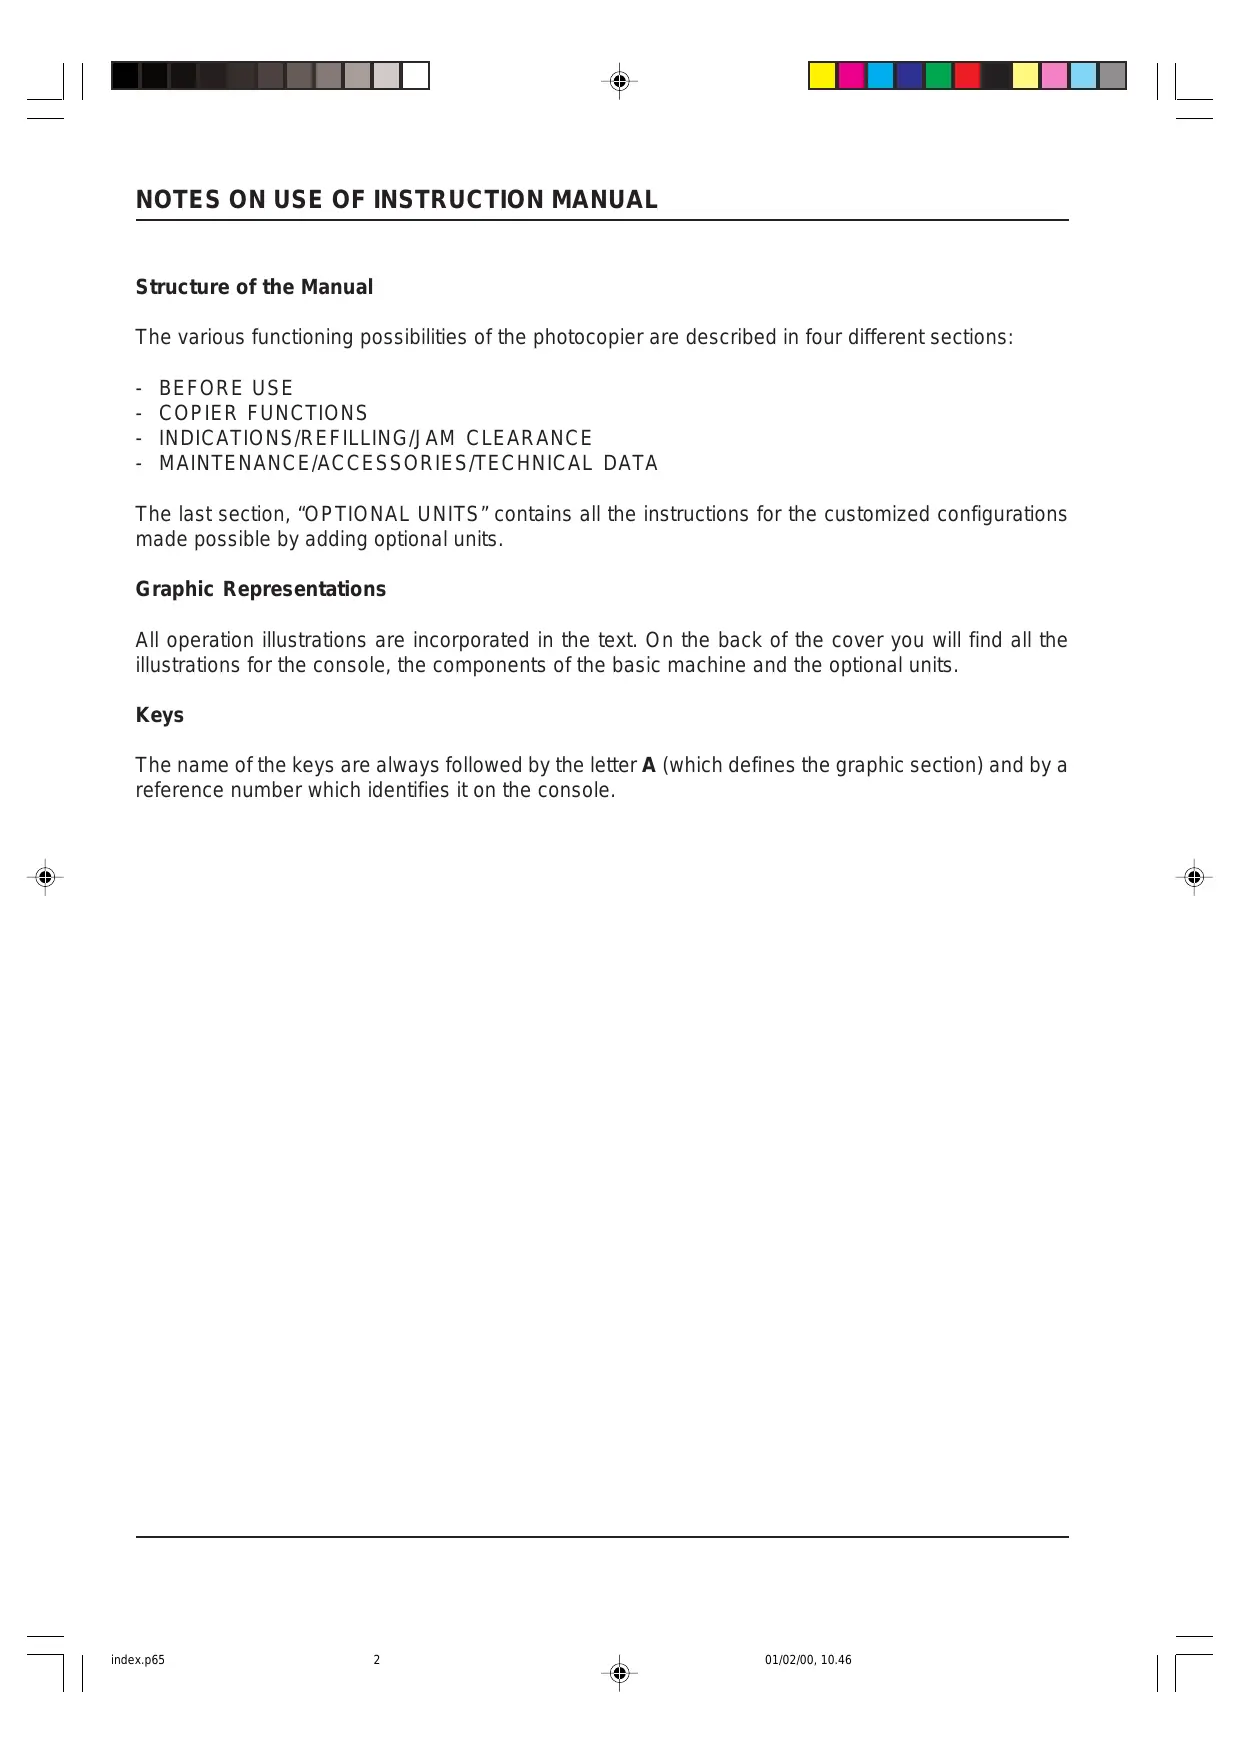
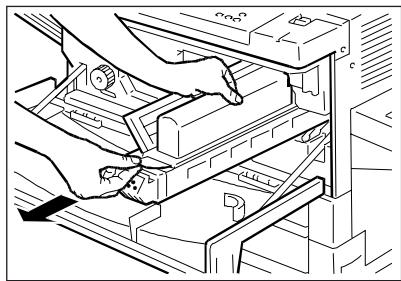
1. Open the front panel and move the developer unit lever in an anti-clockwise direction.
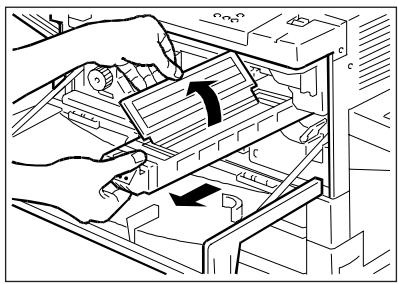
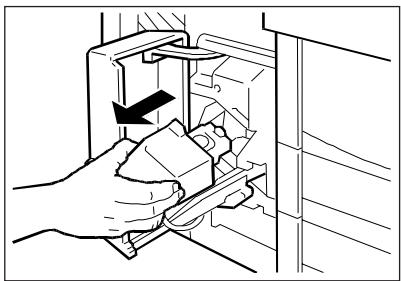
2. Pull the developer unit out until it stops. Open the cover.
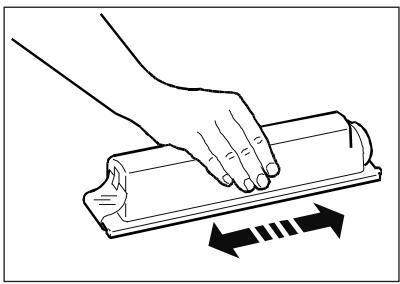
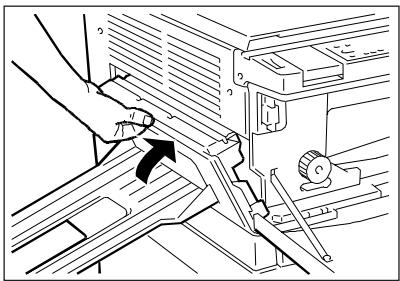
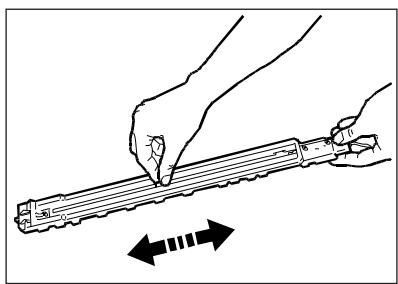
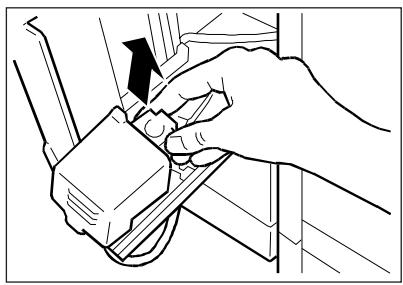
3. Shake the new toner cartridge.
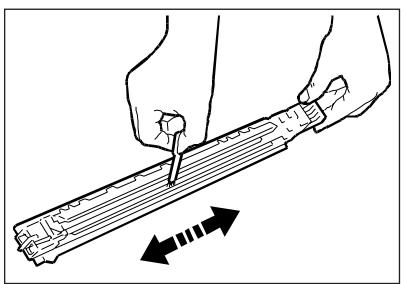
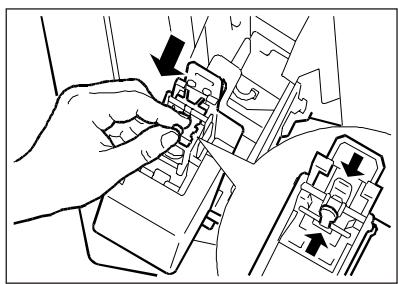
4. Fit the edge of the cartridge in the developer unit groove, and insert the prong on the cartridge into the hole of the developer unit.
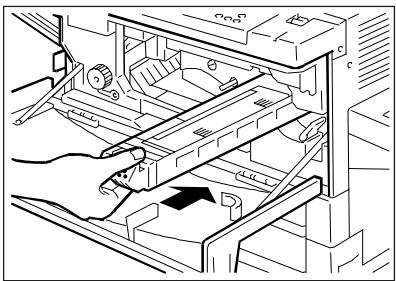
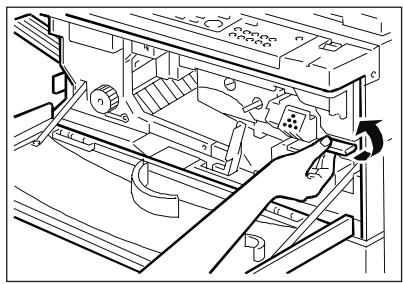
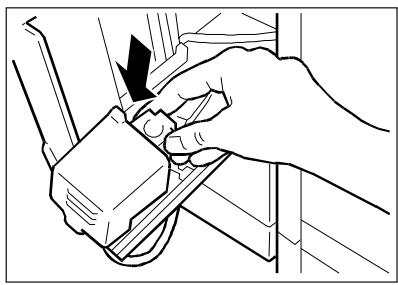
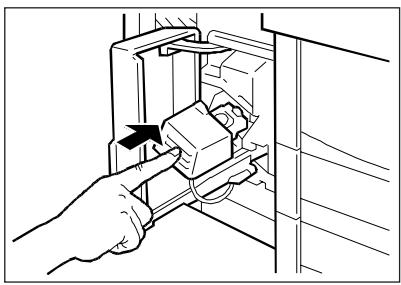
6. Tap the cartridge until all the toner has gone in. Do not add any more toner. Remove the empty cartridge from the unit. Close the cover and push the developer unit back in.
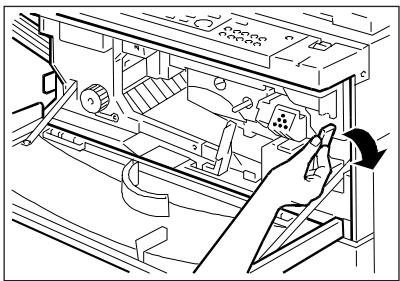
7. Bring the lever back to its original position. Close the front panel.
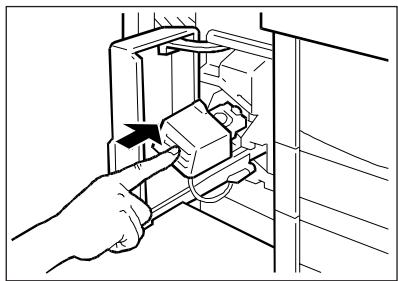
5. Press down on the cartridge and remove the adhesive tape.
OPERATOR TROUBLESHOOTING
Faults not caused by the machine malfunctioning may occur, particularly during the initial phase. The following guidelines will help you to solve certain problems and avoid wasting time.
Copy quality is directly affected by the key operator preventive maintenance.
THE COPIER FAILS TO OPERATE WHEN THE POWER ON SWITCH IS PRESSED
Check:
- The position of the on-off switch
- That the machine is plugged in properly.
COPIES ARE TOO LIGHT OR TOO DARK
Manual check:
- Move the EXPOSURE REGULATOR (A-17) to the right to make copies darker.
- Move the EXPOSURE REGULATOR (A-17) to the left to make copies lighter.
When the Automatic exposure control feature is used but copies are still to light or too dark, proceed as follows:

- Turn the SETTING DEVICE in a clockwise direction to make copies lighter.
- Turn the SETTING DEVICE in an anti-clockwise direction to make copies darker.
COPIES ARE MARKED IN THE SAME PLACE
If marks occur in the same place on all copies, clean the copyboard glass and the cover.
REGULAR CLEANING
The following parts of the copier should be cleaned weekly or when the copies become marked or unclear.
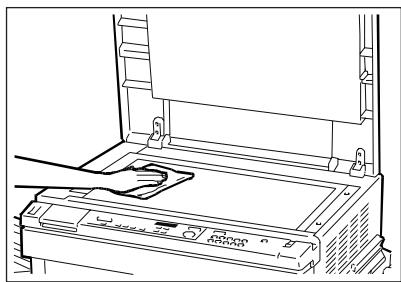
COPYBOARD GLASS
Clean the glass using a cloth and a non-abrasive product, and then wipe it completely dry.
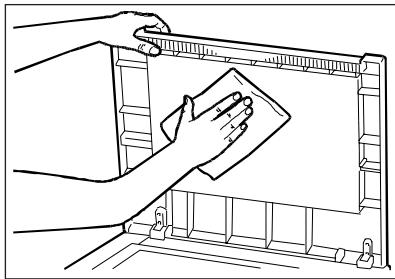
COVER
Clean the surface of the cover using a cloth and a specific product for plastic materials, and then wipe it completely dry.
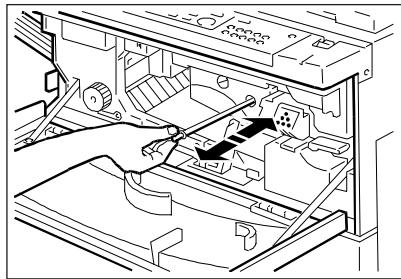
CORONA ASSEMBLIES
Switch off the copier and open the front panel. Pull out the charging wiring cleaning rod and then push it back in. Repeat the operation several times and then replace the rod to its original position.
CLEANING THE CORONA TRANSFER/SEPARATION UNIT
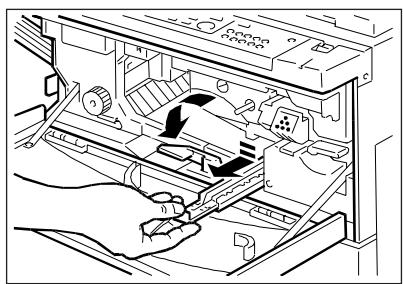
- Switch off the copier and open the front panel. Move the lever to the left. Press lightly on the bottom of the corona assembly and remove it.
- Turn over the corona assembly and move the cursor several times from one end to the other.
- Using the small brush, clean the orange groove of the corona unit.
- With the wires facing upward, replace the unit in the copier.
- Move the lever to the right and close the front panel.
MATERIALS AND OPTIONAL ACCESSORIES
MATERIALS
PAPER
In addition to normal standard xerox paper, coloured paper and OHP may be used for overhead projectors. For more details, contact your dealer.
TONER
Add toner (only the type specified) when the relevant indicator lights up.
The toner should be kept in a cool dry place at a temperature below 35 deg., away from direct sunlight.
OPTIONAL ACCESSORIES
CASSETTE
The copier is fed by two front cassettes. The standard supply provides two cassettes in the following formats: A4 and A3.
Available formats:
Europe: B5 - B5R - A4 - A4R - B4 - A3
USA:LTR-LTRR-LGL-LDG
GENERAL CHARACTERISTICS
Type: Desktop-top copier using plain untreated paper
Copyboard glass: Fixed
Photoconductor: OPC cartridge
Toner: Mono-component cartridge
Reproduction Ratio: Direct 1:1.000 ± 0.5%
Reductions 1:0.500
$$ 1: 0. 7 0 7 (A 3 - > A 4) $$
Enlargements 1:2.000
$$ 1: 1. 4 1 4 (A 4 - > A 3) $$
Zoom 1:0.500 -1:2.000
Maximum: A3
Warm-up time: Max. 30 s (Room temperature 20 deg.)
First copy: 8 s (A4/upper tray)
Paper feeder: 2 cassettes (250 sheets), multi-feeder (50 sheets)
1:1
A4 20 copies/min
A3 11 copies/min
Reductions
A3->A4R 14 copies/min
Enlargements
A4R->A3 11 copies/min
Multicopies: 1-99
Power voltage: 230 V 50 Hz
Size and weight
Length: 697 mm
Depth: 617 mm
Height: 541 mm
Weight: 58 Kg
ADF (AUTOMATIC DOCUMENT FEEDER - C back of cover)
To photocopy a set of documents using the ADF, place the sheets on the document feed tray and press the PRINT key (A-3).
The ADF automatically takes each document from the pile, positions it on the copyboard glass and returns it to the original receiving tray once it has been copied.
The ADF can contain a maximum of 15 sheets in A3 format or 30 sheets in A4 format.
COMPONENTS
- Original position indicator
Lights up when the originals are placed on the original feed tray.
- Original feed tray
The sheets are positioned facing upward on the tray.
- Original receiving tray
- Original delivery tray cover
- Feed area cover
- Sliding paper guide
Can be adjusted to the paper size.
Originals copied with the ADF
Paper between 50g / m^2 and 105g / m^2
Maximum paper format A3
Original documents in the following condition may not be used:
- Torn or with holes
- Folded or wrinkled
- Clipped or stapled together
- Carbon-backed originals
- Rough surface
- OHP film.
Copying with the ADF
1. Adjust the paper guide to suit the original format.
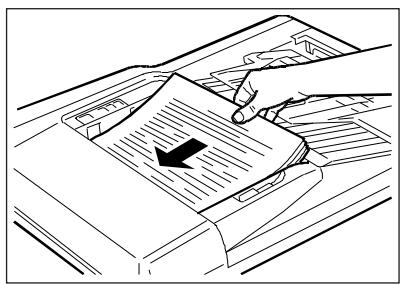
2. Place the originals facing upward on the feed tray.
3. Open the original receiving tray before inserting A3 or B4 size originals on the feeder tray, then lower the cover.
- Set the required number of copies and press the PRINT key (A-30).
- if an original is placed on the ADF while another is present on the copyboard glass, the PAPER JAM and PAPER JAM LOCATION indicators (A-8 and A-7) will flash until the original on the glass is removed.
- Press the CLEAR/STOP key (A-16) to stop copying.
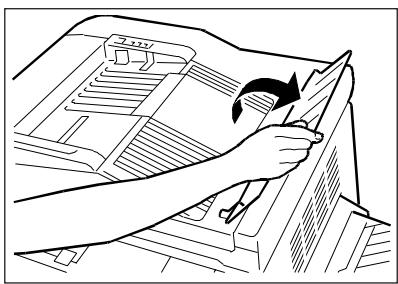
Clearing paper jammed in the ADF
When the PAPER JAM (A-9)
PAPER JAM POSITION (A-24)
ORIGINAL POSITION (C-1)
indicators flash at the same time, proceed as follows:
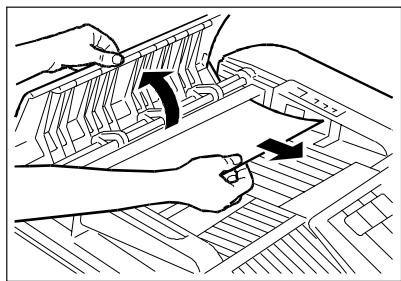
1. Remove the originals from the feed tray, open the left hand cover and remove the jammed paper.
2. Open the right hand cover of the document delivery area and remove the jammed sheet.
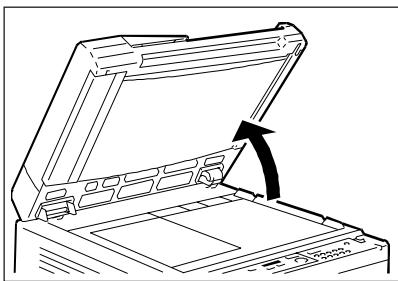
3. Lift the ADF.
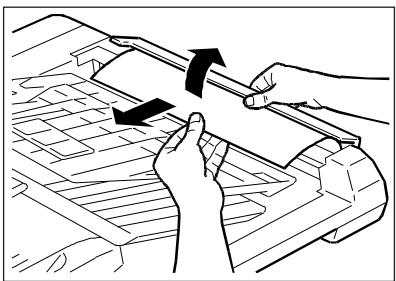
4. Open the left hand cover and remove the jammed paper.
5. If the sheet jams in the document delivery unit, open the right hand cover and remove the jammed paper.
6. Lower the ADF.
TECHNICAL CHARACTERISTICS
| Absorbed power: | max. 60 W | |
| Dimensions: | 61 cm | (length) |
| 51 cm | (width) | |
| 10 cm | 他说 (height) | |
| Weight: | 10.2 kg | |
AUTOMATIC IDENTIFICATION OF SHEETS NOT COPIED
This feature is particularly useful when a jam occurs inside the copier while copying with the ADF. In this case, the operator must remove the jammed paper, collect the originals from the original receiving tray, stack them carefully (following the original sequence) and start copying again.
The photocopier is able to count the originals, identify the first sheet that has not been copied and start copying again from this point.
SORTER 10 / SORTER 20 (E/F Back of cover)
The sorter can be used in two different modes by the operator, depending on the impagination requirements.
In SORT mode (sorting in consecutive order), one copy of each original is delivered to a different bin, keeping the correct numerical order of the pages.
With SORT/GROUP mode (sorting by groups), all copies of the same original are delivered to the same bin.
COMPONENTS (Sorter 10 /E back of cover)
- Handle
- Bins for collecting the copies (Number of bins: 10)
COMPONENTS (Sorter 20 /F back of cover)
- Handle
- Bins for collecting the copies (Number of bins: 20)
SELECTING THE MODES: SORT
- Press the SORT/GROUP/STAPLE-SORT key (A-4) until the indicator lights up.
- Set the required number of copies, using the NUMERICAL keys (A-31).
Note
If you set too many copies for the bins to contain (10 for Sorter 10 and 20 for Sorter 20), the copier will automatically correct the setting (to 10 or 20) to match the type of sorter selected.
- Press the PRINT key (A-30).
SELECTING THE MODES: GROUP
- Press the SORT/GROUP/STAPLE-SORT key (A-4) until the indicator lights up.
- Set the required number of copies, using the NUMERICAL keys (A-31).
Note
If you set too many copies for the bins to contain (10 for Sorter 10 and 20 for Sorter 20), the copier will automatically correct the setting (to 10 or 20) to match the type of sorter selected.
- Press the PRINT key (A-30).
REMOVING PAPER JAMMED IN SORTER 10
The PAPER JAM (A-9) and PAPER JAM LOCATION (A-24) indicators flash to indicate that paper has jammed in the sorter.
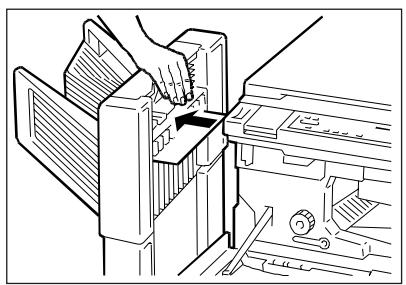
1. Open the front panel and press on the handle to disconnect the Sorter.
2. Remove the jammed sheet.
3. Return the Sorter to its original position.
REMOVING PAPER JAMMED IN SORTER 20
The PAPER JAM (A-9) and PAPER JAM LOCATION (A-24) indicators flash to indicate that paper has jammed in the sorter.
1. Open the front panel and press on the handle to disconnect the Sorter.
2. Remove the jammed sheet.

3. Return the Sorter to its original position.
TECHNICAL SPECIFICATIONS
SORTER 10
| 1. Type of paper used: | A3-B5 (64 g/m2 - 80 g/m2) | ||
| 2. Copies per bin: | |||
| Non sort bin | 1st bin all formats | 100 sheets | |
| Sort: | A4, A4R, B5, B5R | 30 sheets | |
| B4 | 25 sheets | ||
| A3 | 10 sheets | ||
| Group: | A4, A4R, B5, B4 and B5R | 20 sheets | |
| A3 | 10 sheets | ||
| 3. Absorbed power: | 70 W (approx.) | ||
| 4. Dimensions and weight: | |||
| Length: | 31 cm | ||
| Width: | 49.3 cm | ||
| Height: | 29.5 cm (with the kit 53.8 cm) | ||
| Weight: | 5.2 Kg | ||
SORTER 20
| 1. Type of paper used: | A3-B5 (64 g/m2 - 80 g/m2) | ||
| 2. Copies per bin: | |||
| Non sort bin | 1st bin all formats | 100 sheets | |
| Sort: | A4 and B5 | 50 sheets | |
| B4, A3, A4R and B5R | 25 sheets | ||
| Group: | A4 and B5 | 30 sheets | |
| B4, A3, A4R and B5R | 15 sheets | ||
| 3. Absorbed power: | 70 W (approx.) | ||
| 4. Dimensions and weight: | |||
| Length: | 33 cm | ||
| Width: | 53 cm | ||
| Height: | 65 cm | ||
| Weight: | 19 Kg (approx.) | ||
STAPLER SORTER 10 (G back of cover)
Using this feature, the operator can not only produce sets of documents in page order (SORT mode) or in groups (Group mode), but also staple complete copies produced in Sort mode or with the Sort mode deactivated.
ATTENTION:
You cannot set the staple mode when copying using the Multi-feeder.
COMPONENTS (G back of cover)
-
Manual staple key
-
Handle
-
LED on: press to staple the copies
- LED flashing: indicates a stapler jam
No staples indicator
-
Indicator flashing: staples have run out
-
Stapler cover (open to add staples)
- Copy delivery bins (1-10)
SELECTING THE MODE: SORT
In Sort mode, copies of each original are delivered to different bins, keeping the correct page order.
- Press the SORT/GROUP/STAPLE-SORT key (A-4) until the indicator lights up.
- Set the number of copies required. (If you set more than 10 copies, the copier will automatically change the number to 10).
- Press the PRINT key (A-30).
SELECTING THE MODE: GROUP
In Group mode, all copies of the same original are delivered to the same bin.
- Press the SORT/GROUP/STAPLE-SORT key (A-4) until the indicator lights up.
-
Set the number of copies required.
-
If you set too many copies for the bin to contain, the copier automatically corrects the set number to match the selected bin and then starts copying.
- If more than 10 originals are placed in the feeder tray (e.g. 11, 12, etc.), successive copies will be delivered to the last bin.
-
If more than 10 copies are placed in the tray, divide them into groups of ten (or less) and copy each set separately.
-
Press the PRINT key (A-30).
SELECTING THE MODE: SORT AND STAPLE
Sort/Staple mode sorts the copies in progressive order (the copy of each original is delivered to a different bin) and staples the copies.
The copies of each original are stapled/delivered to the same bin.
POSITION OF ORIGINALS DIAGRAM
Copyboard glass
Make sure that the original is placed with the corner to be stapled on the upper right handle side.
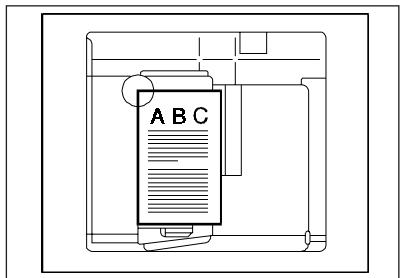
ADF
Make sure that the original is placed with the corner to be stapled on the top left hand side of the ADF.
Copying procedure:
- Press the SORT/GROUP/STAPLE-SORT key (A-4) until the indicator lights up. (only with ADF installed)
- Set the number of copies required using the NUMERICAL keys (A-31). - If you set more than 10 copies, the copier automatically changes it to 10 and then makes 10 copies.
- Press the PRINT key (A-30). When copying finishes, the copies in each bin are stapled.
Notes
- The MANUAL STAPLER key flashes (green) when a jam occurs in the stapler. To remove the jammed paper, follow the instructions described in “Removing jammed staples”.
- The NO STAPLES INDICATOR flashes (red) when the staples run out.
To add more staples, following the instructions described in "ADDING STAPLES".
- If the original is placed on the copyboard glass, press the MANUAL STAPLER key when copying terminates.
(If the manual stapler key does not light up, the copies cannot be stapled).
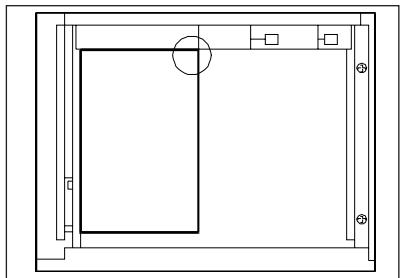
MANUAL INSERT STAPLING
If required, copies can be stapled together using the Stapler/Sort and then inserted manually.
Type of sheet to staple
Size: from A3 to B5
Number of sheets: up to 20 sheets (80g / m^2)
Procedure:

- Align the edges of the copies to be stapled.
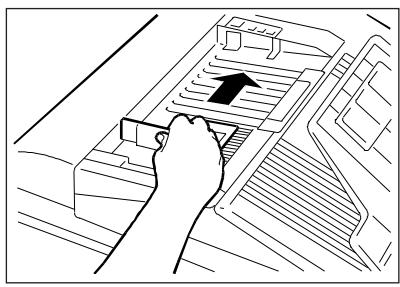
- Position the copies in the first top bin, as shown in the figure. Make sure that the edges of the copies are in line with the front edge of the bin.
The copies are stapled in the corner marked by a circle.
ATTENTION:
Never place your hand near the area to be stapled. Doing so, could result in injury.
- When the MANUAL STAPLER key lights up, press it for the copies to be stapled.
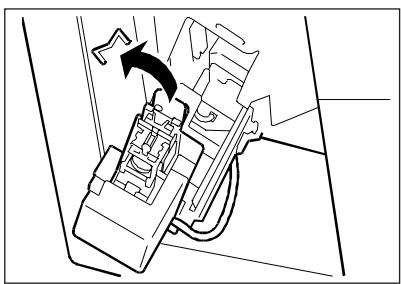
ADDING STAPLES

The NO STAPLES INDICATOR flashes (orange) when the staples are finished. To add staples, proceed as follows.
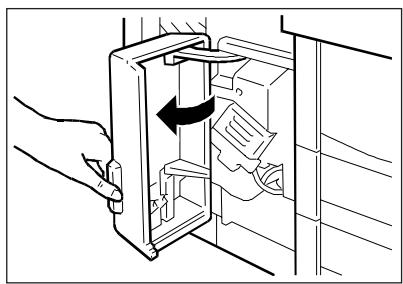
-
Open the cover (the container inside can hold two staple cartridges).
-
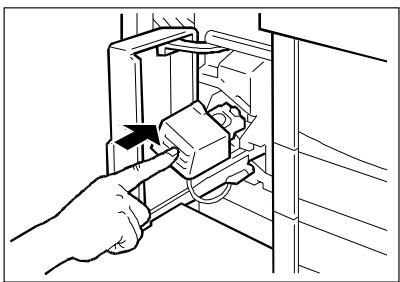
Remove the stapler unit (press and release).
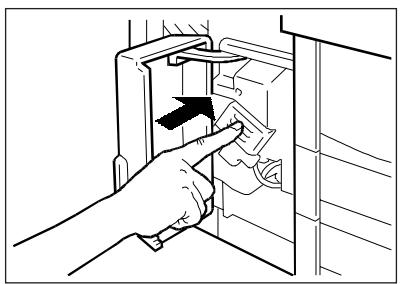
-
Pull the unit out until it stops.
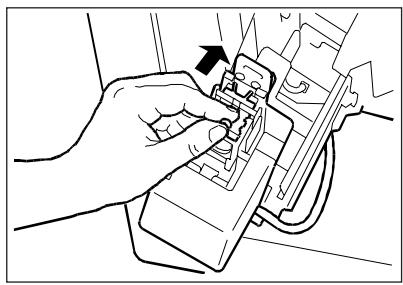
4. Remove the empty cartridge.
5. Insert a new cartridge.
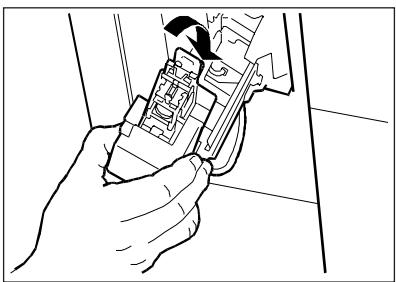
6. Replace the unit and cover the stapler cover.
REMOVING JAMMED STAPLES

The MANUAL STAPLER INDICATOR key flashes (green) when a jam occurs in the stapler. Clear the jam as described below:
1. Remove the sheets from the bins.
3. Extract the stapler unit (press and release).
4. Pull the unit out until it stops.

2. Open the cover.
5. Lift the stapler until it opens.
6. Pressing down on the plastic safety tab, pull out the metallic strip.
7. Remove the jammed staples.
8. Return the metallic strip to its original position. (Make sure that the plastic safety tab locks into place).
9. Close the unit.
10. Replace the unit and close the cover.
CLEARING PAPER JAMS IN THE STAPLER SORTER
When the indicators:
PAPER JAM (A-9)
PAPER JAM LOCATION (A-24)
flash at the same time, proceed as follows:

1. Open the front panel and disconnect the Stapler Sorter.
2. Remove the jammed sheet.
3. Return the Stapler Sorter to its original position. If the Stapler Sorter is not inserted correctly, the PAPER JAM LOCATION INDICATOR (A-24) will flash.
TECHNICAL SPECIFICATIONS
| 1. Copy paper: | 64 g/m2 - 80 g/m2 | ||
| 2. Copies per bin: | |||
| Non sort bin: | 1st bin all formats | 100 sheets | |
| Sort: | B5 and B4 | 30 sheets | |
| B4 | 25 sheets | ||
| A3 | 10 sheets | ||
| Staple-Sort: | B5, A4 and B4 | 20 sheets | |
| A3 | 10 sheets | ||
| B5R (cannot be stapled) | |||
| Group: | B5, A4 and B4 | 20 sheets | |
| 3. Absorbed power: | 40 W (approx.) | ||
| 4. Dimensions and weight: | |||
| Length: | 33.5 cm | ||
| Width: | 57.6 cm | ||
| Height: | 35.8 cm | ||
| Weight: | 9 kg (approx.) | ||
| 5. Stapling capacity: | 20 sheets | ||
ACCESSORIES
Staple cartridges
Every cartridge contains approximately 1000 metal staples.
CONTROL CARD COPY COUNTER
Each department or section of a company may need to control access to the photocopier (the user may use the copier only if he has the control card), or may need to know the costs for each department.
If you are using the control card copy counter, it must be inserted before copying is started.
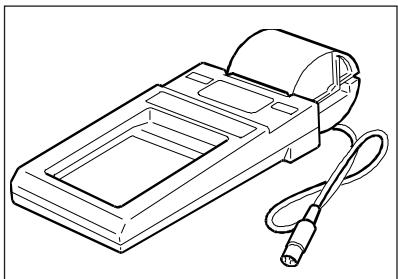
Connect the printer to the CONTROL CARD COPY COUNTER to print information regarding the copies made with the control card.
Note
For details on using the control card, consult the instructions booklet supplied with this accessory.
LCT TRAY (LARGE CAPACITY TRAY - D back of cover)
The LCT tray can hold a maximum of 1000 sheets which means that you do not have to keep adding paper during copy cycles.
COMPONENTS
- PAPER TRAY.
To add paper, open the tray.
- RIGHT PANEL.
Open this panel to remove jammed paper.
ADDING PAPER

1. Pull the tray out until it stops.
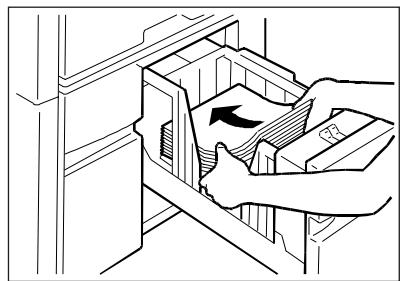
2. Fan the paper and place it in the tray.
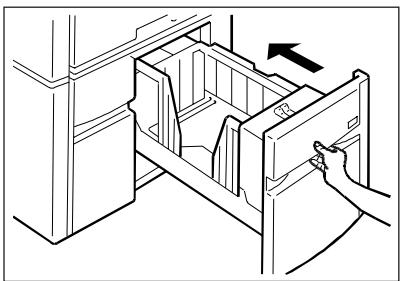
3. Close the tray.
Note
To avoid paper jams, do not use folded or crumpled paper.
TECHNICAL SPECIFICATIONS
-
Paper format used: A4
-
Maximum tray capacity:
100 sheets (80g / m^2)
FRANÇAIS

ENERGY STAR is a U.S. registered mark.
INDICATIONS/REAPPROVISIONNELMENTS/SUPPRESSIONS
Indications 10
COMMENT UTILISER CE MANUEL
Structure du manuel
| REDUCTIONS | A3 > A4 Minimum 50% |
REPRODUCTION MANUELLE RECTO-VERSO
ACCESSIONS OPTIONNELS
MAGASIN
USA:LTR-LTRR-LGL-LDG
CHARACTERISTIQUES GENERALES
Type:
Plan d'exposition:
Photoconducteur:
Toner:
ENERGY STAR is a U.S. registered mark.
ENERGY STAR is a U.S. registered mark.
USA:LTR-LTRR-LGL-LDG
CHARACTERISTICAS GENERALES
Tip:
Plano de exposión:
Fotoconductor:
Toner:
Escalas de reproduccion:

- PUBLICATION ISSUED BY:
- ILLUSTRAZIONI
- AREA USCITA COPIE (Zona sinistra)
- CARATTERISTICHE GENERALI
- Tip:
- Piano esposizione:
- Fotocondutlore:
- Toner:
- CONTENTS
- BEFORE USE
- COPIER FUNCTIONS
- INDICATIONS/REFILLING/JAM CLEARANCE
- MAINTENANCE/ACCESSORIES/TECHNICAL DATA
- OPTIONAL UNITS
- ILLUSTRATIONS
- NOTES ON USE OF INSTRUCTION MANUAL
- Structure of the Manual
- Graphic Representations
- Keys
- WARNING ON INSTALLATION AND USE
- The environmental conditions affect the correction functioning of the copier. Do not install the machine in environments which present the following conditions:
- Safe power supply
- Installation area
- Before moving the copier
- Precautions for use
- BASIC MACHINE COMPONENTS (B back of cover)
- CONSOLE (A back of cover)
- Power On
- Copier power on conditions (standard mode)
- Position of the original
- Setting the copy mode
- Copying
- CLEAR/STOP key
- RESET key
- SELF-RESET FUNCTION
- STANDBY FUNCTION (Energy Saving)
- Notes
- AUTOMATIC STANDBY FUNCTION
- SETTING THE AUTO SHUT-OFF TIME
- SETTING THE NUMBER OF COPIES
- REGULATING THE EXPOSURE (Dark/Light)
- Automatic
- Manual
- SELECTING THE COPY FORMAT
- Automatic selection (Standard mode)
- Note:
- Manual selection
- REDUCTIONS AND ENLARGEMENTS
- Fixed reductions/enlargements
- Selections
- Reductions/Enlargement with the zoom
- Reductions/enlargements with automatic zoom
- Note
- USING THE MANUAL MULTI-FEEDER
- Operating sequence:
- COPYING ADJACENT PAGES ON SEPARATE SHEETS
- Operating sequence
- MANUAL FRONT-REAR COPYING
- INDICATOR LIGHTS
- TONER
- PAPER
- PAPER JAM
- CONTROL CARD (Optional unit)
- "E" INDICATOR (Call the Technical Assistance Service)
- ADDING PAPER
- REMOVING A PAPER JAM
- PAPER JAM LOCATION DIAGRAM
- JAMMING AREAS AND REMOVAL
- PAPER TRANSFER AREA (front area)
- PAPER FEED AREA
- COPY OUTFEED AREA (Left-hand side)
- ADDING TONER
- OPERATOR TROUBLESHOOTING
- THE COPIER FAILS TO OPERATE WHEN THE POWER ON SWITCH IS PRESSED
- Check:
- COPIES ARE TOO LIGHT OR TOO DARK
- Manual check:
- COPIES ARE MARKED IN THE SAME PLACE
- REGULAR CLEANING
- COPYBOARD GLASS
- COVER
- CORONA ASSEMBLIES
- CLEANING THE CORONA TRANSFER/SEPARATION UNIT
- MATERIALS AND OPTIONAL ACCESSORIES
- MATERIALS
- OPTIONAL ACCESSORIES
- CASSETTE
- GENERAL CHARACTERISTICS
- Size and weight
- ADF (AUTOMATIC DOCUMENT FEEDER - C back of cover)
- COMPONENTS
- Originals copied with the ADF
- Original documents in the following condition may not be used:
- Copying with the ADF
- Clearing paper jammed in the ADF
- AUTOMATIC IDENTIFICATION OF SHEETS NOT COPIED
- SORTER 10 / SORTER 20 (E/F Back of cover)
- COMPONENTS (Sorter 10 /E back of cover)
- COMPONENTS (Sorter 20 /F back of cover)
- SELECTING THE MODES: SORT
- SELECTING THE MODES: GROUP
- REMOVING PAPER JAMMED IN SORTER 10
- REMOVING PAPER JAMMED IN SORTER 20
- TECHNICAL SPECIFICATIONS
- STAPLER SORTER 10 (G back of cover)
- ATTENTION:
- COMPONENTS (G back of cover)
- SELECTING THE MODE: SORT
- SELECTING THE MODE: GROUP
- SELECTING THE MODE: SORT AND STAPLE
- POSITION OF ORIGINALS DIAGRAM
- ADF
- Copying procedure:
- MANUAL INSERT STAPLING
- Type of sheet to staple
- Procedure:
- ADDING STAPLES
- REMOVING JAMMED STAPLES
- CLEARING PAPER JAMS IN THE STAPLER SORTER
- CONTROL CARD COPY COUNTER
- LCT TRAY (LARGE CAPACITY TRAY - D back of cover)
- FRANÇAIS
- INDICATIONS/REAPPROVISIONNELMENTS/SUPPRESSIONS
- COMMENT UTILISER CE MANUEL
- Structure du manuel
- REPRODUCTION MANUELLE RECTO-VERSO
- ACCESSIONS OPTIONNELS
- MAGASIN
- CHARACTERISTIQUES GENERALES
- Type:
- Plan d'exposition:
- Photoconducteur:
- CHARACTERISTICAS GENERALES
Brand : OLIVETTI
Model : COPIA 9020
Category : Photocopier