
d-Copia 600 - Photocopier OLIVETTI - Free user manual and instructions
Find the device manual for free d-Copia 600 OLIVETTI in PDF.


| Product Type | Photocopier |
| Brand | Olivetti |
| Model | d-Copia 600 |
| Dimensions (W x D x H) | 600 x 700 x 500 mm |
| Weight | 50 kg |
| Power Supply | 220-240V, 50/60 Hz |
| Power Consumption | 1.5 kW (max) |
| Copy Speed | 60 pages per minute |
| Maximum Copy Size | A3 |
| Paper Capacity | 500 sheets (standard tray) |
| Functions | Copy, Print, Scan |
| Connectivity | USB 2.0, Ethernet |
| Toner Type | Black toner cartridge |
| Duty Cycle | Up to 100,000 pages per month |
| Warm-up Time | Less than 30 seconds |
| First Copy Out Time | Less than 4 seconds |
| Maintenance Interval | Every 50,000 copies |
| Cleaning Method | Use dry, lint-free cloth |
| Safety Features | Auto shut-off, overheat protection |
| Spare Parts Availability | Authorized service centers |
| Repairability Index | High - modular design |
| Operating Temperature | 10°C to 35°C |
| Humidity Range | 20% to 80% non-condensing |
| Warranty | 1 year on-site |
Frequently Asked Questions - d-Copia 600 OLIVETTI
User questions about d-Copia 600 OLIVETTI
0 question about this device. Answer the ones you know or ask your own.
Ask a new question about this device
Download the instructions for your Photocopier in PDF format for free! Find your manual d-Copia 600 - OLIVETTI and take your electronic device back in hand. On this page are published all the documents necessary for the use of your device. d-Copia 600 by OLIVETTI.
USER MANUAL d-Copia 600 OLIVETTI
d-Copia 600 d-Copia 800
Operation Guide
PUBLICATION ISSUED BY:
Olivetti S.p.A.
Copyright © 2006, Olivetti
All rights reserved
The C€ mark affixed to the product certifies that the product satisfies the basic quality requirements.

The manufacturer reserves the right to carry out modifications to the product described in this manual at any time and without any notice.

ENERGY STAR is a U.S. registered mark.
The ENERGY STAR program is an energy reduction plan introduced by the United States Environmental Protection Agency in response to environmental issues and for the purpose of advancing the development and utilization of more energy efficient office equipment.
Your attention is drawn to the following actions which could compromise the conformity attested to above, as well as the characteristics of the product:
- incorrect electrical power supply;
- incorrect installation, incorrect or improper use or use not in compliance with the warnings provided in the User's Manual supplied with the product;
- replacement of original components or accessories with others of a type not approved by the manufacturer, or performed by unauthorised personnel.
All rights reserved. No part of this material may be reproduced or transmitted in any form or by any means, electronic or mechanical, including photocopying, recording or by any information storage and retrieval system, without permission in writing from the Publisher.
Take Advantage of Advanced Functions
For information on basic copying, refer to Chapter 3 of the Operation Guide.
| Selecting Image Quality | Adjusting Exposure | Auto Zoom | |||||
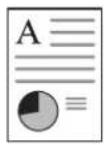
| Enjoy crisp, high-quality copies, even of photographs. | Freely adjustable copy exposure level. | Reduce or enlarge original images to fit your selected paper size.11×17": 129% | |||||
 |  |  |  |  |  |  | 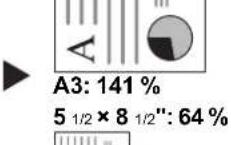 |
| A5: 70% | |||||||
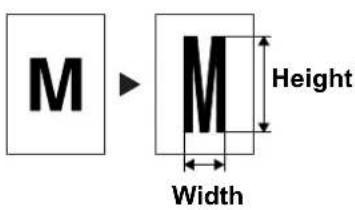
| Manual Zoom | Preset Zoom | XY Zoom | |||||
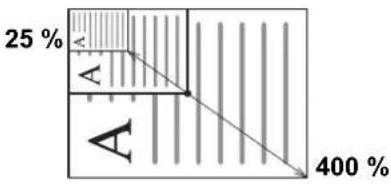
| Reduce or enlarge original images by 25 to 400 % (25-200 % with the document processor). | One-touch selection of magnifications. | Select vertical and horizontal magnification individually. | |||||
 |  |  | |||||
| Duplex Mode | Split Mode | Sort Mode | |||||
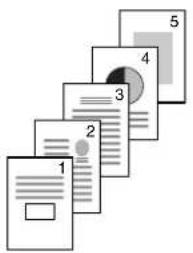
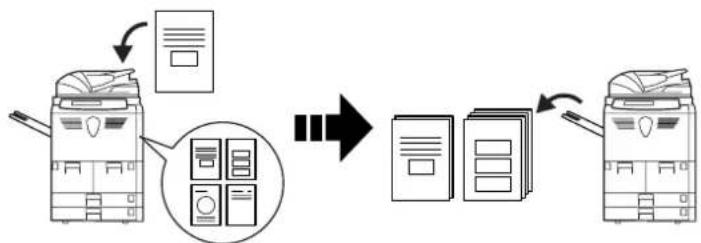
| Create two-sided copies automatically from any kind of original. | Copy double-sided or two-page originals onto separate sheets automatically. | Make separate sets in the quantity of your choice. | |||||
 | [24W8] | 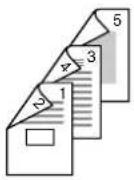 |  | [57B2] | 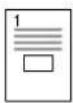 |  | 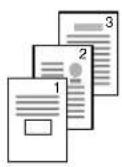 |
| [5YHA] |  |  | |||||
Read more about these sophisticated functions in Chapter 1 of the Advanced Operation Guide.
Auto Paper Selection
Automatic selection of paper to match the original.
Offset Mode
Handy option to stack sets in alternating orientations.
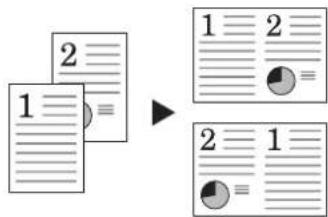
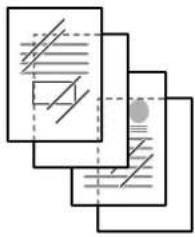
Combine Mode
Combine two or four originals on a single page.

flowchart
graph TD
    A["Document A"] --> B{Output Box}
    B --> C["Empty Box"]
    style A fill:#f9f,stroke:#333
    style B fill:#ccf,stroke:#333

flowchart
graph TD
    A["Stack 1: 1"] --> B["Stack 2: 2"]
    B --> C["Stack 3: 3"]
    C --> D["Stack 1: 1"]
    C --> E["Stack 2: 2"]
    E --> F["Stack 3: 3"]
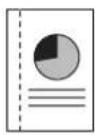
Margin Mode
Set up blank margin or gutter space for your binding needs.
Centering Originals
Customize output by centering the image on the page.
Border Erase
Eliminate unnecessary borders on the original for cleaner output.








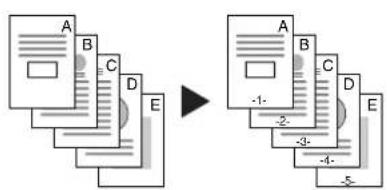
Page Numbering
Print sequential page numbers on the copies.
Cover Mode
Use a distinctive front and/or back cover.
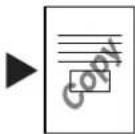
Form Overlay
Copy images from separate originals together onto one sheet.
flowchart
graph TD
    A["Document A"] --> B["Section B"]
    B --> C["Section C"]
    C --> D["Section D"]
    D --> E["Section E"]

    subgraph Transformation
    direction TB
    A -->|+1-| B -->|-2-| C -->|-3-| D -->|-4-| E
    end

    style A fill:#f9f,stroke:#333
    style B fill:#ccf,stroke:#333
    style C fill:#cfc,stroke:#333
    style D fill:#fcc,stroke:#333
    style E fill:#cff,stroke:#333


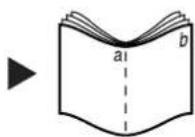
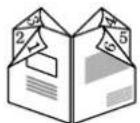
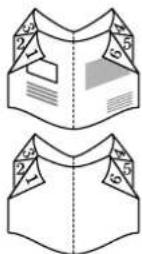
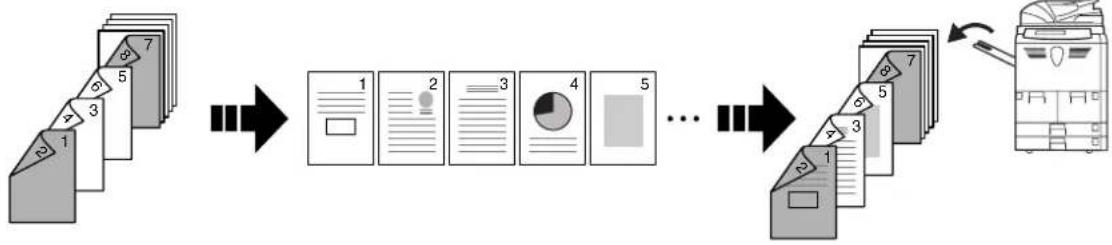
Booklet from Sheets
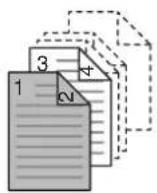
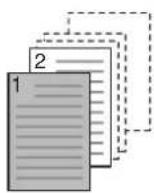
Create booklets from separate originals.
Booklets from Booklets
Reproduce booklets just as they are.
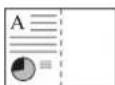
Memo Mode
Add space for notes next to copied images.





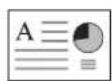



Batch Scanning
Copy high-volume originals in a single copy job.
Proof Mode
Copy a test sheet before a high-volume job.
Repeat Copy
Produce more copies as needed after making the initial copies.
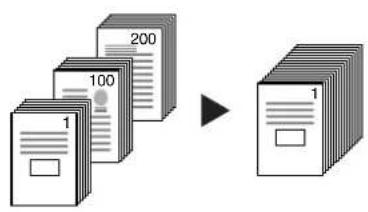
flowchart
graph LR
    A["Document File 1"] --> B["Document File 200"]
    B --> C["Final File 1"]
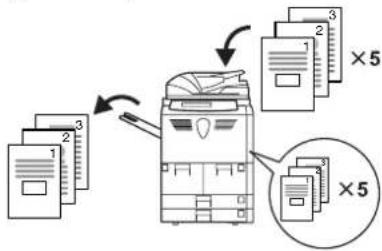
flowchart
graph TD
    A["1"] --> B["2"]
    B --> C["3"]
    C --> D["Output"]
    D --> E["3×5"]
    E --> F["Output"]
    style A fill:#f9f,stroke:#333
    style B fill:#f9f,stroke:#333
    style C fill:#f9f,stroke:#333
    style D fill:#ccf,stroke:#333
    style E fill:#ccf,stroke:#333
    style F fill:#ccf,stroke:#333
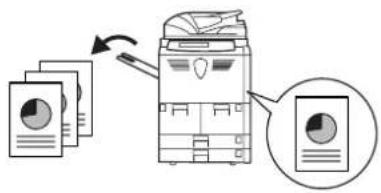
flowchart
graph TD
    A["Document"] --> B["Printer"]
    B --> C["Feedback Loop"]
    C --> D["Document"]
    style A fill:#f9f,stroke:#333
    style B fill:#ccf,stroke:#333
    style C fill:#cfc,stroke:#333
    style D fill:#fcc,stroke:#333
Backing Sheets for Transparencies
Use paper as backing sheets when printing transparencies for projectors.
Auto Rotation
Automatically match the orientation of originals.
EcoPrint (Economy Printing) Mode
Use toner more efficiently as necessary.
natural_image
Abstract diagram of overlapping document sheets with horizontal lines and a central circle (no text or symbols)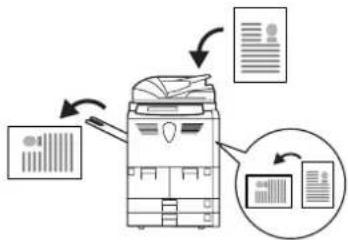
flowchart
graph TD
    A["File"] --> B["Document"]
    B --> C["Output"]
    C --> D["Document"]
    D --> E["Output"]
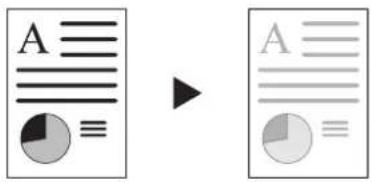
Inverted Copying
Invert both black and white and color images.
Mirror Image
Create mirror images of originals.
Auto Selection Mode
Easily handle originals of different sizes.

flowchart
graph LR
    A["Flower Image"] --> B["Image Collection"]
    B --> C["Printer Output"]
Multi-Page Forms
Great for bound originals made up of several sheets.
Programmed Copying
Store commonly used settings.


Programming Multi-Part Jobs
Simply specify your series of special copying needs-such as cover pages, internal cover pages...
and zooming or border erase for particular pages...
load the originals, and voila! Automated copying of your detailed jobs.
flowchart
graph LR
    A["Document folding"] --> B["Document handling"]
    B --> C["Output printing"]
    style A fill:#f9f,stroke:#333
    style B fill:#ccf,stroke:#333
    style C fill:#cfc,stroke:#333
Read more about these handy document/output management functions in Chapter 2 of the Advanced Operation Guide.
Form Box
Add and manage graphics for compositing.
Shared Data Box
Easily store commonly used documents...
to produce them later as needed without the original.

flowchart
graph TD
    A["Document"] --> B["File Transfer"]
    B --> C["Printer / Printer"]
    C --> D["Output"]
    style A fill:#f9f,stroke:#333
    style D fill:#ccf,stroke:#333
flowchart
graph LR
    A["Receipt"] --> B{File Handling}
    B --> C["Storage"]
    C --> D["Output"]
    style A fill:#f9f,stroke:#333
    style D fill:#bbf,stroke:#333
Synergy Print Box
Just add common documents... to make them instantly available later in combination with other copying jobs.
Output Management
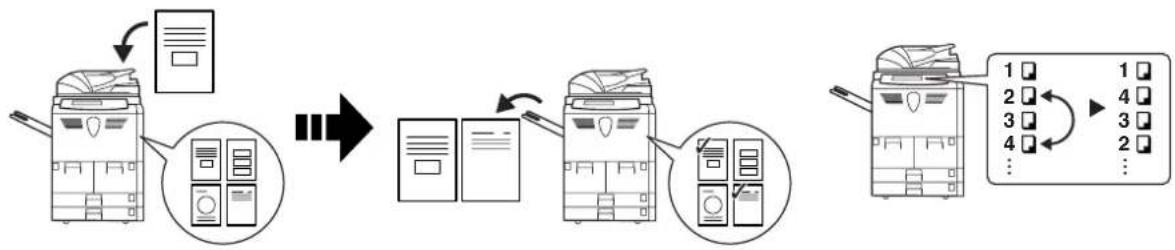
Control and modify the copying order of originals
flowchart
graph TD
    A["Printer"] --> B["Data Collection"]
    B --> C["Server"]
    C --> D["Output Module 1"]
    D --> E["Data Collection"]
    E --> F["Server"]
    F --> G["Output Module 2"]
    G --> H["Output Module 3"]
    H --> I["Output Module 4"]
    I --> J["Output Module 5"]
    J --> K["Output Module 6"]
    K --> L["Output Module 7"]
    L --> M["Output Module 8"]
    M --> N["Output Module 9"]
    N --> O["Output Module 10"]
Features for Easier Copying
Job Accounting Mode: Refer to Chapter 3 of the Advanced Operation Guide.
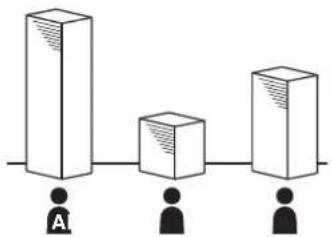
Use department codes to manage total copy volume.
Weekly Timer: Refer to Chapter 3 of the Advanced Operation Guide.
Auto Power on/off.
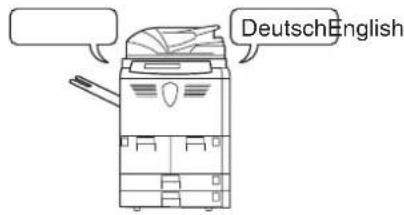
Language Setting: Refer to
Selecting the Language on page 2-20.
Choose the correct message display language.

Read about our full line of useful Optional Equipment on page 4-1.
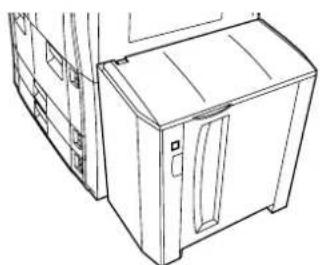
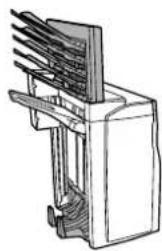
Side Feeder Document Finisher (When equipped with a multi-job tray
natural_image
Line drawing of a cabinet or enclosure with front and side views (no text or symbols)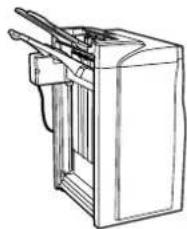
natural_image
Line drawing of a mechanical device with handle and frame (no text or symbols)and folding unit)
natural_image
Technical line drawing of a mechanical component with fins and a base (no text or symbols)Key Counter Printer Kit Scanner Kit
natural_image
Line drawing of a rectangular electronic component with slots and ventilation slots (no text or symbols)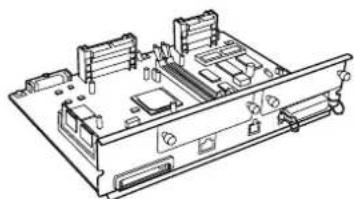
natural_image
Technical line drawing of an electronic device chassis with RAM slots and connectors (no text or symbols)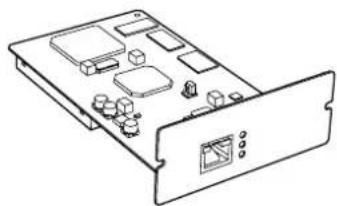
natural_image
Line drawing of an electronic device rear panel with ports and connectors (no text or symbols)Security Kit
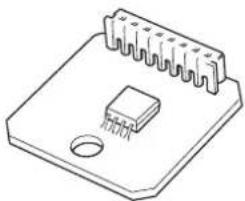
natural_image
Isometric line drawing of a microchip or integrated circuit package with pins and a central slot (no text or symbols)Legal and Safety Information
Please read this information before using your copier. This chapter provides information on the following topics:
- Legal Information...viii
• Energy Star Program...ix
• Safety Conventions in This Guide...x - Caution Labels...xii
• Installation Precautions...xiii - Precautions for Use...xiv
Legal Information
Notice
The information in this guide is subject to change without notification. Additional pages may be inserted in future editions. The user is asked to excuse any technical inaccuracies or typographical errors in the present edition.
No responsibility is assumed if accidents occur while the user is following the instructions in this guide. No responsibility is assumed for defects in the printer's firmware (contents of its read-only memory).
This guide, any copyrightable subject matter sold or provided with or in connection with the sale of the machine, are protected by copyright. All rights are reserved. Copying or other reproduction of all or part of this guide, any copyrightable subject matter without the prior written consent of Olivetti S.p.a, is prohibited. Any copies made of all or part of this guide, any copyrightable subject must contain the same copyright notice as the material from which the copying is done.
Legal Restriction On Copying
• It may be prohibited to copy copyrighted material without permission of the copyright owner.
- It is prohibited under any circumstances to copy domestic or foreign currencies.
- Copying other items may be prohibited.
Energy Star Program

We have determined as a participating company in the International Energy Star Program that this product is compliant with the standards laid out in the International Energy Star Program.
About the International Energy Star Program
International Energy Star Program has as its basic goals the promotion of efficient energy use and the reduction of the environmental pollution that accompanies energy consumption by promoting the manufacture and sale of products that fulfill program standards.
International Energy Star Program standards require that copies come equipped with a Low Power Mode where energy consumption is reduced after a certain amount of time elapses since the device was last used, as well as an Off Mode where the device automatically turns itself off after there is no activity within a set amount of time. When the copier includes printer and fax functions, the printer and fax must enter a Low Power Mode where power consumption is automatically reduced after a certain amount of time elapses since they were last used, and they must also support a Sleep Mode where power consumption is reduced to a minimum when there is no activity within a set amount of time. This product is equipped with the following features as a result of its compliance with International Energy Star Program standards.
Low Power Mode
The device automatically enters Low Power Mode when 15 minutes have passed since the device was last used. The amount of time of no activity that must pass before Low Power Mode is activated may be lengthened. Refer to Low-Power Mode on page 3-19 for more information.
Off Mode
The device automatically enters Off Mode when 90 minutes have passed since the device was last used. The amount of time of no activity that must pass before Off Mode is activated may be lengthened. For more information refer to Sleep Mode on page 3-20.
Sleep Mode (If the copier has printer and/or facsimile function)
The device automatically enters Sleep Mode when 90 minutes have passed since the device was last used. The amount of time of no activity that must pass before Sleep Mode is activated may be lengthened. For more information refer to Sleep Mode on page 3-20.
Automatic 2-Sided Copy Function
The Energy Star Program encourages the use of 2-sided copying which reduces the load on the environment and this device includes 2-sided copying as a standard function. For example, by copying two 1-sided originals onto a single sheet of paper as a 2-sided copy, it is possible to lower the amount of paper used. For more information refer to Duplex Mode on page 3-11.
Paper Recycling
The Energy Star Program encourages the use of environmentally friendly recycled paper. Your sales or service representative can provide information about recommended paper types.
Safety Conventions in This Guide
Please read this Operation Guide before using the copier. Keep it close to the copier for easy reference.
The sections of this guide and parts of the copier marked with symbols are safety warnings meant to protect the user, other individuals and surrounding objects, and ensure correct and safe usage of the copier. The symbols and their meanings are indicated below.

DANGER: Indicates that serious injury or even death will very possibly result from insufficient attention to or incorrect compliance with the related points.

WARNING: Indicates that serious injury or even death may result from insufficient attention to or incorrect compliance with the related points.

CAUTION: Indicates that personal injury or mechanical damage may result from insufficient attention to or incorrect compliance with the related points.
Symbols
The symbol indicates that the related section includes safety warnings. Specific points of attention are indicated inside the symbol.

.... [General warning]

..... [Warning of danger of electrical shock]

..... [Warning of high temperature]
The Ⓧ symbol indicates that the related section includes information on prohibited actions. Specifics of the prohibited action are indicated inside the symbol.

..... [Warning of prohibited action]

.... [Disassembly prohibited]
The ● symbol indicates that the related section includes information on actions which must be performed. Specifics of the required action are indicated inside the symbol.

..... [Alert of required action]

..... [Remove the power plug from the outlet]

..... [Always connect the machine to an outlet with a ground connection]
Please contact your service representative to order a replacement if the safety warnings in this Operation Guide are illegible or if the guide itself is missing. (fee required)

Caution Labels
Caution labels have been attached to the copier at the following locations for safety purposes. Be sufficiently careful to avoid fire or electric shock when removing a paper jam or when replacing toner.
Label 1, 2
High temperature inside. Do not touch parts in this area, because there is a danger of getting burned.

Label 8, 9
Do not touch the support area for the document processor as there is a danger that your fingers or other objects may become caught or pinched, and this can result in injury.

Label 3
High voltage inside. Never touch parts in this area, because there is a danger of electric shock.


natural_image
Technical line drawing of a mechanical device with internal components and mounting holes (no text or symbols)Label 4, 10
High temperature inside. Do not touch parts in this area, because there is a danger of getting burned.


natural_image
Technical line drawing of a mechanical assembly with no visible text or symbols
natural_image
Technical line drawing of an open electronic device showing internal components and assembly (no text or symbols)Label 5, 6, 7
High temperature inside. Do not touch parts in this area, because there is a danger of getting burned.

NOTE: Do not remove these labels.
Environment

Caution
Avoid placing the copier on or in locations which are unstable or not level. Such locations may cause the copier to fall down or fall over. This type of situation presents a danger of personal injury or damage to the copier.
Avoid locations with humidity or dust and dirt. If dust or dirt become attached to the power plug, clean the plug to avoid the danger of fire or electrical shock.
Avoid locations near radiators, heaters, or other heat sources, or locations near flammable items, to avoid the danger of fire.
To keep the copier cool and facilitate changing of parts and maintenance, allow access space as shown below. Leave adequate space, especially around the rear cover, to allow air to be properly ventilated out of the copier.

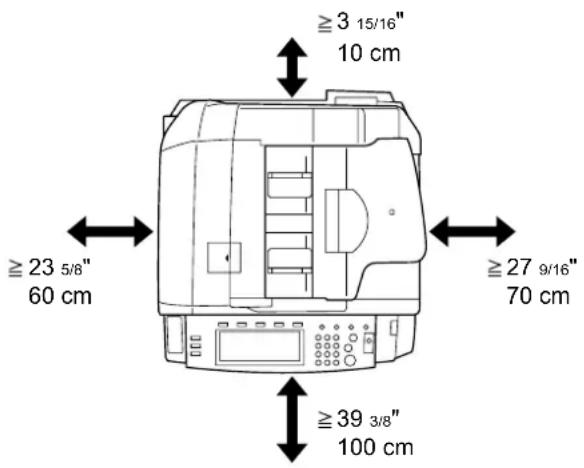
Always use the caster stoppers to stabilize the copier once it is in place to keep it from moving and/or falling over and causing injury.

Other precautions
Adverse environmental conditions may affect the safe operation and performance of the copier. Install in an air-conditioned room (recommended room temperature: around 73.4 °F (23 °C), humidity: around 50 %) and avoid the following locations when selecting a site for the copier.
- Avoid locations near a window or with exposure to direct sunlight.
- Avoid locations with vibrations.
- Avoid locations with drastic temperature fluctuations.
- Avoid locations with direct exposure to hot or cold air.
- Avoid poorly ventilated locations.
If the floor is delicate against casters, when this product is moved after installation, the floor material may be damaged.
During copying, some ozone is released, but the amount does not cause any ill effect to one's health. If, however, the copier is used over a long period of time in a poorly ventilated room or when making an extremely large number of copies, the smell may become unpleasant. To maintain the appropriate environment for copy work, it is suggested that the room be properly ventilated.
Power supply/Grounding the copier

Warning
Do not use a power supply with a voltage other than that specified. Avoid multiple connections in the same outlet. These types of situations present a danger of fire or electrical shock.
Plug the power cord securely into the outlet. If metallic objects come in contact with the prongs on the plug, it may cause a fire or electric shock.
Always connect the copier to an outlet with a ground connection to avoid the danger of fire or electrical shock in case of an electric short. If an earth connection is not possible, contact your service representative.


Other precautions
Connect the power plug to the closest outlet possible to the copier.
The power supply cord is used as the main disconnect device. Ensure that the socket/outlet is located/installed near the equipment and is easily accessible.
Handling of plastic bags

Warning
Keep the plastic bags that are used with the copier away from children. The plastic may cling to their nose and mouth causing suffocation.


Precautions for Use
Cautions when using the copier

Warning
Do not place metallic objects or containers with water (flower vases, flower pots, cups, etc.) on or near the copier. This of situation presents a danger of fire or electrical shock should they fall inside.
Do not remove any of the covers from the copier as there is a danger of electrical shock from high voltage parts inside the copier.


Do not damage, break or attempt to repair the power cord. Do not place heavy objects on the cord, pull it, bend it unnecessarily or cause any other type of damage. These types of situations present a danger of fire or electrical shock.
Never attempt to repair or disassemble the copier or its parts as there is a danger of fire, electrical shock or damage to the laser. If the laser beam escapes, there is a danger of it causing blindness.
If the copier becomes excessively hot, smoke appears from the copier, there is an odd smell, or any other abnormal situation occurs, there is a danger of fire or electrical shock. Turn the main power switch off (O position) immediately, be absolutely certain to remove the power plug from the outlet and then contact your service representative.
If anything harmful (paper clips, water, other fluids, etc.) falls into the copier, turn the main power switch off (O position) immediately. Next, be absolutely certain to remove the power plug from the outlet to avoid the danger of fire or electrical shock. Then contact your service representative.
Do not remove or connect the power plug with wet hands, as there is a danger of electrical shock.
Always contact your service representative for maintenance or repair of internal parts.

Caution
Do not pull the power cord when removing it from the outlet. If the power cord is pulled, the wires may become broken and there is a danger of fire or electrical shock. (Always grasp the power plug when removing the power cord from the outlet.)
Always remove the power plug from the outlet when moving the copier. If the power cord is damaged, there is a danger of fire or electrical shock.
If the copier will not be used for a short period of time (overnight, etc.), turn the main switch off (O). If it will not be used for an extended period of time (vacations, etc.), remove the power plug from the outlet for safety purposes during the time the copier is not in use.
Always hold the designated parts only when lifting or moving the copier.
For safety purposes, always remove the power plug from the outlet when performing cleaning operations.
If dust accumulates within the copier, there is a danger of fire or other trouble. It is therefore recommended that you consult with your service representative in regard to cleaning of internal parts. This is particularly effective if accomplished prior to seasons of high humidity. Consult with your service representative in regard to the cost of cleaning the internal parts of the copier.
Do not leave the document processor open as there is a danger of personal injury.
Other precautions
Do not place heavy objects on the copier or cause other damage to the copier.
Do not open the front cover, turn off the main power switch, or pull out the power plug during copying.



When lifting or moving the copier, contact your service representative.
Do not touch electrical parts, such as connectors or printed circuit boards. They could be damaged by static electricity.
Do not attempt to perform any operations not explained in this handbook.
Caution: Use of controls or adjustments or performance of procedures other than those specified herein may result in hazardous radiation exposure.
Do not look directly at the light from the scanning lamp as it may cause your eyes to feel tired or painful.
This copier comes equipped with an HDD (hard disk). Do not attempt to move the copier while the power is still on; Since any resulting shock or vibration may cause damage to the hard disk, be sure to turn off the power before attempting to move the copier.
Cautions when handling consumables

Caution
Do not attempt to incinerate the toner container or the waste toner box. Dangerous sparks may cause burns.
Keep the toner container and the waste toner box out of the reach of children.
If toner happens to spill from the toner container or the waste toner box, avoid inhalation and ingestion, as well as contact with your eyes and skin.
- If you do happen to inhale toner, move to a place with fresh air and gargle thoroughly with a large amount of water. If coughing develops, contact a physician.
- If you do happen to ingest toner, rinse your mouth out with water and drink 1 or 2 cups of water to dilute the contents of your stomach. If necessary, contact a physician.
- If you do happen to get toner in your eyes, flush them thoroughly with water. If there is any remaining tenderness, contact a physician.
- If toner does happen to get on your skin, wash with soap and water.
Do not attempt to force open or destroy the toner container or the waste toner box.
Other precautions
After use, always dispose of the toner container and the waste toner box in accordance with Federal, State and Local rules and regulations.
If the copier will not be used for an extended period of time, remove the paper from the cassette and the MP tray (multi-purpose tray), return it to its original package and reseal it.
Don't store the unit in a place exposed to:
- Direct sunlight
• High or rapidly variable temperature or humidity (limit: 104 °F or 40 °C)


Laser Safety (Europe)
Laser radiation could be hazardous to the human body. For this reason, laser radiation emitted inside this machine is hermetically sealed within the protective housing and external cover. In the normal operation of the product by user, no radiation can leak from the machine.
This machine is classified as Class 1 laser product under IEC 60825.
Caution: Performance of procedures other than those specified in this manual may result in hazardous radiation exposure.
These labels are attached to the laser scanner unit inside the machine and are not in a user access area.
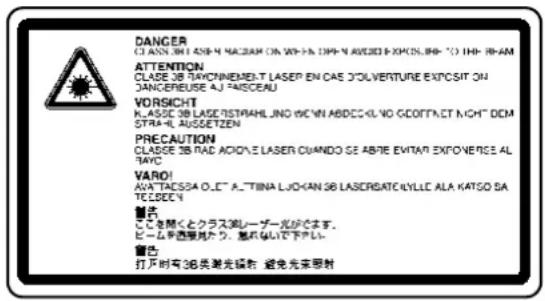
The label shown below is attached on the left side of the machine.

Safety Instructions Regarding the Disconnection of Power
Caution: The power plug is the main isolation device! Other switches on the equipment are only functional switches and are not suitable for isolating the equipment from the power source.
DECLARATION OF CONFORMITY
TO
89/336/EEC, 73/23/EEC and 93/68/EEC
We declare under our sole responsibility that the product to which this declaration relates is in conformity with the following specifications.
Limits and methods of measurement for immunity characteristics of information technology equipment EN55024
Limits and methods of measurement for radio interference characteristics of information technology equipment EN55022 Class B
Limits for harmonic currents emissions for equipment input current ≤ 16A per phase EN61000-3-2
Limitation of voltage fluctuations and flicker in low-voltage supply systems for equipment with rated current ≤16A EN61000-3-3
Safety of information technology equipment, including electrical equipment EN60950
Radiation Safety of laser products, equipment classification, requirements and user's guide EN60825-1
SAFETY OF LASER BEAM (USA)
1. Safety of laser beam
This copier has been certified by the manufacturer to Class 1 level under the radiation performance standards established by the U.S.DHHS (Department of Health and Human Services) in 1968. This indicates that the product is safe to use during normal operation and maintenance. The laser optical system, enclosed in a protective housing and sealed within the external covers, never permits the laser beam to escape.
2. The CDRH Act
A laser-product-related act was implemented on Aug. 2, 1976, by the Center for Devices and Radiological Health (CDRH) of the U.S. Food and Drug Administration (FDA). This act prohibits the sale of laser products in the U.S. without certification, and applies to laser products manufactured after Aug. 1, 1976. The label shown below indicates compliance with the CDRH regulations and must be attached to laser products marketed in the United States. On this copier, the label is on the left.
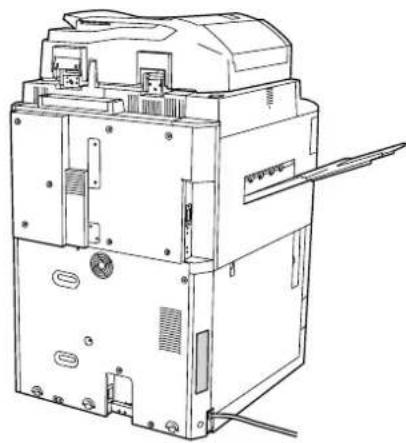
natural_image
Technical line drawing of a mechanical device with internal components and mounting holes (no text or symbols)3. Optical unit
When checking the optical unit, avoid direct exposure to the laser beam, which is invisible. Shown at below is the label located on the cover of the optical unit.
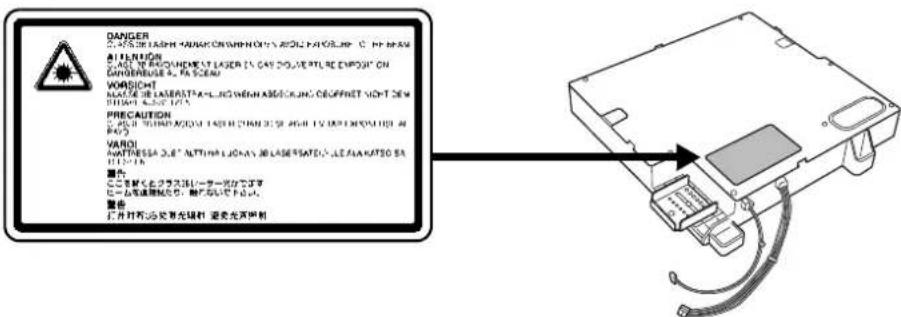
For safety of the service personnel, follow the maintenance instructions in the other section of this manual.
5. Safety switch
The power to the laser unit is cut off when the upper front cover is opened.
Safety Instructions Regarding the Disconnection of Power
Caution: The power plug is the main isolation device! Other switches on the equipment are only functional switches and are not suitable for isolating the equipment from the power source.
This equipment has been tested and found to comply with the limits for a Class B digital device, pursuant to Part 15 of the FCC Rules. These limits are designed to provide reasonable protection against harmful interference in a residential installation. This equipment generates, uses and can radiate radio frequency energy and, if not installed and used in accordance with the instructions, may cause harmful interference to radio communications. However, there is no guarantee that interference will not occur in a particular installation. If this equipment does cause harmful interference to radio or television reception, which can be determined by turning the equipment off and on, the user is encouraged to try to correct the interference by one or more of the following measures:
- Reorient or relocate the receiving antenna.
- Increase the separation between the equipment and receiver.
- Connect the equipment into an outlet on a circuit different from that to which the receiver is connected.
- Consult the dealer or an experienced radio/TV technician for help.
CAUTION — The changes or modifications not expressly approved by the party responsible for compliance could void the user's authority to operate the equipment.
* The above warning is valid only in the United States of America.
MERCURY WARNING

THE LAMP(S) INSIDE THIS PRODUCT CONTAIN MERCURY AND MUST BE RECYCLED OR DISPOSED OF ACCORDING TO LOCAL, STATE OR FEDERAL LAWS.
Introduction
This Operation Guide contains the following chapters:
1 Part Names
Identifies copier parts and operation panel keys.
2 Preparing to Copy
Explains how to load paper and originals.
3 Basic Operation
Describes the procedures for basic copying.
4 Optional Equipment
Introduces the convenient optional equipment available for this copier.
5 Maintenance
Describes cleaning and toner replacement.
6 Troubleshooting
Explains how to handle error messages, paper jams, and other problems.
Appendix
Lists the copier specifications.
Guides Included
The following guides are included with this copier. Refer to the proper guide for your needs.
Operation Guide (This Guide)
Describes how to load paper, basic copier operations, and troubleshooting.
Advanced Operation Guide
Covers copying details in depth as well as default settings.
Conventions in This Guide
The following conventions are used depending on the nature of the description.
Convention Description Example
| Bold | Indicates operation panel keys. | Press the Start key. |
| [Regular] Indicates touch panel keys. Press [Basic]. | ||
| Italic | Indicates touch panel messages. | Ready to copy is displayed. |
| NOTE Indicates supplemental information or operations for reference. | NOTE: - | |
| IMPORTANT Indicates items that are required or prohibited so as to avoid problems. | IMPORTANT: - | |
Contents
Take Advantage of Advanced Functions ....i
Legal and Safety Information ...... vii
Legal Information ......viii
Energy Star Program ix
Safety Conventions in This Guide ....x
Caution Labels ...... xii
Installation Precautions ....xiii
Precautions for Use ....xiv
Introduction ......xxi
Guides Included ...... xxii
Conventions in This Guide ....xxii
1 Part Names 1-1
Copier 1-2
Document Processor 1-4
Internal Parts 1-5
Operation Panel 1-6
Touch Panel 1-7
2 Preparing to Copy 2-1
Loading Paper 2-2
Specifying Paper Type and Size to the Cassettes and MP Tray 2-8
Loading Originals 2-16
Selecting the Language 2-20
3 Basic Operation 3-1
Basic Copying Procedures 3-2
Selecting Image Quality ....3-4
Adjusting Exposure 3-5
Reducing/Enlarging 3-6
Duplex Mode 3-11
Split Mode 3-14
Sort Mode 3-16
Interrupt Mode 3-17
Job Reservation 3-18
Low-Power Mode 3-19
Sleep Mode 3-20
4 Optional Equipment 4-1
Overview of Optional Equipment 4-2
Side Feeder 4-3
Document Finisher 4-3
Key Counter 4-3
Printer Kit 4-4
Scanner Kit 4-4
Security Kit 4-4
5 Maintenance 5-1
Cleaning the Copier 5-2
Replacing Toner Container 5-4
6 Troubleshooting 6-1
Solving Malfunctions 6-2
Responding to Error Messages 6-4
Clearing Paper Jams 6-9
Appendix ...... Appendix-1
Specifications ...... Appendix-2
Index ...... Index-1
1 Part Names
This chapter identifies copier parts and operation panel keys.
- Copier...1-2
• Operation Panel...1-6 - Touch Panel...1-7
Copier

1 Operation Panel
2 Operation Panel Lock Lever
3 Document Processor
4 Cassette 1
5 Cassette 2
6 Cassette 3
7 Cassette 4
8 MP Tray (multi-purpose tray)
9 Paper Width Guides
10 MP Tray Extension
11 Right Cover
12 Handles
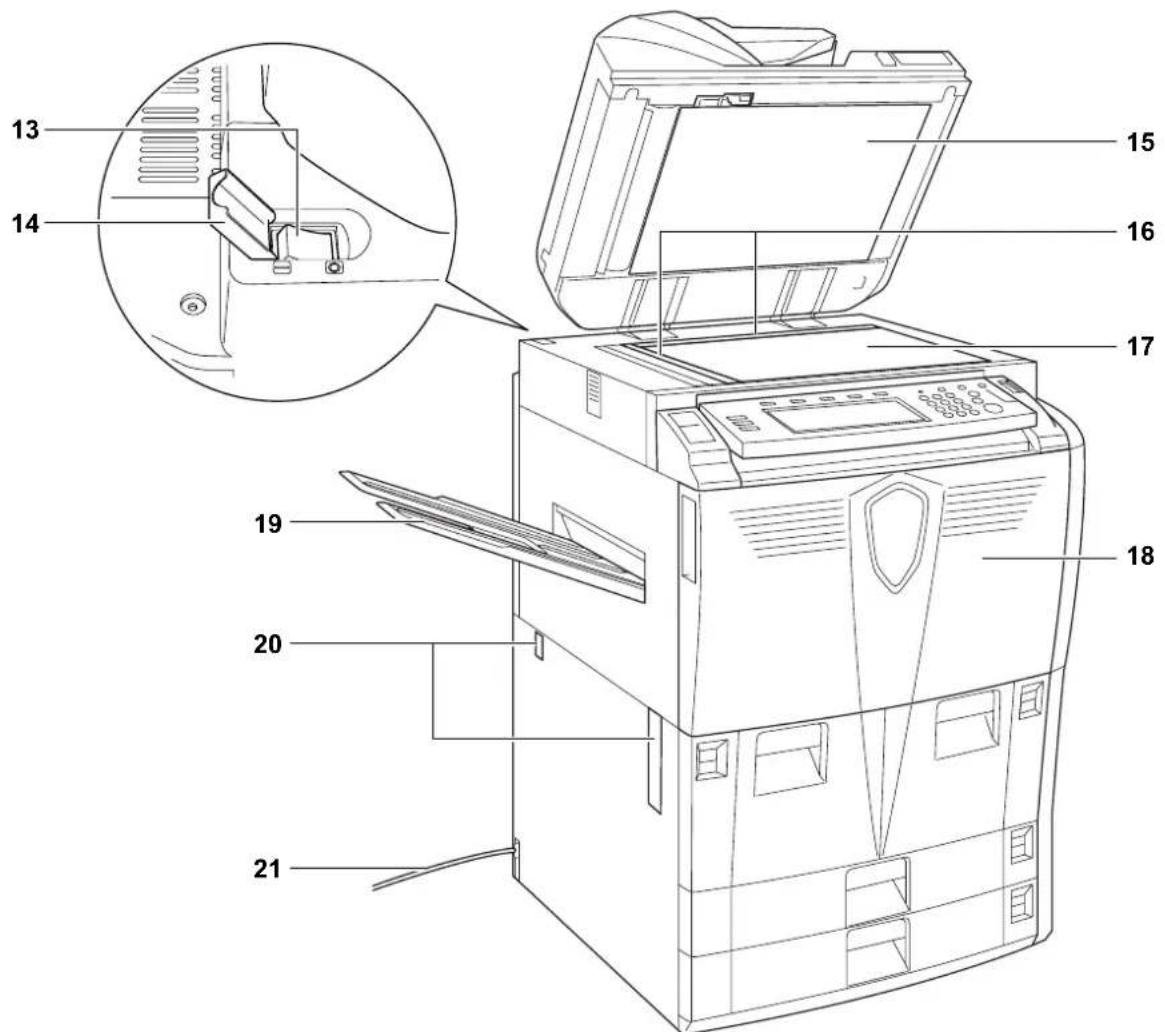
13 Main Power Switch
14 Main Power Switch Cover
15 Document Processor Bottom Cover
16 Original Size Indicator Plates
17 Platen
18 Front Cover
19 Output Tray (Option)
20 Handles
21 Power Cord
Document Processor
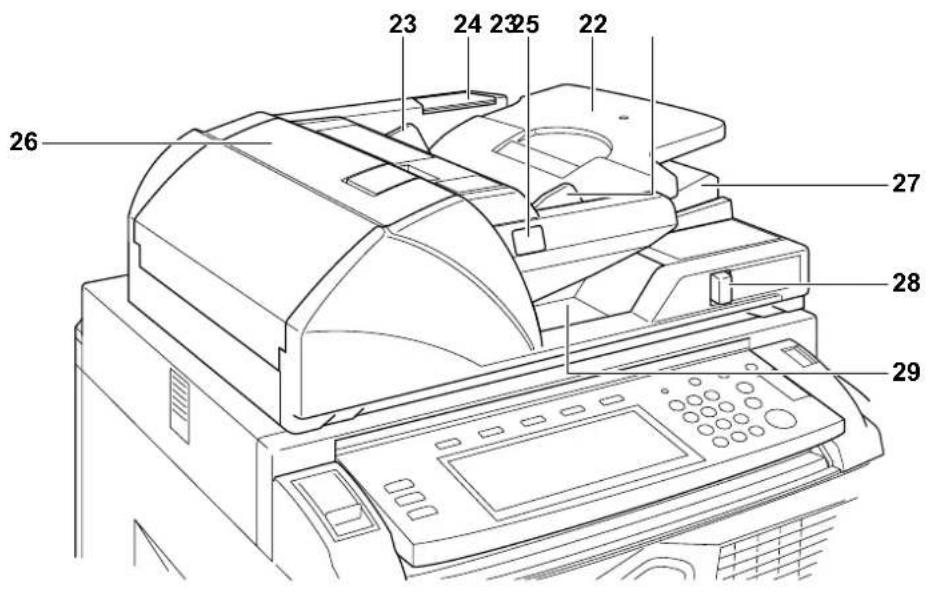
22 Original Table
23 Original Width Guides
24 Cleaning Cloth Compartment
25 Original Loaded Indicator
26 Document Processor Top Cover
27 Ejection Guide
28 Document Processor Angle Adjustment Lever
29 Original Eject Table
Internal Parts
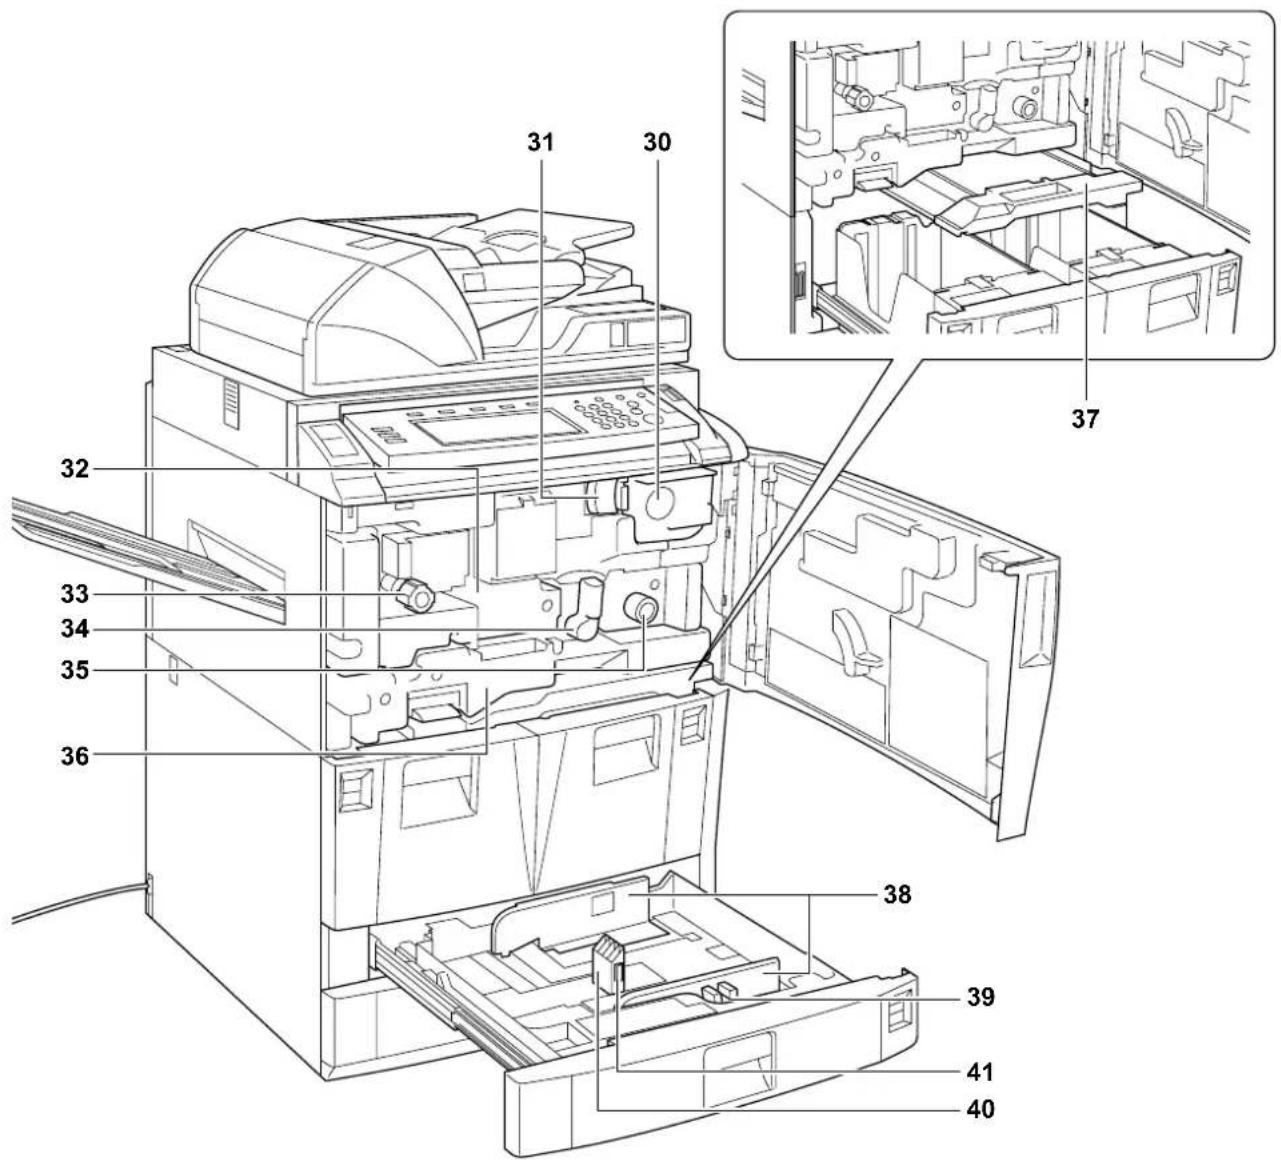
30 Toner Container
31 Toner Container Release Lever
32 Paper Conveyor
33 Knob A1
34 Lever A2
35 Knob A3
36 Duplex Unit
37 Paper Feeder
38 Paper Width Guides
39 Paper Width Adjusting Tab
40 Paper Length Guide
41 Paper Length Adjusting Tab
Operation Panel
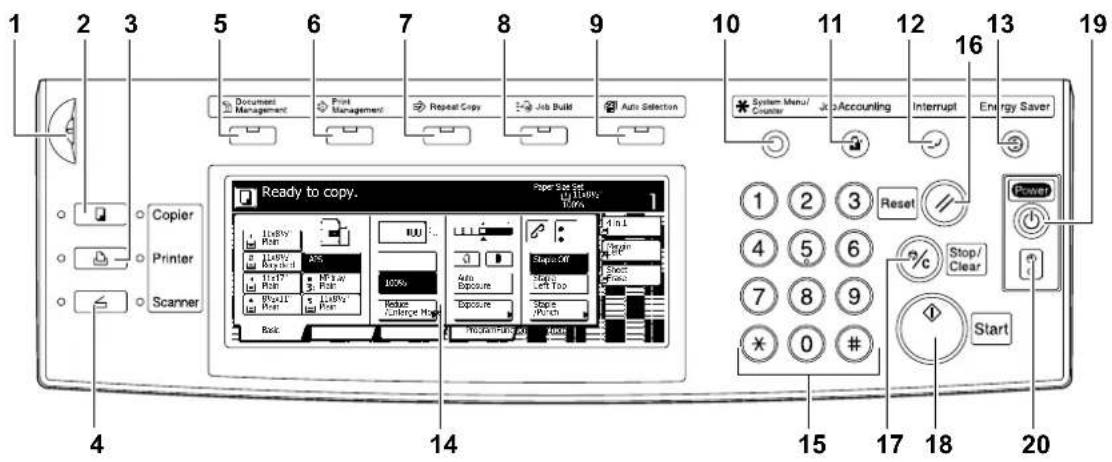
1 Brightness Adjustment Dial
2 C o p y Key/Indicator
3 P r i n t e r Key/Indicator
4 S c a n n e r Key/Indicator
5 Document Management Key/Indicator
6 Print Management Key/Indicator
7 Re p e a t C o p y Key/Indicator
8 Job Build Key/Indicator
9 Auto Selection Key/Indicator
10 System Menu/Counter key
11 Job Accounting key
12 Interrupt Key/Indicator
13 Energy Saver Key/Indicator
14 Touch Panel
15 Numeric Keys
16 Reset Key
17 Stop/Clear Key
18 Start Key/Indicator
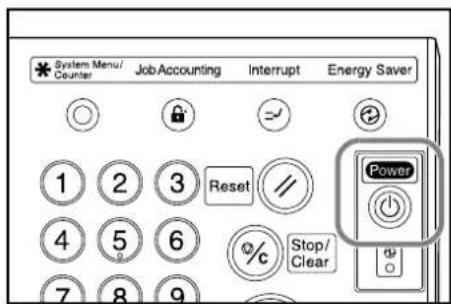
19 Power Key/Indicator
20 Main Power Indicator
Touch Panel
1 [Basic] Screen
Press [Basic] to display this screen.
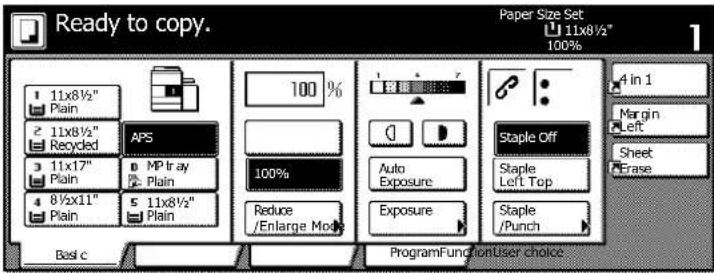
2 [User choice] Screen
Press [User choice] to display this screen.
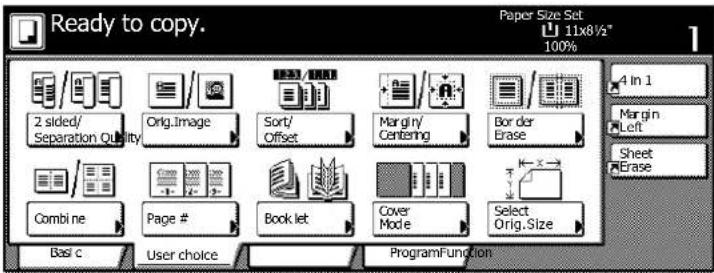
3 [Function] Screen
Press [Function] to display this screen.

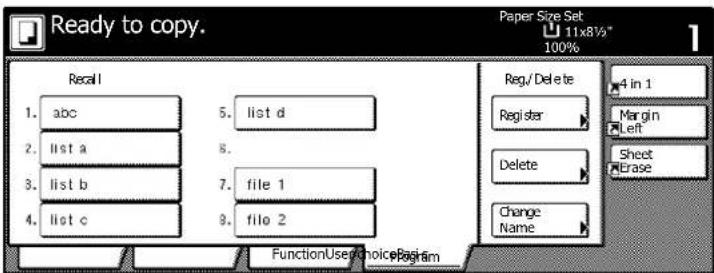
4 [Program] Screen
Press [Program] to display this screen.
2 Preparing to Copy
This chapter explains the preparations required before using the copier.
- Loading Paper...2-2
- Specifying Paper Type and Size to the Cassettes and MP Tray...2-8
- Loading Originals...2-16
- Selecting the Language...2-20
Loading Paper
Load paper in the four cassettes, the MP tray and/or the optional side feeder. For details on the types of paper supported, refer to Paper in the Appendix of the Advanced Operation Guide.
Before Loading Paper
When you open a new package of paper, follow the instructions as below to fan through the paper prior to loading.
1 Holding the paper on both sides, bend the edges downward so that the middle curves upward.
2 Holding your thumbs in place toward the center, unbend the paper so that the bottom sheet is back at its original position. Your thumbs should prevent the stack from straightening out, forming a hill-like shape.
3 Fluff the paper, raising one hand and lowering the other, then alternating. The individual sheets are slightly lifted, separated from each other.
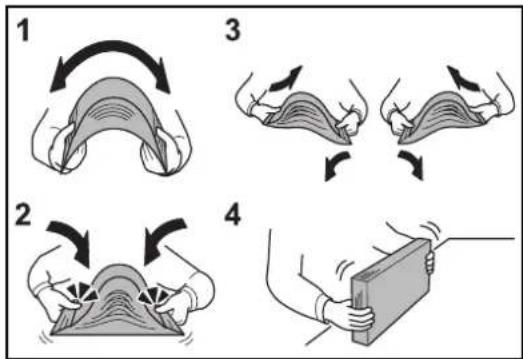
4 Align the sheets by tapping the stack on a flat surface.
If the paper is curled or folded, straighten it before loading. Paper that is curled or folded may cause paper jams.
IMPORTANT: If you copy onto used paper (paper already used for copying), do not use paper that is stapled or clipped together. This may damage the copier or cause poor image quality.
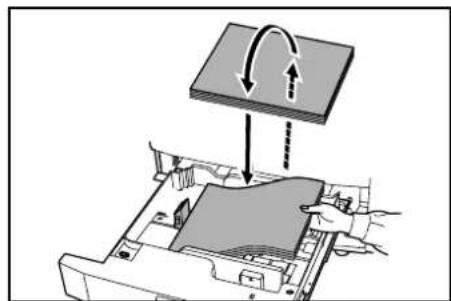
If ejected copies are not flat or are stacked unevenly, turn the paper in the cassette over and reload it.
Avoid exposing opened paper to high temperatures and high humidity as dampness may cause copying problems. Seal any remaining paper after loading the MP tray or a cassette in its original package. If the copier will not be used for a prolonged period, protect all paper from humidity by removing from the cassettes and sealing in the original package.
natural_image
Diagram of a mechanical assembly with a curved arrow indicating motion or force, showing no text or symbols.Loading Paper in Cassettes 1 and 2
Cassettes 1 and 2 support standard and recycled paper. Up to 1,500 sheets of standard paper (80 g/m ^4 ) may be loaded in each cassette.
The cassettes support 11 × 8 1/2" or A4 paper.
IMPORTANT: Specify the type of paper loaded in the cassettes. Refer to Specifying the Paper Type on page 2-9 for details.
1 Pull the cassette out toward you until it stops.
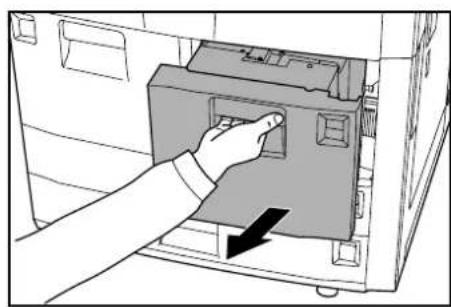
natural_image
Hand inserting a device into a computer case (no text or symbols visible)2 Align the paper flush against the right side of the cassette as you load it.
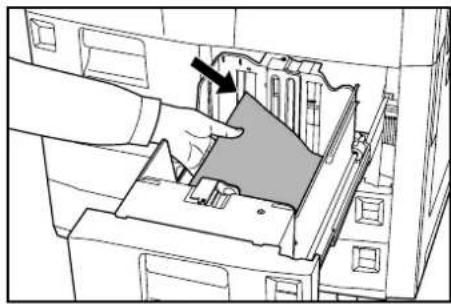
natural_image
Line drawing of a hand inserting a component into a file folder (no text or symbols visible)IMPORTANT: Before loading the paper, be sure that it is not curled or folded. Paper that is curled or folded may cause paper jams.
Ensure that the loaded paper does not exceed the level indicated.
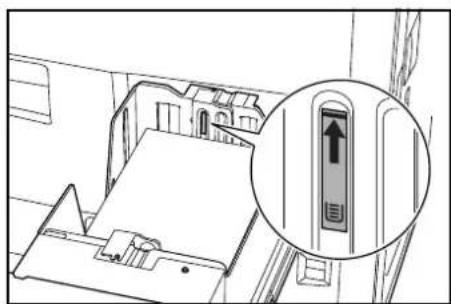
natural_image
Line drawing of a room interior with a magnified inset showing a vertical device (no text or symbols)3 Gently push the cassette back in.
Loading Paper in Cassettes 3 and 4
Cassettes 3 and 4 support standard, recycled, and colored paper. Up to 500 sheets of standard paper (80 g/m ^2 ) (or 525 sheets for standard paper of 75 g/m ^2 ) can be loaded in each cassette.
The following paper sizes are supported: 11 × 17" , 812 × 14" , 11 × 812" , 812 × 11" , 512 × 812" , 812 × 13" , 812 × 1312" , A3, B4, A4, A4R, B5, B5R, A5R, Folio, 8K and 16K.
IMPORTANT: After loading paper, be sure to specify the type and size of the paper loaded in the cassettes on the operation panel. For further details, refer to Specifying the Paper Size on page 2-8 and Specifying the Paper Type on page 2-9.
1 Pull the cassette out toward you until it stops.
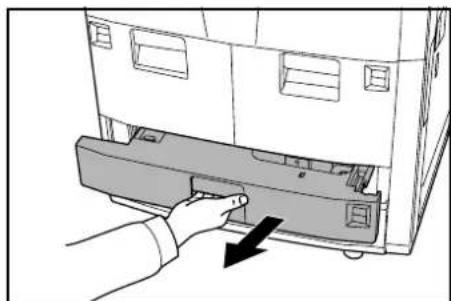
natural_image
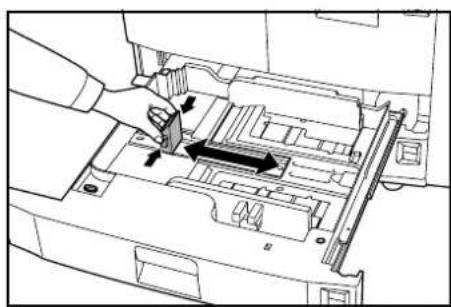
Hand inserting a device into a computer case (no text or symbols visible)2 Using the paper length adjusting tab, move the plate to fit the paper.
NOTE: Paper sizes are marked on the cassette.
natural_image
Technical line drawing of a mechanical assembly with a hand operating a component (no text or symbols visible)3 Holding the paper width adjusting tab both ends, move the paper width guide to fit the paper.

natural_image
Diagram of a hand inserting a component into a machine (no text or symbols visible)NOTE: Paper sizes are marked on the cassette.
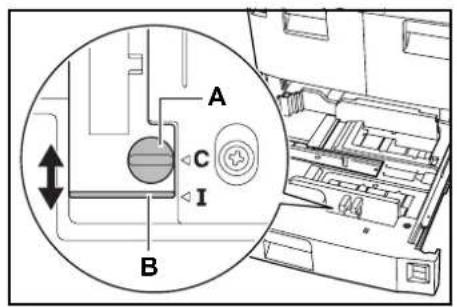
To switch between inch and metric paper sizes, slide the size adjustment switch.
1 Holding the paper width adjustment tab both ends, move the paper width guide to anywhere that the paper size scale is not indicated.
2 Rotate the size adjustment switch (A) 90 degrees, horizontal to vertical. ⊖→∅
3 Slide the size adjustment lever (B) to upper (C) or lower (I) position. I: Inches C: Metrics
4 Rotate the size adjustment switch 90 degrees, vertical to horizontal.
4 Align the paper flush against the right side of the cassette as you load it.

natural_image
Diagram of a printer's internal structure showing a hand inserting a card into a folder (no text or symbols visible)IMPORTANT: Be sure that the paper length and width guides rest securely against the paper. If there is a gap, readjust the guides to fit the paper. The gap may cause paper jam.
Before loading the paper, be sure that it is not curled or folded. Paper that is curled or folded may cause paper jams.
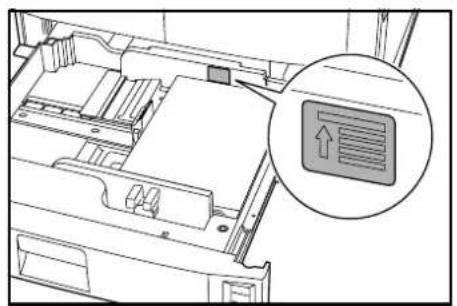
Ensure that the loaded paper does not exceed the level indicated. Paper that exceeds the level indicated may cause paper jam.
natural_image
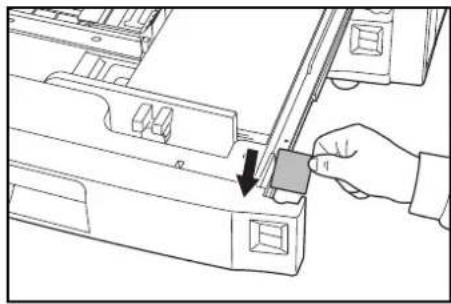
Technical line drawing of a mechanical assembly with an inset showing a button labeled '↑' (no text or symbols on the diagram itself)5 Insert the appropriate paper size card in the slot to indicate the size of the paper inside.
natural_image
Line drawing of a hand inserting a component into a device (no text or symbols)6 Gently push the cassette back in.
Loading Paper in the MP Tray
The MP tray supports special paper (45 to 200 g/m ^2 ) in addition to standard and recycled paper. Up to 100 sheets of standard paper (80 g/m ^2 ) may be loaded in the MP tray.
The MP tray accepts paper sizes from 5 12 × 8 12 " to 11 × 17 " and from 16K, 8K, Folio, A6R, and B6R to A3.
The capacity of the MP tray is as follows.
Paper Type Capacity
| Standard paper (80 g/m2) 100 sheets | |
| Standard paper (120 g/m2, 160 g/m2, 200 g/m2) or transparencies | 25 sheets |
IMPORTANT: After loading paper, be sure to specify the type and size of the paper loaded in the MP tray on the operation panel. For further details, refer to Specifying the Paper Size to the MP Tray on page 2-11 and Specifying the Paper Type to the MP Tray on page 2-14.
1 Open the MP tray.
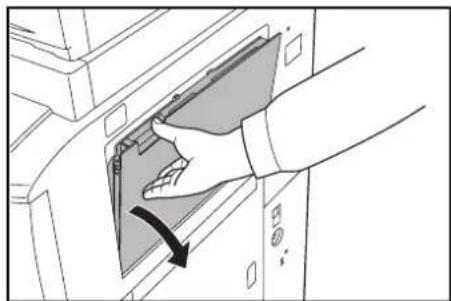
natural_image
Illustration of a hand inserting a folder into a device (no text or symbols visible)For paper larger than 8 12 × 11" or A4R, pull out the MP tray extension.
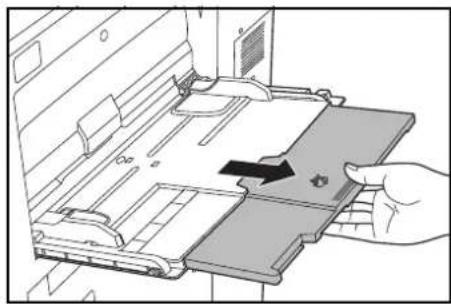
natural_image
Illustration of a hand inserting a device into a rack, showing internal components and a black arrow indicating rotation (no text or symbols present)2 Adjust the paper width guides to fit the width of the paper.

natural_image
Illustration of hands inserting a device into a storage tray (no text or symbols visible)3 Insert the paper along the paper width guides into the tray until it stops.
Ensure that the paper width guides are flush against the edges of the paper.
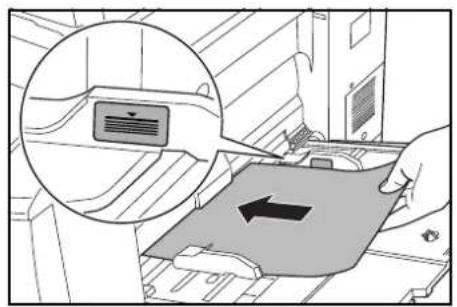
IMPORTANT: Before loading postcards and other types of thick paper that may be curled, straighten out the paper. The paper may not be fed depending on the paper quality.
Only load the MP tray when you are using. Avoid leaving paper in the MP tray.
Ensure that the loaded paper does not exceed the level indicated. Exceeding the maximum level may cause paper jam.
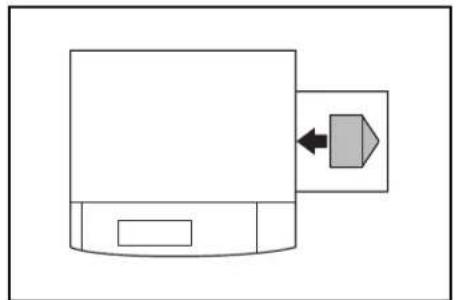
natural_image
Simple line drawing of a device with an arrow pointing to it, no text or symbols presentWhen loading envelopes, open the flap and keep the printing side face-up. Insert envelopes against the guide with the flap on the right until they stop.
Loading Paper in the Optional Side Feeder
The optional side feeder has a capacity of 4,000 sheets of 11 × 8_1/2 (A4 or B5) standard paper (80g / m^2) .
IMPORTANT: After loading paper, be sure to specify the type and size of the paper loaded in the side feeder on the operation panel. Refer to Specifying the Paper Type on page 2-9 for details.
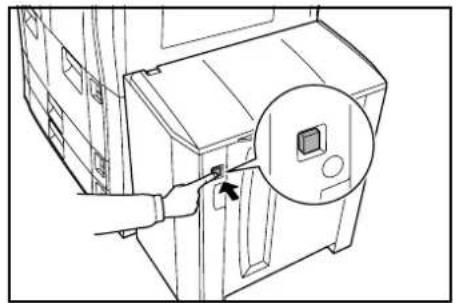
1 Press the switch for the paper lifter on the right side of the side feeder. The paper lifter inside of the side feeder will drop to the bottom.
NOTE: When the side feeder runs out of paper, the paper lifter will automatically descend to the bottom.
natural_image
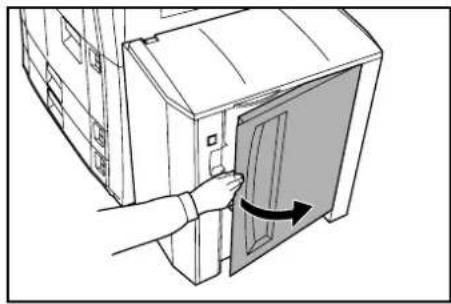
Line drawing of a device with a hand interacting with a button, showing a magnified inset of a screen (no text or symbols present)2 Open the right cover.
NOTE: When the right cover is open, the paper lifter will not descend if you press the switch for the paper lifter.
It is easier to load new paper with the top cover open.
natural_image
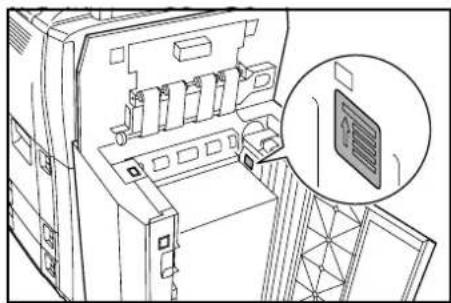
Illustration of a hand opening a door with an arrow indicating clockwise motion (no text or symbols)3 Align the paper flush against the left side in the back of the feeder as you load it.

natural_image
Diagram of a hand inserting a component into a server rack (no text or symbols visible)IMPORTANT: Before loading the paper, be sure that it is not curled or folded. Paper that is curled or folded may cause paper jams.
Ensure that the loaded paper does not exceed the level indicated. Exceeding the maximum level may cause paper jam.
natural_image
Technical line drawing of an electronic device with a magnified inset showing internal components (no text or symbols)4 Close the top and right covers of the side feeder.
Specifying Paper Type and Size to the Cassettes and MP Tray
After loading paper in the cassettes 1 or 2 or the optional side feeder (cassette 5), specify the paper type. Refer to Specifying the Paper Type on page 2-9 for details.
After loading paper in the cassettes 3 or 4, specify both the paper type and size. Refer to Specifying the Paper Size below and Specifying the Paper Type on page 2-9.
After loading paper in the MP tray, specify both the paper type and size. Refer to Specifying the Paper Size to the MP Tray on page 2-11 and Specifying the Paper Type to the MP Tray on page 2-14.
Specifying the Paper Size
Specify the paper size when using the cassettes 3 and 4. For automatic detection of the paper size, specify [Auto Detection] and select [Centimeter] or [Inch] as the unit.
The following paper sizes are available.
11 × 17", 8 1/2 × 14", 11 × 8 1/2", 8 1/2 × 11", 5 1/2 × 8 1/2", 8 1/2 × 13 1/2", 8 1/2 × 13" (Oficio 2), A3, B4, A4, A4R, B5, B5R, A5R, Folio, 8K and 16K
1 Press the System Menu/Counter key.
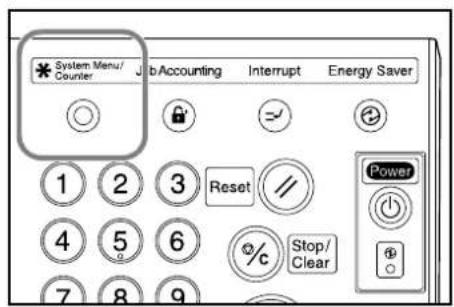
2 Press [Machine Default].
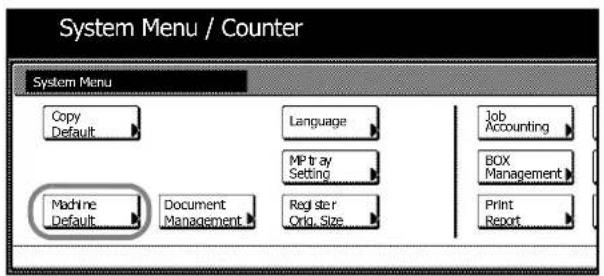
3 Use the numeric keys to enter the four-digit management code. By default, the management code is 6000 for 60 cpm model and 8000 for 80 cpm model.
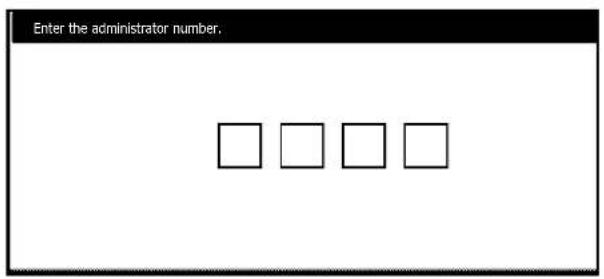
NOTE: When installing the optional security kit, enter the eight-digit management code. By default, the management code is 60006000 for 60 cpm model and 80008000 for 80 cpm model.
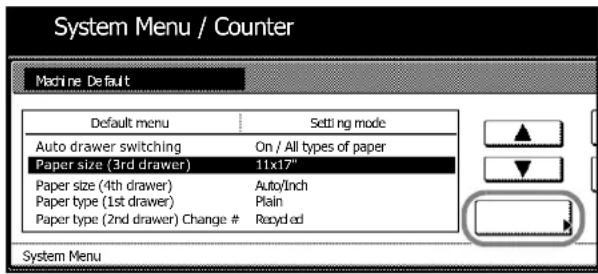
4 Press [▲] or [▼] to choose Paper size [3rd drawer] (Paper size [3rd cassette]) or Paper size [4th drawer] (Paper size [4th cassette]). Press [Change #] to begin changing settings.
5 When [Auto Detection] is selected, choose the unit of measurement. When [Standard sizes] is selected, choose the paper size.
Press [Close].
[Close]: Returns to the previous page by holding the settings.
[Back]: Returns to the previous page by canceling the settings.
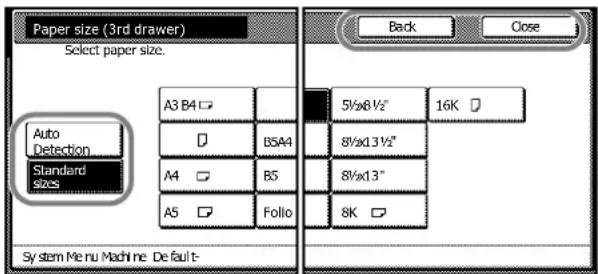
6 Press [Close].
7 Press [End]. The touch panel will return to the [Basic] screen.
Specifying the Paper Type
Specify the paper type when using the cassettes 1 to 5.
The following paper types are available.
Plain, Recycled, Preprinted, Bond, Color (Colour), Letterhead, Thick paper, High Quality and Custom 1-8
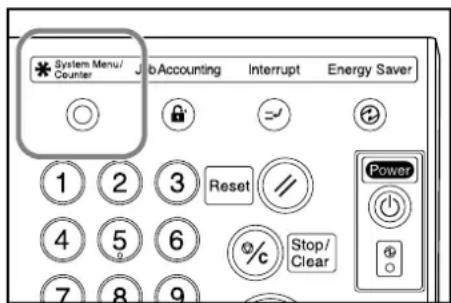
1 Press the System Menu/Counter key.
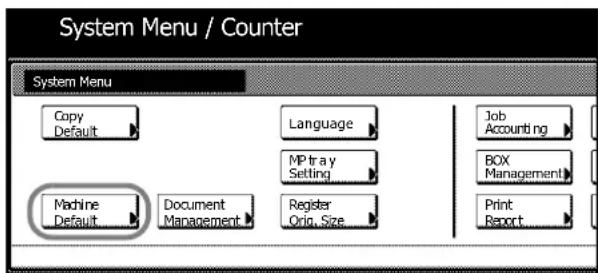
2 Press [Machine Default].
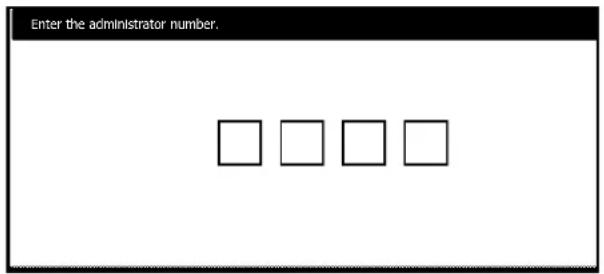
3 Use the numeric keys to enter the four-digit management code. By default, the management code is 6000.
4 Press [▲] or [▼] to choose from Paper type (1st drawer) (Paper type [1st cassette]) through Paper type (5th drawer) (Paper type [5th cassette]). Press [Change #] to begin changing settings.
NOTE: Paper type (5th drawer) (Paper type [5th cassette]) is displayed when installing the optional side feeder.

5 Select the paper type and press [Close].

6 Press [Close].
7 Press [End]. The touch panel will return to the [Basic] screen.
Specifying the Paper Size to the MP Tray
Specify the paper size when using the MP tray.
Select the paper size from the followings.
Setting Method Unit Paper Sizes
| Auto Detect Inch 11 × 17", 8 | _1/2 × 14" , 11 × 8_1/2" , 8_1/2 × 11" and 5_1/2 × 8_1/2" |
| Centimeter A3, B4, A4, A4R, B5, B5R, A5R, B6R, A6R and Folio | |
| Other Standard Sizes ISO B5, Envelope DL, Envelope C5, Envelope C4, Comm. | |
| #10, Comm. #9, Monarch, Executive, OUFUKU (Return postcard), YOUKEI 2, YOUKEI 4, 8_1/2 × 13_1/2" , 8_1/2 × 13" (Oficio 2), 8K and 16K | |
| Input Size Inch models | |
| Vertical: 3_7/8 to 11_5/8" (in 1/8" increments)Horizontal: 5_7/8 to 17" (in 1/8" increments) | |
| Metric modelsVertical: 98 to 297 mm (in 1-mm increments)Horizontal: 148 to 432 mm (in 1-mm increments) | |
Auto Detect
The paper size is automatically detected. Specify [Centimeter] or [Inch].
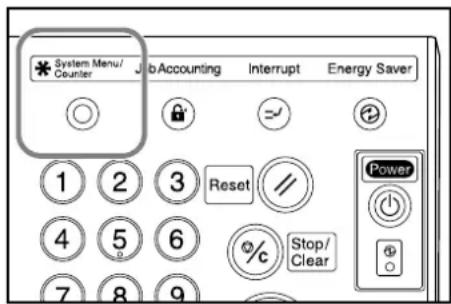
1 Press the System Menu/Counter key.
2 Press [MP tray Setting].

3 Press [Auto Detection].
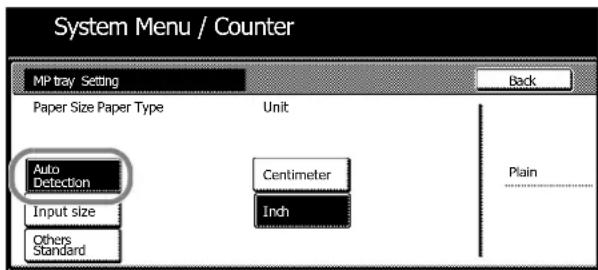
4 Press [Centimeter] or [Inch].
5 Press [Close]. The touch panel will return to the [Basic] screen.
Other Standard Sizes
Specify special standard sizes.
1 Press the System Menu/Counter key.
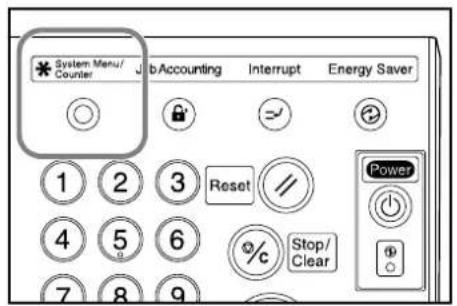
2 Press [MP tray Setting].
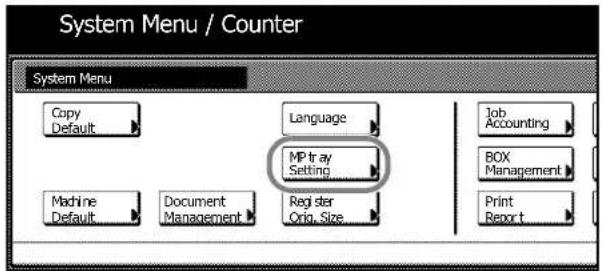
3 Press [Others Standard] and then [Select size].
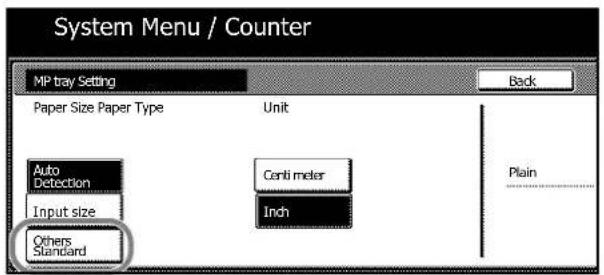
4 Select the paper size.
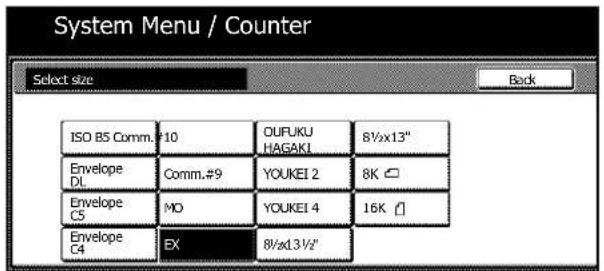
5 Press [Close].
6 Press [Close]. The touch panel will return to the [Basic] screen.
Input Size
Specify the required paper size.
1 Press the System Menu/Counter key.
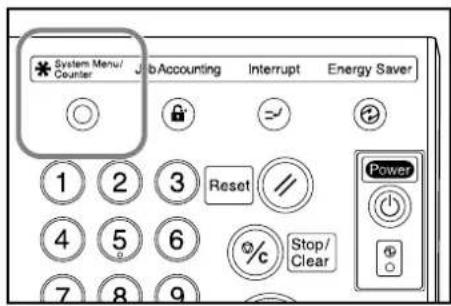
2 Press [MP tray Setting].

3 Press [Input size].
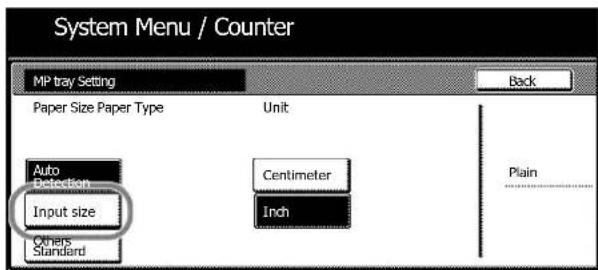
4 Press [+] or [-] to specify the vertical size. With the metric models, you may enter the size directly using the numeric keys by pressing [#-Keys].

The setting range is as follows.
Setting Range
| Inch models | 3 7/8 to 11 5/8" (in 1/8" increments) |
| Metric models 98 to 297 mm (in 1-mm increments) | |
5 Press [+] or [-] to specify the horizontal size. With the metric models, you may enter the size directly using the numeric keys by pressing [#-Keys].
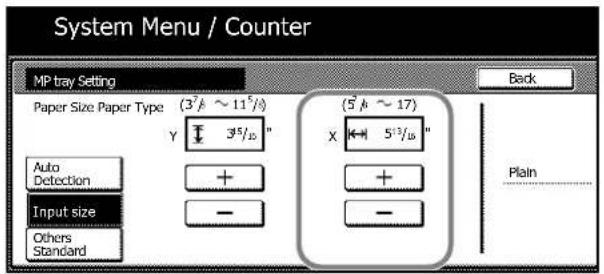
The setting range is as follows.
Setting Range
Inch models 5 7/8 to 17" (in 1/8" increments)
Metric models 148 to 432 mm (in 1-mm increments)
6 Press [Close]. The touch panel will return to the [Basic] screen.
Specifying the Paper Type to the MP Tray
Specify the paper type when using the MP tray.
The following paper types are available.
Plain, Transparency, Rough, Vellum, Labels, Recycled, Preprinted, Bond, Cardstock, Color (Colour), Prepunched, Letterhead, Thick paper, Envelope, High Quality and Custom 1-8
1 Press the System Menu/Counter key.
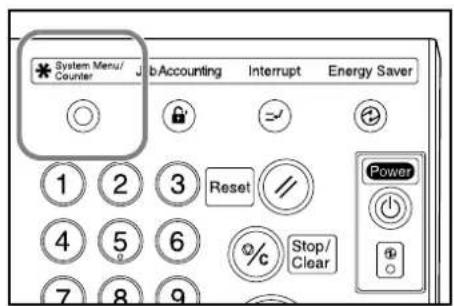
2 Press [MP tray Setting].

3 Press [Select Paper Type].

4 Select the paper type.
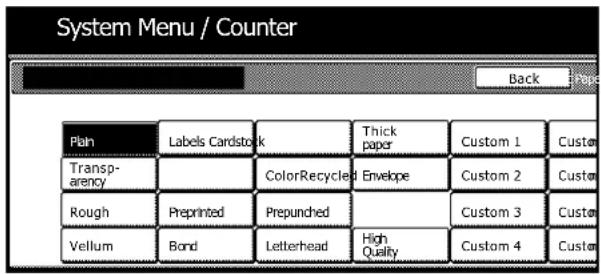
5 Press [Close].
6 Press [Close]. The touch panel will return to the [Basic] screen.
Loading Originals
Loading Originals in the Document Processor
The document processor automatically scans each sheet of multiple originals individually. Both sides of two-sided originals are scanned automatically.
The document processor supports the following types of originals.
Items Specifications
| Weight 45 g/m2 to 160 g/m2 | |
| Size Minimum: 5 | _1/2 × 8_1/2" (A5R); Maximum: 11 × 17" (A3) |
| Capacity Standard paper (80 g/m2), colored paper or recycled paper: 200 sheets(30 sheets in Auto Selection mode)Coated paper: 1 sheetHigh quality paper, 50 g/m2: 200 sheetsHigh quality paper, 110 g/m2: 145 sheets | |
Precautions on Types of Originals for Document Processor
Do not use the document processor for the following types of originals. In addition, if originals have punched holes or perforations, load them with the holes or perforations away from the leading edge.
- Transparencies such as for overhead projectors
- Delicate originals such as carbon paper, crumpled paper, or vinyl sheets
- Irregularly shaped (non-rectangular) originals, wet originals, or originals containing adhesive tape or glue
- Originals bound with clips or staples. (To avoid jams, remove the clips or staples and straighten any curls, wrinkles, or creases before loading them. Failure to do so may cause the originals to jam.)
- Originals with cut-out sections or with very slippery surfaces
- Originals with correction fluid which is not dried
- Originals with folds. (To avoid jams, straighten the folds before loading them. Failure to do so may cause the originals to jam.)
How to Load Originals
Follow these steps to load originals in the document processor.
IMPORTANT: Before loading originals, be sure there are no originals left on the original eject table. Originals left on the original eject table may cause the new originals to jam.

natural_image
Illustration of a hand inserting a card into a printer (no text or symbols visible)1 Adjust the original width guides to fit the originals.
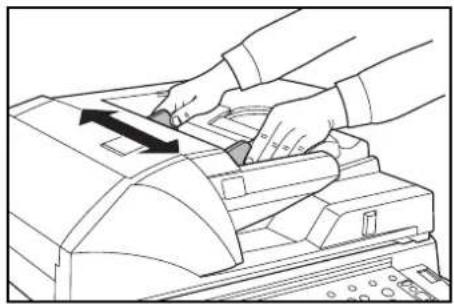
natural_image
Illustration of hands operating a printer with a paper airplane (no text or symbols visible)2 Place the originals. Put the side to be copied (or the first side of two-sided originals) face-up. Slide the leading edge into the document processor as far as it will go.
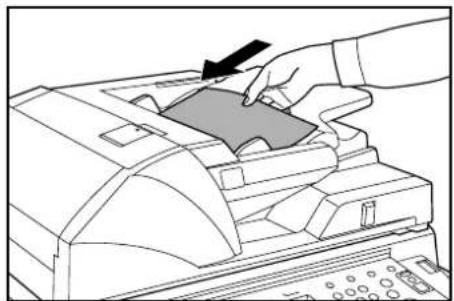
natural_image
Illustration of a hand inserting a card into a printer (no text or symbols visible)IMPORTANT: Confirm that the original width guides exactly fits the originals. If there is a gap, readjust the original width guides. The gap may cause the originals to jam.
Pull out the ejection guide for originals of 8 12 × 14" (B4) or 11 × 17" (A3).
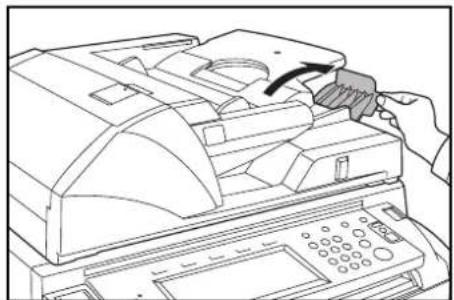
natural_image
Line drawing of a printer with an open lid and control panel, no text or symbols presentEnsure that loaded originals do not exceed the level indicated. Exceeding the maximum level may cause the originals to jam.
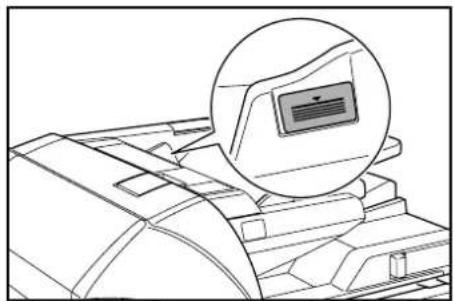
natural_image
Technical line drawing of a mechanical component with a magnified inset showing a device (no text or symbols)Loading Originals on the Platen
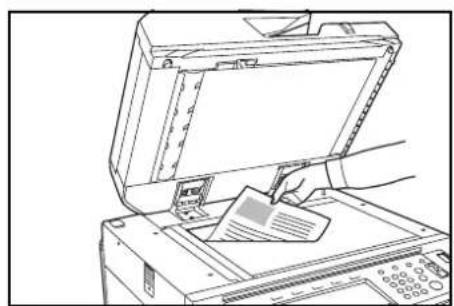
To copy books, magazines, or other originals that cannot be loaded in the document processor, open the document processor and place the original directly on the platen.
Adjust how the document processor opens by using the document processor angle adjustment lever. Move the lever left to open the document processor 60° and move it right to open the document processor 30°.
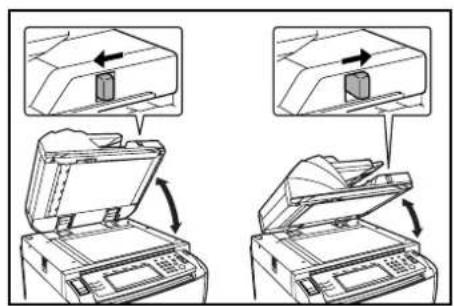
IMPORTANT: Before opening the document processor, be sure that there are no originals left on the original table or on the original eject table. Originals left on the original table or on the original eject table may fall off the copier when the document processor is opened.
Do not move the document processor angle adjustment lever when the document processor is open. Close the document processor before using the lever.
1 Open the document processor.
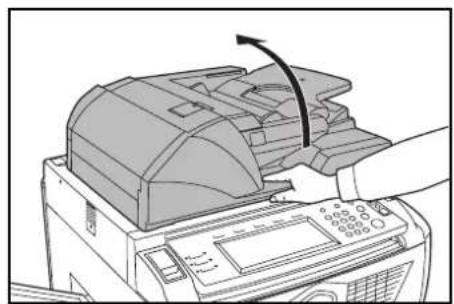
natural_image
Illustration of a hand using a printer to press a stack of paper (no text or symbols visible)2 Place the original. Put the copying side facedown and align it flush against the original size indicator plates with the back left corner as the reference point.
natural_image
Line drawing of a printer with paper being inserted, showing mechanical components and a paper airplane (no text or symbols)Inch models

Metric models
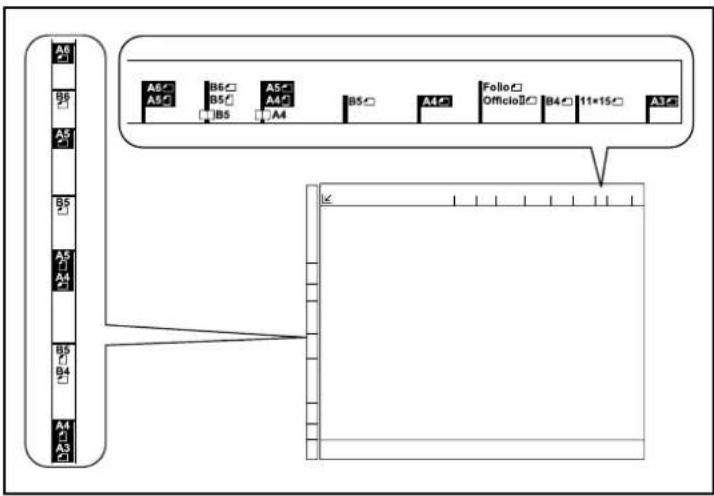
3 Close the document processor. For originals over 4 cm thick, leave the document processor open during copying.
IMPORTANT: Do not push the document processor forcefully when you close it. Excessive pressure may crack the platen glass.
Shadows may be copied around the edges and in the middle of open-faced originals such as books.

Caution
Do not leave the document processor open as there is a danger of personal injury.
Selecting the Language
Select the language displayed on the touch panel.
The following languages are available.
Languages
| Inch models | English, French (Francais), Spanish (Español) and Japanese (日本語) |
| Metric models | English, German (Deutsch), French (Français), Spanish (Español) and Italian (Italiano) |
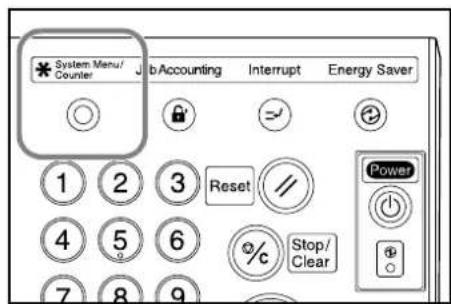
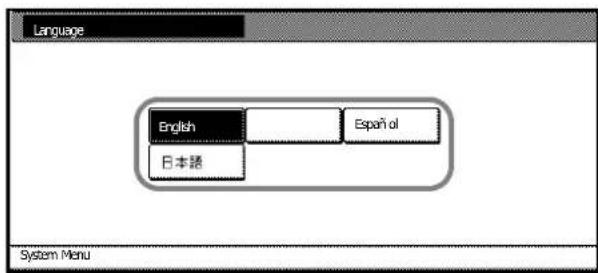
1 Press the System Menu/Counter key.
2 Press [Language].
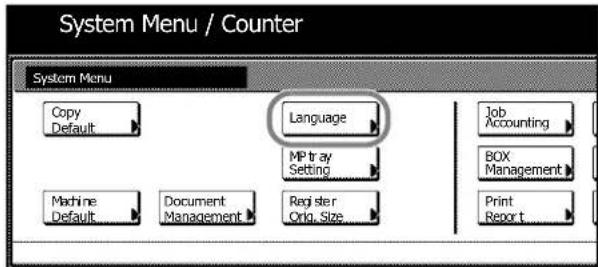
3 Press the key for the desired language. The touch panel language will change accordingly.
3 Basic Operation
This chapter explains the following operations.
• Basic Copying Procedures...3-2
- Selecting Image Quality...3-4
- Adjusting Exposure...3-5
- Reducing/Enlarging...3-6
- Duplex Mode...3-11
- Split Mode...3-14
- Sort Mode...3-16
- Interrupt Mode...3-17
• Job Reservation...3-18
- Low-Power Mode...3-19
- Sleep Mode...3-20
Refer to the Advanced Operation Guide for additional functions.
Basic Copying Procedures
Follow the steps as below for basic copying.
1 Open the main power switch cover and move the main power switch to on (I position).
After the copier has warmed up, the Start indicator will turn green.
natural_image
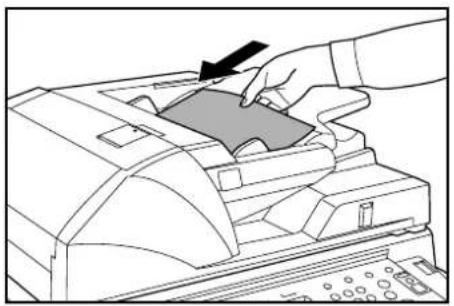
Line drawing of a hand pressing a button on a vehicle door (no text or symbols)2 Place the originals in the document processor or on the platen.
NOTE: For loading instructions, refer to Loading Originals on page 2-16.
natural_image
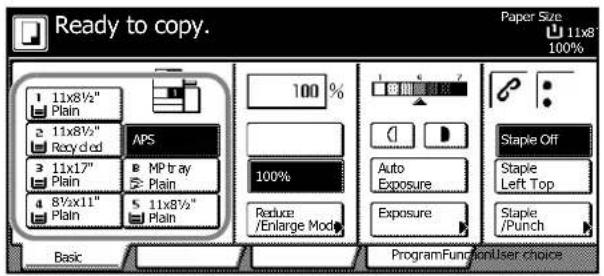
Illustration of a hand pressing down on a printer's cover with a black arrow indicating the process (no text or symbols present)3 Check that [APS] is selected. In this mode, paper that matches the size of the originals will be selected automatically. To change the paper size, press the desired paper size to select the paper source.
NOTE: For details on selecting paper manually, refer to Chapter 3 of the Advanced Operation Guide.
4 Use the numeric keys to enter the copy quantity. You can specify up to 9,999 copies.
NOTE: It is possible to restrict the maximum copy quantity. Refer to Chapter 3 of the Advanced Operation Guide.
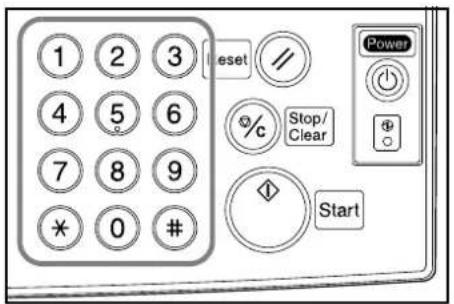
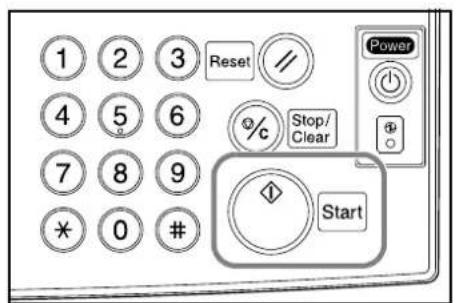
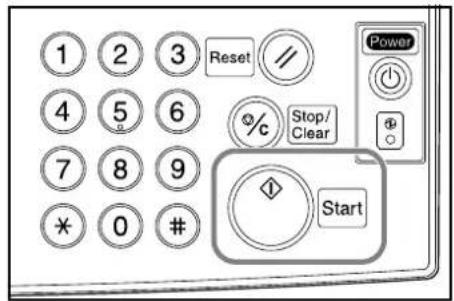
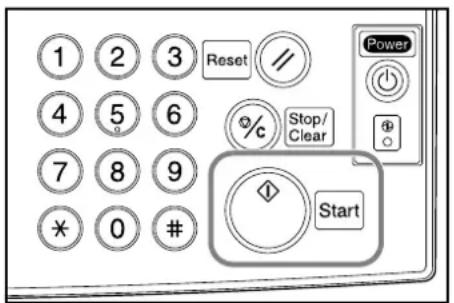
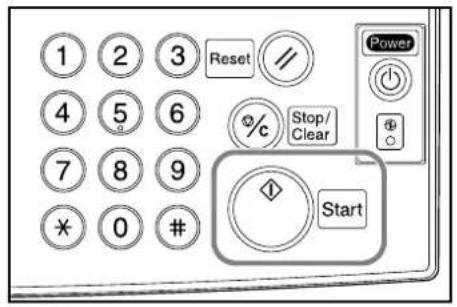
5 Press the Start key to start copy.
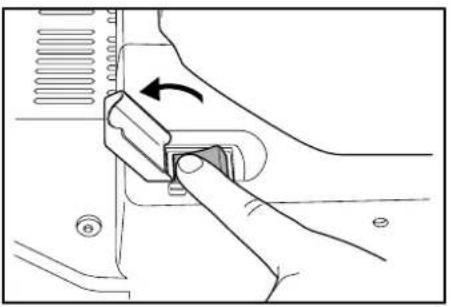
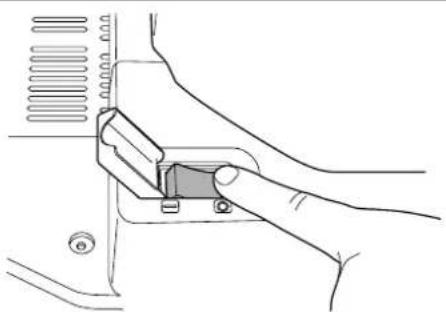
NOTE: You can adjust the angle of the operation panel as shown by releasing the operation panel lock lever. After adjustment, lock the lever again.
When adjusting the angle of the operation panel, do not place your hands or fingers underneath the operation panel. This can result in injury.

natural_image
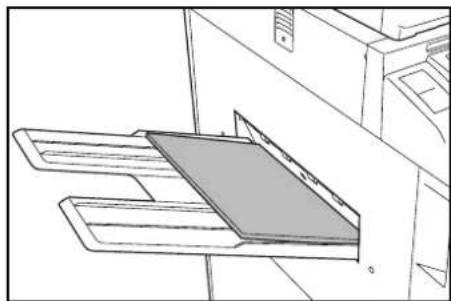
Illustration of a printer presser with a magnified inset showing the printer's internal structure (no text or symbols present)6 Remove the finished copies from the output tray.
The output tray can hold up to 250 sheets of standard paper (80 g/m ^2 ). However, the capacity will vary depending on the type and condition of the paper.
natural_image
Line drawing of a printer or printer with a tray and cover (no text or symbols)
Caution
If the copier will not be used for a short period of time (overnight, etc.), turn the main power switch off (O position). If it will not be used for an extended period of time (vacations, etc.), remove the power plug from the outlet for safety purposes.
natural_image
Line drawing of a hand inserting a small component into a car's seat (no text or symbols)When turning off the main power switch, press the Power key on the operation panel to off (O). Make sure that the Power lamp is off before turning off the main power switch. Turning off the main power switch before pressing the Power key to off may cause damage to the equipped hard disk.
Selecting Image Quality
Choose the image quality suited to the type of original.
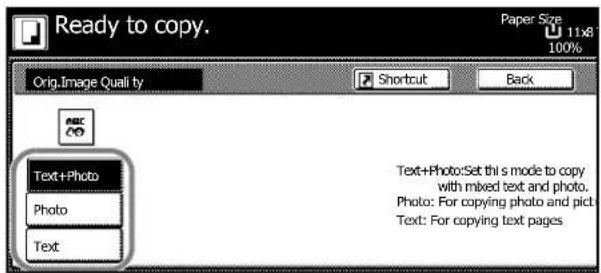
Image Quality Mode Description
Text+Photo For originals with both text and photographs.
Photo For originals primarily consisting of photographs.
Text For originals primarily consisting of text.
1 Place the originals in the document processor or on the platen.
2 Press [Function].
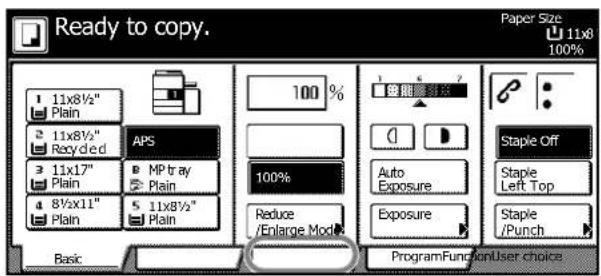
3 Press [Orig.Image Quality] ([Image Quality]).
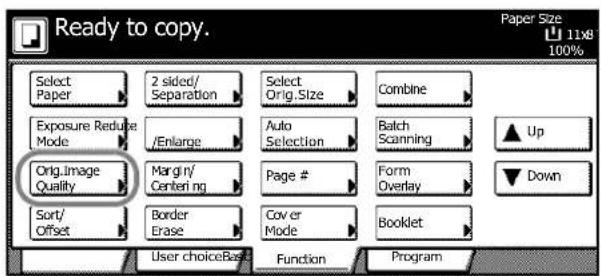
4 Select the image quality.
5 Press the Start key to start copying.
NOTE: You can also adjust the exposure for each Image Quality mode. Refer to Chapter 3 of the Advanced Operation Guide.
Adjusting Exposure
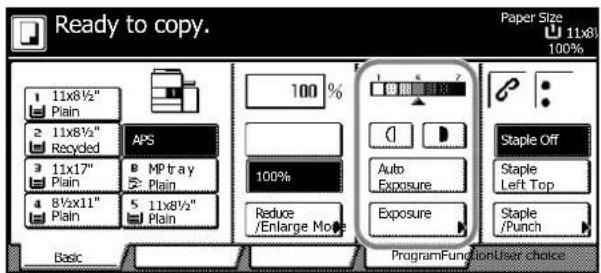
Adjust the exposure automatically or manually. [Manual] is selected as the default setting mode. When selecting [Manual], follow the steps as below.
1 Place the originals in the document processor or on the platen.
2 Press the exposure adjustment key ( ) to adjust the exposure level.
To use the automatic exposure mode, press [Auto]. The copier determines a suitable exposure level for copying.
To change the exposure mode from [Auto] to [Manual], press the exposure adjustment key ( ).
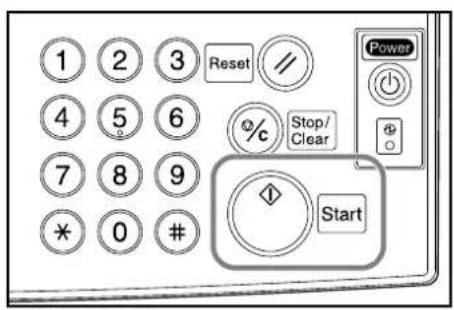
3 Press the Start key to start copying.
NOTE: By pressing [Exposure], the Exposure Mode screen will be displayed. You can also adjust the exposure from this screen.
You can increase or decrease the exposure of the auto exposure mode. Refer to Chapter 3 of the Advanced Operation Guide.
You can fix the default setting mode in the auto exposure mode. Refer to Chapter 3 of the Advanced Operation Guide.
You can choose the adjustment level from 7 or 13. Refer to Chapter 3 of the Advanced Operation Guide.
Reducing/Enlarging
Adjust the magnification to reduce or enlarge the original image.
The following zoom modes are available.
- Auto Zoom: Automatically reduces or enlarges the original image suited to the selected paper size.
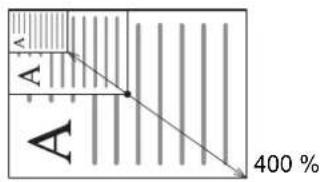
- Manual Zoom: Reduces or enlarges original image in 1 % increments between 25 and 400 % (25-200 % with the document processor).
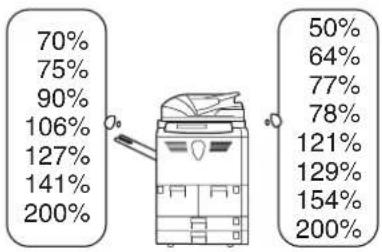
- Preset Zoom: Reduces or enlarges at preset magnifications.
- XY Zoom: Select vertical and horizontal magnifications individually. Reduce or enlarge original image in 1% increments between 25 and 400% (25-200 % with the document processor).
Auto Zoom
Automatically reduces or enlarges the original image suited to the selected paper size.
Follow the steps as below to use auto zoom.
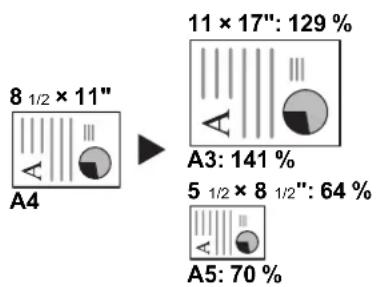
1 Place the originals in the document processor or on the platen and select paper size.

2 Press [Auto %]. The magnification will be displayed.

3 Press the Start key. The image will be automatically reduced or enlarged for copying onto the selected paper.
Manual Zoom
Reduces or enlarges original image in 1 % increments between 25 and 400 % (25-200 % with the document processor).
Follow the steps as below to use manual zoom.
25%
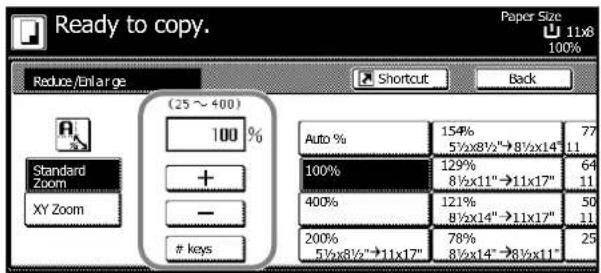
1 Place the originals in the document processor or on the platen and press [Reduce/Enlarge].

2 Press [+] or [-] to change the displayed magnification as desired.
You can also enter the magnification directly using the numeric keys by pressing [# keys] ([#-Keys]).
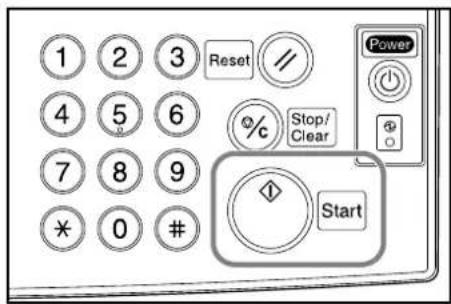
3 Press the Start key to start copying.
Preset Zoom
Reduces or enlarges at preset magnifications.
Zoom Level
| Inch models 200 % (5 | _1/2 × 8_1/2" 11 × 17") , 154 % ( 5_1/2 × 8_1/2" 8_1/2 × 14" ),129 % ( 8_1/2 × 11" 11 × 17" ), 121 % ( 8_1/2 × 14" 11 × 17" ),78 % ( 8_1/2 × 14" 8_1/2 × 11" ), 77 % ( 11 × 17" 8_1/2 × 14" ),64 % ( 11 × 17" 8_1/2 × 11" ), 50 % ( 11 × 17" 5_1/2 × 8_1/2" ) |
| Metric models | 200 % (A5→A3), 141 % (A4→A3, A5→A4), 127 % (Folio→A3),106 % ( 11 × 15" A3 ), 90 % (Folio→A4), 75 % ( 11 × 15" A4 ),70 % (A3→A4, A4→A5) |
| Metric models (Asia Pacific) | 200 % (A5→A3), 141 % (A4→A3, B5→B4), 122 % (A4→B4, A5→B5),115 % (B4→A3, B5→A4), 86 % (A3→B4, A4→B5),81 % (B4→A4, B5→A5), 70 % (A3→A4, B4→B5) |
Follow the steps as below to use preset zoom.
1 Place the originals in the document processor or on the platen and press [Reduce/Enlarge].
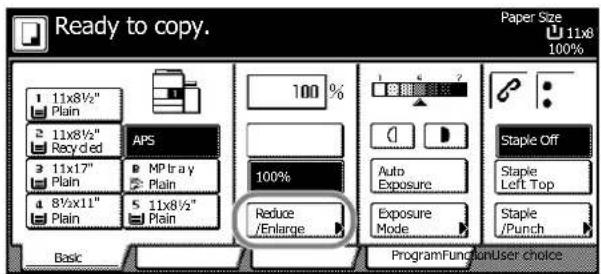
2 Select the magnification.
NOTE: You can also adjust the magnification in 1 % increments as desired by pressing [+] and [-].

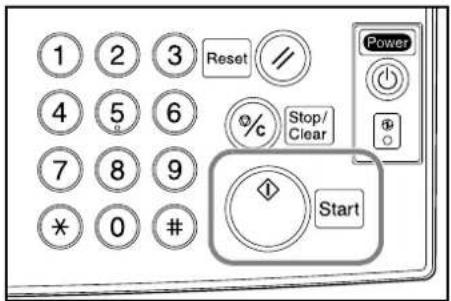
3 Press the Start key to start copying.
XY Zoom
Select vertical and horizontal magnifications individually. Reduce or enlarge original images in 1 % increments between 25 and 400 % (25-200 % with the document processor).
Follow the steps as below to use XY zoom.

1 Place the originals in the document processor or on the platen and press [Reduce/Enlarge].
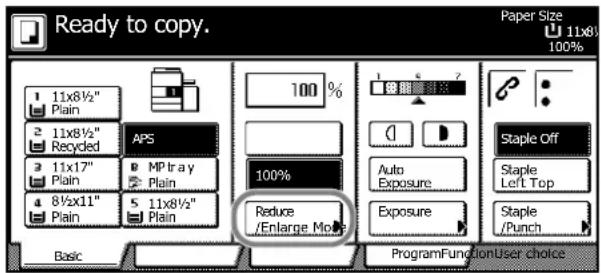
2 Press [XY Zoom].

3 Press [+] or [-] to change the displayed magnification as desired.
You can also enter the magnification directly using the numeric keys by pressing [# keys] ([#-Keys]).
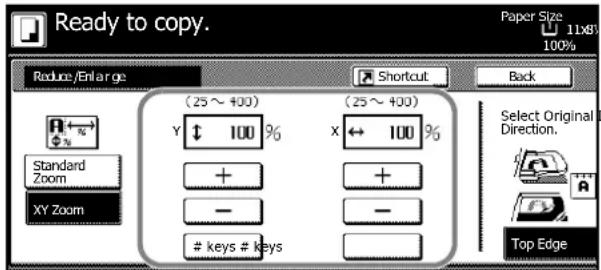
4 Select the orientation of the original.

5 Press the Start key to start copying.
Duplex Mode
Use Duplex mode to create two-sided copies from a variety of originals, including facing pages (such as books or magazines) and two-sided originals.
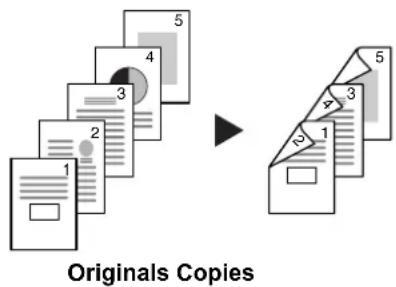
One-sided to Two-sided
Produces two-sided copies from one-sided originals. In case of an odd number of originals, the back side of the last copy will be blank.
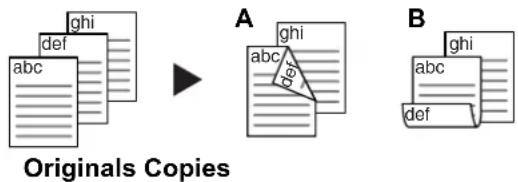
The following binding options are available.
- Original Left/Right Binding Copy Left/Right Binding:
Images are copied onto the back side without being rotated. Copies can be bound on the left with the images in the correct orientation. Refer to Figure A below.
• Original Left/Right Binding → Copy Top Binding:
Images are copied onto the back side after being rotated 180^ . Copies can be bound on top with the images in the correct orientation (that is, the same orientation as the front side after turning the page). Refer to Figure B below.
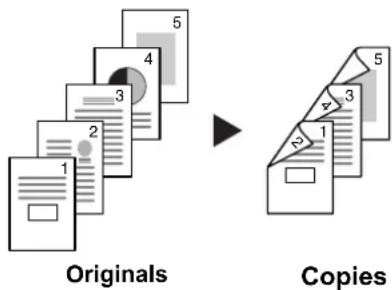
Two-sided to Two-sided
Produces two-sided copies from two-sided originals.
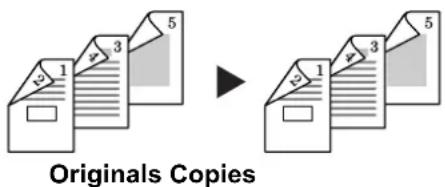
NOTE: The following paper sizes are supported in Two-sided to Two-sided mode.
Supported Paper Sizes
| Inch models 11 × 17", 8 | _1/2 × 14" , 11 × 8 _1/2 ", 8 _1/2 × 11", 5 _1/2 × 8 _1/2 ", 8 _1/2 × 13" and 8 _1/2 × 13 _1/2 " |
Metric models A3, B4, A4, A4R, B5, B5R, A5R and Folio
Book to Two-sided
Produces two-sided copies from originals such as books and magazines with facing pages.
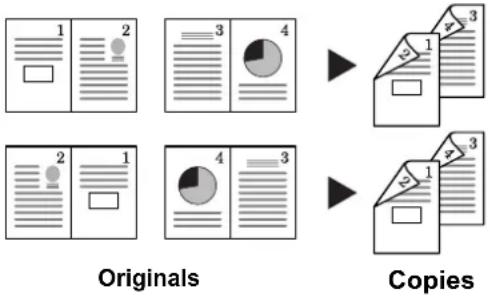
NOTE: The following paper sizes are supported in Book to Two-sided mode.
Supported Original Sizes
| Inch models | 11 × 17" and 8 1/2 × 11" |
| Metric models A3, B4, A4R, B5R, A5R and 8K | |
Follow the steps as below to use duplex copying.
1 Press [Function].
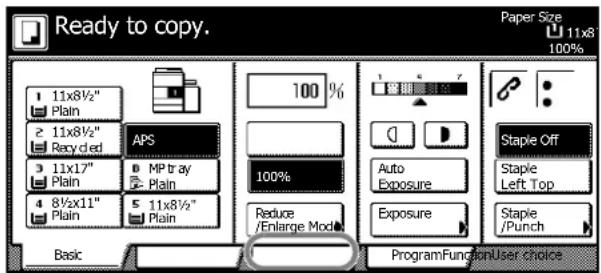
2 Press [2 sided/Separation] ([2 sided/Split]).
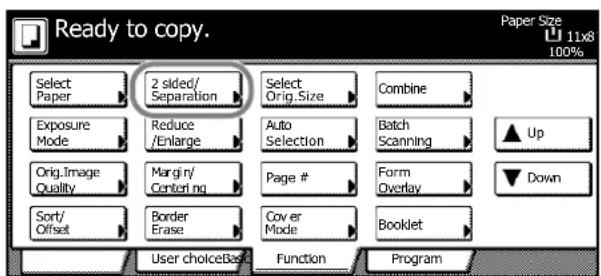
3 Select the desired Duplex mode.
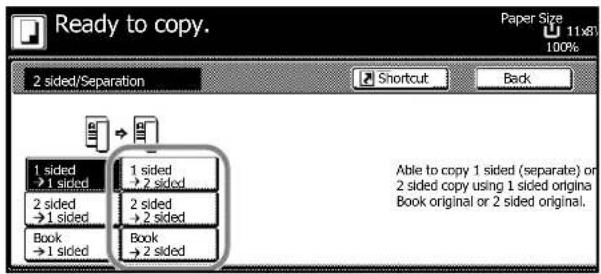
4 If you choose [2 sided → 2 sided] ([2-sided → 2-sided]) or [Book → 2 sided] ([Book → 2-sided]), select the binding edge of the originals.

5 Select the binding edge for the finished copies.
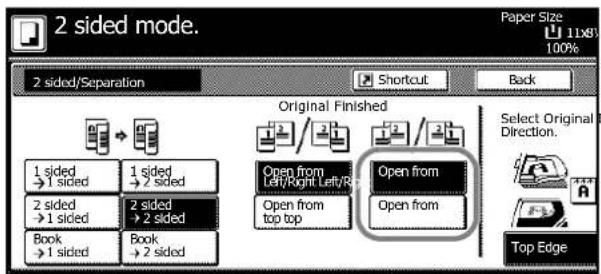
6 If you choose [1 sided → 2 sided] ([1-sided → 2-sided]) or [2 sided → 2 sided] ([2-sided → 2-sided]), select the orientation of the originals.
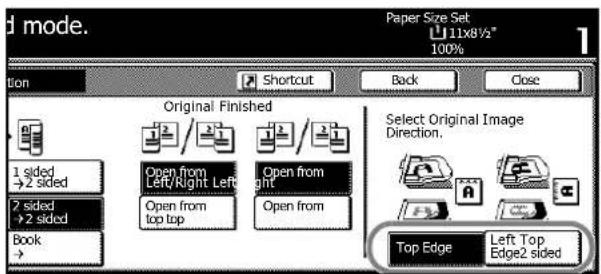
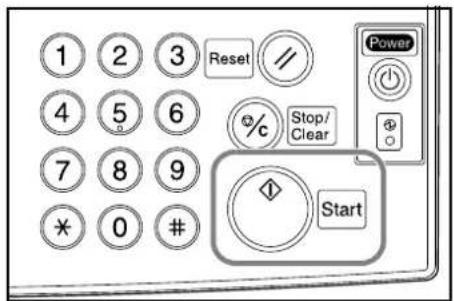
7 Place the originals in the document processor or on the platen and press the Start key.
If the original is placed on the platen, Scan next original(s) will be displayed. Place the next original and press the Start key.
After scanning all originals, press [Scanning finished] to start copying.
Split Mode
Use Split mode to create single-sided copies from two-sided originals or originals with facing pages (such as books or magazines) as follows.
Two-sided to One-sided
Copies each side of a two-sided original onto two individual sheets.
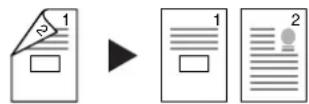
Original Copies
The following binding options are available.
- Left-/Right Binding: Images are copied onto the second sheet without being rotated.
- Top Binding: Images are copied onto the second sheet after being rotated 180^ .
Book to One-sided
Copies each page of originals with facing pages (such as books or magazines) onto two individual sheets.
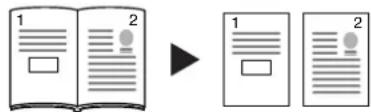
Original Copies
The following binding options are available.
- Left Binding: Originals with facing pages are copied from left to right.
- Right Binding: Originals with facing pages are copied from right to left.
NOTE: The following sizes of original and paper are supported in Split mode.
| Original Size Paper Size | |
| Inch models 11 × 17" and 8 | _1/2 × 1 1 " 1 1 × 8_1/2" |
| Metric models A3, B4, A4R, B5R, A5R and 8K A4, B5 and 16K | |
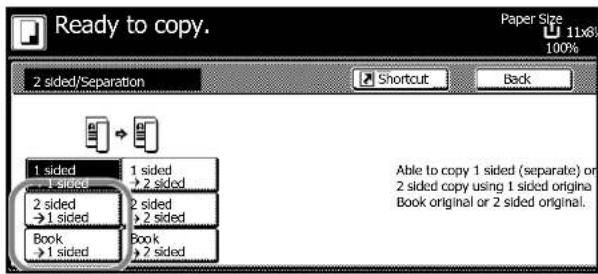
Follow the steps as below to use Split mode.
1 Press [Function].
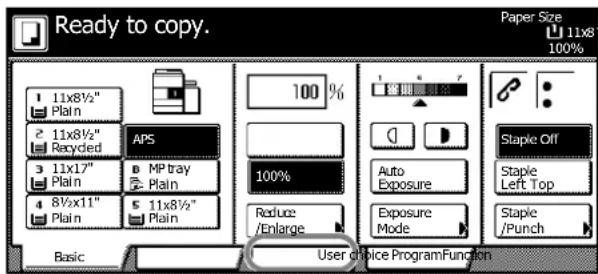
2 Press [2 sided/Separation] ([2-sided/Split]).
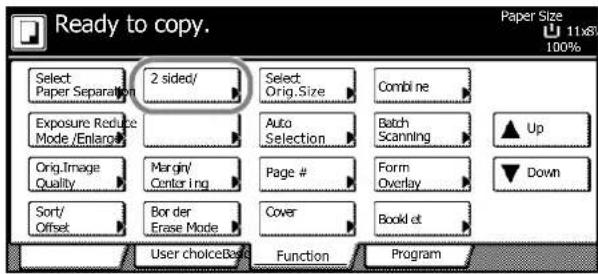
3 Select the desired Split mode.
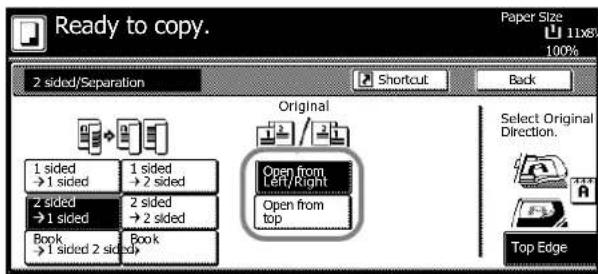
4 Specify the binding edge of the originals.
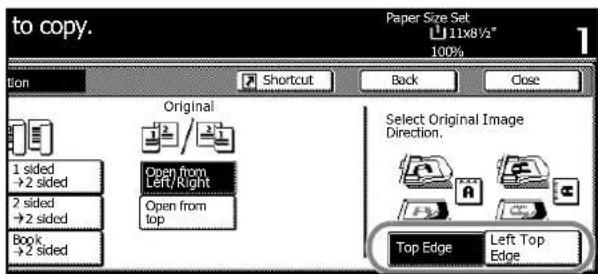
5 If you choose [2 sided → 1 sided] ([2-sided → 1-sided]), select the orientation of the originals.
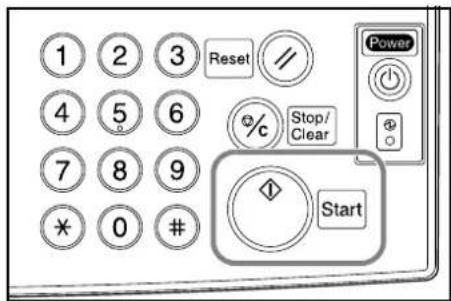
6 Place the originals in the document processor or on the platen and press the Start key.
If the original is placed on the platen, Scan next original(s) will be displayed. Place the next original and press the Start key.
After scanning all originals, press [Scanning finished] to start copying.
Sort Mode
By using the document processor, scans multiple originals to deliver complete sets of copies as required according to page number.
Follow the steps as below to use Sort mode.
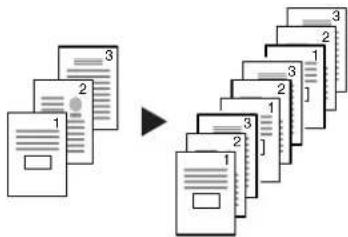
flowchart
graph TD
    A["Document 1"] --> B["Document 2"]
    B --> C["Document 3"]
    C --> D["Output"]
    style A fill:#f9f,stroke:#333
    style D fill:#bbf,stroke:#333
Originals Copies
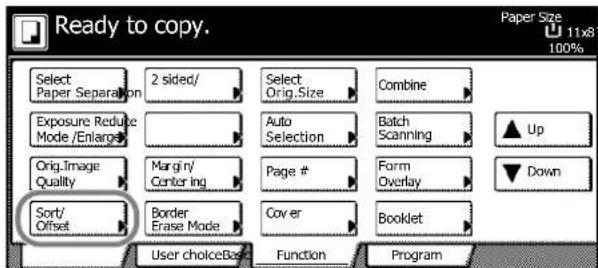
1 Press [Function].

2 Press [Sort/Offset] ([Sort/Group]).
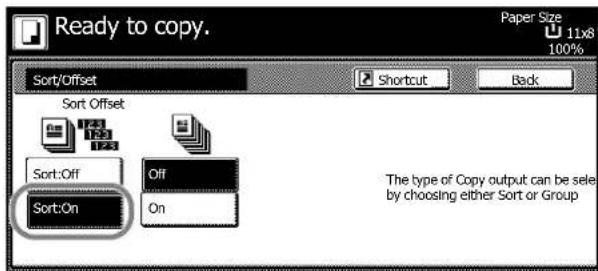
3 Press [Sort:On].
4 Use the numeric keys to enter the copy quantity.
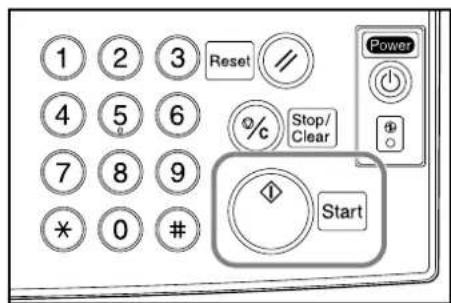
5 Place the originals in the document processor. Press the Start key to start copy.
Complete sets of copies will be delivered on the output tray.
Interrupt Mode
Interrupt copying is useful to pause one copy job and copy other originals with different copy settings. After you complete the urgent job, you can resume the interrupted copy job with the settings as it was.
Follow the steps as below to use interrupt copying.
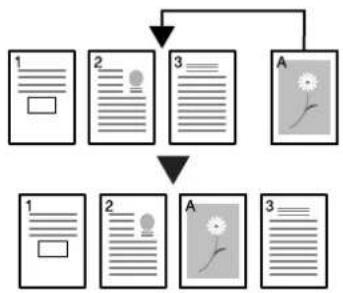
flowchart
graph TD
    A["1: Document"] --> B["2: Paper Icon"]
    B --> C["3: Paper Icon"]
    C --> D["A: Flower Icon"]
    D --> E["4: Final Output"]
    style A fill:#f9f,stroke:#333
    style B fill:#ccf,stroke:#333
    style C fill:#cfc,stroke:#333
    style D fill:#fcc,stroke:#333
    style E fill:#ffc,stroke:#333
1 Press the Interrupt key.
Interrupt Mode OK will be displayed.

2 Temporarily remove the originals for the current job.
3 Place the originals for the interrupt job in the document processor or on the platen.
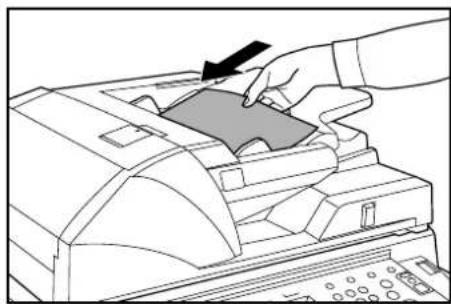
natural_image
Line drawing of a hand pressing down on a printer's tray (no text or symbols)4 Specify the copy settings for the interrupt job and press the Start key.
5 After the interrupt job is completed, remove the originals and press the Interrupt key.
The previous settings will be restored.
6 Place the previous originals in the document processor or on the platen and press the Start key.
Job Reservation
Use Job Reservation mode to scan another original and queue the job while processing current job. The reserved job will be started after the current job is completed.
Follow the steps as below to use Job Reservation mode.
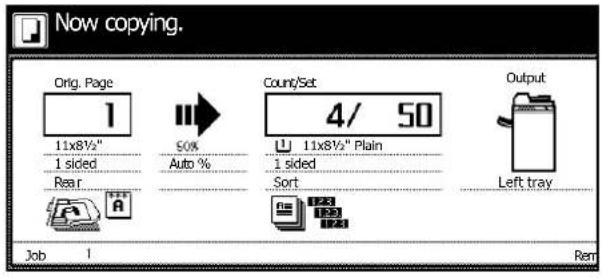
1 Press [Reserve next copy].
Ready to copy. (Job reservation) will be displayed.

2 Place the originals for the queued job in the document processor or on the platen.
3 Specify the copy settings for the queued job.
To finish queuing the job, press [Finish Job Res.] ([Job resrv. finished]).

4 Press the Start key to scan the originals for the queued job.
After scanning all the originals, the touch panel will return to the screen of step 1.
The queued job will be started after completing the current copy job.

Low-Power Mode
To activate Low-Power mode, press the Energy Saver key.
On the operation panel, only the Energy Saver, Power, and Main Power indicators will remain lit.
To resume copying, perform one of the following actions. The copier returns to a copy-ready condition.
- Press any key on the operation panel.
- Place originals in the document processor.
- Open the document processor.
The copier will be ready to copy in 10 seconds.

NOTE: If the copier receives print data in Low-Power mode through an optional printer unit, it will automatically return and process the job.
Auto Low-Power Mode
In Auto Low-Power mode, the copier automatically switches to Low-Power mode if left idle for a preset period. The default period for Auto Low-Power mode is 15 minutes.
NOTE: You can adjust the period for Auto Low-Power mode. Refer to Chapter 3 of the Advanced Operation Guide.
Sleep Mode
To activate Sleep mode, press the Power key.
On the operation panel, only the Main Power indicator will remain lit.
The copier will use much less power than Low-Power mode.
To resume copying, press the Power key again. The copier will be ready to copy in 30 seconds.
NOTE: If the copier receives print data in Sleep mode through an optional printer unit, it will automatically return and process the job.
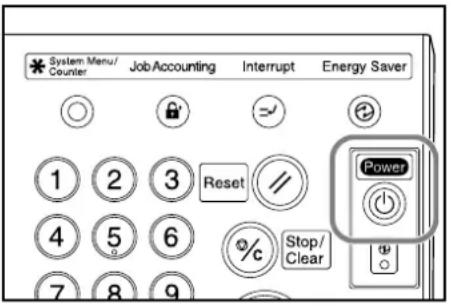
Auto Sleep mode
In Auto Sleep mode, the copier automatically switches to Sleep mode if left idle for a preset period. The default period for Auto Sleep mode is 90 minutes.
NOTE: You can adjust the period for Auto Sleep mode. Refer to Chapter 3 of the Advanced Operation Guide.
4 Optional Equipment
This chapter introduces optional equipment available for the copier.
• Overview of Optional Equipment...4-2
- Side Feeder...4-3
- Document Finisher...4-3
• Key Counter...4-3
- Printer Kit...4-4
- Scanner Kit...4-4
- Security Kit...4-4
Overview of Optional Equipment
The following optional equipments are available for the copier.
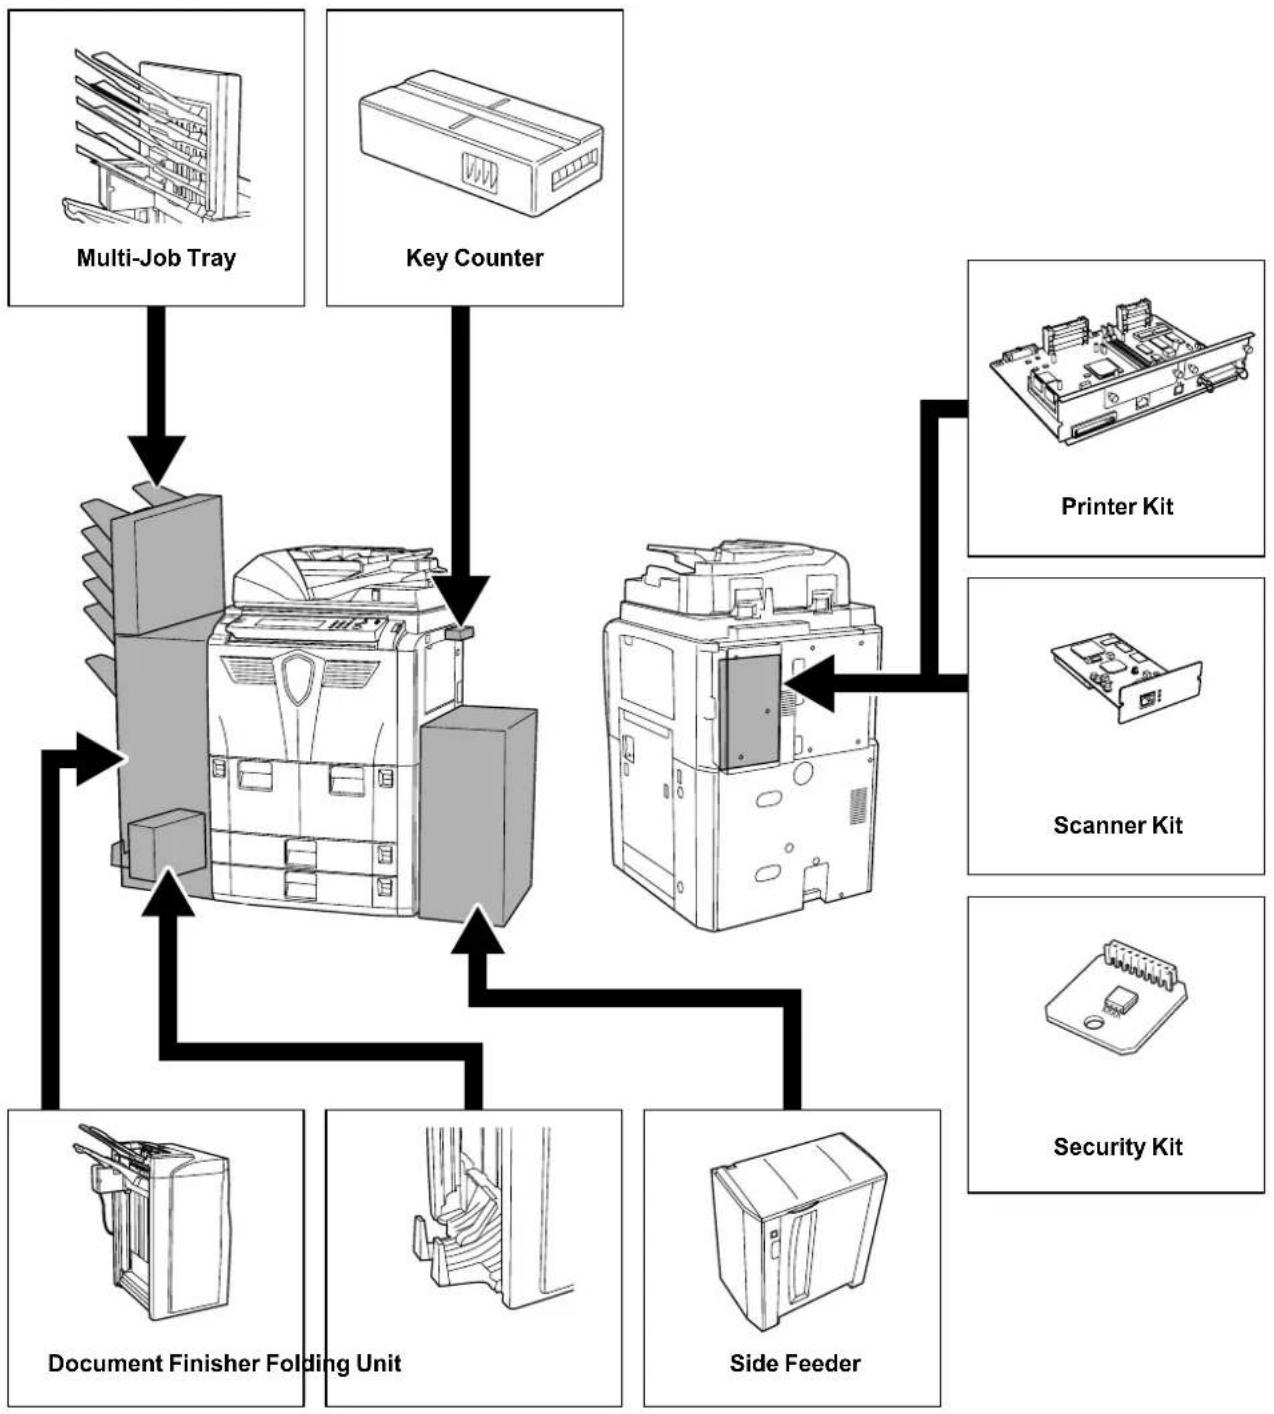
flowchart
graph TD
    A["Multi-Job Tray"] --> B["Printer Kit"]
    C["Key Counter"] --> B
    D["Document Finisher Folding Unit"] --> B
    E["Side Feeder"] --> B
    F["Scanner Kit"] --> B
    G["Security Kit"] --> B
Side Feeder
The side feeder has a capacity of 4,000 sheets measuring 11 × 8^1/2 (A4 or B5). It can be used in conjunction with the copier's built-in cassettes to provide a generous supply of paper for copying.
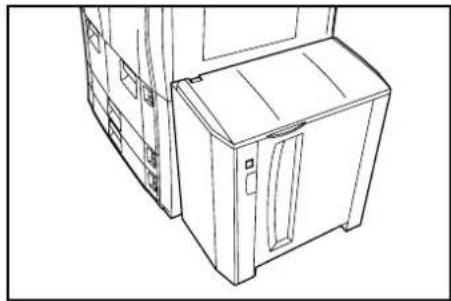
natural_image
Line drawing of a server rack unit with front panel and door (no text or symbols)Document Finisher
The document finisher holds a large quantity of finished copies. The finisher offers a convenient means of sorting. It can also staple finished sets and punch holes if equipped with the appropriate optional accessories. Other options include the multi-job tray and folding unit.
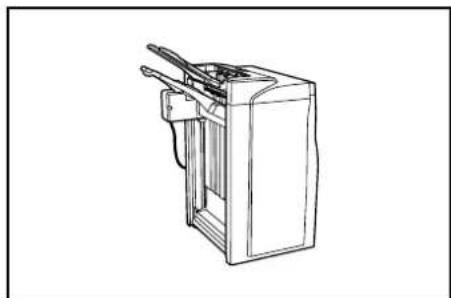
natural_image
Line drawing of a mechanical device with handle and base (no text or symbols)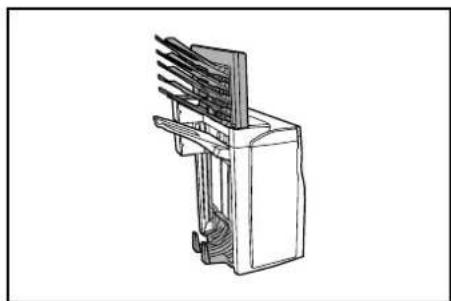
natural_image
Technical line drawing of a mechanical device with internal components (no text or symbols)Key Counter
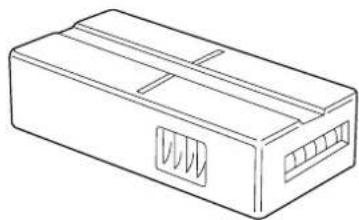
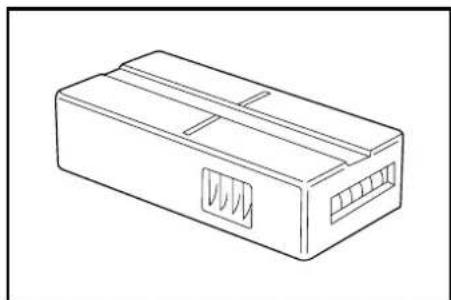
The key counter enables you to monitor copier usage. It offers a convenient solution for centralized management of copy volume for different departments in a large company.
natural_image
Line drawing of a rectangular electronic component with slots and a side port (no text or symbols)How to Insert the Key Counter
Insert the key counter securely into the key counter slot.
NOTE: When the key counter function is activated, copies can only be made when a key counter is inserted into the copier. If the key counter is not inserted securely, Insert key counter will be displayed.

natural_image
Illustration of a hand holding a small rectangular object with an arrow indicating direction (no text or symbols)Printer Kit
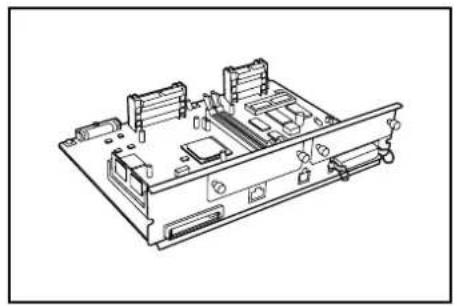
Install the printer kit to use the copier as a printer as well. The copier comes equipped with a network board and can be used as a network printer accessible from several computers over a network. Take further advantage of the other expansion options available, including the network interface and hard disk.
natural_image
Technical line drawing of a computer motherboard with RAM slots and drive bays (no text or symbols)Scanner Kit
Install the scanner kit to use the copier as a network scanner accessible from multiple computers over a network.
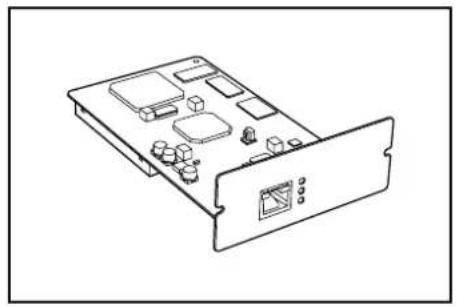
natural_image
Line drawing of a computer motherboard with ports and connectors (no text or symbols)Security Kit
The copier works by temporarily storing scanned data on an internal hard disk. This data is used for copying and cannot be detected by the copier afterwards. The data remains on the hard disk, however, until it is overwritten by other data. Thus, the data could conceivably be retrieved by accessing the hard disk using specialized tools.
For greater security, the security kit prevents this by overwriting all unnecessary data in the storage area of the hard disk so that it cannot be retrieved.
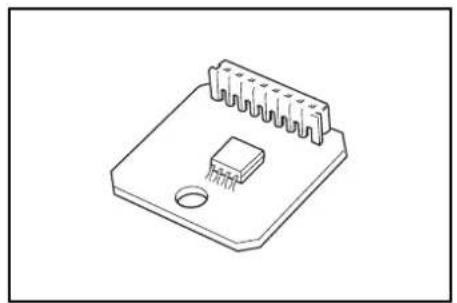
natural_image
Isometric line drawing of a microchip or integrated circuit package with a small rectangular component and a circular hole (no text or symbols)5 Maintenance
This chapter describes cleaning and toner replacement.
- Cleaning the Copier...5-2
- Replacing Toner Container...5-4
Cleaning the Copier
Clean the copier regularly to ensure optimum copy quality.

Caution
For safety, always unplug the power cord before cleaning the copier.
Cleaning the Document Processor and Platen
Open the document processor. Using a soft cloth dampened with alcohol or mild detergent, wipe the platen and the backside of the document processor.
IMPORTANT: Do not use thinner or other organic solvents.
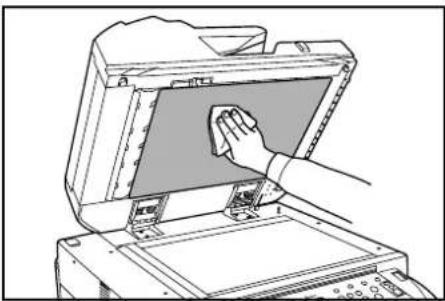
natural_image
Line drawing of a hand cleaning a printer with a cloth (no text or symbols)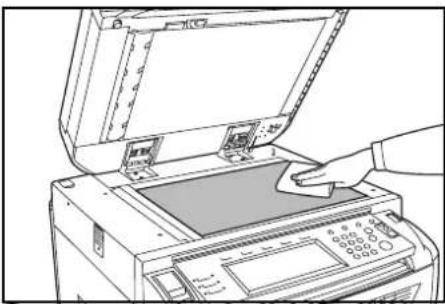
natural_image
Line drawing of a printer with an open lid and a hand inserting a sample into it (no text or symbols visible)Cleaning the Slit Glass
Use the cloth provided with the copier to clean the top and bottom slit glass. The appearance of black lines on copies when the document processor is used is a sign that the slit glass is possibly soiled.
The message Clean the slit glass for original fed from DP (Clean the slit glass for original fed) may be displayed if the slit glass requires cleaning. After cleaning it, press [End].
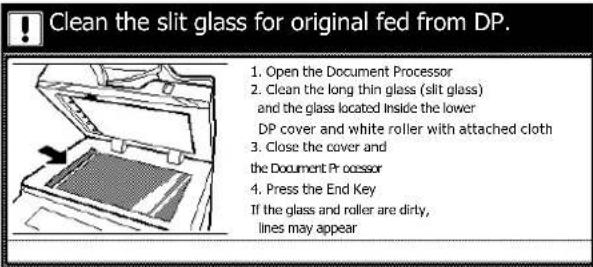
The appearance of white lines on copies is a sign that the roller of the document processor are possibly soiled.
IMPORTANT: Use a soft, dry cloth to clean the slit glass. Do not use water or organic solvents such as thinner.
1 Remove the cloth from the cleaning cloth compartment.

natural_image
Line drawing of a mechanical device with a paper airplane and scroll, no text or symbols present2 Open the document processor and wipe the bottom slit glass (A).
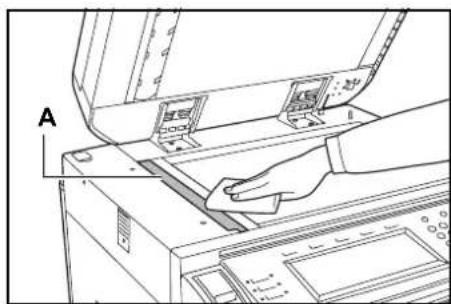
natural_image
Line drawing of a hand inserting a component into a printer (no text or symbols visible)3 Holding the green lever, open the document processor bottom cover.
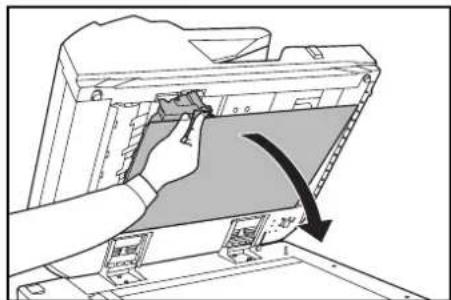
natural_image
Illustration of a hand using a computer to press or install a device, with a curved arrow indicating motion (no text or symbols present)4 Wipe the top slit glass (B) and the white roller (C).
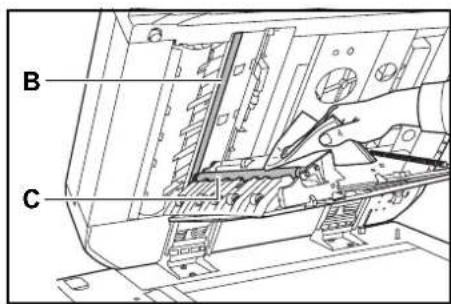
5 Close the document processor bottom cover.
Replacing Toner Container
Promptly replace the toner container when the touch panel displays Add toner.
Replace the toner container only if this messages appears.
NOTE: Press [Adding toner] to display the replacement instructions on the touch panel.


Caution
Do not attempt to incinerate the toner container or the waste toner box. Dangerous sparks may cause burns.

Caution
Do not attempt to force open or destroy the toner container or the waste toner box.
1 Open the front cover.
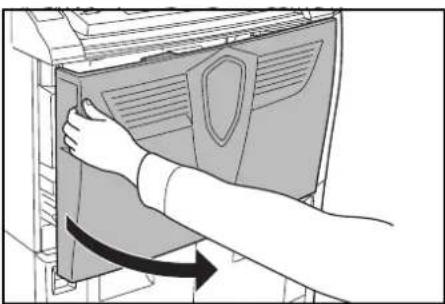
natural_image
Illustration of a hand inserting a shield into a computer monitor (no text or symbols visible)2 Push the toner container release lever to the left and pull the used container out slightly.
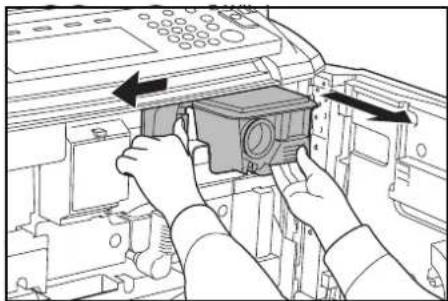
natural_image
Illustration of hands operating a device with directional arrows indicating movement (no text or symbols present)3 Let go of the toner container release lever and pull the used toner container until it can be removed.
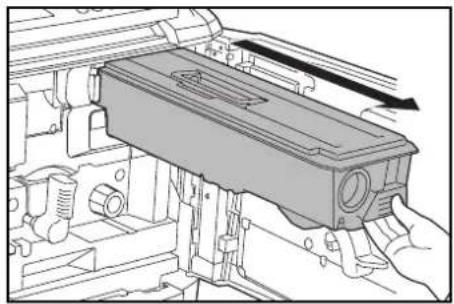
natural_image
Technical line drawing of a mechanical assembly with no visible text or symbols4 Holding the toner container handle, push the toner container release lever to the left again and gently remove the container.

natural_image
Illustration of a hand using a tool to adjust or install a mechanical component, with an inset showing a hand holding a device (no text or symbols present)5 Place the used toner container in the plastic disposal bag provided.
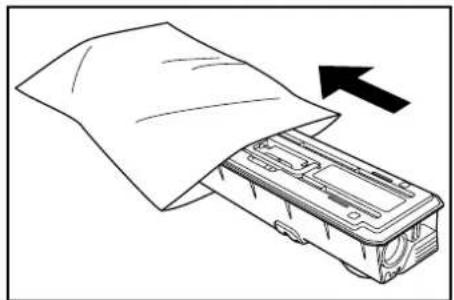
natural_image
Diagram of a printer or scanner with a paper sheet being inserted, showing a black arrow indicating compression (no text or symbols present)6 Remove the new toner container from the box.

natural_image
Illustration of a hand pressing down on a mechanical component with an arrow indicating force (no text or symbols present)7 Set the toner container on a flat surface. When setting it down with the gear-end facing down, place some cushioning material underneath.
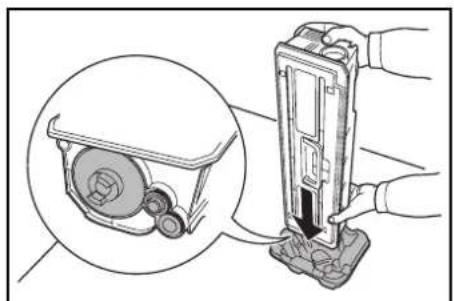
natural_image
Illustration of a mechanical device being inserted into a housing, showing internal components and a close-up view (no text or symbols)8 Tap the top of the toner container at least ten times.

9 Turn the toner container upside-down and tap the top of the toner container at least ten times.
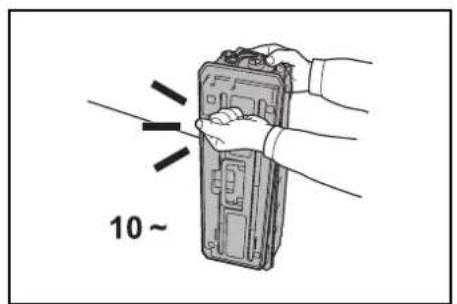
10 Holding the toner container in both hands, shake it vertically at least ten times to distribute the toner evenly.

11 Turn the toner container upside-down and shake it vertically at least ten times.
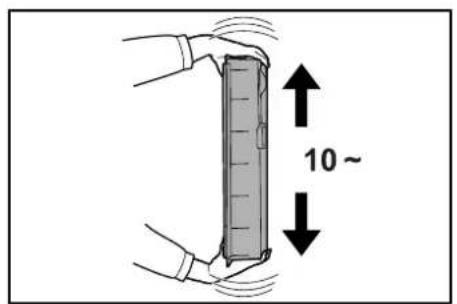
12 Hold the toner container horizontally and shake it from side to side at least five times.
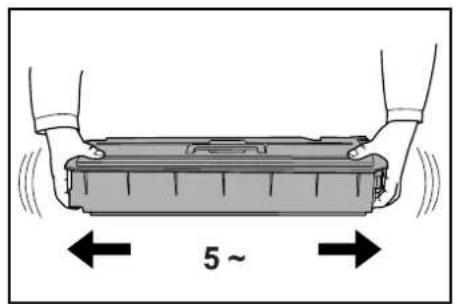
IMPORTANT: Do not install the toner container before shaking it sufficiently. This may cause errors due to incomplete toner replenishment.
13 Insert the new toner container into the copier. There will be an audible 'click' when the container is inserted in the correct position.
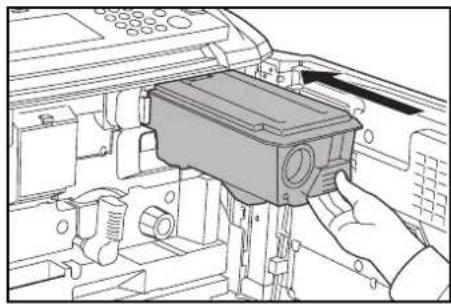
natural_image
Technical line drawing of a mechanical assembly with a hand operating a component (no visible text or symbols)14 Close the front cover.
After use, always dispose of the toner container and the waste toner box in accordance with Federal, State and Local rules and regulations.
6 Troubleshooting
This chapter explains how to solve problems with the copier.
- Solving Malfunctions...6-2
- Responding to Error Messages...6-4
- Clearing Paper Jams...6-9
Solving Malfunctions
The table below provides general guidelines for problem solving.
If a problem occurs with your copier, check the checkpoints and perform procedures indicated on the following pages. If the problem persists, contact your Service Representative.
| Symptom Checkpoints Corrective Actions Reference | Page | ||
| The operation panel does not respond when the copier is turned on (| position). | Is the copier plugged in? Plug the power cord into an AC outlet. — | ||
| Pressing the Start key does not produce copies. | Is there a message on the touch panel? | Determine the appropriate response to the message and respond accordingly. | page 6-4 |
| Blank sheets are ejected. | Are the originals loaded correctly? | When placing originals on the platen, place them face-down and align them with the original size indicator plates. | page 2-18 |
| When placing originals in the document processor, place them face-up. | page 2-16 | ||
| Copies are too light. | Is the copier in Auto Exposure mode? | Set the correct exposure level for auto exposure. | Advanced Operation Guide, Chapter 3 |
| Is the copier in Manual Exposure mode? | Use the exposure adjustment key to set the correct exposure level. | page 3-5 | |
| When changing the default exposure level, adjust the exposure manually and choose the desired level. | Advanced Operation Guide, Chapter 3 | ||
| Is the toner distributed evenly within the toner container? | Shake the toner container from side to side 10 times. | page 5-4 | |
| Is the copier in EcoPrint mode? Deactivate EcoPrint mode by pressing [Off] for this setting. | Advanced Operation Guide, Chapter 1 | ||
| Is there a message indicating the addition of toner? | Replace the toner container. page 5-4 | ||
| Is the copy paper damp? Replace the copy paper with new paper. | page 2-2 | ||
| Copies are too dark. | Is the copier in Auto Exposure mode? | Set the correct exposure level for auto exposure. | Advanced Operation Guide, Chapter 3 |
| Is the copier in Manual Exposure mode? | Use [Exposure Adjustment] to set the correct exposure level. | page 3-5 | |
| When changing the default exposure level, adjust the exposure manually and choose the desired level. | Advanced Operation Guide, Chapter 3 | ||
| Copies have a moire pattern (dots grouped together in patterns and not aligned uniformly). | Is the original a printed photograph? | Select [Photo] as the Image Quality mode. | page 3-4 |
| Symptom Checkpoints | Corrective Actions | Reference | Page |
| Copies are not clear. Did you choose appropriate Image Quality mode for the original? | Select an appropriate Image Quality mode. | page 3-4 | |
| Copies are dirty. Is the platen or document processor dirty? | Clean the platen or the document processor. | page 5-2 | |
| Images are skewed. | Are the originals placed correctly? | When placing originals on the platen, place them face-down and flush against the original size indicator plates. | page 2-18 |
| When placing originals in the document processor, align the original width guides securely before placing the originals. | page 2-16 | ||
| Is the paper loaded correctly? Check the position of the paper width guides. | page 2-2 | ||
| The paper often jams. | Is the paper loaded correctly? | Load the paper correctly. | page 2-2 |
| Is the paper of the supported type? Is it in good condition? | Remove the paper, turn it over, and reload it. | page 2-2 | |
| Is the paper curled, folded, or wrinkled? | Replace the paper with new paper. page 2-2 | ||
| Are there any loose scraps or jammed paper in the copier? | Remove any jammed paper. page 6-9 | ||
| Copies from the document processor have black lines. | Are the slit glasses dirty? | Clean the slit glasses. | page 5-2 |
| Follow the procedure for correcting black lines. This may remove the black lines. | Advanced Operation Guide, Chapter 3 | ||
| Copies from the document processor have white lines. | Are the document processor roller dirty? | Clean the roller of the document processor. | page 5-2 |
Responding to Error Messages
If the touch panel displays any of these messages, follow the corresponding procedure.
| Error Messages Checkpoints Corrective Actions Reference | Page | ||
| Close #### cover. Is the indicated cover open? Close all covers securely. — | |||
| Check the cover. Are any covers open? Close all covers securely. — | |||
| Close Document Processor. | Is the document processor open? Close the document processor. — | ||
| Set drawer #.(Close paper cassette #.) | Is one of the cassettes not fully closed? | Pull out the cassette and push in securely. | — |
| Reset Side Paper Deck.(Reset side feeder.) | Is the optional side feeder installed correctly on the copier? | Install the side feeder securely to the copier. | — |
| Reset feeding unit for paper drawer.(Reset feeding unit for pap. cassette.) | Is the paper feeder securely pushed into the copier? | Pull out the paper feeder and securely push it all the way into the copier. | page 6-12 |
| Add paper in drawer #.(Add paper cassette #.) | Is the indicated cassette out of paper? | Load paper. If the same type of paper is loaded in another cassette in the same orientation, you can press either one of paper selection keys on the left of the touch panel to switch to that cassette for copying. | — |
| Low on paper. Is the optional side feeder, cassette 1 or cassette 2 running out of paper? | Load paper in cassette 1, cassette 2 or the side feeder. | page 2-2page 2-6 | |
| Paper capacity exceeded.Remove paper from Side Paper Deck.(Paper capacity exceeded.Remove paper from side feeder.) | Is the maximum storage capacity of the optional side feeder exceeded? | Remove paper from the side feeder so that it becomes less than the maximum capacity. | page 2-6 |
| Add paper in the Multipurpose tray.### size(Place paper on the Multipurpose tray.### size) | Is paper of the specified size loaded in the MP tray? | Load paper of the size indicated in the MP tray. | page 2-5 |
| Add paper in the Multipurpose tray.(Add paper on the Multipurpose tray.) | Is the MP tray running out of paper? | Load paper in the MP tray. | page 2-5 |
| Place transparency in the Multipurpose tray.(Place transparencies on the Multipurpose tray.) | Are any transparencies loaded in the MP tray? | Load transparencies in the MP tray. | — |
| Check paper size. | Is the copier loaded with any paper of a size that cannot be used under the current settings? | Load paper of a size that can be used. | — |
| Reposition original. Is the orientation of the specified paper different from that of the original? | Change the orientation of the original. If you press the Start key without changing the original, the original will be copied at the current size. | — | |
| Check paper size. Copy paper is not the same size as original.(Paper size in cassette differs from actual size.Check paper size in cassette.) | Is the specified paper loaded? Or are the settings incorrect? | Load the specified paper. Adjust any settings that are incorrect. | — |
| Reposition original or change drawer.(Reset original or select another paper cassette.) | Is the orientation of the specified paper different from that of the original? | Change the orientation of the original. — | |
| Reset originals in processor. | — Remove originals from the document processor, stack them uniformly, and place them. | page 2-16 | |
| Reset all originals in processor.(Reset originals in processor.) | — Remove originals from the document processor, put them in the original order, and place them. | page 2-16 | |
| Reset all originals in Document Processor.(Reset originals in Document Processor.) | Are there any originals left in the document processor? | Remove any originals from the document processor. | — |
| Cannot copy this paper type. | Can the specified copy functions be used with the selected paper type? | Select another type of paper. — | |
| Cannot staple this paper type. | Did you select a paper type that cannot be stapled? | Select another type of paper. — | |
| Cannot punch this paper type. | Did you select a paper type that cannot be punched? | Select another type of paper. — | |
| Cannot offset this paper size.(Cannot group this paper size.) | Is stacking or sorting available for the size of the loaded paper ( 11 × 17" , 812 × 14" , 512 × 812" , A3, B4, A5R, B6R, A6R, Folio, 8K)? | Change the paper size. — | |
| Cannot staple this size.(Cannot staple this paper size.) | Is stapling available for the size of the loaded paper? For further details, refer to the document finisher Operation Guide. | Change the paper size. — | |
| Cannot punch this size.(Cannot punch this paper size.) | Is punching available for the size of the loaded paper? For further details, refer to the document finisher Operation Guide. | Change the paper size. — | |
| Cannot staple. ##: maximum capacity (Staple)(Cannot staple. ##: Max. staples) | Is the maximum page quantity for stapling exceeded? For further details, refer to the document finisher Operation Guide. | Reduce the number of pages to staple to be maximum capacity or less. | — |
Error Messages Checkpoints Corrective Actions Reference
Page
| The left tray exceeds capacity. Remove paper, and press "Start" key.(Too much paper in left tray. Remove paper, and press "Start" key.) | Is the maximum storage capacity of the output tray exceeded? | Remove paper from the output tray and press the Start key to resume copying. | — |
| The left tray exceeds capacity. Remove paper, and press "Continue" key.(Too much paper in left tray. Remove paper, and press "Continue" key.) | Is the maximum storage capacity of the output tray exceeded while using printer functions? | Remove paper from the output tray and press [Continue] to resume copying. | — |
| Finisher paper capacity exceeded. (Tray #)Remove paper, and press "Start" key. | Is the maximum capacity of the optional document finisher exceeded? | Remove paper from the document finisher tray and press the Start key to resume copying. | — |
| Finisher paper capacity exceeded. (Tray #)Remove paper, and press "Continue" key. | Is the maximum capacity of the optional document finisher exceeded while using printer functions? | Remove paper from the document finisher tray and press [Continue] to resume copying. | — |
| These functions cannot be combined. | Have you selected functions that cannot be used together? | Check the settings. — | |
| Exceeds pre registered copying quantity.(Copy limit for this ID-code has been reached. No copying possible.) | Is the maximum limit for copying as specified in Job Accounting mode exceeded? | The copy volume has been reached the set limit of your department. No additional copying is possible. Use the copy management function to clear the copy count. | Advanced Operation Guide, Chapter 4 |
| Insert key counter. | Is the key counter inserted correctly? | Insert the key counter securely and completely. | — |
| Memory full. — The memory buffer is full. Print or | delete the scanned data so far. No further copying or scanning is possible until either operation has been executed. | — | |
| Memory full. Delete the registered data in the box.(Memory full. Delete the registered data from box.) | — The data box for document management functions has been reached the permissible capacity.When assigning new originals to the boxes, delete unnecessary data. | Advanced Operation Guide, Chapter 2 | |
| Toner will be empty soon. — Prepare the replacement toner | container. | page 5-4 | |
| Ready to copy. Add toner. — The copier is running low on toner; | only one page may be copied at a time. Prepare a replacement toner container. | page 5-4 | |
| Add toner to resume copying. | — Replace the toner container. page 5-4 | ||
| Image Cycle.(Now adding toner.) | — Toner replenishment is in progress.Wait until the process is completed. | — | |
| Error Messages Checkpoints Corrective Actions Reference | Page | ||
| Now restoring stored data in HDD.(Please wait. Now maintaining stored data.) | — Performing hard disk maintenance.Wait until the process is completed. | — | |
| The waste toner box almost full. Call service.(The waste toner container is almost full. Call service.) | — Contact your Service Representative or Authorized Service Center. | — | |
| The waste toner box is full. Call service.(The waste toner container is full. Call service.) | |||
| Check the waste punch box.(Check Punch Hole box.) | Is the container for hole punch waste paper in the optional document finisher full? | Refer to the document finisher Operation Guide and dispose of the punch waste paper in the box. | — |
| Out of staples. Add staples.(Stapler empty. Add staples.) | Is the optional document finisher out of staples? | Refer to the document finisher Operation Guide and replace the staple cartridge. | — |
| Time for maintenance. — Periodic maintenance is required to keep your copier in good condition. Contact your Service Representative or Authorized Service Center promptly. | — | ||
| Paper misfeed. Remove paper. | — If a paper jam occurs, the location of the jam will be indicated on the touch panel and the copier will stop. Leave the copier on (I position) and follow the instruction to remove the jammed paper. | page 6-9 | |
| Open drawer #, check and remove paper from inside of the machine.(Open cassette #, check and remove paper from inside of machine.) | Is there a paper jam in the cassette? | Remove any jammed paper from the cassette. | page 6-9 |
| Remove paper from inner tray of Finisher. | Is there any paper left in the optional document finisher? | Remove all paper left in the document finisher. | — |
| Staple jam. Remove staples.(Staple jam. Remove staple(s).) | Is a staple jammed in the optional document finisher? | Refer to the document finisher Operation Guide and remove the jammed staple. | — |
| Call service. Is this message displayed even after opening and closing the front cover? | Make a note of this message (C followed by a number), turn off the copier (O position), unplug the power cord, and contact your Service Representative or Authorized Service Center. | — | |
Error Messages Checkpoints Corrective Actions Reference
Page
| Paper drawer is out of order. Select another paper drawer.(Paper cassette is out of order. Select other paper cassette.) | — The cassette in use has a problem and is temporarily unavailable.Contact your Service Representative or Authorized Service Center promptly. To continue copying, use the other cassette. | — |
| Side Paper Deck is out of order. select another paper drawer.(Side feeder is out of order. Select another paper cassette.) | — The optional side feeder has a problem and is temporarily unavailable. Contact your Service Representative or Authorized Service Center promptly. To continue copying, use the other cassette. | — |
| Multipurpose tray cannot be used. Select another paper drawer.(Multipurpose tray cannot be used. Select a paper cassette.) | — The MP tray has a problem and is temporarily unavailable. Contact your Service Representative or Authorized Service Center promptly. To continue copying, use the other cassette. | — |
| System error. Main switch off / on. | — A system error has occurred. Turn the main power switch off and on again. | — |
| HDD error. Cannot activate Job Accounting mode. | — A hard disk error has occurred.Contact your Service Representative or Authorized Service Center. | — |
Clearing Paper Jams
If a paper jam occurs, the touch panel will display Paper misfeed and the copier will stop. Refer to these procedures to remove the jammed paper.
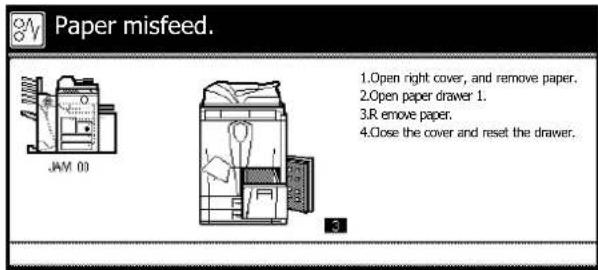
Jam Location Indicators
If a paper jam occurs, the location of the jam will be displayed by an alphabet, which corresponds to the specific component in the copier as the following figure with clearing instructions.

flowchart
graph TD
    A["Paper misfeed"] --> B["1. Open light covers, and remove papers"]
    A --> C["2. Open paper covers 1"]
    A --> D["3. Remove paper"]
    A --> E["4. Load the paper and use of the cloth"]
    B --> F["J"]
    C --> G["G"]
    D --> H["H"]
    E --> I["E"]
    F --> J["J"]
    G --> K["G"]
    H --> L["H"]
    I --> M["A"]
    J --> N["C"]
    K --> O["D"]
    L --> P["F"]
    M --> Q["C"]
    N --> R["J"]
    O --> S["J"]
| Paper Jam Location Indicator | Paper Jam Location Reference | Page |
| A Cassette 1 page 6-10 | ||
| B Cassette 2 page 6-11 | ||
| C Cassettes 3 or 4 page 6-13 | ||
| D MP tray page 6-15 | ||
| E | Inside the right cover | page 6-15 |
| F Optional side feeder page 6-16 | ||
| G Paper conveyor page 6-18 | ||
| H Duplex unit page 6-21 | ||
| I | Document processor | page 6-22 |
| J | Optional document finisher | page 6-24 |
After you remove the jam, the copier will warm up again and the error message will be cleared. The copier resumes with the page which jam has occurred.
Precautions of the Paper Jam
- Do not reuse jammed paper.
- If the paper tears during removal, be sure to remove any loose scraps of paper from the copier inside. Scraps of paper left in the copier could cause subsequent jamming.
- Discard the paper that jammed in the optional document finisher. The page which jam has occurred will be copied again.

Warning
High voltage is present in the charger section. Take sufficient care when working in this area, as there is a danger of electrical shock.

Caution
The fixing unit is extremely hot. Take sufficient care when working in this area, as there is a danger of getting burned.
Cassette 1
Follow the steps as below to clear paper jams in the cassette 1.
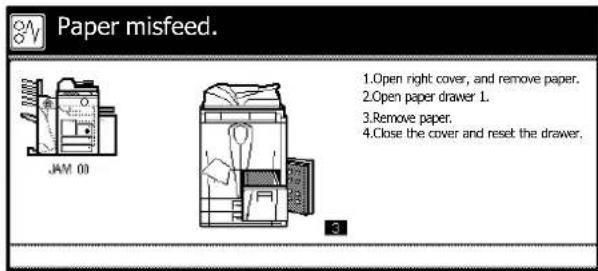
1 Open the right cover and remove the jammed paper.
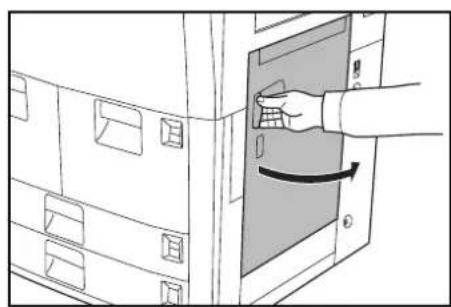
natural_image
Illustration of a hand inserting a card into a filing cabinet (no text or symbols visible)2 Push the indicated position to close the right cover.
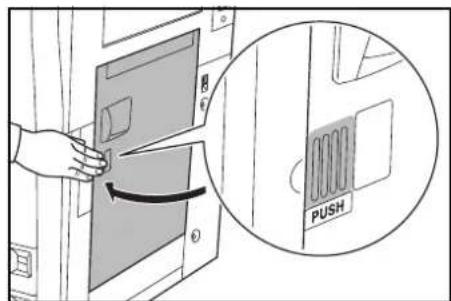
3 Pull out the cassette 1.
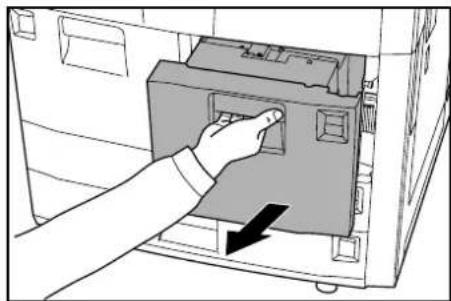
natural_image
Hand inserting a device into a computer case (no text or symbols visible)4 Remove the jammed paper.
If the paper tears, remove every loose scraps from the copier inside.

natural_image
Line drawing of a hand inserting a component into a device (no text or symbols visible)5 Push the cassette 1 back in securely.
Cassette 2
Follow the steps as below to clear paper jams in the cassette 2.
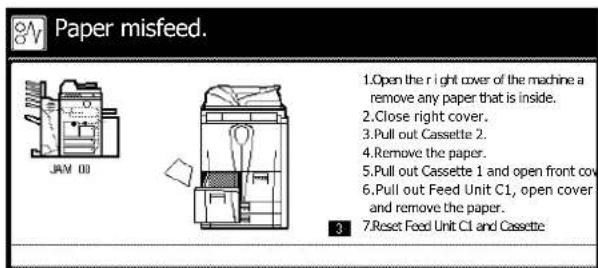
1 Open the right cover and remove the jammed paper.
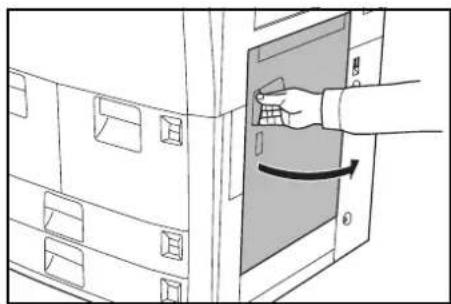
natural_image
Line drawing of a hand inserting a button into a cabinet with drawers, showing no text or symbols2 Push the indicated position to close the right cover.

3 Pull out the cassette 2.
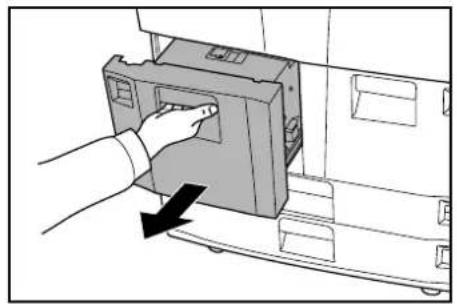
natural_image
Hand inserting a plastic into a device casing (no text or symbols visible)4 Remove the jammed paper.
If the paper tears, remove every loose scraps from the copier inside.
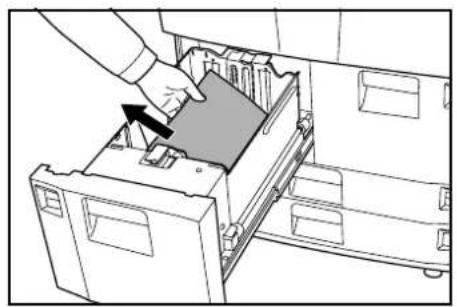
natural_image
Diagram of a hand inserting a plastic into a computer case (no text or symbols visible)5 While the cassette 2 is out, pull out cassette 1.
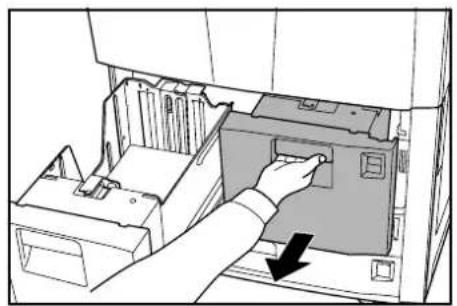
natural_image
Illustration of a hand inserting a device into a file folder (no text or symbols visible)6 Open the front cover.
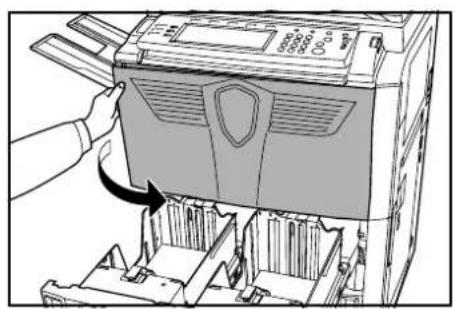
natural_image
Illustration of a computer tower with an arrow indicating a file transfer or assembly process (no text or symbols present)7 Pull the lever C1 and remove the paper feeder.
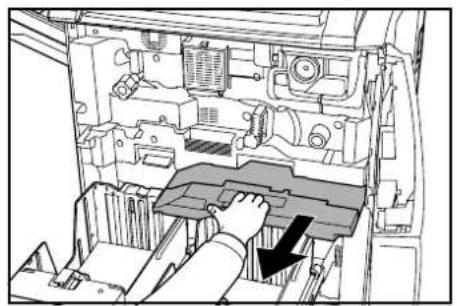
natural_image
Mechanical assembly diagram showing a hand operating a component with a black arrow indicating direction (no text or symbols present)8 Open the cover C2.

9 Remove the jammed paper.
If the paper tears, remove every loose scraps from the copier inside.

natural_image
Line drawing of a person inserting a device into a computer motherboard (no text or symbols visible)10 Close the cover C2 and return the paper feeder to its original position. Push it securely into place.
11 Push the cassettes 1 and 2 back in securely.
12 Close the front cover.
Cassettes 3 and 4
Follow the steps as below to clear paper jams in the cassettes 3 or 4.
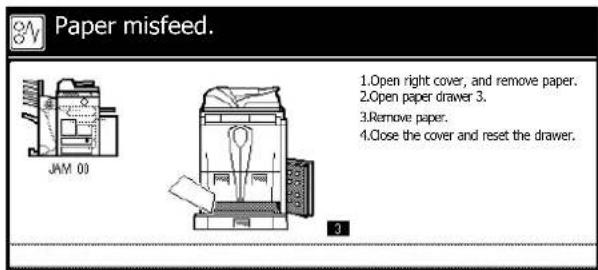
1 Open the right cover and remove the jammed paper.
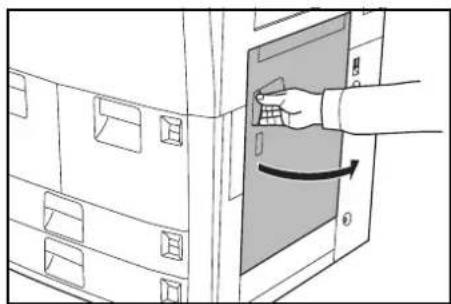
natural_image
Illustration of a hand inserting a card into a filing cabinet (no text or symbols visible)2 Push the indicated position to close the right cover.
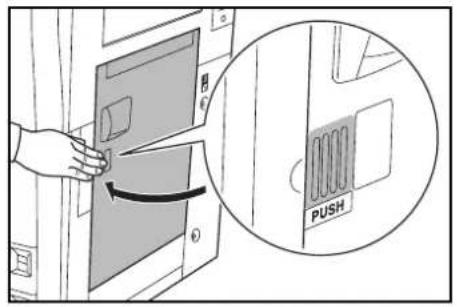
3 Pull out the cassette in use.
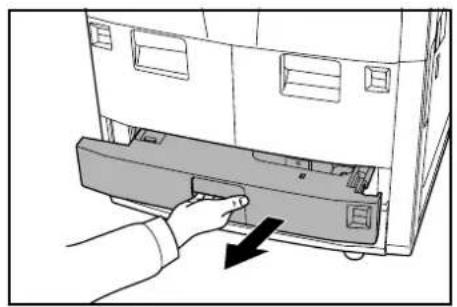
natural_image
Hand inserting a device into a computer case (no text or symbols visible)4 Remove the jammed paper.

natural_image
Diagram of a printer's internal structure showing a hand pressing a component with an arrow indicating the process (no text or symbols present)If the jammed paper is left inside the copier, pull out the cassette and remove the jammed paper.
If the paper tears, remove every loose scraps from the copier inside.
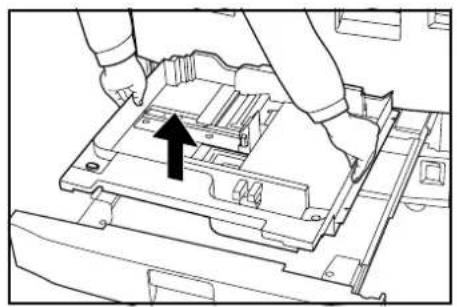
natural_image
Technical line drawing of a mechanical assembly with a hand operating a component (no text or symbols visible)5 Push the cassette back in securely.
MP Tray
Follow the steps as below to clear paper jams in the MP tray.
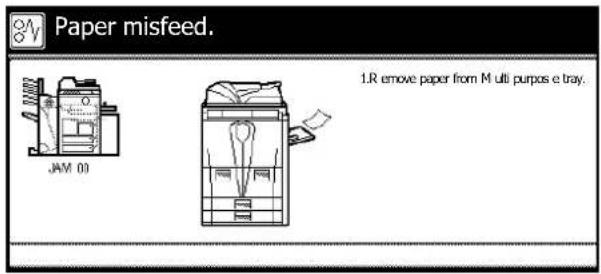
1 Remove all paper from the MP tray.
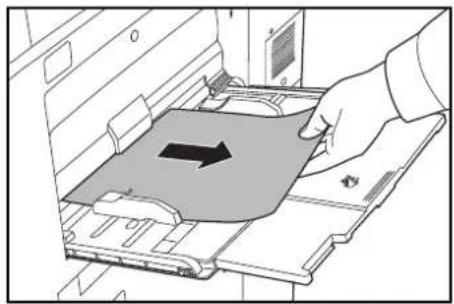
natural_image
Illustration of a hand inserting a device into a rack, with an arrow indicating the component (no text or symbols present)2 Reload the paper in the MP tray.
Inside the Right Cover
Follow the steps as below to clear paper jams inside the right cover.
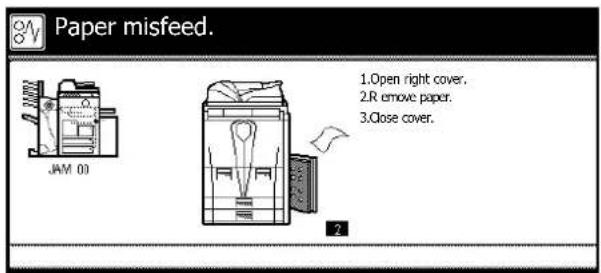
1 Open the right cover.

2 Remove the jammed paper.
If the paper tears, remove every loose scraps from the copier inside.
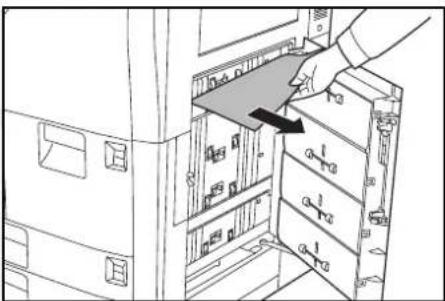
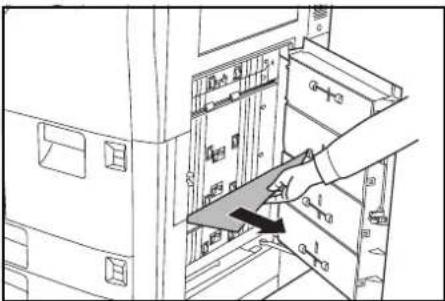
natural_image
Line drawing of a server rack with a hand inserting a drive into the rack (no text or symbols visible)3 Push the indicated position to close the right cover.
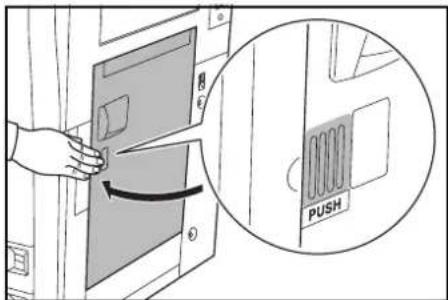
Optional Side Feeder
Follow the steps as below to clear paper jams inside the side feeder.
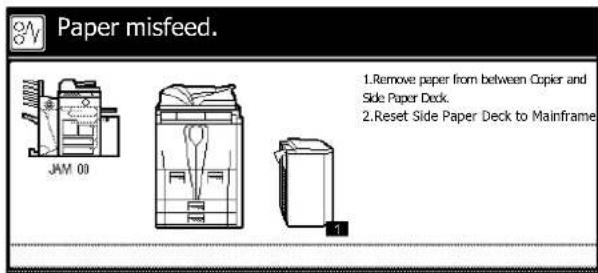
1 Press the top button of the side feeder and detach the side feeder from the copier.
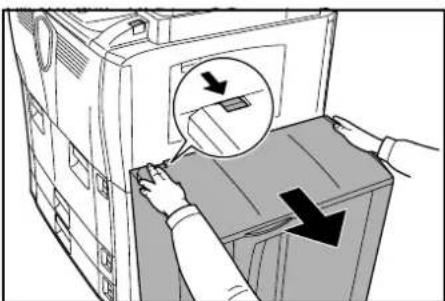
natural_image
Illustration of a hand inserting a device into a box, showing a magnified view of the internal structure (no text or symbols present)2 Remove the paper jammed in the connecting slot of the side feeder.
If the paper tears, remove every loose scraps from the copier inside.
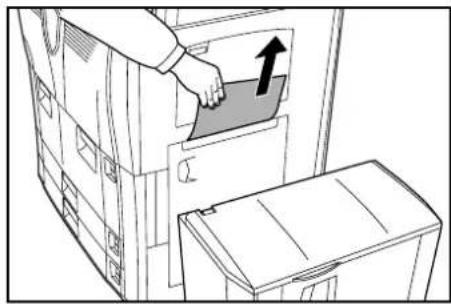
natural_image
Line drawing of a person opening a door with an arrow indicating upward motion (no text or symbols)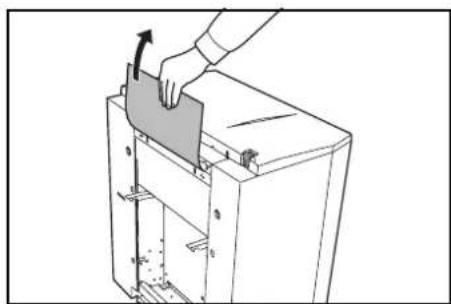
natural_image
Line drawing of a hand pressing down on a mechanical component with an arrow indicating motion (no text or symbols)3 Attach the side feeder to the copier by returning to the original position.
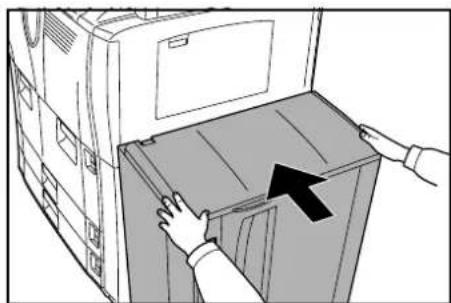
natural_image
Illustration of hands installing or removing a device into a cabinet (no text or symbols visible)4 Open the top cover of the side feeder.
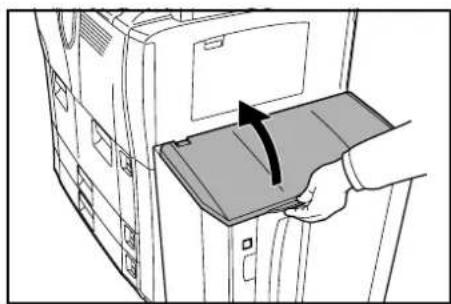
natural_image
Illustration of a hand inserting a device into a computer tower, showing the arrow indicating direction (no text or symbols present)5 Remove the jammed paper.
If the paper tears, remove every loose scraps from the copier inside.
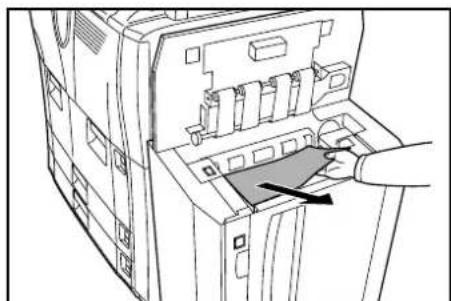
natural_image
Line drawing of a printer's internal structure with a hand inserting a paper into the base (no text or symbols)6 Close the top cover of the side feeder.
Paper Conveyor
Follow the steps as below to clear paper jams in the paper conveyor.

1 Open the front cover.
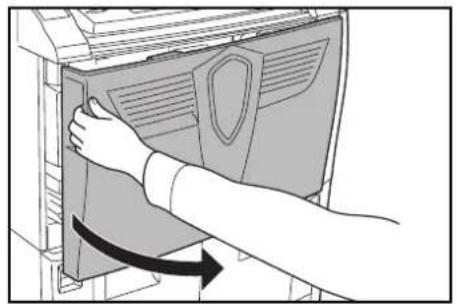
natural_image
Illustration of a hand opening a computer monitor with a shield cover (no text or symbols visible)2 Turn the knob A1 counter-clockwise at least 20 times. Jammed paper will be pushed out to the output tray; remove the paper.
If the paper tears, remove every loose scraps from the copier inside.
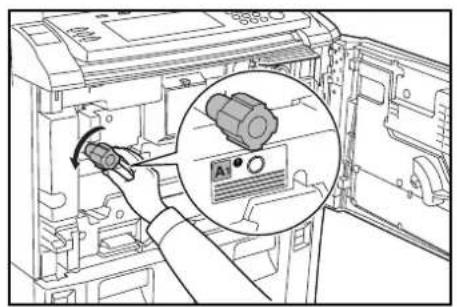
3 Push the lever A2 down to the left.
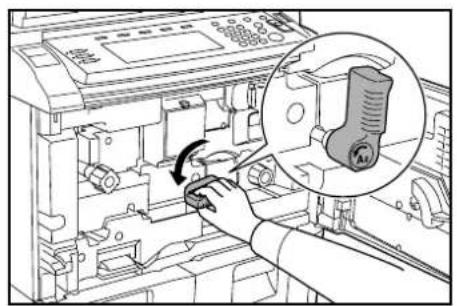
natural_image
Mechanical assembly diagram showing a hand operating a component with a magnified inset highlighting a component (no text or symbols present)4 Turn the knob A3 counter-clockwise at least 8 times. Jammed paper will be pushed to the paper conveyor.

5 Pull the lever A2 and slowly pull out the paper conveyor.
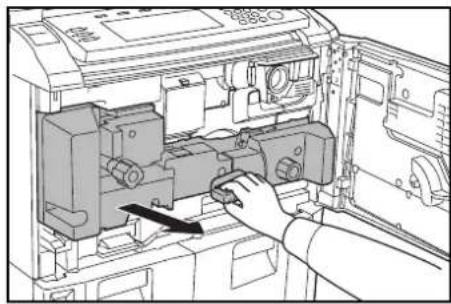
natural_image
Interior view of a computer room with a hand operating the internal components (no visible text or symbols)
Warning
High voltage is present in the charger section. Take sufficient care when working in this area, as there is a danger of electrical shock.

Caution
The fixing unit is extremely hot. Take sufficient care when working in this area, as there is a danger of getting burned.
6 Remove the paper from above the paper conveyor.

natural_image
Diagram of a hand inserting a component into an electronic device (no text or symbols visible)7 Open the cover A4.
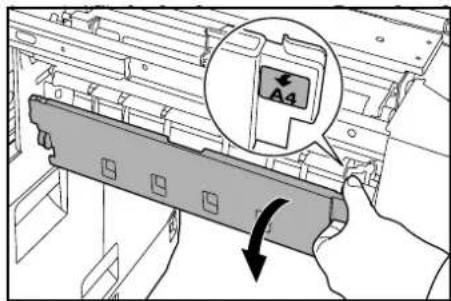
8 Remove the jammed paper.
If the paper tears, remove every loose scraps from the copier inside.
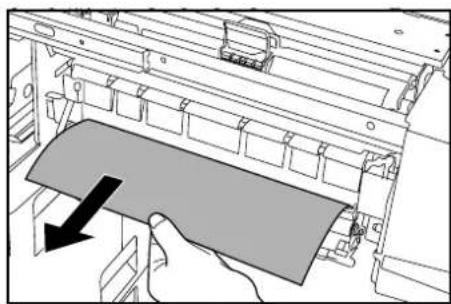
natural_image
Diagram of a computer monitor with an open screen and a hand holding a tray, showing no text or symbols.9 Close the cover A4.
10 Open the cover A5.
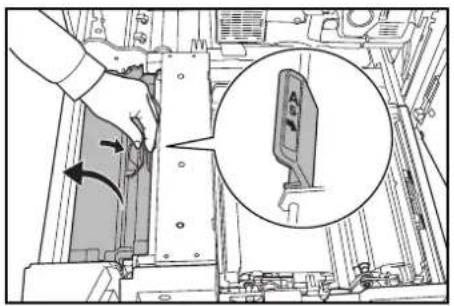
11 Remove the jammed paper.
If the paper tears, remove every loose scraps from the copier inside.
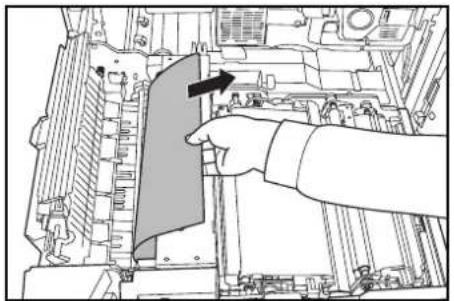
natural_image
Illustration of a hand inserting a card into a computer motherboard (no text or symbols visible)12 Push A6 and close the cover A5 securely.
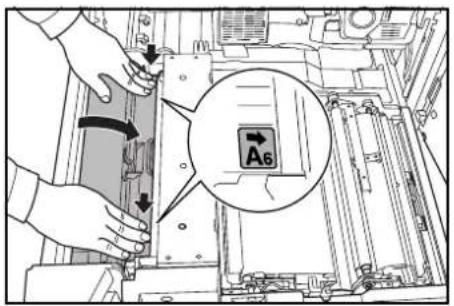
13 Open the cover A7 and remove the jammed paper.
If the paper tears, remove every loose scraps from the copier inside.

14 Close the cover A7.
15 Open the cover A8 and remove the jammed paper.
If the paper tears, remove every loose scraps from the copier inside.
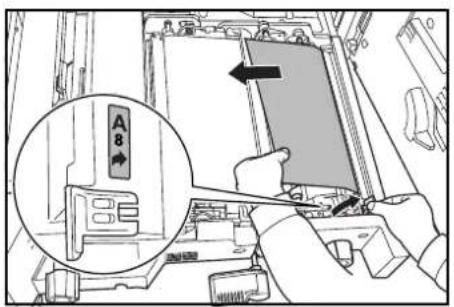
16 Close the cover A8.
17 Restore the paper conveyor to its original position and push it back in securely.
18 Return the lever A2 to its original position.

natural_image
Technical line drawing of a mechanical assembly with a hand operating a component (no text or symbols visible)19 Close the front cover.
Duplex Unit
Follow the steps as below to clear paper jams in the duplex unit.
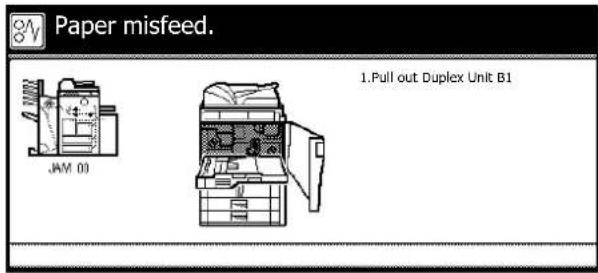
1 Open the front cover.

natural_image
Hand inserting a shield into a computer monitor (no text or symbols visible)2 Pull the lever B1 and pull out the duplex unit.

3 Remove any paper from above the duplex unit. If the paper tears, remove every loose scraps from the copier inside.

natural_image
Technical line drawing of a mechanical assembly with a hand pressing a component (no text or symbols visible)4 Open the bottom cover of the duplex unit (B2) and remove the jammed paper.
If the paper tears, remove every loose scraps from the copier inside.
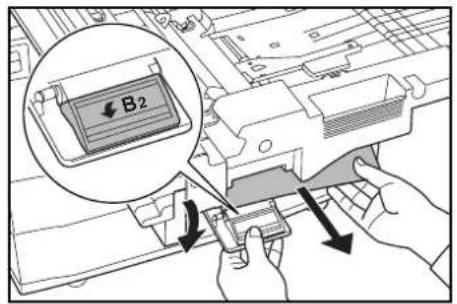
5 Close the cover B2.
6 Open the cover B3 and remove the jammed paper from there.
If the paper tears, remove every loose scraps from the copier inside.

7 Close the cover B3.
8 Replace the duplex unit in its original position and push it back in securely.
9 Close the front cover.
Document Processor
Follow the steps as below to clear paper jams in the document processor.
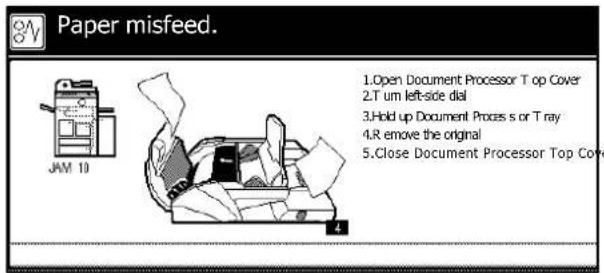
1 Open the document processor top cover.

natural_image
Illustration of a printer's lid being inserted into a paper airplane (no text or symbols visible)2 Remove the jammed paper.
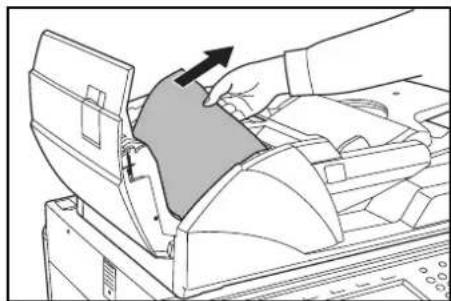
natural_image
Illustration of a hand inserting a device into a printer (no text or symbols visible)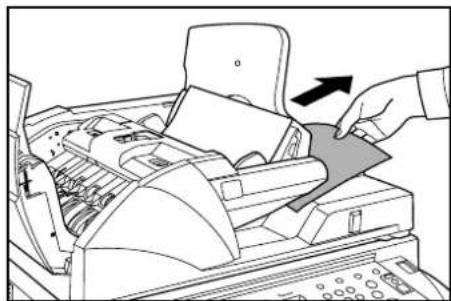
natural_image
Illustration of a hand inserting a card into a printer (no text or symbols visible)If it is difficult to remove the original, turn the feed dial. The original will be pushed to a place where it is easier to remove.
If the original tears, remove every loose scraps from the copier inside.

natural_image
Line drawing of a hand pressing down on a mechanical component with an arrow indicating rotation (no text or symbols)3 Remove any originals left on the original table.

natural_image
Line drawing of a printer's internal structure with a hand holding a paper, showing no text or symbols.4 Close the document processor top cover.
5 Open the document processor.
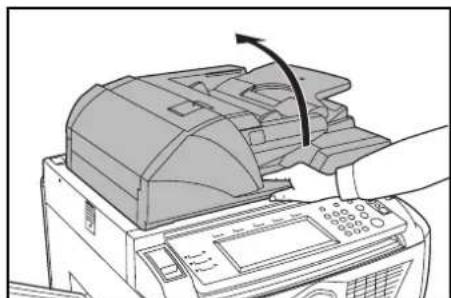
natural_image
Illustration of a hand operating a printer with an arrow indicating the process (no text or symbols present)6 Holding the green lever, open the document processor bottom cover.
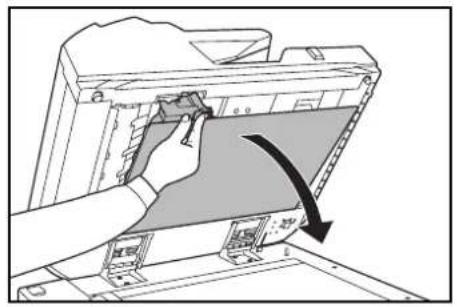
natural_image
Illustration of a hand using a tool to press or adjust a device component, with no visible text or symbols.7 Remove the jammed originals.
If the original tears, remove every loose scraps from the copier inside.
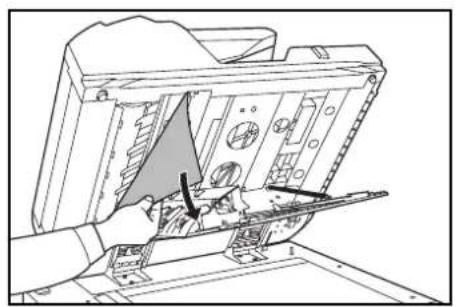
natural_image
Technical line drawing of a mechanical assembly with no visible text or symbols8 Close the document processor bottom cover.
9 Close the document processor and reload the originals in the original table.
Optional Document Finisher
If a misfeed occurs in the document finisher, refer to the document finisher Operation Guide to remove the jam.
Appendix
This appendix lists the copier specifications.
- Copier...Appendix-2
- Copying Performance...Appendix-3
- Optional Side Feeder...Appendix-3
- Optional Document Finisher...Appendix-4
• Environmental Specifications...Appendix-4
Specifications
NOTE: These specifications are subject to change without notice.
Copier
| Copying System Indirect electrostatic system | |
| Originals Supported Sheets, books, and three-dimensional objects (maximum size: A3) | |
| Copy Sizes | |
| Cassettes 1 and 2 | 11 × 8_1/2" and A4 |
| Cassette 3 and 4 | 11 × 17", 8_1/2 × 14", 11 × 8_1/2", 8_1/2 × 11", 5_1/2 × 8_1/2", 8_1/2 × 13", 8_1/2 × 13_1/2", A3, B4, A4, A4R, B5, B5R, A5R, Folio, 8K and 16K. |
| MP Tray | \( 5_1/2 × 8_1/2" to 11 × 17", A5R to A3, B6R, A6R, Folio, 8K, 16K, YOUKEI 2 and YOUKEI 4 |
| Duplexing | 5_1/2 × 8_1/2" to 11 × 17", A5R to A3 |
| Non-Copying Margin: | 0.5 to 5.5 mm |
| Supported Paper For details on the supported paper, refer to the Advanced Operation Guide (Appendix: Paper). | |
| Paper Supply Capacity | |
| Cassettes 1 and 2 | 1,500 sheets ( 80 g/m^2 ) × 2 cassettes |
| Cassette 3 and 4 | 500 sheets ( 80 g/m^2 ) × 2 cassettes |
| MP Tray | 100 sheets ( 80 g/m^2 ) |
| Output Tray Capacity 250 sheets ( 80 g/m^2 ) | |
| Warm-up Time 30 sec | |
| Recovery from Low-Power mode: 10 secRecovery from Sleep mode: 30 sec(At room temp.: 73.4^/23^, 50 % RH ) | |
| Memory | |
| Bitmap | 128 MB |
| Image Storage | 40 GB |
| Operating Environment | |
| Temperature | 10 to 32.5^ |
| Humidity | 15 to 80 % |
| Altitude | 2,000 m maximum |
| Power Source 120 V AC, 60 Hz, 16 A | |
| 220 to 240 V AC, 50/60 Hz, 9.5 A | |
| Dimensions(W) × (D) × (H) | 26_3/4 × 30_13/16 × 46_7/8" 680 × 783 × 1,190 mm |
| Weight Approx. 413.6 lbs./Approx. 188 kg | |
| Space Required for Copier(W) × (D) | 58_1/4 × 30_13/16" 1,480 × 783 mm |
Copying Performance
| Copying Speed | ||
| Platen (1:1) | 60 cpm model | 11 × 17" /A3: 31 sheets/min 812 × 14" /B4: 37 sheets/min 11 × 812" /A4: 60 sheets/min 812 × 11" /A4R: 43 sheets/minB5: 60 sheets/minB5R: 47 sheets/min |
| 80 cpm model | 11 × 17" /A3: 41 sheets/min 812 × 14" /B4: 50 sheets/min 11 × 812" /A4: 80 sheets/min 812 × 11" /A4R: 57 sheets/minB5: 80 sheets/minB5R: 62 sheets/min | |
| Document Processor(1:1) | 60 cpm model | 11 × 812" /A4: 60 sheets/min 11 × 812" /A4: 80 sheets/min |
| 80 cpm model | ||
| First Copy Time 60 cpm model | 3.6 sec or less ( 1:1, 11 × 812" /A4, from the platen) | |
| 80 cpm model | ||
| Resolution Scanning: 600 × 600 dpiCopying: Equivalent to 1,800 × 600 dpi | ||
| Continuous Copying 1 to 9,999 sheets | ||
| Zoom Level Any level from 25 to 400 % in 1 % incrementsWith the document processor: 25 to 200 %Includes preset zoom levels | ||
Optional Side Feeder
| Paper Supply Method Pneumatic supply system; capacity: 4,000 sheets (80 g/m2) | |
| Paper Size | 11 × 8 1/2", A4 and B5 |
| Supported Paper Weight: 64 to 160 g/m2 | |
| Paper Types: Standard, recycled, and colored paper | |
| Dimensions | 14 5/8 × 23 3/16 × 27 5/16" |
| (W) × (D) × (H) | 371 × 589 × 693 mm |
| Weight Approx. 90.2 lbs. or less/Approx. 41 kg or less | |
Optional Document Finisher
| Number of Trays 2 | |
| Supported Paper Sizes | |
| Trays A (Without stapling) | 11 × 17" , 8_1/2 × 14" , A3, B4 and Folio: 1500 sheets 11 × 8_1/2" , 8_1/2 × 11" , 5_1/2 × 8_1/2" , A4, A4R, B5, B5R, A5R, B6R and A6R: 3000 sheets |
| Trays B | 11 × 17" , 8_1/2 × 14" , 11 × 8_1/2" , 8_1/2 × 11" , 5_1/2 × 8_1/2" , A3, B4, A4, A4R, B5, B5R, A5R, B6R and A6R: 200 sheets |
| Supported Paper Weight | Trays A and B: 45 to 200 g/m2When stapling: 60 to 200 g/m2When punching (optional feature): 45 to 200 g/m2 |
| Maximum Sheets for Stapling | 11 × 17" , 8_1/2 × 14" , A3 and B4: 30 sheets; 11 × 8_1/2" , 8_1/2 × 11" , A4, A4R and B5: 50 sheets (using paper up to 80 g/m2) |
| Dimensions(W) × (D) × (H) | 31_5/16 × 25_3/16 × 42_1/8" 796 × 640 × 1,070 mm |
| Weight Approx. 160.6 lbs./Approx. 73 kg | |
Environmental Specifications
| Recovery from Low-Power mode 10 sec | |
| Time until Low-Power mode (default) 15 min | |
| Time until Sleep mode (default) 90 min | |
| Duplexing | Standard |
| Paper Supply Capability | Supports recycled paper made from 100 % recycled pulp |
NOTE: Consult your Dealer or Service Representative for recommended paper types.
Index
A
Adjusting exposure i, 3-5
Auto Exposure mode 3-5
Manual Exposure mode 3-5
Advanced functions i
Auto Exposure mode 3-5
Auto Low-Power mode 3-19
Auto rotation iii
Auto Selection mode iii
Auto Sleep mode 3-20
Auto zoom i, 3-6
B
Backing sheets for transparencies iii
Basic copying procedures 3-2
[Basic] screen 1-7
Batch scanning iii
Booklets ii
Border erase ii
C
Cassette
Cassette 1 1-2, 2-2, 6-10
Cassette 2 1-2, 2-2, 6-11
Cassette 3 1-2, 2-3, 6-13
Cassette 4 1-2, 2-3, 6-13
Loading paper 2-2, 2-3
Paper jams 6-10, 6-11, 6-13
Specifying the paper size 2-8
Specifying the paper type 2-9
Caution labels xii
Centering originals ii
Cleaning
Document processor and platen 5-2
Slit glass 5-2
Cleaning cloth compartment 1-4
Clearing paper jams 6-9
Combine mode ii
Copy
Adjusting exposure 3-5
Duplex mode 3-11
Interrupt mode 3-17
Job reservation 3-18
Low-Power mode 3-19
Reducing/Enlarging 3-6
Selecting image quality 3-4
Sleep mode 3-20
Sort mode 3-16
Split mode 3-14
Copying performance Appendix-3
Copying speed Appendix-3
Cover mode ii
D
Document finisher 4-3
Paper jams 6-24
Specifications Appendix-4
Document processor 1-2
Cleaning 5-2
Loading originals 2-16
Paper jams 6-22
Precautions 2-16
Document processor angle adjustment lever 1-4, 2-18
Document processor bottom cover 1-3, 6-24
Document processor top cover 1-4, 6-22
Duplex mode i, 3-11
Duplex unit 1-5, 6-21
E
EcoPrint (Economy Printing) iii
Ejection guide 1-4, 2-17
Energy Star program ix
Environmental specifications Appendix-4
F
First copy time Appendix-3
Form Box iv
Form overlay ii
Front cover 1-3
[Function] screen 1-7
G
Grounding the copier xiv
H
Handles 1-2, 1-3
|
Installation precautions xiii
Interrupt mode 3-17
Inverted copying iii
J
Jam location indicator 6-9
Job accounting v
Job reservation 3-18
K
Key counter 4-3
How to insert the key counter 4-4
Knob A1 1-5, 6-18
Knob A3 1-5, 6-18
L
Legal and safety information
Caution labels xii
Installation precautions xiii
Legal information viii
Power supply xiv
Precautions for use xiv
Safety conventions x
Symbols x
Lever A2 1-5, 6-18
Loading originals
Document processor 2-16
Platen 2-18
Loading paper 2-2
Low-Power mode ix, 3-19
M
Main power switch 1-3, 3-2
Main power switch cover 1-3
Maintenance 5-1
Management code 2-8
Manual Exposure mode 3-5
Manual zoom i, 3-6, 3-7
Margin mode ii
Memo mode ii
Mirror image iii
MP tray 1-2
Loading paper 2-5
Paper jams 6-15
Specifying the paper size 2-11
Specifying the paper type 2-14
MP tray extension 1-2, 2-5
Multi-page forms iii
0
Offset mode ii
Operation panel 1-2, 1-6
Operation panel lock lever 1-2, 3-3
Optional equipment
Document finisher 4-3
Key counter 4-3
Printer kit 4-4
Scanner kit 4-4
Security kit 4-4
Side feeder 4-3
Original eject table 1-4
Original loaded indicator 1-4
Original size indicator plates 1-3, 2-18
Original table 1-4
Original width guides 1-4, 2-17
Output management iv
Output tray 1-3, 3-3
Overview of optional equipment 4-2
P
Page numbering ii
Paper
Before loading paper 2-2
Cassette 1 and 2 2-2
Cassette 3 and 4 2-3
MP tray 2-5
Paper size 2-8, 2-11
Paper type 2-9, 2-14
Side feeder 2-6
Paper conveyor 1-5, 6-18
Paper feeder 1-5, 6-12
Paper jams
Cassette 1 6-10
Cassette 2 6-11
Cassette 3 and 4 6-13
Document finisher 6-24
Document processor 6-22
Duplex unit 6-21
Inside the right cover 6-15
MP tray 6-15
Paper conveyor 6-18
Side feeder 6-16
Paper length adjusting tab 1-5, 2-3
Paper length guide 1-5, 2-4
Paper width adjusting tab 1-5, 2-4
Paper width guides 1-2, 1-5, 2-4, 2-6
Part names 1-1
Copier 1-2
Document processor 1-4
Internal parts 1-5
Operation panel 1-6
Touch panel 1-7
Photo 3-4
Platen 1-3
Cleaning 5-2
Loading originals 2-18
Power cord 1-3
Power supply xiv
Precautions for use xiv
Preparing to copy 2-1
Preset zoom i, 3-6, 3-8
Printer kit 4-4
[Program] screen 1-7
Programmed copying iii
Programming multi-part jobs iv
Proof mode iii
R
Reducing/Enlarging 3-6
Repeat copy iii
Replacing toner container 5-4
Resolution Appendix-3
Responding to error messages 6-4
Right cover 1-2, 6-15
s
Scanner kit 4-4
Security kit 4-4
Selecting image quality i, 3-4
Photo 3-4
Text 3-4
Text+Photo 3-4
Selecting the language 2-20
Shared Data Box iv
Side feeder 4-3
Loading paper 2-6
Paper jams 6-16
Specifications Appendix-3
Sleep mode ix, 3-20
Slit glass 5-2
Solving malfunctions 6-2
Sort mode i, 3-16
Specifications
Copier Appendix-2
Copying performance Appendix-3
Document finisher Appendix-4
Environmental specifications Appendix-4
Side feeder Appendix-3
Split mode i, 3-14
Symbols x
Synergy Print Box iv
T
Text 3-4
Text+Photo 3-4
Toner container 1-5, 5-4
Toner container release lever 1-5, 5-4
Touch panel 1-7
U
[User choice] screen 1-7
W
Warm-up 3-2
Weekly timer v
X
XY zoom i, 3-6, 3-9
DIRECTIVE 2002/96/CE ON THE TREATMENT, COLLECTION, RECYCLING AND DISPOSAL OF ELECTRIC AND ELECTRONIC DEVICES AND THEIR COMPONENTS
INFORMATION
1. FOR COUNTRIES IN THE EUROPEAN UNION (EU)
The disposal of electric and electronic devices as solid urban waste is strictly prohibited: it must be collected separately.
The dumping of these devices at unequipped and unauthorized places may have hazardous effects on health and the environment.
Offenders will be subjected to the penalties and measures laid down by the law.
To dispose of our devices correctly:
a) Contact the Local Authorities, who will give you the practical information you need and the instructions for handling the waste correctly, for example: location and times of the waste collection centres, etc.
b) When you purchase a new device of ours, give a used device similar to the one purchased to our dealer for disposal.

The crossed dustbin symbol on the device means that:
- when it to be disposed of, the device is to be taken to the equipped waste collection centres and is to be handled separately from urban waste;
- The producer guarantees the activation of the treatment, collection, recycling and disposal procedures in accordance with Directive 2002/96/CE (and subsequent amendments).
2. FOR OTHER COUNTRIES (NOT IN THE EU)
The treatment, collection, recycling and disposal of electric and electronic devices will be carried out in accordance with the laws in force in the country in question.


- d-Copia 600 d-Copia 800
- PUBLICATION ISSUED BY:
- Take Advantage of Advanced Functions
- Auto Paper Selection
- Offset Mode
- Combine Mode
- Margin Mode
- Centering Originals
- Border Erase
- Page Numbering
- Cover Mode
- Form Overlay
- Booklet from Sheets
- Booklets from Booklets
- Memo Mode
- Batch Scanning
- Proof Mode
- Repeat Copy
- Backing Sheets for Transparencies
- Auto Rotation
- EcoPrint (Economy Printing) Mode
- Inverted Copying
- Mirror Image
- Auto Selection Mode
- Multi-Page Forms
- Programmed Copying
- Programming Multi-Part Jobs
- Form Box
- Shared Data Box
- Synergy Print Box
- Output Management
- Features for Easier Copying
- Legal and Safety Information
- Legal Information
- Notice
- Energy Star Program
- About the International Energy Star Program
- Low Power Mode
- Off Mode
- Sleep Mode (If the copier has printer and/or facsimile function)
- Automatic 2-Sided Copy Function
- Paper Recycling
- Safety Conventions in This Guide
- Symbols
- Caution Labels
- Label 1, 2
- Label 8, 9
- Label 3
- Label 4, 10
- Label 5, 6, 7
- Environment
- Caution
- Other precautions
- Power supply/Grounding the copier
- Warning
- Handling of plastic bags
- Precautions for Use
- Cautions when using the copier
- Cautions when handling consumables
- Laser Safety (Europe)
- Safety Instructions Regarding the Disconnection of Power
- DECLARATION OF CONFORMITY
- SAFETY OF LASER BEAM (USA)
- Safety of laser beam
- The CDRH Act
- Optical unit
- Safety switch
- MERCURY WARNING
- Introduction
- Part Names
- Preparing to Copy
- Basic Operation
- Optional Equipment
- Maintenance
- Troubleshooting
- Appendix
- Guides Included
- Conventions in This Guide
- Contents
- Appendix ...... Appendix-1
- Index ...... Index-1
- Copier
- Document Processor
- Internal Parts
- Operation Panel
- Touch Panel
- [Basic] Screen
- [User choice] Screen
- [Function] Screen
- [Program] Screen
- Loading Paper
- Before Loading Paper
- Loading Paper in Cassettes 1 and 2
- Loading Paper in Cassettes 3 and 4
- Loading Paper in the MP Tray
- Loading Paper in the Optional Side Feeder
- Specifying Paper Type and Size to the Cassettes and MP Tray
- Specifying the Paper Size
- Specifying the Paper Type
- Specifying the Paper Size to the MP Tray
- Auto Detect
- Other Standard Sizes
- Input Size
- Setting Range
- Specifying the Paper Type to the MP Tray
- Loading Originals
- Loading Originals in the Document Processor
- Precautions on Types of Originals for Document Processor
- How to Load Originals
- Loading Originals on the Platen
- Selecting the Language
- Basic Copying Procedures
- Selecting Image Quality
- Image Quality Mode Description
- Adjusting Exposure
- Reducing/Enlarging
- Auto Zoom
- Manual Zoom
- keys
- Preset Zoom
- keys 8½x14"→8½x11"
- XY Zoom
- keys # keys
- Duplex Mode
- One-sided to Two-sided
- Two-sided to Two-sided
- Book to Two-sided
- Split Mode
- Two-sided to One-sided
- Book to One-sided
- Sort Mode
- Interrupt Mode
- Job Reservation
- Low-Power Mode
- Auto Low-Power Mode
- Sleep Mode
- Auto Sleep mode
- Overview of Optional Equipment
- Side Feeder
- Document Finisher
- Key Counter
- How to Insert the Key Counter
- Printer Kit
- Scanner Kit
- Security Kit
- Cleaning the Copier
- Cleaning the Document Processor and Platen
- Cleaning the Slit Glass
- Replacing Toner Container
- Solving Malfunctions
- Responding to Error Messages
- Clearing Paper Jams
- Jam Location Indicators
- Precautions of the Paper Jam
- Cassette 1
- Cassette 2
- Cassettes 3 and 4
- MP Tray
- Inside the Right Cover
- Optional Side Feeder
- Paper Conveyor
- Duplex Unit
- Optional Document Finisher
- Specifications
- Index
- A
- B
- C
- D
- E
- F
- G
- H
- |
- J
- K
- L
- M
- 0
- P
- R
- s
- T
- U
- W
- X
- DIRECTIVE 2002/96/CE ON THE TREATMENT, COLLECTION, RECYCLING AND DISPOSAL OF ELECTRIC AND ELECTRONIC DEVICES AND THEIR COMPONENTS
- INFORMATION
- FOR COUNTRIES IN THE EUROPEAN UNION (EU)
- To dispose of our devices correctly:
- FOR OTHER COUNTRIES (NOT IN THE EU)
Brand : OLIVETTI
Model : d-Copia 600
Category : Photocopier