
SP300 - Digital piano KORG - Free user manual and instructions
Find the device manual for free SP300 KORG in PDF.
| Product type | Digital Piano |
| Brand | KORG |
| Model | SP-300 |
| Dimensions (W x D x H) | 1300 x 343.8 x 132.5 mm (music stand excluded) |
| Weight | 25 kg (55.1 lbs) |
| Power supply | AC DC adapter 21V, 1A (center negative) |
| Keyboard | 88 weighted keys with hammer action, touch sensitive |
| Polyphony | 60 notes maximum (varies by timbres and effects) |
| Timbres | 30 ROM timbres divided into 3 banks |
| Effects | Reverb and Chorus (3 levels each) |
| Metronome | Tempo (40-200), time signature, accent, volume |
| MIDI functions | Transmission/reception, Program Change, Control Change, Data Dump, Local On/Off |
| Connections | MIDI IN/OUT, Audio INPUT/OUTPUT (L/Mono, R), Headphones (2), Damper |
| Built-in speakers | 2 x 10 cm, amplification 15W + 15W |
| Pedal | Damper supplied (half-pedal possible with optional Korg DS1H) |
| Temperaments | Equal, Kirnberger, Werckmeister |
| Included accessories | AC adapter, damper pedal, music stand |
| Options | Damper pedal DS1H, piano stand |
| Maintenance | Clean with a dry cloth; do not use liquid or abrasive detergents |
| Safety | Do not expose to humidity, direct sunlight, strong vibrations; do not insert metal objects |
| Warranty | According to local distributor; contact an authorized Korg dealer |
Frequently Asked Questions - SP300 KORG
User questions about SP300 KORG
0 question about this device. Answer the ones you know or ask your own.
Ask a new question about this device
Download the instructions for your Digital piano in PDF format for free! Find your manual SP300 - KORG and take your electronic device back in hand. On this page are published all the documents necessary for the use of your device. SP300 by KORG.
USER MANUAL SP300 KORG
Using the unit in the following locations can result in a malfunction.
- In direct sunlight
- Locations of extreme temperature or humidity
- Excessively dusty or dirty locations
- Locations of excessive vibration
Power supply
Please connect the designated AC adapter to an AC outlet of the correct voltage. Do not connect it to an AC outlet of voltage other than that for which your unit is intended.
Interference with other electrical devices
This product contains a microcomputer. Radios and televisions placed nearby may experience reception interference. Operate this unit at a suitable distance from radios and televisions.
Handling
To avoid breakage, do not apply excessive force to the switches or controls.
Care
If the exterior becomes dirty, wipe it with a clean, dry cloth. Do not use liquid cleaners such as benzene or thinner, or cleaning compounds or flammable polishes.
Keep this manual
After reading this manual, please keep it for later reference.
Keeping foreign matter out of your equipment
- Never set any container with liquid in it near this equipment. If liquid gets into the equipment, it could cause a breakdown, fire, or electrical shock.
- Be careful not to let metal objects get into the equipment. If something does slip into the equipment, unplug the AC adapter from the wall outlet. Then contact your nearest Korg dealer or the store where the equipment was purchased.
CE MARK FOR EUROPEAN HARMONIZED STANDARDS
The CE mark that is attached to our company's products of AC mains operated apparatus until December 31, 1996 means it conforms to the EMC Directive (89/336/EEC) and to the CE mark Directive (93/68/EEC).
The CE mark that is attached after January 1, 1997 means it conforms to the EMC Directive (89/336/EEC), to the CE mark Directive (93/68/ EEC) and to the Low Voltage Directive (73/23/ EEC).
In addition, the CE mark that is attached to our company's products of Battery operated apparatus means it conforms to the EMC Directive (89/336/ EEC) and to the CE mark Directive (93/68/EEC).
THE FCC REGULATION WARNING (FOR THE U.S.A. ONLY)
This equipment has been tested and found to comply with the limits for a Class B digital device, pursuant to Part 15 of the FCC Rules. These limits are designed to provide reasonable protection against harmful interference in a residential installation. This equipment generates, uses, and can radiate radio frequency energy and, if not installed and used in accordance with the instructions, may cause harmful interference to radio communications. However, there is no guarantee that interference will not occur in a particular installation. If this equipment does cause harmful interference to radio or television reception, which can be determined by turning the equipment off and on, the user is encouraged to try to correct the interference by one or more of the following measures:
Reorient or relocate the receiving antenna.
- Increase the separation between the equipment and receiver.
- Connect the equipment into an outlet on a circuit different from that to which the receiver is connected.
- Consult the dealer or an experienced radio/TV technician for help.
Unauthorized changes or modification to this system can void the user's authority to operate this equipment.
DISCLAIMER
The information contained in this manual has been carefully revised and checked through. Due to our constant efforts to improve our products, the specifications might differ to those in the manual. Korg is not responsible for any eventual differences found between the specifications and the contents of the instruction manual - the specifications being subject to change without prior notice
WARRANTY
KORG products are manufactured according to the strictest electrical and mechanical regulations that exist in various countries of the world. These products are warranted by the KORG distributor only in each country. Any KORG product that is not sold with the manufacturer's or distributor's warranty, or without a serial number, cannot benefit from servicing under the warranty. This regulation is for the consumer's own protection.
ASSISTANCE AND SERVICE FOR MUSICIANS
For repairs, contact your nearest Authorized KORG Service Center. For more information on KORG products, and to find software and accessories for your piano, please contact your local Authorized KORG distributor.
KORG ON THE INTERNET
Home page Korg Inc.: "http://www.korg.co.jp"
Home page Korg USA: "http://www.korg.com"
Home page Korg Italy: "http://www.korg.it"
DATA RESET
When the instrument is turned off, all parameters are reset.
CONTENTS
Introduction 7
Main features 7
1 Panels 9
Front panel 9
Rear panel 10
2 Before you begin 12
Connecting to an external amplification system 12
Using the headphones 12
Connecting external sources 13
Turning the instrument on 13
Turning the internal speakers on or off 13
Adjusting the volume 13
Listening to the Demo 13
3 Basic functions 16
Playing a single sound (Single mode) 16
Playing two sounds at the same time (Layer mode) 16
Choosing the reverb and the chorus 17
The damper pedal 18
The metronome 18
4 Other functions 21
Touch settings 21
Transpose 22
Fine tuning 22
Selecting a temperament 23
5 MIDI 25
What is MIDI? 25
What can you do with MIDI? 25
Connections 25
Standard MIDI settings 26
Selecting the transmission channel 26
Using the SP-300 as a multitimbral tone generator 27
Local On/Off 27
Program Change 28
Control Change 30
MIDI Data Dump 30
6 Appendix 33
Troubleshooting 33
Polyphony 33
Technical specifications 34
Control panel shortcuts 35
Control panel and keyboard 35
MIDI Implementation Chart 141
Introduction
Main features
Wide range of sounds. Thirty different and expressive high-quality sounds, including a Stereo Concert Grand Piano. You can use the Layer function to simultaneously play two sounds.
Effects. The SP-300 provides built-in digital effects that can simulate the natural ambience of a concert hall (Reverb) and add richness to the sound (Chorus).
Damper pedal simulation. The Damper pedal on the SP-300 corresponds to the Damper or Forte pedal of an acoustic piano. On an acoustic piano, when you press this pedal, the pads (dampers) that stop the vibrations of the strings are lifted.
Metronome. The built-in metronome allows you to select the time signature, tempo, and volume, and even use a bell sound as the accent.
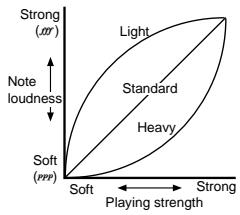
Touch control. You can choose from three different settings to adjust how the sound will respond to your keyboard playing dynamics.
Temperaments. In addition to the Equal temperament, the SP-300 allows you to select two alternative classical temperaments (Kirnberger and Werckmeister) for historically accurate performance of classical music. When selecting an acoustic piano sound, the typical Stretched Tuning is automatically selected.
Adjustable pitch. The Transpose function lets you change the pitch of the piano, and the Pitch Control function allows you to make fine tune adjustments.
MIDI capabilities. The SP-300 supports the MIDI protocol, the standard that allows music data to be transferred between musical instruments and computers. MIDI allows two or more devices to control or be controlled by each other, and also allows you to use the SP-300 as a 16-part multitimbral tone generator.
Powerful integrated amplification. SP-300 includes a powerful, 15 + 15 Watt amplifier, with two 10cm speakers in Bass Reflex box.
Audio inputs. The audio inputs allow you to directly connect an external mono or stereo audio source, without the need of a mixer.
Two sets of heapphones. You can connect two stereo headphones, to play with your teacher or another musician.
1
Panels
Front panel
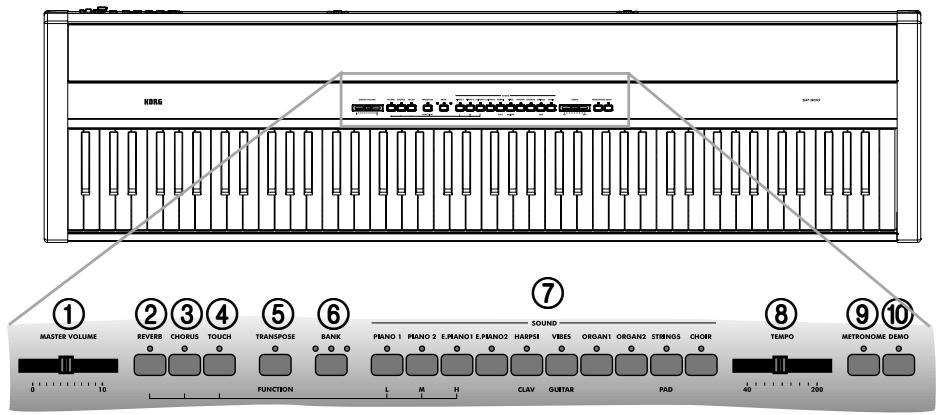
① MASTER VOLUME slider: Adjusts the volume for the Output and the Phones connectors.
② REVERB button: Turns the reverb on/off. This adds ambience to the sound.
③ CHORUS button: Turns the chorus on/off. This makes the sound richer.
④ TOUCH button: Lets you select the keyboard sensitivity.
⑤ TRANSPOSE/FUNCTION button: Multifunction button to be used in order to modify the transpose and fine tuning functions, to program the MIDI parameters and to carry on other adjustments.
Note: When the instrument is turned off, all parameters are reset.
⑥ BANK button: Selects one of the 3 available banks of sounds.
⑦ SOUND SELECTION buttons: Press a button to select a sound (Single mode). You can press two buttons at the same time, to play two sounds at the same time on
the keyboard (Layer mode).
⑧ TEMPO slider: Adjusts the metronome tempo.
⑨ METRONOME button: Turns the metronome click on/off.
DEMO button: Turns the demo mode on/off, to listen to the demo songs. Select the songs with the sound selection buttons (see number 7 above).
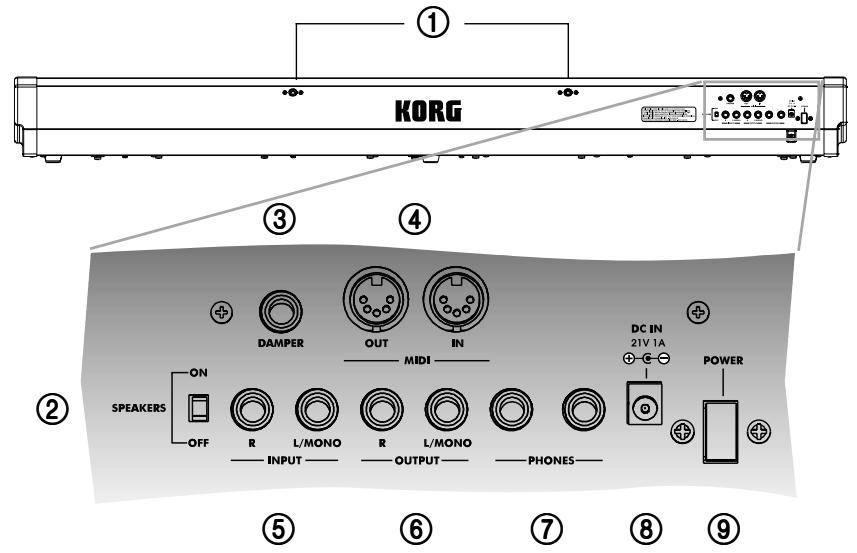
Rear panel
① Music stand holes: Insert the music stand into these two holes. Please note that, the first times you use the music stand, you will need to apply some force to insert or remove it. Later, the rubbery plastic material of which the holes are made will adapt to the music stand, making the operation easier to carry on.
② SPEAKERS ON/OFF switch: Use this switch to turn the internal speakers on or off.
③ DAMPER connector: Connect the supplied pedal to this connector.
④ MIDI (IN, OUT) connectors: Connectors that are used to connect other MIDI devices (sequencer, keyboards, etc.). OUT: Data output (to be connected to the MIDI IN connector of another MIDI device). IN: Data input (to be connected to the MIDI OUT connector of another MIDI device).
⑤ INPUT (L/MONO, R) connectors: Audio inputs. Connect to these connectors an external audio source, such as a CD/tape player, a mixer, or another keyboard.
Warning: Avoid connecting the output of a power amplifier to these inputs!.
⑥ OUTPUT (L/MONO, R) connectors: Audio outputs. Connect these connectors to an external amplifying system. (With a hi-fi system use the AUX or TAPE connectors, not the PHONO connector). To amplify the SP-300 in mono, connect the single L/MONO connector. Use the MASTER VOLUME slider to set the output volume.
⑦ PHONES connector: Connect one or two pairs of headphones to these jacks.
⑧ DC IN 21V 1A connector: Connect the supplied AC adapter to this connector.
⑨ POWER switch: On/off switch.
2
Before you begin
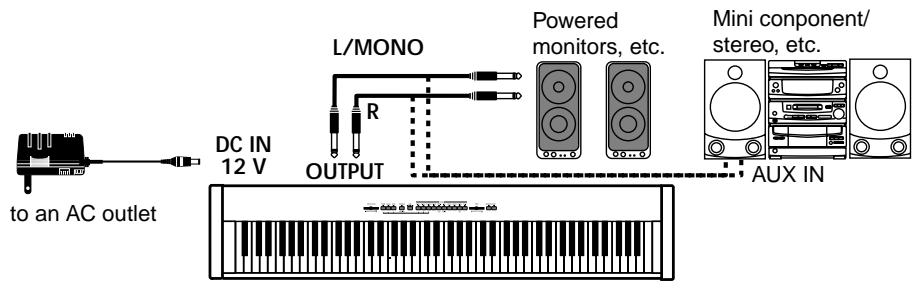
Connecting to an external amplification system
Use the OUTPUT connectors, if you like to connect your SP-300 to a high-quality mixer, stereo hi-fi, or a couple of active monitors. When using a stereo hi-fi, connect the OUTPUTs to the AUX or TAPE inputs (never use the PHONO inputs). For mono amplification, connect only the L/MONO output.
Using the headphones
For playing or practicing during night hours, or when you don't want to be heard by others in the same room, connect one or two pairs of high-quality headphones (32Ω impedance suggested) to the appropriate connectors on the rear panel. These connectors are standard 1/4" phone jacks. If your headphones have a mini-jack adapter, grasp the adapter when plugging in or out the headphones.
Warning: When using headphones, protect your hearing by avoiding extended listening at high volumes.
Connecting external sources
Connect any other electronic musical instrument, a mixer's output, or a CD/tape player, to the INPUTS on the back of the instrument. These inputs expect a line-level signal. To connect a microphone, you need a dedicated microphone preamplifier or a mixer.
Warning: Avoid connecting the output of a power amplifier to these inputs!.
Turning the instrument on
Insert the DC plug of the supplied AC adapter into the DC inlet of the SP-300, and then connect the AC plug to a wall socket; then press the POWER switch. When the instrument is on, the LEDs on the control panel will light up. To turn the instrument off, press the POWER switch again.
Note: When the instrument is turned off, all parameters are reset.
Turning the internal speakers on or off
Whether you prefer listening to the internal speakers or to an external amplification system, you can turn the internal speakeers on or off. Use the SPEAKER ON/OFF switch on the back panel to turn them on or off.
Adjusting the volume
Move the MASTER VOLUME slider towards the right to increase the volume; towards the left to decrease the volume. The maximum is "10"; the minimum (silence) is "0". This control adjusts the output level of the headphones, the internal speakers and of the OUTPUTs. It does not control the input level of the audio source connected to the INPUTs.
Note: It is always better to start with a low volume and then increase gradually.
Listening to the Demo
The SP-300 contains 30 pre-recorded demo songs. Listen to them to experience the rich sound and expressive potential of this instrument.
Listen to all songs at once. You can listen to all demo songs with a single command.
1 Press the DEMO button (or keep the TRANSPOSE/FUNCTION button pressed, and press E1 on the keyboard). The sound selection buttons LED will blink sequen-
tially from left to right. After a few seconds, playback will begin. All demo songs will be played back. After the last song, the playback will begin again from the first song.
2 During playback, you can press a sound selection button to repeat just the current bank of ten demo songs. (There are three banks of ten demo songs each: 1-10, 11-20, 21-30).
For example, if you press the CHOIR button while song number 1 is playing, song number 10 will immediately start playing, and the playback will cycle from song 1 through song 10.
3 Press the DEMO button to stop the playback and exit the demo mode.
Listen to a specified song. You can select just one demo song to be played back.
1 First of all, you must select one of the three demo song banks.
- To select the first bank (1-10), press the DEMO button once. The LEDs will blink sequentially, from left to right.
- To select the second bank (11-20), press the DEMO button a second time. All LEDs will blink at the same time.
- To select the third bank (21-30), press the DEMO button a third time. Adjacent LEDs will blink alternatively
2 Press one of the sound selection buttons to select the corresponding song in the selected bank. The LED on the selected demo button will stay on, while the other LEDs will turn off.
After the end of the selected song, all the songs of the selected bank will be played back in cycle.
| Button | Bank 1 (1-10) | Bank 2 (11-20) | Bank 3 (21-30) |
| PIANO 1 | F. Mendelssohn-Bar-tholdy: Prelude Op.104a, no.2 | Korg Original (M. Tem-pia): Reflection | C.A. Debussy: Arabesque no.1 |
| PIANO 2 | F. Chopin: Nocturne Op.9, no.2 | S. Joplin: The Enter-tainer | J.S. Bach: Two-voice invention no.13 |
| E.PIANO 1 | C.A. Debussy: Clair de lune | Korg Original (M. Tem-pia): Jumper | F. Chopin: Fantasie-Impromptu Op.66 |
| E.PIANO 2 | Korg Original (M. Tem-pia): Lullaby for a Little Star | Korg Original (M. Tem-pia): All the Ones You Don't Know | J.S. Bach: Prelude in C major (from Das Wohl-temeperierte Klavier) |
| HARPSI /CLAV | L. van Beethoven: Für Elise | J.S. Bach: Italian Con-cert | Korg Original (M. Tem-pia): Rubber Bob |
| VIBES /GUITAR | F. Chopin: Etude Op.10, no.3 | Korg Original (M. Tem-pia): Jazz in Spain | R. Schumann: Trauma-rei, Op.15, no.7 |
| ORGAN 1 | W.A. Mozart: A la turque (from the Sonata in A-major K.331) | Korg Original (M. Tem-pia): Cool “B” | F. Mendelssohn-Bar-tholdy: Spring Song, Op.62, no.6 |
| ORGAN 2 | F. Chopin: Valse no.6 in D-,major Op.64, no.1 | F. Mendelssohn-Bar-tholdy: Wedding March | Korg Original (M. Tem-pia): Sunflowers |
| STRINGS /PAD | Korg Original (M. Tem-pia): Old Feather Blues | J.S. Bach: Air on the G string | P.D. Paradisi: Toccata in A major |
| CHOIR | Korg Original (M. Tem-pia): Noise of time | Korg Original (M. Tem-pia): Voice Texture | Korg Original (M. Tem-pia): Wet Raccoon Rag |
3 Press the DEMO button to stop the playback and exit the demo mode.
Note: During the demo playback you can't use the sound selection buttons to select sounds, or the REVERB and CHORUS buttons.
Adjusting the tempo of the demo songs. Use the TEMPO slider to change the tempo of the selected demo song. Normally, the playback tempo of the demo song will not match the markings of the TEMPO slider.
Note: You can't use the metronome during the demo playback.
Note: When a demo is selected, its original tempo is recalled.
3
Basic functions
Playing a single sound (Single mode)
You can select a sound from the thirty sounds supplied with the instrument.
1 Press one of the sound selection buttons in order to select a sound. The LED on the button you pressed will light.
2 Use the BANK button to select one of the three available banks (1-10, 11-20, 21-30). Pressed a first time it selects Bank 2; pressed a second time it selects Bank 3; pressed a third time it selects Bank 1 again.
| Button | Bank 1 | # | Bank 2 | # | Bank 3 | # |
| PIANO 1 | Grand Piano 1 | 2 | Bright Piano | 2 | Grand Piano 2 | 1 |
| PIANO 2 | Classic Piano | 2 | Honky-Tonky | 2 | E.Grand Piano | 1 |
| E.PIANO 1 | Stage E.Piano | 1 | Club E.Piano | 2 | Thin E.Piano | 2 |
| E.PIANO 2 | Digital E.Piano | 1 | 60's E.Piano | 1 | Vintage E.Piano | 2 |
| HARPSI/CLAV | Harpsichord | 1 | Clav. | 1 | Wah Clav. | 1 |
| VIBES/GUITAR | Vibraphone | 1 | Marimba | 1 | Acoustic Guitar | 1 |
| ORGAN 1 | Jazz Organ 1 | 2 | Jazz Organ 2 | 2 | Jazz Organ 3 | 2 |
| ORGAN 2 | Church Organ 1 | 3 | Church Organ 2 | 1 | Church Organ 3 | 1 |
| STRINGS/PAD | Strings | 1 | Slow Strings | 2 | Warm Pad | 2 |
| CHOIR | Choir Hoo | 1 | Choir Doo | 2 | Choir Pad | 2 |
(#) These columns show the number of oscillators per voice used by each sound
Playing two sounds at the same time (Layer mode)
You can play two sounds at the same time on the keyboard. This is called the Layer mode.
Note: When selecting the Layer mode, the total number of voices that can play at the same time is reduced, depending on the total number of oscillators used by the selected sounds.
Note: You can't select two sounds included under the same button.
1 Press one of the sound selection buttons in order to select the first sound. The LED on the button you pressed will light. Use the BANK button to select a sound in one of the other banks.
2 Press another sound selection button to select the second sound. The LED on the button you pressed will light. Use the BANK button to select a sound in one of the other banks.
3 Press both buttons at the same time to select the sounds. Both LEDs will light.
Note: Steps 1 and 2 are not required, if the right banks are already selected.
Returning to the Single mode. To return to the Single mode, just press a single sound selection button.
Adjusting the volume of sounds in Layer mode. To adjust the balance between the sounds in Layer mode, hold down the button of the sound whose level you wish to decrease, and repeatedly press the button of the sound whose level you wish to raise.
Note: This setting will be memorized even after turning the Layer mode off, but will be lost when turning the instrument off. To save these settings, save them using the Data Dump function (see “MIDI Data Dump” on page 30).
Choosing the reverb and the chorus
The SP-300 has two effects: reverb and chorus. The reverb simulates the sound reverberation in a room, while the chorus simulates a modulating effect that makes the sounds richer. The effect settings will be remembered even when selecting a different sound.
Note: Effect settings made in Single mode are memorized even when selecting the Layer mode, but no change made in Layer mode will be preserved.
When the instrument is turned on, the effect settings are reset to the factory settings. To save these settings, save them using the Data Dump function (see "MIDI Data Dump" on page 30).
1 Hold down the REVERB or CHORUS button, and press either the PIANO 1/L, PIANO 2/M, or E.PIANO1/H sound selection button to select the reverb or chorus depth.
| Button | Reverb depth | Chorus depth |
| PIANO 1/L | Light reverb | Light chorus |
| PIANO 2/M | Normal reverb | Normal chorus |
| E.PIANO 1/H | Deep reverb | Deep chorus |
2 To check the currently selected reverb or chorus depth, hold down the REVERB or CHORUS button, and look at which of the above LEDs is turned on.
3 To turn the reverb or chorus off, press the REVERB or CHORUS button. The LED on the button will turn off.
The damper pedal
The supplied pedal can be used as a damper pedal. If you connect to the DAMPER jack a Korg DS1H pedal (optional), you can use the half-pedalling, with a gradual resonance effect depending on the depth of the pedal pressure.
In Layer mode, you can select the sound(s) to apply the pedal to.
Note: When the instrument is turned on, the pedal settings are reset. To save these settings, save them using the Data Dump function (see “MIDI Data Dump” on page 30).
1 Hold the TRANSPOSE/FUNCTION button, and press the damper pedal. Each time you press the pedal, the LED on the sound selection button(s) where the damper pedal is active will light.
2 When the pedal is assigned to the desired sound(s), release the TRANSPOSE/FUNCTION button.
The metronome
The SP-300 incorporates a metronome, with which you can set the tempo during practice.
Starting and stopping the metronome. Press the METRONOME button to make the metronome start or stop. When turning on, the metronome is set according to the slider position, but you can adjust it with the procedure described below. After having listened to the demo, the tempo will be that of the last demo that had been listened to.
Adjusting the metronome volume. While the metronome is playing, keep the METRONOME button pressed and repeatedly press the STRINGS/PAD button (or the B5 key) to lower the volume, or the CHOIR button (or the C6 key) to raise it. To reset the volume, simultaneously press the STRINGS/PAD and CHOIR buttons (or the B5 and C6 keys on the keyboard) while holding the METRONOME button.

| Key | Effect | Key | Effect |
| B5 | Lower volume | C6 | Higher volume |
Adjusting the tempo using the TEMPO slider. Use the TEMPO slider to adjust the tempo. The range is = 40 200
Numeric tempo input. In some cases, you may require an exact tempo (like 127 BPM). It is possible to enter a precise tempo, using the numeric input.
1 Hold down the METRONOME button.
2 Use the keyboard to input the three-digit tempo value (insert a "0" before a two-number value).

| Key | Number | Key | Number |
| C5 | 0 | C#5 | 1 |
| D5 | 2 | D#5 | 3 |
| E5 | 4 | F5 | 5 |
| F#5 | 6 | G5 | 7 |
| G#5 | 8 | A5 | 9 |
For example, to select a tempo value of 168, keep the METRONOME button pressed, then press C#5 (1), F#5 (6), G#5 (8). To select a tempo value of 85, keep the METRONOME button pressed, then press C5 (0), G#5 (8), F5 (5).
Selecting the time signature. You can add an accent to the first beat of a measure.
| Button | Time signature |
| PIANO 1 | 2 movements (2/4, 2/8...) |
| PIANO 2 | 3 movements (3/4, 3/8...) |
| E.PIANO 1 | 4 movements (4/4, 4/8...) |
| E.PIANO 2 | 6 movements (6/4, 6/8...) |
1 While the metronome is working, keep the METRONOME button pressed and press the button that corresponds to the time signature you wish to use (see table above). The first movement of the measure will be accented.
2 To deactivate the accent, keep the METRONOME button pressed and press the sound selection button whose LED is lit.
Note: When the instrument is turned on, the accent is automatically disabled.
Selecting a bell for the accent. The accented beat can be changed to a bell sound.
1 While the metronome is playing, hold down the METRONOME button, then press the VIBES/GUITAR sound selection button. The LED on the button will light, and a bell sound will be heard on the first beat of the bar.
2 To return to the normal accent, hold down the METRONOME button and press the HARPSI/CLAV sound selection button to switch on the LED on the HARPSI/CLAV button.
Note: When the instrument is turned on, the bell is automatically disabled.
4
Other functions
Touch settings
The keyboard sensitivity, or touch, can be programmed. Keep the TOUCH button pressed, and press the appropriate button to select one of the available touch settings.
| Button | Touch sensitivity |
| PIANO 1/L | Light. Loud notes can be produced even by playing lightly. |
| PIANO 2/M | Normal. Normal piano touch. |
| E.PIANO 1/H | Heavy. Loud notes can be pro-dued only by playing very hard. |
To check the currently selected setting, hold down the TOUCH button, and look at which of the above LEDs is turned on.
Note: When the instrument is turned on, the touch setting is reset to Normal.
Alternatively, you can use the TRANSPOSE/FUNCTION button and the keyboard. Hold the TRANSPOSE/FUNCTION button, and press the key on keyboard that corresponds to the touch setting you wish to carry out (see table).

| Key | Touch sensitivity |
| B3 | Light. Loud notes can be produced even by playing lightly. |
| C4 | Normal. Normal piano touch. |
| D4 | Heavy. Loud notes can be produced only by playing very hard. |
Transpose
In some cases, a song may be written in a difficult key (e.g., many black keys), or you may wish to shift the pitch to match another instrument or vocalist. In such cases, you can transpose (shift the pitch) so that you can use an easier fingering, or use the same familiar fingering to play at a different pitch. This is called the Transpose function.
For example if you transpose upward by one semitone, playing the notes shown at the lower left will produce the pitches shown at the right.

Note: When the instrument is turned on, the transposing is reset.
1 Hold the TRANSPOSE/FUNCTION button, and press the key on keyboard that corresponds to the transpose you wish to carry out (see table). The TRANSPOSE/ FUNTION LED will remain lit up, to indicate that the transpose function is active.

| Key | Effect |
| F#6 — B6 | 6 — 1 semitones below |
| C7 | Standard pitch |
| C#7 — F7 | 1 — 5 semitones higher |
2 To get back to standard pitch, hold the TRANSPOSE/FUNCTION button and press the C7 key. The TRANSPOSE/FUNCTION LED will turn off.
Fine tuning
In order to adapt the SP-300 pitch to that of another instrument, you can adjust the pitch in steps of 0.5Hz over a range of A4 = 427.5 452.5Hz . The standard tuning is A4 = 440Hz .
Note: The pitch will go back to standard level (A4 = 440 Hz) when the instrument is turned off, then on again.
1 Hold the TRANSPOSE/FUNCTION button, and press the corresponding key to change the pitch. Each time the B5 or C6 key is pressed, the pitch will be raised or lowered by 0.5Hz .
2 To get back to standard pitch, hold the TRANSPOSE/FUNCTION button and press the B5 and C6 buttons at the same time.

| Key | Fine tuning |
| B5 | Lowers the pitch by 0.5 Hz |
| B5+C6 | Standard pitch (A4 = 440 Hz) |
| C6 | Raises the pitch by 0.5 Hz |
Selecting a temperament
There are numerous classical compositions that were composed using temperaments that differ from the "equal temperament" commonly used today. In order to reproduce the original sound of such compositions, the SP-300 provides Kirnberger and Werckmeister classical temperaments, in addition to the equal temperament, allowing you to select from a total of three temperaments.
To select one of the available temperaments, hold down the TOUCH button, then press the button corresponding to the desired temperament. To return to the equal tuning hold down the TOUCH button, then press the sound selection button whose LED is lit.
| Button | Temperament |
| HARPSI/CLAV | Werckmeister. This is the Werckmeister III scale invented by Andreas Werckmeister, the German organist and music theoretician. This scale was created in the later Baroque period to allow relatively free transposition. |
| VIBES/GUITAR | Kirnberger. This is the Kirnberger III scale invented by Johann Phillip Kirnberger in the early 18th century, and is used mainly for tuning harps-choids. |
| Both LEDs turned off | Equal temperament. Nearly all keyboard instruments today use equal temperament. This temperament spaces all semitones at equal distances, and allows identical scales to be played in any key. |
To check the currently selected temperament, hold down the TOUCH button, and look at which of the above LEDs is turned on.
Note: When the power is turned on, the equal temperament will be automatically selected.
About stretched tuning. In order to produce the most natural resonance, PIANO 1 and PIANO 2 sounds use a "stretched tuning" that makes the notes of the lower range slightly flatter than equal temperament, and the upper range slightly sharper. This is how an acoustic piano is normally tuned by professional tuners.
5
MIDI
What is MIDI?
MIDI, is the abbreviation of Musical Instrument Digital Interface. It is an international standard that was created to connect and transfer data between electronic musical instruments, computers and other devices.
What can you do with MIDI?
Thanks to MIDI, you can use the SP-300 to control other instruments, use other instruments to control the SP-300, and use a sequencer to create complex musical pieces.
When you use the SP-300 keyboard or pedal, or select a sound, the notes, pedal activation and change in sound are transmitted to another instrument, or are recorded by a sequencer.
Connections
Always connect the MIDI OUT connector of the instrument to the MIDI IN connector of another instrument. Never connect two connectors of the same instrument to each other.
Connect the MIDI OUT connector of the transmitting (master) device to the MIDI IN connector of the receiving (slave) device.
To connect the SP-300 to a computer, you need a MIDI interface for the computer, sequencing or musical notation software, and two standard MIDI cables. Connect
the SP-300 MIDI OUT connector to the MIDI IN connector of the computer. Connect the SP-300 MIDI IN connector to the MIDI OUT connector of the computer.

Standard MIDI settings
When turning the instrument on, the MIDI parameters of the SP-300 are programmed as follows:
| Parameter | Setting |
| Transmission channel | 1 |
| Reception channel(s) | All 16 (1-16) |
| Local | ON |
| Omni | ON |
Selecting the transmission channel
The standard MIDI has 16 separate channels available for transmission and reception of data. SP-300 always receives on all 16 channels, and transmits on a single channel. To transmit data from the SP-300, you need to choose which of the 16 channels you wish to transmit data on.
Hold down the TRANSPOSE/FUNCTION button, and press the note in the range C2-D#3 corresponding to the desired MIDI channel.

| Key | Channel | Key | Channel |
| C2 | 1 | C#2 | 2 |
| D2 | 3 | D#2 | 4 |
| E2 | 5 | F2 | 6 |
| F#2 | 7 | G2 | 8 |
| G#2 | 9 | A2 | 10 |
| A#2 | 11 | B2 | 12 |
| C3 | 13 | C#3 | 14 |
| D3 | 15 | D#3 | 16 |
Note: When the power is turned on, channel 1 will automatically be selected.
Note: By default, channel 10 will automatically be assigned to the metronome sound (notes D#5-E5).
Note: In Layer mode, the second sound transmits on the following channel. For example, if you select channel 7, the first sound will transmit on channel 7, while the second sound will transmit on channel 8. If you select channel 16, the first sound will transmit on channel 16, while the second sound will transmit on channel 1 (cycling back to the first channel).
Using the SP-300 as a multitimbral tone generator
When SP-300 is controlled from an external MIDI device, it can work as a 16-part multimbral tone generator. You can select a different sound on each of the 16 MIDI channels.
1 Use a MIDI cable to connect the SP-300's MIDI IN to the MIDI OUT of a sequencer etc.
2 Transmit MIDI data from the connected sequencer (or other device). See "Program Change" on page 28 for instructions on how to select a sound using the MIDI Program Change message. Program Change reception should be activated on the SP300.
Read the other devices user's manual for details on sending Program Change messages.
Local On/Off
Local is the parameter that allows you to establish whether the keyboard has to play the internal sounds and transmit MIDI data at the same time (Local On), or whether it just has to transmit MIDI data and not play the internal sound (Local Off).
Local Off should be chosen when you wish to use the SP-300 as a mute keyboard, to play another instrument. It should be chosen also when SP-300 is connected to a sequencer via its MIDI IN and MIDI OUT connectors. This will avoid the notes to be played twice, by the keyboard and by the sequencer, producing an annoying "echo" effect.
Normally, you will choose Local On (automatically selected when turning the SP-300 on), so that playing the keyboard will produce sound.
Hold down the TRANSPOSE/FUNCTION button, and press the PIANO 1 sound selection button. The Local setting will alternate to On/Off each time you press this button.
| Local status | PIANO 1 LED status |
| Local On | Lit |
| Local Off | Dark |
Note: When the power is turned on, the Local will be automatically set to On.
Program Change
The sound of the SP-300 can be selected via MIDI, by sending a Program Change message on the channel where you wish to assign the sound. The table enlists the Program Change numbers (numbering from 0-29; if the transmitting device uses numbers from 1-30, you will need to increment the number by one).
Transmitting Program Change messages. You can send a MIDI Program Change message to a MIDI device connected to the SP-300 MIDI OUT, to change its sound. When selecting one of the internal sounds of the SP-300 by using the sound selection buttons, a MIDI Program Change number will be transmitted, as shown in the table below.
Receiving Program Change messages. When a Program Change message is received from an external device, the corresponding internal sound will be selected on the SP-300, as shown in the following table. Only Program Change (PC) numbers in the range 0–29 have effect on the SP-300, while other numbers (30-127) are ignored.
| PC# | Button | Bank | Sound |
| 0 | PIANO 1 | 1 | Grand Piano 1 |
| 1 | 2 | Bright Piano | |
| 2 | 3 | Grand Piano 2 | |
| 3 | PIANO 2 | 1 | Classic Grand Piano |
| 4 | 2 | Honky-Tonky | |
| 5 | 3 | E.Grand Piano | |
| 6 | E.PIANO 1 | 1 | Stage E.Piano |
| 7 | 2 | Club E.Piano | |
| 8 | 3 | Thin E.Piano | |
| 9 | E.PIANO 2 | 1 | Digital E.Piano |
| 10 | 2 | 60's E.Piano | |
| 11 | 3 | Vintage E.Piano | |
| 12 | HARPSI/CLAV | 1 | Harpsichord |
| 13 | 2 | Clav. | |
| 14 | 3 | Wah Clav. | |
| 15 | VIBES/GUITAR | 1 | Vibraphone |
| 16 | 2 | Marimba | |
| 17 | 3 | Acoustic Guitar | |
| 18 | ORGAN1 | 1 | Jazz Organ 1 |
| 19 | 2 | Jazz Organ 2 | |
| 20 | 3 | Jazz Organ 3 | |
| 21 | ORGAN2 | 1 | Church Organ 1 |
| 22 | 2 | Church Organ 2 | |
| 23 | 3 | Church Organ 3 | |
| 24 | STRINGS/PAD | 1 | Strings |
| 25 | 2 | Slow Strings | |
| 26 | 3 | Warm Pad | |
| 27 | CHOIR | 1 | Choir Hoo |
| 28 | 2 | Choir Doo | |
| 29 | 3 | Choir Pad |
Program Change enable/disable. To transmit and receive this kind of data, you must enable Program Change messages transmission and reception. Otherwise, you can disable Program Changes data.
Hold down the TRANSPOSE/FUNCTION button, and press the PIANO 2 sound selection button. Each time you press the switch, the setting will alternate between Enabled and Disabled.
| Program Change status | PIANO 2 LED status |
| Enable | Lit |
| Cancel | Dark |
Note: When the power is turned on, program changes will be enabled for all MIDI channels.
Control Change
When you operate the damper pedal, adjust the balance in Layer mode, or make other adjustments on the control panel, a Control Change message is sent to a connected external MIDI device. At the same time, SP-300 can receive a Control Change message from an external MIDI device connected to its MIDI IN, to control the damper pedal, volume adjustment, and other data.
Control Change enable/disable. To transmit and receive this kind of data, you must enable Control Change messages transmission and reception. Otherwise, you can disable Control Changes data.
Hold down the TRANSPOSE/FUNCTION button, and press the E.PIANO 1 sound selection button. Each time you press this button, the setting will alternate between Enabled and Disabled.
| Control Change status | E.PIANO 1 LED status |
| Enabled | Lit |
| Disabled | Dark |
Note: When the power is turned on, Control Change messages will be enabled on all MIDI channels.
MIDI Data Dump
You can save the current sound settings (Single or Layer mode) on an external MIDI storage device, like a sequencer or a MIDI data file. You can later reload these data into the SP-300, to restore a saved set of data.
Warning: To avoid loosing data, read carefully read the owner's manual of your MIDI data filer.
Hint: To avoid any trouble, don't forget to deactivate System Exclusive data reception on the connected device.
The following table shows which data are saved with the Data Dump.
| Category | Data |
| Single mode | Reverb and chorus settings (on/off status, send level) |
| Layer mode | Reverb and chorus settings (on/off status, send level), balance between sounds, damper pedal on/off status for each sound. |
Saving data to the data filer. Here is how to save the data of the SP-300.
1 Use a MIDI cable to connect the SP-300 MIDI OUT to the MIDI IN of the data filer.
2 Prepare the data file to receive MIDI data.
3 On the SP-300, hold down the TRANSPOSE/FUNCTION button, and press the VIBES/GUITAR sound selection button. The LEDs of the TRANSPOSE/FUNCTION and VIBES/GUITAR buttons will blink, indicating that the SP-300 is ready to transmit the data dump.
4 Press the TOUCH button. The data dump will begin, and the sound setting data will be transmitted to the data filer.
During a data dump operation, the SP-300 will not produce sound, and no other function will work. When the data dump is completed, you will return to normal playing condition.
You may cancel a data dump operation before the data dump begins, by pressing the TRANSPOSE/FUNCTION or VIBES/GUITAR button.
Loading data from the data filer. You can load into the SP-300 data you previously saved on a data filer.
1 Use a MIDI cable to connect the MIDI IN of the SP-300 to the MIDI OUT of the data filer.
2 On the SP-300, hold down the TRANSPOSE/FUNCTION button and press the VIBES/GUITAR sound selection button. The LEDs of the TRANSPOSE/FUNCTION and VIBES/GUITAR buttons will blink, and the SP-300 will wait to receive the data dump.
3 Set the data filer to send the sound setting data that were previously saved from the SP-300. Please read the data filer owner's manual for details on data transmission.
The SP-300 will receive the data.
When the data dump is finished, the SP-300 will return to the same status it was before the data dump.
During a data dump operation, the SP-300 will not produce sound, and no other function will work.
You may cancel a data dump operation before the data dump begins, by pressing the TRANSPOSE/FUNCTION or VIBES/GUITAR button.
6
Appendix
Troubleshooting
If during use any of the following problems should occur, carefully examine the instrument to see if you can find out what the problem is, and try resolving it by following the suggestions below. If the instrument will still not function properly refer to your dealer or to an Authorized Korg Service Center.
| Problem | Possible remedy | Page |
| The instrument will not turn on. | Check that the AC adapter is correctly connected to the piano and the outlet. | 11 |
| No sound. | (1) Make sure that the volume is not set on 0. If it is, bring it up to an adequate level. | 13 |
| (2) Make sure that the internal speakers are not turned off. | 13 | |
| (3) Make sure that the MIDI Local function is not set on OFF. If it is, set it to ON (or turn the instrument off and then on again). | 27 |
Polyphony
The SP-300 contains sampled sounds, which have been recorded, analyzed and processed from the actual sounds of the original musical instruments. These sounds usually consist of one or more different samples reproduced by pressing a key. Each sample is played back by a single oscillator. Sounds using just one oscillator have a full polyphony of max. 60 voices, while sounds using two oscillators have a limited polyphony of max. 30 notes. Sounds using more oscillators have a more limited polyphony. When the number of notes exceeds the limit of the sound, some notes will be stopped, so that the new ones can be heard.
Furthermore, when playing in Layer mode with more than two notes, the max. polyphony depends on how many oscillators are used in total. Using the REVERB, CHORUS further reduces the polyphony, respectively, by 10 and 3 notes.
Please refer to the table on page 16 for more information about the number of oscillators used by each sound.
Technical specifications
| Specifications | SP-300 |
| Keyboard | 88 notes, velocity sensitive, with hammer-action simulation |
| Touch selection | Light, Normal, Heavy |
| Tuning | Transpose, Fine tuning, Temperament (Equal, Kirnberger, Werckmeister) |
| Sound generation | Stereo PCM System |
| Polyphony | 60 notes (max). The use of 2-oscillator sounds, the Layer mode and/or the reverb or chorus reduces the maximum number of simultaneous notes. |
| Sounds | 30 sounds in ROM |
| Effects | Reverb, Chorus (3 levels each) |
| Demo | 30 incorporated demos |
| Metronome | Tempo, Time signature, Accent and Volume controls |
| Pedal | Damper (included). Half-pedalling supported with Korg DS1H (optional). |
| Connections | Audio output (OUTPUT L/MONO, R), Audio input (INPUT L/MONO, R), Headphones, MIDI (IN, OUT), Damper |
| Controls | Power switch, Speakers switch, Master Volume, Reverb, Chorus, Touch, Transpose/Function, Bank, Sound selectors, Tempo, Metronome, Demo |
| Amplification | 2 × 15 Watt amplifier, 2 × 10cm speakers in Bass Reflex box |
| Power supply | DC21V, 1A, center negative barrel, AC adapter (included) |
| Power consumption | 21 Watt |
| Dimensions (W × D × H) | 51.1 × 13.5 × 5.2 inch (1300 × 343.8 × 132.5 mm), excluding music stand |
| Weight | 55.1 lbs (25 kg) |
| Accessories | DC12V, 500mA, center negative barrel, AC adapter; Damper Pedal; Music stand (all included) |
| Options | DS 1H - Damper Pedal with half-pedal control, Piano stand |
Sounds processed with INFINITYTM.
Korg reserves the right to change the specifications without notice.
Control panel shortcuts
Control panel and keyboard
| ...while pressing this one Keep this button pressed... | PIANO 1 | PIANO2 | E.PIANO 1 | E.PIANO 2 | HARPSI/CLAV | VIBES/GUITAR | ORGAN 1 | ORGAN 2 | STRINGS/PAD | CHOIR |
| REVERB | Depth = Low | Depth = Medium | Depth = High | |||||||
| CHORUS | Depth = Low | Depth = Medium | Depth = High | |||||||
| TOUCH | Light | Normal | Heavy | Werckmeister | Kirnberger | |||||
| METRONOME | Time: 2/4 | Time: 3/4 | Time: 4/4 | Time: 6/4 | Accent | Bell sound | Metro Vol. Dec. | Metro Vol. Inc. | ||
| TRANSPOSE/FUNCTION | Local On/Off | Prg.Change Rx/Tx | Crl.Change Rx/Tx | Data Dump |
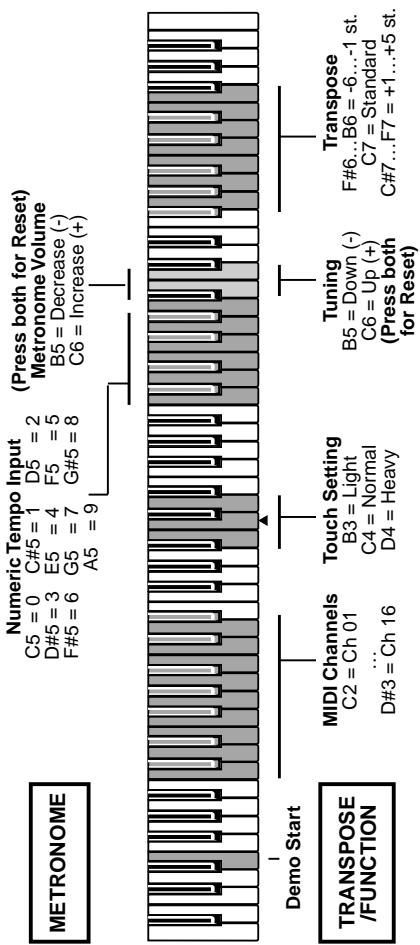
The following diagram shows the various functions you can access by holding the METRONOME or TRANSPOSE/FUNCTION button down, while pressing one of the notes on the keyboard.
5
SP-300
Piano numérique
Mode d'emploi
PRECAUTIONS
This equipment has been tested and found to comply with the limits for a Class B digital device, pursuant to Part 15 of the FCC Rules. These limits are designed to provide reasonable protection against harmful interference in a residential installation. This equipment generates, uses, and can radiate radio frequency energy and, if not installed and used in accordance with the instructions, may cause harmful interference to radio communications. However, there is no guarantee that interference will not occur in a particular installation. If this equipment does cause harmful interference to radio or television reception, which can be determined by turning the equipment off and on, the user is encouraged to try to correct the interference by one or more of the following measures:
Reorient or relocate the receiving antenna.
- Increase the separation between the equipment and receiver.
- Connect the equipment into an outlet on a circuit different from that to which the receiver is connected.
- Consult the dealer or an experienced radio/TV technician for help.
Unauthorized changes or modification to this system can void the user's authority to operate this equipment.
CANADA
THIS APPARATUS DOES NOT EXCEED THE "CLASS B" LIMITS FOR RADIO NOISE EMISSIONS FROM DIGITAL APPARATUS SET OUT IN THE RADIO INTERFERENCE REGULATION OF THE CANADIAN DEPARTMENT OF COMMUNICATIONS.
LE PRESENT APPAREIL NUMERIQUE N'EMET PAS DE BRUIT RADIOELECTRIQUE DEPASSANT LES LIMITES APPLICABLES AUX APPAREILS NUMERIQUES DE LA "CLASSE B" PRESCRITES DANS LE REGLEMENT SUR LE BROUILAGE RADIOELECTRIQUE EDICTE PAR LE MINISTERE DES COMMUNICATIONS DU CANADA.
RECLAMATIONS
Spcifications techniques
Home page Korg Italy: www.korg.it
DATEN-RESET
| Function | Transmitted | Recognized | Remarks | |
| Basic Channel | Default | 1 | -- | |
| Changed | 1-16 | 1-16 | ||
| Mode | Default | 3 | ||
| Messages | X | X | ||
| Altered | ********** | |||
| Note Number: | True Voice | 15-113 | 0-127 | |
| ********** | 21-108 | |||
| Velocity | Note On | O 9n, V=1-127 | O 9n, V=1-127 | |
| Note Off | X | X | ||
| Aftertouch | Poly (Key) | X | X | |
| Mono (Channel) | X | X | ||
| Pitch Bend | X | O | ||
| Control Change | 7 | O | O | Volume *1 |
| 11 | X | O | Expression *1 | |
| 64 | O | O | Damper Pedal *1, *3 | |
| 66 | X | O | Sostenuto *1 | |
| 67 | X | O | Soft Pedal *1, *3 | |
| 91 | O | O | Reverb Depth *1 | |
| 93 | O | O | Chorus Depth *1 | |
| 120, 121 | X | O | All Sound Off, Reset All Controls | |
| Program Change | True # | 0-29 | 0-29 | *2 |
| ********** | 0-29 | |||
| System Exclusive | O | O | Device Inquiry Sound Data Dump | |
| System Common | :Song Position | X | X | |
| :Song Select | X | X | ||
| :Tune | X | X | ||
| System Real Time | :Clock | X | X | |
| :Commands | X | X | ||
| Aux Messages | :Local On/Off | X | O | *4 |
| :All Notes Off | O | X | ||
| :Active Sensing | O | O | ||
| :Reset | X | X | ||
| Notes | *1: Transmitted/received when Control Changes are enabled*2: Transmitted/received when Program Changes are enabled*3: Half-pedal input/output value (0, 38, 74, 127)*4: All Notes Off is transmitted when exing the Layer mode and when selecting the Local Off status. | |||
Mode 1:OMNI ON, POLY
Mode 2:OMNI ON, MONO
O:Yes
Mode 3:OMNI OFF, POLY
Mode 4:OMNI OFF, MONO
X: No
Care Card Garantie
KORG-CARE-CARD
- Power supply
- Interference with other electrical devices
- Handling
- Care
- Keep this manual
- Keeping foreign matter out of your equipment
- CE MARK FOR EUROPEAN HARMONIZED STANDARDS
- THE FCC REGULATION WARNING (FOR THE U.S.A. ONLY)
- DISCLAIMER
- WARRANTY
- ASSISTANCE AND SERVICE FOR MUSICIANS
- KORG ON THE INTERNET
- DATA RESET
- CONTENTS
- Introduction
- Main features
- 1
- Panels
- Front panel
- 2
- Before you begin
- Connecting to an external amplification system
- Using the headphones
- Connecting external sources
- Turning the instrument on
- Turning the internal speakers on or off
- Adjusting the volume
- Listening to the Demo
- 3
- Basic functions
- Playing a single sound (Single mode)
- Playing two sounds at the same time (Layer mode)
- Choosing the reverb and the chorus
- The damper pedal
- The metronome
- 4
- Other functions
- Touch settings
- Transpose
- Fine tuning
- Selecting a temperament
- 5
- MIDI
- What is MIDI?
- What can you do with MIDI?
- Connections
- Standard MIDI settings
- Selecting the transmission channel
- Using the SP-300 as a multitimbral tone generator
- Local On/Off
- Program Change
- Control Change
- MIDI Data Dump
- 6
- Appendix
- Troubleshooting
- Polyphony
- SP-300
- Piano numérique
- Mode d'emploi
- PRECAUTIONS
- CANADA
- RECLAMATIONS
- Spcifications techniques
- DATEN-RESET
- Care Card Garantie
- KORG-CARE-CARD
Brand : KORG
Model : SP300
Category : Digital piano