
SP170S - Digital piano KORG - Free user manual and instructions
Find the device manual for free SP170S KORG in PDF.
| Brand | KORG |
| Model | SP-170S |
| Category | Digital Piano |
| Keyboard | NH Keyboard 88 keys (A0–C8) |
| Maximum Polyphony | 120 notes (60 notes in stereo) |
| Preset Sounds | 10 sounds |
| Speakers | 2 oval speakers (10 cm × 5 cm), amplification 9W × 2 |
| Headphone Jacks | 2 jacks (also serve as line outputs) |
| Connectivity | MIDI OUT, Damper Pedal (switch) |
| Included Pedal | Switch pedal (forte function) |
| Power Supply | DC 12 V power adapter (included) |
| Power Consumption | 9 W |
| Weight | 12 kg (without music stand) |
| Included Accessories | Power adapter, music stand, pedal |
| Cleaning | Clean, dry cloth; avoid benzene, thinner or flammable products |
| Safety | Use only the supplied adapter; avoid exposure to sun, heat, humidity, dust, vibrations; do not place liquids nearby |
| Warranty | Valid only in country of purchase; keep receipt |
| Recycling (EU) | Follow recycling guidelines for the product and batteries |
Frequently Asked Questions - SP170S KORG
User questions about SP170S KORG
0 question about this device. Answer the ones you know or ask your own.
Ask a new question about this device
Download the instructions for your Digital piano in PDF format for free! Find your manual SP170S - KORG and take your electronic device back in hand. On this page are published all the documents necessary for the use of your device. SP170S by KORG.
USER MANUAL SP170S KORG
This product has been manufactured according to strict specifications and voltage requirements that are applicable in the country in which it is intended that this product should be used. If you have purchased this product via the internet, through mail order, and/or via a telephone sale, you must verify that this product is intended to be used in the country in which you reside.
WARNING: Use of this product in any country other than that for which it is intended could be dangerous and could invalidate the manufacturer's or distributor's warranty. Please also retain your receipt as proof of purchase otherwise your product may be disqualified from the manufacturer's or distributor's warranty.
REMARQUE IMPORTANTE POUR LES CLIENTS
Using the unit in the following locations can result in a malfunction.
- In direct sunlight
- Locations of extreme temperature or humidity
- Excessively dusty or dirty locations
- Locations of excessive vibration
- Close to magnetic fields
Power supply
Please connect the designated AC adapter to an AC outlet of the correct voltage. Do not connect it to an AC outlet of voltage other than that for which your unit is intended.
Interference with other electrical devices
Radios and televisions placed nearby may experience reception interference. Operate this unit at a suitable distance from radios and televisions.
Handling
To avoid breakage, do not apply excessive force to the switches or controls.
Care
If the exterior becomes dirty, wipe it with a clean, dry cloth. Do not use liquid cleaners such as benzene or thinner, or cleaning compounds or flammable polishes.
Keep this manual
After reading this manual, please keep it for later reference.
Keeping foreign matter out of your equipment
Never set any container with liquid in it near this equipment. If liquid gets into the equipment, it could cause a breakdown, fire, or electrical shock.
Be careful not to let metal objects get into the equipment. If something does slip into the equipment, unplug the AC adapter from the wall outlet. Then contact your nearest Korg dealer or the store where the equipment was purchased.
- All product names and company names are the trademarks or registered trademarks of their respective owners.
THE FCC REGULATION WARNING (for USA)
This equipment has been tested and found to comply with the limits for a Class B digital device, pursuant to Part 15 of the FCC Rules. These limits are designed to provide reasonable protection against harmful interference in a residential installation. This equipment generates, uses, and can radiate radio frequency energy and, if not installed and used in accordance with the instructions, may cause harmful interference to radio communications. However, there is no guarantee that interference will not occur in a particular installation. If this equipment does cause harmful interference to radio or television reception, which can be determined by turning the equipment off and on, the user is encouraged to try to correct the interference by one or more of the following measures:
Reorient or relocate the receiving antenna.
- Increase the separation between the equipment and receiver.
- Connect the equipment into an outlet on a circuit different from that to which the receiver is connected.
- Consult the dealer or an experienced radio/TV technician for help. Unauthorized changes or modification to this system can void the user's authority to operate this equipment.
Notice regarding disposal (EU only)
If this symbol is shown on the product, manual, battery, or package, you must dispose of it in the correct manner to avoid harm to human health or damage to the environment. Contact your local administrative body for details on the correct disposal method. If the battery contains heavy metals in excess of the regulated amount, a chemical symbol is displayed below the symbol on the battery or battery package.
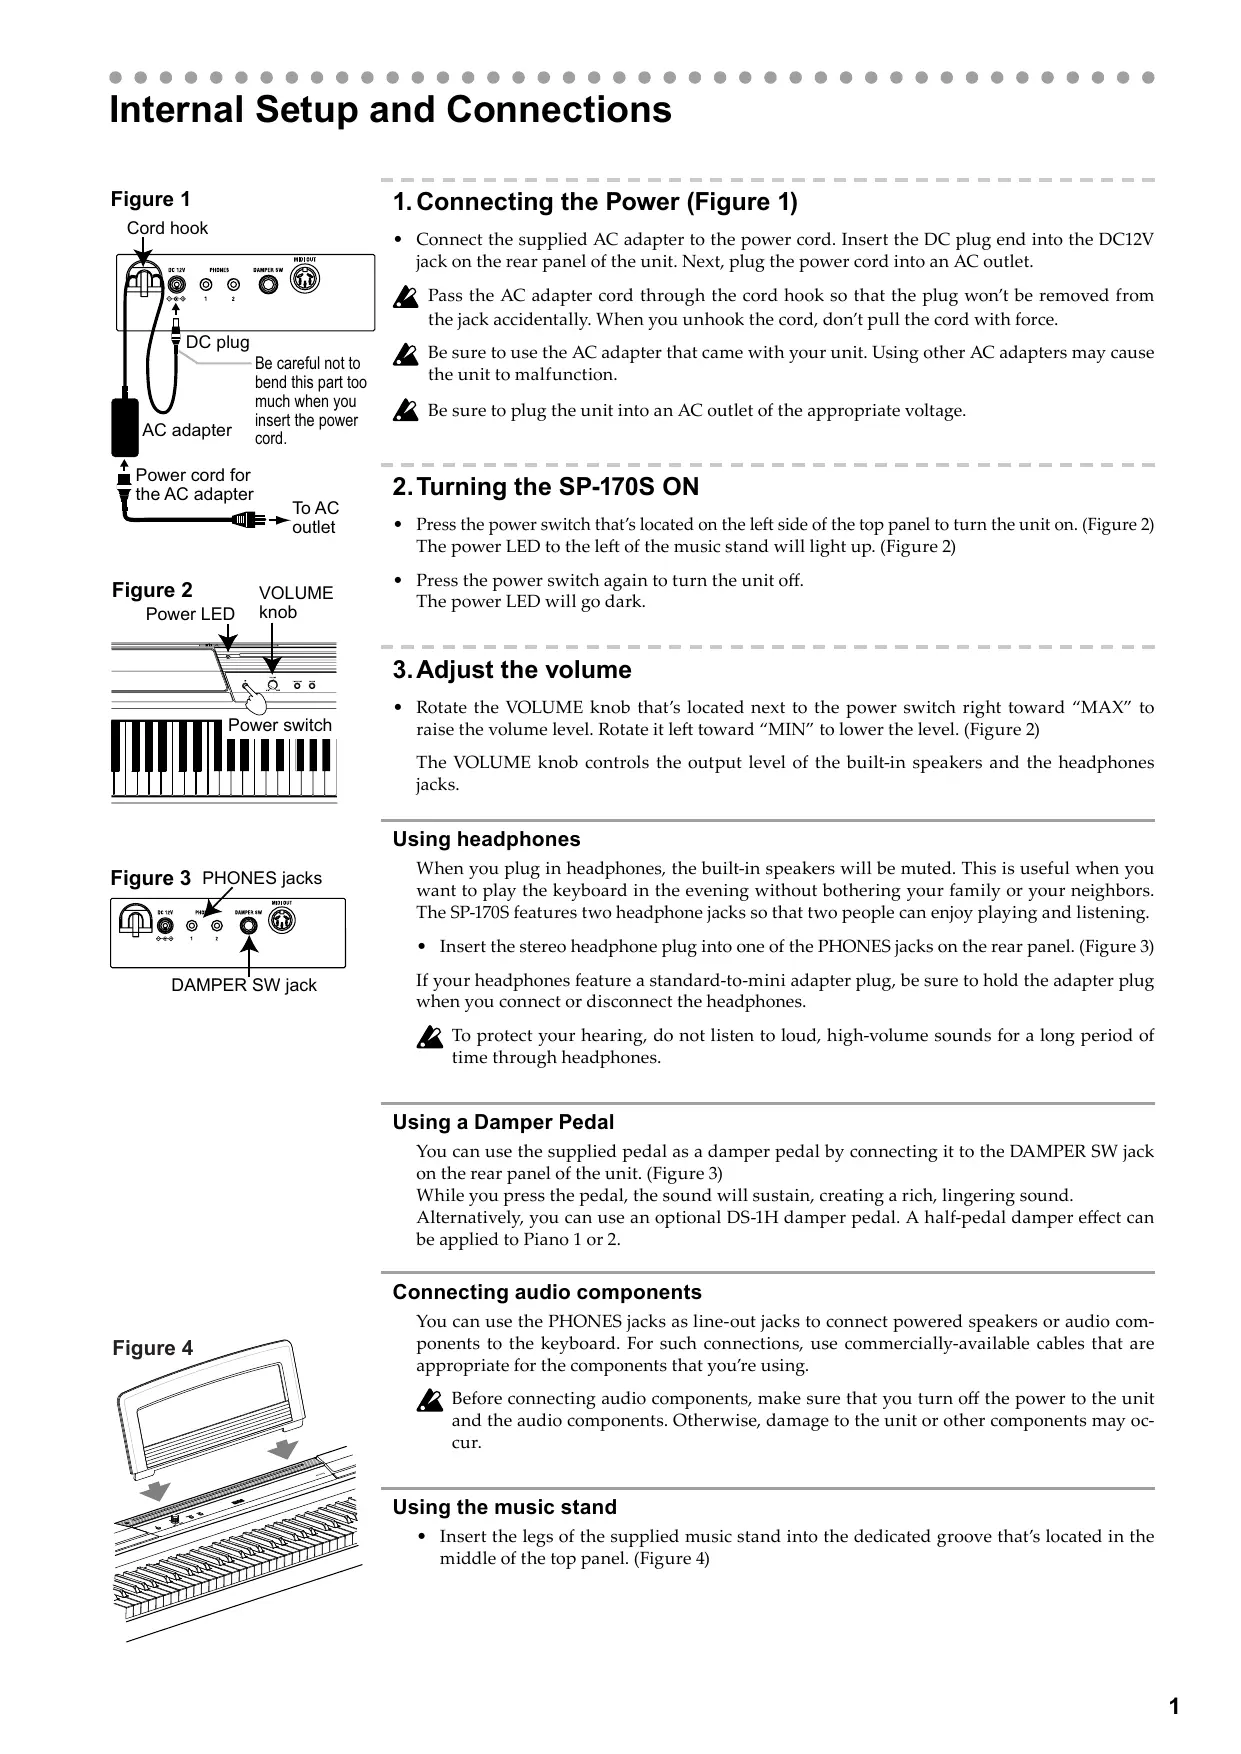
Internal Setup and Connections
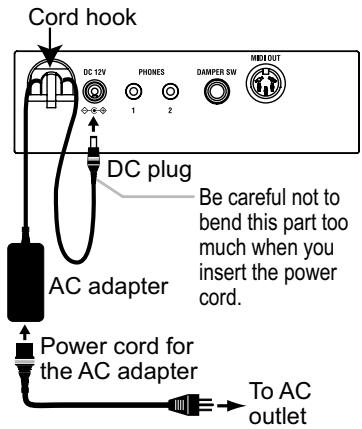
Figure 1
1. Connecting the Power (Figure 1)
- Connect the supplied AC adapter to the power cord. Insert the DC plug end into the DC12V jack on the rear panel of the unit. Next, plug the power cord into an AC outlet.
Pass the AC adapter cord through the cord hook so that the plug won't be removed from the jack accidentally. When you unhook the cord, don't pull the cord with force.
2 Be sure to use the AC adapter that came with your unit. Using other AC adapters may cause the unit to malfunction.
2 Be sure to plug the unit into an AC outlet of the appropriate voltage.
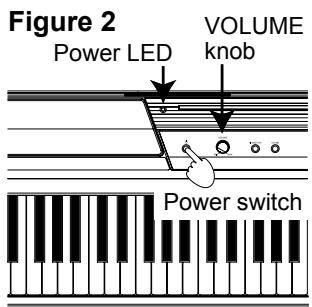
2. Turning the SP-170S ON
- Press the power switch that's located on the left side of the top panel to turn the unit on. (Figure 2) The power LED to the left of the music stand will light up. (Figure 2)
- Press the power switch again to turn the unit off. The power LED will go dark.
3. Adjust the volume
- Rotate the VOLUME knob that's located next to the power switch right toward "MAX" to raise the volume level. Rotate it left toward "MIN" to lower the level. (Figure 2)
The VOLUME knob controls the output level of the built-in speakers and the headphones jacks.
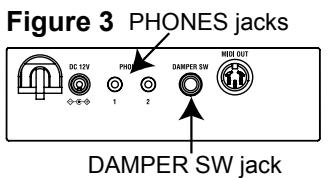
Using headphones
When you plug in headphones, the built-in speakers will be muted. This is useful when you want to play the keyboard in the evening without bothering your family or your neighbors. The SP-170S features two headphone jacks so that two people can enjoy playing and listening.
- Insert the stereo headphone plug into one of the PHONES jacks on the rear panel. (Figure 3) If your headphones feature a standard-to-mini adapter plug, be sure to hold the adapter plug when you connect or disconnect the headphones.
To protect your hearing, do not listen to loud, high-volume sounds for a long period of time through headphones.
Using a Damper Pedal
You can use the supplied pedal as a damper pedal by connecting it to the DAMPER SW jack on the rear panel of the unit. (Figure 3)
While you press the pedal, the sound will sustain, creating a rich, lingering sound.
Alternatively, you can use an optional DS-1H damper pedal. A half-pedal damper effect can be applied to Piano 1 or 2.
Connecting audio components
You can use the PHONES jacks as line-out jacks to connect powered speakers or audio components to the keyboard. For such connections, use commercially-available cables that are appropriate for the components that you're using.
Before connecting audio components, make sure that you turn off the power to the unit and the audio components. Otherwise, damage to the unit or other components may occur.
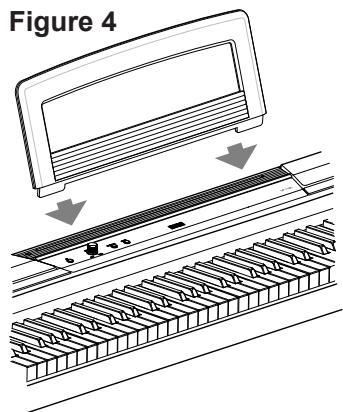
Using the music stand
- Insert the legs of the supplied music stand into the dedicated groove that's located in the middle of the top panel. (Figure 4)
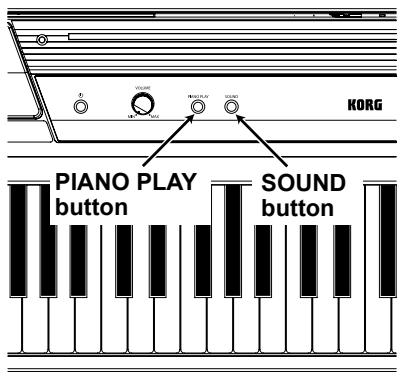
Playing Different Sounds
The SP-170S features 10 preset sounds.
Pressing the SOUND button repeatedly will change the sound in the following sequence.
Piano 1 Piano 2 E. Piano 1 E. Piano 2 Harpsi Clav Vibraphone P. Organ
E. Organ Strings
After Strings, the sound will return to Piano 1. Pressing the PIANO PLAY button will switch any sound to Piano 1.
Whenever you turn on the unit, the default preset sound (Piano 1) will be recalled.
| Piano 1: | Elegant and warm grand piano |
| Piano 2: | Clear and bright grand piano |
| E. Piano 1: | Smooth, authentic electric piano |
| E. Piano 2: | Modern, percussive electric piano |
| Harpsichord: | Classical harpsichord |
| Clavichord: | Expressive electric clavichord |
| Vibraphone: | Smooth vibraphone |
| P. Organ: | Pipe organ |
| E. Organ: | Drawbar electronic organ |
| Strings: | Ensemble string section |
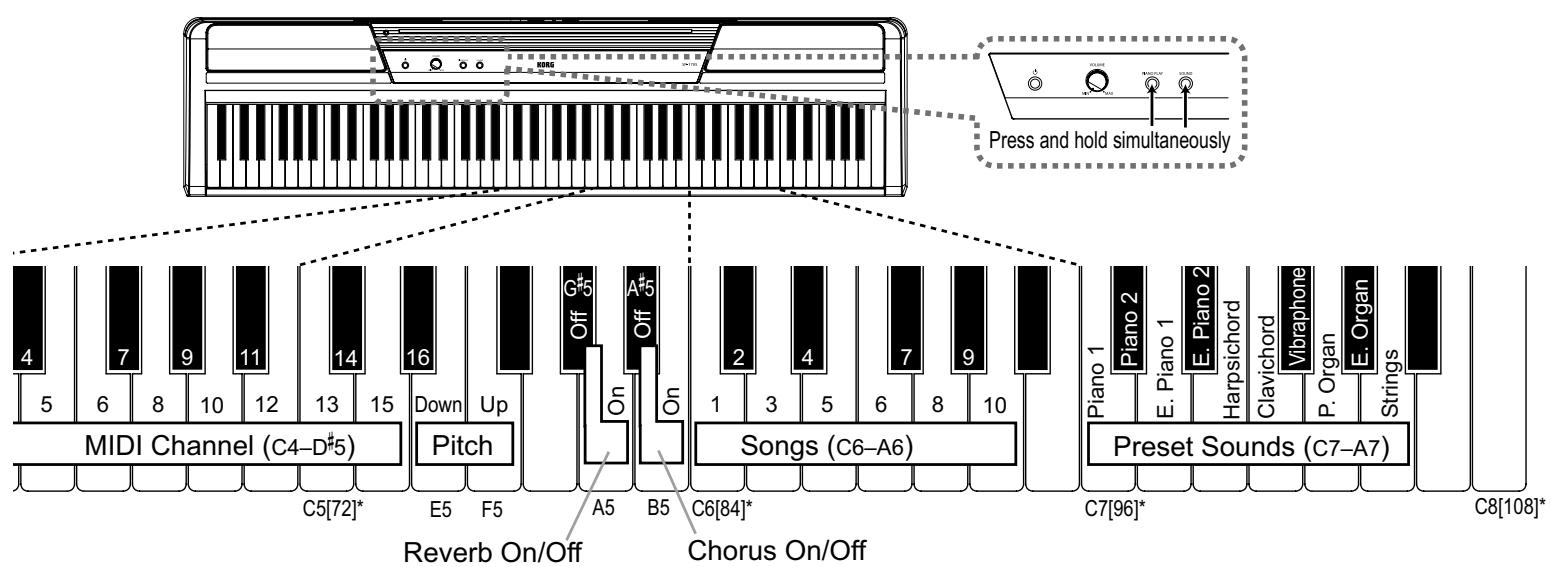
You can also change the sound by pressing one of the keys ranging from C7 to A7 while simultaneously pressing and holding down the PIANO PLAY and SOUND buttons. (Please refer to "Key Functions" on pages 2 and 3.)
Using Other Functions
The SP-170S allows you to play back the songs or adjust various functions by pressing a specific key while also pressing and holding down the PIANO PLAY and SOUND buttons. Please refer to the "MIDI" section on the next page for more information on MIDI channels and program change messages. Please visit the Korg website (http://www.korg.com/) to view the MIDI Implementation Chart.

While pressing and holding down the PIANO PLAY and SOUND buttons, do not play the keyboard. Otherwise, you might get an unexpected result.
For information on the functions that are assigned to the keys, please refer to "Key Functions" on pages 2 and 3.
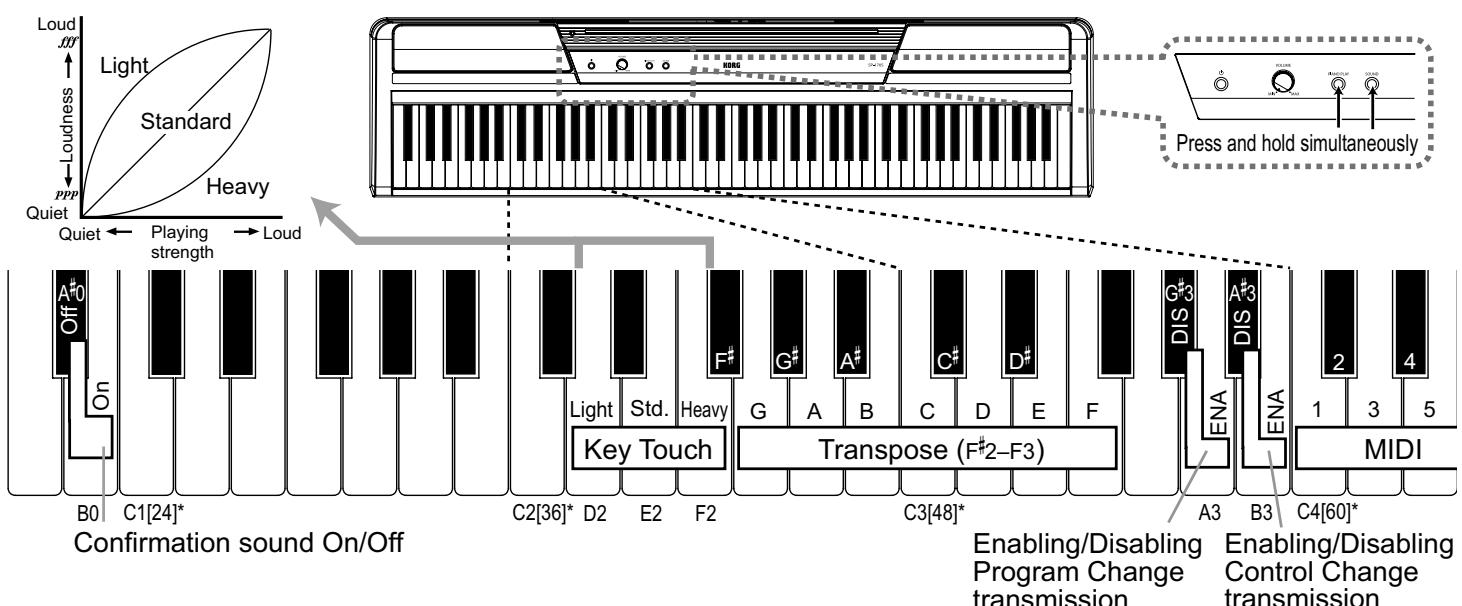
About the confirmation sound
When you press a key to adjust settings for a function, you will hear the confirmation sound. To turn this sound off, simultaneously press and hold down the PIANO PLAY and SOUND buttons and press the A#0 key. To turn on the confirmation sound, repeat the previous procedure but press B0 instead of A#0. The confirmation sound is set to On by default (when you turn the unit on).
Key Functions
[ ]^* indicates MIDI Note number.
Playing Back Songs
The SP-170S features 10 songs that use 10 preset sounds.
While pressing and holding down the PIANO PLAY and SOUND buttons, press one of the keys ranging from C6 to A6 (on the right side of the keyboard). The song assigned to the key that you pressed (as shown below) will start playing. Playback starts from the selected song, then continues and repeats all songs in ascending order until you stop playback. To stop playback, press the PIANO PLAY and SOUND buttons simultaneously.

During playback of a song, you can switch the sound using the PIANO PLAY and SOUND buttons while playing the keyboard. The effect setting of the song will also be applied to the sound.

Even if you change the sound during playback of a song, the corresponding MIDI data (such as MIDI Program Change messages) will not be output.
Song name
| 1 (Piano 1): | Fantaisie-Impromptu Op.66 /F.Chopin |
| 2 (Piano 2): | Amazing Grace/unknown (arr. : N.Nishi) |
| 3 (E. Piano 1): | Ramble/M.Sakaguchi |
| 4 (E. Piano 2): | KORG Original |
| 5 (Harpsichord): | Invention No.8/J.S.Bach |
| 6 (Clavichord): | KORG Original |
| 7 (Vibraphone): | KORG Original |
| 8 (P. Organ): | Toccata in D moll/J.S.Bach |
| 9 (E. Organ): | KORG Original |
| 10 (Strings): | First Snow/M.Sakaguchi |
Effects (Reverb and Chorus)
You can use a reverb effect to add depth to the sound, and a chorus effect to add width and space.
- Simultaneously press and hold down the PIANO PLAY and SOUND buttons, and then press the A5 key to turn on the reverb effect. To turn off the reverb effect, repeat the previous procedure but press the G#5 key instead of A5.
- Simultaneously press and hold down the PIANO PLAY and SOUND buttons, and then press the B5 key to turn on the chorus effect. To turn off the chorus effect, repeat the previous procedure but press the A#5 key instead of B5.
You can apply effects to each preset sound.
When you turn on the power to the unit, the effects will use the optimum settings for each preset sound.
Key Touch Control function
The Key Touch Control function enables you to change the way your playing strength will affect the output level. You can set this function by using the white keys in a range from D2 to F2. (See the figure on the left.)
- To play fortissimo with soft strokes (Light touch), press and hold down the PIANO PLAY and SOUND buttons, and then press the D2 key.
- To play fortissimo with very strong strokes (Heavy touch), press and hold down the PIANO PLAY and SOUND buttons, and then press the F2 key.
- To simulate a normal piano touch (Standard touch), press and hold down the PIANO PLAY and SOUND buttons, and then press the E2 key.
The default setting (when you turn on the unit) is Standard touch.
Transpose function (Shifting the key)
In some cases, a song may be written in a difficult key (e.g., using many black keys), or you may wish to shift the key to match another instrument or vocalist. In such cases, you can transpose (shift the key) to use an easier fingering, or to use the same familiar fingering to play in a different key. This is called the Transpose function. You can shift the key in a range of eleven semitones.
For example if you transpose upward by one semitone, playing the notes shown in the score on the left below will produce the pitch that's shown in the score on the right.

- To transpose the key, press and hold down the PIANO PLAY and SOUND buttons, and then press a key from F#2 to B3 or from C#3 to F3. The name of the key that you pressed will become the transposed key.
For example, if you wish to use the C3 key to play note A2 (lower by three semitones), press and hold down the PIANO PLAY and SOUND buttons, and press the A2 key. If you wish to use the C3 key to play note D#3 (higher by three semitones), press and hold down the PIANO PLAY and SOUND buttons, and press the D#3 key.
To reset the Transpose function to "No Transposition (+/-0)," press and hold down the PIANO PLAY and SOUND buttons, and then press the C3 key.
The default setting (when you turn on the unit) is "No Transposition."
Pitch Control function (Tuning)
When you're playing together with other instruments, you can use this the Pitch Control function to fix any slight differences in pitch between instruments. You can adjust the tuning of the SP-170S in half-step (0.5) Hz intervals over a range of 427.5–452.5 Hz (Hertz) by using the E5 and F5 keys.
- Press and hold down the PIANO PLAY and SOUND buttons (on the right end of the keyboard), then press the E5 key to lower the pitch in 0.5Hz step search time your press it, or press the F5 key repeatedly to raise the pitch in 0.5Hz steps each time you press it.
- To reset the pitch to 440Hz , press and hold down the PIA-NO PLAY and SOUND buttons, and press the E5 and F5 keys simultaneously.
The default setting (when you turn on the unit) is A4=440Hz.
MIDI
Using the MIDI OUT jack
The MIDI OUT jack transmits MIDI messages. When you play the keyboard, the MIDI messages will be output to control (e.g., play the sound of) an external MIDI device. Use an optional MIDI cable to connect the MIDI OUT jack of the SP170S to the MIDI IN jack of an external MIDI device.
Changing the MIDI channel
If you're using the SP-170S as a controller to play sounds from a connected MIDI device, the MIDI channel of the SP-170S must match the MIDI channel the external MIDI device. To change the MIDI channel (1-16) that MIDI data is being transmitted from via the MIDI OUT jack on the rear panel, press and hold down the PIANO PLAY and SOUND buttons simultaneously, and press one of the keys ranging from C4 to D#5.
The default MIDI channel (when you turn on the unit) is "1."
Transmitting Program Change and Control Change messages
You can change the program number of the connected MIDI device from the SP-170S.
When you select a preset sound on the SP-170S (see "Playing Different Sounds" on page 2), it transmits a MIDI Program Change number (PC#) as shown in the table below. To disable this transmission (DIS), press and hold down the PIANO PLAY and SOUND buttons simultaneously, and then press the G#3 key. To enable this transmission (ENA), repeat the previous procedure but press the A3 key instead.
The SP-170S also transmits Control Change messages to control Damper (CC64), Bank Select (CC00), etc. for the connected MIDI device. To disable this transmission (DIS), press and hold down the PIANO PLAY and SOUND buttons simultaneously, and then press the A3 key. To enable this transmission (ENA), repeat the previous procedure but press the B3 key instead.
The default setting (when you turn on the unit) is ENA (transmitted) for both Program and Control Change messages.
Program Change Table
| BANK# | PC# | Sound | BANK# | PC# | Sound |
| 0 | 0 | Piano 1 | 0 | 7 | Clavichord |
| 0 | 1 | Piano 2 | 0 | 11 | Vibraphone |
| 0 | 4 | E. Piano 1 | 0 | 19 | P. Organ |
| 0 | 5 | E. Piano 2 | 0 | 16 | E. Organ |
| 0 | 6 | Harpsichord | 0 | 48 | Strings |
CC00: Bank Select (MSB) for each sound is assigned to 121
Troubleshooting
If you perceive any malfunction, check the following suggestions. If the problem persists, contact your nearest Korg distributor.
Power does not turn on
- Make sure that the AC adapter is properly connected to the SP-170S and the AC outlet.
- Make sure that the power LED is illuminated.
No sound from the speakers
- Rotate the VOLUME knob on the rear panel to the right toward MAX.
- The speakers will be muted if the headphones are connected.
Sound is interrupted
- The preset sounds of the SP-170S have been created by sampling (recording) sounds of actual musical instruments. When you press a key, some sounds play a single piece of sampled data, while other sounds play two pieces of sampled data. The SP-170S uses two pieces of data for most of its preset sounds. When one of these two-sample sounds is selected (regardless of whether the damper pedal is being pressed), the maximum polyphony is 60 notes. However, with two Piano sounds, the maximum polyphony is 120 notes. If the maximum polyphony is exceeded, some of the notes will be lost.
The pitch or tone of the piano sounds wrong in some key regions
- The SP-170S's piano sounds replicate the sound of an actual piano as faithfully as possible. This means that in some regions of the keyboard, you may feel that the overtones seem stronger, or that the tone or pitch seems wrong. This is not a malfunction.
Pedal is not effective
- Make sure that the pedal cable is properly connected.
Connected MIDI device does not respond to MIDI messages
- Make sure that all MIDI cables are properly connected.
- Make sure that the SP-170S is transmitting MIDI data on the same MIDI channel as the connected MIDI device.
Specifications
Keyboard NH Keyboard: 88 note (A0-C8)
Maximum polyphony 120 notes / 60 notes (Stereo)
Sounds Ten sounds
Jacks Headphones x 2 (also function as outputs), MIDI OUT, Damper SW (Pedal)
Amp output 9W× 2
Speakers Oval (10cm× 5cm)× 2
Power supply DC 12 V
Power Consumption 9 W
Weight 12kg / 26.46 lbs (excluding music stand)
Dimensions (W× D× H)
1312 × 325 × 144 ~mm / 51.65'' × 12.8'' × 5.67''
(including projections, but excluding music stand)
Included items AC adapter ( ) , Music stand, Pedal
- Specifications and appearance are subject to change without notice for improvement.
| 1 (Piano 1): | Fantaisie-Impromptu Op.66 /F.Chopin |
| 2 (Piano 2): | Amazing Grace/unknown (arr. : N.Nishi) |
| 3 (E. Piano 1): | Ramble/M.Sakaguchi |
| 4 (E. Piano 2): | KORG Original |
| 5 (Harpsichord): | Invention No.8/J.S.Bach |
| 6 (Clavichord): | KORG Original |
| 7 (Vibraphone): | KORG Original |
| 8 (P. Organ): | Toccata in D moll/J.S.Bach |
| 9 (E. Organ): | KORG Original |
| 10 (Strings): | First Snow/M.Sakaguchi |
Dimensions (L x P x H)
1312× 325× 144mm
To stop playback of the demo song, press the PIANO PLAY and SOUND buttons simultaneously.
Sound is interrupted
- REMARQUE IMPORTANTE POUR LES CLIENTS
- Power supply
- Interference with other electrical devices
- Handling
- Care
- Keep this manual
- Keeping foreign matter out of your equipment
- THE FCC REGULATION WARNING (for USA)
- Notice regarding disposal (EU only)
- Internal Setup and Connections
- Connecting the Power (Figure 1)
- Turning the SP-170S ON
- Adjust the volume
- Using headphones
- Using a Damper Pedal
- Connecting audio components
- Using the music stand
- Playing Different Sounds
- Using Other Functions
- About the confirmation sound
- Key Functions
- Playing Back Songs
- Effects (Reverb and Chorus)
- Key Touch Control function
- Transpose function (Shifting the key)
- Pitch Control function (Tuning)
- MIDI
- Using the MIDI OUT jack
- Changing the MIDI channel
- Transmitting Program Change and Control Change messages
- Troubleshooting
- Power does not turn on
- No sound from the speakers
- Sound is interrupted
- The pitch or tone of the piano sounds wrong in some key regions
- Pedal is not effective
- Connected MIDI device does not respond to MIDI messages
- Specifications
Brand : KORG
Model : SP170S
Category : Digital piano