
AX10B - Bass Multi-effects KORG - Free user manual and instructions
Find the device manual for free AX10B KORG in PDF.

| Product Type | Multi-effects for bass |
| Brand | KORG |
| Model | AX10B |
| Dimensions (L x D x H) | 287 mm x 182 mm x 60 mm |
| Weight | 1.1 kg (without batteries) |
| Power Supply | 4 AA alkaline batteries (approx. 18 h) or 9V DC AC adapter (sold separately) |
| Number of Programs | 40 preset + 40 user (10 banks × 4 programs) |
| Effect Types | 3 pre-effects (Compressor, Distortion, Octave), 11 amp models, 11 modulation effects, 11 ambience effects, noise reduction |
| Tuner | Built-in chromatic, range A0–E6, calibration 438–445 Hz |
| Expression Pedal | Built-in, controls volume, octave, modulation, ambience, wah |
| Technology | REMS (Resonant Structure and Electronic circuit Modeling System) |
| Input | 1/4" mono jack (INPUT) |
| Output | 1/4" stereo jack (OUTPUT, line/headphones) |
| Included Accessories | User manual |
| Options | AC adapter (9V DC) |
| Maintenance and Cleaning | Wipe with a clean, dry cloth. Do not use solvents. |
| Safety | Do not expose to moisture, shocks, or extreme temperatures. Use only the specified adapter. |
| Repairability | Contact your authorized Korg dealer for any repairs. |
Frequently Asked Questions - AX10B KORG
User questions about AX10B KORG
0 question about this device. Answer the ones you know or ask your own.
Ask a new question about this device
Download the instructions for your Bass Multi-effects in PDF format for free! Find your manual AX10B - KORG and take your electronic device back in hand. On this page are published all the documents necessary for the use of your device. AX10B by KORG.
USER MANUAL AX10B KORG
Thank you for purchasing the AX10B — Tone Works bass modeling signal processor. To ensure trouble-free enjoyment, please read this manual carefully and use the product as described. When you have finished reading the manual, keep it for future reference.
- Korg's "REMS" modeling technology is used to provide numerous sophisticated effects including: 3 types of pre-effects, 11 types of amp modeling, 11 types of modulation effects, and 11 types of ambience effects. The panel controls for these amps and effects are logically arranged according to the signal flow, from the bass input to the output, allowing you to easily and intuitively create a wide range of sounds.
AX10B signal routing
| INPUT | PREFX3 TYPES | AMP TYPE11 TYPES | MODULATION11 TYPES | AMBIENCE11 TYPES | OOUTPUT |
- The AX10B models a variety of famous bass amp sounds, ranging from distinctive warm and fat tube amp sounds to the sound of modern amps. Effects such as chorus, delay, and tape echo are also provided.
- 40 factory presets that take full advantage of the AX10B's potential are provided for immediate use, plus 40 of your own settings in the user area.
- The built-in expression pedal gives you an added dimension of realtime control, letting you change the volume, add a pitch one octave lower, or control the modulation speed, delay time, filter, or pitch bend. There's even a unique Talk effect that produces a talking modulator sound, opening up new possibilities for bass performance.
- The built-in Auto Chromatic Tuner lets you tune silently which is ideal for live situations.
Table of contents
Introduction 3
Precautions 4
Quick Start 5
Parts and what they do 6
Front panel 6
Rear panel 7
Setup. 8
Turning the power on/off 8
Connections 8
Playing the AX10B 9
Selecting programs 9
Bypass and Mute 9
Tuner 9
Using the expression pedal 10
Creating sounds 10
Creating sounds on the AX10B 10
PRE FX 11
AMP TYPE 11
MODULATION 11
AMBIENCE 12
Expression pedal 12
NR (Noise Reduction) 12
Storing a program 12
Other functions 13
Calibrating (adjusting) the expression pedal .. 13
Restoring programs to the factory settings..... 13
Troubleshooting 13
Main specifications 14
Precautions
Location
Using the unit in the following locations can result in a malfunction.
In direct sunlight
- Locations of extreme temperature or humidity
- Excessively dusty or dirty locations
- Locations of excessive vibration
- Close to magnetic fields
Power supply
Please connect the designated AC adapter to an AC outlet of the correct voltage. Do not connect it to an AC outlet of voltage other than that for which your unit is intended.
Interference with other electrical devices
Radios and televisions placed nearby may experience reception interference. Operate this unit at a suitable distance from radios and televisions.
Handling
To avoid breakage, do not apply excessive force to the switches or controls.
Care
If the exterior becomes dirty, wipe it with a clean, dry cloth. Do not use liquid cleaners such as benzene or thinner, or cleaning compounds or flammable polishes.
Keep this manual
After reading this manual, please keep it for later reference.
Keeping foreign matter out of your equipment
Never set any container with liquid in it near this equipment. If liquid gets into the equipment, it could cause a breakdown, fire, or electrical shock.
Be careful not to let metal objects get into the equipment. If something does slip into the equipment, unplug the AC adapter from the wall outlet. Then contact your nearest Korg dealer or the store where the equipment was purchased.
THE FCC REGULATION WARNING (for U.S.A.)
This equipment has been tested and found to comply with the limits for a Class B digital device, pursuant to Part 15 of the FCC Rules. These limits are designed to provide reasonable protection against harmful interference in a residential installation. This equipment generates, uses, and can radiate radio frequency energy and, if not installed and used in accordance with the instructions, may cause harmful interference to radio communications. However, there is no guarantee that interference will not occur in a particular installation. If this equipment does cause harmful interference to radio or television reception, which can be determined by turning the equipment off and on, the user is encouraged to try to correct the interference by one or more of the following measures:
- Reorient or relocate the receiving antenna.
- Increase the separation between the equipment and receiver.
- Connect the equipment into an outlet on a circuit different from that to which the receiver is connected.
- Consult the dealer or an experienced radio/TV technician for help.
Unauthorized changes or modification to this system can void the user's authority to operate this equipment.
CE mark for European Harmonized Standards
CE mark which is attached to our company's products of AC mains operated apparatus until December 31, 1996 means it conforms to EMC Directive (89/336/EEC) and CE mark Directive (93/68/EEC).
And, CE mark which is attached after January 1, 1997 means it conforms to EMC Directive (89/336/EEC), CE mark Directive (93/68/EEC) and Low Voltage Directive (73/23/EEC).
Also, CE mark which is attached to our company's products of Battery operated apparatus means it conforms to EMC Directive (89/336/EEC) and CE mark Directive (93/68/EEC).
IMPORTANT NOTICE TO CONSUMERS
This product has been manufactured according to strict specifications and voltage requirements that are applicable in the country in which it is intended that this product should be used. If you have purchased this product via the internet, through mail order, and/or via a telephone sale, you must verify that this product is intended to be used in the country in which you reside.
WARNING: Use of this product in any country other than that for which it is intended could be dangerous and could invalidate the manufacturer's or distributor's warranty.
Please also retain your receipt as proof of purchase otherwise your product may be disqualified from the manufacturer's or distributor's warranty.
What is REIMS?
FREMS (Resonant structure and Electronic circuit Modeling System) is KORG's proprietary sound modeling technology which precisely reproduces the complex character and nature of both acoustic and electric instruments as well as electronic circuits in real world environments. FREMS emulates a wide variety of sound generation characteristics including instrument bodies, speakers & cabinets, acoustic fields, microphones, vacuum tubes, transistors, etc.
Quick Start
Before you make connections with any external devices, turn all volumes to the minimum position and turn off the power.
1. If you will be powering the AX10B with batteries, open the battery compartment located on the bottom panel, and install four AA alkaline batteries (sold separately). If you will be powering the AX10B with the separately sold AC adaptor, connect the AC adaptor to the rear panel DC9V connector (the power will turn on).
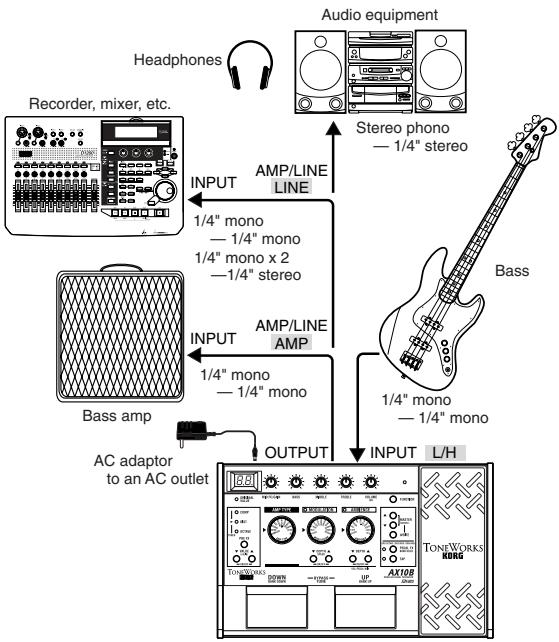
2. Set the INPUT L/H switch to the appropriate position for the output of your bass. Use the "H" position if your bass has a high output, or the "L" position if your bass has a low output.
3. Connect your bass to the AX10B's INPUT jack. If you are using batteries, the power of the AX10B will turn on at this point.
4. If you are connecting the AX10B to a bass amp, set the AMP/LINE switch to "AMP". If you are connecting the AX10B to headphones, a recorder, or a mixer, set this switch to "LINE".
5. Connect the AX10B's OUTPUT jack to the INPUT of your bass amp or recorder. If you want to use headphones, connect them to the OUTPUT jack.
6. Turn on the power of the connected equipment, and raise the volume to an appropriate level. You can also use the AX10B's MASTER buttons to adjust the volume.
7. Press the program select switches to change programs.
TIPS The AX10B has 40 preset programs (01~94) and 40 user programs (0.1~9.4). With the factory settings, the user programs contain the same contents as the preset programs.
- You can control the pedal effect by using the expression pedal. The pedal is active when the PEDAL LED at the upper left of the pedal is lit. If this LED is dark, advance the pedal all the way forward to make the LED light and the pedal will be active.
- Editing the sound Use the AMP TYPE selector to select an amp type, and use the various control knobs to adjust the gain, tone, and volume etc.
- Editing an effect If you want to edit the modulation effect or ambience effect (located after the amp), use the MODULATION selector or AMBIENCE selector to select the desired effect, and use the DEPTH buttons located below the selector to adjust the effect depth etc. You can also adjust the speed etc. of a modulation effect by holding down the FUNCTION button and pressing the DEPTH buttons (which act as the SPEED buttons). For the ambience effect, you can set the delay or reverb time by pressing the TAP button at the desired interval.
- To edit the pre-effect located before the amp, press the PRE FX button to select an effect, and use the VALUE buttons to make adjustments. This concludes our brief introduction to the AX10B. This manual contains much more information about the AX10B so please read it to ensure that you are taking full advantage of all its capabilities.

Parts and what they do
Front panel
1 Display
This shows the program number and when you operate a knob or button, the value of that parameter will briefly appear in the display.
This will light when the power is on.
- The dot in the lower right of the display will light when you edit a parameter value.
- If the AX10B is running on batteries, _0 will blink when the batteries run low.
2 AMP TYPE selector
This selects one of 11 types of amp models.
3 Control knobs
These knobs adjust the gain, tone, and volume of the amp models.
You can adjust the depth of the noise reduction (NR) by holding down the FUNCTION button and turning the VOLUME/NR knob.
Some settings of these knobs may cause distortion in your sound. If this occurs, lower the VOLUME control knob (or MASTER buttons).
4 PRE FX (TUNER) LED
These indicate the selected pre-effect.
The LEDs will not light if the pre-effect is off.
When the tuner is operating, these LEDs indicate the difference from the correct pitch. (p.9)
5 PRE FX button
Each time you press this button, the pre-effect type will change in the order of COMP DIST OCTAVE COMP.
6 VALUE (CALIB) buttons -ON/OFF-
These buttons adjust the value of the pre-effect.
You can switch PRE FX on/off by pressing the VALUE and buttons simultaneously.
When the tuner is operating, you can use these buttons to adjust the calibration (CALIB).
7 MODULATION selector
This selects one of 11 types of modulation effects.
8 DEPTH/SPEED buttons-ON/OFF
These buttons adjust the depth etc. of the modulation effect (DEPTH).
You can adjust the modulation speed etc. by holding down the FUNCTION button and pressing these buttons (SPEED).
You can switch the MODULATION effect on/off by pressing the DEPTH and buttons simultaneously (ON/OFF). When off, the MODULATION selector LED will not be lit.
9 AMBIENCE selector
This selects one of 11 ambience effects.
10 DEPTH buttons -ON/OFF-
These buttons adjust the depth etc. of the selected ambience effect.
You can switch AMBIENCE on/off by pressing the DEPTH and buttons simultaneously (ON/OFF). When off, the AMBIENCE selector LED will not be lit. If the expression pedal is controlling volume, you can set the minimum volume (i.e., when the pedal is fully returned) by holding down the FUNCTION button and pressing or .
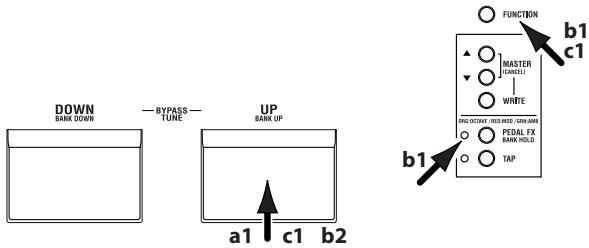
11 TAP button
You can set the delay or reverb time of the ambience effect by tapping this button at the desired interval. The LED located at the left will blink to indicate the tempo.
12 FUNCTION button
To edit one of the parameters printed on the front panel in red, hold down this button and operate the corresponding knob or button. For example, you can edit the speed of the modulation effect by holding down this button and using the MODULATION DEPTH buttons.
13 MASTER (CANCEL) buttons
These buttons adjust the overall volume of the AX10B (MASTER).
When the AX10B is ready to write (store), pressing either of these buttons will cancel the Write operation (CANCEL).
14 WRITE button
Use this button to write (store) a program.
When you press this button, the AX10B will enter "write-ready" mode; if you press this button again, the program will be written (stored). (p.12)
15 PEDAL FX/BANK HOLD button
This button selects the effect that will be controlled by the expression pedal (Pedal Effect).
Each time you press the button, the LED will change color to indicate the pedal effect that will be controlled.
ORG: OCTAVE (orange): Octave
RED:MOD (red): The effect selected by MODULATION
GRN:AMB (green): The effect selected by AMBIENCE
OFF: VOLUME (dark): Volume pedal
Rear panel
20 INPUT L/H select switch
Set this switch according to the pickup output of your bass.
H: High-output basses with active circuitry
L: Low-output basses
21 INPUT jack
Connect your bass to this jack. Use a 1/4" monoplug. If the AX10B is running on batteries, the power will come on when you plug into this jack.
If the AX10B is running on batteries, the power will not come on if a 1/4'' stereo plug is inserted.
22 OUTPUT jack
Connect this jack to your bass amp, recorder, or headphones.
If something other than OCTAVE is selected for the pre-effect, you cannot use the PEDAL FX button to select OCTAVE.
By holding down the FUNCTION button and pressing this button, you can select "bank hold" mode as the way in which programs will be selected (BANK HOLD). Refer to "Selecting programs: b" (p.9).
16 Expression pedal
You can use the expression pedal to control effects or volume. By advancing the pedal all the way forward you can switch the selected pedal effect on/off.
17 PEDAL LED
This LED will light if the expression pedal is active.
18 ORIGINAL VALUE LED
This LED will light if the edited value is identical to the saved (original) value.
19 Program select switches DOWN/BANK DOWN,UP/ BANK UP-BYPASS,TUNE-
Use these switches to select programs. You can select programs in one of three ways. Refer to "Selecting programs" (p.9).
If you press the UP and DOWN switches simultaneously, the effects will be bypassed and the tuner will operate (BYPASS) (p.9).
23 AMP/LINE select switch
Set this to "AMP" if you are plugging into an amp, or to "LINE" if you are plugging into a recorder or using headphones.
If you are connecting the AX10B to a bass amp that has a tweeter for extended high-frequency response, select the "LINE" position.
24 DC9V
The separately sold AC adapter can be connected here (p.8). When this is connected, the power will be turned on automatically.
You must only use the specified AC adaptor (p.14).
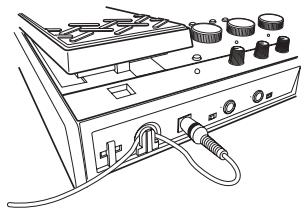
25 Cable hook
If the separately sold AC adapter is used, connect the cable of the AC adapter around this hook (p.8).


Setup
Turning the power on/off
Before you turn the power on or off, you must turn down the volume of any connected devices.
When using batteries:
- To open the battery compartment, lightly press the tab located by the arrow and lift the cover up. Install four AA alkaline batteries (sold separately) observing the correct polarity and close the cover.
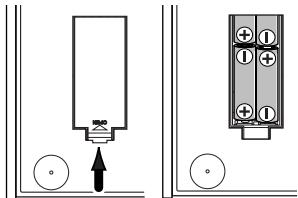
- When using batteries, the power will turn on when a mono cable is plugged into the INPUT jack. The display will light while the power is on. The power will turn off when you remove the cable from the INPUT jack.
Be sure to remove the cable from the INPUT jack when you are not using the AX10B to preserve battery life.
If you connect a stereo cable, the power will not be turned on.
When the batteries run down, an indication of _0 will blink in the display. Please replace the batteries as soon as possible. If dead batteries are left in the unit, they may leak or cause other malfunctions. You should also remove the batteries if you will not be using the AX10B for an extended period.
When using the AC adaptor:
- Connect the separately sold AC adaptor to the DC 9V jack, and plug the AC adaptor into an AC outlet. The POWER LED will light, and the power will turn on.
Use only the specified external AC adaptor. (p.14)
Be sure to disconnect the AC adaptor from the AC outlet when you are not using the AX10B. Do not apply excessive force to the cable.
Wrap the AC adaptor cable around the hook as shown in the diagram.
Connections
- Turn off the power of the equipment you want to connect, and lower each volume control.
- Set the INPUT L/H switch according to the output of your pickups.
"H" is suitable for basses that have a high output level. "L" is suitable for basses that have a low output level.
- Connect your bass to the INPUT jack.
- Set the LINE/AMP select switch to the appropriate position.
Use the "AMP" position if you are connecting the AX10B to a bass amp. Use the "LINE" position if you are connecting the AX10B to audio equipment such as mixers, recorders or headphones.
If you are connecting the AX10B to a bass amp that has a tweeter for extended high-frequency response, select the "LINE" position.
5. Connect the OUTPUT jack to your amp or recorder, etc.
The OUTPUT jack is stereo (TRS), so if you use a mono cable to connect it to your bass amp etc., only the sound of the L (left) channel will be heard.
If you are listening through headphones, connect them to this jack.
If you are running into two channels of a mixer or using two amplifiers in stereo, use a stereo to dual mono cable.
- When you have finished making connections, turn on the power of your bass amp, recorder, or other equipment, and adjust the volume.
Use the MASTER buttons to adjust the overall volume (master level) of the AX10B. (p.7 [13])
TIPS If the sound distorts when you play the AX10B in "bypass" mode, use the MASTER buttons to lower the level.
Playing the AX10B
Selecting programs
When you've finished setting up, you can select programs and try them out. The AX10B has 40 preset programs and 40 user programs. There are ten preset banks (0~9) and ten user banks (0~9.), with four programs in each bank.
User programs

Bank: 0.~9. Program: 1~4
Preset programs

Bank: 0~9 Program: 1~4
You can select programs in any of the following three ways.
a:Step through the programs of all banks
- Press the program select UP or DOWN switch. .94 ÷ 01 ÷ 02 ÷ 03 ÷ 04 ÷ 11 ÷ ÷ 93 ÷ 94 ÷ 0.1
b: Step through the programs in a bank
- Hold down the FUNCTION button and press the PEDAL FX (BANK HOLD) button to select "bank hold" mode. The bank will appear as "H" in the display.
- Press the program select UP or DOWN switch. Only the program will change; the bank will remain the same. ...H4÷ H1÷ H2÷ H3÷ H4÷ H1÷ H2...
- To defeat "bank hold" mode, hold down the FUNCTION button and press the PEDAL FX (BANK HOLD) button.
c: Step through the banks (leaving the program fixed)
- Hold down the FUNCTION button and press the program select UP (BANK UP) or DOWN (BANK DOWN) switch. The bank will change. You can also use this method while Bank Hold mode is selected. (The following example is when program 1 is selected) ... 11 ÷ 21 ÷ 31 ÷ 41 ÷ ÷ 91 ÷ 0.1 ÷ ÷ 9.1
Bypass and Mute
If you bypass the AX10B, your sound will be direct (dry) without any effects (wet). If you mute the AX10B, there will be no sound.
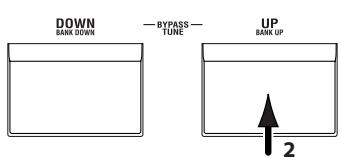
- Simultaneously press the UP and DOWN program select switches.
Bypass: Simultaneously press UP and DOWN and release them immediately.
Mute: Simultaneously press UP and DOWN and hold them for about one second; then release them.
When you press UP and DOWN simultaneously,
the display - will blink slowly, and after approximately one second will blink more rapidly. To bypass, release the buttons while the display is blinking slowly. To mute, release the buttons when the display is blinking rapidly.
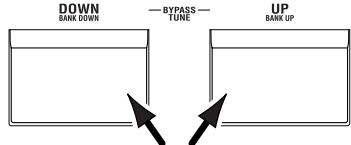
- To cancel Bypass or Mute, press either the UP or DOWN program select switch.
Tuner
You can use the AX10B's built-in auto chromatic tuner to tune your bass. To activate the tuner, simultaneously press the UP and DOWN program select switches.
TIPS You can activate the tuner by selecting either Bypass or Mute. If you select Mute, you will be able to tune silently.
Tuning procedure
- To activate the tuner, simultaneously press the UP and DOWN program select switches to either Bypass or Mute the AX10B. For the procedure, refer to "Bypass and Mute" (above).
- Pluck the string that you want to tune, and the closest note name will appear in the display. A decimal point "." at the right of the note name indicates a sharp (#).
Do not play two or more strings simultaneously when tuning. - Tune the string approximately so that the correct note name is shown in the display.
- Fine-tune the string so that only the middle LED of the PRE FX (TUNER) section is lit.
When the note name is A#
Too low
Too high
Correct tuning


- When you have finished tuning, press the UP or DOWN program select switch to return to normal operation.
Adjusting the tuner calibration
When you turn on the power, middle A is set to a reference frequency of 440Hz . If desired, you can adjust (calibrate) this reference pitch.
- While the tuner is activated, use the VALUE (CALIB) buttons to adjust the calibration. The range is 438 445Hz . When you adjust the value, the display will show the lower two digits of the calibration frequency (e.g., "41" for 441Hz ).
The AX10B does not remember the tuner calibration setting when powered-off.
Using the expression pedal
You can use the expression pedal to add a pitch one octave lower, and control parameters such as volume, modulation speed, filter, pitch bend, and ambience level.
The expression pedal can control the PRE FX effect OCTAVE, a parameter of the selected MODULATION or AMBIENCE effect (11 types each), or volume. You can choose one of these to be controlled by the expression pedal.
Using the expression pedal
- Select a program for which the PEDAL LED (located at the upper left of the expression pedal) is lit.
If you have selected a program for which the PEDAL LED is lit, you can use the expression pedal to control a pedal effect.
Even for programs for which the PEDAL LED is not lit, you can advance the pedal all the way to switch it on (the PEDAL LED will light).
If volume is selected as the pedal effect, you cannot switch it on/off from the pedal; it will always be on.
- Operate the expression pedal while you play, and you'll notice how the sound changes accordingly.
Do not apply excessive force to the expression pedal. Before you begin using the expression pedal, you should determine the amount of force that is needed to make the PEDAL LED light or to control the effect, and use only the necessary amount of force.
TIPS You can use the PEDAL FX button to switch the effect (or volume) that is controlled by the expression pedal. The current assignment is indicated by the color of the LED located at the left of the button. (p.12)
Creating sounds
Creating sounds on the AX10B
You can create sounds in one of two ways; you can edit an existing preset program or user program, or you can create a sound "from scratch".
If you want to start from an existing program, select a program that is close to the sound you want, and modify it as necessary. Adjust the amp MID FC/ GAIN,BASS, MIDDLE and TREBLE knobs, and use the VALUE, DEPTH, SPEED, and TAP buttons to adjust the depth and speed etc. of the effects.
If you want to create a sound from scratch, you can (for example) begin by selecting the AMPTYPE. If you turn the PRE FX, MODULATION, and AMBIENCE effects off at this time, you will be able to hear the character of each amp type more clearly. You can switch each effect off by simultaneously pressing its VALUE or DEPTH ▲ and▼ buttons.
When you have decided on an amp type, adjust the MID FC/GAIN, BASS, MIDDLE, TREBLE and VOLUME control knobs.
After you have made your amp settings, you can start adding effects. First are MODULATION and AMBIENCE, located after the amp. Simultaneously press the DEPTH and buttons to switch the effect on. Then turn the MODULATION selector or AMBIENCE selector to choose the desired effect. Use the DEPTH buttons to adjust the effect depth etc. For the modulation effect, you can hold down the FUNCTION button and use the DEPTH buttons to adjust the delay/reverb time. To choose settings for PRE FX, before the amp, turn the PRE FX on, and then use the PRE FX button to select the effect. Use the PRE FX VALUE buttons to adjust the amount of effect. You may wish to temporarily turn off MODULATION and AMBIENCE while adjusting the PRE FX.
Then use the PEDAL FX button to select what you will control from the expression pedal. This button selects the effect (or volume) that will be controlled by the pedal.
If you hear unwanted noise, you can adjust the noise reduction. Hold down the FUNCTION button and turn the NR knob (the right-most knob) to adjust the depth of the noise reduction.
Finally, when you have come up with a sound you like, you should write (store) it into memory. If you switch to a different program or turn off the power without writing your new program, it will be lost.
Some effect settings may produce unwanted distortion. If this happens, lower the VOLUME knob.
PREFX
Use the PRE FX button to select a pre-effect, and use the VALUE buttons to adjust the amount of effect. If you have selected WAH as the PEDAL FX, you can use the expression pedal to control WAH.
| TYPE | Explanation | Normal | PEDAL FX: WAH | |
| VALUE | PEDAL | VALUE | ||
| COMP | Compressor with an emphasized attack | Adjusts sensitivity: 0~30 | --- | --- |
| DIST | Distortion optimized for bass | Amount of distortion: 0~30 | --- | --- |
| OCTAVE | This generates a pitch one octave lower than the original sound, and mixes it with the original sound to add depth and low end. (*1) | Adjusts tone: 0~30 | Controls the effect depth | Specifies the effect depth at maximum pedal position |
(^*1) This effect may not operate correctly if two or more strings are played simultaneously, or when low-pitched strings are played.
AMPTYPE
Use the AMP TYPE selector to select an amp, and adjust the MID FC/GAIN, BASS, MIDDLE, TREBLE and VOLUME. A cabinet effect appropriate for that amp is added to each AMP TYPE (with the exception of EQ). Changing the setting of the AMP/LINE switch will change the depth of the cabinet effect.
| TYPE | Explanation |
| EQ | 3-band EQ from direct line input. |
| VALVE | A tube amp with the ULTRA LO switch turned ON. (recommended CAB: 810CLS) |
| VALVE2 | A tube amp suitable for rock. (recommended CAB: 810CLS) |
| CLASSIC | A tube amp whose basic character changes according to the setting of the value dial. (recommended CAB: 118+112) |
| SCOOPED | An amp that is typical of 80's sounds. (recommended CAB: 410MTL) |
| LA STUDIO | An amp that is typical of the LA sound. (recommended CAB: 410 LA) |
| GOLDPNL | An amp distinctive for its eye-catching gold panel and clean sound. (recommended CAB: 410MDN) |
| JAZZ | A combo amp favored by jazz bassists. (recommended CAB: 115JAZ) |
| STUDIO | A tube combo ideal for the Motown sound. (recommended CAB: 115STU) |
| AC100 | A 100W tube amp made by Vox. (recommended CAB: 215TALL) |
| UKMAJOR | A 200W tube amp made in the UK. (recommended CAB: 415 UK, 412 UK). |
Control knobs
| MID FC/GAIN(*2) | Mid-range peak frequency adjustment (when AMP TYPE is set to EQ ~ JAZZ) 1~5 Gain adjustment (when AMP TYPE is set to STUDIO ~ UKMAJOR) |
| BASS | Adjusts low-frequency range. |
| MIDDLE | Adjusts mid-frequency range. |
| TREBLE | Adjusts high-frequency range.. |
| VOLUME NR (*3) | Adjusts volume. Adjusts noise reduction depth. (Hold down the TAP button and turn EFF.DEPTH) |
(^2) Functions as MID FC if AMP TYPE is set to EQ~ JAZZ. Functions as GAIN if AMP TYPE is set to STUDIO UKMAJOR.
(^3) To adjust the noise reduction, hold down the FUNCTION button and turn the VOLUME (NR) knob.
MODULATION
Use the MODULATION selector to choose a modulation effect, and use the DEPTH buttons to adjust the DEPTH parameter. To adjust the SPEED parameter, hold down the FUNCTION button and use the DEPTH (SPEED) buttons. If MOD is selected as the PEDAL FX, you can use the expression pedal to control the effect.
| TYPE | Explanation | Normal | PEDAL FX:MOD | |||
| DEPTH | SPEED | PEDAL | DEPTH | SPEED | ||
| CHORUS | Vintage stereo chorus. | Effect depth: 0~30 | Modulation speed: 0~30 | Modulation speed | Effect depth: 0~30 | N/A(*4) |
| FLANGE | Vintage flanger. | |||||
| PHASER | Vintage phaser. | |||||
| TREM | Vintage tremolo. | |||||
| ROTARY | Rotary speaker simulation. | |||||
| FEEDBK | Mode 1 artificially generates feedback, and operates when a note is held for an extended time. Mode 2 generates feedback one octave higher. | Feedback amount: 0~15 Vibrato depth: 16~30 | Mode setting: 1. Normal, 2. Overtone | First half of pedal movement controls feedback amount; further movement controls vibrato depth | Mode setting: 1. Normal, 2. Overtone | |
| PITCH1 | Pitch shifter mixed with the direct sound. | Pitch shift amount (*5): 12~1., d., d, 1~12 | Effect level: 0~30 | Effect level | Pitch shift amount (*5): 12~1., d., d, 1~12 | |
| FILTER | Filter whose cutoff frequency varies in response to picking strength (for "Normal") or pedal movement (for "PEDAL FX") | Down sweep √: 0~15, UP sweep ∧: 16~30 | Resonance: 0~30 | Cutoff frequency | Resonance: 0~30 | |
| U-VIBE | Vintage U-Vibe. | Effect depth: 0~30 | Modulation speed: 0~30 | Modulation speed | Effect depth: 0~30 | |
| TALK | "Talking" effect controlled by pick attack (for "Normal") or pedal movement (for "PEDAL FX") | Mode setting: 1~5 (*6) | Controls "talking" effect | Effect depth: 0~30 | Mode setting: 1~5 (*6) | |
| PITCH2 | Pitch shifter with 100% effect (wet). | Pitch shift amount (*7): 12~1., 1~12 | N/A (*4) | Controls the pitch shift amount | Pitch shift amount when pedal at maxi-mum (*7): 12~1., 1~12, SP | N/A(*4) |
(4) You cannot use the buttons to edit the value. (5) ". indicates negative (-), "d" indicates detune.
(6) Mode setting: 1: YAH-YAH, 2: U-WAH, 3: YOI-YOI, 4: YEAH, 5: HI U-WAH
(7) “.” indicates negative (-), “SP” indicates stair-step pitch change one octave upward.
AMBIENCE
Use the AMBIENCE selector to choose an ambience effect, and use the DEPTH buttons to adjust the DEPTH parameter. To adjust the delay time or reverb time, press the TAP button twice at the desired interval. If AMB is selected as the PEDAL FX, you can use the expression pedal to control the effect.
| TYPE | Explanation | TAP | Normal | PEDAL FX: AMBIENCE | |
| DEPTH | PEDAL | DEPTH | |||
| SLAP | Slap-type delay whose delay time is a 1/4 of the interval at which you press TAP | Delay time: up to 250 [ms] | Effect level: 0~30 | Controls the effect depth | Specifies the effect depth at maximum pedal position |
| ECHO1 | Tape echo simulation with a warm tone (feedback low) | ||||
| ECHO2 | Tape echo simulation with a warm tone (feedback medium) | Delay time: up to 1.0 [s] | |||
| ECHO3 | Tape echo simulation with a warm tone (feedback high) | ||||
| PP DLY | Ping-pong delay that bounces from left to right | ||||
| MULTI | Multi-tap delay | ||||
| AIR | Reverb with an airy feel | N/A (*4) | |||
| ROOM | Room reverb | Reverb time: up to 4.0 [s] | |||
| HALL | Hall reverb (*8) | Reverb time: up to 8.0 [s] | |||
| PLATE | Plate reverb (*8) | ||||
| SPRING | Spring reverb (*8) | ||||
(^*8) Sets the reverb time to twice the interval at which you press TAP.
Expression pedal
Selecting the effect that will be controlled by the pedal
Press the PEDAL FX button to select the effect that will be controlled by the pedal. The LED located at the left indicates the effect (or volume) that will be controlled.
ORG: OCTAVE (orange): Octave
RED:MOD (red): The effect selected by MODULATION
GRN:AMB (green): The effect selected by AMBIENCE
OFF: VOLUME (unlit): Volume pedal
If an effect other than OCTAVE is selected for the pre-effect, you cannot select OCTAVE from the
PEDAL FX button. If OCTAVE is selected as the pedal effect, changing the pre-effect to something other than OCTAVE will switch the pedal effect to VOLUME.
Using the pedal to switch the effect on/off
By advancing the pedal all the way forward you can switch the selected PEDAL FX effect on/off. When the effect is on, the LED at the left of the pedal will light. If VOLUME is selected as the PEDAL FX, the LED cannot be turned off.
Setting the minimum value of the volume pedal
If PEDAL FX is set to VOLUME, you can hold down the FUNCTION switch and use the AMBIENCE DEPTH buttons to specify the minimum volume (VOL PEDAL MIN) that will be controlled by the pedal.
Saving the sound of a specific pedal position
You cannot save the sound produced by a specific pedal position. The pedal effect will always modify the sound according to the actual current position of the pedal.
NR (Noise Reduction)
You can adjust the amount of noise reduction by holding down the FUNCTION button and turning the VOLUME (NR) control knob.
Depending on the connected device, excessively high NR settings may cause notes to be cut off. If this happens, lower the level.
Storing a program
When you have created a sound you want to keep, you can write (store) it into one of the 40 user programs (0.1~9.4).
If you switch programs or turn off the power before writing your edited program, the changes you made will be lost.
The program that had been in the writing destination will be overwritten.
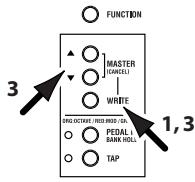
- Press the WRITE button. The program number will blink in the display, and the AX10B will be in "write-ready" mode.
- Use the program select switches to select where you would like to store the program.
You cannot write to a preset program (01~94). - Press the WRITE button to write the program into the selected program number.
If you decide not to write, press either of the MASTER (CANCEL) buttons to exit write-ready mode (display blinking). You will return to normal operation.
1
Other functions
Calibrating (adjusting) the expression pedal
If the expression pedal is not working properly, please perform the procedure described below.
When calibrating the pedal, use your hand because accurate adjustments may not be possible if you use your foot to operate the pedal.
- While simultaneously holding down the FUNC-TION button and the PEDAL FX button, turn on the power.
The display will indicate _口 for approximately one second, and then indicate _ .
- Slowly move the pedal back. When it stops, take your hand off the pedal and press the PEDAL FX button.
The display will change from to. If you press the MASTER (CANCEL) during the calibration operation, calibration will be halted and the program number will appear.
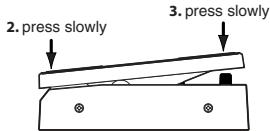
- Slowly move the pedal forward. When it stops, take your hand off the pedal and press the PEDAL FX button.
When the adjustment has been completed, the display will blink 00 , and then the program number will appear. Check the pedal to make sure the settings are correct.
TIPS For example if you assign PEDAL FX to VOLUME and set VOL PEDAL MIN to 0, it will be easy to verify the MIN level when the pedal is fully returned.
If the calibration operation fails, the display will indicate _r , and you will return to the display before calibration ( --- ). If repeated attempts are unsuccessful, it is possible that the AX10B has malfunctioned. Contact your dealer.
Restoring programs to the factory settings
- While holding down the WRITE button, turn on the power.
The display will indicate Ld.
If you decide to start up normally without loading the factory settings, press either of the MASTER (CANCEL) buttons. - While the display indicates Ld, press the WRITE button. The factory programs will be loaded into the user area (0.1~9.4). When loading is completed, the display will blink oo, and then the program number will appear.
Never turn off the power while this operation is in progress.
Be aware that if you reload the preset programs, all previously written programs will be overwritten.
Troubleshooting
If the AX10B does not operate as you expect, please check the following points first. If this does not resolve the problem, contact your dealer.
Power does not turn on.
- Are batteries installed? Alternatively, is the AC adapter connected to an AC outlet? (p.8)
Is a mono phone plug cable connected to the INPUT jack? (p.8)
No sound
Are your bass, amp and/or headphones connected to the correct jacks? (p.8)
Is your amp turned on and set correctly?
Are any cables broken?
Is the master level of the AX10B set to "0" or to a low level? (p.7)
Is the program volume of the AX10B set to "0" or to a low level? (p.11)
Is the volume of your instrument turned down?
Is the AX10B muted?
No effect is heard
Is the AX10B bypassed? (p.9)
Are the effects used in the program turned on?
Pedal does not work
Have you selected a program which uses an expression pedal effect? (p.10,12)
Is the pedal indicator lit?
Cannot write (Display indicates "Er")
Did you turn the power off while the preset programs were being loaded?
Reload the preset programs. (p.13)
Main specifications
Amp models: 11
Effects: Pre effect types: 3
Modulation types: 11
Ambience types: 11
Noise Reduction: 1
Number of programs: Preset Programs: 40 (10 banks x 4 programs)
User Programs: 40 (10 banks x 4 programs)
Input: Bass Input (mono 1/4" jack)
Output: Line/Headphone dual-purpose output (stereo 1/4" jack)
Tuner: Tuning Range: 27.5Hz-1,318.5Hz(A0-E6)
Tuner calibration: A = 438Hz - 445Hz
Power supply: Four AA alkaline batteries (not included allows approximately 18 hours of continuous use) or separately sold AC adaptor (DC9V -C-Θ)
Dimensions (W x D x H): 287 mm x 182 mm x 60 mm
Weight: 1.1 kg (not including batteries)
Included items: Owner's manual
Options: AC adaptor
Appearance and specifications are subject to change without notice for improvement.
TONEWORKS KORG
10 Touches DEPTH - ON/OFF -
15 Touche PEDAL FX/BANK HOLD
8 DEPTH/SPED-Taston-ON/OFF-
15 PEDAL FX/BANK HOLD-Taste
...H4÷ H1÷ H2÷ H3÷ H4÷ H1÷ H2...