MicroARRANGER - Keyboard KORG - Free user manual and instructions
Find the device manual for free MicroARRANGER KORG in PDF.

User questions about MicroARRANGER KORG
0 question about this device. Answer the ones you know or ask your own.
Ask a new question about this device
Download the instructions for your Keyboard in PDF format for free! Find your manual MicroARRANGER - KORG and take your electronic device back in hand. On this page are published all the documents necessary for the use of your device. MicroARRANGER by KORG.
USER MANUAL MicroARRANGER KORG
professional arranger
Owner's Manual

text_image
micro ARRANGER KORGPRECAUTIONS
LOCATION
Using the unit in the following locations can result in a malfunction.
- In direct sunlight
- Locations of extreme temperature or humidity
• Excessively dusty or dirty locations - Locations of excessive vibration
- Close to magnetic fields
POWER SUPPLY
Please connect the designated AC adapter to an AC outlet of the correct voltage. Do not connect it to an AC outlet of voltage other than that for which your unit is intended.
INTERFERENCE WITH OTHER ELECTRICAL DEVICES
Radios and televisions placed nearby may experience reception interference. Operate this unit at a suitable distance from radios and televisions.
HANDLING
To avoid breakage, do not apply excessive force to the switches or controls.
CARE
If the exterior becomes dirty, wipe it with a clean, dry cloth. Do not use liquid cleaners such as benzene or thinner, or cleaning compounds or flammable polishes.
KEEP THIS MANUAL
After reading this manual, please keep it for later reference.
KEEPING FOREIGN MATTER OUT OF YOUR EQUIPMENT
Never set any container with liquid in it near this equipment. If liquid gets into the equipment, it could cause a breakdown, fire, or electrical shock.
Be careful not to let metal objects get into the equipment. If something does slip into the equipment, unplug the AC adapter from the wall outlet.
Then contact your nearest Korg dealer or the store where the equipment was purchased.
THE FCC REGULATION WARNING (FOR USA)
This equipment has been tested and found to comply with the limits for a Class B digital device, pursuant to Part 15 of the FCC Rules. These limits are designed to provide reasonable protection against harmful interference in a residential installation. This equipment generates, uses, and can radiate radio frequency energy and, if not installed and used in accordance with the instructions, may cause harmful interference to radio communications. However, there is no guarantee that interference will not occur in a particular installation. If this equipment does cause harmful interference to radio or television reception, which can be determined by turning the equipment off and on, the user is encouraged to try to correct the interference by one or more of the following measures:
- Reorient or relocate the receiving antenna.
- Increase the separation between the equipment and receiver.
- Connect the equipment into an outlet on a circuit different from that to which the receiver is connected.
- Consult the dealer or an experienced radio/TV technician for help.
Unauthorized changes or modification to this system can void the user's authority to operate this equipment.
NOTICE REGARDING DISPOSAL (EU ONLY)

When this "crossed-out wheeled bin" symbol is displayed on the product, owner's manual, battery, or battery package, it signifies that when you wish to dispose of this product, manual, package or battery you must do so in an approved manner. Do not discard this product, manual, package or battery along with ordinary household waste.

Disposing in the correct manner will prevent harm to human death and potential damage to the environment. Since the correct method of disposal will depend on the applicable laws and regulations in your locality, please contact your local administrative body for details. If the battery contains heavy metals in excess of the regulated amount, a chemical symbol is displayed below the “crossed-out wheeled bin” symbol on the battery or battery package.
IMPORTANT NOTICE TO CONSUMERS
This product has been manufactured according to strict specifications and voltage requirements that are applicable in the country in which it is intended that this product should be used. If you have purchased this product via the internet, through mail order, and/or via a telephone sale, you must verify that this product is intended to be used in the country in which you reside.
WARNING: Use of this product in any country other than that for which it is intended could be dangerous and could invalidate the manufacturer's or distributor's warranty. Please also retain your receipt as proof of purchase otherwise your product may be disqualified from the manufacturer's or distributor's warranty.
DATA HANDLING
Data stored in memory may occasionally be lost due to incorrect user action. Be sure to save your important data to a memory card. KORG will not be responsible for damages caused by data loss.
LCD DISPLAY
Some pages of the manuals show LCD screens along with an explanation of operation and functionality. All sound names, parameter names, and values are merely examples and may not always match the actual display that you are working on.
TRADEMARKS
Mac, the Mac logo and the Audio Units logo are trademarks of Apple Inc., registered in the U.S. and other countries.
MS-DOS and Windows are registered trademarks of Microsoft Corporation, registered in the U.S. and other countries.
All product names and company names are the trademarks or registered trademarks of their respective owners.
THE BALANCE SLIDER
When turning the instrument on, please be assured the BALANCE slider is set to the center. This sets both Sequencer 1 (SEQ1) and Sequencer 2 (SEQ2) to their maximum level.
This will avoid you start a Song without hearing anything.

text_image
SEQ 1 SEQ 2HOW TO...
Keyboard
...select a Sound Program 25
...select a Performance 25
...play a Sound Program across the
whole keyboard, as with a piano 24
...split the keyboard in two 24
...add sounds to the right hand 24
...mute/unmute sounds 24
Style Play mode
...select a Style 26
...start/stop the Style 27
...select a Fill or a Break 27
...select a Style Variation 27
...see the Style tracks 41
...create a new Style 52
Song Play mode
...play a Song (Standard MIDI File) 31
...see the Lyrics 74
...see the Song tracks 73
...start both Sequencers at the same time 18, 80
Backing Sequence mode
...record a new Backing Sequence (Song) 82
Song mode
...record a new Song 90
...edit a Standard MIDI File 88
In general
...turn the speakers off 125
...change the Damper polarity 126
...select the Arabic Scale 34
TABLE OF CONTENTS
Introduction
Welcome! 8
Useful links 8
About this manual 9
Loading the operating system 9
Reloading the Factory Data 9
Start up 10
Connecting the AC power adapter .... 10
Turning the instrument on and off .... 10
Controlling the Volume 10
The BALANCE slider 10
Headphones 10
Audio Outputs 11
Audio Inputs 11
MIDI connections....11
Damper Pedal 11
Demo 11
The music stand 11
Front panel 12
Display and User Interface 19
Display controls 19
Interface structure 20
Message windows 21
Symbols and Icons 21
Grayed-out non-available parameters 21
Rear panel 22
Basic Guide
Basic operations 24
Playing on the keyboard 24
Selecting, muting/unmuting and soloing a track ... 24
Selecting a Performance 25
Selecting a Program 25
Selecting a Style 26
Selecting a Single Touch Setting (STS) 26
Changing all keyboard tracks at once 26
Shortcut to see the original bank for a Style, Performance or Program 26
Tutorial 27
Playing a Style (Automatic Accompaniment) 27
Playing in Realtime (Without using Automatic Accompaniment) .... 28
Recording a Song (Simultaneously recording the Style and realtime performance) .... 30
Playing a Song from a card 31
Editing a Song 32
The Arabic Scale 34
MIDI 35
What is MIDI? 35
Midifiles 35
The General MIDI standard 35
The Global channel .....35
The Chord 1 and Chord 2 channels .....36
The Control channel ....36
MIDI Setup 36
Connecting microARRANGER to a Master keyboard .....36
Connecting the microARRANGER to a MIDI accordion .....37
Connecting the microARRANGER to an external sequencer ..37
Playing another instrument with the microARRANGER ....38
Reference Guide
Style Play operating mode 40
What's a Style? 40
Styles and Performances 40
Changing and resetting the Tempo 40
The DIRECT SD bank 40
Main page 41
Style tracks page 41
How to select Programs .....41
The Write window 42
Menu 42
Edit page structure 42
Page 1 - Mixer: Volume .....43
Page 2 - Mixer: Pan ....43
Page 3 - Mixer: FX Send ....43
Page 4 - Tuning: Detune .....44
Page 5 - Tuning: Scale .....44
Page 6 - Tuning: PitchBend Sensitivity .....44
Page 7 - FX: A/B Select .....44
Page 8 - FX: C/D Select .....45
Page 9 - FX: A editing .....45
Page 10 - FX: B editing .....45
Page 11 - FX: C editing .....45
Page 12 - FX: D editing .....45
Page 13 - Track: Easy edit .....45
Page 14 - Track: Mode .....46
Page 15 - Track: Internal/External .....47
Page 16 - R.T. controls: Damper .....47
Page 17 - R.T. controls: Joystick .....47
Page 18 - R.T. controls: Dynamic range .....48
Page 19 - R.T. controls: Ensemble .....48
Page 20 - Style controls: Drum/Fill .....49
Page 21 - Style controls: Wrap Around / Keyboard Range .....49
Page 22 - Pads ....50
Page 23 - Preferences: Lock ....50
Page 24 - Preferences: controls .....51
Style Record mode 52
The Style's structure 52
Style Import/Export 53
Entering the Record mode 53
Listening to the Style while in Record/Edit mode . . . 53
Exit and Save/Abort Style 54
The Write window 54
List of recorded events 54
Fast Delete using the control panel buttons ..... 54
Main page 55
Style Tracks page 56
Step Record page 57
Style Record procedure 58
Menu 61
Edit page structure 61
Page 1 - Edit: Quantize 62
Page 2 - Edit: Transpose 62
Page 3 - Edit: Velocity 63
Page 4 - Event Edit 63
Page 5 - Event Filter 64
Event Edit procedure 65
Page 6 - Edit: Delete 66
Page 7 - Edit: Delete All ..... 67
Page 8 - Edit: Copy 67
Page 9 - Style Element Controls: Programs ..... 68
Page 10 - Style Element Controls: Expression ..... 68
Page 11 - Style Element Controls: Keyboard Range . 68
Page 12 - Style Element Controls: Chord Variation Table ....69
Page 13 - Style Controls: Mode/Tension ..... 69
Song Play operating mode 70
The Songs and the Standard MIDI File format ..... 70
Transport controls 70
MIDI Clock 70
Switching between sequencers during editing ..... 70
Selecting a Song composing its progressive number 70
Realtime and sequencer tracks 70
Master Volume, Sequencer Volume, BALANCE ...71
Effects in Song Play mode 71
Groove Quantize window 71
The Write window 72
Main page 73
Tracks 1–8 page ....73
Tracks 9–16 page....74
Song Select page 74
The Lyrics page 74
Playing a Jukebox file 74
Menu 75
Edit page structure 75
Page 1 - Mixer: Volume ..... 76
Page 2 - Mixer: Pan ..... 76
Page 3 - Mixer: FX send A/B .....76
Page 3 - Mixer: FX send C/D ..... 77
Page 4 - FX: A/B Select ..... 77
Page 4 - FX: C/D Select 77
Page 5 - FX: A editing 78
Page 6 - FX: B editing 78
Page 5 - FX: C editing ..... 78
Page 6 - FX: D editing 78
Page 7 - Track: Mode ..... 78
Page 8 - Track: Internal/External ..... 79
Page 9 - Jukebox 79
Page 10 - Preferences 80
Saving a list of Songs 81
Backing Sequence operating mode ..... 82
Transport controls 82
The Backing Sequence, Song and Song Play modes. 82
How to playback a Song 82
Realtime Recording mode 82
Chord/Acc Step recording 83
Main Page (Backing Sequence Play) 83
Load Song page 84
Save Song page 84
Realtime Recording page 85
Chord/Acc Step Recording page 85
How to delete a whole Song 87
Song operating mode 88
Transport controls 88
Master Volume and Sequencer Volume ..... 88
The Songs and the Standard MIDI File format ..... 88
Fast track deletion 88
How to delete a whole Song 88
Main page 88
Tracks 1–8 page 89
Tracks 9–16 page 89
Song Select page 89
Save Song page 90
Realtime Record procedure 90
Step Record procedure 91
Song Record page 92
Step Record page 93
Menu 94
Edit page structure 94
Page 1 - Mixer: Volume ..... 95
Page 2 - Mixer: Pan 95
Page 3 - Mixer: FX Block 95
Page 4 - Mixer: FX Send A/B (or C/D) ..... 96
Page 5 - Tuning: Detune 96
Page 6 - Tuning: Scale 96
Page 7 - Tuning: PitchBend/Scale 97
Page 8 - FX: A/B Select 97
Page 9 - FX: C/D Select 97
Page 10 - FX: A editing 98
Page 11 - FX: B editing 98
Page 12 - FX: C editing 98
Page 13 - FX: D editing 98
Page 14 - Track: Easy edit 98
Page 15 - Track: Mode ..... 99
Page 16 - Track: Internal/External ..... 99
Page 17 - Edit: Quantize 100
Page 18 - Edit: Transpose ..... 100
Page 19 - Edit: Velocity ..... 100
Page 20 - Edit: Delete ..... 101
Page 21 - Edit: Cut Measures ..... 101
Page 22 - Edit: Insert Measures ..... 101
Page 23 - Edit: Copy 102
Page 24 - Event Edit .... 102
Page 25 - Event Filter ..... 103
Event Edit procedure 104
Program operating mode 105
Main page 105
Sound Programs and Drum Programs ..... 105
Menu 105
Edit page structure 106
The Compare function 106
How to select oscillators .... 106
Erase Program/Oscillator 106
The 'Write' window 106
Page 1 - Basic 107
Page 2 - Sample (Sound Programs) ..... 107
Page 2 - DK Samples (Drum Programs) ..... 108
Page 3 - Pitch 109
Page 4 - Pitch LFO1 110
Page 5 - Pitch LFO2 .... 111
Page 6 - Pitch EG 111
Page 7 - Filter 112
Page 8 - Filter Modulation ..... 113
Page 9 - Filter LFO1 114
Page 10 - Filter LFO2 .... 115
Page 11 - Filter EG 115
Page 12 - Amp 117
Page 13 - Amp Modulation ..... 117
Page 14 - Amp LFO1 118
Page 15 - Amp LFO2 .... 118
Page 16 - Amp EG 118
Page 17 - LFO1 120
Page 18 - LFO2 122
Page 19 - Effects 122
Page 20 - FX1 editing ..... 122
Page 21 - FX2 editing .... 122
AMS (Alternate Modulation Source) list ..... 123
Global edit environment 125
The Write window 125
Menu 125
Page 1 - General controls 125
Page 2 - Master Transpose .... 126
Page 3 - Assignable Pedal/Footswitch, Assignable Slider ..... 126
Page 4 - MIDI Setup 126
Page 5 - MIDI Controls .... 127
Page 6 - MIDI IN Channels 127
Page 7 - MIDI IN Controls (1) 128
Page 8 - MIDI IN Controls (2) 128
Page 9 - MIDI IN Filters .... 129
Page 10 - MIDI OUT Channels 129
Page 11 - MIDI OUT Filters 129
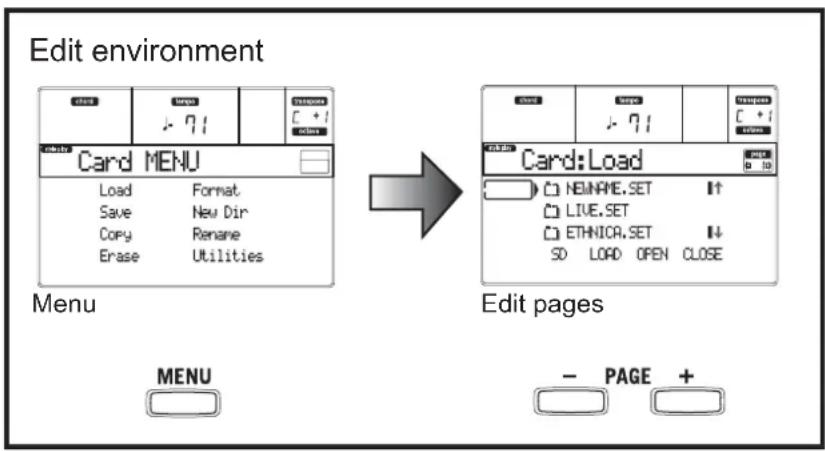
Card Edit environment 130
The WRITE/CARD IN USE LED 130
Supported cards 130
Loading data created with the Pa80/Pa60/Pa50 ... 131
Card structure 131
File types 131
File and folder size display 132
Page structure 132
Navigation tools 132
Menu 133
Page 1 - Load ....133
Page 2 - Save 135
Page 3 - Copy .....138
Page 4 - Erase ....139
Page 5 - Format ....140
Page 6 - New Dir .....140
Page 7 - Rename ....140
Page 8 - Utilities 1 ....141
Page 9 - Utilities 2 ....142
Appendix
Factory Data 144
Styles 144
Style Elements 146
Single Touch Settings (STS) .....146
Programs (bank order) .....147
Programs (Program Change order) .....154
Drum Kits ....160
Drum Kit instruments 161
Performances 173
MIDI Setup 174
Effects 175
Diagrams 175
Dynamic Modulation sources .....175
Filter/Dynamic 175
Pitch/Phase Mod. 185
Mod./P.Shift .....195
ER/Delay 202
Reverb 208
Mono-Mono Chain 209
Assignable parameters 225
List of functions assignable to the Footswitch .....225
List of functions assignable to the Pedal or Assignable Slider .....226
List of sounds assignable to the Pads .....226
List of functions assignable to the Pads .....227
Scales 227
MIDI Controllers 228
MIDI Implementation Chart 229
Parameters 230
Recognized chords 233
Error messages & Troubleshooting ..... 235
Error messages 235
Troubleshooting 238
Technical specifications 239
Alphabetical Index 240
INTRODUCTION
1. WELCOME!
Thank you for purchasing the Korg Professional Arranger microARRANGER.
This instrument is an ideal keyboard for song production — it lets you select a desired musical style and generate a high-quality band accompaniment simply by playing chords, and then you can play the melody yourself to easily create an original song.
Here are some of the features of your new instrument:
- Powerful HI (Hyper Integrated) KORG sound generation system, as seen in our best professional synthesizers.
- O P O active (Pable Operating System) multitasking operating system, to let you load data while playing your instrument.
- Operating System updates, to load new features from card. Don't let your instrument get old!
- Solid State Disk (SSD), for any system update—a smart way to replace the usual ROM memory.
- SD card slot, capable of reading and writing on SD and MMC memory types.
• Direct Style access from SD card.
- General MI DI Level 2 Sounds-compatible.
• More than 662 Sound Programs.
• 4 multieff processor, each with 89 effect types.
- 1 6 performances and 1,216 Single Touch Settings (STS), for fast setting of keyboard sounds and effects.
• 3 0 4 Styles.
• XDS Double Sequencer with Crossfader.
• Style Record and Edit
• F u l d seqenture (Song Record and Edit)
- Integrated speakers, for the most true sound reproduction.
- Wid e Custom Display.
USEFUL LINKS
Your preferred KORG dealer also carries a wide range of Korg hardware and software accessories. Please ask your dealer about additional Programs, Styles, and other useful music materials.
Each KORG distributor can supply you with useful information. Just give him a call for additional services. In the English-speaking world, here are the relevant addresses:
USA KORG USA, 316 South Service Road, Melville, New York, 11747, USA Tel:1-516-333-9100, Fax:1-516-333-9108
UK KORG UK Ltd, 1 Harrison Close, Knowl- hill, Milton Keynes, MK5, 8PA, UK Tel: 01908 304600, Fax: 01908 304699 UK Technical Support Tel: 01908 304637 E-mail: info@korg.co.uk
Many KORG distributors also have their own web page on the internet, where you can find infos and software. Useful web pages in English are the following:
http://www.korg.com/ http://www.korg.co.uk/
A place to find operating system updates and various system files (for example, a full backup of the factory data) is at the following link:
http://www.korgpa.com/
ABOUT THIS MANUAL
This manual is divided in three sections:
- A Basic Guide, containing an overview of the instrument, as well as a series of practical guides (named "Tutorials").
• A Reference Guide, with each page and parameter described in detail. - An Appendix, with a list of data and useful information for the advanced user.
Within the manual, you will find the following abbreviations:
▶PERF
The parameter can be saved onto a Performance by pressing the WRITE button.
▶STYLE
The parameter can be saved onto the current Style Performance by pressing the WRITE button.
STS
The parameter can be saved onto a Single Touch Setting by pressing the WRITE button.
▶GBL
The parameter can be saved onto a Global setting by going to the Global environment (see "Global edit environment" on page 125) and pressing the WRITE button.
Your microARRANGER can be constantly updated as new versions of the operating system are released by KORG. You can download the operating system from http://www.korgpa.com/. Please, read the Readme file included with the operating system itself.
You can see which version of the operating systems is installed in your microARRANGER by keeping the SHIFT button pressed, and pressing the ENTER and EXIT buttons together. The operating system version number will appear in the display. Press EXIT to close the message window.
To load a new system, follow these instructions:
-
Copy the three operating system's files in the root of an SD card. These are the needed files:
-
BPaMAR1.sys
- NBPaMAR1.sys
-
OsPaMAR1.lzx
-
Turn the instrument off, and insert the card containing the operating system into the card slot.
- Turn the instrument on. A message appears in the display, king if you want to load the operating system.
- Press ENTER to load, or EXIT to cancel the loading procedure. If you press ENTER, wait until the loading is finished.
When the operating system is finished loading, message appears, asking you to remove the card and press any button.
Hint: When done, delete the operating system files, to avoid microARRANGER starts the upgrade procedure each time it is turned on with the same card in the drive.
- Remove the card, and press any button.
RELOADING THE FACTORY DATA
Should the internal memory content get damaged, you can reload the original Factory Data from the backup card. See "Restore Data" on page 141.
2. START UP
CONNECTING THE AC POWER ADAPTER
Connect the supplied AC power adapter to the dedicated socket on the rear of the instrument. Then, plug it into a wall socket.
Warning: Use only the supplied adapter, or an adapter suggested by Korg. Other adapters may look similar, but they may damage your instrument!
TURNING THE INSTRUMENT ON AND OFF
Turning the power on
- Press the power button (⏻) located on the upper right side of the front panel.
The startup screen will appear in the LCD, and after a time it will display the main page in Style Play mode and the unit will be ready for sound output.
Turning the power off
- Press the power button (⏻) located on the upper right side of the front panel to turn off the power.
Warning: When turning the instrument off, all data contained in RAM (a volatile memory, used for Song editing) will be lost. On the contrary, data contained in the SSD disk (a non-volatile memory, used for Factory and User data) will be preserved.
Note: Never turn off the power while the SD card data is being read or written.
ABOUT THE AUTO POWER-OFF FUNCTION
With the factory settings, this instrument will automatically power-off when four hours have passed since you last played the keyboard or used the buttons. If desired, you can turn off (disable) this function.
The power will also turn off automatically after four hours pass with only songs or demo songs being played.
To adjust power on/off settings, press the [GLOBAL] button to enter the GLOBAL page, and adjust the settings on the Page1-Gen.Controls page. ("AutoF" on page 125)
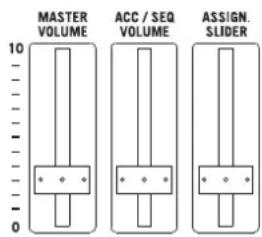
CONTROLLING THE VOLUME
- Use the MASTER VOLUME slider to control the overall volume of the instrument. This slider controls the volume of the sound going to the internal speakers, the L/MONO & RIGHT OUTPUTS, and the HEADPHONES connector.
text_image
MASTER VOLUME ACC / SEQ VOLUME ASSIGN. SLIDERNote: Start at a moderate level, then raise the MASTER VOLUME up. Don't keep the volume at an uncomfortable level for too long.
- Use the ACC/SEQ VOLUME slider to control the Style tracks (drums, percussion, bass...) volume. This slider also controls both of the Sequencers tracks, excluding the Realtime (Keyboard) tracks.
- By default, you can use the ASSIGN.SLIDER to control the keyboard tracks volume. This slider is user-assignable, but is set to the Keyboard Expression parameter by default.
THE BALANCE SLIDER
The BALANCE slider sets the relative volume of the two onboard sequencers (Sequencer1 and Sequencer 2).
- Move it fully left to set Sequencer 1 to the maximum level and Sequencer 2 to zero.
- Move it fully right to set Sequencer 1 to zero and Sequencer 2 to the maximum level.
- Move it to the center to set both Sequencers at the same level.
Note: When turning the instrument on, move this slider to the center, to avoid starting a Song at the minimum level.
HEADPHONES
You can connect a pair of headphones to the rear panel headphone jack (PHONES: stereo mini-jack). You can use headphones with an impedance of 16–200Ω (50Ω recommended). Use a headphone distributor to connect more than one pair of headphones.
AUDIO OUTPUTS
You can send the sound to an external amplification system, instead of the internal speakers. This is useful when recording, or when playing live.
Stereo. Connect two mono cables to the L/MONO & RIGHT OUTPUTS. Connect the other end of the cables to a stereo channel of your mixer, two mono channels, two powered monitors, or the TAPE/AUX input of your audio system. Don't use the PHONO inputs of your audio system!
Mono. Connect a mono cable to the L/MONO OUTPUT. Connect the other end of the cable to a mono channel of your mixer, a powered monitor, or a channel of your TAPE/AUX input of a hi-fi system (you will hear that channel only, unless you can set the amplifier to Mono mode).
AUDIO INPUTS
You can connect the output of another electronic musical instrument, an unpowered mixer, or any audio device to the rear panel input jack (INPUT: stereo mini-jack). Since this is a line-level input, you'll need to use a separately sold mic preamp or mixer if you're connecting a mic.
Use the connected device's volume control to adjust the input level. Be careful not to make it distort (or "clip"). Here is how to set the volume of the connected device:
- if the sound heard on microARRANGER's outputs is too low, you should increase the output level of the connected device.
• if it sounds fine, it's ok. - if its distur should lower the level a little, until the sounds is fine again.
MIDI CONNECTIONS
You can play the internal sounds of your microAR-RANGER with an external controller, i.e. a master keyboard, a MIDI guitar, a wind controller, a MIDI accordion, or a digital piano.
- Connect a standard MIDI cable from the MIDI OUT of your controller to the MIDI IN connector on the microARRANGER.
- Select a transmission MIDI channel on your controller. Some controllers, like the MIDI accordions, usually transmit on more than one channel (see more information in the MIDI chapter).
- On the microARRANGER, sect the MIDI Setup that best fits your controllers type (see "Page 4 - MIDI Setup" on page 126).
DAMPER PEDAL
Connect a Damper (Sustain) pedal to the DAMPER connector on the back panel. Use a KORG PS-1, PS-3 or DS-1H footswitch pedal, or a compatible one. To switch the Damper polarity, see "Damper Pol. (Damper Polarity)" on page 126.
DEMO
Listen to the built-in Demo Songs to appreciate the power of the microARRANGER. There are 16 Demo Songs to choose from.
- Press the STYLE PLAY and SONG PLAY buttons together. Their LEDs start blinking.
At this point, if you don't press any other button, all the Demo Songs will be played back. - Choose a page using the PAGE buttons. There are two different pages in the Demo mode.
- Select a Demo Song by pressing the corresponding VOLUME/VALUE button around the display. The Demo will automatically start.
- Stop the Demo by pressing START/STOP.
- Exit the Demo mode by pressing one of the MODE buttons.
THE MUSIC STAND
A music stand comes standard with your microARRANGER. Fit it into the two dedicated holes in the back panel.
3. FRONT PANEL

text_image
micro ARRANGER 2 3 4 5 6 7 27 28 29 MOTOR VILLIWI STYLE PLAY SONG PLAY B.250 SONG PROPER BASIL FLOW MINIART BASIL NIVE MAX. BASIL SPLIT POINT & QUANTITY TEMP 1 30 31 32 33 34 TEMP 0 / VALUE KORG 1 VOLUME / VALUE OFFER / ALL SPECT 1 / AVE 0 35 38 CHN LOWER ORR OFFER KEY PLAT COE TYPE CHANGE PROFESSIONAL CHINA OUT / NO ENTER / YES 36 37 44 PROGRAM / PERFORMANCE HORN ONION 1 ONION 2 ONION STRAW & SWITCH STRAW STOP WHITE CARD IN LIME ENBRIDGE TAX MICHIGRATION SWITCH 2 BASIS BRAIN & PULSE STX TRANSFORM EXCONE 16 17 18 19 20 21 22 23 24 25 26 45 46 471 Power switch ()
This turns the microARRANGER's power on or off.
2 MASTER VOLUME
This slider controls the overall volume of the instrument, both of the internal speakers, the L/MONO and RIGHT outputs, and the HEADPHONES output.
Warning: At the maximum level, with rich-sounding Songs, Styles or Programs, the internal speakers could distort during signal peaks. Should this happen, lower the Master Volume a little.
3 ACC/SEQ VOLUME
This slider controls the accompaniment tracks volume (Style Play mode) or the Song tracks volume, excluding the Realtime tracks (Song and Song Play modes). This is a relative control, where the effective maximum value is determined by the MASTER VOLUME slider position.
4 ASSIGN.SLIDER
This is a freely programmable slider (see "Sld (Slider)" on page 126). By default, it acts as the Keyboard Expression control, to let you balance the relative volume of the Realtime (Keyboard) tracks.
5 MODE sectio n
Each of these buttons recalls one of the operating modes of the instrument. Each mode excludes the others.
STYLE PLAY
Style Play mode, where you can play Styles (automatic accompaniments) and/or play up to four Realtime tracks on the keyboard.
In the main page, Realtime (Keyboard) tracks are shown on the right half of the display. You can reach the main page by pressing EXIT from any of the Style Play edit pages. If you are in a different operating mode, press STYLE PLAY to recall the Style Play mode. If the TRACK SELECT LED is on, press TRACK SELECT to turn it off and see the Realtime tracks.
This operating mode is automatically selected when the instrument is turned on.
SONG PLAY
Song Play mode, where you can playback 16-track Songs in Standard Midi File (SMF) format directly from the memory card. You can also play ".MID" and ".KAR" files directly from the memory card. Since the microARRANGER is equipped with two sequencers, you can even play two Songs at the same time, and mix them with the BALANCE slider.
In addition to the Song tracks, you can play one to four Realtime (Keyboard) tracks, along with the Song(s). In the main page, Realtime (Keyboard) tracks are shown on the right half of the display. You can reach the main page by pressing EXIT from any of the Song Play edit pages. If you are in a different operating mode, press SONG PLAY to recall the Song Play mode. If the TRACK SELECT LED is on or flashing, press TRK SELECT one or two times to turn it off and see the Realtime tracks.
B.SEQ
Backing Sequence mode, where you can record a new Song based on the Realtime and Style tracks, and save it as a new Standard MIDI File.
SONG
Song mode, where you can play, record, or edit a Song.
PROGRAMProgram mode, to play single Sound Programs on the keyboard, or edit them.
DEMO
Press the STYLE PLAY and SONG PLAY buttons together to select the Demo mode.
This mode slyou listen to some Demo Songs, to let you hear the sonic power of the microARRANGER.
6 GLOBAL
This button recalls the Global edit environment where you can select various global settings. This edit environment overlaps any operating mode, which will still remain active in the background. Press EXIT to go back to the underlying operating mode.
7 SD CARD
This button recalls the Card edit environment, where you can execute various operations on files and cards (Load, Save, Format, etc...). This edit environment overlaps any operating mode, that still remains active in the background. Press EXIT to go back to the underlying operating mode.
8 MEMORY (TIE)
This button turns the Lower and Chord Memory functions on or off. Go to the "Page 24 - Preferences: controls" edit page (Style Play mode, see page 51) to decide if this button should be a Chord Memory only, or a Lower/Chord Memory button. When it works as a Lower/Chord Memory:
ON The sound to the left of the split point, and the chord for the automatic accompaniment, are kept in memory even when you raise your hand from the keyboard.
OFF The sound and chords are released as soon as you raise your hand from the keyboard.
This button doubles as a TIE function for the Song mode (see chapter 13).
9 BASS INV. (REST)
This button turns the Bass Inversion function on or off.
ON The lowest note of a chord played in inverted form will always be detected as the root note of the chord. Thus, you can specify to the arranger composite chords such as Am7/G or "F/C".
OFF The lowest note is scanned together with the other chord notes, and is not always considered as the root note.
This button doubles as a REST function for the Song mode (see chapter 13).
10 MAN. BASS
This button turns the Manual Bass function on or off.
Note: When you press the MAN. BASS button, the Bass track volume is automatically set to the maximum value. The volume is automatically set back to the original value when the MAN. BASS button is deactivated.
ON The automatic accompaniment stops playing (apart for the Drum and Percussion tracks), and you can manually play the Bass track on the Lower part of the keyboard. You can start the automatic accompaniment again by pressing one of the CHORD SCANNING buttons.
OFF The bass track is automatically played by the Style.
11 SPLIT POINT (<)
▶GBL
Keep this button pressed to open the Split Point window. While this window is open, you can set the split point simply by playing the split point note on the keyboard. Then, release the SPLIT POINT button.
To memorize the selected split point note, press the GLOBAL button, then press WRITE to save the Global into memory (see "The Write window" on page 125).
This button doubles as a PREVIOUS EVENT function for the Backing Sequence and Song modes (see chapters 12 and 13).
12 G.QUANTIZE (>)
Press this button to open the Groove Quantize window, where you can select a realtime groove quantization to be applied to the Song (only Sequencer 1). See "Groove Quantize window" on page 71.
This button doubles as a NEXT EVENT function for the Backing Sequence and Song modes (see chapters 12 and 13).
13 TEMPO ☑ (= LOCK)
This button turns the Tempo Lock function on or off.
ON When you select a different Style or Performance, the tempo doesn't change. You can still change it using the DIAL or the TEMPO buttons.
OFF When you select a different Style or Performance, the memorized tempo value is automatically selected.
14 SINGLE TOUCH
This button turns the Single Touch function on or off.
ON When a different Style (or the same again) is selected, a Single Touch Setting (STS1) is automatically selected, meaning that the Realtime tracks and effects will change, together with the Style tracks and effects.
OFFWhen yo u select a different Style (or the same again), the Style tracks and effects are changed, while the Realtime tracks are not changed.
15 STYLE section (NUMERIC KEYPAD)
Use these buttons to open the Style Select window and select a Style. See "Selecting a Style" on page 26.
The leftmost button lets you select the upper or lower row of Style banks. Press it until you've selected the row you're looking for. (After both LEDs have turned on, press the button again to turn them off).
UPPER LED ON
Upper-row Styles selected.
LOWER LED ON
Lower-row Styles selected.
A word about Style banks and names. Styles from "8/16 BEAT" to "WORLD 3", and from "LATIN1" to "TRAD" are standard Styles, the user can't normally overwrite with a Load operation (unless you remove the protection; see "Factory Style Protect" on page 142). "DIRECT SD" Styles are Styles directly accessed from the memory card (no need to load from card). See "The DIRECT SD bank" on page 40.
Styles from "USER1" to "USER3" are locations where you can load new Styles from the memory card.
Each button (Style bank) contains 2 pages, each with up to 8 Styles. Browse through the Styles using the PAGE buttons.
There is a shortcut to see the original bank for a Style.
You can see the original bank where a Style is contained. Just keep the SHIFT button pressed, and then
press the lefmost button of the STYLE section. A message window will appear, showing the name of the original bank. Release the SHIFT button to exit the window.
There is a shortcut to see all pages of the selected bank. To cycle all pages for a selected bank, press the bank's button until you see the page that you're looking for.
These buttons double as a numeric keypad on certain pages (see "Selecting a Song composing its progressive number" on page 70).
16 FADE IN/OUT
▶STYLE
When the Style stopped, press this button to start it with a volume fade-in (the volume goes from zero to the maximum).
When the Style is playing, press this button to stop it with a volume fade-out (the volume gradually decreases).
You don't need to press START/STOP to start or stop the Style.
17 VARIATION 1-4 (NOTE LENGTH) buttons
▶PERF ▶STYLE
Each of these buttons will select one of the four variations of the current Style. Each variation can vary in patterns and sounds.
These buttons double as a NOTE LENGTH function for the Song mode (see chapter 13).
18 FILL 1-2 (NOTE L ENGTH) buttons
▶PERF ▶STYLE
These two buttons trigger a fill-in. Press them twice (LED blinking) to let them play in loop, and select any other Style element (Fill, Intro, Variation...) to exit the loop.
They also double as a NOTE LENGTH function for the Song mode (see chapter 13).
19 COUNT IN / BRE AK
▶PERF ▶STYLE
While the Style is not running, press this button, then press SART/STOP. This combination triggers a one-bar initial count, then the Style starts playing.
While the Style is already in play, this button triggers a break (an empty measure beginning with a kick + crash shot). Press it twice to let it play in loop, and select any other Style element (Fill, Intro, Variation...) to exit the loop.
20 ENDING 1-2 (DOT, TRIPLET) buttons
▶PERF ▶STYLE
While the Style is running, these two buttons trigger an Ending, and stop the Style. Press one of them, and the Style will stop running with an Ending. If pressed while the Style is stopped, they act as an additional couple of Intros.
Press them twice (LED blinking) to let them play in loop, and select any other Style element (Fill, Intro, Variation...) to exit the loop.
▶ ENDING1 also doubles as a DOT function, and ENDING2 doubles as a TRIPLET function, to be used in Song mode (see chapter 13).
Note: Ending 1 plays a short sequence with different chords, while Ending 2 plays on the last recognized chord.
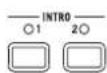
21 INTRO 1-2 buttons
▶PERF ▶STYLE
These two buttons set the arranger in Intro mode. After pressing one of these buttons, start the Style, and it will begin with the selected intro. The INTRO LED will automatically go off at the end of the intro.
Press them twice (LED blinking) to let them play in a loop, and select any other Style element (Fill, Intro, Variation...) to exit the loop.
Note: Intro 1 plays a short sequence with different chords, while Intro 2 plays on the last recognized chord.
22 START/STOP
Starts or stops the Style that's running.
SHIFT You can reset all 'frozen' notes and controllers on the microARRANGER and any instrument connected to its MIDI OUT, by using the "Panic" key combination. Juspress SHIFT + START/STOP to stop all notes and reset all controllers.
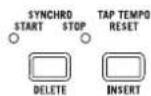
23 SYNCHRO START / STOP (DELETE)
This button rnathe Synchro Start and Synchro Stop functions on or off. Press it repeatedly to turn the functions on or off. The LEDs will cycle in this order: START → START+STOP → OFF.
START LED ON
When this LED is lit-up, just play a chord in the chord recognition area (usually under the split point, see "CHORD SCANNING section" on page 17) to automatically start the Style running. If you like, you can turn one of the INTROs on before starting the Style.
START+STOP LEDs ON
When both LEDs are lit-up, raising your hand from the keyboard momentarily will stop the Style from playing. If you play a chord again, the Style starts again.
OFF All Synchro functions are turned off.
This button doubles as a DELETE function for the Backing Sequence and Song modes (see chapters 12 and 13).
It is also used to delete the selected character, during text editing.
24 TAP TEMPO/RESET (INSERT)
This is a double-function button, acting in a different way depending on the Style status (stop/play).
Tap Tempo: When the Style is not playing, you can "beat" the tempo on this button. At the end, the accompaniment starts playing, using the "tapped in" tempo.
Reset: When you press this button while the Style is in play, the Style pattern goes back to the previous strong beat.
This button doubles as an INSERT function for the Backing Sequence and Song modes (see chapters 12 and 13).
It is also used to insert a character at the cursor position, during text editing.
25 WRITE/CARD IN USE
In Style Play mode, this button opens the Write window, that lets you save all the tracks onto a Performance, the Realtime (Keyboard) tracks in a Single Touch Setting (STS), or the accompaniment tracks onto a Style Performance. (See "The Write window" on page 42).
In the Global edit environment, press it to save Global parameters in memory. (See "The Write window" on page 125).
This button's LED works as a CARD IN USE indicator, and turns on when the card slot is in use.
26 EN SEMBLE
▶PERF ▶STS
This button turns the Ensemble function on or off. When on, the right-hand melody is harmonized with the left-hand chords.
Note: The Ensemble function works only when the keyboard is in SPLIT mode, and the LOWER Chord Scanning mode selected.
27 RECORD
This button sets the instrument in Record mode (depending on the current operating mode).
28 MENU
This button opens the Menu page for the current operating mode or edit environment. After opening a menu, you can jump to one of the edit pages by pressing the corresponding VOLUME/VALUE buttons; or browse them using the PAGE buttons. Otherwise, go back to the main page of the current operating mode, or close the edit environment, by pressing the EXIT button.
See the relevant chapter devoted to each operating mode or edit environment, to see their "maps" in detail.
29 PAGE -/+
After pressing MENU to open a menu, use these buttons to browse the edit pages of an operating mode or editing environment. Press EXIT to go back from an edit page to the main page of the current operating mode, or to close the Global or Card Edit environment. In addition, you can use these buttons to select a different page in a Style Select or Program Select window.
30 VOLUME/VALUE (MUTE) A-H buttons
▶PERF ▶STYLE ▶STS
Within this user's manual, each button pair is marked with an alphabetic letter (A–H). See "Display and User Interface" on page 19 for more details.
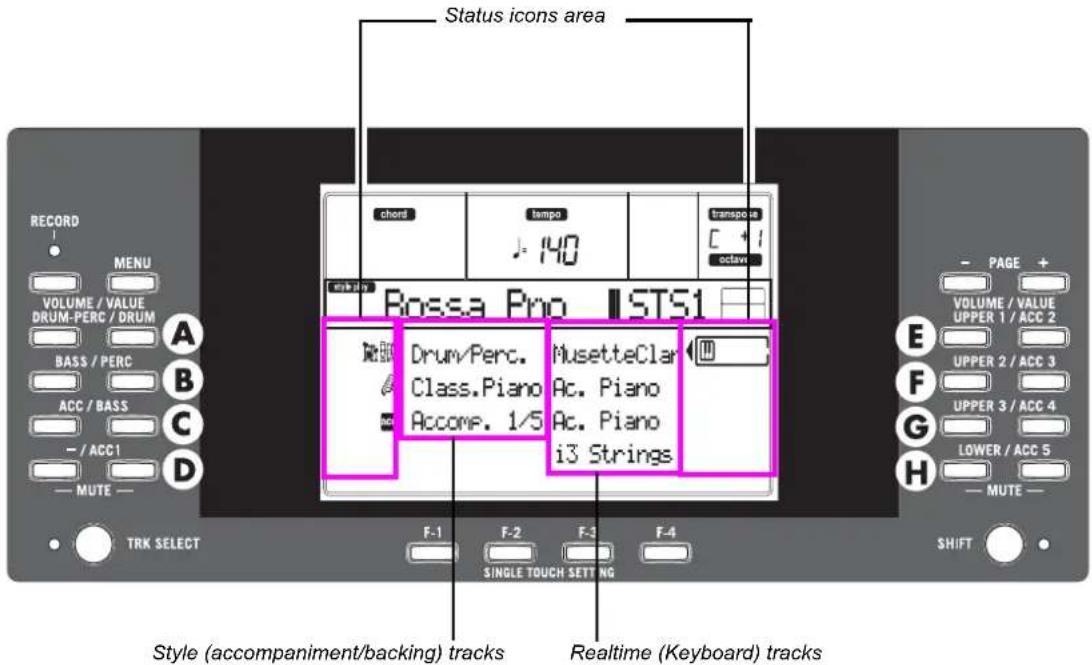
text_image
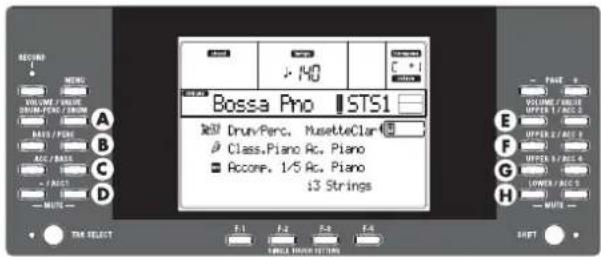
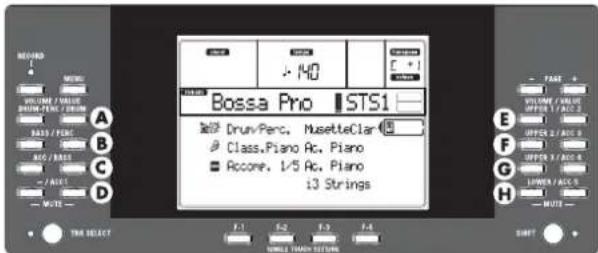
Bossa Pro 1.50 STS1 Druv.Perc, MusetteClar Class,Piano Ac, Piano Accomp. 1/5 Ac, Piano i3 StringsA corresponding track name is printed over each button pair. These names show the corresponding track the button pair affects in the main page of the Style Play mode.
- The left half is for the main page, where you can see the Realtime tracks, and the Style tracks grouped together:
text_image
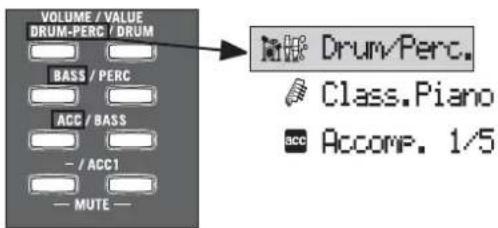
VOLUME / VALUE DRUM-PERC / DRUM BASS / PERC ACC / BASS - / ACC1 - MUTE - Drum/Perc. Class.Piano Acco. 1/5- The right half is for the Style tracks page, where you can see each of the accompaniment tracks:

text_image
VOLUME / VALUE DRUM-PERC / DRUM BASS / PERC ACC / BASS - / ACC1 - MUTE - Standard Kit Latin Perc Fretless AcGuitarSee "Symbols and Icons" on page 21.
Use these buttons to perform various operations on the commands and functions appearing in the display.
SELECTING
Use each button pair to select the corresponding item in the display (i.e. a track, a parameter or command). Use either the left or right button in a pair.
VOLUME While you are in the main pages of any operating mode, select a track and use these buttons to change the track's volume. Use the left button to decrease it, or the right button to increase it.
MUTE Press both buttons in a pair to mute the corresponding track. Press both buttons again to unmute the track.
SOLO SHIFT While in the Style Play, Song Play and Song modes, you can solo one of the tracks. Just keep the SHIFT button pressed, and press both of the VOLUME/VALUE buttons corresponding with the track you wish to solo.
To exit the solo mode, keep the SHIFT button pressed again, and press both the VOLUME/VALUE buttons corresponding to the soloed track.
VALUE Use each button pair to change the corresponding parameter's value. The left button decreases the value, the right button increases it.
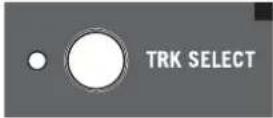
31 TRACK SELECT
Depending on the operating mode, this button switches between the various tracks view.
STYLE PLAY MODE
Switches between the Realtime tracks and the Style tracks.
SONG PLAY MODE
Switches between the main page (showing the Realtime/Keyboard tracks), Song tracks 1–8, and Song tracks 9–16.
SONG MODE
Switches between the main page, Song tracks 1–8 and Song tracks 9–16.
The TRACK SELECT LED shows the current page view:
Off Main page (Realtime tracks, or Song controls)
On 2nd page (Style tracks, or Song tracks 1–8)
Flashing 3rd page (Song tracks 9–16)
(F-1–F-4 FUNCTION KEYS) buttons
While in the main page of the Style Play or Backing Sequence mode, these buttons select a Single Touch Setting each. Each of the Styles includes a maximum of four Single Touch Settings (STS), to automatically configure the Realtime tracks and effects at the touch of a finger. When the SINGLE TOUCH LED is lit, an STS is automatically selected when selecting a Style.
In Edit mode, these buttons double as function keys, to select the corresponding items in the display.
33 SHIFT
With this button held down, pressing certain other buttons will access to a second function.
34 TEMPO/VALUE section
The DIAL and the DOWN/- and UP/+ buttons can be used to control the Tempo, assign a different value to the selected parameter in the display or scroll a list of files in the Song Select and Card pages. The VALUE LED shows the status of this section.
DIAL Turn the dial clockwise to increase the value or tempo. Turn it counter-clockwise to decrease the value or tempo.
SHIFT When used while pressing the SHIFT button, this control always acts as a Tempo control.
DOWN/- and UP/+ DOWN/- decreases the value or tempo; UP/+ increases the value or tempo.
SHIFT Keep the SHIFT button pressed down, and press either the DOWN/- or UP/+ button to reset the Tempo to the value that's saved onto the selected Style.
35 VALUE LED
This LED shows the status of the DIAL and DOWN/- and UP/+ buttons.
ON The DIAL and DOWN/- and UP/+ buttons act as Value controls, to change the value of the selected parameter in the display.
OFF The DIAL and DOWN/- and UP/+ buttons control the Tempo.
36 EXIT/NO
Use the button to perform various actions, leaving from the current status:
- exit a dialog box
- answer "No" to any question that appears in the display
- exit the Menu window
- go back to the main page of the current operating mode
- exit the Global or Card Edit environment, and go back to the main page of the current operating mode
- exit from a Style, Performance or Program Select window
37 ENTER/YES
Use the button to perform various actions, agreeing the current selected status:
- answer "Yes" to any question that appears in the display
• confirm a command
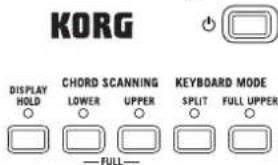
38 DISPLAY HOLD
This button turns the Display Hold function on or off.
ON When you open a temporary window (like the Program Select window), it remains in the display until you press EXIT/NO, or an operating mode button.
OFF Any temporary window closes after a certain time, or after selecting an item in the window.
39 CHORD SCANNING section
▶PERF ▶STS
In Style Play and Backing Sequence mode, use these buttons to define the way chords are recognized by the arranger.
LOWER Chords are detected below the split point. The number of notes you should play to form a chord is defined by the Chord Scanning Mode parameter (see “Chord Recognition Mode” on page 51).
UPPERChor ds are detected above the split point. You must always play three or more notes to let the arranger recognize a chord.
FULL (both LEDs on) Chords are detected on the full keyboard range. Yo must always play three or more notes to let the arranger recognize a chord.
OFF No chords will be detected. After pressing START/STOP, only the Drum and Percussion accompaniment tracks can play.
40 KEYBOARD MODE section
▶PERF ▶STS
These buttons define how the four Keyboard (or Real-time) tracks are positioned on the keyboard.
SPLIT The Lower track plays below the split point, while the Upper 1, Upper 2 and Upper 3 tracks play above it. By default, selecting this keyboard mode automatically selects the Lower chord scanning mode (see "Chord Recognition Mode" on page 51).
FULL UPPER
The Upper 1, Upper 2 and/or Upper 3 tracks play on the whole keyboard range. The Lower track does not play. By default, selecting this keyboard mode automatically selects the Full chord scanning mode (see "Chord Recognition Mode" on page 51).
41 STYLE CHANGE
This button turns the Style Change function on or off.
ON When you select a Performance, the Style could change, according to which Style number is memorized onto the Performance.
OFF When you select a Performance, the Style and Style track settings remain unchanged. Only Realtime (Keyboard) tracks settings are changed.
42 PERFORM.
Press this button to use the PROGRAM/PERFORMANCE section to select a Performance.
43 PROGRAM
Press this button to use the PROGRAM/PERFORMANCE section to select a Program, and assign it to the selected track.
44 PROGRAM/PERFORMANCE section
▶PERF ▶STYLE ▶STS
Use these buttons to open the Program Select or Performance Select window, and select a Program or a Performance. See “Selecting a Program” on page 25, or “Selecting a Performance” on page 25. For a list of available Programs, see “Programs (Program Change order)” on page 154.
The leftmost button selects the upper or lower row of Program or Performance banks. Press it until you've selected the row that you're looking for. (After both LEDs have consecutively turned on, press the button again to turn them off).
UPPER LED ON
Upper of Programs or Performances selected.
LOWER LED ON
Lower row of Programs or Performances selected.
On the front panel, Program banks are identified by the instrument names, while Performance banks are identified by numbers (1–10; 0=bank 10).
A note about Program banks and names. Programs from "PIANO to "SFX" are standard Programs, the user can't directly modify.
Programs "SER1" and "USER2" are locations where you can load new Programs from the memory card.
"USER DK" is where you can load new drum kits.
Each Program bank contains various pages, each with up to 8 Programs. You can browse them using the PAGE buttons.
Shortcut to see the original bank for a Performance or Program. You can see the original bank where a Performance or Program is contained. Just keep the SHIFT button pressed, and then press the lefmost button of the PROGRAM/PERFORMANCE section. A message window will appear, showing the name of the original bank. Release the SHIFT button to exit the window.
Shortcut to see all pages of the selected bank. To cycle all of the pages for a selected bank, press the bank's button.
45 PADS (1–4, STOP)
▶PERF ▶STS
These programmable pads can be used to trigger a sound effect. Use the STOP button to stop a cyclic sound. (See "List of sounds assignable to the Pads" on page 226).
Each Pad corresponds to a dedicated Pad track.
46 TRANSPOSE
▶PERF ▶STYLE
These buttons transpose the whole instrument in semitone steps (Master Transpose). The transposition value is shown (as a note name) on the top right of the display.
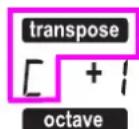
Press both buttons together, to reset the Master Transpose to zero.
Note: The Master Transpose has no effect on tracks set to Drum mode (and, even if set in a different status, on the Drum and Percussion tracks). See "Page 14 - Track: Mode" on page 46, and "Page 7 - Track: Mode" on page 78.
b Lowers the Master Transpose a semitone.
# Raises the Master Transpose a semitone.
47 OCTAVE
▶PERF ▶STYLE ▶STS
These buttons transpose the selected track in steps of a whole octave (12 semitones; max ±2 octaves). The transposition value is shown (in octaves) on the top right area of the display.
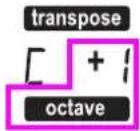
Press both buttons together, to reset the Octave Transpose to zero.
Note: The Octave Transpose has no effect on tracks set to Drum mode (and, even if set in a different status, on the Drum and Percussion tracks).
- Lowers the selected track an octave.
+ Raises the selected track an octave.
48 BALANCE slider
In Song Play mode, this slider balances the volume of the two on-board sequencers. When fully on the left, only Sequencer 1 can be heard. When fully on the right, only Sequencer 2 can be heard. When in the middle, both sequencers will play at full volume.
49 SEQUENCER TRANSPORT CONTROLS - SEQ1 and SEQ2
The instrument is equipped with two sequencers (Sequencer 1 and Sequencer 2), each with its own set of transport controls.
<< and >> Rewind and Fast Forward commands. If you use them while the Song is in play, they make it scroll back or forward.
When pressed once, these buttons move the Song to the previous or following measure. When kept pressed, they make the Song scroll continuously, until you release them.
SHIFT In Jukebox mode (Sequencer 1), keep the SHIFT button pressed, and press these buttons to scroll to the previous or next Song in the Jukebox list (see "Page 9 - Jukebox" on page 79).
PAUSE Pauses the Song at the current position. Press PAUSE or PLAY/STOP to start the Song playing again.
PLAY/STOPStarts or stops the current Song. When you stop the Song, the Song Position goes back to measure 1.
SHIFT In Song Play mode, pressing this button while keeping SHIFT pressed, starts both sequencers at the same time.
4. DISPLAY AND USER INTERFACE
The display shows the current status of the microAR-RANGER and its performance and editing parameters. You can select each parameter by using the VOLUME/VALUE (A-H) buttons on the side of the display, or each page command appearing along the last line using the F-1-F-4 buttons. You can vary many of the parameter's values by pressing the left (-) or right (+) button of any VOLUME/VALUE pair.
text_image
Status icons area RECORD MENU VOLUME / VALUE DRUM-PERC / DRUM A BASS / PERC B ACC / BASS C - / ACC1 D MUTE - TRK SELECT F-1 F-2 F-3 F-4 SINGLE TOUCH SETTING Drum/Perc. Class.Piano Accomp. 1/5 MusetteClar Ac. Piano Ac. Piano i3 Strings PAGE + VOLUME / VALUE UPPER 1 / ACC 2 E UPPER 2 / ACC 3 F UPPER 3 / ACC 4 G LOWER / ACC 5 H MUTE - Style (accompaniment/backing) tracks Realtime (Keyboard) tracksDISPLAY CONTROLS
VOLUME/VALUE (A-H) buttons and display parameters. These buttons are used to select the corresponding parameter or command in the display, to change the parameter's value, or to change the volume of the corresponding track.
While you are on the main page, these buttons can select a track, change the track's volume, or mute/unmute a track.
See "VOLUME/VALUE (MUTE) A-H buttons" on page 15 for more information.
F-1–F-4 buttons. When in an Edit page, these buttons may be used when there are four parameters in a row, as in the following example:
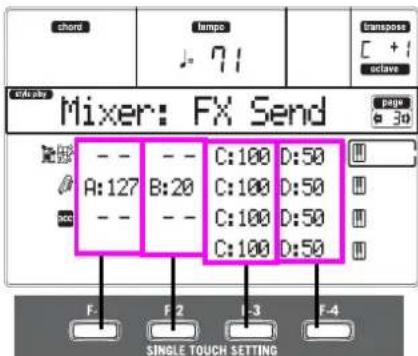
text_image
short lamps 71 Transpos C + 1 octave Calculator Mixer: FX Send page 30 OFF A:127 B:20 C:100 D:50 C:100 D:50 C:100 D:50 C:100 D:50 F- F2 I-3 F-4 SINGLE TOUCH SETTINGFirst, sect the line using a VOLUME/VALUE (A-H) button. Therelect a column using the F-1-F-4 function button.
In the Card Edit environment, the F-1-F-4 buttons can be used also to select one of the page commands appearing in the last line of the display.
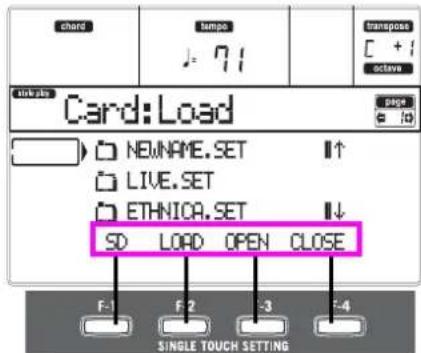
text_image
chord tumpo J = 71 transpose [ + ] active Linker Card:Load page # NEWNAME.SET ↑ LIVE.SET ETHNICA.SET ↓ SD LOAD OPEN CLOSE F-1 F2 -3 -4 SINGLE TOUCH SETTINGSee "SINGLE TOUCH SETTING (F-1-F-4 FUNCTION KEYS) buttons" on page 16 for more information.
PAGE. The PAE buttons select the previous or next edit page. When selecting a Style or a Program, they select a different page of Styles or Programs. See "PAGE -/+" on page 15 for more information.
MENU. The MENU button opens the current operating mode or edit environment's Menu. When in a Menu, you can use the VOLUME/VALUE buttons to select an edit section to jump to.
TRACK SELECT. Each of the operating modes have a different number of tracks:
Style Play 4 Realtime tracks, 8 Style tracks, 4 Pads.
Song Play 4 Realtime tracks, 2 x 16 Song Tracks, 4 Pads.
Backing Sequence
4 Realtime tracks, 8 Style tracks, 4 Pads.
Song 16 Song tracks.
You can only see up to 8 tracks in the display. So, use the TRACK SELECT button to switch to the other (hidden) tracks. For example, when in Style Play, you can use this button to switch from the Realtime tracks and the Style tracks.
INTERFACE STRUCTURE
Thanks to its multitasking operating system, the micro-ARRANGER user interface is structured in "overlapping", active layers. From the lower level:
• operating modes (Style Play, Backing Sequence, Song Play, Song, Program)
• edit environments (Global, Card)
- selecting windows (Style Select, Song Select, Program Select, Performance Select).
When opening an edit environment or a selecting page, the current operating mode is still working in the background.

flowchart
graph TD
    A["Selecting windows"] --> B["Edit environments"]
    B --> C["Operating modes"]
Operating modes. (See diagram at the bottom of this page). At the lowest level, an operating mode is always active. The current operating mode is indicated by the lit LED on the STYLE PLAY, B.SEQ, SONG PLAY, SONG or PROGRAM button in the MODE section. The relevant icon lights up in the display.
An opating mode is divided into a main page (the page where you usually play a Style, a Song or a Program), a menu, and a series of edit pages.
Press MENU to access the Menu. Use the MENU and PAGE buttons to browse across the various edit pages. Press EXIT to go back to the main page.

flowchart
graph LR
    A["Main page Menu Edit pages"] --> B["Operating modes"]
    B --> C["Mixer: Volume"]
    C --> D["Menu"]
    D --> E["- PAGE +"]
Edit environment. (See diagram at the bottom of this page). When you press GLOBAL or SD CARD, an edit environment overlaps the current operating mode. Press EXIT to go back to the current operating mode. An edit environment is made up of a menu and a series of eid pages . Use the MENU and PAGE buttons to browse across the various edit pages.
Selecting windows. When you press one of the STYLE or PROGRAM/PERFORMANCE buttons, you open a selecting window. This window closes after selecting one of the items in it, or after pressing EXIT. If the DISPLAY HOLD LED is light up, the window doesn't close after selecting an item. Press EXIT to close the window, and go back to the underlying page.
MESSAGE WINDOWS
Sometimes, a message might appear in the display, warning about an error or an incorrect operation:
Not a Standard MIDI File
Press ENTER or EXIT to exit one of these windows. Other messages ask for an answer, as in the "Are you sure" window below:
Are you sure? ENTER=Ok, EXIT=Cancel
Press ENTER/YES for Yes, or EXIT/NO for No.
SYMBOLS AND ICONS
Many icons and symbols, on the custom display, show the status of a parameter or the display content.

Realtime/Keyboard track (Upper 1–3, Lower).

Drum track (Style track view).

Percussion track (Style track view).

Grouped Drum and Percussion tracks.

Bass track (Style track view).

Grouped accompaniment tracks. This symbol indicates the five grouped accompaniment tracks (Acc1–5).

Accompaniment tracks (Style track view).

Sequencer tracks.

Selected track or parameter. When this symbol appears, you can execute any available operation on the selected item.
(no icon)
The track is in mute, and can't play on the keyboard.
GRAYED-OUT NON-AVAILABLE PARAMETERS
Currently non-available parameters are now shown in "gray" in the display, i.e. with a "ghost" texture. Here is an example of a grayed-out parameter, compared to a normal parameter:
Bottom:G-1 Top:08
Text in solid black

Text in gray
flowchart
graph LR
    A["Edit environment"] --> B["Menu"]
    B --> C["Edit pages"]
    C --> D["Menu: Format, Save, Copy, Erase, Format, New Dir, Rename, Utilities"]
    D --> E["Edit pages: NENAME.SET, LIVE.SET, ETHNICX.SET, SD_LOAD_OPEN_CLOSE"]
    E --> F["Edit pages: -PAGE +"]
5. REAR PANEL

text_image
KORG micro ARRANGER FINDERS OUTPUT R L/MOND DAMPER ASSIGN. PDL/SW N—MDI—OUT DC 12V 1 2 3 4 5 6 7 81 PHONES
Use this jack to connect a pair of headphones. You can use headphones with an impedance of 16–200Ω (50Ω suggested). Use a headphone distributor to connect more than one pair of headphones.
2 INPUT
Use these unbalanced connectors to input another keyboard/synthesizer, a (non-powered) mixer's output, or a CD/tape player (line impedance). The signal is automatically routed to the speakers, the Audio Outputs and the Phones.
3 OUTPUTS
Use these unbalanced connectors to send the audio signal (sound) to a mixer, a PA system, a set of powered monitors, or your hi-fi system. Set the output level with the MASTER VOLUME slider.
4 DAMPER
Use this to connect a Damper pedal, like the KORG PS1, PS3 or DS1H. To change its polarity, see "Damper Pol. (Damper Polarity)" on page 126.
5 ASSIGN. PDL/SW
Use this to connect a continuous or footswitch pedal, like the KORG EXP2 or XVP10. To program it, see "P/S (Pedal/Switch)" on page 126.
6 MIDI interface
The MIDI interface allows your microARRANGER to be connected to an external controller (master key-
board, MIDI guitar, wind controller, MIDI accordion...), to an expander, or to a computer running a sequencer or an editor. For more information on how to use the MIDI interface, see the MIDI chapter.
IN This connector receives MIDI data from a computer or a controller. Connect it to an external controller's or computer's MIDI OUT.
OUT This connector sends MIDI data generated by the microARRANGER's keyboard, controllers, and/or the internal sequencer. Connect it to an expander's or computer's MIDI IN.
7 DC 12V (AC power adapter connector)
Plug the supplied power adapter into this connector.
8 SD Card Slot
To insert an SD card (or SDHC card), push it into the slot until it clicks into place. To remove the SD card, push it in; the card will pop out slightly, allowing you to pull it out.
Note: Cafully read the owner's manual that came with your SD card, and observe the instructions regarding care and handling.
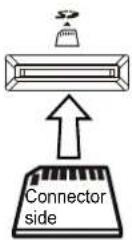
Note: Take care to insert the SD card in the correct direction and orientation, and be sure to press it all the way into the slot. Do not use excessive force.
BASIC GUIDE
6. BASIC OPERATIONS
PLAYING ON THE KEYBOARD
Just play on the keyboard. You will hear the Realtime tracks playing. There are four Realtime tracks: Upper 1–3 and Lower. They may play all at the same time, or just one or a few of them, depending on their Mute status. If you cannot hear a track, check the mute status of that part.
Tracks can be set in different ways: use the KEYBOARD MODE section to select the way they are configured on the keyboard.
- Press R to Play the UPper 1–3 tracks on the full range of the keyboard, just as you would on a piano.

text_image
KEYBOARD MODE SPLIT FULL/UPPER Upper 1 Upper 2 Upper 3- P r EIT to let the Upper 1–3 tracks play on the right of the Split Point, and the Lower track on the left.

text_image
KEYBOARD MODE SPECT FULL UPPER Lower Split Point Upper 1 Upper 2 Upper 3- Keep the SPLIT POINT button pressed, and play a note to change the point where the keyboard is divided in an Upper and a Lower part.

text_image
SPLIT POINT LOWER UPPERTo save the selected split point note, press the GLOBAL button, then press WRITE to save the Global in memory (see "The Write window" on page 125).
SELECTING, MUTING/UNMUTING AND SOLOING A TRACK
Selecting. Use the VOLUME/VALUE (A-H) buttons to select a track.
text_image
Bossa Pro STS1 DruvPerc, MusetteClar Class,Piano Ac, Piano Riccone, 1/5 Ac, Piano i3 StringsThe selected track is shown with a solid square surrounding its status icons.
E.Piano2

If you can't see the track that you're looking for, use the TRACK SELECT button to scroll up or down the tracks, and find the hidden ones.
Mute/unmute. Press both VOLUME/VALUE (A-H) buttons to mute or unmute a track. For example, if you are on the main page that appears after turning the instrument on, and you want to mute the Upper 1 track, press the E (UPPER1/ACC2) buttons together.

The mute/play status is shown by the relevant icon in the display:

Play status; the track plays on the keyboard.
(no icon)
Mute status; the track doesn't play on the keyboard.
Solo. While in the Style Play, Song Play and Song modes, you can solo one of the tracks. Just keep the SHIFT button pressed, and press both VOLUME/VALUE buttons corresponding to the track you wish to solo.
To exit the solo mode, keep the SHIFT button pressed again, and press both VOLUME/VALUE buttons corresponding to the soloed track.
SELECTING A PERFORMANCE
A Performance is a set of Programs and settings for the Keyboard and Style tracks, that makes selecting complex combinations live fast and easy. When the STYLE CHANGE LED is on, a Performance can also select a different Style.
It is always advisable to use Performances, rather than single Programs, when playing even a solo sound, since a Performance lets you select the right effects, transposition, plus many other parameters, together with the Programs.
| Data type | Parameters | |
| Realtime Tracks | Upper 1, Upper 2, Upper 3, Lower | Master Transpose, Program, Volume, Pan, Octave, Scale, Detune, Pitch Bend, Poly/Mono/Drum, Int/Ext, Damper, Dynamic Range, Joystick, C&D Effect Send level, Type, Parameters, Program parameters, Pads |
| Style Tracks | Drum, Percussion, Bass, Acc1, Acc2, Acc3, Acc4, Acc5 | Program, Volume, Pan, Octave, Detune, Pitch Bend, Poly/Mono/Drum, Int/Ext, Wrap Around, Keyboard Range, A&B Effect Send level, Type, Parameters, Program parameters, Drum Mapping, Kick&Snare Assignation |
Other "performance" parameters are saved in the Global.
| Global | Chord Recognition Mode, Memory Mode, Velocity Trigger, Lock |
- Pres the PERFORM button. This changes the PROGRAM/PERFORMANCE section into a Performance selector.

-
Use the leftmost button of the PROGRAM/PERFORMANCE section to select the first row of ten banks (1–10, upper LED turned on), or the second row of ten banks (11–20, lower LED turned on).
-
Press one of the 1-0 buttons to select the PROGRAM/PERFORMANCE bank containing the Performance you are looking for.

text_image
PROGRAM / PERFORMANCE PIANO E.PIANO MALLET & ACCORDION ORGAN 1 ORGAN 2 GUITAR STRINGS & TRUMPET & BRASS SAX WOODWIND SYNTH 1 SYNTH 2 BASS DRUM & PERC SFX USER 1 USER 2 USER DKThe Performance Select window appears. There are 8 Performances for each bank.
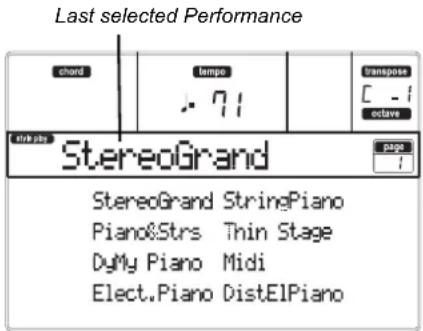
text_image
Last selected Performance chord tempo .71 transpose C - 1 octave click steps StereoGrand page StereoGrand StringPiano Piano&Strs Thin Stage DyMy Piano Midi Elect.Piano DistElPiano- Select a Performance using the VOLUME/VALUE (A-H) buttons.
- If the DISPLAY HOLD LED is on, press EXIT to exit this window.
The STYLE CHANGE button
When you select a Performance, the Style may or may not change, depending on the status of the STYLE CHANGE button. (When you save a Performance, the current Style number is always memorized).
- If the STYLE CHANGE LED is on, the Style saved in the Performance will be selected.
- If the STYLE CHANGE LED is off, the Style doesn't change.
SELECTING A PROGRAM
You can select a different Program (i.e., sound) to be played by a track. Before selecting a Program, you must select the track that you want to assign the Program to. Note: To assign different Programs to the Style tracks, press TRACK SELECT to see the Style tracks. If you select a Program while grouped tracks (Drum/Percussion or ACC) are selected, the Program will be assigned to the last selected track. Each Style Element (Variations, Fills...) can have different Programs, so your selection might be automatically reset when selecting a different Element. To avoid this reset, see "Prog (Program)" on page 49.
- Use the VOLUME/VALUE (E-H) buttons on the right side of the display, to select the Realtime (Keyboard) track you wish to assign a different Program to.

text_image
Bossa Pro STS1 Druv/Ferc. MusetteClar Class.Piano Ac. Piano Accone. 1/5 Ac. Piano i3 Strings- Press the PROGRAM button. This changes the PROGRAM/PERFORMANCE section into a Program selector.

- Use the leftmost PROGRAM/PERFORMANCE button to select a row of Program banks (upper, lower).
- Select the PROGRAM/PERFORMANCE bank containing the Program you are looking for (Program banks are identified by instrument names).

text_image
PROGRAM / PERFORMANCE Piano E.Piano MALLET & ACCORDION ORGAN 1 ORGAN 2 GUITAR STRINGS & TRUMPET & BRASS SAX WOODWIND SYNTH 1 SYNTH 2 BASB DRUM & PERC SFX USER 1 USER 2 USER DKThe Program Select window appears. See "Programs (Program Change order)" on page 154 for a list of Factory Programs.

text_image
Last selected Program Selected track Grand Piano T:U1 Grand Piano Ac.Piano Class.Piano BrightPiano L/R Piano ElGranPiano AcPianoWide ElGranWide5.Browse al 1 the Programs in the selected bank using the PAGE buttons. There can be various pages for each bank, containing up to 8 Programs each.
6. As you find the Program you are looking for, select it using the VOLUME/VALUE (A-H) buttons.
7. If the DISPLAY HOLD LED is on, press EXIT to exit this window.
SELECTING A STYLE
A Style is a set of rhythm and accompaniment patterns. You can select a Style from the internal memory, or from a memory card (see "The DIRECT SD bank" on page 40).
- Use the leftmost STYLE button to select a row Style banks (upper, lower).
- Select the STYLE bank containing the Style that you're looking for.

The Style Select window appears.

text_image
shard tempo J-137 Transpose C -1 octave Linker JazzWaltz 1 pages ID Jazz Brush JazzWaltz 1 Med. Swing JazzWaltz 2 Slow Swing 5/4 Swing SwingBallad Mood Swing- There are 2 pages for each bank, each containing 8 Styles. Select a page using the PAGE buttons.
- As you find the Style you are looking for, select it using the VOLUME/VALUE (A-H) buttons. Note: The new Style will enter at the next strong beat.
- If the DISPLAY HOLD LED is on, press EXIT to exit this window.
When you select a Style, the Realtime (Keyboard) tracks can be changed.
- If the SINGLE TOUCH LED is on, the Single Touch Setting (STS) #1 is automatically selected, and the Realtime tracks are changed. Programs, and the Keyboard Mode, may change.
- If the SINGLE TOUCH LED is off, Realtime tracks don't change.
SELECTING A SINGLE TOUCH SETTING (STS)
A Single Touch Setting (STS) contains Realtime (Keyboard) tracks' settings. Four STS are included in each Style, and can be recalled by pressing the SINGLE TOUCH SETTING (F-1–F-4) buttons under the display. Note: You can select a STS only when you are in the main page of the Style Play or Backing Sequence operating mode.
CHANGING ALL KEYBOARD TRACKS AT ONCE
of Select a Performance or a Single Touch Setting (F-1–F-4 buttons, when you are in the Style Play main page) to change keyboard Programs and effects at the touch of a button.
SHORTCUT TO SEE THE ORIGINAL BANK FOR A STYLE, PERFORMANCE OR PROGRAM
You can see the original bank where your Style, Performance or Program came from. Just keep the SHIFT button pressed, and press the lefmost button of the STYLE or PROGRAM/PERFORMANCE section. A message window will appear, showing the name of the original bank.
Release the SHIFT button to exit the window.
7. TUTORIAL
This chapter is fully devoted to step-by-step instructions, that we hope may be useful to learn the basics—in the field.
PLAYING A STYLE
(Automatic Accompaniment)
A Style will be your virtual band for your best solos. Select one of the 304 Styles we fitted in this machine...
1 OK, select your favorite musical Style.
There are plenty of Styles to choose from. We will go with a Jazz Style—the "Jazz Brush".
- Select the second row of Styles. Press the leftmost STYLE button to switch the lower LED on.
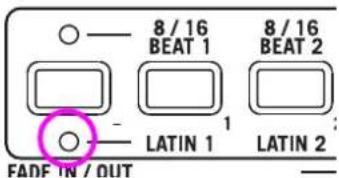
text_image
8/16 BEAT 1 8/16 BEAT 2 LATIN 1 LATIN 2 FADE IN / OUT- Now, you are free to press button number 4, called "JAZZ 1".

The Style Select window appears.
The selected Style

text_image
chord tempo . 71 transpose C 0 actare Grove Bld Ⅱ 1-1 Jazz Brush JazzWaltz1 Med. Swing JazzWaltz2 Slow Swing 5/4 Swing SwingBallad Mood Swing- Press one of the A VOLUME/VALUE buttons to select "Jazz Brush".
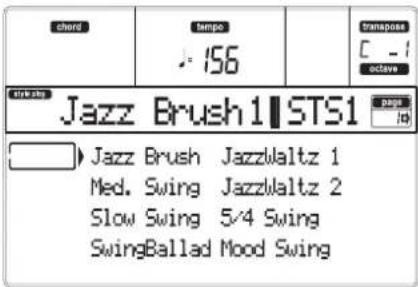
text_image
chord tempo .156 transpose C - 1 octave Jazz Brush 1 STS1 Jazz Brush JazzWaltz 1 Med. Swing JazzWaltz 2 Slow Swing 5/4 Swing SwingBallad Mood Swing2 Call an Intro.
You can engage an Intro to be played before the Style. Press INTRO1 or INTRO2. The former plays more freely, without letting you decide the chords. The latter lets you play a chord progression while it's playing.

text_image
O4 FILL COUNT IN BREAK ENDING INTRO O1 2O O1 2O O1 2O • □ □3 Start the Style!
Play a chord, and press the START/STOP button.

Then begin playing. Usually (when the SPLIT LED is on) chords are recognized under the split point, i.e. on the Lower part of the keyboard. With the UPPER or FULL Chord Scanning mode, you must play three or more notes to have a chord recognized.
text_image
KORG DISPLAY HOLD CHORD SCANNING LOWER UPPER KEYBOARD MODE SPLIT FULL UPPER - FULL-4 Play your chords and your melody.
Go on playing. As you may notice, the microARRANGER features a very sophisticated chord recognition engine. Recognized chords are shown in the display.
5 Make a break—or should we say “a fill”?
During your playing, you are free to call a one-bar break. Try it:
PRESS BREAK
Do you see? Music stopped for one bar. Then, it is back again. After a while, let's go for something different...
PRESS FILL1 OR FILL2
No silence, this time. microARRANGER plays a complex passage to let you take a breath. FILL1 is the simpler one, where FILL2 is more sophisticated. Usually, you will use FILL1 when playing with Variations 1 and 2 (the most easy), FILL2 when working with Variations 3 and 4 (more complex ones).

6 Select other Variations.
There are four VARIATION buttons. These are four different versions of the same Style. Try them all!

text_image
VARIATION O1 O2 O3 O4 FILL COUNT IN BREAK ENDING O1 O2 O3 O4 • 2You can go to a Variation after a Fill. Just press a FILL button, then, immediately after press a VARIATION button.
7 S t o p i t !
OK, you could say: "Oh, that's easy, I know how to do it, I can just press that big red START/STOP button again".
Yes, you are perfectly right. But that's the easy way. Let us suggest a more colorful way:
PRESS ENDING1 OR ENDING2
An ending is instantaneously called, and will begin playing, to lead the Style to a colorful end. As usual, ENDING1 is pre-programmed, while ENDING2 asks for your chord progression.

text_image
MATION O3 O4 FILL COUNT IN BREAK ENDING O1 2O O1 2O INTRO O1 2OIn Sync
"What if I want to avoid all that START/STOP stuff? I mean, I prefer to have my hands free for playing music!"
Good point. The SYNCHRO button is there right for this purpose.
1 While the Style is stopped, press the SYN-CHRO button.
The SYNCHRO-START LED begins blinking. The Synchro Start function is enabled.


2 Play a c hord on the keyboard.
You must play a chord for the chord recognition engine. Usually, it will be to the left of the split point, but it depends on the CHORD SCANNING section (see "CHORD SCANNING section" on page 17).
The Style starts.
3 Sto p the Style using your chosen method.
Need more information?
Go to "Style Play operating mode" on page 40. The Reference Guide includes all the information you need.
PLAYING IN REALTIME
(Without using Automatic Accompaniment)
As soon as you turn your microARRANGER on, it is in Style Play mode, and you can play it in realtime. Please follow me...
1 Play on the keyboard.
When you turn the microARRANGER on, Performance 1-1 is automatically selected.
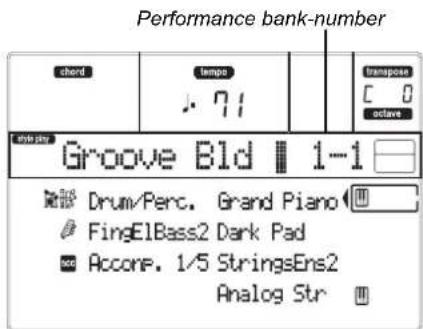
text_image
Performance bank-number chord tempo .71 Transpose C 0 octave Grove Bld 1-1 Drum/Perc. Grand Piano FingElBass2 Dark Pad Accone. 1/5 StringsEns2 Analog StrThis sets the Realtime (Keyboard) tracks for you. In this case you get the Upper 1 track playing on the full keyboard range, with the Grand Piano Program selected.
As you may know, there are four available Realtime tracks: Upper 1–3 and Lower. Upper Realtime tracks may play on the full range of the keyboard (the selected KEYBOARD MODE shall be FULL UPPER). Otherwise, the Lower track plays on the left of the Split Point, and the Upper tracks on the right (KEYBOARD MODE shall be SPLIT).
If you are not satisfied with this setting at startup, you can simply select another Performance. Or change the track's settings—as you will see in this tutorial—and save them into Performance 1-1. You'll soon see how to do it.
2 Select a different Performance.
Is the PERFORM. LED on?

If so, press one of the PROGRAM/PERFORMANCE buttons, and select a Performance with the VOLUME/VALUE buttons (on the side of the display).
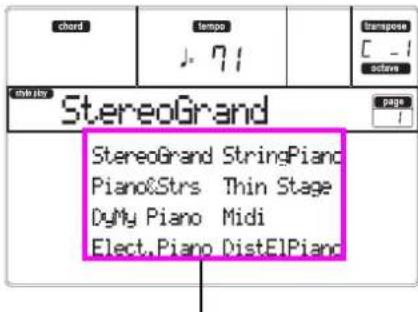
text_image
chord tempo J. 71 Transpose C _ 1 active main play StereoGrand StereoGrand StringPiano Piano&Strs Thin Stage DyMy Piano Midi Elect.Piano DistElPianoSelect a Performance with the VOLUME/VALUE buttons
Go ahead and try out the different Performances. We provided 160 of them for you.
3 Select Performance 1-1 ("Grand Piano") again.
As above: press Performance bank 1, and use the A VOLUME/VALUE buttons to select Performance 1-1.
4 Unmute the Upper 2 track.
Press both F VOLUME/VALUE buttons. The Upper 2 track will be selected and unmuted. The Play icon

will appear, surrounded by the "selected track" frame and accompanied by the pointing arrow. You will hear the Dark Pad Program play together with the Grand Piano.

text_image
Grove Bld 1-1 Drum/Perc. Grand Piano FingElBass1 Dark Pad Accomp. 1/5 StringsEhs2 Analog StrPress the F VOLUME/VALUE buttons
5 Press SPLIT on the KEYBOARD MODE section, and play.
Now, the keyboard is split in two parts: the Lower part on the Ifand the Upper part on the right. The AnalogStr Program is playing on the Lower part, while the Grand Piano and the Dark Pad are playing on the Upper part.
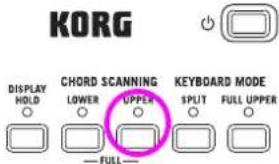
text_image
KORG DISPLAY HOLD CHORD SCANNING LOWER UPPER KEYBOARD MODE SPLIT FULL UPPER — FULL —6 Set the split point.
Not happy with the current split point? Keep the SPLIT POINT button held down, and play the new split point on the keyboard. You can even save this setting in memory (see "The Write window" on page 125).
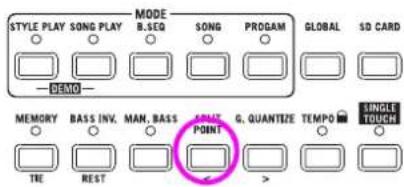
text_image
MODE STYLE PLAY SONG PLAY B.SEQ SONG PROGRAM GLOBAL SD CARD — DEMO — MEMORY BASS INV. MAN. BASS POINT G. QUANTIZE TEMPO SINGLE TOUCH TRE REST >7 Mute/ unmute various tracks.
Press both H VOLUME/VALUE buttons. You will mute the Lower track.

text_image
chord Tempo J: 71 Transpose C 0 octave Groove Bld 1-1 Drum/Perc. Grand Piano FingElBass2 Dark Pad Accomp. 1/5 StringsEns2 Analog Str Press the H VOLUME/VALUE buttonsPress them again to unmute the Lower track. Try also with the Upper tracks, using the E, F and G VOLUME/VALUE buttons. You will notice the sound becomes more or less fuller-sounding, depending on the number of tracks muted or unmuted.
text_image
shord tempo .71 transpose C 0 octave Groove Bld 1-1 Drum/Perc. Grand Piano FingElBass2 Dark Pad Accone. 1/5 StringsErs2 Analog StrPress the E-G VOLUME/VALUE buttons
8 Set the relative volume of the Realtime tracks.
Use each E-H VOLUME/VALUE button pair to set the volume of the Realtime tracks. Press one of the VOLUME/VALUE button to select a track. Then press the right one to increase the volume, the left one to lower it.
Press the left one to lower...

9 Press FULL UPPER on the KEYBOARD MODE section, and play.
Again, the Upper tracks can play across the full keyboard range.
text_image
KORG DISPLAY HOLD CHORD SCANNING LOWER UPPER KEYBOARD MODE SPLIT FULL UNDER — FULL —10 Save your track configuration in a Performance.
That's all! When you find the right sound, you can press the WRITE button to save the track configuration into a Performance, a Single Touch Setting (STS), or a Style Performance. The Performance is a handy way to save Realtime tracks. See "The Write window" on page 42 for more information.
RECORDING A SONG
(Simultaneously recording the Style and realtime performance)
The Backing Sequence mode is a fast and effective way of recording a new Song, making full use of the features of the Style Play mode. So, arm your recorder, and play live with the Styles—a song will be ready in seconds!
1 First, enter Backing Sequence mode
Press B.SEQ to access the Backing Sequence mode. The Realtime tracks, on the keyboard, will remain the same as you selected in the Style Play mode.
text_image
chord tempo J:120 (RGB) measure 00 1 transpose C 0 octave NewSong Load Song Metro:Off Save Song Meter: 4/4 Sel. Tempo Tempo:AutoDon't worry about this display: it's something you don't need to learn at this point. You may find more information on it, going to the Reference Guide (see "Backing Sequence operating mode" on page 82).
This is the Backing Sequence Play page, where you can load, play or save a Song.
2 Now, press RECORD.
You are prompted to select either the Realtime recording mode, or the Chord/Acc Step recording mode.
text_image
chord tempo 00:1 measure Transpose C 0 octave endy time Record Realtime Recording Chord/Acc Step Mode3 Select the Realtime recording mode.
Simply press one of the A VOLUME/VALUE buttons. The Record page appears.
text_image
chord tempo J. 120 (44.1) measure 001 Transpose C 0 active Recc.:NewSong Style: Soft Beat 99% Perf.: 1-1 Metro:Off Resol:Hi RT/Pad:REC Sel. Tempo Ch/Acc:REC4 If you think the selected Style is not what you like for your backing tracks, select a different one.
(see "Selecting a Style" on page 26). Here is a fast reminder:
-
Select one of the Style rows in the STYLE section, using the leftmost button.
-
Select one of the Style Banks, by pressing one of the buttons of the STYLE section.
3.Se lect one of the pages, using the PAGE buttons.
- Select a Style, using the VOLUME/VALUE (A-H) buttons.
The Style Bank and number appear after the "Style" parameter in the display.
5 And what about changing the Performance or Single Touch Setting?
(see “Selecting a Performance” on page 25, or “Selecting a Single Touch Setting (STS)” on page 26). Here is a short recap for the Performances:
-
Press the PERFORM button to set the PROGRAM/ PERFORMANCE section act as a Performance selector.
-
Select one of the Performance Banks, by pressing one of the buttons of the PROGRAM/PERFORMANCE section.
-
Select a Performance, using the VOLUME/VALUE (A-H) buttons.
...and for the Single Touch Settings (STS):
- Press one of the SINGLE TOUCH SETTING buttons.
6 Ok, now we can go.
As you see, both the RT track and the Ch/Acc track are in RECord mode. This means you can start recording everything you play in a realtime performance with the Styles.
PRESS START/STOP
WAIT FOR THE PRECOUNT TO REACH BAR 1 AND BEGIN PLAYING!
7 Play as if you were playing live.
You can do exactly what you do when playing with the Styles: select a different Style, Performance, STS, different Variation, a Fill, and Ending...
You can even start your recording with an Intro: just press one of the INTRO buttons before pressing START/STOP to start recording.
8 Stop the Song.
To stop the Song, press either START/STOP or one of the ENDING buttons. The Song will stop, but the Recording will still be on. So, you can start with another Song to be recorded in the same session (go back to step 6, if you like).
Otherwise, finish the Recording. Now for going to the next step.
9 Finish the recording.
PRESS PLAY/STOP (SEQ1)
and the Recording status will be gone. Both Backing Sequence tracks (RT and Ch/Acc) will be set to the PLAY status.
10 Listen to the Song.
When back in the Backing Sequence Play page, press PLAY/STOP (SEQ1) to listen to the new Song. How smart were you?
If the Song is fine, you can switch to the Song mode and do some editing. Or you can save it (as seen below), and play it in Song Play mode.
11 Deleting one of the tracks, or the whole Song and record again.
That's easy!
- Press RECORD to enter Record mode.

text_image
chord tempo J: 120 (44.1) measure 001 transpose C 0 octave Recc.:NewSong Style: Soft Beat 99% Perf.: 1-1 Metro:Off Resol:Hi RT/Pad:REC Sel. Tempo Ch/Acc:REC- Set the track to delete and set the REC status to record.
- Set the track you want to listen to during recording to PLAY status. If you don't want to delete it, but you don't want to listen to it, set the track to MUTE status.
- Start recording again. If you are recording the RT track, you can't use the Style controls.
- Press PLAY/STOP (SEQ1) to finish the Song and exit Recording mode.
12 Time to save your Song.
If you don't save your Song, it will be lost when you turn the instrument off, or switch to the Song Play mode. You must save to a card any Song you wish to preserve.
- Insert your SD card into the card slot.
- In the Backing Sequence Play page, select the "Save Song" parameter.
text_image
chord tempo 120 (sec 1) measure 001 Transpose C 0 octave NewSong Load Song Metro:Off Save Song Meter: 4/4 Sel. Tempo Tempo:Auto- Press the [F-1] button to select the SD card (SD).
text_image
chord tempo J: 120 (Hz) measure 00 I transpose C 0 octave Save Song page a / NEW NAME MID II↑ MYSONGS MYSONG MID II↓ SD SAVE OPEN CLOSE- Move the folder where you wish to save your Song to the first line of the display, using the E-F (Scroll Up) and G-H (Scroll Down) VOLUME/VALUE buttons, or the TEMPO/VALUE controls. Press F-3 (OPEN) to open it. Close the current folder by pressing F-4 (CLOSE).
- To create a new file, move the "NEW_NAME.MID" item to the first line of the display.
- When the "NEW_NAME.MID" item is selected, press one of the A VOLUME/VALUE buttons. You are prompted to assign a name to the new folder:
REJLNAME.MID
Move the cursor using the DOWN/- and UP/+ buttons. Select a character using the DIAL. Insert a character at the cursor position by pressing the INSERT button. Delete a character at the cursor position by pressing the DELETE button.
- When you have finished writing a name for the new midfile, press F-2 (SAVE) to confirm. The "Are you sure?" message will appear. Press ENTER to confirm, or EXIT to abort.
Need more information?
Go to "Backing Sequence operating mode" on page 82. The Reference Guide includes all the information you need.
PLAYING A SONG FROM A CARD
1 Insert the card containing the Song into the card slot.
2 Press the SONG PLAY button to access the Song Play mode.
text_image
chord tempo J. 137 measure 001 transpose C 0 octave S1: No song S1: Piano01 S2: Guitar01 Lyrics StrngEns2 VoxPad13 Press the A (S1:) VOLUME/VALUE button to open the Song Select window.
text_image
S1: Song Select CLUB BALLADS 0001 MYSONG.MID SD SELECT OPEN CLOSE Page commandsNote: You can also access the Song Select window by pressing the PAGE+ button from the main page. You can exit this window either by pressing EXIT or PAGE-.
4 Press the F-1 button to select the SD card (SD).
The card content appears.
5 Use the TEMPO/VALUE controls, or the VOLUME/VALUE (E-H) buttons to scroll the list. The E-F buttons are the Scroll Up (↑), while the G-H buttons are the Scroll Down (↓).
Move the file you are looking for to the first line of the display.
6 If the file you are looking for is in a folder (a file whose name begins with “☐”), move the folder to the first line in the display, then select the F-3 (OPEN) command. Select the F-4 (CLOSE) command to close a folder and go back to the upper level.

7 When the file you are looking for is in the first line of the display, press the F-2 (SELECT) button.
8 When the Song appears
in the S1 line on the main page of the Song Play mode, press the left (SEQ 1) PLAY/STOP button to start the playback.
Note: If the BALANCE slider is all the way to the right, Sequencer 1 is at the minimum volume and can't be heard.
If you wish to play a different Song on Sequencer 2 at the same, press the B (S2:) VOLUME/VALUE button (press it twice if a Song is already selected for Sequencer 2), and repeat the above procedure to select a Song for Sequencer 2. Use the right (SEQ 2) PLAY/STOP button to start/stop the second Song. Use the BALANCE cursor to mix between Sequencer 1 and Sequencer 2.
Stop the Song(s) using the PLAY/STOP button for the corresponding Sequencer.
Need more information?
Go to "Backing Sequence operating mode" on page 82. The Reference Guide includes all the information you need.
EDITING A SONG
You can edit a Song, either a Standard MIDI File bought at the shop, or one of your Songs made in Backing Sequence mode.
What about changing those boring General MIDI sounds with those gorgeous original KORG sounds? You can do it—in Song mode.
1 Press SONG to go to the Song mode.
This is the Song garage, where you may find tools to reshape your Song.

text_image
chord tempo J=74 (RGB) measure 001 transpose C 0 oclave NewSong Load Song Metro:Off Save Song Meter: 4/4 Sel. Tempo Tempo:Auto2 Insert in the card slot the card containing the midfile you wish to edit.
Midfiles are files generated by a computer sequencer or a musical instrument, usually after a conversion. For example, if working with a computer, you should find a command whose name could sound a little like "Convert to .MID". A midfile has a ".MID" or ".KAR" extension.
3 Loa d the Song.
Press one of the B VOLUME/VALUE buttons (corresponding to the Load Song command). As expected, the Load page will appear.
text_image
chord tempo J-120 (SEQ 1) measure 00:1 transpose C 0 oclave Load Song page a i BALLADS I↑ MYSONGS MYSONG.MID I↓ SD LOAD OPEN CLOSEIf you replaced the card, press F-1 (SD) to read the SD card again.
Move the midfile to load to the first line of the display. Use the DIAL or the UP and DOWN buttons to scroll the list; or use the E–F (Scroll Up) or G–H (Scroll down) VOLUME/VALUE buttons.
When the midfile is on the first line of the display, press F-2 (LOAD) to load it. The "Are you sure?" message will appear. Press ENTER to confirm.
Note: When loading a Standard MIDI File, the first MIDI events are converted to the Song Performance events. You will see them as the Programs, Volume, Pan, Effect settings assigned to the tracks.
4 Listen to the Song.
After loading you are back to the main page of the Song mode.
text_image
chord tempo J: 74 (100.1) measure 00:1 Transpose C 0 octave MySong Load Song Metro:Off Save Song Meter: 4/4 Sel. Tempo Tempo:AutoPress PLAY/STOP (SEQ1) to listen to the Song. The LED on the button turns on.
Does it sound good? If it is a General MIDI-compatible midifile, there is a good chance it does. But we can further improve on it.
5 Stop the Song.
This one is easy: press PLAY/STOP (SEQ1). The LED on the PLAY/STOP button turns off.
Please, always remember: make any changes to the Song when the sequencer is not playing. Otherwise, a Stop command will reset all your changes.
(Not funny, huh?)
6 Select dif ferent Programs.
You can replace General MIDI Programs with KORG Programs. It will sound more rich, more lively.
- Press TRACK SELECT to see tracks 1–8. The LED turns on.
text_image
shard tempo J. 74 (00:1) measure 00:1 transpose C 0 active MySong Piano1 Piano1 DkStrings Guitar01 Legato StrngEns2 BrassyHorn VoxPad1You are watching at tracks 1–8. You can switch to tracks 9–16 by pressing the TRACK SELECT button again.
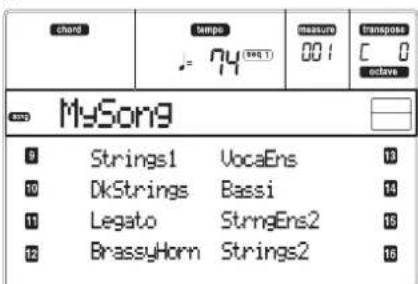
text_image
short tempo measure Transpos C 0 octave MySong 9 Strings1 UocaEns 10 10 DkStrings Bassi 14 11 Legato StrngEns2 16 12 BrassyHorn Strings2 16If you press TRACK SELECT again, you are back to the main page. Press TRACK SELECT AGAIN to go to tracks 1–8...
- Select the track you wish to assign a different Program using the VOLUME/VALUE buttons. Press one of the buttons corresponding to the track to
select. For example, one of the A buttons to select track 1:

text_image
MySong 0 Piano1 Piano1 DkStrings Guitar01 Legato StrngEns2 BrassyHorn VoxPad1- Select a Program. You should know how to do. If not, what about going back for a little to the "Basic operations" chapter, "Selecting a Program" section, page 25? It will be of a great help in the future...
Which Programs to choose? With >662 Programs, you will for sure find your preferred sound. Just browse any Program bank, and listen to them. Turn on the DISPLAY HOLD LED, to stay in the Selecting Window until you have found the right Program. (Then, press EXIT or DISPLAY HOLD to exit the window.)
- Execute as many changes as you like to the other tracks.
7 Change the volume.
Yes, this is another obvious change. Press MENU to open the edit menu.

text_image
chord tempo J: 74 measure 001 transpose C 0 activa Song Edit MENU Mixer/Tun. Transp./Vel Effects Del/Cut-Ins Track Edit Copy Quantize Event EditPress one of the A VOLUME/VALUE buttons, to select the MixingThing item. Suddenly, a Volume edit page appears...

text_image
short tempo measure transpose C 0 active Mixer: Volume page 1 2 3 4 090 090 090 092 086 112Select a track, and use the DIAL or the UP and DOWN buttons, or the VOLUME/VALUE buttons, to change the track's volume.
Modify all tracks you think need to be modified.
8 Save the Song.
Your changes will be lost when you load a new Song, switch to the Song Play mode, or turn the instrument
off. So, press EXIT to go back to the main page of the Song mode.

text_image
chord tempo J=74 (0:1) measure 001 transpose C 0 octave MySong Load Song Metro:Off Save Song Meter: 4/4 Sel. Tempo Tempo:AutoPress one of the C VOLUME/VALUE buttons, to select the Save Song command. Save your Song with a new name. How to accomplish this simple operation is described in great details on page 90 ("Save Song page").
Note: When saving a Song the Song Performance events (initial Program, Volume, Pan, Effect Send settings) are saved at the beginning of the Standard MIDI File. Effect settings are saved as microARRANGER SysEx events, ignored by other musical instruments.
Other editings
The Volume is not the only parameter you can edit. You can edit a lot more things, like the Pan, the Effects, the Tuning... you can even use up to 4 effects (A–D Internal FX Processors), but this will be useful only when reading the Song back on the microARRANGER only, since other General MIDI-compliant instruments use only 2 effects.
Need more information?
Go to "Song operating mode" on page 88. The Reference Guide includes all the information you need.
THE ARABIC SCALE
You can program an Arabic scale in real time, by assigning a footswitch or a pad the "Quarter Tone" function.
Another way of changing the scale is assigning it to a Performance or Single Touch Setting (STS), but this is the most convenient way to change the pitch in real time.
1 Program a footswitch to be the Quarter tone switch.
Simply go to the Global environment, and reach "Page 3 - Assignable Ped/Footswitch, Assignable Slider". There, you will find the "P/S (Pedal/Switch)" parameter, to which you can assign the Quarter tone function. Press WRITE to save the Global status in memory (see "The Write window" on page 125).
2 Lower some note pitches.
Keep the Quarter tone pedal pressed. The keyboard will not play at this time. Press the notes you want to lower a quarter of tone. Release the pedal.
3 Play with your new scale.
The notes you pressed are now lowered of a quarter of tone.
4 Reset the original scale.
Press the Quarter tone pedal again. All pitches will be reset, and the scale selected by the Performance, STS or Style Performance will be recalled.
Need more information?
As stated, you can assign an alternative scale to a Performance or STS. Go to "Page 5 - Tuning: Scale" on page 44, and give also a look to the "Scale Mode" parameter (see page 51).
8. MIDI
WHAT IS MIDI?
Here is a brief overview of MIDI, as related to the microARRANGER. If interested, you may find more information on the general use of MIDI in the various specialized magazines and books.
In general
MIDI stands for Musical Instruments Digital Interface. This interface lets you connect two musical instruments, or a computer and various musical instruments.
Physically, MIDI is composed of three different connectors. The MIDI IN receives data from another device; the MIDI OUT sends data to another device; the MIDI THRU sends to another device exactly what was received on the MIDI IN (this is useful to daisy-chain more instruments).
Channels and messages
Basically, a MIDI cable transmits 16 channels of data. Think to each MIDI channel as a TV channel: the receiver must be set on the same channel of the transmitter. The same happens with MIDI messages: when you send a Note On message on channel 1, it will be received on channel 1 only. This allows for multitimbricity: you can have more than one sound playing on the same MIDI instrument.
There are various messages, but here are the most commonly used:
Note On - This message instructs an instrument to play note on a specific channel. Notes have both a name (C4 standing for the center C) and a number (60 being the equivalent for C4). A Note Off message is often used to say the note has been released. In some case, a Note On with value "0" is used instead.
Together with the Note On message, a Velocity value is always sent. This value tells the instrument how loud the note must play.
Pitch Bend (PB) - You can generate this message acting on the joystick (X movement). The pitch is translated up or down.
Program Change (PC)– When you select a Program, a Program Change message is generated on the channel. Use this message, together with Control Change 00 and 32, to remotely select microARRANGER data from a sequencer or a master keyboard.
Control Change (CC) - This is a wide array of messages, controlling most of the instrument parameters. Some examples:
- CC00, or Bank Select MSB, and CC32, or Bank Select LSB. This message pair is used, together with the Program Change message, to select a Program.
- CC01, or Modulation. This is the equivalent of pressing up the joystick. A vibrato effect is usually triggered on.
-
CC07, or Master Volume. Use this controller to set the channel's volume.
-
CC10, or Pan. This one sets the channel's position on the stereo front.
- CC64, or Damper Pedal. Use this controller to simulate the Damper pedal.
Tempo
Tempo is a global MIDI message, that is not tied to a particular channel. Each Song includes Tempo data.
Lyrics
Lyrics are non-standard MIDI events, made to display text together with the music. microARRANGER can read many of the available Lyrics format on the market.
MIDIFILES
Midfiles, or Standard MIDI Files (SMF), are a practical way of exchanging songs between different instruments and computers. microARRANGER has the SMF format as its default song format, so reading a song from a computer, or saving a song that a computer software can read, is not a problem at all.
microARRANGER sequencers are compatible with the SMF in format 0 (all data in one track; it is the most common format) and 1 (multitrack). It can read the SMF in Song Play mode and modify/save them in Song mode. It can save a Song in SMF 0 format in the Back-ing Sequence or Song mode.
When in Song Play mode, the microARRANGER can also display SMF lyrics in Solton, M-Live (Midisoft), Tune1000 and compatible (Edirol, GMX, HitBit, XF) formats, and the chord abbreviations of SMF in Solton, M-live (Midisoft), GMX, and XF format.
THE GENERAL MIDI STANDARD
Some years ago, the musical instruments world felt a need for some further standardization. Then, the General MIDI Standard (GM) was born. This extension of the basic MIDI sets new rules for compatibility between instruments:
• A minimum of 16 MIDI channels was required.
- A basic set of 128 Programs, correctly ordered, was mandatory.
• The Drum Kit had a standard order.
• Channel 10 had to be devoted to the Drum Kit.
A most recent extension is the GM2, that further expands the Programs database. The microARRANGER is soundwise-compatible with the GM2 standard.
THE GLOBAL CHANNEL
Any channels with the Global option assigned (see "Page 6 - MIDI IN Channels" on page 127) can simulate the microARRANGER integrated keyboard. When the microARRANGER is connected to a master keyboard,
transmission should take place over the Global channel of the microARRANGER.
The MIDI messages received over a Global channel and not over a standard channel are affected by the buttons of the KEYBOARD MODE section, as well from the split point. Therefore, if the SPLIT button LED is lit up, the notes that arrive to the microARRANGER over this channel will be divided by the split point into the Upper (above the split point) and Lower (below the split point) parts.
The notes that arrive to a Global channel are used for the chord recognition of the automatic accompaniment. If the KEYBOARD MODE is SPLIT, only the notes below the split point will be used. These notes will be combined with the ones of the special Chord 1 and Chord 2 channels.
THE CHORD 1 AND CHORD 2 CHANNELS
You can set two special Chord channels (see page 128) to send to the microARRANGER notes for the chord recognition. The notes will be combined with the notes that go through the channel set as Global (Global notes are recognized only under the split point, if the SPLIT LED is lit up).
The Chord channels are not affected by the split point and the KEYBOARD MODE section of the control panel. All the notes – both above and below the split point – will be sent to the chord recognition.
The buttons of the CHORD SCANNING section have a particular effect on the Chord channels:
- if you have selected LOWER, the chord recognition mode will be set by the "Chord Recognition Mode" parameter in the Style Play mode (see page 51);
- if you have selected UPPER or FULL, the chord recognition mode will always be Fingered 2 (you need to play at least three notes in order for the chord to be detected).
These two channels are especially useful for accordion players to assign a different Chord channel to the chords and the bass played with the left hand. In this way, chords and bass will participate to the creation of chords for the chord recognition of the automatic accompaniment.
THE CONTROL CHANNEL
You can set a MIDI IN channel as the Control channel (see page 128), to select Styles and Performance from an external device. See the Appendix for a list of messages corresponding to microARRANGER internal data.
MIDI SETUP
You can play microARRANGER with an external controller, and use it simply as a gorgeous sound generator. To help you configure the MIDI channels, we have provided a set of MIDI Setups. Go to Global mode to select the one that fits your MIDI needs. (See "Page 4 - MIDI Setup" on page 126 for more information).
We recommend you to consider each MIDI Setup as a starting point you can freely tweak. Once you have selected the most appropriate MIDI Setup for the connection to be made, you can modify the parameters as necessary and save the Global in the memory with the Write function (see "The Write window" on page 125).
CONNECTING microARRANGER TO A MASTER KEYBOARD
You can control the microARRANGER with a master keyboard or any other MIDI keyboard. You only need to connect the MIDI OUT connector of the master keyboard to the MIDI IN connector of the microARRANGERmicroARRANGER. The master keyboard will become the integrated keyboard of the microARRANGER if it transmits over the same channel programmed as Global in the microARRANGER.

text_image
MIDI IN MIDI OUTIf the master keyboard transmits over the Global channel of the microARRANGER, the split point and the status of the KEYBOARD MODE section in the control panel will affect the notes received from the master keyboard.
Connections and settings
To connect the master keyboard to the microARRANGER follow this procedure:
- Connect the MIDI OUT connector of the master keyboard to the MIDI IN connector of the micro-ARRANGER.
- Program the master keyboard to transmit over the Global channel of the microARRANGER (see "Page 6 - MIDI IN Channels" on page 127).
For information on the master keyboard programming, see the user's manual of the master keyboard. - Press GLOBAL to enter the Global mode, then go to "Page 4 - MIDI Setup" (see page 126).
- Select the Master Keyboard Setup.
Note: The settings can change when new data is loaded from a card. To protect the settings from loading, use the Global Protect function (see "Global Protect" on page 142). - Press WIKE, select Global, and press ENTER to save the Global. The "Are you sure?" message will appear. Press ENTER to confirm, or EXIT to abort.
- Press one of the buttons in the MODE section to go to the desired operative mode.
CONNECTING THE microARRANGER TO A MIDI ACCORDION
There are different types of MIDI accordion and each type requires a different configuration of the microARRANGER. Select one of the MIDI "Accordion" Setups to configure the module properly (see page 126).
Connection and settings
To connect the accordion to the microARRANGER follow this procedure:
- Connect the MIDI OUT connector of the accordion to the MIDI IN connector of the microARRANGER.
- Press GLOBAL to enter the Global mode, then go to "Page 4 - MIDI Setup" (see page 126).
- Select one of the Accordion Setups.
Note: The settings can change when new data is loaded from a card. To protect the settings from loading, use the Global Protect function (see "Global Protect" on page 142). - Press WRIT E, select Global, and press ENTER to save the Global. The "Are you sure?" message will appear. Press ENTER to confirm, or EXIT to abort.
- Press one of the buttons in the MODE section to go to the desired operative mode.
CONNECTING THE microARRANGER TO AN EXTERNAL SEQUENCER
You can program a new Song on an external sequencer, using microARRANGER as a multi-timbral expander.
Connections and settings
In order to connect the microARRANGER to a computer, you need to have a computer with the MIDI interface.
- Connect the microARRANGER and the computer as in the following diagram.
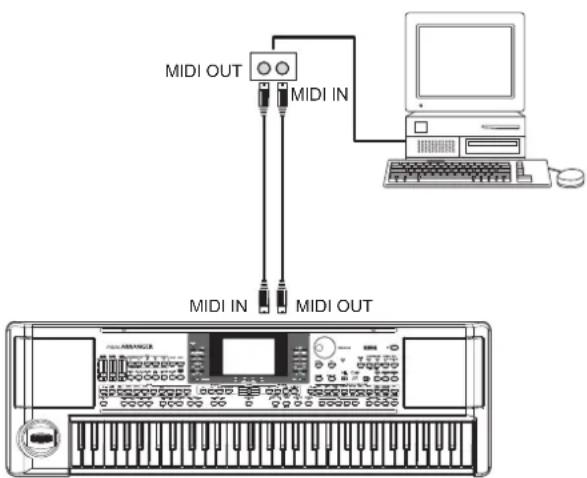
text_image
MIDI OUT MIDI IN MIDI IN MIDI OUT-
Press GLOBAL, and go to "Page 5 - MIDI Controls". Set the Local parameter to Off (see page 127).
-
Go to "Page 4 - MIDI Setup" (see page 126). Select the Ext.Seq Setup.
Note: The settings can change when new data is loaded from a card. To protect the settings from loading, use the Global Protect function (see "Global Protect" on page 142). - Press WRITE, select Global, and press ENTER to save the Global. The "Are you sure?" message will appear. Press ENTER to confirm, or EXIT to abort.
- Set the Upper 1 track in play, and press FULL UPPER in the KEYBOARD MODE section. This way, you can transmit to the external sequencer on the full keyboard range.
- At this point, the notes played on the Upper track go from the MIDI OUT of the microARRANGER to the MIDI IN of the computer/MIDI interface.
The not generated by the computer (i.e. a Song played by its sequencer) are sent thru the MIDI OUT of the MIDI interface to the MIDI IN connector of the microARRANGER.
The Local Off
When the microARRANGER is connected to an external sequencer, we recommend you to set the microARRANGER in Local Off mode (see "Local" on page 127) to avoid that the notes are simultaneously played by the keyboard and by the MIDI events sent by the external sequencer.
When the microARRANGER is in Local Off, the microARRANGER keyboard transmits data to the external sequencer, but not to the internal sound generation. The sequencer will receive the notes played on the microARRANGER keyboard (Upper 1) and send them to the selected track of the song. The track will transmit the data to the internal sound generation of the microARRANGER.
Note: In order to send data to the microARRANGER sound generation, the "MIDI Thru" function must be activated in the external sequencer (normally active; the name may be different according to the type of sequencer). For more information refer to the instructions manual of the sequencer.
The programs
The Song that is played back by the computer sequencer can select the microARRANGER Programs through the MIDI messages Bank Select MSB and Bank Select LSB (bank selection, two messages) and Program Change (program selection). For a list of Programs and MIDI values, see “Programs (Program Change order)” on page 154.
A suggestion for those who program songs on computer: Even though it is not essential, you usually set the 18a on channel 2, melody on channel 4, drum kit on channel 10, control for an external voice harmonizer on channel 5.
PLAYING ANOTHER INSTRUMENT WITH THE microARRANGER
You can use the microARRANGER as the master controller for your MIDI setup.
- Connect microARRANGER's MIDI OUT to the other instrument's MIDI IN.
-
Set-up the other instrument's tracks to the same channels you want to play from microARRANGER. For example, if you wish to play the Upper 1 and Upper 2 tracks with the other instrument's sound, set the other instrument to receive on the same channels of the Upper 1 and Upper 2 tracks (by default, channels 1 and 2).
-
Set the general volume of the other instrument with its own volume controls.
-
Mute/unmute any track right from the microARRANGER front panel. Set each track's volume using microARRANGER own VOLUME/VALUE controls.
-
Play on microARRANGER's keyboard.
The Keyboard
microARRANGER's physical keyboard can drive up to 4 tracks via the MIDI OUT (Upper 1–3 and Lower). MIDI output channels are set in Global mode (see "Page 10 - MIDI OUT Channels" on page 129).
As a fault situation (Default Setup), each of micro-ARRANGER Realtime Tracks transmit on these channels:
| Track | Out Channel |
| Upper1 | 1 |
| Upper2 | 2 |
| Upper3 | 3 |
| Lower | 4 |
When a track is in mute, it can't transmit any MIDI data to an external expander or sequencer connected micro-ARRANGER's MIDI OUT.
To hear only the expander's sounds, you can lower the MASTER VOLUME control on the microARRANGER, or set the Realtime Tracks to the External status (see "Page 15 - Track: Internal/External" on page 47).
The Sequencer
Any Sequencer's track can drive a channel on an external instrument. To set each track's MIDI output channel, see "Page 10 - MIDI OUT Channels" on page 129.
To hear only the expander's sounds, you can lower the MASTER VOLUME control on the microARRANGER, or set the Song tracks to the External status (see "Page 8 - Track: Internal/External" on page 79).
Select the Sequencer 1 or Sequencer 2 MIDI Setup (depending on the Sequencer you are using on the microARRANGER) to set the channels as follows.
| Track | Out Channel |
| Song 1...16 | 1...16 |
The Arranger
One of the most interesting aspect of MIDI, is that you can use your microARRANGER to play an external instrument with its onboard arranger. Yes, it's hard to beat the audio quality of microARRANGER, but you could wish to use that old faithful synth you are still accustomed to...
To assign some of microARRANGER Style tracks to an external instrument, set them to the External status (see "Page 15 - Track: Internal/External" on page 47).
Select the Default MIDI Setup to set the channels as follows (this is the default status of microARRANGER).
| Track | Out Channel |
| Bass | 9 |
| Drums | 10 |
| Percussion | 11 |
| Acc1...5 | 12...16 |
REFERENCE GUIDE
The Style Play mode is the boot-up operating mode. When in this mode, you can play Styles (i.e. automatic accompaniments), or just play with one to four Real-time tracks on the keyboard (Upper 1...3 and Lower).
WHAT'S A STYLE?
A Style is a rhythm/accompaniment structure, that sim-ulates a band backing your solos.
In a vertical direction, it is composed of 8 different tracks (Drums, Percussion, Bass, and 5 different harmonic or melodic instruments). You can play on the keyboard with 4 more Realtime tracks (Upper 1–3 and Lower).
In a horizontal direction, it is a series of Style Elements (i.e., the various sets of patterns for each chord and each of the Intros, Variations, Fills, Breaks and Endings).
STYLES AND PERFORMANCES
Styles and Performances are linked in many ways.
- When the SINGLE TOUCH LED is on, selecting a Style also changes the Realtime (Keyboard) tracks (a Single Touch Setting is selected). The Performance settings are overridden.
- When the STYLE CHANGE LED is on, selecting a Performance also selects a Style (the one whose number is memorized with the Performance).
- When pressing the WRITE button, you can save the track's settings either in a Performance, a Style Performance, or a Single Touch Setting (STS).
CHANGING AND RESETTING THE TEMPO
While in the main page of the Style Play mode, you can change the Tempo using the DIAL or the DOWN/- and UP/+ buttons.
In any other page, keep the SHIFT button pressed, and use the DIAL to change the Tempo.
To recall the Tempo stored in the current Style, keep the SHIFT button pressed, and press one of the DOWN/- or UP/+ buttons.
THE DIRECT SD BANK
In addition to the internal memory Styles, you can have DIRECT SD Styles, directly accessed from the card.
Just insert a card, and press the DIRECT SD Style bank. The card slot will read the first (in alphabetical order) ".SET" folder in the card, and will give you direct access to the Styles it contains (no loading required).
Browse through the DIRECT SD Styles using the PAGE buttons. You can have up to 6 pages, and up to 48 DIRECT SD Styles in a card.
| Folder | DIRECT SD pages |
| *.SET > ST-YLE > USER01 | 1, 2 |
| *.SET > STYLE > USER02 | 3, 4 |
| *.SET > STYLE > USER03 | 5, 6 |
How to make the DIRECT SD bank
To configure the DIRECT SD bank, save your Styles into the first folder in the card. Folders are read in alphabetical order.
Note: The following procedures requires you overwrite the User Style banks. Save these banks before proceeding, to avoid loosing important data.
- Insert the card into the card slot.
- Press SD CARD and go to the Load page.

text_image
chord tempo J: 71 transferase C + active Card:Load page a id □ NEWNAME.SET □ LIVE.SET □ ETHNIC.A.SET SD LOAD OPEN CLOSE- Use the F-1 (SD) button to rescan the SD card.
- Load three banks of Styles, to be transformed into the DIRECT SD bank.
- Go to the Save page.

text_image
chard tempo J: 71 transpose C +1 active card:Save page @ 26 → All -- SAVE OPEN CLOSE-
While the "ALL" item is selected, press F-3 (OPEN) to open it.
-
Use the E-F (Scroll Up) and G-H (Scroll Down) VOLUME/VALUE buttons (or the TEMPO/VALUE section controls) to move the "STYLE" item to the first line of the display, and press F-2 (SAVE).
-
Select the SD card (SD) as the target, using the F-1 button.
-
The card directory appear to use the E-F (Scroll Up) and G-H (Scroll Down) VOLUME/VALUE buttons (or the TEMPO/VALUE section controls), to scroll the card content. Move the first folder of the directory to the first line of the display.
-
Press ENTER twice to save the banks.
MAIN PAGE
This is the page you see after you turn the instrument on.
To access this page from another operating mode, press the STYLE PLAY button.
Note: When switching from Song Play to Style Play, a Performance is automatically selected, and various track parameters may change.
To return to this page from one of the Style Play edit pages, press the EXIT/NO button.
To switch between the Realtime (Keyboard) tracks and the Style tracks, use the TRACK SELECT button.
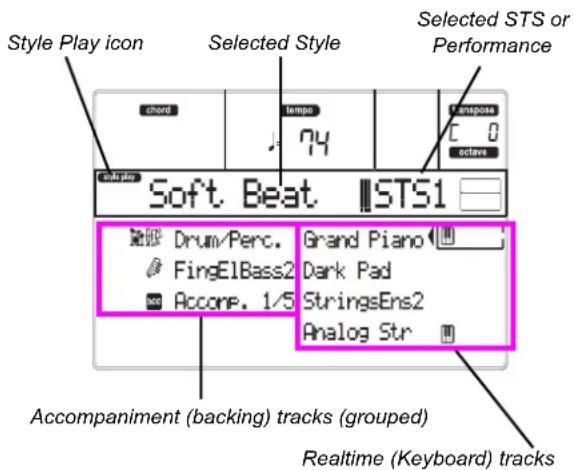
text_image
Style Play icon Selected Style Selected STS or Performance Soft Beat 1.0 STS1 Drum/Perc. FingElBass2 Accone, 1/5 Grand Piano Dark Pad StringsEns2 Analog Str Accompaniment (backing) tracks (grouped) Realtime (Keyboard) tracksStyle Play icon
When on, this icon indicates that the instrument is in Style Play mode.
Selected Style
Currently selected Style.
Selected STS or Performance
The last selected Single Touch Setting (STS) or Performance.
A (Drum/Perc grouped tracks)
Use these buttons to select, mute/unmute or change the volume of both Drum and Percussion tracks (grouped together) at the same time. To mute these tracks, press both VOLUME/VALUE buttons. To unmute, press both buttons again. To change the volume, select the track, then keep one of the buttons pressed.
B (Bass track Program name)
Name of the Program assigned to the Bass backing track. Use these buttons to select, mute/unmute or change the volume of the Bass track. To mute this track,
press both VOLUME/VALUE buttons. To unmute, press both buttons again. To change the volume, select the track, then keep one of the buttons pressed.
C (Acc.1–5 grouped tracks)
Use these buttons to select, mute/unmute or change the volume of the instrumental accompaniment tracks (tracks 1–5, other than Bass, Drum and Percussion). To mute these tracks, press both VOLUME/VALUE buttons. To unmute them, press both buttons again. To change the volume, keep one of the buttons pressed.
E (Upper 1 Program), F (Upper 2 Program), G (Upper 3 Program), H (Lower Program)
Name of the Programs assigned to the Realtime (Keyboard) tracks. Use these buttons to select, mute/unmute or change the volume of the corresponding tracks.
STYLE TRACKS PAGE
To see and edit the Style tracks, press TRACK SELECT from the main page. The TRACK SELECT LED turns on.

text_image
chord tempo J: 74 transpose C 0 active Soft Beat |STS1 Brush 2 Piano01 Perc Kit Guitar01 *AcouBass StrngEns2 AcouPiano2 VoxPad1Press the TRACK SELECT button once again to go back to the main page.
A-H (Style Track Programs)
Name of the Programs assigned to the Style tracks. Use these buttons to select, mute/unmute or change the volume of the corresponding tracks.
HOW TO SELECT PROGRAMS
You can assign a different Program to each of the Real-time (Keyboard) and Style tracks. See “Selecting a Program” on page 25 for more information.
After selecting a new Program, save your changes into a Performance, Style or STS (see below “The Write window” section).
Note: If you select a Program while grouped tracks (Drum/Percussion or ACC) are selected, the Program will be assigned to the last selected track.
THE WRITE WINDOW
Open this window by pressing the WRITE button. Here, you can save all track settings into a Performance, the Realtime (Keyboard) track settings into a Single Touch Setting, or the Style track settings into the current Style Performance.

text_image
chord tempo J. 74 transpose C 0 oclave write by WRITE to: Perf.Name:StereoGrand Perf.N:01-1 StereoGrand STS N.:1 Current Style-
Select the kind of object you want to save your tracks into.
-
Select the "Perf No." line to save all tracks (and the current selected Style settings) into a Performance. Use the corresponding VOLUME/VALUE buttons, or the TEMPO/VALUE section controls, to select a Performance location in memory. The name of the Performance already at the target destination will be shown.
- Select the "STS No." line to save the Realtime (Keyboard) tracks into a Single Touch Setting (STS). Use the corresponding VOLUME/VALUE buttons or the TEMPO/VALUE section controls, to select a Single Touch Setting number.
- Select the Current Style line, to save the Style tracks into the current Style Performance.
| If you select... | ...you save... | ...to this location... |
| Performance | All track settings, selected Style number, Master Transpose | Selected Performance |
| STS | Realtime (Keyboard) track settings | Selected Single Touch Setting (a part of the current Style) |
| Current Style | Style track settings, Master Transpose | Current Style Performance |
- If you are saving a Performance, you can change its name. Select the "Perf name" line.
Move the cursor using the DOWN/- and UP/+ buttons. Select a character using the DIAL. Insert a character at the cursor position by pressing the INSERT button. Delete a character at the cursor position by pressing the DELETE button.
- Press ENTER to save the settings in memory. The "Are you sure?" message appears. Press ENTER to confirm, or EXIT to abort.
MENU
From any page, press MENU to open the Style Play edit menu. This menu gives access to the various Style Play edit sections.
When in the menu, select an edit section using the VOLUME/VALUE (A-H) buttons, select an edit page using PAGE +, or press EXIT to exit the menu.
When in an edit page, press EXIT to go back to the main page of the Style Play operating mode.
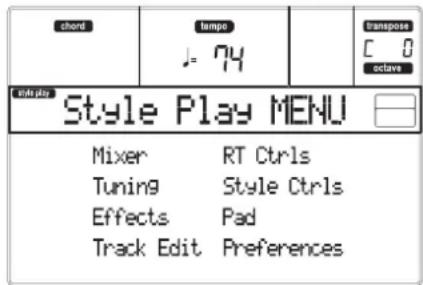
text_image
chord tempo J = 74 Transpose C 0 octave Style Play MENU Mixer RT Ctrls Tuning Style Ctrls Effects Pad Track Edit PreferencesEach item in this menu corresponds to an edit section. Each edit section groups various edit pages.
EDIT PAGE STRUCTURE
Select an edit section from the Menu, and/or use the PAGE buttons to reach the desired page.
Press EXIT to go back to the main page of the Style Play mode.
All edit pages share the same structure.
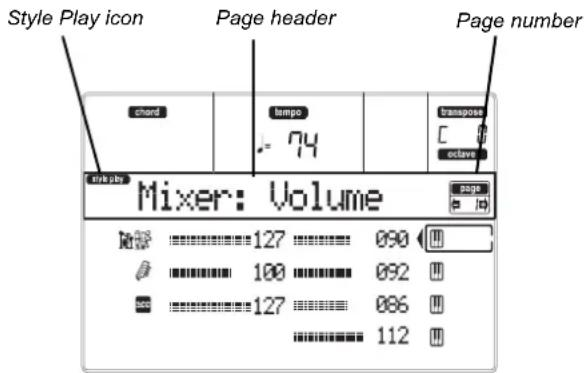
text_image
Style Play icon Page header Page number chord tempo 74 transpose C 0 octave Mixer: Volume page 127 090 100 092 127 086 112Style Play icon
When on, this icon indicates that the instrument is in Style Play mode.
Page header
The header shows the name of the current edit page. As a general rule, the header is divided into a first word, identifying the section name (e.g., "Mixer:FX Send" is a "Mixer" section page), and a second word, referring to the page name (e.g. "FX Send").

text_image
Section name Mixer: FX Send Page namePage number
This area shows the current page number.
A-H
Each pair of VOLUME/VALUE (A-H) buttons selects a different parameter of command, depending on the
edit page. After selecting a parameter, you can change its value by pressing one of the two buttons in a pair, or using the TEMPO/VALUE controls.
PAGE 1 - MIXER: VOLUME
This page lets you set the volume for each of the Real-time (Keyboard) or Style tracks.
Use the TRACK SELECT button to switch from the Real-time (Keyboard) tracks to the Style tracks, and vice versa.

text_image
chord tempo J: 74 Transpose C 0 octave Mixer: Volume page e 10 R: 127 090100 092
NO 127 086 112 chord tempo J: 74 Transpose C 0 octave Mixer: Volume page e 10 R: 110 090100 092
110 086
NO 110 112Volume
▶PERF ▶STYLE ▶STS
Track's volume.
0...127 MIDI value of the track's volume.
PAGE 2 - MIXER: PAN
This page lets you set the pan (position in the stereo front) for each track.
Use the TRACK SELECT button to switch from the Real-time (Keyboard) tracks to the Style tracks, and vice-versa.
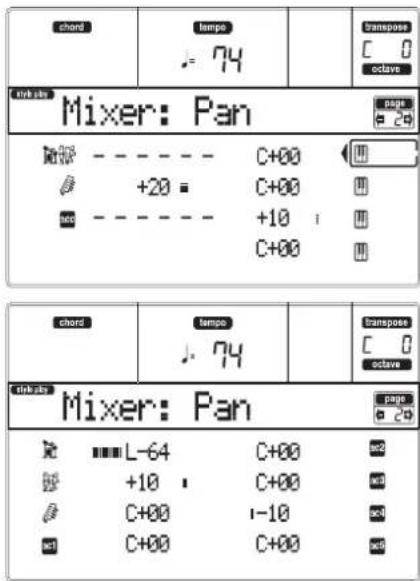
text_image
chord tempo J = 74 Transpose C 0 octave Mixer: Pan page 20 Tamp: - - - - - - C+00 +20 C+00 +10 C+00 C+00 chord tempo J = 74 Transpose C 0 octave Mixer: Pan page 20 Tamp: L-64 C+00 +10 C+00 C+00 I-10 C+00 C+00Pan
▶PERF ▶STYLE ▶STS
L-64Hard Left.
C+00Center.
R+63Hard Right.
OffThe dir
ect (uneffected) signal does not go to the outputs; only the FX signal is heard for this track.
PAGE 3 - MIXER: FX SEND
This page lets you set the level of the track's direct (uneffected) signal going to the Internal FX processors. The effect processors included in microARRANGER are connected in parallel, so you can decide which percentage of the direct signal should be effected:

flowchart
graph TD
    A["Track"] --> B["FX Processor"]
    B --> C["Output"]
    A --> B
There are four Internal FX processors in Style Play mode. You can assign them any kind of available effects, but we found it convenient to arrange them in the following way, for all the Styles included with the microARRANGER:
A Reverb processor for the Style tracks.
B Modulating FX processor for the Style tracks.
C Reverb processor for the Realtime (Keyboard) tracks.
D Modulating FX processor for the Realtime (Keyboard) tracks.
Use the TRACK SELECT button to switch from the Real-time (Keyboard) tracks to the Style tracks, and vice-versa.

text_image
chord tempo J: 71 Transpose C +1 octave Mixer: FX Send page 30 施設 -- -- C:100 D:50 A:127 B:20 C:100 D:50 B: -- -- C:100 D:50 C:100 D:50 chord tempo J: 74 Transpose C 0 octave Mixer: FX Send page 30 A:100 B:50 A:100 B:50 B: A:127 B:20 A:100 B:50 A:110 B:50 A:100 B:50 B: A:100 B:50 A:100 B:50To select a parameter and edit its value:
-
Use the VOLUME/VALUE (A-H) buttons to select a track.
-
Use the F-1-F-4 buttons to select one of the effect processors.
-
Use the TEMPO/VALUE controls to change the value.
Send level
▶PERF ▶STYLE ▶STS
000
No effect. Only the direct (uneffected) signal goes to the outputs.
127
100% effect. The direct (uneffected) and effected signals go to the outputs with the same level.
PAGE 4 - TUNING: DETUNE
This page is the place where you can set the fine tuning for each track.
Use the TRACK SELECT button to switch from the Real-time (Keyboard) tracks to the Style tracks, and vice-versa.

text_image
chord tempo 74 transpose C 0 octave Tuning: Detune page 40 +00 +00 +00 +00 Tuning: Detune page 40 +00 +00 +00 +00 Tuning: DetuneDetune
▶PERF ▶STYLE ▶STS
This is the fine tuning value.
-64Lowest pitch.
00Stan dard tuning.
+63Highest pitch.
PAGE 5 - TUNING: SCALE
This page lets you program the alternative scale for the selected tracks (see "Scale Mode" on page 51). The remaining tracks use the Scale set in the Global mode (see "Scale" on page 125).
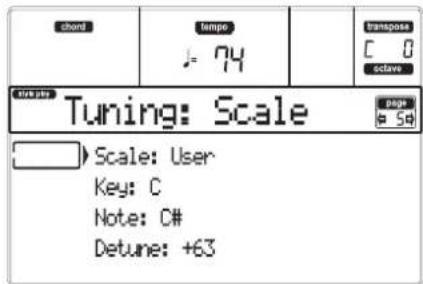
text_image
chord tempo - 74 Transpose C 0 octave Tuning: Scale Page 5d Scale: User Key: C Note: C# Detune: +63Scale
▶PERF ▶STS
Selected scale. See "Scales" on page 227 for a list of the available scales.
Key
▶PERF ▶STS
Parameter required for some Scales, when you should select a preferred key.
Note
▶PERF ▶STS
Note in edit, to be detuned. This parameter can be accessed when a User Scale is selected.
Detune
▶PERF ▶STS
Note detune, relative to the standard Equal tuning. This parameter can be accessed when a User Scale is selected.
PAGE 6 - TUNING: PITCHBEND SENSITIVITY
This page lets you program the Pitch Bend range for the Realtime (Keyboard) tracks.
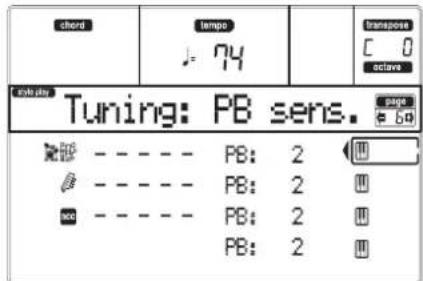
text_image
chord tempo J: 74 Transpose C 0 activate Tuning: PB sens. pagedB - - - - - PB: 2
- - - - - PB: 2
sec - - - - - PB: 2 PB: 2Parameters
▶PERF ▶STYLE ▶STS
These parameters show the Pitch Bend range for each track, in semitones.
01...12 Maximum up/down pitchbend range (in semitones). 12 = ± 1 octave.
Off No pitchbend allowed.
PAGE 7 - FX: A/B SELECT
This page enables you to select the A and B effects. Usually, the A effect is the reverb, and the B effect is the modulating effect for the Style tracks.

text_image
chord tempo - 74 Transpose C 0 octave fx: A/B Select A: 2 B: 89 Compressor Rev-Gate ModT:UP.1 B>Asend:127A, B
▶PERF ▶STYLE
Effects assigned to the A and B effect processors. Usually, A is the reverb, while B is the modulating effect (chorus, flanger, delay...). For a list of the available effects, see "Effects" on page 175.
ModTrk (Modulating Track)
▶PERF ▶STYLE
Source track for modulating MIDI messages. You can modulate an effect parameter with a MIDI message generated by a physical controller.
B>A send (B>A Send)
▶PERF ▶STYLE
Amount of the B effect going back to the input of the A effect.
PAGE 8 - FX: C/D SELECT
This page lets you select the C and D effects. Usually, the C effect is the reverb, and the D effect is the modulating effect for the Realtime (Keyboard) tracks.
text_image
chord tempo J: 74 transpose C 0 octave Link pin FX: C/D Select page @ 00 C: 2 D: 89 Compressor Rev-Gate ModT:UP.1 B>Asend:127C, D
▶PERF ▶STS
Effects assigned to the C and D effect processors. Usually, C is the reverb, while D is the modulating effect (chorus, flang, delay...). For a list of the available effects, see "Effects" on page 175.
ModTrk (Modulating Track)
▶PERF ▶STS
Source track for modulating MIDI messages. You can modulate an effect parameter with a MIDI message generated by a physical controller.
D>Csend (D>C Send)
▶PERF ▶STS
Amount of the D effect going back to the input of the C effect.
PAGE 9 - FX: A EDITING
This page contains the editing parameters for the A effect (usually, reverb for the Style tracks).
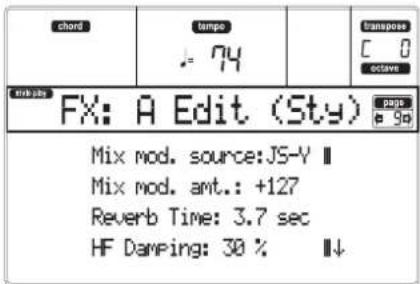
text_image
chord tempo - 74 Transpose C 0 octave Link jobs FX: A Edit (Sty) Mix mod. source: JS-V || Mix mod. amt.: +127 Reverb Time: 3.7 sec HF Damping: 30 % ||↓Use the E and H VOLUME/VALUE buttons to scroll the parameter list.
Parameters
▶PERF ▶STYLE
See "Effects" on page 175 for a list of available parameters for each effect type.
PAGE 10 - FX: B EDITING
This page contains the editing parameters for the B effect (usually modulating effect for the Style tracks). For more details, see "Page 9 - FX: A editing" above.
Parameters
▶PERF ▶STYLE
PAGE 11 - FX: C EDITING
This page contains the editing parameters for the C effect (usually reverb for the Realtime tracks). For more details, see "Page 9 - FX: A editing" above.
Parameters
▶PERF ▶STS
PAGE 12 - FX: D EDITING
This page contains the editing parameters for the D effect (usually modulating effect for the Realtime tracks). For more details, see "Page 9 - FX: A editing" above.
Parameters
▶PERF ▶STS
PAGE 13 - TRACK: EASY EDIT
In this page you can edit the main parameters of the Programs assigned to each track.
Note: All values are relative to the value of the original Program.
You can also change the volume for each class of Drums and Percussion, if the selected track is set in Drum mode (see below "Page 14 - Track: Mode").

text_image
chord tempo . 74 transpose C 0 octave Track: Easy Edit page 130 Attack :0 Attack :0 Attack :0 Attack :0 Attack :0 Attack :0 chord tempo . 74 transpose C 0 octave Track: Easy Edit page 130 Kick V.:127 Attack :0 Perc1V.:127 Attack :0 Attack :0 Attack :0 Attack :0Here is the edit procedure:
- Use the VOLUME/VALUE (A-H) buttons to select a track.
- Use the F-1-F-4 buttons to select a Program parameter, or its value. (For the Drum and Percussion tracks, see below the "Drum tracks" section).
- Use the TEMPO/VALUE controls to change the Program parameter or its value.
Parameters
▶PERF ▶STYLE ▶STS
Attack
Attack time. This is the time during which the sound goes from zero (at the moment when you strike a key) to it's maximum level.
Decay
Decay time. Time to go from the final Attack level to the beginning of the Release.
Release
Release time. This is the time during which the sound goes from the sustaining (or Decay) phase, to zero. The Release is triggered by releasing a key.
Cutoff
Filter cutoff. This sets the sound brightness.
Resonance
Use the Filter Resonance to define the width of the frequency range affected by the Filter.
Delay time before the Vibrato begins, after the sound starts.
Drum tracks
When a track is set in Drum Mode (like the Drum and Percussion tracks), you can adjust the volume for each of the Drum and Percussion categories.
Kick V Kick drums volume.
Snare V Snare drums volume.
Tom V Toms volume.
HiHat V Hi-Hat volume.
CymbalV Ride, Crash and other cymbals volume.
Percus1V "Classic" percussion set volume.
Percus2V "Ethnic" percussion set volume.
SFX V Sp e lume. i a l
Reset
You can reset the parameters' value by keeping the SHIFT button pressed, while pressing one of the selected track VOLUME/VALUE buttons. After you press the above button combination, the Reset window appears:
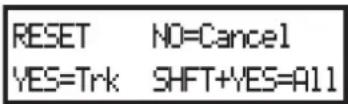
Press ENTER/YES to reset the currently selected track. Keep SHIFT pressed, and press ENTER/YES, to reset all tracks. Press EXIT/NO to abort and keep all parameters unchanged.
PAGE 14 - TRACK: MODE
This page lets you set the polyphony mode for each track.
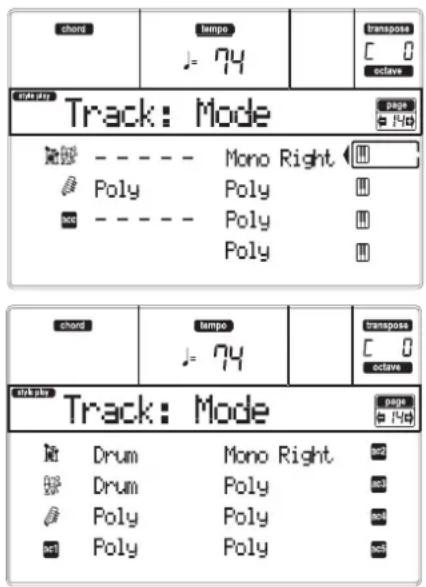
text_image
chord tempo J = 74 Transpose C 0 octave Track: Mode pageNo
Radio - - - - - Mono Right Poly Poly- - - - - Poly
PolyNo
chord tempo J = 74 Transpose C 0 octave Track: Mode pageNo
Drum Mono RightDrum Poly
Poly Poly
Poly Poly
Parameters
▶PERF ▶STYLE ▶STS
| Drum | This is a Drum/Percussion track. No Master or Octave Transpose applies to this track. You can set a different volume for each class of percussive instruments (see “Page 13 - Track: Easy edit” on page 45). |
| Poly | Tracks of this kind are polyphonic, i.e. they can play more than one note at the same time. |
| Mono | Tracks of this kind are monophonic, i.e. each new note stops the previous note. |
| Mono Right | A Mono track, but with priority assigned to the rightmost (highest) note. |
effects vo
PAGE 15 - TRACK: INTERNAL/EXTERNAL
This page lets you set the Internal or External status for each track. It is very useful to let a Style track drive an external expander, or play a digital piano with one of microARRANGER's Realtime tracks.

text_image
chord tempo 74 Transpose C 0 active Track: Int./Ext.Back Both Both
Both Both Both External Both
text_image
chord tempo . 74 transpos C 0 octave Track: Int./Ext. External Both External Both Both Both Both BothParameters
▶PERF ▶STYLE ▶STS
Internal
The track plays the sounds generated by the internal sound engine. It does not play an external instrument connected to the MIDI OUT.
External
The track plays an external instrument connected to the MIDI OUT. It does not play the internal sounds, therefore saving polyphony.
When a track is set to "External", a strings of transmitted Control Change and Program Change data is shown instead of the Program name assigned to the track. In the following example, CC#0 is the Control Change 0 (Bank Select MSB), CC#32 is the Control Change 32 (Bank Select LSB), PC is the Program Change.
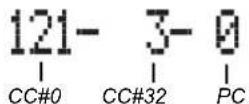
Both
The track plays both the internal sounds and an external instrument connected to the MIDI OUT.
PAGE 16 - R.T. CONTROLS: DAMPER
This page lets you enable/disable the Damper pedal for each of the Realtime (Keyboard) tracks.
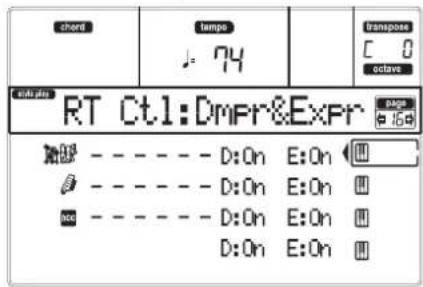
text_image
chord tempo J: 74 Transpose C 0 octave RT Ct1:DmFr&Expr 加速度 - - - - - D:On E:On - - - - - - D:On E:On + - - - - - D:On E:On D:On E:OnD (Damper)
▶PERF ▶STS
On
When you press the Damper pedal and release the keys, the track's sound is kept sustained.
Off
The Damper pedal is not active on any track set to this status.
E (Expression)
▶PERF ▶STS
This parameters allows you to switch the Expression control on/off on each individual Realtime track. The Expression control is a relative level control, always subtracted from the Volume value of the track.
As an example, imagine you have a Piano sound assigned to Upper 1, and a Strings sound assigned to Upper 2. If you turn the Expression switch on on Upper 2, and off on Upper 1, you can use a pedal to control only the Strings' volume, while the Piano remains unchanged. To program a pedal or the Assignable Slider to act as an Expression control, see "Page 3 - Assignable Pedal/Footswitch, Assignable Slider" on page 126. You can only assign this function to a volume-type pedal, not to a switch-type one. Assign the "KB Expression" option to the pedal or Assignable Slider, then press WRITE to save the setting into the Global.
PAGE 17 - R.T. CONTROLS: JOYSTICK
This page lets you enable/disable the Joystick for each of the Realtime (Keyboard) tracks.
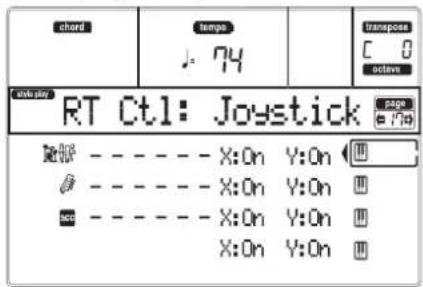
text_image
chord tempo J: 74 transpose C 0 active control RT Ctl: Joystick X:On Y:On X:On Y:On X:On Y:OnHere is the edit procedure:
- Use the VOLUME/VALUE (E-H) buttons to select a track.
- Use the F-3-F-4 buttons to select the X or Y parameter for that track.
- Use the TEMPO/VALUE controls to change the status.
X
▶PERF ▶STS
This enables/disables the left/right movement of the Joystick (Pitch Bend, and sometimes the sound parameter's control).
Y
▶PERF ▶STS
This enables/disables the front/rear movement of the Joystick (Y+: Modulation, and sometimes the sound parameter's control; Y-: Various controls, or non-active).
PAGE 18 - R.T. CONTROLS: DYNAMIC RANGE
This page lets you program a dynamic range for each of the Realtime (Keyboard) tracks. This is useful to create a sound made of up to three dynamic layers, assigning each of the Upper tracks to a different dynamic range.
As an example, you may assign the El.Piano 1 Program to the Upper 1, and the El.Piano 2 Program to the Upper 2 track. Then, set Upper 1 to [L=0, H=80] , and Upper 2 to [L=81, H=127] . The El.Piano 1 will play when playing softer, the El.Piano 2 when playing louder.
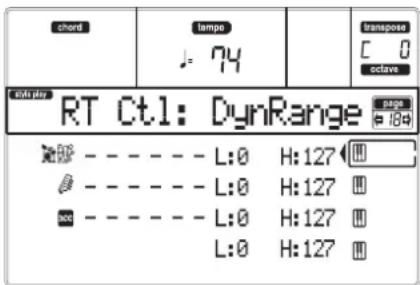
text_image
chord tempo 74 transpose C 0 octave RT Ct1: DynRange R2P - - - - - L:0 H:127 - - - - - - L:0 H:127 - - - - - - L:0 H:127 L:0 H:127Here is the edit procedure:
- Use the VOLUME/VALUE (E-H) buttons to select a track.
- Use the F-3–F-4 buttons to select the L or H parameter for that track.
- Use the TEMPO/VALUE contile to change the parameter's value.
L/H
▶PERF ▶STS
This parameter pair sets the Lower and Higher dynamic range for the track.
0 Lowest velocity value.
127 Highest velocity value.
PAGE 19 - R.T. CONTROLS: ENSEMBLE
This page lets you program the Ensemble function. This function harmonizes the right-hand played melody with the left-hand recognized chords.
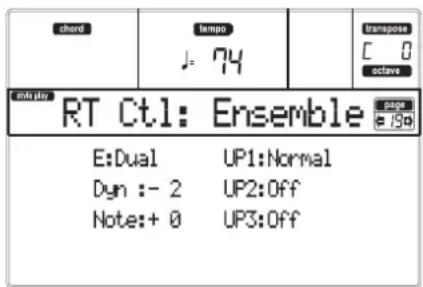
text_image
chord tempo J: 74 Transpose C 0 octave code play RT Ct1: Ensemble E:Dual UP1:Normal Dyn :- 2 UP2:Off Note:+ 0 UP3:OffUp1...Up3
▶PERF ▶STS
Right-hand (Upper) tracks.
Off There is no harmonization on this track.
Normal This track is included in the harmonization.
Mute This track only plays the Ensemble notes, but not the original note.
E(nsemble)
▶PERF ▶STS
Harmonization type.
Duet Adds a single note to the melody.
Close Adds a closed-position chord to the melody.
Open 1 Adds an open-position chord to the melody.
Open 2 As the above, but with a different algo-rhythm.
Block Block harmonization - very typical of jazz music.
Power Ensemble
Adds a fifth and an octave to the melody, as heard in hard rock.
Fourths LO Typical of jazz, this option adds a perfect fourth and a minor seventh under the melody.
Fourths UP As the above, but with notes added over the melody.
Fifths This adds a series of Fifths below the original note.
Octave Adds one or more octaves to the melody.
Dual This option adds to the melody line a second note, at a fixed interval set with the "Note" parameter. When selecting this option, a transposition value appears (-24...+24 semitones to the original note).
Brass Typical Brass section harmonization.
Reed Typical Reed section harmonization.
Trill This option trills the melody note. You can set the trill speed by using the Tempo parameter (see below).
Note: You must play at least two notes with this option!
Repeat The played note is repeated in sync with the Tempo parameter (see below). When playing a chord, only the first note is repeated.
Echo As the Repeat option, but with the repeated notes fading away after the time set with the Feedback parameter (see below).
Dyn(amics)
▶PERF ▶STS
This parameter sets the velocity difference between the right-hand melody and the added harmonization notes.
-10...0 Subtracted velocity value.
Tempo
▶PERF ▶STS
Note: This parameter only appears when the Trill, Repeat or Echo options are selected.
Note value for the Trill, Repeat or Echo Ensemble options. This is in sync with the Metronome Tempo.
Feedback
▶PERF ▶STS
Note: This parameter only appears when the Echo option is selected.
This parameter sets how many times the original note/chord is repeated by the Echo option.
PAGE 20 - STYLE CONTROLS: DRUM/FILL
In this page you can select various general parameters for the Style.
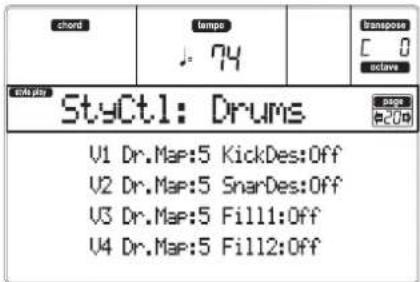
text_image
chord temps J: 74 Transpose C 0 actave date per StyCtl: Drums V1 Dr.Map:5 KickDes:Off V2 Dr.Map:5 SnarDes:Off V3 Dr.Map:5 Fill1:Off V4 Dr.Map:5 Fill2:OffV1-V4 Drum Map
▶PERF ▶STYLE
The Drum Mapping lets you select an alternative arrangement of percussive instruments for the selected Drum Kit, without any additional programming. Just select a Drum Map, and some percussive instruments will be replaced with different instruments.
0...7 Drum Map number. Number 0 is the standard mapping.
Kick D(esignation)
▶PERF ▶STYLE
The Kick Designation replaces the original Kick (Bass Drum) sound with a different Kick of the same Drum Kit.
Off, 1...3 Kick replacing the original one. Off corresponds to the original Kick.
Snare D(esignation)
▶PERF ▶STYLE
The Snare Designation replaces the original Snare Drum sound with a different Snare of the same Drum Kit.
Off, 1...3 Snare replacing the original one. Off corresponds to the original Snare.
Fill1/2
▶PERF ▶STYLE
These parameters set a Variation to be automatically selected at the end of the Fill.
Off The same Variation, playing before selecting a Fill, will be selected again.
1&2...3&4 The specified Variations will be alternatively selected. For example, with the "1&2" option, Variation 1 and Variation 2 will be alternatively selected after the end of the Fill.
Up/Down The next higher/lower numbered Variation is selected, in cycle. After Variation 4, an Up command will select Variation 1. After Variation 1, a Down command will select Variation 4.
Inc/Dec
The next higher/lower numbered Variation is selected. When Variation 4 is reached, an Inc command will select Variation 4 again. When Variation 1 is reached, a Dec command will select Variation 1 again.
->1...->4
"Fill to Variation" (->1, ->2, ->3, ->4) automatically selects one of the four available Style Variations at the end of the fill.
PAGE 21 - STYLE CONTROLS: WRAP AROUND / KEYBOARD RANGE
In this page you can program the Wrap Around function and the Keyboard Range for the Style tracks.
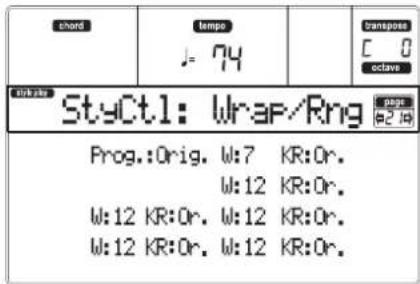
text_image
chord tempo J- 74 transpose C 0 octave StyCt1: Wrap/Rng Prog.:Orig. W:7 KR:Or. W:12 KR:Or. W:12 KR:Or. W:12 KR:Or. W:12 KR:Or. W:12 KR:Or.Here is the edit procedure:
-
Use the VOLUME/VALUE (A-H) buttons to select a parameter.
-
Use the F-1-F-4 buttons to move the cursor between the parameter and its status or value.
-
Use the TEMPO/VALUE controls to change the parameter's status or value.
Prog (Program)
▶PERF ▶STYLE
This parameter lets you select a different Program, other than the one recorded into the Style Element (Variations, Fills, Intros, Endings).
Note: This parameter is automatically set to On each time you assign a Program to any of the Style tracks, either from the front panel or via MIDI.
Original Style tracks always use the original Programs. If you assign a different Program to a Style track, it may be reset to the original one when selecting a different Style Element.
On You can assign different Programs to each Style track, and save them in a Performance or Style Performance. This becomes the only track's Program for all Style Elements.
W (Wrap Around)
▶PERF ▶STYLE
The wrap-around point is the highest register limit for the backing track. The accompaniment patterns will be transposed according to the detected chord. If the chord is too high, the Style tracks might play in a register that is too high, and therefore unnatural. If, however, it reaches the wrap-around point, it will be automatically transposed an octave lower.
The wrap-around point can be set for each track in semitone steps up to a maximum of 12 semitones, relative to the chord root. This value will be the interval between the key specified by the Style Element and the wrap-around point.
1...12 Maximum transposition (in semitones) of the track, referred to the original key of the pattern.
KR (Keyboard Range)
▶PERF ▶STYLE
This parameter is an on/off switch for the Key Range parameter memorized into the Style.
Or(iginal) The Keyboard Range is used. When a track goes over the lower or higher limit set by this (hidden) parameter, it is transposed, to play into the programmed range.
Off No Keyboard Range used.
PAGE 22 - PADS
This page lets you select a different sound or function for each of the four PAD buttons.
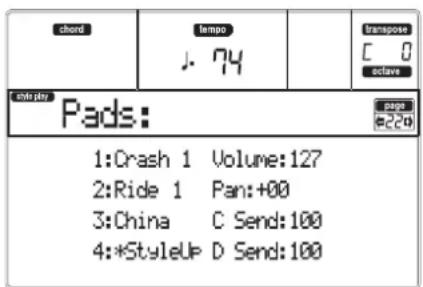
text_image
chord tempo J: 74 Transpose C 0 octave Pads: 1:Crash 1 Volume:127 2:Ride 1 Pan:+00 3:China C Send:100 4:*StyleUp D Send:1001-4
▶PERF ▶STS
Each of the four PAD buttons. See "List of sounds assignable to the Pads" on page 226 and "List of functions assignable to the Pads" on page 227.
Note: Function names are preceded by an asterisk (*)
Volume
▶PERF ▶STS
Volume for each of the four Pad tracks.
Pan
▶PERF ▶STS
Pan for each of the four Pad tracks.
-64 Fully Left.
00 Centered.
+63 Fully Right.
C Send
▶PERF ▶STS
Send level to the C Internal FX processor (usually reverb) for each of the four Pad tracks.
D Send
▶PERF ▶STS
Send level to the D Internal FX processor (usually modulating effect) for each of the four Pad tracks.
PAGE 23 - PREFERENCES: LOCK
You can "lock" various functions, to avoid they can be changed when selecting a different Performance, Style or Single Touch Setting.
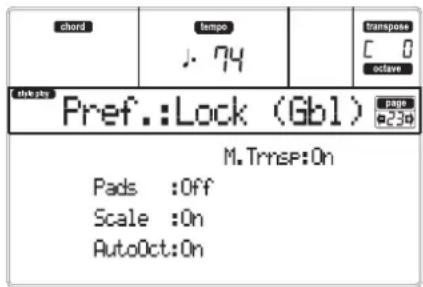
text_image
chord tempo J. 74 Transpose C 0 octave date:5s Pref.:Lock (Gbl) M.Tnresp:On Pads :Off Scale :On AutoOct:OnHint: When turning the instrument on, Performance 1 is automatically selected. Therefore, if you wish your parameters to stay unchanged, save your preferred default settings into Performance 1 (see "The Write window" on page 42), and turn these locks on.
Note: These settings are stored in the Global file. After changing these settings, press WRITE to save them into the Global. The Write Global window will appear (see "The Write window" on page 125).
Pads
▶GBL
Sounds or functions assigned to the Pads.
Scale
▶GBL
When this lock function is On, the Scale parameter does not change when selecting a different Performance, Style or Single Touch Setting.
Auto Octave
▶GBL
This lock lets the instrument automatically transpose the Upper tracks when switching between the FULL UPPER and the SPLIT Keyboard modes.
On When switching to the FULL UPPER or SPLIT Keyboard Mode, the Upper tracks transposition is left unchanged.
Off When switching to the FULL UPPER Keyboard Mode, the Upper tracks Octave Transpose is automatically set to "0". When switching to the SPLIT Keyboard Mode, the Upper tracks Octave Transpose is automatically set to "-1".
M.Trnsp (Master Transpose)
▶GBL
The Master Transpose value is memorized into the Performance or Style Performance. To prevent the Master Transpose to be automatically changed when selecting a Style or Performance, this lock should be set to On.
On (Default) The lock is engaged. When selecting a Style or Performance, the Master Transpose will not change.
Off The lock is turned off. When selecting a Style or Performance, the Master Transpose value may change, according to the data memorized into the Performance or Style Performance.
PAGE 24 - PREFERENCES: CONTROLS
In this page you can set various general parameters for the Style.

text_image
chord tempo J: 74 Transpose C 0 actave cnd play Pref.:Ct1 (Gb1) ChrdRecMode:One Finger Scale Mode :RT Tracks Memory Mode:Chord Velocity Ct1:Start/StopNote: These settings are stored in the Global file. After changing these settings, press WRITE to save them into the Global. The Write Global window will appear (see "The Write window" on page 125).
Chord Recognition Mode
▶GBL
This parameter sets how chords are recognized by the auto-accompaniment engine. Please note that when in Full or Upper Chord Scanning mode, the Fingered 3 mode is always selected, and you must always play at least three notes, to let a chord be recognized.
Fingered 1 Play one or more notes, according to the selected Chord Scanning Mode. A full Major chord will be recognized even if only a single note is played.
Fingered 2 You must always play three or more notes for a full chord to be recognized. If you play just one note, a unison will be played. If you play a suspended 5th, a suspended chord will be played. The full chord will be recognized when you play three or more notes.
Fingered 3 You must always play three or more notes for a chord to be recognized.
One Finger You can also compose a chord using a simplified chord playing technique:
- If you play only one note, a Major chord is recognized.
- Play the root note, plus a white key on the left, for a 7th. Ex.: C3 + B2.
- Play the root note, plus a black key on the left, for a Minor chord. Ex.: C3 + Bb2.
- Play the root note, plus a white and black key on the left, for a Minor 7th. Ex.: C3 + B2 + Bb2.
Scale Mode
▶GBL
This parameter determines which tracks will use the selected alternative scale (see "Scale" on page 44).
Realtime tracks
The scale will only affect the Realtime (Keyboard) tracks.
Upper tracks
The scale will only affect the Upper 1–3 Realtime (Keyboard) tracks.
All Tracks The scale will affect all tracks (Realtime, Style, Pads).
Memory Mode
▶GBL
This parameter sets the way the MEMORY button works.
Chord
When its LED is on, the MEMORY button keeps the recognized chord in memory. When its LED is off, the chord is reset when raising the hand from the keyboard.
Chord + Lower
When its LED is on, the MEMORY button keeps the recognized chord in memory, and keeps the Lower track held until the next note or chord is played. When its LED is off, the chord is reset when raising the hand from the keyboard, and the Lower track is not sustained.
Lower
When its LED is on, the MEMORY button keeps the Lower track held until the next note or chord is played. When off, the Lower track is not sustained when raising the hand from the keyboard. The chord is always kept in memory.
Velocity Control
▶GBL
Set this parameter to trigger a Fill or a Break simply by playing louder with your left hand. When playing on the Lower track with a velocity higher than 95, the selected Style Element will start. For this function to work, the SPLIT Keyboard Mode and LOWER Chord Scanning Mode must be selected.
Off The function is turned off.
Break, Fill 1, Fill 2
When playing with a velocity higher than 95 on the Lower track, the selected element is automatically triggered.
Start/Stop
You can start or stop the Style by playing harder on the keyboard.
10. STYLE RECORD MODE
By entering the Style Record mode, you can create your own Styles, or edit an existing Style.
THE STYLE'S STRUCTURE
The term "Style" relates with music sequences automatically played by the arranger of the microARRANGER. A Style consists of a predefined number of Style Elements (E) (microARRANGER features ten different Style Elements: Variation 1–4, Intro 1–2, Fill 1–2, Ending 1–2). When playing, these Style Elements can be selected directly from the control panel, using the corresponding buttons.
To explain the Style structure, we can use a tree-structure, as shown in the following diagram:
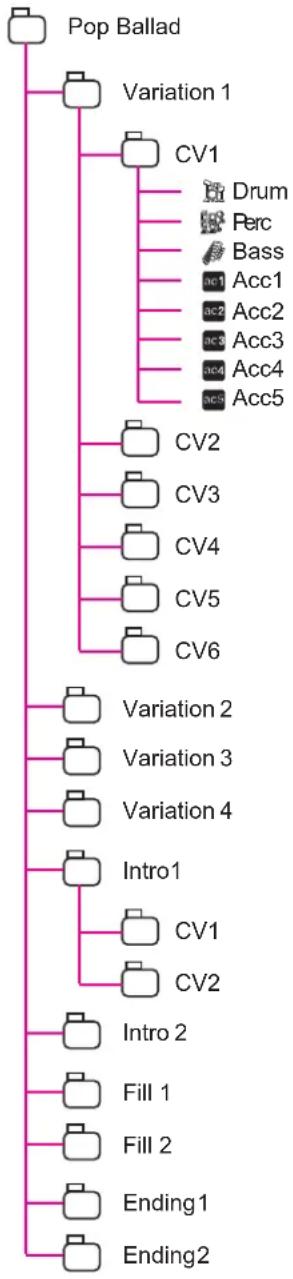
flowchart
graph TD
    A["Pop Ballad"] --> B["Variation 1"]
    A --> C["CV1"]
    C --> D["Drum"]
    C --> E["Perc"]
    C --> F["Bass"]
    C --> G["Acc1"]
    C --> H["Acc2"]
    C --> I["Acc3"]
    C --> J["Acc4"]
    C --> K["Acc5"]
    B --> L["CV2"]
    B --> M["CV3"]
    B --> N["CV4"]
    B --> O["CV5"]
    B --> P["CV6"]
    L --> Q["Variation 2"]
    L --> R["Variation 3"]
    L --> S["Variation 4"]
    L --> T["Intro1"]
    T --> U["CV1"]
    T --> V["CV2"]
    U --> W["Intro 2"]
    V --> X["Fill 1"]
    V --> Y["Fill 2"]
    T --> Z["Ending1"]
    T --> AA["Ending2"]
Each Style Element is made up of smaller units, called Chord Variations (CV), but not all of them have the same number of CVs. Variations 1–4 have up to 6 CVs each, while the other Style Elements have only up to 2 CVs.
When you play on the chord recognition area (Lower, Upper or Full, depending on the Chord Scanning section on the control panel), the arranger scans the keyboard and determines which chord you are playing. Then, dependig on the selected Style Element, it determines which Chord Variation (CV) should be played for the scanned chord. Which Chord Variation corresponds to each scanned chord is a setting of the Style: the Chord Variation Table. Each Style Element contains a Cthor Variation Table, whose prototype is the following:
| Chord Chord Variations (CVs) | ||
| Variation 1–4 | Intro 1–2, Fill 1–2, Ending 1–2 | |
| Maj | CV1 – CV6 | CV1 – CV2 |
| 6 | ||
| M7 | ||
| M7b5 | ||
| Sus4 | ||
| Sus2 | ||
| M7sus4 | ||
| min | ||
| m6 | ||
| m7 | ||
| m7b5 | ||
| mM7 | ||
| 7 | ||
| 7b5 | ||
| 7sus4 | ||
| dim | ||
| dimM7 | ||
| aug | ||
| aug7 | ||
| augM7 | ||
| no 3rd | ||
| no 3rd, no 5th | ||
After deding what CV to play, the arranger triggers the right sequence for each track. Since each sequence is written in a particular key (for example, CMajor, GMajor or Emin), the arranger transposes it according to the scanned chord. Notes in the sequence are carefully transposed according to the Note Transpition Tables (NTT), to make them work fine with all recognized chords. The NTT allows you to record just some Chord Variations, and have all the notes play in the right place, avoiding dissonances and transposing the pattern notes to the notes of the recognized chord.
Going deeper into the Style structure, we can see that each Chord Variation is made up of Track Sequences, and the microARRANGER supports 8 different tracks. DRUM and PERC are used for drum and percussion sequences, BASS for bass and ACC1–5 are for accompaniment sequences (string, guitar, piano or other accompaniment instruments).
Just to summarize, when you play a chord on the chord recognition area, the arranger determines which Style Element is used, then determines which Chord Variation should be used for the played chord, then Style sequences for every track of that Chord Variation are transposed from the original chord to the recognized chord using the NTT, and so on every time you play a chord.
Note: The eaBand the Count In are not Style Elements, and cannot be programmed by the user. While in record/edit, the BREAK/COUNT IN button does not work.
What to record
Recording a Style is a matter of recording tracks, inside a series of Chord Variations, inside a series of Style Elements, inside the Style itself.
You don't need to record all Chord Variations for all Style Elements. It is often only necessary to record just a Chord Variation for each Style Element. Exceptions are the Intro 1 and Ending 1, where we suggest to record both a Major and minor Chord Variations.
STYLE IMPORT/EXPORT
You can use Korg's Style To Midi application to exchange Styles between your computer and the micro-ARRANGER, through the Standard MIDI File (format. The application is freely downloadable from http://www.korgpa.com/. Please read the included instructions.
ENTERING THE RECORD MODE
While in the Style Play operating mode, press RECORD. The following page will appear in the display:

text_image
shord tempo : 74 Transpose C 0 actave Record Current Style New Style- Select Current Style to edit the current Style. If it is a FactorStyle, you will not be able to save it on the original location; you will select a User Style instead.
When editing an existing Style, the original Style Performance is recalled, but the following parameters are reset to their default values: Drum Mapping (0), Snare & Kick Designation (Off), Program (Original), Keyboard Range (Original). This means that you can hear some differences between the Style in play and the same Style being edited; for example, resetting the Drum Mapping may lead to some instrument's replacement.
After editing the Style, please save it (see "Exit and Save/Abort Style" below). Then, edit the Style Performance to adjust the track's settings (Tempo, Volume, Pan, FX Send... see page 43 and following in the "Style Play operating mode" chapter) and save it by pressing the WRITE button.
- Select New Style to start from a new, empty Style. A default Style Performance will be recalled. When finished recording, you will save the new Style onto a User Style location.
After recording the Style, please save it (see “Exit and Save/Abort Style” below). Then, edit the Style Performance to adjust the track’s settings (Tempo, Volume, Pan, FX Send… see page 43 and following in the “Style Play operating mode” chapter) and save it by pressing the WRITE button.
Note: After a record or edit operation, the Style is rewritten in memory. When you press START/STOP there is a delay before you can actually listen to the Style. This delay is higher with a Style containing more MIDI events.
Note: While in Record mode, all footswitches are disabled.
LISTENING TO THE STYLE WHILE IN RECORD/EDIT MODE
While you are in Record/Edit mode, you can listen to the selected Chord Variation or to the whole Style, depending on the page you are in.
To select a Chord Variation, go to the Main page of the Record/Edit mode (see "E (Style Element)" and "CV (Chord Variation)" on page 55).
- When you are in the Quantize, Transpose, Velocity, or Delete pages, you can listen to the selected Chord Variation. Press START/STOP to check how it works. Press START/STOP again to stop the playback.
- When you are in the Delete All, Copy, Style Element Controls or Style Control pages, you can listen to the whole Style. Press START/STOP and play some chords to do your tests. Select any Style Element using the control panel buttons (VARIATION 1–4, INTRO 1–2, FILL 1–2, ENDING -2). Press START/STOP again to stop the playback.
Note: When doing the above tests, the Fingered 3 Chord Scanning mode is automatically selected.
EXIT AND SAVE/ABORT STYLE
When finished editing, you can save your Style in memory, or abort any change. Press WRITE or RECORD to go to the Write page (see "The Write window" on page 54).
Note: Who saving the Style in memory, microARRANGER automatically compresses it to reduce its size and save memory.
Hint: Save often while recording, to avoid accidentally losing your Style.
THE WRITE WINDOW
This page appears when you press the WRITE or RECORD button while in Record mode. Here you can save the recorded or edited Style in memory.

text_image
chord tempo . 74 transpose C 0 octave write to: Style name: NewBossa To: U01-01 Bossa Abort- To e the Style to the internal memory, press the A or B VOLUME/VALUE buttons, then press ENTER. The "Are you sure?" message will appear. Press ENTER to confirm, or EXIT to abort.
- To return to the previous Style Record page, leaving all untouched and the Style unsaved, press EXIT.
- To delete all changes to the Style, press one of the D VOLUME/VALUE buttons to select the Abort command. The "Are you sure message?" will appear. Press ENTER to confirm deletion, or EXIT to return to the Write page.
Style name
Use this parameter to change the Style's name. Press the right A VOLUME/VALUE button to enter editing, and modify the name using the UP/DOWN buttons to move the cursor, and the DIAL to select a character. Press INSERT to insert a character at the cursor position, or DELETE to delete it
To (Style number)
Use the B VOLUME/VALUE buttons, or the TEMPO/VALUE controls, to select a different User Style location in memory.
Note: Only User locations are available.
Abort
Select this command to delete any change to the Style.
LIST OF RECORDED EVENTS
The Style Record mode filters out some events that may damage the right operation of the Style. Here are the recorded events, and the most important filtered-out events.
| Control function | CC# (Control Change Number) |
| Allowed | |
| Note On | |
| Note Off* | |
| Pitch Bend | |
| Modulation 1 | 1 |
| Modulation 2 | 2 |
| Pan | 10 |
| Expression | 11 |
| CC#12 | 12 |
| CC#13 | 13 |
| Damper | 64 |
| Filter Resonance | 71 |
| Low Pass Filter Cutoff | 74 |
| CC#80 | 80 |
| CC#81 | 81 |
| CC#82 | 82 |
| Not allowed | |
| After Touch | |
| Volume | 7 |
| All other Control Change messages | |
(*) A Note Off will always be inserted at the end of the Chord Variation.
Note: Some Control Change messages cannot be recorded directly using microARRANGER integrated controls.
FAST DELETE USING THE CONTROL PANEL BUTTONS
While in the Main page or the Style Tracks page, you can use the control panel buttons to delete various elements of the Style:
DELETE + note
When a track is selected, you can use this key sequence to delete a single note or a single percussive instrument.
If the Style is playing, this shortcut deletes the instrument only while the key is kept pressed, leaving all other notes untouched within the track.
DELETE + Track
While in the Style Tracks page, you can delete a whole track with a single shortcut. Keep the DELETE button pressed, then press one of the VOLUME/VALUE buttons corresponding to the track to be deleted. The "Are you sure?" message appear. Press ENTER to confirm, EXIT to abort.
MAIN PAGE
After pressing the RECORD button, and selected the Style to record/edit, the Main page of the Style Record mode appears.
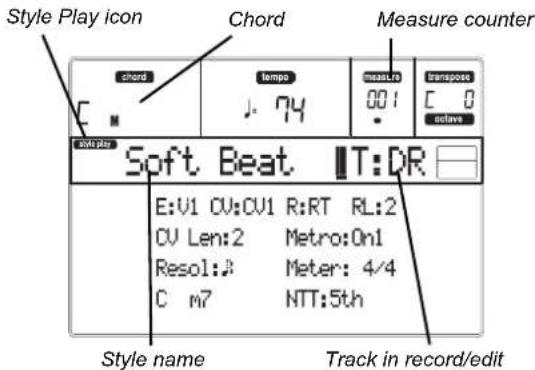
text_image
Style Play icon Chord Measure counter chord tempo 001 transpose C 0 active Soft Beat T:DR E:V1 CU:CU1 R:RT RL:2 CV Len:2 Metro:On1 Resol:3 Meter: 4/4 C m7 NTT:5th Style name Track in record/editStyle Play icon
When this icon appears in the display, you are in Style Play or Style Record mode.
Chord
While in the Main and Style Tracks page, this area shows the Original Key/Chord (see "Original Key/Chord" on page 56) for the selected track.
Style name
This is the name of the Style in record/edit.
Measure counter
This counter shows the measure in record. The measure range is specified by the "RecLen" parameter (see "RL (Recording Length)" on page 55).
Track in record/edit
Most editing in this edit mode are executed on a single track. While in the main page, the currently selected track is shown on the upper right area of the display. The abbreviations are: DR (Drums), PC (Percussion), BS (Bass), A1...A5 (Accompaniment 1...5).
To select the track to edit, press TRACK SELECT to jump to the Style Tac ks page (see "Style Tracks page" on page 56) and use the VOLUME/VALUE buttons to select it.
E (Style Element)
Use the A VOLUME/VALUE buttons to select the line, and the F-1 button to select this parameter.
This parameter lets you select the Style Element to put in edit. Each Style Element corresponds to one of the buttons on the control panel carrying the same name.
Note: When this parameter and the assigned value is in small letters (e:v1), the Style Element is empty; when it is in capitals (E:V1), it is already recorded
V1...V4 Variation 1 to Variation 4
I1...I2 I intro 1 to Intro 2
F1...F2 Fill 1 to Fill 2
E1...E2 Ending 1 to End ing 2
CV (Chord Variation)
Use the A VOLUME/VALUE buttons to select the line, and the F-2 button to select this parameter. This parameter lets you select the Chord V ariation to edit, after selecting the Style Element this Chord Variation pertains to.
Note: When this parameter and the assigned value is in small letters (cv:cv1), the Chord Variation is empty; when it is in capitals (CV:CV1), it is already recorded
SE:V1...V4 You can select one of 6 Chord Variations to edit.
SE:I1...E4 You can select one of 2 Chord Variations to edit.
R (Recording Mode)
This parameters lets you select between the Realtime and the Step recording modes. Use one of the E VOLUME/VALUE buttons and the F-3 function button to select this parameter. Ch ange its status using the E VOLUME/VALUE buttons, or the TEMPO/VALUE controls.
RT Realtime. This methods allows you to record in realtime each pattern of the Style.
Stp Step Record. This method allows you to enter the events one at a time. See “Style Record procedure” below for more information.
RL (Recording Length)
This parameter sets the recording length (in measures) of the selected track. Its value is always equal to, or a divider of, the Chord Variation Length (see next parameter).
This is not the total length of the Chord Variation, but just of the current track. For example, you may have a Chord Variation eight measures long, with a drum pattern repeating each two measures. If so, set the CV Len parameter to "8", and the RecLen parameter to "2" before starting recording the Drum track. When saving the Style, or executing any edit operation on the Style, the 2-measures pattern will be extended to the full 8-measures length of the Chord Variation.
Warning: If you assign CVLen a value lower than RecLen, the value of RecLen is not immediately updated in the display. Therefore, you are still free of changing the value of CVLen, before the measures exceeding its value are deleted (see warning in "CVLen (Chord Variation Length)" below).
However, if you press START/STOP to begin recording, the real RecLen value is changed to the new one, even if the display still shows the old value.
For example, you may have CVLen = 4 and RecLen = 4. If you set CVLen to 2, and press START/STOP to begin recording, RecLen is still shown as 4, but it is in reality set to 2, and recording will cycle for just 2 measures. After you press START/STOP to stop recording, RecLen is updated to 2, and all measures after the second measure are deleted.
CVLen (Chord Variation Length)
This parameter sets the total length (in measures) for the selected Chord Variation. When playing a Style, this will be the length of the accompaniment pattern to be cycled, when the chord corresponding to the Chord Variation is recognized on the keyboard.
Warning: If you reduce the Chord Variation Length after recording, any measure after the selected length will be deleted. Be very careful when setting the CVLen to a lower value after recording!
Metro (Metronome)
This is the metronome heard during recording.
Off No metronome click will be heard during recording. A one-bar precount will be played before starting recording.
On1 Metronome on, with a one-bar precount before starting recording.
On2 Metronome on, with a two-bar precount before starting recording.
Resol (Resolution)
This parameter sets the quantization during recording. ♪ (1/32) ♪ (1/8)
Grid resolution, in musical values. For example, when you select 1/16, all notes are moved to the nearest 1/16 division. When you select 1/8, all notes are moved to the nearest 1/8 division.

text_image
No quantization 1/16 1/8Meter
This is the meter (time signature) of the Style. You can edit this parameter only when the Style is empty, i.e. before you begin recording anything.
Original Key/Chord
This is the track's original key and chord. Use the D VOLUME/VALUE buttons to select the line, and the F-1 and F-2 buttons to switch from the key/chord name and the key/chord type (Maj, min...).
When in Style Play mode, this chord will be played back exactly as it was recorded, without any NTT processing (see below). To record just one Chord Variation for a Style Element, the suggested original key/chord is "maj7". Be very careful to play the 7th+ note (i.e., with a "Cmaj7th" key/chord, the B), to avoid the lack of notes, or a bad NTT conversion when playing different chords. Note: To conform to Korg specifications, it is advisable to record both the "Major" and "minor" Chord Variations for the Intro 1 and Ending 1 Style Elements.
When you select a track, the original key/chord assigned to the selected track will be activated. All recorded tracks will play back on that key/chord. For example, if the original key/chord for the Acc1 track is A7th, when selecting the Acc1 tracks all the remaining tracks will play according to the A7th key/chord.
In the above example, you will record the Acc1 track in the AMajor key, with notes that will comply with the A7th chord. This is the pattern that will be recalled exactly as it was recorded, when playing an A7th chord.
Copying the Key/Chord value to all other tracks of the same Chord Variation. While in this page, you can keep the SHIFT button pressed, while pressing one of the [D]
VOLUME/ VALUE buttons, to copy the Key of the currently selected track to all other tracks of the same Chord Variation. This function is useful to speed-up pattern programming, and to avoid having different tracks in different keys within the same Chord Variation.
NTT
The Note Transposition Table (NTT) determines how the arranger will transpose pattern notes, when playing a chord that does not exactly match to the original chord of a Chord Variation. For example, if you only recorded a Chord Variation for the CMaj chord, when a CMaj7 is recognized on the keyboard the arranger must transpose some notes to create the missing 7th.
Note: To conform to Korg specifications, it is advisable to set the NTT to "No Transpose" on the Intro 1 and Ending 1.
Root The root note (in CMaj = C) is transposed to the missing notes.
5th The 5th note (in CMaj = G) is transposed to the missing notes.
i-Series All original patterns must be programmed on the “Maj7” or “min7” chords. When loading old Korg i-Series instruments, this option is automatically selected.
No Transp No transposition applied. The pattern will always play as recorded. This is the standard setting of Intro 1 and Ending 1 in Korg's original Styles.

text_image
As recorded with NTT= Root or 5th (Key/Chord = CMaj) When you play a CM7 with NTT= Root When you play a CM7 with NTT= 5th As recorded with NTT= i-Series (Key/Chord = CM7) When you play a CMaj with NTT= i-Series When you play a CM7 with NTT= i-SeriesSTYLE TRACKS PAGE
While in the main Style Record page, press TRACK SELECT to jump to this page. Here you can see and select any Style track.

text_image
Style in record/edit Style Element-Chord Variation in record/edit Soft Beat V1-CU1 Brush 2 Piano01 Perc Kit Guitar01 *AcouBass StrngEns2 AcouPiano2 VoxPad1 Style tracksProgram name
Select a track using the VOLUME/VALUE buttons. Select a Program using the PROGRAM/PERFORMANCE section.
While in this page, you can set the track's volume using the VOLUME/VALUE buttons. Since the track's volume is memorized in the Style Performance and not in the pattern, this setting will not be recorded and saved. However, this will allow you to play back louder any reference track, or the track you are recording.
Track status
When in the Style Tracks page, each track can be in one of three status.
Play (Visible status icon). This status is available only for non-selected tracks. When in play, a track can play back the recorded pattern.
Mute (Hidden status icon). When in this status, you can play the track on the keyboard, but you can't record on it. This is useful to do some preliminary test, before actually start recording.
To set a track in mute, first select it, then press both corresponding VOLUME/VALUE buttons to hide the status icon. To set the track in record again, press again the corresponding VOLUME/VALUE buttons.
Record (Flashing status icon). When in this status, the track is ready to record. Just select a track to set it in record status.
STEP RECORD PAGE
Access this page from the Main page of the Style Record mode, by selecting the "Stp" recording mode ("R" parameter), and pressing START/STOP.

text_image
Previous event Event to be inserted cloud tempo C 74 transpose C 8 active unknown Step V1-CV1 T: DR (a) M001.01.000 C4 U:64 D:85% (b) M001.01.192 Meter: 4/4 key U:64 D:85% Current position Step value Waiting for a keystroke...(a) section
Previously inserted event. You may delete this event, and set it in edit again, by pressing the <button.
(b) section
Event to be inserted. See the following parameters for information on each element of this section.
M (Measure)
This is the position of the event (note, rest or chord) to be inserted.
Meter
Meter of the current measure. This parameter can't be edited. You can set the Meter in the Main page of the Style Record mode, before actually starting recording (see step 6 on page 58 for more information).
key?
This is a prompt, asking for a note or chord to be played on the keyboard, to enter an event on the current step.
Step value
Length of the event to be inserted. Use the NOTE VALUE buttons, on the lower left area of the control panel, to change this value.

text_image
VARIATION ○1 ○2 ○3 ○4 - - - - - - - - - - - - - - - - - - - - - - - - - - - - - - - - - - - - - - - - - - - - - - - - - - - - - - - - - - - - - - - - - - - - - - - - - - - - - - - - - - - - - - - - - -
Note value.
Dot (.) Augments the selected note by one half of its value.
Triplet (3) Makes the selected note a triplet note.
V (Velocity)
Set this parameter before entering a note or chord. This will be the playing strength (i.e., velocity value) of the event to be inserted.
KBD Keyboard. You can select this parameter, by turnmall counter-clockwise the dial. When this option is selected, the playing strength of the played note is recognized and recorded.
1...127 Velocity value. The event will be inserted with this velocity value, and the actual playing strength of the note played on the keyboard will be ignored.
D (Duration)
Relative duration of the inserted note. The percentage is always referred to the step value.
50% Staccato.
85% Ordinary articulation.
100%L egato.
Buttons used in Step Record mode
TIE button
Ties the note to be inserted to the previous note.
REST button
Inserts a rest.
NOTE VALUE buttons
Select the step value.
START/STOP button
Exits the Step Record mode.
< (Previous step)
Goes to the previous step, deleting the inserted step.
>> (Fast Forward)
Goes to the next measure, and fill the remaining space with rests.
STYLE RECORD PROCEDURE
There are two different methods for recording a Style: Realtime and Step.
• Realtime Recording allows you to record Style patterns in realtime.
- Step Recording allows you to create a new Style by entering the single notes or chords in each track. This is very useful when transcribing an existing score, or needing a higher grade of detail, and is particularly suitable to create drum and percussion tracks.
Preparing to record
- If you like to edit an existing Style, select that Style.
- Press RECORD to enter the Style Record mode. You are prompted to select either the Current Style, or a New Style.

text_image
chord tempo J = 74 Transpose C 0 octave Record Current Style New StyleSelect "Current Style" if you want to edit the current Style, or make a new Style starting from existing one. Select "New Style" if you want to start from scratch with an empty Style.
- After you select your preferred option, the Main page of the Style Record mode will appear.

text_image
chord tempo J: 74 measure 001 transpose C 0 octave Soft Beat IT:DR E:V1 CV:CV1 R:RT RL:2 CV Len:2 Metro:On1 Resol:3 Meter: 4/4 C m7 NTT:5th- Use the A VOLUME/VALUE buttons, and the F-1 and F-2 function keys to select the E (Style Element) and CV (Chord Variation) parameter. Note: For more information on the Style Elements and Chord Variations, and the Style structure in general, see "The Style's structure" on page 52.
- Use the RL (Recording Length) parameter to set the length (in measures) of the pattern to step-record. Select this parameter using the E VOLUME/VALUE buttons and the F-4 function button. Use the TEMPO/VALUE controls to set the value.
- Use the Meter parameter to set the Style's meter. You can edit this parameter only if you selected the New Style option when entering the Record mode.
-
Set the tempo. Keep the SHIFT button pressed, and use the TEMPO/VALUE controls to change the tempo.
-
At this point, if you want to do a Realtime Recording go on reading "Realtime Record procedure" below. Otherwise, if you prefer to do a Step Record, jump to "Step Record procedure" on page 59.
Realtime Record procedure
- When still in the Main page of the Style Record mode, press one of the E VOLUME/VALUE buttons, to select the "R" parameter. Use these buttons, or the TEMPO/VALUE controls, to select the "RT" (Realtime) recording mode.
R:RT
- Press TRK SELECT to switch to the Style Tracks page. Here you can assign the right Program to each Style track. (For more details, see "Style Tracks page" on page 56).
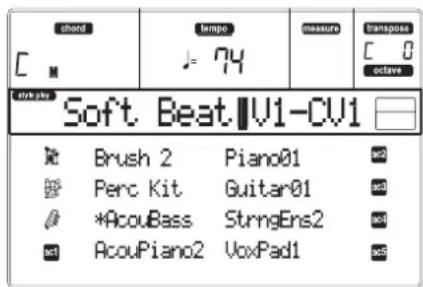
text_image
chord C M tempo J= 74 measure Transpose C 0 octave Soft Beat.V1-CU1 Brush 2 Piano01 Perc Kit Guitar01 *AcouBass StrngEns2 AcouPiano2 VoxPad1-
If you like , you can set the tempo again from this an page: just use the TEMPO/VALUE controls.
-
Assign a Program to each track, by using the PROGRAM/PERFORMANCE section.
- If needed, set the Octave Transpose for each track. Note: The Octave Transpose will affect only the notes coming from the keyboard, and not from the arranger.
- Select the track to put in record. Its status icon will begin flashing.
Note: When entering the Record mode, the last selected track is already in record. When you press START/STOP after entering the Record mode, you can immediately start recording.
If you like, you can try your part before recording:
- Set the track in mute, by pressing both corresponding VOLUMVALUE buttons; the status icon disappears.
- Press START/STOP to play back the other tracks, if already recorded, and practice on the keyboard.
-
When you have finished practicing, press START/STOP to stop the arranger, and unmute the track by pressing both VOLUME/VALUE buttons; the track will be in record again.
-
While the status icon is flashing, press START/STOP to begin recording. Depending on the "Metro" (metronome) option you selected, a 1- or 2-bars precount may play before the recording actually begins. When it begins, play freely. The pattern will last for some measures, according to the RecLen value, then restart.
Since the relog will happen in overdub, you can add notes on any following passage. This is
very useful to record different percussive instruments at any cycle on a Drum or Percussion track.
Note: While record the track's Keyboard Range (see page 68) is ignored, and the track can play over the whole keyboard range. The Local parameter (see "Local" on page 127) is also automatically set to On, to allow playing on the keyboard.
- When finished recording, press START/STOP to stop the arranger. Select a different track, and go on recording the whole Chord Variation.
Note: You can select a different track only when the arranger is not running.
- When finished recording the Chord Variation, select a different Chord Variation or Style Element to go on recording the whole Style.
- When finished recording the new Style, press WRITE or RECORD to save it in memory. The Write page will appear:
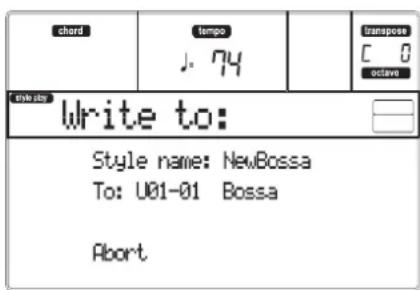
text_image
chard tempo J. 74 Translate C 0 octavo write to: Style name: NewBossa To: U01-01 Bossa Abort- To change the Style's name: press the right A VOLUME/VALUE button to enter editing, and modify the name using the UP/DOWN buttons to move the cursor, and the DIAL to select a character. Press INSERT to insert a character at the cursor position, or DELETE to delete it.
- To select a different location in memory, press one of the B VOLUME/VALUE buttons, then select a location with these buttons or the TEMPO/VALUE controls.
Press ENTER to confirm, or one of the D (Abort) VOLUME/VALUE buttons to abort the save. The
"Are you sure?" message will appear in the display. Press ENTER to confirm, EXIT to abort. After pressing ENTER, you will exit from the Record mode.
If you press EXIT while in the Write page, you will go back to the previous Style Record page, without any change.
Step Record procedure
- When still in the Main page of the Style Record mode, press one of the E VOLUME/VALUE buttons, to select the "R" parameter. Use these buttons, or the TEMPO/VALUE controls, to select the "Stp" recording mode.

- Press TRK SELECT to switch to the Style Tracks page. Here you can assign the right Program to each Style track. (For more details, see "Style Tracks page" on page 56).
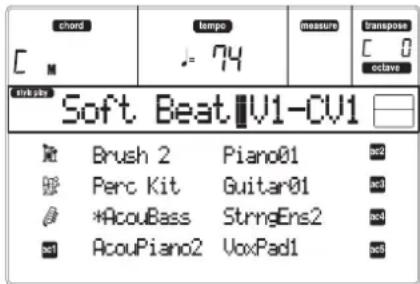
text_image
chord C M tempo - 74 measure Transpose C 0 octave Link path Soft Beat.V1-CV1 Brush 2 Piano01 Perc Kit Guitar01 *AcouBass StrngEns2 AcouPiano2 VoxPad1- Assign a Program to each track, by using the PROGRAM/PERFORMANCE section.
- Press START/STOP to turn on its LED and enter the Step Record page. (See "Step Record page" on page 57 for more information on each parameter of this page).
Previous event Event to be inserted

text_image
C M Current Step V1-CV1 IIT:DR (a) M---.--- Empty 95% — J (b) M001.01.000 Meter: 4/4 key? J U:64 D:85% Current position Step value Waiting for a keystroke...The first two lines (a) are the latest inserted event. The last two lines (b) are the event currently in edit, ready to be inserted.
The "Empty" event marks the beginning of the pattern, when there are no events inserted. It is automatically inserted when entering the Record mode. It will be removed when an event is inserted.
-
The "Maaa.bb.ccc" parameter in (b) is the current position. This is the place where the note in edit will be inserted.
-
If you don't want to insert a note at this position, insert a rest instead, as shown in step 7.
-
To jump to the next measure, filling the remaining beats with rests, press the >> button.
-
To change the step value, use the NOTE VALUE buttons, on the lower left area of the control panel.

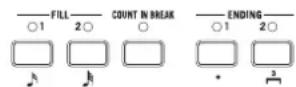
- Insert a note, rest or chord at the current position.
- To insert a single note, just play it on the keyboard. The inserted note length will match the step length. You may change the velocity and relative duration of the note, by editing the V (Velocity) and D (Duration) parameters. See “V (Velocity)” and “D (Duration)” on page 57.
- To insert a rest, just press the REST button. Its length will match the step value.
- To tie the note to be inserted to the previous one, press the TIE button. A note will be inserted, tied to the previous one, with exactly the same name. You don't need to play it on the keyboard again.
-
To insert a chord or a second voice, see "Chords and second voices in Step Record mode" below.
-
After inserting a new event, you may go back by 4. pressing the < button. This will delete the previsously inserted event, and set the step in edit again. 4.
-
When the end of the pattern is reached, the "End Loop" (End of Loop) event is shown in the first two lines of the display (a), and the recording restarts from the "M001.01.000" position. Any note exceeding the pattern length, inserted at its end, will be reduced to fit the total length of the pattern. At this point, you may go on, inserting new events in dub mode (the previously inserted events will not be deleted). This is very useful when recording a drum or percussion track, where you may want to record the bass drum on a first cycle, the snare drum on the second cycle, and the hi-hat and cymbals during the following cycles.
-
When finished recording, press START/STOP to turn off its LED. The Main page of the Style Record mode appears.

text_image
chord C tempo J: 74 measure 001 Transpose C 0 octave Soft Beat IT:DR E:V1 CV:CV1 R:RT RL:2 CV Len:2 Metro:On1 Resol:J3 Meter: 4/4 C m7 NTT:5thWhen exiting, the "RT" recording mode is automatically selected. You may press START/STOP to listen to the Style. Press START/STOP again to stop the playback.
To enter the Step Record mode again, select the "Stp" recording mode, and press START/STOP.
- From the Main page of the Style Record mode, press RECORD to exit the Record mode. You will be prompted to assign a new name to the Style, and select a memory location where to save it. See "The We window" on page 54 for information on how to save a Style.
Chords and second voices in Step Record mode
With microARRANGER, you are not obliged to insert single notes in a track. There are several ways to insert chords and double voices. Lets look at some.
Inserting a chord. When the "key?" prompt appears in the display, play a chord instead of a single note. The event's name will be the first note of the chord you pressed, followed by the ..." marking.
C4, ... J: U:64 D:85%
Inserting a chord with notes with different velocity values. You can make the upper or lower note of a chord, for example, louder than the remaining ones, to make the most important note emerge from the chord. Here is how to insert a three-note chord:
- Edit the Velocity value of the first note.
- Press the first note and keep it pressed.
- Edit the Velocity value of the second note.
-
Press the second note and keep it pressed. i5. Edit the Velocity va lue of the third note.
-
Press the third note, then release all notes.
Inserting a second voice. You can insert passages where one note is kept pressed, and another voice moves freely.
Ex. 1:

flowchart
graph TD
    A["Step Time = On Press E and C"] --> B["Step Time = Off Release E (continue holding C)"]
    B --> C["Step Time = On Press G"]
    C --> D["Step Time = Off Release G and C"]
Ex.2:

flowchart
graph LR
    A["Step Time = On"] --> B["Tie"]
    B --> C["Step Time = On"]
    C --> D["Off"]
    style A fill:#f9f,stroke:#333
    style B fill:#ccf,stroke:#333
    style C fill:#cfc,stroke:#333
    style D fill:#fcc,stroke:#333
Ex.3:
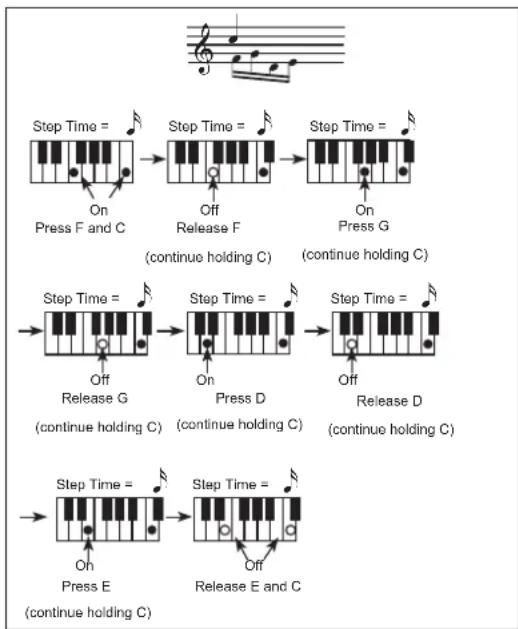
flowchart
graph TD
    A["Step Time = Press F and C"] --> B["Step Time = Off Release F"]
    B --> C["Step Time = On Press G"]
    D["Step Time = Off Release G (continue holding C)"] --> E["Step Time = On Press D (continue holding C)"]
    E --> F["Step Time = Off Release D (continue holding C)"]
    G["Step Time = On Press E (continue holding C)"] --> H["Step Time = Off Release E and C"]
MENU
From any page of the Style Record mode, press MENU to open the Style Record edit menu. This menu gives access to the various Style Record edit sections.
Note: While the Style is in play, you cannot access the Edit section pages from the Main page and the Style Tracks page (see page 55 and page 56). Stop the playback before pressing MENU.
When in the menu, select an edit section using the VOLUME/VALUE (A-H) buttons, select an edit page using PAGE +, or press EXIT to exit the menu.
When in an edit page, press EXIT to go back to the main page (or the Style Tracks page) of the Style Record mode.
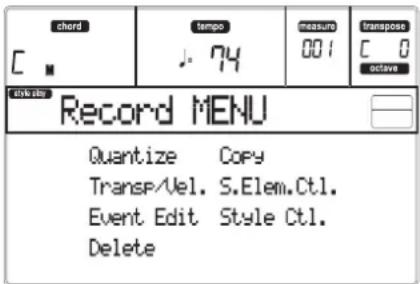
text_image
chord C . tempo . 74 measure 001 transpose C 0 octave Record MENU Quantize Copy Transp/Vel. S.Elem.Ctl. Event Edit Style Ctl. DeleteEach item in this menu corresponds to an edit section. Each edit section groups various edit pages.
Note: When switching from the Edit section pages (Quantize, Transpose, Velocity, Delete) to the other pages, or vice-versa, the Style (if in play) is automatically stopped.
EDIT PAGE STRUCTURE
Select an edit section from the Menu, and/or use the PAGE buttons to reach the desired page.
Press EXIT to go back to the main page of the Style Record mode.
All edit pages share the same structure.
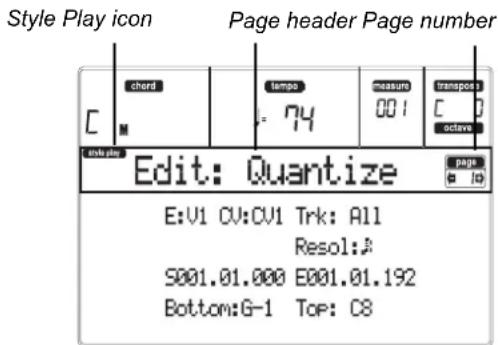
text_image
Style Play icon Page header Page number chord tempo measure transport C 74 001 active Edit: Quantize E:U1 CV:CU1 Trk: A11 Resol:A S001.01.000 E001.01.192 Bottom:G-1 Top: C8Style Play icon
When on, this icon indicates that the instrument is in Style Play mode.
Page header
The header shows the name of the current edit page. As a general rule, the header is divided in a first word, identifying the section name (e.g., "Edit:Quantize" is an "Edit" section page), and a second word, referring to the page name (e.g. "Quantize").
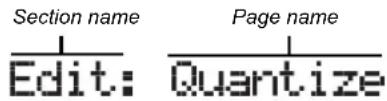
text_image
Section name Edit: Quantize Page namePage number
This area shows the current page number.
A-H
Each pair of VOLUME/VALUE (A–H) buttons selects a different parameter of command, depending on the edit page. After selecting a parameter, you can change its value by pressing one of the two buttons in a pair, or using the TEMPO/VALUE controls.
PAGE 1 - EDIT: QUANTIZE
The quantize function may be used to correct any rhythm error after recording, or to give the pattern a "groovy" feeling.
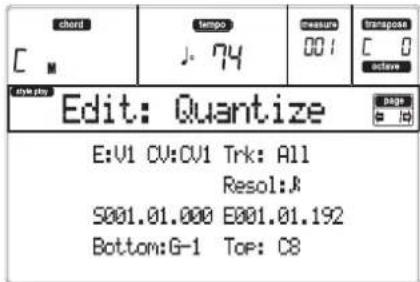
text_image
chord C M tempo J. 74 measure 001 transpose C 0 active Edit: Quantize E:V1 CV:CV1 Trk: A11 Resol:A S001.01.000 E001.01.192 Bottom:G-1 Top: C8After setting the various parameters, press ENTER to execute. The "Are you sure?" message will appear. Press ENTER to confirm, EXIT to abort.
E/CV (Style Element/Chord Variation)
(Non editable) These read-only parameters show which Style Element and Chord Variation are currently selected for editing. See the Main page "E (Style Element)" and "CV (Chord Variation)" parameters on page 55 for information on selecting a different Style Element and Chord Variation.
Trk (Track)
Use this parameter to select a track.
All All tracks selected.
Drum...Acc5Selected track.
Resol (Resolution)
This parameter sets the quantization after recording. For example, when you select 1/8a , all notes are moved to the nearest 1/8 division. When you select 1/4 , all notes are moved to the nearest 1/4 division.

text_image
No quantization 1/8 1/4♪ (1/32) ♪ (1/4)
Grid resolution, in musical values. An "a" after the value means no swing. A "b...f" after the value means swing-quantization.
S / E (Start/End)
Use these parameters to set the starting (S) and ending (E) points of the range to quantize.
If a Chord Variation is four measures long, and you want to select it all, the Start will be positioned at 1.01.000, and the End at 5.01.000.
Bottom / Top
Use these parameters to set the bottom and top of the keyboard range to quantize. If you select the same note as the Bottom and Top parameters, you can select a single percussive instrument in a Drum or Percussion track.
Note: These parameters are available only when a Drum or Percussion track is selected.
PAGE 2 - EDIT: TRANSPOSE
In this page you can transpose the selected track(s).
Note: After transposing, please don't forget to readjust the "Original Key/Chord" parameter in the Style Record page (see page 56).
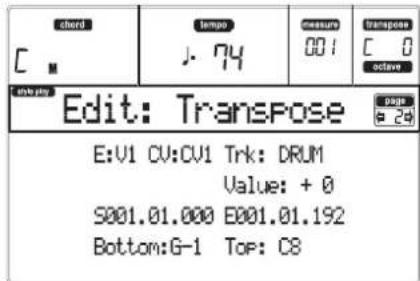
text_image
chard C tempo J. 74 measure 001 Transpose C 0 active Edit: TransPose E:V1 CV:CV1 Trk: DRUM Value: + 0 S001.01.000 E001.01.192 Bottom:G-1 Top: C8After setting the various parameters, press ENTER to execute. The "Are you sure?" message will appear. Press ENTER to confirm, EXIT to abort.
E/CV (Style Element/Chord Variation)
(Non editable) These read-only parameters show which Style Element and Chord Variation are currently selected for editing. See the Main page "E (Style Element)" and "CV (Chord Variation)" parameters on page 55 for information or selecting a different Style Element and Chord Variation.
Trk (Track)
Use this parameter to select a track.
All All tracks selected, apart for tracks set in Drum mode (like the Drum and Percussion tracks). The whole selected Chord Variation will be transposed.
Drum...Acc5Single selected track.
Value
Transpose value (±127 semitones).
S / E (Start/End)
Use these parameters to set the starting (S) and ending (E) points of the range to be transposed.
If a Chord Variation is four measures long, and you want to select it all, the Start will be positioned at 1.01.000, and the End at 5.01.000.
Bottom / Top
Use these parameters to set the bottom and top of the keyboard range to be transposed. If you select the same note as the Bottom and Top parameters, you can select a single percussive instrument in a Drum or Percussion track. Since in a Drum Kit each instrument is assigned to a different note of the scale, transposing a percussive instrument means assigning the part to a different instrument.
Note: These parameters are available only when a Drum or Percussion track is selected.
PAGE 3 - EDIT: VELOCITY
In this page you can change the velocity (dynamics) value of notes in the selected track.

text_image
short C M tempo .74 measure 001 Transpose C 0 ctave Edit: Velocity E:U1 CV:CU1 Trk: DRUM Value: + 0 S001.01.000 E001.01.192 Bottom:G-1 Top: C8After setting the various parameters, press ENTER to execute. The "Are you sure?" message will appear. Press ENTER to confirm, EXIT to abort.
E/CV (Style Element/Chord Variation)
(Non editable) These read-only parameters show which Style Element and Chord Variation are currently selected for editing. See the Main page "E (Style Element)" and "CV (Chord Variation)" parameters on page 55 for information on selecting a different Style Element and Chord Variation.
Trk (Track)
Use this parameter to select a track.
All All tracks selected. The velocity for all notes of the whole selected Chord Variation will be changed.
Drum...Acc5Selected track.
Value
Velocity change value (±127).
S / E (Start/End)
Use these parameters to set the starting (S) and ending (E) points of the range to be modified.
If a Chord Variation is four measures long, and you want to select it all, the Start will be positioned at 1.01.000, and the End at 5.01.000.
Bottom / Top
Use these parameters to set the bottom and top of the keyboard range to be modified. If you select the same note as the Bottom and Top parameters, you can select a single percussive instrument in a Drum or Percussion track.
Note: These parameters are available only when a Drum or Percussion track is selected.
PAGE 4 - EVENT EDIT
The Event Edit page allows you to edit each event in a single track. See “Event Edit procedure” on page 65 for more information on the event editing procedure.

text_image
chord C M tempo . 74 measure 001 transpose C 0 octave Event Edit Trk: DRUM E:V1 CV:CV1 Position :001.01.000 ↑ Ev: Note F#2 72 Length: 000.00.000 ↓ Event Type First value Second valueTrk (Track)
Track in edit. To select a different track, press one of the A VOLUME/VALUE buttons to open the Go To Track window.

Use the TEMPO/VALUE controls to select a track, and press ENTER to confirm, or EXIT to abort.
E/CV (Style Element/Chord Variation)
Selected Style Element and Chord Variation. This parameter can't be edited. To select a different Style Element and Chord Variation, press EXIT to go back to the Main page of the Style Record mode (see "Main page" on page 55).
Position
Position of the event shown in the display, expressed in the form 'aaa.bb.ccc':
- 'aaa' is the measure
- 'bb' is the beat
• 'ccc' is the tick (each quarter beat = 384 ticks)
You can edit this parameter to move the event to a different position.
Ev (Event)
Type and values of the event shown in the display. Depending on the selected event, the value may change. This parameter also shows the (non-editable) "End Loop" marking, when the end of a track is reached.
| Event | First value | Second value |
| Note | Note name | Velocity |
| Ctrl | Control Change number | Control Change value |
| Bend | Bending value | - |
To change the event type, use the C VOLUME/VALUE buttons to select the Event line, then use the same buttons or the TEMPO/VALUE controls to select a different event type.
To select and edit the event's value, use the F-3 and F-4 function keys, and use the G/VOLUME/VALUE buttons or the TEMPO/VALUE controls.
Length
Length of the selected Note event. The value format is the same as the Position value.
Note: If you change a length of "000.00.000" to a different value, you can't go back to the original value. This rather uncommon zero-length value may be found in some drum or percussion tracks.
Transport, navigation and editing controls
E/F and H VOLUME/VALUE buttons
These buttons are the "Scroll to previous event" (E/F) and "Scroll to next event" (H) controls. They corresponds to the scrolling arrows shown on the screen.
G VOLUME/VALUE buttons
Use these buttons to select the corresponding parameter value area.
F-3 and F-4 buttons
After selecting the parameter value area with the G VOLUME/VALUE buttons, use these buttons to select, respectively, the first and second value of the event in edit.
START/STOP button
Press START/STOP and play some chords on the keyboard to test the pattern in edit. Press START/STOP again to stop the pattern running.
SHIFT + << or >>
Keep the SHIFT button pressed and press the << or >> button to open the Go to Measure window.

Use the TEMPO/VALUE controls to select a measure, then press ENTER to confirm, or EXIT to abort.
INSERT
Press the INSERT button to insert a new event at the current shown Position. The default values are Type = Note, Pitch = C4, Velocity = 100, Length = 192.
After inserting an event, use the C VOLUME/VALUE buttons to select the Event line, and the same buttons or the TEMPO/VALUE controls to select a different event type.
DELETE
Press the DELETE button to delete the event shown in the display.
PAGE 5 - EVENT FILTER
This page is where you can select the event types to be shown in the Event Edit page. You can access this page by pressing the PAGE+ button, while you are in the Event Edit page.

text_image
chord C tempo J: 74 measure 001 transpose C 0 octavo Edit: Ev. Filter Page 5d Note :Off Aftt :Off Prog :Off PAft :Off Ctrl :Off Bend :Off T/Meter:Off SessEx: OffTurn Off the filter for all event types you wish to see in the Event Edit page.
Note: Some of the events are "ghosted", and non editable, since the corresponding events are not editable in a Style.
NoteNotes.
Ctrl Control Change events. Only the following Control Change numbers are allowed.
| Control function CC# (Control Change Number) | |
| Modulation 1 | 1 |
| Modulation 2 | 2 |
| Pan | 10 |
| Expression(a) | 11 |
| CC#12 | 12 |
| CC#13 | 13 |
| Damper | 64 |
| Filter Resonance | 71 |
| Low Pass Filter Cutoff | 74 |
| CC#80 | 80 |
| CC#81 | 81 |
| CC#82 | 82 |
(a) Expression events cannot be inserted at the starting Position (001.01.000). An Expression value is already among the default "header" parameters of the Style Element.
Bend Pitch Bend events.
EVENT EDIT PROCEDURE
The Event Edit is the page where you can edit each single MIDI event of the selected Style Element. You can, for example, replace a note with a different one, or change its playing strength (i.e., velocity value). Here is the general event editing procedure.
- Select the Style to edit, and press RECORD. Select the "Current Style" option to enter recording. The LED on the RECORD button will turn on, and the Main page of the Style Record mode will appear.

text_image
Style Element Chord Variation chord tempo measure transpose C 0 c c c c Soft Beat ||T:DR E:U1 CV:CV1 R:RT RL:2 CV Len:2 Metro:On1 Resol:3 Meter: 4/4 C m7 NTT:5th- Use the A VOLUME/VALUE buttons, and the F-1 and F-2 functions to select the E (Style Element) and CV (Chord Variation) parameters.
Note: For more information on the Style Elements and Chord Variations, and the Style structure in general, see "The Style's structure" on page 52.
- Press MENU, and use the VOLUME/VALUE (A-H) buttons to select the Event Edit section. The Event Edit page appears (see "Page 4 - Event Edit" on page 63 for more information).

text_image
chord C tempo . 74 measure 001 transpose C 0 octave Link pin Event Edit Trk: DRUM E:V1 CU:CV1 Position :001.01.000 ↑ Evt Ctrl 11 110 ↓-
Press START/STOP to listen to the selected Chord Variation. If you like, play some chords on the keyboard, to test the pattern. Press START/STOP to stop it.
-
Press PAGE+ to go to the Event Filter page, and turn "Off" the filters for the event types you wish to see in the display (see "Page 5 - Event Filter" on page 64 for more information).
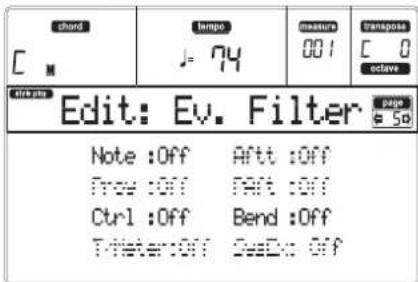
text_image
chord C tempo J = 74 measure 001 Transporte C 0 ctave Edit: Ev. Filter Page 50 Note :Off Aftt :Off Free :Off Part :Off Ctrl :Off Bend :Off Filter:Off SeeDc :Off-
Press PAGE- to go back to the Event Edit page.
-
Press the A VOLUME/VALUE button (Trk), to select the ackr to edit. The Go To Track window appears.
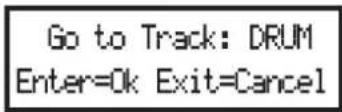
Use the TEMPO/VALUE controls to select a track, and press ENTER to confirm (or EXIT to abort).
- The list of events contained in the selected track (in the Style Element and Chord Variation selected on step 2) will appear in the display. The first step, or Measure Start, is currently shown. Since it contains an initialization event, it is not editable and appears "in grey" (i.e., written with a "ghost" character).
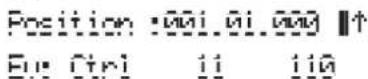
- Press one of the H VOLUME VALUE buttons (Scroll Down arrow), to go to the next step. This is usually a note, that you can edit.

text_image
chord C M tempo J 74 measure 001 transpose C 0 octave Event Edit Trk: DRUM E:V1 CU:CU1 Position :001.01.000 ↑ Ev: Note F#2 72 Lenght: 000.00.000 ↓For more information on the event types and their values, see "Page 4 - Event Edit" on page 63.
- Use the B VOLUME/VALUE buttons to select the Position line. Use these buttons or the TEMPO/ VALUE controls to change the event's position.

text_image
Position :001.01.001 Measure Beat Tick- Use the C VOLUME/VALUE buttons to select the Event line. You may use the C VOLUME/VALUE buttons or the TEMPO/VALUE controls to change the event type. Use the G VOLUME/VALUE buttons, and the F-3 and F-4 function keys to respectively select the first and second value of the parameter. Use the G VOLUME/VALUE buttons or the TEMPO/VALUE controls to modify the selected value.

text_image
Ev: Note F#2 72 Event Type First value Second value- If a Note event is selected, use the D VOLUME/VALUE buttons to select the Length line, and use
the same buttons, or the TEMPO/VALUE controls, to change the event's length.

text_image
Lenght: 000.00.000 Measure Beat Tick• After having modified the shown event, you may scroll to the next event with the H VOLUME/VALUE buttons (Scroll to next), or to the previous event with the E/F VOLUME/VALUE buttons (Scroll to previous).
- You may use the SHIFT + << or >> shortcut to go to a different measure (see "SHIFT + << or >>" on page 64)
- As described in step 4, you may press START/STOP and play some chords to listen how the pattern sounds after your changes. Press START/STOP again to stop the pattern running.
- Use the INSERT button to insert an event at the Position shown in the display (a Note event with default values will be inserted). Use the DELETE button to delete the event shown in the display.
- When the editing is complete, you may select a different track (go to step 7), or a different Style Element and Chord Variation (press EXIT to go back to the Main page of the Style Record mode, then go to step 2).
- When finished editing the whole Style, press WRITE to open the Write Style page.

text_image
short C M tempo J-74 measure 001 transpose C 0 active WRITE to: Style name: Groove Bld To: U01-01 Foxtrot 3 Abort- Use the A or E VOLUME/VALUE buttons to enter the Text Editing mode. Use the UP and DOWN buttons to move the cursor, and the dial to select a character.
- Use the B VOLUME/VALUE buttons to select a target location. The name of the Style already existing at the selected location is shown after the Style Bank-Location number.
Warning: If you select an existing Style and confirm writing, the older Style is deleted and replaced by the new one. Save the Styles you don't want to lose on a card, before overwriting them.
- Press ENTER to save the Style to the internal memory, or one of the D VOLUME/VALUE buttons (Abort) to delete any changes made in Style Record mode. When the "Are you sure?" message appears, press ENTER to confirm, or EXIT to go back to the Write Style page.
PAGE 6 - EDIT: DELETE
This page is where you can delete single elements or MIDI events out of the Style.
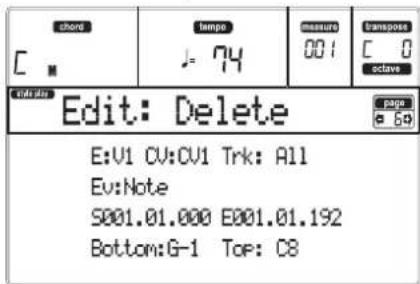
text_image
short C Lumpo J-74 measure 001 Transpose C 0 octave Edit: Delete E:U1 CU:CU1 Trk: A11 Ev:Note S001.01.000 E001.01.192 Bottom:G-1 Top: C8After setting the various parameters, press ENTER to execute. The "Are you sure?" message will appear. Press ENTER to confirm, EXIT to abort.
E/CV (Style Element/Chord Variation)
(Non editable) These read-only parameters show which Style Element and Chord Variation are currently selected for editing. See the Main page "E (Style Element)" and "CV (Chord Variation)" parameters on page 55 for information on selecting a ereliff Style Element and Chord Variation.
Trk (Track)
Use this parameter to select a track.
All All tracks selected. After deletion, the selected Chord Variation will remain empty.
Drum...Acc5Selected track.
Ev (Event)
Type of MIDI event to delete.
All All events. The measures are not removed from the Chord Variation.
Note All notes in the selected range.
Dup. Note All duplicate notes. When two notes with the same pitch are encountered on the same tick, the one with the lowest velocity is deleted.
A.Touch After Touch events.
Note: This kind of data is automatically removed during recording.
P.Bend Pitch Bend events.
PrChange Program Change events, excluding the bundled Control Change #00 (Bank Select MSB) and #32 (Bank Select LSB).
Note: This kind of data is automatically removed during recording.
C.Change All Control Change events, for example Bank Select, Modulation, Damper, Soft Pedal...
CC00/32...CC127
Single Control Change events. Double Control Change numbers (like 00/32) are MSB/LSB bundles.
Note: Some CC data are automatically removed during recording. See the table on page 54 for more information on the allowed data.
S / E (Start/End)
Use these parameters to set the starting (S) and ending (E) points of the range to delete.
If a Chord Variation is four measures long, and you want to select it all, the Start will be positioned at 1.01.000, and the End at 5.01.000.
Bottom / Top
Use these parameters to set the bottom and top of the keyboard range to delete. If you select the same note as the Bottom and Top parameters, you can select a single percussive instrument in a Drum or Percussion track.
Note: These parameters are available only when the All or Note option is selected.
PAGE 7 - EDIT: DELETE ALL
This function lets you quickly delete a selected Style Element or Chord Variation, or the whole Style, resetting it to the default parameter's values.

text_image
chord tempo measure transpose C 0 active Edit: Delete All page Del.:V1-CV1 Trk :A11After setting the various parameters, press ENTER to execute. The "Are you sure?" message will appear. Press ENTER to confirm, EXIT to abort.
When in this page, press the corresponding button on the control panel to select a Style Element (VARIATION1 ... ENDING2).
Del (Delete)
Use this parameter to select the whole Style, a single Style Element, or a single Chord Variation.
All All Style Elements, i.e. the whole Style. When Del=All and Trk=All, the whole Style is deleted, and all parameters set to the default status.
Var1...End2 Single Style Element.
V1-CV1...E2-CV2
Single Chord Variation.
Trk (Track)
All All tracks of the selected Style, Style Element or Chord Variation.
Drum-Acc5 Single track of the selected Style, Style Element or Chord Variation.
PAGE 8 - EDIT: COPY
Here you can copy a track, Chord Variation or Style Element inside the same Style, or from a different one. Furthermore, you can copy a whole Style.
Warning: The Copy operation deletes all data at the target location (overwrite).
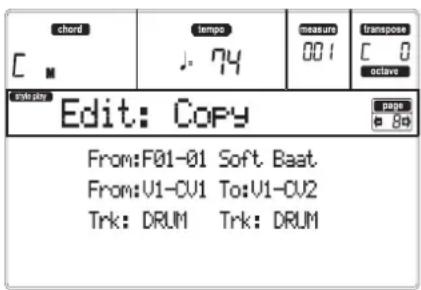
text_image
chord C M tempo J. 74 measure 001 transpose C 0 octave Edit: Copy From:F01-01 Soft Baat From:U1-CU1 To:U1-CU2 Trk: DRUM Trk: DRUMAfter sting the various parameters, press ENTER to execute. The "Are you sure?" message will appear. Press ENTER to confirm, EXIT to abort.
Note: If you copy too many events on the same "tick", the "Too many events!" message appears, and the copy operation is aborted.
Note: When you copy over an existing Chord Variation, Program Change data is not copied, to leave the original Programs unchanged for that Chord Variation.
When in this page, press the corresponding button on the control panel to select a Style Element (VARIATION1 ... ENDING2).
From Style
Use the first parameter to select the source Style to copy the track, Chord Variation or Style Element from.
From... to Style Element/Chord Variation
Use these parameters to select the source and target Style Elements or Chord Variations.
Note: You can't copy from a Variation to a different Style Element (or vice-versa), because of their different structure.
All All Style Elements, i.e. the whole Style. You can't change the target, that is automatically set to All.
Var1...End2 Single Style Element.
V1-CV1...E2-CV2
Single Chord Variation.
From... to Track
Use these parameters to select the source and target track to copy.
All All tracks of the selected Style, Style Element or Chord Variation.
Drum-Acc5 Single track of the selected Style, Style Element or Chord Variation.
Copying on a Chord Variation with a different length
You can copy a Chord Element on a different Chord Element with a different length. Just keep in mind the following:
- If the source length is a divider of the target length, the source Chord Variation will be multiplied to fit the target Chord Variation. For example, if the source is 4-measures long, and the target 8-measures, the source will be copied two times.
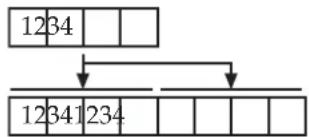
flowchart
graph TD
    A["1234"] --> B["12341234"]
    A --> C[" "]
    A --> D[" "]
- If the source length is not a divider of the target length, the source Chord Variation will be copied for as many measures as can fit the target Chord Variation. For example, if the source is 6-measures long, and the target 8-measures, the source will be copied once, then the fist 2 measures will be copied to fit the remaining 2 measures.

text_image
1234 5 6 12345612Note: Avoid copying on a Chord Variation with a different meter, for example a 4/4 Chord Variation onto a 3/4 one.
PAGE 9 - STYLE ELEMENT CONTROLS: PROGRAMS
In this page you can assign a different Program to each track of the selected Style Element. Each Style Element can have different Programs; after saving the new Style, please don't forget to set the "Prog" parameter to "Original" (see "Prog (Program)" on page 49), to let the Style select the Program bypassing the Style Performance settings.

text_image
chord C M tempo - 74 measure 001 transpose C 0 octave Link info SEC1:Program V1 gate e Std StandardDK Jazz GT PerKit 1 Brass FingerBass Vibes Ac.Piano VoxPadWhen in this page, press the corresponding button on the control panel to select a Style Element (VARIATION1 ... ENDING2).
To copy the settings of this page to another Style Element, keep the SHIFT button pressed, and press the button of the target Style Element.
Program
Use the PROGRAM/PERFORMANCE section to assign a Program to the selected track.
PAGE 10 - STYLE ELEMENT CONTROLS: EXPRESSION
In this page you can modify the Expression (CC#11) value for each of the Style tracks. This lets you reduce the relative level of a track in a single Style Element, without reducing the overall Volume of the Style.
This is a very useful control, when you have different Programs assigned to the same track in different Style Elements, and the internal level of these Programs is different.

text_image
chord C M tempo J. 74 measure 001 Transpose C 0 active SECT1:Express.V1 Value: 100 Value: 100 Value: 100 Value: 100 Value: 100 Value: 100 Value: 100 Value: 100When in this page, press the corresponding button on the control panel to select a Style Element (VARIATION1 ... ENDING2).
To copy the settings of this page to another Style Element, keep the SHIFT button pressed, and press the button of the target Style Element.
Value
Use this parameter to set the Expression value for the corresponding track.
PAGE 11 - STYLE ELEMENT CONTROLS: KEYBOARD RANGE
The Keyboard Range automatically transposes any pattern note that would otherwise play too high or too low in pitch, compared to the original acoustic instrument, when transposed by the arranger. This will result in a more natural sound for each accompaniment instrument.
For example, the lower limit for a guitar is E2. If you play a chord under the E2, the transposed pattern could exceed this limit, and sound unnatural. A Bottom limit set to E2 for the guitar track will solve the problem.
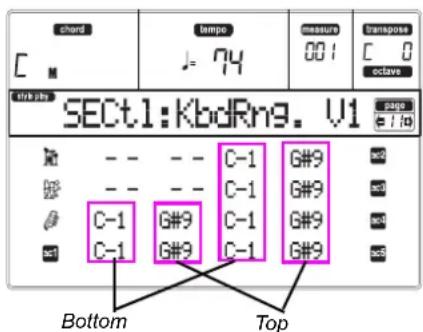
text_image
chard C M tempo J = 74 measure 001 transpose C 0 octave Inter tab SECTL:KbdRng. V1 page C-1 G#9 C-1 G#9 C-1 G#9 C-1 G#9 Bottom TopNote: The Keyboard Range is ignored while recording. The selected track can play on the full range of the keyboard.
When in this page, press the corresponding button on the control panel to select a Style Element (VARIATION1 ... ENDING2).
To copy the settings of this page to another Style Element, keep the SHIFT button pressed, and press the button of the target Style Element.
Bottom/Top
Use these parameters to set the bottom and top of the keyboard range for the corresponding track.
PAGE 12 - STYLE ELEMENT CONTROLS: CHORD VARIATION TABLE
This is the page where you can assign a Chord Variation to each recognized chord. When a chord is recognized, the assigned Chord Variation will be automatically selected by the arranger to play the accompaniment.
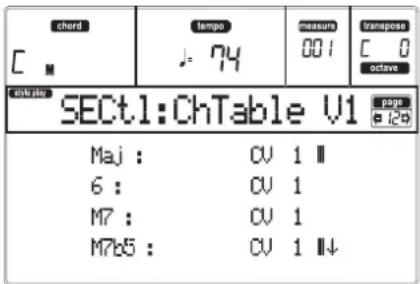
text_image
chord C tempo 74 measure 001 transpose C 0 octave data pin SEC1:ChTable V1 page a 12b Maj : CV 1 || 6 : CV 1 M7 : CV 1 M7b5 : CV 1 ||↓When in this page, press the corresponding button on the control panel to select a Style Element (VARIATION1 ... ENDING2).
E-F (Scroll Up), G-H (Scroll Down)
Use these buttons to scroll the available parameters in the display.
Chords / Chord Variation
Use these parameters to assign a Chord Variation to each of the enlisted chords.
PAGE 13 - STYLE CONTROLS: MODE/TENSION
In this page you can set the Retrigger mode for the Style tracks, and activate/deactivate the Tension for the Accompaniment tracks.

text_image
chord tempo measure transpose C M J: 74 001 C B active StCt1: Mode/Tens. Page #13 --- --- M:Off T:On--- --- M:Rt T:On
M:Rp M:Rp T:On M:Rt T:On M:Rp T:OffWhen in this page, press the corresponding button on the control panel to select a Style Element (VARIATION1 ... ENDING2).
M (Mode)
This setting harmonizes the notes of the Bass track or the Acc1-5 tracks to the new chord when the chord is changed.
Off
Each time you play a new chord, the current notes will be stopped. The track will remain silent until a new note will be encountered in the pattern.
Rt
(Retrigger) The sound will be stopped, and we notes matching the recognized chord will be played back.
Rp
(Repitch) New notes matching the recognized chord will be played back, by repitching notes already playing. There will be no break in the sound. This is very useful on Guitar and Bass tracks.
T (Tension)
Tension adds notes (a 9th, 11th and/or 13th) that have actually been played to the accompaniment, even if they haven't been written in the Style pattern. This parameter specifies whether or not the Tension included in the recognized chord will be added to the Acc1–5 tracks.
On
The Tension will be added.
OffNo Tension will
be added.
The Song Play operating mode is where you can listen to Songs (played directly from the card), and play along with the Song on the four Realtime (Keyboard) tracks (Upper 1–3, Lower). Since the microARRANGER is equipped with two onboard sequencers, you can play two Songs at the same time. This is very useful to mix between two Songs during a live performance.
THE SONGS AND THE STANDARD MIDI FILE FORMAT
The native Song file format of the microARRANGER is the Standard MIDI File (SMF), an universal standard set by all manufacturers. You can read these files with any musical instrument or computer.
A difference could be in the sound played by each track. If you recorded a Song with the microARRANGER (Song mode), using only General MIDI programs, you can play the same Song on virtually any other musical instrument or computer. If you used KORG native programs, you cannot reproduce the same sounds on instruments from other brands.
When you read SMFs in Song Play mode, there is no problem reading files made using only General MIDI sounds. Sounds could be different when playing a Song made on a different instrument: despite the wide compatibility of microARRANGER with other, non-standard formats, differences may arise.
If so, go to the Song operating mode and load the SMF. Then, manually reassign the non-matching Programs, replacing them with similar Programs on the microARRANGER. Then save the SMF again, and you will be able to play it in Song Play mode with the correct Programs.
TRANSPORT CONTROLS
You can use the separate transport controls for each of the two onboard sequencers. Use the SEQ1 controls for Sequencer 1, and SEQ2 controls for Sequencer 2. See "SEQUENCER TRANSPORT CONTROLS - SEQ1 and SEQ2" on page 18 for more information).
MIDI CLOCK
In Song Play mode the MIDI Clock is always generated by the internal sequencer, even if the Clock parameter is set to External (see "Clock" on page 127). microARRANGER transmits only the MIDI Clock message generated by Sequencer 1.
SWITCHING BETWEEN SEQUENCERS DURING EDITING
When you enter Edit mode, you can edit the selected sequencer's parameters. Go to the main page of Song Play mode, and select the S1 (A buttons) or S2 (B buttons) to select the sequencer you wish to edit (see "Main page" on page 73).
SELECTING A SONG COMPOSING ITS PROGRESSIVE NUMBER
Each Song on a card (up to 9,999) has a progressive number assigned. You can see this number before the Song's name in the Song Select page.

While in the Main, Song Select, or Lyrics page, the STYLE section doubles as a numeric keypad. You can use it for composing the 4-digit number corresponding to the Song you wish to select; the folder selected in the Song Select page will become the current folder. This way, you can speed up the Song retrieval.
Selecting a Song in the Song Select page
- Open the Song Select page.
- Select the card and open the folder containing the Song to be selected. This folder will be used also in the Main and Lyrics page.
- Compose the 4-digit number corresponding to the Song you wish to select (for example: if the Song is number "1043", dial 1, 0, 4, 3).
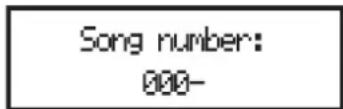
After the fourth digit has been inserted, the window automatically disappears, and the Song is selected.
- If the Song number is just 1, 2 or 3-digit long, dial the number, then press ENTER to confirm (for example: if the Song is number "52", dial 5, 2, ENTER).
Note: If no Song corresponds to the dialed number, the "Song not available" message appears. Press any button to make it disappear.
Selecting a Song in the Main page
While the S1 or S2 field is selected, compose the number corresponding to the Song you wish to select. The current folder is the one selected in the Song Select page.
Selecting a Song in the Lyrics page
Compose the number corresponding to the Song you wish to select. The current folder is the one selected in the Song Select page.
REALTIME AND SEQUENCER TRACKS
The microARRANGER is equipped with a double sequencer. Each Song can play a maximum of 16 tracks, for a total of 32 sequencer tracks.
In addition, you can play on the keyboard with four additional Realtime tracks (Upper 1–3 and Lower). You can edit the Volume, Mute status, and Program selection for these tracks on the main page of the Song Play mode.
When you enter Song Play mode from the Style Play mode, the Realtime tracks are the same as the Style Play mode. A quick way to select Programs and Effects for the Realtime tracks is choosing a different Performance.
MASTER VOLUME, SEQUENCER VOLUME, BALANCE
While the MASTER VOLUME slider controls the general volume of the instrument, you can use the ACC/SEQ VOLUME slider to control only the Sequencer's tracks volume. This lets you adjust the Sequencer's volume alone, while the Realtime (Keyboard) tracks are not affected by this slider.
Use the BALANCE slider to mix between Sequencer 1 and Sequencer 2. Move it to the center for the maximum volume of both sequencers.
EFFECTS IN SONG PLAY MODE
The microARRANGER is equipped with four effect processors, or DSPs (Digital Signal Processors). In Song Play mode you can have two or four effects at the same time, depending on the midfile you are reading.
Note: When playing back a Song that makes use of all four effects (AD), you can't edit any parameter devoted to the effects. These parameters appear greyed out in the display.
- A Song created on the microARRANGER (in Song or Backing Sequence mode) can use up to 4 effects (usually 2 reverbs + 2 modulating effects); each track may use the A/B or C/D pair.
- A Standard MIDI File will only use 2 effects (usually 1 reverb + 1 modulating effect). This lets you use the remaining 2 effects for the Realtime tracks.
- When using both sequencers at the same time, and the "S2 FX Mode" is set to "A/B Mode" (see page 80), they only use the A/B pair, while the C/D pair is reserved to the Realtime (keyboard tracks).
- When using both sequencers at the same time, and the "S2 FX Mode" is set to "C/D Mode" (see page 80), Sequencer 1 uses the A/B pair, while Sequencer 2 uses the C/D pair, sharing it with the Realtime (keyboard tracks).
You can apply a realtime “groove-quantization” to Sequencer 1. Groove-quantization is a way of changing the music groove during the playback, moving notes to the nearest axis of a rhythmic “grid”. Please feel free to experiment: this function is a great source of musical invention.
While in Song Play, press G.QUANTIZE. The following window will appear.
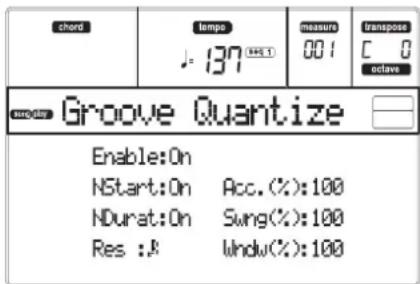
text_image
chord tempo J: 137 (RST) measure 001 transpose C 0 octave Groove Quantize Enable:On NStart:On Acc.(%):100 NDurat:On Swing(%):100 Res :A windv(%):100Press EXIT to exit this window.
Enable
Enables/disable the quantize. It is automatically set to Off each time the instrument is turned on, or when selecting a different Song.
NStart (Note Start)
Enables/disables the quantization of the Note On event (i.e. beginning of the note).
NDurat (Note Duration)
Enables/disables the quantization of the Note Off event (i.e. the length of the note).
Res (Resolution)
Coarse quantize grill resolution. This parameter is the main quantization value, to be varied with the Acc, Swing and Window values.
Grid resolution, in musical values (a “3” after the value means “triplet”). For example, when you select 1/8, all notes are moved to the nearest 1/8 division. When you select 1/4, all notes are moved to the nearest 1/4 division.
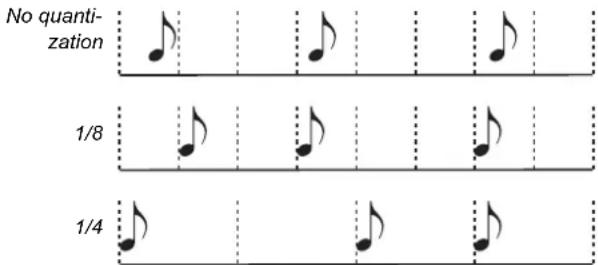
text_image
No quantization 1/8 1/4Acc (Accuracy)
Accuracy percentage of quantize. For example, if Acc=50, and the note is 20 tics away from the coarse grid, it is moved to the grid of only 10 tics.
0 No accuracy. The quantize is not executed. 100 Maximum accuracy. The note is moved exactly at the grid position.
Swing
Asymmetry of quantization. Grid axis are moved to the nearest grid axis.
0 Even-numbered axis are totally moved over the previous odd-numbered axis.
50 Axis are perfectly equidistant.
100 Even-numbered axis are totally moved over the following odd-numbered axis.
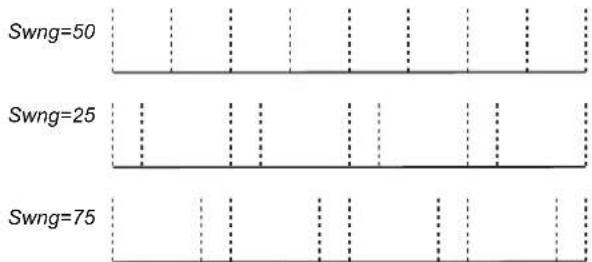
text_image
Swng=50 Swng=25 Swng=75Window
Area of quantize intervention, bordering the grid axis.
0 The quantize window corresponds to the axis. No quantization happens.
100T he quantize window extends to the nearest window; all events are quantized.
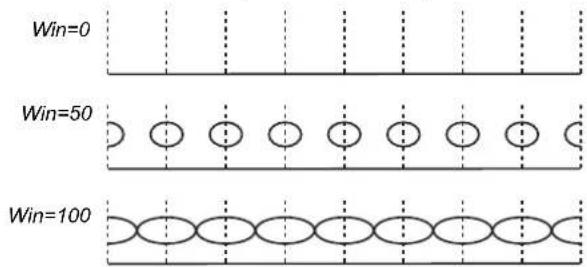
text_image
Win=0 Win=50 Win=100THE WRITE WINDOW
You can save onto the internal memory a Seq1+Seq2 Setup. There is a separate Setup for each of the two onboard sequencers.
This Setup memorizes the Internal FX settings, the Internal/External status of each track, and the Play/Mute status of each track. When a new Song is selected,
the saved Setup is automatically recalled, and all parameters are reset.
- Globally setting the Internal FX parameters allows you, for example, to assign to all Songs a Reverb suitable for the venue where you are performing, without having to modify any of the Songs. (This is true only for non-microARRANGER/80 Songs).
• G 1 o tting the Internal/External status allows you, for example, to send the Piano track of all Songs to a dedicated expander (just set globally the Piano track to the External mode). - The Play/Mute status allows you to globally mute tracks that you don't want to play during a show, for example the melody track. (This is ture only for non-microARRANGER/80 Songs).
For more information on the Internal FX settings for the Song Play mode, see "Page 3 - Mixer: FX send A/B" or "Page 3 - Mixer: FX send C/D", and following, on page 76.
Here is the procedure to save the Seq1+Seq2 Setup in memory.
- Press WRITE. The Write page appears.
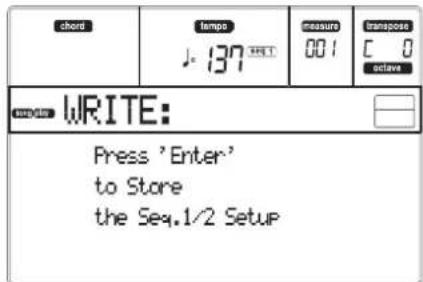
text_image
chord temps J: 137 measure 001 transpose C 0 activate WRITE: Press 'Enter' to Store the Seq.1/2 Setup- Press ENTER to confirm, or EXIT to abort. If you confirm, the Setup is saved into the Global. You may then save this Setup on the card together with the Global data.
MAIN PAGE
Press SONG PLAY to access this page from another operating mode.
Note: When switching from Style Play to Song Play, the Song Setup is automatically selected, and various track parameters may change.
Press EXIT/NO to access this page from the Menu or any of the Song Play edit pages.
To see the Song's tracks, use the TRACK SELECT button to switch from the main page (showing the Real-time trks), to the other tracks. Pressed a first time, you will see tracks 1–8 (enlightened TRACK SELECT LED); a second press will show tracks 9–16 (flashing TRACK SELECT LED); pressed again, you will go back to the Realtime tracks (TRACK SELECT LED switched off).
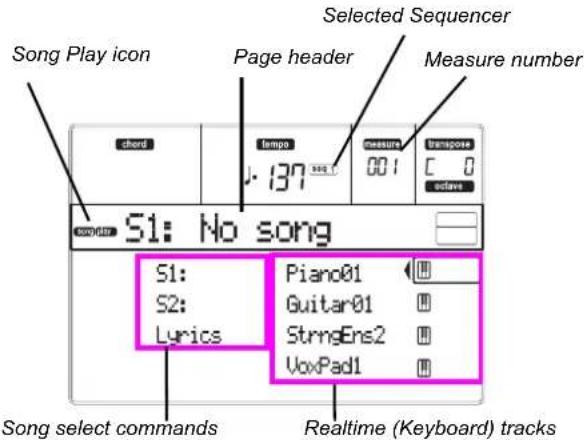
text_image
Song Play icon Selected Sequencer Page header Measure number chord lamps measure transpose c 0 imize S1: No song S1: S2: Lyrics Piano01 Guitar01 StringEns2 VoxPad1 Song select commands Realtime (Keyboard) tracksSong Play icon
When on, this icon shows that the instrument is in Song Play mode.
Page header
This line shows the currently selected sequencer, and the assigned Song ("S1:Song Name" or "S2:Song Name").
When no Song is assigned to the current sequencer, this line shows only the selected sequencer number ("S1:" or "S2:", depending on the selected sequencer).
When no sequencer or Song is selected, only the "No Song" text appears.
Press either A (S1:) or B (S1:) to switch between Sequencer 1 and Sequencer 2. When one of the sequencers is selected, the sequencer number is also shown at the right of the metronome Tempo.

When a Jukebox file is in play, its name appears on the page header.
Selected Sequencer
These indicators show if the currently selected sequencer is Seq1 or Seq2. Use the A and B VOLUME/VALUE buttons to select a sequencer.
Bar number
This counter shows the current bar number position of the selected Song.
A (S1:SongName)
Pressed a first time (with a Song already selected) this button pair selects Sequencer 1. Pressed a second time (or with no Song selected), it opens the Song Selection page (see "Song Select page" on page 74), allowing for selection of a single Song or a Jukebox file for Sequencer 1.
If you select another Song, while a Song is in play within the same Sequencer, the new Song will start playing.
While this parameter is selected, you can select a Song by composing its progressive number (see "Selecting a Song composing its progressive number" on page 70).
B (S2:SongName)
Pressed a first time (with a Song already selected) this button pair selects Sequencer 2. Pressed a second time (or with no Song selected), it opens the Song Selection page (see "Song Select page" on page 74), allowing for selection of a single Song for Sequencer 2.
If you select another Song, while a Song is in play within the same Sequencer, the new Song will start playing.
While this parameter is selected, you can select a Song by composing its progressive number (see "Selecting a Song composing its progressive number" on page 70).
C (Lyrics)
Open the Lyrics page (see "The Lyrics page" on page 74). Lyrics will be shown only if included into the selected Song, and compatible with a standard format that microARRANGER can recognize.
E (Upper 1 Program), F (Upper 2 Program), G (Upper 3 Program), H (Lower)
Name of the Programs assigned to the Realtime (Keyboard) tracks. Use these buttons to select, mute/unmute or change the volume of the corresponding tracks.
TRACKS 1–8 PAGE
To see and edit tracks 1–8, press TRACK SELECT from the main page. The TRACK SELECT LED turns on.
Press the TRACK SELECT button twice, to go back to the main page.
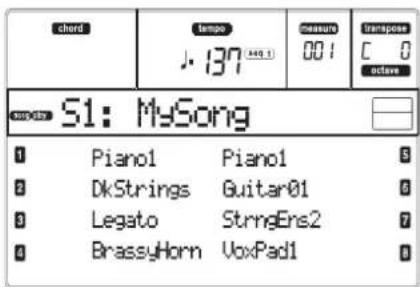
text_image
chord tempo J.137 (40:1) measure 001 transpose C 0 oclove S1: MySong Piano1 Piano1 DkStrings Guitar01 Legato StrngEn2 BrassyHorn VoxPad1A-H (Tracks 1–8 Programs)
Name of the Programs assigned to tracks 1–8. Use these buttons to select, mute/unmute or change the volume of the corresponding tracks.
TRACKS 9–16 PAGE
To see and edit tracks 9–16, press TRACK SELECT once from the Tracks 1–8 page, or twice from the main page. The TRACK SELECT LED begins flashing.
Press the TRACK SELECT button again, to go back to the main page.
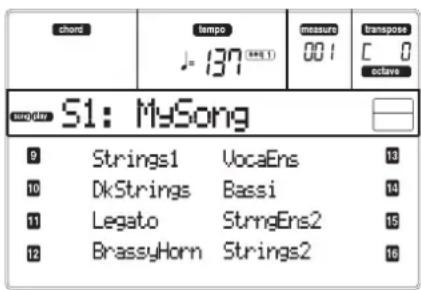
text_image
chord tempo J-137 (MHz) measure 001 Transpose C 0 octave S1: MySong 9 Strings1 VocaEns 10 DkStrings Bassi 11 Legato StrngEns2 12 BrassyHorn Strings2A–H (Tracks 9–16 Programs)
Name of the Programs assigned to tracks 9–16. Use these buttons to select, mute/unmute or change the volume of the corresponding tracks.
SONG SELECT PAGE
This page appears when you press either the A (S1:) or B (S2:) button while you are in the main page. You can also access the Song Select page by pressing PAGE +.
Press EXIT (or PAGE-) to go back to the main page of the Song Play operating mode, without selecting a Song.
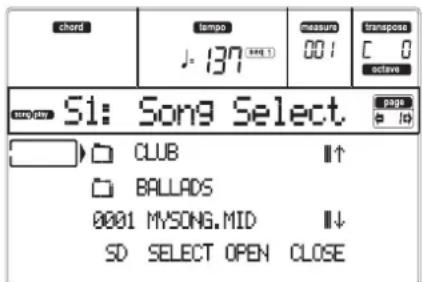
text_image
chord tempo J: 137 (HH) measure 001 transpose C 0 active S1: Song Select pages CLUB BALLADS 0001 MYSONG.MID SD SELECT OPEN CLOSEWhile in this page, select a Song for the selected Sequencer, or a Jukebox file for Sequencer 1.
Note: There is a separate working directory for each onboard sequencer.
A-C (File, folder)
Move the ".MID", ".KAR" or ".JBX" file, or folder, to be selected to the first line of the display. To select a file, press the F-2 (SELECT) button. To open a folder, press the F-3 (OPEN) button.
The "sv" mbol identifies a folder.
E-F (Scroll Up)
Scroll the list up. Keep SHIFT pressed and press one of these buttons to jump to the previous alphabetical section.
G-H (Scroll Down)
Scroll the list down. Keep SHIFT pressed and press one of these buttons to jump to the next alphabetical section.
F-1 (SD)
Press this button after replacing a card in the card slot. The new card will be read, and the file list shown on the display will be updated.
F-2 (SELECT)
Selects the item on the first line in the display (Song or Jukebox file). If a Song is already playing, it stops, and the new Song starts playing. You are returned to the Main page.
F-3 (OPEN)
Opens the selected folder (item whose name begins with "☐")
F-4 (CLOSE)
Closes the current folder, returning to the parent ("upper") folder.
THE LYRICS PAGE
This page shows the lyrics and chord abbreviations included in the midfile (if any).
To access this page, select the Lyrics command, or press PAGE+ twice, from the main page of the Song Play mode (see "Main page" on page 73).

text_image
Chords chord tempo measure transpose C 0 cave S1: Michelle pays 0 Michelle, ma belle 8Exit from this display, and go back to the main page of the Song Play mode, by pressing the EXIT button.
While the Song is playing, the text flows in the display, and the chord abbreviations (if any) will appear on the chords area of the display. The lyrics at the current position are underlined:
Michelle, ma belle
A (1)
Press this button pair to show Lyrics and Chords of Sequencer 1.
B (2)
Press this button pair to show Lyrics and Chords of Sequencer 2.
With Sequencer 1, you can select a Jukebox file (a file with the “.JBX” extension) instead of a single Song.
This lets you play a list of Songs without multiple selections.
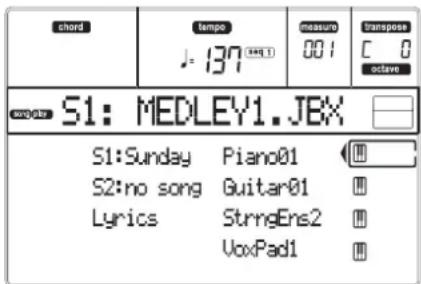
text_image
chord tempo J: 137 (04:1) measure 001 transpose C 0 octave S1: MEDLEY1.JBX S1:Sunday Piano01 S2:no song Guitar01 Lyrics StrngEns2 VoxPad1Note: The Jukebox file can be assigned to the Sequencer 1 only.
Note: To create a Jukebox file, go to the Jukebox page (see page 79).
Warning: Should you delete a Song included into the Juke-box list currently in play, the sequencer will stop, and the "No Song" message will appear. At this point, press SHIFT+>> (Seq1) to go to the next Song, and press PLAY/STOP again.
Transport controls
When you select a Jukebox file, Sequencer 1 transport controls are slightly different than with single Songs.
<< and >> Pressed alone, these buttons are the Rewind and Fast Forward commands.
SHIFT Keep the SHIFT button pressed, and press these buttons to scroll to the previous or next Song in the Jukebox list.
PAUSE Pauses the Song at the current position. Press PASE or PLAY/STOP to start the Song playing again.
PLAY/STOPStarts or stops the current Song. When you stop the Song, the sequencer goes back to measure 1 of the current Song.
If the Jukebox page is open, you can start from the Song at the first line of the display. See "Page 9 - Jukebox" on page 79.
MENU
From any page, press MENU to open the Song Play edit menu. This menu gives access to the various Song Play edit sections.
When in the menu, select a section using the VOLUME/VALUE buttons, press PAGE+ to select a page, or press EXIT to exit the menu.
When in an edit page, press EXIT to go back to the Song Play mode main page.
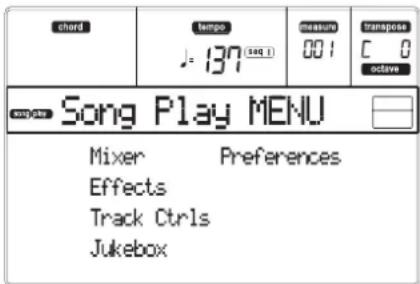
text_image
chord tempo J: 137 (244.1) measure 001 transpose C 0 octave Song Play MENU Mixer Preferences Effects Track Ctrls JukeboxEach item of this menu corresponds to an edit section. Each edit section groups many edit pages.
EDIT PAGE STRUCTURE
Select an edit section from the Menu, and/or use the PAGE buttons to reach the desired page.
Press EXIT to go back to the main page of the Song Play mode.
All edit pages share the same structure.
Selected Sequencer

text_image
Song Play icon Page header Page number chord tempo measure transpage 137 (sec 1) 00:1 C active Mixer: Volume PAGE 6 1 090 090 2 090 092 3 090 086 4 090 112Song Play icon
When on, this icon indicates that the instrument is in Song Play mode.
Page header
The header shows the name of the current edit page. Usually, the header is divided into a first word, identifying the section name (e.g., "Mixer:FX Send" is a "Mixer" section page), and a second word, referring to the page name (e.g. "FX Send").
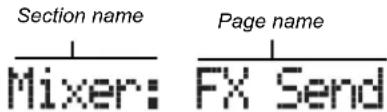
text_image
Section name Page name Mixer: FX SendSelected Sequencer
These indicators show if the currently selected sequencer is Seq1 or Seq2. Go to the Main page and use the A and B VOLUME/VALUE buttons to select a sequencer.
Page
This area shows the current page number.
A-H
Each pair of VOLUME/VALUE buttons select a different parameter of command, depending on the edit page.
PAGE 1 - MIXER: VOLUME
Here you can adjust the volume for each of the 16 sequencer tracks. Press both VOLUME/VALUE button to mute/unmute the corresponding track.
A muted track remains muted even when selecting a different Song.
Use the TRACK SELECT button to switch between Song tracks 1–8, Song tracks 9–16, and back again.

text_image
chord tempo 00/1 measure C 0 active Mixer: Volume page 0 10 1 ■■■■■■ 090 ■■■■■■ 090 5 2 ■■■■■■ 090 ■■■■■■ 092 0 3 ■■■■■■ 090 ■■■■■■ 086 7 4 ■■■■■■ 090 ■■■■■■ 112 0 chord tempo 00/1 measure C 0 active Mixer: Volume page 0 10 9 ■■■■■■ 090 ■■■■■ 090 13 10 ■■■■■■ 090 ■■■■■ 092 14 11 ■■■■■■ 090 ■■■■■ 086 15 12 ■■■■■■ 090 ■■■■■■ 112 16PAGE 2 - MIXER: PAN
Here you can adjust the pan for each Song track. Use the TRACK SELECT button to switch between Song tracks 1–8, Song tracks 9–16, and back again.
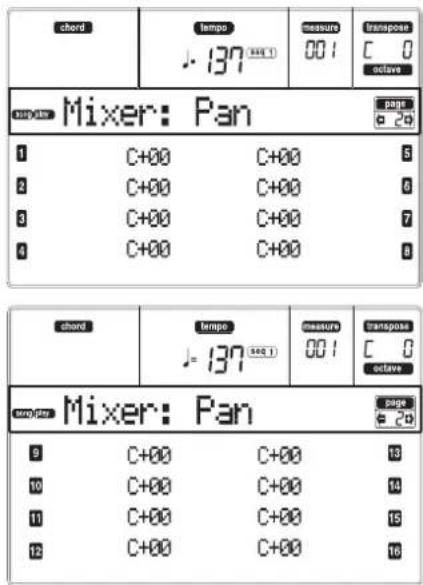
text_image
chord tempo J-137 measure 001 transpose C 0 octave Mixer: Pan page 20 1 C+00 C+00 5 2 C+00 C+00 6 3 C+00 C+00 7 4 C+00 C+00 8 chord tempo J-137 measure 001 transpose C 0 octave Mixer: Pan page 20 9 C+00 C+00 13 10 C+00 C+00 14 11 C+00 C+00 15 12 C+00 C+00 16Pan
-64Hard Left.
+00Center.
+63Hard Right.
Off The direct (uneffected) signal does not go to the outputs; only the FX signal is heard for this track.
PAGE 3 - MIXER: FX SEND A/B
This page lets you set the level of the track's direct (uneffected) signal going to the A and B Internal FX processors (usually assigned to Sequencer 1).
Use the TRACK SELECT button to switch from tracks 1–8 to tracks 9–16.
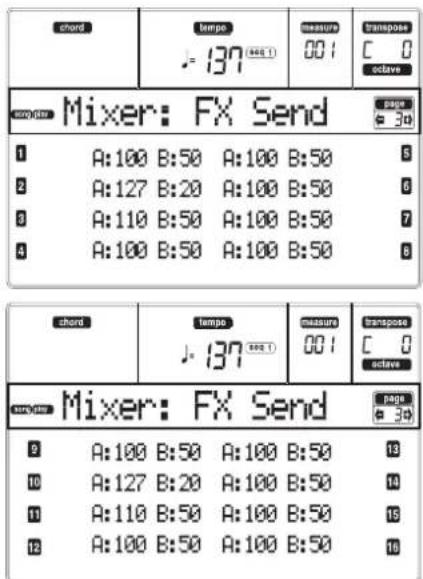
text_image
chord tempo J:137 (40.1) measure 001 transpose C 0 octave copy rate Mixer: FX Send page 3d 1 A:100 B:50 A:100 B:50 6 2 A:127 B:20 A:100 B:50 6 3 A:110 B:50 A:100 B:50 7 4 A:100 B:50 A:100 B:50 8 chord tempo J:137 (40.1) measure 001 transpose C 0 octave copy rate Mixer: FX Send page 3d 9 A:100 B:50 A:100 B:50 13 10 A:127 B:20 A:100 B:50 14 11 A:110 B:50 A:100 B:50 15 12 A:100 B:50 A:100 B:50 16Note: When playing back a Song that makes use of all four effects (A–D), you can't edit any effect parameter. These parameters appear greyed out in the display.
Note: When you stop the Song, or select a different Song, the default effects are selected again. You can, however, stop the Song, change the effects, then start the Song again. Edit the Song in Song mode to permanently change the effects.
Here is the edit procedure:
- Use the VOLUME/VALUE (A-H) buttons to select a track.
- Use the F-1-F-4 buttons to select a parameter for that track.
- Use the TEMPO/VALUE controls to change the parameter's value.
Parameters
000
No effect. Only the direct (uneffected) signal goes to the outputs.
127
100% effect. The direct (uneffected) and effected signals go to the outputs with the same level.
PAGE 3 - MIXER: FX SEND C/D
This page lets you set the level of the track's direct (uneffected) signal going to the C and D Internal FX processors.
Note: You can access this page only while editing the Sequencer 2, and the "S2 FX Mode" parameter is set to "CD Mode" (see page 80).
Use the TRACK SELECT button to switch from tracks 1–8 to tracks 9–16.

text_image
chord tempo 001 transpose C 0 octave Mixer: FX Send page 30 1 C:100 D:50 C:100 D:50 2 C:127 D:20 C:100 D:50 3 C:110 D:50 C:100 D:50 4 C:100 D:50 C:100 D:50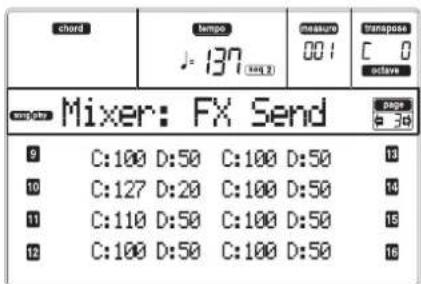
text_image
chord tempo J: 137 (mm) measure 001 transpose C 0 octave Mixer: FX Send page @ 36 9 C:100 D:50 C:100 D:50 10 C:127 D:20 C:100 D:50 11 C:110 D:50 C:100 D:50 12 C:100 D:50 C:100 D:50Here is the edit procedure:
- Use the VOLUME/VALUE (A-H) buttons to select a track.
- Use the F-1-F-4 buttons to select a parameter for that track.
- Use the TEMPO/VALUE controls to change the parameter's value.
Parameters
000
No effect. Only the direct (uneffected) signal goes to the outputs.
127
100% effect. The direct (uneffected) and effected signals go to the outputs with the same level.
PAGE 4 - FX: A/B SELECT
This page lets you select the A and B effects. Usually, the A effect is a reverb, while the B effect is a modulating effect.
Effects A and B are usually reserved to Sequencer 1. You can, however, create Songs by using all four effects in Song mode. Depending on the status of the "S2 FX Mode" parameter, this effect pair could be reserved to Sequencer 2, too (see page 80).
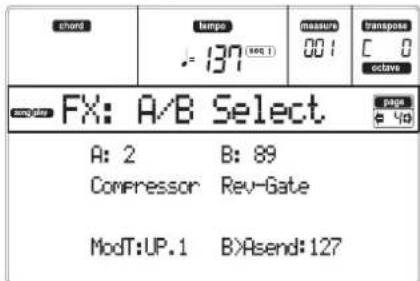
text_image
chord tempo .137 (sec 1) measure 001 transpose C 0 octave FX: A/B Select page 40 A: 2 B: 89 Compressor Rev-Gate ModT:UP.1 B>Asend:127Note: When playing back a Song that makes use of all four effects (AD), you can't edit any effect parameter. These parameters appear greyed out in the display.
Note: When you stop the Song, or select a different Song, the default effects are selected again. You can, however, stop the Song, change the effects, then start the Song again. Edit the Song in Song mode to permanently change the effects.
A, B
Effects assigned to the A and B effect processors. Usually, A is the reverb, while B is the modulating effect (chorus, flanger, delay...). For a list of the available effects, see "Effects" on page 175.
ModTrk (Modulating Track)
Source track for modulating MIDI messages. You can modulate an effect parameter with a MIDI message generated by a physical controller.
B>Asend (B>A Send)
Amount of the B effect going back to the input of the A effect.
PAGE 4 - FX: C/D SELECT
This page lets you select the C and D effects. Usually, the C effect is a reverb, while the D effect is a modulating effect.
Effects C and D are usually reserved to Sequencer 2 and the Realtime tracks. You can, however, create Songs using all four effects in Song mode. Depending on the status of the "S2 FX Mode" parameter, Sequencer 2 might also use the A/B effect pair (see page 80).

text_image
chord temps J=137 measure 001 transpose C 0 octave FX:C/D Select page 20 C: 2 D: 89 Compressor Rev-Gate ModT:UP.1 B>Asend:127Note: When playing back a Song that makes use of all four effects (A–D), you can't edit any effect parameter. These parameters appear greyed out in the display.
Note: When you stop the Song, or select a different Song, the default effects are selected again. You can, however, stop the Song, change the effects, then start the Song again. Edit the Song in Song mode to permanently change the effects.
C, D
Effects assigned to the C and D effect processors. Usually, C is the reverb, while D is the modulating effect (chorus, flanger, delay...). For a list of the available effects, see "Effects" on page 175.
ModTrk (Modulating Track)
Source track for modulating MIDI messages. You can modulate an effect parameter with a MIDI message generated by a physical controller.
D>Csend (D>C Send)
Amount of the D effect going back to the input of the C effect.
PAGE 5 - FX: A EDITING
This page contains the editing parameters for the A effect (usually, reverb for Sequencer 1).

text_image
chord tempo -137 (RGB) measure 001 transpose C 0 octave fx: A Edit (Sq1) Mix mod. source: JS-Y Mix mod. amt.: +127 Reverb Time: 3.07sec HF Damping: 30 % ↓Use the E–F and G–H VOLUME/VALUE button pairs to scroll the parameter list.
Use the A-D VOLUMME/VALUE button pairs to select and edit a parameter.
Use the TEMPO/VALUE controls to edit the selected parameter.
Note: When playing back a Song that makes use of all four effects (A–D), you can't edit any effect parameter. These parameters appear greyed out in the display.
Note: When you stop the Song, or select a different Song, the default effects are selected again. You can, however, stop the Song, change the effects, then start the Song again. Edit the Song in Song mode to permanently change the effects.
Parameters
See "Effects" on page 175 for a list of available parameters for each effect type.
PAGE 6 - FX: B EDITING
This page contains the editing parameters for the B effect (usually modulating effect for Sequencer 1). For more details, see "Page 5 - FX: A editing" above.
PAGE 5 - FX: C EDITING
This page contains the editing parameters for the C effect. You can access this page only when the "S2 FX Mode" parameter is set to C/D (see "S2 FX Mode" on page 80). For more details, see "Page 5 - FX: A editing" above.
Note: C and D effects are used also by the Realtime (Keyboard) tracks.
PAGE 6 - FX: D EDITING
This page contains the editing parameters for the D effect. You can access this page only when the "S2 FX Mode" parameter is set to C/D (see "S2 FX Mode" on page 80). For more details, see "Page 5 - FX: A editing" above.
Note: C and D effects are used also by the Realtime (Keyboard) tracks.
PAGE 7 - TRACK: MODE
This page lets you set the polyphony mode for each Song track.
Use the TRACK SELECT button to switch from tracks 1–8 to tracks 9–16.

text_image
chord tempo J=137 (MRT) measure 001 Transpose C 0 octave Track: Mode page 70 Poly Poly Poly Poly Poly Poly Poly 5 6 8 7 4 Poly Poly 8 chord tempo J=137 (MRT) measure 001 Transpose C 0 octave Track: Mode page 70 Poly Mono Right 13 10 Drum Poly 14 11 Drum Poly 15 12 Poly Poly 16Parameters
| Drum | This is a Drum/Percussion track. No Master or Octave Transpose applies to this track. |
| Poly | Tracks of this kind are polyphonic, i.e. they can play more than one note at the same time. |
| Mono | Tracks of this kind are monophonic, i.e. each new note stops the previous note. |
| Mono Right | A Mono track, but with priority assigned to the rightmost (highest) note. |
PAGE 8 - TRACK: INTERNAL/EXTERNAL
This page lets you set the Internal or External status for each track. It is very useful to let a Song track drive an external expander.
Use the TRACK SELECT button to switch from tracks 1–8 to tracks 9–16.

text_image
chord tempo J-137 measure 001 transpos C 0 octave Track: Int./Ext. page 80 Internal Internal 5 Internal Internal 6 Internal External 7 Internal Internal 8 chord tempo J-137 measure 001 transpos C 0 octave Track: Int./Ext. page 80 Internal Internal 10 Internal Internal 10 Internal External 15 Internal Internal 10Parameters
Internal
The track plays the sounds generated by the internal sound engine. It does not play an external instrument connected to the MIDI OUT.
External
The track plays an external instrument connected to the MIDI OUT. It does not play the internal sounds, therefore saving polyphony.
When a track is set to "External", a strings of transmitted Control Change and Program Change data is shown instead of the Program name assigned to the track. In the following example, CC#0 is the Control Change 0 (Bank Select MSB), CC#32 is the Control Change 32 (Bank Select LSB), PC is the Program Change.
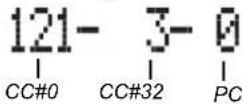
Both
The track plays both the internal sounds and an external instrument connected to the MIDI OUT.
PAGE 9 - JUKEBOX
The Jukebox function lets you play a list of Songs (127 max), at the simple touch of a button. You can play a Jukebox file by selecting it in the Song Select page (see "Playing a Jukebox file" on page 74), just as if it was a normal Song.
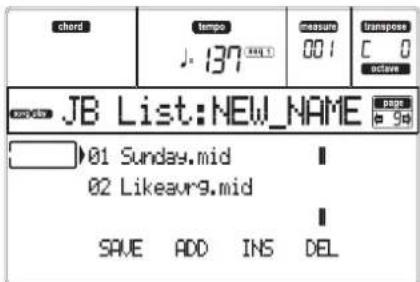
text_image
chord tempo J.137 measure 001 transpose C 0 octave JB List:NEW_NAME 01 Sunday.mid 02 Likeavr9.mid SAVE ADD INS DELIn this page, you can create, edit and save a Jukebox file. If a Jukebox file is already selected into a Sequencer, you will enter this page with that file ready to be edited. Otherwise, you will enter this page with an empty "NEW_NAME.JBX" file.
To create a new file, even when a Jukebox file is already selected, press SHIFT+ F-4 (Del), and confirm with ENTER (see below the "F-4 (Del)" paragraph).
When you press PLAY/STOP from this page, the Jukebox playback begins from the currently selected Song (i.e., the Song on the fist line of the display).
F-1 (SAVE)
Press this button to save the Jukebox file to the card. The Jukebox Save page appears, allowing you to save your file to the card.
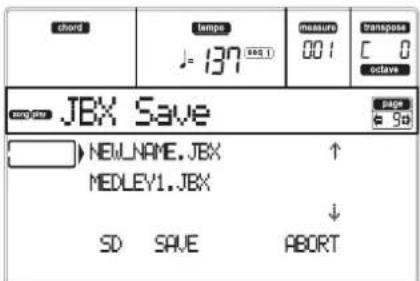
text_image
chord tempo J=137 sec 1 measure 001 transpose C 0 octave JBX Save PAGE 6 96 NEWLNAME.JBX ↑ MEDLEY1.JBX ↓ SD SAVE ABORTNote: You can save your ".JBX" file only in the same folder as the Songs in the list.
You can create a new file, or overwrite an existing one.
- Move to the first line of the display the ".JBX" file you want to save your list into. Select an existing file if you want to overwrite it. Select the "NEW_NAME.JBX" item to create a new file.
Use the E-F (Scroll Up) and G-H (Scroll Down) VOLUME/VALUE buttons, or the TEMPO/VALUE controls to scroll the list.
- If you are making a new file, when the "NEW_NAMEJBX" item is on the first line of the display, press one of the A VOLUME/VALUE buttons. You are prompted to assign a name to the selected item:
REV\_NAME
- Move the cursor using the DOWN/- and UP/+ buttons. Select a character using the DIAL. Insert a
character at the cursor position by pressing the INSERT button. Delete a character at the cursor position by pressing the DELETE button.
- When you have finished writing a name, press F-2 (SAVE) to confirm. The "Are you sure?" message appears. Press ENTER to confirm, EXIT to abort.
F-2 (Add)
Adds a Song at the end of the current list. You can add up to 127 Songs in a list.
Note: A Jukebox list can include only Songs contained in the same folder.
F-3 (Ins)
Inserts a Song at the cursor position (i.e., the first line of the display). All subsequent Songs are moved to the next higher-numbered slot. You can add up to 127 Songs in a list.
Note: A Jukebox list can include only Songs contained in the same folder.
F-4 (Del)
This command let's you delete the Song on the first line of the display.
SHIFT Pressed while keeping SHIFT pressed, the whole Jukebox list is deleted. (The instrument asks for a confirmation with the "Are you sure?" message; press ENTER to confirm, EXIT to abort).
The Jukebox file name changes to "NEW_NAME.JBX".
PAGE 10 - PREFERENCES
In this page, you can set various general parameters.
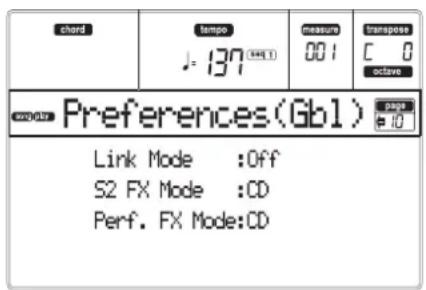
text_image
chard tempo measure transpose C 0 octave Preferences(GB1) Link Mode :Off S2 FX Mode :CD Perf. FX Mode:CDUse the A-D VOLUME/VALUE button pairs to select a parameter.
Note: These settings are stored in the Global file. After changing these settings, press WRITE to save them into the Global. The Write Global window will appear (see "The Write window" on page 72).
Note: You can always start both sequencers simultaneously. Start both sequencers simultaneously by keeping SHIFT held down while pressing one of the PLAY/STOP controls.
Link Mode
▶GBL
The two onboard Sequencers can work each with a different Tempo (Off), or use the same Tempo (Link modes).
Off
The sequencers Tempo are not linked. Each sequencer uses its own Tempo.
Link Measure
The two sequencers Tempo are linked together. The Tempo data written into the Songs are ignored. Adjust the Tempo using the TEMPO/VALUE controls.
Start one of the sequencers, by pressing its own PLAY/STOP control. Then, start the other sequencer, by pressing the other PLAY/STOP control; the second sequencer starts at the next measure.
Link Beat
The two sequencers Tempo are linked together. The Tempo data written into the Songs are ignored. Adjust the Tempo using the TEMPO/VALUE controls.
Start one of the sequencers, by pressing its own PLASTOP control. Then, start the other sequencer, by pressing the other PLAY/STOP control; the second sequencer starts at the next beat (quarter or octave, depending on the Song's Time Signature).
S2 FX Mode
▶GBL
This parameter selects the effects mode for Sequencer 2. When a 4-effects Song is loaded, all four effects are used, independently from this setting.
AB
The A and B effect pair is used. Sequencer 2 shares its effects with Sequencer 1.
CD
The C and D effect pair is used.
Note: When this parameter is set to CD, Sequencer 2 shares its effects with the Realtime (Keyboard) tracks, so these effects can be changed either selecting a Song for Sequencer 2, or selecting a Performance (unless the "Performance FX Mode" parameter is set to Off – see below).
Performance FX Mode
▶GBL
This parameter selects the effects mode for the Performance.
Off
When selecting a Performance, no effect is selected.
CD
The Performance selects the C and D effect pair.
Note: When both this parameter and the "S2 FX Mode" parameter are set to CD, Sequencer 2 shares its effects with the Realtime (Keyboard) tracks, so these effects can be changed either selecting a Song for Sequencer 2, or selecting a Performance.
SAVING A LIST OF SONGS
How to save a list of Songs contained in a folder
- Press SONG PLAY to select the Song Play operative mode.
- Press one of the A (S1:) VOLUME/VALUE button to select the Load Song page.
- Use the F-3 (OPEN) and F-4 (CLOSE) buttons to browse through the folders inside the card.
- Move the folder you are looking for to the first line of the display. Use the TEMPO/VALUE controls, or the E-F (Scroll Up) and G-H (Scroll Down) VOLUME/VALUE buttons.
- Once the folder is selected, press SHIFT + F-2.
6.A di alog box will appear, asking you to insert a new card into the card slot. Insert the card, and press ENTER to confirm, or EXIT to abort.
Note: The text file will contain a list of "*.mid", "*.kar" and "*.jbx" files only (i.e., the files you can select using the numeric keypad – see "Selecting a Song composing its progressive number" on page 70). Folders and different kinds of files will not be included.
When sed , the text file will be named after the selected folder. For example, a folder named "Dummy" will generate a "Dummy.txt" file. If a file with the same name already exists on the card, it will be overwritten without waiting for any confirmation. A file containing the list of all valid files contained into the root of the card will generate a "Root.txt" file.
The list will include the progressive number assigned to each Song, file names in MS-DOS format (8.3), the total number of files in the list.
For the correct display and printing of the list on a personal computer, use a fixed size (i.e., non-proportional) character in your text editor.
Warning: While the list may contain more than 9999 files, you can't select Songs outside the 0001–9999 range when using the numeric keypad.
How to save a list of Songs contained in a Jukebox file
- Press SONG PLAY to select the Song Play operative mode.
- To select an existing Jukebox file, press one of the A (B) VOLUME/VALUE buttons to select the Load Song page.
If you are creating a new Jukebox file, press MENU instead, select the Jukebox page, and jump to step 7. - Use the F-3 (OPEN) and F-4 (CLOSE) buttons to browse through the folders inside the card.
- Move the folders and files to select to the first line of the display. Use the TEMPO/VALUE controls, or the E-F (Scroll Up) and G-H (Scroll Down) VOLUME/VALUE buttons.
- When the Jukebox file you are looking for is selected, press F-2 (SELECT) to select it.
- Once the Jukebox file is selected, press MENU and select the Jukebox page.
- While you are in the Jukebox page, press SHIFT + F-2 to save the list.
- A dialog box will appear, asking you to insert a new card into the card slot. Insert the card, and press ENTER to confirm, or EXIT to abort.
Note: When saved, the text file will be named after the selected Jukebox file. For example, a Jukebox file named "Dummy.jbx" will generate a "Dummy.txt" file. A new, unnamed Jukebox file will generate a "New_name.txt" file. If a file with the same name already exists on the card, it will be overwritten without waiting for any confirmation.
The list will include the progressive number assigned to each Song, file names in MS-DOS format (8.3), the total number of files in the list.
For the correct display and printing of the list on a personal computer, use a fixed size (i.e., non-proportional) character in your text editor.
The Backing Sequence mode lets you record a live performance with the Styles. The front panel controls work mostly as in Style Play mode, but here you are recording what you are playing. After recording, the result is a new Song made of the Realtime tracks and the Style tracks.
TRANSPORT CONTROLS
When in Backing Sequence mode, use SEQ1 transport controls (PLAY/STOP, PAUSE...). See "SEQUENCER TRANSPORT CONTROLS - SEQ1 and SEQ2" on page 18 for more information).
The Backing Sequence and Song modes are linked together: go to Backing Sequence mode to record a Song, and switch to Song mode to edit it.
Since they use the same sequencer and memory area, recording a new Song in Backing Sequence mode deletes the Song loaded in Song mode.
Note: The Song is kept in RAM, so save it before turning the instrument off, or it will be lost.
Warning: When switching to Song Play, the Song is deleted, since Backing Sequence, Song and Song Play share the same sequencer (Sequencer 1). The "Erase Song?" message appears. Press ENTER to confirm, EXIT to stay in Backing Sequence mode, and avoid deleting the Song.
HOW TO PLAYBACK A SONG
You can load a Standard MIDI File, and play it back while in Backing Sequence mode.
Note: When in the Main page (Backing Sequence Play) the keyboard doesn't play.
- Enter the Backing Sequence modThe Backing Sequence Playback page appears (see page 83).

text_image
chord tempo J: 120 (M4.1) measure 00:1 Transpose C 0 octave NewSong Load Song Metro:Off Save Song Meter: 4/4 Sel. Tempo Tempo:Auto- Press one of the B (Load Song) VOLUME/VALUE buttons to load a Song (see "Load Song page" on page 84). You can load any Standard Midi File (files with the ".MID" or ".KAR" extension).
- Press PLAY/STOP to start the playback.
- Press PLAY/STOP again to stop the playback. The playback is automatically stopped at the end of the Song.
REALTIME RECORDING MODE
While in Backing Sequence mode, you can record a new Song in realtime mode (i.e., recording exactly what you play). Realtime (Keyboard) tracks will be Song tracks 1–4, Pads will be Song tracks 5–8, while Style tracks will be Song tracks 9–16.
- Enter the Backing Sequence mode.
- Press RECORD. You will be prompted to select the Realtime Recording mode, or the Chord/Acc Step Mode.

text_image
chord tempo J: 120 (RGB) measure 001 transpose C 0 octave Record Realtime Recording Chord/Acc Step Mode- Press one of the A VOLUME/VALUE buttons to select the Realtime Recording mode. The Realtime Recording page appears (see "Realtime Recording page" on page 85).

text_image
chord tempo J: 120 measure 001 transpose C 0 octave endry time Rec.: NewSong Style: Soft Beat 99% Perf.: 1-1 Metro:Off Resol:Hi RT/Pad:REC Sel. Tempo Ch/Acc:REC- The last selected Style is currently selected. Should it not be the right one, select a different Style to start recording with. (See "Selecting a Style" on page 26).
- The last selected Performance or STS is currently selected. If you prefer, select a different Performance or STS. (See "Selecting a Performance" on page 25, and "Selecting a Single Touch Setting (STS)" on page 26).
- Select the status of the Backing Sequence tracks, using the G (RT) and H (Ch/Acc) button pairs. (RT stays for Realtime/Keyboard; Ch/Acc stays for Chord/Accompaniment, i.e. the Style tracks). To record all you play on the keyboard, plus the automatic accompaniment, leave their status to REC (see "Realtime Recording page" on page 85).
Warning: Tracks set to REC are automatically deleted when starting recording. Set a track to the PLAY status, when you don't want to delete it. For example, if you are recording a Realtime (Keyboard) part on and existing Style track, set the Ch/Acc parameter to PLAY, and the RT track to REC.
- Start recording by pressing the left PLAY/STOP button (or the START/STOP button). After a count-in (see "Metro (Metronome)" on page 85), you can start recording.
Play a solo intro, or start the auto-accompaniment with the START/STOP button. To start with the Style playing right from bar 1, keep the chord pressed during the precount, and press START/STOP before the end of the precount. Otherwise, the Style will start playing from the next bar, following the one where you pressed START/STOP.
Since you can use any Style control, you could start with the usual combinations (INTRO, ENDING, FILL... see "Playing a Style (Automatic Accompaniment)" on page 27 for more information).
Note: While in Backing Sequence mode, you can't record the SYNCHRO, FADE IN/OUT, TAP TEMPO/RESET, ACCOMPANIMENT VOLUME controls.
- Play your music. You can even stop the Style by pressing START/STOP. If you stop the Style while recording, start it again with the START/STOP button.
- When finished recording your performance, press the left PLAY/STOP button. The RECORD LED will turn off, and you will go back to the Playback page (see "How to playback a Song" before).
The recorded Song will be automatically converted to the Standard MIDI File format. - At this point, you can edit the Song in Song mode (see "Song operating mode" on page 88), or save it to a card (see "Save Song page" on page 84).
Warning: The recorded Song is in RAM (Random Access Memory), and will be deleted when turning the instrument off, or entering Record again (either in Backing Sequence or Song mode). Save the Song to the card, if you wish to preserve it.
CHORD/ACC STEP RECORDING
While in the Backing Sequence operative mode, you can enter the Chord/Acc Step Mode to create or edit the Style (Chord/Acc) part of a Song. This mode lets you enter chords even if you are not a keyboard player, or fix any error made playing chords or selecting Style controls, during the Realtime Recording mode.
You can edit only Songs created on the microAR-RANGER, Pa50, Pa60 or Pa80 (Backing Sequence mode), provided that you have the same Styles in the same locations. When saving a Song created in Backing Sequence mode, all Chord/Acc data is preserved, and can be loaded later, to be edited using the Chord/Acc Step Mode.
Here is how to enter the Chord/Acc Step Mode, and execute your editing:
- Press B.SEQ to enter the Backing Sequence mode.
- Press RECORD. You will be prompted to select the Realtime Recording mode or the Chord/Acc Step Mode.

text_image
chord tempo J: 120 (GHz) measure 001 transpose C 0 octave record Realtime Recording Chord/Acc Step Mode- Press one of the B (Chord/Acc Step Mode) VOLUME/VALUE buttons to enter the Step Mode. The Chord/Acc Step mode page appears (see "Chord/Acc Step Recording page" on page 85).
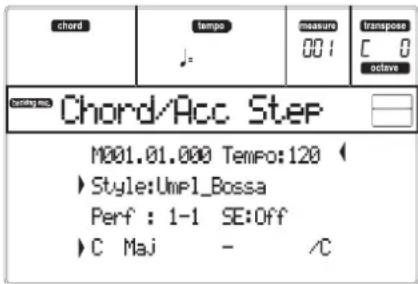
text_image
chord tempo measure 001 transpose C 0 active Chord/Acc Step M001.01.000 Tempo:120 ( ►Style:Ump1_Bossa Perf : 1-1 SE:Off ►C Maj - /C- Select the M(easure) parameter, and go to a different position into the Song, using the TEMPO/VALUE controls, or the A VOLUME/VALUE buttons. Alternatively, you can move the locator using the <> and << >> buttons. See "Transport controls" on page 87.
- Select the parameter type to insert, edit or delete at the current position. If an arrow (▶) appears next to a parameter, the shown event has been inserted at the current position.
- Use the TEMPO/VALUE controls to modify the selected event. Delete it using the DELETE button. When editing a parameter without the arrow (▶) next to it, a new event is inserted.
- Exit the Chord/Acc Step Mode by pressing the RECORD button.
- Press START/STOP to listen to the results of your editing. If they are fine, save the Backing Sequence on a card.
MAIN PAGE (BACKING SEQUENCE PLAY)
This is the main page of the Backing Sequence mode. To access this page from another operating mode, press the B.SEQ button.
Note: When in this page, the keyboard doesn't play.
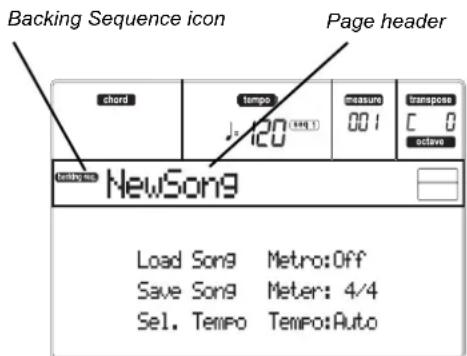
text_image
Backing Sequence icon Page header chord tempo measure transpose c 0 octave NewSong Load Song Metro:Off Save Song Meter: 4/4 Sel. Tempo Tempo:AutoBacking Sequence icon
When on, this icon indicates that the instrument is in Backing Sequence mode.
Page header
This header shows the name of the selected Song.
B (Load Song)
Use these buttons to select a Song (i.e., a Standard MIDI File). The Song Select page opens, and you can select a Song (see below "Load Song page").
C (Save Song)
This command saves the recorded Song as a Standard MIDI File. The file is automatically added the “.MID” extension. After pressing this command, the Save Song page appears (see “Save Song page” on page 84).
D (Select Tempo)
Select this parameter to use the TEMPO/VALUE section to select the Tempo. When you select this parameter, the VALUE LED turns off.
F (Metro)
Use these buttons to turn the metronome on/off during playback.
G (Meter)
This non-editable parameter shows the starting meter (or time signature) of the selected Song.
H (Tempo mode)
This sets the Tempo change mode.
Man(ual) When the cursor is on the "D (Select Tempo)" parameter, you can change the Tempo using the TEMPO/VALUE section controls. The Song will be played back using the manually selected tempo.
Auto The Tempo recorded into the Song will be used instead.
LOAD SONG PAGE
This page appears when you press PAGE+ or either the B (Load Song) buttons while you are in the main page. Press EXIT to go back to the main page of the Backing Sequence operating mode, without selecting a Song.

text_image
chord tempo J: 120 (Hz, L) measure 00 I Transpose C 0 octave loading bus Load Song page BALLADS MYSONGS MYSONG.MID SD LOAD OPEN CLOSEA-C (File, folder)
Move the file or folder to be selected to the first line of the display. To select a file, press the F-2 (SELECT) button. To open a folder, press the F-3 (OPEN) button.
The "☐" symbol identifies a folder.
E-F (Scroll Up)
Scroll the list up. Keep SHIFT pressed and press one of these buttons to jump to the previous alphabetical section.
G-H (Scroll Down)
Scroll the list down. Keep SHIFT pressed and press one of these buttons to jump to the next alphabetical section.
TEMPO/VALUE section
These controls scroll the list up or down.
F-1 (SD)
Press this button after replacing a card in the card slot. The new card will be read, and the file list shown on the display will be updated.
F-2 (LOAD)
Load the Song at the first line of the display.
F-3 (OPEN)
Opens the selected folder (file whose name begins with the "symbol").
F-4 (CLOSE)
Closes the current folder, returning to the parent ("upper") folder.
SAVE SONG PAGE
The recorded Song is contained in RAM, and is lost when turning the instrument off. The Song is also lost when you overwrite it in Record mode, or when switching to the Song Play mode. You must save to a card any Song you wish to preserve.
-
If you are in Record mode (RECORD LED on), stop the sequencer and press RECORD to go back to the Backing Sequence Playback page.
-
Select the Save Song button. The Save Song page appears.

text_image
short tempo J: 120 measure 00 I transpose C 0 activate Save Song NEW NAME MID MYSONGS MYSONG MID SD SAVE OPEN CLOSE-
Move the folder where you wish to save your Song to the first line of the display, using the E-F (Scroll Up) and G-H (Scroll Down) VOLUME/VALUE buttons, or the TEMPO/VALUE controls. Press F-3 (OPEN) to open it. Close the current folder by pressing F-4 (CLOSE).
-
When in the selected folder, you can save the Song over an existing file, or create a new file.
- To overwrite an existing file, move it to the first line of the display.
- To create a new file, move the "NEW_NAME.MID" item to the first line of the display.
- When the "NEW_NAME.MID" item is selected, press one of the A VOLUME/VALUE buttons. You are prompted to assign a name to the new folder:
NEW\_NAME.MID
Move the cursor using the DOWN/- and UP/+ buttons. Select a character using the DIAL. Insert a character at the cursor position by pressing the INSERT button. Delete a character at the cursor position by pressing the DELETE button.
- When you have finished writing a name for the new midfile, press F-2 (SAVE) to confirm. The "Are you sure?" message will appear. Press ENTER to confirm, or EXIT to abort.
REALTIME RECORDING PAGE
While you are in Backing Sequence mode, press RECORD, then one of the A VOLUME/VALUE buttons, to access the Realtime Recording mode. The RECORD LED turns on.

text_image
shord tempo J: 120 measure 001 transpose C 0 active Rec.:NewSong Style: Soft Beat 99% Perf.: 1-1 Metro:Off Resol:Hi RT/Pad:REC Sel. Tempo Ch/Acc:RECStyle
This non-editable parameter shows the selected Style. If no Style is selected, the name will be empty. You can select a different Style, using the STYLE section (see "Selecting a Style" on page 26).
0...99%
This non-editable parameters shows the remaining recording space in memory, as a percentage.
Perf or STS (Performance or STS)
This non-editable parameter shows the selected Performance or STS (depending on the last item selected). If no Performance or STS is selected, the name will be empty. You can select a different Performance, using the PROGRAM/PERFORMANCE section (see "Selecting aerbrmance" on page 25). To select one of the four STS for the current Style, use the F-1-F-4 buttons.
Resol (Resolution)
Use this parameter to set the quantization during recording. Quantization is a way of correcting timing errors; notes played too soon or too later are moved to the nearest axis of a rhythmic "grid", set with this parameter, thus playing perfectly in time.
Hi No quantization applied. ♪ (1/32) ♪ (1/8)
Grid resolution, in musical values. For example, when you select 1/8, all notes are moved to the nearest 1/8 division. When you select 1/4, all notes are moved to the nearest 1/4 division.
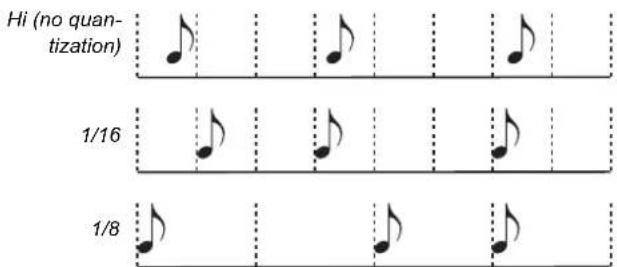
text_image
Hi (no quantization) 1/16 1/8Sel.Tempo (Select Tempo)
Select this parameter to use the TEMPO/VALUE section to select the Tempo. When you select this parameter, the VALUE LED turns off.
Metro (Metronome)
This parameter sets the metronome mode during recording.
Off The metronome can be heard only during the precount.
On1 The tronome plays during recording. Recording begins with a 1-bar precount. Start recording after bar -1.
On2 The metronome plays during recording. Recording begins with a 2-bar precount. Start recording after bar -1.
RT/Pads
Ch/Acc
These parameters let you decide the track status during recording.
RT/Pads: This Backing Sequence track includes the four Realtime (Keyboard) tracks, and the four Pads. They will be Song tracks 1–8, as in the following table:
| RT/Pad track | Song track/Channel |
| Upper 1 | 1 |
| Upper 2 | 2 |
| Upper 3 | 3 |
| Lower | 4 |
| Pad 1 | 5 |
| Pad 2 | 6 |
| Pad 3 | 7 |
| Pad 4 | 8 |
Ch/Acc: This Backing Sequence track includes all Style tracks, including recognized chords. They will be Song tracks 9–16.
MUTE The track is muted. If this tracks has already been recorded, it will not be heard during recording of the other Backing Sequence track.
PLAY The track is in play. If there are recorded data, they will be heard during recording of the other Backing Sequence track.
REC The track is in record. All previously recorded data will be deleted.
CHORD/ACC STEP RECORDING PAGE
While you are in Backing Sequence mode, press RECORD, then one of the B VOLUME/VALUE buttons, to access the Chord/Acc Step Recording mode. The RECORD LED turns on.

text_image
Chord tempo measure 001 transpose C 0 octave Chord/Acc Step M001.01.000 Tempo:120 ( ►Style:Umf1_Bossa Perf : 1-1 SE:Off ►C Maj - /CSide arrow ( )
The small arrow next to a parameter means that its value is effective at the current position. For example, if you are at the "M003.01.000" position, and an arrow lights up next to the Chord parameter, this means that a chord change happens at the "M003.01.000" position.
M(easure)
This is the locator. It shows the current position of the Step Editor. To go to a different position within the Song, select this parameter, then use the TEMPO/VALUE controls, the A VOLUME/VALUE buttons, or the <> buttons (while the << >> buttons let you move to the previous or following measure). When using one of these controls, the locator moves in steps of 1/8 (192 ticks), or jumps to the next event.
The locator's format is as follows:
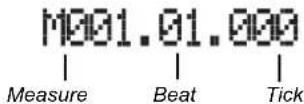
Measure: Measure or bar number.
Beat: Divider in the Time Signature ratio (e.g., a quarter in a 3/4 time).
Tick: Minimh sequencer's resolution. The microAR-RANGER internal sequencers feature a resolution of 384 ticks per quarter.
INSERT When the Measure parameter is selected, press INSERT to insert a measure starting from the current position. All Chord/Acc events contained into the current measure will be moved to the following measure. The event at the Mxxx.xx.000 position (i.e., exactly at the beginning of the measure, like a Time Signature or Style change) will not be moved.
DELETEWhen the Measure paramet is selected, press DELETE to delete the current measure. All Chord/Acc event contained into the following measures are moved to the current measure.
SHIFT + DELETE
When the Measure parameter is selected, press SHIFT + DELETE to delete all events in the Style tracks, starting from the current position to the end of the Song. To delete all events in the Style tracks, go back to the M001.01.000 position, and press SHIFT + DELETE.
Note: All events on the very first tick (M001.01.000), like Style, Tempo, Chord, Style Element selection, cannot be deleted.
Tempo
This is the Tempo Change parameter. To insert a Tempo Change event at the current position, select this parameter and use the TEMPO/VALUE controls to change its value.
DELETE When the Tempo parameter is selected, and the side arrow ( ) – showing that a Tempo Change event has been selected at
the current position - appears next to it, press DELETE to delete the Tempo Change at the current position.
Note: If the side arrow doesn't appear, the event was not selected at the current position, and will not be deleted.
SHIFT + DELETE
When the Tempo parameter is selected, press SHIFT + DELETE to delete all Tempo Change events, starting from the current position to the end of the Song. To delete all Tempo Change events in the Song, go back to the M001.01.000 position, and press SHIFT + DELETE.
Note: All events on the very first tick (M001.01.000), like Perf, Style, Tempo, Chord, Style Element selection, cannot be deleted.
Style
This is the last selected Style. To insert a Style change at the current position, follow the standard selecting procedure using the buttons of the STYLE section.
Note: Any Style Change inserted after the beginning of the measure (i.e., to a position other than Mxxx.01.000) will be effective at the following measure. For example, if a Style Change event has been inserted at M004.03.000, the selected Style will be effectively selected at M005.01.000. (This works exactly as in Style Play mode).
Note: When inserting a Style Change, you may also insert a Tempo Change at the same position. A Style Change will not automatically insert the Style's Tempo.
DELETE When the Style parameter is selected, and the side arrow (▶) – showing that a Style Change event has been selected at the current position- appears next to it, press DELETE to delete the Style Change at the current position.
Note: If the side arrow doesn't appear, the event was not selected at the current position, and will not be deleted.
SHIFT + DELETE
When the Style parameter is selected, press SHIFT + DELETE to de all Style Change events, starting from the current position to the end of the Song. To delete all Style Change events in the Song, go back to the M001.01.000 position, and press SHIFT + DELETE.
Note: All events on the very first tick (M001.01.000), like Perf, Style, Tempo, Chord, Style Element selection, cannot be deleted.
Perf
This is the last selected Performance. Select a Performance to recall the Style it memorizes. To insert a Performance change at the current position, follow the standard selecting procedure using the buttons of the PROGRAM/PERFORMANCE section.
Note: The STYLE CHANGE LED is automatically turned on when entering the Chord/Acc Step Mode. This means that
selecting a Performance automatically selects the Style memorized into the Performance.
The SINGLE TOUCH and STS buttons are automatically disabled, meaning that you can't change the Realtime (Keyboard) tracks while in Chord/Acc Step Mode.
DELETE When the Perf parameter is selected, and the side arrow (▶) – showing that a Performance Change event has been selected at the current position – appears next to it, press DELETE to delete the Performance Change at the current position.
Note: If the side arrow doesn't appear, the event was not selected at the current position, and will not be deleted.
SHIFT + DELETE
When the Perf parameter is selected, press SHIFT + DELETE to delete all Performance Change events, starting from the current position to the end of the Song. To delete all Performance Change events in the Song, go back to the M001.01.000 position, and press SHIFT + DELETE.
Note: All events on the very first tick (M001.01.000), like Perf, Style, Tempo, Chord, Style Element selection, cannot be deleted.
SE (Style Element)
This is the Style Element (i.e., a Variation, Fill, Intro, or Ending). The length of the selected Style Element is always shown on the measure counter, at the top of the display:

This will let you know where to place the following Style Element Change. For example, if you inserted an Intro event lasting for 4 measures, you can insert 4 empty measure after this event, and a Variation event at the end of the Intro, beginning at the 4th empty measure.
"Off" means that the accompaniment will not play at the setted position - only the Realtime tracks will play.
Hint: Insert a Style Element Off event exactly where the auto-accompaniment must stop, at the end of the Song.
Chord
Use the D VOLUME/VALUE buttons to select the Chord line. Use the F-1-F-4 buttons to select the part of the chord you wish to edit.

text_image
C Name Maj Type - Tension /C ExtensionUse the TEMPO/VALUE controls to modify the selected parameter. You can also play a chord, and it will be automatically recognized. While recognizing a chord, the status of the BASS INV. button will be considered.
"No chord" means that the accompaniment will not play at the current position (apart for the Drum and Percussion tracks). To select the "No chord" option, press F-1 to select the Name part of the Chord, then use the TEMPO/VALUE section to select the very last value (C...B, Off).
Note: If you replace a chord with a different one, please remember that the Lower track will not be automatically changed.
Transport controls
While in Step Mode, you can use various control panel buttons to accomplish the editing procedure.
<< or >> (Rewind or Fast Forward)
Use these buttons to move to the previous or following measure. These commands are effective even if the M(easure) parameter is not selected.
< or > (Previous or Next Step)
Use these button to go to the previous or next step (1/8, or 192 ticks). If an event is located before the previous or next step, the locator stops on that event. For example, if you are positioned on M001.01.000, and no event exists before M001.01.192, the > button moves to the M001.01.192 location. If an event exists on M001.01.010, the > button stops to the M001.01.010 location.
These commands are effective even if the M(easure) parameter is not selected.
SHIFT + < or > (Previous or Next Event)
Keep the SHIFT button pressed while pressing the < or > button, to move to the previous or next recorded event.
HOW TO DELETE A WHOLE SONG
You can delete a whole Song with the simple SHIFT + DELETE button sequence.
- Enter the Backing Sequence mode. You must be in the main page of the mode. If you are in Record mode, go back to the Playback mode.
- Press SHIFT + DELETE.
- The "Delete Song?" message appears. Press ENTER to confirm, EXIT to abort.
The Song operating mode is the full-featured onboard sequencer, where you can create from scratch or edit a Song. You can also use this mode to edit the initial parameters of a Standard MIDI File, either made with an external sequencer or with microARRANGER own Song and Backing Sequence modes.
You can save edited Song as a Standard MIDI File (“.MID” file), and playback it either in Song Play, Backing Sequence or Song mode.
For a practical example of Song editing, see "Editing a Song" on page 32.
TRANSPORT CONTROLS
While in Song mode, use the SEQ1 transport controls for the Song playback. See "SEQUENCER TRANSPORT CONTROLS - SEQ1 and SEQ2" on page 18 for more information).
MASTER VOLUME AND SEQUENCER VOLUME
You can use the MASTER VOLUME and ACC/SEQ VOLUME sliders to set the volume. See "Master Volume, Sequencer Volume, BALANCE" on page 71.
Move the BALANCE slider to the center (or the left) for the maximum volume of the sequencer (Song mode relies on Sequencer 1).
THE SONGS AND THE STANDARD MIDI FILE FORMAT
The native Song format for microARRANGER is the Standard MIDI File. See "The Songs and the Standard MIDI File format" on page 70.
When saving a Song as a SMF, an empty measure in automatically inserted to the beginning of the Song. This measure contains various Song initialization parameters.
When a SMF is loaded, the empty measure is automatically removed.
FAST TRACK DELETION
When you are in the Main page of the Song Record mode, and the Song tracks are shown in the display, keep the DELETE button pressed, and press one of the VOLUME/VALUE buttons corresponding to the track to delete. The "Are you sure?" message will appear. Press ENTER to delete the track, or EXIT to abort.
HOW TO DELETE A WHOLE SONG
While in the Main page, you can delete a whole Song, with the simple SHIFT + DELETE button sequence.
- Enter the Song mode. You must be in the Main page of the mode. If you are in Record mode, go back to the Playback mode.
- Press SHIFT + DELETE.
- The "Delete Song?" message appears. Press ENTER to confirm, EXIT to abort.
MAIN PAGE
Press SONG to access this page from another operating mode.
Note: When itching from Style Play to Song, the Song Setup is automatically selected, and various track parameters may change.
Press EXIT/NO to access this page from the Menu or any of the Song Play edit pages.
To see the Song's tracks, use the TRK SELECT button to switch from the Main page to the Tracks pages. Pressed a first time, you will see tracks 1–8 (enlightened TRK SELECT LED); a second press will show tracks 9–16 (flashing TRK SELECT LED); pressed again, you will go back to the Main page (TRK SELECT LED switched off).

text_image
Song icon Page header Bar number chord tempo measure transpose 001 C 0 active NewSong Load Song Metro:Off Save Song Meter: 4/4 Sel. Tempo Tempo:AutoSong icon
When on, this icon shows that the instrument is in Song mode.
Page header
This line shows the selected Song name.
Bar number
This counter shows the current bar number position of the selected Song.
B (Load Song)
Use these buttons to select a Song (i.e., a Standard MIDI File). The Song Select page opens, and you can select a Song (see below "Song Select page").
C (Save Song)
This command saves the edited Song as a Standard MIDI File. After pressing this command, the Save Song page appears (see "Save Song page" on page 90).
D (Select Tempo)
Select this parameter to use the TEMPO/VALUE section to select the Tempo. When you select this parameter, the VALUE LED turns off.
Note: The tempo is always record in overwrite mode (old data is replaced by the new data).
F (Metro)
Use these buttons to turn the metronome on/off during playback.
G (Meter)
This non-editable parameter shows the starting meter (or time signature) of the selected Song.
H (Tempo mode)
This sets the Tempo change mode.
Man(ual) When the cursor is on the "D (Select Tempo)" parameter, you can change the Tempo using the TEMPO/VALUE section controls. The Song will be played back using the manually selected tempo.
Auto The Tempo recorded to the Song will be used.
TRACKS 1–8 PAGE
To see and edit tracks 1–8, press TRACK SELECT from the main page. The TRACK SELECT LED turns on.
Press the TRACK SELECT button twice, to go back to the main page.

text_image
chord tempo measure transpose C 0 octave MySong9 Piano1 Piano1 DkStrings Guitar01 Legato StrngEns2 BrassyHorn VoxPad1A-H (Tracks 1–8 Programs)
Name of the Programs assigned to tracks 1–8. Use these buttons to select, mute/unmute or change the volume of the corresponding tracks.
TRACKS 9–16 PAGE
To see and edit tracks 9–16, press TRACK SELECT once from the Tracks 1–8 page, or twice from the main page. The TRACK SELECT LED begins flashing.
Press the TRACK SELECT button again, to go back to the main page.
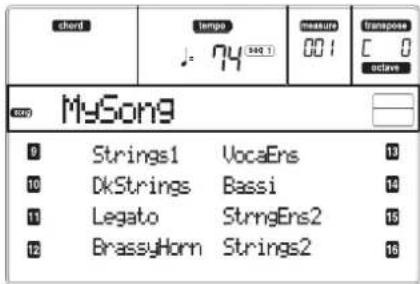
text_image
chord tempo measure transpose C 0 active MySong9 0 Strings1 VocaEns 10 10 DkStrings Bassi 10 11 Legato StrngEns2 15 12 BrassyHorn Strings2 16A-H (Tracks 9–16 Programs)
Name of the Programs assigned to tracks 9–16. Use these buttons to select, mute/unmute or change the volume of the corresponding tracks.
SONG SELECT PAGE
This page appears when you press PAGE+ or either the B (Load Song) buttons while you are in the main page. Press EXIT to go back to the Main page of the Song operating mode, without selecting a Song.

text_image
chord tempo 120 (seq 1) measure 00 I transpose C 0 octave Load Song page BALLADS MYSONGS MYSONG.MID SD LOAD OPEN CLOSEA-C (File, folder)
Move the file or folder to be selected to the first line of the display. To select a file, press the F-2 (LOAD) button. To open a folder, press the F-3 (OPEN) button.
The “☐” symbol identifies a folder.
E-F (Scroll Up)
Scroll the list up.
G-H (Scroll Down)
Scroll the list down.
TEMPO/VALUE section
These controls scroll the list up or down.
F-1 (SD)
Press this button after replacing a card in the card slot. The new card will be read, and the file list shown on the display will be updated.
F-2 (LOAD)
Load the Song at the first line of the display.
F-3 (OPEN)
Opens the selected folder (file whose name begins with the "symbol).
F-4 (CLOSE)
Closes the current folder, returning to the parent ("upper") folder.
SAVE SONG PAGE
The new or edited Song is contained in RAM, and is lost when turning the instrument off. The Song is also lost when you overwrite it in Backing Sequence Record mode, or when switching to the Song Play mode. You must save to a card any Song you wish to preserve. The Song is saved as a Standard MIDI File (SMF).
Note: When saving a Song as a SME, an empty measure in automatically inserted to the beginning of the Song. This measure contains various Song initialization parameters.
-
If you are in an edit page, press EXIT to go back to the Main page.
-
Select the Save Song button. The Save Song page appears.

text_image
chord tempo J-74 (RCT) measure 001 Transpose C 0 active Save Song page NEW NAME MID ↑ MYSONGS MYSONG MID ↓ SD LOAD OPEN CLOSE-
Move the e folder where you wish to save your Song to the first line of the display, using the E-F (Scroll Up) and G-H (Scroll Down) VOLUME/VALUE buttons, or the TEMPO/VALUE controls. Press F-3 (OPEN) to open it. Close the current folder by pressing F-4 (CLOSE).
-
When in the selected folder, you can save the Song over an existing midfile (a file with a ".MID" extension), or create a new midfile.
- To overwrite an existing midfile, move it to the first line of the display.
- To create a new midifile, move the "NEW_NAME.MID" item to the first line of the display.
- When the "NEW_NAME.MID" item is selected, press one of the A VOLUME/VALUE buttons. You are prompted to assign a name to the new file:
REJLNAME.MID
Move the cursor using the DOWN/- and UP/+ buttons. Select a character using the DIAL. Insert a character at the cursor position by pressing the INSERT button. Delete a character at the cursor position by pressing the DELETE button.
- When you have finished writing a name for the new midifile, press F-2 (SAVE) to confirm. The "Are you sure?" message will appear. Press ENTER to confirm, or EXIT to abort.
Play/Mute status saved with the Song
When saving a Song, the Play/Mute status is saved with the Song. This status is preserved when playing back the same Song in Song Play mode.
Master Transpose saved with the Song
When saving a Song, the Master Transpose value is saved with the Song. Since this value is saved as System Exclusive data, it is preserved when playing back the Song in Song Play mode.
Hint: Since the Master Transpose is a global parameter, loading a Song with a non-standard transposition may result in unwanted transposing when loading other Songs that do not contain their own transposition data. To transpose a Song it is advisable to use the Edit-Transpose function; you can access this function by pressing the MENU button and one of the E VOLUME/VALUE buttons (see "Page 18 - Edit: Transpose" on page 100).
You may also lock the Master Transpose for various tracks, to avoid unwanted transposition. See "Page 2 - Master Transpose" on page 126 of the Global chapter.
As a general rule, you should use the Master Transpose (TRANSPOSE buttons on the control panel) when you need to transpose the Realtime tracks together with the Song. You should use the Edit-Transpose function (Song Edit mode) when only the Song has to be transposed.
Note: The Master Transpose value is always shown in the upper right corner of the display:

REALTIME RECORD PROCEDURE
Here is the general procedure to follow for the Real-time Recording.
-
Press SONG to enter the Song mode.
-
Press RECORD to enter the Song Record mode. You are now in the Main page of the Song Record mode and you can prepare your recording. (For more details, see "Song Record page" on page 92).
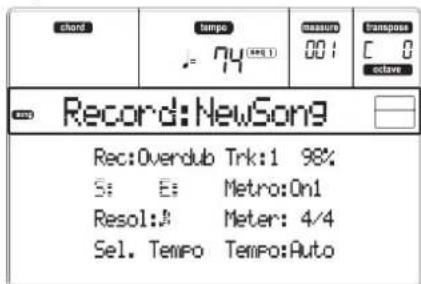
text_image
chord tempo . - 74 (###) measure 001 Transpose C 0 ctave Record: NewSong Rec: Overdub Trk: 1 98% S: E: Metro: On1 Resol: A Meter: 4/4 Sel. Tempo Tempo: Auto-
Be sure one of the Overdub or Overwrite recording options is selected (see "Rec (Record mode)" on page 92).
-
Set the tempo. There are two ways of changing tempo:
- Keep the HH button pressed, and use the TEMPO/VALUE controls to change the tempo.
- Move the cursor to the "Sel.Tempo" parameter, and use the TEMPO/VALUE controls to change tempo.
- Press TRK SELECT to switch to the Song Tracks 1-8 page.

text_image
chord tempo J. 74 (1943) measure 001 transpose C 0 octave Rec: NewSong Piano1 Piano1 DkStrings Guitar01 Legato StrngErs2 BrassyHorn VoxPad1Press the button again to switch to the Song Tracks 9–16 page.
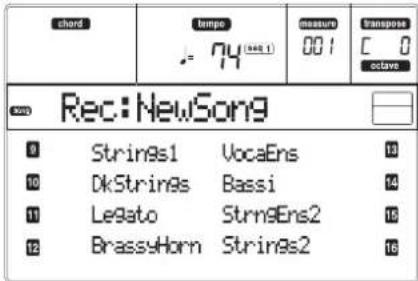
text_image
chord tempo 74 (s=1) measure 001 Transpose C 0 octave Rec: NewSong # Strings1 VocaEns 10 DkStrings Bassi 14 Legato StrngEns2 15 BrassyHorn Strings2 16-
If you like, you can set the tempo again from these pages: just use the TEMPO/VALUE controls.
-
Assign the right Program to each track.
-
Select the track to put in record. Its status icon will automatically begin flashing.
-
While the status icon is flashing, press PLAY/STOP to begin ordering. Depending on the Metro option you selected, a 1- or 2-bars precount may play before the recording actually begins. When it begins, play freely.
- If you selected the Auto Punch recording mode, the recording will begin only when reaching the Start point.
- If you selected the Pedal Punch recording mode, press the pedal when you want to begin recording. Press it again to finish recording.
Note: The Punch functions will not work on an empty Song. At least one track must already be recorded.
-
When finished recording, press PLAY/STOP to stop the sequencer. Select a different track, and go on recording the whole Song.
-
When finished recording the new Song, press RECORD to exit the Record mode. The Song will be saved in memory.
Warning: Save the Song to a card, to avoid it is lost when turning the instrument off.
Note: When exiting the Record mode, the Octave Transpose is automatically reset to "0".
- Edit the new Song; press the MENU page, and select the various edit pages.
STEP RECORD PROCEDURE
The Step Record allows you to create a new Song by entering the single notes or chords in each track. This is very useful when transcribing an existing score, or needing a higher grade of detail, and is particularly suitable to create drum and percussion tracks.
- While in the Main screen of the Song mode, press RECORD to enter the Song Record mode. The Main page of the Song Record mode will appear.

text_image
chord tempo . 74 (100:1) measure 00:1 Transpose C 0 active Record: NewSong Rec: Overdub Trk: 1 98% S: E: Metro: On1 Resol: A Meter: 4/4 Sel. Tempo Tempo: Auto- Use the A VOLUME/VALUE buttons to select the "Rec" (Recording Mode) parameter. Use these buttons, or the TEMPO/VALUE controls, to select the "Step Dub" (Step Overdub) or the "StepOwr" (Step Overwrite) recording mode.
- The Step Overdub mode lets you add events to the existing events.
- The Stp Overwrite mode will overwrite all existing events.
- Press SEQ1 PLAY/STOP to turn its LED on, and enter the Step Record page. (See "Step Record page" on page 93 for more information on each parameter of this page).
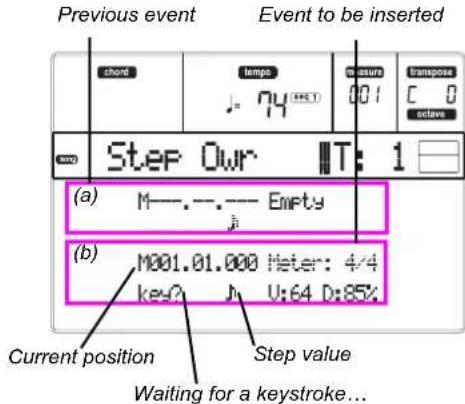
text_image
Previous event Event to be inserted Chord Tempo J = 74 (***) Measure 001 Transpos C 0 actave Step Our T: 1 (a) M---.--- Empty (b) M001.01.000 Meter: 4/4 key: J U:64 D:85% Current position Step value Waiting for a keystroke...The first two lines (a) are the latest inserted event. The second two lines (b) are the event currently in edit, ready to be inserted.
The "Empty" event marks the beginning of the Song, when there are no events inserted. It is automatically inserted when entering the Record mode. It will be removed when an event is inserted.
- The "Maaa.bb.ccc" parameter in (b) is the current position. This is the place where the note in edit will be inserted.
- If you don't want to insert a note at this position, insert a rest instead, as shown in step 6.
- To jump to the next measure, filling the remaining beats with rests, press the >> button.
- To change the step value, use the NOTE VALUE buttons, on the lower left area of the control panel.

text_image
VARIATION ○1 ○2 ○3 ○4 - - - - - - - - - - - - - - - - - - - - - - - - - - - - - - - - - - - - - - - - - - - - - - - - - - - - - - - - - - - - - - - - - - - - - - - - - - - - - - - - - - - - - - - - - - - - - - - - --
Insert a note, rest or chord at the current position.
-
To insert a single note, just play it on the keyboard. The inserted note length will match the step length. You may change the velocity and relative duration of the note, by editing the V (Velocity) and D (Duration) parameters. See "V (Velocity)" and "D (Duration)" on page 94.
- To insert a rest, just press the REST button. Its length will match the step value.
- To tie the note to be inserted to the previous one, press the TIE button. A note will be inserted, tied to the previous one, with exactly the same name. You don't need to play it on the keyboard again.
-
To insert a chord or a second voice, see "Chords and second voices" below.
-
After inserting a new event, you may go back by pressing the < button. This will delete the previously inserted event, and set the step in edit again.
-
Wh en finished recording, press SEQ1 PLAY/STOP to turn off its LED. The Main page of the Song Record mode appears again.

text_image
chord tempo J. 74 (00:1) measures 001 transpose C 0 active Record: NewSong Rec: Overdub Trk: 1 98% S: F: Metro: On1 Resol: R Meter: 4/4 Sel. Tempo Tempo: Auto- From the Main page of the Song Record mode, press RECORD to exit the Record mode. While in the Main page of the Song mode, you may press SEQ1 PLAY/STOP to listen to the Song, or select the Save Song command to save the Song to the card.
Chords and second voices
With microARRANGER, you are not obliged to insert single notes in a track. There are several ways to insert chords and double voices. For more information, see the "Chords and second voices in Step Record mode" section on page 60 of the "Style Record mode" chapter.
SONG RECORD PAGE
While in the Song mode, press RECORD to enter the Song Record mode. The Song Record page appears.
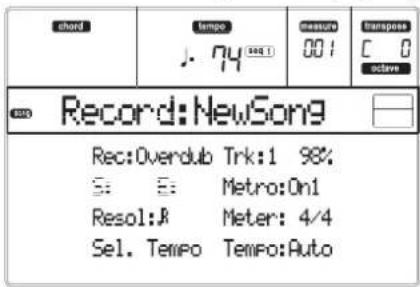
text_image
chord tempo J: 74 (sec1) measure 001 transpose C 0 active Record: NewSong Rec: Overdub Trk: 1 98% S: E: Metro: On1 Resol: A Meter: 4/4 Sel. Tempo Tempo: AutoRec (Record mode)
Set this parameter to select a recording mode.
Overdub The newly recorded events will be mixed to any existing events.
Overwrite The newly recorded events will replace any existing events.
Auto Punch Recording will automatically begin at the "S" position, and stop at the "E" position (see the following line).
Note: The Auto Punch function will not work on an empty Song. At least one track must already be recorded.
PedalPunch Recording will begin when pressing a pedal set to the "Punch In/Out" function, and wilfinish when pressing the same pedal again.
Note: The Pedal Punch function will not work on an empty Song. At least one track must already be recorded.
StepDub Step Overdub. This recording mode lets you enter events one at a time, adding events to the existing events.
StepOwr Step Overwrite. This recording mode lets you enter events one at a time, overwriting all existing events.
Trk (Track)
Track in record.
1...16 One of the 16 tracks selected. To select a track, go to the Track pages (see "Tracks 1-8 page" on page 89 and "Tracks 9-16 page" on page 89).
S/E (Start/End)
These parameters appear only when the "Auto Punch" recording mode is selected. They set the starting and ending points of the Punch recording.
Metro (Metronome)
This is the metronome heard during recording.
Off No metronome click will be heard during recording. A one-bar precount will be played before starting recording.
On1 Metronome on, with a one-bar precount before starting recording.
On2 Metronome on, with a two-bar precount before starting recording.
Resol (Resolution)
Use this parameter to set the quantization during recording. Quantization is a way of correcting timing errors; notes played too soon or too later are moved to the nearest axis of a rhythmic "grid", set with this parameter, thus playing perfectly in time.
Hi No quantization applied.
(1/32)... (1/8)
Grid resolution, in musical values. For example, when you select 1/16, all notes are moved to the nearest 1/16 division. When you select 1/8, all notes are moved to the nearest 1/8 division.
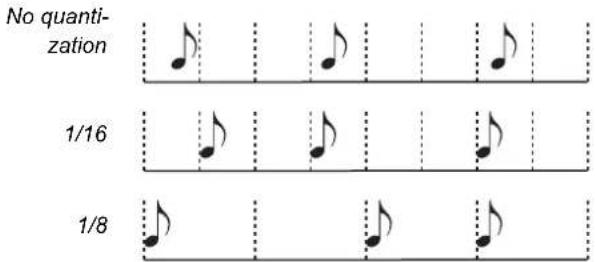
text_image
No quantization 1/16 1/8Meter
This is the meter (or time signature) of the Song. You can edit this parameter only when the Song is empty, i.e. before you begin recording anything. To insert a meter change in the middle of the Song, use the "Insert Measure" function (see page 101).
Sel.Tempo (Select Tempo)
Select this parameter to use the TEMPO/VALUE controls to set the tempo.
Note: You can always change the Tempo, when other parameters are selected, by keeping the SHIFT button pressed, and rotating the DIAL.
Note: The tempo is always record in overwrite mode (old data is replaced by the new data).
Tempo (Tempo mode)
This parameter sets the way tempo events are read.
Record All Tempo changes made during recording will be recorded to the Master Track.
Auto The Sequencer plays back all recorded Tempo events. No new Tempo events are recorded.
Manual The latest manual Tempo setting (made using the TEMPO/VALUE controls) is considered the current Tempo value. No Tempo change will be recorded. This is very useful to record the Song much slower than its actual Tempo.
STEP RECORD PAGE
Access this page from the Main page of the Song Record mode, by selecting the "StepDub" or "StepOwr" recording mode ("Rec" parameter), and pressing SEQ1 PLAY/STOP.
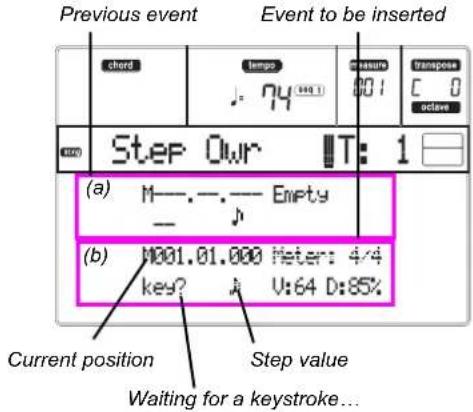
text_image
Previous event Event to be inserted chord tempo 00:1 measure transpose C 0 active Step Our IT: 1 (a) M—.—.— Empty _ (b) 0001.01.000 Meter: 4/4 key? A V:64 D:85% Current position Step value Waiting for a keystroke...(a) section
Previously inserted event. You may delete this event, and set it in edit again, by pressing the <button.
(b) section
Event to be inserted. See the following parameters for information on each element of this section.
M (Measure)
This is the position of the event (note, rest or chord) to be inserted.
Meter
Meter of the current measure. This parameter can't be edited. You can set a Meter change by using the Insert function of the Edit menu, and inserting a new series of measures with a different Meter (see "Page 22 - Edit: Insert Measures" on page 101).
key?
This is a prompt, asking for a note or chord to be played on the keyboard, to enter an event on the current step.
Step value
Length of the event to be inserted. Use the NOTE VALUE buttons, on the lower left area of the control panel, to change this value.

text_image
VARIATION ○1 ○2 ○3 ○4 FILL COUNT IN BREAK ENDING ○1 2○ ○ ○ 2○ • ↓ ↓ • ↓o...
Note value.
Dot (.)
Augments the selected note by one half of its value.
Triplet (3) Makes the selected note a triplet note.
V (Velocity)
Set this parameter before entering a note or chord. This will be the playing strength (i.e., velocity value) of the event to be inserted.
KBD
Keyboard. You can select this parameter, by turninall counter-clockwise the dial. When this option is selected, the playing strength of the played note is recognized and recorded.
1...127
Velocity value. The event will be inserted with this velocity value, and the actual playing strength of the note played on the keyboard will be ignored.
D (Duration)
Relative duration of the inserted note. The percentage is always referred to the step value.
50%Staccato.
85%Ordinary articulation.
100%Legato.
Buttons used in Step Record mode
TIE button
Ties the note to be inserted to the previous note.
REST button
Inserts a rest.
NOTE VALUE buttons
Select the step value.
SEQ1 PLAY/STOP button
Exits the Step Record mode.
< (Previous step)
Goes to the previous step, erasing the inserted event.
>> (Fast Forward)
Goes to the next measure, and fill the remaining space with rests.
MENU
While in any page, press MENU to open the Song edit menu. This menu gives access to the various Song edit sections.
When in the menu, select an edit section using the VOLUME/VALUE (A-H) buttons, select an edit page using PAGE +, or press EXIT to exit the menu.
When in an edit page, press EXIT to go back to the main page of the Song operating mode.
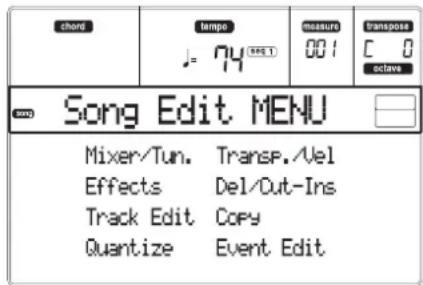
text_image
chord tempo J=74 (PRET) measure 001 Transpose C 0 octave Song Edit MENU Mixer/Tun. Transp./Vel Effects Del/Cut-Ins Track Edit Copy Quantize Event EditEach item in this menu corresponds to an edit section. Each edit section groups various edit pages.
EDIT PAGE STRUCTURE
Select an edit section from the Menu, and/or use the PAGE buttons to reach the desired page.
Press EXIT to go back to the main page of the Song mode.
All edit pages share the same structure.
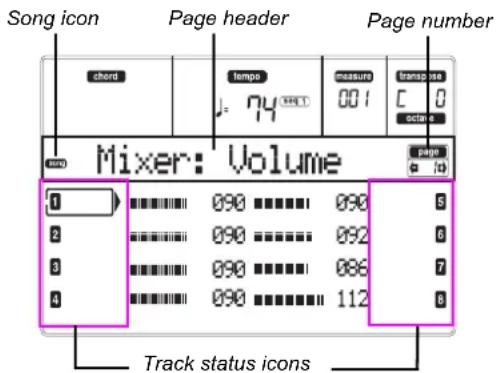
text_image
Song icon Page header Page number chord tempo measure transpose C 0 001 000 Mixer: Volume page c 10 1 2 3 4 5 6 7 8 9 10 Track status iconsSong icon
When on, this icon indicates that the instrument is in Song mode.
Page header
The header shows the name of the current edit page. Usually the header is divided in a first word, identifying the section name (e.g., "Mixer:FX Send" is a "Mixer" section page), and a second word, referring to the page name (e.g. "FX Send").
Page
This area shows the current page number.
A-H
Each pair of VOLUME/VALUE buttons select a different track, parameter of command, depending on the edit page.
Track status icons
A series of icons near each track show the track's status.

Selected track or parameter. When this symbol appears, you can execute any available operation on the selected item.

Track in play or already recorded.
(no icon)
The track is in mute, or does not contain data.
PAGE 1 - MIXER: VOLUME
Here you can adjust the volume for each of the 16 sequencer tracks. Press both VOLUME/VALUE button to mute/unmute the corresponding track.
A muted track remains muted even when selecting a different Song.
Use the TRACK SELECT button to switch between Song tracks 1–8, Song tracks 9–16, and back again.
text_image
chord tempo J. 74 measure 001 Transpose C 0 octave Mixer: Volume page e 10 0 ********** 090 ********** 090 5 2 ********** 090 ********** 092 6 3 ********** 090 ********** 086 7 4 ********** 090 ********** 112 6 chord tempo J. 74 measure 001 Transpose C 0 octave Mixer: Volume page e 10 9 ********** 090 ********** 090 13 10 ********** 090 ********** 092 14 11 ********** 090 ********** 086 15 12 ********** 090 ********** 112 16PAGE 2 - MIXER: PAN
Here you can adjust the pan for each Song track.
Use the TRACK SELECT button to switch between Song tracks 1–8, Song tracks 9–16, and back again.
text_image
chord lamps J=74 (RCT) measure 001 transpose C 0 octave Mixer: Pan pages 20 1 C+00 C+00 5 2 C+00 C+00 6 3 C+00 C+00 7 4 C+00 C+00 8 chord lamps J=74 (RCT) measure 001 transpose C 0 octave Mixer: Pan pages 20 9 C+00 C+00 13 10 C+00 C+00 14 11 C+00 C+00 15 12 C+00 C+00 16Pan
-64Hard Left.
+00Center.
+63Hard Right.
Off
The direct (uneffected) signal does not go to the outputs; only the FX signal is heard for this track.
This page lets you select a pair of effect processor (AB or CD) for each of the Song track.
Use the TRACK SELECT button to switch between Song tracks 1–8, Song tracks 9–16, and back again.

text_image
chord tempo 001 measure C 0 octave Mixer: FX Block page 30 1 AB AB 9 2 AB AB 6 3 AB AB 7 4 AB AB 8 chord tempo 001 measure C 0 octave Mixer: FX Block page 30 9 AB AB 10 10 AB AB 14 11 AB AB 15 12 AB AB 16PAGE 4 - MIXER: FX SEND A/B (OR C/D)
This page lets you set the level of the track's direct (uneffected) signal going to the A and B, or C and D Internal FX pair. Go to the previous page ("Page 3 - Mixer: FX Block") to select an FX pair.
Use the TRACK SELECT button to switch from tracks 1–8 to tracks 9–16.

text_image
chord tempo J: 74 (RQ.1) measure 001 transpose C 0 octave Mixer: FX Send page 40 1 A:100 B:50 A:100 B:50 2 A:127 B:20 A:100 B:50 3 A:110 B:50 A:100 B:50 4 A:100 B:50 A:100 B:50 chord tempo J: 74 (RQ.1) measure 001 transpose C 0 octave Mixer: FX Send page 40 9 A:100 B:50 A:100 B:50 10 A:127 B:20 A:100 B:50 11 A:110 B:50 A:100 B:50 12 A:100 B:50 A:100 B:50Here is the edit procedure:
- Use the VOLUME/VALUE (A-H) buttons to select a track.
- Use the F-1–F-4 buttons to select a parameter for that track.
- Use the TEMPO/VALUE controls to change the parameter's value.
Parameters
000 No effect. Only the direct (uneffected) signal goes to the outputs.
127 100% effect. The direct (uneffected) and effected signals go to the outputs with the same level.
PAGE 5 - TUNING: DETUNE
This page is where you can set the fine tuning for each track.
Use the TRACK SELECT button to switch between Song tracks 1–8, Song tracks 9–16, and back again.

text_image
chord tempo measure transpose C 0 octave Tuning: Detune page @ 58 1 +00 +00 2 +00 +00 3 +00 +00 4 +00 +00 chord tempo measure transpose C 0 octave Tuning: Detune page @ 58 9 +00 +00 10 +00 +00 11 +00 +00 12 +00 +00Detune
This is the fine tuning.
-64Lowest pitch
0 Standard tuning.
+63Highest pitch.
PAGE 6 - TUNING: SCALE
This page lets you program the alternative scale for the Song tracks.

text_image
chord tempo . 74 (HHT) measure 001 transpose C 0 active Tuning: Scale Scale: User Key: C Note: C# Detune: +63Scale
Alternative scale for the Song tracks. See "Scales" on page 227 for a list of available scales. To enable/disable the alternative scale for each Song track, see "Page 7 - Tuning: PitchBend/Scale" on page 97.
Key
Parameter required for some Scales, when you should set a preferred key.
Note
Note in edit, to be detuned. This parameter can be accessed when a User Scale is selected.
Detune
Note detune, compared to the standard Equal tuning. This parameter can be accessed when a User Scale is selected.
PAGE 7 - TUNING: PITCHBEND/SCALE
This page lets you program the Pitch Bend range for the Song tracks. Furthermore, it lets you activate/deactivate the alternative scale for each track.
Use the TRACK SELECT button to switch between Song tracks 1–8, Song tracks 9–16, and back again.
text_image
chord tempo J: 74 measure 001 transpose C 0 octave Tun:P.Bend/Scale page 1 PB: 2 Sc:N PB: 2 Sc:N 2 PB: 2 Sc:N PB: 2 Sc:N 3 PB: 2 Sc:N PB: 2 Sc:N 4 PB: 2 Sc:N PB: 2 Sc:N Tun:P.Bend/Scale page 9 PB: 2 Sc:N PB: 2 Sc:N 10 PB: 2 Sc:N PB: 2 Sc:N 11 PB: 2 Sc:N PB: 2 Sc:N 12 PB: 2 Sc:N PB: 2 Sc:NPB(end)
This parameters shows the Pitch Bend range for each track, in semitones.
01...12 Maximum positive/negative pitchbend range (in semitones). 12 = ± 1 octave.
Off No pitchbend allowed.
Sc(ale)
This parameter lets you activate/deactivate the alternative scale for each track. (See "Page 6 - Tuning: Scale" on page 96 for more information on selecting an alternative scale).
Yes The track is tuned according to the alternative scale.
No The track is tuned according to the Global scale (see "Scale" on page 125).
PAGE 8 - FX: A/B SELECT
This page lets you select the A and B effects. Usually, the A effect is a reverb, while the B effect is a modulating effect.
Standard MIDI Files usually require two effects only. You can, however, assign all four effects to a Song (see "Page 3 - Mixer: FX Block" on page 95).
text_image
chord temps .74 (100.1) measure 001 Transport C 0 octave FX: A/B Select page B A: 2 B: 89 Compressor Rev-Gate ModT:UP.1 B>Asend:127Note: When you stop the Song, or select a different Song, the default effects are selected again. You can, however, stop the Song, change the effects, then start the Song again. Save the Song to permanently change the effects.
A, B
Effects assigned to the A and B effect processors. Usually, A is the reverb, while B is the modulating effect (chorus, flanger, delay...). For a list of the available effects, see "Effects" on page 175.
ModTrk (Modulating Track)
Source track for modulating MIDI messages. You can modulate an effect parameter with a MIDI message generated by a physical controller.
B>Asend (B>A Send)
Amount of the B effect going back to the input of the A effect.
PAGE 9 - FX: C/D SELECT
This page lets you select the C and D effects. Usually, the C effect is a reverb, while the D effect is a modulating effect.
Standard MIDI Files usually require two effects only. You can, however, assign all four effects to a Song (see "Page 3 - Mixer: FX Block" on page 95).
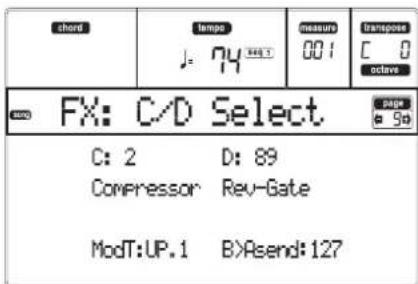
text_image
short tempo J: 74 measure 001 transpose C 0 octave FX: C/D Select C: 2 D: 89 Compressor Rev-Gate ModT:UP.1 B>Asend:127Note: When you stop the Song, or select a different Song, the default effects are selected again. You can, however, stop the Song, change the effects, then start the Song again. Edit the Song in Song mode to permanently change the effects.
C, D
Effects assigned to the C and D effect processors. Usually, C is the reverb, while D is the modulating effect (chorus, flanger, delay...). For a list of the available effects, see "Effects" on page 175.
ModTrk (Modulating Track)
Source track for modulating MIDI messages. You can modulate an effect parameter with a MIDI message generated by a physical controller.
D>Csend (D>C Send)
Amount of the D effect going back to the input of the C effect.
PAGE 10 - FX: A EDITING
This page contains the editing parameters for the A effect (usually a reverb).
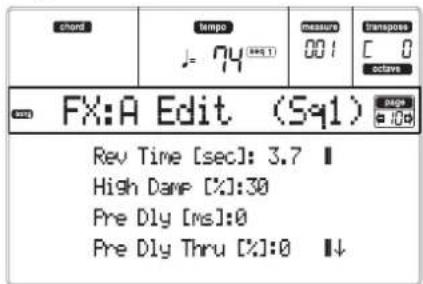
text_image
chord tempo J=74 (sec) measure 001 Transpos C 0 actave FX:A Edit (Sq1) Rev Time [sec]: 3.7 High Damp [%]:30 Pre Dly [ms]:0 Pre Dly Thru [%]:0 ↓Use the E-F and G-H VOLUME/VALUE button pairs to scroll the parameter list.
Use the A-D VOLUME/VALUE button pairs to select and edit a parameter.
Use the TEMPO/VALUE controls to edit the selected parameter.
Note: When you stop the Song, or select a different Song, the default effects are selected again. You can, however, stop the Song, change the effects, then start the Song again. Edit the Song in Song mode to permanently change the effects.
Parameters
See "Effects" on page 175 for a list of available parameters for each effect type.
PAGE 11 - FX: B EDITING
This page contains the editing parameters for the B effect (usually a modulating effect). For more details, see "Page 10 - FX: A editing" above.
PAGE 12 - FX: C EDITING
This page contains the editing parameters for the C effect. For more details, see "Page 10 - FX: A editing" above.
PAGE 13 - FX: D EDITING
This page contains the editing parameters for the D effect. For more details, see "Page 10 - FX: A editing" above.
PAGE 14 - TRACK: EASY EDIT
In this page you can edit the main parameters of the Programs assigned to each track.
Note: All values are relative to the value of the original Program.
You can also change the volume for each class of Drums and Percussions, if the selected track is set in Drum mode (see below "Page 15 - Track: Mode").
Use the TRACK SELECT button to switch between Song tracks 1–8, Song tracks 9–16, and back again.
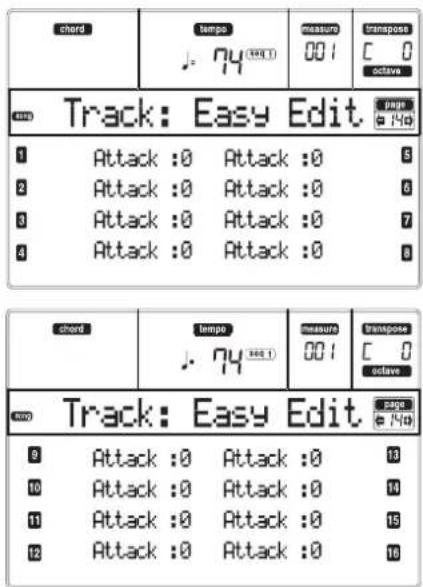
text_image
chard tempo 001 transpose C 0 octave Track: Easy Edit page @ No 1 Attack :0 Attack :0 5 2 Attack :0 Attack :0 6 3 Attack :0 Attack :0 7 4 Attack :0 Attack :0 8 chard tempo 001 transpose C 0 octave Track: Easy Edit page @ No 9 Attack :0 Attack :0 13 10 Attack :0 Attack :0 14 11 Attack :0 Attack :0 15 12 Attack :0 Attack :0 16Here is the edit procedure:
- Use the VOLUME/VALUE (A-H) buttons to select a track.
- Use the F-1–F-4 buttons to select a sound parameter, or its value. (For the Drum and Percussion tracks, see below the "Drum tracks" section).
- Use the TEMPO/VALUE controls to change the sound parameter or its value.
Parameters
| Attack | Attack time. This is the time during which the sound goes from zero (at the moment when you strike a key) to it's maximum level. |
| Decay | Decay time. Time to go from the final Attack level to the beginning of the Release. |
| Release | Release time. This is the time during which the sound goes from the sustaining (or Decay) phase, to zero. The Release is triggered by releasing a key. |
| Cutoff | Filter cutoff. This sets the sound brightness. |
| Resonance | Use the Filter Resonance to define the width of the frequency range affected by the Filter. |
| Vibrato RateSpeed of the Vibrato. | |
| Vibrato Depth | Intensity of the Vibrato. |
| Vibrato Delay | Delay time before the Vibrato begins, after the sound starts. |
Drum tracks
When a track is set in Drum Mode (like the Drum and Percussion tracks), you can adjust the volume for each of the Drum and Percussion categories.
Kick V Kick drums volume.
Snare V Snare drums volume.
Tom V Toms volume.
HiHat V Hi-Hat volume.
CymbalV Ride, Crash and other cymbals volume.
Percus1V "Classic" percussion set volume.
Percus2V "Ethnic" percussion set volume.
SFXV S p cts volume. c i a
Reset
You can reset the parameters' value by keeping the SHIFT button pressed, while pressing the selected track VOLUME/VALUE button. When you press the above combination, the Reset window appears:
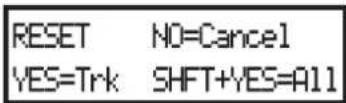
Press ENTER/YES to reset the currently selected track. Keep SHIFT pressed, and press ENTER/YES, to reset all tracks. Press EXIT/NO to abort and leave all parameters unchanged.
PAGE 15 - TRACK: MODE
This page lets you set the polyphony mode for each track.
Use the TRACK SELECT button to switch between Song tracks 1–8, Song tracks 9–16, and back again.

text_image
chord tempo J: 74 (RGB) measure 001 transpose C 0 octave Euro Track: Mode page @ 150 1 Poly Poly 9 2 Poly Poly 6 3 Poly Poly 7 4 Poly Poly 0 chord tempo J: 74 (RGB) measure 001 transpose C 0 octave Euro Track: Mode page @ 150 9 Poly Poly 13 10 Drum Poly 14 11 Drum Poly 15 12 Poly Poly 16Parameters
Drum
This is a Drum/Percussion track. No Master or Octave Transpose applies to this track. You can set a different volume for each class of percussive instruments ("Page 14 - Track: Easy edit" on page 98).
Poly Tracks of this kind are polyphonic, i.e. they can play more than one note at the same time.
Mono Tracks of this kind are monophonic, i.e. each new note stops the previous note.
Mono Right A Mono track, but with priority assigned to the rightmost (highest) note.
PAGE 16 - TRACK: INTERNAL/EXTERNAL
This page lets you set the Internal or External status for each track. It is very useful to let a Song track drive an external expander.
Use the TRACK SELECT button to switch between Song tracks 1–8, Song tracks 9–16, and back again.

text_image
chord tempo J. 74 (10:1) measure 00:1 transpose C 0 octave Track: Int./Ext. page © 159 1 Both Both 2 Both Both 3 Both External 4 Both Both 6 chord tempo J. 74 (10:1) measure 00:1 transpose C 0 octave Track: Int./Ext. page © 159 9 Both Both 10 Both Both 11 Both External 12 Both Both 13 14 15 16Parameters
Internal
The track plays the sounds generated by the internal sound engine. It does not play an external instrument connected to the MIDI OUT.
External
The track plays an external instrument connected to the MIDI OUT. It does not play the internal sounds, thus saving polyphony.
When a track is set to "External", a strings of transmit Control Change and Program Change data is shown instead of the Program nam assigned to the track. In the following example, CC#0 is the Control Change 0 (Bank Select MSB), CC#32 is the Control Change 32 (Bank Select LSB), PC is the Program Change.

Both
The track plays both the internal sounds and an external instrument connected to the MIDI OUT.
PAGE 17 - EDIT: QUANTIZE
The quantize function corrects any rhythm error after recording.

text_image
chord tempo J 74 (MALL) measure 001 Transpose C 0 octave Edit: Quantize Trk: A11 Resol:A S001.01.000 E001.01.192 Bottom:G-1 Top: C8After setting the various parameters, press ENTER to execute. The "Are you sure?" message will appear. Press ENTER to confirm, EXIT to abort.
Trk (Track)
Use this parameter to select a track.
All All tracks selected.
1...16 Selected track.
Resol (Resolution)
This parameter sets the quantization after recording. For example, when you select 1/8a, all notes are moved to the nearest 1/8 division. When you select 1/4, all notes are moved to the nearest 1/4 division.

text_image
No quantization 1/8 1/4Grid resolution, in musical values. An "a" after the value means no swing. A "b...f" after the value means swing-quantization.
S / E (Start/End)
Use these parameters to set the starting (S) and ending (E) points of the range to quantize.
If you wish to select a four-measure sequence starting at the beginning of the Song, the Start will be positioned at 1.01.000, and the End at 5.01.000.
Bottom / Top
Use these parameters to set the bottom and top of the keyboard range to quantize. If you select the same note as the Bottom and Top parameters, you can select a single percussive instrument in a Drum track.
Note: These parameters are available only when a Drum track is selected.
PAGE 18 - EDIT: TRANSPOSE
Here you can transpose the Song, a track or a part of a track.
text_image
chord tempo J: 74 (0.01) measure 001 transpose C 0 octave Edit: TransPose Trk: 9 Value: + 0 S001.01.000 E001.01.192 Bottom:G-1 Top: C8After setting the various parameters, press ENTER to execute. The "Are you sure?" message will appear. Press ENTER to confirm, EXIT to abort.
Trk (Track)
Use this parameter to select a track.
All All tracks selected (apart for Drum tracks).
1...16Selected track.
Value
Value of the transpose (in semitones).
S / E (Start/End)
Use these parameters to set the starting (S) and ending (E) points of the range to transpose.
If you wish to select a four-measure sequence starting at the beginning of the Song, the Start will be positioned at 1.01.000, and the End at 5.01.000.
Bottom / Top
Use these parameters to set the bottom and top of the keyboard range to transpose. If you select the same note as the Bottom and Top parameters, you can select a single percussive instrument in a Drum track.
PAGE 19 - EDIT: VELOCITY
Here you can change the Velocity value for the notes.

text_image
chord temps J 74 (0.1) measure 001 Transpose C 0 slave Edit: Velocity Trk: 9 Value: + 0 S001.01.000 E001.01.192 Bottom: G-1 Top: C8After setting the various parameters, press ENTER to execute. The "Are you sure?" message will appear. Press ENTER to confirm, EXIT to abort.
Trk (Track)
Use this parameter to select a track.
All All tracks selected.
1...16Selected track.
Value
Velocity change value.
S / E (Start/End)
Use these parameters to set the starting (S) and ending (E) points of the range to edit.
If you wish to select a four-measure sequence starting at the beginning of the Song, the Start will be positioned at 1.01.000, and the End at 5.01.000.
Bottom / Top
Use these parameters to set the bottom and top of the keyboard range to edit. If you select the same note as the Bottom and Top parameters, you can select a single percussive instrument in a Drum track.
PAGE 20 - EDIT: DELETE
This page is where you can delete MIDI events from the Song.
text_image
chord tempo J. 74 (sec 1) measure 001 transpose C 0 octave Edit: Delete Trk: 9 Ev:All S001.01.000 E001.01.192 Bottom:G-1 Top: C8After setting the various parameters, press ENTER to execute. The "Are you sure?" message will appear. Press ENTER to confirm, EXIT to abort.
Trk (Track)
Use this parameter to select a track.
All All tracks selected.
1...16Sele cted track.
Master Master track. This is where the Tempo, Scale and Effect events are recorded.
Ev (Event)
Type of MIDI event to delete.
All All events. The measures will not be removed from the Song.
Note All notes in the selected range.
Dup. Note All duplicate notes. When two notes with the same pitch are encountered on the same tick, the one with the lowest velocity is deleted.
A.Touch After Touch events.
P.Bend Pitch Bend events.
PrChangeProgra m Change events, excluding the bundled Control Change #00 (Bank Select MSB) and #32 (Bank Select LSB).
C. Change All Control Change events, for example Bank Select, Modulation, Damper, Soft Pedal...
CC00/32...CC127
Single Control Change events. Double Control Change numbers (like 00/32) are MSB/LSB bundles.
S / E (Start/End)
Use these parameters to set the starting (S) and ending (E) points of the range to delete.
If you wish to select a four-measure sequence starting at the beginning of the Song, the Start will be positioned at 1.01.000, and the End at 5.01.000.
Bottom / Top
Use these parameters to set the bottom and top of the keyboard range to delete. If you select the same note as the Bottom and Top parameters, you can select a single percussive instrument in a Drum track.
Note: These parameters are available only when the All or Note options are selected.
PAGE 21 - EDIT: CUT MEASURES
In this page you can cut measures from the Song.
text_image
chord tempo J. 74 (###) measure 001 transpos C 0 octave Edit: Cut Meas. Start: 1 Length:1After selecting the Start and Length parameters, press ENTER to execute. The "Are you sure?" message will appear. Press ENTER to confirm, EXIT to abort.
After the cut, the following measure are moved back, to fill the cut measures.
Start
First measure where to begin cutting.
Length
Number of measures to be cut.
PAGE 22 - EDIT: INSERT MEASURES
In this page you can insert measures in the Song. You can also use this function to insert measures with a different meter (time signature).
text_image
chord tempo measure transpose C 0 octave Edit: Ins.Meas. Meter: 4/4 Start: 1 Length:1After selecting the Meter, Start and Length parameters, press ENTER to execute. The "Are you sure?" message will appear. Press ENTER to confirm, EXIT to abort.
Note: You cannot append measures after the end of the Song. To append measures use the Record or Copy function.
Note: You cannot use this function on an empty Song.
Meter
Meter of the measures to be inserted.
Start
First of the inserted measures.
Length
Number of measures to be inserted.
PAGE 23 - EDIT: COPY
Here you can copy tracks or phrases.
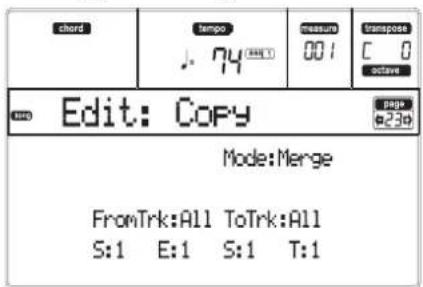
text_image
chard tempo .74 (MINT) measure 001 Transpose C 0 active Edit: Copy page e23b Mode:Merge FromTrk:All ToTrk:All S:1 E:1 S:1 T:1After setting the various parameters, press ENTER to execute. The "Are you sure?" message will appear. Press ENTER to confirm, EXIT to abort.
Note: If you copy too many events on the same "tick", the "Too many events!" message appears, and the copy operation is aborted.
Mode
Use this parameter to select the Copy mode.
Merge Copied data are merged with the data at the target position.
Overwrite Copied data replace all data at the target position.
Warning g: Deleted data cannot be recovered!
FromTrk (From Track)
ToTrk (To Track)
Use these parameters to select the source and target track to copy.
All All tracks. The target track cannot be selected.
1...16 Selected source and target tracks.
S/E
The left "S/E" parameters are the starting and ending measure to copy. For example, if S=1 and E=4, the first four measures are copied.
s
The right "S" parameter is the first of the target measures.
T
Number of times the copy must be executed.
PAGE 24 - EVENT EDIT
Enter this page from the Menu of the Song mode. The Event Edit page allows you to edit each event in a single track. See "Event Edit procedure" on page 104 for more information on the event editing procedure.
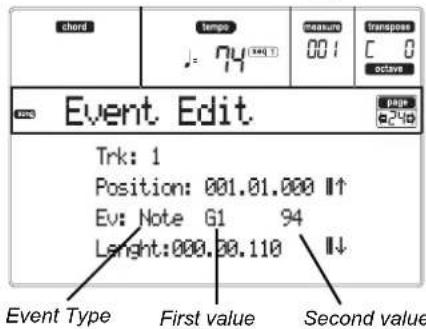
text_image
chord tempo 001 measure C 8 octave Event Edit Trk: 1 Position: 001.01.000 ↑ Ev: Note G1 94 Length:000.30.110 ↓ Event Type First value Second valueTrk (Track)
Track in edit. To select a different track, press one of the A VOLUME/VALUE buttons to open the Go To Track window.
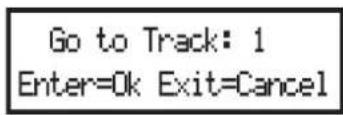
Use the TEMPO/VALUE controls to select a track, and press ENTER to confirm, or EXIT to abort.
1...16 One of the ordinary tracks of the Song. These tracks contains musical data, like notes and controllers.
Master This is a special track, containing Tempo changes, Metechanges, Scale and Transpose data, and the effect parameters.
Position
Position of the event shown in the display, expressed in the form 'aaa.bb.ccc':
- 'aaa' is the measure
- 'bb' is the beat
- 'ccc' is the tick (each quarter beat = 384 ticks)
You can edit this parameter to move the event to a different position.
Ev (Event)
Type and values of the event shown in the display. Depending on the selected event, the value may change. This parameter also shows the (non-editable) "End Of Track" marking, when the end of the track is reached.
Here are the events contained in ordinary tracks (1–16).
| Event | First value | Second value |
| Note | Note name | Velocity |
| Prog | Program Change number | - |
| Ctrl | Control Change number | Control Change value |
| Bend | Bending value | - |
| Aftt | Mono (Channel) After-touch value | - |
| PAft | Note to which the After-touch is applied | Poly Aftertouch value |
And here are the events contained in the Master track.
| Event | First value | Second value |
| Tempo | Tempo change | - |
| Volume | Master Volume value | - |
| Meter | Meter change^(a) | - |
| Scale | One of the available pre-set Scales | Root note for the selected Scale |
| UScale (User Scale) | One of the available User Scales | Root note for the selected Scale |
| QT (Quarter Tone) | Altered note | Note alteration^(b) |
| QT Clear (Quar-ter Tone Clearing) | Reset of all Scale changes | - |
| FXType | One of the four available FX processors | Effect number^(c) |
| FXSend | Feedback Send (B>A or D>C) | Feedback send level |
(a) Meter changes can't be edited or inserted. To insert a Meter change, use the Insert function in the Edit section and insert a series of measures with the new meter. Existing data can then be copied or entered to these measures
(b) To edit the Quarter Tone settings, select the first value, then select the scale's degree to edit. Edit the second value to change the tuning of the selected note of the scale.
(c) When selecting a different effect number during this edit, default settings will be assigned to this event.
To change the event type, use the C VOLUME/VALUE buttons to select the Event line, then use the same buttons or the TEMPO/VALUE controls to select a different event type.
To select and edit the event's value, use the F-3 and F-4 function keys, and use the G/VOLUME/VALUE buttons or the TEMPO/VALUE controls.
Length
Length of the selected Note event. The value format is the same as the Position value.
Note: If you change a length of "000.00.000" to a different value, you can't go back to the original value. This rather uncommon zero-length value may be found in the drum and percussion tracks of Songs made in Backing Sequence mode.
Transport, navigation and editing controls
E/F and H VOLUME/VALUE buttons
These buttons are the "Scroll to previous event" and "Scroll to next event" controls. They corresponds to the scroll arrows shown on the screen.
G VOLUME/VALUE buttons
Use these buttons to select the corresponding parameter value area.
F-3 and F-4 buttons
After selecting the parameter value area with the G VOLUME/VALUE buttons, use these buttons to select, respectively, the first and second value of the event in edit.
SEQ1 PLAY/STOP button
Press PLAY/STOP to listen to the Song in edit. Press PLAY/STOP again to stop it.
SHIFT + << or >>
Keep the SHIFT button pressed and press the << or >> button to open the Go to Measure window.

Use the TEMPO/VALUE controls to select a measure, and press ENTER to confirm, or EXIT to abort.
SHIFT + PAUSE
While the sequencer is running, keep the SHIFT button pressed, and press the PAUSE button to display the event that is currently playing. This is called the Catch Locator function.
INSERT
Press the INSERT button to insert a new event at the current shown Position. The default values are Type = Note, Pitch = C4, Velocity = 100, Length = 192.
Note: You can't insert new events in an empty, non-recorded Song. To insert an event, you must first insert some empty measures. To use the Insert function, press MENU and one of the F VOLUME/VALUE buttons, then press the PAGE+ button twice.
DELETE
Press the DELETE button to delete the event shown in the display.
PAGE 25 - EVENT FILTER
This page is where you can select the event types to be shown in the Event Edit page. You can access this page by pressing the PAGE+ button while in the Event Edit page.

text_image
chord tempo . 74 (300 Σ) measure 001 transpose C 0 octave Edit: Ev. Filter Note :Off AFtt :Off Prog :Off PAft :Off Ctrl :Off Bend :Off T/Meter:Off PaCtl: OffTurn On the filter for all event types you do not wish to see in the Event Edit page.
Note Notes.
Prog Program Change values.
Ctrl Control Change events.
T/Meter Tempo and Meter changes (Master Track only).
Aftt Mono (Channel) Aftertouch events.
PAft Poly Aftertouch events.
Bend Pitch Bend events.
PaCtl Controls exclusive of the microARRANGER, like the FX and Scale settings. These controls are recorded to the Master Track, and saved as System Exclusive data.
EVENT EDIT PROCEDURE
The Event Edit is the page where you can edit each single MIDI event of the selected track. You can, for example, replace a note with a different one, or change its playing strength. Here is the general event editing procedure.
-
While in the Main page of the Song mode, load the Song to edit (see "Main page" on page 88). If a Song is already loaded or just recorded, this step is not needed.
-
Press MENU, and use one of the H VOLUME/ VALUE buttons to select the Event Edit section. The Event Edit page appears (see "Page 24 - Event Edit" on page 102 for more information).

text_image
chord tempo J. 74 (MELT) measure 001 transpose C 0 octave Event Edit Trk: 1 Position: 001.01.000 ↑ Ev: Note G1 94 Length:000.00.110 ↓-
Press SEQ1 PLAY/STOP to listen to the Song. Press SEQ1 PLAY/STOP again to stop it.
-
Press PAGE+ to go to the Event Filter page, and turn "Off" the filter for the event types you wish to see in the display (see "Page 25 - Event Filter" on page 103 for more information).

text_image
chord tempo J. 74 measure 001 Transpose C 0 calavo Edit: Ev. Filter Note :Off AFtt :Off Prog :Off PAft :Off Ctrl :Off Bend :Off T/Meter:Off PaCtl : Off-
Press PAG E- to go back to the Event Edit page.
-
Press the A VOLUME/VALUE button (Trk), to select the track to edit. The Go To Track window appears.

Use the TEMPO/VALUE controls to select a track, and press ENTER to confirm (or EXIT to abort).
- The list of events contained in the selected track will appear in the display.
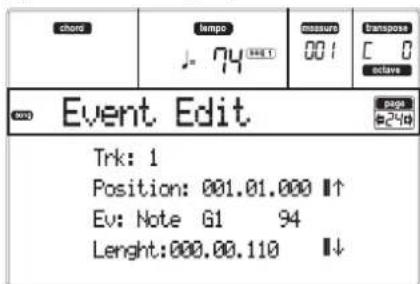
text_image
chord tempo J-74 measure 001 transpose C 0 ctave Event Edit Trk: 1 Position: 001.01.000 ↑ Ev: Note G1 94 Length:000.00.110 ↓For more information on the event types and their values, see "Page 24 - Event Edit" below.
- Use the B VOLUME/VALUE buttons to select the Position line. Use these buttons or the TEMPO/ VALUE controls to change the event's position.

text_image
Position :001.01.001 Measure Beat Tick- Use the C VOLUME/VALUE buttons to select the Event line. You may use the C VOLUME/VALUE buttons or the TEMPO/VALUE controls to change the event type. Use the G VOLUME/VALUE buttons, and the F-3 and F-4 function keys to respectively select the first and second value of the parameter. Use the G VOLUME/VALUE buttons or the TEMPO/VALUE controls to modify the selected value.

text_image
Ev: Note Event Type G1 First value 94 Second value- In the case of a Note event, use the D VOLUME/VALUE buttons to select the Length line, and use the same buttons, or the TEMPO/VALUE controls, to change the event's length.

text_image
Lenght: 000.00.000 Measure Beat Tick- After having modified the shown event, you may scroll to the next event with the H VOLUME/VALUE buttons (Scroll to next), or to the previous event with the E/F VOLUME/VALUE buttons (Scroll to previous).
- You may use the SHIFT + << or >> shortcut to go to a different measure (see "SHIFT + << or >>" on page 103)
- While the sequencer is running, you may use the SHIFT + PAUSE shortcut to move the current event in the display (see "SHIFT + PAUSE" on page 103).
- As described in step 3, you may press SEQ1 PLAY/STOP to listen to the Song, and press SEQ1 PLAY/STOP again to stop the sequencer.
-
Use the INSERT button to insert an event at the Position shown in the display (a Note event with default values will be inserted). Use the DELETE button to delete the event shown in the display.
-
When the editing is complete, you may select a different track (go to step 6).
-
When finished editing the whole Song, press EXIT to go back to the Main page of the Song mode, and select the Save Song command to save the Song the card. See "Save Song page" on page 90 for more information on saving a Song.
14. PROGRAM OPERATING MODE
The Program operating mode is where you can listen to individual Programs, and edit them.
To select a Program, see the "Basic operations" chapter. In this mode, the selected Program can always be played across the full keyboard range.
To automatically select the Program to be assigned to the last selected track, keep the SHIFT button pressed, and press the PROGRAM button.
Hint: This is useful to see the Bank Select/Program Change numbers when programming a Song on an external sequencer. Note: The Program uses the same Scale of the latest selected Performance or STS.
MAIN PAGE
Here is the main page of the Program operating mode.

text_image
Program icon tempo Page header Chord tempo transpose C 0 octave Grand Piano T:U1 Group:Piano MIDI CC 00: 121 OC 32: 3 PC: 0Program icon
When turned on, this icon shows that the instrument is in Program mode.
Page header
This line shows the selected Program name. Use the TEMPO/VALUE controls, or the PROGRAM/PERFORMANCE section to select a Program. (See "Selecting a Program" on page 25 for more information).
Tempo
This is the tempo of Sequencer 1. The Tempo is one of the AMSs (see "AMS (Alternate Modulation Source) list" on page 123). Use the SHIFT + DIAL combination to change it.
A (Group)
This non-editable parameter shows which group the Program is included into. A group is the equivalent of a PROGRAM/PERFORMANCE button.
B (CC00)
This non-editable parameter shows the value of the Control Change (CC) 00 message (or Bank Select MSB) for the selected Program.
C (CC32)
This non-editable parameter shows the value of the Control Change (CC) 32 message (a.k.a. Bank Select LSB) for the selected Program.
D (PC)
This non-editable parameter shows the value of the Program Change (PC) message for the selected Program. Values are in the standard 0–127 MIDI numbering format.
Note: Some manufacturers could use the 1–128 numbering system; when connecting your microARRANGER to an instrument of this kind, increment the PC value by 1 unit.
Effects
In Program mode, the Program uses its own effects instead of relying on A–D effects. Two effect processors (FX1 and FX2) are available.
The MIDI channel
In Program mode, microARRANGER receives and transmits on the same channel of the Upper 1 track. If the Global channel is assigned, notes can be received also on this channel. See "Page 6 - MIDI IN Channels" on page 127 and "Page 10 - MIDI OUT Channels" on page 129 for more information.
SOUND PROGRAMS AND DRUM PROGRAMS
microARRANGER features two different kinds of Programs:
- Sound Programs. These are normal instrument Programs, like pianos, strings, basses.
- Drum Programs. These are drum and percussion kits, where each note of the keyboard is a different percussive instrument. You can find Drum Programs in the DRUM KIT and USER DK banks.
Before pressing MENU to enter the edit environment, you should select a Program of the type you wish to edit or create.
Notes pointing to special Drum Program features are marked by the DRUM icon.
MENU
While in any other page of the Program operative mode, press MENU to open the Program edit menu. This menu gives access to the various Program edit sections.
When in the menu, select an edit section using the VOLUME/VALUE (A-G) buttons, select an edit page using PAGE +, or press EXIT to exit the menu.
When in an edit page, press EXIT to go back to the main page of the Program operating mode.
text_image
chord tempo . transpose C 0 octave Prog Edit MENU Basic Amp Samples LFOs Pitch Effects FilterEach item in this menu corresponds to an edit section. Each edit section groups various edit pages.
EDIT PAGE STRUCTURE
Select an edit section from the Menu, and/or use the PAGE buttons to reach the desired page.
Press EXIT to go back to the main page of the Program mode.
All edit pages share the same structure.
Program icon Page header Oscillator in edit Page number
text_image
chord tempo Transport C 0 October Samples Osc1 Selected: M5 Hi Bank/Num: L)AcousticPiano [H] Reverse: Osc1" ROM 0 No/N Parameters Parameters valueProgram icon
When switched on, this icon shows that the instrument is in Program mode.
Page header
The header shows the name of the current edit page.
Oscillator in edit
When in an edit page where selecting an oscillator is required, this area shows the selected oscillator. Use the F-1-F-4 buttons to select one of the four available oscillators.
Page number
This area shows the current page number.
Parameters
Select an edit parameter using the A–D VOLUME/VALUE buttons. You can scroll the parameter list using the E–F (Scroll Up) and G–H (Scroll Down) VOLUME/VALUE buttons.
Parameter value
Use the A-D VOLUME/VALUE buttons, or the TEMPO/VALUE controls, to change the parameter value.
THE COMPARE FUNCTION
While in edit, you can compare the current Program with its original values. You cannot edit the Program while you are in Compare mode.
- Keep the SHIFT button pressed, and press ENTER to enter the Compare function. The PROGRAM LED begins flashing. Play on the keyboard to listen to the original Program.
- P r eITFs+ ENTER S again to exit the Compare mode and return to the edited Program.
HOW TO SELECT OSCILLATORS
While in an edit page requiring an oscillator to be selected for editing, use the F-1–F-4 buttons to select one of the available oscillators.
ERASE PROGRAM/OSCILLATOR
You can initialize any parameter value, by using one of the following shortcuts:
- While in the Basic page, keep the SHIFT button pressed, and press the DELETE button to initialize the whole Program to a default status.
- While in an edit page where the "Osc" abbreviation appears in the upper right area of the display, keep the SHIFT button pressed, and press the DELETE button to initialize the currently selected oscillator to a default status
After you press the shortcut, the "Init osc?" message appears. Press ENTER to confirm, EXIT to abort.
THE 'WRITE' WINDOW
This page appears when you press the WRITE button. Here you can save the Program into a User Program location in memory.
text_image
chord temps = transpose C 0 activate PROG WRITE to: progrn Name: Grand Piano To: U1-01- Select a name and a location, then press ENTER to save the Program.
- The "Are you sure?" message appears. Press ENTER to confirm, or EXIT to abort.
Warning: If you write over an existing User Program, the Program will be deleted and replaced by the one you are saving ("overwrite"). Please save to card any Program you don't want to lose.
Name
Use this parameter to change the Program's name. Press the right A VOLUME/VALUE button to enter editing. Modify the name using the UP/DOWN buttons to move the cursor, and the DIAL to select a character. Press INSERT to insert a character at the cursor position, or DELETE to delete it
To (Location number)
Use the B VOLUME/VALUE buttons to select a different User Program location in memory. Otherwise, select this parameter and use the VOLUME/VALUE controls to select the location.
Note: You can't save over a Factory Program location.
PAGE 1 - BASIC
Here you can make basic settings for the Program, such as basic oscillator settings, the oscillator count, and the polyphonic mode.

text_image
chord tempo transpose C 0 oclave Basic program Oscillators: 21 Mode: Poly Single Trigger: No Legato: No↓Oscillators
Use this parameter to specify the basic Program type; whether it will use one or more oscillators (up to four).
DRUM Drum Programs use only one oscillator.
1...4 Number of oscillators the Program will use. The total amount of polyphony varies depending on the number of oscillators used by the Program (a maximum of 62 with only 1 oscillator, or a maximum of 15 with 4 oscillators).
Mode
This is the polyphonic mode of the Program.
Poly The Program will play polyphonically, allowing you play chords.
Mono The Program will play monophonically, producing only one note at a time.
Single Trigger
This parameter is available when the "Mode" parameter is set to Poly.
YesW then the same note is played repeatedly, the previous note will be silenced before the next note is sounded, so that the notes do not overlap.
No When the same note is played repeatedly, the previous note will not be silenced before the next note is sounded.
Legato
This parameter is available when the "Mode" parameter is set to Mono.
Yes Legato is on. When multiple note-on's occur, the first note-on will retrigger the sound, and the second and subsequent note-on's will not retrigger. When legato is on, multiple note-on's will not retrigger the voice. If one note is already on and another note is turned on, the first voice will continue sounding. The oscillator sound, envelope, and LFO will not be reset, and only the pitch of the oscillator will be updated. This setting effective for wind instrument sounds and analog synth-type sounds.
No Legato is off. Notes will always be retriggered when note-on occurs. When legato is off, multiple note-on's will retrigger the voice at each note-on. The
oscillator sound, envelope, and LFO will be reset (and retriggered) according to the settings of the Program.
Note: If "Legato" is On, certain multisamples or keyboard locations may produce an incorrect pitch.
Priority
This parameter is available when the "Mode" parameter is set to Mono. It specifies which note will be given priority to play when two or more notes are played simultaneously.
Low Lowest note will take priority.
High Highest note will take priority.
Last Last note will take priority.
PAGE 2 - SAMPLE (SOUND PROGRAMS)
The multisample(s) (waveform) on which the Program will be based can be selected here for each of the four oscillators. Each oscillator can use 1 or 2 multisamples, each one assigned to the High or Low layer.

text_image
chord temps - transpose C 0 octave Samples |Osc1 page Selected: Osc1# MS Hi Bank/Num: ROM L)AcousticPiano 0 [H] Reverse: No↓The internal Flash-ROM contains 340 different multisamples (preset multisamples).
Selected
Use this parameter to select an oscillator to put in edit. Alternatively, you can select oscillators using the F-1–F-4 buttons.
MS Hi/Lo Bank/Num
Use these parameters to select a different multisample for each of the High and Low layers. You can use velocity to switch between the two multisamples. Reverse, Offset and Level can be adjusted independently for the High and Low multisamples.
The first line shows the bank (ROM), while the second line is for selecting the multisample. The Program number appears at the end of the second line.
The multisample you select for the High layer will be triggered by velocities higher than the value of the "Velocity Switch" parameter (see page 108). If you do not wish to use velocity switching, set the switch to a value of 001, and select only the High multisample.
Note: Each multisample has an upper limit, and may not produce sound when played above that limit.
[H/L] Reverse
The multisample will be played in reverse. In the case of Flash-ROM multisamples that were originally specified to loop, the multisample will be played back in "one-shot" reverse mode. If the multisample was originally set to reverse, it will playback without change.
Yes The multisample will playback in reverse.
No The multisample will play back normally.
[H/L] Use Offset
These parameters specify the point where the multisample(s) will begin to play. For some multisamples this parameter will not be available.
| Yes | The sound will begin from the offset location pre-determined for each multisample. |
| No | The sound will start from the beginning of the multisample waveform. |
[H/L] Level
These parameters specify the level of each multisample.
0...127Multisample level.
Note: Depending on the multisample, high settings of this parameter may cause the sound to distort when a chord is played. If this occurs, lower the level.
Velocity Switch
This is the velocity value dividing the High and Low layers for the selected oscillator. Notes struck harder than this value will be played by the High multisample.
V-Zone Top/Bottom (Velocity Zone)
Here you can specify the velocity range for the selected oscillator.
Note: You cannot set the Bottom Velocity higher than the Top Velocity, nor the Top Velocity lower than the Bottom Velocity. 0...127 Assigned velocity.
Octave
Use this parameter to adjust the pitch of the selected oscillator in octave units. The normal octave of the multisample is "0".
-2...+1Octave transposition.
Transpose
Use this parameter to adjust the pitch of the selected oscillator in semitone steps over a range of ±1 octave.
-12...+12 Transposition in semitones.
Tune
Use this parameter to adjust the pitch of the sample in one-cent steps (a semitone is 100 cents) over a range of ±1 octave.
-1200...+1200
Fine-tune value in cents.
Delay (ms)
This parameter sets a delay time from the note-on to the real beginning of the sound. With a setting of KeyOff, the sound will begin when note-off occurs. This is useful to create sounds such as the "click" that is heard when a harpsichord note is released. In this case, set the "Sustain Level" parameter to 0 (see page 115).
Key Off The sound will begin when the note is released.
0...5000 Delay time in milliseconds.
PAGE 2 - DK SAMPLES (DRUM PROGRAMS)
This page appears when you edit a Drum Program. Here you can select a different percussive sample for each layer (High and Low) on each key.
text_image
chord tempo - transpose C 0 octave DK Samples page = 26 Key: C 21 Assigned: Yes MS Hi Bank/Num: ROM BD-SoftRoom 41↓Key
Key in edit. You can press a key on the keyboard to select a key.
Assigned
Use this parameter to turn the sample on/off.
Yes The sample is assigned to the selected key.
No The sample is not assigned. The sample assigned to the next highest assigned key is used instead.
MS Hi/Lo Bank/Num
Use these parameters to select a different multisample (drum kit) for each of the High and Low layers. For more information, see “MS Hi/Lo Bank/Num” on page 107.
[H/L] Level
These parameters specify the level of each multisample. For more information, see “[H/L] Level” on page 108.
[H/L] Transpose
These parameters transpose the selected multisample. Use them to change the pitch of the selected key.
0 No transposition applied.
-64...+63 Transpose value in semitones.
[H/L] Tune
Use these parameters to fine-tune the assigned sample.
0 No fine-tuning.
-99...+99 Fine-tuning value in cents (1/100 of a semitone).
[H/L] Reverse
The multisample will be played in reverse. For more information see “[H/L] Reverse” on page 107.
[H/L] Use Offset
These parameters specify the point where the multi-sample(s) will begin to play. For more information see "[H/L] Use Offset" on page 108.
[H/L] Cutoff
These parameters set the cutoff frequency for the filter applied to the selected sample.
[H/L] Resonance
These parameters set the resonance for the filter applied to the selected sample.
[H/L] Attack
These parameters are an offset to the selected sample's EG Attack.
[H/L] Decay
These parameters are an offset to the selected sample's EG Decay.
Velocity Switch
This is the velocity value dividing the High and Low layers for the selected sample/key. Notes stricken harder than this value will be played by the High multisample.
Single Trigger
Use this parameter to set the sample as a single-triggered one.
Yes When the same key (note) is played repeatedly, the previous note will be stopped before the new note is triggered, so that they will not overlap.
No When the same key (note) is played repeatedly, the previous note will not be stopped before the new note is triggered.
Receive Note On
Use this parameter to enable/disable the reception of the Note On (Key On) message.
Yes The Note On message is normally received.
No The Note On message is not received.
Therefore, the corresponding key is muted.
Receive Note Off
Use this parameter to enable/disable the reception of the Note Off (Key Off) message.
Yes The sound will stop as soon as you release the key.
No The sound will continue playing up to the end of the sample. The Note Off message is ignored.
Warning: If the "Single Trigger" parameter is set to No, and the sound is looped, the sound will y endlessly. In an "emergency" situation, use the Panic command (see "START/STOP" on page 14).
Exclusive Group
Exclusive Groups are sets of mutually exclusive keys, stopping each other. For example, if the Open Hi-Hat and Closed Hi-Hat are assigned the same Exclusive Group, playing an Open Hi-Hat will stop the Closed Hi-Hat playing.
None No Exclusive Group assigned. The selected key will not be stopped by any other key.
1...127 Exclusive Groups assigned to the selected key. When you play this key, all other keys assigned to the same Exclusive Group will be stopped, and this key will be stopped by other keys assigned to the same Exclusive Group.
Pan
This parameter sets the position in the stereo panorama of the selected key.
Send FX1
This parameter sets the FX1 send level for of the selected key.
Send FX2
This parameter sets the FX2 send level for of the selected key.
PAGE 3 - PITCH
Here you can make pitch settings for each oscillator. These settings specify how keyboard location will affect the pitch of each oscillator, and select the controllers that will affect the oscillator pitch and specify the depth of control. You can also specify the amount of pitch change produced by the Pitch EG and by LFO1 and LFO2, switch portamento on/off and specify how it will apply.

text_image
chord tempo transpose C 0 octave Pitch 10sc1 Selected: 0sc1# Slope: +1.0 Joystick +X: +2 Joystick -X: -2↓Selected
Use this parameter to select an oscillator to put in edit. Alternatively, you can select oscillators using the F-1–F-4 buttons.
Slope
Normally you will leave this parameter at +1.0. Positive (+) values will cause the pitch to rise as you play higher notes, and negative (−) values will cause the pitch to fall as you play higher notes.
With a value of 0, there will be no change in pitch, and the C4 pitch will sound regardless of the keyboard location you play.
The diagram shows how the Pitch Slope and pitch are related:

line
| Key | Pitch | | --- | --- | | C4 | 1oct | | C5 | 2oct | | 0 | 0 | | -1 | -1 |-1.0...+2.0 Pitch slope value.
JS (+X)
This parameter specifies how the pitch will change when the joystick is moved all the way to the right. A setting of 12 produces 1 octave of change.
For example if you set this to +12 and move the joystick all the way to the right, the pitch will rise one octave above the original pitch.
-60...+12 Maximum pitch change in semitones.
JS (-X)
This parameter specifies how the pitch will change when the joystick is moved all the way to the left. A setting of 12 produces 1 octave of change.
For example, if you set this to -60 and move the joystick all the way to the left, the pitch will fall five octaves below the original pitch. This can be used to simulate the downward swoops that a guitarist produces using the tremolo arm.
-60...+12 Maximum pitch change in semitones.
Pitch modulation
AMS (Alternate Modulation Source)
This parameter selects the source that will modulate the pitch of the selected oscillator. See “AMS (Alternate Modulation Source) list” on page 123.
Intensity
This parameter specifies the depth and direction of the effect produced by "AMS". With a setting of 0, no modulation will be applied. With a setting of 12.00, the pitch will change up to one octave.
For example, if you set "AMS" to Joystick +Y and push the joystick, the pitch will rise if this parameter is set to a positive (+) value, or fall if this parameter is set to a negative (−) value. The range is a maximum of one octave. -12.00...+12.00
Parameter value.
Pitch EG modulation
EG Intensity
This parameter specifies the depth and direction of the modulation that the pitch EG specified on "Page 6 - Pitch EG" will apply to the pitch. With a setting of 12.00, the pitch will change a maximum of ±1 octave. -12.00...+12.00
Paramet er value.
EG AMS (EG Alternate Modulation Source)
This parameter selects the source that will modulate the pitch EG of the selected oscillator. See “AMS (Alternate Modulation Source) list” on page 123).
Intensity (AMS Intensity)
This parameter specifies the depth and direction of the effect that "AMS" will have. For example, if you set "AMS" to Velocity and set this value to +12.00, the velocity will control the range of pitch change produced by the pitch EG in a range of ±1 octave. As you play more softly, the pitch change will draw closer to the pitch EG levels.
Pitch change (level)
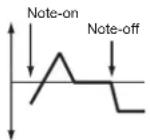
Softly played
(Intensity (Pitch EG) setting)

Strongly played with a positive (+) value

Strongly played with a negative (−) value
Note: "Intensity" (Pitch EG) and AMS will be added to determine the depth and direction of the pitch modulation applied by the pitch EG.
Portamento
Portamento
This parameter turns the portamento effect (smooth change in pitch from one note to the next) on/off, and specifies how it will be applied.
Note: Portamento will also be switched when CC#65 (Portamento SW) is received.
On Portamento will be applied.
Off Portamento will not be applied.
Portamento Time
This parameter sets the portamento time. Increasing the value will produce a slower change in pitch.
000...127 Portamento time in MIDI value.
PAGE 4 - PITCH LFO1
In this page you can set the LFO1 modulation parameters for the selected oscillator.
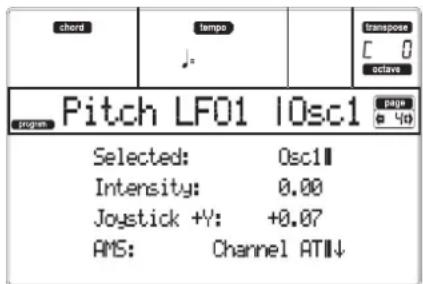
text_image
chord tempo transpose C 0 octave Pitch LF01 I0sc1 page Selected: Osc11 Intensity: 0.00 Joystick +Y: +0.07 AMS: Channel ATI↓Selected
Use this parameter to select an oscillator to put in edit. Alternatively, you can select oscillators using the F-1–F-4 buttons.
Intensity
This parameter specifies the depth and direction of the pitch modulation applied by the LFO1 settings you made on "Page 17 - LFO1". With a setting of 12.00, a maximum of ±1 octave of pitch modulation will be applied. Negative (−) values will invert the LFO waveform.
-12.00...+12.00
Intensity depth and direction.
JS+Y (JoyStick +Y)
This parameter specifies the depth and direction of the effect that joystick movement in the +Y direction (away from yourself) will have on the pitch modulation applied by the LFO1.
As this value is increased, moving the joystick in the +Y direction will cause the LFO1 to produce deeper pitch modulation. With a setting of 12.00 a maximum of ±1 octave of pitch modulation will be applied. Negative (−) values will invert the LFO waveform.
-12.00...+12.00
Joystick action depth.
Pitch LFO1 'Level' modulation
AMS (Alternate Modulation Source)
This parameter selects the source that will control the depth of pitch modulation produced by the LFO1. See "AMS (Alternate Modulation Source) list" on page 123.
Intensity
This parameter specifies the depth and direction of the effect that "AMS" will have. With a setting of 0, modulation will not be applied. With a setting of 12.00, the LFO1 will apply a maximum of ± 1 octave of pitch modulation. Negative (-) settings will invert the LFO waveform.
For example if "AMS" is set to Joystick +Y and push the joystick, a positive (+) setting of this parameter will cause the pitch modulation created by LFO1 to be applied with the normal phase, and a negative (−) setting will cause the LFO to be applied with inverted phase.
The "LFO1 Intensity", "JS+Y" and "AMS" settings will be added to determine the depth and direction of the pitch modulation applied by LFO1.
-12.00...+12.00
Parameter value.
PAGE 5 - PITCH LFO2
In this page you can set the LFO2 modulation parameters for the selected oscillator. See "Page 4 - Pitch LFO1" for information on the various parameters.

text_image
chord lamps . . . . . . . . . . . . . . . . . . . . . . . . . . . . . . . . . . . . . . . . . . . . . . . . . . . . . . . . . . . . . . . . . . . . . . . . . . . . . . . . . . . . . . . . . . . . . . . . . . . . . . . . . . . . . . . .00 + 0.07 - AMS: Channel ATINJPAGE 6 - PITCH EG
Here you can make settings for the pitch EG, which creates time-variant changes in the pitch of the oscillators. The depth of pitch change produced by these EG settings or the oscillators is adjusted by the "Intensity (AMS1/2 Intensity)" parameter (see page 111).
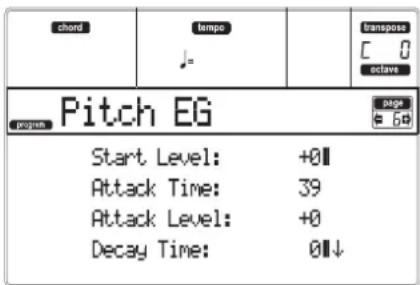
text_image
chord tempo - transpose C 0 oclave Pitch EG page 60 Start Level: +01 Attack Time: 39 Attack Level: +0 Decay Time: 0↓Pitch envelope
Time-varying pitch settings (when Pitch EG Intensity = +12.00)
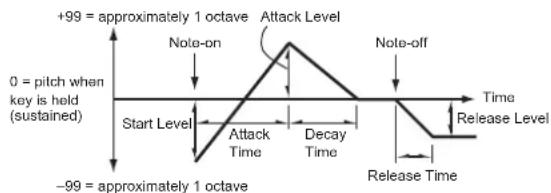
text_image
+99 = approximately 1 octave 0 = pitch when key is held (sustained) Nole-on Attack Level Start Level Attack Time Decay Time -99 = approximately 1 octave Nole-off Time Release Level Release TimeStart/Attack/Decay/Release Level
These parameters specify the amount of pitch change. The actual amount of pitch change will depend on the "Intensity (AMS1/2 Intensity)" parameter (see below). For example, with an "Intensity" setting of +12.00, a "Level" setting of +99 would raise the pitch one octave, and a "Level" setting of -99 would lower the pitch one octave.
-99...+99Parameter value.
Start Level
Specifies the amount of pitch change at note-on.
Attack Level
Specifies the amount of pitch change when the attack time has elapsed.
Release Level
Specifies the amount of pitch change when the release time has elapsed.
Attack/Decay/Release Time
These parameters specify the time over which the pitch change will occur.
0...99Parameter value.
Attack Time
Specifies the time over which the pitch will change from note-on until it reaches the pitch specified as the attack level.
Decay Time
Specifies the time over which the pitch will change after reaching the attack level until it reaches the normal pitch.
Release Time
Specifies the time over which the pitch will change from note-off until it reaches the pitch specified as the release level.
Pitch EG 'Level' modulation
Pitch EG change (level) (AMS=JS-Y/Velocity, Intensity= positive (+) value

A note played softly with Start Level Swing set at 0, Attack Level Swing set to +, the Joystick pulled on

A note played strongly with Start Level Swing set to 0, Attack Level Swing set to +, the Joystick pulled on

A note played strongly with Start Level Swing set to 0, Attack Level Swing set to -, the Joystick pulled on
AMS1/2 (L) (Alternate Modulation Source 1/2)
These parameters select the source that will control the pitch EG "Level" parameters ("AMS (Alternate Modulation Source) list" on page 123).
Intensity (AMS1/2 Intensity)
These parameters specify the depth and direction of the effect applied by "AMS1". With a setting of 0, the levels specified by "Start/Attack/Decay/Release Level" will be used.
For example if "AMS1" is Joystick +Y, pushing the joystick to turn it on will change the "Level" parameters of the Pitch EG. As the absolute value of "Intensity" is increased, the pitch EG levels will change more greatly when the joystick is released. The direction of the change is specified by "Start Level Swing" and "Attack Level Swing". When the key pressure is released, the pitch EG levels will return to their own settings.
If "AMS1" is set to Velocity, increasing the absolute value of "Intensity" will produce increasingly wider change in pitch EG levels for strongly-played notes. The direction of the change is specified by "Start Level Swing" and "A ck Level Swing". As you play more softly, the pitch change will draw closer to the pitch EG levels.
-99...+99Parameter value.
Start Level Swing
This parameter specifies the direction of change in "Start Level" caused by "AMS1/2". If "Intensity" is a positive (+) value, a setting of + will raise the EG level, and a setting of - will decrease it. With a setting of 0 there will be no change.
Attack Level Swing
This parameter specifies the direction of change in "Attack Level" caused by "AMS1/2". If "Intensity" is a positive (+) value, a setting of + will raise the EG level, and a setting of - will decrease it. With a setting of 0 there will be no change.
Pitch EG 'Time' modulation
Pitch EG changes (Time) (AMS = Velocity, Intensity = positive (+) value)
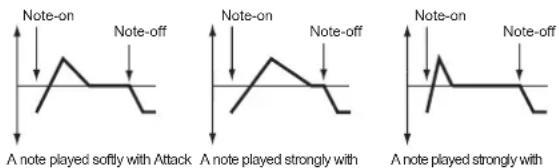
text_image
Note-on Note-off A note played softly with Attack Note-on Note-off A note played strongly with Note-on Note-off A note played strongly withAMS(T) (Alternate Modulation Source)
This parameter selects the source that will control the "Time" parameters of the pitch EG (see "AMS (Alternate Modulation Source) list" on page 123).
Intensity (AMS(T) Intensity)
This parameter specifies the depth and direction of the effect that "AMS" will have on the "Time" parameters. With a setting of 0, the pitch EG times will be just as specified by the "Attack/Decay/Release Time" settings.
The alternate modulation value at the moment that the EG reaches each point will determine the actual value of the EG time that comes next.
For example, the decay time will be determined by the alternate modulation value at the moment that the attack level is reached.
When this parameter is set to values of 16, 33, 49, 66, 82, or 99, the specified EG times will speed up as much as 2, 4, 8, 16, 32, or 64 times respectively (or slowed down to 1/2, 1/4, 1/8, 1/16, 1/32, or 1/64 of the original time).
For example if "AMS" is set to Velocity, increasing the absolute value of "Intensity" will allow strongly-played notes to increase the changes in pitch EG "Time" values. The direction of the change is specified by "Attack Time Swing" and "Decay Time Swing". As you play more softly, the pitch EG times will more closely approach the actual settings of the pitch EG.
-99...+99 Parameter value.
Attack Time Swing
This parameter specifies the direction in which "AMS" will affect the "Attack Time" parameter. With positive (+) values of "Intensity", a setting of + will cause the time to be lengthened, and a setting of - will cause the time to be shortened. With a setting of 0 there will be no change.
Decay Time Swing
Specify the direction in which "AMS" will affect the "Decay Time". With positive (+) values of "Intensity", a setting of + will cause the time to be lengthened, and a setting of - will cause the time to be shortened. With a setting of 0 there will be no change.
PAGE 7 - FILTER
Here you can make settings for the filters that will be used by the oscillators. You can select either a 24 dB/octave low pass filter with resonance, or a series connection of a 12 dB/octave low pass filter and a 12 dB/octave high pass filter.

text_image
chord temps Transpose C 0 octave Filter 10sc1 Selected: Osc11 Type: LPF Resonant Trim: 99 Frequency A: 71↓Selected
Use this parameter to select an oscillator to put in edit. Alternatively, you can select oscillators using the F-1–F-4 buttons.
Filter Type
This parameter selects the type of filter (Low Pass Resonant, Low Pass & High Pass) for the selected oscillator. When the Low Pass & High Pass filter type is selected, the filter B will be activated.
Low Pass Resonance: 24 dB/octave low pass filter with resonance
Low Pass & High Pass: 12 dB/octave low pass filter and 12 dB/octave high pass filter in series
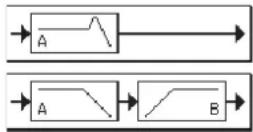
Trim
Use this parameter to adjust the level at which the audio signal output from the selected oscillator is input to filter A.
Note: If this value is raised, the sound may distort if Resonance is set to a high value or when you play a chord.
00...99 Trim level.
Frequency A (Cutoff Frequency A)
This parameter specifies the cutoff frequency of filter A.

line
| Frequency | Level | | --------- | ----- | | Low Pass | 12dB/oct | | High | 24dB/oct |This is a filter that cuts the high-frequency region above the cutoff frequency. This is the most common type of filter, and is used to cut part of the overtone components, making an originally bright timbre sound more mellow (darker). When the "Filter Type" is Low Pass Resonance, the cutoff will have a steeper slope.
00...99 Cutoff frequency value.
Resonance A
The resonance emphasizes the overtone components that lie in the region of the cutoff frequency specified by "Frequency", producing a more distinctive sound. Increasing this value will produce a stronger effect.
00...99 Resonance value.
Resonance modulation

line
| Low Pass Level | High Resonance Value | | -------------- | -------------------- | | 0 | 0 | | 1 | Low | | 2 | High | | 3 | Low | | 4 | High | | 5 | Low |AMS (Alternate Modulation Source)
Selects the source that will control the "Resonance" level. See "AMS (Alternate Modulation Source) list" on page 123.
Intensity (AMS Intensity)
This parameter specifies the depth and direction of the effect that "AMS (Alternate Modulation Source)" will have on the resonance level specified by "Resonance A".
For example if Velocity has been selected, changes in keyboard velocity will affect the resonance.
With positive (+) values, the resonance will increase as you play more strongly, and as you play more softly the resonance will approach the level specified by the "Resonance" setting.
With negative (−) values, the resonance will decrease as you play more strongly, and as you play more softly the resonance will approach the level specified by the "Resonance" setting.
The resonance level is determined by adding the "Resonance" and "Intensity (AMS Intensity)" values. -99...+99Parameter value.
Filter B
Frequency B (Cutoff Frequency B)
This parameter specifies the cutoff frequency of filter B. This parameter will be displayed when "Filter Type" is set to Low Pass & High Pass.
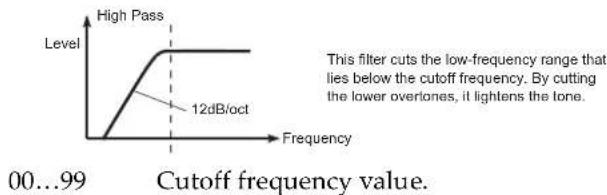
line
| Frequency Range | Cutoff Value | | --------------- | ------------ | | 0 | 0 | | 12dB/oct | High Pass |PAGE 8 - FILTER MODULATION
These settings let you apply modulation to the cutoff frequency ("Frequency") of the filter for the selected oscillator to modify the tone.

text_image
chord tempo . . Transport C 0 ocaves Filter Mod |Osc1 Selected: Osc1|| Tracking Low: B 3 Tracking High: F 5 Ramp Low: +48↓When "Filter Type" is Low Pass Resonance, parameters for filter B will not be editable (greyed out).
Selected
Use this parameter to select an oscillator to put in edit. Alternatively, you can select oscillators using the F-1–F-4 buttons.
Filter keyboard tracking
Tracking Low/High
These settings specify keyboard tracking for the cutoff frequency of the filter for the selected oscillator. The way in which the cutoff frequency is affected by the keyboard location you play can be specified by the "Tracking Low", "Tracking High", "Ramp Low" and "Ramp High" parameters.
C-1...G9L lowest/Highest note in the range.
Tracking Low
Keyboard tracking will apply to the range below the specified note number.
Tracking High
Keyboard tracking will apply to the range above the specified note number.
Ramp
This parameter specifies the angle of keyboard tracking. -99...+99Angle value.
Here is how cutoff frequency is affected by keyboard location and the Ramp setting ("Intensity to A" and "Intensity to B" = +50):

line
| Low Ramp | High Ramp | | -------- | --------- | | +99 | +99 | | +43 | +62 | | 0 | 0 | | -43 | -43 | | -99 | -99 |Ramp Low
Ramp High
If "Intensity to A" and "Intensity to B" are set to +50, "Ramp Low" is set to -62 and "Ramp High" is set to +62, the angle of the change in cutoff frequency will correspond to the keyboard location (pitch). This means that the oscillation that occurs when you increase the "Resonance A" will correspond to the keyboard location.
If you set "Ramp Low" to +43 and "Ramp High" to -43, the cutoff frequency will not be affected by keyboard location. Use this setting when you do not want the cutoff frequency to change for each note.
Tracking to A/B
These parameters specify the note numbers at which keyboard tracking will begin to apply, and set the "Intensity to A" and "Intensity to B" parameters to specify the depth and direction of the change applied to filters A and B.
For the range of notes between "Key Low" and "Key High", the cutoff frequency will change according to the keyboard location (pitch).
-99...+99Parameter value.
Filter EG modulation
Changes in cutoff frequency
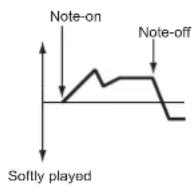
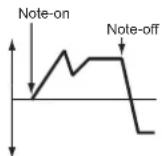
Strongly played Setting to +
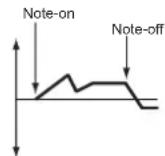
Strongly played Setting to –
Velocity to A
This parameter specifies the depth and direction of the effect that velocity will have on the time-varying changes created by the filter EG (as set on "Page 11 - Filter EG") to control the filter A cutoff frequency.
With positive (+) values, playing more strongly will cause the filter EG to produce greater changes in cutoff frequency. With negative (−) values, playing more strongly will also cause the filter EG to produce greater changes in cutoff frequency, but with the polarity of the EG inverted.
99...+99 Value of the Velocity to A parameter.
Velocity to B
This parameter specifies the depth and direction of the effect that velocity will have on the time-varying changes created by the filter EG to control the filter B cutoff frequency (see "Velocity to A").
99...+99 Value of the Velocity to B parameter.
EG Intensity to A
Specifies the depth and direction of the effect that the time-varying changes created by the filter 1 EG will have on the filter A cutoff frequency.
With positive (+) settings, the sound will become brighter when the EG levels set by Filter EG "Level" and "Time" parameters are in the "+" area, and darker when they are in the "-" area.
With negative (−) settings, the sound will become darker when the EG levels set by Filter EG "Level" and "Time" parameters are in the "+" area, and brighter when they are in the "-" area.
-99...+99Parameter value.
EG Intensity to B
Specifies the depth and direction of the effect that the time-varying changes created by the filter EG will have on the filter B cutoff frequency (see "EG Intensity to A").
-99...+99Parameter value.
EG AMS (Alternate Modulation Source)
Selects the source that will control the depth and direction of the effect that the time-varying changes produced by the filter EG will have on the cutoff frequency of filters A and B. See "AMS (Alternate Modulation Source) list" on page 123.
Intensity to A
Specifies the depth and direction of the effect that "AMS" will have on filter A. For details on how this will apply, refer to "EG Intensity to A".
Intensity to B
Specifies the depth and direction of the effect that "AMS" will have on filter B. For details on how this will apply, refer to "EG Intensity to A".
Note: The sum of the settings for "Velocity to A/B", "Intensity to A/B", and "(AMS) Intensity to A/B" will determine the depth and direction of the effect produced by the filter EG.
Filter A/B modulation
AMS1(fA/B) (Alternate Modulation Source1 for filter A/B)
Selects the source that will control modulation of the filter A cutoff frequency. See “AMS (Alternate Modulation Source) list” on page 123.
Note: The filter B parameters will be displayed when "Filter Type" on page 112 is Low Pass & High Pass.
Intensity
Specifies the depth and direction of the effect that "AMS1" will have.
When "AMS1" is JS X, a positive (+) value for this parameter will cause the cutoff frequency to rise when the joystick is moved toward the right, and fall when the joystick is moved toward the left. With a negative (−) value for this parameter, the opposite will occur.
This value is added to the setting of the Filter A "Frequency".
AMS2 (Alternate Modulation Source2)
Selects the source that will control modulation of the filter A cutoff frequency (see "AMS (Alternate Modulation Source) list" on page 123).
Intensity
Specifies the depth and direction of the effect that the selected source will have (see "Intensity" on page 114).
PAGE 9 - FILTER LFO1
Here you can use the filter LFO to apply cyclic modulation to the cutoff frequency of the filter (for the selected oscillator) to create cyclical changes in tone.

text_image
shord tempo J- transpose C 0 activate Filter LF0110sc1 page e 50 Selected: Osc11 Intensity to A: +0 Intensity to B: +0 Joystick -Y to A: +5↓Selected
Use this parameter to select an oscillator to put in edit. Alternatively, you can select oscillators using the F-1–F-4 buttons.
Intensity to A
Specifies the depth and direction of the modulation that LFO1 (set on "Page 17 - LFO1") will have on the cutoff frequency of filter A. Negative (-) settings will invert the phase.
-99...+99Parameter value.
Intensity to B
Specify the depth and direction of the modulation that LFO1 will have on the cutoff frequency of filter B (see "Intensity to A").
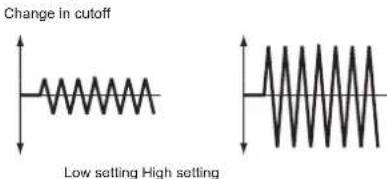
text_image
Change in cutoff Low setting High setting-99...+99Parameter value.
Joystick -Y to A
By moving the joystick in the Y direction (toward yourself), you can control the depth at which LFO1 modulates the cutoff frequency of filter A. This parameter specifies the depth and direction of the control.
Higher settings of this parameter will produce greater increases in the effect of LFO1 on the filter when the joystick is moved toward yourself.
-99...+99Parameter value.
Joystick -Y to B
By moving the joystick in the Y direction (toward yourself), you can control the depth at which LFO1 modulates the cutoff frequency of filter B. This parameter specifies the depth and direction of the control (see "Joystick -Y to A").
Filter LFO1 modulation
AMS (Alternate Modulation Source)
Select a source that will control the depth and direction of cutoff frequency change for both filters A and B. See "AMS (Alternate Modulation Source) list".
Intensity to A
Specifies the depth and direction of the effect that "AMS" will have on filter A.
For example if "AMS" is Joystick +Y, higher settings of this parameter will allow greater change to be applied to LFO1 when you push the joystick.
-99...+99Parameter value.
Intensity to B
Specifies the depth and direction of the effect that "AMS" will have on filter B (see "Intensity to A").
PAGE 10 - FILTER LFO2
Adjusts the depth of the cyclic modulation applied by LFO2 (set on "Page 18 - LFO2") to the cutoff frequency of filters A and B. For more information on the parameters see "Page 9 - Filter LFO1" on page 114.

text_image
chord lamps - Transport C 0 active Filter LF0210sc1 Selected: Osc11 Intensity to A: +0 Intensity to B: +0 Joystick -Y to A: +5↓PAGE 11 - FILTER EG
Here you can make settings for the EG that will produce time-varying changes in the cutoff frequency of filters A and B for the selected oscillator. The depth of the effect that these settings will have on the filter cutoff frequency is determined by the "Velocity" and "Intensity" parameters.
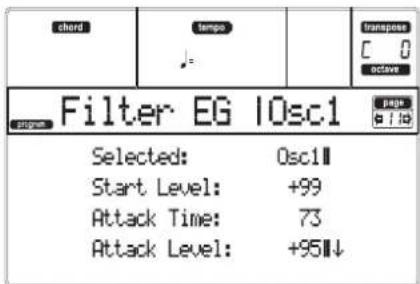
text_image
chord tempo Transpose C 0 octave Filter EG 10sc1 Selected: 0sc1# Start Level: +99 Attack Time: 73 Attack Level: +95↓Selected
Use this parameter to select an oscillator to put in edit. Alternatively, you can select oscillators using the F-1-F-4 buttons.
Filter envelope

flowchart
graph LR
    A["Start Level"] --> B["Attack Time"]
    B --> C["Decay Time"]
    C --> D["Slope Time"]
    D --> E["Release Time"]
    E --> F["Break Point Level"]
    F --> G["Sustain Level"]
    G --> H["Note-off"]
    H --> I["Release Level"]
    I --> J["End"]
    style A fill:#f9f,stroke:#333
    style B fill:#f9f,stroke:#333
    style C fill:#f9f,stroke:#333
    style D fill:#f9f,stroke:#333
    style E fill:#f9f,stroke:#333
    style F fill:#f9f,stroke:#333
    style G fill:#f9f,stroke:#333
    style H fill:#f9f,stroke:#333
    style I fill:#f9f,stroke:#333
    style J fill:#f9f,stroke:#333
Start/Attack/Break/Sustain/Release Level
These are the envelope segment levels. The result will depend on the filter that was selected in "Filter Type". For example, with the Low Pass Resonance filter, positive (+) values of EG Intensity will cause the tone to be brightened by positive (+) levels, and darkened by negative (−) levels. -99...+99Level value.
Start Level
This parameter specifies the change in cutoff frequency at the time of note-on.
Attack Level
This parameter specifies the change in cutoff frequency after the attack time has elapsed.
Break Point Level
This parameter specifies the change in cutoff frequency after the decay time has elapsed.
Sustain Level
This parameter specifies the change in cutoff frequency that will be maintained from after the slope time has elapsed until note-off occurs.
Release Level
This parameter specifies the change in cutoff frequency that will occur when the release time has elapsed.
Attack/Decay/Slope/Release Time
These parameters specify the time over which the filter change will occur.
0...99Time value.
Attack Time
This parameter specifies the time over which the level will change from note-on until the attack level is reached.
Decay Time
This parameter specifies the time over which the level will change from the attack level to the break point level.
Slope Time
This parameter specifies the time over which the level will change after the decay time has elapsed until the sustain level is reached.
Release Time
This parameter specifies the time over which the level will change after note-on occurs until the release level is reached.
Filter EG 'Level' modulation
Filter 1 EG changes (level) (AMS = Velocity, Intensity = a positive (+) value)
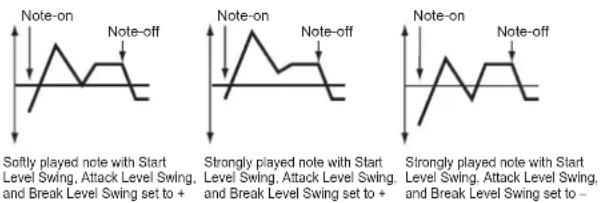
Softly played note with Start Level Swing, Attack Level Swing and Break Level Swing set to +
Strongly played note with Start Level Swing, Attack Level Swing and Break Level Swing set to +
Strongly played note with Start Level Swing, Attack Level Swing, and Break Level Swing set to –
AMS(L) (Alternate Modulation Source)
This parameter selects the source that will control the "Level" parameters of the filter EG ("AMS (Alternate Modulation Source) list" on page 123).
Intensity (AMS Intensity)
This parameter specifies the depth and direction of the effect applied by "AMS". With a setting of 0, the levels specified by "Frequency A (Cutoff Frequency A)" will be used. For example, if "AMS" is Velocity, and you set "Start Level Swing", "Attack Level Swing" and "Break Level Swing" to + and set "Intensity" to a positive (+) value, the EG levels will rise as you play more strongly. If "Intensity" is set to a negative (-) values, the EG levels will fall as you play more strongly.
-99...+99Intensity value.
Start Level Swing
This parameter specifies the direction in which "AMS" will affect "Start Level". When "Intensity" has a positive (+) value, a setting of + for this parameter will allow "AMS" to raise the EG level, and a setting of - will allow "AMS" to lower the EG level. With a setting of 0 there will be no change.
Attack Level Swing
This parameter specifies the direction in which "AMS" will affect "Attack Level". When "Intensity" has a positive (+) value, a setting of + for this parameter will allow "AMS" to raise the EG level, and a setting of - will allow "AMS" to lower the EG level. With a setting of 0 there will be no change.
Break Level Swing
This parameter specifies the direction in which "AMS" will affect "Break Point Level". When "Intensity" has a positive (+) value, a setting of + for this parameter will allow "AMS" to raise the EG level, and a setting of - will allow "AMS" to lower the EG level. With a setting of 0 there will be no change.
Filter EG 'Time' modulation
Filter 1 EG changes (Time) (AMS = Velocity, Intensity = a positive (+) value)

Softly played note with Attack, Decay, Slope and Release Level Swings set to +
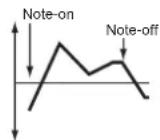
Strongly played note with Attack, Decay, Slope and Release Level Swings set to +
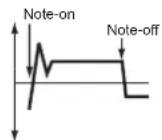
Strongly played note with Attack, Decay, Slope and Release Level Swings set to —
AMS1/2(T)
Use this parameter to select the source that will control the "Time" parameters of the filter EG. See "AMS (Alternate Modulation Source) list" on page 123.
Intensity
This parameter specifies the depth and direction of the effect that "AMS1/2(T)" will have.
For example, if "AMS1/2(T)" is set to FltKTr +/+, the EG "Time" parameters will be controlled by the Keyboard Tracking settings. With positive (+) values of this parameter, positive (+) values of "Ramp" will lengthen the EG times, and negative (−) values of "Ramp" will shorten the EG times. The direction of change is specified by "Attack Time Swing", "Decay Time Swing", "Slope Time Swing", and "Release Time Swing".
With a setting of 0, the times specified by "Frequency A (Cutoff Frequency A)" will be used.
If “AMS1(2)” is set to Velocity, positive (+) values of this parameter will cause EG times to lengthen as you play more strongly, and negative (−) values will cause EG times to shorten as you play more strongly. -99...+99Intensity value.
Attack Time Swing
This parameter specifies the direction in which "AMS1/2(T)" will affect the attack time. With positive (+) values of "Intensity", setting this parameter to + will allow AMS to lengthen the time, and setting this parameter to – will allow AMS to shorten the time. With a setting of 0 there will be no change.
Decay Time Swing
This parameter specifies the direction in which "AMS1/2(T)" will affect the decay time. With positive (+) values of "Intensity", setting this parameter to + will allow AMS to lengthen the time, and setting this parameter to – will allow AMS to shorten the time. With a setting of 0 there will be no change.
Slope Time Swing
This parameter specifies the direction in which "AMS1/2(T)" will affect the slope time. With positive (+) values of "Intensity", setting this parameter to + will allow AMS to lengthen the time, and setting this parameter to – will allow AMS to shorten the time. With a setting of 0 there will be no change.
Release Time Swing
This parameter specifies the direction in which "AMS1/2(T)" will affect the release time. With positive (+) values of "Intensity", setting this parameter to + will allow AMS to lengthen the time, and setting this parameter to – will allow AMS to shorten the time. With a setting of 0 there will be no change.
PAGE 12 - AMP
These parameters control the volume and pan of the selected oscillator.

text_image
chord tempo transpose C 0 octave Amp 10sc1 Selected: Osc11 Level: 120 Pan: L001 AMS: Note Number↓Selected
Use this parameter to select an oscillator to put in edit. Alternatively, you can select oscillators using the F-1–F-4 buttons.
Level
Volume of the selected oscillator.
Note: The volume of a Program can be controlled by CC#7 (volume) and #11 (expression). The resulting level is determined by multiplying the values of CC#7 and #11. The Global MIDI channel is used for control.
0...127Volume level.
Pan
Pan (stereo position) of the selected oscillator.

This parameter is not available when editing a Drum Program. Use individual Pan control for each key (see "Pan" on page 109).
Random The sound will be heard from a different location at each note-on.
L001 Places the sound at far left.
C064 Places the sound in the center.
R127 Places the sound to far right.
Note: This can be controlled by CC#10 (panpot). A CC#10 value of 0 or 1 will place the sound at the far left, a value of 64 will place the sound at the location specified by the "Pan" setting for each oscillator, and a value of 127 will place the sound at the far right. This is controlled on the global MIDI channel.
Pan modulation
AMS (Alternate Modulation Source)
Selects the source that will modify pan (see "AMS (Alternate Modulation Source) list" on page 123). This change will be relative to the "Pan" setting.
Intensity
Specifies the depth of the effect produced by "AMS". For example, if "Pan" is set to C064 and "AMS" is Note Number, positive (+) values of this parameter will cause the sound to move toward the right as the note numbers increase beyond the C4 note (i.e., as you play higher), and toward the left as the note numbers decrease (i.e., as you play lower). Negative (−) values of this parameter will have the opposite effect.
-99...+99 Parameter value.
PAGE 13 - AMP MODULATION
These settings allow you to apply modulation to amp (for each oscillator) to modulate the volume.
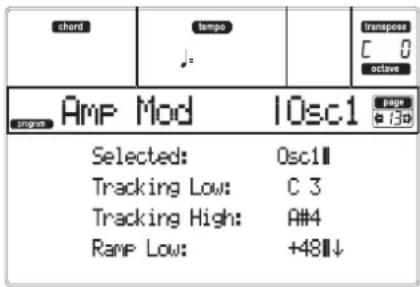
text_image
chord tempo J: amp Mod 10sc1 Selected: Osc1 Tracking Low: C 3 Tracking High: A#4 Ramp Low: +48↓Selected
Use this parameter to select an oscillator to put in edit. Alternatively, you can select oscillators using the F-1–F-4 buttons.
Amplifier keyboard tracking
These parameters let you use keyboard tracking to adjust the volume of the selected oscillator. Use the "Key" and "Ramp" parameters to specify how the volume will be affected by the keyboard location that you play.
Tracking Low/High
These settings specify the note number at which keyboard tracking will begin to apply. The volume will not change between "Tracking Low" and "Tracking High".
C-1...G9 Lowest/Highest note in the range.
Tracking Low
Keyboard tracking will apply to the range below the specified note number.
Tracking High
Keyboard tracking will apply to the range above the specified note number.
Ramp
These parameters specify the angle of keyboard tracking.
-99...+99 Angle value.
Here is an example of volume changes produced by keyboard location and "Ramp" settings:

line
| Key | Volume | |---|---| | Ramp Low=+99 | 1 | | Ramp Low=0 | 0 | | Ramp Low=-99 | -1 | | Ramp High=+99 | 2 | | Ramp High=0 | 0 | | Ramp High=-99 | -1 | | Key Low | 0 | | Key High | 0 |Ramp Low
With positive (+) values of this parameter, the volume will increase as you play notes below the “Tracking Low” note number. With negative (−) values, the volume will decrease.
Ramp High
With positive (+) values of this parameter, the volume will increase as you play notes above the "Key High" note number. With negative (−) values, the volume will decrease.
Amplifier Modulation
These parameters specify how the volume of the selected oscillator will be affected by velocity.
Velocity Intensity
With positive (+) values, the volume will increase as you play more strongly. With negative (−) values, the volume will decrease as you play more strongly.

line
| Condition | Volume Change | | -------------- | ------------- | | Softly played | Low | | Strongly played| High |-99...+99Intensity value.
EG AMS (Alternate Modulation Source)
Selects the source that will control the volume of the amp for the selected oscillator (See "AMS (Alternate Modulation Source) list" on page 123). "Velocity" cannot be selected.
Intensity
This parameter specifies the depth and direction of the effect that "AMS" will have. The actual volume will be determined by multiplying the value of the changes produced by the amp EG with the values of Alternate Modulation etc., and if the levels of the amp EG are low, the modulation applied by Alternate Modulation will also be less.
For example, if "AMS" is set to Joystick +Y, positive (+) values of this parameter will cause the volume to increase when you push the joystick. However if the EG settings etc. have already raised the volume to its maximum level, the volume cannot be increased further.
With negative (−) values of this parameter, the volume will decrease when the joystick is pushed.
-99...+99Intensity value.
PAGE 14 - AMP LFO1
These parameters let you use "LFO1" (see "Page 17 - LFO1" on page 120) and "LFO 2" (see "Page 18 - LFO2" on page 122) to control the volume of the selected oscillator.

text_image
short tempo Transpose C 0 active Amp LF01 I0sc1 Selected: Osc1Ⅱ Intensity: +0 AMS: Joystick -Y Intensity: +0ⅡSelected
Use this parameter to select an oscillator to put in edit. Alternatively, you can select oscillators using the F-1-F-4 buttons.
Intensity
This parameter specifies the depth and direction of the effect that "LFO1" will have on the volume of the selected oscillator. Negative (−) values will invert the LFO waveform.
-99...+99Intensity value.
Amplifier LFO1 modulation
AMS (Alternate Modulation Source)
Use this parameter to select a source that will control the depth by which "LFO1" will modulate the volume of the selected oscillator. See "AMS (Alternate Modulation Source) list" on page 123.
Intensity
As the absolute value of this setting is increased, the effect of "AMS" on "LFO1" will increase. Negative (−) values will invert the LFO waveform.
-99...+99Intensity value.
PAGE 15 - AMP LFO2
These parameters let you use "LFO1" (see "Page 17 - LFO1" on page 120) and "LFO 2" (see "Page 18 - LFO2" on page 122) to control the selected oscillator volume. See "Page 14 - Amp LFO1" for more information on parameter's editing.
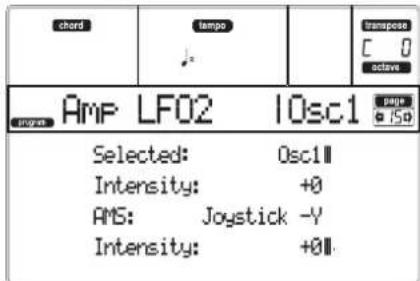
text_image
chord lamps . Transpose C 0 active Amp LF02 10sc1 page 150 Selected: Osc11 Intensity: +0 AMS: Joystick -V Intensity: +01.PAGE 16 - AMP EG
These parameters let you create time-varying changes in the volume of the selected oscillator.
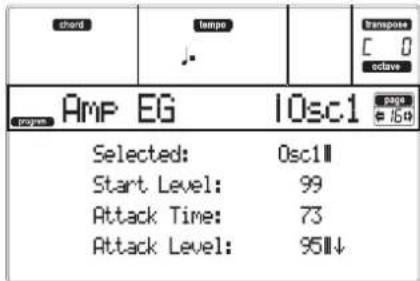
text_image
chord tempo . Transport C 0 ctave Amp EG 10sc1 Selected: 0sc1 Start Level: 99 Attack Time: 73 Attack Level: 95↓Selected
Use this parameter to select an oscillator to put in edit. Alternatively, you can select oscillators using the F-1-F-4 buttons.
Amp envelope

flowchart
graph TD
    A["Start Level"] --> B["Attack Time"]
    B --> C["Decay Time"]
    C --> D["Slope Time"]
    D --> E["Sustain Level"]
    E --> F["Release Time"]
    F --> G["Note-off"]
    G --> H["Attack Level"]
    H --> I["Break Point"]
    I --> J["Note-on"]
    style A fill:#f9f,stroke:#333
    style G fill:#f9f,stroke:#333
    style H fill:#ccf,stroke:#333
    style I fill:#cfc,stroke:#333
    style J fill:#fcc,stroke:#333
Start/Attack/Break/Sustain/Release Level
These parameters are the level of the envelope segment. 0...99Level value.
Start Level
This parameter specifies the volume level at note-on. If you want the note to begin at a loud level, set this to a high value.
Attack Level
This parameter specifies the volume level that will be reached after the attack time has elapsed.
Break Level
This parameter specifies the volume level that will be reached after the decay time has elapsed.
Sustain Level
This parameter specifies the volume level that will be maintained from after the slope time has elapsed until note-off occurs.
Attack/Decay/Slope/Release Time
These parameters specify the time over which the volume change will occur.
0...99Time valu e.
Attack Time
This parameter specifies the time over which the volume will change after note-on until it reaches the attack level. If the start level is 0, this will be the rise time of the sound.
Decay Time
This parameter specifies the time over which the volume will change from when it reaches the attack level until it reaches the break point level.
Slope Time
This parameter specifies the time over which the volume will change from when it reaches the break point level until it reaches the sustain level.
Release Time
This parameter specifies the time over which the volume will change after note-off until it reaches 0.
Amp EG 'Level' modulation
Amp 1 EG changes (Level) (AMS=Velocity, Intensity = a positive (+) value)

Softly played note when Start Level Swing=0 and Attack Level Swing and Breack Level Swing are set to +

Strongly played note when Start Level Swing=0 and Attack Level Swing and Break Level Swing are set to +

Strongly played note when Start Level Swing=0 and Attack Level Swing and Breack Level Swing are set to +
AMS(L) (Alternate Modulation Source)
This parameter specifies the source that will control the "Level" parameters of the amp EG. See "AMS (Alternate Modulation Source) list" on page 123.
Intensity
This parameter specifies the depth and direction of the effect that "AMS" will have. For example, if "AMS" is Velocity, setting "Start Level Swing", "Attack Level Swing" and "Break Point Level Swing" to + and setting "Intensity" to a positive (+) value will cause the amp EG volume levels to increase as you play more strongly. Setting "Intensity" to a negative (−) values will cause the amp EG volume levels to decrease as you play more strongly. With a setting of 0, the levels will be as specified on "Page 16 - Amp EG".
-99...+99Intensity value.
Start Level Swing
This parameter specifies the direction in which "AMS" will change "Start Level". If "Intensity" is set to a positive (+) wal setting this parameter to + will allow AMS to increase the EG level, and setting this parameter to – will allow AMS to decrease the EG level. With a setting of 0, no change will occur.
Attack Level Swing
This parameter specifies the direction in which "AMS" will change "Attack Level". If "Intensity" is set to a positive +value , setting this parameter to + will allow AMS to increase the EG level, and setting this parameter to – will allow AMS to decrease the EG level. With a setting of 0, no change will occur.
Break Point Level Swing
This parameter specifies the direction in which "AMS" will change "Break Level". If "Intensity" is set to a positive (+) value, setting this parameter to + will allow AMS to increase the EG level, and setting this parameter to – will allow AMS to decrease the EG level. With a setting of 0, no change will occur.
Amp EG 'Time' modulation
These parameters let you use an alternate modulation source to modify the amp EG times that were specified in "Attack/Decay/Slope/Release Time" on page 119.
Amp 1 EG changes (Time)
(AMS=Amp KTrk +/+, Intensity = a positive (+) value)
(When Amp Keyboard Track "Low Ramp" = a positive (+) value, and
"High Ramp" = a positive (+) value
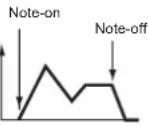

Low-pitched note played with Attack, Decay, Slope, and Release Time Swing at +
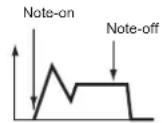
High -pilched note played with Attack, Decay, Slope, and Release Time Swing at –
Amp 1 EG changes (Time) (AMS=Velocity, Intensity= a positive (+) value)
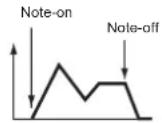
Softly played note with Attack, Decay, Slope and Release Time Swing at +
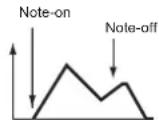
Strongly played note with Attack, Decay, Slope and Release Time Swing at +
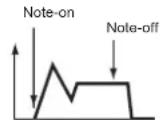
Strongly played note with Attack, Decay, Slope and Release Time Swing at –
AMS1(T) (Alternate Modulation Source 1 - Time)
This parameter specifies the source that will control the "Time" parameters of the amp EG (see "AMS (Alternate Modulation Source) list" on page 123). With a setting of Off, there will be no modulation.
Intensity
This parameter specifies the depth and direction of the effect that "AMS1" will have. For example, if "AMS1(T)" is Amp KTrk +/+, the (Amp) Keyboard Track settings (see "Amplifier keyboard tracking on page 117) will control the EG "Time" parameters. With positive (+) values of this parameter, positive (+) values of "Ramp (Ramp Setting) will cause EG times to be lengthened, and negative (−) values of "Ramp (Ramp Setting)" will cause EG times to be shortened. The direction of the change is specified by "Attack Time Swing", "Decay Time Swing", "Slope Time Swing", and "Release Time".
When “AMS1(T)” is Velocitpositive (+) values will cause EG times to lengthen as you play more strongly, and negative (−) values will cause EG times to shorten as you play more strongly. With a setting of 0, the EG times will be as specified by the “Amp envelope” parameters (see page 119).
Attack Time Swing
This parameter specifies the direction of the effect that "AMS1" will have on "Attack Time". With positive (+) values of "Intensity", setting this parameter to + will allow AMS1 to lengthen the time, and setting it to - will allow AMS1 to shorten the time. With a setting of 0 there will be no effect.
Decay Time Swing
This parameter specifies the direction of the effect that "AMS1" will have on "Decay Time". With positive (+) values of "Intensity", setting this parameter to + will allow AMS1 to lengthen the time, and setting it to - will allow AMS1 to shorten the time. With a setting of 0 there will be no effect.
Slope Time Swing
This parameter specifies the direction of the effect that "AMS1" will have on "Slope Time". With positive (+) values of "Intensity", setting this parameter to + will allow AMS1 to lengthen the time, and setting it to – will allow AMS1 to shorten the time. With a setting of 0 there will be no effect.
Release Time
This parameter specifies the direction of the effect that "AMS1" will have on "Release Time". With positive (+) values of "Intensity", setting this parameter to + will allow AMS1 to lengthen the time, and setting it to - will allow AMS1 to shorten the time. With a setting of 0 there will be no effect.
AMS2 (Alternate Modulation Source 2)
This is another alternate modulation source for the Amp EG. See above "AMS1" parameters.
PAGE 17 - LFO1
In this and the next page you can make settings for the LFO that can be used to cyclically modulate the Pitch, Filter, and Amp of each oscillator. There are two LFO units for each oscillator. By setting the LFO1 or LFO2 Intensity to a negative (-) value for Pitch, Filter, or Amp, you can invert the LFO waveform.

text_image
chord temps = Transpose C 0 octave LFO1 I0sc1 page program Selected: Osc1II Wave: Triangle Rand Frequency: 31 Key Sync: OnII↓Wave
This parameter selects the LFO waveform. The numbers that appear at the right of some of the LFO waveforms indicate the phase at which the waveform will begin.

text_image
Triangle 0 Triangle 90 Triangle Random Saw 0 Saw 180 Square Sine Guitar Exponential Triangle Exponential Saw Down Exponential Saw Up Step Triangle - 4 Step Triangle - 6 Phase will change randomly at each key-in Step Saw - 4 Step Saw - 6 Sawtooth down Random1 (S/H): Conventional sample & hold (S/H) in which the level changes randomly at fixed intervals of time Random2 (S/H): Both the levels and the time intervals will change randomly. Random3 (S/H): The maximum level and minimum level will alternate at random intervals of time (i.e., a square wave with random period). Random4 (Vector) Random5 (Vector) Random6 (Vector) These types cause Random 1-3 to change smoothly. They can be used to simulate the instability of acoustic instruments etc.Frequency
Set the LFO frequency. A setting of 99 is the fastest.
00...99 Frequency rate.
Key Sync
This parameter specifies if the LFO is synchronized to key strokes.
On The LFO will start each time you play a note, and an independent LFO will operate for each note.
Off The LFO effect that was started by the first-played note will continue to be applied to each newly-played note. (In this case, Delay and Fade will be applied only to the LFO when it is first started).
Offset
This parameter specifies the central value of the LFO waveform. For example, with a setting of 0 as shown in the following diagram, the vibrato that is applied will be centered on the note-on pitch. With a setting of +99, the vibrato will only raise the pitch above the note-on pitch, in the way in which vibrato is applied on a guitar. When “Wave” is set to Guitar, the modulation will occur only in the positive (+) direction even if you set “Offset” to 0.
Here are offset settings and pitch change produced by vibrato
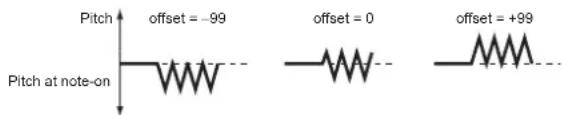
text_image
Pitch offset = -99 offset = 0 offset = +99 Pitch at note-on-99...+99Offset value.
Delay
This parameter specifies the time from note-on until the LFO effect begins to apply. When "Key Sync" is Off, the delay will apply only when the LFO is first started. 0...99 Delay time.
Fade In
This parameter specifies the time from when the LFO begins to apply until it reaches the maximum amplitude. When "Key Sync." is Off, the fade will apply only when the LFO is first started.
Here is how "Fade In" affects the LFO (when "Key Sync" is On):

00...99 Fade rate.
Frequency MIDI/Tempo Sync
MIDI/Tempo Sync
This parameter enables/disables the LFO synchronization with Sequencer 1 Tempo.
On The LFO frequency will synchronize to the tempo (MIDI Clock) of Sequencer 1. In this case, the values you specified for "Frequency" (see page 120) and "Frequency modulation" (see page 121) will be ignored.
Base Note/Times
When "MIDI/Tempo Sync" is On, these parameters set a note length relative to “ (Tempo)” and the multiple (“Times”) that will be applied to it. These parameters will determine the frequency of the LFO1. For example if “Base Note” is (quarter note) and “Times” is 04, the LFO will perform one cycle every four beats.
Even if you change the “(Tempo)” setting of Sequencer 1, the LFO will always perform one cycle every four beats.
Base Note
DRUM This parameter is not available when editing a Drum Program.
$$ \text { ♩ } _ {1} \text { ♩ } _ {3} \text { ♩ } _ {1} \text { ♩ } _ {3} \text { ♩ } _ {1} \text { ♩ } _ {1} \text { ♩ } _ {3} \text { ♩ } _ {1} \text { ♩ } _ {1} \text { ♩ } $$
Note value.
Times
DRUM This parameter is not available when editing a Drum Program.
01...16 Beats before restarting the cycle.
Frequency modulation
You can use two alternate modulation sources to adjust the speed of the LFO1 for the selected oscillator.
AMS1(F) (Alternate Modulation Source1)
Selects the source that will adjust the frequency of the selected oscillator LFO1 (see "AMS (Alternate Modulation Source) list" on page 123). LFO1 can be modulated by LFO2.
Intensity (AMS1 Intensity)
This parameter specifies the depth and direction of the effect that "AMS1(F)" will have. When this parameter is set to a value of 16, 33, 49, 66, 82, or 99, the LFO frequency being can be increased by a maximum of 2, 4, 8, 16, 32, or 64 times respectively (or decreased by 1/2, 1/4, 1/8, 1/16, 1/32, or 1/64 respectively).
For example, if "AMS1(F)" is Note Number, positive (+) values of this parameter will cause the oscillator LFO to speed up as you play higher notes. Negative (−) values will cause the oscillator LFO to slow down as you play higher notes. This change will be centered on the C4 note.
If AMS1(F) is set to JS +Y, raising the value of this parameter will cause the oscillator LFO1 speed to increase as the joystick is moved away from yourself. With a setting of +99, moving the joystick all the way away from yourself will increase the LFO speed by approximately 64 times.
-99...+99Intensity value.
AMS2(F) (Alternate Modulation Source2)
Intensity (AMS2 Intensity)
Make settings for a second alternate modulation source that will adjust the frequency of the oscillator LFO1 (see above "AMS1(F) (Alternate Modulation Source1)" and "Intensity (AMS1 Intensity)").
PAGE 18 - LFO2
Here you can make settings for the LFO2, which is the second LFO that can be applied to the selected oscillator. See "Page 17 - LFO1" for more information on the parameters value.
However in “Frequency modulation”, the LFO cannot be selected as a modulation source in “AMS1” or “AMS2.”
PAGE 19 - EFFECTS
Here you can select two effects for the whole Program, switch them on/off, and specify chaining.
text_image
chord tempo Transpose C 0 octave Effects FX1: 53 RecSmithHallII Send: 56 FX2: 16 Chorus Send: 0↓Note: For details on the effects, refer to the "Effects" chapter.
FX1/2
Use these parameters to select the effect type for effect 1/2. See the "Effects" chapter for more information.
Note: If 000: No Effect is selected, the output from the master effect will be muted.
Send
Send level for each effect.
DRUM Drum samples have their own send level settings (see "Send FX1" and "Send FX2" on page 109). Use this parameter to adjust the general offset of the Drum Program.
000...127Effect level.
Chain 2>1
Use this parameter to send the output of effect 2 to the input of effect 1.
000...127 Level of the signal exiting the effect 2 going back to the effect 1.
Send to Master
This parameters allows you to decide if the direct + effected signal must go to the Master, or just the effected signal.
Yes Only the effected signal will be sent to the Audio Outputs. The direct (non-effected) signal will not be sent.
No Both the effected signal and direct signals will be sent to the Audio Outputs.
PAGE 20 - FX1 EDITING
In this page you can edit the effected assigned to the FX1 (A or C) effect processor (usually reverb). See the "Effects" chapter for more information.
PAGE 21 - FX2 EDITING
In this page you can edit the effected assigned to the FX2 (B or D) effect processor (usually modulating effect). See the "Effects" chapter for more information.
AMS (ALTERNATE MODULATION SOURCE) LIST
| Off Do not use Alternate Modulation | |
| Pitch EG Pitch EG | |
| Filter EG Filter EG within the same oscillator | |
| Amp EG Amp EG within the same oscillator | |
| LFO1 LFO1 within the same oscillator | |
| LFO2 LFO2 within the same oscillator | |
| Flt KTrk +/+ (Filter Keyboard Track +/+) | Filter keyboard tracking within the same oscillator |
| Flt KTrk +/- (Filter Keyboard Track +/-) | Filter keyboard tracking within the same oscillator |
| Flt KTrk 0/+ (Filter Keyboard Track 0/+) | Filter keyboard tracking within the same oscillator |
| Flt KTrk +/0 (Filter Keyboard Track +/0) | Filter keyboard tracking within the same oscillator |
| Amp KTrk +/+ (Amp Keyboard Track +/+) Amp keyboard tracking within the same oscillator | |
| Amp KTrk +/- (Amp Keyboard Track +/-) Amp keyboard tracking within the same oscillator | |
| Amp KTrk 0/+ (Amp Keyboard Track 0/+) Amp keyboard tracking within the same oscillator | |
| Amp KTrk +/0 (Amp Keyboard Track +/0) Amp keyboard tracking within the same oscillator | |
| Note Number | Note number |
| Velocity | Velocity |
| Poly AT (Poly After Touch)(a) | Polyphonic After Touch (transmitted from the microARRANGER only as sequence data) |
| Channel AT (Channel After Touch)(a) | After Touch (Channel After Touch) |
| Joystick X | Joystick X (horizontal) axis |
| Joystick +Y | Joystick +Y (vertical upward) direction (CC#01) |
| Joystick -Y | Joystick -Y (vertical downward) direction (CC#02) |
| JS+Y & AT/2 (Joy Stick +Y & After Touch/2)(a) | Joystick +Y (vertical upward) direction and After Touch |
| JS-Y & AT/2 (Joy Stick -Y & After Touch/2)(a) | Joystick -Y (vertical downward) direction and After Touch |
| Ass.Pedal | Assignable foot pedal (CC#04) |
| CC#18 | CC#18 |
| CC#17 | CC#17 |
| CC#19 | CC#19 |
| CC#20 | CC#20 |
| CC#21 | CC#21 |
| Damper | Ddamper pedal (CC#64) |
| CC#65 | Portamento switch (CC#65) |
| Sostenuto | Sostenuto pedal (CC#66) |
| CC#80 | CC#80 |
| CC#81 | CC#81 |
| CC#82 | CC#82 |
| CC#83 | CC#83 |
| Tempo | Tempo (tempo data from Sequencer 1 clock or external MIDI clock) |
(a) After Touch data can only be received via MIDI, or create as a MIDI event in Song Record-Step Recording mode.
Flt KTrk +/+ (Filter Keyboard Track +/+)
Flt KTrk +/- (Filter Keyboard Track +/-)
Flt KTrk 0/+ (Filter Keyboard Track 0/+)
Flt KTrk +/0 (Filter Keyboard Track +/0)
Amp KTrk +/+ (Amp Keyboard Track +/+)
Amp KTrk +/- (Amp Keyboard Track +/-)
Amp KTrk 0/+ (Amp Keyboard Track 0/+)
Amp KTrk +/0 (Amp Keyboard Track +/0)
+/+
The direction of the effect will be determined by the sign (positive or negative) of the "Ramp Low" or "Ramp High" setting.
+/−
The direction of the effect will be determined by the sign of the “Ramp Low” setting, and by the opposite sign of the “Ramp High” setting (-50 for a setting of +50, and +50 for a setting of -50).
0/+
"Ramp Low" will have no AMS effect. The sign of the "Ramp High" setting will determine the direction of its effect.
+/0
The sign of the "Ramp Low" setting will determine the direction of its effect. "Ramp High" will have no AMS effect.
line
example of Amp Keyboard Track settings | Note Number | Amp | | :--- | :--- | | Key Low | Ramp Low = +50 | | Key High | Ramp High = +50 | | AMS Intensity = positive (+) value | zero | | AMS Intensity = positive (+) value | -max | | AMS Intensity = positive (+) value | max | | AMS Intensity = positive (+) value | zero | | AMS Intensity = positive (+) value | -max | | AMS Intensity = positive (+) value | max | | AMS Intensity = positive (+) value | zero | | AMS Intensity = positive (+) value | -max | | AMS Intensity = positive (+) value | max | | AMS Intensity = positive (+) value | zero | | AMS Intensity = positive (+) value | -max |JS +Y & AT/2 (Joy Stick +Y & After Touch/2)
The effect will be controlled by the joystick +Y (vertically upward) and by after touch data (received via MIDI). In this case, the effect of after touch will be only half of the specified intensity.
JS -Y & AT/2 (Joy Stick -Y & After Touch/2)
The effect will be controlled by the joystick -Y (vertically downward) and by after touch data (received via MIDI). In this case, the effect of after touch will be only half of the specified intensity.
15. GLOBAL EDIT ENVIRONMENT
The Global edit environment is the place where you can set most of the microARRANGER global functions, i.e. functions overriding any operating mode. This edit environment overlaps the current operating mode (Style, Song Play, Song, Backing Sequence).
THE WRITE WINDOW
Open this window by pressing the WRITE button while one of the Global pages is in the display. Here, you can save various global settings. Among the global settings saved with this page are also the Preference parameters of the Style Play and Song Play mode, plus the Global Protect parameter of the Card mode. The Split Point is also saved here.
text_image
chord tempo . . . Transpose C 0 active Write Global: . Press 'Enter' to store the GlobalWhile this page is on the display, press ENTER twice. The parameters are saved to the Flash-ROM, and will stay in memory even when turning the instrument off.
MENU
From any page, press MENU to open the Global edit menu. This menu gives access to the various Global edit pages.
When in this menu, select a section using the VOLUME/VALUE buttons, press PAGE+ to select a page, or press EXIT to exit the menu.
When in a page, press EXIT to go back to current operating mode (Style Play, Song Play, Song, Backing Sequence).

text_image
chord temps J- transpose C 0 active Global/Midi MENU General Ctl Midi Out Pdl/Fsw/Sld MidiSet Ctl Midi InPAGE 1 - GENERAL CONTROLS
This page contains various general parameters, setting the status of the keyboard, the speakers and the metronome.
text_image
chord tempo J. transpose C 0 active Gbl:Gen.Controls Page Vel.Curve:3 M.Tune :+ 0 Scale:Equal Met.Vol:110 Key:C Speakrs:On AutoOff:YesVel.Curve (Velocity Curve)
▶GBL
This parameter sets the sensitivity of the keyboard to your touch.
1 No dynamic control available. Dynamic values are fixed, as in a classic organ.
2...9 Curves, from the lightest one to the hardest one.
M.Tune (Master Tune)
▶GBL
This is the master tuning of the instrument. Use it to adapt your keyboard tuning to an acoustic instrument, for example an acoustic piano.
-50Lowest pitch.
00 Standard pitch (A4=440Hz).
+50 Highest pitch.
Scale
▶GBL
This parameter sets the main scale (or temperament) for the whole instrument, apart for tracks where a different scale is selected by a Performance or STS (see "Scale" on page 44).
See "Scales" on page 227 for a list of available scales.
Note: You cannot select a User scale in Global mode.
Key
▶GBL
This parameter is needed by some scales to set the preferred key (see "Scale" on page 44).
Speakers
This parameter turns the internal speakers on or off.
Note: Speakers are always turned on again each time you turn the instrument on.
Met.Vol (Metronome Volume)
▶GBL
Volume of the metronome.
40...127 Relative volume, from minimum to maximum.
AutoOff
This parameter sets the auto power-off setting.
Yes The power will automatically turn off if you don't play the keyboard or operate the instrument's buttons for a period of four hours.
No Auto power-off will not occur.
PAGE 2 - MASTER TRANSPOSE
This page is where you can turn the Master Transpose on or off.
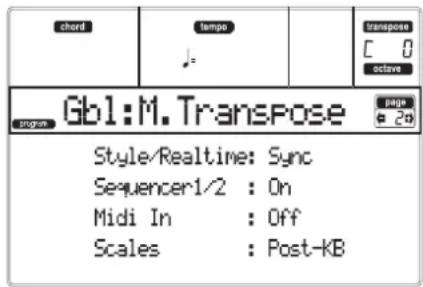
text_image
chord tempo Transpose C 0 active Gbl:M.TransPose page 2d Style/Realtime: Sync Sequencer1/2 : On Midi In : Off Scales : Post-kBStyle/Realtime
▶GBL
This is a flag to turn the Master Transpose on or off on the Style and Realtime (Keyboard) tracks.
Off No Master Transpose is applied to the Style and Realtime tracks.
Sync Sync mode. When you press either the TRANSPOSE or [] buttons, the new transpose setting will not take effect until the first beat of the next measure is reached. The Realtime tracks sounding at the time of the transpose will be stopped.
RTime Realtime mode. When you press either the TRANSPOSE I or [#] buttons, the new transpose setting will occur when the next note is played for both the Style and Real-time tracks individually. (Note that any notes sounding from the Realtime tracks will be stopped when you press the TRANSPOSE button) The next key or chord you press will sound with the new transpose setting. (Note that if you play a Realtime track prior to a new chord, the Realtime track will play in the new key as the Style will continue to play in the old key until a new chord is entered).
Seq 1/2
▶GBL
This is a flag to turn the Master Transpose on or off on the two onboard Sequencers' tracks.
Midi In
▶GBL
This is a flag to turn the Master Transpose on or off on the received MIDI messages.
Scales
The Scale Transpose Position allows you to decide the relation between the Scale and the Master Transpose.
Post-KB
When this option is selected, notes will be transposed immediately after they leave the keyboard. The Scale will be applied to the transposed notes. For example, if you altered an E, and then set the Master Transpose to +1, the E key will play F, and the altered key will be E_b (that will play an altered E).

Pre-OSC
When this option is selected, all notes are transposed immediately before they enter the internal tone generator. Therefore, the Scale will be applied before transposition. For example, if you altered an E, and then set the Master Transpose to +1, the altered key will still be E (that will play an altered F).

PAGE 3 - ASSIGNABLE PEDAL/ FOOTSWITCH, ASSIGNABLE SLIDER
This page lets you program the Assignable Pedal/Foot-switch, and the Assignable Slider.

text_image
chord tempo Transpose C 0 octave Gb1:P/Sw-Sld P/S: Soft Sld: Master Volume Damper Pol. :-(Korg) Pedal/Sw Pol.:-(Korg)See page 225 for a list of the assignable functions. The first functions are switch-type functions, while the remaining (starting from Master Volume) are continuous-like functions.
P/S (Pedal/Switch)
▶GBL
Continuous pedal, or footswitch, connected to the ASSIGNABLE PDL/SW connector.
Sld (Slider)
▶GBL
Function assigned to the ASSIGNABLE SLIDER on the front panel.
Damper Pol. (Damper Polarity)
▶GBL
Polarity of the Damper pedal.
Pedal/Sw.Pol. (Pedal/Footswitch Polarity)
▶GBL
Polarity of the Assignable pedal or footswitch.
PAGE 4 - MIDI SETUP
MIDI channels can be automatically configured by selecting a MIDI Setup. Each of them assigns the best values to various MIDI parameters, to allow an easier connection with a particular MIDI controller.

text_image
chard tempo transpose C 0 active Gbl:Midi Setup Default Accordion 1 Master Kbd Accordion 2 Sequencer 1 Accordion 3 Sequencer 2 Extern. SeqNote: After selecting a MIDI Setup, you can apply any changes to each channel's settings. To store the changes in memory, press WRITE and save the Global in memory.
See "MIDI" on page 35 for more information on using the MIDI Setups.
Default This a default setting. It is suitable both for programming on an external sequencer, and for playing microARRANGER with a master keyboard.
Master Kbd Select this setting when you are connecting a mute master keyboard.
Sequencer 1 This setting is for playing a Song (Sequencer 1) with an external instrument sounds, or for listening to a Song performed by an external sequencer using microARRANGER as a sound generator. Each track (S1 Tr1–16) corresponds to a MIDI channel with the same number (1–16).
Sequencer 2 As above, but with Sequencer 2.
Accordion 1...3
Select one of these settings when connecting a MIDI Accordion.
Ext.SeqThi s setting is for programming a Song on an external sequencer.
PAGE 5 - MIDI CONTROLS
This page lets you program general MIDI parameters.

text_image
chord tempo J: Transpose C 0 octave Gbl:Midi Control page 50 Local : On Clock : Internal Clock Send : OffLocal
The Local parameter turns the keyboard on or off.
Note: The Local parameter is always turned on again each time you turn the instrument on.
On When you play on the keyboard, MIDI data is sent to the internal sound generator and to the MIDI OUT port.
Off The keyboard is connected to the MIDI OUT, but cannot play the internal sound generator.
This is very useful when working with an external sequencer, to send notes and controllers from the keyboard to the external sequencer, and then let the sequencer send them back to the sound generator, without overlapping. See the MIDI chapter.
Clock
This parameter selects the MIDI Clock source.
Note: The Clock parameter is always set to "Int" each time you turn the instrument on.
Internal Internal, i.e. the clock generated by the microARRANGER Sequencer 1 internal metronome.
MIDI External from MIDI. The microARRANGER is slaved to an external instrument or sequencer, connected to its MIDI IN port. The Start/Stop and Play/Stop commands, and the metronome Tempo, cannot be selected from the control panel of the microARRANGER. Use the external instrument to set the Tempo, and start or stop the sequencers (Song, Song Play, Backing Sequence modes) and the arranger (Style and Backing Sequence modes).
Clock Send
▶GBL
This parameter turns the clock information on the MIDI OUT on or off.
Off The microARRANGER cannot send the MIDI Clock signal. You cannot slave another instrument to the microARRANGER, can when connected to the MIDI OUT.
MIDI The microARRANGER can send the MIDI Clock signal. You can slave another instrument to the microARRANGER Tempo, Start/Stop and Play/Stop commands. Connect the other instrument to the microARRANGER MIDI OUT port.
PAGE 6 - MIDI IN CHANNELS
In this page, you can assign the microARRANGER tracks to any of the MIDI IN channels. Use the TRACK SELECT button to switch from channels 1–8 to channels 9–16.

text_image
chord tempo Transpose C 0 octave Gbl:MidiIn Chnl page 60 Ch 1:UP.1 Ch 5:UP.3 Ch 2:LOWR Ch 6:GLOBAL Ch 3:BASS Ch 7:ACC1 Ch 4:UP.2 Ch 8:ACC2Channel
▶GBL
You can assign to each channel one of the following tracks:
(Off) No track assigned.
Lower Lower track.
Upper1...3 One of the Upper tracks.
Drum Drum track.
Perc Percussion track.
Bass Bass track.
Acc1...5 One of the Auto-accompaniment tracks.
S1 T1...16 One of Sequencer 1 tracks.
S2 T1...16 One of Sequencer 2 tracks.
Global Special channel to simulate the microARRANGER's integrated controls (keyboard,
pedals, joystick) with an external keyboard or controller. MIDI messages coming on this channel are considered as being generated by microARRANGER's integrated controllers.
Control On this special channel, the microARRANGER receives MIDI messages to remotely sett Styles, Penfances, STS and Style Elements. See tables on page 144 and following for more information on the received data
PAGE 7 - MIDI IN CONTROLS (1)
This page is where you can program the Chord Recognition channels for the internal arranger, and a fixed velocity value for all notes appearing at the input.
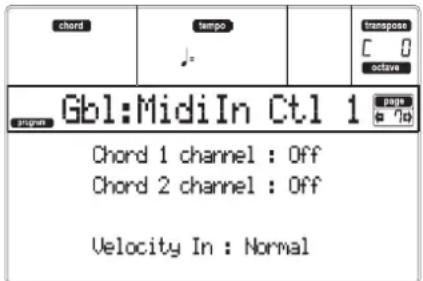
text_image
chord tempo . Transpose C 0 octave Gbl:MidiIn Ctl 1 Gbps Chord 1 channel : Off Chord 2 channel : Off Velocity In : NormalThere are two separate Chord channels. This is very useful when you must send chords to microARRANGER on two channels (like with some MIDI Accordions).
Chord1 channel ▶GBL
Notes entering this channel are sent to the Chord Recognition engine.
Chord2 channel ▶GBL
Notes entering this channel are sent to the Chord Recognition engine.
Velocity Input ▶GBL
Use this parameter to set a fixed velocity (dynamics) value for all MIDI notes entering. This is useful when playing the microARRANGER with an organ or a MIDI Accordion.
Normal Normal velocity values are received.
40...127 All received velocity values are converted to the selected value.
PAGE 8 - MIDI IN CONTROLS (2)
This is another page containing various MIDI IN settings, like note transposition for the Realtime tracks. The transpose parameters are useful to many MIDI accordion players, whose MIDI interface may transmit on an unexpected octave.

text_image
chord temps . Transpose C 0 octave Gbl:MidiIn Ctl 2 Upp.Oct:+ 1 Oct.In :Off Low.Oct:+ 0 Mute In:OffUppOct (Upper Octave) ▶GBL
Octave transposition of data received on the MIDI IN for the Upper tracks. For example, if you select the +1 value, a received C4 will play a C5 on the microARRANGER.
LowOct (Lower Octave) ▶GBL
Octave transposition of data received on the MIDI IN for the Lower track. For example, if you select the +1 value, a received C4 will play a C5 on the microARRANGER.
OctIn (Octave In) ▶GBL
Enables/disables the octave transposition of data received via MIDI.
On Data received via MIDI can be transposed, according to the selected Octave Transposition. For example, if the Octave Transposition is +1, a received C4 will actually play a C5.
Off Data received via MIDI can't be transposed by the Octave Transposition applied to the track. For example, if the Octave Transposition is +1, a received C4 will still play a C4.
Mute In ▶GBL
Use this parameter to determine if a muted track can still play data received via MIDI.
On No data received via MIDI on a muted track can be played by microARRANGER.
Off Data received via MIDI on a muted track can still play on the microARRANGER.
PAGE 9 - MIDI IN FILTERS
Use this page to set up to 8 filters for the MIDI data received by the microARRANGER.
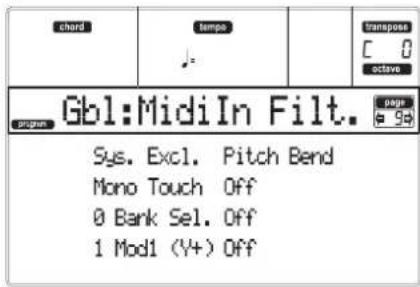
text_image
chord temps Transpose C 0 octave Gbl:MidiIn Filt. Sys. Excl. Pitch Bend Mono Touch Off 0 Bank Sel. Off 1 Mod1 (Y+) OffFilters
▶GBL
Selected MIDI IN filters.
OffNo filter.
Pitch BendPitch Be nd.
MonoTouch Mono (or Channel) After Touch.
PolyTouch Poly After Touch.
PrgChangeProgr am Change.
In this page, you can assign to any MIDI OUT channel one of microARRANGER's tracks. Use the TRACK SELECT button to switch from channels 1–8 to channels 9–16.

text_image
chord tempo Transpose C 0 active Gbl:Midi Out Chnl Ch 1:UP.1 Ch 5:UP.3 Ch 2:LOWR Ch 6:ACC1 Ch 3:BASS Ch 7:ACC2 Ch 4:UP.2 Ch 8:ACC3Channel
▶GBL
You can assign to each channel one of the following tracks:
(Off) No track assigned.
Lower Lower track.
Upper1...3 One of the Upper tracks.
Drum Drum track.
Perc Percussion track.
Bass Bass track.
Acc1...5 One of the Auto-accompaniment tracks.
S1 T1...16 One of Sequencer 1 tracks.
S2 T1...16 One of Sequencer 2 tracks.
SQ Tr01...16 Use these channels to send data generated by a track with the same name on either or both onboard sequencers at the same time.
Chord Use this channel to send notes recognized by the Chord Recognition engine to the MIDI OUT. This is useful, for example, to control an external Harmonizer from the microARRANGER, using the Lower track to play chords, even if the track is in mute.
PAGE 11 - MIDI OUT FILTERS
Use this page to set up to 8 filters for the MIDI data sent by the microARRANGER.
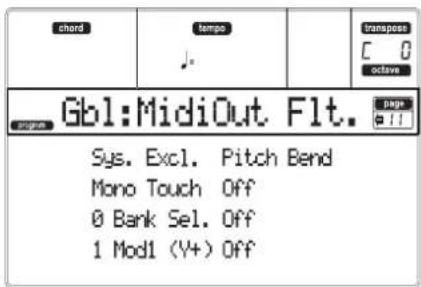
text_image
chard tempo Transpos C 0 octave Gbl:MidiOut Flt. sys. Excl. Pitch Bend Mono Touch Off 0 Bank Sel. Off 1 Mod1 (Y+) OffFilters
▶GBL
Selected MIDI OUT filters.
OffNo filter.
Pitch BendPi tch Bend.
MonoTouch Mono (or Channel) After Touch.
PolyTouch Poly After Touch.
PrgChangeProgram Change.
SysExcl System Exclusive.
All CC All Control Change messages.
0...127Control Change message #0...127. See "MIDI Controllers" on page 228 for a list of available Control Change messages.
16. CARD EDIT ENVIRONMENT
The Card Edit environment is the place where you can manage files. This edit environment overlaps the current operating mode (Style Play, Song Play, Backing Sequence, Song, Program).
THE WRITE/CARD IN USE LED
When the drive is reading or writing data on a card, the WRITE/CARD IN USE indicator lights up. While in a Card page, the "Wait" message appears in the display; in this situation, you can't select a different Card page (you can, however, select a different operative mode).
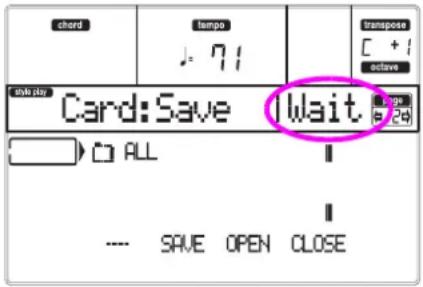
text_image
chord tempo J 71 transpose C + octave Date key Card: Save (Wait) ALL SAVE OPEN CLOSEWarning! Never remove a card when the WRITE/CARD IN USE LED is turned on!
SUPPORTED CARDS
You can use the following types of cards to save or load data to and from the microARRANGER's internal memory:
• SD (High Speed, Ultra II, SDHC)
- MMC
• MicroSD with an SD adapter
• MiniSD with an SD adapter
Note: Before you can use the SD/MMC card, you must format it on the microARRANGER. Don't use your computer or digital camera to format (initialize) a card you plan to use with the microARRANGER. If the card was formatted on a different device, it may not work correctly with the microARRANGER
Note: The SD/MMC card is not included. It must be purchased separately.
Note: The microARRANGER supports SD cards with a power supply voltage of 2.7–3.6V.
SD and MMC card handling
- Do not remove the card from the drive while the microARRANGER is reading or saving data.
- The SD/MMC card may be hot immediately following use. Power-off the microARRANGER and wait for the card to cool before removing it.
- SD/MMC cards are precision parts. Do not bend them, drop them, or subject them to physical shock.
-
Avoid using or storing SD/MMC cards in locations of extremely high or low temperature such as in direct sunlight, a closed automobile, or near a heater, or in locations of high humidity or excessive dust.
-
Avoid using or storing SD/MMC cards in locations where they may be subject to strong static electricity or electrical noise.
- Do not allow dirt or foreign matter to adhere to the contacts of an SD/MMC card. If the contacts should become soiled, gently wipe them off using a dry cloth.
- When you are not using an SD/MMC card, keep it in the protective case that was included with the card to prevent it from being damaged by static electricity.
- Do not leave an SD/MMC card where it is accessible by infants or children who might place it in their mouth and swallow it.
- Carefully read and observe the owner's manual included with your SD/MMC card.
Write protecting an SD card
SD cards have a write protect switch that prevents the data from being overwritten accidentally and lost. If you set the card's switch to the protected setting, it will be impossible to write or erase data on the card, or to format it. If you need to save edited data on the card, move the switch back to its original unprotected setting.

text_image
Write-protect switch Protected I_maxInserting/exchanging cards
Inserting a card
Insert the card, making sure that it is oriented correctly. The gold contacts should be facing down, and the angled corner to your right.
text_image
SD card slot SD cardRemoving a card
Press the card inward and release it, and the card will pop out.
Note: Before you can use an SD card, you must format it on the microARRANGER. The card may not work if it was formatted on another device.
Organizing your data into separate folders
We suggest to organize your data into separate folders, instead of saving many files into the root (i.e., the main level) of the card. This allows for faster accesses to the card, thus a quicker response of the microARRANGER to your CARD commands.
LOADING DATA CREATED WITH THE PA80/PA60/PA50
microARRANGER data is perfectly interchangeable with its Pa80, Pa60 and Pa50 counterparts. The only data microARRANGER can't load from Pa80/Pa60 is the following:
• Digital Drawbar Programs
• I n p tingst 1/2 sett
• V H Gal/GlutarProcessor Board settings
• E C 5 settings
• TO HOST port setting
• Audio Output routing
At the same time, Pa80 and Pa60 can read any data created with the microARRANGER and Pa50.
CARD STRUCTURE
Each card (and the internal memory) can contain files and folders. The data structure in microARRANGER is slightly more rigorously determined than in a computer, due to the pre-configured data structure inside the instrument's memory. The diagram on the right shows the global structure of a microARRANGER card.
Note: Style banks from 1 to 16 (Factory Styles) can be seen in Card mode only when the "Factory Style Protect" parameter is t toeOff (see page 142), and only when loading or saving a single Style bank.
FILE TYPES
The following tables describe all the file and folder types the microARRANGER can manage. Here are the files you can read or write on the microARRANGER.
| Extension File/folder type | |
| SET | All the User data. (This is a folder containing other folders). |
| GBL | Global, Seq1+Seq2 Setup |
| PRF | Performance |
| PCG | User Program |
| STY | User Style |
The microARRANGER can also read the following common types of data.
| Extension File type | |
| MID | Midi file (Standard MIDI File, SMF) |
| KAR | Karaoke file |
| JBX | Jukebox |

flowchart
graph TD
    A["MYDIR.SET"] --> B["GLOBAL BANK01.GBL"]
    A --> C["PERFORM BANK01.PRF"]
    C --> D["BANK02.PRF 1-1 Grand Piano ... 1-8 Full Strings"]
    C --> E["BANK...PRF 2-1 Jazz Brass ... 2-8 Jazz Strings"]
    C --> F["BANK10.PRF 2-1 Rock Brass ... 2-8 Rock Strings"]
    A --> G["PROGRAM USER01.PCG 1 Piano 1 ... 64 SynBrass22"]
    A --> H["USER02.PCG 1 SopranoSax ... 64 Noise"]
    A --> I["USERDK.PCG 1 Standard Kit ... 64 Orchestral Kit"]
    A --> J["STYLE BANK01.STY 1-1 8 Beat 1 ... 1-16 8 Beat 16"]
    A --> K["BANK...STY BANK16.STY 16-1 Traditional 1 ... 16-8 Traditional 16"]
    A --> L["USER01.STY U1-1 User 1 ... U1-16 User 16"]
    A --> M["USER02.STY U2-1 User 1 ... U2-16 User 16"]
    A --> N["USER03.STY U3-1 User 1 ... U3-16 User 16"]
FILE AND FOLDER SIZE DISPLAY
The size of any file and folder in the card can be seen in the display.
The single file size is always shown on the right of the file:

text_image
chard tempo J = 71 transpose C +1 activate Card:Load ETNICA.MID M/FUNNY WALTZ 11K↑ 23K 12K↓ SD LOAD OPEN CLOSETo see a folder size, first move it to the first line of the display, then keep the SHIFT button pressed, and press the F-3 (OPEN) function button under the display. A dialog box will appear, showing the size of the folder:
Press EXIT to exit this dialog.
PAGE STRUCTURE
Here is the typical structure of a Card page.
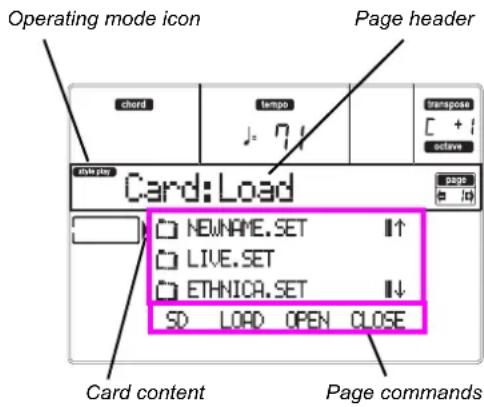
text_image
Operating mode icon Page header card tempo transpose +1 active style play Card:Load page e 10 NEWNAME.SET ↑ LIVE.SET ETHNICA.SET ↓ SD LOAD OPEN CLOSE Card content Page commandsOperating mode icon
When in the Card Edit environment, one of the operating modes is still active in the background. The operating mode icon shows which mode is currently active. Press EXIT to go back to the current operating mode from any of the Card pages.
Page header
This line shows the Card page you are in.
Card content
These lines show the content of the current folder. Move the item to select to the first line, using the E-F (Scroll Up) and G-H (Scroll Down) VOLUME/VALUE buttons, or the TEMPO/VALUE controls.
Use the Page commands (F-1–F-4) on the last line to execute an operation on the selected file or folder.
The "symbol before a name identifies a folder (i.e., a "folder" containing other files).
Page commands
You can use these commands to browse through files and folders, and to execute data transfer commands (load, save...). Commands may be different in any Card page. Use the F-1–F-4 buttons to select the corresponding command.
NAVIGATION TOOLS
When in a Card page, you can use any of the following commands to browse through the files and folders, or through the list of commands.
E-F (Scroll Up)
Scroll the list up. Keep SHIFT pressed and press one of these buttons to jump to the previous alphabetical section.
G-H (Scroll Down)
Scroll the list down. Keep SHIFT pressed and press one of these buttons to jump to the next alphabetical section.
TEMPO/VALUE section
These controls scroll the list up or down.
F-1 (SD)
Press this button after replacing a card in the card slot. After pressing this button, the new card will be scanned, and the file list shown on the display will be updated.
F-2 (Data transfer command)
Executes the shown operation.
F-3 (OPEN)
Opens the selected folder or bank (files whose name begins with the "☐" icon.
F-4 (CLOSE)
Closes the current folder, returning to the parent ("upper") folder.
MENU
From any page, press MENU to open the Card Edit menu. This menu gives access to the various Card Edit pages.
When in this menu, select a section using the VOLUME/VALUE buttons, press PAGE+ to select a page, or press EXIT to exit the menu.
When in any page, press EXIT to go back to the current operating mode.
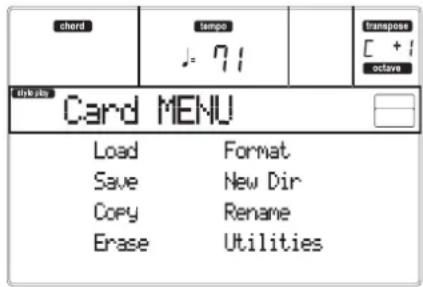
text_image
chord tempo J: 71 Transpose [ + ] octave cbdals Card MENU Load Format Save New Dir Copy Rename Erase UtilitiesPAGE 1 - LOAD
In this page you can load files from a card to the internal memory.
Press SD CARD and use the MENU button to reach this page.

text_image
chard tempo . 71 transpose [ + ] octave unknown Card:Load page a /d □ NEWNAME.SET □ LIVE.SET □ ETHNICA.SET SD LOAD OPEN CLOSELoading all the User data
You can load all the User data (Performances, User Programs, User Styles, Global) with a single operation.
- Insert the source card into the card slot.
- Press F-1 to scan the card and show the file list.
- Use the E-H (Scroll) buttons (or the TEMPO/ VALUE controls) to select the ".SET" folder containing the data you wish to load.
Move the folder to the first line of the display. If the folder you are looking for is in another folder, use the F-3 (OPEN) button to open it. Use the F-4 (CLOSE) button to go back to the parent folder.
- Press F-2 (LOAD) to confirm the selection. The "Are you sure?" message appears. Press ENTER to confirm, or EXIT to abort.
When the operation is completed (the "Wait" indicator appears), the source page comes back in the display, and you may perform further loading operations.
Note: Data loaded from card, and data already in memory is merged. For example, if there is data in all three USER Style banks in memory (USER01, USER02, USER03), and there is only the USER01 Style bank on the card, the USER01 bank is overwritten, while USER02 and USER03 banks are left unchanged.
As a result, you will have a STYLE folder in memory containing the USER01 bank you just loaded, and the old USER02 and USER03 banks.
Loading all data of a specified type
You can load all User data of a specified type (User Programs, User Styles, Performances) with a single operation.
- Insert the source card into the card slot.
- Press F-1 to scan the card and show the file list.
- Use the E-H (Scroll) buttons (or the TEMPO/ VALUE controls) to select the ".SET" folder containing the data you wish to load.
Move the folder to the first line of the display. If the folder you are looking for is in another folder, use the F-3 (OPEN) button to open it. Use the F-4 (CLOSE) button to go back to the parent folder.
- Press F-3 (OPEN) to open the ".SET" folder. A list of User data appears (Performance, Program, Style, Global).
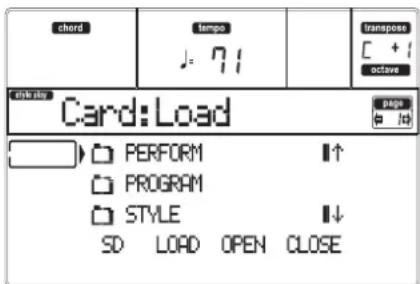
text_image
chord tempo J: 71 transpose C + octave Card:Load pages PERFORM I↑ PROGRAM STYLE SD LOAD OPEN CLOSE- Use the E-H (Scroll) buttons (or the TEMPO/VALUE controls) to move the data type you are looking for to the first line of the display.
- Press F-2 (LOAD) to confirm your selection. The "Are you sure?" message will appear. Press ENTER to confirm, or EXIT to abort.
When the operation is completed (the "Wait" indicator disappears), the source page comes back in the display, and you may perform further loading operations.
Note: Data loaded from card, and data already in memory are merged. For example, if there is data in all three USER Style banks in memory (USER01, USER02, USER03), and there is only the USER01 Style bank on the card, the USER01 bank is overwritten, while USER02 and USER03 banks are left unchanged.
As a result, you will have a STYLE folder in memory containing the USER01 bank you just loaded, and the old USER02 and USER03 banks.
Loading a single bank
You can load a single bank of User data (User Programs, User Styles, Performances) with a single operation. A bank corresponds to a STYLE or PROGRAM/ PERFORMANCE button.
- Insert the source card into the card slot.
- Press F-1 to scan the card and show the file list.
-
Use the E-H (Scroll) buttons (or the TEMPO/ VALUE controls) to select the ".SET" folder containing the data you wish to load.
Move the folder to the first line of the display. If the folder you are looking for is in another folder, use the F-3 (OPEN) button to open it. Use the F-4 (CLOSE) button to go back to the parent folder. -
Press F-3 (OPEN) to open the ".SET" folder. A list of User data appears (Global, Performance, Program, Style).

text_image
chord tempo - 71 transpose [ + ] active Card:Load page □ PERFORM □ PROGRAM □ STYLE SD LOAD OPEN CLOSE-
Use the E-H (Scroll) buttons (or the TEMPO/VALUE controls) to move the data type you are looking for to the first line of the display.
-
Press F-3 (OPEN) to open the selected folder. A list of User banks appears.

text_image
chord tempo · 71 transpose C +1 actave Card:Load page □ USER01.STY □ USER02.STY □ USER03.STY ↓ SD LOAD OPEN CLOSE-
Use the E-H (Scroll) buttons (or the TEMPO/VALUE controls) to move the desired bank to the first line of the display.
-
Press F-2 (LOAD) to confirm the file selection. The list of User banks in memory appears.
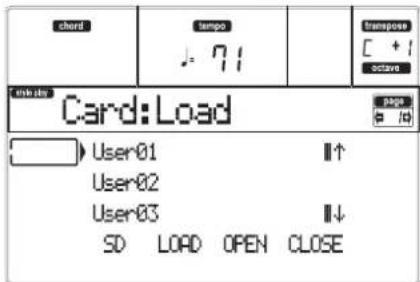
text_image
chord tempo : 71 Transpose [ + ] octavo Card Load User01 User02 User03 SD LOAD OPEN CLOSEIn the page above, the previously selected Style bank will be loaded into the bank 1 (USER1 button) in memory. The existing Styles in memory will be deleted and overwritten.
-
Scroll the available locations in memory, using the E-H (Scroll) buttons (or the TEMPO/VALUE controls).
-
When the target bank is selected (i.e., it is in the first line of the display), press F-2 (LOAD) to load the bank. The "Are you sure message" will appear. Press ENTER to confirm, or EXIT to abort.
Warning: After confirming, all User data contained in the bank in memory is deleted.
When the operation is completed (the "Wait" indicator disappears), the source page comes back in the display, and you may perform further loading operations.
Loading a single item
You can load a single User item (i.e., a single User Program, a single User Style, or a single Performance) with a single operation.
-
Insert the source card into the card slot.
-
Press F-1 to scan the card and show the file list.
-
Use the E-H (Scroll) buttons (or the TEMPO/VALUE controls) to select the “.SET” folder containing the item you wish to load.
Move the folder to the first line of the display. If the folder you are looking for is in another folder, use the F-3 (OPEN) button to open it. Use the F-4 (CLOSE) button to go back to the parent folder.
- Press F-3 (OPEN) to open the “.SET” folder. A list of User data appears (Global, Performance, Program, Style).
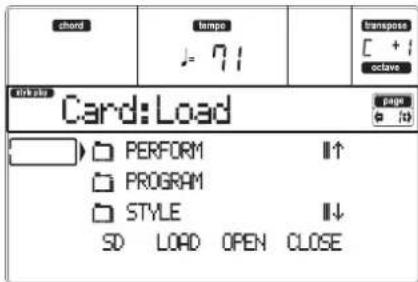
text_image
chord tempo - 71 transpose [ + ] octave Linkable Card:Load page/b
PERFORM I↑ PROGRAM STYLE I↓ SD LOAD OPEN CLOSE-
Use the E-H (Scroll) buttons (or the TEMPO/ VALUE controls) to move the data type you are looking for to the first line of the display.
-
Press F-3 (OPEN) to open the selected folder. A list of User banks appears.

text_image
chord tempo J: 71 transpose [ + ] octave Link key Card:Load page @ i0 USER01.STY USER02.STY USER03.STY ↓ SD LOAD OPEN CLOSE-
Use the E-H (Scroll) buttons (or the TEMPO/VALUE controls) to move the desired bank to the first line of the display.
-
Press F-3 (OPEN) to open the selected bank. A list of User items appears.
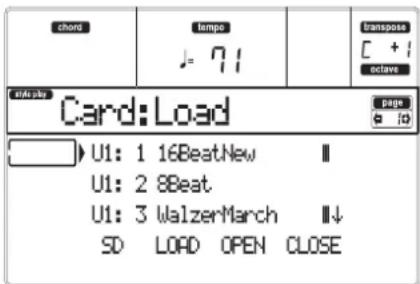
text_image
chord tempo J = 71 transpose C +1 octave Card:Load page a io U1: 1 16BeatNew U1: 2 8Beat U1: 3 WalzerMarch SD LOAD OPEN CLOSE- Use the E-H (Scroll) buttons (or the TEMPO/VALUE controls) to move the desired item to the first line of the display.
- Press F-2 (LOAD) to confirm the file selection. The internal memory file list appears. If you are loading a single file or bank of Styles, Programs or Performances, you are prompted to choose a destination in memory. For example, when loading a single Style, after selecting the Load command, a page similar to the following appears in the display:

text_image
chord tempo J. 71 transpose C +1 oclove Card play Card:Load to U1: 1 16BeatNew to U1: 2 _ _ to U1: 3 _ _ SD LOAD OPEN CLOSEIn the page above, the previously selected Style will be loaded into the location U1:1 (USER1 button, Style 01) in memory. The existing Style in memory will be deleted and overwritten.
- Scroll the available locations in memory, using the E-H (Soll) buttons (or the TEMPO/VALUE controls). When the target location is selected (i.e., it is in the first line of the display), press F-2 (LOAD) to load the file.
Locations marked with a row of underscores ("__") are empty locations.
- Once the target location is selected, press F-2 (LOAD) to load the file. The "Are you sure?" message will appear. Press ENTER to confirm, or EXIT to abort.
Warning: After confirming, the item you are overwriting in memory will be deleted.
When the operation is completed (the "Wait" indicator appears), the source page comes back in the display, and you may perform further loading operations.
PAGE 2 - SAVE
In this page, you can save User data from the internal memory to a card. You can save files, banks, or all the User files of the internal memory.
Press SD CARD and use the MENU or PAGE buttons to reach this page.

text_image
chord tempo . 71 transpose [ + ] octave Card: Save Page20
→ D ALL I I -- SAVE OPEN CLOSEHere are the various types of files contained in memory:
| The file/folder type... | ...contains... | ...and will create on the card... |
| ALL All the User data in memory | A .SET folder | |
| Style | The USER 01-03 Styles | A STYLE folder inside a .SET folder |
| Program | The USER Programs and Drum Kits | A PROGRAM folder inside a .SET folder |
| Perform (Performances) | The Performances | A PERFORM folder inside a .SET folder |
| .GBL file | The Global. All parameters marked with ▶GBL within the Style Play, Song Play, Song and Global chapters are saved in the Global. | A GLOBAL folder inside a .SET folder |
Saving the whole memory content
You can save the whole content of the memory with a single operation.
- Insert the target card into the card slot.
- The whole content ("All") of the internal memory is already selected. Press F-2 (SAVE) to confirm the selection.
- The content of the target card appears.
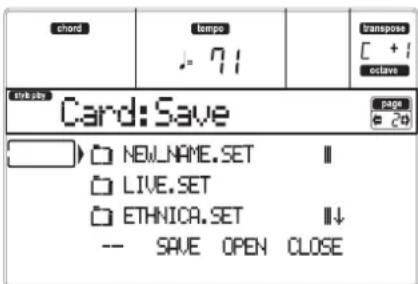
text_image
chord temps . - 71 transpose [ + ] octave links Card: Save page e 20 NEWLNAME.SET LIVE.SET ETHNICA.SET -- SAVE OPEN CLOSEAt this point, you can:
- Create a new “.SET” folder (see “Creating a new “.SET” folder” on page 138).
-
Save onto an existing ".SET" folder.
-
If you are saving into an existing folder, move the desired ".SET" folder to the first line of the display, using the E-H (Scroll) buttons (or the TEMPO/ VALUE controls).
-
Once the target folder is selected, press F-2 (SAVE) to save the files. The "Are you sure?" message will appear. Press ENTER to confirm, or EXIT to abort.
Warning: After confirming, all data in the target folder is deleted.
When the operation is completed (the "Wait" indicator disappears), the source page comes back in the display and you may perform further saving operations.
Saving all data of a specific type
You can save all data of a specific type with a single operation.
- Insert the target card into the card slot.
- The whole content ("All") of the internal memory is ready selected. Press F-3 (OPEN) to open the "All" folder. A list of User data types appear (each type is a separate folder).
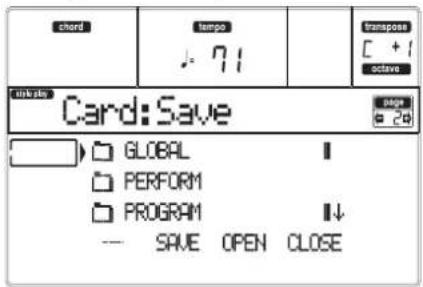
text_image
chord tempo J 71 Transpose [ + ] octave Link path Card: Save GLOBAL PERFORM PROGRAM SAVE OPEN CLOSE- Use the E-H (Scroll) buttons (or the TEMPO/VALUE controls) to move the data type you are looking for to the first line of the display.
- Once you have selected the type of data required, press F-2 (SAVE) to confirm the selection.
- The content of the target card appears.

text_image
chord tempo J: 71 Transpose C + octave Card: Save NewNAME.SET LIVE.SET ETHNICA.SET -- SAVE OPEN CLOSEAt this point, you can:
- Create a new ".SET" folder (see "Creating a new ".SET" folder" on page 138).
-
Save onto an existing ".SET" folder.
-
If you are saving into an existing folder, move the desired ".SET" folder to the first line of the display, using the E-H (Scroll) buttons (or the TEMPO/ VALUE controls).
- Once the target folder is selected, press F-2 (SAVE) to save the files. The "Are you sure?" message will appear. Press ENTER to confirm, or EXIT to abort.
Warning: After confirming, all data in the target folder is deleted.
When the operation is completed (the "Wait" indicator disappears), the source page comes back in
the display and you may perform further saving operations.
Saving a single bank
You can save a single User bank with a single operation. A bank corresponds to a button on the control panel of the instrument (i.e. a button of the STYLE section).
- Insert the target card into the card slot.
- The whole content ("All") of the internal memory is already selected. Press F-3 (OPEN) to open the "All" folder. A list of User data types appear (each type is a separate folder).

text_image
chard tempo . 71 transpose [ + ] octave Card: Save page @ 20 GLOBAL PERFORM PROGRAM SAVE OPEN CLOSE- Use the E-H (Scroll) buttons (or the TEMPO/VALUE controls) to move the data type you are looking for to the first line of the display.
- Once the data type is selected, press F-3 (OPEN) to open the folder and gain access to the separate banks.

text_image
chord tempo ↓ 71 transpose [ + ] active Card play Card: Save USER01.STY USER02.STY USER03.STY SAVE OPEN CLOSE- Use the E-H (Scroll) buttons (or the TEMPO/VALUE controls) to move the bank to save to the first line of the display.
- Once you have selected the bank that you want to save, press F-2 (SAVE) to confirm the selection.
- The content of the target card appears.

text_image
chord tempo J: 71 Transpose C +1 active Card: Save NEWNAME.SET LIVE.SET ETHNICA.SET SAVE OPEN CLOSEAt this point, you can:
- Create a new ".SET" folder (see "Creating a new ".SET" folder" on page 138).
-
Save onto an existing ".SET" folder.
-
If you are saving into an existing folder, move the desired ".SET" folder to the first line of the display,
using the E-H (Scroll) buttons (or the TEMPO/VALUE controls).
-
Press F-2 (SAVE) to confirm. A list of banks on the target card appears. Only banks of the selected type are shown.
-
Use the E-H (Scroll) buttons (or the TEMPO/VALUE controls) to move the target bank to the first line of the display.
-
Once the target bank is selected, press F-2 (SAVE) to save the files. The "Are you sure?" message will appear. Press ENTER to confirm, or EXIT to abort.
Warning: If you confirm, any data in the target bank will be deleted.
When the operation is completed (the "Wait" indicator appears), the source page comes back in the display, and you may perform further saving operations.
Saving a single item
You can save a single User item with a single operation.
-
Insert the target card into the card slot.
-
Th e whole content ("All") of the internal memory is already selected. Press F-3 (OPEN) to open the "All" folder. A list of User data types appear (each type is a separate folder).
text_image
chord tempo - 71 transpose [ + ] octave Card slot Card: Save page a 2b GLOBAL PERFORM PROGRAM SAVE OPEN CLOSE-
Use the E-H (Scroll) buttons (or the TEMPO/VALUE controls) to move the data type you are looking for to the first line of the display.
-
Once the data type is selected, press F-3 (OPEN) to open the folder and gain access to the separate banks.
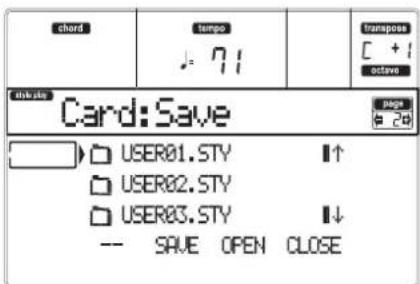
text_image
chord tempo ↓ 71 transpose [ + ] octavo Linkute Card: Save USER01.STY USER02.STY USER03.STY SAVE OPEN CLOSE-
Use the E-H (Scroll) buttons (or the TEMPO/VALUE controls) to move the bank containing the file to save to the first line of the display.
-
Once you have selected the bank, press F-3 (OPEN) to gain access to the single files.

text_image
chord tempo - 71 Transpose [ + ] octave Card: Save U1: 1 88-Groove1 U1: 2 88-Groove2 U1: 3 88-Groove3 -- SAVE OPEN CLOSE7.Once yo u have selected the file that you want to save, press F-2 (SAVE) to confirm the selection.
- The content of the target card appears in the display.

text_image
chord tempo J 71 transpose C +1 octave Card:Save page 2d NEWNAME.SET LIVE.SET ETHNICAT.SET SAVE OPEN CLOSEAt this point, you can:
- Create a new ".SET" folder (see "Creating a new ".SET" folder" on page 138).
- Save onto an existing ".SET" folder (saved data is merged with the existing data on the card).
-
If you are saving into an existing folder, move the desired ".SET" folder to the first line of the display, using the E-H (Scroll) buttons (or the TEMPO/ VALUE controls).
-
Press F-2 (SAVE) to confirm. A list of files on the target deice appears. Only files of the selected type are shown.
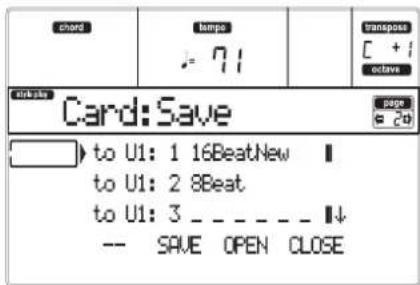
text_image
chord lamps - 71 transpose [ + ] octave Card: Save to U1: 1 16BeatNew to U1: 2 8Beat to U1: 3 _ _ _ _ _ _ ↓ -- SAVE OPEN CLOSELocations marked with a row of underscores (“____”) are empty locations.
-
Use the E-H (Scroll) buttons (or the TEMPO/VALUE controls) to move the target location to the first line of the display.
-
Once the target location is selected, press F-2 (SAVE) to save the file. The "Are you sure?" message will appear. Press ENTER to confirm, or EXIT to abort.
Warning: If you confirm, any data at the target location will be deleted.
When the operation is completed (the "Wait" indicator disappears), the source page comes back in the display and you may perform further saving operations.
Creating a new ".SET" folder
When saving data (Save operations), you can save onto existing folders, or you can create a new ".SET" folder. Here is how to do it.
- When the file list of the target card is in the display, use the E-H (Scroll) buttons (or the TEMPO/VALUE controls) to move the "NEW_NAME.SET" item to the first line of the display.
Note: A "NEW_NAME.SET" item is always the first item in any directory.
- When the "NEW_NAME.SET" item is selected, press one of the A VOLUME/VALUE buttons. You are prompted to assign a name to the new folder:
REVNAME.SET
-
Move the cursor using the DOWN/- and UP/+ buttons. Select a character using the DIAL. Insert a character at the cursor position by pressing the INSERT button. Delete a character at the cursor position by pressing the DELETE button.
-
When you have finished writing a name for the new folder, press F-2 (SAVE) to confirm. The "Are you sure?" message will appear. Press ENTER to confirm, or EXIT to abort.
PAGE 3 - COPY
In this page you can copy single files (i.e., midfiles of Jukebox files), whole folders (generic or ".SET" folders), or a generic folder's content. Note that you can copy data only inside the same card.
To preserve the data structure integrity, during Copy operations you can't open a ".SET" folder, and copy one of its files. You can only open generic folders.
Press SD CARD and use the MENU or PAGE buttons to reach this page.
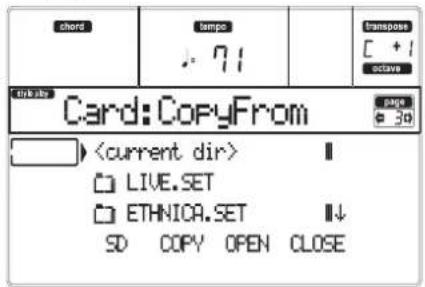
text_image
chord tempo . 71 transpose [ + ] octave Card: CopyFromCopying a whole folder or folder's content
You can copy a folder (generic or ".SET") into a different folder. If selecting the
Note: During the Copy procedure, you can't open a ".SET" folder. You can, anyway, open any generic folder.
-
Insert the card into the card slot.
-
Press F-1 to scan the card and show the file list.
-
Move the folder that you want to copy to the first line of the display. If it is contained in another folder, use the F-3 (OPEN) button to open it. Press F-4 (CLOSE) to go back to the previous hierarchic level.
To copy just the current folder's content, move the
- Once the item to copy is on the first line, press F-2 (COPY) to form the item selection. The window's header changes from "Copy from" to "Copy to".
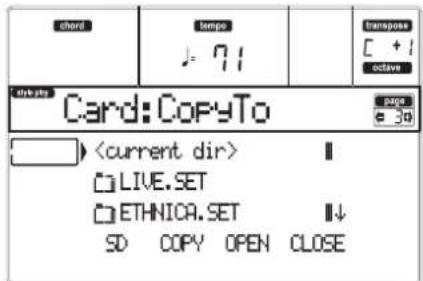
text_image
chord tempo J = 71 transpose [ + ] octave Card: CopyTo page e 3d- Move the target folder to the first line in the display.
- To copy into an existing generic folder (not a ".SET" folder), select that folder.
- To copy into the current folder, select the
- Once the target is selected, press F-2 (COPY). The "Overwrite?" message appears:

Press ENTER to confirm overwriting, EXIT to avoid it.
When you decide to overwrite, the data you are copying will replace the existing data on the target. For example, if the same midfile exists on the target folder, it will be overwritten. If a USER bank exists, it will be overwritten.
Data that doesn't exist on the source folder is left unchanged. For example, if the USER03 Style bank exists on the target folder, but not in the source folder, it is left untouched after copying the other banks.
When you decide not to overwrite, data existing on the target folder is left unchanged, therefore are not copied.
- The "Are you sure?" message appears. Press ENTER to confirm, EXIT to abort the copy.
Copying a single file
You can copy a single file from a generic folder to a different folder. The file must reside on the root (the main/highest folder in the card hierarchy) or into a generic folder. You can't copy single files from a ".SET" folder.
-
Insert the card into the card slot.
-
Press F-1 to scan the card and show the file list.
-
Move the folder, containing the file you wish to copy, to the first line of the display. If it is contained in another folder, use the F-3 (OPEN) button to open it. Press F-4 (CLOSE) to go back to the previous hierarchic level.
-
Press F-3 (OPEN) to open the folder containing the file to copy.
-
Move the file to copy to the first line of the display.
-
Once the file is on the first line, press F-2 (COPY) to confirm its selection. The window's header changes from "Copy from" to "Copy to".

text_image
chord tempo J-71 transpose [+1] octave Link pin Card: CopyTo page @50- Move the target folder to the first line in the display.
Press F-3 (OPEN) to open a folder, F-4 (CLOSE) to close it.
- Once the target is selected, press F-2 (COPY). The "Overwrite?" message appears:

Press ENTER to confirm overwriting, EXIT to avoid it.
When you decide to overwrite, the data you are copying will replace the existing data on the target. For example, if the same midfile exists on the target folder, it will be overwritten.
Data that doesn't exist on the source folder is left unchanged. For example, if the MYSONG01.MID midfile exists on the target folder, but not in the source folder, it is left untouched after copying the other data.
When you decide not to overwrite, data existing on the target folder is left unchanged, therefore are not copied.
- The "Are you sure?" message appears. Press ENTER to confirm, EXIT to abort the copy.
PAGE 4 - ERASE
The Erase function lets you erase files and folders from cards.

text_image
chord tempo . 71 Transpose [ + ] octave Card reader Card: Erase MyFILES.SET LIVE.SET ETHNICAT.SET SD DEL OPEN CLOSEErase procedure
- If the file to be deleted is contained in a card, insert the card into the card slot.
- Press F-1 to select a device. Devices are selected in this order: SD → SSD → SD...
| Device | Type |
| SD | SD (or MMC) Card |
| SSD | Solid State Disk (internal memory) |
- Move the file or folder that you want to erase to the first line of the display. If the file or folder you are looking for is in another folder, use the F-3 (OPEN) button to open it. Press F-4 (CLOSE) to go back to the previous hierarchic level.
- Press F-2 (ERASE) to delete the selected item. The "Are you sure?" message will appear. Press ENTER to confirm, or EXIT to abort.
When the operation is completed (the "Wait" indicator disappears), you are kept on the Erase page, and you may perform further erase operations.
PAGE 5 - FORMAT
The Format function lets you initialize a card.
Press SD CARD and use the MENU or PAGE buttons to reach this page.
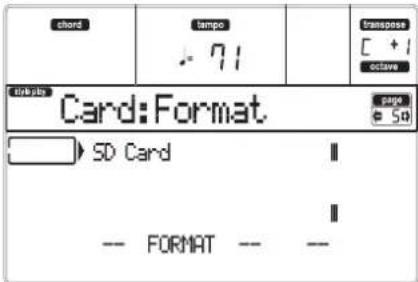
text_image
shord tempo .71 transpose [ +1 octave] Linkals Card:Format. Page @ 50 SD Card -- FORMAT -- --Warning: When formatting a card, all data it contains is lost.
SD Card
This is a very fast format command. This command rewrites just the FAT (File Allocation Table) of the card, without actual reformatting of all sectors.
- Insert a card into the card slot.
- Press F-2 (FORMAT) to select the formatting command.
- The "Delete all data?" message appears in the display; press ENTER to confirm, EXIT to abort.
- The "Press F-4 to continue" message appears in the display; press F-4 to confirm formatting, or EXIT to abort.
PAGE 6 - NEW DIR
The New Dir function lets you create a new folder in any of the cards, or inside any generic folder. You can't create or open ".SET" folders, since these are reserved folders, to be created with a Save operation.
Press SD CARD and use the MENU or PAGE buttons to reach this page.

text_image
chord tempo J 71 transpose C + actave Card:New Dir page 68 SD CREATE OPEN CLOSENew folder procedure
- Insert a card into the card slot.
-
Press F-1 to scan the card.
-
Press one of the A VOLUME/VALUE buttons. You are prompted to assign a name to the new folder:
REWNAME
Move the cursor using the DOWN/- and UP/+ buttons. Select a character using the DIAL. Insert a character at the cursor position by pressing the INSERT button. Delete a character at the cursor position by pressing the DELETE button.
- Press F-2 (CREATE) to confirm. The "Are you sure?" message appears. Press ENTER to confirm, EXIT to abort.
PAGE 7 - RENAME
Use the Rename function to change the name of a folder or a file. To preserve data structure consistence, you can't rename single files inside a ".SET" folder, or the ".SET" folder name extension.
Press SD CARD and use the MENU or PAGE buttons to reach this page.

text_image
chard tempo J: 71 transpose [ + ] octave Link key Card:Rename Page e 70 DVSET.SET ↑ LIVE.SET ETHNICA.SET ↓ SD RENAME OPEN CLOSERename procedure
- Insert the card that contains the file to be renamed into the card slot.
- Press F-1 to scan the card.
- Move the item to rename to the first line. Then press one of the A VOLUME/VALUE buttons. You are prompted to change the name:
Ethnic.set
Move the cursor using the DOWN/- and UP/+ buttons. Select a character using the DIAL. Insert a character at the cursor position by pressing the INSERT button. Delete a character at the cursor position by pressing the DELETE button.
- Press F-2 (RENAME) to confirm. The "Are you sure?" message appears. Press ENTER to confirm, EXIT to abort.
PAGE 8 - UTILITIES 1
This page includes a set of card utilities.
Press SD CARD and use the MENU or PAGE buttons to reach this page.
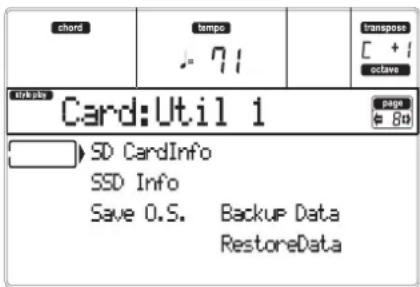
text_image
chard tempo . 71 Transpos [ + ] octave Linkpath Card:Util 1 SD CardInfo SSD Info Save O.S. Backup Data RestoreDataSD info
Select this command to see the name of the inserted card, and the free space on it.
If pressed without a card inserted, the "No card / Unformatted Press Exit" warning appears. Please, insert a card and press ENTER (or EXIT to abort).
SSD info
Select this command to see the free space on the Solid State Disk (SSD), used as the system's internal memory.
Save OS
This command starts an Operating System backup, to save a copy of the instrument's Operating System on a card.
Note: Should you not do a back-up and your internal data is changed, you can download the data from http://www.korgpa.com/, or ask your local KORG dealer.
- Select the Save OS command.
-
Insert a card and press ENTER. The following files are created on the card:
-
BPaMAR1.SYS
- NBPaMAR1.SYS
- OSPaMAR1.LZX
If the card is not formatted, microARRANGER asks if you want to format it:
No Card/Unformatted Sh+Enter to format
Keep SHIFT pressed, and press ENTER to format the card.
Backup Data
This command starts a backup of all internal factory data (Styles, Programs, Performances...) excluding the Operating System itself.
Note: Should you not do a back-up and your internal data is changed, you can download the data from http://www.korgpa.com/, or ask your local KORG dealer.
- Select the Backup Data command.
- The "Are you sure?" message appears. Press ENTER to continue, EXIT to abort.
If the card is not formatted, microARRANGER asks if you want to format it:
No Card/Unformatted Sh+Enter to format
Keep SHIFT pressed, and press ENTER to format the card.
Restore Data
This command restores the backup of the internal factory data, executed with the "Backup Data" command.
Note: Should your Factory Data card become corrupt, you can download the data from http://www.korgpa.com/, or ask your local KORG dealer.
Warning: Don't play on the keyboard while restoring data, and stay in the Card mode. Wait until the "Wait" message disappears, and the WRITE/CARD IN USE LED turns off.
- Prepare a card containing the Backup folder and insert it into the drive.
- Select this s command.
- The "Are you sure?" message appears. Press ENTER to continue, EXIT to abort.
- Wait until the backup card has been read.
- When the Wait message has disappeared, and the WRITE/CARD IN USE LED has turned off, turn the instrument off, then on again.
Note: At the end of a Restore Data operation, the "Some files missing" error message may appear. This is due to the lack of Performance banks 11–20 on older versions of the operating system of Pa80, whose data you are probably reading. However, this is not a problem. Press EXIT to close the message
PAGE 9 - UTILITIES 2
This page includes the Protect functions.
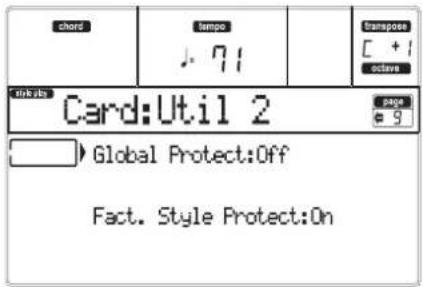
text_image
chord tempo .71 Transpose [ + ] octave Link to Card:Util 2 Global Protect:Off Fact. Style Protect:OnGlobal Protect
▶GBL
When loading a ".SET" file, this parameter (if On) protects the Global from being reprogrammed by the loaded data. All Global parameters are therefore left unchanged.
When loading a single ".GLB" file, this parameter is ignored, and the Global is overwritten by the loaded data.
Note: This parameter is automatically set to Off when turning the instrument off.
Factory Style Protect
When On, this parameter protects the Factory Styles (from the "8 BEAT/16 BEAT 1" to the "TRAD" bank) from being overwritten when loading data from card. Furthermore, you can't access these banks when saving data.
When Off, you can load or save User Styles even into the Factory Styles banks (from "8 BEAT/16 BEAT 1" to "TRAD"). This way, you can personalize your Factory Style banks.
Please note that the Save All procedure always saves only the USER Style banks.
Note: This parameter is automatically set to On when turning the instrument off.
Note: Should your accidentally delete some Factory Data, reload the Backup data, contact your KORG dealer or service center, or download the data from http://www.korgpa.com/.
APPENDIX
17. FACTORY DATA
STYLES
Note: You can remotely select Styles on the microARRANGER, by sending it Bank Select MSB (CC#0), Bank Select LSB (CC#32) and Program Change messages on the Control channel (see page 128).
| # | CC#0 | CC#32 | PC | Bank: 8/16 Beat 1 | CC#0 | CC#32 | PC | Bank: 8/16 Beat 2 | CC#0 | CC#32 | PC | Ballad |
| 1 | 0 | 0 | 0 | Soft Beat | 0 | 1 | 0 | Guitar Bld1 | 0 | 2 | 0 | Groove Bld |
| 2 | 1 | Pop Beat | 1 | Guitar Bld2 | 1 | Diva | ||||||
| 3 | 2 | Stndrd8Beat | 2 | 8Bt Analog1 | 2 | RockBallad1 | ||||||
| 4 | 3 | Unplug8Bt 1 | 3 | Analogyst | 3 | Folk Ballad | ||||||
| 5 | 4 | Love 8 Beat | 4 | 8Bt Analog2 | 4 | PopBallad 2 | ||||||
| 6 | 5 | Half Beat | 5 | Trendy Beat | 5 | HalfTimeBld | ||||||
| 7 | 6 | UK 8 Beat | 6 | Slow Ballad | 6 | CountryBld1 | ||||||
| 8 | 7 | 8BeatGroove | 7 | 6Strings Bt | 7 | 4/4 Ballad | ||||||
| 9 | 8 | UK RnB | 8 | Std 16Beat 1 | 8 | Love Ballad | ||||||
| 10 | 9 | PopBallad 1 | 9 | Std 16Beat 2 | 9 | NaturalBeat | ||||||
| 11 | 10 | HipHop Beat | 10 | Unpl.16Beat | 10 | Celtic Bld | ||||||
| 12 | 11 | LightRock 1 | 11 | Pop 16Beat1 | 11 | 16BtAnalog1 | ||||||
| 13 | 12 | LightRock 2 | 12 | Pop 16Beat2 | 12 | Color Beat | ||||||
| 14 | 13 | Miami Beat | 13 | Cinema Bld | 13 | PopBallad 3 | ||||||
| 15 | 14 | ClassicBeat | 14 | Windy Beat | 14 | 8Bt Analog3 | ||||||
| 16 | 15 | Plug8Bt 2 | 15 | Home Beat | 15 | 16BtAnalog2 | ||||||
| # | CC#0 | CC#32 | PC | Bank: Ballroom | CC#0 | CC#32 | PC | Bank: Dance | CC#0 | CC#32 | PC | Bank: Rock |
| 1 | 0 | 3 | 0 | Slow Pop | 0 | 4 | 0 | HouseGarage | 0 | 5 | 0 | Open Rock 1 |
| 2 | 1 | Slow Rock 1 | 1 | House | 1 | Open Rock 2 | ||||||
| 3 | 2 | Slow Rock 2 | 2 | Dream | 2 | Pop Rock | ||||||
| 4 | 3 | Unpl.SIRock | 3 | Techno | 3 | Fire Rock | ||||||
| 5 | 4 | BigBnd Fox1 | 4 | Underground | 4 | Hard Rock | ||||||
| 6 | 5 | Slow Waltz1 | 5 | Progressive | 5 | Heavy Rock | ||||||
| 7 | 6 | Slow Waltz2 | 6 | Jungle | 6 | RockShuffle | ||||||
| 8 | 7 | Foxtrot 1 | 7 | Rap | 7 | RockBallad2 | ||||||
| 9 | 8 | BigBnd Fox2 | 8 | Hip Hop | 8 | Half Time | ||||||
| 10 | 9 | Slow Fox | 9 | Disco 70 | 9 | Rock 6/8 | ||||||
| 11 | 10 | Foxtrot 2 | 10 | 80's Dance | 10 | Abbey Road | ||||||
| 12 | 11 | Operetta | 11 | Love Disco | 11 | Surf Rock | ||||||
| 13 | 12 | BigBnd Fox3 | 12 | Disco Party | 12 | Pop Shuffle | ||||||
| 14 | 13 | Charleston | 13 | Disco Funky | 13 | BluesShuffl | ||||||
| 15 | 14 | Quick Step | 14 | Disco Gully | 14 | 60's Rock | ||||||
| 16 | 15 | New Jive | 15 | Twist | 15 | Rock & Roll | ||||||
| # | CC#0 | CC#32 | PC | Bank: Soul & Funk | CC#0 | CC#32 | PC | Bank: World 1 | CC#0 | CC#32 | PC | Bank: World 2 |
| 1 | 0 | 6 | 0 | Rubber Funk | 0 | 7 | 0 | OberkrWaltz | 0 | 8 | 0 | Bluegrass |
| 2 | 1 | Groove Funk | 1 | OberkrPolka | 1 | Country 8Bt | ||||||
| 3 | 2 | Acid Jazz | 2 | Bavar.Pop 1 | 2 | Country16Bt | ||||||
| 4 | 3 | Double Beat | 3 | Bavar.Pop 2 | 3 | CountryBeat | ||||||
| 5 | 4 | Groove | 4 | Party Polka | 4 | Mod.Country | ||||||
| 6 | 5 | Jazz Funk | 5 | Pop Polka | 5 | CntryBoogie | ||||||
| 7 | 6 | Al Swing | 6 | Flipper 6/8 | 6 | CountryShf1 | ||||||
| 8 | 7 | HipHop Funk | 7 | Flipper 4/4 | 7 | CountryShf2 | ||||||
| 9 | 8 | HipHop Soul | 8 | Schlager 1 | 8 | CountryBld2 | ||||||
| 10 | 9 | MotownShufl | 9 | Schlager 2 | 9 | Country 3/4 | ||||||
| 11 | 10 | PopBallad 4 | 10 | Schlager 3 | 10 | Orleans | ||||||
| 12 | 11 | RhythmBlues | 11 | Schlager 4 | 11 | Jig | ||||||
| 13 | 12 | Soul | 12 | PopSchlager | 12 | CelticDream | ||||||
| 14 | 13 | Memphis | 13 | Trucker | 13 | Norteno | ||||||
| 15 | 14 | Motown | 14 | Cajun | 14 | Quebradita | ||||||
| 16 | 15 | Gospel | 15 | Zydeco | 15 | Tejano | ||||||
| # | CC#0 | CC#32 | PC | Bank: World 3 | CC#0 | CC#32 | PC | Bank: Latin 1 | CC#0 | CC#32 | PC | Bank: Latin 2 |
| 1 | 0 | 9 | 0 | Hora | 0 | 10 | 0 | UnplugBossa | 0 | 11 | 0 | Engl. Tango |
| 2 | 1 | Sevillana 1 | 1 | Basic Bossa | 1 | Orch. Tango | ||||||
| 3 | 2 | Sevillana 2 | 2 | L.A. Bossa | 2 | Tango.it | ||||||
| 4 | 3 | Jota | 3 | New Bossa | 3 | Habanera 1 | ||||||
| 5 | 4 | Copla | 4 | Miss Bossa | 4 | Habanera 2 | ||||||
| 6 | 5 | Classic 3/4 | 5 | Lite Bossa | 5 | Mambo 1 | ||||||
| 7 | 6 | Bolero | 6 | GrooveBossa | 6 | Mambo 2 | ||||||
| 8 | 7 | Minuetto | 7 | DiscoChaCha | 7 | Salsa 1 | ||||||
| 9 | 8 | Baroque | 8 | Cha Cha Cha | 8 | Salsa 2 | ||||||
| 10 | 9 | New Age | 9 | Sabor | 9 | Mariachi | ||||||
| 11 | 10 | Tarantella | 10 | ChaCha Funk | 10 | Reggae 1 | ||||||
| 12 | 11 | Raspa | 11 | Latin Rock | 11 | Reggae 2 | ||||||
| 13 | 12 | Vahde | 12 | UnplugLatin | 12 | Reggae 3 | ||||||
| 14 | 13 | Oriental | 13 | Beguine 1 | 13 | Pasodoble 1 | ||||||
| 15 | 14 | Roman | 14 | Beguine 2 | 14 | PasDobBanda | ||||||
| 16 | 15 | Ciftetelli | 15 | Slow Bolero | 15 | Pasodoble 2 | ||||||
| # | CC#0 | CC#32 | PC | Bank: Latin Dance | CC#0 | CC#32 | PC | Bank: Jazz 1 | CC#0 | CC#32 | PC | Bank: Jazz 2 |
| 1 | 0 | 12 | 0 | Samba | 0 | 13 | 0 | Jazz Brush | 0 | 14 | 0 | Big Band 3 |
| 2 | 1 | Sambalegre | 1 | Med. Swing | 1 | Sw. Shuffle | ||||||
| 3 | 2 | Disco Samba | 2 | Slow Swing | 2 | FastBigBand | ||||||
| 4 | 3 | Samba Funk | 3 | SwingBallad | 3 | LatinBigBnd | ||||||
| 5 | 4 | Merengue 1 | 4 | JazzWaltz 1 | 4 | BigBnd Fox4 | ||||||
| 6 | 5 | Merengue 2 | 5 | JazzWaltz 2 | 5 | Dixieland | ||||||
| 7 | 6 | Cumbia | 6 | 5/4 Swing | 6 | Hollywood | ||||||
| 8 | 7 | Latin Dance | 7 | Mood Swing | 7 | Broadway | ||||||
| 9 | 8 | Batucada | 8 | Be Bop | 8 | Acid Jazz | ||||||
| 10 | 9 | Rumba | 9 | Unpl.Swing1 | 9 | New Jazz | ||||||
| 11 | 10 | Gipsy | 10 | Unpl.Swing2 | 10 | Latin Jazz | ||||||
| 12 | 11 | Rumba Pop | 11 | B.BndBallad | 11 | Fusion | ||||||
| 13 | 12 | Calypso | 12 | BigBandMed. | 12 | Ragtime Pno | ||||||
| 14 | 13 | Lambada | 13 | Big Band 1 | 13 | Shuffle Pno | ||||||
| 15 | 14 | Meneito | 14 | BigBand40's | 14 | Boogie Pno | ||||||
| 16 | 15 | Macarena | 15 | Big Band 2 | 15 | Bossa Pno | ||||||
| # | CC#0 | CC#32 | PC | Bank: Trad | CC#0 | CC#32 | PC | Bank: User 1 | CC#0 | CC#32 | PC | Bank: User 2 |
| 1 | 0 | 15 | 0 | Ital.Valzer | 0 | 17 | 0 | Foxtrot 3 | 0 | 18 | 0 | 16Beat John |
| 2 | 1 | Valzer | 1 | Hully Gully | 1 | 8 Beat John | ||||||
| 3 | 2 | GermWaltz 1 | 2 | Mazurka 3 | 2 | 2Bt Country | ||||||
| 4 | 3 | GermWaltz 2 | 3 | Polka 3 | 3 | Bajon | ||||||
| 5 | 4 | Laendler | 4 | It. Valzer2 | 4 | Ipanema | ||||||
| 6 | 5 | WalzMusette | 5 | Slow Waltz3 | 5 | SanbaDeSol | ||||||
| 7 | 6 | ViennaWaltz | 6 | Trad.Bolero | 6 | Ricky | ||||||
| 8 | 7 | Viennese | 7 | NewBeguine | 7 | Mambo 99 | ||||||
| 9 | 8 | Mazurka 1 | 8 | SchlagerMx1 | 8 | PopShuffle2 | ||||||
| 10 | 9 | Mazurka 2 | 9 | SchlagerMx2 | 9 | Front Beat | ||||||
| 11 | 10 | Polka 1 | 10 | Dance Mix | 10 | Long Train | ||||||
| 12 | 11 | Polka 2 | 11 | Soca Dance | 11 | 2000 Hits | ||||||
| 13 | 12 | Germ. Polka | 12 | 60's Dance | 12 | Questions | ||||||
| 14 | 13 | Trad. Polka | 13 | 70's Disco | 13 | 8BeatRock1 | ||||||
| 15 | 14 | Marsch | 14 | Motown 2 | 14 | 8BeatRock2 | ||||||
| 16 | 15 | FrenchMarsc | 15 | Dance 80 | 15 | L.A. R & B |
| # | CC#0 | CC#32 | PC | Bank: User 3 | CC#0 | CC#32 | PC | Bank: Direct SD Page 1–2, 3–4, 5–6 |
| 1 | 0 | 19 | 0 | Soul 2 | 0 | 29–31 | 0–15 | *.SET |
| 2 | 1 Boston Boy | |||||||
| 3 | 2 6/8 | JazzPop | ||||||
| 4 | 3 J-Pop | |||||||
| 5 | 4 Hip | HopFunk2 | ||||||
| 6 | 5 Shuffle | |||||||
| 7 | 6 Jazz | Funk 2 | ||||||
| 8 | 7 Blues | |||||||
| 9 | 8 6/8 | Swing | ||||||
| 10 | 9 The | Avalon | ||||||
| 11 | 10 | 6/8 R & B | ||||||
| 12 | 11 | Groovin' | ||||||
| 13 | 12 90's | Funk | ||||||
| 14 | 13 Party | Funk | ||||||
| 15 | 14 6/8 | Blues | ||||||
| 16 | 15 Fusion | Funk | ||||||
STYLE ELEMENTS
Note: You can remotely select the various Style Elements on the microARRANGER, by sending it Program Change messages on the Control channel (see page 128).
| PC | Style Element | PC | Style Element | PC | Style Element | PC | Style Element | PC | Style Element |
| 80 | Var.1 | 81 | Var.2 | 82 | Var.3 | 83 | Var.4 | 84 | Intro 1 |
| 85 | Intro 2 | 86 | Fill 1 | 87 | Fill 2 | 88 | Ending 1 | 89 | Ending 2 |
| 90 | Break/Count IN | 91 | Fade IN/OUT | 92 | Memory | 93 | Bass Inversion | 94 | Manual Bass |
| 95 | Tempo Lock | 96 | Single Touch | 97 | Style Change |
Note: You can remotely select Single Touch Settings (STS) on the microARRANGER, by sending it Bank Select MSB (CC#0), Bank Select LSB (CC#32) and Program Change messages on the Control channel (see page 128). If a Style is already selected, just send the Program Change message.
| CC#0 | CC#32 | PC | STS | PC | STS | PC | STS | PC | STS |
| The same as the Style to which the STS pertains | 64 | STS 1 | 65 | STS 2 | 66 | STS 3 | 66 | STS 4 | |
PROGRAMS (BANK ORDER)
The following table enlists all microARRANGER Factory Programs in the same order as they appear by pressing the PROGRAM/PERFORMANCE bank buttons.
Legend: The table also includes MIDI data used to remotely select the Programs. CC00: Control Change 0, or Bank Select MSB. CC32: Control Change 32, or Bank Select LSB. PC: Program Change.
| Name CC00 CC32 PC | |||
| Bank: Piano | |||
| Grand Piano 121 3 0 | |||
| Class.Piano 121 4 0 | |||
| L/R Piano 121 5 0 | |||
| AcPianoWide 121 1 0 | |||
| Ac. Piano | 121 0 0 | ||
| BrightPian | 121 0 1 | ||
| ElGranPian | 121 0 2 | ||
| ElGrandWide | 121 1 2 | ||
| AcPianoDark | 121 2 0 | ||
| BrPianoWide | 121 1 1 | ||
| 90's Piano | 121 3 2 | ||
| M1 Piano | 121 2 2 | ||
| 2000'sPiano | 121 4 2 | ||
| ChorusPiano | 121 5 2 | ||
| Honky-Tonk | 121 | 0 | 3 |
| Honky-Wide | 121 1 3 | ||
| Piano Pad | 121 2 1 | ||
| Piano Pad 2 | 121 3 1 | ||
| PnoStrngPad | 121 4 1 | ||
| Pno&Strings | 121 7 0 | ||
| PianoLayers | 121 6 2 | ||
| Piano&Vibes | 121 6 0 | ||
| Harpsichord | 121 0 6 | ||
| Harpsi Oct. | 121 1 6 | ||
| Harpsi Wide | 121 2 6 | ||
| HarpsiK.Off | 121 3 6 | ||
| Harpsi Korg | 121 4 6 | ||
| Clav | 121 0 7 | ||
| Pulse Clav | 121 1 7 | ||
| Clav Wah | 121 2 7 | ||
| Clav Snap | 121 3 7 | ||
| Sticky Clav | 121 4 | 7 | |
| Bank: E. Piano | |||
| ClubElPiano | 121 | 11 | 4 |
| DynoTine EP | 121 | 10 | 4 |
| Vintage EP | 121 4 4 | ||
| Pro-Dyno EP | 121 5 4 | ||
| ProStage EP | 121 6 4 | ||
| Studio EP 121 7 4 | |||
| StereoDigEP | 121 6 5 | ||
| ClassDigiEP | 121 7 5 | ||
| EP Phase | 121 4 5 | ||
| Hybrid EP | 121 8 5 | ||
| Class.Tines | 121 9 5 | ||
| PhantomTine | 121 | 10 | 5 |
| Sweeping EP 121 12 5 | |||
| WhitePad EP | 121 | 13 | 5 |
| Name CC00 CC32 PC | |||
| ThinEIPiano | 121 9 4 | ||
| DW8000 EP | 121 | 11 | 5 |
| El.Piano 1 | 121 0 4 | ||
| El.Piano 2 | 121 0 5 | ||
| DetunedEP 1 | 121 | 1 | 4 |
| EP1Veloc.sw | 121 | 2 | 4 |
| 60'sEIPiano | 121 | 3 | 4 |
| DetunedEP 2 | 121 | 1 | 5 |
| EP2Veloc.sw | 121 | 2 | 5 |
| EP Legend | 121 | 3 | 5 |
| R&B E.Piano | 121 | 8 | 4 |
| SynPiano X | 121 | 5 | 5 |
| Bank: Mallet & Bell | |||
| Vibraphone | 121 | 0 | 11 |
| Vibraphone2 | 121 | 2 | 11 |
| Vibrap.Wide | 121 | 1 | 11 |
| Marimba | 121 | 0 | 12 |
| MarimbaWide | 121 | 1 | 12 |
| RimbaKeyOff | 121 | 2 | 12 |
| MonkeySkuls | 121 | 3 | 12 |
| Xylophone | 121 | 0 | 13 |
| Balaphon | 121 | 6 | 12 |
| Celesta | 121 | 0 8 | |
| Glocken | 121 | 0 9 | |
| Music Box | 121 | 0 | 10 |
| Sistro | 121 | 1 9 | |
| Orgel | 121 | 1 10 | |
| Digi Bell | 121 | 4 | 98 |
| Vs Bell Boy | 121 | 2 | 98 |
| Steel Drums | 121 | 0 | 114 |
| Warm Steel | 121 | 1 | 114 |
| TubularBell | 121 | 0 | 14 |
| Church Bell | 121 | 1 | 14 |
| Carillon | 121 | 2 | 14 |
| KrystalBell | 121 | 3 | 98 |
| ChurchBell2 | 121 | 3 | 14 |
| Tinkle Bell | 121 | 0 | 112 |
| Dulcimer | 121 | 0 | 15 |
| Santur | 121 | 1 15 | |
| Kalimba | 121 | 0 | 108 |
| VeloKalimba | 121 | 1 | 108 |
| MalletClock | 121 | 5 | 12 |
| Gamelan | 121 | 1 | 112 |
| BaliGamelan | 121 | 2 | 112 |
| GarbageMall | 121 | 3 | 112 |
| Bank: Accordion | |||
| Sweet Harm. | 121 | 1 | 22 |
| Harmonica | 121 | 0 | 22 |
| Harmonica 2 | 121 | 2 | 22 |
| Cassotto | 121 | 9 | 21 |
| Fisa Master | 121 | 8 | 21 |
| Fisa 16+8 | 121 6 21 | ||
| Fisa 16+4 | 121 7 21 | ||
| MusetteClar | 121 | 5 | 21 |
| Musette 1 | 121 | 3 | 21 |
| Musette 2 | 121 | 4 | 21 |
| Accordion | 121 | 0 | 21 |
| TangoAccord | 121 | 0 | 23 |
| Fisa Tango! | 121 | 1 | 23 |
| Name | CC00 | CC32 | PC |
| Akordeon 121 2 21 | |||
| Accordion 2 121 1 21 | |||
| Arab.Accord 121 10 | 21 | ||
| Bank: Organ 1 | |||
| Jimmy Organ 121 10 18 | |||
| BX3 Velo Sw 121 1 18 | |||
| ClassiClick 121 4 18 | |||
| M1 Organ 121 5 17 | |||
| Jazz Organ 121 8 16 | |||
| Dist. Organ 121 5 18 | |||
| RotaryOrgan 121 8 17 | |||
| DarkJazzOrg 121 4 16 | |||
| Bx3ShortDec 121 7 17 | |||
| SuperBXPerc 121 6 18 | |||
| Percuss.BX3 121 4 17 | |||
| Killer B | 121 2 18 | ||
| Drawb.Organ 121 0 16 | |||
| DetDrawbOrg | 121 1 16 | ||
| It60'sOrgan | 121 2 16 | ||
| DrawbOrgan2 | 121 3 16 | ||
| Old Wheels | 121 3 17 | ||
| Perc. Organ | 121 0 17 | ||
| Det.PercOrg | 121 1 17 | ||
| Perc.Organ2 | 121 2 17 | ||
| Rock Organ | 121 0 18 | ||
| Good Old B 121 10 16 | |||
| Dirty B | 121 3 18 | ||
| IperDarkOrg 121 5 16 | |||
| FullDrawbar | 121 6 16 | ||
| DWGS Organ | 121 7 16 | ||
| GospelOrgan 121 9 16 | |||
| PercShorDec 121 8 18 | |||
| Perc.Wheels | 121 9 18 | ||
| DirtyJazOrg 121 7 18 | |||
| VOX Legend 121 11 16 | |||
| TeknoOrgBas | 121 | 6 | 17 |
| ArabianOrg. | 121 12 | 16 | |
| Bank: Organ 2 | |||
| PipeMixture 121 3 19 | |||
| FlautoPipes 121 3 20 | |||
| Pipe Tutti | 121 6 19 | ||
| PositiveOrg | 121 7 19 | ||
| ChurchOrg.1 121 0 19 | |||
| ChurchOcMix 121 1 19 | |||
| DetunChurch | 121 2 19 | ||
| ChurchPipes 121 4 19 | |||
| Full Pipes | 121 5 19 | ||
| Reed Organ | 121 0 20 | ||
| Puff Organ | 121 1 20 | ||
| Small Pipe | 121 2 | 20 | |
| Bank: Guitar | |||
| NylonGuitar 121 0 24 | |||
| Spanish Gtr | 121 6 24 | ||
| SteelGuitar | 121 0 25 | ||
| 12StringGtr 121 1 25 | |||
| Club J.Gtr1 121 2 26 | |||
| CleanGuitar | 121 0 27 | ||
| MutedGuitar 121 0 28 | |||
| Name | CC00 | CC32 | PC |
| DistortionG | 121 0 30 | ||
| Nylon Bossa | 121 4 24 | ||
| NylonKeyOff | 121 2 24 | ||
| Steel Gtr 2 | 121 4 25 | ||
| AcGtrKeyOff | 121 5 24 | ||
| Club J.Gtr2 121 3 26 | |||
| Vintage S. | 121 4 27 | ||
| CleanMutGtr | 121 6 28 | ||
| Stereo Dist | 121 8 30 | ||
| Nylon Gtr 2 121 3 24 | |||
| Gtr Strings | 121 7 24 | ||
| FingerK.Off | 121 7 25 | ||
| St12Strings 121 5 25 | |||
| Jazz Guitar | 121 0 26 | ||
| SingleCoil | 121 6 27 | ||
| Clean Funk 121 8 28 | |||
| JoystGtr Y- 121 3 30 | |||
| Reso.Guitar | 121 12 25 | ||
| St.Folk Gtr | 121 | 9 | 25 |
| Steel&Body | 121 3 25 | ||
| Hackbrett 121 6 25 | |||
| Jazz Man 121 3 28 | |||
| DetCleanGtr | 121 1 27 | ||
| R&R Guitar 121 4 28 | |||
| OverdriveGt | 121 0 29 | ||
| Ukulele | 121 1 24 | ||
| Mandolin | 121 2 25 | ||
| Mandol.KOff | 121 10 25 | ||
| MandoTrem | 121 | 11 | 25 |
| Banjo | 121 0 105 | ||
| BanjoKeyOff | 121 1 105 | ||
| Bouzouki | 121 5 104 | ||
| Tambra | 121 6 104 | ||
| Finger Tips | 121 | 8 | 25 |
| MidToneGtr | 121 | 2 | 27 |
| Chorus Gtr 121 3 27 | |||
| ProcesEIGtr | 121 5 27 | ||
| NewStra.Gtr | 121 7 27 | ||
| DistRhytmGt | 121 2 30 | ||
| WetDistGtr 121 6 30 | |||
| SoloDistGtr 121 7 30 | |||
| L&R El.Gtr | 121 9 27 | ||
| L&R El.Gtr2 | 121 10 27 | ||
| RhythmEIGtr 121 7 28 | |||
| Guitarish | 121 8 27 | ||
| Country Nu | 121 | 11 | 27 |
| Stra. Chime | 121 | 5 | 28 |
| MuteMonster 121 5 30 | |||
| Disto Mute | 121 9 28 | ||
| FunkyCutGtr | 121 1 28 | ||
| MuteVeloGtr | 121 2 28 | ||
| FeedbackGtr | 121 1 30 | ||
| Guitar Pinc | 121 1 29 | ||
| Ped.Steel 2 | 121 4 26 | ||
| PedSteelGtr | 121 1 26 | ||
| GtrFeedback | 121 1 31 | ||
| PowerChords 121 4 30 | |||
| FunkyWhaSw | 121 12 27 | ||
| VoxWahChick | 121 3 120 | ||
| EGHarmonics | 121 2 31 | ||
| GtrHarmonic 121 0 31 | |||
| Sitar 121 0 104 | |||
| Sitar 2 121 1 104 | |||
| SitarTambou 121 2 104 | |||
| IndianStars 121 3 104 | |||
| Oud 121 2 105 | |||
| Kanun 121 2 107 | |||
| Kanun Trem. 121 3 107 | |||
| Kanun Mix 121 4 107 | |||
| Shamisen 121 0 106 | |||
| Koto 121 0 107 | |||
| Taisho Koto 121 1 107 | |||
| IndianFrets 121 4 | 104 | ||
| Bank: Strings & Vocals | |||
| Solo Violin 121 2 40 | |||
| StringQuart 121 9 48 | |||
| Ens. & Solo 121 11 48 | |||
| St. Strings | 121 | 3 | 48 |
| Analog Str | 121 2 50 | ||
| i3 Strings | 121 5 48 | ||
| Oh-AhVoices | 121 9 52 | ||
| Take Voices | 121 | 4 | 52 |
| Slow Violin | 121 3 40 | ||
| Camera Str. | 121 12 48 | ||
| ArcoStrings | 121 7 48 | ||
| LegatoStrng | 121 4 48 | ||
| MasterPad | 121 2 89 | ||
| N Strings | 121 6 48 | ||
| OhSlowVoice | 121 3 52 | ||
| TakeVoices2 121 5 52 | |||
| SlowAttViol 121 1 40 | |||
| PizzEnsembl 121 1 45 | |||
| Fiddle | 121 | 0 | 110 |
| PizzSection 121 2 45 | |||
| SweeperStr. | 121 | 1 | 49 |
| AnalogVelve | 121 3 50 | ||
| Aaah Choir 121 7 52 | |||
| Oooh Voices 121 2 52 | |||
| Violin | 121 0 40 | ||
| Viola | 121 0 41 | ||
| Cello | 121 0 42 | ||
| Contrabass | 121 | 0 | 43 |
| Tremolo Str | 121 0 44 | ||
| PizzicatoSt | 121 0 45 | ||
| Choir Aahs | 121 0 52 | ||
| Voice Oohs | 121 | 0 | 53 |
| StringsEns1 | 121 0 48 | ||
| StringsEns2 | 121 0 49 | ||
| Orches.Harp 121 0 46 | |||
| 60s Strings | 121 2 48 | ||
| Oct.Strings | 121 8 48 | ||
| SynStrings3 | 121 1 50 | ||
| Oooh Choir | 121 6 52 | ||
| Choir Aahs2 | 121 1 52 | ||
| String&Bras | 121 1 48 | ||
| Dbl Strings | 121 3 45 | ||
| ArabStrings 121 13 48 | |||
| SynStrings1 | 121 0 50 | ||
| SynStrings2 | 121 0 51 | ||
| Name | CC00 | CC32 | PC |
| Odissey | 121 4 50 | ||
| Grand Choir | 121 | 11 | 52 |
| Slow Choir | 121 | 10 | 52 |
| Symph. Bows | 121 | 10 | 48 |
| Cyber Choir | 121 2 85 | ||
| Choir Light | 121 | 12 | 52 |
| Vocalesque | 121 2 54 | ||
| Synth Voice | 121 0 54 | ||
| Voice Lead | 121 0 85 | ||
| Choir Pad 121 0 91 | |||
| Halo Pad | 121 | 0 | 94 |
| FullVox Pad | 121 | 9 | 91 |
| FreshBreath | 121 | 7 | 91 |
| EtherVoices | 121 | 1 | 85 |
| DreamVoice | 121 | 5 | 54 |
| Humming | 121 | 1 53 | |
| AnalogVoice 121 1 54 | |||
| Mmmh Choir 121 8 52 | |||
| StringChoir | 121 | 13 | 52 |
| ClassicVox | 121 | 4 | 54 |
| Doolally | 121 | 2 | 53 |
| Fresh Air | 121 | 2 | 91 |
| Vocalscape | 121 | 3 | 54 |
| Heaven | 121 | 3 91 | |
| Airways | 121 | 3 53 | |
| Yang Chin | 121 | 1 | 46 |
Bank: Trumpet & Trombone
| MonoTrumpet | 121 | 3 | 56 |
| Flugel Horn 121 7 56 | |||
| TrumpPitch | 121 | 5 | 56 |
| TrumpetExpr | 121 | 4 | 56 |
| HardTrombon | 121 | 3 | 57 |
| SoftTrombon | 121 4 57 | ||
| Wha Trumpet | 121 | 2 | 59 |
| Muted Trp | 121 | 0 | 59 |
| Dual Trump | 121 6 56 | ||
| Warm Flugel 121 8 56 | |||
| Trumpet | 121 | 0 | 56 |
| Trumpet 2 | 121 | 2 | 56 |
| Trombone | 121 | 0 | 57 |
| Trombone 2 | 121 | 1 | 57 |
| PitchTromb 121 5 57 | |||
| BeBopCornet | 121 | 9 56 | |
| DarkTrumpet | 121 | 1 | 56 |
| Tuba | 121 | 0 58 | |
| Tuba Gold | 121 | 2 | 58 |
| Ob.Tuba | 121 | 1 58 | |
| Dynabone | 121 | 3 | 58 |
| BrightTromb | 121 | 2 57 | |
| Muted Trp 2 | 121 | 1 | 59 |
Bank: Brass
| BigBandBrs | 121 | 4 61 | |
| Tight Brass | 121 | 2 | 61 |
| Trp & Brass 121 7 61 | |||
| Glen&Friend | 121 | 3 | 61 |
| MutEnsemble | 121 | 3 | 59 |
| Horns & Ens 121 4 60 | |||
| Syn Brass | 121 | 0 | 62 |
| Orches. Hit | 121 | 0 | 55 |
| Name | CC00 | CC32 | PC |
| BrassSect.1 121 0 61 | |||
| Fat Brass 121 13 61 | |||
| Trumpet Ens 121 9 61 | |||
| Glen & Boys 121 6 61 | |||
| MutEnsembl2 121 4 59 | |||
| French Horn 121 0 60 | |||
| Syn Brass 2 121 0 63 | |||
| Brass Hit 121 25 61 | |||
| AttackBrass 121 8 61 | |||
| BrassSect.2 121 1 61 | |||
| TromboneEns 121 10 61 | |||
| Sax & Brass 121 5 61 | |||
| Flute Muted 121 6 73 | |||
| FrenchHorn2 121 1 60 | |||
| Syn Brass 3 121 1 62 | |||
| Euro Hit | 121 3 55 | ||
| TightBrass2 121 12 61 | |||
| Dyna Brass | 121 14 61 | ||
| Trombones | 121 11 | 61 | |
| Brass Band | 121 16 61 | ||
| Brass Pad | 121 3 63 | ||
| French Sect 121 2 60 | |||
| Syn Brass 4 121 1 63 | |||
| 6th Hit | 121 2 55 | ||
| Power Brass | 121 21 61 | ||
| Brass Expr. | 121 15 61 | ||
| Dyna Brass2 | 121 22 61 | ||
| Film Brass | 121 17 61 | ||
| Brass Slow | 121 18 61 | ||
| ClassicHorn 121 3 60 | |||
| ElectrikBrs | 121 4 62 | ||
| BrassImpact 121 4 55 | |||
| Fanfare | 121 19 61 | ||
| Movie Brass | 121 20 | 61 | |
| Sfz Brass | 121 23 61 | ||
| Jump Brass 121 3 62 | |||
| AnalogBras1 121 2 62 | |||
| AnalogBras2 121 2 63 | |||
| Syn Brass 5 121 5 62 | |||
| Brass Fall | 121 26 61 | ||
| BassHitPlus 121 1 55 | |||
| Dbl Brass | 121 24 | 61 | |
| Bank: Sax | |||
| Tenor Noise | 121 | 1 | 66 |
| Alto Breath | 121 1 65 | ||
| Sweet Sprno 121 1 64 | |||
| Barit Growl | 121 1 67 | ||
| BreathyBari | 121 2 67 | ||
| Soft Tenor | 121 | 2 | 66 |
| SaxEnsemble | 121 2 65 | ||
| Folk Sax | 121 5 66 | ||
| Tenor Sax | 121 | 0 | 66 |
| Alto Sax | 121 0 65 | ||
| Soprano Sax 121 0 64 | |||
| BaritoneSax 121 0 67 | |||
| TenorBreath 121 3 66 | |||
| Tenor Growl 121 4 66 | |||
| BreathyAlto | 121 3 65 | ||
| AltSaxGrowl 121 4 65 | |||
| Name | CC00 | CC32 | PC |
| Bank: Woodwind | |||
| Jazz Flute | 121 1 73 | ||
| Old Shaku | 121 1 77 | ||
| FluteSwitch | 121 2 73 | ||
| FluteDyn5th 121 3 73 | |||
| Flute Frull | 121 4 73 | ||
| Pan Flute 121 0 75 | |||
| Jazz Clarin | 121 1 71 | ||
| Flute 2 | 121 9 73 | ||
| Double Reed 121 1 68 | |||
| EnglisHorn2 121 1 69 | |||
| Recorder 2 | 121 1 74 | ||
| Nay | 121 2 72 | ||
| Orch. Flute | 121 5 73 | ||
| WoodenFlute | 121 7 73 | ||
| War Pipes | 121 1 109 | ||
| ClarinetEns | 121 5 71 | ||
| Woodwinds | 121 6 71 | ||
| Small Orch | 121 1 72 | ||
| Kawala | 121 1 75 | ||
| Shaku 2 | 121 2 77 | ||
| Whistle 2 | 121 1 78 | ||
| Sect Winds | 121 3 71 | ||
| Sect Winds2 | 121 4 71 | ||
| Clarinet G | 121 2 71 | ||
| Folk Clarin | 121 7 71 | ||
| Oboe | 121 0 68 | ||
| EnglishHorn 121 0 69 | |||
| Bassoon | 121 0 70 | ||
| Clarinet | 121 0 71 | ||
| Piccolo | 121 0 72 | ||
| Flute | 121 0 73 | ||
| Recorder | 121 0 74 | ||
| Bambu Flute 121 8 73 | |||
| BlownBottle | 121 0 76 | ||
| Shakuhachi | 121 0 77 | ||
| Whistle | 121 0 78 | ||
| Ocarina | 121 0 79 | ||
| Bag Pipe 121 0 109 | |||
| Zurna | 121 | 1 | 111 |
| Hichiriki | 121 | 2 | 111 |
| Shanai | 121 | 0 | 111 |
| Flute Click | 121 1 | 121 | |
| Bank: Synth 1 | |||
| The Pad | 121 4 89 | ||
| Future Pad | 121 5 91 | ||
| Air Clouds | 121 1 97 | ||
| Dark Pad | 121 6 89 | ||
| Tinklin Pad | 121 3 97 | ||
| Pods In Pad 121 4 97 | |||
| Analog Pad | 121 8 89 | ||
| Analog Pad2 | 121 9 89 | ||
| Money Pad | 121 5 89 | ||
| TsunamiWave 121 6 91 | |||
| RavelianPad 121 8 91 | |||
| AstralDream 121 1 95 | |||
| Meditate | 121 2 95 | ||
| Reso Down | 121 2 97 | ||
| Sky Watcher | 121 2 90 | ||
| Super Sweep 121 4 90 | |||
| Wave Sweep 121 5 90 | |||
| Cross Sweep 121 6 90 | |||
| Digi IcePad 121 2 101 | |||
| Crimson5ths 121 1 86 | |||
| Freedom Pad 121 7 89 | |||
| Noble Pad 121 5 97 | |||
| Mellow Pad 121 4 95 | |||
| Lonely Spin 121 1 100 | |||
| Cinema Pad 121 5 95 | |||
| VirtualTrav 121 1 88 | |||
| Syn Ghostly 121 2 100 | |||
| MotionOcean 121 1 96 | |||
| Moon Cycles 121 5 102 | |||
| Farluce 121 11 90 | |||
| Bell Pad | 121 6 98 | ||
| Bell Choir | 121 7 98 | ||
| Warm Pad 121 0 89 | |||
| Sweep Pad 121 0 95 | |||
| Soundtrack 121 0 97 | |||
| Sine Pad | 121 1 89 | ||
| Itopia Pad | 121 1 91 | ||
| Big Panner | 121 4 63 | ||
| Dance ReMix 121 10 91 | |||
| Rave | 121 6 97 | ||
| ElastickPad 121 7 97 | |||
| Moving Bell 121 5 | 98 | ||
| Bank: Synth 2 | |||
| Old Portam | 121 3 80 | ||
| Power Saw | 121 5 81 | ||
| Octo Lead | 121 6 81 | ||
| ElectroLead | 121 2 87 | ||
| Rich Lead | 121 3 87 | ||
| ThinAnaLead 121 4 87 | |||
| Dance Lead 121 4 80 | |||
| Wave Lead | 121 5 80 | ||
| Sine Wave 121 6 80 | |||
| Synchro Cit 121 2 84 | |||
| Wild Arp | 121 6 55 | ||
| EspressLead | 121 5 87 | ||
| HipHop Lead | 121 6 87 | ||
| Analog Lead 121 7 80 | |||
| Seq Lead | 121 7 81 | ||
| Old&Analog | 121 8 80 | ||
| PhatSawLead | 121 8 81 | ||
| Glide Lead | 121 9 81 | ||
| Gliding Sq. | 121 9 80 | ||
| Flip Blip | 121 7 55 | ||
| Power Synth | 121 3 89 | ||
| Sine Switch | 121 10 80 | ||
| Reso Sweep | 121 | 1 | 90 |
| Syn Sweeper 121 3 90 | |||
| Cosmic 121 1 93 | |||
| MotionRaver | 121 1 101 | ||
| Sync Kron | 121 3 84 | ||
| Fire Wave | 121 10 81 | ||
| Dig PolySix 121 7 90 | |||
| Pop Syn Pad | 121 4 91 | ||
| Noisy Stabb | 121 | 8 | 90 |
| Name | CC00 | CC32 | PC |
| Mega Synth | 121 9 90 | ||
| TecnoPhonic | 121 | 10 | 90 |
| DarkElement 121 3 95 | |||
| Band Passed 121 3 102 | |||
| Cat Lead | 121 | 9 | 87 |
| Pan Reso | 121 | 4 | 102 |
| Square Rez | 121 | 11 | 80 |
| Rezbo | 121 | 11 | 81 |
| Auto Pilot | 121 | 14 | 38 |
| MetallicRez | 121 | 4 | 84 |
| Square Bass 121 7 87 | |||
| Syn Pianoid | 121 | 12 | 81 |
| Brian Sync | 121 | 5 | 84 |
| Arp Twins | 121 | 6 | 84 |
| Arp Angeles | 121 | 2 | 88 |
| Big & Raw 121 8 87 | |||
| Caribbean | 121 | 2 | 96 |
| Lead Square | 121 | 0 | 80 |
| Lead Saw | 121 | 0 | 81 |
| Calliope | 121 | 0 | 82 |
| Chiff | 121 | 0 | 83 |
| Charang | 121 | 0 | 84 |
| Fifths Lead | 121 | 0 | 86 |
| Bass & Lead | 121 | 0 | 87 |
| New Age Pad | 121 | 0 | 88 |
| Polysynth | 121 0 90 | ||
| BowedGlass | 121 | 0 | 92 |
| MetallicPad 121 0 93 | |||
| Crystal | 121 | 0 | 98 |
| Atmosphere | 121 | 0 | 99 |
| Brightness | 121 | 0 | 100 |
| LeadSquare2 121 1 80 | |||
| Lead Sine | 121 | 2 | 80 |
| Lead Saw 2 | 121 | 1 | 81 |
| LeadSawPuls | 121 | 2 | 81 |
| LeadDbISaw | 121 | 3 | 81 |
| Seq. Analog | 121 | 4 | 81 |
| Wire Lead | 121 | 1 | 84 |
| Soft Wrl | 121 1 | 87 | |
| Bank: Bass | |||
| Acous. Bass | 121 | 0 | 32 |
| Finger Bass | 121 | 0 | 33 |
| Picked Bass 121 0 34 | |||
| Fretl. Bass | 121 | 0 | 35 |
| Slap Bass 1 | 121 0 36 | ||
| Slap Bass 2 | 121 0 37 | ||
| SynthBass 1 | 121 | 0 | 38 |
| SynthBass 2 | 121 | 0 | 39 |
| AcBass Buzz 121 1 32 | |||
| Fing ElBass | 121 2 33 | ||
| Pick ElBass | 121 1 34 | ||
| Fret. Bass2 121 1 35 | |||
| SuperSwBass | 121 | 1 | 36 |
| SuperSwBas2 | 121 | 2 | 36 |
| SynBassWarm | 121 | 1 | 38 |
| SynBassReso | 121 2 38 | ||
| Bass & Ride | 121 | 2 | 32 |
| FingElBass2 | 121 | 3 | 33 |
| PickElBass2 | 121 2 34 | ||
| Fretless Sw 121 2 35 | |||
| Thumb Bass 121 1 37 | |||
| Finger Slap 121 1 33 | |||
| Attack Bass 121 1 39 | |||
| Rubber Bass 121 2 39 | |||
| FingElBass3 121 4 33 | |||
| DarkR&BBass 121 4 35 | |||
| Sweet Fret 121 3 35 | |||
| Dyna Bass 121 2 37 | |||
| Stick Bass 121 5 33 | |||
| Glr Bass 121 4 34 | |||
| Bass Mute 121 5 34 | |||
| Dr. Octave 121 16 38 | |||
| Nasty Bass 121 6 39 | |||
| 30303 Bass 121 5 38 | |||
| Stein Bass | 121 | 3 | 34 |
| Euro Bass 121 4 39 | |||
| Jungle Rez | 121 5 39 | ||
| 30303Square | 121 6 38 | ||
| Bass Square | 121 7 38 | ||
| Phat Bass | 121 7 39 | ||
| SynBass Res | 121 8 38 | ||
| Clav Bass | 121 3 38 | ||
| Hammer 121 4 38 | |||
| AttackPulse 121 3 39 | |||
| Digi Bass 1 121 9 38 | |||
| BlindAsABat | 121 12 38 | ||
| PoinkerBass 121 8 39 | |||
| Digi Bass 3 121 11 38 | |||
| Jungle Bass | 121 13 38 | ||
| Hybrid Bass | 121 15 38 | ||
| Digi Bass 2 121 10 | 38 | ||
| Bank: Drum & Perc | |||
| Std. Kit1 | 120 | 0 | 0 |
| Std. Kit2 | 120 | 0 | 1 |
| Std. Kit3 | 120 | 0 | 2 |
| Std. Kit4 | 120 | 0 | 4 |
| AcousticKit | 120 | 0 | 3 |
| Room Kit1 120 0 8 | |||
| Room Kit2 120 0 12 | |||
| Jungle Kit | 120 0 10 | ||
| HipHop Kit1 | 120 | 0 | 9 |
| HipHop Kit2 | 120 0 13 | ||
| Techno Kit1 | 120 | 0 | 11 |
| Techno Kit2 | 120 | 0 | 14 |
| Techno Kit3 | 120 | 0 | 15 |
| Power Kit1 120 0 16 | |||
| Power Kit2 120 0 17 | |||
| Electro Kit | 120 0 24 | ||
| Analog Kit 120 0 25 | |||
| House Kit1 | 120 0 26 | ||
| House Kit2 | 120 0 27 | ||
| House Kit3 | 120 0 28 | ||
| House Kit4 | 120 0 29 | ||
| Jazz Kit | 120 0 32 | ||
| Brush Kit1 120 0 40 | |||
| Brush V.S.2 120 0 41 | |||
| OrchestraK. | 120 0 48 | ||
| Bdrum&Sdrum | 120 0 50 | ||
| Name | CC00 | CC32 | PC |
| SFX Kit | 120 0 56 | ||
| Percus.Kit1 120 0 64 | |||
| Latin P.Kit | 120 | 0 | 65 |
| TRI-Per.KIT | 120 0 66 | ||
| ArabianKit1 | 120 | 0 | 116 |
| ArabianKit2 | 120 | 0 | 117 |
| Timpani | 121 0 47 | ||
| Agogo | 121 | 0 | 113 |
| Log Drum | 121 4 12 | ||
| Woodblock | 121 | 0 | 115 |
| Taiko Drum | 121 | 0 | 116 |
| Melodic Tom | 121 | 0 | 117 |
| Synth Drum | 121 | 0 | 118 |
| Reverse Cym | 121 | 0 | 119 |
| Dragon Gong | 121 | 1 | 119 |
| Castanets | 121 | 1 | 115 |
| Concert BD | 121 | 1 | 116 |
| MelodicTom2 | 121 | 1 | 117 |
| Rhyt.BoxTom | 121 | 1 | 118 |
| Electr.Drum | 121 | 2 | 118 |
| Rev Tom | 121 | 2 | 117 |
| Rev Snare | 121 | 3 | 118 |
| i30Perc.Kit 120 0 | 67 | ||
| Bank: SFX | |||
| Goblins | 121 0 101 | ||
| Echo Drops | 121 0 102 | ||
| Star Theme | 121 | 0 | 103 |
| GtFretNoise | 121 | 0 | 120 |
| BreathNoise | 121 0 121 | ||
| Seashore | 121 0 122 | ||
| Bird Tweet 121 0 123 | |||
| AcBassStrng | 121 2 120 | ||
| Telephone | 121 | 0 | 124 |
| Helicopter | 121 0 125 | ||
| Applause | 121 0 126 | ||
| Gun Shot | 121 0 127 | ||
| SynthMallet 121 1 98 | |||
| Echo Bell | 121 1 102 | ||
| Echo Pan | 121 2 102 | ||
| GtrCutNoise | 121 | 1 | 120 |
| Rain | 121 1 122 | ||
| Thunder | 121 2 122 | ||
| Wind | 121 3 122 | ||
| Stream | 121 | 4 | 122 |
| Bubble | 121 5 122 | ||
| Dog | 121 1 123 | ||
| HorseGallop | 121 2 123 | ||
| Bird Tweet2 | 121 3 123 | ||
| Telephone 2 | 121 | 1 | 124 |
| Door Creak 121 2 124 | |||
| Door | 121 3 124 | ||
| Scratch | 121 | 4 | 124 |
| Wind Chime | 121 5 124 | ||
| Car Engine 121 1 125 | |||
| Car Stop | 121 2 125 | ||
| Car Pass | 121 3 125 | ||
| Car Crash | 121 4 125 | ||
| Siren | 121 5 125 | ||
| Train | 121 | 6 | 125 |
| Jetplane 121 7 125 | |||
| Starship 121 8 125 | |||
| Burst Noise 121 9 125 | |||
| Laughing 121 1 126 | |||
| Screaming 121 2 126 | |||
| Punch 121 3 126 | |||
| Heart Beat 121 4 126 | |||
| Footsteps 121 5 126 | |||
| Machine Gun 121 1 127 | |||
| Lasergun 121 2 127 | |||
| Explosion 121 3 127 | |||
| Ice Rain 121 0 96 | |||
| Jaw Harp 121 3 105 | |||
| HitInIndia 121 5 55 | |||
| Stadium 121 6 126 | |||
PROGRAMS (PROGRAM CHANGE ORDER)
The following table enlists all microARRANGER Factory Programs in order of Bank Select-Program Change number.
Legend: The table also includes MIDI data used to remotely select the Programs. CC00: Control Change 0, or Bank Select MSB. CC32: Control Change 32, or Bank Select LSB. PC: Program Change.
| CC00 | CC32 PC | Name | microARRANGER Bank | GM2 | |
| 121 | 0 | 0 | Ac. Piano | Piano | √ |
| 121 | 1 | 0 | AcPianoWide | Piano | √ |
| 121 | 2 | 0 | AcPianoDark | Piano | √ |
| 121 3 | 0 Grand Piano Piano | ||||
| 121 4 | 0 Class.Piano Piano | ||||
| 121 | 5 | 0 | L/R Piano | Piano | |
| 121 6 | 0 Piano&Vibes | Piano | |||
| 121 | 7 | 0 | Pno&Strings | Piano | |
| 121 | 0 | 1 | BrightPiano | Piano | √ |
| 121 1 | 1 BrPiano Wide Piano √ | ||||
| 121 | 2 | 1 | Piano Pad | Piano | |
| 121 | 3 | 1 | Piano Pad 2 | Piano | |
| 121 4 | 1 PnoStringPad Piano | ||||
| 121 | 0 | 2 | ElGranPiano | Piano | √ |
| 121 | 1 | 2 | ElGrandWide | Piano | √ |
| 121 | 2 | 2 | M1 Piano | Piano | |
| 121 | 3 | 2 | 90's Piano | Piano | |
| 121 | 4 | 2 | 2000'sPiano | Piano | |
| 121 | 5 | 2 | ChorusPiano | Piano | |
| 121 | 6 | 2 | PianoLayers | Piano | |
| 121 | 0 | 3 | Honky-Tonk | Piano | √ |
| 121 | 1 | 3 | Honky-Wide | Piano | √ |
| 121 | 0 | 4 | El.Piano 1 | E.Piano | √ |
| 121 | 1 | 4 | DetunedEP 1 | E.Piano | √ |
| 121 | 2 | 4 | EP1Veloc.sw | E.Piano | √ |
| 121 | 3 | 4 | 60'sElPiano | E.Piano | √ |
| 121 | 4 | 4 | Vintage EP | E.Piano | |
| 121 5 | 4 Pro-Dyno EP E Piano | ||||
| 121 | 6 | 4 | ProStage EP | E.Piano | |
| 121 | 7 | 4 | Studio EP | E.Piano | |
| 121 8 | 4 R&B E Piano E Piano | ||||
| 121 | 9 | 4 | ThinElPiano | E.Piano | |
| 121 | 10 | 4 | DynoTine EP | E.Piano | |
| 121 | 11 | 4 | ClubElPiano | E.Piano | |
| 121 | 0 | 5 | El.Piano 2 | E.Piano | √ |
| 121 | 1 | 5 | DetunedEP 2 | E.Piano | √ |
| 121 | 2 | 5 | EP2Veloc.sw | E.Piano | √ |
| 121 | 3 | 5 | EP Legend | E.Piano | √ |
| 121 | 4 | 5 | EP Phase | E.Piano | √ |
| 121 | 5 | 5 | SynPiano X | E.Piano | |
| 121 | 6 | 5 | StereoDigEP | E.Piano | |
| 121 | 7 | 5 | ClassDigiEP | E.Piano | |
| 121 | 8 | 5 | Hybrid EP | E.Piano | |
| 121 | 9 | 5 | Class.Tines | E.Piano | |
| 121 | 10 | 5 | PhantomTine | E.Piano | |
| 121 | 11 | 5 | DW8000 EP | E.Piano | |
| 121 | 12 | 5 | Sweeping EP | E.Piano | |
| 121 | 13 | 5 | WhitePad EP | E.Piano | |
| 121 | 0 | 6 | Harpsichord | Piano | √ |
| CC00 | CC32 | PC Name | microARRANGER Bank | GM2 | |
| 121 | 1 | 6 | Piano | ||
| 121 | 2 | 6 | Piano | ||
| 121 | 3 | 6 | Piano | ||
| 121 | 4 | 6 | Piano | ||
| 121 | 0 | 7 | Piano | ||
| 121 | 1 | 7 | Piano | ||
| 121 2 | 7 Clav Wah Piano | ||||
| 121 | 3 | 7 | Piano | ||
| 121 | 4 | 7 | Piano | ||
| 121 | 0 | 8 | Mallet & Bell | ||
| 121 | 0 | 9 | Mallet & Bell | ||
| 121 | 1 | 9 | Mallet & Bell | ||
| 121 | 0 | 10 | Music Box | Mallet & Bell | |
| 121 | 1 | 10 | Orgel | Mallet & Bell | |
| 121 | 0 | 11 | Vibraphone | Mallet & Bell | |
| 121 | 1 | 11 | Vibrap.Wide | Mallet & Bell | |
| 121 | 2 | 11 | Vibraphone2 | Mallet & Bell | |
| 121 | 0 | 12 | Marimba | Mallet & Bell | |
| 121 | 1 | 12 | MarimbaWide | Mallet & Bell | |
| 121 | 2 | 12 | RimbaKeyOff | Mallet & Bell | |
| 121 | 3 | 12 | MonkeySkuls | Mallet & Bell | |
| 121 | 4 | 12 | Log Drum | Drum & Perc | |
| 121 | 5 | 12 | MalletClock | Mallet & Bell | |
| 121 | 6 | 12 | Balaphon | Mallet & Bell | |
| 121 0 | 13 | Xylophone | Mallet & Bell | ||
| 121 | 0 | 14 | TubularBell | Mallet & Bell | |
| 121 | 1 | 14 | Church Bell | Mallet & Bell | |
| 121 | 2 | 14 | Carillon | Mallet & Bell | |
| 121 | 3 | 14 | ChurchBell2 | Mallet & Bell | |
| 121 | 0 | 15 | Dulcimer | Mallet & Bell | |
| 121 | 1 | 15 | Santur | Mallet & Bell | |
| 121 | 0 | 16 | Drawb.Organ | Organ 1 | |
| 121 | 1 | 16 | DetDrawbOrg | Organ 1 | |
| 121 | 2 | 16 | It60'sOrgan | Organ 1 | |
| 121 | 3 | 16 | DrawbOrgan2 | Organ 1 | |
| 121 | 4 | 16 | DarkJazzOrg | Organ 1 | |
| 121 | 5 | 16 | IperDarkOrg | Organ 1 | |
| 121 | 6 | 16 | FullDrawbar | Organ 1 | |
| 121 | 7 | 16 | DWGS Organ | Organ 1 | |
| 121 | 8 | 16 | Jazz Organ | Organ 1 | |
| 121 | 9 | 16 | GospelOrgan | Organ 1 | |
| 121 | 10 | 16 | Good Old B | Organ 1 | |
| 121 | 11 | 16 | VOX Legend | Organ 1 | |
| 121 | 12 | 16 | ArabianOrg. | Organ 1 | |
| 121 | 0 | 17 | Perc. Organ | Organ 1 | |
| 121 | 1 | 17 | Det.PercOrg | Organ 1 | |
| 121 | 2 | 17 | Perc.Organ2 | Organ 1 | |
| 121 | 3 | 17 | Old Wheels | Organ 1 | |
| 121 | 4 | 17 | Percuss.BX3 | Organ 1 | |
| 121 | 5 | 17 | M1 Organ | Organ 1 | |
| 121 | 6 | 17 | TeknoOrgBas | Organ 1 | |
| 121 | 7 | 17 | Bx3ShortDec | Organ 1 | |
| 121 | 8 | 17 | RotaryOrgan | Organ 1 | |
| 121 | 0 | 18 | Rock Organ | Organ 1 | |
| 121 | 1 | 18 | BX3 Velo Sw | Organ 1 | |
| 121 | 2 | 18 | Killer B | Organ 1 | |
| 121 | 3 | 18 | Dirty B | Organ 1 | |
| 121 | 4 | 18 | ClassiClick | Organ 1 | |
| 121 | 5 | 18 | Dist. Organ | Organ 1 | |
| CC00 | CC32 | PC | Name | microARRANGER Bank | GM2 |
| 121 6 | 18 SuperBXPerc | Organ 1 | |||
| 121 7 | 18 DirtyJazOrg | Organ 1 | |||
| 121 8 | 18 PercShorDec | Organ 1 | |||
| 121 9 | 18 Perc.Wheels | Organ 1 | |||
| 121 10 | 18 Jimmy Organ | Organ 1 | |||
| 121 | 0 | 19 | ChurchOrg.1 | Organ 2 | |
| 121 | 1 | 19 | ChurchOcMix | Organ 2 | |
| 121 | 2 | 19 | DetunChurch | Organ 2 | |
| 121 3 | 19 PipeMixture | Organ 2 | |||
| 121 4 | 19 ChurchPipes | Organ 2 | |||
| 121 5 | 19 Full Pipes | Organ 2 | |||
| 121 6 | 19 Pipe Tutti | Organ 2 | |||
| 121 7 | 19 Positive | Organ 2 | |||
| 121 | 0 | 20 | Reed Organ | Organ 2 | |
| 121 | 1 | 20 | Puff Organ | Organ 2 | |
| 121 | 2 | 20 | Small Pipe | Organ 2 | |
| 121 3 | 20 Flauto | Pipes Organ 2 | |||
| 121 | 0 | 21 | Accordion | Accordion | |
| 121 | 1 | 21 | Accordion 2 | Accordion | |
| 121 | 2 | 21 | Akordeon | Accordion | |
| 121 3 | 21 Musette 1 | Accordion | |||
| 121 4 | 21 Musette 2 | Accordion | |||
| 121 | 5 | 21 | MusetteClar | Accordion | |
| 121 6 | 21 Fisa 1 | 6+8 Accordion | |||
| 121 7 | 21 Fisa 1 | 6+4 Accordion | |||
| 121 8 | 21 | Fisa Master | Accordion | ||
| 121 | 9 | 21 | Cassotto | Accordion | |
| 121 10 | 21 Arab.Accord | Accordion | |||
| 121 | 0 | 22 | Harmonica | Accordion | |
| 121 | 1 | 22 | Sweet Harm. | Accordion | |
| 121 2 | 22 Harmonica 2 | Accordion | |||
| 121 | 0 | 23 | TangoAccord | Accordion | |
| 121 | 1 | 23 | Fisa Tango! | Accordion | |
| 121 | 0 | 24 | NylonGuitar | Guitar | |
| 121 | 1 | 24 | Ukulele | Guitar | |
| 121 | 2 | 24 | NylonKeyOff | Guitar | |
| 121 | 3 | 24 | Nylon Gtr 2 | Guitar | |
| 121 | 4 | 24 | Nylon Bossa | Guitar | |
| 121 | 5 | 24 | AcGtrKeyOff | Guitar | |
| 121 6 | 24 Spanish Gtr Guitar | ||||
| 121 | 7 | 24 | Gtr Strings | Guitar | |
| 121 | 0 | 25 | SteelGuitar | Guitar | |
| 121 | 1 | 25 | 12StringGtr | Guitar | |
| 121 | 2 | 25 | Mandolin | Guitar | |
| 121 | 3 | 25 | Steel&Body | Guitar | |
| 121 | 4 | 25 | Steel Gtr 2 | Guitar | |
| 121 | 5 | 25 | St12Strings | Guitar | |
| 121 | 6 | 25 | Hackbrett | Guitar | |
| 121 7 | 25 FingerK.Off Guitar | ||||
| 121 | 8 | 25 | Finger Tips | Guitar | |
| 121 9 | 25 St.Folk Gtr Guitar | ||||
| 121 10 | 25 Mandol.KOff | Guitar | |||
| 121 | 11 | 25 | MandoTrem | Guitar | |
| 121 12 | 25 Reso.Guitar | Guitar | |||
| 121 | 0 | 26 | Jazz Guitar | Guitar | |
| 121 | 1 | 26 | PedSteelGtr | Guitar | |
| 121 | 2 | 26 | Club J.Gtr1 | Guitar | |
| 121 | 3 | 26 | Club J.Gtr2 | Guitar | |
| 121 4 | 26 Ped.Steel 2 Guitar | ||||
| CC00 | CC32 | PC | Name | microARRANGER Bank | GM2 |
| 121 | 0 | 27 | CleanGuitar | Guitar | √ |
| 121 | 1 | 27 | DetCleanGtr | Guitar | √ |
| 121 | 2 | 27 | MidToneGtr | Guitar | √ |
| 121 3 | 27 Chorus Gtr | Guitar | |||
| 121 | 4 | 27 | Vintage S. | Guitar | |
| 121 5 | 27 ProcesElGtr | Guitar | |||
| 121 6 | 27 Single Coil | Guitar | |||
| 121 7 | 27 New Stra.Gtr Guitar | ||||
| 121 8 | 27 Guitarish | Guitar | |||
| 121 9 | 27 L&R El.Gtr | Guitar | |||
| 121 10 | 27 L&R El.Gtr2 | Guitar | |||
| 121 | 11 | 27 | Country Nu | Guitar | |
| 121 12 | 27 FunkyWhaSw | Guitar | |||
| 121 | 0 | 28 | MutedGuitar | Guitar | √ |
| 121 | 1 | 28 | FunkyCutGtr | Guitar | √ |
| 121 | 2 | 28 | MuteVeloGtr | Guitar | √ |
| 121 | 3 | 28 | Jazz Man | Guitar | √ |
| 121 4 | 28 R&R Guitar Guitar | ||||
| 121 5 | 28 Stra.Chime | Guitar | |||
| 121 6 | 28 Clean MutGtr Guitar | ||||
| 121 7 | 28 RhythmElGtr Guitar | ||||
| 121 8 | 28 Clean Funk Guitar | ||||
| 121 9 | 28 Disto Mute | Guitar | |||
| 121 | 0 | 29 | OverdriveGt | Guitar | √ |
| 121 | 1 | 29 | Guitar Pinch | Guitar | √ |
| 121 | 0 | 30 | DistortionG | Guitar | √ |
| 121 | 1 | 30 | FeedbackGtr | Guitar | √ |
| 121 | 2 | 30 | DistRhytmGt | Guitar | √ |
| 121 | 3 | 30 | JoystGtr Y- | Guitar | |
| 121 4 | 30 PowerChords | Guitar | |||
| 121 5 | 30 MuteMonster | Guitar | |||
| 121 6 | 30 WetDistGtr | Guitar | |||
| 121 7 | 30 SoloDistGtr | Guitar | |||
| 121 | 8 | 30 | Stereo Dist | Guitar | |
| 121 | 0 | 31 | GtrHarmonic | Guitar | √ |
| 121 | 1 | 31 | GtrFeedback | Guitar | √ |
| 121 2 | 31 EGHarmonics | Guitar | |||
| 121 | 0 | 32 | Acous. Bass | Bass | √ |
| 121 | 1 | 32 | AcBass Buzz | Bass | |
| 121 | 2 | 32 | Bass & Ride | Bass | |
| 121 | 0 | 33 | Finger Bass | Bass | √ |
| 121 | 1 | 33 | Finger Slap | Bass | √ |
| 121 | 2 | 33 | Fing ElBass | Bass | |
| 121 | 3 | 33 | FingElBass2 | Bass | |
| 121 | 4 | 33 | FingElBass3 | Bass | |
| 121 | 5 | 33 | Stick Bass | Bass | |
| 121 | 0 | 34 | Picked Bass | Bass | √ |
| 121 1 | 34 Pick ElBass Bass | ||||
| 121 | 2 | 34 | PickElBass2 | Bass | |
| 121 | 3 | 34 | Stein Bass | Bass | |
| 121 | 4 | 34 | Gtr Bass | Bass | |
| 121 | 5 | 34 | Bass Mute | Bass | |
| 121 | 0 | 35 | Frell. Bass | Bass | √ |
| 121 | 1 | 35 | Fret. Bass2 | Bass | |
| 121 | 2 | 35 | Fretless Sw | Bass | |
| 121 | 3 | 35 | Sweet Fret | Bass | |
| 121 | 4 | 35 | DarkR&BBass | Bass | |
| 121 | 0 | 36 | Slap Bass 1 | Bass | √ |
| 121 | 1 | 36 | SuperSwBass | Bass | |
| 121 2 | 36 Super | SwBas2 | Bass | ||
| 121 | 0 | 37 | Slap Bass 2 | Bass | √ |
| 121 1 | 37 Thumb | Bass | Bass | ||
| 121 2 | 37 Dyna | Bass | Bass | ||
| 121 | 0 | 38 | SynthBass 1 | Bass | √ |
| 121 | 1 | 38 | SynBassWarm | Bass | √ |
| 121 | 2 | 38 | SynBassReso | Bass | √ |
| 121 | 3 | 38 | Clav Bass | Bass | √ |
| 121 | 4 | 38 | Hammer | Bass | √ |
| 121 5 | 38 30303 | Bass | Bass | ||
| 121 6 | 38 30303 | Square | Bass | ||
| 121 7 | 38 Bass | Square | Bass | ||
| 121 8 | 38 SynBass | Res | Bass | ||
| 121 9 | 38 Digi | Bass 1 | Bass | ||
| 121 | 10 | 38 | Digi Bass 2 | Bass | |
| 121 | 11 | 38 | Digi Bass 3 | Bass | |
| 121 | 12 | 38 | BlindAsABat | Bass | |
| 121 | 13 | 38 | Jungle Bass | Bass | |
| 121 | 14 | 38 | Auto Pilot | Synth 2 | |
| 121 | 15 | 38 | Hybrid Bass | Bass | |
| 121 | 16 | 38 | Dr. Octave | Bass | |
| 121 | 0 | 39 | SynthBass 2 | Bass | √ |
| 121 | 1 | 39 | Attack Bass | Bass | √ |
| 121 | 2 | 39 | Rubber Bass | Bass | √ |
| 121 | 3 | 39 | AttackPulse | Bass | √ |
| 121 | 4 | 39 | Euro Bass | Bass | |
| 121 5 | 39 Jungle | Rez | Bass | ||
| 121 6 | 39 Nasty | Bass | Bass | ||
| 121 | 7 | 39 | Phat Bass | Bass | |
| 121 8 | 39 Poinker | Bass | Bass | ||
| 121 | 0 | 40 | Violin | Strings & Vocals | √ |
| 121 | 1 | 40 | SlowAttViol | Strings & Vocals | √ |
| 121 | 2 | 40 | Solo Violin | Strings & Vocals | |
| 121 | 3 | 40 | Slow Violin | Strings & Vocals | |
| 121 | 0 | 41 | Viola | Strings & Vocals | √ |
| 121 | 0 | 42 | Cello | Strings & Vocals | √ |
| 121 | 0 | 43 | Contrabass | Strings & Vocals | √ |
| 121 | 0 | 44 | Tremolo Str | Strings & Vocals | √ |
| 121 | 0 | 45 | PizzicatoSt | Strings & Vocals | √ |
| 121 | 1 | 45 | PizzEnsembl | Strings & Vocals | |
| 121 | 2 | 45 | PizzSection | Strings & Vocals | |
| 121 | 3 | 45 | Dbl Strings | Strings & Vocals | |
| 121 | 0 | 46 | Orches.Harp | Strings & Vocals | √ |
| 121 | 1 | 46 | Yang Chin | Strings & Vocals | √ |
| 121 | 0 | 47 | Timpani | Drum & Perc | √ |
| 121 | 0 | 48 | StringsEns1 | Strings & Vocals | √ |
| 121 | 1 | 48 | String&Bras | Strings & Vocals | √ |
| 121 | 2 | 48 | 60s Strings | Strings & Vocals | √ |
| 121 | 3 | 48 | St. Strings | Strings & Vocals | |
| 121 | 4 | 48 | LegatoStrng | Strings & Vocals | |
| 121 | 5 | 48 | i3 Strings | Strings & Vocals | |
| 121 | 6 | 48 | N Strings | Strings & Vocals | |
| 121 | 7 | 48 | ArcoStrings | Strings & Vocals | |
| 121 | 8 | 48 | Oct.Strings | Strings & Vocals | |
| 121 | 9 | 48 | StringQuart | Strings & Vocals | |
| 121 | 10 | 48 | Symph. Bows | Strings & Vocals | |
| 121 | 11 | 48 | Ens. & Solo | Strings & Vocals | |
| 121 | 12 | 48 | Camera Str. | Strings & Vocals | |
| 121 | 13 | 48 | ArabStrings | Strings & Vocals | |
| CC00 | CC32 | PC | Name | microARRANGER Bank | GM2 |
| 121 | 0 | 49 | StringsEns2 | Strings & Vocals | √ |
| 121 | 1 | 49 | SweeperStr. | Strings & Vocals | |
| 121 | 0 | 50 | SynStrings1 | Strings & Vocals | √ |
| 121 | 1 | 50 | SynStrings3 | Strings & Vocals | √ |
| 121 | 2 | 50 | Analog Str | Strings & Vocals | |
| 121 | 3 | 50 | AnalogVelve | Strings & Vocals | |
| 121 | 4 | 50 | Odissey | Strings & Vocals | |
| 121 | 0 | 51 | SynStrings2 | Strings & Vocals | √ |
| 121 | 0 | 52 | Choir Aahs | Strings & Vocals | √ |
| 121 | 1 | 52 | Choir Aahs2 | Strings & Vocals | √ |
| 121 | 2 | 52 | Oooh Voices | Strings & Vocals | |
| 121 | 3 | 52 | OhSlowVoice | Strings & Vocals | |
| 121 | 4 | 52 | Take Voices | Strings & Vocals | |
| 121 | 5 | 52 | TakeVoices2 | Strings & Vocals | |
| 121 | 6 | 52 | Oooh Choir | Strings & Vocals | |
| 121 | 7 | 52 | Aaah Choir | Strings & Vocals | |
| 121 | 8 | 52 | Mmmh Choir | Strings & Vocals | |
| 121 | 9 | 52 | Oh-AhVoices | Strings & Vocals | |
| 121 | 10 | 52 | Slow Choir | Strings & Vocals | |
| 121 | 11 | 52 | Grand Choir | Strings & Vocals | |
| 121 | 12 | 52 | Choir Light | Strings & Vocals | |
| 121 | 13 | 52 | StringChoir | Strings & Vocals | |
| 121 | 0 | 53 | Voice Oohs | Strings & Vocals | √ |
| 121 | 1 | 53 | Humming | Strings & Vocals | √ |
| 121 | 2 | 53 | Doolally | Strings & Vocals | |
| 121 | 3 | 53 | Airways | Strings & Vocals | |
| 121 | 0 | 54 | Synth Voice | Strings & Vocals | √ |
| 121 | 1 | 54 | AnalogVoice | Strings & Vocals | √ |
| 121 | 2 | 54 | Vocalesque | Strings & Vocals | |
| 121 | 3 | 54 | Vocalscape | Strings & Vocals | |
| 121 | 4 | 54 | ClassicVox | Strings & Vocals | |
| 121 | 5 | 54 | DreamVoice | Strings & Vocals | |
| 121 | 0 | 55 | Orches. Hit | Brass | √ |
| 121 | 1 | 55 | BassHitPlus | Brass | √ |
| 121 | 2 | 55 | 6th Hit | Brass | √ |
| 121 | 3 | 55 | Euro Hit | Brass | √ |
| 121 4 | 55 BrassImpact | Brass | |||
| 121 5 | 55 HitInIndia | SFX | |||
| 121 | 6 | 55 | Wild Arp | Synth 2 | |
| 121 | 7 | 55 | Flip Blip | Synth 2 | |
| 121 | 0 | 56 | Trumpet | Trp & Trbn | √ |
| 121 | 1 | 56 | DarkTrumpet | Trp & Trbn | √ |
| 121 | 2 | 56 | Trumpet 2 | Trp & Trbn | |
| 121 3 | 56 MonoTrumpet | Trp & Trbn | |||
| 121 | 4 | 56 | TrumpetExpr | Trp & Trbn | |
| 121 | 5 | 56 | TrumpPitch | Trp & Trbn | |
| 121 | 6 | 56 | Dual Trump | Trp & Trbn | |
| 121 | 7 | 56 | Flugel Horn | Trp & Trbn | |
| 121 | 8 | 56 | Warm Flugel | Trp & Trbn | |
| 121 9 | 56 BeBopCornet | Trp & Trbn | |||
| 121 0 | 57 | Trombone | Trp & Trbn | √ | |
| 121 | 1 | 57 | Trombone 2 | Trp & Trbn | √ |
| 121 | 2 | 57 | BrightTromb | Trp & Trbn | √ |
| 121 | 3 | 57 | HardTrombon | Trp & Trbn | |
| 121 4 | 57 SoftTrombon | Trp & Trbn | |||
| 121 | 5 | 57 | PitchTromb | Trp & Trbn | |
| 121 | 0 | 58 | Tuba | Trp & Trbn | √ |
| 121 1 | 58 Ob.Tuba Trp & Trbn | ||||
| 121 | 2 | 58 | Tuba Gold | Trp & Trbn | |
| 121 3 | 58 Dynabone Trp & Trbn | ||||
| 121 | 0 | 59 | Muted Trp | Trp & Trbn | |
| 121 | 1 | 59 | Muted Trp 2 | Trp & Trbn | |
| 121 2 | 59 Wha Trumpet | Trp & Trbn | |||
| 121 3 | 59 MutEnsemble | Trp & Trbn | |||
| 121 4 | 59 MutEnsembl2 | Trp & Trbn | |||
| 121 | 0 | 60 | French Horn | Brass | |
| 121 | 1 | 60 | FrenchHorn2 | Brass | |
| 121 2 | 60 French Sect Brass | ||||
| 121 3 | 60 ClassicHorn Brass | ||||
| 121 4 | 60 Horns & Ens Brass | ||||
| 121 | 0 | 61 | BrassSect.1 | Brass | |
| 121 | 1 | 61 | BrassSect.2 | Brass | |
| 121 2 | 61 Tight Brass | ||||
| 121 3 | 61 Glen& Friend Brass | ||||
| 121 4 | 61 BigBandBrs Brass | ||||
| 121 5 | 61 Sax & Brass | Brass | |||
| 121 6 | 61 Glen & Boys Brass | ||||
| 121 | 7 | 61 | Trp & Brass | Brass | |
| 121 8 | 61 Attack Brass | ||||
| 121 | 9 | 61 | Trumpet Ens | Brass | |
| 121 | 10 61 | TromboneEns Brass | |||
| 121 | 11 | 61 Trombones Brass | |||
| 121 | 12 61 | TightBrass2 Brass | |||
| 121 | 13 61 | Fat Brass Brass | |||
| 121 | 14 61 | Dyna Brass | Brass | ||
| 121 | 15 61 | Brass Expr. Brass | |||
| 121 | 16 61 | Brass Band Brass | |||
| 121 | 17 61 | Film Brass Brass | |||
| 121 | 18 61 | Brass Slow Brass | |||
| 121 | 19 61 | Fanfare Brass | |||
| 121 | 20 | 61 | Movie Brass | Brass | |
| 121 | 21 61 | Power Brass Brass | |||
| 121 | 22 61 | Dyna Brass2 Brass | |||
| 121 | 23 61 | Sfz Brass Brass | |||
| 121 | 24 61 | Dbl Brass Brass | |||
| 121 | 25 61 | Brass Hit Brass | |||
| 121 | 26 61 | Brass Fall Brass | |||
| 121 | 0 | 62 | Syn Brass 1 | Brass | |
| 121 | 1 | 62 | Syn Brass 3 | Brass | |
| 121 | 2 | 62 | AnalogBras1 | Brass | |
| 121 | 3 | 62 | Jump Brass | Brass | |
| 121 | 4 | 62 | ElectrikBrs | Brass | |
| 121 | 5 | 62 | Syn Brass 5 | Brass | |
| 121 | 0 | 63 | Syn Brass 2 | Brass | |
| 121 | 1 | 63 | Syn Brass 4 | Brass | |
| 121 | 2 | 63 | AnalogBras2 | Brass | |
| 121 3 | 63 Brass Pad Brass | ||||
| 121 | 4 | 63 | Big Panner | Synth 1 | |
| 121 | 0 | 64 | Soprano Sax | Sax | |
| 121 | 1 | 64 | Sweet Spmo | Sax | |
| 121 | 0 | 65 | Alto Sax | Sax | |
| 121 1 | 65 Alto Breath | Sax | |||
| 121 2 | 65 SaxEnsemble | Sax | |||
| 121 3 | 65 BreathyAlto | Sax | |||
| 121 | 4 | 65 | AltSaxGrowl | Sax | |
| 121 | 0 | 66 | Tenor Sax | Sax | |
| 121 | 1 | 66 | Tenor Noise | Sax | |
| 121 | 2 | 66 | Soft Tenor | Sax | |
| CC00 | CC32 | PC | Name | microARRANGER Bank | GM2 |
| 121 3 | 66 Tenor | Breath | Sax | ||
| 121 | 4 | 66 | Tenor Growl | Sax | |
| 121 5 | 66 Folk Sax | Sax | |||
| 121 | 0 | 67 | BaritoneSax | Sax | √ |
| 121 1 | 67 Barit | Growl | Sax | ||
| 121 2 | 67 BreathyBari | Sax | |||
| 121 | 0 | 68 | Oboe | Woodwind | √ |
| 121 1 | 68 Double Reed | Woodwind | |||
| 121 | 0 | 69 | EnglishHorn | Woodwind | √ |
| 121 | 1 | 69 | EnglisHorn2 | Woodwind | |
| 121 | 0 | 70 | Bassoon | Woodwind | √ |
| 121 | 0 | 71 | Clarinet | Woodwind | √ |
| 121 | 1 | 71 | Jazz Clarin | Woodwind | |
| 121 | 2 | 71 | Clarinet G | Woodwind | |
| 121 3 | 71 Sect Winds Woodwind | ||||
| 121 | 4 | 71 | Sect Winds2 | Woodwind | |
| 121 | 5 | 71 | ClarinetEns | Woodwind | |
| 121 6 | 71 Woodwinds | Woodwind | |||
| 121 | 7 | 71 | Folk Clarin | Woodwind | |
| 121 | 0 | 72 | Piccolo | Woodwind | √ |
| 121 | 1 | 72 | Small Orch | Woodwind | |
| 121 | 2 | 72 | Nay | Woodwind | |
| 121 | 0 | 73 | Flute | Woodwind | √ |
| 121 1 | 73 Jazz Flute Woodwind | ||||
| 121 | 2 | 73 | FluteSwitch | Woodwind | |
| 121 3 | 73 FluteDyn5th Woodwind | ||||
| 121 | 4 | 73 | Flute Frull | Woodwind | |
| 121 | 5 | 73 | Orch. Flute | Woodwind | |
| 121 6 | 73 Flute Muted Woodwind | ||||
| 121 | 7 | 73 | WoodenFlute | Woodwind | |
| 121 | 8 | 73 | Bambu Flute | Woodwind | |
| 121 | 9 | 73 | Flute 2 | Woodwind | |
| 121 | 0 | 74 | Recorder | Woodwind | √ |
| 121 | 1 | 74 | Recorder 2 | Woodwind | |
| 121 | 0 | 75 | Pan Flute | Woodwind | √ |
| 121 | 1 | 75 | Kawala | Woodwind | |
| 121 | 0 | 76 | BlownBottle | Woodwind | √ |
| 121 | 0 | 77 | Shakuhachi | Woodwind | √ |
| 121 | 1 | 77 | Old Shaku | Woodwind | |
| 121 | 2 | 77 | Shaku 2 | Woodwind | |
| 121 | 0 | 78 | Whistle | Woodwind | √ |
| 121 | 1 | 78 | Whistle 2 | Woodwind | |
| 121 | 0 | 79 | Ocarina | Woodwind | √ |
| 121 | 0 | 80 | Lead Square | Synth 2 | √ |
| 121 | 1 | 80 | LeadSquare2 | Synth 2 | √ |
| 121 | 2 | 80 | Lead Sine | Synth 2 | √ |
| 121 3 | 80 Old Portam Synth 2 | ||||
| 121 | 4 | 80 | Dance Lead | Synth 2 | |
| 121 | 5 | 80 | Wave Lead | Synth 2 | |
| 121 | 6 | 80 | Sine Wave | Synth 2 | |
| 121 7 | 80 Analog Lead Synth 2 | ||||
| 121 8 | 80 Old&Analog Synth 2 | ||||
| 121 | 9 | 80 | Gliding Sq. | Synth 2 | |
| 121 | 10 | 80 | Sine Switch | Synth 2 | |
| 121 | 11 | 80 | Square Rez | Synth 2 | |
| 121 | 0 | 81 | Lead Saw | Synth 2 | √ |
| 121 | 1 | 81 | Lead Saw 2 | Synth 2 | √ |
| 121 | 2 | 81 | LeadSawPuls | Synth 2 | √ |
| 121 | 3 | 81 | LeadDblSaw | Synth 2 | √ |
| 121 | 4 | 81 | Seq. Analog | Synth 2 | √ |
| 121 5 | 81 Power | Saw Synth 2 | |||
| 121 6 | 81 Octo | Lead Synth 2 | |||
| 121 7 | 81 Seq | Lead Synth 2 | |||
| 121 8 | 81 Phat | SawLead | Synth 2 | ||
| 121 9 | 81 Glide | Lead Synth 2 | |||
| 121 10 | 81 Fire | Wave Synth 2 | |||
| 121 11 | 81 Rezbo | Synth 2 | |||
| 121 12 | 81 Syn | Pianoid | Synth 2 | ||
| 121 | 0 | 82 | Calliope | Synth 2 | √ |
| 121 | 0 | 83 | Chiff | Synth 2 | √ |
| 121 | 0 | 84 | Charang | Synth 2 | √ |
| 121 | 1 | 84 | Wire Lead | Synth 2 | √ |
| 121 | 2 | 84 | Synchro City | Synth 2 | |
| 121 3 | 84 Sync | Kron Synth 2 | |||
| 121 | 4 | 84 | MetallicRez | Synth 2 | |
| 121 5 | 84 Brian | Sync Synth 2 | |||
| 121 | 6 | 84 | Arp Twins | Synth 2 | |
| 121 | 0 | 85 | Voice Lead | Strings & Vocals | √ |
| 121 | 1 | 85 | EtherVoices | Strings & Vocals | |
| 121 | 2 | 85 | Cyber Choir | Strings & Vocals | |
| 121 | 0 | 86 | Fifths Lead | Synth 2 | √ |
| 121 | 1 | 86 | Crimson5ths | Synth 2 | |
| 121 | 0 | 87 | Bass & Lead | Synth 2 | √ |
| 121 | 1 | 87 | Soft Wrl | Synth 2 | √ |
| 121 | 2 87 | ElectroLead Synth 2 | |||
| 121 3 | 87 Rich | Lead Synth 2 | |||
| 121 | 4 | 87 | ThinAnaLead | Synth 2 | |
| 121 | 5 | 87 | EspressLead | Synth 2 | |
| 121 | 6 | 87 | HipHop Lead | Synth 2 | |
| 121 | 7 | 87 | Square Bass | Synth 2 | |
| 121 | 8 | 87 | Big & Raw | Synth 2 | |
| 121 | 9 | 87 | Cat Lead | Synth 2 | |
| 121 | 0 | 88 | New Age Pad | Synth 1 | √ |
| 121 | 1 | 88 | VirtualTrav | Synth 1 | |
| 121 2 | 88 Arp | Angeles Synth 1 | |||
| 121 | 0 | 89 | Warm Pad | Synth 1 | √ |
| 121 | 1 | 89 | Sine Pad | Synth 1 | √ |
| 121 2 | 89 Master | Pad Synth 1 | |||
| 121 | 3 | 89 | Power Synth | Synth 1 | |
| 121 | 4 | 89 | The Pad | Synth 1 | |
| 121 5 | 89 Money | Pad Synth 1 | |||
| 121 | 6 | 89 | Dark Pad | Synth 1 | |
| 121 | 7 | 89 | Freedom Pad | Synth 1 | |
| 121 | 8 | 89 | Analog Pad | Synth 1 | |
| 121 | 9 | 89 | Analog Pad2 | Synth 1 | |
| 121 | 0 | 90 | Polysynth | Synth 1 | √ |
| 121 | 1 | 90 | Reso Sweep | Synth 1 | |
| 121 | 2 | 90 | Sky Watcher | Synth 1 | |
| 121 | 3 | 90 | Syn Sweeper | Synth 1 | |
| 121 | 4 | 90 | Super Sweep | Synth 1 | |
| 121 | 5 | 90 | Wave Sweep | Synth 1 | |
| 121 | 6 | 90 | Cross Sweep | Synth 1 | |
| 121 | 7 | 90 | Dig PolySix | Synth 1 | |
| 121 | 8 | 90 | Noisy Stabb | Synth 1 | |
| 121 9 | 90 Mega | Synth Synth 1 | |||
| 121 | 10 | 90 | TecnoPhonic | Synth 1 | |
| 121 | 11 | 90 | Farluce | Synth 1 | |
| 121 | 0 | 91 | Choir Pad | Synth 1 | √ |
| CC00 | CC32 | PC | Name | microARRANGER Bank | GM2 |
| 121 | 1 | 91 | Itopia Pad | Synth 1 | √ |
| 121 | 2 | 91 | Fresh Air | Strings & Vocals | |
| 121 | 3 | 91 | Heaven | Synth 1 | |
| 121 | 4 | 91 | Pop Syn Pad | Synth 1 | |
| 121 | 5 | 91 | Future Pad | Synth 1 | |
| 121 | 6 | 91 | TsunamiWave | Synth 1 | |
| 121 | 7 | 91 | FreshBreath | Synth 1 | |
| 121 | 8 | 91 | RavelianPad | Synth 1 | |
| 121 | 9 | 91 | FullVox Pad | Synth 1 | |
| 121 10 | 91 Dance ReMix | Synth 1 | |||
| 121 | 0 | 92 | BowedGlass | Synth 1 | √ |
| 121 | 0 | 93 | MetallicPad | Synth 1 | √ |
| 121 | 1 | 93 | Cosmic | Synth 1 | |
| 121 | 0 | 94 | Halo Pad | Synth 1 | √ |
| 121 | 0 | 95 | Sweep Pad | Synth 1 | √ |
| 121 | 1 | 95 | AstralDream | Synth 1 | |
| 121 | 2 | 95 | Meditate | Synth 1 | |
| 121 | 3 | 95 | DarkElement | Synth 1 | |
| 121 | 4 | 95 | Mellow Pad | Synth 1 | |
| 121 | 5 | 95 | Cinema Pad | Synth 1 | |
| 121 | 0 | 96 | Ice Rain | Synth 1 | √ |
| 121 | 1 | 96 | MotionOcean | Synth 1 | |
| 121 2 | 96 Caribbean Synth 1 | ||||
| 121 | 0 | 97 | Soundtrack | Synth 1 | √ |
| 121 1 | 97 Air Clouds Synth 1 | ||||
| 121 2 | 97 Reso Down | Synth 1 | |||
| 121 | 3 | 97 | Tinklin Pad | Synth 1 | |
| 121 | 4 | 97 | Pods In Pad | Synth 1 | |
| 121 | 5 | 97 | Noble Pad | Synth 1 | |
| 121 | 6 | 97 | Rave | Synth 1 | |
| 121 | 7 | 97 | ElastickPad | Synth 1 | |
| 121 | 0 | 98 | Crystal | Synth 2 | √ |
| 121 | 1 | 98 | SynthMallet | SFX | √ |
| 121 | 2 | 98 | Vs Bell Boy | Mallet & Bell | |
| 121 | 3 | 98 | KrystalBell | Mallet & Bell | |
| 121 | 4 | 98 | Digi Bell | Mallet & Bell | |
| 121 | 5 | 98 | Moving Bell | Synth 1 | |
| 121 | 6 | 98 | Bell Pad | Mallet & Bell | |
| 121 | 7 | 98 | Bell Choir | Synth 1 | |
| 121 | 0 | 99 | Atmosphere | Synth 2 | √ |
| 121 | 0 | 100 | Brightness | Synth 2 | √ |
| 121 | 1 | 100 | Lonely Spin | Synth 1 | |
| 121 | 2 | 100 | Syn Ghostly | Synth 1 | |
| 121 | 0 | 101 | Goblins | SFX | √ |
| 121 | 1 | 101 | MotionRaver | Synth 2 | |
| 121 | 2 | 101 | Digi IcePad | Synth 1 | |
| 121 | 0 | 102 | Echo Drops | SFX | √ |
| 121 | 1 | 102 | Echo Bell | SFX | √ |
| 121 | 2 | 102 | Echo Pan | SFX | √ |
| 121 | 3 | 102 | Band Passed | Synth 2 | |
| 121 4 | 102 | Pan Reso | Synth 2 | ||
| 121 | 5 | 102 | Moon Cycles | Synth 1 | |
| 121 | 0 | 103 | Star Theme | SFX | √ |
| 121 | 0 | 104 | Sitar | Guitar | √ |
| 121 | 1 | 104 | Sitar 2 | Guitar | √ |
| 121 | 2 | 104 | SitarTambou | Guilar | |
| 121 | 3 | 104 | IndianStars | Guitar | |
| 121 | 4 | 104 | IndianFrets | Guitar | |
| 121 | 5 | 104 | Bouzouki | Guitar | |
| 121 6 | 104 Tamba Guitar | ||||
| 121 | 0 | 105 | Banjo | Guitar | |
| 121 1 | 105 Banjo KeyOff | Guitar | |||
| 121 2 | 105 Oud Guitar | ||||
| 121 3 | 105 Jaw Harp SFX | ||||
| 121 | 0 | 106 | Shamisen | Guitar | |
| 121 | 0 | 107 | Koto | Guitar | |
| 121 | 1 | 107 | Taisho Koto | Guitar | |
| 121 2 | 107 Kanun Guitar | ||||
| 121 3 | 107 Kanun Trem | Guitar | |||
| 121 4 | 107 Kanun Mix | Guitar | |||
| 121 | 0 | 108 | Kalimba | Mallet & Bell | |
| 121 | 1 | 108 | VeloKalimba | Mallet & Bell | |
| 121 | 0 | 109 | Bag Pipe | Woodwind | |
| 121 | 1 | 109 | War Pipes | Woodwind | |
| 121 | 0 | 110 | Fiddle | Strings & Vocals | |
| 121 | 0 | 111 | Shanai | Woodwind | |
| 121 | 1 | 111 | Zurna | Woodwind | |
| 121 | 2 | 111 | Hichiriki | Woodwind | |
| 121 | 0 | 112 | Tinkle Bell | Mallet & Bell | |
| 121 | 1 | 112 | Gamelan | Mallet & Bell | |
| 121 | 2 | 112 | BaliGamelan | Mallet & Bell | |
| 121 | 3 | 112 | GarbageMall | Mallet & Bell | |
| 121 | 0 | 113 | Agogo | Drum & Perc | |
| 121 | 0 | 114 | Steel Drums | Mallet & Bell | |
| 121 | 1 | 114 | Warm Steel | Mallet & Bell | |
| 121 | 0 | 115 | Woodblock | Drum & Perc | |
| 121 | 1 | 115 | Castanets | Drum & Perc | |
| 121 | 0 | 116 | Taiko Drum | Drum & Perc | |
| 121 | 1 | 116 | Concert BD | Drum & Perc | |
| 121 | 0 | 117 | Melodic Tom | Drum & Perc | |
| 121 | 1 | 117 | MelodicTom2 | Drum & Perc | |
| 121 | 2 | 117 | Rev Tom | Drum & Perc | |
| 121 | 0 | 118 | Synth Drum | Drum & Perc | |
| 121 | 1 | 118 | Rhyt.BoxTom | Drum & Perc | |
| 121 | 2 | 118 | Electr.Drum | Drum & Perc | |
| 121 | 3 | 118 | Rev Snare | Drum & Perc | |
| 121 | 0 | 119 | Reverse Cym | Drum & Perc | |
| 121 | 1 | 119 | Dragon Gong | Drum & Perc | |
| 121 | 0 | 120 | GtFretNoise | SFX | |
| 121 | 1 | 120 | GtrCutNoise | SFX | |
| 121 | 2 | 120 | AcBassStrng | SFX | |
| 121 3 | 120 Vox WahChick Guitar | ||||
| 121 | 0 | 121 | BreathNoise | SFX | |
| 121 | 1 | 121 | Flute Click | Woodwind | |
| 121 | 0 | 122 | Seashore | SFX | |
| 121 | 1 | 122 | Rain | SFX | |
| CC00 | CC32 | PC | Name | microARRANGER Bank | GM2 |
| 121 | 2 | 122 | Thunder | SFX | √ |
| 121 | 3 | 122 | Wind | SFX | √ |
| 121 | 4 | 122 | Stream | SFX | √ |
| 121 | 5 | 122 | Bubble | SFX | √ |
| 121 | 0 | 123 | Bird Tweet | SFX | √ |
| 121 | 1 | 123 | Dog | SFX | √ |
| 121 | 2 | 123 | HorseGallop | SFX | √ |
| 121 | 3 | 123 | Bird Tweet2 | SFX | √ |
| 121 | 0 | 124 | Telephone 1 | SFX | √ |
| 121 | 1 | 124 | Telephone 2 | SFX | √ |
| 121 | 2 | 124 | Door Creak | SFX | √ |
| 121 | 3 | 124 | Door | SFX | √ |
| 121 | 4 | 124 | Scratch | SFX | √ |
| 121 | 5 | 124 | Wind Chime | SFX | √ |
| 121 | 0 | 125 | Helicopter | SFX | √ |
| 121 | 1 | 125 | Car Engine | SFX | √ |
| 121 | 2 | 125 | Car Stop | SFX | √ |
| 121 | 3 | 125 | Car Pass | SFX | √ |
| 121 | 4 | 125 | Car Crash | SFX | √ |
| 121 | 5 | 125 | Siren | SFX | √ |
| 121 | 6 | 125 | Train | SFX | √ |
| 121 | 7 | 125 | Jetplane | SFX | √ |
| 121 8 | 125 | Starship | SFX | √ | |
| 121 | 9 | 125 | Burst Noise | SFX | √ |
| 121 | 0 | 126 | Applause | SFX | √ |
| 121 | 1 | 126 | Laughing | SFX | √ |
| 121 | 2 | 126 | Screaming | SFX | √ |
| 121 | 3 | 126 | Punch | SFX | √ |
| 121 | 4 | 126 | Heart Beat | SFX | √ |
| 121 | 5 | 126 | Footsteps | SFX | √ |
| 121 | 6 | 126 | Stadium | SFX | |
| 121 | 0 | 127 | Gun Shot | SFX | √ |
| 121 | 1 | 127 | Machine Gun | SFX | √ |
| 121 | 2 | 127 | Lasergun | SFX | √ |
| 121 | 3 | 127 | Explosion | SFX | √ |
DRUM KITS
The following table enlists all microARRANGER Factory Drum Kit Programs in order of Bank Select-Program Change number.
Legend: The table also includes MIDI data used to remotely select the Programs. CC00: Control Change 0, or Bank Select MSB. CC32: Control Change 32, or Bank Select LSB. PC: Program Change.
| CC00 | CC32 | PC | Name | GM2 |
| 120 0 | 0 Std. Kit1 √ | |||
| 120 0 | 1 Std. Kit2 | |||
| 120 0 | 2 Std. Kit3 | |||
| 120 0 | 3 AcousticKit | |||
| 120 0 | 4 Std. Kit4 | |||
| 120 0 | 5-7: (remap to 0) | |||
| 120 | 0 | 8 | Room Kit1 | √ |
| 120 0 | 9 HipHop Kit1 | |||
| 120 0 | 10 Jungle Kit | |||
| 120 | 0 | 11 | Techno Kit1 | |
| 120 0 | 12 Room Kit2 | |||
| 120 0 | 13 HipHop Kit2 | |||
| 120 | 0 | 14 | Techno Kit2 | |
| 120 | 0 | 15 | Techno Kit3 | |
| 120 | 0 | 16 | Power Kit1 | √ |
| 120 0 | 17 Power Kit2 | |||
| 120 0 | 18-23: (remap to 16) | |||
| 120 | 0 | 24 | Electro Kit | √ |
| 120 | 0 | 25 | Analog Kit | √ |
| 120 0 | 26 House Kit1 | |||
| CC00 | CC32 | PC Name | GM2 | |
| 120 | 0 | 27 | House Kit2 | |
| 120 | 0 | 28 | House Kit3 | |
| 120 | 0 | 29 | House Kit4 | |
| 120 0 | 30-31: (remap to 24) | |||
| 120 | 0 | 32 | Jazz Kit | √ |
| 120 0 | 33-39: (remap to 32) | |||
| 120 | 0 | 40 | Brush Kit1 | √ |
| 120 | 0 | 41 | Brush V.S.2 | |
| 120 0 | 42-47: (remap to 40) | |||
| 120 | 0 | 48 | OrchestraK. | √ |
| 120 0 | 49: (remap to 48) | |||
| 120 | 0 | 50 | Bdrum&Sdrum | |
| 120 0 | 51: (remap to 116) | |||
| 120 0 | 52-55: (remap to 48) | |||
| 120 | 0 | 56 | SFX Kit | √ |
| 120 0 | 57-63: (remap to 56) | |||
| 120 | 0 | 64 | Percus.Kit1 | |
| 120 | 0 | 65 | Latin P.Kit | |
| 120 | 0 | 66 | TRI-Per.KIT | |
| 120 | 0 | 67 | i30 Perc.Kit | |
| 120 0 | 68-71: (remap to 64) | |||
| 120 0 | 72-115: (remap to 0) | |||
| 120 | 0 | 116 | Arabian Kit 1 | |
| 120 | 0 | 117 | Arabian Kit 2 | |
| 120 0 | 118-127: (remap to 0) | |||
DRUM KIT INSTRUMENTS
Legend: In the Drum Kit tables, the numer 120-x-x before each Drum Kit name is the Bank Select MSB (CC00) - Bank Select LSB (CC32) - Program Change (PC) number. Sample enlists both the sample number in memory, and the sample name. Excl is the Exclusive parameter: when a note is struck, all notes with the same Exclusive number are stopped. A right-pointing arrow ( ) indicates a velocity switch.
| 120-0-0: Std. Kit1 120-0-1: Std. Kit2 120-0-2: Std. Kit3 | ||||||||||
| Note | Sample | Excl. | Sample | Excl. | Sample | Excl. | ||||
| 8 G#1 0 BD-Dry 1 Off | ||||||||||
| 9 | A-1 | 17 | BD-House 1 | Off | 17 | BD-House 1 | Off | 17 | BD-House 1 | Off |
| 10 | A#-1 | 125 | 99-SD | Off | 125 | 99-SD | Off | 125 | 99-SD | Off |
| 11 | B-1 | 123 | 88-BD | Off | 123 | 88-BD | Off | 123 | 88-BD | Off |
| 12 | C0 | 124 | 88-SD | Off | 124 | 88-SD | Off | 124 | 88-SD | Off |
| 13 | C#0 | 37 | SD-Full Room | Off | 40 | SD-Amb.Piccolo | Off | 38 | SD-Off Center | Off |
| 14 | D0 | 48 | SD-Processed | 1 | 48 | SD-Processed | Off | 48 | SD-Processed | Off |
| 15 | D#0 | 0 | BD-Dry 1 | Off | 6 | BD-Pillow | Off | 6 | BD-Pillow | Off |
| 16 | E0 | 12 | BD-Tight | Off | 27 | BD-Amb.Rocker | Off | 27 | BD-Amb.Rocker | Off |
| 17 | F0 | 31 | SD-Dry 1 | Off | 39 | SD-Jazz Ring | Off | 42 | SD-BrushHit | Off |
| 18 | F#0 | 87 | HH1 Closed2 | 1 | 87 | HH1 Closed2 | 1 | 87 | HH1 Closed2 | 1 |
| 19 | G0 | 2 | BD-Dry 3 | Off | 0 | BD-Dry 1 | Off | 5 | BD-Jazz | Off |
| 20 | G#0 | 73 | SideStickAmb | Off | 72 | SideStickDry | Off | 72 | SideStickDry | Off |
| 21 | A0 | 120 | SD-Orch. | 7 | 32 | SD-Dry 2 | 7 | 69 | SD-Brasser | 7 |
| 22 | A#0 | 119 | SD-Orch.Roll | 7 | 49 | SD-CrackerRoom | 7 | 32 | SD-Dry 2 | Off |
| 23 | B0 | 74 | DrumStickHit | Off | 74 | DrumStickHit | Off | 74 | DrumStickHit | Off |
| 24 | C1 | 120 | SD-Orch. | 7 | 120 | SD-Orch. | 7 | 120 | SD-Orch. | 7 |
| 25 | C#1 | 119 | SD-Orch.Roll | 7 | 119 | SD-Orch.Roll | 7 | 119 | SD-Orch.Roll | 7 |
| 26 | D1 | 121 | FingerSnaps | Off | 121 | FingerSnaps | Off | 121 | FingerSnaps | Off |
| 27 | D#1 | 143 | Zap2 | Off | 143 | Zap2 | Off | 143 | Zap2 | Off |
| 28 | E1 | 281 | Noise White | Off | 281 | Noise White | Off | 281 | Noise White | Off |
| 29 | F1 | 145 | DJ-Scratch2 | 7 | 145 | DJ-Scratch2 | 7 | 145 | DJ-Scratch2 | 7 |
| 30 | F#1 | 145 | DJ-Scratch2 | 7 | 145 | DJ-Scratch2 | 7 | 145 | DJ-Scratch2 | 7 |
| 31 | G1 | 74 | DrumStickHit | Off | 74 | DrumStickHit | Off | 74 | DrumStickHit | Off |
| 32 | G#1 | 142 | Zap1 | Off | 142 | Zap1 | Off | 142 | Zap1 | Off |
| 33 | A1 | 249 | Click | Off | 249 | Click | Off | 249 | Click | Off |
| 34 | A#1 | 213 | Triangle-Open | Off | 213 | Triangle-Open | Off | 213 | Triangle-Open | Off |
| 35 | B1 | 2 | BD-Dry 3 | Off | 12 | BD-Tight | Off | 0 | BD-Dry 1 | Off |
| 36 | C2 | 0 | BD-Dry 1 | Off | 10 | BD-Tubby | Off | 10 | BD-Tubby | Off |
| 37 | C#2 | 73 | SideStickAmb | Off | 73 | SideStickAmb | Off | 73 | SideStickAmb | Off |
| 38 | D2 | 32 | SD-Dry 2 | Off | 38 | SD-Off Center | Off | 39 | SD-Jazz Ring | Off |
| 39 | D#2 | 122 | Hand Claps | Off | 127 | 88-Claps | Off | 127 | 88-Claps | Off |
| 40 | E2 | 37 | SD-Full Room | Off | 38 | SD-Off Center | Off | 40 | SD-Amb.Piccolo | Off |
| 41 | F2 | 79 | Tom 2-Floor | Off | 79 | Tom 2-Floor | Off | 79 | Tom 2-Floor | Off |
| 42 | F#2 | 90 | HH1 Open 2 | 1 | 86 | HH1 Closed1 | 1 | 92 | HH2 Closed1 | 1 |
| 43 | G2 | 79 | Tom 2-Floor | Off | 79 | Tom 2-Floor | Off | 79 | Tom 2-Floor | Off |
| 44 G#2 | 94 | HH2 Foot | 1 | 88 | HH1 Foot | 1 | 94 | HH2 Foot | 1 | |
| 45 | A2 | 78 | Tom 2-Lo | Off | 78 | Tom 2-Lo | Off | 78 | Tom 2-Lo | Off |
| 46 | A#2 | 89 | HH1 Open 1 | 1 | 89 | HH1 Open 1 | 1 | 89 | HH1 Open 1 | 1 |
| 47 | B2 | 78 | Tom 2-Lo | Off | 78 | Tom 2-Lo | Off | 78 | Tom 2-Lo | Off |
| 48 | C3 | 77 | Tom 2-Hi | Off | 77 | Tom 2-Hi | Off | 77 | Tom 2-Hi | Off |
| 49 | C#3 | 104 | Crash Cymbal 1 | Off | 104 | Crash Cymbal 1 | Off | 104 | Crash Cymbal 1 | Off |
| 50 | D3 | 77 | Tom 2-Hi | Off | 77 | Tom 2-Hi | Off | 77 | Tom 2-Hi | Off |
| 51 | D#3 | 113 | Ride-Edge 2 | Off | 113 | Ride-Edge 2 | Off | 113 | Ride-Edge 2 | Off |
| 52 | E3 | 106 | China Cymbal | Off | 106 | China Cymbal | Off | 106 | China Cymbal | Off |
| 53 | F3 | 114 | Ride-Jazz | Off | 114 | Ride-Jazz | Off | 114 | Ride-Jazz | Off |
| 54 | F#3 | 212 | Tambourin-Acc2 | Off | 212 | Tambourin-Acc2 | Off | 212 | Tambourin-Acc2 | Off |
| 55 | G3 | 107 | Splash Cymbal | Off | 107 | Splash Cymbal | Off | 107 | Splash Cymbal | Off |
| 56 | G#3 | 225 | Cowbell | Off | 225 | Cowbell | Off | 225 | Cowbell | Off |
| 57 | A3 | 104 | Crash Cymbal 1 | Off | 104 | Crash Cymbal 1 | Off | 104 | Crash Cymbal 1 | Off |
| 58 | A#3 | 198 | Vibraslap | Off | 198 | Vibraslap | Off | 198 | Vibraslap | Off |
| 59 | B3 | 113 | Ride-Edge 2 | Off | 113 | Ride-Edge 2 | Off | 113 | Ride-Edge 2 | Off |
| 60 | C4 | 171 | BongoHi-Open | Off | 171 | BongoHi-Open | Off | 171 | BongoHi-Open | Off |
| 61 | C#4 | 168 | BongoLo-Open | Off | 168 | BongoLo-Open | Off | 168 | BongoLo-Open | Off |
| 62 | D4 | 159 | CongaLoMtSlp | Off | 159 | CongaLoMtSlp | Off | 163 | CongaHiMtSlap | Off |
| 63 | D#4 | 161 | CongaHi-Open | Off | 161 | CongaHi-Open | Off | 161 | CongaHi-Open | Off |
| 64 | E4 | 158 | CongaLo-Open | Off | 158 | CongaLo-Open | Off | 158 | CongaLo-Open | Off |
| 65 | F4 | 207 | TimbaleHi-Rim2 | Off | 207 | TimbaleHi-Rim2 | Off | 207 | TimbaleHi-Rim2 | Off |
| 66 | F#4 | 202 | TimbaleLo-Open | Off | 202 | TimbaleLo-Open | Off | 202 | TimbaleLo-Open | Off |
| 67 | G4 | 224 | Agogo-Bell | Off | 224 | Agogo-Bell | Off | 224 | Agogo-Bell | Off |
| 68 | G#4 | 224 | Agogo-Bell | Off | 224 | Agogo-Bell | Off | 224 | Agogo-Bell | Off |
| 69 | A4 | 219 | Cabasa-Up | Off | 219 | Cabasa-Up | Off | 219 | Cabasa-Up | Off |
| 70 | A#4 | 182 | MaracasPush | Off | 182 | MaracasPush | Off | 182 | MaracasPush | Off |
| 71 | B4 | 234 | SambaWhistle | 2 | 234 | SambaWhistle | 2 | 234 | SambaWhistle | 2 |
| 72 | C5 | 234 | SambaWhistle | 2 | 234 | SambaWhistle | 2 | 234 | SambaWhistle | 2 |
| 73 | C#5 | 181 | Guiro Short | 3 | 181 | Guiro Short | 3 | 181 | Guiro Short | 3 |
| 74 | D5 | 180 | Guiro Long | 3 | 180 | Guiro Long | 3 | 180 | Guiro Long | 3 |
| 75 | D#5 | 199 | Claves | Off | 199 | Claves | Off | 199 | Claves | Off |
| 76 | E5 | 200 | Woodblock1 | Off | 200 | Woodblock1 | Off | 200 | Woodblock1 | Off |
| 77 | F5 | 200 | Woodblock1 | Off | 200 | Woodblock1 | Off | 200 | Woodblock1 | Off |
| 78 | F#5 | 215 | Cuica-Hi | 4 | 215 | Cuica-Hi | 4 | 215 | Cuica-Hi | 4 |
| 79 | G5 | 216 | Cuica-Lo | 4 | 216 | Cuica-Lo | 4 | 216 | Cuica-Lo | 4 |
| 80 | G#5 | 214 | Triangle-Mute | 5 | 214 | Triangle-Mute | 5 | 214 | Triangle-Mute | 5 |
| 81 | A5 | 213 | Triangle-Open | 5 | 213 | Triangle-Open | 5 | 213 | Triangle-Open | 5 |
| 82 | A#5 | 220 | Cabasa-Down | Off | 220 | Cabasa-Down | Off | 220 | Cabasa-Down | Off |
| 83 | B5 | 228 | Sleigh Bell | Off | 228 | Sleigh Bell | Off | 228 | Sleigh Bell | Off |
| 84 | C6 | 231 | Marc Tree | Off | 231 | Marc Tree | Off | 231 | Marc Tree | Off |
| 85 | C#6 | 178 | CastSingle | Off | 178 | CastSingle | Off | 178 | CastSingle | Off |
| 86 | D6 | 203 | TimbaleLo-Mute | 6 | 203 | TimbaleLo-Mute | 6 | 203 | TimbaleLo-Mute | 6 |
| 87 | D#6 | 202 | TimbaleLo-Open | 6 | 202 | TimbaleLo-Open | 6 | 202 | TimbaleLo-Open | 6 |
| 88 | E6 | 243 | Stadium | Off | 243 | Stadium | Off | 243 | Stadium | Off |
| 120-0-3: AcousticKit | 120-0-4: Std. Kit4 | 120-0-8: Room Kit1 | 120-0-9: HipHop Kit1 | ||||||||||
| Note | Sample | Excl. | Sample | Excl. | Sample | Excl. | Sample | Excl. | |||||
| 9 | A-1 | 17 | BD-House 1 | Off | 17 | BD-House 1 | Off | 13 | BD-Squash | Off | 13 | BD-Squash | Off |
| 10 | A#-1 | 125 | 99-SD | Off | 125 | 99-SD | Off | 59 | SD-Hip 6 | Off | 59 | SD-Hip 6 | Off |
| 11 | B-1 | 123 | 88-BD | Off | 123 | 88-BD | Off | 123 | 88-BD | Off | 123 | 88-BD | Off |
| 12 | C0 | 124 | 88-SD | Off | 124 | 88-SD | Off | 124 | 88-SD | Off | 124 | 88-SD | Off |
| 13 | C#0 | 38 | SD-Off Center | Off | 38 | SD-Off Center | Off | 56 | SD-Hip 3 | Off | 56 | SD-Hip 3 | Off |
| 14 | D0 | 49 | SD-CrackerRoom | Off | 48 | SD-Processed | 1 | 58 | SD-Hip 5 | Off | 58 | SD-Hip 5 | Off |
| 15 | D#0 | 6 | BD-Pillow | Off | 27 | BD-Amb.Rocker | Off | 25 | BD-Ambi Kick | Off | 25 | BD-Ambi Kick | Off |
| 16 | E0 | 27 | BD-Amb.Rocker | Off | 12 | BD-Tight | Off | 11 | BD-Gated | Off | 11 | BD-Gated | Off |
| 17 | F0 | 40 | SD-Amb.Piccolo | Off | 39 | SD-Jazz Ring | Off | 40 | SD-Amb.Piccolo | Off | 40 | SD-Amb.Piccolo | Off |
| 18 | F#0 | 87 | HH1 Closed2 | 1 | 87 | HH1 Closed2 | 1 | 90 | HH1 Open 2 | 1 | 90 | HH1 Open 2 | 1 |
| 19 | G0 | 5 | BD-Jazz | Off | 2 | BD-Dry 3 | Off | 6 | BD-Pillow | Off | 6 | BD-Pillow | Off |
| 20 | G#0 | 72 | SideStickDry | Off | 72 | SideStickDry | Off | 72 | SideStickDry | Off | 72 | SideStickDry | Off |
| 21 | A0 | 120 | SD-Orch. | 7 | 32 | SD-Dry 2 | Off | 47 | SD-Yowie | 7 | 47 | SD-Yowie | Off |
| 22 | A#0 | 119 | SD-Orch.Roll | 7 | 31 | SD-Dry 1 | Off | 59 | SD-Hip 6 | 7 | 59 | SD-Hip 6 | Off |
| 23 | B0 | 74 | DrumStickHit | Off | 74 | DrumStickHit | Off | 74 | DrumStickHit | Off | 74 | DrumStickHit | Off |
| 24 | C1 | 120 | SD-Orch. | 7 | 120 | SD-Orch. | 7 | 120 | SD-Orch. | 7 | 120 | SD-Orch. | 7 |
| 25 | C#1 | 119 | SD-Orch.Roll | 7 | 119 | SD-Orch.Roll | 7 | 119 | SD-Orch.Roll | 7 | 119 | SD-Orch.Roll | 7 |
| 26 | D1 | 121 | FingerSnaps | Off | 121 | FingerSnaps | Off | 121 | FingerSnaps | Off | 121 | FingerSnaps | Off |
| 27 | D#1 | 143 | Zap2 | Off | 143 | Zap2 | Off | 143 | Zap2 | Off | 143 | Zap2 | Off |
| 28 | E1 | 281 | Noise White | Off | 281 | Noise White | Off | 281 | Noise White | Off | 281 | Noise White | Off |
| 29 | F1 | 145 | DJ-Scratch2 | 7 | 145 | DJ-Scratch2 | 7 | 145 | DJ-Scratch2 | 7 | 145 | DJ-Scratch2 | 7 |
| 30 | F#1 | 145 | DJ-Scratch2 | 7 | 145 | DJ-Scratch2 | 7 | 145 | DJ-Scratch2 | 7 | 145 | DJ-Scratch2 | 7 |
| 31 | G1 | 74 | DrumStickHit | Off | 74 | DrumStickHit | Off | 74 | DrumStickHit | Off | 74 | DrumStickHit | Off |
| 32 | G#1 | 142 | Zap1 | Off | 142 | Zap1 | Off | 142 | Zap1 | Off | 142 | Zap1 | Off |
| 33 | A1 | 249 | Click | Off | 249 | Click | Off | 249 | Click | Off | 249 | Click | Off |
| 34 | A#1 | 213 | Triangle-Open | Off | 213 | Triangle-Open | Off | 213 | Triangle-Open | Off | 213 | Triangle-Open | Off |
| 35 | B1 | 3 | BD-Normal | Off | 2 | BD-Dry 3 | Off | 10 | BD-Tubby | Off | 28 | BD-Pop 99 | Off |
| 36 | C2 | 0→6 | BD-Dry 1→BD-Pillow | Off | 12 | BD-Tight | Off | 27 | BD-Amb.Rocker | Off | 21 | BD-Hip 3 | Off |
| 37 | C#2 | 73 | SideStickAmb | Off | 73 | SideStickAmb | Off | 72 | SideStickDry | Off | 126 | 88-Rimshot | Off |
| 38 | D2 | 35→36 | SD-Ghost f→SD-Ghost p | Off | 40 | SD-Amb.Piccolo | Off | 49 | SD-CrackerRoom | Off | 60 | SD-Ringy | Off |
| 39 | D#2 | 122 | Hand Claps | Off | 127 | 88-Claps | Off | 127 | 88-Claps | Off | 127 | 88-Claps | Off |
| 40 | E2 | 35→36 | SD-Ghost f→SD-Ghost p | Off | 37 | SD-Full Room | Off | 37 | SD-Full Room | Off | 67 | SD-Vintage6 | Off |
| 41 | F2 | 79 | Tom 2-Floor | Off | 79 | Tom 2-Floor | Off | 79 | Tom 2-Floor | Off | 75 | Tom 1-Hi | Off |
| 42 | F#2 | 90 | HH1 Open 2 | 1 | 90 | HH1 Open 2 | 1 | 86 | HH1 Closed1 | 1 | 97 | HH-OldClose1 | 1 |
| 43 | G2 | 79 | Tom 2-Floor | Off | 79 | Tom 2-Floor | Off | 79 | Tom 2-Floor | Off | 75 | Tom 1-Hi | Off |
| 44 | G#2 | 94 | HH2 Foot | 1 | 94 | HH2 Foot | 1 | 94 | HH2 Foot | 1 | 100 | HH-OldClose2 | Off |
| 45 | A2 | 78 | Tom 2-Lo | Off | 78 | Tom 2-Lo | Off | 78 | Tom 2-Lo | Off | 75 | Tom 1-Hi | Off |
| 46 | A#2 | 89 | HH1 Open 1 | 1 | 89 | HH1 Open 1 | 1 | 96 | HH2 Open | 1 | 98 | HH-Old Open1 | 1 |
| 47 | B2 | 78 | Tom 2-Lo | Off | 78 | Tom 2-Lo | Off | 78 | Tom 2-Lo | Off | 75 | Tom 1-Hi | Off |
| 48 | C3 | 77 | Tom 2-Hi | Off | 77 | Tom 2-Hi | Off | 77 | Tom 2-Hi | Off | 75 | Tom 1-Hi | Off |
| 49 | C#3 | 104 | Crash Cymbal 1 | Off | 104 | Crash Cymbal 1 | Off | 104 | Crash Cymbal 1 | Off | 104 | Crash Cymbal 1 | Off |
| 50 | D3 | 77 | Tom 2-Hi | Off | 77 | Tom 2-Hi | Off | 77 | Tom 2-Hi | Off | 75 | Tom 1-Hi | Off |
| 51 | D#3 | 113 | Ride-Edge 2 | Off | 113 | Ride-Edge 2 | Off | 113 | Ride-Edge 2 | Off | 113 | Ride-Edge 2 | Off |
| 52 | E3 | 106 | China Cymbal | Off | 106 | China Cymbal | Off | 106 | China Cymbal | Off | 108 | CymbalReverse | Off |
| 53 | F3 | 115 | Ride-Cup | Off | 114 | Ride-Jazz | Off | 114 | Ride-Jazz | Off | 114 | Ride-Jazz | Off |
| 54 | F#3 | 212 | Tambourin-Acc2 | Off | 212 | Tambourin-Acc2 | Off | 212 | Tambourin-Acc2 | Off | 212 | Tambourin-Acc2 | Off |
| 55 | G3 | 107 | Splash Cymbal | Off | 107 | Splash Cymbal | Off | 107 | Splash Cymbal | Off | 107 | Splash Cymbal | Off |
| 56 | G#3 | 225 | Cowbell | Off | 225 | Cowbell | Off | 225 | Cowbell | Off | 136 | 88-Cowbell | Off |
| 57 | A3 | 104 | Crash Cymbal 1 | Off | 104 | Crash Cymbal 1 | Off | 104 | Crash Cymbal 1 | Off | 104 | Crash Cymbal 1 | Off |
| 58 | A#3 | 198 | Vibraslap | Off | 198 | Vibraslap | Off | 198 | Vibraslap | Off | 198 | Vibraslap | Off |
| 59 | B3 | 114 | Ride-Jazz | Off | 113 | Ride-Edge 2 | Off | 113 | Ride-Edge 2 | Off | 113 | Ride-Edge 2 | Off |
| 60 | C4 | 171 | BongoHi-Open | Off | 171 | BongoHi-Open | Off | 171 | BongoHi-Open | Off | 171 | BongoHi-Open | Off |
| 61 | C#4 | 168 | BongoLo-Open | Off | 168 | BongoLo-Open | Off | 168 | BongoLo-Open | Off | 168 | BongoLo-Open | Off |
| 62 | D4 | 163 | CongaHiMtSlap | Off | 163 | CongaHiMtSlap | Off | 163 | CongaHiMtSlap | Off | 163 | CongaHiMtSlap | Off |
| 63 | D#4 | 161 | CongaHi-Open | Off | 161 | CongaHi-Open | Off | 161 | CongaHi-Open | Off | 161 | CongaHi-Open | Off |
| 64 | E4 | 158 | CongaLo-Open | Off | 158 | CongaLo-Open | Off | 158 | CongaLo-Open | Off 158 CongaLo-Open Off | |||
| 65 | F4 | 207 | TimbaleHi-Rim2 | Off | 207 | TimbaleHi-Rim2 | Off | 207 | TimbaleHi-Rim2 Off | ||||
| 66 | F#4 | 202 | TimbaleLo-Open | Off | 202 | TimbaleLo-Open | Off | 202 | TimbaleLo-Open Off | ||||
| 67 | G4 | 224 | Agogo-Bell | Off | 224 | Agogo-Bell | Off | 224 | Agogo-Bell Off | ||||
| 68 | G#4 | 224 | Agogo-Bell | Off | 224 | Agogo-Bell | Off | 224 | Agogo-Bell Off | ||||
| 69 | A4 | 219 | Cabasa-Up | Off | 219 | Cabasa-Up | Off | 219 | Cabasa-Up Off | ||||
| 70 | A#4 | 182 | MaracasPush | Off | 182 | MaracasPush | Off | 182 | MaracasPush Off | ||||
| 71 | B4 | 234 | SambaWhistle | 2 | 234 | SambaWhistle | 2 | 234 | SambaWhistle 2 | ||||
| 72 | C5 | 234 | SambaWhistle | 2 | 234 | SambaWhistle | 2 | 234 | SambaWhistle 2 | ||||
| 73 | C#5 | 181 | Guiro Short | 3 | 181 | Guiro Short | 3 | 181 | Guiro Short 3 | ||||
| 74 | D5 | 180 | Guiro Long | 3 | 180 | Guiro Long | 3 | 180 | Guiro Long 3 | ||||
| 75 | D#5 | 199 | Claves | Off | 199 | Claves | Off | 199 | Claves Off | ||||
| 76 | E5 | 200 | Woodblock1 | Off | 200 | Woodblock1 | Off | 200 | Woodblock1 Off | ||||
| 77 | F5 | 200 | Woodblock1 | Off | 200 | Woodblock1 | Off | 200 | Woodblock1 Off | ||||
| 78 | F#5 | 215 | Cuica-Hi | 4 | 215 | Cuica-Hi | 4 | 215 | Cuica-Hi 4 | ||||
| 79 | G5 | 216 | Cuica-Lo | 4 | 216 | Cuica-Lo | 4 | 216 | Cuica-Lo 4 | ||||
| 80 | G#5 | 214 | Triangle-Mute | 5 | 214 | Triangle-Mute | 5 | 214 | Triangle-Mute 5 | ||||
| 81 | A5 | 213 | Triangle-Open | 5 | 213 | Triangle-Open | 5 | 213 | Triangle-Open 5 | ||||
| 82 | A#5 | 220 | Cabasa-Down | Off | 220 | Cabasa-Down | Off | 220 | Cabasa-Down Off | ||||
| 83 | B5 | 228 | Sleigh Bell | Off | 228 | Sleigh Bell | Off | 228 | Sleigh Bell Off | ||||
| 84 | C6 | 231 | Marc Tree | Off | 231 | Marc Tree | Off | 231 | Marc Tree Off | ||||
| 85 | C#6 | 178 | CastSingle Off | ||||||||||
| 120-0-10: Jungle Kit | 120-0-11: Techno Kit1 | 120-0-12: Room Kit2 | 120-0-13: HipHop Kit2 | ||||||||||
| Note | Sample | Excl. | Sample | Excl. | Sample | Excl. | Sample | Excl. | |||||
| 9 | A-1 | 13 | BD-Squash | Off | 21 | BD-Hip 3 | Off | 13 | BD-Squash | Off | 13 | BD-Squash | Off |
| 10 | A#-1 | 59 | SD-Hip 6 | Off | 59 | SD-Hip 6 | Off | 59 | SD-Hip 6 | Off | 59 | SD-Hip 6 | Off |
| 11 | B-1 | 123 | 88-BD | Off | 123 | 88-BD | Off | 123 | 88-BD | Off | 123 | 88-BD | Off |
| 12 | C0 | 124 | 88-SD | Off | 124 | 88-SD | Off | 124 | 88-SD | Off | 124 | 88-SD | Off |
| 13 | C#0 | 56 | SD-Hip 3 | Off | 56 | SD-Hip 3 | Off | 56 | SD-Hip 3 | Off | 56 | SD-Hip 3 | Off |
| 14 | D0 | 58 | SD-Hip 5 | Off | 58 | SD-Hip 5 | Off | 58 | SD-Hip 5 | Off | 58 | SD-Hip 5 | Off |
| 15 | D#0 | 25 | BD-Ambi Kick | Off | 25 | BD-Ambi Kick | Off | 25 | BD-Ambi Kick | Off | 25 | BD-Ambi Kick | Off |
| 16 | E0 | 11 | BD-Gated | Off | 11 | BD-Gated | Off | 11 | BD-Gated | Off | 11 | BD-Gated | Off |
| 17 | F0 | 40 | SD-Amb.Piccolo | Off | 40 | SD-Amb.Piccolo | Off | 40 | SD-Amb.Piccolo | Off | 40 | SD-Amb.Piccolo | Off |
| 18 | F#0 | 90 | HH1 Open 2 | 1 | 90 | HH1 Open 2 | 1 | 90 | HH1 Open 2 | 1 | 90 | HH1 Open 2 | 1 |
| 19 | G0 | 6 | BD-Pillow | Off | 6 | BD-Pillow | Off | 6 | BD-Pillow | Off | 6 | BD-Pillow | Off |
| 20 | G#0 | 72 | SideStickDry | Off | 72 | SideStickDry | Off | 72 | SideStickDry | Off | 72 | SideStickDry | Off |
| 21 | A0 | 47 | SD-Yowie | Off | 47 | SD-Yowie | Off | 46 | SD-Big Rock | Off | 47 | SD-Yowie | Off |
| 22 | A#0 | 59 | SD-Hip 6 | Off | 59 | SD-Hip 6 | Off | 59 | SD-Hip 6 | Off | 59 | SD-Hip 6 | Off |
| 23 | B0 | 74 | DrumStickHit | Off | 74 | DrumStickHit | Off | 74 | DrumStickHit | Off | 74 | DrumStickHit | Off |
| 24 | C1 | 120 | SD-Orch. | 7 | 120 | SD-Orch. | 7 | 120 | SD-Orch. | 7 | 120 | SD-Orch. | 7 |
| 25 | C#1 | 119 | SD-Orch.Roll | 7 | 119 | SD-Orch.Roll | 7 | 119 | SD-Orch.Roll | 7 | 119 | SD-Orch.Roll | 7 |
| 26 | D1 | 121 | FingerSnaps | Off | 121 | FingerSnaps | Off | 121 | FingerSnaps | Off | 121 | FingerSnaps | Off |
| 27 | D#1 | 143 | Zap2 | Off | 143 | Zap2 | Off | 143 | Zap2 | Off | 143 | Zap2 | Off |
| 28 | E1 | 281 | Noise White | Off | 281 | Noise White | Off | 281 | Noise White | Off | 281 | Noise White | Off |
| 29 | F1 | 145 | DJ-Scratch2 | 7 | 145 | DJ-Scratch2 | 7 | 145 | DJ-Scratch2 | 7 | 145 | DJ-Scratch2 | 7 |
| 30 | F#1 | 145 | DJ-Scratch2 | 7 | 145 | DJ-Scratch2 | 7 | 145 | DJ-Scratch2 | 7 | 145 | DJ-Scratch2 | 7 |
| 31 | G1 | 74 | DrumStickHit | Off | 74 | DrumStickHit | Off | 74 | DrumStickHit | Off | 74 | DrumStickHit | Off |
| 32 | G#1 | 142 | Zap1 | Off | 142 | Zap1 | Off | 142 | Zap1 | Off | 142 | Zap1 | Off |
| 33 | A1 | 249 | Click | Off | 249 | Click | Off | 249 | Click | Off | 249 | Click | Off |
| 34 | A#1 | 213 | Triangle-Open | Off | 213 | Triangle-Open | Off | 213 | Triangle-Open | Off | 213 | Triangle-Open | Off |
| 35 | B1 | 19 | BD-Hip 1 | Off | 13 | BD-Squash | Off | 12 | BD-Tight | Off | 25 | BD-Ambi Kick | Off |
| 36 | C2 | 29 | BD-Deep 88 | Off | 17 | BD-House 1 | Off | 27 | BD-Amb.Rocker | Off | 24 | BD-Dance 99 | Off |
| 37 | C#2 | 121 | FingerSnaps | Off | 242 | Comp Voice Noise | Off | 72 | SideStickDry | Off | 121 | FingerSnaps | Off |
| 38 | D2 | 66 | SD-Vintage5 | Off | 125 | 99-SD | Off | 48 | SD-Processed | Off | 51 | SD-Rap | Off |
| 39 | D#2 | 127 | 88-Claps | Off | 127 | 88-Claps | Off | 127 | 88-Claps | Off | 337 | Alkis | Off |
| 40 | E2 | 61 | SD-Tiny | Off | 125 | 99-SD | Off | 47 | SD-Yowie | Off | 55 | SD-Hip 2 | Off |
| 41 | F2 | 75 | Tom 1-Hi | Off | 139 | Real El.Tom | Off | 76 | Tom 1-Floor | Off | 75 | Tom 1-Hi | Off |
| 42 | F#2 | 129 | 88-HH Open | 1 | 99 | HH-Old TiteClos | 1 | 93 | HH2 Closed2 | 1 | 97 | HH-OldClose1 | 1 |
| 43 | G2 | 75 | Tom 1-Hi | Off | 139 | Real El.Tom | Off | 76 | Tom 1-Floor | Off | 75 | Tom 1-Hi | Off |
| 44 | G#2 | 102 | HH-Hip | Off | 103 | HH-AlpoClose | Off | 94 | HH2 Foot | 1 | 102 | HH-Hip | Off |
| 45 | A2 | 75 | Tom 1-Hi | Off | 139 | Real El.Tom | Off | 75 | Tom 1-Hi | Off | 75 | Tom 1-Hi | Off |
| 46 | A#2 | 98 | HH-Old Open1 | 1 | 101 | HH-Old Open2 | 1 | 91 | HH1 Sizzle | 1 | 98 | HH-Old Open1 | 1 |
| 47 | B2 | 75 | Tom 1-Hi | Off | 139 | Real El.Tom | Off | 75 | Tom 1-Hi | Off | 75 | Tom 1-Hi | Off |
| 48 | C3 | 75 | Tom 1-Hi | Off | 139 | Real El.Tom | Off | 75 | Tom 1-Hi | Off | 75 | Tom 1-Hi | Off |
| 49 | C#3 | 132 | 88-Crash | Off | 104 | Crash Cymbal 1 | Off | 104 | Crash Cymbal 1 | Off | 104 | Crash Cymbal 1 | Off |
| 50 | D3 | 75 | Tom 1-Hi | Off | 139 | Real El.Tom | Off | 75 | Tom 1-Hi | Off | 75 | Tom 1-Hi | Off |
| 51 | D#3 | 113 | Ride-Edge 2 | Off | 113 | Ride-Edge 2 | Off | 113 | Ride-Edge 2 | Off | 113 | Ride-Edge 2 | Off |
| 52 | E3 | 108 | CymbalReverse | Off | 108 | CymbalReverse | Off | 106 | China Cymbal | Off | 108 | CymbalReverse | Off |
| 53 | F3 | 114 | Ride-Jazz | Off | 114 | Ride-Jazz | Off | 114 | Ride-Jazz | Off | 114 | Ride-Jazz | Off |
| 54 | F#3 | 212 | Tambourin-Acc2 | Off | 212 | Tambourin-Acc2 | Off | 212 | Tambourin-Acc2 | Off | 212 | Tambourin-Acc2 | Off |
| 55 | G3 | 107 | Splash Cymbal | Off | 106 | China Cymbal | Off | 107 | Splash Cymbal | Off | 107 | Splash Cymbal | Off |
| 56 | G#3 | 136 | 88-Cowbell | Off | 225 | Cowbell | Off | 225 | Cowbell | Off | 136 | 88-Cowbell | Off |
| 57 | A3 | 104 | Crash Cymbal 1 | Off | 104 | Crash Cymbal 1 | Off | 104 | Crash Cymbal 1 | Off | 104 | Crash Cymbal 1 | Off |
| 58 | A#3 | 198 | Vibraslap | Off | 198 | Vibraslap | Off | 198 | Vibraslap | Off | 198 | Vibraslap | Off |
| 59 | B3 | 113 | Ride-Edge 2 | Off | 113 | Ride-Edge 2 | Off | 113 | Ride-Edge 2 | Off | 113 | Ride-Edge 2 | Off |
| 60 | C4 | 171 | BongoHi-Open | Off | 171 | BongoHi-Open | Off | 171 | BongoHi-Open | Off | 171 | BongoHi-Open | Off |
| 61 | C#4 | 168 | BongoLo-Open | Off | 168 | BongoLo-Open | Off | 168 | BongoLo-Open | Off | 168 | BongoLo-Open | Off |
| 62 | D4 | 163 | CongaHiMtSlap | Off | 163 | CongaHiMtSlap | Off | 163 | CongaHiMtSlap | Off | 163 | CongaHiMtSlap | Off |
| 63 | D#4 | 161 | CongaHi-Open | Off | 161 | CongaHi-Open | Off | 161 | CongaHi-Open | Off | 161 | CongaHi-Open | Off |
| 64 | E4 | 158 | CongaLo-Open | Off | 158 | CongaLo-Open | Off | 158 | CongaLo-Open | Off | 158 | CongaLo-Open | Off |
| 65 | F4 | 207 | TimbaleHi-Rim2 | Off | 207 | TimbaleHi-Rim2 | Off | 207 | TimbaleHi-Rim2 | Off | 207 | TimbaleHi-Rim2 | Off |
| 66 | F#4 | 202 | TimbaleLo-Open | Off | 202 | TimbaleLo-Open | Off | 202 | TimbaleLo-Open | Off | 202 | TimbaleLo-Open | Off |
| 67 | G4 | 224 | Agogo-Bell | Off | 224 | Agogo-Bell | Off | 224 | Agogo-Bell | Off | 224 | Agogo-Bell | Off |
| 68 | G#4 | 224 | Agogo-Bell | Off | 224 | Agogo-Bell | Off | 224 | Agogo-Bell | Off | 224 | Agogo-Bell | Off |
| 69 | A4 | 219 | Cabasa-Up | Off | 219 | Cabasa-Up | Off | 219 | Cabasa-Up | Off | 219 | Cabasa-Up | Off |
| 70 | A#4 | 101 | HH-Old Open2 | Off | 182 | MaracasPush | Off | 182 | MaracasPush | Off | 101 | HH-Old Open2 | Off |
| 71 | B4 | 234 | SambaWhistle | 2 | 234 | SambaWhistle | 2 | 234 | SambaWhistle | 2 | 234 | SambaWhistle | 2 |
| 72 | C5 | 234 | SambaWhistle | 2 | 234 | SambaWhistle | 2 | 234 | SambaWhistle | 2 | 234 | SambaWhistle | 2 |
| 73 | C#5 | 181 | Guiro Short | 3 | 181 | Guiro Short | 3 | 181 | Guiro Short | 3 | 181 | Guiro Short | 3 |
| 74 | D5 | 180 | Guiro Long | 3 | 180 | Guiro Long | 3 | 180 | Guiro Long | 3 | 180 | Guiro Long | 3 |
| 75 | D#5 | 199 | Claves | Off | 199 | Claves | Off | 199 | Claves | Off | 199 | Claves | Off |
| 76 | E5 | 200 | Woodblock1 | Off | 200 | Woodblock1 | Off | 200 | Woodblock1 | Off | 200 | Woodblock1 | Off |
| 77 | F5 | 200 | Woodblock1 | Off | 200 | Woodblock1 | Off | 200 | Woodblock1 | Off | 200 | Woodblock1 | Off |
| 78 | F#5 | 215 | Cuica-Hi | 4 | 215 | Cuica-Hi | 4 | 215 | Cuica-Hi | 4 | 215 | Cuica-Hi | 4 |
| 79 | G5 | 216 | Cuica-Lo | 4 | 216 | Cuica-Lo | 4 | 216 | Cuica-Lo | 4 | 216 | Cuica-Lo | 4 |
| 80 | G#5 | 214 | Triangle-Mute | 5 | 214 | Triangle-Mute | 5 | 214 | Triangle-Mute | 5 | 214 | Triangle-Mute | 5 |
| 81 | A5 | 213 | Triangle-Open | 5 | 213 | Triangle-Open | 5 | 213 | Triangle-Open | 5 | 213 | Triangle-Open | 5 |
| 82 | A#5 | 220 | Cabasa-Down | Off | 220 | Cabasa-Down | Off | 220 | Cabasa-Down | Off | 220 | Cabasa-Down | Off |
| 83 | B5 | 228 | Sleigh Bell | Off | 228 | Sleigh Bell | Off | 228 | Sleigh Bell | Off | 228 | Sleigh Bell | Off |
| 84 | C6 | 231 | Marc Tree | Off | 231 | Marc Tree | Off | 231 | Marc Tree | Off 231 Marc Tree | |||
| 120-0-14: Techno Kit2 | 120-0-15: Techno Kit3 | 120-0-16: Power Kit1 | 120-0-17: Power Kit2 | ||||||||||
| Note | Sample | Excl. | Sample | Excl. | Sample | Excl. | Sample | Excl. | |||||
| 9 | A-1 | 13 | BD-Squash | Off | 13 | BD-Squash | Off | 24 | BD-Dance 99 | Off | 24 | BD-Dance 99 | Off |
| 10 | A#-1 | 59 | SD-Hip 6 | Off | 59 | SD-Hip 6 | Off | 125 | 99-SD | Off | 125 | 99-SD | Off |
| 11 | B-1 | 123 | 88-BD | Off | 123 | 88-BD | Off | 123 | 88-BD | Off | 123 | 88-BD | Off |
| 12 | C0 | 124 | 88-SD | Off | 124 | 88-SD | Off | 124 | 88-SD | Off | 124 | 88-SD | Off |
| 13 | C#0 | 56 | SD-Hip 3 | Off | 56 | SD-Hip 3 | Off | 65 | SD-Vintage4 | Off | 65 | SD-Vintage4 | Off |
| 14 | D0 | 58 | SD-Hip 5 | Off | 58 | SD-Hip 5 | Off | 64 | SD-Vintage3 | Off | 64 | SD-Vintage3 | Off |
| 15 | D#0 | 25 | BD-Ambi Kick | Off | 25 | BD-Ambi Kick | Off | 27 | BD-Amb.Rocker | Off | 27 | BD-Amb.Rocker | Off |
| 16 | E0 | 11 | BD-Gated | Off | 11 | BD-Gated | Off | 19 | BD-Hip 1 | Off | 19 | BD-Hip 1 | Off |
| 17 | F0 | 40 | SD-Amb.Piccolo | Off | 40 | SD-Amb.Piccolo | Off | 38 | SD-Off Center | Off 38 | SD-Off Center | Off | |
| 18 | F#0 | 90 | HH1 Open 2 | 1 | 90 | HH1 Open 2 | 1 | 93 | HH2 Closed2 | 1 | 93 | HH2 Closed2 | 1 |
| 19 | G0 | 6 | BD-Pillow | Off | 6 | BD-Pillow | Off | 13 | BD-Squash | Off | 13 | BD-Squash | Off |
| 20 | G#0 | 72 | SideStickDry | Off | 72 | SideStickDry | Off | 73 | SideStickAmb | Off | 73 | SideStickAmb | Off |
| 21 | A0 | 47 | SD-Yowie | Off | 47 | SD-Yowie | Off | 62 | SD-Vintage1 | Off | 62 | SD-Vintage1 | Off |
| 22 | A#0 | 59 | SD-Hip 6 | Off | 59 | SD-Hip 6 | Off | 69 | SD-Brasser | Off | 69 | SD-Brasser | Off |
| 23 | B0 | 74 | DrumStickHit | Off | 74 | DrumStickHit | Off | 74 | DrumStickHit | Off | 74 | DrumStickHit | Off |
| 24 | C1 | 120 | SD-Orch. | 7 | 120 | SD-Orch. | 7 | 120 | SD-Orch. | 7 | 120 | SD-Orch. | 7 |
| 25 | C#1 | 119 | SD-Orch.Roll | 7 | 119 | SD-Orch.Roll | 7 | 119 | SD-Orch.Roll | 7 | 119 | SD-Orch.Roll | 7 |
| 26 | D1 | 121 | FingerSnaps | Off | 121 | FingerSnaps | Off | 121 | FingerSnaps | Off | 121 | FingerSnaps | Off |
| 27 | D#1 | 143 | Zap2 | Off | 143 | Zap2 | Off | 143 | Zap2 | Off | 143 | Zap2 | Off |
| 28 | E1 | 281 | Noise White | Off | 281 | Noise White | Off | 281 | Noise White | Off | 281 | Noise White | Off |
| 29 | F1 | 145 | DJ-Scratch2 | 7 | 145 | DJ-Scratch2 | 7 | 145 | DJ-Scratch2 | 7 | 145 | DJ-Scratch2 | 7 |
| 30 | F#1 | 145 | DJ-Scratch2 | 7 | 145 | DJ-Scratch2 | 7 | 145 | DJ-Scratch2 | 7 | 145 | DJ-Scratch2 | 7 |
| 31 | G1 | 74 | DrumStickHit | Off | 74 | DrumStickHit | Off | 74 | DrumStickHit | Off | 74 | DrumStickHit | Off |
| 32 | G#1 | 142 | Zap1 | Off | 142 | Zap1 | Off | 142 | Zap1 | Off | 142 | Zap1 | Off |
| 33 | A1 | 249 | Click | Off | 249 | Click | Off | 249 | Click | Off | 249 | Click | Off |
| 34 | A#1 | 213 | Triangle-Open | Off | 213 | Triangle-Open | Off | 213 | Triangle-Open | Off | 213 | Triangle-Open | Off |
| 35 | B1 | 23 | BD-Pop Kick | Off | 23 | BD-Pop Kick | Off | 11 | BD-Gated | Off | 23 | BD-Pop Kick | Off |
| 36 | C2 | 17 | BD-House 1 | Off | 17 | BD-House 1 | Off | 9 | BD-Terminator | Off | 11 | BD-Gated | Off |
| 37 | C#2 | 126 | 88-Rimshot | Off | 140 | PR-House05 | Off | 73 | SideStickAmb | Off | 72 | SideStickDry | Off |
| 38 | D2 | 52 | SD-Noise | Off | 70 | SD-Chili | Off | 50 | SD-Dance | Off | 48 | SD-Processed | Off |
| 39 | D#2 | 127 | 88-Claps | Off | 127 | 88-Claps | Off | 122 | Hand Claps | Off | 122 | Hand Claps | Off |
| 40 | E2 | 143 | Zap2 | Off | 124 | 88-SD | Off | 49 | SD-CrackerRoom | Off | 60 | SD-Ringy | Off |
| 41 | F2 | 133 | 88-Tom | Off | 257 | Tribe | Off | 82 | Tom Processed | Off | 82 | Tom Processed | Off |
| 42 | F#2 | 99 | HH-Old TiteClos | 1 | 130 | 99-HH Close | 1 | 92 | HH2 Closed1 | 1 | 93 | HH2 Closed2 | 1 |
| 43 | G2 | 133 | 88-Tom | Off | 273 | Wind | Off | 82 | Tom Processed | Off | 82 | Tom Processed | Off |
| 44 | G#2 | 103 | HH-AlpoClose | Off | 100 | HH-OldClose2 | Off | 88 | HH1 Foot | 1 | 94 | HH2 Foot | 1 |
| 45 | A2 | 133 | 88-Tom | Off | 296 | Amp Noise | Off | 82 | Tom Processed | Off | 82 | Tom Processed | Off |
| 46 | A#2 | 101 | HH-Old Open2 | 1 | 131 | 99-HH Open | 1 | 96 | HH2 Open | 1 | 96 | HH2 Open | 1 |
| 47 | B2 | 133 | 88-Tom | Off | 139 | Real El.Tom | Off | 82 | Tom Processed | Off | 82 | Tom Processed | Off |
| 48 | C3 | 133 | 88-Tom | Off | 139 | Real El.Tom | Off | 82 | Tom Processed | Off | 82 | Tom Processed | Off |
| 49 | C#3 | 104 | Crash Cymbal 1 | Off | 104 | Crash Cymbal 1 | Off | 104 | Crash Cymbal 1 | Off | 104 | Crash Cymbal 1 | Off |
| 50 | D3 | 133 | 88-Tom | Off | 139 | Real El.Tom | Off | 82 | Tom Processed | Off | 82 | Tom Processed | Off |
| 51 | D#3 | 113 | Ride-Edge 2 | Off | 113 | Ride-Edge 2 | Off | 113 | Ride-Edge 2 | Off | 113 | Ride-Edge 2 | Off |
| 52 | E3 | 108 | CymbalReverse | Off | 108 | CymbalReverse | Off | 106 | China Cymbal | Off | 106 | China Cymbal | Off |
| 53 | F3 | 114 | Ride-Jazz | Off | 114 | Ride-Jazz | Off | 114 | Ride-Jazz | Off | 114 | Ride-Jazz | Off |
| 54 | F#3 | 212 | Tambourin-Acc2 | Off | 212 | Tambourin-Acc2 | Off | 212 | Tambourin-Acc2 | Off | 212 | Tambourin-Acc2 | Off |
| 55 | G3 | 107 | Splash Cymbal | Off | 278 | Xylophone Spectr | Off | 107 | Splash Cymbal | Off | 107 | Splash Cymbal | Off |
| 56 | G#3 | 136 | 88-Cowbell | Off | 136 | 88-Cowbell | Off | 225 | Cowbell | Off | 225 | Cowbell | Off |
| 57 | A3 | 104 | Crash Cymbal 1 | Off | 104 | Crash Cymbal 1 | Off | 104 | Crash Cymbal 1 | Off | 104 | Crash Cymbal 1 | Off |
| 58 | A#3 | 198 | Vibraslap | Off | 212 | Tambourin-Acc2 | Off | 198 | Vibraslap | Off | 198 | Vibraslap | Off |
| 59 | B3 | 113 | Ride-Edge 2 | Off | 113 | Ride-Edge 2 | Off | 113 | Ride-Edge 2 | Off | 113 | Ride-Edge 2 | Off |
| 60 | C4 | 134 | 88-Conga | Off | 171 | BongoHi-Open | Off | 171 | BongoHi-Open | Off | 171 | BongoHi-Open | Off |
| 61 | C#4 | 134 | 88-Conga | Off | 168 | BongoLo-Open | Off | 168 | BongoLo-Open | Off | 168 | BongoLo-Open | Off |
| 62 | D4 | 134 | 88-Conga | Off | 163 | CongaHiMtSlap | Off | 163 | CongaHiMtSlap | Off | 163 | CongaHiMtSlap | Off |
| 63 | D#4 | 134 | 88-Conga | Off | 161 | CongaHi-Open | Off | 161 | CongaHi-Open | Off | 161 | CongaHi-Open | Off |
| 64 | E4 | 134 | 88-Conga | Off | 158 | CongaLo-Open | Off | 158 | CongaLo-Open | Off | 158 | CongaLo-Open | Off |
| 65 | F4 | 207 | TimbaleHi-Rim2 | Off | 207 | TimbaleHi-Rim2 | Off | 207 | TimbaleHi-Rim2 | Off | 207 | TimbaleHi-Rim2 | Off |
| 66 | F#4 | 202 | TimbaleLo-Open | Off | 202 | TimbaleLo-Open | Off | 202 | TimbaleLo-Open | Off | 202 | TimbaleLo-Open | Off |
| 67 | G4 | 224 | Agogo-Bell | Off | 224 | Agogo-Bell | Off | 224 | Agogo-Bell | Off | 224 | Agogo-Bell | Off |
| 68 | G#4 | 224 | Agogo-Bell | Off | 224 | Agogo-Bell | Off | 224 | Agogo-Bell | Off | 224 | Agogo-Bell | Off |
| 69 | A4 | 219 | Cabasa-Up | Off | 219 | Cabasa-Up | Off | 219 | Cabasa-Up | Off | 219 | Cabasa-Up | Off |
| 70 | A#4 | 182 | MaracasPush | Off | 182 | MaracasPush | Off | 182 | MaracasPush | Off | 182 | MaracasPush | Off |
| 71 | B4 | 234 | SambaWhistle | 2 | 234 | SambaWhistle | 2 | 234 | SambaWhistle | 2 | 234 | SambaWhistle | 2 |
| 72 | C5 | 234 | SambaWhistle | 2 | 234 | SambaWhistle | 2 | 234 | SambaWhistle | 2 | 234 | SambaWhistle | 2 |
| 73 | C#5 | 181 | Guiro Short | 3 | 181 | Guiro Short | 3 | 181 | Guiro Short | 3 | 181 | Guiro Short | 3 |
| 74 | D5 | 180 | Guiro Long | 3 | 180 | Guiro Long | 3 | 180 | Guiro Long | 3 | 180 | Guiro Long | 3 |
| 75 | D#5 | 199 | Claves | Off | 199 | Claves | Off | 199 | Claves | Off | 199 | Claves | Off |
| 76 | E5 | 200 | Woodblock1 | Off | 200 | Woodblock1 | Off | 200 | Woodblock1 | Off | 200 | Woodblock1 | Off |
| 77 | F5 | 200 | Woodblock1 | Off | 200 | Woodblock1 | Off | 200 | Woodblock1 | Off | 200 | Woodblock1 | Off |
| 78 | F#5 | 215 | Cuica-Hi | 4 | 239 | Uhh | Off | 215 | Cuica-Hi | 4 | 215 | Cuica-Hi | 4 |
| 79 | G5 | 215 | Cuica-Hi | 4 | 237 | Yeah! | Off | 216 | Cuica-Lo | 4 | 216 | Cuica-Lo | 4 |
| 80 | G#5 | 233 | Flexatone | 5 | 214 | Triangle-Mute | 5 | 214 | Triangle-Mute | 5 | 214 | Triangle-Mute | 5 |
| 81 | A5 | 233 | Flexatone | 5 | 213 | Triangle-Open | 5 | 213 | Triangle-Open | 5 | 213 | Triangle-Open | 5 |
| 82 | A#5 | 220 | Cabasa-Down | Off | 220 | Cabasa-Down | Off | 220 | Cabasa-Down | Off | 220 | Cabasa-Down | Off |
| 83 | B5 | 228 | Sleigh Bell | Off | 228 | Sleigh Bell | Off | 228 | Sleigh Bell | Off | 228 | Sleigh Bell | Off |
| 84 | C6 | 231 | Marc Tree | Off | 231 | Marc Tree | Off | 231 | Marc Tree | Off | 231 | Marc Tree | Off |
| 85 | C#6 | 178 | CastSingle | Off | 178 | CastSingle | Off | 178 | CastSingle | Off | 178 | CastSingle | Off |
| 86 | D6 | 203 | TimbaleLo-Mute | 6 | 203 | TimbaleLo-Mute | 6 | 203 | TimbaleLo-Mute | 6 | 203 | TimbaleLo-Mute | 6 |
| 87 | D#6 | 342 | Darbuka 1 DumOp | 6 | 202 | TimbaleLo-Open | 6 | 202 | TimbaleLo-Open | 6 | 202 | TimbaleLo-Open | 6 |
| 120-0-24: Electro Kit | 120-0-25: Analog Kit | 120-0-26: House Kit1 | 120-0-27: House Kit2 | ||||||||||
| Note | Sample | Excl. | Sample | Excl. | Sample | Excl. | Sample | Excl. | |||||
| 9 | A-1 | 19 | BD-Hip 1 | Off | 271 | Explosion | Off | 23 | BD-Pop Kick | Off | 23 | BD-Pop Kick | Off |
| 10 | A#-1 | 125 | 99-SD | Off | 59 | SD-Hip 6 | Off | 67 | SD-Vintage6 | Off | 125 | 99-SD | Off |
| 11 | B-1 | 123 | 88-BD | Off | 3 | BD-Normal | Off | 29 | BD-Deep 88 | Off | 29 | BD-Deep 88 | Off |
| 12 | C0 | 124 | 88-SD | Off | 47 | SD-Yowie | Off | 124 | 88-SD | Off | 124 | 88-SD | Off |
| 13 | C#0 | 38 | SD-Off Center | Off | 39 | SD-Jazz Ring | Off | 50 | SD-Dance | Off | 50 | SD-Dance | Off |
| 14 | D0 | 64 | SD-Vintage3 | Off | 71 | SD-Whopper | Off | 40 | SD-Amb.Piccolo | Off | 40 | SD-Amb.Piccolo | Off |
| 15 | D#0 | 23 | BD-Pop Kick | Off | 23 | BD-Pop Kick | Off | 25 | BD-Ambi Kick | Off | 25 | BD-Ambi Kick | Off |
| 16 | E0 | 25 | BD-Ambi Kick | Off | 24 | BD-Dance 99 | Off | 9 | BD-Terminator | Off | 9 | BD-Terminator | Off |
| 17 | F0 | 59 | SD-Hip 6 | Off | 69 | SD-Brasser | Off | 65 | SD-Vintage4 | Off 65 | SD-Vintage4 Off | ||
| 18 | F#0 | 128 | 88-HH Close | 1 | 86 | HH1 Closed1 | 1 | 143 | Zap2 | Off | 143 | Zap2 | Off |
| 19 | G0 | 17 | BD-House 1 | Off | 19 | BD-Hip 1 | Off | 22 | BD-Hip 4 | Off | 22 | BD-Hip 4 | Off |
| 20 | G#0 | 143 | Zap2 | Off | 142 | Zap1 | Off | 142 | Zap1 | Off | 142 | Zap1 | Off |
| 21 | A0 | 48 | SD-Processed | Off | 59 | SD-Hip 6 | Off | 66 | SD-Vintage5 | Off | 66 | SD-Vintage5 | Off |
| 22 | A#0 | 65 | SD-Vintage4 | Off | 61 | SD-Tiny | Off | 310 | Mouth Harp | Off | 310 | Mouth Harp | Off |
| 23 | B0 | 74 | DrumStickHit | Off | 74 | DrumStickHit | Off | 74 | DrumStickHit | Off | 74 | DrumStickHit | Off |
| 24 | C1 | 120 | SD-Orch. | 7 | 120 | SD-Orch. | 7 | 120 | SD-Orch. | 7 | 120 | SD-Orch. | 7 |
| 25 | C#1 | 119 | SD-Orch.Roll | 7 | 119 | SD-Orch.Roll | 7 | 119 | SD-Orch.Roll | 7 | 119 | SD-Orch.Roll | 7 |
| 26 | D1 | 121 | FingerSnaps | Off | 121 | FingerSnaps | Off | 121 | FingerSnaps | Off | 121 | FingerSnaps | Off |
| 27 | D#1 | 143 | Zap2 | Off | 143 | Zap2 | Off | 143 | Zap2 | Off | 143 | Zap2 | Off |
| 28 | E1 | 281 | Noise White | Off | 281 | Noise White | Off | 281 | Noise White | Off | 281 | Noise White | Off |
| 29 | F1 | 145 | DJ-Scratch2 | 7 | 145 | DJ-Scratch2 | 7 | 145 | DJ-Scratch2 | 7 | 145 | DJ-Scratch2 | 7 |
| 30 | F#1 | 145 | DJ-Scratch2 | 7 | 145 | DJ-Scratch2 | 7 | 145 | DJ-Scratch2 | 7 | 145 | DJ-Scratch2 | 7 |
| 31 | G1 | 74 | DrumStickHit | Off | 74 | DrumStickHit | Off | 74 | DrumStickHit | Off | 74 | DrumStickHit | Off |
| 32 | G#1 | 142 | Zap1 | Off | 142 | Zap1 | Off | 142 | Zap1 | Off | 142 | Zap1 | Off |
| 33 | A1 | 249 | Click | Off | 249 | Click | Off | 249 | Click | Off | 249 | Click | Off |
| 34 | A#1 | 213 | Triangle-Open | Off | 213 | Triangle-Open | Off | 213 | Triangle-Open | Off | 213 | Triangle-Open | Off |
| 35 | B1 | 15 | BD-Dance 2 | Off | 29 | BD-Deep 88 | Off | 21 | BD-Hip 3 | Off | 21 | BD-Hip 3 | Off |
| 36 | C2 | 138 | FM El.Tom | Off | 29 | BD-Deep 88 | Off | 25 | BD-Ambi Kick | Off | 13 | BD-Squash | Off |
| 37 | C#2 | 141 | PR-House06 | Off | 126 | 88-Rimshot | Off | 141 | PR-House06 | Off | 319 | Rek-Jingle | Off |
| 38 | D2 | 139 | Real El.Tom | Off | 124 | 88-SD | Off | 61 | SD-Tiny | Off | 65 | SD-Vintage4 | Off |
| 39 | D#2 | 127 | 88-Claps | Off | 127 | 88-Claps | Off | 127 | 88-Claps | Off | 127 | 88-Claps | Off |
| 40 | E2 | 58 | SD-Hip 5 | Off | 124 | 88-SD | Off | 125 | 99-SD | Off | 51 | SD-Rap | Off |
| 41 | F2 | 139 | Real El.Tom | Off | 133 | 88-Tom | Off | 257 | Tribe | Off | 79 | Tom 2-Floor | Off |
| 42 | F#2 | 90 | HH1 Open 2 | 1 | 128 | 88-HH Close | 1 | 130 | 99-HH Close | 1 | 99 | HH-Old TiteClos | 1 |
| 43 | G2 | 139 | Real El.Tom | Off | 133 | 88-Tom | Off | 82 | Tom Processed | Off | 79 | Tom 2-Floor | Off |
| 44 | G#2 | 94 | HH2 Foot | 1 | 129 | 88-HH Open | 1 | 96 | HH2 Open | Off | 103 | HH-AlpoClose | Off |
| 45 | A2 | 139 | Real El.Tom | Off | 133 | 88-Tom | Off | 123 | 88-BD | Off | 78 | Tom 2-Lo | Off |
| 46 | A#2 | 89 | HH1 Open 1 | 1 | 129 | 88-HH Open | 1 | 131 | 99-HH Open | 1 | 97 | HH-OldClose1 | 1 |
| 47 | B2 | 139 | Real El.Tom | Off | 133 | 88-Tom | Off | 139 | Real El.Tom | Off | 78 | Tom 2-Lo | Off |
| 48 | C3 | 139 | Real El.Tom | Off | 133 | 88-Tom | Off | 139 | Real El.Tom | Off | 77 | Tom 2-Hi | Off |
| 49 | C#3 | 104 | Crash Cymbal 1 | Off | 132 | 88-Crash | Off | 104 | Crash Cymbal 1 | Off | 104 | Crash Cymbal 1 | Off |
| 50 | D3 | 139 | Real El.Tom | Off | 133 | 88-Tom | Off | 139 | Real El.Tom | Off | 77 | Tom 2-Hi | Off |
| 51 | D#3 | 113 | Ride-Edge 2 | Off | 113 | Ride-Edge 2 | Off | 113 | Ride-Edge 2 | Off | 113 | Ride-Edge 2 | Off |
| 52 | E3 | 108 | CymbalReverse | Off | 106 | China Cymbal | Off | 108 | CymbalReverse | Off | 108 | CymbalReverse | Off |
| 53 | F3 | 114 | Ride-Jazz | Off | 114 | Ride-Jazz | Off | 114 | Ride-Jazz | Off | 114 | Ride-Jazz | Off |
| 54 | F#3 | 212 | Tambourin-Acc2 | Off | 282 | Noise FM Mod | Off | 212 | Tambourin-Acc2 | Off | 212 | Tambourin-Acc2 | Off |
| 55 | G3 | 107 | Splash Cymbal | Off | 107 | Splash Cymbal | Off | 106 | China Cymbal | Off | 106 | China Cymbal | Off |
| 56 | G#3 | 225 | Cowbell | Off | 136 | 88-Cowbell | Off | 225 | Cowbell | Off | 225 | Cowbell | Off |
| 57 | A3 | 104 | Crash Cymbal 1 | Off | 104 | Crash Cymbal 1 | Off | 104 | Crash Cymbal 1 | Off | 104 | Crash Cymbal 1 | Off |
| 58 | A#3 | 198 | Vibraslap | Off | 198 | Vibraslap | Off | 198 | Vibraslap | Off | 198 | Vibraslap | Off |
| 59 | B3 | 113 | Ride-Edge 2 | Off | 113 | Ride-Edge 2 | Off | 113 | Ride-Edge 2 | Off | 113 | Ride-Edge 2 | Off |
| 60 | C4 | 171 | BongoHi-Open | Off | 134 | 88-Conga | Off | 171 | BongoHi-Open | Off | 171 | BongoHi-Open | Off |
| 61 | C#4 | 168 | BongoLo-Open | Off | 134 | 88-Conga | Off | 168 | BongoLo-Open | Off | 168 | BongoLo-Open | Off |
| 62 | D4 | 163 | CongaHiMtSlap | Off | 134 | 88-Conga | Off | 163 | CongaHiMtSlap | Off | 163 | CongaHiMtSlap | Off |
| 63 | D#4 | 161 | CongaHi-Open | Off | 133 | 88-Tom | Off | 161 | CongaHi-Open | Off | 161 | CongaHi-Open | Off |
| 64 | E4 | 158 | CongaLo-Open | Off | 133 | 88-Tom | Off | 158 | CongaLo-Open | Off | 158 | CongaLo-Open | Off |
| 65 | F4 | 207 | TimbaleHi-Rim2 | Off | 207 | TimbaleHi-Rim2 | Off | 207 | TimbaleHi-Rim2 | Off | 207 | TimbaleHi-Rim2 | Off |
| 66 | F#4 | 202 | TimbaleLo-Open | Off | 202 | TimbaleLo-Open | Off | 202 | TimbaleLo-Open | Off | 202 | TimbaleLo-Open | Off |
| 67 | G4 | 224 | Agogo-Bell | Off | 224 | Agogo-Bell | Off | 224 | Agogo-Bell | Off | 224 | Agogo-Bell | Off |
| 68 | G#4 | 224 | Agogo-Bell | Off | 224 | Agogo-Bell | Off | 224 | Agogo-Bell | Off | 224 | Agogo-Bell | Off |
| 69 | A4 | 219 | Cabasa-Up | Off | 219 | Cabasa-Up | Off | 219 | Cabasa-Up | Off | 219 | Cabasa-Up | Off |
| 70 | A#4 | 182 | MaracasPush | Off | 182 | MaracasPush | Off | 102 | HH-Hip | Off | 209 | Tambourin-Push | Off |
| 71 | B4 | 234 | SambaWhistle | 2 | 234 | SambaWhistle | 2 | 234 | SambaWhistle | 2 | 234 | SambaWhistle | 2 |
| 72 | C5 | 234 | SambaWhistle | 2 | 234 | SambaWhistle | 2 | 234 | SambaWhistle | 2 | 234 | SambaWhistle | 2 |
| 73 | C#5 | 181 | Guiro Short | 3 | 181 | Guiro Short | 3 | 181 | Guiro Short | 3 | 181 | Guiro Short | 3 |
| 74 | D5 | 180 | Guiro Long | 3 | 180 | Guiro Long | 3 | 180 | Guiro Long | 3 | 180 | Guiro Long | 3 |
| 75 | D#5 | 199 | Claves | Off | 135 | 88-Clave | Off | 199 | Claves | Off | 199 | Claves | Off |
| 76 | E5 | 200 | Woodblock1 | Off | 200 | Woodblock1 | Off | 200 | Woodblock1 | Off | 200 | Woodblock1 | Off |
| 77 | F5 | 200 | Woodblock1 | Off | 200 | Woodblock1 | Off | 200 | Woodblock1 | Off | 200 | Woodblock1 | Off |
| 78 | F#5 | 215 | Cuica-Hi | 4 | 215 | Cuica-Hi | 4 | 239 | Uhh | Off | 215 | Cuica-Hi | 4 |
| 79 | G5 | 216 | Cuica-Lo | 4 | 215 | Cuica-Hi | 4 | 237 | Yeah! | Off | 216 | Cuica-Lo | 4 |
| 80 | G#5 | 214 | Triangle-Mute | 5 | 230 | Finger Cymbal | 5 | 214 | Triangle-Mute | 5 | 214 | Triangle-Mute | 5 |
| 81 | A5 | 213 | Triangle-Open | 5 | 230 | Finger Cymbal | 5 | 213 | Triangle-Open | 5 | 213 | Triangle-Open | 5 |
| 82 | A#5 | 220 | Cabasa-Down | Off | 220 | Cabasa-Down | Off | 101 | HH-Old Open2 | Off | 220 | Cabasa-Down | Off |
| 83 | B5 | 228 | Sleigh Bell | Off | 228 | Sleigh Bell | Off | 228 | Sleigh Bell | Off | 228 | Sleigh Bell | Off |
| 84 | C6 | 231 | Marc Tree | Off | 231 | Marc Tree | Off | 231 | Marc Tree | Off 231 Marc Tree Off | |||
| 85 | C#6 | 178 | CastSingle | Off | 178 | CastSingle | Off | 178 | CastSingle Off | ||||
| 120-0-28: House Kit3 | 120-0-29: House Kit4 | 120-0-32: Jazz Kit | 120-0-40: Brush Kit1 | ||||||||||
| Note | Sample | Excl. | Sample | Excl. | Sample | Excl. | Sample | Excl. | |||||
| 9 | A-1 | 23 | BD-Pop Kick | Off | 23 | BD-Pop Kick | Off | 17 | BD-House 1 | Off | 79 | Tom 2-Floor | Off |
| 10 | A#-1 | 125 | 99-SD | Off | 125 | 99-SD | Off | 125 | 99-SD | Off | 79 | Tom 2-Floor | Off |
| 11 | B-1 | 29 | BD-Deep 88 | Off | 29 | BD-Deep 88 | Off | 29 | BD-Deep 88 | Off | 79 | Tom 2-Floor | Off |
| 12 | C0 | 124 | 88-SD | Off | 124 | 88-SD | Off | 124 | 88-SD | Off | 78 | Tom 2-Lo | Off |
| 13 | C#0 | 50 | SD-Dance | Off | 50 | SD-Dance | Off | 39 | SD-Jazz Ring | Off | 77 | Tom 2-Hi | Off |
| 14 | D0 | 40 | SD-Amb.Piccolo | Off | 40 | SD-Amb.Piccolo | Off | 40 | SD-Amb.Piccolo | Off | 32 | SD-Dry 2 | Off |
| 15 | D#0 | 25 | BD-Ambi Kick | Off | 25 | BD-Ambi Kick | Off | 27 | BD-Amb.Rocker | Off | 5 | BD-Jazz | Off |
| 16 | E0 | 9 | BD-Terminator | Off | 9 | BD-Terminator | Off | 6 | BD-Pillow | Off | 6 | BD-Pillow | Off |
| 17 | F0 | 65 | SD-Vintage4 | Off | 65 | SD-Vintage4 | Off | 37 | SD-Full Room | Off 121 Finger Snaps Off | |||
| 18 | F#0 | 143 | Zap2 | Off | 143 | Zap2 | Off | 87 | HH1 Closed2 | 1 | 86 | HH1 Closed1 | 1 |
| 19 | G0 | 22 | BD-Hip 4 | Off | 22 | BD-Hip 4 | Off | 0 | BD-Dry 1 | Off | 2 | BD-Dry 3 | Off |
| 20 | G#0 | 142 | Zap1 | Off | 142 | Zap1 | Off | 73 | SideStickAmb | Off | 72 | SideStickDry | Off |
| 21 | A0 | 66 | SD-Vintage5 | Off | 66 | SD-Vintage5 | Off | 32 | SD-Dry 2 | Off | 43 | SD-BrushTap1 | 7 |
| 22 | A#0 | 310 | Mouth Harp | Off | 310 | Mouth Harp | Off | 42 | SD-BrushHit | Off | 43 | SD-BrushTap1 | 7 |
| 23 | B0 | 74 | DrumStickHit | Off | 74 | DrumStickHit | Off | 74 | DrumStickHit | Off | 74 | DrumStickHit | Off |
| 24 | C1 | 120 | SD-Orch. | 7 | 120 | SD-Orch. | 7 | 120 | SD-Orch. | 7 | 120 | SD-Orch. | 7 |
| 25 | C#1 | 119 | SD-Orch.Roll | 7 | 119 | SD-Orch.Roll | 7 | 119 | SD-Orch.Roll | 7 | 119 | SD-Orch.Roll | 7 |
| 26 | D1 | 121 | FingerSnaps | Off | 121 | FingerSnaps | Off | 121 | FingerSnaps | Off | 121 | FingerSnaps | Off |
| 27 | D#1 | 143 | Zap2 | Off | 143 | Zap2 | Off | 143 | Zap2 | Off | 143 | Zap2 | Off |
| 28 | E1 | 281 | Noise White | Off | 281 | Noise White | Off | 281 | Noise White | Off | 281 | Noise White | Off |
| 29 | F1 | 145 | DJ-Scratch2 | 7 | 145 | DJ-Scratch2 | 7 | 145 | DJ-Scratch2 | 7 | 145 | DJ-Scratch2 | 7 |
| 30 | F#1 | 145 | DJ-Scratch2 | 7 | 145 | DJ-Scratch2 | 7 | 145 | DJ-Scratch2 | 7 | 145 | DJ-Scratch2 | 7 |
| 31 | G1 | 74 | DrumStickHit | Off | 74 | DrumStickHit | Off | 74 | DrumStickHit | Off | 74 | DrumStickHit | Off |
| 32 | G#1 | 142 | Zap1 | Off | 142 | Zap1 | Off | 142 | Zap1 | Off | 142 | Zap1 | Off |
| 33 | A1 | 249 | Click | Off | 249 | Click | Off | 249 | Click | Off | 249 | Click | Off |
| 34 | A#1 | 213 | Triangle-Open | Off | 213 | Triangle-Open | Off | 213 | Triangle-Open | Off | 213 | Triangle-Open | Off |
| 35 | B1 | 28 | BD-Pop 99 | Off | 21 | BD-Hip 3 | Off | 5 | BD-Jazz | Off | 6 | BD-Pillow | Off |
| 36 | C2 | 24 | BD-Dance 99 | Off | 11 | BD-Gated | Off | 4 | BD-SoftRoom | Off | 5 | BD-Jazz | Off |
| 37 | C#2 | 141 | PR-House06 | Off | 73 | SideStickAmb | Off | 73 | SideStickAmb | Off | 73 | SideStickAmb | Off |
| 38 | D2 | 47 | SD-Yowie | Off | 31 | SD-Dry 1 | Off | 31 | SD-Dry 1 | Off | 43 | SD-BrushTap1 | Off |
| 39 | D#2 | 127 | 88-Claps | Off | 127 | 88-Claps | Off | 127 | 88-Claps | Off | 42 | SD-BrushHit | Off |
| 40 | E2 | 59 | SD-Hip 6 | Off | 52 | SD-Noise | Off | 39 | SD-Jazz Ring | Off | 45 | SD-BrushSwirl | Off |
| 41 | F2 | 139 | Real El.Tom | Off | 139 | Real El.Tom | Off | 84 | Tom JazzFloor | Off | 85 | Tom Brush Hi | Off |
| 42 | F#2 | 128 | 88-HH Close | 1 | 128 | 88-HH Close | 1 | 92 | HH2 Closed1 | 1 | 90 | HH1 Open 2 | 1 |
| 43 | G2 | 139 | Real El.Tom | Off | 139 | Real El.Tom | Off | 84 | Tom JazzFloor | Off | 85 | Tom Brush Hi | Off |
| 44 | G#2 | 128 | 88-HH Close | 1 | 129 | 88-HH Open | Off | 94 | HH2 Foot | 1 | 94 | HH2 Foot | 1 |
| 45 | A2 | 139 | Real El.Tom | Off | 139 | Real El.Tom | Off | 83 | Tom Jazz Hi | Off | 85 | Tom Brush Hi | Off |
| 46 | A#2 | 129 | 88-HH Open | 1 | 129 | 88-HH Open | 1 | 91 | HH1 Sizzle | 1 | 95 | HH2 FootOpen | 1 |
| 47 | B2 | 139 | Real El.Tom | Off | 139 | Real El.Tom | Off | 83 | Tom Jazz Hi | Off | 85 | Tom Brush Hi | Off |
| 48 | C3 | 139 | Real El.Tom | Off | 139 | Real El.Tom | Off | 83 | Tom Jazz Hi | Off | 85 | Tom Brush Hi | Off |
| 49 | C#3 | 104 | Crash Cymbal 1 | Off | 132 | 88-Crash | Off | 104 | Crash Cymbal 1 | Off | 104 | Crash Cymbal 1 | Off |
| 50 | D3 | 139 | Real El.Tom | Off | 139 | Real El.Tom | Off | 83 | Tom Jazz Hi | Off | 85 | Tom Brush Hi | Off |
| 51 | D#3 | 113 | Ride-Edge 2 | Off | 111 | CYM-99 Ride | Off | 113 | Ride-Edge 2 | Off | 112 | Ride-Edge 1 | Off |
| 52 | E3 | 108 | CymbalReverse | Off | 108 | CymbalReverse | Off | 106 | China Cymbal | Off | 106 | China Cymbal | Off |
| 53 | F3 | 114 | Ride-Jazz | Off | 114 | Ride-Jazz | Off | 115 | Ride-Cup | Off | 114 | Ride-Jazz | Off |
| 54 | F#3 | 212 | Tambourin-Acc2 | Off | 211 | Tambourin-Acc1 | Off | 212 | Tambourin-Acc2 | Off | 212 | Tambourin-Acc2 | Off |
| 55 | G3 | 107 | Splash Cymbal | Off | 107 | Splash Cymbal | Off | 105 | Crash Cymbal 2 | Off | 107 | Splash Cymbal | Off |
| 56 | G#3 | 225 | Cowbell | Off | 136 | 88-Cowbell | Off | 225 | Cowbell | Off | 225 | Cowbell | Off |
| 57 | A3 | 104 | Crash Cymbal 1 | Off | 104 | Crash Cymbal 1 | Off | 104 | Crash Cymbal 1 | Off | 104 | Crash Cymbal 1 | Off |
| 58 | A#3 | 198 | Vibraslap | Off | 198 | Vibraslap | Off | 198 | Vibraslap | Off | 198 | Vibraslap | Off |
| 59 | B3 | 113 | Ride-Edge 2 | Off | 113 | Ride-Edge 2 | Off | 112 | Ride-Edge 1 | Off | 113 | Ride-Edge 2 | Off |
| 60 | C4 | 171 | BongoHi-Open | Off | 171 | BongoHi-Open | Off | 171 | BongoHi-Open | Off | 171 | BongoHi-Open | Off |
| 61 | C#4 | 168 | BongoLo-Open | Off | 168 | BongoLo-Open | Off | 168 | BongoLo-Open | Off | 168 | BongoLo-Open | Off |
| 62 | D4 | 163 | CongaHiMtSlap | Off | 163 | CongaHiMtSlap | Off | 165 | CongaHi-Slap2 | Off | 163 | CongaHiMtSlap | Off |
| 63 | D#4 | 161 | CongaHi-Open | Off | 161 | CongaHi-Open | Off | 161 | CongaHi-Open | Off | 161 | CongaHi-Open | Off |
| 64 | E4 | 158 | CongaLo-Open | Off | 158 | CongaLo-Open | Off | 158 | CongaLo-Open | Off | 158 | CongaLo-Open | Off |
| 65 | F4 | 207 | TimbaleHi-Rim2 | Off | 207 | TimbaleHi-Rim2 | Off | 207 | TimbaleHi-Rim2 | Off | 207 | TimbaleHi-Rim2 | Off |
| 66 | F#4 | 202 | TimbaleLo-Open | Off | 202 | TimbaleLo-Open | Off | 202 | TimbaleLo-Open | Off | 202 | TimbaleLo-Open | Off |
| 67 | G4 | 224 | Agogo-Bell | Off | 224 | Agogo-Bell | Off | 224 | Agogo-Bell | Off | 224 | Agogo-Bell | Off |
| 68 | G#4 | 224 | Agogo-Bell | Off | 224 | Agogo-Bell | Off | 224 | Agogo-Bell | Off | 224 | Agogo-Bell | Off |
| 69 | A4 | 219 | Cabasa-Up | Off | 219 | Cabasa-Up | Off | 219 | Cabasa-Up | Off | 219 | Cabasa-Up | Off |
| 70 | A#4 | 102 | HH-Hip | Off | 209 | Tambourin-Push | Off | 182 | MaracasPush | Off | 182 | MaracasPush | Off |
| 71 | B4 | 234 | SambaWhistle | 2 | 234 | SambaWhistle | 2 | 234 | SambaWhistle | 2 | 234 | SambaWhistle | 2 |
| 72 | C5 | 234 | SambaWhistle | 2 | 234 | SambaWhistle | 2 | 234 | SambaWhistle | 2 | 234 | SambaWhistle | 2 |
| 73 | C#5 | 181 | Guiro Short | 3 | 181 | Guiro Short | 3 | 181 | Guiro Short | 3 | 181 | Guiro Short | 3 |
| 74 | D5 | 180 | Guiro Long | 3 | 180 | Guiro Long | 3 | 180 | Guiro Long | 3 | 180 | Guiro Long | 3 |
| 75 | D#5 | 199 | Claves | Off | 199 | Claves | Off | 199 | Claves | Off | 199 | Claves | Off |
| 76 | E5 | 200 | Woodblock1 | Off | 200 | Woodblock1 | Off | 200 | Woodblock1 | Off | 200 | Woodblock1 | Off |
| 77 | F5 | 200 | Woodblock1 | Off | 200 | Woodblock1 | Off | 200 | Woodblock1 | Off | 200 | Woodblock1 | Off |
| 78 | F#5 | 215 | Cuica-Hi | Off | 215 | Cuica-Hi | 4 | 215 | Cuica-Hi | 4 | 215 | Cuica-Hi | 4 |
| 79 | G5 | 215 | Cuica-Hi | Off | 215 | Cuica-Hi | 4 | 216 | Cuica-Lo | 4 | 216 | Cuica-Lo | 4 |
| 80 | G#5 | 233 | Flexatone | 5 | 233 | Flexatone | 5 | 214 | Triangle-Mute | 5 | 214 | Triangle-Mute | 5 |
| 81 | A5 | 233 | Flexatone | 5 | 233 | Flexatone | 5 | 213 | Triangle-Open | 5 | 213 | Triangle-Open | 5 |
| 82 | A#5 | 101 | HH-Old Open2 | Off | 220 | Cabasa-Down | Off | 220 | Cabasa-Down | Off | 220 | Cabasa-Down | Off |
| 83 | B5 | 228 | Sleigh Bell | Off | 228 | Sleigh Bell | Off | 228 | Sleigh Bell | Off | 228 | Sleigh Bell | Off |
| 84 | C6 | 231 | Marc Tree | Off | 231 | Marc Tree | Off | 231 | Marc Tree | Off 231 Marc Tree | |||
| 120-0-41: Brush V.S.2 | 120-0-48: OrchestraK | 120-0-116: Arabian Kit 1 | 120-0-117: Arabian Kit 2 | ||||||||||
| Note | Sample | Excl. | Sample | Excl. | Sample | Excl. | Sample | Excl. | |||||
| 9 | A-1 | 79 | Tom 2-Floor | Off | 17 | BD-House 1 | Off | 17 | BD-House 1 | Off | |||
| 10 | A#-1 | 79 | Tom 2-Floor | Off | 125 | 99-SD | Off | 125 | 99-SD | Off | |||
| 11 | B-1 | 79 | Tom 2-Floor | Off | 123 | 88-BD | Off | 123 | 88-BD | Off | |||
| 12 | C0 | 78 | Tom 2-Lo | Off | 124 | 88-SD | Off | 124 | 88-SD | Off | |||
| 13 | C#0 | 77 | Tom 2-Hi | Off | 37 | SD-Full Room | Off | 37 | SD-Full Room | Off | |||
| 14 | D0 | 32 | SD-Dry 2 | Off | 48 | SD-Processed | 1 | 48 | SD-Processed | 1 | |||
| 15 | D#0 | 5 | BD-Jazz | Off | 0 | BD-Dry 1 | Off | 0 | BD-Dry 1 | Off | |||
| 16 | E0 | 6 | BD-Pillow | Off | 12 | BD-Tight | Off | 12 | BD-Tight | Off | |||
| 17 | F0 | 121 | FingerSnaps | Off | 31 | SD-Dry 1 | Off | 31 | SD-Dry 1 | Off | |||
| 18 | F#0 | 86 | HH1 Closed1 | 1 | 87 | HH1 Closed2 | 1 | 87 | HH1 Closed2 | 1 | |||
| 19 | G0 | 2 | BD-Dry 3 | Off | 2 | BD-Dry 3 | Off | 2 | BD-Dry 3 | Off | |||
| 20 | G#0 | 72 | SideStickDry | Off | 73 | SideStickAmb | Off | 73 | SideStickAmb | Off | |||
| 21 | A0 | 43 | SD-BrushTap1 | 7 | 74 | DrumStickHit | Off | 74 | DrumStickHit | Off | |||
| 22 | A#0 | 43 | SD-BrushTap1 | 7 | 283 | Tubular | Off | 283 | Tubular | Off | |||
| 23 | B0 | 74 | DrumStickHit | Off | 225 | Cowbell | Off | 225 | Cowbell | Off | |||
| 24 | C1 | 120 | SD-Orch. | 7 | 120 | SD-Orch. | 7 | 225 | Cowbell | Off | 225 | Cowbell | Off |
| 25 | C#1 | 119 | SD-Orch.Roll | 7 | 119 | SD-Orch.Roll | 7 | 119 | SD-Orch.Roll | Off | 119 | SD-Orch.Roll | Off |
| 26 | D1 | 121 | FingerSnaps | Off | 121 | FingerSnaps | Off | 121 | FingerSnaps | Off | 121 | FingerSnaps | Off |
| 27 | D#1 | 143 | Zap2 | Off | 86 | HH1 Closed1 | Off | 143 | Zap2 | Off | 143 | Zap2 | Off |
| 28 | E1 | 281 | Noise White | Off | 88 | HH1 Foot | Off | 87 | HH1 Closed2 | Off | 87 | HH1 Closed2 | Off |
| 29 | F1 | 145 | DJ-Scratch2 | 7 | 89 | HH1 Open 1 | 7 | 145 | DJ-Scratch2 | Off | 145 | DJ-Scratch2 | Off |
| 30 | F#1 | 145 | DJ-Scratch2 | 7 | 112 | Ride-Edge 1 | Off | 145 | DJ-Scratch2 | Off | 145 | DJ-Scratch2 | Off |
| 31 | G1 | 74 | DrumStickHit | Off | 74 | DrumStickHit | Off | 74 | DrumStickHit | Off | 74 | DrumStickHit | Off |
| 32 | G#1 | 142 | Zap1 | Off | 142 | Zap1 | Off | 165 | CongaHi-Slap2 | Off | 165 | CongaHi-Slap2 | Off |
| 33 | A1 | 249 | Click | Off | 249 | Click | Off | 249 | Click | Off | 249 | Click | Off |
| 34 | A#1 | 213 | Triangle-Open | Off | 213 | Triangle-Open | Off | 249 | Click | Off | 249 | Click | Off |
| 35 | B1 | 5 | BD-Jazz | Off | 4 | BD-SoftRoom | Off | 2 | BD-Dry 3 | Off | 2 | BD-Dry 3 | Off |
| 36 C2 3 | x4 | BD-Normal BD -SoftRoom | Off | 116 | BD-Orch. | Off | 17 | BD-House 1 | Off | 12 | BD-Tight | Off | |
| 37 | C#2 | 43 | SD-BrushTap1 | Off | 73 | SideStickAmb | Off | 72 | SideStickDry | Off | 72 | SideStickDry | Off |
| 38 D2 43 | →44 | SD-BrushTap1→SD-BrushTap2 | Off | 120 | SD-Orch. | Off | 33 | SD-Dry 3 | Off | 33 | SD-Dry 3 | Off | |
| 39 | D#2 | 39→42 | SD-Jazz Ring SD→BrushHit | Off | 178 | CastSingle | Off | 337 | Alkis | Off | 122 | Hand Claps | Off |
| 40 E2 | 45→45 | SD-BrushSwtl SD→BrushSwtl | Off | 120 | SD-Orch. | Off | 68 | SD-AmbiHop | Off | 33 | SD-Dry 3 | Off | |
| 41 | F2 | 85 | Tom Brush Hi | Off | 118 | Timpani | Off | 79 | Tom 2-Floor | Off | 79 | Tom 2-Floor | Off |
| 42 | F#2 | 90 | HH1 Open 2 | 1 | 118 | Timpani | Off | 88 | HH1 Foot | 1 | 90 | HH1 Open 2 | 1 |
| 43 | G2 | 85 | Tom Brush Hi | Off | 118 | Timpani | Off | 79 | Tom 2-Floor | Off | 79 | Tom 2-Floor | Off |
| 44 | G#2 | 94 | HH2 Foot | 1 | 118 | Timpani | Off | 94 | HH2 Foot | 1 | 94 | HH2 Foot | 1 |
| 45 | A2 | 85 | Tom Brush Hi | Off | 118 | Timpani | Off | 78 | Tom 2-Lo | Off | 78 | Tom 2-Lo | Off |
| 46 | A#2 | 95 | HH2 FootOpen | 1 | 118 | Timpani | Off | 89 | HH1 Open 1 | 1 | 89 | HH1 Open 1 | 1 |
| 47 | B2 | 85 | Tom Brush Hi | Off | 118 | Timpani | Off | 78 | Tom 2-Lo | Off | 78 | Tom 2-Lo | Off |
| 48 | C3 | 85 | Tom Brush Hi | Off | 118 | Timpani | Off | 77 | Tom 2-Hi | Off | 77 | Tom 2-Hi | Off |
| 49 | C#3 | 104 | Crash Cymbal 1 | Off | 118 | Timpani | Off | 104 | Crash Cymbal 1 | Off | 104 | Crash Cymbal 1 | Off |
| 50 | D3 | 85 | Tom Brush Hi | Off | 118 | Timpani | Off | 77 | Tom 2-Hi | Off | 77 | Tom 2-Hi | Off |
| 51 | D#3 | 112 | Ride-Edge 1 | Off | 118 | Timpani | Off | 113 | Ride-Edge 2 | Off | 113 | Ride-Edge 2 | Off |
| 52 | E3 | 106 | China Cymbal | Off | 118 | Timpani | Off | 352 | Hollo 1 | Off | 301 | Dbk-Tky-Open | Off |
| 53 | F3 | 114 | Ride-Jazz | Off | 118 | Timpani | Off | 353 | Hollo 2 | Off | 300 | Dbk-Tky-Mute | Off |
| 54 | F#3 | 212 | Tambourin-Acc2 | Off | 212 | Tambourin-Acc2 | Off | 211 | Tambourin-Acc1 | Off | 211 | Tambourin-Acc1 | Off |
| 55 | G3 | 107 | Splash Cymbal | Off | 107 | Splash Cymbal | Off | 345 | Darbuka 2 | Off | 302 | Dbk-Tky-Rim | Off |
| 56 | G#3 | 225 | Cowbell | Off | 225 | Cowbell | Off | 225 | Cowbell | Off | 225 | Cowbell | Off |
| 57 | A3 | 104 | Crash Cymbal 1 | Off | 104 | Crash Cymbal 1 | Off | 350 | Darbuka D3 | Off | 302 | Dbk-Tky-Rim | Off |
| 58 | A#3 | 198 | Vibraslap | Off | 198 | Vibraslap | Off | 219 | Cabasa-Up | Off | 219 | Cabasa-Up | Off |
| 59 | B3 | 113 | Ride-Edge 2 | Off | 117 | Orch Cymb | Off | 339 | Bandir Closed | Off | 304 | Douf-Dom-ak | Off |
| 60 | C4 | 171 | BongoHi-Open | Off | 171 | BongoHi-Open | Off | 353 | Hollo 2 | Off | 307 | Douf-Tek-ak 2 | Off |
| 61 | C#4 | 168 | BongoLo-Open | Off | 168 | BongoLo-Open | Off | 168 | BongoLo-Open | Off | 168 | BongoLo-Open | Off |
| 62 | D4 | 163 | CongaHiMtSlap | Off | 163 | CongaHiMtSlap | Off | 353 | Hollo 2 | Off | 306 | Douf-Tek-ak 1 | Off |
| 63 | D#4 | 161 | CongaHi-Open | Off | 161 | CongaHi-Open | Off | 171 | BongoHi-Open | Off | 171 | BongoHi-Open | Off |
| 64 | E4 | 158 | CongaLo-Open | Off | 158 | CongaLo-Open | Off | 305 | Douf-rim-ak | Off | 305 | Douf-rim-ak | Off |
| 65 | F4 | 207 | TimbaleHi-Rim2 | Off | 207 | TimbaleHi-Rim2 | Off | 344 | Darbuka 1 Closed | Off | 328 | Tabla-Dom | Off |
| 66 | F#4 | 202 | TimbaleLo-Open | Off | 202 | TimbaleLo-Open | Off | 348 | Darbuka D1 | 4 | 348 | Darbuka D1 | 4 |
| 67 | G4 | 224 | Agogo-Bell | Off | 224 | Agogo-Bell | Off | 346 | Darbuka 3 | 4 | 331 | Tabla-Tak | 4 |
| 68 | G#4 | 224 | Agogo-Bell | Off | 224 | Agogo-Bell | Off | 349 | Darbuka D2 | Off | 329 | Tabla-Flam | Off |
| 69 | A4 | 219 | Cabasa-Up | Off | 219 | Cabasa-Up | Off | 341 | Darbuka 1 Tek7 | Off | 330 | Tabla-Rim | Off |
| 70 | A#4 | 182 | MaracasPush | Off | 182 | MaracasPush | Off | 341 | Darbuka 1 Tek7 | Off | 189 | Tabla-Na | Off |
| 71 | B4 | 234 | SambaWhistle | 2 | 234 | SambaWhistle | 2 | 343 | Darbuka 1 Tek5 | Off | 191 | Tabla-Tin | Off |
| 72 | C5 | 234 | SambaWhistle | 2 | 234 | SambaWhistle | 2 | 359 | Tef 1 | Off | 318 | Rek-dom-ak | Off |
| 73 | C#5 | 181 | Guiro Short | 3 | 181 | Guiro Short | 3 | 360 | Tef 2 | Off | 321 | Rik2 | Off |
| 74 | D5 | 180 | Guiro Long | 3 | 180 | Guiro Long | 3 | 320 | Rik1 | Off | 320 | Rik1 | Off |
| 75 | D#5 | 199 | Claves | Off | 199 | Claves | Off | 322 | Rik3 | Off | 322 | Rik3 | Off |
| 76 | E5 | 200 | Woodblock1 | Off | 200 | Woodblock1 | Off | 360 | Tef 2 | Off | 322 | Rik3 | Off |
| 77 F5 | |||||||||||||
(continues on the next page)
| (continued) | ||||||||||||
| 120-0-41: Brush V.S.2 | 120-0-48: OrchestraK | 120-0-116: Arabian Kit 1 | 120-0-117: Arabian Kit 2 | |||||||||
| Note | Sample | Excl. | Sample | Excl. | Sample | Excl. | Sample | |||||
| 89 | F6 | 356 | Ramazan DVL1 | 3 | 175 | Djembe-Open | ||||||
| 90 | F#6 | 358 | Ramazan DVL3 | 3 | 301 | Dbk-Tky-Open | ||||||
| 91 | G6 | 355 | Kup 2 | 5 | 312 | Bells Open | ||||||
| 92 | G#6 | 83 | Tom Jazz Hi | 5 | 323 | Sagat-HalfOpen | ||||||
| 93 | A6 | 355 | Kup 2 | 5 | 324 | Sagat-Close | ||||||
| 94 | A#6 | 354 | Kup 1 | Off | 351 | Davul | ||||||
| 95 | B6 | 2 | BD-Dry 3 | Off | 5 | BD-Jazz | ||||||
| 96 | C7 | 354 | Kup 1 | Off | 361 | Tef 3 | ||||||
| 120-0-50: Bdrum & Sdrum | 120-0-56: SFX Kit | 120-0-64: Percus.Kit1 | 120-0-65: Latin P.Kit | ||||||||||
| Note | Sample | Excl. | Sample | Excl. | Sample | Excl. | Sample | Excl. | |||||
| 0 C-1 | 257 Tribe Off | ||||||||||||
| 1 C#-1 | 142 Zap1 Off | ||||||||||||
| 2 D-1 | 133 88-Tom Off | ||||||||||||
| 3 D#-1 | 123 88-BD Off | ||||||||||||
| 4 E-1 | 123 88-BD Off | ||||||||||||
| 5 | F-1 | 22 | BD-Hip 4 | Off | |||||||||
| 6 | F#-1 | 23 | BD-Pop Kick | Off | |||||||||
| 7 | G-1 | 19 | BD-Hip 1 | Off | |||||||||
| 8 | G#-1 | 18 | BD-House 2 | Off | |||||||||
| 9 | A-1 | 28 | BD-Pop 99 | Off | |||||||||
| 10 A#-1 | 123 88-BD Off | ||||||||||||
| 11 | B-1 | 138 | FM El.Tom | Off | |||||||||
| 12 | C0 | 28 | BD-Pop 99 | Off | |||||||||
| 13 | C#0 | 27 | BD-Amb.Rocker | Off | |||||||||
| 14 | D0 | 25 | BD-Ambi Kick | Off | 181 | Guiro Short | Off | ||||||
| 15 | D#0 | 24 | BD-Dance 99 | Off | 209 | Tambourin-Push | Off | ||||||
| 16 | E0 | 23 | BD-Pop Kick | Off | 210 | Tambourin-Pull | Off | ||||||
| 17 | F0 | 22 | BD-Hip 4 | Off | 211 | Tambourin-Acc1 | Off | ||||||
| 18 | F#0 | 21 | BD-Hip 3 | Off | 211 | Tambourin-Acc1 | Off | 240 | Hit It | Off | |||
| 19 | G0 | 19 | BD-Hip 1 | Off | 212 | Tambourin-Acc2 | Off | 238 | Yeah!-Solo | Off | |||
| 20 | G#0 | 18 | BD-House 2 | Off | 212 | Tambourin-Acc2 | Off | 237 | Yeah! | Off | |||
| 21 | A0 | 16 | BD-Dance 3 | Off | 209 | Tambourin-Push | Off | 241 | Uhhhh Solo | Off | |||
| 22 | A#0 | 15 | BD-Dance 2 | Off | 212 | Tambourin-Acc2 | Off | 214 | Triangle-Mute | 7 | |||
| 23 | B0 | 13 | BD-Squash | Off | 319 | Rek-Jingle | Off | 213 | Triangle-Open | 7 | |||
| 24 | C1 | 30 | BD-Klanger | Off | 233 | Flexatone | Off | 233 | Flexatone | Off | |||
| 25 | C#1 | 29 | BD-Deep 88 | Off | 230 | Finger Cymbal | Off | 230 | Finger Cymbal | Off | |||
| 26 | D1 | 29 | BD-Deep 88 | Off | 0 | BD-Dry 1 | Off | 197 | Tsuzumi | Off | 136 | 88-Cowbell | Off |
| 27 | D#1 | 123 | 88-BD | Off | 296 | Amp Noise | Off | 172 | BongoHi-Slap | Off | 179 | CastDouble | Off |
| 28 | E1 | 12 | BD-Tight | Off | 235 | Chinese Gong | Off | 173 | BongoHi-Stk1 | Off | 178 | CastSingle | Off |
| 29 | F1 | 29 | BD-Deep 88 | Off | 153 | DJ-BD Rub | Off | 170 | BongoLo-Stk | Off | 121 | FingerSnaps | Off |
| 30 | F#1 | 17 | BD-House 1 | Off | 148 | DJ-Scratch3c | Off | 211 | Tambourin-Acc1 | Off | 121 | FingerSnaps | Off |
| 31 | G1 | 14 | BD-Dance 1 | Off | 154 | DJ-SD Rub | Off | 224 | Agogo-Bell | Off | 99 | HH-Old TiteClos | Off |
| 32 | G#1 | 16 | BD-Dance 3 | Off | 145 | DJ-Scratch2 | Off | 273 | Wind | Off | 236 | Metal Hit | Off |
| 33 | A1 | 20 | BD-Hip 2 | Off | 286 | GtCutNois1 | Off | 224 | Agogo-Bell | Off | 197 | Tsuzumi | Off |
| 34 | A#1 | 26 | BD-Amb.Crackle | Off | 287 | GtCutNois2 | Off | 174 | BongoHi-Stk2 | Off | 197 | Tsuzumi | Off |
| 35 | B1 | 29 | BD-Deep 88 | Off | 292 | E.GtrPick1 | Off | 200 | Woodblock1 | Off | 197 | Tsuzumi | Off |
| 36 | C2 | 17 | BD-House 1 | Off | 294 | Gtr Scratch1 | Off | 199 | Claves | Off | 116 | BD-Orch. | 1 |
| 37 | C#2 | 23 | BD-Pop Kick | Off | 290 | Dist.Slide1 | Off | 201 | Woodblock2 | Off | 116 | BD-Orch. | 1 |
| 38 | D2 | 12 | BD-Tight | Off | 291 | Dist.Slide2 | Off | 225 | Cowbell | Off | 224 | Agogo-Bell | Off |
| 39 | D#2 | 1 | BD-Dry 2 | Off | 143 | Zap2 | Off | 200 | Woodblock1 | Off | 224 | Agogo-Bell | Off |
| 40 | E2 | 2 | BD-Dry 3 | Off | 258 | GunShot 1 | Off | 179 | CastDouble | Off | 158 | CongaLo-Open | Off |
| 41 | F2 | 7 | BD-Woofer | Off | 144 | DJ-Scratch1 | 7 | 184 | Baya-Open | Off | 159 | CongaLoMtSlp | Off |
| 42 | F#2 | 3 | BD-Normal | Off | 145 | DJ-Scratch2 | 7 | 217 | Shaker1 | Off | 164 | CongaHi-Slap1 | Off |
| 43 | G2 | 0 | BD-Dry 1 | Off | 74 | DrumStickHit | Off | 186 | Baya-Mute1 | Off | 165 | CongaHi-Slap2 | Off |
| 44 | G#2 | 10 | BD-Tubby | Off | 143 | Zap2 | Off | 182 | MaracasPush | Off | 137 | 88-Maraca | Off |
| 45 | A2 | 3 | BD-Normal | Off | 249 | Click | Off | 184 | Baya-Open | Off | 161 | CongaHi-Open | Off |
| 46 | A#2 | 0 | BD-Dry 1 | Off | 224 | Agogo-Bell | Off | 219 | Cabasa-Up | Off | 214 | Triangle-Mute | 2 |
| 47 | B2 | 3 | BD-Normal | Off | 289 | Fret Noise | Off | 190 | Tabla-Open | Off | 213 | Triangle-Open | 2 |
| 48 | C3 | 6 | BD-Pillow | Off | 286 | GtCutNois1 | Off | 192 | Tabla-Mute1 | Off | 159 | CongaLoMtSlp | Off |
| 49 | C#3 | 116 | BD-Orch. | Off | 287 | GtCutNois2 | Off | 198 | Vibraslap | Off | 162 | CongaHiMute | Off |
| 50 | D3 | 11 | BD-Gated | Off | 286 | GtCutNois1 | Off | 189 | Tabla-Na | Off | 165 | CongaHi-Slap2 | Off |
| 51 | D#3 | 10 | BD-Tubby | Off | 121 | FingerSnaps | Off | 214 | Triangle-Mute | 3 | 211 | Tambourin-Acc1 | Off |
| 52 | E3 | 8 | BD-MondoKill | Off | 246 | Laughing | Off | 116 | BD-Orch. | Off | 161 | CongaHi-Open | Off |
| 53 | F3 | 10 | BD-Tubby | Off | 245 | Scream | Off | 213 | Triangle-Open | 3 | 170 | BongoLo-Stk | Off |
| 54 | F#3 | 9 | BD-Terminator | Off | 256 | Punch | Off | 181 | Guiro Short | Off | 170 | BongoLo-Stk | Off |
| 55 | G3 | 15 | BD-Dance 2 | Off | 255 | Heart-Beat | Off | 311 | Jingle Bell | Off | 173 | BongoHi-Stk1 | Off |
| 56 | G#3 | 138 | FM El.Tom | Off | 248 | Footsteps 2 | Off | 180 | Guiro Long | Off | 202 | TimbaleLo-Open | Off |
| 57 | A3 | 133 | 88-Tom | Off | 247 | Footsteps 1 | Off | 232 | Marc Tree LP | Off | 174 | BongoHi-Stk2 | Off |
| 58 | A#3 | 29 | BD-Deep 88 | Off | 244 | Applause | Off | 231 | Marc Tree | Off | 202 | TimbaleLo-Open | Off |
| 59 | B3 | 16 | BD-Dance 3 | Off | 260 | DoorCreak | Off | 182 | MaracasPush | Off | 211 | Tambourin-Acc1 | Off |
| 60 | C4 | 33 | SD-Dry 3 | Off | 261 | DoorSlam | Off | 122 | Hand Claps | Off | 208 | Timbale-Paila | Off |
| 61 | C#4 | 37 | SD-Full Room | Off | 145 | DJ-Scratch2 | Off | 127 | 88-Claps | Off | 205 | TimbaleHi-Edge | Off |
| 62 | D4 | 38 | SD-Off Center | Off | 231 | Marc Tree | Off | 144 | DJ-Scratch1 | Off | 208 | Timbale-Paila | Off |
| 63 | D#4 | 39 | SD-Jazz Ring | Off | 262 | Car Engine | Off | 145 | DJ-Scratch2 | Off | 205 | TimbaleHi-Edge | Off |
| 64 | E4 | 31 | SD-Dry 1 | Off | 263 | Car Stop | Off | 150 | DJ-HitRub | Off | 207 | TimbaleHi-Rim2 | Off |
| 65 | F4 | 41 | SD-Paper | Off | 264 | Car Pass | Off | 234 | SambaWhistle | Off | 206 | TimbaleHi-Rim1 | Off |
| 66 | F#4 | 65 | SD-Vintage4 | Off | 265 | Car Crash | Off | 234 | SambaWhistle | Off | 318 | Rek-dom-ak | Off |
| 67 | G4 | 69 | SD-Brasser | Off | 254 | Crickets | Off | 165 | CongaHi-Slap2 | Off | 318 | Rek-dom-ak | Off |
| 68 | G#4 | 47 | SD-Yowie | Off | 266 | Train | Off | 166 | CongaHeel | Off | 318 | Rek-dom-ak | Off |
| 69 | A4 | 49 | SD-CrackerRoom | Off | 281 | Noise White | Off | 161 | CongaHi-Open | Off | 319 | Rek-Jingle | Off |
| 70 | A#4 | 46 | SD-Big Rock | Off | 267 | Helicopter | Off | 158 | CongaLo-Open | Off | 227 | Mambo Bell | Off |
| 71 | B4 | 59 | SD-Hip 6 | Off | 298 | Swish Terra | Off | 215 | Cuica-Hi | Off | 200 | Woodblock1 | Off |
| 72 | C5 | 48 | SD-Processed | Off | 258 | GunShot 1 | Off | 216 | Cuica-Lo | Off | 201 | Woodblock2 | Off |
| 73 | C#5 | 50 | SD-Dance | Off | 269 | MachineGun | Off | 208 | Timbale-Paila | Off | 225 | Cowbell | Off |
| 74 | D5 | 52 | SD-Noise | Off | 270 | Laser gun | Off | 207 | TimbaleHi-Rim2 | Off | 182 | MaracasPush | Off |
| 75 | D#5 | 62 | SD-Vintage1 | Off | 271 | Explosion | Off | 206 | TimbaleHi-Rim1 | Off | 227 | Mambo Bell | Off |
| 76 | E5 | 47 | SD-Yowie | Off | 252 | Dog | Off | 202 | TimbaleLo-Open | Off | 219 | Cabasa-Up | Off |
| 77 | F5 | 70 | SD-Chili | Off | 253 | Gallop | Off | 135 | 88-Clave | Off | 217 | Shaker1 | Off |
| 78 | F#5 | 139 | Real El.Tom | Off | 250 | Bird 1 | Off | 136 | 88-Cowbell | Off | 225 | Cowbell | Off |
| 79 | G5 | 125 | 99-SD | Off | 259 | Rainstick | Off | 121 | FingerSnaps | Off | 220 | Cabasa-Down | Off |
| 80 | G#5 | 124 | 88-SD | Off | 272 | Thunder | Off | 196 | Taiko Rim | Off | 220 | Cabasa-Down | Off |
(continues on the next page)
| (continued) | ||||||||||||
| 120-0-50: Bdrum & Sdrum | 120-0-56: SFX Kit | 120-0-64: Percus.Kit1 | 120-0-65: Latin P.Kit | |||||||||
| Note | Sample | Excl. | Sample | Excl. | Sample | Excl. | Sample | |||||
| 81 | A5 | 124 | 88-SD | Off | 273 | Wind | Off | 195 | Taiko Open | Off | 220 | Cabasa-Down |
| 82 | A#5 | 125 | 99-SD | Off | 281 | Noise White | Off | 143 | Zap2 | Off | 334 | Tambourin-Mute2 |
| 83 | B5 | 55 | SD-Hip 2 | Off | 274 | Stream | Off | 119 | SD-Orch.Roll | 5 | 333 | Tambourin-Open |
| 84 | C6 | 44 | SD-BrushTap2 | Off | 275 | Bubble | Off | 120 | SD-Orch. | 5 | 332 | Tambourin-Mute |
| 85 | C#6 | 43 | SD-BrushTap1 | Off | 299 | Cat | Off | 117 | Orch Cymb | 6 | 332 | Tambourin-Mute |
| 86 | D6 | 42 | SD-BrushHit | Off | 251 | Bird 2 | Off | 117 | Orch Cymb | 6 | 333 | Tambourin-Open |
| 87 | D#6 | 42 | SD-BrushHit | Off | 308 | Growl | Off | 336 | Udu-f-open | Off | 336 | Udu-f-open |
| 88 | E6 | 42 | SD-BrushHit | Off | 243 | Stadium | Off | 155 | Orchestra Hit | Off | 175 | Djembe-Open |
| 89 | F6 | 45 | SD-BrushSwirl | Off | 277 | Telephone Ring | Off | 155 | Orchestra Hit | Off | 183 | MaracasPull |
| 90 | F#6 | 45 | SD-BrushSwirl | Off | 276 | ChurchBell | Off | 155 | Orchestra Hit | Off | 183 | MaracasPull |
| 91 | G6 | 45 | SD-BrushSwirl | Off | 244 | Applause | Off | 155 | Orchestra Hit | Off | 215 | Cuica-Hi |
| 92 | G#6 | 31 | SD-Dry 1 | Off | 244 | Applause | Off | 155 | Orchestra Hit | Off | 180 | Guiro Long |
| 93 | A6 | 33 | SD-Dry 3 | Off | 243 | Stadium | Off | 155 | Orchestra Hit | Off | 181 | Guiro Short |
| 94 | A#6 | 46 | SD-Big Rock | Off | 281 | Noise White | Off | 155 | Orchestra Hit | Off | 181 | Guiro Short |
| 95 | B6 | 68 | SD-AmbiHop | Off | 258 | GunShot 1 | Off | 155 | Orchestra Hit | Off | 216 | Cuica-Lo |
| 96 | C7 | 54 | SD-Hip 1 | Off | 266 | Train | Off | 155 | Orchestra Hit | Off | 199 | Claves |
| 97 | C#7 | 62 | SD-Vintage1 | Off | 155 | Orchestra Hit | Off | 234 | SambaWhistle | |||
| 98 | D7 | 56 | SD-Hip 3 | Off | 155 | Orchestra Hit | Off | 234 | SambaWhistle | |||
| 99 | D#7 | 67 | SD-Vintage6 | Off | 155 | Orchestra Hit | Off | 323 | Sagat-HalfOpen | |||
| 100 | E7 | 143 | Zap2 | Off | 155 | Orchestra Hit | Off | 323 | Sagat-HalfOpen | |||
| 101 | F7 | 58 | SD-Hip 5 | Off | 155 | Orchestra Hit | Off | 324 | Sagat-Close | |||
| 102 | F#7 | 71 | SD-Whopper | Off | 155 | Orchestra Hit | Off | 311 | Jingle Bell | |||
| 103 | G7 | 69 | SD-Brasser | Off | 155 | Orchestra Hit | Off | 231 | Marc Tree | |||
| 104 | G#7 | 62 | SD-Vintage1 | Off | 155 | Orchestra Hit | Off | 231 | Marc Tree | |||
| 105 | A7 | 125 | 99-SD | Off | 155 | Orchestra Hit | Off | 228 | Sleigh Bell | |||
| 106 | A#7 | 71 | SD-Whopper | Off | 155 | Orchestra Hit | Off | 340 | Bongo Roll | |||
| 107 | B7 | 71 | SD-Whopper | Off | 155 | Orchestra Hit | Off | 140 | PR-House05 | |||
| 108 | C8 | 50 | SD-Dance | Off | 155 | Orchestra Hit | Off | 140 | PR-House05 | |||
| 109 | C#8 | 50 | SD-Dance | Off | 290 | Dist.Slide1 | Off | 17 | BD-House 1 | |||
| 110 | D8 | 125 | 99-SD | Off | 291 | Dist.Slide2 | Off | 125 | 99-SD | |||
| 111 | D#8 | 125 | 99-SD | Off | 286 | GtCutNois1 | Off | 29 | BD-Deep 88 | |||
| 112 | E8 | 60 | SD-Ringy | Off | 287 | GtCutNois2 | Off | 124 | 88-SD | |||
| 113 | F8 | 292 | E.GtrPick1 | Off | 39 | SD-Jazz Ring | ||||||
| 114 | F#8 | 293 | E.GtrPick2 | Off | 48 | SD-Processed | ||||||
| 115 | G8 | 294 | Gtr Scratch1 | Off | 0 | BD-Dry 1 | ||||||
| 115 | G#8 | 295 | Gtr Scratch2 | Off | 27 | BD-Amb.Rocker | ||||||
| 117 | A8 | 289 | Fret Noise | Off | 40 | SD-Amb.Piccolo | ||||||
| 118 | A#8 | 288 | Power Chord | Off | 86 | HH1 Closed1 | ||||||
| 119 | B8 | 288 | Power Chord | Off | 6 | BD-Pillow | ||||||
| 120 | C9 | 296 | Amp Noise | Off | 73 | SideStickAmb | ||||||
| 120-0-66: TRI-Per.KIT 120-0-67: i30 Perc.Kit | ||||||
| Note Sample Excl. Sample Excl. | ||||||
| 0 C-1 | ||||||
| 1 C#-1 | ||||||
| 2 D-1 | ||||||
| 3 D#-1 | ||||||
| 4 E-1 | ||||||
| 5 F-1 | ||||||
| 6 F#-1 | ||||||
| 7 G-1 | ||||||
| 8 G#-1 | ||||||
| 9 A-1 | ||||||
| 10 A#-1 | ||||||
| 11 B-1 | ||||||
| 12 C0 322 Rik3 Off | ||||||
| 13 C#0 321 Rik2 Off | ||||||
| 14 D0 320 Rik1 Off | ||||||
| 15 | D#0 | 319 | Rek-Jingle | Off | ||
| 16 | E0 | 318 | Rek-dom-ak | Off | ||
| 17 | F0 | 303 | Djembe-Bass | Off | ||
| 18 | F#0 | 195 | Taiko Open | Off | ||
| 19 | G0 | 317 | Pand-Pattern4 | Off | ||
| 20 | G#0 | 316 | Pand-Pattern3 | Off | ||
| 21 | A0 | 315 | Pand-Pattern2 | Off | 209 | Tambourin-Push |
| 22 | A#0 | 314 | Pand-Pattern1 | Off | 212 | Tambourin-Acc2 |
| 23 | B0 | 313 | Pand-Open | Off | 189 | Tabla-Na |
| 24 | C1 | 196→195 | Taiko Rim→Taiko Open | Off | 233 | Flexatone |
| 25 | C#1 | 197 | Tsuzumi→Tsuzumi | Off | 230 | Finger Cymbal |
| 26 | D1 | 175→175 | Djembe-Open→Djembe-Open | Off | 197 | Tsuzumi |
| 27 | D#1 | 177→176 | Djembe-Slap→Djembe-Mute | Off | 172 | BongoHi-Slap |
| 28 | E1 | 185→184 | Baya-Ghe→Baya-Open | Off | 173 | BongoHi-Stk1 |
| 29 | F1 | 186→187 | Baya-Mute1→Baya-Mute2 | Off | 170 | BongoLo-Stk |
| 30 | F#1 | 188→303 | Baya-Mute5→Djembe-Bass | Off | 211 | Tambourin-Acc1 |
| 31 | G1 | 190→190 | Tabla-Open→Tabla-Open | Off | 224 | Agogo-Bell |
| 32 | G#1 | 191→194 | Tabla-Tin→Tabla-Mute3 | Off | 273 | Wind |
| 33 | A1 | 192→193 | Tabla-Mute1→Tabla-Mute2 | Off | 224 | Agogo-Bell |
| 34 | A#1 | 189→193 | Tabla-Na→Tabla-Mute2 | 6 | 174 | BongoHi-Stk2 |
| 35 | B1 | 192 | Tabla-Mute1 | Off | 200 | Woodblock1 |
| 36 | C2 | 116 | BD-Orch. | Off | 199 | Claves |
| 37 | C#2 | 257 | Tribe | Off | 201 | Woodblock2 |
| 38 | D2 | 121 | FingerSnaps | Off | 225 | Cowbell |
| 39 | D#2 | 122 | Hand Claps | Off | 200 | Woodblock1 |
| 40 | E2 | 214 | Triangle-Mute | 1 | 179 | CastDouble |
| 41 | F2 | 213 | Triangle-Open | 1 | 184 | Baya-Open |
| 42 | F#2 | 179 | CastDouble | Off | 217 | Shaker1 |
| 43 | G2 | 178 | CastSingle | Off | 186 | Baya-Mute1 |
| 44 | G#2 | 179 | CastDouble | Off | 182 | MaracasPush |
| 45 | A2 | 180 | Guiro Long | 2 | 184 | Baya-Open |
| 46 | A#2 | 181 | Guiro Short | 2 | 219 | Cabasa-Up |
| 47 | B2 | 180 | Guiro Long | 2 | 190 | Tabla-Open |
| 48 | C3 | 198 | Vibraslap | Off | 192 | Tabla-Mute1 |
| 49 | C#3 | 199 | Claves | Off | 198 | Vibraslap |
| 50 | D3 | 135 | 88-Clave | Off | 189 | Tabla-Na |
| 51 | D#3 | 216→216 | Cuica-Lo→Cuica-Lo | 3 | 214 | Triangle-Mute |
| 52 | E3 | 215→215 | Cuica-Hi→Cuica-Hi | Off | 116 | BD-Orch. |
| 53 | F3 | 202 | TimbaleLo-Open | Off | 213 | Triangle-Open |
| 54 | F#3 | 200 | Woodblock1 | Off | 181 | Guiro Short |
| 55 | G3 | 204 | TimbaleLo-Rim | Off | 311 | Jingle Bell |
| 56 | G#3 | 200 | Woodblock1 | Off | 180 | Guiro Long |
| 57 | A3 | 203 | TimbaleLo-Mute | Off | 232 | Marc Tree LP |
| 58 | A#3 | 200 | Woodblock1 | Off | 231 | Marc Tree |
| 59 | B3 | 205 | TimbaleHi-Edge | Off | 182 | MaracasPush |
| 60 | C4 | 207 | TimbaleHi-Rim2 | Off | 122 | Hand Claps |
| 61 | C#4 | 226 | ChachaBell | Off | 127 | 88-Claps |
| 62 | D4 | 206 | TimbaleHi-Rim1 | Off | 144 | DJ-Scratch1 |
| 63 | D#4 | 227 | Mambo Bell | Off | 145 | DJ-Scratch2 |
| 64 | E4 | 208→208 | Timbale-Paila→Timbale-Paila | Off | 150 | DJ-HitRub |
| 65 | F4 | 168 | BongoLo-Open | Off | 234 | SambaWhistle |
| 66 | F#4 | 225 | Cowbell | Off | 234 | SambaWhistle |
| 67 | G4 | 169 | BongoLo-Slap | Off | 165 | CongaHi-Slap2 |
| 68 | G#4 | 225 | Cowbell | Off | 166 | CongaHeel |
| 69 | A4 | 171 | BongoHi-Open | Off | 161 | CongaHi-Open |
| 70 | A#4 | 174 | BongoHi-Stk2 | Off | 158 | CongaLo-Open |
| 71 | B4 | 172→172 | BongoHi-Slap→BongoHi-Slap | Off | 215 | Cuica-Hi |
| 72 | C5 | 158→158 | CongaLo-Open→CongaLo-Open | Off | 216 | Cuica-Lo |
| 73 | C#5 | 160 | CongaLoSlap | Off | 208 | Timbale-Paila |
| 74 | D5 | 159 | CongaLoMtSlp | Off | 207 | TimbaleHi-Rim2 |
| 75 | D#5 | 163 | CongaHiMtSlap | Off | 206 | TimbaleHi-Rim1 |
| 76 | E5 | 161→161 | CongaHi-Open→CongaHi-Open | Off | 202 | TimbaleLo-Open |
| 77 | F5 | 162 | CongaHiMute | Off | 135 | 88-Clave |
| 78 | F#5 | 166 | CongaHeel | Off | 136 | 88-Cowbell |
| 79 | G5 | 164 | CongaHi-Slap1 | Off | 121 | FingerSnaps |
| 80 | G#5 | 167 | CongaToe | Off | 196 | Taiko Rim |
| 81 | A5 | 165 | CongaHi-Slap2 | Off | 195 | Taiko Open |
| 82 | A#5 | 224 | Agogo-Bell | Off | 143 | Zap2 |
(continues on the next page)
| (continued) | |||||||
| 120-0-66: TRI-Per.KIT 120-0-67: i30 Perc.Kit | |||||||
| Note Sample Excl. Sample Excl. | |||||||
| 83 | B5 | 224 | Agogo-Bell | Off | 119 | SD-Orch.Roll | 5 |
| 84 | C6 | 183→182 | MaracasPull→MaracasPush | Off | 120 | SD-Orch. | 5 |
| 85 | C#6 | 217→217 | Shaker1→Shaker1 | Off | 117 | Orch Cymb | 6 |
| 86 | D6 | 218→218 | Shaker2→Shaker2 | Off | 117 | Orch Cymb | 6 |
| 87 | D#6 | 221→220 | Cabasa-Tap→Cabasa-Down | Off | 336 | Udu-f-open | Off |
| 88 | E6 | 219→221 | Cabasa-Up→Cabasa-Tap | Off | 155 | Orchestra Hit | Off |
| 89 | F6 | 222→223 | Caxixi-Hard→Caxixi-Soft | Off | 155 | Orchestra Hit | Off |
| 90 | F#6 | 209 | Tambourin-Push | Off | 155 | Orchestra Hit | Off |
| 91 | G6 | 211→211 | Tambourin-Acc1→Tambourin-Acc1 | Off | 155 | Orchestra Hit | Off |
| 92 | G#6 | 210 | Tambourin-Pull | Off | 155 | Orchestra Hit | Off |
| 93 | A6 | 212 | Tambourin-Acc2 | Off | 155 | Orchestra Hit | Off |
| 94 | A#6 | 228→228 | Sleigh Bell→Sleigh Bell | Off | 155 | Orchestra Hit | Off |
| 95 | B6 | 234 | SambaWhistle | 4 | 155 | Orchestra Hit | Off |
| 96 | C7 | 234 | SambaWhistle | 4 | 155 | Orchestra Hit | Off |
| 97 | C#7 | 229 | RapSleighBell | Off | 155 | Orchestra Hit | Off |
| 98 | D7 | 234 | SambaWhistle | 4 | 155 | Orchestra Hit | Off |
| 99 | D#7 | 231 | Marc Tree | 5 | 155 | Orchestra Hit | Off |
| 100 | E7 | 234 | SambaWhistle | 4 | 155 | Orchestra Hit | Off |
| 101 | F7 | 312 | Bells Open | 5 | 155 | Orchestra Hit | Off |
| 102 | F#7 | 259 | Rainstick | Off | 155 | Orchestra Hit | Off |
| 103 | G7 | 235 | Chinese Gong | Off | 155 | Orchestra Hit | Off |
| 104 | G#7 | 250 | Bird 1 | Off | 155 | Orchestra Hit | Off |
| 105 | A7 | 250 | Bird 1 | Off | 155 | Orchestra Hit | Off |
| 106 | A#7 | 251 | Bird 2 | Off | 155 | Orchestra Hit | Off |
| 107 | B7 | 279 | Cricket Spectrum | Off | 155 | Orchestra Hit | Off |
| 108 | C8 | 231 | Marc Tree | Off | 155 | Orchestra Hit | Off |
| 109 | C#8 | 290 | Dist.Slide1 | Off | |||
| 110 | D8 | 214 | Triangle-Mute | 3 | |||
| 111 | D#8 | 213 | Triangle-Open | 3 | |||
| 112 | E8 | 233 | Flexatone | Off | |||
| 113 | F8 | 312 | Bells Open | Off | |||
| 114 | F#8 | 223 | Caxixi-Soft | Off | |||
| 115 | G8 | 179 | CastDouble | Off | |||
| 115 | G#8 | 179 | CastDouble | Off | |||
| 117 | A8 | 121 | FingerSnaps | Off | |||
| 118 | A#8 | 121 | FingerSnaps | Off | |||
| 119 | B8 | 236 | Metal Hit | Off | |||
| 120 | C9 | 236 | Metal Hit | Off | |||
PERFORMANCES
All Performances are user-editable. Use the following table as a model for your own Performance lists.
Note: You can remotely select Performances on the microARRANGER, by sending it Bank Select MSB (CC#0), Bank Select LSB (CC#32) and Program Change messages on the Control channel (see page 128).
| # | CC#0 | CC#32 | PC Bank: 1 | CC#0 | CC#32 | PC Bank: 2 | CC#0 | CC#32 | PC Bank: 3 | CC#0 | CC#32 | PC Bank: 4 |
| 1 | 100 | 1101 | 20130 | |||||||||
| 2 | 1111 | |||||||||||
| 3 | 2222 | |||||||||||
| 4 | 3333 | |||||||||||
| 5 | 4444 | |||||||||||
| 6 | 5555 | |||||||||||
| 7 | 6666 | |||||||||||
| 8 | 7777 | |||||||||||
| CC#0 | CC#32 | PC Bank: 5 | CC#0 | CC#32 | PC Bank: 6 | CC#0 | CC#32 | PC Bank: 7 | CC#0 | CC#32 | PC Bank: 8 | |
| 1 | 140 | 1501 | 60170 | |||||||||
| 2 | 1111 | |||||||||||
| 3 | 2222 | |||||||||||
| 4 | 3333 | |||||||||||
| 5 | 4444 | |||||||||||
| 6 | 5565 | |||||||||||
| 7 | 6666 | |||||||||||
| 8 | 7777 | |||||||||||
| CC#0 | CC#32 | PC Bank: 9 | CC#0 | CC#32 | PC Bank: 10 | CC#0 | CC#32 | PC Bank: 11 | CC#0 | CC#32 | PC Bank: 12 | |
| 1 | 180 | 1901 | 1001110 | |||||||||
| 2 | 1111 | |||||||||||
| 3 | 2222 | |||||||||||
| 4 | 3333 | |||||||||||
| 5 | 4444 | |||||||||||
| 6 | 5585 | |||||||||||
| 7 | 6666 | |||||||||||
| 8 | 7777 | |||||||||||
| CC#0 | CC#32 | PC Bank: 13 | CC#0 | CC#32 | PC Bank: 14 | CC#0 | CC#32 | PC Bank: 15 | CC#0 | CC#32 | PC Bank: 16 | |
| 1 | 1 | 12 | 0 | 1 | 13 | 0 | 1 | 14 | 0 | 1 | 15 | 0 |
| 2 | 1111 | |||||||||||
| 3 | 2222 | |||||||||||
| 4 | 3333 | |||||||||||
| 5 | 4444 | |||||||||||
| 6 | 5555 | |||||||||||
| 7 | 6666 | |||||||||||
| 8 | 7777 | |||||||||||
| CC#0 | CC#32 | PC Bank: 17 | CC#0 | CC#32 | PC Bank: 18 | CC#0 | CC#32 | PC Bank: 19 | CC#0 | CC#32 | PC Bank: 20 | |
| 1 | 1 | 16 | 0 | 1 | 17 | 0 | 1 | 18 | 0 | 1 | 19 | 0 |
| 2 | 1111 | |||||||||||
| 3 | 2222 | |||||||||||
| 4 | 3333 | |||||||||||
| 5 | 4444 | |||||||||||
| 6 | 5555 | |||||||||||
| 7 | 6666 | |||||||||||
| 8 | 7777 | |||||||||||
MIDI SETUP
| DEFAULT | Master Kbd | Sequencer1 | Sequencer 2 | Accordion 1 | Accordion 2 | Accordion 3 | Ext. Seq | ||
| MIDI IN Channel | 1 | S1_Tr 1 | Global | S1_Tr 1 | S2_Tr 1 | Global | Upp1 | Upp1 | S1_Tr 1 |
| 2 | S1_Tr 2 | - | S1_Tr 2 | S2_Tr 2 | Lower | Lower | Lower | S1_Tr 2 | |
| 3 | S1_Tr 3 | - | S1_Tr 3 | S2_Tr 3 | Bass | - | Bass | S1_Tr 3 | |
| 4 | S1_Tr 4 | - | S1_Tr 4 | S2_Tr 4 | - | Upp2 | Upp2 | S1_Tr 4 | |
| 5 | S1_Tr 5 | - | S1_Tr 5 | S2_Tr 5 | - | Upp3 | Upp3 | S1_Tr 5 | |
| 6 | S1_Tr 6 | - | S1_Tr 6 | S2_Tr 6 | - | - | - | S1_Tr 6 | |
| 7 | S1_Tr 7 | - | S1_Tr 7 | S2_Tr 7 | - | - | - | S1_Tr 7 | |
| 8 | S1_Tr 8 | - | S1_Tr 8 | S2_Tr 8 | - | - | - | S1_Tr 8 | |
| 9 | S1_Tr 9 | - | S1_Tr 9 | S2_Tr 9 | - | Bass | - | S1_Tr 9 | |
| 10 | S1_Tr 10 | - | S1_Tr 10 | S2_Tr 10 | Drum | Drum | Drum | S1_Tr 10 | |
| 11 | S1_Tr 11 | - | S1_Tr 11 | S2_Tr 11 | Perc | Perc | Perc | S1_Tr 11 | |
| 12 | S1_Tr 12 | - | S1_Tr 12 | S2_Tr 12 | Acc1 | Acc1 | Acc1 | S1_Tr 12 | |
| 13 | S1_Tr 13 | - | S1_Tr 13 | S2_Tr 13 | Acc2 | Acc2 | Acc2 | S1_Tr 13 | |
| 14 | S1_Tr 14 | - | S1_Tr 14 | S2_Tr 14 | Acc3 | Acc3 | Acc3 | S1_Tr 14 | |
| 15 | S1_Tr 15 | - | S1_Tr 15 | S2_Tr 15 | Acc4 | Acc4 | Acc4 | S1_Tr 15 | |
| 16 | S1_Tr 16 | - | S1_Tr 16 | S2_Tr 16 | Acc5 | Acc5 | Acc5 | S1_Tr 16 | |
| MIDI OUT Channel | 1 | 1 Upp1 | Upp1 | S1_Tr 1 | S2_Tr 1 | Upp1 | S1_Tr 1 | S2_Tr 1 | Upp. 1 |
| 2 | Upp2 | Upp2 | S1_Tr 2 | S2_Tr 2 | Upp2 | S1_Tr 2 | S2_Tr 2 | - | |
| 3 | Upp3 | Upp3 | S1_Tr 3 | S2_Tr 3 | Upp3 | S1_Tr 3 | S2_Tr 3 | - | |
| 4 | Lower | Lower | S1_Tr 4 | S2_Tr 4 | Lower | S1_Tr 4 | S2_Tr 4 | - | |
| 5 | - | - | S1_Tr 5 | S2_Tr 5 | - | S1_Tr 5 | S2_Tr 5 | - | |
| 6 | - | - | S1_Tr 6 | S2_Tr 6 | - | S1_Tr 6 | S2_Tr 6 | - | |
| 7 | - | - | S1_Tr 7 | S2_Tr 7 | - | S1_Tr 7 | S2_Tr 7 | - | |
| 8 | - | - | S1_Tr 8 | S2_Tr 8 | - | S1_Tr 8 | S2_Tr 8 | - | |
| 9 | Bass | Bass | S1_Tr 9 | S2_Tr 9 | Bass | S1_Tr 9 | S2_Tr 9 | - | |
| 10 | Drum | Drum | S1_Tr 10 | S2_Tr 10 | Drum | S1_Tr 10 | S2_Tr 10 | - | |
| 11 | Perc | Perc | S1_Tr 11 | S2_Tr 11 | Perc | S1_Tr 11 | S2_Tr 11 | - | |
| 12 | Acc1 | Acc1 | S1_Tr 12 | S2_Tr 12 | Acc1 | S1_Tr 12 | S2_Tr 12 | - | |
| 13 | Acc2 | Acc2 | S1_Tr 13 | S2_Tr 13 | Acc2 | S1_Tr 13 | S2_Tr 13 | - | |
| 14 | Acc3 | Acc3 | S1_Tr 14 | S2_Tr 14 | Acc3 | S1_Tr 14 | S2_Tr 14 | - | |
| 15 | Acc4 | Acc4 | S1_Tr 15 | S2_Tr 15 | Acc4 | S1_Tr 15 | S2_Tr 15 | - | |
| 16 | Acc5 | Acc5 | S1_Tr 16 | S2_Tr 16 | Acc5 | S1_Tr 16 | S2_Tr 16 | - | |
| MIDI IN Velocity | Normal | Normal | Normal | Normal | 110 | 110 | Normal | Normal | |
| Chord 1 Chann. | Off | 1 | Off | Off | 2 | 2 | 2 | Off | |
| Chord 2 Chann. | Off | Off | Off | Off | 3 | 3 | 3 | Off | |
18. EFFECTS
microARRANGER is equipped with four powerful Effect Processors (A, B, C, D). You can send them the internal tracks.
DIAGRAMS
The following instructions show the signal path diagram for each of the effect types. The signal coming from the tracks (Send) is mono. Before entering an effect processor, it is split in two “wires” (Left and Right), and processed in stereo. The signal is then output in stereo from the effect processor, and sent to the Mix output (Left&Right, the headphones or the internal speakers).
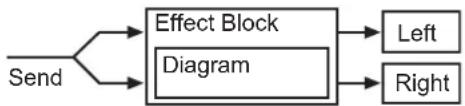
flowchart
graph TD
    A["Send"] --> B["Effect Block"]
    B --> C["Left"]
    B --> D["Right"]
    B --> E["Diagram"]
DYNAMIC MODULATION SOURCES
When the D ≧ symbol is encountered, a Dynamic Modulation can be applied to the corresponding parameter. The following table shows the available modulation sources.
Modulation source Note
| Off No modulation | |
| Gate1 | |
| Gate1+Dmpr | |
| Gate2 | |
| Gate2+Dmpr | |
| Note Nr Note Number | |
| Velocity Note Velocity | |
| ATouch After Touch | |
| JS X | Joystick Left/Right |
| JS+Y: CC#01 | Joystick Forward |
| JS-Y: CC#02 | Joystick Backward |
| MIDI(CC#04) | |
| MIDI(CC#12) | |
| MIDI(CC#13) | |
| MIDI(CC#16) | |
| MIDI(CC#18) | |
| MIDI(CC#17) | |
| Modulation source Note | |
| MIDI(CC#19) | |
| MIDI(CC#20) | |
| MIDI(CC#21) | |
| Damper: #64 | |
| Prta.SW: #65 | Portamento Switch |
| Sostenu: #66 | Sostenuto Pedal |
| MIDI(CC#80) | |
| MIDI(CC#81) | |
| MIDI(CC#82) | |
| MIDI(CC#83) | |
| Tempo | |
FILTER/DYNAMIC
Filter and dynamics control effects
000: No Effect
Select this option when you do not use any effects. When this option is selected, the effect is muted.
001: Amp Simulat
(Stereo Amp Simulation)
This effect simulates the frequency response characteristics of guitar amplifiers. It is also effective for organ and drum sounds.

flowchart
graph LR
    A["Left"] --> B["Amp Simulation Filter"]
    C["Right"] --> D["Amp Simulation Filter"]
    B --> E["Wet / Dry"]
    D --> F["Wet / Dry"]
| a | Amplifier TypeSelects the type of guitar amplifier | SS, EL84, 6L6 |
| b | Wet/DrySets the balance between the effect and dry sounds | Dry, 1:99...99:1, WetD### |
| Src Selects the modulation source of the effect balance | Off...Tempo | |
| AmtSets the modulation amount of the effect balance | -100...+100 |
002: Compressor
(Stereo Compressor)
This effect compresses the input signal to regulate the level and give a "punchy" effect. It is useful for guitar, piano, and drum sounds. This is a stereo compressor. You can link left and right channels, or use each channel separately.
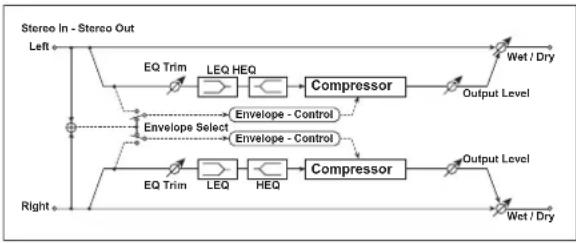
flowchart
graph LR
    A["Left"] --> B["EQ Trim"]
    B --> C["LEQ HEQ"]
    C --> D["Compressor"]
    D --> E["Wet / Dry"]
    F["Right"] --> G["EQ Trim"]
    G --> H["LEQ HEQ"]
    H --> I["Compressor"]
    I --> J["Wet / Dry"]
    C -.-> K["Envelope Select"]
    H -.-> L["Envelope - Control"]
    I -.-> M["Envelope - Control"]
    D -.-> N["Output Level"]
| a | Envelope Select L/R Mix, L/R IndividuallyDetermines whether the left and right channels are linked or used separately | |
| b | SensitivitySets the sensitivity | 1...100 |
| c | AttackSets the attack level | 1...100 |
| d | EQ TrimSets the EQ input level | 0...100 |
| e | Pre LEQ Gain [dB]Sets the gain of Low EQ | -15.0...+15.0dB |
| Pre HEQ Gain [dB]Sets the gain of High EQ | -15.0...+15.0dB | |
| f | Output LevelSets the output level of the compressor | 0...100 ,D_2 |
| Src Off...TempoSelects the modulation source for the compressor output level | ||
| Amt -100...+100Sets the modulation amount of the compressor output level | ||
| g | Wet/Dry Dry, 1:99...99:1, WetTable , "Sets the balance between the effect and dry sounds," on page 175 D_2 | |
| Src Off...TempoTable , "Selects the modulation source of the effect balance," on page 175 | ||
| AmtTable , "Sets the modulation amount of the effect balance," on page 175 | -100...+100 | |
a: Envelope Select
This parameter selects whether the left and right channels are linked to control both signals simultaneously, or whether each channel is controlled independently.
b: Sensitivity, f: Output Level
The “Sensitivity” parameter sets the sensitivity of the compressor. If this parameter is set to a higher value, lower level sounds will be boosted. With a higher Sensitivity, the overall volume level is higher. To adjust the final volume level, use the “Output Level” parameter.
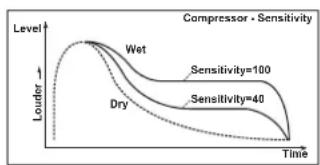
c: Attack
This parameter controls the attack level.
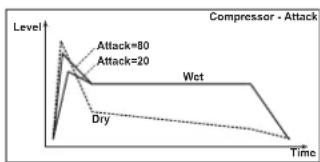
line
| Time | Level | |---|---| | 0 | Attack=80 | | 1 | Attack=20 | | 2 | Dry | | 3 | Wet | | 4 | Dry | | 5 | Dry | | 6 | Dry | | 7 | Dry | | 8 | Dry | | 9 | Dry | | 10 | Dry | | 11 | Dry | | 12 | Dry | | 13 | Dry | | 14 | Dry | | 15 | Dry | | 16 | Dry | | 17 | Dry | | 18 | Dry | | 19 | Dry | | 20 | Dry | | 21 | Dry | | 22 | Dry | | 23 | Dry | | 24 | Dry | | 25 | Dry | | 26 | Dry | | 27 | Dry | | 28 | Dry | | 29 | Dry | | 30 | Dry | | 31 | Dry | | 32 | Dry | | 33 | Dry | | 34 | Dry | | 35 | Dry | | 36 | Dry | | 37 | Dry | | 38 | Dry | | 39 | Dry | | 40 | Dry | | 41 | Dry | | 42 | Dry | | 43 | Dry | | 44 | Dry | | 45 | Dry | | 46 | Dry | | 47 | Dry | | 48 | Dry | | 49 | Dry | | 50 | Dry | | 51 | Dry | | 52 | Dry | | 53 | Dry | | 54 | Dry | | 55 | Dry | | 56 | Dry | | 57 | Dry | | 58 | Dry | | 59 | Dry | | 60 | Dry | | 61 | Dry | | 62 | Dry | | 63 | Dry | | 64 | Dry | | 65 | Dry | | 66 | Dry | | 67 | Dry | | 68 | Dry | | 69 | Dry | | 70 | Dry | | 71 | Dry | | 72 | Dry | | 73 | Dry | | 74 | Dry | | 75 | Dry | | 76 | Dry | | 77 | Dry | | 78 | Dry | | 79 | Dry | | 80 | Dry | | 81 | Dry | | 82 | Dry | | 83 | Dry | | 84 | Dry | | 85 | Dry | | 86 | Dry | | 87 | Dry | | 88 | Dry | | 89 | Dry | | 90 | Dry | | 91 | Dry | | 92 | Dry | | 93 | Dry | | 94 | Dry | | 95 | Dry | | 96 | Dry | | 97 | Dry | | 98 | Dry | | 99 | Dry | | 100 | Dry |003: Limiter
(Stereo Limiter)
The Limiter regulates the input signal level. It is similar to the Compressor, except that the Limiter compresses only signals that exceed the specified level to lower unnecessary peak signals. The Limiter applies a peaking-type EQ to the trigger signal (which controls the degree of the Limiter effect), allowing you to set any band width to be covered. This effect is a stereo limiter. You can link left and right channels, or use each channel individually.

flowchart
graph TD
    A["Left"] --> B["Side PEQ"]
    B --> C["Envelope - Control"]
    B --> D["Envelope - Control"]
    C --> E["Limiter"]
    D --> F["Limiter"]
    E --> G["Gain Adjust"]
    F --> H["Gain Adjust"]
    G --> I["Wet / Dry"]
    H --> J["Wet / Dry"]
    K["Right"] --> L["Envelope Select"]
    L --> M["Side PEQ"]
    M --> N["Limiter"]
    N --> O["Gain Adjust"]
    O --> P["Wet / Dry"]
    style A fill:#f9f,stroke:#333
    style K fill:#ccf,stroke:#333
    style L fill:#cfc,stroke:#333
| a | Envelope Select L/R Mix, L Only, R Only, L/R IndividuallySelects from linking both channels, controlling only from left channel, only from the right channel, or controlling each channel individually | |
| b | Ratio1.0:1...50.0:1, Inf:1Sets the signal compression ratio | |
| c | Threshold [dB]-40...0dBSets the level above which the compressor is applied | |
| d | Attack1...100Sets the attack time | |
| Release1...100Sets the release time | ||
| e | Gain Adjust [dB]-Inf, -38...+24dBSets the output gain , D | |
| SrcOff...TempoSelects the modulation source for the output gain | ||
| Amt-63...+63Sets the modulation amount of the output gain | ||
| f | Side PEQ InsertOff, OnToggles between on/off of the trigger signal's EQ | |
| Trigger MonitorOff, OnSwitches between effect output monitor and trigger signal monitor | ||
| g | Side PEQ Cutoff [Hz]20...12.00kHzSets the EQ center frequency for the trigger signal | |
| Q0.5...10.0Sets the EQ bandwidth for the trigger signal | ||
| Gain [dB]-18.0...+18.0dBSets the EQ gain for the trigger signal | ||
| h | Wet/Dry Dry, 1:99...99:1, WetTable , “Sets the balance between the effect and dry sounds,” on page 175D | |
| Src Off...TempoTable , “Selects the modulation source of the effect balance,” on page 175 | ||
| Amt-100...+100Table , “Sets the modulation amount of the effect balance,” on page 175 | ||
a: Envelope Select
When L/R Mix is selected for this parameter, the left and right channels are linked to control the Limiter using the mixed signal. If L Only (or R Only) is selected, the left and right channels are linked, and the Limiter is controlled via only the left (or right) channel.
With L/R individually, the left and right channels control the Limiter individually.
b: Ratio, c: Threshold [dB], e: Gain Adjust [dB]
This parameter sets the signal compression "Ratio". Compression is applied only when the signal level exceeds the "Threshold" value.
Adjust the output level using the "Gain Adjust" parameter, since compression causes the entire level to be reduced.
![KORG MicroARRANGER - b: Ratio, c: Threshold [dB], e: Gain Adjust [dB] - 1](/content/2026/06/1236217/images/a11bb61318f981f14b4f5df149df5776667e6b854f47ef1931071946b918b806.jpg)
line
Limiter - Threshold / Ratio | Input Level | Output Level | Limiter - Threshold / Ratio | | :--- | :--- | :--- | | Low (0) | High | Ratio=1.0 : 1 | | Low (1) | Medium | Ratio=2.0 : 1 | | Low (2) | Low | Ratio=4.0 : 1 | | Low (3) | Low | Ratio=Inf : 1 | The chart displays a single line representing the output level of a threshold across different input levels for a given Limiter - Threshold / Ratio ratio. The x-axis is labeled 'Input Level' and the y-axis is labeled 'Output Level'.![KORG MicroARRANGER - b: Ratio, c: Threshold [dB], e: Gain Adjust [dB] - 2](/content/2026/06/1236217/images/96e3a00fbd17f58c6a1e14daeccb8df95ac1f482c76e03dd5a3eb333ec2af64d.jpg)
line
| Time | Ratio=Inf:1 | Ratio=2.0:1 | Ratio=1.0:1 | |---|---|---|---| | Start | Low | Low | Low | | Peak | Low | Low | Low | | End | Low | Low | Low |d: Attack, d: Release
These parameters set the attack time and release time. A higher attack time will cause the compression to be applied more slowly.

text_image
Dry Wet Wet Limiter - Attack / Release Threshold Ratio=Inf : 1 Attack=1 Release=1 Ratio=Inf : 1 Attack=100 Release=100 Attack Releasef: Side PEQ Insert, g: Side PEQ Cutoff [Hz], g: Q, g: Gain [dB]
These parameters are used to set the EQ applied to the trigger signal.
The Limiter determines whether the compression is applied or not, based on the post-EQ trigger signal. Setting the equalizer allows you to set the Limiter to respond to any frequency band.
f: Trigger Monitor
Setting this parameter On will cause the trigger signal to be output, instead of the effect sound. Use this parameter to check the trigger signal with EQ applied.
Usually, set this to Off.
004: MBandLimit
(Multiband Limiter)
This effect applies the Limiter to the low range, mid range, and high range of the input signal. You can control dynamics for each range to adjust the sound pressure of the low range, mid range, and high range in a different way from the EQ.

flowchart
graph TD
    A["Left"] --> B["Band-Pass Filters"]
    B --> C["Low"]
    B --> D["Mid"]
    B --> E["High"]
    C --> F["Limiter"]
    D --> G["Low Offset"]
    E --> H["Mid Offset"]
    F --> I["Gain Adjust"]
    G --> I
    H --> I
    I --> J["Wet / Dry"]
    K["Right"] --> L["Wet: Mono In - Mono Out / Dry: Stereo In - Stereo Out"]
    M["Wet / Dry"] --> N["Wet / Dry"]
| a | Ratio 1.0:1...50.0:1, Inf:1Sets the signal compression ratio →Fx:003 | |
| b | Threshold [dB] -40...0dBSets the level above which the compressor is applied →Fx:003 | |
| c | AttackSets the attack time | 1...100→Fx:003 |
| d | ReleaseSets the release time | 1...100→Fx:003 |
| e | Low Offset [dB]Gain of the low-range trigger signal | -40...0dB→ |
| f | Mid Offset [dB]Gain of the mid-range trigger signal | -40...0dB→ |
| g | High Offset [dB]Gain of the high-range trigger signal | -40...0dB→ |
| h | Gain Adjust [dB] -Inf, -38...+24dBSets the output gain →Fx:003,DZZ | |
| SrcSelects the modulation source for the output gain | Off...Tempo | |
| AmtSets the modulation amount of the output gain | -63...+63 | |
| i | Wet/Dry Dry, 1:99...99:1, WetTable, "Sets the balance between the effect and dry sounds," on page 175DZZ | |
| Src Off...TempoTable, "Selects the modulation source of the effect balance," on page 175 | ||
| AmtTable, "Sets the modulation amount of the effect balance," on page 175 | -100...+100 | |
e: Low Offset [dB], f: Mid Offset [dB], g: High Offset [dB]
These parameters set the gain of the trigger signal.
For example, if you do not want to apply compression to the high range, reduce the "High Offset" value down below the "Threshold" level. In this way, the high range limiter will not respond, and compression will not be applied.
005: Gate
(Stereo Gate)
This effect mutes the input signal if its level is lower than the specified level. It also reverses the on and off operation of the gate, and uses Note On and Off messages to turn the gate on and off.
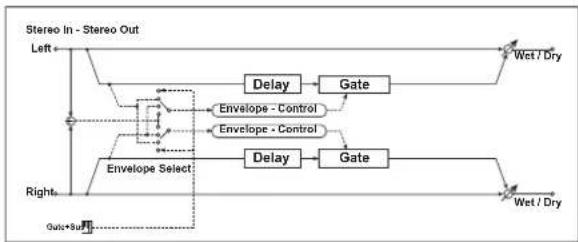
flowchart
graph TD
    A["Left"] --> B["Delay"]
    B --> C["Gate"]
    C --> D["Wet / Dry"]
    E["Right"] --> F["Envelope Select"]
    F --> G["Envelope - Control"]
    F --> H["Envelope - Control"]
    F --> I["Delay"]
    I --> J["Gate"]
    J --> K["Wet / Dry"]
    L["Quik+Su"] --> F
| a | Envelope Select D-mod, L/R Mix, L Only, R OnlySelects from Control via the modulation source, mixing the left and right signals, Only left, and Only right →, | |
| Src Off...Gate2+DmprSelects the modulation source that controls the gate when Envelope Select = D-mod | ||
| b | Polarity +,-Switches between non-reversed and reversed Gate on/off → | |
| c | ThresholdSets the level to which the Gate is applied | 0...100→ |
| d | AttackSets the attack time | 1...100→ |
| ReleaseSets the release time | 1...100→ | |
| e | Delay Time [msec]Sets the delay time of the gate input | 0...100msec→ |
| f | Wet/Dry Dry, 1:99...99:1, WetTable, "Sets the balance between the effect and dry sounds," on page 175 | |
| Src Off...TempoTable, "Selects the modulation source of the effect balance," on page 175 | ||
| AmtTable, "Sets the modulation amount of the effect balance," on page 175 | -100...+100 | |
a: Envelope Select, a: Src
The “Envelope Select” parameter selects whether the gate on/off is triggered by the level of the input signal, or controlled directly by the modulation source. The Src parameter specifies the modulation source, selected from Off to Gate2+Dpmr.
With "Envelope Select" = L/R Mix, the left and right channel signal mixture will trigger the gate on/off. When L Only or R Only is selected, the gate is controlled by either of the channel signals.
b: Polarity
This parameter reverses the Gate on/off operation. With a negative value, the gate is closed when the input signal level exceeds the Threshold. The gate operation controlled by the modulation source is also reversed.
c: Threshold, d: Attack, d: Release
This parameter sets the signal level below which Gate is applied when "Envelope Select" is set to L/R Mix, L Only, or R Only.
The Attack and Release parameters set the Gate attack time and release time.
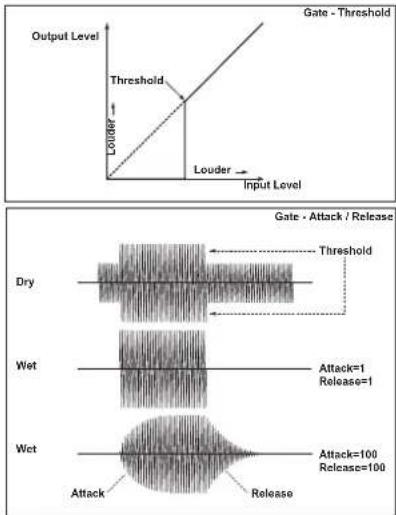
text_image
Output Level Threshold Gate - Threshold Louder Input Level Dry Wet Wet Attack Release Gate - Attack / Release Threshold Attack=1 Release=1 Attack=100 Release=100e: Delay Time
This parameter sets the delay time of the Gate input. If the sound has a very fast attack, increase the delay time so that the signal will be input after the Gate is opened. This will preserve the attack part of the sound.
006: OD/HGainWah
(Overdrive/Hi.Gain Wah)
This distortion effect utilizes an Overdrive mode and a Hi-Gain mode. Controlling the wah effect, the 3-band EQ, and the amp simulation will allow you to create versatile distortion sounds. This effect is suitable for guitar and organ sounds.
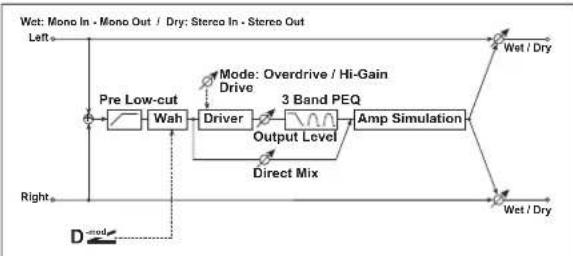
flowchart
graph LR
    A["Left"] --> B["Pre Low-cut"]
    B --> C["Wah"]
    C --> D["Driver"]
    D --> E["3 Band PEQ"]
    E --> F["Amp Simulation"]
    F --> G["Wet / Dry"]
    H["Right"] --> I["D mode"]
    I --> J["Direct Mix"]
    J --> D
    K["Wet: Mono In - Mono Out / Dry: Stereo In - Stereo Out"] --> L["Wet / Dry"]
    M["Mode: Overdrive / Hi-Gain Drive"] --> D
| a | WahSwitches Wah on/off | Off, On→,D2 |
| Src Off...TempoSelects the modulation source that switches the Wah on and off | ||
| Sw Toggle, MomentSelects the switching mode for the modulation source that switches the Wah on and off → | ||
| b | Wah Sweep RangeSets the range of Wah | -10...+10→,D2 |
| Wah Sweep Src Selects the modulation source that controls the Wah | Off...Tempo→ | |
| c | Drive Mode Overdrive, Hi-GainSwitches between overdrive and hi-gain distortion | |
| d | DriveSets the degree of distortion | 1...100→ |
| Pre Low-cut Sets the low range cut amount of the distortion input | 0...10→ | |
| e | Output LevelSets the output level | 0...50→,D2 |
| Src Selects the modulation source for the output level | Off...Tempo | |
| AmtSets the modulation amount of the output level | -50...+50 | |
| f | Low Cutoff [Hz] 20...1.0kHzSets the center frequency for Low EQ (shelving type) | |
| Gain [dB]Table, “Sets the gain of Low EQ,” on page 176 | -18...+18dB | |
| g | Mid1 Cutoff [Hz] 300...10.00kHzSets the center frequency for Mid/High EQ 1 (peaking type) | |
| QSets the band width of Mid/High EQ 1 | 0.5...10.0→ | |
| Gain [dB]Sets the gain of Mid/High EQ 1 | -18...+18dB | |
| h | Mid2 Cutoff [Hz] 500...20.00kHzSets the center frequency for Mid/High EQ 2 (peaking type) | |
| QSets the band width of Mid/High EQ 2 | 0.5...10.0→ | |
| Gain [dB]Sets the gain of Mid/High EQ 2 | -18...+18dB | |
| i | Direct Mix 0...50Sets the amount of the dry sound mixed to the distortion | |
| Speaker SimulationSwitches the speaker simulation on/off | Off, On | |
| j | Wet/Dry Dry, 1:99...99:1, WetTable, “Sets the balance between the effect and dry sounds,” on page 175DZZ | |
| Src Off...TempoTable, “Selects the modulation source of the effect balance,” on page 175 | ||
| AmtTable, “Sets the modulation amount of the effect balance,” on page 175 | -100...+100 | |
a: Wah
The Wah parameter switches the wah effect on/off.
a: Sw
This parameter sets how the wah effect is switched on and off via the modulation source.
When "Sw" = Moment, the wah effect is usually turned off. It is turned on only when you press the pedal or operate the joystick.

When a value for the modulation source is less than 64, "off" speed is selected, and when the value is 64 or higher, "on" is selected.
When "Sw" = Toggle, the wah effect is switched between on and off each time you press the pedal or operate the joystick.

The switch will be turned on/off each time the value of the modulation source exceeds 64.
b: Wah Sweep Range, b: Wah Sweep Src
This parameter sets the sweep range of the wah center frequency. A negative value will reverse the direction of sweep. The wah center frequency can be controlled by the modulation source specified in the "Wah Sweep Src" parameter.
d: Drive, e: Output Level
The degree of distortion is determined by the level of input signal and the setting of "Drive". Raising the "Drive" setting will cause the entire volume level to increase. Use the "Output Level" parameter to adjust the volume level. The "Output Level" parameter uses the signal level input to the 3-Band EQ. If clipping occurs at the 3-Band EQ, adjust the "Output Level" parameter.
d: Pre Low-cut
Cutting the signal in the low range before it is input to the Distortion will create a sharp distortion.
g: Q, h: Q
These parameters set the bandwidth of each equalizer. The higher the value, the narrower the band becomes.
007: Param.4B Eq
(Stereo Parametric 4-Band EQ)
This is a stereo 4-band parametric equalizer. You can select peaking type or shelving type for Band 1 and 4. The gain of Band 2 can be controlled by dynamic modulation.

flowchart
graph LR
    Left["Left"] -->|Trim| A1["LEQ"]
    Left -->|Trim| A2["LEQ"]
    Left -->|Trim| A3["LEQ"]
    A1 --> B1["PEQ"]
    A2 --> B2["PEQ"]
    A3 --> B3["PEQ"]
    B1 --> C1["HEQ"]
    B2 --> C2["HEQ"]
    B3 --> C3["HEQ"]
    C1 --> D1["Wet / Dry"]
    C2 --> D2["Wet / Dry"]
    C3 --> D3["Wet / Dry"]
    D1 --> E1["Dmod"]
    D2 --> E2["Dmod"]
    D3 --> E3["Dmod"]
| a | TrimSets the input level | 0...100 |
| b | Band1 Type Peaking, Shelving-LowSelects the type of Band 1 → | |
| c | Band4 Type Peaking, Shelving-HighSelects the type of Band 4 → | |
| d | Band2 Dynamic Gain SrcSelects the modulation source of the Band 2 gain | Off...Tempo→ |
| Amt [dB]Sets the modulation amount of Band 2 gain | -18...+18dB→ | |
| e | Band1 Cutoff [Hz]Sets the center frequency of Band 1 | 20...1.00kHz |
| QSets the bandwidth of Band 1 | 0.5...10.0→Fx:006 | |
| Gain [dB]Sets the gain of Band 1 | -18.0...+18.0dB | |
| f | Band2 Cutoff [Hz]Sets the center frequency of Band 2 | 50...10.00kHz |
| QSets the bandwidth of Band 2 | 0.5...10.0→Fx:006 | |
| Gain [dB]Sets the gain of Band 2 | -18.0...+18.0dB→,D→ | |
| g | Band3 Cutoff [Hz]Sets the center frequency of Band 3 | 300...10.00kHz |
| QSets the bandwidth of Band 3 | 0.5...10.0→Fx:006 | |
| Gain [dB]Sets the gain of Band 3 | -18.0...+18.0dB | |
| h | Band4 Cutoff [Hz]Sets the center frequency of Band 4 | 500...20.00kHz |
| QSets the bandwidth of Band 4 | 0.5...10.0→Fx:006 | |
| Gain [dB]Sets the gain of Band 4 | -18.0...+18.0dB | |
| i | Wet/Dry Dry, 1:99...99:1, WetTable , "Sets the balance between the effect and dry sounds," on page 175 | |
| Src Off...TempoTable , "Selects the modulation source of the effect balance," on page 175 | ||
| AmtTable , "Sets the modulation amount of the effect balance," on page 175 | -100...+100 | |
b: Band1 Type, c: Band4 Type
Selects a filter type for Band 1 and 4.

text_image
Parametric 4EQ - Band1, Band4 Type +Gain 3dB Band4 Type=Shelving High Band4 Type=Peaking 0dB Band1 Type=Shelving Low Band1 Type=Peaking -Gain 3dB Band1 Cutoff Band4 Cutoffd: Band2 Dynamic Gain Src, d: Amt [dB], f: Gain [dB]
You can control the gain of Band 2 using the modulation source.
![KORG MicroARRANGER - d: Band2 Dynamic Gain Src, d: Amt [dB], f: Gain [dB] - 1](/content/2026/06/1236217/images/938c9929c47ed79dd0275b724c4086101a900bd50b8a36f200cb5890314e6635.jpg)
line
| Band2 Gain[dB] | Band2 Dynamic Gain Amt[dB] | | -------------- | --------------------------- | | +6.0 | +9.0 | | -15.0 | -15.0 |008: Graph.7B Eq
(Stereo Graphic 7 Band EQ)
This is a stereo 7-band graphic equalizer. The bar graph of the gain setting for each band gives you a clear, visual idea of frequency responses. You can select a center frequency setting for each band from twelve types, according to the sound.
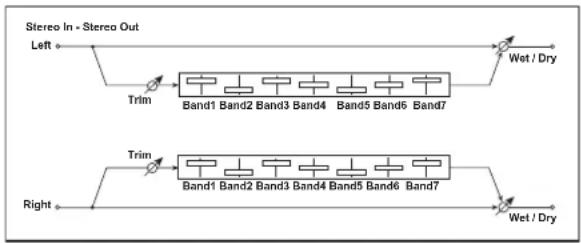
flowchart
graph LR
    A["Left"] --> B["Trim"]
    B --> C["Band1 Band2 Band3 Band4 Band5 Band6 Band7"]
    D["Wet / Dry"] --> E["Top"]
    F["Right"] --> G["Trim"]
    G --> H["Band1 Band2 Band3 Band4 Band5 Band6 Band7"]
    I["Wet / Dry"] --> J["Bottom"]
| a | Type 1:Wide 1, 2:Wide 2, 3:Wide 3, 4:Half Wide 1, 5:Half Wide 2, 6:Half Wide 3, 7:Low, 8:Wide Low, 9:Mid, 10:Wide Mid, 11:High, 12:Wide High Selects a combination of center frequencies for each band → | |
| b | TrimSets the input level | 0...100 |
| c | Band1 [dB]Sets the gain of Band 1 | -18.0...+18.0dB |
| d | Band2 [dB]Sets the gain of Band 2 | -18.0...+18.0dB |
| e | Band3 [dB]Sets the gain of Band 3 | -18.0...+18.0dB |
| f | Band4 [dB]Sets the gain of Band 4 | -18.0...+18.0dB |
| g | Band5 [dB]Sets the gain of Band 5 | -18.0...+18.0dB |
| h | Band6 [dB]Sets the gain of Band 6 | -18.0...+18.0dB |
| i | Band7 [dB]Sets the gain of Band 7 | -18.0...+18.0dB |
| j | Wet/Dry Dry, 1:99...99:1, WetTable , "Sets the balance between the effect and dry sounds," on page 175D= | |
| Src Off...TempoTable , "Selects the modulation source of the effect balance," on page 175 | ||
| AmtTable , "Sets the modulation amount of the effect balance," on page 175 | -100...+100 | |
a: Type
This parameter selects a combination of center frequencies for each band. Each center frequency is shown on the right edge of the LCD.
You can configure a 21-Band Graphic EQ ranging from 80Hz to 18kHz if you route three Graphic 7Band EQ effects in series, with a setting of 7:Low, 9:Mid, and 11:High for each EQ.
009: Wah/AutoWah
(Stereo Wah/Auto Wah)
This stereo wah effect allows you to create sounds from vintage wah pedal simulation to auto-wah simulation, and much broader range settings.

flowchart
graph TD
    A["Stereo In - Stereo Out"] --> B["Left"]
    B --> C["Wet / Dry"]
    C --> D["Wah"]
    D --> E["Sweep Mode"]
    E --> F["Auto"]
    F --> G["D-mod"]
    G --> H["LFO"]
    H --> I["LFO"]
    I --> J["Envelope Sens"]
    J --> K["Envelope Shape"]
    K --> L["Response"]
    L --> M["Envelope Sens"]
    M --> N["Right"]
    N --> O["Wet / Dry"]
| a | Frequency BottomSets the lower limit of the wah center frequency | 0...100→ |
| Frequency TopSets the upper limit of the wah center frequency | 0...100→ | |
| b | Sweep Mode Auto, D-mod, LFOSelects the control from auto-wah, modulation source, and LFO→,D | |
| Src Off...TempoSelects the modulation source for the wah when Sweep Mode=D-mod | ||
| Response 0...100Sets the response speed when Sweep Mode = Auto or D-mod | ||
| c | Envelope Sens (Envelope Sensitivity)Sets the sensitivity of auto-wah | 0...100→ |
| Envelope ShapeSets the sweep curve of auto-wah | -100...+100→ | |
| d | LFO Frequency [Hz]Sets the LFO speed | 0.02...20.00Hz→,D |
| SrcSelects the modulation source of LFO speed | Off...Tempo | |
| AmtSets the modulation amount of LFO speed | -20.00...+20.00Hz | |
| e | BPM/MIDI SyncSwitches between using the frequency of the LFO speed and using the tempo and notes | Off, On→,Sync |
| BPMSelects MIDI Clock and assigns tempo | MIDI, 40...240→ | |
| Base NoteSelects the type of notes that specify the LFO speed | → | |
| TimesSets the number of notes that specify the LFO speed | x1...x16→ | |
| f | ResonanceSets the resonance amount | 0...100 |
| Low Pass FilterSwitches the Wah Low Pass Filter on and off | Off, On | |
| g | Wet/Dry Dry, 1:99...99:1, WetTable, “Sets the balance between the effect and dry sounds,” on page 175D | |
| Src Off...TempoTable, “Selects the modulation source of the effect balance,” on page 175 | ||
| AmtTable, “Sets the modulation amount of the effect balance,” on page 175 | -100...+100 | |
a: Frequency Bottom, a: Frequency Top
The sweep width and direction of the wah filter are determined by the "Frequency Top" and "Frequency Bottom" settings.

b: Sweep Mode
This parameter changes the wah control mode. Setting "Sweep Mode" to Auto will select an auto-wah that sweeps according to envelope changes in the input signal level. Autowah is frequently used for funk guitar parts and clay sounds. When "Sweep Mode" is set to D-mod, you can control the filter directly via the modulation source in the same way as a wah pedal.
When "Sweep Mode" is set to LFO, the effect uses LFO to sweep in cycle.
c: Envelope Sens (Envelope Sensitivity)
This parameter sets the sensitivity of auto-wah. Increase the value if the input signal is too low to sweep. Reduce the value if the input signal is so high that the filter is stopped temporarily.
c: Envelope Shape
This parameter determines the sweep curve for auto-wah.
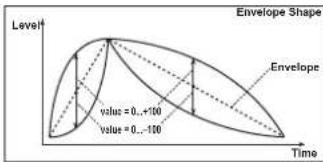
text_image
Level Envelope Shape value = 0..+100 value = 0..-100 Timed: LFO Frequency [Hz], e: BPM/MIDI Sync
When "BPM/MIDI Sync"=Off, the LFO speed uses the LFO Frequency parameter setting. When "BPM/MIDI Sync"=On, the LFO speed follows the "BPM", "Base Note", and "Times" settings.
e: BPM, e: Base Note, e: Times
One cycle of LFO sweep is obtained by multiplying the length of a note ( ♩ ) (selected for "Base Note", in relation to the tempo specified in ("BPM", or the MIDI Clock tempo if "BPM" is set to MIDI) by the number specified in the Times parameter.
010: Random Filt
(Stereo Random Filter)
This stereo band pass filter uses a step-shape waveform and random LFO for modulation. You can create a special effect from filter oscillation.

flowchart
graph TD
    A["Left"] --> B["Filter"]
    C["Right"] --> D["Filter"]
    B --> E["Wet / Dry"]
    D --> F["Wet / Dry"]
    G["LFO: Step-Tri/Random"] -.-> H["LFO Phase"]
    style G stroke-dasharray: 5 5
| a | LFO WaveformSelects LFO Waveform | Step-Tri, Random→ |
| b | LFO Phase [degree]Sets the LFO phase difference between the left and right | -180...+180→ |
| c | LFO Frequency [Hz]Sets the LFO speed | 0.02...20.00Hz→,Dme |
| Src Selects the modulation source used for both LFO speed and step speedOff...Tempo | ||
| Amt Sets the modulation amount of LFO speed | -20.00...+20.00Hz | |
| d | LFO Step Freq (Frequency) [Hz]Sets the LFO step speed (speed that changes in steps) | 0.05...50.00Hz→,Dme |
| Amt Sets the modulation amount of LFO step speed | -50.00...+50.00Hz | |
| e | BPM/MIDI Sync Switches between using the frequency of the LFO speed and using the tempo and notes | Off, On→Fx:009,Sync |
| BPM Selects MIDI Clock and assigns tempo | MIDI, 40...240→Fx:009,→ | |
| Base Note Selects the type of notes that specify the LFO speed | →Fx:009 | |
| Times Sets the number of notes that specify the LFO speed | x1...x16→Fx:009 | |
| f | Step Base Note Selects the type of notes to specify the LFO step speed | →,Sync |
| Times Sets the number of notes to specify the LFO step speed | x1...x32→ | |
| g | Manual Sets the filter center frequency | 0...100 |
| h | Depth Sets the modulation depth of filter center frequency | 0...100 |
| Src Selects the modulation source of filter modulation | Off...Tempo | |
| Amt Sets the modulation amount of filter modulation | -100...+100 | |
| i | Resonance Sets the resonance amount | 0...100 |
| j | Wet/Dry -Wet...-1:99, Dry, 1:99...Wet Table, "Sets the balance between the effect and dry sounds," on page 175→Dme | |
| Src Table, "Sets the modulation source of the effect balance," on page 175 Off...Tempo | ||
| Amt Table, "Sets the modulation amount of the effect balance," on page 175 | -100...+100 | |
a: LFO Waveform, c: LFO Frequency [Hz], d: LFO Step Freq (Frequency) [Hz]
When "LFO Waveform" is set to Step-Tri, LFO is a step-shape, triangle waveform. The "LFO Frequency" parameter sets the original triangle waveform speed. Changing the "LFO Step Freq" parameter enables you to adjust the width of the steps.
When "LFO Waveform" is set to Random, the "LFO Step Freq" parameter uses a random LFO cycle.
![KORG MicroARRANGER - a: LFO Waveform, c: LFO Frequency [Hz], d: LFO Step Freq (Frequency) [Hz] - 1](/content/2026/06/1236217/images/d0ea2bb999a6a8010a8ff0f95971796da42a07ab96c9c23be7afbc5119708788.jpg)
text_image
LFO Frequency LFO Step Freq Step-Tri Random Filter LFO LFO Step Freq Randomb: LFO Phase [degree]
Offsetting the left and right phases alters how modulation is applied to the left and right channels, creating a swelling affect.
![KORG MicroARRANGER - b: LFO Phase [degree] - 1](/content/2026/06/1236217/images/f8d37225aa9506df1aa38c49e33755d696ce9669382c93599d5d10df446647eb.jpg)
text_image
LFO Phase 0 +90 +180 [degree] -180 -90 0 [degree]e: BPM, f: Step Base Note, f: Times
The width of an LFO step, or a cycle of random LFO, is obtained by multiplying the length of a note ( _... ) (selected for "Step Base Note", in relation to the tempo specified in "BPM," or the MIDI Clock tempo if "BPM" is set to MIDI) by the number specified in the "Times" parameter.
j: Wet/Dry
The effect sound's phase will be reversed when you set this parameter in the range of values from -Wet to -1:99.
011: Excit/Enhan
(Stereo Exciter/Enhancer)
This effect is a combination of the Exciter, which adds a punch to the sound and the Enhancer, which adds spread and presence.

flowchart
graph TD
    A["Left"] --> B["LEQ HEQ"]
    B --> C["Exciter"]
    C --> D["Delay"]
    D --> E["Depth"]
    E --> F["Wet / Dry"]
    G["Right"] --> H["EQ Trim"]
    H --> I["Exciter"]
    I --> J["Delay"]
    J --> K["Enhancer"]
    K --> L["Wet / Dry"]
    M["Dused"] -.-> I
| a | Exciter BlendSets the intensity (depth) of the Exciter effect | -100...+100→,DZZ |
| Src Off...TempoSelects the modulation source of the Exciter intensity | ||
| Amt -100...+100Sets the modulation amount of the Exciter intensity | ||
| b | Emphatic PointSets the frequency to be emphasized | 0...70→,DZZ |
| Src Off...TempoSelects the modulation source of the frequency to be emphasized | ||
| Amt -70...+70Sets the amount of modulation of the frequency to be emphasized | ||
| c | Enhancer Dly L (Enhancer Delay L) [msec]Sets the delay time for the Enhancer left channel | 0.0...50.0msec→ |
| d | Enhancer Dly R (Enhancer Delay R) [msec] 0.0...50.0msecSets the delay time for the Enhancer right channel → | |
| e | Enhancer Depth 0...100Sets the determines to what degree the Enhancer effect is appliedDZZ | |
| Src Off...TempoSelects the modulation source of the Enhancer width | ||
| Amt -100...+100Sets the modulation amount of the Enhancer width | ||
| f | EQ TrimSets the 2-band EQ input level | 0...100 |
| g | Pre LEQ Gain [dB]Table , "Sets the gain of Low EQ," on page 176 | -15.0...+15.0dB |
| Pre HEQ Gain [dB]Table , "Sets the gain of High EQ," on page 176 | -15.0...+15.0dB | |
| h | Wet/Dry Dry, 1:99...99:1, WetTable , "Sets the balance between the effect and dry sounds," on page 175DZZ | |
| Src Off...TempoTable , "Selects the modulation source of the effect balance," on page 175 | ||
| AmtTable , "Sets the modulation amount of the effect balance," on page 175 | -100...+100 | |
a: Exciter Blend
This parameter sets the depth (intensity) of the Exciter effect. Positive values give a frequency pattern (to be emphasized) different from negative values.
b: Emphatic Point
This parameter sets the frequency to be emphasized. Higher values will emphasize lower frequencies.
c: Enhancer Dly L [msec], d: Enhancer Dly R [msec]
These parameters set the delay time for the Enhancer left and right channel. Specifying a slightly different delay time for the left and right channel will add a stereo image, depth, and width to the sound.
012: Sub Oscill
(Stereo Sub Oscillator)
This effect adds very low frequencies to the input signal. It is very useful when simulating a roaring drum sound or emphasizing powerful low range. This effect is different from the equalizer in that you can add very low range harmonics. You can also adjust the oscillator frequency to match a particular note number, for use as an octaver.
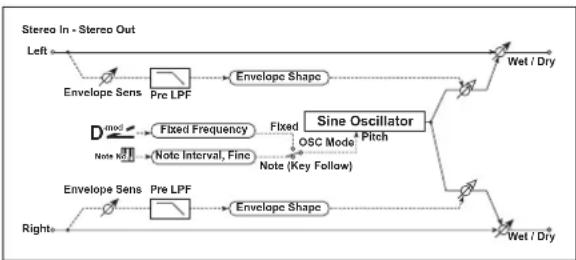
flowchart
graph TD
    A["Left"] --> B["Envelope Sens"]
    B --> C["Pre LPF"]
    C --> D["Envelope Shape"]
    D --> E["Wet / Dry"]
    F["Note M"] --> G["Fixed Frequency"]
    G --> H["Sine Oscillator"]
    H --> I["Pitch"]
    H --> J["OSC Mode"]
    H --> K["Note (Key Follow)"]
    L["Right"] --> M["Envelope Sens"]
    M --> N["Pre LPF"]
    N --> O["Envelope Shape"]
    O --> P["Wet / Dry"]
| a | OSC Mode Note (Key Follow), FixedDetermines whether the oscillator frequency follows the note number or whether it is fixed → | |
| b | Note Interval -48...0Sets the pitch difference from the note number when OSC Mode=Note (Key Follow) → | |
| Note FineFine adjustment of the oscillator frequency | -100...+100→ | |
| c | Fixed Frequency [Hz] 10.0...80.Sets the oscillator frequency when OSC Mode=Fixed | 0HzDZ |
| Src Off...TempoSelects the modulation source for the oscillator frequency when OSC Mode=Fixed | ||
| Amt -80...+80HzSets the oscillator frequency modulation amount when OSC Mode=Fixed | ||
| d | Envelope Pre LPF Sets the upper limit of the frequency range for which very low harmonics are added → | |
| e | Envelope Sens (Envelope Sensitivity) Sets the sensitivity with which very low harmonics are added | 0...100 |
| Envelope ShapeSets the oscillator's volume envelope curve | -100...+100 | |
| f | Wet/Dry Dry, 1:99...99:1, Wet Table, “Sets the balance between the effect and dry sounds,” on page 175DZ | |
| Src Off...TempoTable, “Selects the modulation source of the effect balance,” on page 175 | ||
| AmtTable, “Sets the modulation amount of the effect balance,” on page 175 | -100...+100 | |
a: OSC Mode, b: Note Interval, b: Note Fine
The “OSC Mode” parameter selects the oscillator operation mode. When Note (Key Follow) is selected, the oscillator's frequency is determined based on the note number, allowing you to use it as an octaver. The “Note Interval” parameter sets the pitch offset from the original note number by semitone steps. The “Note Fine” parameter allows you to fine-tune in steps of cents.
d: Envelope Pre LPF
This parameter sets the upper limit of the frequency range to which very low harmonics are added. Adjust this parameter if you do not want to add lower harmonics to the higher range.
013: Talking Mod
(Talking Modulator)
This effect adds an unusual character, like a human voice, to the input signal. Modulating the tone via dynamic modulation, you can create an interesting effect that sounds as if the guitar or synthesizer is talking.
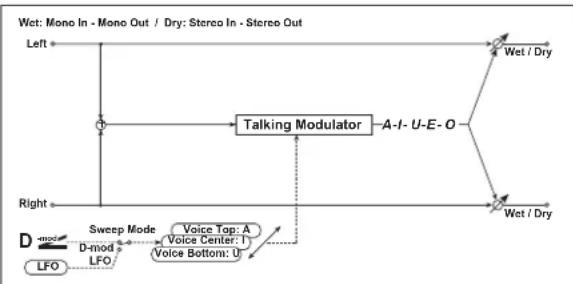
flowchart
graph TD
    A["Wet: Mono In - Mono Out / Dry: Stereo In - Stereo Out"] --> B["Left +"]
    B --> C["Talking Modulator"]
    C --> D["A-I- U-E-O"]
    D --> E["Wet / Dry"]
    E --> F["Wet / Dry"]
    G["Right"] --> H["Sweep Mode"]
    H --> I["D-mod"]
    I --> J["LFO"]
    J --> K["Voice Top: A\nVoice Center: I"]
    K --> L["Voice Bottom: U"]
    L --> M["Right"]
    N["D"] --> O["Sweep Mode"]
    O --> P["D-mod"]
    P --> Q["LFO"]
    Q --> R["Voice Top: A\nVoice Center: I"]
    R --> S["Voice Bottom: U"]
| a | Sweep Mode Switches between modulation source control and LFO control D-mod | |
| b | Manual Voice Control Bottom, 1...49, Center, 51...99, TopVoice pattern control | |
| Src Off...Tempo Selects the modulation source that controls the voice pattern | ||
| c | Voice Top Selects a vowel sound at the top end of control | A, I, U, E, O→ |
| d | Voice Center Selects a vowel sound in the center of control | A, I, U, E, O→ |
| e | Voice Bottom Selects a vowel sound at the bottom end of control | A, I, U, E, O→ |
| f | LFO Frequency [Hz] Sets the LFO speed | 0.02...20.00Hz→Fx:009, D-z |
| Src Selects the modulation source of LFO speed | Off...Tempo | |
| Amt Sets the modulation amount of LFO speed | -20.00...+20.00Hz | |
| g | BPM/MIDI Sync Switches between using the frequency of the LFO speed and using the tempo and notes | Off, On→Fx:009, Sync |
| BPM Selects MIDI Clock and assigns tempo | MIDI, 40...240→Fx:009 | |
| Base Note Selects the type of notes that specify the LFO speed | →Fx:009 | |
| Times Sets the number of notes that specify the LFO speed | x1...x16→Fx:009 | |
| h | Formant Shift Sets the frequency to which the effect is applied | -100...+100→ |
| Resonance Sets the Level of resonance of the voice pattern | 0...100→ | |
| i | Wet/Dry Dry, 1:99...99:1, Wet Table, “Sets the balance between the effect and dry sounds,” on page 175 | |
| Src Off...Tempo Table, “Selects the modulation source of the effect balance,” on page 175 | ||
| Amt Table, “Sets the modulation amount of the effect balance,” on page 175 | -100...+100 | |
c: Voice Top, d: Voice Center, e: Voice Bottom
These parameters assign vowels to the top, center, and bottom position of the controller.
E.g.: When "Voice Top" = A, "Voice Center" = I, and "Voice Bottom" = U:
If "Sweep Mode" is set to D-mod and Ribbon is selected as the modulation source, moving your finger from the right to left of the ribbon controller will change the sound from "a" to "i," then "u."
If Sweep Mode is set to LFO, the sound will change cyclically from "a" to "i," "u," "i," then "a."
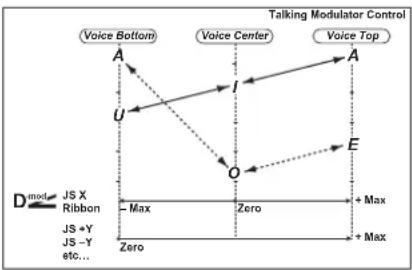
flowchart
graph TD
    A["Voice Bottom"] --> U["U"]
    U --> I["I"]
    I --> O["O"]
    O --> E["E"]
    style A fill:#f9f,stroke:#333
    style U fill:#ccf,stroke:#333
    style I fill:#cfc,stroke:#333
    style O fill:#fcc,stroke:#333
    style E fill:#ffc,stroke:#333
    note1["Talking Modulator Control"] --> A
    note2["JS X Ribbon"] --> D
    note3["JS +Y", "JS -Y" etc..."] --> D
    note4["Max"] --> E
    note5["Zero"] --> O
h: Formant Shift
This parameter adjusts the frequency level to which the effect is applied. If you wish to apply the effect to a higher-range sound, set this parameter to a higher value; to apply the effect to a lower-range sound, set this to a lower value.
h: Resonance
This parameter sets the intensity of resonance for the voice pattern. A larger value will add more character to the sound.
014: Decimator
(Stereo Decimator)
This effect creates a rough sound like a cheap sampler by lowering the sampling frequency and data bit length. You can also simulate noise unique to a sampler (aliasing).
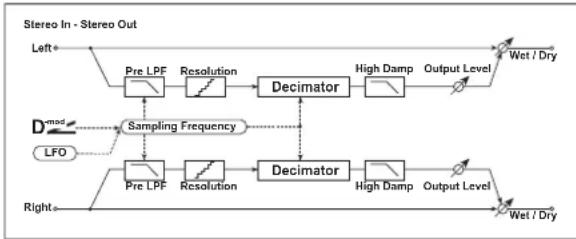
flowchart
graph LR
    A["Left*"] --> B["Pre LPF"]
    B --> C["Resolution"]
    C --> D["Decimator"]
    D --> E["High Damp"]
    E --> F["Output Level"]
    G["D^mod"] --> H["Sampling Frequency"]
    I["LFO"] --> H
    H --> J["Pre LPF"]
    J --> K["Resolution"]
    K --> L["Decimator"]
    L --> M["High Damp"]
    M --> N["Output Level"]
    O["Right"] --> P["Wet / Dry"]
    Q["Stereo In - Stereo Out"] --> R["Wet / Dry"]
| a | Pre LPF Off, OnSelects whether the harmonic noise caused by a decrease in sampling frequency is generated or not → | |
| High Damp [%]Sets the ratio of cut of the high range | 0...100% | |
| b | Sampling Freq (Sampling Frequency) [Hz]Sets the sampling frequency | 1.00k...48.00kHzDZZ |
| Src Off...TempoSelects the modulation source of the sampling frequency | ||
| Amt -48.00k...+48.00kHzSets the modulation amount of the sampling frequency | ||
| c | LFO Frequency [Hz]Sets the LFO speed | 0.02...20.00HzDZZ |
| SrcSelects the modulation source of LFO speed | Off...Tempo | |
| Amt -20.00...+20.00HzSets the modulation amount of LFO speed | ||
| d | Depth 0...100Sets the depth of the sampling frequency LFO modulation | DZZ |
| Src Off...TempoSelects the LFO modulation source of the sampling frequency | ||
| Amt -100...+100Sets the LFO modulation amount of the sampling frequency | ||
| e | ResolutionSets the data bit length | 4...24→ |
| f | Output LevelSets the output level | 0...100→,DZZ |
| SrcSelects the modulation source for the output level | Off...Tempo | |
| AmtSets the modulation amount of the output level | -100...+100 | |
| g | Wet/Dry Dry, 1:99...99:1, WetTable , "Sets the balance between the effect and dry sounds," on page 175DZZ | |
| Src Off...TempoTable , "Selects the modulation source of the effect balance," on page 175 | ||
| AmtTable , "Sets the modulation amount of the effect balance," on page 175 | -100...+100 | |
a: Pre LPF
If a sampler with a very low sampling frequency receives very high-pitched sound that could not be heard during playback, it could generate pitch noise that is unrelated to the original sound. Set "Pre LPF" to ON to prevent this noise from being generated.
If you set the "Sampling Freq" to about 3kHz and set "Pre LPF" to OFF, you can create a sound like a ring modulator.
e: Resolution, f: Output Level
If you set a smaller value for the "Resolution" parameter, the sound may be distorted. The volume level may also be changed. Use "Output Level" to adjust the level.
015: Analog Rec
(Stereo Analog Record)
This effect simulates the noise caused by scratches and dust on analog records. It also reproduces some of the modulation caused by a warped turntable.
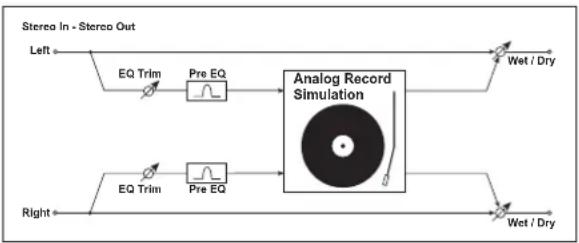
flowchart
graph LR
    A["Left"] --> B["EQ Trim"]
    B --> C["Pre EQ"]
    C --> D["Analog Record Simulation"]
    D --> E["Wet / Dry"]
    F["Right"] --> G["EQ Trim"]
    G --> H["Pre EQ"]
    H --> D
    D --> I["Wet / Dry"]
| a | Speed [RPM]Sets the r.p.m. of a record | 33 1/3, 45, 78 |
| b | FlutterSets the modulation depth | 0...100→ |
| c | Noise DensitySets the noise density | 0...100 |
| Noise ToneSets the noise tone | 0...100 | |
| d | Noise LevelSets the noise level | 0...100DZ |
| SrcSelects the modulation source for the noise level | Off...Tempo | |
| AmtSets the modulation amount of the noise level | -100...+100 | |
| e | Click LevelSets the click noise level | 0...100→DZ |
| Src Off...TempoSelects the modulation source for the click noise level | ||
| Amt -100...+100Sets the modulation amount of the click noise level | ||
| f | EQ TrimTable, “Sets the EQ input level,” on page 176 | 0...100 |
| g | Pre EQ Cutoff [Hz]Sets the EQ center frequency | 300...10.00kHz |
| QSets the EQ band width | 0.5...10.0 | |
| Gain [dB]Sets the EQ gain | -18.0...+18.0dB | |
| h | Wet/Dry Dry, 1:99...99:1, WetTable, “Sets the balance between the effect and dry sounds,” on page 175DZ | |
| Src Off...TempoTable, “Selects the modulation source of the effect balance,” on page 175 | ||
| AmtTable, “Sets the modulation amount of the effect balance,” on page 175 | -100...+100 | |
b: Flutter
This parameter enables you to set the depth of the modulation caused by a warped turntable.
e: Click Level
This parameter enables you to set the level of the click noise that occurs once every rotation of the turntable. This simulation reproduces record noise, and the noise generated after the music on a vinyl record finishes.
PITCH/PHASE MOD.
Pitch/phase modulation effects
016: Chorus
(Stereo Chorus)
This effect adds thickness and warmth to the sound by modulating the delay time of the input signal. You can add spread to the sound by offsetting the phase of the left and right LFOs from each other.

flowchart
graph LR
    A["Left"] --> B["EQ Trim"]
    B --> C["LEQ"]
    C --> D["HEQ"]
    D --> E["Chorus"]
    E --> F["Wet / Dry"]
    G["Right"] --> H["EQ Trim"]
    H --> I["LEQ"]
    I --> J["HEQ"]
    J --> K["Chorus"]
    K --> L["Wet / Dry"]
    M["LFO: Trl / Sine"] -.-> K
    style A fill:#f9f,stroke:#333
    style G fill:#f9f,stroke:#333
    style B fill:#ccf,stroke:#333
    style H fill:#ccf,stroke:#333
    style I fill:#ccf,stroke:#333
    style J fill:#ccf,stroke:#333
    style K fill:#ccf,stroke:#333
    style L fill:#ccf,stroke:#333
| a | LFO WaveformSelects LFO Waveform | Triangle, Sine |
| b | LFO Phase [degree] -180...+180Sets the LFO phase difference between the left and right →Fx:010 | |
| c | LFO Frequency [Hz] 0.02...20.00HzSets the LFO speed →Fx:009, | |
| SrcSelects the modulation source of LFO speed | Off...Tempo | |
| Amt -20.00...+20.00HzSets the modulation amount of LFO speed | ||
| d | BPM/MIDI Sync Off, OnSwitches between using the frequency of the LFO speed and using the tempo and notes →Fx:009, | |
| BPMSelects MIDI Clock and assigns tempo | MIDI, 40...240→Fx:009 | |
| Base Note Selects the type of notes that specify the LFO speed →Fx:009 | ||
| Times x1...x16Sets the number of notes that specify the LFO speed →Fx:009 | ||
| e | L Pre Delay [msec]Sets the delay time for the left channel | 0.0...50.0msec→ |
| f | R Pre Delay [msec]Sets the delay time for the right channel | 0.0...50.0msec→ |
| g | DepthSets the depth of LFO modulation | 0...100Dmod |
| Src Off...TempoSelects the modulation source of the LFO modulation depth | ||
| Amt -100...+100Sets the modulation amount of the LFO modulation depth | ||
| h | EQ TrimTable , "Sets the EQ input level," on page 176 | 0...100 |
| i | Pre LEQ Gain [dB]Table , "Sets the gain of Low EQ," on page 176 | -15.0...+15.0dB |
| Pre HEQ Gain [dB]Table , "Sets the gain of High EQ," on page 176 | -15.0...+15.0dB | |
| j | Wet/Dry -Wet...-1:99, Dry, 1:99...WetTable , "Sets the balance between the effect and dry sounds," on page 175→Fx:010, Dmod | |
| Src Off...TempoTable , "Selects the modulation source of the effect balance," on page 175 | ||
| AmtTable , "Sets the modulation amount of the effect balance," on page 175 | -100...+100 | |
e: L Pre Delay [msec], f: R Pre Delay [msec]
Setting the left and right delay time individually allows you to control the stereo image.
017: Harm.Chorus
(Stereo Harmonic Chorus)
This effect applies chorus only to higher frequencies. This can be used to apply a chorus effect to a bass sound without making the sound thinner. You can also use this chorus block with feedback as a flanger.
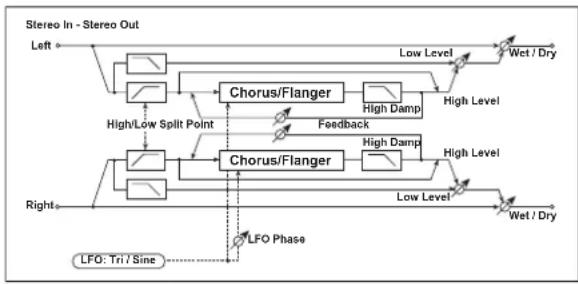
flowchart
graph TD
    A["Left"] --> B["Chorus/Flanger"]
    B --> C["High Damp"]
    C --> D["Wet / Dry"]
    B --> E["Feedback"]
    E --> F["High/Low Split Point"]
    F --> G["Chorus/Flanger"]
    G --> H["High Damp"]
    H --> I["Wet / Dry"]
    G --> J["LFO Phase"]
    J --> K["LFO: Tri / Sine"]
    style A fill:#f9f,stroke:#333
    style B fill:#ccf,stroke:#333
    style C fill:#cfc,stroke:#333
    style D fill:#fcc,stroke:#333
    style E fill:#cff,stroke:#333
    style F fill:#ffc,stroke:#333
    style G fill:#cfc,stroke:#333
    style H fill:#cfc,stroke:#333
    style I fill:#fcc,stroke:#333
    style J fill:#ffc,stroke:#333
    style K fill:#fcc,stroke:#333
| a | LFO WaveformSelects LFO Waveform | Triangle, Sine |
| b | LFO Phase [degree] -180...+180Sets the LFO phase difference between the left and right →Fx:010 | |
| c | LFO Frequency [Hz] 0.02...20.00HzSets the LFO speed →Fx:009, D | |
| Src Selects the modulation source of LFO speed | Off...Tempo | |
| Amt -20.00...+20.00HzSets the modulation amount of LFO speed | ||
| d | BPM/MIDI Sync Off, OnSwitches between using the frequency of the LFO speed and using the tempo and notes →Fx:009, Sync | |
| BPM Selects MIDI Clock and assigns tempo | MIDI, 40...240→Fx:009 | |
| Base Note Selects the type of notes that specify the LFO speed →Fx:009 | ||
| Times x1...x16Sets the number of notes that specify the LFO speed →Fx:009 | ||
| e | Pre Delay [msec]Sets the delay time from the original sound | 0.0...50.0msec |
| f | Depth Sets the depth of LFO modulation | 0...100D |
| Src Off...Tempo Selects the modulation source of the LFO modulation depth | ||
| Amt -100...+100Sets the modulation amount of the LFO modulation depth | ||
| g | High/Low Split Point 1...100Sets the frequency split point between the low and high range → | |
| h | Feedback -100...+100Sets the feed back amount of the chorus block → | |
| High Damp [%] 0...100%Sets the high range damping amount of the chorus block | ||
| i | Low Level Sets the low range output level | 0...100 |
| High Level Sets the high range (chorus) output level | 0...100 | |
| j | Wet/Dry Dry, 1:99...99:1, Wet Table, “Sets the balance between the effect and dry sounds,” on page 175 | |
| Src Off...TempoTable, “Selects the modulation source of the effect balance,” on page 175 | ||
| Amt -100...+100Table, “Sets the modulation amount of the effect balance,” on page 175 | ||
g: High/Low Split Point
This parameter sets the frequency that splits the high and low range. Only the high range will be sent to the chorus block.
h: Feedback
Sets the feedback amount of the chorus block. Increasing the feedback will allow you to use the effect as a flanger.
018: MTap Ch/Dly
(Multitap Chorus/Delay)
This effect has four chorus blocks with a different LFO phase. You can create a complex stereo image by setting each block's delay time, depth, output level, and pan individually. You can also fix some of the chorus blocks to combine the chorus and delay effects.

flowchart
graph TD
    A["Wet: Mono In - Stereo Out / Dry: Stereo In - Stereo Out"] --> B["Left"]
    B --> C["Feedback"]
    C --> D["Tap1 Delay"]
    C --> E["Tap2 Delay"]
    C --> F["Tap3 Delay"]
    C --> G["Tap4 Delay"]
    D --> H["Level"]
    E --> I["Level"]
    F --> J["Level"]
    G --> K["Level"]
    H --> L["Pan"]
    I --> M["Pan"]
    J --> N["Pan"]
    K --> O["Pan"]
    P["Wet / Dry"] --> Q["Wet / Dry"]
    R["LFO: Triangle"] --> S["0 [degree"]]
    R --> T["180 [degree"]]
    R --> U["90 [degree"]]
    R --> V["270 [degree"]]
| a | LFO Frequency [Hz]Sets the LFO speed | 0.02...13.00Hz |
| b | Tap1(000) [msec]Sets the Tap1 (LFO phase=0 degrees) delay time | 0...570msec |
| DepthSets the Tap1 chorus depth | 0...30 | |
| LevelSets the Tap1 output level | 0...30 | |
| PanSets the Tap1 stereo image | L6...L1, C, R1...R6 | |
| c | Tap2(180) [msec]Sets the Tap2 (LFO phase=180 degrees) delay time | 0...570msec |
| DepthSets the Tap2 chorus depth | 0...30 | |
| LevelSets the Tap2 output level | 0...30 | |
| PanSets the Tap2 stereo image | L6...L1, C, R1...R6 | |
| d | Tap3(090) [msec]Sets the Tap3 (LFO phase=90 degrees) delay time | 0...570msec |
| DepthSets the Tap3 chorus depth | 0...30 | |
| LevelSets the Tap3 output level | 0...30 | |
| PanSets the Tap3 stereo image | L6...L1, C, R1...R6 | |
| e | Tap4(270) [msec]Sets the Tap4 (LFO phase=270 degrees) delay time | 0...570msec |
| DepthSets the Tap4 chorus depth | 0...30 | |
| LevelSets the Tap4 output level | 0...30 | |
| PanSets the Tap4 stereo image | L6...L1, C, R1...R6 | |
| f | Tap1 FeedbackSets the Tap1 feedback amount | -100...+100D |
| SrcSelects the modulation source of Tap1 feedback amount and effect balance | Off...Tempo | |
| AmtSets the Tap1 feedback amount and modulation amount | -100...+100 | |
| g | Wet/DryDry, 1:99...99:1, WetTable, "Sets the balance between the effect and dry sounds," on page 175D | |
| AmtTable, "Sets the modulation amount of the effect balance," on page 175 | -100...+100 | |
019: Ensemble
This Ensemble effect has three chorus blocks that use LFO to create subtle shimmering, and gives three dimensional depth and spread to the sound, because the signal is output from the left, right, and center.
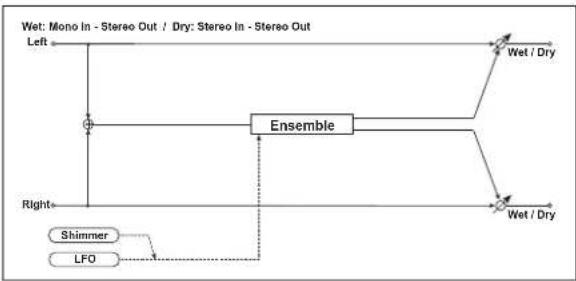
flowchart
graph TD
    A["Left"] --> B["Ensemble"]
    B --> C["Wet / Dry"]
    B --> D["Wet / Dry"]
    B --> E["Shimmer"]
    B --> F["LFO"]
    B --> G["Right"]
| a | SpeedSets the LFO speed | 1...100D |
| SrcSelects the modulation source of LFO speed | Off...Tempo | |
| AmtSets the modulation amount of LFO speed | -100...+100 | |
| b | DepthSets the depth of LFO modulation | 0...100D |
| Src Off...TempoSelects the modulation source of the LFO modulation depth | ||
| Amt -100...+100Sets the modulation amount of the LFO modulation depth | ||
| c | Shimmer 0...100Sets the amount of shimmering of the LFO waveform → | |
| d | Wet/Dry Dry, 1:99...99:1, WetTable , "Sets the balance between the effect and dry sounds," on page 175D | |
| Src Off...TempoTable , "Selects the modulation source of the effect balance," on page 175 | ||
| AmtTable , "Sets the modulation amount of the effect balance," on page 175 | -100...+100 | |
c: Shimmer
This parameter sets the amount of shimmering of the LFO waveform. Increasing this value adds more shimmering, making the chorus effect more complex and richer.
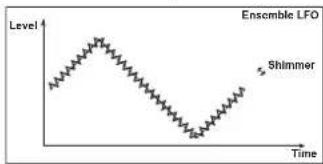
020: Flanger
(Stereo Flanger)
This effect gives a significant swell and movement of pitch to the sound. It is more effective when applied to a sound with a lot of harmonics. This is a stereo flanger. You can add spread to the sound by offsetting the phase of the left and right LFOs from each other.
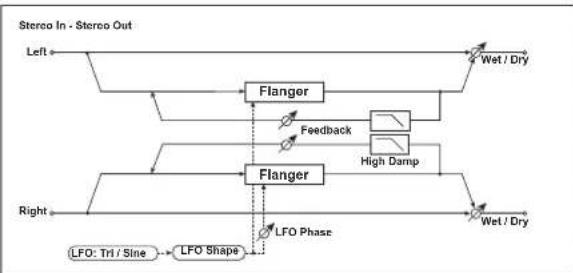
flowchart
graph TD
    A["Left"] --> B["Flanger"]
    B --> C["Feedback"]
    C --> D["High Damp"]
    D --> E["Wet / Dry"]
    F["Right"] --> G["Flanger"]
    G --> H["LFO Phase"]
    H --> I["LFO Shape"]
    I --> J["LFO: Tri / Sine"]
    J --> K["Wet / Dry"]
    B --> L["Wet / Dry"]
| a | Delay Time [msec]Sets the delay time from the original sound | 0.0...50.0msec |
| b | LFO WaveformSelects LFO Waveform | Triangle, Sine |
| LFO Shape -100...+100Determines how much the LFO waveform is changed → | ||
| c | LFO Phase [degree] -180...+180Sets the LFO phase difference between the left and right →Fx:010 | |
| d | LFO Frequency [Hz] Sets the LFO speed | 0.02...20.00Hz→Fx:009,Dmod |
| SrcSelects the modulation source of LFO speed | Off...Tempo | |
| Amt Sets the modulation amount of LFO speed | -20.00...+20.00Hz | |
| e | BPM/MIDI Sync Off, OnSwitches between using the frequency of the LFO speed and using the tempo and notes →Fx:009,Sync | |
| BPM Selects MIDI Clock and assigns tempo | MIDI, 40...240→Fx:009 | |
| Base Note Selects the type of notes that specify the LFO speed →Fx:009 | ||
| Times x1...x16Sets the number of notes that specify the LFO speed →Fx:009 | ||
| f | Depth Sets the depth of LFO modulation | 0...100 |
| g | Feedback Sets the feedback amount | -100...+100→ |
| High Damp [%] Sets the feedback damping amount in the high range → | ||
| h | Wet/Dry -Wet...-1:99, Dry, 1:99...WetTable, "Sets the balance between the effect and dry sounds," on page 175→Fx:010,Dmod | |
| Src Off...TempoTable, "Selects the modulation source of the effect balance," on page 175 | ||
| Amt Table, "Sets the modulation amount of the effect balance," on page 175 | -100...+100 | |
b: LFO Shape
Changing the LFO waveform shape controls the peak sweep of flanging effects.
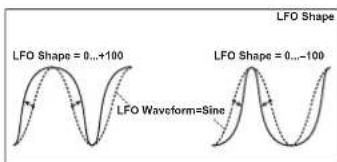
text_image
LFO Shape LFO Shape = 0...+100 LFO Waveform=Sine LFO Shape = 0...-100g: Feedback, h: Wet/Dry
The peak shape of the positive and negative "Feedback" value is different. The harmonics will be emphasized when the effect sound is mixed with the dry sound if you set a posi-
tive value for both "Feedback" and "Wet/Dry", and if you set a negative value for both "Feedback" and "Wet/Dry".
g: High Damp [%]
This parameter sets the amount of damping of the feedback in the high range. Increasing the value will cut high-range harmonics.
021: RandomFlang
(Stereo Random Flanger)
The stereo effect uses a step-shape waveform and random LFO for modulation, creating a unique flanging effect.

flowchart
graph TD
    A["Left"] --> B["Flanger"]
    B --> C["Wet / Dry"]
    D["Right"] --> E["Flanger"]
    E --> F["Wet / Dry"]
    G["LFO: Step-Tri/Random"] --> H["LFO Phase"]
    I["Feedback"] --> J["High Damp"]
    K["End"] --> L["End"]
| a | Delay Time [msec]Sets the delay time from the original sound | 0.0...50.0msec |
| b | LFO WaveformSelects LFO Waveform | Step-Tri, Random→Fx:010 |
| c | LFO Phase [degree] -180...+180Sets the LFO phase difference between the left and right →Fx:010 | |
| d | LFO Frequency [Hz] 0.02...20.00HzSets the LFO speed →Fx:010, D | |
| Src Off...TempoSelects the modulation source used for both LFO speed and step speed | ||
| Amt -20.00...+20.00HzSets the modulation amount of LFO speed | ||
| e | LFO Step Freq (Frequency) [Hz] 0.05...50.00HzSets the LFO step speed (speed that changes in steps) →Fx:010, D | |
| Amt -50.00...+50.00HzSets the modulation amount of LFO step speed | ||
| f | BPM/MIDI Sync Off, OnSwitches between using the frequency of the LFO speed and using the tempo and notes →Fx:009, Sync | |
| BPMSelects MIDI Clock and assigns tempo | MIDI, 40...240→Fx:009, 010 | |
| Base Note Selects the type of notes that specify the LFO speed →Fx:009 | ||
| Times Sets the number of notes that specify the LFO speed x1...x16→Fx:009 | ||
| g | Step Base Note Selects the type of notes to specify the LFO step speed →Fx:010, Sync | |
| Times Sets the number of notes to specify the LFO step speed x1...x32→Fx:010 | ||
| h | DepthSets the depth of LFO modulation | 0...100 |
| i | FeedbackSets the feedback amount | -100...+100→Fx:020 |
| High Damp [%] Sets the feedback damping amount in the high range →Fx:020 | ||
| j | Wet/Dry -Wet...-1:99, Dry, 1:99...WetTable , "Sets the balance between the effect and dry sounds," on page 175→Fx:010, 020, D | |
| Src Off...TempoTable , "Selects the modulation source of the effect balance," on page 175 | ||
| Amt Table , "Sets the modulation amount of the effect balance," on page 175 | -100...+100 | |
022: Envel.Flang
(Stereo Envelope Flanger)
This Flanger uses an envelope generator for modulation. You will obtain the same pattern of flanging each time you play. You can also control the Flanger directly using the modulation source.
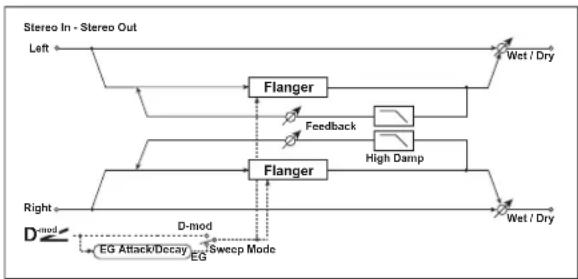
flowchart
graph TD
    A["Stereo In - Stereo Out"] --> B["Left"]
    B --> C["Flanger"]
    C --> D["Feedback"]
    D --> E["High Damp"]
    E --> F["Wet / Dry"]
    G["Right"] --> H["D-mod"]
    H --> I["EG Attack/Decay"]
    I --> J["EG Sweep Mode"]
    J --> K["Wet / Dry"]
    L["Flanger"] --> M["Feedback"]
    M --> N["High Damp"]
    N --> O["Wet / Dry"]
| a | L Dly Bottom [msec] (L Delay Bottom)Sets the lower limit of the delay time on the left channel | 0.0...50.0msec Fx:009 |
| L Dly Top [msec] (L Delay Top)Sets the upper limit of the delay time on the left channel | 0.0...50.0msec Fx:009 | |
| b | R Dly Bottom [msec] (R Delay Bottom)Sets the lower limit of the delay time on the right channel | 0.0...50.0msec Fx:009 |
| R Dly Top [msec] (R Delay Top)Sets the upper limit of the delay time on the right channel | 0.0...50.0msec Fx:009 | |
| c | Sweep ModeDetermines whether the flanger is controlled by the envelope generator or by the modulation source ,Src Off...TempoSelects the modulation source that triggers the EG (when EG is selected for Sweep Mode), or modulation source that causes the flanger to sweep (when D-mod is selected for Sweep Mode) | |
| d | EG AttackSets the EG attack speed | 1...100 |
| EG DecaySets the EG decay speed | 1...100 | |
| e | FeedbackSets the feedback amount | -100...+100 Fx:020 |
| f | High Damp [%]Sets the feedback damping amount in the high range | 0...100% Fx:020 |
| g | Wet/Dry –Wet...–1:99, Dry, 1:99...WetTable , “Sets the balance between the effect and dry sounds,” on page 175 Fx:010, 020,D | |
| Src Off...TempoTable , “Selects the modulation source of the effect balance,” on page 175 | ||
| AmtTable , “Sets the modulation amount of the effect balance,” on page 175 | -100...+100 | |
c: Sweep Mode, c: Src
This parameter switches the flanger control mode. With "Sweep Mode" = EG, the flanger will sweep using the envelope generator. This envelope generator is included in the envelope flanger, and not related to the Pitch EG, Filter EG, or Amp EG.
The "Src" parameter selects the source that starts the envelope generator. If you select, for example, Gate, the envelope generator will start when the note-on message is received.
When "Sweep Mode" = D-mod, the modulation source can control the flanger directly. Select the modulation source using the "Src" parameter.

The effect is off when a value for the modulation source specified for the "Src" parameter is smaller than 64, and the effect is on when the value is 64 or higher. The Envelope Generator is triggered when the value changes from 63 or smaller to 64 or higher.
d: EG Attack, d: EG Decay
Attack and Decay speed are the only adjustable parameters on this EG.
023: Phaser
(Stereo Phaser)
This effect creates a swell by shifting the phase. It is very effective on electric piano sounds. You can add spread to the sound by offsetting the phase of the left and right LFOs from each other.

flowchart
graph TD
    A["Stereo In - Stereo Out"] --> B["Left"]
    B --> C["Phaser"]
    C --> D["Wet / Dry"]
    C --> E["Resonance"]
    E --> F["High Damp"]
    F --> G["Phaser"]
    G --> H["Wet / Dry"]
    G --> I["LFO Phase"]
    I --> J["LFO Shape"]
    J --> K["LFO: Tri / Sino"]
    K --> L["Right"]
| a | LFO WaveformSelects LFO Waveform | Triangle, Sine |
| LFO Shape -100...+100Determines how much the LFO waveform is changed →Fx:020 | ||
| b | LFO Phase [degree] -180...+180Sets the LFO phase difference between the left and right →Fx:010 | |
| c | LFO Frequency [Hz] 0.02...20.00HzSets the LFO speed →Fx:009, D | |
| SrcSelects the modulation source of LFO speed | Off...Tempo | |
| Amt -20.00...+20.00HzSets the modulation amount of LFO speed | ||
| d | BPM/MIDI Sync Off, OnSwitches between using the frequency of the LFO speed and using the tempo and notes →Fx:009, Sync | |
| BPM MIDI, 40...240Selects MIDI Clock and assigns tempo →Fx:009 | ||
| Base Note Selects the type of notes that specify the LFO speed →Fx:009 | ||
| Times x1...x16Sets the number of notes that specify the LFO speed →Fx:009 | ||
| e | Manual Sets the frequency to which the effect is applied | 0...100 |
| f | Depth Sets the depth of LFO modulation | 0...100D |
| Src Off...TempoSelects the modulation source for the LFO modulation depth | ||
| Amt -100...+100Sets the modulation amount of the LFO modulation depth | ||
| g | Resonance Sets the resonance amount | -100...+100→ |
| High Damp [%] 0...100%Sets the resonance damping amount in the high range→ | ||
| h | Wet/Dry -Wet...-1:99, Dry, 1:99...WetTable, "Sets the balance between the effect and dry sounds," on page 175→Fx:010, D | |
| Src Off...TempoTable, "Selects the modulation source of the effect balance," on page 175 | ||
| Amt Table, "Sets the modulation amount of the effect balance," on page 175 | -100...+100 | |
g: Resonance, h: Wet/Dry
The peak shape of the positive and negative Feedback value is different. The harmonics will be emphasized when the effect sound is mixed with the dry sound, if you set a positive value for both “Resonance” and “Wet/Dry”, and if you set a negative value for both “Resonance” and “Wet/Dry”.
g: High Damp [%]
This parameter sets the amount of damping of the resonance in the high range. Increasing the value will cut high-range harmonics.
024: RandomPhser
(Stereo Random Phaser)
This is a stereo phaser. The effect uses a step-shape waveform and random LFO for modulation, creating a unique phasing effect.

flowchart
graph TD
    A["Left"] --> B["Phaser"]
    B --> C["Resonance"]
    C --> D["High Damp"]
    D --> E["Wet / Dry"]
    F["Right"] --> G["Phaser"]
    G --> H["LFO Phase"]
    H --> I["Step-TriRandom"]
    I -.-> J["LFO: Step-TriRandom"]
    style A fill:#f9f,stroke:#333
    style F fill:#f9f,stroke:#333
    style B fill:#ccf,stroke:#333
    style G fill:#ccf,stroke:#333
    style C fill:#cfc,stroke:#333
    style D fill:#fcc,stroke:#333
    style E fill:#fcc,stroke:#333
    style I fill:#fcc,stroke:#333
| a | LFO WaveformStep-Tri, Step-Sin, Random Selects LFO Waveform→Fx:010 | |
| b | LFO Phase [degree] -180...+180Sets the LFO phase difference between the left and right→Fx:010 | |
| c | LFO Frequency [Hz] 0.02...20.00HzSets the LFO speed→Fx:010,Dmod | |
| SrcOff...TempoSelects the modulation source commonly used for LFO speed and step speed | ||
| Amt -20.00...+20.00HzSets the modulation amount of LFO speed | ||
| d | LFO Step Freq (Frequency) [Hz]0.05...50.00HzSets the LFO step speed→Fx:010,Dmod | |
| Amt -50.00...+50.00HzSets the modulation amount of LFO step speed | ||
| e | BPM/MIDI SyncOff, OnSwitches between using the frequency of the LFO speed and using the tempo and notes→Fx:009,Sync | |
| BPMSelects MIDI Clock and assigns tempo | MIDI, 40...240→Fx:009, 010 | |
| Base NoteSelects the type of notes that specify the LFO speed→Fx:009 | ||
| Timesx1...x16Sets the number of notes that specify the LFO speed→Fx:009 | ||
| f | Step Base NoteSelects the type of notes to specify the LFO step speed→Fx:010,Sync | |
| Timesx1...x32Sets the number of notes to specify the LFO step speed→Fx:010 | ||
| g | ManualSets the frequency to which the effect is applied | 0...100 |
| h | DepthSets the depth of LFO modulation | 0...100 |
| i | ResonanceSets the resonance amount | -100...+100→Fx:023 |
| High Damp [%]Sets the resonance damping amount in the high range→Fx:023 | ||
| j | Wet/Dry-Wet...-1:99, Dry, 1:99...WetTable, "Sets the balance between the effect and dry sounds," on page 175→Fx:010, 023,Dmod | |
| SrcOff...TempoTable, "Selects the modulation source of the effect balance," on page 175 | ||
| Amt-100...+100Table, "Sets the modulation amount of the effect balance," on page 175 | ||
025: Envel.Phser
(Stereo Envelope Phaser)
This stereo phaser uses an envelope generator for modulation. You will obtain the same pattern of phasing each time you . May can also control the Phaser directly using the modulation source.

flowchart
graph TD
    A["Left"] --> B["Phaser"]
    B --> C["Resonance"]
    C --> D["High Damp"]
    D --> E["Wet / Dry"]
    F["Right"] --> G["Phaser"]
    G --> H["Wet / Dry"]
    I["D-mod"] --> J["EG Attack/Decay"]
    J --> K["EG"]
    K --> L["Sweep Mode"]
    L --> M["D-mod"]
    N["Left"] --> O["Wet / Dry"]
    P["Right"] --> Q["Wet / Dry"]
| a | L Manu Bottom (L Manual Bottom) 0...100Sets the lower limit of the frequency range for the effect on the left channel Fx:009 | |
| L Manu Top (L Manual Top) 0...100Sets the upper limit of the frequency range for the effect on the left channel Fx:009 | ||
| b | R Manu Bottom (R Manual Bottom) 0...100Sets the lower limit of the frequency range for the effect on the right channel Fx:009 | |
| R Manu Top (R Manual Top) 0...100Sets the upper limit of the frequency range for the effect on the right channel Fx:009 | ||
| c | Sweep Mode EG, D-modDetermines whether the flanger is controlled by the envelope generator or by the modulation source Fx:022, | |
| Src Off...TempoSelects the modulation source that triggers the EG (when EG is selected for Sweep Mode), or modulation source that causes the flanger to sweep (when D-mod is selected for Sweep Mode) | ||
| d | EG Attack Sets the EG attack speed | 1...100 Fx:022 |
| EG Decay Sets the EG decay speed | 1...100 Fx:022 | |
| e | Resonance Sets the resonance amount | -100...+100 Fx:023 |
| f | High Damp [%] Sets the resonance damping amount in the high range | 0...100% Fx:023 |
| g | Wet/Dry -Wet,...-1:99, Dry, 1:99...WetTable , "Sets the balance between the effect and dry sounds," on page 175 Fx:010, 023, | |
| Src Off...TempoTable , "Selects the modulation source of the effect balance," on page 175 | ||
| Amt -100...+100Table , "Sets the modulation amount of the effect balance," on page 175 | ||
026: BiphaseMod.
(Stereo Biphase Modulation)
This stereo chorus effect adds two different LFOs together. You can set the Frequency and Depth parameters for each LFO individually. Depending on the setting of these LFOs, very complex waveforms will create an analog-type, unstable modulated sound.

flowchart
graph TD
    A["Left + Stereo In - Stereo Out"] --> B["Chorus/Flanger"]
    B --> C["High Damp"]
    C --> D["Wet / Dry"]
    B --> E["Feedback"]
    E --> F["Chorus/Flanger"]
    F --> G["High Damp"]
    G --> H["Wet / Dry"]
    I["Right"] --> J["LFO1: Tri / Sine"]
    I --> K["LFO2: Tri / Sine"]
    J --> L["180 [degree"]]
    K --> L
| a | LFO1 WaveformSelects LFO1 waveform | Triangle, Sine |
| LFO2 WaveformSelects LFO2 waveform | Triangle, Sine | |
| b | LFO Phase Sw 0 degree, 180 degreeSwitches the LFO phase difference between left and right | |
| c | LFO1 Frequency [Hz]Sets the LFO1 speed | 0.02...30.00HzD |
| SrcSelects the modulation source of LFO1&2 speed | Off...Tempo | |
| AmtSets the modulation amount of LFO1 speed | -30.00...+30.00 | |
| d | LFO2 Frequency [Hz]Sets the LFO2 speed | 0.02...30.00HzD |
| AmtSets the modulation amount of LFO2 speed | -30.00...+30.00 | |
| e | Depth1Sets the depth of LFO1 modulation | 0...100D |
| Src Selects the modulation source of LFO1&2 modulation depth | Off...Tempo | |
| AmtSets the modulation amount of LFO1 modulation depth | -100...+100 | |
| f | Depth2Sets the depth of LFO2 modulation | 0...100D |
| AmtSets the modulation amount of LFO2 modulation depth | -100...+100 | |
| g | L Pre Delay [msec]Sets the delay time for the left channel | 0.0...50.0msec→Fx:016 |
| h | R Pre Delay [msec]Sets the delay time for the right channel | 0.0...50.0msec→Fx:016 |
| i | FeedbackSets the feedback amount | -100...+100→Fx:017 |
| High Damp [%]Sets the damping amount in the high range | 0...100% | |
| j | Wet/Dry -Wet...-1:99, Dry, 1:99...Wet Table, “Sets the balance between the effect and dry sounds,” on page 175→Fx:010,D | |
| Src Off...TempoTable, “Selects the modulation source of the effect balance,” on page 175 | ||
| AmtTable, “Sets the modulation amount of the effect balance,” on page 175 | -100...+100 | |
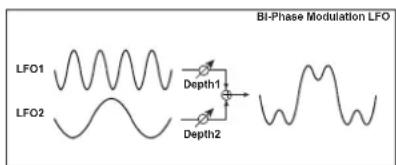
text_image
BI-Phase Modulation LFO LFO1 Depth1 LFO2 Depth2027: Vibrato
(Stereo Vibrato)
This effect causes the pitch of the input signal to shimmer. Using the AutoFade allows you to increase or decrease the shimmering speed.

flowchart
graph TD
    A["Left"] --> B["Vibrato"]
    B --> C["Wet / Dry"]
    D["Right"] --> E["Vibrato"]
    E --> F["Wet / Dry"]
    G["LFO: Tri / Sine"] --> H["LFO Shape"]
    I["AutoFade"] --> J["Fade-In Delay"] --> K["LFO Frequency"]
    L["-->"] -.-> E
| a | AUTOFADE Src Off...TempoSelects the modulation source that starts AutoFade →, | |
| Fade-In RateSets the rate of fade-in | 1...100→ | |
| b | Fade-In Delay [msec]Sets the fade-in delay time | 00...2000msec→ |
| c | LFO WaveformSelects LFO Waveform | Triangle, Sine |
| LFO Shape -100...+100Determines how much the LFO waveform is changed →Fx:020 | ||
| d | LFO Frequency Mod D-mod, AUTOFADESwitches between D-mod and AUTOFADE for the LFO frequency modula-tion → | |
| e | LFO Frequency [Hz] 0.02...20.00HzSets the LFO speed →Fx:009, | |
| SrcSelects the modulation source of LFO speed | Off...Tempo | |
| Amt -20.00...+20.00HzSets the modulation amount of LFO speed | ||
| f | BPM/MIDI Sync Off, OnSwitches between using the frequency of the LFO speed and using the tempo and notes →Fx:009, | |
| BPMSelects MIDI Clock and assigns tempo | MIDI, 40...240→Fx:009 | |
| Base NoteSelects the type of notes that specify the LFO speed | ||
| TimesSets the number of notes that specify the LFO speed | x1...x16→Fx:009 | |
| g | DepthSets the depth of LFO modulation | 0...100Dmod |
| SrcSelects the modulation source of the LFO modulation depth | Off...Tempo | |
| AmtSets the modulation amount of the LFO modulation depth | ||
| h | Wet/DryDry, 1:99...99:1, WetTable, “Sets the balance between the effect and dry sounds,” on page 175 | |
| SrcTable, “Selects the modulation source of the effect balance,” on page 175 | ||
| AmtTable, “Sets the modulation amount of the effect bal-ance,” on page 175 | -100...+100 | |

flowchart
graph TD
    A["Gate1 Signal"] --> B["Note On"]
    B --> C["Fade-In Rate"]
    C --> D["Fade-In Dealy"]
    D --> E["LFO Frequency = 1.0+3.0=4.0Hz"]
    E --> F["All Note Off"]
    F --> G["LFO Freq, Mod=AUTOFADE Amt=3.0"]
    G --> H["AUTOFADE Src=Gate1 LFO Frequency[Hz"]=1.0]
    H --> I["Note On"]
    I --> J["Fade-In Rate"]
    J --> K["LFO Frequency = 1.0Hz"]
d: LFO Frequency Mod, a: AUTOFADE Src, a: Fade-In Rate
b: Fade-In Delay [msec]
When “LFO Frequency Mod” is set to AUTOFADE, you can use the modulation source selected in “AUTO FADE Src” as a trigger to automatically fade in the modulation amount. When “BPM/MIDI Sync” is set to On, you cannot use this.
The “Fade-in Rate” parameter specifies the rate of fade-in. The “Fade-in Delay” parameter determines the time from AutoFade modulation source ON until the fade-in starts.
The following is an example of fade-in where the LFO speed is increased from "1.0Hz" to "4.0Hz" when a note-on message is received.
"AUTOFADE Src" = Gate1, "LFO Frequency [Hz]" = 1.0
"LFO Frequency Mod"=AUTOFADE, "Amt"=3.0
![KORG MicroARRANGER - b: Fade-In Delay [msec] - 1](/content/2026/06/1236217/images/93ce4ed83498fd0803eb0442d0d24ad732bcfb217c94af0ac072ca0411685897.jpg)
The effect is off when a value for the dynamic modulation source specified for the "AUTOFADE Src" parameter is smaller than 64, and the effect is on when the value is 64 or higher. The AutoFade function is triggered when the value changes from 63 or smaller to 64 or higher.
The effect is off when a value for the dynamic modulation source specified for the "AUTOFADE Src" parameter is smaller than 64, and the effect is on when the value is 64 or higher. The AutoFade function is triggered when the value changes from 63 or smaller to 64 or higher.
![KORG MicroARRANGER - b: Fade-In Delay [msec] - 2](/content/2026/06/1236217/images/21c1d98aced3c7dfa265abae695960bc6876b2cc6578b71b9ac6ed607f5e7d41.jpg)
flowchart
graph TD
    A["Gate1 Signal"] --> B["Note On"]
    B --> C["Fade-In Rate"]
    C --> D["Fade-In Dealy"]
    D --> E["LFO Frequency = 1.0+3.0=4.0Hz"]
    E --> F["LFO Frequency = 1.0Hz"]
    F --> G["All Note Off"]
    G --> H["Note Off"]
    H --> I["All Note Off"]
    I --> J["Note Off"]
    J --> K["Note Off"]
    K --> L["Note Off"]
    L --> M["Note Off"]
    M --> N["Note Off"]
    N --> O["Note Off"]
    O --> P["Note Off"]
    P --> Q["Note Off"]
    Q --> R["Note Off"]
    R --> S["Note Off"]
    S --> T["Note Off"]
    T --> U["Note Off"]
    U --> V["Note Off"]
    V --> W["Note Off"]
    W --> X["Note Off"]
    X --> Y["Note Off"]
    Y --> Z["Note Off"]
    Z --> AA["Note Off"]
    AA --> AB["Note Off"]
    AB --> AC["Note Off"]
    AC --> AD["Note Off"]
    AD --> AE["Note Off"]
    AE --> AF["Note Off"]
    AF --> AG["Note Off"]
    AG --> AH["Note Off"]
    AH --> AI["Note Off"]
    AI --> AJ["Note Off"]
    AJ --> AK["Note Off"]
    AK --> AL["Note Off"]
    AL --> AM["Note Off"]
    AM --> AN["Note Off"]
    AN --> AO["Note Off"]
    AO --> AP["Note Off"]
    AP --> AQ["Note Off"]
    AQ --> AR["Note Off"]
    AR --> AS["Note Off"]
    AS --> AT["Note Off"]
    AT --> AU["Note Off"]
    AU --> AV["Note Off"]
    AV --> AW["Note Off"]
    AW --> AX["Note Off"]
    AX --> AY["Note Off"]
028: AutoFadeMod.
(Stereo Auto Fade Modulation)
This stereo chorus/flanger effect enables you to control the LFO speed and effect balance using auto fade, and you can spread the sound by offsetting the phase of the left and right LFOs from each other.
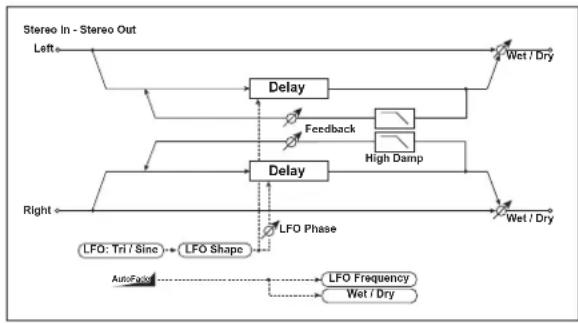
flowchart
graph TD
    A["Left"] --> B["Delay"]
    B --> C["Feedback"]
    C --> D["High Damp"]
    D --> E["Delay"]
    E --> F["LFO Phase"]
    F --> G["LFO Shape"]
    G --> H["AutoFace"]
    H --> I["LFO Frequency"]
    I --> J["Wet / Dry"]
    J --> K["Wet / Dry"]
    K --> L["Delay"]
    L --> M["Feedback"]
    M --> N["High Damp"]
    N --> O["Delay"]
    O --> P["Wet / Dry"]
    P --> Q["Wet / Dry"]
    Q --> R["Delay"]
    R --> S["Feedback"]
    S --> T["High Damp"]
    T --> U["Delay"]
    U --> V["Wet / Dry"]
    V --> W["Wet / Dry"]
    W --> X["Delay"]
    X --> Y["Feedback"]
    Y --> Z["High Damp"]
    Z --> AA["Delay"]
    AA --> AB["Wet / Dry"]
    AB --> AC["Wet / Dry"]
| a | AUTOFADE Src Off...TempoSelects the modulation source that starts AutoFade→Fx:027.D | |
| RateSets the rate of fade-in | 1...100→Fx:027 | |
| Fade-In Dly (Fade-In Delay) [msec]Sets the fade-in delay time | 00...2000msec→Fx:027 | |
| b | LFO WaveformSelects LFO Waveform | Triangle, Sine |
| LFO Shape -100...+100Determines how much the LFO waveform is changed →Fx:020 | ||
| c | LFO Phase [degree] -180...+180Sets the LFO phase difference between the left and right→Fx:010 | |
| d | LFO Frequency Mod D-mod, AUTOFADESwitches between D-mod and AUTOFADE for the LFO frequency modula-tion →Fx:027 | |
| e | LFO Frequency [Hz]Sets the LFO speed | 0.02...20.00HzD |
| SrcSelects the modulation source of LFO speed | Off...Tempo | |
| Amt -20.00...+20.00HzSets the modulation amount of LFO speed | ||
| f | L Delay Time [msec]Sets the left channel delay time | 0.0...500.0msec |
| R Delay Time [msec]Sets the right channel delay time | 0.0...500.0msec | |
| g | DepthSets the depth of LFO modulation | 0...200 |
| h | FeedbackSets the feedback amount | -100...+100→Fx:020 |
| High Damp [%]Sets the feedback damping amount in the high range→Fx:020 | ||
| i | Wet/Dry ModD-mod, AUTOFADESwitches between D-mod and AUTOFADE for the effect balance modulation→Fx:027 | |
| j | Wet/Dry-Wet...-1:99, Dry, 1:99...WetTable, "Sets the balance between the effect and dry sounds," on page 175→Fx:010, 020,D | |
| SrcOff...TempoTable, "Selects the modulation source of the effect balance," on page 175 | ||
| AmtTable, "Sets the modulation amount of the effect bal-ance," on page 175 | -100...+100 | |
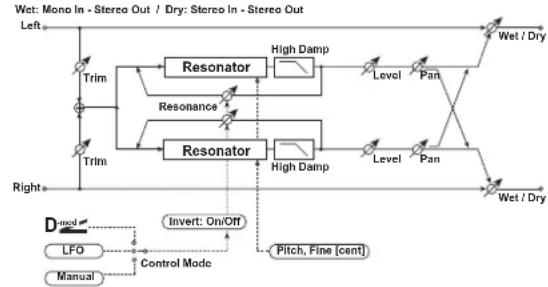
flowchart
graph TD
    A["Left"] --> B["Trim"]
    B --> C["Resonator"]
    C --> D["High Damp"]
    D --> E["Level"]
    E --> F["Wet / Dry"]
    G["Right"] --> H["Trim"]
    H --> I["Resonator"]
    I --> J["High Damp"]
    J --> K["Level"]
    K --> L["Wet / Dry"]
    M["D-mod"] -.-> N["Invert: On/Off"]
    O["LFO"] --> P["Control Mode"]
    Q["Manual"] --> P
    P --> R["Pitch, Fine [cent"]]
    S["Resonance"] -.-> C
    T["Pan"] -.-> J
029: 2Voice Res
This effect resonates the input signal at a specified pitch. You can set the pitch, output level, and pan settings for two resonators individually. You can control the resonance intensity via an LFO.

flowchart
graph TD
    A["Wet: Mono In - Stereo Out / Dry: Stereo In - Stereo Out"] --> B["Left"]
    B --> C["Trim"]
    C --> D["Resonator"]
    D --> E["High Damp"]
    E --> F["Level"]
    F --> G["Wet / Dry"]
    D --> H["Resonance"]
    H --> I["High Damp"]
    I --> J["Level"]
    J --> K["Wet / Dry"]
    D --> L["Resonator"]
    L --> M["High Damp"]
    M --> N["Level"]
    N --> O["Wet / Dry"]
    L --> P["Invert: On/Off"]
    P --> Q["Pitch, Fine [cent"]]
    Q --> R["Dmod"]
    R --> S["LFO"]
    S --> T["Manual"]
    T --> U["Control Mode"]
    U --> V["Right"]
| a | Control ModeManual, LFO, D-mod Switches the controls of resonance intensity ,DZZ | |
| LFO/D-mod InvertOff, On Reverses the Voice 1 and 2 control when LFO/D-mod is selected | ||
| b | LFO Frequency [Hz]Sets the LFO speed | 0.02...20.00Hz |
| D-mod SrcOff...Tempo Selects the modulation source that controls resonance intensity | ||
| c | Mod. Depth-100...+100Sets the amount of resonance intensity control via LFO/D-mod | |
| Trim0...100Sets the input level at the resonator | ||
| d | Voice1: PitchC0...B8Sets the voice1 Pitch for resonance | |
| Fine [cent]-50...+50Fine-adjusts the voice 1 pitch for resonance | ||
| e | Voice1: Resonance-100...+100Sets the intensity of resonance when Control Mode = Manual | |
| High Damp [%]0...100%Sets the damping amount of resonant sound in the high range | ||
| f | Voice1: Level0...100Sets the Voice1 output level | |
| PanL6...R6Sets the Voice1 stereo image | ||
| g | Voice2: PitchC0...B8Sets the Voice2 Pitch for resonance | |
| Fine [cent]-50...+50Fine-adjusts the voice 2 pitch for resonance | ||
| h | Voice2: Resonance-100...+100Sets the intensity of resonance when Control Mode = Manual | |
| High Damp [%]0...100%Sets the damping amount of resonant sound in the high range | ||
| i | Voice2: Level0...100Sets the Voice2 output level | |
| PanL6...R6Sets the Voice2 stereo image | ||
| j | Wet/DryDry, 1:99...99:1, Wet Table , “Sets the balance between the effect and dry sounds,” on page 175DZZ | |
| SrcOff...TempoTable , “Selects the modulation source of the effect balance,” on page 175 | ||
| Amt-100...+100Table , “Sets the modulation amount of the effect balance,” on page 175 | ||
a: Control Mode, e: Voice1: Resonance, h: Voice2: Resonance
This parameter determines the resonance intensity.
When “Control Mode” = Manual, the “Resonance” parameter sets the intensity of resonance. If the “Resonance” parameter has a negative value, harmonics will be changed, and resonance will occur at a pitch one octave lower.
When “Control Mode” = LFO, the intensity of resonance varies according to the LFO. The LFO sways between positive and negative values, causing resonance to occur between specified pitches an octave apart in turn.
When “Control Mode” = D-mod, the resonance is controlled by the dynamic modulation source. If JS X or Ribbon is assigned as the modulation source, the pitch an octave higher and lower can be controlled, similar to when LFO is selected for Control Mode.
a: LFO/D-mod Invert
When “Control Mode” = LFO or D-mod, the controlled phase of either Voice 1 or 2 will be reversed. When the resonance pitch is set for Voice 1 (Resonance has a positive value), Voice 2 will resonate at a pitch an octave below (Resonance has a negative value).
d: Voice1: Pitch, d: Fine [cent], g: Voice2: Pitch, g: Fine [cent]
The Pitch parameter specifies the pitch of resonance by note name. The “Fine” parameter allows for fine adjustment in steps of cents.
e: High Damp [%], h: High Damp [%]
This parameter sets the damping amount of resonant sound in the high range. Lower values will make a metallic sound with a higher range of harmonics.
030: Doppler
This effect simulates the "Doppler effect" of a moving sound with a changing pitch, similar to the siren of an passing ambulance. Mixing the effect sound with the dry sound will create a unique chorus effect.

flowchart
graph TD
    A["Wet: Mono In - Stereo Out / Dry: Stereo In - Stereo Out"] --> B["Left"]
    B --> C["Doppler"]
    C --> D["Pan Depth"]
    D --> E["Wet / Dry"]
    C --> F["LFO"]
    F --> G["Trigger"]
    G --> H["LFO Mode = 1-Shot"]
    H --> I["Wet / Dry"]
    style A fill:#f9f,stroke:#333
    style E fill:#ccf,stroke:#333
    style F fill:#cfc,stroke:#333
    style G fill:#fcc,stroke:#333
    style H fill:#cff,stroke:#333
| a | LFO ModeSwitches LFO operation mode | Loop, 1-Shot→.D2 |
| Src Off...TempoWhen LFO Mode is set to 1-Shot, this modulation source triggers the LFO→ | ||
| b | LFO Sync Off, OnSwitches between LFO reset on and off when LFO Mode is set to Loop → | |
| c | LFO Frequency [Hz] 0.02...20.00HzSets the LFO speed →Fx:009, | D2 |
| SrcSelects the modulation source of LFO speed | Off...Tempo | |
| Amt -20.00...+20.00HzSets the modulation amount of LFO speed | ||
| d | BPM/MIDI Sync Off, OnSwitches between using the frequency of the LFO speed and using the tempo and notes →Fx:009, | Sync |
| BPMSelects MIDI Clock and assigns tempo | MIDI, 40...240→Fx:009 | |
| Base NoteSelects the type of notes that specify the LFO speed | →Fx:009 | |
| TimesSets the number of notes that specify the LFO speed | x1...x16→Fx:009 | |
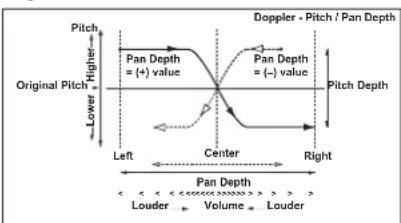
text_image
Doppler - Pitch / Pan Depth Original Pitch Higher Pan Depth = (+) value Pan Depth = (−) value Pitch Lower Left Center Right Pan Depth Louder Volume Louder| e | Pitch DepthSets the pitch variation of the moving sound | 0...100→,D2 |
| SrcSelects the modulation source of pitch variation | Off...Tempo | |
| AmtSets the modulation amount of pitch variation | -100...+100 | |
| f | Pan DepthSets the panning of the moving sound | -100...+100→,D2 |
| SrcSelects the modulation source of panning | Off...Tempo | |
| AmtSets the modulation amount of panning | -100...+100 | |
| g | Wet/DryDry, 1:99...99:1, Wet Table, "Sets the balance between the effect and dry sounds," on page 175 | |
| Src Off...TempoTable, "Selects the modulation source of the effect balance," on page 175 | ||
| AmtTable, "Sets the modulation amount of the effect balance," on page 175 | -100...+100 | |
a: LFO Mode, a: Src, b: LFO Sync
The “LFO Mode” parameter switches LFO operation mode. When Loop is selected, the Doppler effect will be created repeatedly. If “LFO Sync” is set to On, the LFO will be reset when the modulation source specified with the “Src” parameter is turned on.
When "LFO Mode" is set to 1-Shot, the Doppler effect is created only once when the modulation source specified in the "Src" field is turned on. At this time if you do not set the "Src" parameter, the Doppler effect will not be created, and no effect sound will be output.

The effect is off when a value for the modulation source specified for the "Src" parameter is smaller than 64, and the effect is on when the value is 64 or higher. The Doppler effect is triggered when the value changes from 63 or smaller to 64 or higher.
e: Pitch Depth
With the Doppler effect, the pitch is raised when the sound approaches, and the pitch is lowered when the sound goes away. This parameter sets this pitch variation.
f: Pan Depth
This parameter sets the width of the stereo image of the effect sound. With larger values, the sound seems to come and go from much further away. With positive values, the sound moves from left to right; with negative values, the sound moves from right to left.
031: Scratch
This effect is applied by recording the input signal and moving the modulation source. It simulates the sound of scratches you can make using a turntable.

flowchart
graph TD
    A["Wet: Mono In - Mono Out / Dry: Stereo In - Stereo Out"] --> B["Left +"]
    B --> C["Scratch"]
    C --> D["Direct Mix"]
    D --> E["Wet / Dry"]
    C --> F["Rec Control"]
    F --> G["Scratch"]
    G --> H["Wet / Dry"]
    I["Right +"] --> J["D-mod"]
    J --> K["Envelope Control"]
    K --> L["Input"]
    L --> M["Envelope Select"]
    M --> N["D-mod"]
    N --> O["End"]
| a | Scratch Source Off...TempoSelects the modulation source for simulation control →,Dmod | |
| b | Response 0...100Sets the speed of the response to the Scratch Source → | |
| c | Envelope Select D-mod, InputSelects whether the start and end of recording is controlled via the modula-tion source or the input signal level →,Dmod | |
| Src Off...TempoSelects the modulation source that controls recording when Envelope Select is set to D-mod → | ||
| d | Threshold 0...100Sets the recording start level when Envelope Select is set to Input→ | |
| e | Response 0...100Sets the speed of the response to the end of recording → | |
| f | Direct Mix Always On, Always Off, Cross FadeSelects how a dry sound is mixed→ | |
| g | Wet/DryDry, 1:99...99:1, WetTable, “Sets the balance between the effect and dry sounds,” on page 175Dmod | |
| Src Off...TempoTable, “Selects the modulation source of the effect balance,” on page 175 | ||
| Amt-100...+100Table, “Sets the modulation amount of the effect bal-ance,” on page 175 | ||
a: Scratch Source, b: Response
The Scratch Source parameter enables you to select the modulation source that controls simulation. The value of the modulation source corresponds to the playback position. The Response parameter enables you to set the speed of the response to the modulation source.
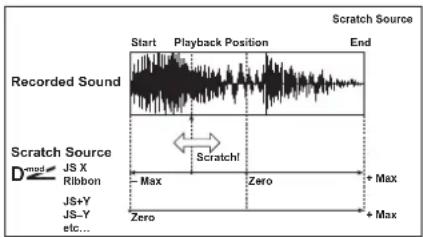
text_image
Scratch Source Start Playback Position End Recorded Sound Scratch Source Max Scratch! JS X Ribbon JS+Y JS-Y etc... Zero Zero + Max Zero + Maxc: Envelope Select, c: Src, d: Threshold
When “Envelope Select” is set to D-mod, the input signal will be recorded only when the modulation source value is 64 or higher.
When "Envelope Select" is set to Input, the input signal will be recorded only when its level is over the Threshold value.
The maximum recording time is 1365msec. If this is exceeded, the recorded data will start being erased from the top.
e: Response
This parameter enables you to set the speed of the response to the end of recording. Set a smaller value when you are recording a phrase or rhythm pattern, and set a higher value if you are recording only one note.
f: Direct Mix
With Always On, a dry sound is usually output. With Always Off, dry sounds are not output. With Cross Fade, a dry sound is usually output, and it is muted only when scratching.
Set Wet/Dry to Wet to use this parameter effectively.
MOD./P.SHIFT
Other modulation and pitch shift effects
032: Tremolo
(Stereo Tremolo)
This effect modulates the volume level of the input signal. The effect is stereo, and offsetting the LFO of the left and right phases from each other produces a tremolo effect between left and right.
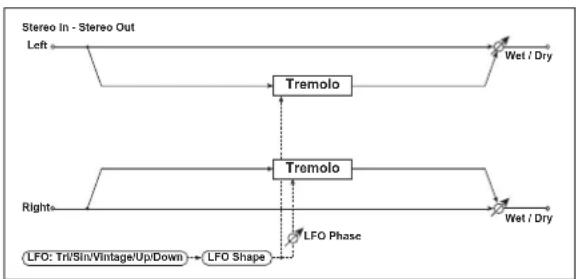
flowchart
graph TD
    A["Left"] --> B["Tremolo"]
    C["Right"] --> D["Tremolo"]
    B --> E["Wet / Dry"]
    D --> F["LFO Phase"]
    D --> G["LFO Shape"]
    style A fill:#f9f,stroke:#333
    style C fill:#f9f,stroke:#333
    style B fill:#ccf,stroke:#333
    style D fill:#ccf,stroke:#333
    style E fill:#dfd,stroke:#333
    style F fill:#dfd,stroke:#333
    style G fill:#dfd,stroke:#333
| a | LFO Waveform Triangle, Sine, Vintage, Up, DownSelects LFO Waveform → | |
| LFO Shape -100...+100Determines how much the LFO waveform is changed →Fx:020 | ||
| b | LFO Phase [degree] -180...+180Sets the LFO phase difference between the left and right → | |
| c | LFO Frequency [Hz] Sets the LFO speed 0.02...20.00Hz→Fx:009, D | |
| Src Selects the modulation source of LFO speed | Off...Tempo | |
| Amt Sets the modulation amount of LFO speed -20.00...+20.00Hz | ||
| d | BPM/MIDI Sync Off, OnSwitches between using the frequency of the LFO speed and using the tempo and notes →Fx:009, Sync | |
| BPM Selects MIDI Clock and assigns tempo | MIDI, 40...240→Fx:009 | |
| Base Note Selects the type of notes that specify the LFO speed →Fx:009 | ||
| Times x1...x16Sets the number of notes that specify the LFO speed →Fx:009 | ||
| e | Depth Sets the depth of LFO modulation | 0...100D |
| Src Selects the modulation source of the depth of modulation | Off...Tempo | |
| Amt Sets the modulation amount of the depth of modulation -100...+100 | ||
| f | Wet/Dry Dry, 1:99...99:1, Wet Table, “Sets the balance between the effect and dry sounds,” on page 175 | |
| Src Off...TempoTable, “Sets the modulation source of the effect balance,” on page 175 | ||
| Amt Table, “Sets the modulation amount of the effect balance,” on page 175 | -100...+100 | |
a:LFO Waveform
This parameter selects the LFO waveform. Vintage wave simulates the characteristics of the tremolo created on a guitar amplifier. Combining this effect with the Amp Simulation will make a realistic, vintage tremolo amplifier sound.
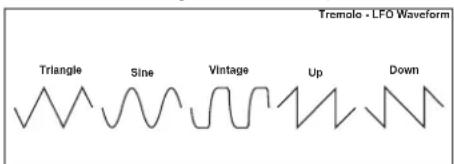
text_image
Tremolo - LFO Waveform Triangle Sine Vintage Up Downb: LFO Phase [degree]
This parameter determines the difference between the left and right LFO phases. A higher value will simulate the auto-pan effect in which the sound is panned between left and right.
033: EnvelTremol
(Stereo Envelope Tremolo)
This effect uses the input signal level to modulate a stereo tremolo. You can simulate a tremolo effect that becomes deeper as it fades out while the level gets lower.
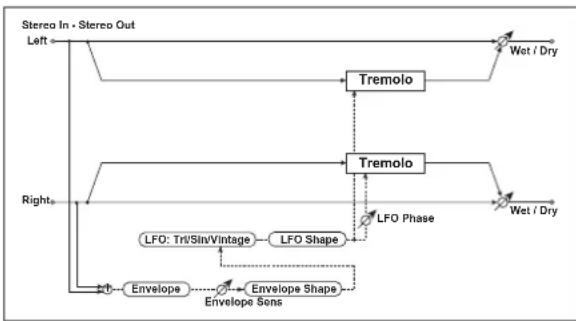
flowchart
graph TD
    A["Left"] --> B["Tremolo"]
    B --> C["Wet / Dry"]
    D["Right"] --> E["Tremolo"]
    E --> F["LFO Phase"]
    F --> G["Wet / Dry"]
    H["Left"] --> I["Envelope"]
    I --> J["Envelope Sens"]
    J --> K["Envelope Shape"]
    K --> L["LFO Shape"]
    L --> M["LFO: Tri/SinVintage"]
    M --> N["Tremolo"]
    N --> O["Wet / Dry"]
| a | Envelope Sens (Envelope Sensitivity)Sets the envelope sensitivity of the input signal | 0...100 |
| Envelope ShapeSets the envelope curve shape of the input signal | -100...+100 | |
| b | LFO WaveformTriangles, Sine, Vintage Selects LFO Waveform | |
| LFO Shape -100...+100Determines how much the LFO waveform is changed →Fx:020 | ||
| c | LFO Phase [degree] -180...+180Sets the LFO phase difference between the left and right →Fx:032 | |
| d | LFO Frequency [Hz]Sets the LFO speed | 0.02...20.00Hz→ |
| Envelope Amount [Hz]Sets the changes of the LFO speed according to the input signal level → | ||
| e | DepthSets the depth of LFO modulation | 0...100→ |
| Envelope AmountSets the changes of the modulation depth according to the input signal level → | ||
| f | Wet/DryDry, 1:99...99:1, Wet Table, “Sets the balance between the effect and dry sounds,” on page 175D | |
| SrcOff...TempoTable, “Selects the modulation source of the effect balance,” on page 175 | ||
| AmtTable, “Sets the modulation amount of the effect balance,” on page 175 | -100...+100 | |
d: LFO Frequency [Hz], d: Envelope Amount [Hz], e: Depth, e: Envelope Amount
These parameters set the modulation via an envelope (input signal level).
The “LFO speed” is obtained by adding the “LFO Frequency” value to the “Envelope Amount” value multiplied by the input signal. The LFO modulation depth is obtained by adding the Depth value to the “Envelope Amount” value multiplied by the input signal level.
- The following example indicates that the "Depth" is 0 with an LFO Frequency of 1.0Hz and the maximum input, and that the "Depth" is 100 with a Frequency of 8.0Hz with zero input.
"LFO Frequency [Hz]="8.0, "Envelope Amount [Hz]="-7.0
"Depth"=100, "Envelope Amount"=-100
![KORG MicroARRANGER - d: LFO Frequency [Hz], d: Envelope Amount [Hz], e: Depth, e: Envelope Amount - 1](/content/2026/06/1236217/images/e0c4482e6f6719ffd9c371f641738a3583b8d3a3802e3ff0d2d8be2c0a1a1fb5.jpg)
line
| Time | Level | |------|-------| | 0 | 0 | | Peak | 100 | | End | 0 |034: Auto-Pan
(Stereo Auto Pan)
This Auto Pan effect pans sound between left and right. It is stereo, and shifting the left and right LFO phases from each other will simulate the sound of the left and right channels crossing over each other by turns, or chasing each other.
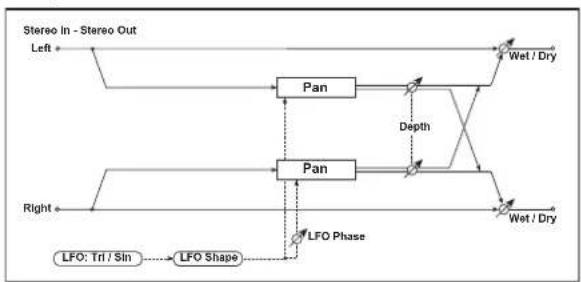
flowchart
graph TD
    A["Left"] --> B["Pan"]
    B --> C["Depth"]
    C --> D["Wet / Dry"]
    E["Right"] --> F["Pan"]
    F --> G["LFO Phase"]
    G --> H["Wet / Dry"]
    I["LFO: Trl / Sin"] --> J["LFO Shape"]
    J --> F
| a | LFO WaveformSelects LFO Waveform | Triangle, Sine |
| LFO Shape -100...+100Determines how much the LFO waveform is changed → | ||
| b | LFO Phase [degree] -180...+180Sets the LFO phase difference between the left and right → | |
| c | LFO Frequency [Hz] 0.02...20.00HzSets the LFO speed →Fx:009, | D |
| SrcSelects the modulation source of LFO speed | Off...Tempo | |
| Amt -20.00...+20.00HzSets the modulation amount of LFO speed | ||
| d | BPM/MIDI Sync Off, OnSwitches between using the frequency of the LFO speed and using the tempo and notes →Fx:009, | Sync |
| BPMSelects MIDI Clock and assigns tempo | MIDI, 40...240→Fx:009 | |
| Base NoteSelects the type of notes that specify the LFO speed →Fx:009 | ||
| TimesSets the number of notes that specify the LFO speed | x1...x16→Fx:009 | |
| e | DepthSets the depth of LFO modulation | 0...100D22 |
| Src Selects the modulation source of the depth of modulation | Off...Tempo | |
| AmtSets the modulation amount of the depth of modula-tion | -100...+100 | |
| f | Wet/Dry Dry, 1:99...99:1, Wet Table, “Sets the balance between the effect and dry sounds,” on page 175D22 | |
| Src Off...TempoTable, “Selects the modulation source of the effect balance,” on page 175 | ||
| AmtTable, “Sets the modulation amount of the effect bal-ance,” on page 175 | -100...+100 | |
a: LFO Shape
You can change the panning curve by modifying the LFO waveform.
b: LFO Phase
This parameter determines the difference in the left and right LFO phases. When you change the value gradually from 0, the sound from the left and right channels will chase each other around. If you set the parameter to +180 or -180, the sound from each channel will cross over each other.
You need to input different sounds to each channel in order for this parameter to be effective.

flowchart
graph TD
    subgraph "LFO Phase = 0 degrees"
        A1["L-In"] --> B1["R-In"]
        B1 --> C1["C-In"]
        C1 --> D1["R-In"]
        D1 --> E1["L-In"]
        E1 --> F1["R-In"]
        F1 --> G1["L-In"]
    end

    subgraph "LFO Phase = 90 degrees"
        A2["L-In"] --> B2["R-In"]
        B2 --> C2["C-In"]
        C2 --> D2["R-In"]
        D2 --> E2["L-In"]
        E2 --> F2["R-In"]
        F2 --> G2["L-In"]
    end

    subgraph "LFO Phase = 180 degrees"
        A3["L-In"] --> B3["R-In"]
        B3 --> C3["C-In"]
        C3 --> D3["R-In"]
        D3 --> E3["L-In"]
        E3 --> F3["R-In"]
        F3 --> G3["L-In"]
    end

    Left --> Center
    Right --> Right
    style Left fill:#f9f,stroke:#333
    style Center fill:#ccf,stroke:#333
    style Right fill:#cfc,stroke:#333
035: Phaser/Trem
(Stereo Phaser + Tremolo)
This effect has a stereo phaser and tremolo LFOs linked together. Swelling phaser modulation and tremolo effects synchronize with each other, creating a soothing modulation effect. It is suitable for electric piano type sounds.
flowchart
graph TD
    A["Left"] --> B["Phaser"]
    B --> C["Tremolo"]
    C --> D["Wet / Dry"]
    B --> E["Phaser"]
    E --> F["Tremolo"]
    F --> G["Wet / Dry"]
    H["Right"] --> I["Phaser"]
    I --> J["Tremolo"]
    J --> K["Wet / Dry"]
    L["LFO Type"] --> M["LFO Phase"]
    M --> N["LFO Shape"]
    O["Resonance"] --> P["Phaser Wet / Dry"]
    Q["LFO Shape"] --> R["LFO Phase"]
| a | Type: Phs - Trml...Phs LR - Trml LRSelects the type of the tremolo and phaser LFOs → | |
| LFO Phase [degree] -180...+180Sets the phase difference between the tremolo and phaser LFOs → | ||
| b | LFO Frequency [Hz] 0.02...20.00HzSets the LFO speed →Fx:009, D→ | |
| Src Selects the modulation source of LFO speed | Off...Tempo | |
| Amt -20.00...+20.00HzSets the modulation amount of LFO speed | ||
| c | BPM/MIDI Sync Off, OnSwitches between using the frequency of the LFO speed and using the tempo and notes →Fx:009,Sync | |
| BPM Selects MIDI Clock and assigns tempo | MIDI, 40...240→Fx:009 | |
| Base Note Selects the type of notes that specify the LFO speed →Fx:009 | ||
| Times x1...x16Sets the number of notes that specify the LFO speed →Fx:009 | ||
| d | Phaser Manual Sets the phaser frequency range | 0...100 |
| Resonance Sets the phaser resonance amount | -100...+100 | |
| e | Phaser Depth Sets the phaser modulation depth | 0...100D→ |
| Src Selects the modulation source for the phaser modulation depthOff...Tempo | ||
| Amt Sets the modulation amount for the phaser modulation depth-100...+100 | ||
| f | Phaser Wet/Dry -Wet...-2:99, Dry, 2:99...WetSets the balance between the phaser effect and dry sounds → | |
| g | Tremolo Shape Sets the degree of the tremolo LFO shaping | -100...+100→Fx:020 |
| h | Tremolo Depth Sets the tremolo modulation depth | 0...100D→ |
| Src Selects the modulation source for the tremolo modulation depthOff...Tempo | ||
| Amt Sets the modulation amount of the tremolo modulation depth-100...+100 | ||
| i | Wet/Dry Dry, 1:99...99:1, WetTable, “Sets the balance between the effect and dry sounds,” on page 175→D→ | |
| Src Table, “Sets the modulation source of the effect balance,” on page 175Off...Tempo | ||
| Amt Table, “Sets the modulation amount of the effect balance,” on page 175 | -100...+100 | |
a: Type, a: LFO Phase [degree]
Select the type of phaser LFO and tremolo LFO for the "Type" parameter. How the effect sound moves or rotates depends on the type of LFO. Selecting "LFO Phase" enables you to
offset the timing of the phaser peak and control a subtle movement and rotation of the sound.
f: Phaser WetDry, i: Wet/Dry
The “Phaser Wet/Dry” parameter sets the balance between the phaser output and the dry sound. The “Wet/Dry” parameter sets the balance between the final phaser and tremolo output level and the dry sound.
036: RingModulat
(Stereo Ring Modulator)
This effect creates a metallic sound by applying the oscillators to the input signal. Use the LFO or Dynamic Modulation to modulate the oscillator to create a radical modulation. Matching the oscillator frequency with a note number will produce a ring modulation effect in specific key ranges.
flowchart
graph TD
    A["Stereo In - Stereo Out"] --> B["Left"]
    B --> C["Pre LPF"]
    C --> D["Ring Modulator"]
    D --> E["Wet / Dry"]
    F["Right"] --> G["Pre LPF"]
    G --> H["Ring Modulator"]
    H --> I["Wet / Dry"]
    J["Fixed Frequency"] --> K["Note N"]
    K --> L["Note Offset, Fine"]
    L --> M["LFO"]
    M --> N["Note (Key Follow)"]
    O["Sine Oscillator"] --> P["Osc Mode"]
    P --> Q["Pitch"]
    Q --> H
    R["Fixed"] --> S["Fixed"]
    S --> T["Sine Oscillator"]
| a | Pre LPF Sets the damping amount of the high range input to the ring modulator | |
| b | OSC Mode Fixed, Note (Key Follow) Switching between specifying the oscillator frequency and using a note number | |
| c | Fixed Frequency [Hz] 0...12.00kHz Sets the oscillator frequency when OSC Mode is set to Fixed Fx; D | |
| Src Off...Tempo Selects the modulation source for the oscillator frequency when OSC Mode is set to Fixed | ||
| Amt -12.00...+12.00kHz Sets the modulation amount of the oscillator frequency when OSC Mode is set to Fixed | ||
| d | Note Offset -48...+48 Sets the pitch difference from the original note when OSC Mode is set to Note (Key Follow) | |
| Note Fine -100...+100 Fine-adjusts the oscillator frequency | ||
| e | LFO Frequency [Hz] 0.02...20.00Hz Sets the LFO speed of the oscillator frequency modulation Fx:009, D | |
| Src Off...Tempo Selects the modulation source of LFO speed | ||
| Amt -20.00...+20.00Hz Sets the modulation amount of LFO speed | ||
| f | BPM/MIDI Sync Off, On Switches between using the frequency of the LFO speed and using the tempo and notes Fx:009, | |
| BPM MIDI, 40...240 Selects MIDI Clock and assigns tempo Fx:009 | ||
| Base Note Selects the type of notes that specify the LFO speed Fx:009 | ||
| Times x1...x16 Sets the number of notes that specify the LFO speed Fx:009 | ||
| g | LFO Depth 0...100 Sets the depth of LFO modulation for the oscillator frequency D | |
| Src Off...Tempo Selects the modulation source of the depth of modulation | ||
| Amt -100...+100 Sets the modulation amount of the depth of modulation | ||
| h | Wet/Dry Dry, 1:99...99:1, WetTable, "Sets the balance between the effect and dry sounds," on page 175 | |
| Src Off...TempoTable, "Selects the modulation source of the effect balance," on page 175 | ||
| AmtTable, "Sets the modulation amount of the effect balance," on page 175 | -100...+100 | |
a: Pre LPF
This parameter enables you to set the damping amount of the high range sound input to the ring modulator. If the input sound contains lots of harmonics, the effect may sound dirty. In this case, cut a certain amount of high range.
b: OSC Mode
This parameter determines whether or not the oscillator frequency follows the note number.
c: Fixed Frequency [Hz]
This parameter sets the oscillator frequency when "OSC Mode" is set to Fixed.
d: Note Offset, d: Note Fine
These parameters for the oscillator are used when "OSC Mode" is set to Note (Key Follow). The "Note Offset" sets the pitch difference from the original note in semitone steps. The "Note Fine" parameter fine-adjusts the pitch in cent steps. Matching the oscillator frequency with the note number produces a ring modulation effect in the correct key.
037: Detune
Using this effect, you can obtain a detune effect that offsets the pitch of the effect sound slightly from the pitch of the input signal. Compared to the chorus effect, a more natural sound thickness will be created.

flowchart
graph LR
    A["Input Level"] --> B["Detune"]
    C["Input Level"] --> B
    B --> D["Delay"]
    D --> E["High Damp"]
    E --> F["Wet / Dry"]
    E --> G["Feedback"]
    G --> H["Wet / Dry"]
    I["Left"] --> A
    J["Right"] --> C
| a | Pitch Shift [cent]Sets the pitch difference from the input signal | -100...+100centD |
| SrcSelects the modulation source of the pitch shift | Off...Tempo | |
| AmtSets the modulation amount of the pitch shift | -100...+100cent | |
| b | Delay Time [msec]Sets the delay time | 0...1000msec |
| c | FeedbackSets the feedback amount | -100...+100 |
| High Damp [%]Sets the damping amount in the high range | 0...100% | |
| d | Input Level Dmod [%]Sets the modulation amount of the input level | -100...+100→,D |
| SrcSelects the modulation source for the input level | Off...Tempo→ | |
| e | Wet/Dry Dry, 1:99...99:1, WetTable, “Sets the balance between the effect and dry sounds,” on page 175 | |
| Src Off...TempoTable, “Selects the modulation source of the effect balance,” on page 175 | ||
| AmtTable, “Sets the modulation amount of the effect balance,” on page 175 | -100...+100 | |
d: Input Level Dmod [%], d: Src
This parameter sets the dynamic modulation of the input level.
![KORG MicroARRANGER - d: Input Level Dmod [%], d: Src - 1](/content/2026/06/1236217/images/70b045652308757a3bc5e843201f0c47d528660643c1114cc5a873618aca0338.jpg)
line
| Input Level | Load Factor | Condition | |---|---|---| | s1.0 | s0.5 | Zero | | s0.5 | s1.0 | Higher | | s0.5 | s0.5 | Max | Input Level D-mod: s1.0, s0.5 | Condition | s1.0, s0.5 | | Input Level D-mod: s0.5, s1.0, s0.5 | Zero, Higher, Max | Output Line Label: Ampt = -50, Ambt = +100, D-mode038: PitchShift
(Pitch Shifter)
This effect changes the pitch of the input signal. You can select from three types: Fast (quick response), Medium, and Slow (preserves tonal quality). You can also create an effect in which the pitch is gradually raised (or dropped) using the delay with feedback.
flowchart
graph LR
    A["Input Level"] --> B["Pitch Shifter"]
    B --> C["Delay"]
    C --> D["High Damp"]
    D --> E["Wet / Dry"]
    F["Input Level"] --> B
    G["Feedback Position"] --> C
    H["Feedback"] --> D
    I["Wet: Mono In - Mono Out / Dry: Stereo In - Stereo Out"] --> J["Left"]
    K["Wet / Dry"] --> L["Right"]
| a | Mode Slow, Medium, FastSwitches Pitch Shifter mode → | |
| b | Pitch Shift [1/2tone] -24...+24Sets the pitch shift amount by steps of a semitone →,DZZ | |
| Src Off...TempoSelects the modulation source of pitch shift amount → | ||
| AmtSets the modulation amount of pitch shift amount | -24...+24→ | |
| c | Fine [cent]Sets the pitch shift amount by steps of a cent | -100...+100cent→,DZZ |
| AmtSets the modulation amount of pitch shift amount | -100...+100cent→ | |
| d | Delay Time [msec]Sets the delay time | 0...1000msec |
| e | Feedback PositionSwitches the feedback connection. | Pre, Post→ |
| f | FeedbackSets the feedback amount | -100...+100→ |
| High Damp [%]Sets the damping amount in the high range | 0...100% | |
| g | Input Level Dmod [%]Sets the modulation amount of the input level→Fx:037,DZZ | -100...+100→Fx:037 |
| SrcSelects the modulation source for the input level | Off...Tempo→Fx:037 | |
| h | Wet/DryDry, 1:99...99:1, WetTable, “Sets the balance between the effect and dry sounds,” on page 175DZZ | |
| Src Off...TempoTable, “Selects the modulation source of the effect balance,” on page 175 | ||
| AmtTable, “Sets the modulation amount of the effect balance,” on page 175 | -100...+100 | |
039: PitShiftMod.
(Pitch Shift Modulation)
This effect modulates the detuned pitch shift amount using an LFO, adding a clear spread and width to the sound by panning the effect sound and dry sound to the left and right. This is especially effective when the effect sound and dry sound output from stereo speakers are mixed.
flowchart
graph TD
    A["Wet: Mono In - Stereo Out / Dry: Stereo In - Stereo Out"] --> B["Left"]
    B --> C["Pitch Shifter"]
    C --> D["Wet / Dry"]
    C --> E["Pan"]
    E --> F["Wet / Dry"]
    G["LFO: Tri / Sqr"] -.-> C
    H["Right"] --> C
| a | Pitch Shift [cent]Sets the pitch difference from the input signal | -100...+100cent→ |
| b | LFO WaveformSelects LFO Waveform | Triangle, Square |
| c | LFO Frequency [Hz] 0.02...20.00HzSets the LFO speed →Fx:009, | D |
| SrcSelects the modulation source of LFO speed | Off...Tempo | |
| Amt -20.00...+20.00HzSets the modulation amount of LFO speed | ||
| d | BPM/MIDI Sync Off, OnSwitches between using the frequency of the LFO speed and using the tempo and notes →Fx:009, | Sync |
| BPMSelects MIDI Clock and assigns tempo | MIDI, 40...240→Fx:009 | |
| Base NoteSelects the type of notes that specify the LFO speed →Fx:009 | ||
| Times x1...x16Sets the number of notes that specify the LFO speed →Fx:009 | ||
| e | DepthSets the LFO modulation depth for pitch shift amount | -100...+100→,D |
| SrcSelects the modulation source of the depth of modulation | Off...Tempo | |
| AmtSets the modulation amount of the depth of modulation | -100...+100 | |
| f | PanSets the panning effect sound and dry sound separately | L, 1:99...99:1, R→ |
| g | Wet/DryTable, “Sets the balance between the effect and dry sounds,” on page 175→,D | Dry, 1:99...99:1, Wet |
| SrcTable, “Selects the modulation source of the effect balance,” on page 175 | Off...Tempo | |
| AmtTable, “Sets the modulation amount of the effect balance,” on page 175 | -100...+100 | |
a: Pitch Shift [cent], e: Depth
These parameters set the amount of pitch shift and amount of modulation by means of the LFO.
![KORG MicroARRANGER - a: Pitch Shift [cent], e: Depth - 1](/content/2026/06/1236217/images/768d6017b69d25d7dc0fdc1c087e41ec3cf23eb06125f09004778a732b077ad6.jpg)
line
Pitch Shift Mod - Pitch Shift / Depth | Measurement Type | Pitch Shift (Value) | | :--- | :--- | | Original Pitch | Higher | | Pitch Shift (+ value) | Lower | | Pitch Shift (- value) | Higher | | LFO Waveform=Triangle Depth (Value) | Higher | | LFO Waveform=Square Depth (- Value) | Lower |f: Pan, g: Wet/Dry
The Pan parameter pans the effect sound and dry sound to the left and right. With L, the effect sound is panned left, and the dry sound is panned right. With a Wet/Dry = Wet setting, the effect and dry sound will be output in a proportion of 1:1.
040: RotarySpeak
(Rotary Speaker)
This effect simulates a rotary speaker, and obtains a more realistic sound by simulating the rotor in the low range and the horn in the high range separately. The effect also simulates the stereo microphone settings.
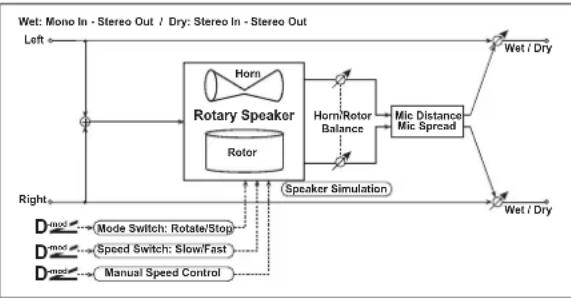
flowchart
graph TD
    A["Wet: Mono In - Stereo Out / Dry: Stereo In - Stereo Out"] --> B["Left"]
    B --> C["Rotary Speaker"]
    C --> D["Horn"]
    D --> E["Mic Distance Mic Spread"]
    E --> F["Wet / Dry"]
    C --> G["Rotor"]
    G --> H["Speaker Simulation"]
    H --> I["Speed Switch: Slow/Fast"]
    I --> J["Manual Speed Control"]
    J --> K["Mode Switch: Rotate/Stop"]
    K --> L["Dmod"]
    L --> M["Right"]
    M --> N["Left"]
| a | Mode SwitchSwitches between speaker rotation and stop | Rotate, StopDZZ |
| Src Off...TempoSelects the modulation source that toggles between rotation and stop | ||
| Sw Toggle, MomentSelects switching mode of the modulation source that toggles between rota-tion and stop → | ||
| b | Speed Switch Slow, FastSwitches the speaker rotation speed between slow and fast DZZ | |
| Src Off...TempoSelects the modulation source that toggles between slow and fast | ||
| Sw Toggle, MomentSelects switching mode of the modulation source that toggles between slow and fast → | ||
| c | Manual Speed Ctrl (Manual Speed Control) Off...TempoSelects the modulation source in case the rotation speed is changed directly →,DZZ | |
| d | Horn Acceleration 0...100How quickly the horn rotation speed in the high range is switched → | |
| Horn Ratio Stop, 0.50...2.00Adjusts the (high-range side) horn rotation speed. Standard value is 1.00.Selecting “Stop” will stop the rotation | ||
| e | Rotor Acceleration 0...100Determines how quickly the rotor rotation speed in the low range is switched → | |
| Rotor Ratio Stop, 0.50...2.00Adjusts the (low-range side) rotor rotation speed. Standard value is 1.00.Selecting “Stop” will stop the rotation | ||
| f | Horn/Rotor Balance Rotor, 1...99, HornSets the level balance between the high-range horn and low-range rotor | |
| g | Mic Distance 0...100Sets the distance between the microphone and rotary speaker → | |
| Mic Spread 0...100Sets the angle of left and right microphones → | ||
| h | Wet/Dry Dry, 1:99...99:1, WetTable, “Sets the balance between the effect and dry sounds,” on page 175DZZ | |
| Src Off...TempoTable, “Selects the modulation source of the effect balance,” on page 175 | ||
| Amt -100...+100Table, “Sets the modulation amount of the effect bal-ance,” on page 175 | ||
a: Sw
This parameter sets how the modulation source switches between rotation and stop.
When "Sw" = Toggle, the speaker rotates or stops alternately each time you press the pedal or operate the joystick.

Each time the value for the modulation source exceeds 64, the speaker rotates or stops alternately.
When "Sw" = Moment, the speaker is rotating. It stops only when you press the pedal or operate the joystick.
MIDI Rotation will occur when the value of the modulation source is less than 64, and will stop when the value is 64 or greater.
b: Sw
This parameter sets how the rotation speed (slow and fast) is switched via the modulation source.
When "Sw" = Toggle, the speed is switched between slow and fast each time you press the pedal or operate the joystick.
MIDI Slow/fast will alternate each time the value of the modulation source exceeds 64.
When "Sw" = Moment, the speed is usually slow. It becomes fast only when you press the pedal or operate the joystick.
MDI When a value for the modulation source is less than 64, "slow" speed is selected, and when the value is 64 or higher, "fast" is selected.
c: Manual Speed Ctrl
If you wish to control the speaker rotation speed manually, not switching between Slow and Fast, select the modulation
source in the "Manual Speed Ctrl" field. If manual control is not necessary, set this field to Off.
d: Horn Acceleration, e: Rotor Acceleration
On a real rotary speaker, the rotation speed is accelerated or decelerated gradually after you switch the speed. The "Horn Acceleration" parameter sets the speed at which the rotation is accelerated or decelerated.
g: Mic Distance, g: Mic Spread
This is a simulation of stereo microphone settings.

flowchart
graph TD
    A["Microphone"] -->|Mic Distance| B["Rotary Speaker (Top View)"]
    C["Microphone"] -->|Mic Distance| B
    D["Rotary Speaker + Mic Placement"] -->|Mic Spread| B
ER/DELAY
Early reflection and delay effects
041: Early Refl
(Early Reflections)
This effect is only the early reflection part of a reverberation sound, and adds presence to the sound. You can select one of the four decay curves.

flowchart
graph LR
    A["Left"] --> B["EQ Trim"]
    B --> C["LEQ HEQ"]
    C --> D["Pre Delay"]
    D --> E["Early Reflections"]
    E --> F["Wet / Dry"]
    G["Right"] --> H["EQ Trim"]
    H --> I["LEQ HEQ"]
    I --> J["Pre Delay"]
    J --> K["Early Reflections"]
    K --> L["Wet / Dry"]
| a | Type Sharp, Loose, Modulated, Reverse Selects the decay curve for the early reflection → | |
| b | ER Time [msec] Sets the time length of early reflection | 10...800msec |
| c | Pre Delay [msec] 0...200msec Sets the time taken from the original sound to the first early reflection | |
| d | EQ Trim 0...100 Sets the input level of EQ applied to the effect sound | |
| e | Pre LEQ Gain [dB] Table, "Sets the gain of Low EQ," on page 176 | -15.0...+15.0dB |
| Pre HEQ Gain [dB] Table, "Sets the gain of High EQ," on page 176 | -15.0...+15.0dB | |
| f | Wet/Dry Dry, 1:99...99:1, Wet Table, "Sets the balance between the effect and dry sounds," on page 175 | |
| Src Off...Tempo Table, "Selects the modulation source of the effect balance," on page 175 | ||
| Amt Table, "Sets the modulation amount of the effect balance," on page 175 | -100...+100 | |
a: Type
This parameter selects the decay curve for the early reflec- tion.
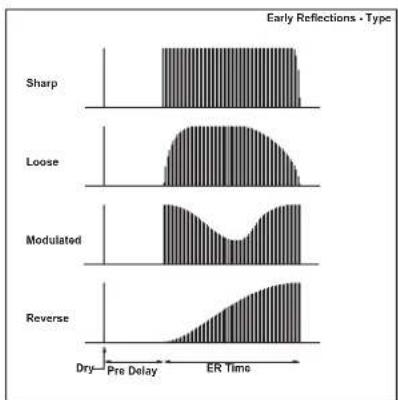
bar
| Reflection Type | Peak Frequency | | --------------- | -------------- | | Sharp | High | | Loose | Medium | | Modulated | Low | | Reverse | High |042: AutoReverse
(Auto Reverse)
This effect records the input signal and automatically plays it in reverse (the effect is similar to a tape reverse sound).
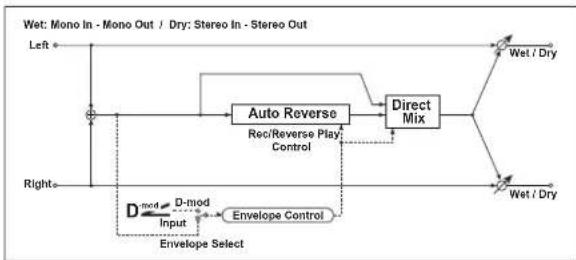
flowchart
graph TD
    A["Left +"] --> B["Auto Reverse"]
    B --> C["Direct Mix"]
    C --> D["Wet / Dry"]
    E["Right"] --> F["D-mod Input"]
    F --> G["D-mod Envelope Select"]
    G --> H["Envelope Control"]
    H --> I["Rec/Reverse Play Control"]
    I --> B
| a | Rec ModeSets the recording mode | Single, Multi→ |
| b | Reverse Time [msec] 20...1320msecSets the maximum duration of the reverse playback → | |
| c | Envelope Select D-mod, InputSelects whether the start and end of recording is controlled via the modula-tion source or the input signal level →,DZZ | |
| Src Off...TempoSelects the modulation source that controls recording when Envelope Select is set to D-mod → | ||
| d | Threshold Sets the recording start level when Envelope Select is set to Input → | |
| e | Response Sets the speed of the response to the end of recording →Fx:031 | |
| f | Direct Mix Always On, Always Off, Cross Fade Selects how a dry sound is mixed →Fx:031 | |
| g | Wet/Dry Dry, 1:99...99:1, WetTable , "Sets the balance between the effect and dry sounds," on page 175DZZ | |
| Src Off...TempoTable , "Selects the modulation source of the effect balance," on page 175 | ||
| Amt Table , "Sets the modulation amount of the effect bal-ance," on page 175 | -100...+100 | |
a: Rec Mode, b: Reverse Time
When "Rec Mode" is set to Single, you can set up to 1320msec for "Reverse Time." If recording starts during the reverse playback, the playback will be interrupted.
When "Rec Mode" is set to Multi, you can make another recording during the reverse playback. However, the maximum Reverse Time is limited to 660msec.
If you wish to record a phrase or rhythm pattern, set "Rec Mode" to Single. If you record only one note, set "Rec Mode" to Multi.
The "Reverse Time" parameter specifies the maximum duration of the reverse playback. The part in excess of this limit will not be played in reverse. If you wish to add short pieces of the reverse playback of single notes, make the "Reverse Time" shorter.
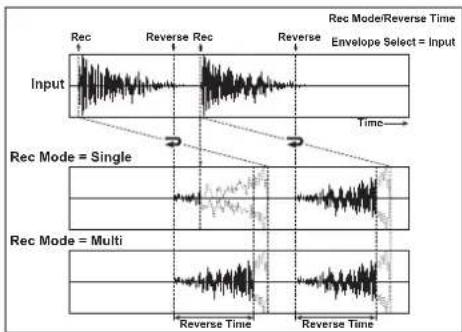
text_image
Rec Input Rec Mode/Reverse Time Reverse Time Rec Single Rec Mode = Multi Reverse Time Reverse Time Envelope Select = Inputc: Envelope Select, c: Src, d: Threshold
These parameters select the source to control the start and end of recording.
When "Envelope Select" is set to D-mod, the input signal will be recorded only when the value of the modulation source selected by the Src parameter is 64 or higher.
When "Envelope Select" is set to Input, the input signal will be recorded only when its level exceeds the Threshold level.
When recording is completed, reverse playback starts immediately.
043: L/C/R Delay
This multitap delay outputs three Tap signals to the left, right, and center respectively. You can also adjust the left and right spread of the delay sound.
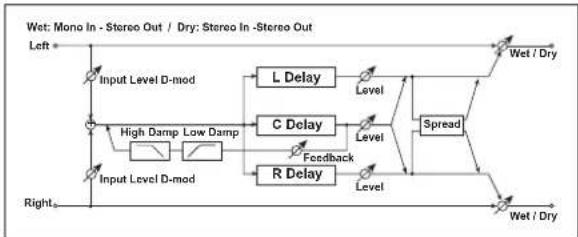
flowchart
graph TD
    A["Input Level D-mod"] --> B["High Damp"]
    B --> C["L Delay"]
    C --> D["Level"]
    D --> E["Spread"]
    E --> F["Wet / Dry"]
    G["Input Level D-mod"] --> H["Low Damp"]
    H --> I["C Delay"]
    I --> J["Level"]
    J --> K["Spread"]
    K --> L["Wet / Dry"]
    M["Feedback"] --> N["R Delay"]
    N --> O["Level"]
    O --> P["Spread"]
    P --> Q["Wet / Dry"]
    R["Left *"] --> S["Input Level D-mod"]
    T["Right *} --> U[Input Level D-mod"]
| a | L Delay Time [msec]Sets the delay time of TapL | 0...1360msec |
| LevelSets the output level of TapL | 0...50 | |
| b | C Delay Time [msec]Sets the delay time of TapC | 0...1360msec |
| LevelSets the output level of TapC | 0...50 | |
| c | R Delay Time [msec]Sets the delay time of TapR | 0...1360msec |
| LevelSets the output level of TapR | 0...50 | |
| d | Feedback (C Delay)Sets the feedback amount of TapC | -100...+100D22 |
| Src Off...TempoSelects the modulation source of the TapC feedback amount | ||
| Amt -100...+100Sets the modulation amount of the TapC feedback amount | ||
| e | High Damp [%]Sets the damping amount in the high range | 0...100%→ |
| Low Damp [%]Sets the damping amount in the low range | 0...100%→ | |
| f | Input Level Dmod [%] -100...+100Sets the modulation amount of the input level →Fx:037,D22 | |
| SrcSelects the modulation source for the input level | Off...Tempo→Fx:037 | |
| g | Spread 0...50Sets the width of the stereo image of the effect sound → | |
| h | Wet/Dry Dry, 1:99...99:1, WetTable , "Sets the balance between the effect and dry sounds," on page 175D22 | |
| Src Off...TempoTable , "Selects the modulation source of the effect balance," on page 175 | ||
| AmtTable , "Sets the modulation amount of the effect balance," on page 175 | -100...+100 | |
e: High Damp [%], e: Low Damp [%]
These parameters set the damping amount of high range and low range. The tone of the delayed sound becomes darker and lighter as it feeds back.
g: Spread
This parameter sets the pan width of the effect sound. The stereo image is widest with a value of 50, and the effect sound of both channels is output from the center with a value of 0.
044: Cross Delay
(Stereo/Cross Delay)
This is a stereo delay, and can by used as a cross-feedback delay effect in which the delay sounds cross over between the left and right by changing the feedback routing.
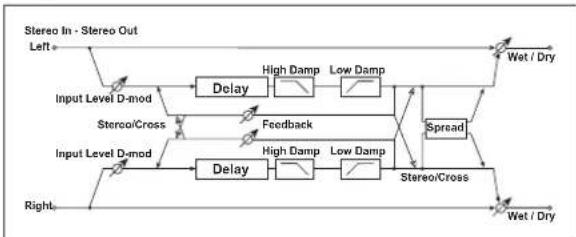
flowchart
graph TD
    A["Input Level D-mod"] --> B["Delay"]
    B --> C["High Damp"]
    C --> D["Low Damp"]
    D --> E["Spread"]
    E --> F["Output"]
    G["Input Level D-mod"] --> H["Delay"]
    H --> I["High Damp"]
    I --> J["Low Damp"]
    J --> K["Spread"]
    K --> L["Output"]
    M["Stereo In - Stereo Out Left+"] --> N["Wet / Dry"]
    O["Stereo/Cross"] --> P["Feedback"]
    Q["Right"] --> R["Wet / Dry"]
| a | Stereo/Cross Switches between stereo delay and cross-feedback delay | Stereo, Cross |
| b | L Delay Time [msec]Sets the delay time for the left channel | 0.0...680.0msec |
| c | R Delay Time [msec]Sets the delay time for the right channel | 0.0...680.0msec |
| d | L FeedbackSets the feedback amount for the left channel | -100...+100Dmed |
| Src Off...TempoSelects the modulation source of feedback amount | ||
| Amt LSets the modulation amount of the left channel feedback | -100...+100 | |
| e | R FeedbackSets the feedback amount for the right channel | -100...+100Dmed |
| Amt RSets the modulation amount of the right channel feedback | -100...+100 | |
| f | High Damp [%]Sets the damping amount in the high range | 0...100%→Fx:043 |
| g | Low Damp [%]Sets the damping amount in the low range | 0...100%→Fx:043 |
| h | Input Level Dmod [%] -100...+100Sets the modulation amount of the input level | →Fx:037,DZ |
| Src Selects the modulation source for the input level | Off...Tempo→Fx:037 | |
| i | SpreadSets the width of the stereo image of the effect sound | -50...+50→Fx:043 |
| j | Wet/Dry Dry, 1:99...99:1, WetTable , "Sets the balance between the effect and dry sounds," on page 175DZZ | |
| Src Off...TempoTable , "Selects the modulation source of the effect balance," on page 175 | ||
| AmtTable , "Sets the modulation amount of the effect balance," on page 175 | -100...+100 | |
045: M. Tap Delay
(Stereo Multitap Delay)
The left and right Multitap Delays have two taps respectively. Changing the routing of feedback and tap output allows you to create various patterns of complex effect sounds.

flowchart
graph TD
    A["Input Level D-mod"] --> B["High Damp"]
    A --> C["Low Damp"]
    B --> D["Delay"]
    C --> D
    D --> E["Spread"]
    E --> F["Wet / Dry"]
    G[" Stereo In - Stereo Out "] --> H[" Left "]
    I[" Input Level D-mod "] --> J[" High Damp "]
    I --> K[" Low Damp "]
    J --> L[" Delay (1) "]
    K --> M[" Delay (1) "]
    L --> N[" Mode (2)"]
    M --> O[" Mode (2)"]
    N --> P[" Spread"]
    O --> Q[" Spread"]
    P --> R[" Wet / Dry "]
    S[" Right "] --> T[" Feedback "]
    U[" Mode: Normal "] --> V[" Mode: Cross Feedback "]
    W[" Mode: Cross Pan1 "] --> X[" Mode: Cross Pan2 "]
| a | Mode Normal, Cross Feedback, Cross Pan1, Cross Pan2Switches the left and right delay routing → | |
| b | Tap1 Time [msec]Sets the Tap1 delay time | 0.0...680.0msec |
| c | Tap2 Time [msec]Sets the Tap2 delay time | 0.0...680.0msec |
| d | Tap1 LevelSets the Tap1 output level | 0...100→ |
| e | Feedback (Tap2)Sets the Tap2 feedback amount | -100...+100DZ |
| Src Off...TempoSelects the modulation source of the Tap2 feedback amount | ||
| Amt -100...+100Sets the modulation amount of the Tap2 feedback amount | ||
| f | High Damp [%]Sets the damping amount in the high range | 0...100%→Fx:043 |
| g | Low Damp [%]Sets the damping amount in the low range | 0...100%→Fx:043 |
| h | Input Level Dmod [%] -100...+100Sets the modulation amount of the input level →Fx:037, DZ | |
| SrcSelects the modulation source for the input level | Off...Tempo→Fx:037 | |
| i | Spread Sets the width of the stereo image of the effect sound →Fx:043, DZ | |
| Src Off...TempoSelects the modulation source of the effect sound's stereo image width | ||
| Amt -100...+100Sets the modulation amount of the effect sound's stereo image width | ||
| j | Wet/Dry Dry, 1:99...99:1, WetTable, "Sets the balance between the effect and dry sounds," on page 175DZ | |
| Src Off...TempoTable, "Selects the modulation source of the effect balance," on page 175 | ||
| Amt Table, "Sets the modulation amount of the effect balance," on page 175 | -100...+100 | |
a: Mode
You can change how the left and right delay signals are panned by modifying the routing of the left and right delay as shown in the figure above. You need to input different sounds to each channel in order for this parameter to be effective.
d: Tap1 Level
This parameter sets the output level of Tap1. Setting a different level from Tap2 will add a unique touch to a monotonous delay and feedback.
046: Modul.Delay
(Stereo Modulation Delay)
This stereo delay uses an LFO to sweep the delay time. The pitch also varies. You will obtain a delay sound with swell and shimmering. You can also control the delay time using a modulation source.
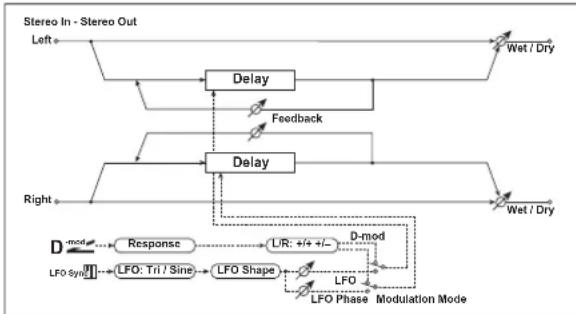
flowchart
graph TD
    A["Stereo In - Stereo Out"] --> B["Left"]
    B --> C["Delay"]
    C --> D["Feedback"]
    D --> E["Delay"]
    E --> F["Right"]
    F --> G["Wet / Dry"]
    G --> H["D-mod"]
    H --> I["Response"]
    I --> J["LFO: Tri / Sine"]
    J --> K["LFO Shape"]
    K --> L["D-mod"]
    L --> M["LFO"]
    M --> N["LFO Phase"]
    N --> O["Modulation Mode"]
    O --> P["D-mod"]
    P --> Q["LFO"]
    Q --> R["LFO Phase"]
    R --> S["Modulation Mode"]
| a | Modulation ModeLFO, D-modSwitches between LFO modulation control and modulation source control | |
| b | D-mod ModulationReversed L/R control by modulation source | L/R:+/+, L/R:+/-→,DZZ |
| Src Off...TempoSelects the modulation source that controls delay time | ||
| Response0...30Sets the rate of response to the modulation source | ||
| c | LFO WaveformSelects LFO Waveform | Triangle, Sine |
| LFO ShapeDetermines how much the LFO waveform is changed→Fx:020 | ||
| d | LFO Frequency [Hz]Sets the LFO speed | 0.02...20.00Hz |
| e | LFO SyncSwitches LFO reset off/on | Off, On→,DZZ |
| Src Off...TempoSelects the modulation source that resets the LFO | ||
| f | L LFO Phase [degree]Sets the phase obtained when the left LFO is reset→-180...+180 | |
| R LFO Phase [degree]Sets the phase obtained when the right LFO is reset→-180...+180 | ||
| g | L DepthSets the depth of the left LFO modulation | 0...200 |
| R DepthSets the depth of the right LFO modulation | 0...200 | |
| h | L Delay Time [msec]Sets the left delay time | 0.0...500.0 |
| R Delay Time [msec]Sets the right delay time | 0.0...500.0 | |
| i | L FeedbackSets the feedback amount of left delay | -100...+100 |
| R FeedbackSets the feedback amount of right delay | -100...+100 | |
| j | Wet/Dry-Wet...-1:99, Dry, 1:99...WetTable, “Sets the balance between the effect and dry sounds,” on page 175→Fx:010,DZZ | |
| Src Off...TempoTable, “Selects the modulation source of the effect balance,” on page 175 | ||
| AmtTable, “Sets the modulation amount of the effect balance,” on page 175 | -100...+100 | |
b: D-mod Modulation
When the modulation source is used for control, this parameter reverses the left and right modulation direction.
e: LFO Sync, e: Src,
f: L LFO Phase [degree], f: R LFO Phase [degree]
The LFO can be reset via a modulation source.
The "Src" parameter sets the modulation source that resets the LFO. For example, you can assign Gate as a modulation
source so that the sweep always starts from the specified point.
“L LFO Phase” and “R LFO Phase” set the phase obtained when the left and right LFOs are reset. In this way, you can create changes in pitch sweep for the left and right channels individually.
![KORG MicroARRANGER - f: L LFO Phase [degree], f: R LFO Phase [degree] - 1](/content/2026/06/1236217/images/ef08d8859f0dfaf027aea9fb6a2608a2e0d929f101cc0304544ff4d618f02e8f.jpg)
The effect is off when a value of the modulation source specified in the "Src" parameter is 63 or smaller, and the effect is on when the value is 64 or higher. The LFO is triggered and reset to the "L LFO Phase" and "R LFO Phase" settings when the value changes from 63 or smaller to 64 or higher.
047: Dynam.Delay
(Stereo Dynamic Delay)
This stereo delay controls the level of delay according to the input signal level. You can use this as a ducking delay that applies delay to the sound only when you play keys at a high velocity or only when the volume level is low.

flowchart
graph TD
    A["Left"] --> B["Delay"]
    B --> C["High Damp Low Damp"]
    C --> D["Wet / Dry"]
    D --> E["Spread"]
    E --> F["Out"]
    F --> G["Wet / Dry"]
    G --> H["Attack, Release"]
    H --> I["Threshold"]
    I --> J["FB"]
    J --> K["Feedback"]
    K --> L["Delay"]
    L --> M["High Damp Low Damp"]
    M --> N["Spread"]
    N --> O["Out"]
    O --> P["Wet / Dry"]
    P --> Q["Envelope"]
    Q --> R["Threshold"]
    R --> S["Attack, Release"]
    S --> T["Control Target"]
| a | Control TargetSelects from no control, output, and feedback | None, Out, FB→ |
| PolarityReverses level control | +, -→ | |
| b | ThresholdSets the level to which the effect is applied | 0...100→ |
| OffsetSets the offset of level control | 0...100→ | |
| c | AttackSets the attack time of level control | 1...100→ |
| d | ReleaseSets the release time of level control | 1...100→ |
| e | L Delay Time [msec]Sets the delay time for the left channel | 0.0...680.0msec |
| f | R Delay Time [msec]Sets the delay time for the right channel | 0.0...680.0msec |
| g | FeedbackSets the feedback amount | -100...+100 |
| h | High Damp [%]Sets the damping amount in the high range | 0...100%→Fx:043 |
| Low Damp [%]Sets the damping amount in the low range | 0...100%→Fx:043 | |
| i | Spread -100...+100Sets the width of the stereo image of the effect sound | →Fx:043 |
| j | Wet/Dry Dry, 1:99...99:1, WetTable , "Sets the balance between the effect and dry sounds," on page 175 | |
| Src Off...TempoTable , "Selects the modulation source of the effect balance," on page 175 | ||
| AmtTable , "Sets the modulation amount of the effect balance," on page 175 | -100...+100 | |
a: Control Target
This parameter selects no level control, delay output control (effect balance), or feedback amount control.
a: Polarity, b: Threshold, b: Offset, c: Attack, d: Release
The “Offset” parameter specifies the value for the “Control Target” parameter (that is set to None), expressed as the ratio relative to the parameter value (the “Wet/Dry” value with “Control Target”=Out, or the “Feedback” value with “Control Target”=FB).
When “Polarity” is positive, the “Control Target” value is obtained by multiplying the parameter value by the “Offset” value (if the input level is below the threshold), or equals the parameter value if the input level exceeds the threshold.
When “Polarity” is negative, Control Target value equals the parameter value if the input level is below the threshold, or is obtained by multiplying the parameter value by the “Offset” value if the level exceeds the threshold.
The “Attack” and “Release” parameters specify attack time and release time of delay level control.

line
| Condition | Peak Level | Time | |-----------|------------|------| | Dry | Low | 0 | | Envelope | Low | 0 | | Wet | High | 0 | | Control Target=Out Polarity= (-) | Medium | 0 | | Control Target=Out Polarity= (+) | High | 0 |048: AutoPan Dly
(Stereo Auto Panning Delay)
This stereo delay effect pans the delay sound left and right using the LFO.

flowchart
graph TD
    A["Left"] --> B["Delay"]
    B --> C["High Damp Low Damp"]
    C --> D["Pan"]
    D --> E["Wet / Dry"]
    F["Right"] --> G["Delay"]
    G --> H["High Damp Low Damp"]
    H --> I["Pan"]
    I --> J["Wet / Dry"]
    K["LFO: Tri / Sin"] -.-> L["FLO Shape"] -.-> M["LFO Phase"]
    N["Feedback"] --> G
    O["Depth"] --> I
| a | L Delay Time [msec]Sets the delay time for the left channel | 0.0...680.0msec |
| L FeedbackSets the feedback amount for the left channel | -100...+100 | |
| b | R Delay Time [msec]Sets the delay time for the right channel | 0.0...680.0msec |
| R FeedbackSets the feedback amount for the right channel | -100...+100 | |
| c | High Damp [%]Sets the damping amount in the high range | 0...100%→Fx:043 |
| Low Damp [%]Sets the damping amount in the low range | 0...100%→Fx:043 | |
| d | LFO WaveformSelects LFO Waveform | Triangle, Sine |
| LFO Shape -100...+100Determines how much the LFO waveform is changed →Fx:020 | ||
| e | LFO Phase [degree] -180...+180Sets the LFO phase difference between the left and right →Fx:034 | |
| f | Panning Frequency [Hz]Sets the panning speed | 0.02...20.00Hz |
| g | Panning DepthSets the panning width | 0...100D |
| Src Off...TempoSelects the modulation source for the panning width | ||
| AmtSet the modulation amount of the panning width | -100...+100 | |
| h | Wet/Dry Dry, 1:99...99:1, WetTable, “Sets the balance between the effect and dry sounds,” on page 175D | |
| Src Off...TempoTable, “Selects the modulation source of the effect balance,” on page 175 | ||
| AmtTable, “Sets the modulation amount of the effect balance,” on page 175 | -100...+100 | |

flowchart
graph TD
    A["Input Level D-mod"] --> B["High Damp Low Damp"]
    B --> C["L Delay"]
    C --> D["C Delay"]
    D --> E["R Delay"]
    E --> F["Feedback"]
    F --> G["Level"]
    G --> H["Spread"]
    H --> I["Wet / Dry"]
    J["BPM"] -.-> K["BPM"]
    K --> L["Base Note x Times"]
    K --> M["Base Note x Times"]
    K --> N["Base Note x Times"]
    O["Left"] --> P["Wet: Mono In - Stereo Out / Dry: Stereo In -Stereo Out"]
    P --> Q["Wet / Dry"]
    R["Right"] --> S["Wet / Dry"]
049: LCR BPM Dly
The L/C/R delay enables you to match the delay time with the song tempo. You can also synchronize the delay time with the arpeggiator or sequencer. If you program the tempo before performance, you can achieve a delay effect that synchronizes with the song in real-time. Delay time is set by notes.
Note: With extreme values, the sync may be lost.
| a | BPMSelects MIDI Clock and assigns tempo | MIDI, 40...240→, Sync |
| b | L Delay Base Note Selects the type of notes to specify the delay time for TapL →, Sync | |
| Times Sets the number of notes to specify the delay time for TapL x1...x16 → | ||
| Level Sets the output level of TapL | 0...50 | |
| c | C Delay Base Note Selects the type of notes to specify the delay time for TapC →, Sync | |
| Times Sets the number of notes to specify the delay time for TapC x1...x16 → | ||
| Level Sets the output level of TapC | 0...50 | |
| d | R Delay Base Note Selects the type of notes to specify the delay time for TapR →, Sync | |
| Times Sets the number of notes to specify the delay time for TapR x1...x16 → | ||
| Level Sets the output level of TapR | 0...50 | |
| e | Feedback (C Delay) Sets the feedback amount of TapC | -100...+100D |
| Src Off...Tempo Selects the modulation source for the TapC feedback | ||
| Amt Sets the modulation amount of the TapC feedback | -100...+100 | |
| f | High Damp [%] Sets the damping amount in the high range | 0...100%→Fx:043 |
| Low Damp [%] Sets the damping amount in the low range | 0...100%→Fx:043 | |
| g | Input Level Dmod [%] Sets the modulation amount of the input level | -100...+100→Fx:037, D |
| Src Selects the modulation source for the input level | Off...Tempo→Fx:037 | |
| h | Spread Sets the width of the stereo image of the effect sound | 0...50→Fx:043 |
| i | Wet/Dry Dry, 1:99...99:1, Wet Table, “Sets the balance between the effect and dry sounds,” on page 175 | |
| Src Off...Tempo Table, “Selects the modulation source of the effect balance,” on page 175 | ||
| Amt Table, “Sets the modulation amount of the effect balance,” on page 175 | -100...+100 | |
a: BPM, b: L Delay Base Note, b: Times, c: C Delay Base Note,
c: Times, d: R Delay Base Note, d: Times
The delay time is the length of the note obtained by multiplying the "Base Note" parameter by the Times value, in relation to the tempo specified by the "BPM" parameter (or the MIDI Clock tempo if "BPM" is set to MIDI).
050: BPM Delay
(Stereo BPM Delay)
This stereo delay enables you to set the delay time to match the song tempo.
Note: With extreme values, the sync may be lost.

flowchart
graph TD
    A["Left + Stereo In - Stereo Out"] --> B["Input Level D-mod"]
    B --> C["Delay"]
    C --> D["High Damp Low Damp"]
    D --> E["Wet / Dry"]
    F["Right + Input Level D-mod"] --> G["Delay"]
    G --> H["High Damp Low Damp"]
    H --> I["Wet / Dry"]
    J["BPM"] --> K["BPM"]
    K --> L["Base Note x Times"]
    L --> M["Adjust [%"]]
    M --> N["Base Note x Times"]
    N --> O["Adjust [%"]]
    O --> P["Feedback"]
    P --> Q["Delay"]
    Q --> R["High Damp Low Damp"]
    R --> S["Wet / Dry"]
| a | BPM MIDI, 40...240Selects MIDI Clock and assigns tempo →Fx:049, | |
| R >----, OVER!!Display the error message if the right channel delay time exceeds the upper limit → | ||
| b | L Delay Base Note Selects the type of notes to specify the left channel delay time →Fx:049, | |
| Times x1...x16Sets the number of notes to specify the left channel delay time →Fx:049 | ||
| Adjust [%]Fine-adjust the left channel delay time | -2.50...+2.50% | |
| c | R Delay Base Note Selects the type of notes to specify the right channel delay time →Fx:049, | |
| Times x1...x16Sets the number of notes to specify the right channel delay time →Fx:049 | ||
| Adjust [%]Fine-adjust the right channel delay time | -2.50...+2.50% | |
| d | L FeedbackSets the feedback amount for the left channel | -100...+100D |
| Src Off...TempoSelects the modulation source of feedback amount | ||
| Amt L -100...+100Sets the modulation amount of the left channel feedback | ||
| e | R FeedbackSets the feedback amount for the right channel | -100...+100D |
| Amt R -100...+100Sets the modulation amount of the right channel feedback | ||
| f | High Damp [%]Sets the damping amount in the high range | 0...100%→Fx:043 |
| g | Low Damp [%]Sets the damping amount in the low range | 0...100%→Fx:043 |
| h | Input Level Dmod [%] -100...+100Sets the modulation amount of the input level →Fx:037,D | |
| SrcSelects the modulation source for the input level | Off...Tempo→Fx:037 | |
| i | Wet/Dry Dry, 1:99...99:1, WetTable, “Sets the balance between the effect and dry sounds,” on page 175D | |
| Src Off...TempoTable, “Selects the modulation source of the effect balance,” on page 175 | ||
| AmtTable, “Sets the modulation amount of the effect balance,” on page 175 | -100...+100 | |
051: Seq. Delay
(Sequential Delay)
This four-tap delay enables you to select a tempo and rhythm pattern to set up each tap.

flowchart
graph TD
    A["Wet: Mono In - Stereo Out / Dry: Stereo in -Stereo Out"] --> B["Input Level D-mod"]
    B --> C["Delay"]
    C --> D["Pan"]
    D --> E["Wet / Dry"]
    C --> F["High Damp"]
    C --> G["Low Damp"]
    F --> H["Input Level D-mod"]
    G --> I["Feedback"]
    H --> J["BPM"]
    I --> K["Rhythm Pattern"]
    J --> L["Tand"]
    K --> M["Output"]
    style A fill:#f9f,stroke:#333
    style E fill:#ccf,stroke:#333
    style F fill:#cfc,stroke:#333
    style G fill:#fcc,stroke:#333
    style H fill:#ffc,stroke:#333
    style I fill:#fcc,stroke:#333
    style J fill:#cff,stroke:#333
    style K fill:#ffc,stroke:#333
    style L fill:#cfc,stroke:#333
| a | BPMSelects MIDI Clock and assigns tempo | MIDI, 44...240→, Sync |
| b | Rhythm PatternSelects a rhythm pattern | |
| c | Tap1 PanSets the panning of Tap1 | L, 1...99, R |
| Tap2 PanSets the panning of Tap2 | L, 1...99, R | |
| Tap3 PanSets the panning of Tap3 | L, 1...99, R | |
| Tap4 PanSets the panning of Tap4 | L, 1...99, R | |
| d | FeedbackSets the feedback amount | -100...+100Dmod |
| Src Off...TempoSelects the modulation source of feedback amount | ||
| AmtSets the modulation amount of the feedback | -100...+100 | |
| e | High Damp [%]Sets the damping amount in the high range | 0...100%→Fx:043 |
| Low Damp [%]Sets the damping amount in the low range | 0...100%→Fx:043 | |
| f | Input Level Dmod [%] -100...+100Sets the modulation amount of the input level →Fx:037, Dmod | |
| SrcSelects the modulation source for the input level | Off...Tempo→Fx:037 | |
| g | Wet/Dry Dry, 1:99...99:1, WetTable, "Sets the balance between the effect and dry sounds," on page 175 | |
| Src Off...TempoTable, "Selects the modulation source of the effect balance," on page 175 | ||
| AmtTable, "Sets the modulation amount of the effect balance," on page 175 | -100...+100 | |
a: BPM, b: Rhythm Pattern
With the tempo specified by the "BPM" parameter (or the MIDI Clock tempo if "BPM" is set to MIDI), the length of one beat equals the feedback delay time, and the interval between taps becomes equal. Selecting a rhythm pattern will automatically turn the tap outputs on and off. When "BPM" is set to MIDI, the lower limit of the "BPM" is 44.
REVERB
Reverb effects
These effects simulate the ambience of reverberation in concert halls.
052: Rev. Hall
This hall-type reverb simulates the reverberation of mid-size concert halls or ensemble halls.
053: RevSmthHall
(Smooth Hall)
This hall-type reverb simulates the reverberation of larger halls and stadiums, and creates a smooth release.
054: RevWetPlate
This plate reverb simulates warm (dense) reverberation.
055: RevDryPlate
This plate reverb simulates dry (light) reverberation.

flowchart
graph LR
    A["Left"] --> B["EQ Trim"]
    B --> C["LEQ HEQ"]
    C --> D["Pre Delay"]
    D --> E["Reverb"]
    E --> F["Wet / Dry"]
    G["Right"] --> H["EQ Trim"]
    H --> C
    I["Wet: Mono In - Stereo Out / Dry: Stereo In - Stereo Out"] --> J["Wet / Dry"]
    style A fill:#f9f,stroke:#333
    style G fill:#f9f,stroke:#333
    style I fill:#f9f,stroke:#333
| a | Reverb Time [sec]Sets the reverberation time | 0.1...10.0sec |
| High Damp [%]Sets the damping amount in the high range | 0...100% | |
| b | Pre Delay [msec]Sets the delay time from the dry sound | 0...200msec→ |
| Pre Delay Thru [%]Sets the mix ratio of non-delay sound | 0...100%→ | |
| c | EQ TrimTable, "Sets the EQ input level," on page 176 | 0...100 |
| d | Pre LEQ Gain [dB]Table, "Sets the gain of Low EQ," on page 176 | -15...+15dB |
| Pre HEQ Gain [dB]Table, "Sets the gain of High EQ," on page 176 | -15...+15dB | |
| e | Wet/Dry Dry, 1:99...99:1, WetTable, "Sets the balance between the effect and dry sounds," on page 175 | |
| Src Off...TempoTable, "Selects the modulation source of the effect balance," on page 175 | ||
| AmtTable, "Sets the modulation amount of the effect balance," on page 175 | -100...+100 | |
b: Pre Delay [msec], b: Pre Delay Thru [%]
The "Pre Delay" sets the delay time to the reverb input, allowing you to control spaciousness.
Using the "Pre Delay Thru" parameter, you can mix the dry sound without delay, emphasizing the attack of the sound.
![KORG MicroARRANGER - b: Pre Delay [msec], b: Pre Delay Thru [%] - 1](/content/2026/06/1236217/images/31f6bf69473c60693f9306c9ccfe4fef84a29cb74541397ce7b474814ddeee3e.jpg)
bar
Reverb - Hall / Plate Type | Time | Level | |---|---| | Pre Delay | Dry | | Pre Delay Thru | Pre Delay | | Reverb | Reverb | | Time | |056: Rev. Room
This room-type reverb emphasizes the early reflections that make the sound tighter. Changing the balance between the early reflections and reverb sound allows you to simulate nuances, such as the type of walls of a room.
057: R.BriteRoom
This room-type reverb emphasizes the early reflections that make the sound brighter. See 056: Reverb Room.

flowchart
graph TD
    A["Left"] --> B["EQ Trim"]
    B --> C["LEQ"]
    C --> D["HEQ"]
    D --> E["Pre Delay"]
    E --> F["Reverb"]
    F --> G["ERs"]
    G --> H["ER Level"]
    H --> I["Wet / Dry"]
    J["Right"] --> K["EQ Trim"]
    K --> L["HEQ"]
    L --> M["Pre Delay Thru"]
    M --> N["Reverb"]
    N --> O["ERs"]
    O --> P["Wet / Dry"]
    Q["Wet: Mono In - Stereo Out / Dry: Stereo In - Stereo Out"] --> R["ER Level"]
    S["Wet / Dry"] --> T["ER Level"]
| a | Reverb Time [sec]Sets the reverberation time | 0.1...3.0sec |
| High Damp [%]Sets the damping amount in the high range | 0...100% | |
| b | Pre Delay [msec]Sets the delay time from the dry sound | 0...200msec→Fx:052 |
| Pre Delay Thru [%]Sets the mix ratio of non-delay sound | 0...100%→Fx:052 | |
| c | ER LevelSets the level of early reflections | 0...100→ |
| d | Reverb LevelSets the reverberation level | 0...100→ |
| e | EQ TrimTable, "Sets the EQ input level," on page 176 | 0...100 |
| f | Pre LEQ Gain [dB]Table, "Sets the gain of Low EQ," on page 176 | -15...+15dB |
| Pre HEQ Gain [dB]Table, "Sets the gain of High EQ," on page 176 | -15...+15dB | |
| g | Wet/Dry Dry, 1:99...99:1, WetTable, "Sets the balance between the effect and dry sounds," on page 175 | |
| Src Off...TempoTable, "Selects the modulation source of the effect balance," on page 175 | ||
| AmtTable, "Sets the modulation amount of the effect balance," on page 175 | -100...+100 | |
c: ER Level, d: Reverb Level
These parameters set the early reflection level and reverb level.
Changing these parameter values allows you to simulate the type of walls in the room. That is, a larger "ER Level" simulates a hard wall, and a larger "Reverb Level" simulates a soft wall.

bar
| Room Type | Level | |---|---| | Dry | 1 | | ER (Early Reflections) | 2 | | Reverb | 3 | | Time | 4 |MONO - MONO CHAIN
Effects that combine two mono effects connected in series
058: Par4Eq-Exc
(Parametric 4-Band EQ - Exciter)
This effect combines a mono-type four-band parametric equalizer and an exciter.
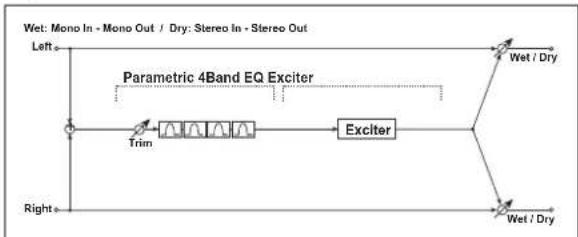
flowchart
graph LR
    A["Left"] --> B["Trim"]
    B --> C["Exciter"]
    C --> D["Wet / Dry"]
    C --> E["Wet / Dry"]
    F["Right"] --> G["Trim"]
    G --> H["Exciter"]
    H --> I["Wet / Dry"]
    style A fill:#f9f,stroke:#333
    style F fill:#f9f,stroke:#333
    style G fill:#ccf,stroke:#333
    style H fill:#ccf,stroke:#333
    style I fill:#ccf,stroke:#333
| a | [E] TrimSets the parametric EQ input level | 0...100 |
| b | [E] Band1 Cutoff [Hz]Sets the center frequency of Band 1 | 20...1.00kHz |
| QSets the bandwidth of Band 1 | 0.5...10.0→Fx:006 | |
| Gain [dB]Sets the gain of Band 1 | -18...+18dB | |
| c | [E] Band2 Cutoff [Hz]Sets the center frequency of Band 2 | 50...5.00kHz |
| QSets the bandwidth of Band 2 | 0.5...10.0→Fx:006 | |
| Gain [dB]Sets the gain of Band 2 | -18...+18dB | |
| d | [E] Band3 Cutoff [Hz]Sets the center frequency for Band 3 | 300...10.00kHz |
| QSets the bandwidth of Band 3 | 0.5...10.0→Fx:006 | |
| Gain [dB]Sets the gain of Band 3 | -18...+18dB | |
| e | [E] Band4 Cutoff [Hz]Sets the center frequency for Band 4 | 500...20.00kHz |
| QSets the bandwidth of Band 4 | 0.5...10.0→Fx:006 | |
| Gain [dB]Sets the gain of Band 4 | -18...+18dB | |
| f | [X] Exciter BlendSets the intensity (depth) of the Exciter effect | -100...+100→Fx:011 |
| g | [X] Emphatic PointSets the frequency range to be emphasized | 0...70→Fx:011 |
| h | Wet/Dry Dry, 1:99...99:1, WetTable, "Sets the balance between the effect and dry sounds," on page 175DZZ | |
| Src Off...TempoTable, "Selects the modulation source of the effect balance," on page 175 | ||
| AmtTable, "Sets the modulation amount of the effect balance," on page 175 | -100...+100 | |
059: Par4Eq-Wah
(Parametric 4-Band EQ – Wah/Auto Wah)
This effect combines a mono-type four-band parametric equizer and a wah. You can change the order of the connection.

flowchart
graph TD
    A["Wet: Mono In - Mono Out / Dry: Stereo In - Stereo Out"] --> B["Parametric 4Band EQ"]
    B --> C["Routing Wah/Auto Wah"]
    C --> D["Wah"]
    D --> E["Wet / Dry"]
    F["Right"] --> G["Trim"]
    G --> H["Waveform"]
    H --> I["Sweep Mode"]
    I --> J["Envelope Auto"]
    J --> K["D-mod"]
    K --> L["LFO"]
    L --> M["LFO"]
    M --> N["D-mod"]
    N --> O["LFO"]
    O --> P["Envelope"]
    P --> Q["D-mod"]
    Q --> R["LFO"]
    R --> S["Envelope"]
    S --> T["D-mod"]
    T --> U["LFO"]
    U --> V["Envelope"]
    V --> W["D-mod"]
    W --> X["LFO"]
    X --> Y["Envelope"]
    Y --> Z["D-mod"]
    Z --> AA["LFO"]
    AA --> AB["Envelope"]
    AB --> AC["D-mod"]
    AC --> AD["LFO"]
    AD --> AE["Envelope"]
    AE --> AF["D-mod"]
    AF --> AG["LFO"]
    AG --> AH["Envelope"]
    AH --> AI["D-mod"]
    AI --> AJ["LFO"]
    AJ --> AK["Envelope"]
    AK --> AL["D-mod"]
    AL --> AM["LFO"]
    AM --> AN["Envelope"]
    AN --> AO["D-mod"]
    AO --> AP["LFO"]
    AP --> AQ["Envelope"]
    AQ --> AR["D-mod"]
    AR --> AS["LFO"]
    AS --> AT["Envelope"]
    AT --> AU["D-mod"]
    AU --> AV["LFO"]
    AV --> AW["Envelope"]
    AW --> AX["D-mod"]
    AX --> AY["LFO"]
    AY --> AZ["Envelope"]
    AZ --> BA["D-mod"]
    BA --> BB["LFO"]
    BB --> BC["Envelope"]
    BC --> BD["D-mod"]
    BD --> BE["LFO"]
    BE --> BF["Envelope"]
    BF --> BG["D-mod"]
    BG --> BH["LFO"]
    BH --> BI["Envelope"]
    BI --> BJ["D-mod"]
    BJ --> BK["LFO"]
    BK --> BL["Envelope"]
    BL --> BM["D-mod"]
    BM --> BN["LFO"]
    BN --> BO["Envelope"]
    BO --> BP["D-mod"]
    BP --> BQ["LFO"]
    BQ --> BR["Envelope"]
    BR --> BS["D-mod"]
    BS --> BT["LFO"]
    BT --> BU["Envelope"]
    BU --> BV["D-mod"]
    BV --> BW["LFO"]
    BW --> BX["Envelope"]
    BX --> BY["D-mod"]
    BY --> BZ["LFO"]
    BZ --> CA["Envelope"]
    CA --> CB["D-mod"]
    CB --> CC["LFO"]
    CC --> CD["Envelope"]
    CD --> CE["D-mod"]
    CE --> CF["LFO"]
    CF --> CG["Envelope"]
    CG --> CH["D-mod"]
    CH --> CI["LFO"]
    CI --> CJ["Envelope"]
    CJ --> CK["D-mod"]
    CK --> CR["LFO"]
    CR --> CS["Envelope"]
    CS --> CT["D-mod"]
    CT --> CU["LFO"]
    CU --> CV["Envelope"]
    CV --> CW["D-mod"]
    CW --> CX["LFO"]
| a | [E] TrimSets the parametric EQ input level | 0...100 |
| b | [E] Band1 Cutoff [Hz]Sets the center frequency of Band 1 | 20...1.00kHz |
| QSets the bandwidth of Band 1 | 0.5...10.0→Fx:006 | |
| Gain [dB]Sets the gain of Band 1 | -18...+18dB | |
| c | [E] Band2 Cutoff [Hz]Sets the center frequency of Band 2 | 50...5.00kHz |
| QSets the bandwidth of Band 2 | 0.5...10.0→Fx:006 | |
| Gain [dB]Sets the gain of Band 2 | -18...+18dB | |
| d | [E] Band3 Cutoff [Hz]Sets the center frequency for Band 3 | 300...10.00kHz |
| QSets the bandwidth of Band 3 | 0.5...10.0→Fx:006 | |
| Gain [dB]Sets the gain of Band 3 | -18...+18dB | |
| e | [E] Band4 Cutoff [Hz]Sets the center frequency for Band 4 | 500...20.00kHz |
| QSets the bandwidth of Band 4 | 0.5...10.0→Fx:006 | |
| Gain [dB]Sets the gain of Band 4 | -18...+18dB | |
| f | [W] Frequency BottomSets the lower limit of the wah center frequency | 0...100→Fx:009 |
| Frequency TopSets the upper limit of the wah center frequency | 0...100→Fx:009 | |
| g | [W] Sweep Mode Auto, D-mod, LFOSelects the control from auto-wah, modulation source, and LFO→Fx:009.D | |
| Src Off...TempoSelects the modulation source for the wah when Sweep Mode=D-mod | ||
| h | [W] LFO Frequency [Hz]Sets the LFO speed | 0.02...20.00Hz |
| ResonanceSets the resonance amount | 0...100 | |
| LPFSwitches the wah low pass filter on and off | Off, On | |
| i | Routing PEQ → WA H, WAH → PEQChanges the order of the parametric equalizer and wah connection | |
| j | Wet/Dry Dry, 1:99...99:1, WetTable , "Sets the balance between the effect and dry sounds," on page 175D | |
| Src Off...TempoTable , "Selects the modulation source of the effect balance," on page 175 | ||
| AmtTable , "Sets the modulation amount of the effect balance," on page 175 | -100...+100 | |
060: 4EqPhsrChFI
(Parametric 4-Band EQ – Chorus/Flanger)
This effect combines a mono-type four-band parametric equalizer and a chorus/flanger.

flowchart
graph LR
    A["Wet: Mono In - Stereo Out / Dry: Stereo In - Stereo Out"] --> B["Left"]
    B --> C["Trim"]
    C --> D["Parametric 4Band EQ"]
    D --> E["Chorus/Flanger"]
    E --> F["Wet / Dry"]
    E --> G["Normal Output Mode"]
    E --> H["Wet Invert"]
    H --> I["Cha/Flng Wet / Dry"]
    I --> J["Wet / Dry"]
    I --> K["LFO: Tri / Sine"]
    K --> L["Feedback"]
    L --> M["Chorus/Flanger"]
    M --> N["Output Mode"]
| a | [E] TrimSets the parametric EQ input level | 0...100 |
| b | [E] Band1 Cutoff [Hz]Sets the center frequency of Band 1 | 20...1.00kHz |
| QSets the bandwidth of Band 1 | 0.5...10.0→Fx:006 | |
| Gain [dB]Sets the gain of Band 1 | -18...+18dB | |
| c | [E] Band2 Cutoff [Hz]Sets the center frequency of Band 2 | 50...5.00kHz |
| QSets the bandwidth of Band 2 | 0.5...10.0→Fx:006 | |
| Gain [dB]Sets the gain of Band 2 | -18...+18dB | |
| d | [E] Band3 Cutoff [Hz]Sets the center frequency for Band 3 | 300...10.00kHz |
| QSets the bandwidth of Band 3 | 0.5...10.0→Fx:006 | |
| Gain [dB]Sets the gain of Band 3 | -18...+18dB | |
| e | [E] Band4 Cutoff [Hz]Sets the center frequency for Band 4 | 500...20.00kHz |
| QSets the bandwidth of Band 4 | 0.5...10.0→Fx:006 | |
| Gain [dB]Sets the gain of Band 4 | -18...+18dB | |
| f | [F] Delay Time [msec]Sets the delay time | 0.0...50.0msec |
| g | [F] LFO Frequency [Hz]Sets the LFO speed | 0.02...20.00Hz |
| LFO WaveformSelects LFO Waveform | Triangle, Sine | |
| h | [F] DepthSets the depth of LFO modulation | 0...100 |
| FeedbackSets the feedback amount | -100...+100→Fx:020 | |
| i | [F] Cho/Flng Wet/Dry -Wet...-2:98, Dry, 2:98...WetSets the effect balance of the chorus/flanger | →Fx:010, 020 |
| Output Mode Normal, Wet InvertSelects the output mode for the chorus/flanger → | ||
| j | Wet/Dry Dry, 1:99...99:1, WetTable , "Sets the balance between the effect and dry sounds," on page 175 | |
| Src Off...TempoTable , "Selects the modulation source of the effect balance," on page 175 | ||
| AmtTable , "Sets the modulation amount of the effect balance," on page 175 | -100...+100 | |
i: Output Mode
When Wet Invert is selected, the right channel phase of the chorus/flanger effect sound is inverted. This creates pseudostereo effects and adds spread.
However, if a mono-input type effect is connected after this effect, the left and right sounds may cancel each other, eliminating the chorus/flanger effects.
061: Par4Eq-Phsr
(Parametric 4-Band EQ – Phaser)
This effect combines a mono-type four-band parametric equalizer and a phaser.
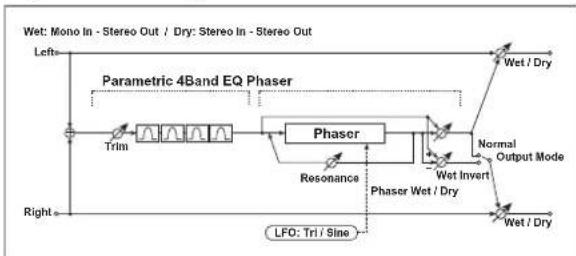
flowchart
graph LR
    A["Wet: Mono In - Stereo Out / Dry: Stereo In - Stereo Out"] --> B["Left"]
    B --> C["Trim"]
    C --> D["Phaseor"]
    D --> E["Resonance"]
    E --> F["Wet Invert"]
    F --> G["Normal Output Mode"]
    G --> H["Wet / Dry"]
    H --> I["Wet / Dry"]
    I --> J["LFO: Tri / Sine"]
    J --> K["Right"]
    style A fill:#f9f,stroke:#333
    style B fill:#ccf,stroke:#333
    style C fill:#cfc,stroke:#333
    style D fill:#fcc,stroke:#333
    style E fill:#cff,stroke:#333
    style F fill:#ffc,stroke:#333
    style G fill:#fcc,stroke:#333
    style H fill:#ffc,stroke:#333
    style I fill:#fcc,stroke:#333
| a | [E] TrimSets the parametric EQ input level | 0...100 |
| b | [E] Band1 Cutoff [Hz]Sets the center frequency of Band 1 | 20...1.00kHz |
| QSets the bandwidth of Band 1 | 0.5...10.0→Fx:006 | |
| Gain [dB]Sets the gain of Band 1 | -18...+18dB | |
| c | [E] Band2 Cutoff [Hz]Sets the center frequency of Band 2 | 50...5.00kHz |
| QSets the bandwidth of Band 2 | 0.5...10.0→Fx:006 | |
| Gain [dB]Sets the gain of Band 2 | -18...+18dB | |
| d | [E] Band3 Cutoff [Hz]Sets the center frequency for Band 3 | 300...10.00kHz |
| QSets the bandwidth of Band 3 | 0.5...10.0→Fx:006 | |
| Gain [dB]Sets the gain of Band 3 | -18...+18dB | |
| e | [E] Band4 Cutoff [Hz]Sets the center frequency for Band 4 | 500...20.00kHz |
| QSets the bandwidth of Band 4 | 0.5...10.0→Fx:006 | |
| Gain [dB]Sets the gain of Band 4 | -18...+18dB | |
| f | [P] LFO Frequency [Hz]Sets the LFO speed | 0.02...20.00Hz |
| LFO WaveformSelects LFO Waveform | Triangle, Sine | |
| g | [P] ManualSets the frequency to which the effect is applied | 0...100 |
| h | [P] DepthSets the depth of LFO modulation | 0...100 |
| ResonanceSets the resonance amount | -100...+100→Fx:023 | |
| i | [P] Phaser Wet/Dry -Wet...-2:98, Dry, 2:98...WetSets the phaser effect balance →Fx:010, 023 | |
| Output Mode Normal, Wet InvertSelects the phaser output mode →Fx:060 | ||
| j | Wet/Dry Dry, 1:99...99:1, WetTable, “Sets the balance between the effect and dry sounds,” on page 175 | |
| Src Off...TempoTable, “Selects the modulation source of the effect balance,” on page 175 | ||
| AmtTable, “Sets the modulation amount of the effect balance,” on page 175 | -100...+100 | |
062: P4Eq-TapDly
(Parametric 4-Band EQ - Multitap Delay)
This effect combines a mono-type four-band parametric equalizer and a multitap delay.

flowchart
graph LR
    A["Left"] --> B["Trim"]
    B --> C["Parametric 4Band EQ Multitap Delay"]
    C --> D["High Damp (1)"]
    D --> E["Feedback Delay"]
    E --> F["MT.Dly Wet / Dry"]
    F --> G["Wet / Dry"]
    G --> H["Wet / Dry"]
    I["Right"] --> J["Left"]
    K["Wet: Mono In - Mono Out / Dry: Stereo In - Stereo Out"] --> L["Wet / Dry"]
| a | [E] TrimSets the parametric EQ input level | 0...100 |
| b | [E] Band1 Cutoff [Hz]Sets the center frequency of Band 1 | 20...1.00kHz |
| QSets the bandwidth of Band 1 | 0.5...10.0→Fx:006 | |
| Gain [dB]Sets the gain of Band 1 | -18...+18dB | |
| c | [E] Band2 Cutoff [Hz]Sets the center frequency of Band 2 | 50...5.00kHz |
| QSets the bandwidth of Band 2 | 0.5...10.0→Fx:006 | |
| Gain [dB]Sets the gain of Band 2 | -18...+18dB | |
| d | [E] Band3 Cutoff [Hz]Sets the center frequency for Band 3 | 300...10.00kHz |
| QSets the bandwidth of Band 3 | 0.5...10.0→Fx:006 | |
| Gain [dB]Sets the gain of Band 3 | -18...+18dB | |
| e | [E] Band4 Cutoff [Hz]Sets the center frequency for Band 4 | 500...20.00kHz |
| QSets the bandwidth of Band 4 | 0.5...10.0→Fx:006 | |
| Gain [dB]Sets the gain of Band 4 | -18...+18dB | |
| f | [D] Tap1 Time [msec]Sets the Tap1 delay time | 0...680msec |
| Tap1 LevelSets the Tap1 output level | 0...100→Fx:045 | |
| g | [D] Tap2 Time [msec]Sets the Tap2 delay time | 0...680msec |
| FeedbackSets the Tap2 feedback amount | -100...+100 | |
| h | [D] Mt.Delay Wet/Dry Dry, 2:98...98:2, WetSets the multitap delay effect balance | |
| High Damp [%]Sets the damping amount in the high range | 0...100%→Fx:043 | |
| i | Wet/Dry Dry, 1:99...99:1, WetTable, "Sets the balance between the effect and dry sounds," on page 175 | |
| Src Off...TempoTable, "Selects the modulation source of the effect balance," on page 175 | ||
| AmtTable, "Sets the modulation amount of theeffect balance," on page 175 | -100...+100 | |
063: Cmp-AutoWah
(Compressor – Wah/Auto Wah)
This effect combines a mono-type compressor and a wah. You can change the order of the connection.
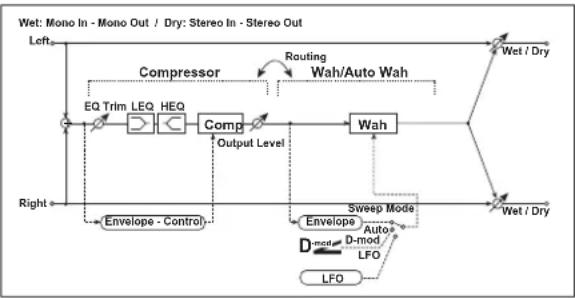
flowchart
graph TD
    A["Wet: Mono In - Mono Out / Dry: Stereo In - Stereo Out"] --> B["Left"]
    B --> C["Compressor"]
    C --> D["EQ Trim LEQ HEQ Comp"]
    D --> E["Output Level"]
    E --> F["Wah"]
    F --> G["Wet / Dry"]
    G --> H["Wet / Dry"]
    H --> I["Sweep Mode"]
    I --> J["Envelope"]
    J --> K["D-mod LFO"]
    K --> L["LFO"]
    L --> M["Auto"]
    M --> N["D-mod"]
    N --> O["Envelope - Control"]
    O --> P["Right"]
    P --> Q["Routing Wah/Auto Wah"]
    Q --> R["Wet / Dry"]
| a | [C] SensitivitySets the sensitivity | 1...100→Fx:002 |
| b | [C] AttackTable, "Sets the attack level," on page 176 | 1...100→Fx:002 |
| Output LevelSets the compressor output level | 0...100→Fx:002 | |
| c | [C] EQ TrimTable, "Sets the EQ input level," on page 176 | 0...100 |
| d | [C] Pre LEQ Gain [dB]Table, "Sets the gain of Low EQ," on page 176 | -15...+15dB |
| Pre HEQ Gain [dB]Table, "Sets the gain of High EQ," on page 176 | -15...+15dB | |
| e | [W] Frequency BottomSets the lower limit of the wah center frequency | 0...100→Fx:009 |
| Frequency TopSets the upper limit of the wah center frequency | 0...100→Fx:009 | |
| f | [W] Sweep Mode Auto, D-mod, LFOSelects the control from auto-wah, modulation source, and LFO→Fx:009,D | |
| Src Off...TempoSelects the modulation source for the wah when Sweep Mode=D-mod | ||
| g | [W] LFO Frequency [Hz]Sets the LFO speed | 0.02...20.00Hz |
| h | [W] ResonanceSets the resonance amount | 0...100 |
| Low Pass FilterSwitches the wah low pass filter on and off | Off, On | |
| i | Routing CMP → WAH, WAH → CMPSwitches the order of the compressor and wah connection | |
| j | Wet/Dry Dry, 1:99...99:1, WetTable, "Sets the balance between the effect and dry sounds," on page 175D | |
| Src Off...TempoTable, "Selects the modulation source of the effect balance," on page 175 | ||
| AmtTable, "Sets the modulation amount of the effect balance," on page 175 | -100...+100 | |
064: Cmp-AmpSim
(Compressor - Amp Simulation)
This effect combines a mono-type compressor and an amp simulation. You can change the order of the effect connection.
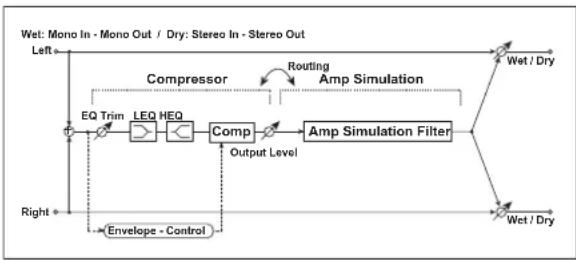
flowchart
graph TD
    A["Left"] --> B["EQ Trim"]
    B --> C["LEQ"]
    C --> D["HEQ"]
    D --> E["Comp"]
    E --> F["Amp Simulation Filter"]
    F --> G["Wet / Dry"]
    G --> H["Wet: Mono In - Mono Out / Dry: Stereo In - Stereo Out"]
    H --> I["Right *"]
    I --> J["Envelope - Control"]
    J --> K["Output Level"]
    K --> L["Compressor"]
    L --> M["Routing Amp Simulation"]
    M --> N["Wet / Dry"]
| a | [C] SensitivitySets the sensitivity | 1...100→Fx:002 |
| b | [C] AttackTable, “Sets the attack level,” on page 176 | 1...100→Fx:002 |
| Output LevelSets the compressor output level | 0...100→Fx:002 | |
| c | [C] EQ TrimTable, “Sets the EQ input level,” on page 176 | 0...100 |
| d | [C] Pre LEQ Gain [dB]Table, “Sets the gain of Low EQ,” on page 176 | -15...+15dB |
| Pre HEQ Gain [dB]Table, “Sets the gain of High EQ,” on page 176 | -15...+15dB | |
| e | [A] Amplifier TypeSelects the type of guitar amplifier | SS, EL84, 6L6 |
| f | Routing CMP → AMP, AMP → CMPSwitches the order of the compressor and amp simulation connection | |
| g | Wet/Dry Dry, 1:99...99:1, WetTable, “Sets the balance between the effect and dry sounds,” on page 175DZZ | |
| Src Off...TempoTable, “Selects the modulation source of the effect balance,” on page 175 | ||
| AmtTable, “Sets the modulation amount of the effect balance,” on page 175 | -100...+100 | |
065: Cmp-OD/HiG
(Compressor - Overdrive/Hi.Gain)
This effect combines a mono-type compressor and an overdrive/high-gain distortion. You can change the order of the effect connection.
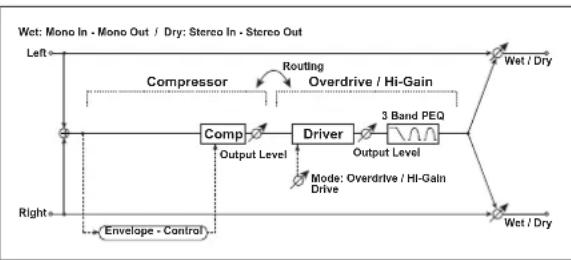
flowchart
graph TD
    A["Left"] --> B["Compressor"]
    B --> C["Driver"]
    C --> D["3 Band PEQ"]
    D --> E["Wet / Dry"]
    F["Right"] --> G["Envelope - Control"]
    G --> H["Output Level"]
    H --> C
    I["Overdrive / Hi-Gain"] --> C
    J["Routing"] --> C
    K["Mode: Overdrive / Hi-Gain Drive"] --> C
    L["Wet / Dry"] --> D
| a | [C] SensitivitySets the sensitivity | 1...100→Fx:002 |
| b | [C] AttackTable, “Sets the attack level,” on page 176 | 1...100→Fx:002 |
| Output LevelSets the compressor output level | 0...100→Fx:002 | |
| c | [O] Drive Mode Overdrive, Hi-GainSwitches between overdrive and high-gain distortion | |
| DriveSets the degree of distortion | 1...100→Fx:006 | |
| d | [O] Output Level 0...50Sets the overdrive output level →Fx:006,D | |
| Src Off...TempoSelects the modulation source for the overdrive output level | ||
| Amt -50...+50Sets the modulation amount of the overdrive output level | ||
| e | [O] Low Cutoff [Hz] 20...1.00kHzSets the center frequency for Low EQ (shelving type) | |
| Gain [dB]Table, “Sets the gain of Low EQ,” on page 176 | -18...+18dB | |
| f | [O] Mid1 Cutoff [Hz] Sets the center frequency for Mid/High EQ 1 (peaking type)300...10.00kHz | |
| QSets the band width of Mid/High EQ 1 | 0.5...10.0→Fx:006 | |
| Gain [dB]Sets the gain of Mid/High EQ 1 | -18...+18dB | |
| g | [O] Mid2 Cutoff [Hz] Sets the center frequency for Mid/High EQ 2 (peaking type)500...20.00kHz | |
| QSets the band width of Mid/High EQ 2 | 0.5...10.0→Fx:006 | |
| Gain [dB]Sets the gain of Mid/High EQ 2 | -18...+18dB | |
| h | Routing CMP → OD, OD → CMPSwitches the order of the compressor and overdrive connection | |
| i | Wet/Dry Dry, 1:99...99:1, WetTable, “Sets the balance between the effect and dry sounds,” on page 175D | |
| Src Off...TempoTable, “Selects the modulation source of the effect balance,” on page 175 | ||
| AmtTable, “Sets the modulation amount of the effect balance,” on page 175 | -100...+100 | |
066: Cmp-Par.4Eq
(Compressor - Parametric 4-Band EQ)
This effect combines a mono-type compressor and a four-band parametric equalizer. You can change the order of the effect connection.
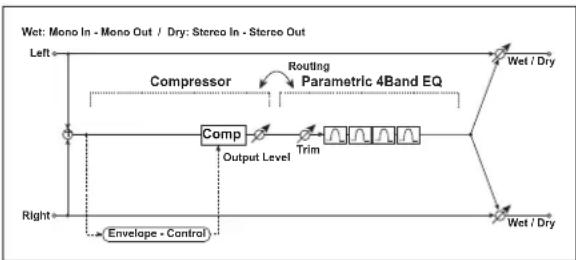
flowchart
graph TD
    A["Left"] --> B["Compressor"]
    B --> C["Comp"]
    C --> D["Output Level"]
    D --> E["Trim"]
    E --> F["Wet / Dry"]
    G["Right"] --> H["Envelope - Control"]
    H --> I["Wet / Dry"]
    J["Routing Parametric 4Band EQ"] --> K["Wet / Dry"]
    L["Wet: Mono In - Mono Out / Dry: Stereo In - Stereo Out"] --> M["Wet / Dry"]
| a | [C] SensitivitySets the sensitivity | 1...100→Fx:002 |
| b | [C] AttackTable, "Sets the attack level," on page 176 | 1...100→Fx:002 |
| Output LevelSets the compressor output level | 0...100→Fx:002 | |
| c | [E] TrimSets the parametric EQ input level | 0...100 |
| d | [E] Band1 Cutoff [Hz]Sets the center frequency of Band 1 | 20...1.00kHz |
| QSets the bandwidth of Band 1 | 0.5...10.0→Fx:006 | |
| Gain [dB]Sets the gain of Band 1 | -18...+18dB | |
| e | [E] Band2 Cutoff [Hz]Sets the center frequency of Band 2 | 50...5.00kHz |
| QSets the bandwidth of Band 2 | 0.5...10.0→Fx:006 | |
| Gain [dB]Sets the gain of Band 2 | -18...+18dB | |
| f | [E] Band3 Cutoff [Hz]Sets the center frequency for Band 3 | 300...10.00kHz |
| QSets the bandwidth of Band 3 | 0.5...10.0→Fx:006 | |
| Gain [dB]Sets the gain of Band 3 | -18...+18dB | |
| g | [E] Band4 Cutoff [Hz]Sets the center frequency for Band 4 | 500...20.00kHz |
| QSets the bandwidth of Band 4 | 0.5...10.0→Fx:006 | |
| Gain [dB]Sets the gain of Band 4 | -18...+18dB | |
| h | Routing CMP → PEQ, PEQ → CMPSwitches the order of the compressor and parametric EQ connection | |
| i | Wet/Dry Dry, 1:99...99:1, WetTable, "Sets the balance between the effect and dry sounds," on page 175D | |
| Src Off...TempoTable, "Selects the modulation source of the effect balance," on page 175 | ||
| AmtTable, "Sets the modulation amount of the effect balance," on page 175 | -100...+100 | |
067: Cmp-ChorFlg
(Compressor – Chorus/Flanger)
This effect combines a mono-type compressor and a chorus/flanger. You can change the order of the effect connection.
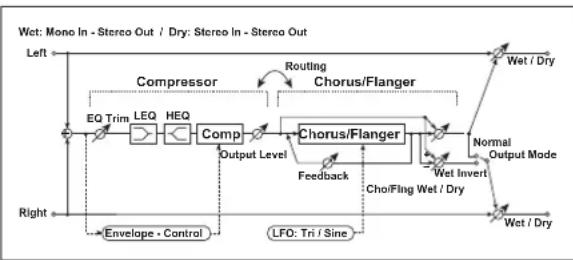
flowchart
graph TD
    A["Left"] --> B["Compressor"]
    B --> C["EQ Trim LEQ HEQ Comp"]
    C --> D["Output Level"]
    D --> E["Chorus/Flanger"]
    E --> F["Wet / Dry"]
    E --> G["Normal Output Mode"]
    E --> H["Wet Invert"]
    H --> I["Wet / Dry"]
    I --> J["LFO: Tri / Sine"]
    J --> K["Envelope - Control"]
    K --> L["Right"]
    M["Routing"] --> E
    N["Routing"] --> E
    O["Feedback"] --> E
| a | [C] SensitivitySets the sensitivity | 1...100→Fx:002 |
| b | [C] AttackTable, “Sets the attack level,” on page 176 | 1...100→Fx:002 |
| Output LevelSets the compressor output level | 0...100→Fx:002 | |
| c | [C] EQ TrimTable, “Sets the EQ input level,” on page 176 | 0...100 |
| d | [C] Pre LEQ Gain [dB]Table, “Sets the gain of Low EQ,” on page 176 | -15...+15dB |
| Pre HEQ Gain [dB]Table, “Sets the gain of High EQ,” on page 176 | -15...+15dB | |
| e | [F] Delay Time [msec]Sets the delay time | 0.0...50.0msec |
| f | [F] LFO Frequency [Hz]Sets the LFO speed | 0.02...20.00Hz |
| LFO WaveformSelects LFO Waveform | Triangle, Sine | |
| g | [F] DepthSets the depth of LFO modulation | 0...100 |
| FeedbackSets the feedback amount | -100...+100→Fx:020 | |
| h | [F] Cho/Fing Wet/Dry -Wet...-2:98, Dry, 2:98...WetSets the effect balance of the chorus/flanger →Fx:010, 020 | |
| Output ModeNormal, Wet InvertSelects the output mode for the chorus/flanger → | ||
| i | RoutingCMP → FLNG, FLNG → CMPSwitches the order of the compressor and chorus/flanger connection → | |
| j | Wet/Dry Dry, 1:99...99:1, WetTable, “Sets the balance between the effect and dry sounds,” on page 175DZZ | |
| Src Off...TempoTable, “Selects the modulation source of the effect balance,” on page 175 | ||
| AmtTable, “Sets the modulation amount of the effect balance,” on page 175 | -100...+100 | |
h: Output Mode, i: Routing
When Wet Invert is selected, the right channel phase of the chorus/flanger effect sound is inverted. This creates pseudostereo effects and adds spread.
However, if a mono-input type effect is connected after this effect, the left and right sounds may cancel each other, eliminating the chorus/flanger effects.
When "Routing" is set to FLNG→CMP, "Output Mode" will be set to Normal.
068: Cmp-Phaser
(Compressor – Phaser)
This effect combines a mono-type compressor and a phaser. You can change the order of the effect connection.

flowchart
graph TD
    A["EQ Trim"] --> B["LEQ HEQ"]
    B --> C["Comp"]
    C --> D["Phaser"]
    D --> E["Wet / Dry"]
    F["Envelope - Control"] --> C
    G["Routing"] --> D
    H["Resonance"] --> D
    I["Normal Output Mode"] --> D
    J["LFO: Tri / Sine"] --> C
    K["Wet Invert"] --> D
    L["Wet / Dry"] --> D
    M["Left"] --> N["Compressor"]
    N --> O["Phaser"]
    O --> P["Output Level"]
    P --> C
| a | [C] SensitivitySets the sensitivity | 1...100→Fx:002 |
| b | [C] AttackTable, “Sets the attack level,” on page 176 | 1...100→Fx:002 |
| Output LevelSets the compressor output level | 0...100→Fx:002 | |
| c | [C] EQ TrimTable, “Sets the EQ input level,” on page 176 | 0...100 |
| d | [C] Pre LEQ Gain [dB]Table, “Sets the gain of Low EQ,” on page 176 | -15...+15dB |
| Pre HEQ Gain [dB]Table, “Sets the gain of High EQ,” on page 176 | -15...+15dB | |
| e | [P] LFO Frequency [Hz]Sets the LFO speed | 0.02...20.00Hz |
| LFO WaveformSelects LFO Waveform | Triangle, Sine | |
| f | [P] ManualSets the frequency to which the effect is applied | 0...100 |
| g | [P] DepthSets the depth of LFO modulation | 0...100 |
| ResonanceSets the resonance amount | -100...+100→Fx:023 | |
| h | [P] Phaser Wet/Dry -Wet...-2:98, Dry, 2:98...WetSets the phaser effect balance →Fx:010, 023 | |
| Output Mode Normal, Wet InvertSelects the phaser output mode →Fx:067 | ||
| i | Routing CMP →PHS, PHS →CMPSwitches the order of the compressor and phaser connection →Fx:067 | |
| j | Wet/Dry Dry, 1:99...99:1, WetTable, “Sets the balance between the effect and dry sounds,” on page 175 | |
| Src Off...TempoTable, “Selects the modulation source of the effect balance,” on page 175 | ||
| AmtTable, “Sets the modulation amount of the effect balance,” on page 175 | -100...+100 | |
069: Cmp-MTapDly
(Compressor - Multitap Delay)
This effect combines a mono-type compressor and a multitap delay. You can change the order of the effect connection.
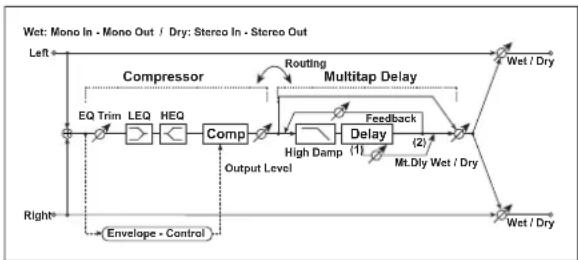
flowchart
graph LR
    A["Left"] --> B["Compressor"]
    B --> C["EQ Trim LEQ HEQ Comp"]
    C --> D["Output Level"]
    D --> E["Comp"]
    E --> F["High Damp (1)"]
    F --> G["Feedback Delay (2)"]
    G --> H["Multitap Delay"]
    H --> I["Wet / Dry"]
    I --> J["Wet / Dry"]
    J --> K["Wet: Mono In - Mono Out / Dry: Stereo In - Stereo Out"]
    L["Right"] --> M["Envelope - Control"]
    M --> N["Routing"]
    N --> O["Multitap Delay"]
    O --> P["Feedback Delay (1)"]
    P --> Q["Multitap Delay (2)"]
| a | [C] SensitivitySets the sensitivity | 1...100→Fx:002 |
| b | [C] AttackTable, “Sets the attack level,” on page 176 | 1...100→Fx:002 |
| Output LevelSets the compressor output level | 0...100→Fx:002 | |
| c | [C] EQ TrimTable, “Sets the EQ input level,” on page 176 | 0...100 |
| d | [C] Pre LEQ Gain [dB]Table, “Sets the gain of Low EQ,” on page 176 | -15...+15dB |
| Pre HEQ Gain [dB]Table, “Sets the gain of High EQ,” on page 176 | -15...+15dB | |
| e | [D] Tap1 Time [msec]Sets the Tap1 delay time | 0...680msec |
| Tap1 LevelSets the Tap1 output level | 0...100→Fx:045 | |
| f | [D] Tap2 Time [msec]Sets the Tap2 delay time | 0...680msec |
| FeedbackSets the Tap2 feedback amount | -100...+100 | |
| g | [D] High Damp [%]Sets the damping amount in the high range | 0...100%→Fx:043 |
| h | [D] Mt.Delay Wet/DrySets the multitap delay effect balance | Dry, 1:99...99:1, Wet |
| i | RoutingCMP→DLY, DLY→CMPSwitches the order of the compressor and multitap delay connection | |
| j | Wet/Dry Dry, 1:99...99:1, WetTable, “Sets the balance between the effect and dry sounds,” on page 175 | |
| Src Off...TempoTable, “Selects the modulation source of the effect balance,” on page 175 | ||
| AmtTable, “Sets the modulation amount of the effect balance,” on page 175 | -100...+100 | |
070: Lim-Par.4Eq
(Limiter - Parametric 4-Band EQ)
This effect combines a mono-type limiter and a four-band parametric equalizer. You can change the order of the effect connection.
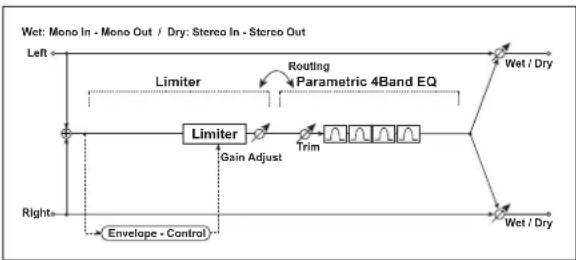
flowchart
graph TD
    A["Left"] --> B["Limiter"]
    B --> C["Gain Adjust"]
    C --> D["Trim"]
    D --> E["Wet / Dry"]
    F["Right"] --> G["Envelope - Control"]
    G --> H["Limiter"]
    H --> I["Routing Parametric 4Band EQ"]
    I --> J["Wet / Dry"]
    K["Left"] --> L["Limiter"]
    L --> M["Gain Adjust"]
    M --> N["Trim"]
    N --> O["Wet / Dry"]
| a | [L] Ratio 1.0:1...50.0:1, Inf:1Sets the signal compression ratio →Fx:003 | |
| Threshold [dB] -40...0dBSets the level above which the compressor is applied →Fx:003 | ||
| b | [L] AttackSets the attack time | 1...100→Fx:003 |
| ReleaseSets the release time | 1...100→Fx:003 | |
| c | [L] Gain Adjust [dB]Sets the limiter output gain | -Inf, -38...+24dB→Fx:003 |
| d | [E] TrimSets the parametric EQ input level | 0...100 |
| e | [E] Band1 Cutoff [Hz]Sets the center frequency of Band 1 | 20...1.00kHz |
| QSets the bandwidth of Band 1 | 0.5...10.0→Fx:006 | |
| Gain [dB]Sets the gain of Band 1 | -18...+18dB | |
| f | [E] Band2 Cutoff [Hz]Sets the center frequency of Band 2 | 50...5.00kHz |
| QSets the bandwidth of Band 2 | 0.5...10.0→Fx:006 | |
| Gain [dB]Sets the gain of Band 2 | -18...+18dB | |
| g | [E] Band3 Cutoff [Hz]Sets the center frequency for Band 3 | 300...10.00kHz |
| QSets the bandwidth of Band 3 | 0.5...10.0→Fx:006 | |
| Gain [dB]Sets the gain of Band 3 | -18...+18dB | |
| h | [E] Band4 Cutoff [Hz]Sets the center frequency for Band 4 | 500...20.00kHz |
| QSets the bandwidth of Band 4 | 0.5...10.0→Fx:006 | |
| Gain [dB]Sets the gain of Band 4 | -18...+18dB | |
| i | Routing LMT→PEQ, PEQ→LMTSwitches the order of the limiter and parametric EQ connection | |
| j | Wet/Dry Dry, 1:99...99:1, WetTable, "Sets the balance between the effect and dry sounds," on page 175D | |
| Src Off...TempoTable, "Selects the modulation source of the effect balance," on page 175 | ||
| AmtTable, "Sets the modulation amount of the effect balance," on page 175 | -100...+100 | |
071: Lim-ChorFlg
(Limiter – Chorus/Flanger)
This effect combines a mono-type limiter and a chorus/flanger. You can change the order of the effect connection.

flowchart
graph TD
    A["Left"] --> B["Limiter"]
    B --> C["EQ Trim"]
    C --> D["LEQ"]
    D --> E["REQ"]
    E --> F["Chorus/Flanger"]
    F --> G["Wet / Dry"]
    G --> H["Wet / Dry"]
    H --> I["Wet Invert"]
    I --> J["Cho/Fling Wet / Dry"]
    J --> K["Wet / Dry"]
    K --> L["LFO: Tri / Sine"]
    L --> M["Envelope - Control"]
    M --> N["Gain Adjust"]
    N --> O["Limiter"]
    O --> P["Routing"]
    P --> Q["Chorus/Flanger"]
    Q --> R["Wet / Dry"]
    R --> S["Wet / Dry"]
    S --> T["Feedback"]
    T --> U["Chorus/Flanger"]
    U --> V["Wet / Dry"]
| a | [L] Ratio 1.0:1...50.0:1, Inf:1Sets the signal compression ratio →Fx:003 | |
| Threshold [dB] -40...0dBSets the level above which the compressor is applied →Fx:003 | ||
| b | [L] AttackSets the attack time | 1...100→Fx:003 |
| ReleaseSets the release time | 1...100→Fx:003 | |
| c | [L] Gain Adjust [dB]Sets the limiter output gain | -Inf, -38...+24dB→Fx:003 |
| d | [F] LFO Frequency [Hz]Sets the LFO speed | 0.02...20.00Hz |
| LFO WaveformSelects LFO Waveform | Triangle, Sine | |
| e | [F] Delay Time [msec]Sets the delay time | 0.0...50.0msec |
| DepthSets the depth of LFO modulation | 0...100 | |
| FeedbackSets the feedback amount | -100...+100→Fx:020 | |
| f | [F] EQ TrimTable, “Sets the EQ input level,” on page 176 | 0...100 |
| g | [F] Pre LEQ Gain [dB]Table, “Sets the gain of Low EQ,” on page 176 | -15...+15dB |
| Pre HEQ Gain [dB]Table, “Sets the gain of High EQ,” on page 176 | -15...+15dB | |
| h | [F] Cho/Fing Wet/Dry -Wet...-2:98, Dry, 2:98...WetSets the effect balance of the chorus/flanger →Fx:010, 020 | |
| Output Mode Normal, Wet InvertSelects the output mode for the chorus/flanger →Fx:067 | ||
| i | Routing LMT→FLNG, FLNG→LMTSwitches the order of the limiter and chorus/flanger connection →Fx:067 | |
| j | Wet/Dry Dry, 1:99...99:1, WetTable, “Sets the balance between the effect and dry sounds,” on page 175D | |
| Src Off...TempoTable, “Selects the modulation source of the effect balance,” on page 175 | ||
| AmtTable, “Sets the modulation amount of the effect balance,” on page 175 | -100...+100 | |
072: Lim-Phaser
This effect combines a mono-type limiter and a phaser. You can change the order of the effect connection.
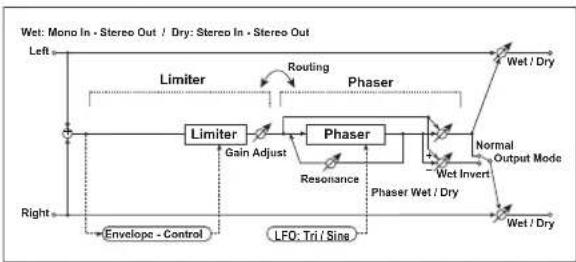
flowchart
graph TD
    A["Left"] --> B["Limiter"]
    B --> C["Phaser"]
    C --> D["Wet / Dry"]
    C --> E["Normal Output Mode"]
    C --> F["Wet Invert"]
    F --> G["Phaser Wet / Dry"]
    G --> H["Wet / Dry"]
    C --> I["Envelope - Control"]
    I --> J["LIFO: Tri / Sins"]
    J --> K["Right"]
    B --> L["Limiter"]
    L --> M["Gain Adjust"]
    M --> N["Phaser"]
    N --> O["Routing"]
    O --> P["Wet / Dry"]
    N --> Q["Resonance"]
    Q --> R["Wet / Dry"]
| a | [L] Ratio 1.0:1...50.0:1, Inf:1Sets the signal compression ratio →Fx:003 | |
| Threshold [dB] -40...0dBSets the level above which the compressor is applied →Fx:003 | ||
| b | [L] AttackSets the attack time | 1...100→Fx:003 |
| ReleaseSets the release time | 1...100→Fx:003 | |
| c | [L] Gain Adjust [dB]Sets the limiter output gain | -Inf, -38...+24dB→Fx:003 |
| d | [P] LFO Frequency [Hz]Sets the LFO speed | 0.02...20.00Hz |
| LFO WaveformSelects LFO Waveform | Triangle, Sine | |
| e | [P] ManualSets the frequency to which the effect is applied | 0...100 |
| f | [P] DepthSets the depth of LFO modulation | 0...100 |
| ResonanceSets the resonance amount | -100...+100→Fx:023 | |
| g | [P] Phaser Wet/Dry -Wet...-2:98, Dry, 2:98...WetSets the phaser effect balance →Fx:010, 023 | |
| Output Mode Normal, Wet InvertSelects the phaser output mode →Fx:067 | ||
| h | Routing LMT →PHS, PHS →LMTSwitches the order of the limiter and phaser connection →Fx:067 | |
| i | Wet/DryDry, 1:99...99:1, WetTable , "Sets the balance between the effect and dry sounds," on page 175 | |
| Src Off...TempoTable , "Selects the modulation source of the effect balance," on page 175 | ||
| Amt-100...+100Table , "Sets the modulation amount of the effect balance," on page 175 | ||
073: Lim-MTapDly
(Limiter - Multitap Delay)
This effect combines a mono-type limiter and a multi-tap delay. You can change the order of the effect connection.

flowchart
graph TD
    A["Left"] --> B["Limiter"]
    B --> C["Gain Adjust"]
    C --> D["Multi tap Delay"]
    D --> E["Feedback"]
    E --> F["Delay"]
    F --> G["Mt.Dly Wet / Dry"]
    G --> H["Wet / Dry"]
    H --> I["Wet: Mono In - Mono Out / Dry; Stereo In - Stereo Out"]
    I --> J["Right"]
    J --> K["Envelope - Control"]
    K --> L["Limiter"]
    L --> M["Gain Adjust"]
    M --> N["Multi tap Delay"]
    N --> O["Feedback"]
    O --> P["Delay"]
    P --> Q["Mt.Dly Wet / Dry"]
    Q --> R["Wet / Dry"]
    R --> S["Wet: Mono In - Mono Out / Dry; Stereo In - Stereo Out"]
    S --> T["Limiter"]
    T --> U["Gain Adjust"]
    U --> V["Multi tap Delay"]
    V --> W["Feedback"]
    W --> X["Delay"]
    X --> Y["Mt.Dly Wet / Dry"]
    Y --> Z["Wet / Dry"]
| a | [L] Ratio 1.0:1...50.0:1, Inf:1Sets the signal compression ratio →Fx:003 | |
| Threshold [dB] -40...0dBSets the level above which the compressor is applied →Fx:003 | ||
| b | [L] AttackSets the attack time | 1...100→Fx:003 |
| ReleaseSets the release time | 1...100→Fx:003 | |
| c | [L] Gain Adjust [dB]Sets the limiter output gain | -Inf, -38...+24dB→Fx:003 |
| d | [D] Tap1 Time [msec]Sets the Tap1 delay time | 0...680msec |
| Tap1 LevelSets the Tap1 output level | 0...100→Fx:045 | |
| e | [D] Tap2 Time [msec]Sets the Tap2 delay time | 0...680msec |
| Feedback (Tap2)Sets the Tap2 feedback amount | -100...+100 | |
| f | [D] Mt.Delay Wet/Dry Sets the multitap delay effect balanceDry, 1:99...99:1, Wet | |
| High Damp [%]Sets the damping amount in the high range | 0...100%→Fx:043 | |
| g | Routing LMT→DLY, DLY→LMTSwitches the order of the limiter and multitap delay connection | |
| h | Wet/Dry Dry, 1:99...99:1, WetTable, "Sets the balance between the effect and dry sounds," on page 175 | |
| Src Off...TempoTable, "Selects the modulation source of the effect balance," on page 175 | ||
| Amt -100...+100Table, "Sets the modulation amount of the effect balance," on page 175 | ||
074: Exc-Compr
(Exciter - Compressor)
This effect combines a mono-type exciter and a compressor. You can change the order of the effect connection.

flowchart
graph LR
    A["Left"] --> B["EQ Trim"]
    B --> C["LEQ HEQ"]
    C --> D["Exciter"]
    D --> E["Comp"]
    E --> F["Wet / Dry"]
    E --> G["Wet: Mono In - Mono Out / Dry: Stereo In - Stereo Out"]
    D --> H["Routing Compressor"]
    H --> I["Output Level"]
    I --> J["Envelope - Control"]
    J --> K["Right +"]
    style A fill:#f9f,stroke:#333
    style K fill:#f9f,stroke:#333
| a | [X] Exciter BlendSets the intensity (depth) of the Exciter effect | -100...+100→Fx:011 |
| b | [X] Emphatic PointSets the frequency range to be emphasized | 0...70→Fx:011 |
| c | [X] EQ TrimTable, "Sets the EQ input level," on page 176 | 0...100 |
| d | [X] Pre LEQ Gain [dB]Table, "Sets the gain of Low EQ," on page 176 | -15...+15dB |
| Pre HEQ Gain [dB]Table, "Sets the gain of High EQ," on page 176 | -15...+15dB | |
| e | [C] SensitivitySets the sensitivity | 1...100→Fx:002 |
| f | [C] AttackTable, "Sets the attack level," on page 176 | 1...100→Fx:002 |
| Output LevelSets the compressor output level | 0...100→Fx:002 | |
| g | Routing XCT→CMP, CMP→XCTSwitches the order of the exciter and compressor connection | |
| h | Wet/Dry Dry, 1:99...99:1, WetTable, "Sets the balance between the effect and dry sounds," on page 175D2 | |
| Src Off...TempoTable, "Selects the modulation source of the effect balance," on page 175 | ||
| AmtTable, "Sets the modulation amount of the effect balance," on page 175 | -100...+100 | |
075: Exc-Limiter
(Exciter - Limiter)
This effect combines a mono-type exciter and a limiter. You can change the order of the effect connection.

flowchart
graph LR
    A["Left"] --> B["EQ Trim LEQ HEQ"]
    B --> C["Exciter"]
    C --> D["Limiter"]
    D --> E["Gain Adjust"]
    E --> F["Wet / Dry"]
    G["Right"] --> H["Envelope - Control"]
    H --> D
    I["Routing"] --> C
    J["Wet: Mono In - Mono Out / Dry: Stereo In - Stereo Out"] --> K["Wet / Dry"]
| a | [X] Exciter BlendSets the intensity (depth) of the Exciter effect | -100...+100→Fx:011 |
| b | [X] Emphatic PointSets the frequency range to be emphasized | 0...70→Fx:011 |
| c | [X] EQ TrimTable, "Sets the EQ input level," on page 176 | 0...100 |
| d | [X] Pre LEQ Gain [dB]Table, "Sets the gain of Low EQ," on page 176 | -15...+15dB |
| Pre HEQ Gain [dB]Table, "Sets the gain of High EQ," on page 176 | -15...+15dB | |
| e | [L] Ratio 1.0:1...50.0:1, Inf:1Sets the signal compression ratio →Fx:003 | |
| f | [L] Threshold [dB] -40...0dBSets the level above which the compressor is applied →Fx:003 | |
| g | [L] AttackSets the attack time | 1...100→Fx:003 |
| ReleaseSets the release time | 1...100→Fx:003 | |
| h | [L] Gain Adjust [dB]Sets the limiter output gain | -Inf, -38...+24dB→Fx:003 |
| i | Routin XCT→LMTSwitches the order of the exciter and limiter connection, LMT→XCT | |
| j | Wet/Dry Dry, 1:99...99:1, WetTable, "Sets the balance between the effect and dry sounds," on page 175 | |
| Src Off...TempoTable, "Selects the modulation source of the effect balance," on page 175 | ||
| AmtTable, "Sets the modulation amount of the effect balance," on page 175 | -100...+100 | |
076: Exc-ChorFlg
(Exciter – Chorus/Flanger)
This effect combines a mono-type limiter and a chorus/flanger.

flowchart
graph LR
    A["Left"] --> B["Exciter"]
    B --> C["EQ Trim LEQ HEQ"]
    C --> D["Exciter"]
    D --> E["Chorus/Flanger"]
    E --> F["Choi/Flng Wet / Dry"]
    F --> G["Wet / Dry"]
    G --> H["Wet / Dry"]
    I["Right"] --> J["LFO: Tri / Sine"]
    J --> K["Feedback"]
    K --> E
    L["Wet Invert"] --> F
    M["Normal Output Mode"] --> F
    N["Wet / Dry"] --> F
| a | [X] Exciter BlendSets the intensity (depth) of the Exciter effect | -100...+100→Fx:011 |
| b | [X] Emphatic PointSets the frequency range to be emphasized | 0...70→Fx:011 |
| c | [X] EQ TrimTable, "Sets the EQ input level," on page 176 | 0...100 |
| d | [X] Pre LEQ Gain [dB]Table, "Sets the gain of Low EQ," on page 176 | -15...+15dB |
| Pre HEQ Gain [dB]Table, "Sets the gain of High EQ," on page 176 | -15...+15dB | |
| e | [F] Delay Time [msec]Sets the delay time | 0.0...50.0msec |
| f | [F] LFO Frequency [Hz]Sets the LFO speed | 0.02...20.00Hz |
| LFO WaveformSelects LFO Waveform | Triangle, Sine | |
| g | [F] DepthSets the depth of LFO modulation | 0...100 |
| FeedbackSets the feedback amount | -100...+100→Fx:020 | |
| h | [F] Cho/Flng Wet/Dry -Wet...-2:98, Dry, 2:98...WetSets the effect balance of the chorus/flanger →Fx:010, 020 | |
| Output Mode Normal, Wet InvertSelects the output mode for the chorus/flanger →Fx:060 | ||
| i | Wet/Dry Dry, 1:99...99:1, WetTable, "Sets the balance between the effect and dry sounds," on page 175 | |
| Src Off...TempoTable, "Selects the modulation source of the effect balance," on page 175 | ||
| AmtTable, "Sets the modulation amount of the effect balance," on page 175 | -100...+100 | |
077: Exc-Phaser
(Exciter – Phaser)
This effect combines a mono-type limiter and a phaser.

flowchart
graph LR
    A["Left"] --> B["EQ Trim LEQ"]
    B --> C["HEQ"]
    C --> D["Exciter"]
    D --> E["Phaser"]
    E --> F["Normal Output Mode"]
    F --> G["Wet / Dry"]
    G --> H["Wet: Mono In - Stereo Out / Dry: Stereo In - Stereo Out"]
    I["Right"] --> J["LFO: Tri / Sine"]
    J --> K["Resonance"]
    K --> E
    L["Phaser Wet / Dry"] --> M["Normal Output Mode"]
    N["Phase Wet / Dry"] --> O["Wet Invert"]
    P["Exciter"] --> Q["Phase"]
    R["Resonance"] --> S["Phase"]
| a | [X] Exciter BlendSets the intensity (depth) of the Exciter effect | -100...+100→Fx:011 |
| b | [X] Emphatic PointSets the frequency range to be emphasized | 0...70→Fx:011 |
| c | [X] EQ TrimTable, "Sets the EQ input level," on page 176 | 0...100 |
| d | [X] Pre LEQ Gain [dB]Table, "Sets the gain of Low EQ," on page 176 | -15...+15dB |
| Pre HEQ Gain [dB]Table, "Sets the gain of High EQ," on page 176 | -15...+15dB | |
| e | [P] LFO Frequency [Hz]Sets the LFO speed | 0.02...20.00Hz |
| LFO WaveformSelects LFO Waveform | Triangle, Sine | |
| f | [P] ManualSets the frequency to which the effect is applied | 0...100 |
| g | [P] DepthSets the depth of LFO modulation | 0...100 |
| ResonanceSets the resonance amount | -100...+100→Fx:023 | |
| h | [P] Phaser Wet/Dry -Wet...-2:98, Dry, 2:98...WetSets the phaser effect balance →Fx:010, 023 | |
| Output Mode Normal, Wet InvertSelects the phaser output mode →Fx:060 | ||
| i | Wet/Dry Dry, 1:99...99:1, WetTable, "Sets the balance between the effect and dry sounds," on page 175 | |
| Src Off...TempoTable, "Selects the modulation source of the effect balance," on page 175 | ||
| AmtTable, "Sets the modulation amount of the effect balance," on page 175 | -100...+100 | |
078: Exc-MTapDly
(Exciter - Multitap Delay)
This effect combines a mono-type exciter and a multi-tap delay.
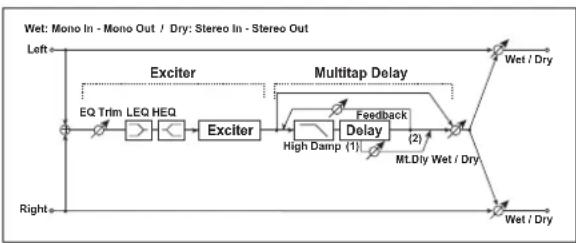
flowchart
graph LR
    A["Left"] --> B["Exciter"]
    B --> C["EQ Trim LEQ HEQ"]
    C --> D["Exciter"]
    D --> E["Multi tap Delay"]
    E --> F["Feedback"]
    F --> G["Delay"]
    G --> H["High Damp (1)"]
    G --> I["(2)"]
    I --> J["MLDly Wet / Dry"]
    J --> K["Wet / Dry"]
    K --> L["Wet: Mono In - Mono Out / Dry: Stereo In - Stereo Out"]
    M["Right"] --> N["Left"]
| a | [X] Exciter BlendSets the intensity (depth) of the Exciter effect | -100...+100→Fx:011 |
| b | [X] Emphatic PointSets the frequency range to be emphasized | 0...70→Fx:011 |
| c | [X] EQ TrimTable, "Sets the EQ input level," on page 176 | 0...100 |
| d | [X] Pre LEQ Gain [dB]Table, "Sets the gain of Low EQ," on page 176 | -15...+15dB |
| Pre HEQ Gain [dB]Table, "Sets the gain of High EQ," on page 176 | -15...+15dB | |
| e | [D] Tap1 Time [msec]Sets the Tap1 delay time | 0...680msec |
| Tap1 LevelSets the Tap1 output level | 0...100→Fx:045 | |
| f | [D] Tap2 Time [msec]Sets the Tap2 delay time | 0...680msec |
| Feedback (Tap2)Sets the Tap2 feedback amount | -100...+100 | |
| g | [D] High Damp [%]Sets the damping amount in the high range | 0...100%→Fx:043 |
| h | [D] Mt.Delay Wet/Dry Dry, 1:99...99:1, WetSets the multitap delay effect balance | |
| i | Wet/Dry Dry, 1:99...99:1, WetTable, "Sets the balance between the effect and dry sounds," on page 175D= | |
| Src Off...TempoTable, "Selects the modulation source of the effect balance," on page 175 | ||
| AmtTable, "Sets the modulation amount of the effect balance," on page 175 | -100...+100 | |
079: OD/HG-Amp S
(Overdrive/Hi.Gain - Amp Simulation)
This effect combines a mono-type overdrive/high-gain distortion and an amp simulation. You can change the order of the effect connection.

flowchart
graph LR
    A["Left"] --> B["Driver"]
    B --> C["3 Band PEQ"]
    C --> D["Amp Simulation Filter"]
    D --> E["Wet / Dry"]
    D --> F["Wet / Dry Out"]
    B --> G["Output Level"]
    G --> H["Mode: Overdrive / Hi-Gain Drive"]
    H --> I["Overdrive / Hi-Gain"]
    I --> J["Routing Amp Simulation"]
    J --> K["Wet / Dry Out"]
    style A fill:#f9f,stroke:#333
    style E fill:#ccf,stroke:#333
    style F fill:#ccf,stroke:#333
| a | [O] Drive Mode Overdrive, Hi-GainSwitches between overdrive and high-gain distortion | |
| DriveSets the degree of distortion | 1...100→Fx:006 | |
| b | [O] Output Level 0...50Sets the overdrive output level→Fx:006,D | |
| Src Off...TempoSelects the modulation source for the overdrive output level | ||
| Amt -50...+50Sets the modulation amount of the overdrive output level | ||
| c | [O] Low Cutoff [Hz] 20...1.00kHzSets the center frequency for Low EQ (shelving type) | |
| Gain [dB]Table, "Sets the gain of Low EQ," on page 176 | -18...+18dB | |
| d | [O] Mid1 Cutoff [Hz]300...10.00kHzSets the center frequency for Mid/High EQ 1 (peaking type) | |
| QSets the band width of Mid/High EQ 1 | 0.5...10.0→Fx:006 | |
| Gain [dB]Sets the gain of Mid/High EQ 1 | -18...+18dB | |
| e | [O] Mid2 Cutoff [Hz]500...20.00kHzSets the center frequency for Mid/High EQ 2 (peaking type) | |
| QSets the band width of Mid/High EQ 2 | 0.5...10.0→Fx:006 | |
| Gain [dB]Sets the gain of Mid/High EQ 2 | -18...+18dB | |
| f | [A] Amplifier TypeSelects the type of guitar amplifier | SS, EL84, 6L6 |
| g | RoutingOD→AMP, AMP→ODSwitches the order of the overdrive and amp simulation connection | |
| h | Wet/Dry Dry, 1:99...99:1, WetTable, "Sets the balance between the effect and dry sounds," on page 175D | |
| Src Off...TempoTable, "Selects the modulation source of the effect balance," on page 175 | ||
| AmtTable, "Sets the modulation amount of the effect balance," on page 175 | -100...+100 | |
080: OD/HG-ChoFI
(Overdrive/Hi.Gain - Chorus/Flanger)
This effect combines a mono-type overdrive/high-gain distortion and a chorus/flanger. You can change the order of the effect connection.
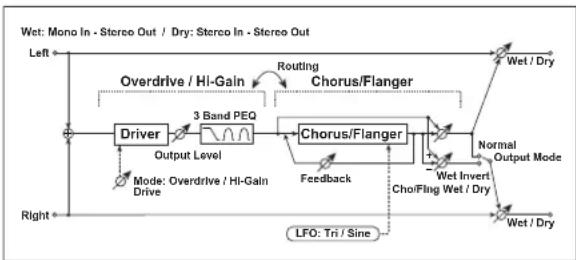
flowchart
graph TD
    A["Driver"] --> B["3 Band PEQ"]
    B --> C["Chorus/Flanger"]
    C --> D["Wet / Dry"]
    C --> E["Wet Invert"]
    E --> F["Normal Output Mode"]
    C --> G["Feedback"]
    G --> H["Choice/Flange Wet / Dry"]
    H --> I["LFO: Tri / Sine"]
    I --> J["Output Level"]
    J --> K["Overdrive / Hi-Gain Drive"]
    K --> L["Routing"]
    L --> M["Chorus/Flanger"]
    M --> N["Wet / Dry"]
    style A fill:#f9f,stroke:#333
    style B fill:#ccf,stroke:#333
    style C fill:#cfc,stroke:#333
    style D fill:#fcc,stroke:#333
    style E fill:#fcc,stroke:#333
    style F fill:#fcc,stroke:#333
    style G fill:#fcc,stroke:#333
    style H fill:#fcc,stroke:#333
    style I fill:#fcc,stroke:#333
    style J fill:#fcc,stroke:#333
    style K fill:#fcc,stroke:#333
    style L fill:#fcc,stroke:#333
    style M fill:#fcc,stroke:#333
    style N fill:#fcc,stroke:#333
| a | [O] Drive Mode Overdrive, Hi-GainSwitches between overdrive and high-gain distortion | |
| DriveSets the degree of distortion | 1...100→Fx:006 | |
| b | [O] Output Level 0...50Sets the overdrive output level →Fx:006, D | |
| Src Off...TempoSelects the modulation source for the overdrive output level | ||
| Amt -50...+50Sets the modulation amount of the overdrive output level | ||
| c | [O] Low Cutoff [Hz] 20...1.00kHzSets the center frequency for Low EQ (shelving type) | |
| Gain [dB]Table, "Sets the gain of Low EQ," on page 176 | -18...+18dB | |
| d | [O] Mid1 Cutoff [Hz] 300...10.00kHzSets the center frequency for Mid/High EQ 1 (peaking type) | |
| QSets the band width of Mid/High EQ 1 | 0.5...10.0→Fx:006 | |
| Gain [dB]Sets the gain of Mid/High EQ 1 | -18...+18dB | |
| e | [O] Mid2 Cutoff [Hz] 500...20.00kHzSets the center frequency for Mid/High EQ 2 (peaking type) | |
| QSets the band width of Mid/High EQ 2 | 0.5...10.0→Fx:006 | |
| Gain [dB]Sets the gain of Mid/High EQ 2 | -18...+18dB | |
| f | [F] LFO Frequency [Hz]Sets the LFO speed | 0.02...20.00Hz |
| LFO WaveformSelects LFO Waveform | Triangle, Sine | |
| g | [F] Delay Time [msec]Sets the delay time | 0.0...50.0msec |
| DepthSets the depth of LFO modulation | 0...100 | |
| FeedbackSets the feedback amount | -100...+100→Fx:020 | |
| h | [F] Cho/FIng Wet/Dry -Wet...-2:98, Dry, 2:98...WetSets the effect balance of the chorus/flanger →Fx:010, 020 | |
| Output Mode Normal, Wet InvertSelects the output mode for the chorus/flanger →Fx:067 | ||
| i | Routing OD → FLNG, FLNG → ODSwitches the order of the overdrive and chorus/flanger connection→Fx:067 | |
| j | Wet/Dry Dry, 1:99...99:1, WetTable, "Sets the balance between the effect and dry sounds," on page 175D | |
| Src Off...TempoTable, "Selects the modulation source of the effect balance," on page 175 | ||
| AmtTable, "Sets the modulation amount of the effect balance," on page 175 | -100...+100 | |
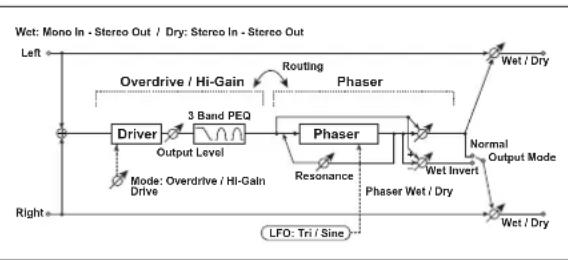
flowchart
graph LR
    A["Driver"] --> B["3 Band PEQ"]
    B --> C["Phaser"]
    C --> D["Wet / Dry"]
    D --> E["Wet / Dry"]
    F["Overdrive / Hi-Gain"] --> B
    G["Routing"] --> C
    H["Phase"] --> C
    I["Resonance"] --> C
    J["Mode: Overdrive / Hi-Gain Drive"] --> B
    K["LFO: Tri / Sine"] --> C
    L["Wet Invert"] --> C
    M["Normal Output Mode"] --> C
    N["Left"] --> A
    O["Right"] --> A
081: OD/HG-Phser
(Overdrive/Hi.Gain - Phaser)
This effect combines a mono-type overdrive/high-gain distortion and a phaser. You can change the order of the effect connection.
| a | [O] Drive Mode Overdrive, Hi-GainSwitches between overdrive and high-gain distortion | |
| DriveSets the degree of distortion | 1...100→Fx:006 | |
| b | [O] Output Level 0...50Sets the overdrive output level→Fx:006,D | |
| Src Off...TempoSelects the modulation source for the overdrive output level | ||
| Amt -50...+50Sets the modulation amount of the overdrive output level | ||
| c | [O] Low Cutoff [Hz] 20...1.00kHzSets the center frequency for Low EQ (shelving type) | |
| Gain [dB]Table, "Sets the gain of Low EQ," on page 176 | -18...+18dB | |
| d | [O] Mid1 Cutoff [Hz] 300...10.00kHzSets the center frequency for Mid/High EQ 1 (peaking type) | |
| QSets the band width of Mid/High EQ 1 | 0.5...10.0→Fx:006 | |
| Gain [dB]Sets the gain of Mid/High EQ 1 | -18...+18dB | |
| e | [O] Mid2 Cutoff [Hz] 500...20.00kHzSets the center frequency for Mid/High EQ 2 (peaking type) | |
| QSets the band width of Mid/High EQ 2 | 0.5...10.0→Fx:006 | |
| Gain [dB]Sets the gain of Mid/High EQ 2 | -18...+18dB | |
| f | [P] LFO Frequency [Hz]Sets the LFO speed | 0.02...20.00Hz |
| LFO WaveformSelects LFO Waveform | Triangle, Sine | |
| g | [P] ManualSets the frequency to which the effect is applied | 0...100 |
| DepthSets the depth of LFO modulation | 0...100 | |
| ResonanceSets the resonance amount | -100...+100→Fx:023 | |
| h | [P] Phaser Wet/DrySets the phaser effect balance→Wet...-2:98, Dry, 2:98...Wet→Fx:010, 023 | |
| Output Mode Normal, Wet InvertSelects the phaser output mode→Fx:067 | ||
| i | RoutingOD → PHS, PHS → ODSwitches the order of the overdrive and phaser connection→Fx:067 | |
| j | Wet/DryDry, 1:99...99:1, WetTable, "Sets the balance between the effect and dry sounds," on page 175 | |
| Src Off...TempoTable, "Selects the modulation source of the effect balance," on page 175 | ||
| AmtTable, "Sets the modulation amount of the effect balance," on page 175 | -100...+100 | |
082: OD/HG-MTDly
(Overdrive/Hi.Gain - Multitap Delay)
This effect combines a mono-type overdrive/high-gain distortion and a multitap delay.

flowchart
graph LR
    A["Driver"] --> B["3 Band PEQ"]
    B --> C["High Damp (1)"]
    C --> D["Feedback Delay"]
    D --> E["Mt.Dly Wet / Dry"]
    E --> F["Wet / Dry"]
    G["Overdrive / Hi-Gain"] --> B
    H["Multitap Delay"] --> D
    I["Mode: Overdrive / Hi-Gain Drive"] --> A
    J["Right"] --> A
    K["Wet: Mono In - Mono Out / Dry: Stereo In - Stereo Out"] --> E
| a | [O] Drive Mode Overdrive, Hi-Gain Switches between overdrive and high-gain distortion | |
| DriveSets the degree of distortion | 1...100→Fx:006 | |
| b | [O] Output Level 0...50Sets the overdrive output level →Fx:006, D | |
| Src Off...TempoSelects the modulation source for the overdrive output level | ||
| Amt -50...+50Sets the modulation amount of the overdrive output level | ||
| c | [O] Low Cutoff [Hz] 20...1.00kHzSets the center frequency for Low EQ (shelving type) | |
| Gain [dB]Table, “Sets the gain of Low EQ,” on page 176 | -18...+18dB | |
| d | [O] Mid1 Cutoff [Hz] 300...10.00kHzSets the center frequency for Mid/High EQ 1 (peaking type) | |
| QSets the band width of Mid/High EQ 1 | 0.5...10.0→Fx:006 | |
| Gain [dB]Sets the gain of Mid/High EQ 1 | -18...+18dB | |
| e | [O] Mid2 Cutoff [Hz] 500...20.00kHzSets the center frequency for Mid/High EQ 2 (peaking type) | |
| QSets the band width of Mid/High EQ 2 | 0.5...10.0→Fx:006 | |
| Gain [dB]Sets the gain of Mid/High EQ 2 | -18...+18dB | |
| f | [D] Tap1 Time [msec]Sets the Tap1 delay time | 0...680msec |
| Tap1 LevelSets the Tap1 output level | 0...100→Fx:045 | |
| g | [D] Tap2 Time [msec]Sets the Tap2 delay time | 0...680msec |
| FeedbackSets the Tap2 feedback amount | -100...+100 | |
| h | [D] Mt.Delay Wet/Dry Dry, 2:98...98:2, WetSets the multitap delay effect balance | |
| High Damp [%]Sets the damping amount in the high range | 0...100%→Fx:043 | |
| i | Wet/Dry Dry, 1:99...99:1, WetTable, “Sets the balance between the effect and dry sounds,” on page 175D | |
| Src Off...TempoTable, “Selects the modulation source of the effect balance,” on page 175 | ||
| AmtTable, “Sets the modulation amount of the effect balance,” on page 175 | -100...+100 | |
083: Wah-AmpSim
(Wah/Auto Wah – Amp Simulation)
This effect combines a mono-type wah and an amp simulation. You can change the order of the effect connection.
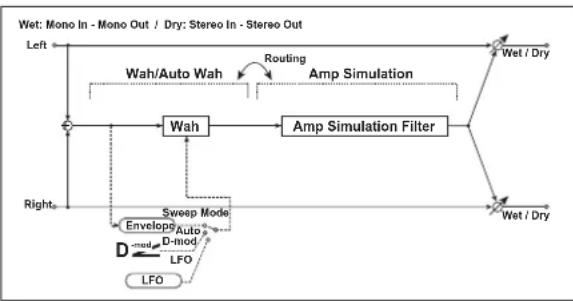
flowchart
graph TD
    A["Wet: Mono In - Mono Out / Dry: Stereo In - Stereo Out"] --> B["Left"]
    B --> C["Wah"]
    C --> D["Amp Simulation Filter"]
    D --> E["Wet / Dry"]
    C --> F["Wah/Auto Wah"]
    F --> G["Routing"]
    G --> H["Wet / Dry"]
    C --> I["Wah"]
    I --> J["Sweep Mode"]
    J --> K["Enveloped Auto"]
    K --> L["D-mod"]
    L --> M["LFO"]
    M --> N["End"]
    style A fill:#f9f,stroke:#333
    style E fill:#ccf,stroke:#333
    style N fill:#cfc,stroke:#333
| a | [W] Frequency BottomSets the lower limit of the wah center frequency | 0...100→Fx:009 |
| Frequency TopSets the upper limit of the wah center frequency | 0...100→Fx:009 | |
| b | [W] Sweep Mode Auto, D-mod, LFO Selects the control from auto-wah, modulation source, and LFO→Fx:009, D-mod | |
| Src Off...TempoSelects the modulation source for the wah when Sweep Mode=D-mod | ||
| c | [W] LFO Frequency [Hz]Sets the LFO speed | 0.02...20.00Hz |
| d | [W] ResonanceSets the resonance amount | 0...100 |
| Low Pass FilterSwitches the wah low pass filter on and off | Off, On | |
| e | [A] Amplifier TypeSelects the type of guitar amplifier | SS, EL84, 6L6 |
| f | Routing WAH → AMP, AMP → WAHSwitches the order of the wah and amp simulation connection | |
| g | Wet/Dry Dry, 1:99...99:1, WetTable , "Sets the balance between the effect and dry sounds," on page 175D mod | |
| Src Off...TempoTable , "Selects the modulation source of the effect balance," on page 175 | ||
| Amt Table , "Sets the modulation amount of the effect balance," on page 175 | -100...+100 | |
084: Decim-Amp S
(Decimator - Amp Simulation)
This effect combines a mono-type decimator and an amp simulation. You can change the order of the effect connection.
| a | [D] Pre LPF Off, OnTurn the harmonic noise caused by lowered sampling on and off →Fx:014 | |
| High Damp [%]Sets the ratio of high-range damping | 0...100% | |
| b | [D] Sampling Freq [Hz] (Sampling Frequency)Sets the sampling frequency | 1.00k...48.00kHz |
| ResolutionSets the data bit length | 4...24→Fx:014 | |
| c | [D] Output LevelSets the decimator output level | 0...100→Fx:014 |
| d | [A] Amplifier TypeSelects the type of guitar amplifier | SS, EL84, 6L6 |
| e | Routing DECI→AMP, AMP→DECI Switches the order of the wah and amp simulation connection | |
| f | Wet/Dry Dry, 1:99...99:1, WetTable, "Sets the balance between the effect and dry sounds," on page 175 | |
| Src Off...TempoTable, "Selects the modulation source of the effect balance," on page 175 | ||
| AmtTable, "Sets the modulation amount of the effect balance," on page 175 | -100...+100 | |
085: Decim-Cmp
(Decimator - Compressor)
This effect combines a mono-type decimator and a compressor. You can change the order of the effect connection.
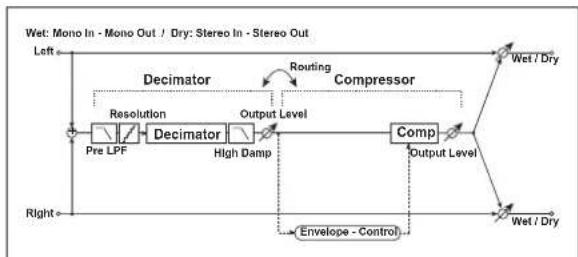
flowchart
graph LR
    A["Left"] --> B["Decimator"]
    B --> C["Output Level"]
    C --> D["Compressor"]
    D --> E["Output Level"]
    E --> F["Wet / Dry"]
    G["Right"] --> H["Envelope - Control"]
    H --> I["Pre LPF"]
    I --> J["Decimator"]
    J --> K["Output Level"]
    K --> L["Comp"]
    L --> M["Wet / Dry"]
    N["Routing"] --> B
    O["Wet: Mono In - Mono Out / Dry: Stereo In - Stereo Out"] --> B
| a | [D] Pre LPF Off, OnTurn the harmonic noise caused by lowered sampling on and off→Fx:014 | |
| High Damp [%]Sets the ratio of high-range damping | 0...100% | |
| b | [D] Sampling Freq [Hz] (Sampling Frequency)Sets the sampling frequency | 1.00k...48.00kHz |
| ResolutionSets the data bit length | 4...24→Fx:014 | |
| c | [D] Output LevelSets the decimator output level | 0...100→Fx:014 |
| d | [C] SensitivitySets the sensitivity | 1...100→Fx:002 |
| e | [C] AttackTable, "Sets the attack level," on page 176 | 1...100→Fx:002 |
| Output LevelSets the compressor output level | 0...100→Fx:002 | |
| f | Routing DECI→CMP, CMP→DECISwitches the order of the decimator and compressor connection | |
| g | Wet/Dry Dry, 1:99...99:1, WetTable, "Sets the balance between the effect and dry sounds," on page 175D2 | |
| Src Off...TempoTable, "Selects the modulation source of the effect balance," on page 175 | ||
| AmtTable, "Sets the modulation amount of the effect balance," on page 175 | -100...+100 | |
086: AmpS-Tremol
(Amp Simulation – Tremolo)
This effect combines a mono-type amp simulation and a tremolo.
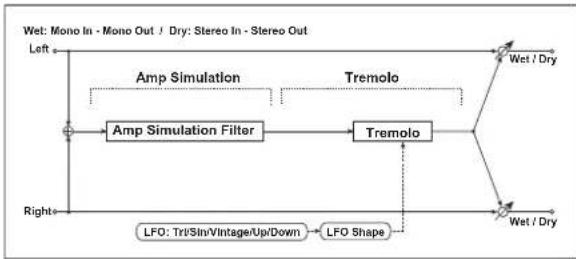
flowchart
graph TD
    A["Left"] --> B["Amp Simulation Filter"]
    B --> C["Tremolo"]
    C --> D["Wet / Dry"]
    C --> E["LFO Shape"]
    E --> F["LFO: Tri/5In/Vintage/Up/Down"]
    F --> G["Right"]
    style A fill:#f9f,stroke:#333
    style D fill:#ccf,stroke:#333
    style G fill:#cfc,stroke:#333
| a | [A] Amplifier TypeSelects the type of guitar amplifier | SS, EL84, 6L6 |
| b | [T] LFO Waveform Triangle, Sine, Vintage, Up, Down Selects LFO Waveform →Fx:032 | |
| LFO ShapeDetermines how much the LFO waveform is changed | -100...+100→Fx:020 | |
| c | [T] LFO Frequency [Hz]Sets the LFO speed | 0.02...20.00Hz |
| d | [T] DepthSets the depth of LFO modulation | 0...100 |
| e | Wet/Dry Dry, 1:99...99:1, WetTable, “Sets the balance between the effect and dry sounds,” on page 175 | |
| Src Off...TempoTable, “Selects the modulation source of the effect balance,” on page 175 | ||
| AmtTable, “Sets the modulation amount of the effect balance,” on page 175 | -100...+100 | |
087: Ch/FI-MTDly
(Chorus/Flanger - Multitap Delay)
This effect combines a mono-type chorus/flanger and a multitap delay.
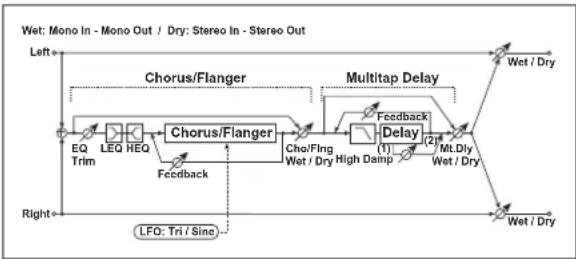
flowchart
graph LR
    A["EQ Trim"] --> B["LEQ"]
    B --> C["HEQ"]
    C --> D["Chorus/Flanger"]
    D --> E["Che/Fing"]
    E --> F["Wet / Dry High Damp"]
    F --> G["Delay"]
    G --> H["Feedback"]
    H --> I["MT.Dly"]
    I --> J["Wet / Dry"]
    J --> K["Wet / Dry"]
    L["Left*"] --> M["Chorus/Flanger"]
    M --> N["Heq"]
    N --> O["Feedback"]
    O --> P["LFO: Tri / Sine"]
    P --> Q["Right*"]
    R["Multitap Delay"] --> S["Feedback"]
    S --> T["MT.Dly"]
    T --> U["Wet / Dry"]
| a | [F] Delay Time [msec]Sets the delay time | 0.0...50.0msec |
| b | [F] LFO Frequency [Hz]Sets the LFO speed | 0.02...20.00Hz |
| LFO WaveformSelects LFO Waveform | Triangle, Sine | |
| c | [F] DepthSets the depth of LFO modulation | 0...100 |
| FeedbackSets the feedback amount | -100...+100→Fx:020 | |
| d | [F] EQ TrimTable, “Sets the EQ input level,” on page 176 | 0...100 |
| e | [F] Pre LEQ Gain [dB]Table, “Sets the gain of Low EQ,” on page 176 | -15...+15dB |
| Pre HEQ Gain [dB]Table, “Sets the gain of High EQ,” on page 176 | -15...+15dB | |
| f | [F] Cho/Flng Wet/Dry -Wet...-2:98, Dry, 2:98...WetSets the effect balance of the chorus/flanger | →Fx:010, 020 |
| g | [D] Tap1 Time [msec]Sets the Tap1 delay time | 0...680msec |
| Tap1 LevelSets the Tap1 output level | 0...100→Fx:045 | |
| h | [D] Tap2 Time [msec]Sets the Tap2 delay time | 0...680msec |
| Feedback (Tap2)Sets the Tap2 feedback amount | -100...+100 | |
| i | [D] Mt.Delay Wet/Dry Dry, 1:99...99:1, WetSets the multitap delay effect balance | |
| High Damp [%]Sets the damping amount in the high range | 0...100%→Fx:043 | |
| j | Wet/Dry Dry, 1:99...99:1, WetTable, “Sets the balance between the effect and dry sounds,” on page 175DZZ | |
| Src Off...TempoTable, “Selects the modulation source of the effect balance,” on page 175 | ||
| AmtTable, “Sets the modulation amount of the effect balance,” on page 175 | -100...+100 | |
088: Phser-ChoFI
(Phaser – Chorus/Flanger)
This effect combines a mono-type phaser and a chorus/flanger.

flowchart
graph LR
    A["Wet: Mono In - Stereo Out / Dry: Stereo In - Stereo Out"] --> B["Left"]
    B --> C["Phaser"]
    C --> D["Chorus/Flanger"]
    D --> E["Wet / Dry"]
    C --> F["Resonance"]
    F --> G["LFO: Tri / Sinc"]
    D --> H["EQ Trim"]
    D --> I["LEQHEQ"]
    D --> J["Feedback"]
    D --> K["Chorus/Flanger"]
    K --> L["Wet Invert Chaifing Wet / Dry"]
    L --> M["Wet / Dry"]
    D --> N["Normal Output Mode"]
    N --> O["Wet / Dry"]
    style A fill:#f9f,stroke:#333
    style B fill:#ccf,stroke:#333
    style C fill:#cfc,stroke:#333
    style D fill:#fcc,stroke:#333
    style E fill:#ffc,stroke:#333
    style F fill:#fcc,stroke:#333
    style G fill:#cff,stroke:#333
    style H fill:#fcc,stroke:#333
    style I fill:#cff,stroke:#333
    style J fill:#fcc,stroke:#333
    style K fill:#cff,stroke:#333
    style L fill:#ffc,stroke:#333
    style M fill:#fcc,stroke:#333
| a | [P] LFO Frequency [Hz]Sets the LFO speed | 0.02...20.00Hz |
| LFO WaveformSelects LFO Waveform | Triangle, Sine | |
| b | [P] ManualSets the frequency to which the effect is applied | 0...100 |
| DepthSets the depth of LFO modulation | 0...100 | |
| ResonanceSets the resonance amount | -100...+100→Fx:023 | |
| c | [P] Phaser Wet/Dry -Wet...-2:98, Dry, 2:98...WetSets the phaser effect balance →Fx:010, 023 | |
| d | [F] LFO Frequency [Hz]Sets the LFO speed | 0.02...20.00Hz |
| LFO WaveformSelects LFO Waveform | Triangle, Sine | |
| e | [F] Delay Time [msec]Sets the delay time | 0.0...50.0msec |
| DepthSets the depth of LFO modulation | 0...100 | |
| FeedbackSets the feedback amount | -100...+100→Fx:020 | |
| f | [F] EQ TrimTable , "Sets the EQ input level," on page 176 | 0...100 |
| g | [F] Pre LEQ Gain [dB]Table , "Sets the gain of Low EQ," on page 176 | -15...+15dB |
| Pre HEQ Gain [dB]Table , "Sets the gain of High EQ," on page 176 | -15...+15dB | |
| h | [F] Cho/Flng Wet/Dry -Wet...-2:98, Dry, 2:98...WetSets the effect balance of the chorus/flanger →Fx:010, 020 | |
| Output Mode Normal, Wet InvertSelects the output mode for the chorus/flanger →Fx:060 | ||
| i | Wet/Dry Dry, 1:99...99:1, WetTable , "Sets the balance between the effect and dry sounds," on page 175 | |
| Src Off...TempoTable , "Selects the modulation source of the effect balance," on page 175 | ||
| AmtTable , "Sets the modulation amount of the effect balance," on page 175 | -100...+100 | |
089: Rev-Gate
(Reverb - Gate)
This effect combines a mono-type reverb and a gate.
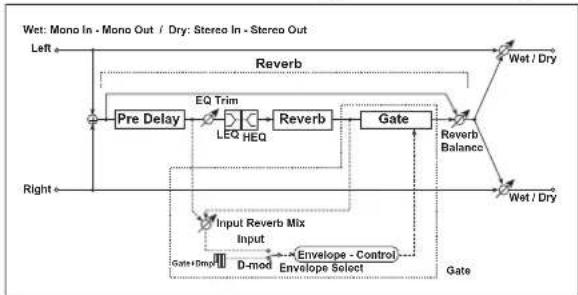
flowchart
graph TD
    A["Left"] --> B["Pre Delay"]
    B --> C["EQ Trim"]
    C --> D["HEQ"]
    D --> E["Reverb"]
    E --> F["Gate"]
    F --> G["Rerverb Balance"]
    G --> H["Wet / Dry"]
    I["Right"] --> J["Input Reverb Mix"]
    J --> K["Input"]
    K --> L["D-mod"]
    L --> M["Envelope - Control"]
    M --> N["Envelope Select"]
    N --> O["Gate"]
    O --> P["Wet / Dry"]
    Q["Wet: Mono In - Mono Out / Dry: Stereo In - Stereo Out"] --> R["Reverb"]
| a | [R] Reverb Time [sec]Sets the reverberation time | 0.1...10.0sec |
| High Damp [%]Sets the damping amount in the high range | 0...100% | |
| b | [R] Pre Delay [msec] 0...200msecSets the delay time of the reverb sound and gate control signal | |
| c | [R] EQ TrimTable, "Sets the EQ input level," on page 176 | 0...100 |
| d | [R] Pre LEQ Gain [dB]Table, "Sets the gain of Low EQ," on page 176 | -15...+15dB |
| Pre HEQ Gain [dB]Table, "Sets the gain of High EQ," on page 176 | -15...+15dB | |
| e | [R] Reverb Balance Dry, 1:99...99:1, WetSets the reverb effect balance | |
| f | [G] Envelope Select D-mod, InputSwitches between modulation source control and input signal control→ | |
| Src Off...Gate2+DmprSelects the modulation source that controls the gate when Envelope Select is set to D-mod → | ||
| g | [G] Input Reverb Mix Dry, 1:99...99:1, WetSets the balance between the dry and reverb sounds of the gate control signal. → | |
| ThresholdSets the gate threshold level | 0...100→ | |
| h | [G] Polarity +,-Switches between non-invert and invert of the gate on/off state→Fx:005 | |
| i | [G] AttackSets the attack time | 1...100→Fx:005 |
| ReleaseSets the release time | 1...100→Fx:005 | |
| j | Wet/Dry Dry, 1:99...99:1, WetTable, "Sets the balance between the effect and dry sounds," on page 175D22 | |
| Src Off...TempoTable, "Selects the modulation source of the effect balance," on page 175 | ||
| AmtTable, "Sets the modulation amount of the effect balance," on page 175 | -100...+100 | |
f: Envelope Select, f: Src, g: Input Reverb Mix, g: Threshold The "Envelope Select" parameter enables you to select whether turning the gate on and off is triggered by the input signal level or controlled directly by the modulation source. You can select from Off to Gate2+Dmpr for the Src parameter to specify the modulation source.
When "Envelope Select" is set to Input, the gate is controlled by the level of signals that are the combination of the dry sound and the reverb sound. When the signal level exceeds the threshold, the gate opens and the reverb sound is output. Normally, set "Input Reverb Mix" to Dry (the gate is controlled only by the dry sound). If you wish to extend the gate time, set the "Input Reverb Mix" value higher and adjust the "Threshold" value.
19. ASSIGNABLE PARAMETERS
LIST OF FUNCTIONS ASSIGNABLE TO THE FOOTSWITCH
The following functions can be assigned to a foot-switch.
| Function Meaning | |
| Off No function assigned | |
| Start/stop | Same functions of the control panel buttons with the same name |
| Play/Stop Seq1 | |
| Play Stop Seq2 | |
| Synchro | |
| Tap tempo/Rst | |
| Tempo lock | |
| Intro 1 | |
| Ending 1 | |
| Intro 2 | |
| Ending 2 | |
| Fill 1 | |
| Fill 2 | |
| C.In / Break | |
| Variation 1 | |
| Variation 2 | |
| Variation 3 | |
| Variation 4 | |
| Variation up | |
| Variation down | |
| Fade in/out | |
| Memory | |
| Bass inversion | |
| Manual Bass | |
| Upper 1 Mute Mute of the Upper 1 track | |
| Upper 2 Mute Mute of the Upper 2 track | |
| Upper 3 Mute Mute of the Upper 3 track | |
| Lower Mute Mute of the Lower track | |
| Song Melody Mute Mute of the Song's track 4 (usually, the Melody track) | |
| Song Drum&Bass M | ute of all tracks, apart for track 2 (usually Bass) and 10 (usually Drum) |
| Function Meaning | |
| Style Change | Same functions of the control panel buttons with the same name |
| Single Touch | |
| Style Up Selects the next Style | |
| Style Down Selects the previous Style | |
| Perform. Up Selects the next | Performance |
| Perform. Down Selects the previous Performance | |
| Program Up Selects the next | Program |
| Program Down Selects the previous Program | |
| STS Up Selects the next ST$ | |
| STS Down | Selects the previous STS |
| STS1 | Selects the STS #1 |
| STS2 | Selects the STS #2 |
| STS3 | Selects the STS #3 |
| STS4 | Selects the STS #4 |
| Punch In/Out | Turns the Punch Recording on/off |
| FX CC12 Sw. | Standard FX controllers |
| FX CC13 Sw. | |
| Fx A mute | Mute of the Internal FX A |
| Fx B mute | Mute of the Internal FX B |
| Fx C mute | Mute of the Internal FX C |
| Fx D mute | Mute of the Internal FX D |
| All Fx mute Mute of all Internal FXs | |
| Drum mute | Mute of the Drum track |
| Perc mute | Mute of the Percussion track |
| Bass mute | Mute of the Bass track |
| Acc1 mute | Mute of the Acc1 track |
| Acc2 mute | Mute of the Acc2 track |
| Acc3 mute | Mute of the Acc3 track |
| Acc4 mute | Mute of the Acc4 track |
| Acc5 mute | Mute of the Acc5 track |
| Acc 1/5 mute | Mute of all Acc tracks |
| Ens. on/off | Ensemble on/off |
| Quarter tone | Quarter Tone on/off |
| Chord Latch | Holds the recognized chord until the pedal is released |
| Chord Latch+Damper | Holds the recognized chord until the pedal is released, and sustains tracks where the Damper has been turned on |
LIST OF FUNCTIONS ASSIGNABLE TO THE PEDAL OR ASSIGNABLE SLIDER
The following functions can be assigned to a continuous pedal or to the Assignable Slider.
| Function Meaning | |
| Master volume Master Volume | |
| Accomp.Volume Accopaniment Volume | |
| Kb Expression Keyboard Expression | |
| Function Meaning | |
| Joystick +X Joystick right | |
| Joystick -X Joystick left | |
| Joystick +Y Joystick forward | |
| Joystick -Y Joystick backward | |
| Vdf cutoff (RT tracks) Filter | utoff (on the Programs assigned to the Realtime tracks) |
| FX CC12 Ctl | Standard FX controllers |
| FX CC13 Ctl |
LIST OF SOUNDS ASSIGNABLE TO THE PADS
You can assign the following sounds to the Pads.
| SOUND NAME SOUND | NAME SOUND NAME SOUND NAME | ||||||
| 1 | ChinaGong | 36 | DistSlid2 | 71 | Darbuka1 | 106 | HeartBeat |
| 2 | Crash 1 | 37 | Sticks | 72 | Darbuka2 | 107 | Footstep1 |
| 3 | Crash 2 | 38 | Cowbell | 73 | Darbuka3 | 108 | Footstep2 |
| 4 | 88 Crash | 39 | Agogo 1 | 74 | Darbuka4 | 109 | Stadium |
| 5 | Ride 1 | 40 | Agogo 2 | 75 | Darbuka5 | 110 | DoorCreak |
| 6 | Ride 2 | 41 | Whistle 1 | 76 | Darbuka6 | 111 | DoorSlam |
| 7 | China | 42 | Whistle 2 | 77 | Darbuka7 | 112 | CarEngine |
| 8 | Ride Bell | 43 | Sh. Guiro | 78 | Darbuka8 | 113 | Car Stop |
| 9 | Splash | 44 | LongGuiro | 79 | DoufRimAk | 114 | Car Pass |
| 10 | RevCymbal | 45 | Cuica 1 | 80 | Tef 1 | 115 | Car Crash |
| 11 | DragonGng | 46 | Cuica 2 | 81 | Tef 2 | 116 | Crickets |
| 12 | OrchCymb1 | 47 | Triangle1 | 82 | Tef 3 | 117 | Train |
| 13 | OrchCymb2 | 48 | Triangle2 | 83 | Tef 4 | 118 | Helicopter |
| 14 | OrcSdRoll | 49 | 88Cowbell | 84 | Tef 5 | 119 | Gun Shot |
| 15 | OrchSnare | 50 | TimbLow | 85 | Tef 6 | 120 | MachinGun |
| 16 | Timpani 1 | 51 | TimbHi | 86 | Rik 1 | 121 | Laser Gun |
| 17 | Timpani 2 | 52 | TimbRim1 | 87 | Rik 2 | 122 | Explosion |
| 18 | Timpani 3 | 53 | TimbRim2 | 88 | Rik 3 | 123 | Dog |
| 19 | Timpani 4 | 54 | CongaLow | 89 | RekDomAk | 124 | H. Gallop |
| 20 | Orch. Hit | 55 | CongaHi | 90 | OpenBells | 125 | Birds 1 |
| 21 | BrassFall | 56 | CongaSlap | 91 | Sagat 1 | 126 | Birds 2 |
| 22 | Ch. Bell | 57 | CongaMute | 92 | Sagat 2 | 127 | Thunder |
| 23 | JingleBel | 58 | Tamb.Acc1 | 93 | Davul | 128 | Sea Shore |
| 24 | WindChim1 | 59 | Tamb.Acc2 | 94 | Ramazan 1 | 129 | River |
| 25 | WindChim2 | 60 | Tamb.Push | 95 | Ramazan 2 | 130 | Bubble |
| 26 | WindChim3 | 61 | TambOpen | 96 | Ramazan 3 | 131 | Cat |
| 27 | VibraSlap | 62 | Castanet1 | 97 | Kup 1 | 132 | Lion |
| 28 | RainStick | 63 | Castanet2 | 98 | Kup 2 | 133 | PhoneRing |
| 29 | Scratch 1 | 64 | Aah ! | 99 | Kup 3 | 134 | Applause |
| 30 | Scratch 2 | 65 | Uuh ! | 100 | Kup 4 | 135 | Wind |
| 31 | Scratch 3 | 66 | Yeah ! 1 | 101 | Baya 1 | 136 | Starship |
| 32 | Scratch 4 | 67 | Yeah ! 2 | 102 | Baya 2 | 137 | Jetplane |
| 33 | Scratch 5 | 68 | Hit It ! | 103 | Laughing | 138 | Siren |
| 34 | Scratch 6 | 69 | Hollo 1 | 104 | Scream | 139 | Cosmic |
| 35 | DistSlid1 | 70 | Hollo 2 | 105 | Punch | ||
LIST OF FUNCTIONS ASSIGNABLE TO THE PADS
You can assign the following functions to the Pads, and use them as switch controls.
| Function | Meaning |
| StyleUp | Selects the next Style |
| StylDown | Selects the previous Style |
| PerfUp | Selects the next Performance |
| PerfDown | Selects the previous Performance |
| ProgUp | Selects the next Program |
| ProgDown | Selects the previous Program |
| PunchI/O | Turns the Punch Recording on/off |
| FxA Mute | Mute of the Internal FX A |
| FxB Mute | Mute of the Internal FX B |
| FxC Mute | Mute of the Internal FX C |
| FxD Mute | Mute of the Internal FX D |
| Fx Mute | Mute of all Internal FXs |
| Upp1Mute | Mute of the Upper 1 track |
| Upp2Mute | Mute of the Upper 2 track |
| Upp3Mute | Mute of the Upper 3 track |
| Low Mute | Mute of the Lower track |
| DrumMute | Mute of the Drum track |
| PercMute | Mute of the Percussion track |
| BassMute | Mute of the Bass track |
| Acc1Mute | Mute of the Acc1 track |
| Acc2Mute | Mute of the Acc2 track |
| Acc3Mute | Mute of the Acc3 track |
| Acc4Mute | Mute of the Acc4 track |
| Acc5Mute | Mute of the Acc5 track |
| Acc Mute | Mute of all Acc tracks |
| Mel.Mute | Mute of the Song's track 4 (usually, the Melody track) |
| Drum&Bas | Mute of all tracks, apart for track 2 (usually Bass) and 10 (usually Drum) |
| QuarterT | Quarter Tone on/off |
| Fx CC12 | Standard FX controllers |
| Fx CC13 |
SCALES
The following is a list of scales (or tunings) you can select in Style Play ("Scale" on page 44) and Global ("Scale" on page 125) modes.
Equal Equal tuning, the standard scale for modern Western music. It is made of 12 identical semitones.
Pure Major Major chords in the selected key are perfectly tuned.
Pure Minor Minor chords in the selected key are perfected tuned.
Arabic An arabic scale, using quarters of tone. Set the Key parameter as follow:
C - for the "rast C/bayati D" scale
D - for the "rast D/bayati E" scale
F - for the "rast F/bayati G" scale
G - for the "rast G/bayati A" scale
A# - for the "rast Bb/bayati C" scale
PythagoreanPythagorean scale, based on the music theories of the great Greek philosopher and matematician. It is most suitable for melodies.
Werckmeister
Late Baroque/Classic Age scale. Very suitable for XVIII Century music.
Kirnberger Harpsichord scale, very common during the XVIII Century.
Slendro Scale of the Indonesian Gamelan. The octave is divided in 5 notes (C, D, F, G, A). The remaining notes are tuned as in the Equal tuning.
Pelog Scale of the Indonesian Gamelan. The octave is divided in 7 notes (all white keys, when Key is = C). The black keys are tuned as in the Equal tuning.
Stretch Simulates the “stretched” tuning of an acoustic piano. Basically an equal tuning, the lowest notes are slightly lower, while the highest notes are slightly higher than the standard.
User scale i.e. scale programmed by the user for the Style Play, Backing Sequence and Song Play modes. The user scale can be saved to a Performance, Style Performance, STS or Song. You can't select a User scale in Global mode.
20. MIDI CONTROLLERS
The following is a table including all Control Change messages, and their effect on various microAR-RANGER functions.
| CC# CC Name microARRANGER Function | ||
| 0 Bank | Select Program selection | |
| 1 Mod1 | (Y+) Joystick forward | |
| 2 Mod2 | (Y-) Joystick backward | |
| 3 Undef. | ctl | |
| 4 Foot | ctl | |
| 5 Port.time | ||
| 6 Data ent. | ||
| 7 Volume Track volume | ||
| 8 Balance | ||
| 9 Undef. | ctl | |
| 10 Pan Pot Track panning | ||
| 11 Expression | Expression | |
| 12 Fx Ct | 1 | |
| 13 Fx Ct | 2 | |
| 14-15 | Undef. ctlp | |
| 16 Gen.pc.1 | ||
| 17 Gen.pc.2 | ||
| 18 Slider | ||
| 19 Gen.pc.4 | ||
| 20-31 | Undef. ctlpp | |
| Control Change #32-63 are the LSB (Least Significant Bytet) of Control Change #0-31, i.e. the MSB (Most Significant Byte), and are changed according to their MSB counterparts. | ||
| 64 Damper Damper pedal | ||
| 65 Portamento | ||
| 66 Sostenuto | Sostenuto pedal | |
| 67 Soft pedal | Soft pedal | |
| 68 Legato | ||
| 69 Hold 2 | ||
| 70 Sustin level | ||
| 71 F.Res.Hp | Filter | resonance |
| CC# CC Name microARRANGER Function | ||
| 72 Release | Release time | |
| 73 Attack | Attack time | |
| 74 | F.CutOff | Filter cutoff (Brilliance) |
| 75 Decay T. | Decay time | |
| 76 Lfo1 Sp. | Vibrato speed | |
| 77 Lfo1 Dpt | Vibrato depth | |
| 78 | Lfo1 Dly | Vibrato initial delay |
| 79 FilterEgp | ||
| 80 Gen.pc.5 | ||
| 81 Gen.pc.6 | ||
| 82 Gen.pc.7 | ||
| 83 Gen.pc.8 | ||
| 84 Port.ctl | ||
| 85-90 | Undef. ctl | |
| 91 | Fx A/C | A/C (reverb) send level |
| 92 Fx 2 ctl | ||
| 93 Fx B/D | B/D (modul.) send level | |
| 94 Fx 4 ctl | ||
| 95 Fx 5 ctl | ||
| 96 Data Inc | ||
| 97 Data Dec | ||
| 98 NRPN Lsb | ||
| 99 NRPN Msb | ||
| 100 | RPN Lsb | |
| 101 | RPN Msb | |
| 102-119 | Undefined ctl | |
| 120 | AllISOff | |
| 121 | Res Ctl | Reset All Controllers |
| 122 | LocalCt | |
| 123 | NoteOff | |
| 124 | OmniOff | |
| 125 | Omni On | |
| 126 | Mono On | |
| 127 | Poly On | |
MIDI IMPLEMENTATION CHART
KORG microARRANGER
Mode 1: OMNI ON, POLY
Mode 3: OMNI OFF, POLY
Mode 2: OMNI ON, MONO
Mode 4: OMNI OFF, MONO
O: Yes
X: No
21. PARAMETERS
Control panel and operating modes parameters
The following table shows the parameters you can save to memory when pressing the WRITE button in the various operating modes and edit environments.
| Page | Parameter Performance | Single Touch Setting (STS) | Style Performance | Global | Seq1+Seq2 Setup | Note | |
| Control Panel | |||||||
| - Master Volume (Slider) ---- | |||||||
| Acc./Seq Volume (Slider) ---- | |||||||
| Assignable Slider ---- | √(function) | - | |||||
| Selected Mode ---- | |||||||
| Memory ---- | |||||||
| Bass Inversion ---- | |||||||
| Manual Bass ---- | |||||||
| Split Point ---- | √ | - Not saved to card | |||||
| Groove Quantize ---- | |||||||
| Tempo Lock | ---- | ||||||
| Single Touch | ---- | ||||||
| Selected Style Number | √ | ----General parameter | |||||
| Synchro Start/Stop | ---- | ||||||
| Fade In/Out | ---- | ||||||
| Style Element(V1, V2, V3, V4, Fill 1/2,Count In, Intro 1/2, Ending 1/2) | √ | - | √ | - | General parameters | ||
| Ensemble On/Off | √ | √ --- | |||||
| Chord Scanning | √ | √ --- | |||||
| Keyboard Mode | √ | √ --- | |||||
| Style Change | ---- | ||||||
| Perf./Program | ---- | ||||||
| Program Change | √√√-- | Separate tracks | |||||
| Octave Transpose | √√√-- | ||||||
| Master Transpose | √ | - | √ | - | General parameters | ||
| Tempo | √ | - | √ | - | |||
| Display Hold | ---- | ||||||
| Style Play Mode | |||||||
| Main | Program | √ | √ | √ | - | - | Separate tracks |
| Play/Mute status | √√√-- | ||||||
| 1 | Volume | √ | √ | √ | - | - | |
| 2 | Par | √√√-- | |||||
| 3 FX | Send Level √√√-- | ||||||
| 4 Detune | √√√-- | ||||||
| 5 | Scale | √ | √ | - | - | - | General parameters |
| Key | √ | √ | - | - | - | ||
| Note | √ | √ | - | - | - | ||
| Detune | √ | √ | - | - | - | ||
| 6 | Pitchbend Sensitivity | √ | √ | √ | - | - | Separate tracks |
| 7-8 | FX Select (A, B, C, D) | √(A, B, C, D) | √(C, D) | √(A, B) | - | - | General parameters |
| Modulating Track | √(A/B, C/D) | √(C/D) | √(A/B) | - | - | ||
| B>A (or D>C) Send | √(A/B, C/D) | √(C/D) | √(A/B) | - | - | ||
| 9-12 | FX Parameters (A, B, C, D) | √(A/B, C/D) | √(C/D) | √(A/B) | - | - | |
| 13 | Easy Program Edit | √ | √ | √ | - | - | Separate tracks |
| 14 | Track Mode | √ | √ | √ | - | - | |
| 15 | Track Internal/External | √ | √√-- | ||||
| 16 | Damper | √√√-- | Only Realtime tracks | ||||
| Expression | √√--- | ||||||
| 17 | Joystick X | √ | √ | - | - | - | |
| Joystick Y | √ | √ | - | - | - | ||
| 18 | Dynamic Range | √ | √ | - | - | - | |
| 19 | Ensemble Track | √ | √ | - | - | - | General parameters |
| Ensemble Type | √ | √ | - | - | - | ||
| Dynamic | √ | √ | - | - | - | ||
| Tempo | √ | √ | - | - | - | ||
| Feedback | √ | √ | - | - | - | ||
| 20 | V1-V4 Drum Map | √ | - | √ | - | - | |
| Kick Designation | √ | - | √ | - | - | ||
| Snare Designation | √ | - | √ | - | - | ||
| Fill 1/2 | √ | - | √ | - | - | ||
| 21 | Program (Original/On) | √ | - | √ | - | - | Only Style tracks, globally |
| Wrap Around | √ | - | √ | - | - | Only Style tracks | |
| Keyboard Range (Original/Off) | √ | - | √ | - | - | ||
| Page | Parameter | Performance | Single Touch Setting (STS) | Style Performance | Global | Seq1+Seq2 Setup | Note |
| 22 | Pad 1-4VolumePanC Send LevelD Send Level | √√√√√√√ | √√√√√√√ | -- | -- | -- | General parameters |
| -- | -- | -- | |||||
| -- | -- | -- | |||||
| 23 | Pad Lock ---√ - | ||||||
| Scale Lock ---√ - | |||||||
| Auto Octave Lock ---√ - | |||||||
| Master Transpose Lock ---√ - | |||||||
| 24 | Chord Recognition Mode ---√ - | ||||||
| Scale Mode ---√ - | |||||||
| Memory Mode ---√ - | |||||||
| Velocity Control ---√ | - | ||||||
| Song Play Mode | |||||||
| Main Program ---- | Separate tracks | ||||||
| 1 Volume ---- | |||||||
| 2 Pan | ---- | ||||||
| 3 FX | Send Level | ---- | General parameters | ||||
| 4 | FX Select (A, B, C, D)Modulating TrackB>A (or D>C) Send | -- | -- | -- | -- | √√ | |
| -- | -- | -- | -- | √ | |||
| -- | -- | -- | -- | √ | |||
| 5-6 | FX Parameters (A, B, C, D) | -- | -- | -- | -- | √ | |
| 7 Track Mode ---- | Separate tracks | ||||||
| 8 Track Internal/External | ----√ | ||||||
| 9 | Jukebox | -- | -- | -- | -- | -- | List saved to card |
| 10 | Link Mode | ----√ | -- | General parameters | |||
| S2 FX Mode | -- | -- | -- | √ | -- | ||
| Performance FX Mode | ----√ | -- | |||||
| Song Mode | |||||||
| Song data | See table "Style and Song parameters" | ||||||
| Global Edit Environment | |||||||
| 1 | Velocity Curve ---√ - | General parameters | |||||
| Master Tune | ----√ | -- | |||||
| ScaleKey | -- | -- | -- | √√ | -- | ||
| -- | -- | -- | √ | -- | |||
| Speakers On/Off | -- | -- | -- | -- | -- | Set to "On" at startup | |
| Metronome Volume | ----√ | -- | General parameters | ||||
| 2 | Master Transpose on ......Style/Realtime tracks...Seq 1/2...Midi InScale Transpose Position | -- | -- | -- | √√√√√ | -- | |
| -- | -- | -- | √√√ | -- | |||
| -- | -- | -- | √ | -- | |||
| 3 | Pedal/Switch Function | ----√ | -- | ||||
| Assignable Slider Function | ----√ | -- | |||||
| Damper Polarity | ----√ | -- | |||||
| Footswitch Polarity | ----√ | -- | |||||
| 4 MIDI Setup Preset | ---- | ||||||
| 5 | Local On/Off | -- | -- | -- | -- | -- | Set to "On" at startup |
| Clock | -- | -- | -- | -- | -- | Set to "Int" at startup | |
| Clock Send | -- | -- | -- | √ | -- | General parameters | |
| 6 | Midi In Channels (1...16) | -- | -- | -- | √ | -- | Separate tracks |
| 7 | Chord 1 ChannelChord 2 Channel | -- | -- | -- | √√ | -- | General parameters |
| -- | -- | -- | √ | -- | |||
| Velocity Input | ----√ | -- | |||||
| 8 | Upper OctaveLower OctaveOctave Transp. on the Midi In | -- | -- | -- | √√√ | -- | |
| -- | -- | -- | √√ | -- | |||
| Mute In | ----√ | -- | |||||
| 9 MIDI In Filters (1...8) | ----√ | -- | |||||
| 10 | Midi Out Channels (1...16) | -- | -- | -- | √ | -- | Separate tracks |
| 11 | Midi Out Filters (1...8) | -- | -- | -- | √ | -- | General parameters |
| Card Edit Environment | |||||||
| Global Protect | -- | -- | -- | √ | -- | Not saved to card | |
| Factory Styles Protect | -- | -- | -- | -- | -- | Set to "On" at startup | |
Style and Song parameters
The following table is a list of data saved (to memory or card) when editing a Style or a Song.
Note: When saving a Song to card as a Standard MIDI File (SMF), all parameters are converted to ordinary track parameters. Pa80 exclusive data are converted to SysEx or Meta-Events, that will be ignored when reading the SMF on a different keyboard or sequencer.
| Style Song | ||||||
| Parameter | Header | Tracks | Master Track | Header | Tracks | Master Track |
| Volume (GM Master Volume)(a) | ---√---√ | |||||
| Tempo---√---√ | ||||||
| Meter (Time Signature)√---√---√ | ||||||
| Programs(b) | √---√√ | - | ||||
| Note On/Off---√---√ | - | |||||
| Pitch Bend---√---√ | - | |||||
| After Touch | ---√---√ | - | ||||
| Control Change(c) | ---√---√ | - | ||||
| Quarter Tone(a) | - | - | - | - | - | √ |
| Quarter Tone Reset(a) | - | - | - | - | - | √ |
| Chord Variation Length | √---- | |||||
| Original Key/Chord | √---- | |||||
| NTT | √---- | |||||
| Expression | √ | √ | - | √ | √ | - |
| Keyboard Range | √---- | |||||
| Chord Variation Table | √---- | |||||
| Retrigger Mode | √---- | |||||
| Tension | √---- | |||||
| Play/Mute status(a) | ---√--- | |||||
| Master Transpose(a) | ---√--- | |||||
| Volume | ---√√ | - | ||||
| Pan | ---√√ | - | ||||
| FX Block(a) | ---√--- | |||||
| FX Send | ---√√ | - | ||||
| Detune | ---√√ | - | ||||
| Scale(a) | - | - | - | √ | - | √ |
| Key | - | - | - | √ | - | √ |
| Note | - | - | - | √ | - | √ |
| Detune | - | - | - | √ | - | √ |
| Scale Yes/Nd(a) | ---√--- | |||||
| Pitch Bend Range | ---√√ | - | ||||
| FX Select (A, B, C, D)(a) | ---√---√ | |||||
| Modulation Track(a) | ---√--- | |||||
| FX Feedback Send (B>A or D>C)(a) | ---√---√ | |||||
| FX Parameters (A, B, C, D) | ---√--- | |||||
| Easy Program Edit | ---√√ | - | ||||
| Track Mode(a) | ---√--- | |||||
| Internal/External Mode | ------- | |||||
(a) Saved as SysEx data.
(b) For this Program to be used in a Style, the "Prog" parameter should be set to "Orig" in the Style Play mode. See "Prog (Program)" on page 49.
(c) Not all Control Change messages are allowed in Styles. Please see "List of recorded events" on page 54 for more information.
22. RECOGNIZED CHORDS
The following pages show the most important chords recognized by the Korg Pa80, when the selected Chord Recognition mode is Fingered 2 (see “Chord Recognition Mode” on page 51). Recognized chords may vary with a different Chord Recognition modes.
Major
3-note

2-note
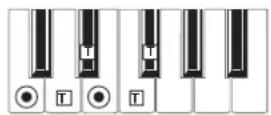
Major 6th
4-note
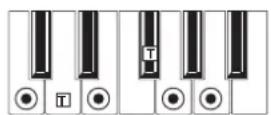
2-note
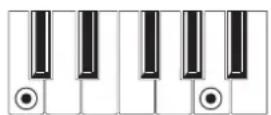
Major 7th
4-note

3-note

2-note
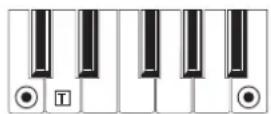
Sus 4
3-note
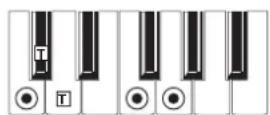
2-note
Sus 2
3-note
Dominant 7th
4-note

3-note

2-note

Dominant 7th Sus 4
4-note
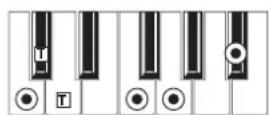
3-note
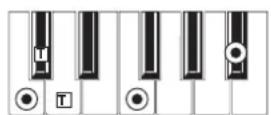
Dominant 7th ^b5
4-note
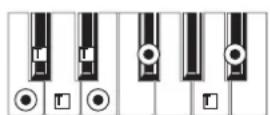
Major 7th b5
4-note

Major 7th Sus 4
4-note
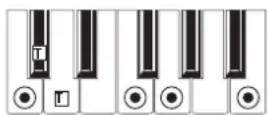

= constituent notes of the chord = can be used as tension
Minor
3-note

2-note
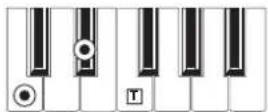
Minor 6th
4-note
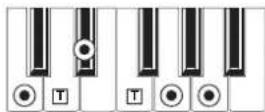
Minor 7th
4-note
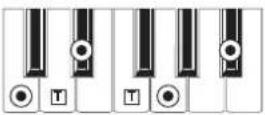
3-note

Minor-Major 7th
4-note

3-note

Diminished
3-note
Diminished Major 7th
4-note
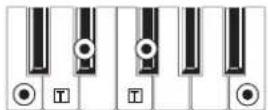
Minor 7th b5
4-note
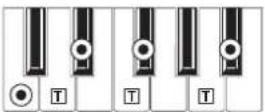
Augmented
3-note

Augmented 7th
4-note
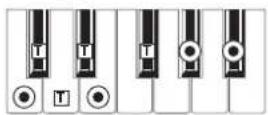
Augmented Major 7th
4-note

No 3rd
No 3rd, no 5th
1-note2-note
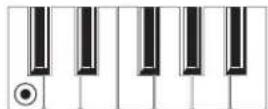

T constituent notes of the chord = can be use
23. ERROR MESSAGES & TROUBLESHOOTING
ERROR MESSAGES
Your microARRANGER can communicate with you using various messages. Here is the list of these messages.
Messages can be of two different types:
- Waiting for your confirmation (Yes – No). Press ENTER/YES to go on, EXIT/NO to stop.
- Revealing an error or failure. Press any button on the front panel.
General
Another Command Is Running (Press Exit)
You can't execute a command until the one that is running is completed.
Are you sure? (Enter/Exit)
This is a confirmation request before many operations. Press ENTER/YES to confirm, EXIT/NO to abort.
Generic error
Some undefined error has happened.
Record Aborted
There is not enough memory to enter the Style Record, Song Record, or Backing Sequencer Record mode.
Style Play
Corrupted Style Perform. – Save It Again
The Style Performance was damaged. Press WRITE, and select the Current Style option, to save it to memory again.
Style Select Fails
microARRANGER was not able to complete the operation.
Style Record
Arranger is Running! (Press Exit)
While in Style Record mode, this message may appear when you try to select a different track, or execute an edit operation, while the Arranger is running.
Low memory!
The space in the SSD (the space where User Styles are stored) is going low. Exit Record, then load some banks of smaller Styles before entering Record again.
Style Copy Failed (Press Exit)
microARRANGER was not able to complete the Copy operation.
Style Delete Failed (Press Exit)
microARRANGER was not able to complete the Delete operation.
Style Save Failed (Press Exit)
microARRANGER was not able to complete the Save operation.
Style Select Failed (Press Exit)
microARRANGER was not able to complete the selection.
SMF Import Failed! (Press Exit)
There was an error while reading the Standard MIDI File with the Import SMF function. The file may be corrupted.
Backing Sequence Mode
Too Many Styles! (Press Exit)
You have recorded the maximum number of Styles allowed (depending on the memory, 10 to 15 Style changes).
Song Play
Cannot Load JBX File to Seq 2 (Press Exit)
You can't load a Jukebox (JBX) file to Sequencer 2. Jukebox files can only be loaded to Sequencer 1.
Juke Box List Empty! (Press Exit)
You are trying to start playing back a Jukebox list, but the list is empty. Please add some Songs to the list.
Juke Box List Full! (Press Exit)
A Jukebox list may contain up to 127 Songs. You were trying to add one Song more.
Save Song List: Insert Card and Press Enter
You are saving a list of Songs. Please insert a card and press ENTER.
Save JBX List: Insert Card and Press Enter
You are saving a list of Songs as a JBX file. Please insert a card and press ENTER.
Wait Please
You were trying to load a file, while microARRANGER is still loading another one.
Song
Too Many Events
You have tried to copy too many events on the same tick.
Out of Memory!
The memory limit for a Song (300KB) has been reached.
Incompatible Meter
You were trying to copy a track on a track with a different meter.
Sequencer is Running! (Press Exit)
While in Song Record mode, this message may appear when you try to select a different track, or execute an edit operation, while the Sequencer is running.
Song Play and Song mode
Cannot load Jukebox file on Seq.2
You can load a Jukebox file only on Sequencer 1.
Damaged Standard Midi File
The Standard MIDI File you are trying to load is damaged, and cannot be played back.
Jukebox list is empty
You tried to delete a Song in an empty Jukebox list, or to save an empty Jukebox list.
Jukebox list is full
The Jukebox list already contains 127 Songs.
Not a Standard Midi File
The selected file is not a Standard MIDI File, and cannot be played back. Select a ".MID" or ".KAR" file. microARRANGER can play back Standard MIDI Files in 0- and 1-format.
Standard Midi File format 2
You have tried to read a Format 2 Standard MIDI File. microARRANGER can't play this kind of file. Select a Standard MIDI Files in 0- and 1-format.
Program
Overwrite Program? (Enter/Exit)
You are trying to store a Program to a memory location already occupied by a Program. Press ENTER to overwrite it, or EXIT to abort.
Card mode
Can't Read Card! (Press Exit)
The card is probably damaged. Try again. If the message appears again, try with a different card.
Can't Read File! (Press Exit)
The file you are trying to load, copy, erase or rename is damaged, or has a null size (0 kb), thus can't be read. This message during a New Dir operation means there are problems on the card. Try loading the file from a different card.
Copy Failed! (Press Exit)
An error occurred during Copy. Copy operation aborted.
Copy: Invalid Destination (Press Exit)
You tried to copy an ordinary file or folder into a ".SET" folder.
Corrupted Style Perf. Save it again
The Style Performance is damaged. Save it again by pressing WRITE, and selecting the “Current Style” option.
Delete all data. Continue? (Enter/Exit)
Formatting will delete all data on the card you are ready to format. Be sure you have a copy of all data you wish to preserve.
Delete Destin. Files Failed! (Press Exit)
The file you were trying to overwrite could not be deleted.
Destination File Exists (Press Exit)
The file you are trying to copy already exists on target.
Directory Full (Press Exit)
You reached the maximum folder number for the root of the selected card. Delete some files, or replace the card.
Directory Not Empty (Press Exit)
You were trying to delete a directory still containing files. Delete these files, then delete the directory.
Directory not found (Press Exit)
The directory is not in the current card. The card has probably been replaced before finishing the card operation. Insert the card again, and try again.
Card Full (Press Exit)
The selected medium (card) is full. Delete files you are not interested to keep, or replace the card with an empty one. Then, try again.
Card not empty! (Sh+Enter to Format)
During a Backup, you inserted a card containing some data. Please replace it with an empty one, or press SHIFT+ENTER to start formatting the card.
Card write-protected
The card is write-protected. Move the protection tab to close the hole, and try again. Be sure there aren't data you don't want to overwrite. Otherwise, replace the card with an empty one.
Erase Failed! (Press Exit)
An error occurred during Erase. Erase operation aborted.
Error while converting (Press Exit)
While trying to load Korg i-series data, some errors occurred. The original file is probably corrupted, or its structure is too different from microARRANGER or Pa-series data.
Error while formatting medium
An error was reported when formatting the medium (card). The format procedure has been aborted. Try again. If formatting a card, replace the card and try again.
Error while Writing! (Press Exit)
An error was reported while writing on the medium (card). The procedure has been canceled. Select a different medium, and try again.
Existing Files Not Copied (Press Exit)
After a Copy procedure (no Overwrite selected), all files sharing the same name have not been copied.
Factory Styles Protected! (Press Exit)
The “.SET” file you just loaded included some banks of Factory Styles. Since the Factory Style Protect flag was switched on, Factory Style banks were not loaded. (See “Factory Style Protect” on page 142).
Fast Format Failed. Full Format? (Enter/Exit)
The Fast Format procedure failed. Press ENTER to go on with a Full Format procedure (slower).
File is protected
You have tried to write over a read-only or system file. microARRANGER can't write over this kind of files. Should you need to write over one of these file, use a personal computer to change the file's properties, then try again. Read your computer's user's manual.
File/Dir Already Existing (Press Exit)
During a Rename or New Dir operation, you were trying to use an existing name. Use a different name.
File in Use (Press Exit)
The file you tried to delete is in use by another procedure. Wait for the procedure to be completed, then try again.
Files in Use Not Deleted (Press Exit)
This message may appear during an Erase operation. Files used by other procedures have not been erased.
Files in use have not been overwritten
This message may appear during a Copy with Overwrite operation. Files used by other procedures have not been copied.
File Is Protected (Press Exit)
You were trying to overwrite a protected file.
File Not Found (Press Exit)
The file is not in the current medium. The card has probably been replaced before finishing the card operation. Insert the card again, and try again.
Format Completed (Press Exit)
Formatting has been successfully completed.
Format aborted (Press Exit)
Format operation aborted.
Format failed! (Press Exit)
An error occurred during Format. Format operation aborted.
Illegal name (Press Exit)
The name is not allowed on microARRANGER.
Insert an SD card and press Enter
While saving the operating system "Save OS" on page 141, or executing a Backup procedure (see "Backup Data" on page 141), microARRANGER asks for a card.
Invalid Copy Parameter (Press Exit)
The copy operation was not possible. Maybe you were trying to copy a file over itself, or copying nested folders.
Load Failed! (Press Exit)
The Load procedure has not been executed. Try again, or try with different files.
Make New Dir Failed! (Press Exit)
While trying to create a new directory, an error occurred.
Media Write-Protected (Press Exit)
The card is physically protected. Remove the protection, and try again.
Memory full
This message appears in Backing Sequence mode, when the memory for recording a Song is full.
No Card/Unformatted. (Sh+Enter to Format)
Either there is no card in the drive, or the card is unformatted. Insert a card, and try again, or press SHIFT+ENTER to start formatting the card.
Not a Pa-series or Corrupted File
The file you are trying to load is not compatible with microARRANGER or Pa-series instruments.
Not Enough Space on Media
There is no more space to load, save or copy data. The card operation will be aborted. Replace the card, and use an empty card to save your data. Should this message appear during loading, the SSD (Solid State Disk)-based internal memory is full.
Nothing to Rename (Press Exit)
There are no items to rename.
Overwrite Existing File? (Yes/No)
You are writing data on an existing ".SET" folder, or on a file of type ".MID" or ".JBX".
Overwrite on Backup? (Enter/Exit)
Press ENTER/YES to overwrite files carrying the same name on the target device, or EXIT/NO to avoid overwriting any file.
Overwrite on Copy? (Enter/Exit)
Press ENTER/YES to overwrite files carrying the same name on the target device (Press Exit)/NO to avoid overwriting any file. File that are not yet on card are always copied.
Overwrite Protected Files? (Enter/Exit)
Protected files cannot usually be overwritten. By pressing ENTER, you can overwrite them during the current operation.
Rename: Invalid Name (Press Exit)
You can't use the name you entered. Please retry and select a different name.
Rename: New Name Must Be a \".SET\
You can't modify a ".SET" folder extension.
Rename Failed! (Press Exit)
An error occurred during Rename. Rename operation aborted.
Save Failed! (Press Exit)
An error occurred during Save. Save operation aborted.
Some Files Missing (Press Exit)
This message may appear at the end of a Restore operation. Some User file may be missing. This is not a problem for the Factory Data integrity.
Unit Not Found (Press Exit)
You were trying to access a storage device not available on your instrument.
Unformatted medium
You have selected a medium (card) that is not yet formatted, or is in a format that microARRANGER can't recognize. Format the medium using the Format procedure (see "Page 5 - Format" on page 140).
Wait
microARRANGER is busy with a card operation.
TROUBLESHOOTING
| Problem Solution Page | ||
| General problems | ||
| Power does not turn on | Make sure that (1) the power cable is plugged into the outlet, (2) the cable is plugged into the connector on the back of the instrument, (3) and is not damaged, (4) there are no problems with the mains. | |
| Is the power switch turned ON? | ||
| If the power still does not turn on, contact your dealer or the nearest KORG Service Center. | ||
| No sound | Is a jack connected to the HEADPHONES connector? This would disable the internal speakers. 22 | |
| Check the connections of your amp or mixer. 22 | ||
| Make sure that all the components of the amplifying system are turned on. | ||
| Are the MASTER VOLUME or ASSIGN.SLIDER sliders of the microARRANGER set to a position other than "0"? | 12 | |
| Is the Local parameter set to Off? Turn it On. 127 | ||
| Is the Speaker parameter set to Off? Turn it On. 125 | ||
| Is the Attack parameter value too high? Set it to a lower value, to let the sound start faster. Is the Volume parameter too low? Set it to a higher value. | 4345 | |
| Lowest note are not played | When the SPLIT button is lit up, the keyboard will be divided into the Lower part (low notes, below the split point) and the Upper part (high notes, above the split point). Is the Lower track muted? Unmute it. | 24 |
| Wrong sounds | Do the USER banks contain modified data? Load the appropriate data for the Song or the Style you wish to playback. | 133 |
| Has one of the USER Drum Kits been modified? Load the appropriate Drum Kits. 133 | ||
| Have the Styles or Performances been modified? Load the appropriate data (Styles or Performances). | 133 | |
| Sound does not stop | Make sure that the damper switch polarity parameter is set correctly. | 126 |
| The selected Style or Song cannot start | Make sure that the Clock parameter is set to Int. If you are using the MIDI Clock of another device, you must set the MIDI Clock parameter to MIDI, and make sure that the external device transmits MIDI Clock data. | 127 |
| Does not respond to MIDI messages | Make sure that all MIDI cables are connected correctly. | 22 |
| Make sure that the external device is transmitting through MIDI channels enabled to receive in the microARRANGER. | 4779 | |
| Make sure that the MIDI IN Filters of the microARRANGER do not prevent the reception of messages. | 129 | |
| Percussive instruments are not played correctly | Make sure that the Percussion and Drum Track is set to Drum Mode and the external device has not transposition applied. | 4678 |
| Some "clicks" can be heard when playing a percussive instrument | This is part of the sound, and not a problem. | |
| A background noise can be heard after selecting a Performance, Style or STS | The selected Performance, Style or STS recalled the effect "15 Analog Record", simulating the noise of a old vinyl recording. | |
| Card related problems | ||
| Cannot format a card | Is the card inserted correctly? | 130 |
| Cannot save data to a card | Is the card formatted? | 140 |
| Is the card inserted correctly? | 130 | |
| Cannot load data from a card | Is the card inserted correctly? | 130 |
| Does the card contain data compatible with the microARRANGER? | 131 | |
24. TECHNICAL SPECIFICATIONS
| Model: KORG microARRANGER | |
| Keyboard | 61 keys (C2–C7), natural-touch mini-keyboard with velocity |
| Operating System KORG OPOS (O | bjective Portable Operating System). Multitasking, Load-While-Play feature. SSD (Solid State Disk)-resident. Upgradable from SD card. |
| Display Backlit custom LCD | |
| Data storage | 8MB (>20MB equivalent) Internal Solid State Disk (SSD), SD/MMC card slot. |
| Sound generation system KORG HI | - Hyper Integrated. |
| Polyphony 62 voices, 62 oscillators. | Filters with resonance. |
| Multitimbricity 40 tracks (2 x 16 Sequencer, 4 Realtime, 4 Pads) | |
| Sound memory 32 Mbyte of PCM ROM, with Stereo Piano. | |
| Programs | 662 (Single Oscillator, Double Oscillator), including a Stereo Piano and GM Level 2-compatible Programs. 33 Drum Kits, 128 User Programs, 64 User Drum Kits. Easy and Full Program Editing. |
| Effects 4 stereo digital multi-effect systems (with 89 effect types each). | |
| Performances | 160 Realtime Performance memories. Up to 304 Styles Performances with 4 Single Touch Setting each. |
| Styles | Up to 304 Styles, Solid State Disk-resident, freely reconfigurable. 8 Style tracks, 4 Single Touch Settings per-Style, 48 User Styles, programmable Style Performances and Single Touch Settings. Direct Card reading feature. Compatible with old i-Series Styles. Style Record with Edit functions, Step Edit, Event Edit. |
| Single Touch Settings (STS) | 4 x 304 (memorize Realtime tracks) |
| Style controls | 4 Variations, 2 Fills,2 Intros, 2 Endings, Counter In/ Break, Synchro Start/Stop, Tap Tempo/Reset, Fade In/Out, Bass Inversion, Manual Bass, Tempo Lock, Memory, Accompaniment Volume, Accompaniment Mute, Drum Mapping, Snare & Kick Designation, Single Touch. |
| General controls | Master Volume, Ensemble, Octave Transpose, Master Transpose, Split Point, Style Change, Tracks Volume, Quarter of Tone, Assignable Slider, Joystick, Dial. |
| Pads | 4 Assignable Pads + Stop button |
| Song Play | XDS* Crossfade Dual Sequencer player - 2 Sequencers with separate Start/Stop, Pause, << (Rewind) and >> (Fast Forward) controls. Balance control. Lyrics data are displayed on-screen. Jukebox function. SMF Direct Player (formats 0 and 1). |
| Song / Backing Sequence | Easy Record function. Full featured sequencer. 16 tracks. SMF native format. |
| Pedals Damper, Assignable (continuous, foot switch) | |
| Realtime controllers | Joystick (pitch + modulation), Assignable slider, Pads |
| MIDI | IN, OUT. Individual track assignment. Auto-setup functions (MIDI Setup) |
| Audio Inputs | Line impedance |
| Audio Outputs | 2 Main (L/Mono, R) |
| Main Amplifier | 2 x 5 Watt Amplifier |
| Speakers | 2 x 10 cm speakers |
| Power Consumption | 9 Watt |
| Dimensions (W x D x H) | 873 x 277 x 91 (mm) / 34.37"× 10.91" × 3.58" (without music stand) |
| Weight | 4.2 kg / 9.26 lbs |
| Accessories | Quick Start Guide, AC adapter (DC12V: ◇-◇), Music Stand, Accessory Discs |
| Options | XVP-10 (Exp/Volume Pedal), EXP-2 (Foot Controller), DS-1H (damper pedal), PS-1/PS-3 (Pedal switch) |
* Specifications and appearance are subject to change without notice for improvement.
25. ALPHABETICAL INDEX
A
Acc/Seq Volume 10, 12
AMS (Alternate Modulation
Source)
Resonance 112
Arabic Scale 34
Assignable Slider 126
Attack 119
Attack Level Amp EG 119
Attack Time Filter EG 116
Audio Inputs 11
Audio Outputs 11
B
Backing Sequence mode 30, 82–87
Backup 9, 141
Balance 10, 18, 32
Bank Select 37
BPM
MIDI/Tempo Sync., LFO 121
C
Chord Recognition Mode 51
Chord Scanning 17
Cutoff Frequency 113
D
Damper 11, 47
Polarity 126
Decay Time Filter EG 116
Delay LFO 121
Demo 11
Direct SD 40
Disk 130–142
Backup 141
Format 140
Display 19–21
F-1-F-4 buttons 16, 19
Page buttons 19
Volume/Value buttons 15, 19
Display Hold 16
Double Sequencer 31, 70
Drum mode 78
Drum tracks 46, 99
E
Edit Environment 21
Effects
Song mode 95, 97
Song Play mode 71, 76
Style Play mode 43, 44
Ending 14
Ensemble 48
F
F-1-F-4 buttons 16, 19
Fade
LFO 121
Fill 14
Filter
Cutoff Frequency 113
Filter Type 112
Low Pass & High Pass 112
Low Pass Resonance 112
Footswitch 126
Polarity 126
Format 140
G
General MIDI 35
Global 125–129
Global channel 35
Groove Quantize 71
1
Inputs 11
Intro 14
J
Joystick 47
Jukebox 74, 79
K
Keyboard Mode 17
Keyboard settings 24
L
Level
Program
Trim 112
LFO
Waveform, LFO waveform 120
Local Off 37, 127
Lock 50
Low Pass & High Pass 112
Low Pass Resonance 112
Lyrics 73, 74
M
Master Transpose 17, 126
Master Tune 125
Master Volume 10, 12
Menu 15
Message window 21
MIDI
Chord channels 128
Clock 70, 127
General MIDI 35
Global channel 35
IN channels 127
Interface 22, 37
OUT channels 129
Setting a track for MIDI 79, 99
Setup 36, 126
Standard MIDI File 70, 88
MIDI interface 22, 37
MIDI Setup 36, 126
Midifile 35, 70, 88
Mode
Backing Sequence 82–87
Program 105–124
Song Play 70–81
Style Play 40–51
Mute 16, 24
0
Octave Transpose 18
Offset
Offset, LFO 121
Operating Modes 12, 20
OS (Operating System)
Backup 9, 141
Update 9
Outputs 11
P
Pads 17, 50
Lock 50
Page 15, 19
Pedal 126
Performance 40
Selecting 17, 25
Pitch Bend 44, 97
Portamento
AMS 123
Program
Editing 45, 98
Selecting 17, 25
Program Change 37
Program mode 105–124
R
Resonance 112
s
Scale
Lock 50
Main scale 125
Selecting in realtime 34
Select
MFX Effect Select 122
Selecting Windows 21
Sequencer
Link mode 80
Selecting and switching 73
Sequencer 1 73
Sequencer 2 73
Sequencer 2 effects mode 80
Transport controls 18
Shift 16
Single Touch 13, 16, 26
Single Touch Settings (STS) 16
Selecting 26
Song
Editing 32
Playback from disk 28, 31, 74, 84, 89
Recording 30, 82
Selecting 74, 84, 89
Standard MIDI File 35
Song Play mode 70–81
Speakers On/Off 125
Split Point 13, 36
Standard MIDI File 35, 70, 88
Style
Ending 14
Fill 14
Intro 14
Recording 52–69
Selecting 13, 26
Style Performance 40
Variation 14
Style Change 25
Style Play mode 40–51
Sync.
Key Sync., LFO 121
MIDI/Tempo, LFO 121
Synchro Start/Stop 14
T
Tap Tempo 15
Tempo 40
Tempo/Value section 16
Track Select 16, 73, 74
Tracks
Drum mode 78
Drum/Percussion 46, 99
Keyboard/Realtime tracks 24, 40, 70
Octave Transpose 18
Programs 17
Selecting 15, 24, 73
Volume 19, 43
Transpose 17, 18
Tune
Tune, Program 108
U
User Interface 20
Edit Environments 21
Operating Modes 20
Selecting Windows 21
V
VALUE slider
AMS 123
Variation 14
Velocity
AMS 123
Velocity Intensity, Amp Mod. 118
Velocity, Filter EG 114
Velocity Curve 125
Volume
Acc/Seq 10, 12, 71, 88
Balance 10
Individual tracks (Song Play) 76
Individual tracks (Song) 95
Individual tracks (Style Play) 43
Master 10, 12, 71, 88
Volume/Value section 15, 19
W
Write 15
Global 125
Style Play mode 42